When adding a DNS zone, there is an option to create secondary zone. A secondary zone is basically a replica of zone from another existing DNS server in the network. The other server which is being replicated is called the Master. Any changes on the Master applies to the secondary zone as well, but not vice versa as we cannot perform changes directly on a secondary zone. In this article we’re going to show you how and why we would Configure Secondary Zone in Windows DNS Server.
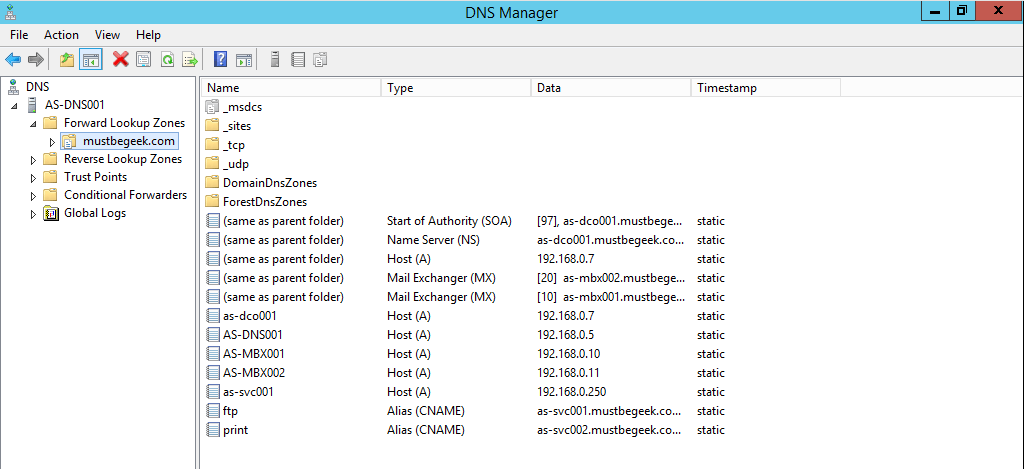
Before configure secondary zone in Windows DNS Server, we have to create a new server and install DNS role in it. Then in the next step we will create a secondary zone by referring to a Master server. In this example, we have our server AS-DCO001 as the Master server and AS-DNS001 in which we will create the secondary zone. Both DNS server role installed on Windows Server 2012 R2. The zone name that we will replicate is mustbegeek.com. Below are the step-by-steps:
Using DNS Manager
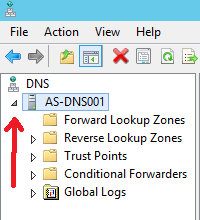
First, open up DNS Manager in AS-DNS001 (the server where we will create a secondary zone) by going to Server Manager and select Tools > DNS.

In the DNS Manager, expand the server name. You’ll see a few items with icon similar to a folder, including Forward Lookup Zones and Reverse Lookup Zones.
Right click on either Forward Lookup Zones or Reverse Lookup Zones, depending on the types of the zone you would like to replicate. Since the zone mustbegeek.com is a forward lookup zone, we’re going to right click on Forward Lookup Zones and select New Zone.

Click Next button to skip the welcome screen.

On the zone type selection, choose Secondary Zone and click Next to proceed.

In the zone name field, type in the zone name carefully. In our case it is mustbegeek.com. Click Next to continue to the next screen.

In this section, type in the Master server FQDN or IP address then press Enter on the keyboard. Valid entry will have green checklist icon as shown in the picture below. You can add more than one Master server. To reorder the Master priority use the Up/Down button. In our case we only have one Master server which is AS-DCO001. When you’re done, click Next button to continue.

Now in the final screen, review if everything’s good then you can click Finish to complete the process.

Now if you browse to the secondary zone you just created, you may see this error message:

To avoid this from happening, we have to ensure that the Master has allowed zone transfer to this server. To configure zone transfer, go to the zone Properties in the Master server.

Then on the Zone Transfer tab, tick on the Allow zone transfer options. You can then select either “To any server”, “Only to servers listed on the Name Servers tab”, or “Only to the following servers”. If you choose the second or third option, you may need to specify the server name where secondary zone will be created. In this example, for the sake of simplicity we’re going to use the first option which is allowing any server to replicate the mustbegeek.com zone.

Now go back to AS-DNS001 and refresh the DNS Manager, you should be able to see all records in mustbegeek.com zone. Or, you can expedite the process by right clicking on the secondary zone name and select Transfer from Master.

With this, we have successfully configured a secondary zone.
Using PowerShell
Did you know that you can also perform the above steps by using PowerShell cmdlets? Using PowerShell to configure secondary zone in Windows DNS server is very easy and can save you a lot of time.
Below is the PowerShell command to create DNS secondary zone:
Add-DnsServerSecondaryZone -Name “ZONE_NAME” —ZoneFile “ZONE_FILENAME” -MasterServers “MASTER_IP”
You only need to replace ZONE_NAME with the name of the actual zone, ZONE_FILENAME with the zone file name (usually the same with zone name, just append “.dns” at the end) and MASTER_IP with the Master server IP address.
Additionally, you can also run this command below on the Master server if the zone transfer is not yet configured.
Set-DnsServerPrimaryZone -Name “ZONE_NAME” -SecureSecondaries TRANSFER_LIST
Again, replace ZONE_NAME with the name of the same zone. Also replace TRANSFER_LIST with either one of the values below depending of your needs:
- TransferAnyServer = Allow zone transfer to any server.
- TransferToZoneNameServer = Allow zone transfer only to servers listed as the Name Servers.
- TransferToSecureServers = Allow zone transfer only to servers listed explicitly on the command. Additional keyword “-SecondaryServers” must be included after this command followed by list IP address of the secondary servers.
Below is the command that we use in AS-DNS001 to create the secondary zone:

And below is the command that we use in AS-DCO001 to allow zone transfer:

The result is exactly the same as we previously configure in the GUI. Just remember to run PowerShell as administrator when executing both commands.
Working with Secondary Zone in Windows DNS Server
There are many reasons to configure secondary zone in Windows DNS server. One of the example is to provide redundancy in DNS infrastructure. When you have a DNS server with secondary zone in the network, it can act as the backup when the Master server failed because secondary zone can still run with records stored in its local cache.
The other good reason to use secondary zone is that because you can configure DNS load balance. You can distribute DNS query redirection to the Master and all the secondaries, therefore reducing the workload on each server. This is a very good option if you have a high intensity network.
With all of these benefits, there is no reason why you shouldn’t learn to configure secondary zone in Windows DNS server.
The following two tabs change content below.
- Bio
- Latest Posts

I am IT practitioner in real life with specialization in network and server infrastructure. I have years of experience in design, analysis, operation, and optimization of infrastructure solutions for enterprise-scaled network. You can send me a message on LinkedIn or email to arranda.saputra@outlook.com for further inquiry regarding stuffs that I wrote or opportunity to collaborate in a project.
How to configure a DNS Secondary Zone in Windows Server 2008 & 2012
Secondary Zones are a DNS feature that allows the entire DNS database from a Master DNS server to be transferred to the Secondary. A Secondary Zones allows an organization to provide fault tolerance and load balancing to internal names. In addition to being able to resolve names to a private namespace or speed up name resolution to a public namespace without the use of Conditional Forwarders or Stub Zones.
When a Secondary DNS server is configured it will request a zone transfer from a DNS Server maintaining the Master database for a zone. If the Master has been configured to allow zone transfers with the Secondary the entire database will be transferred. Once a secondary receives the database from the master it will now perform all name resolution request for the namespace locally. If the client query is not part of the authoritative namespace, it starts a name resolution process beginning with a root name server and continues the process until the name is resolved. The Secondary database is kept up to date via zone transfers from the Master.
Scenario.
Two organizations, USSHQ and Dulce Base need to be able to share resources. A trust relationship between the two organizations Active Directory Domain Services is desired, but neither organization name space can be resolved through public name resolution. In order to configure the trust relationship name resolution need to be configured. One option for name resolution is to use a DNS Secondary Zone. DNS Secondary Zones in each domain will be configured to allow for the resolution to occur for other organization namespace. All other names needing resolved will use the default name resolution method.
If a computer from Dulce Base attempts to contact a computer in USSHQ it is unable to resolve the name. See figure below, the same result would occur going the other direction.

Configuring the source DNS server to allow for zone transfers (steps will be accomplished on both DNS Servers).
- Launch the DNS console and secondary click on the Forward Look Zone that you desire so configure Zone Transfers on, click on Properties.

- Select the Zone Transfers tab.

- To allow zone transfers, select the Allow zone transfers check box. Then choose one of the following :
- To allow zone transfers to any server, click To any server.
- To allow zone transfers only to the DNS servers listed on the Name Servers tab, click Only to servers listed on the Name Servers tab. Use this setting if you have configured Authoritative Name Servers for this zone in the Names Servers tab.
- To allow zone transfers only to specific DNS servers, click Only to the following servers, and then add the IP address of one or more DNS servers. Use this setting if you have not configured Authoritative Name Servers for this zone in the Name Servers tab or you desire to allow zone transfers with Name Servers.
- To allow zone transfers, select the Allow zone transfers check box. Then choose one of the following :
- In this demonstration we will be using the last option, click Only to the following servers.

- Click Edit, enter the IP Address of the Name Server that will be requesting the zone transfer, press enter. After the FQDN has resolved click OK.

- Click OK on the DNS Properties sheet, DNS is now configured to allow zone transfers with the Dulce Base DNS serve.


Configuring a Secondary Zone (Same steps will be accomplished in both DNS servers).
- Launch the DNS Console.

- Expand Forward Lookup Zones, secondary click on Forward Lookup Zone and choose New Zone. On the Welcome to the New Zone Wizard, click Next.

- On the Zone Type page, click Secondary Zone then click Next.

- On the Zone Name page, enter the desired zone to transfer from, click Next.

- Click Next on the Zone File page.
- On the Master DNS Servers page, Enter the IP Address of the master DNS server to transfer from press enter to resolve, Click Next.

- On the Completing the New Zone Wizard, click Finish.
- Refresh the zone, a transfer should have occurred.


Note: The zone transfer may take a few minutes to occur, keep refreshing the screen and be patient.
Name resolution will now succeed from DulceBase.Local to USSHQ.Local. Once the DNS administrator completes the configuration on the USSHQ.Local DNS server name resolution will succeed from USSHQ.Local to DulceBase.local.

As you can see configuring a Secondary Zone is a simple fix to resolving names in a private network when public name resolution fails. But, does require the Administrator of the Master Zone to allow zone transfers with your organization before the zone will actually transfer.
Until next time, RIDE SAFE!
Rick Trader
Windows Server Instructor – Interface Technical Training
Phoenix, AZ
Videos You May Like
Write a Comment
Skip to content
Install and configure DNS Server in Windows Server 2008, in this article we configured only a single DNS Server and applied a trick to cheat Domain Name authority which requires at least two name servers. In Install and configure DNS Server in Windows Server 2008 article we created two name server records both pointing to the same DNS Server but to different IP address configured on a single network adapter. As we know we need at least two name servers to provide DNS services to public domains. This requirement is to provide high availability DNS services for domains. If primary name server goes down DNS requests will be served by secondary name server. So here we go with the step by step instruction on how to configure secondary DNS server.
Primary DNS Nameserver
Do the following activity on the machine running DNS server which will act as Primary name server.
- Install DNS Server role on Primary DNS Server as shown in Install DNS Server
- Configure DNS Server Properties
- Create the forward lookup zone
- Configure the forward lookup zone with a few changes as listed below:
- Name Servers: Add ns1.example.com >> 192.168.1.225 and secondary name server ns2.example.com >> 192.168.1.226 (IP address of the secondary DNS Server). Don’t worry if you receive “The server with this IP address is not authoritative for the required zone” see Snapshot 1.
- Zone transfers: Make sure that “Allow zone transfers” is enabled and “Only to servers listed on the Name Servers” is selected.
- Notify: Make sure that “Automatically notify” is enabled and “Servers listed on the Name Servers tab” is selected.

Secondary DNS Server
We need to carry out following activities on the DNS Server machine which will act as secondary name server.
- Install DNS Server role on Secondary DNS Server as shown in Install DNS Server.
- Configure DNS Server Properties
Create Secondary Forward Lookup Zone
- Launch DNS Manager by clicking Start > Administrative Tools > DNS or type dnsmgmt.msc in Run window (Press Windows Key + R) and press Enter.
- Expand Server > Right click Forward Lookup Zones > New Zone which will launch New Zone wizard.
- Click Next on Welcome to the New Zone wizard.
- Select “Secondary zone” radio button and the click Next.
- Enter zone name e.g. example.com and then click Next.
- Enter IP Address of the Master DNS Server i.e. Primary DNS Server. In my case it is 192.168.1.225. Click Next.

- Click Finish to complete the New Zone creation wizard.
Let’s verify if it works!!!
Once we complete new secondary zone creation wizard within a few minutes entire zone should be transferred from Primary DNS Server to secondary DNS server. We can verify the zone from DNS Management console (dnsmgmt.msc) of Secondary DNS Server. If it doesn’t appear press F5 to refresh.
One more thing we should check is that when we make any changes with forward lookup zone on primary name server those changes should immediately appear in secondary forward lookup zone of secondary name server. This is because we have configured primary forward lookup zone to automatically notify all the name servers listed on name servers tab about the changes happening in primary forward lookup zone.
Register & Update Name servers at Domain Name Registrar
After setting up primary and secondary name servers now we need to register and update name servers at domain name registrar.
In the previous article in this series, I showed you how to promote a Windows Server 2012-based Server Core installation to a Domain Controller. In this article, I’ll discuss configuring your Server Core installation to a Domain Name System (DNS) Server
Contents
- Configuring Server Core as a DNS Server
- Configuring a DNS Server in the DMZ
- Configuring secondary DNS zones
- Managing the DNS Server Role remotely
- Concluding
- Author
- Recent Posts

Although most DNS Servers run on Domain Controllers with Active Directory-integrated DNS zones, I’ll show you some other implementation scenarios where Server Core DNS Servers might save your day!
The DNS Server Server Role has been included in Server Core since Windows Server 2008. The DNS Server in Server Core installations of Windows Server 2008 R2 was the first Server Core DNS Server implementation that supports DNSSEC.
Configuring Server Core as a DNS Server
Installing the DNS Server Server Role on Domain Controllers is as easy as selecting the option to install DNS in the Active Directory Domain Services Configuration Wizard, typing InstallDNS = Yes in a DCPromo unattend answer file, and accepting the defaults when you promote a new Domain Controller for a new domain with dcpromo.exe, Add-Domain, or Add-Forest.
Besides serving DNS name resolution from Server Core Domain Controllers, the following two scenarios, however, also seem plausible for Server Core DNS Servers.
Configuring a DNS Server in the DMZ
Server Core installations are less vulnerable to attacks, so placing them in your perimeter network or Demilitarized Zone (DMZ) to provide DNS sounds like a better idea than placing Server with a GUI installations there. With Server Core DNS Servers, you can still manage the DNS Servers with the command line and graphical tools you’re used to, but you gain some of the security, availability, and modularity benefits you’d normally only be able to gain with Linux- or UNIX-based DNS Servers.
To configure a Server Core installation as a DNS Server in the DMZ, start by giving it a network connection in the network segment of the DMZ. Next, provide it with a meaningful hostname and IP addresses in the DMZ network segment. You can perform all these configuration steps through sconfig.cmd, netsh.exe, netdom.exe, and/or Rename-Computer and New-NetIPAddress.
The next step is to install the DNS Server Server Role. To do so, perform a Server Core installation and provide it with a meaningful hostname and appropriate IP addresses. Next, install the DNS Server Server Role on the Server Core installation. Since we used the PowerShell command the last time, this time we’ll use the almost deprecated command line alternative:
Dism.exe /online /enable-feature /featurename:DNS-Server-Full-Role /featurename:DNS-Server-Tools
Now, depending on your preferences, you can configure the DNS Server with either dnscmd.exe or one or more of the 99 DNS Server-related PowerShell cmdlets.
For instance, to add a Primary DNS Forward Lookup Zone and Primary DNS Reverse Lookup Zone for dmz.servercore.net on the 85.17.209.0/24 network, use the following two dnscmd.exe commands:
dnscmd.exe localhost /ZoneAdd DMZ.ServerCore.Net /Primary /file dmz.servercore.net.dns
dnscmd.exe localhost /ZoneAdd 0.209.17.85.in-addr.arpa /Primary /file 209.17.85.in-addr.arpa.dns
To configure the same settings with PowerShell, the following two commands can be used:
Add-DnsServerPrimaryZone -Name "DMZ.ServerCore.Net" -ZoneFile "dmz.servercore.net.dns"
Add-DnsServerPrimaryZone -NetworkID 85.17.209.0/24 -ZoneFile "209.17.85.in-addr.arpa.dns"
Since a DNS Server in a DMZ used by hosts in the same network would rarely be used without DNS Forwarders, the following command will add the public Google DNS Servers as forwarders:
dnscmd.exe localhost /ResetForwarders 8.8.8.8 8.8.4.4
In PowerShell, the following two commands configure the same settings:
Add-DnsServerForwarder -IPAddress 8.8.8.8 -PassThru
Add-DnsServerForwarder -IPAddress 8.8.4.4 –PassThru
That’s it! Your Server Core DNS Server is up and running. To add an A record and an associated PTR record to the Forward and Reverse DNS zones on the server (for instance, for mail.dmz.servercore.net with IP address 209.17.85.74), you can use the following commands:
Add-DnsServerResourceRecordA -Name "mail" -ZoneName "dmz.servercore.net"
Add-DnsServerResourceRecord -Name "74" -Ptr -ZoneName "209.17.85.in-addr.arpa.dns"

-PtrDomainName "mail.dmz.servercore.net"
Configuring secondary DNS zones
In traditionally highly secure environments, the Domain Name System services would be hosted on Linux- or UNIX-based hosts with BIND DNS Server software. For ease of management, conformity, or migration purposes, you could opt to configure a Server Core installation to host secondary DNS zones to the BIND primary DNS zones. In this example, we’ll migrate a BIND-based DNS Server environment to Windows Server 2012-based Server Core DNS Servers.
You can use the following short PowerShell command to do that:
Install-WindowsFeature DNS -IncludeManagementTools
The next step is to add secondary zones for all the DNS zones hosted on the BIND-based DNS servers. Depending on the number of DNS domain zones these servers are hosting, you will need a couple of PowerShell lines. With the BIND host running on 85.17.209.1, the lines would look like these:
Add-DnsServerSecondaryZone -Name "servercore.net" -ZoneFile "servercore.net.dns" -MasterServers 85.17.209.1
Add-DnsServerSecondaryZone -Name "dirteam.com" -ZoneFile "dirteam.com.dns" -MasterServers 85.17.209.1
Add-DnsServerSecondaryZone -Name "berkouwer.org" -ZoneFile "berkouwer.org.dns" -MasterServers 85.17.209.1
Now, sync the DNS zones, with commands like these:
Sync-DNSServerZone -Name "servercore.net" -PassThru -Verbose

Sync-DNSServerZone -Name "dirteam.com" -PassThru –Verbose

Sync-DNSServerZone -Name "berkouwer.org" -PassThru –Verbose
After completing the zone transfers, convert any of the secondary zones to primary zones:
ConvertTo-DNSServerPrimaryZone -Name "servercore.net" -PassThru -Verbose -ZoneFile "servercore.net.dns"

ConvertTo-DNSServerPrimaryZone -Name "dirteam.com" -PassThru -Verbose -ZoneFile "dirteam.com.dns"

ConvertTo-DNSServerPrimaryZone -Name "berkouwer.org" -PassThru -Verbose -ZoneFile "berkouwer.org.dns"
On the BIND Servers, of course, configure the previously primary DNS servers to be secondary DNS servers for the migrated zones or demote them. Also, when other secondary DNS Zones existed on other DNS Servers, update their configuration to point to the new Server Core DNS Server to use as their master servers.
Managing the DNS Server Role remotely
Besides using dnscmd.exe and the 99 DNS Server-related PowerShell cmdlets, both of which are available on the command line of your Server Core DNS Server, you can also manage the DNS Server Server Role remotely.
On a Windows Server 2012 Server with a GUI, you can add the DNS Server Tools.
Start the Power User Start Menu with Win+X. Select Programs and Features from the menu. In the Programs and Features screen, click Turn Windows features on or off in the left action pane. In the Add Roles and Features Wizard, click Next in the Before you begin screen. Select Role-based or feature-based installation in the Select installation type screen and click Next. On the next screen, select the server where you want to install the DNS Server Tools from the list and click Next. Click Next in the Select server roles screen. In the list of available features, select the DNS Server Tools:

DNS Server Tools
Click Next. On the next screen, click Install.
On Windows 8 installations, you need to install the Remote Server Administration Tools (RSAT). After you download and install RSAT, all the Tools will be installed by default. The DNS Server Tool is accessible through the Administrative Tools shortcut to the far right in the Start Screen.
Concluding
Server Core DNS Servers have become a viable alternative to UNIX- and Linux-based BIND DNS Servers because of their smaller attack surface, higher availability, better performance, and increased modularity, when compared to Server with a GUI installations.
- Server Roles in Server Core
- How to configure Server Core as Domain Controller
- How to install a DNS Server on Server Core
- How to install a DHCP Server on Server Core
- How to install File Services on Server Core
- Certificate Server in Server Core
- Install and manage a Print Server in Server Core
- Server Core Remote Access Services -DirectAccess and Routing
- How to install Hyper-V on Server Core
- Internet Information Services (IIS) on Server Core
- How to install the FTP Server Role on Server Core
- WSUS on Server Core
DNS (Domain Name System, Система Доменных имен) – система, позволяющая преобразовать доменное имя в IP-адрес сервера и наоборот.
DNS-сервер – это сетевая служба, которая обеспечивает и поддерживает работу DNS. Служба DNS-сервера не требовательна к ресурсам машины. Если не подразумевается настройка иных ролей и служб на целевой машине, то минимальной конфигурации будет вполне достаточно.
Как настроить DNS-сервер:
- Настройка сетевого адаптера для DNS-сервера
- Установка роли DNS-сервера
- Создание зоны прямого просмотра
- Создание зоны обратного просмотра
- Создание A-записи
- Описание функции Domain Name System (DNS), которые являются новыми или измененными в Windows Server 2016.
Настройка сетевого адаптера для DNS-сервера
Установка DNS-сервера предполагает наличие доменной зоны, поэтому необходимо создать частную сеть в личном кабинете и подключить к ней виртуальные машины.
После того, как машина будет присоединена к двум сетям, важно не перепутать, какое из подключений требует настройки. Первичный сетевой адаптер настроен автоматически с самого начала, через него открыт доступ к интернету, в то время как на дополнительно подключенных сетевых адаптерах доступа в интернет нет, пока не будет произведена ручная настройка:

Наведя курсор на значок сети в системном трее, можно вызвать всплывающую подсказку с краткими сведениями о сетях. Из примера выше видно, что присоединённая сеть это Network 3.
Далее предстоит проделать цепочку действий:
- Нажать правой клавишей мыши Пуск, в выпадающем меню выбрать пункт Сетевые подключения;
- Правой кнопкой мыши нажать на необходимый сетевой адаптер, в меню выбрать Свойства;
- В окне свойств выбрать IPv4 и нажать на кнопку Свойства;
- Заполнить соответствующие поля необходимыми данными:

Здесь в качестве предпочитаемого DNS-сервера машина назначена сама себе, альтернативным назначен dns.google [8.8.8.8].
Установка роли DNS-сервера
Для установки дополнительных ролей на сервер используется Мастер Добавления Ролей и Компонентов, который можно найти в Диспетчере Сервера.
На верхней навигационной панели Диспетчера сервера справа откройте меню Управление, выберите опцию Добавить Роли и Компоненты:

Откроется окно Мастера, в котором рекомендуют убедиться что:
1. Учётная запись администратора защищена надёжным паролем.
2. Настроены сетевые параметры, такие как статические IP-адреса.
3. Установлены новейшие обновления безопасности из центра обновления Windows.
Убедившись, что все условия выполнены, нажимайте Далее;
Выберите Установку ролей и компонентов и нажмите Далее:

Выберите необходимы сервер из пула серверов и нажмите Далее:

Отметьте чек-боксом роль DNS-сервер и перейдите Далее:

Проверьте список компонентов для установки, подтвердите нажатием кнопки Добавить компоненты:

Оставьте список компонентов без изменений, нажмите Далее:

Прочитайте информацию и нажмите Далее:

В последний раз проверьте конфигурацию установки и подтвердите решение нажатием кнопки Установить:

Финальное окно Мастера сообщит, что установка прошла успешно, Мастер установки можно закрыть:

Создание зон прямого и обратного просмотра
Доменная зона — совокупность доменных имён в пределах конкретного домена.
Зоны прямого просмотра предназначены для сопоставления доменного имени с IP-адресом.
Зоны обратного просмотра работают в противоположную сторону и сопоставляют IP-адрес с доменным именем.
Создание зон и управление ими осуществляется при помощи Диспетчера DNS.
Перейти к нему можно в правой части верхней навигационной панели, выбрав меню Средства и в выпадающем списке пункт DNS:

Создание зоны прямого просмотра
- Выделите каталог Зоны Прямого Просмотра, запустите Мастер Создания Новой Зоны с помощью кнопки Новая зона на панели инструментов сверху:

- Откроется окно Мастера с приветствием, нажмите Далее:

- Из предложенных вариантов выберите Основная зона и перейдите Далее:

- Укажите имя зоны и нажмите Далее:

- При необходимости поменяйте название будущего файла зоны и перейдите Далее:

- Выберите, разрешить динамические обновления или нет. Разрешать не рекомендуется в силу значимой уязвимости. Перейдите Далее:

- Проверьте правильность выбранной конфигурации и завершите настройку, нажав кнопку Готово:

Создание зоны обратного просмотра
- Выделите в Диспетчере DNS каталог Зоны Обратного Просмотра и нажатием кнопки Новая зона на панели инструментов сверху запустите Мастер Создания Новой Зоны:

- Выберите тип Основная Зона, перейдите Далее:

- Выберите назначение для адресов IPv4, нажмите Далее:

- Укажите идентификатор сети (первые три октета сетевого адреса) и следуйте Далее:

- При необходимости поменяйте название будущего файла зоны и перейдите Далее:

- Выберите, разрешить динамические обновления или нет. Разрешать не рекомендуется в силу значимой уязвимости. Перейдите Далее:

- Проверьте правильность выбранной конфигурации и завершите настройку, нажав кнопку Готово:

Создание A-записи
Данный раздел инструкции в большей степени предназначен для проверки ранее проделанных шагов.
Ресурсная запись — единица хранения и передачи информации в DNS, заключает в себе сведения о соответствии какого-либо имени с определёнными служебными данными.
Запись A — запись, позволяющая по доменному имени узнать IP-адрес.
Запись PTR — запись, обратная A записи.
- В Диспетчере DNS выберите каталог созданной ранее зоны внутри каталога Зон Прямого Просмотра. В правой части Диспетчера, где отображается содержимое каталогов, правой кнопки мыши вызовите выпадающее меню и запустите команду «Создать узел (A или AAAA)…»:

- Откроется окно создания Нового Узла, где понадобится вписать в соответствующие поля имя узла (без доменной части, в качестве доменной части используется название настраиваемой зоны) и IP-адрес. Здесь же имеется чек-бокс Создать соответствующую PTR-запись — чтобы проверить работу обеих зон (прямой и обратной), чек-бокс должен быть активирован:

Если поле имени остается пустым, указанный адрес будет связан с именем доменной зоны.
- Также можно добавить записи для других серверов:

- Добавив все необходимые узлы, нажмите Готово.
Проверка
- Проверьте изменения в каталогах обеих зон (на примере ниже в обеих зонах появилось по 2 новых записи):


- Откройте командную строку (cmd) или PowerShell и запустите команду nslookup:

Из вывода команды видно, что по умолчанию используется DNS-сервер example-2012.com с адресом 10.0.1.6.
Чтобы окончательно убедиться, что прямая и обратная зоны работают как положено, можно отправить два запроса:
- Запрос по домену;
- Запрос по IP-адресу:

В примере получены подходящие ответы по обоим запросам.
- Можно попробовать отправить запрос на какой-нибудь внешний ресурс:

В дополнение к имени домена и адресам появилась строчка «Non-authoritative answer», это значит, что наш DNS-сервер не обладает необходимой полнотой информации по запрашиваемой зоне, а информация выведенная ниже, хоть и получена от авторитетного сервера, но сама в таком случае не является авторитетной.
Для сравнения все те же запросы выполнены на сервере, где не были настроены прямая и обратная зоны:

Здесь машина сама себе назначена предпочитаемым DNS-сервером. Доменное имя DNS-сервера отображается как неопознанное, поскольку нигде нет ресурсных записей для IP-адреса (10.0.1.7). По этой же причине запрос 2 возвращает ошибку (Non-existent domain).
Описание функции Domain Name System (DNS), которые являются новыми или измененными в Windows Server 2016.
В Windows Server 2016 DNS-сервер предлагает обновления в следующих областях:
- Политики DNS-серверов
- Ограничение скорости отклика (RRL)
- Аутентификация именованных объектов на основе DNS (DANE)
- Поддержка неизвестных записей
- Корневые подсказки IPv6
- Доработка поддержки Windows PowerShell
Политики DNS-серверов
Теперь вы сможете использовать:
- DNS-политики для управления трафиком на основе геолокации
- Интеллектуальные ответы DNS в зависимости от времени суток, для управления одним DNS-сервером, настроенным для развертывания с разделением
- Применять фильтры к DNS-запросам и многое другое.
Конкретное описание данных возможностей:
Балансировка нагрузки приложений.
Когда вы развернули несколько экземпляров приложения в разных местах, вы можете использовать политику DNS для балансировки нагрузки трафика между разными экземплярами приложения, динамически распределяя нагрузку трафика для приложения.
Управление трафиком на основе геолокации.
Вы можете использовать DNS-политику, чтобы разрешить первичным и вторичным DNS-серверам отвечать на запросы DNS-клиентов на основе географического положения как клиента, так и ресурса, к которому клиент пытается подключиться, предоставляя клиенту IP-адрес ближайшего ресурса. .
Разделенный Brain-DNS.
При разделенном DNS записи DNS распределяются по разным областям зоны на одном и том же DNS-сервере, а DNS-клиенты получают ответ в зависимости от того, являются ли клиенты внутренними или внешними. Вы можете настроить разделенный DNS для зон, интегрированных с Active Directory, или для зон на автономных DNS-серверах.
Фильтрация.
Вы можете настроить политику DNS для создания фильтров запросов на основе предоставленных вами критериев. Фильтры запросов в DNS-политике позволяют настроить DNS-сервер для ответа настраиваемым образом на основе DNS-запроса и DNS-клиента, отправляющего DNS-запрос.
Forensics.
Вы можете использовать политику DNS для перенаправления вредоносных DNS-клиентов на несуществующий IP-адрес вместо того, чтобы направлять их на компьютер, к которому они пытаются подключиться.
Перенаправление по времени суток.
Политику DNS можно использовать для распределения трафика приложения между различными географически распределенными экземплярами приложения с помощью политик DNS, основанных на времени суток.
Вы также можете использовать политики DNS для зон DNS, интегрированных с Active Directory.
Ограничение скорости отклика (RRL)
Теперь вы cможете настроить параметры RRL, чтобы контролировать, как отвечать на запросы к DNS-клиенту, когда ваш сервер получает несколько запросов, направленных на одного и того же клиента. Сделав это, вы можете предотвратить отправку атаки типа «Отказ в обслуживании» (Dos) с использованием ваших DNS-серверов.
Например, бот-сеть может отправлять запросы на ваш DNS-сервер, используя в качестве отправителя IP-адрес третьего компьютера. Без RRL ваши DNS-серверы могут отвечать на все запросы, переполняя третий компьютер. При использовании RRL вы можете настроить следующие параметры:
Количество ответов в секунду. Это максимальное количество раз, когда один и тот же ответ дается клиенту в течение одной секунды.
Количество ошибок в секунду. Это максимальное количество раз, когда ответ об ошибке отправляется одному и тому же клиенту в течение одной секунды.
Окно между запросами. Это количество секунд, на которое приостанавливаются ответы клиенту, если сделано слишком много запросов.
Скорость утечки. Это то, как часто DNS-сервер отвечает на запрос во время приостановки ответов. Например, если сервер приостанавливает ответы клиенту на 10 секунд, а уровень утечки равен 5, сервер по-прежнему отвечает на один запрос на каждые 5 отправленных запросов. Это позволяет обычным клиентам получать ответы, даже если DNS-сервер применяет ограничение скорости ответов в их подсети или полном доменном имени.
TC rate. Эта функция используется, чтобы сообщить клиенту о попытке соединения с TCP, когда ответы клиенту приостановлены. Например, если скорость TC равна 3, и сервер приостанавливает ответы данному клиенту, сервер выдает запрос на TCP-соединение для каждых 3 полученных запросов. Убедитесь, что значение скорости TC ниже, чем скорость утечки, чтобы дать клиенту возможность подключиться через TCP перед утечкой ответов.
Максимум откликов. Это максимальное количество ответов, которые сервер выдает клиенту, пока ответы приостановлены.
Белые домены. Это список доменов, которые нужно исключить из настроек RRL.
Белые подсети. Это список подсетей, которые необходимо исключить из настроек RRL.
Интерфейсы серверов белого списка. Это список интерфейсов DNS-серверов, которые необходимо исключить из настроек RRL.
Аутентификация именованных объектов на основе DNS (DANE)
Теперь вы сможете использовать поддержку DANE (RFC 6394 и 6698), чтобы указать своим DNS-клиентам, от какого CA они должны ожидать выдачи сертификатов для доменных имен, размещенных на вашем DNS-сервере.
Это предотвращает форму атаки «main in the middle», когда кто-то может повредить кэш DNS и указать DNS-имя на свой собственный IP-адрес.
Поддержка неизвестных записей
«Неизвестная запись» — это RR, формат RDATA которой неизвестен DNS-серверу. Недавно добавленная поддержка неизвестных типов записей (RFC 3597) означает, что вы cvожете добавлять неподдерживаемые типы записей в зоны DNS-сервера Windows в двоичном формате по сети.
Распознаватель кэширования Windows уже имеет возможность обрабатывать неизвестные типы записей. DNS-сервер Windows не выполняет никакой конкретной обработки неизвестных записей, но отправляет их обратно в ответах, если для них получены запросы.
Корневые подсказки IPv6
Корневые подсказки IPV6, опубликованные IANA, были добавлены на DNS-сервер Windows. Запросы имен в Интернете теперь могут использовать корневые серверы IPv6 для разрешения имен.
Доработка поддержки Windows PowerShell
В Windows Server 2016 представлены следующие новые командлеты (cmdlets) и параметры Windows PowerShell:
Add-DnsServerRecursionScope — Этот командлет создает новую область рекурсии на DNS-сервере. Области рекурсии используются политиками DNS для указания списка серверов пересылки, которые будут использоваться в запросе DNS.
Remove-DnsServerRecursionScope — Этот командлет удаляет существующие области рекурсии.
Set-DnsServerRecursionScope — Этот командлет изменяет параметры существующей области рекурсии.
Get-DnsServerRecursionScope — Этот командлет извлекает информацию о существующих областях рекурсии.
Add-DnsServerClientSubnet — Этот командлет удаляет существующие подсети DNS-клиентов.
Set-DnsServerClientSubnet — Этот командлет изменяет параметры существующей подсети DNS-клиента.
Get-DnsServerClientSubnet — Этот командлет извлекает информацию о существующих подсетях DNS-клиентов.
Add-DnsServerQueryResolutionPolicy — Этот командлет создает новую политику разрешения запросов DNS. Политики разрешения запросов DNS используются для указания того, как и следует ли отвечать на запрос на основе различных критериев.
Remove-DnsServerQueryResolutionPolicy — Этот командлет удаляет существующие политики DNS.
Set-DnsServerQueryResolutionPolicy — Этот командлет изменяет параметры существующей политики DNS.
Get-DnsServerQueryResolutionPolicy — Этот командлет извлекает информацию о существующих политиках DNS.
Enable-DnsServerPolicy — Этот командлет включает существующие политики DNS.
Disable-DnsServerPolicy — Этот командлет отключает существующие политики DNS.
Add-DnsServerZoneTransferPolicy — Этот командлет создает новую политику передачи зоны DNS-сервера. Политики передачи зоны DNS определяют, следует ли отклонять или игнорировать передачу зоны на основе различных критериев.
Remove-DnsServerZoneTransferPolicy — Этот командлет удаляет существующие политики передачи зон DNS-сервера.
Set-DnsServerZoneTransferPolicy. — Этот командлет изменяет параметры существующей политики переноса зоны DNS-сервера.
Get-DnsServerResponseRateLimiting — Этот командлет извлекает параметры RRL.
Set-DnsServerResponseRateLimiting — Этот командлет изменяет настройки RRL.
Add-DnsServerResponseRateLimitingExceptionlist — Этот командлет создает список исключений RRL на DNS-сервере.
Get-DnsServerResponseRateLimitingExceptionlist — Этот командлет извлекает списки исключений RRL.
Remove-DnsServerResponseRateLimitingExceptionlist — Этот командлет удаляет существующий список исключений RRL.
Set-DnsServerResponseRateLimitingExceptionlist — Этот командлет изменяет списки исключений RRL.
Add-DnsServerResourceRecord — Этот командлет был обновлен для поддержки неизвестного типа записи.
Get-DnsServerResourceRecord — Этот командлет был обновлен для поддержки неизвестного типа записи.
Remove-DnsServerResourceRecord — Этот командлет был обновлен для поддержки неизвестного типа записи.
Set-DnsServerResourceRecord — Этот командлет был обновлен для поддержки неизвестного типа записи.
С дополнительными сведениями вы можете ознакомится в следующих разделах справочника по командам Windows PowerShell для Windows Server 2016 от Microsoft:
Powershell DNS Server
Powershell DNS Client
This is a guide for configuring a secondary zone using DNS Manager. To do this with PowerShell, please see Configure Secondary Zone with PowerShell – Windows Server Core 2016.
How-To
Prerequisites
Before starting, you should have the DNS role installed on the server. To install the DNS role, please see one of the following articles:
Installing the DNS Role with PowerShell -Windows Server Core 2016
Installing the DNS Role using Server Manager – Windows Server 2016
Assumptions
In this guide I am adding a secondary zone to a remote server (Test-DNS16) from the server that has the primary zone (Test-DC16).
1) Open DNS Manager
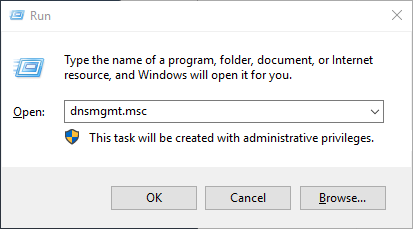
Open the Run box using Win+R, type dnsmgmt.msc, and click OK
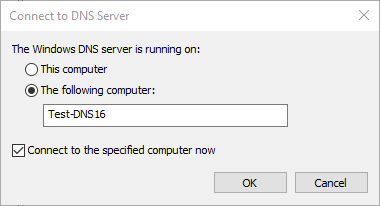
2) Connect to the remote server that will have the secondary zone
If you are on the server that is getting the secondary zone, skip this step
Right click the DNS and select Connect to DNS Server…
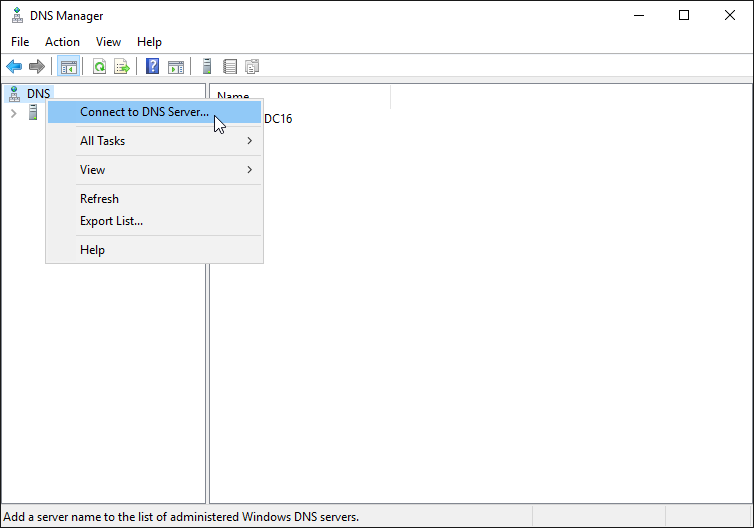
Enter the name of the server and click OK
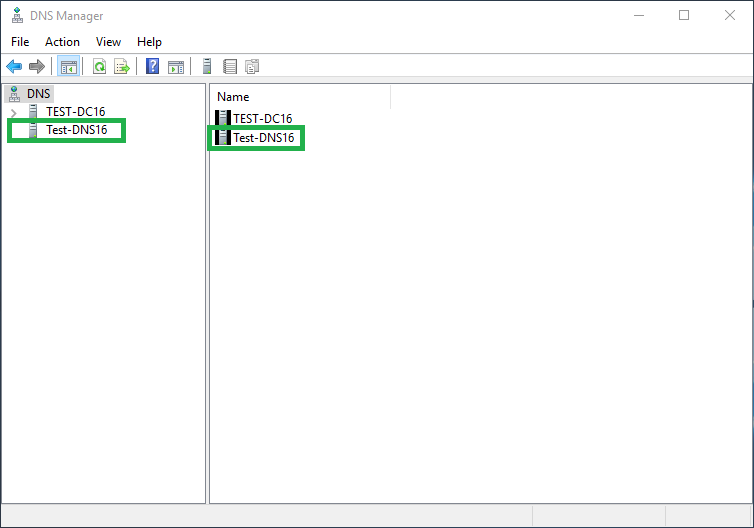
You should now see the other DNS server listed
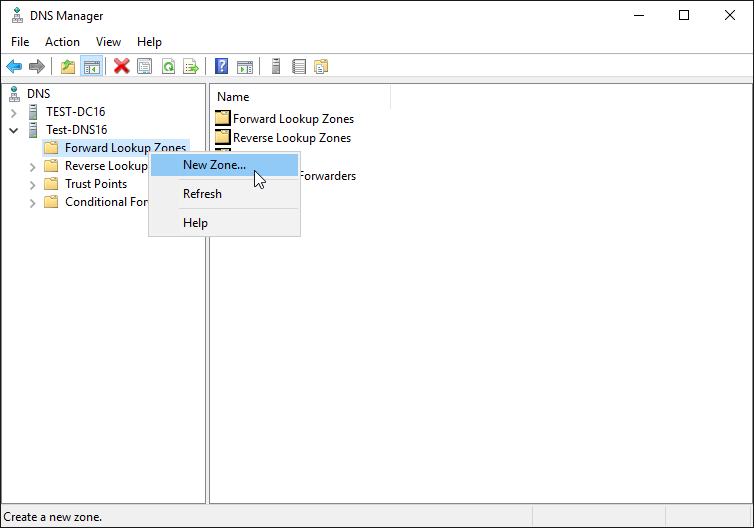
3) Open the New Zone Wizard
Select the drop-down for the DNS server that will have the secondary zone
Right click Forward Lookup Zones and select New Zone…
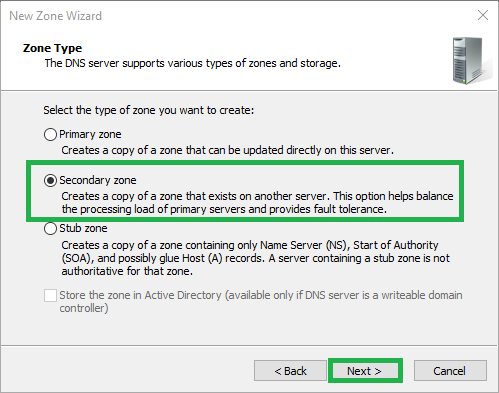
4) Click Next

5) Select Secondary zone then click Next
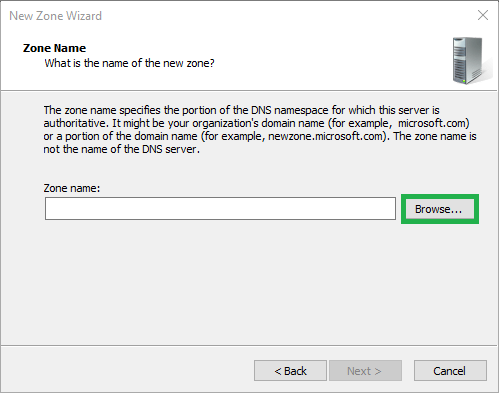
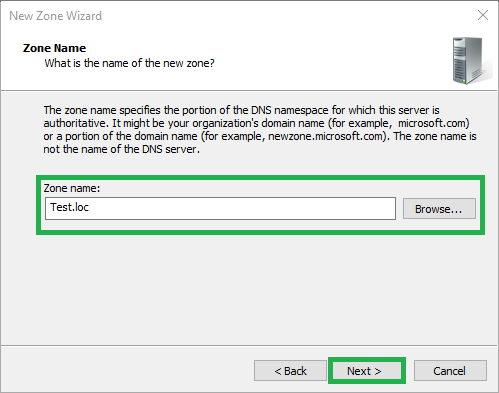
6) Enter the zone name or click Browse
If you know the zone name, type it in and skip step 7
If you do not know the name, click Browse
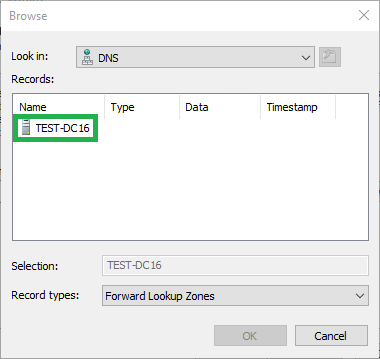
7) Select the zone
Select the server that contains the primary zone
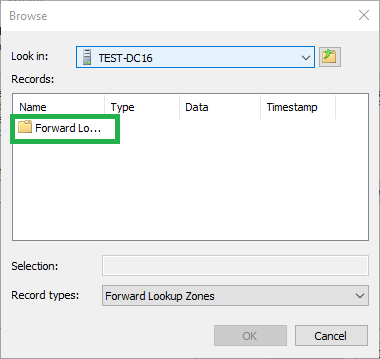
Select Forward Lookup Zones
Select the zone you want to copy and click OK
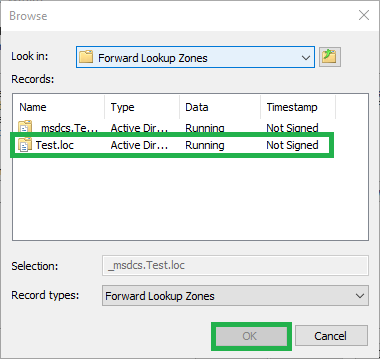
 Click Next
 Click Next
The box should now show the zone you selected
Click Next
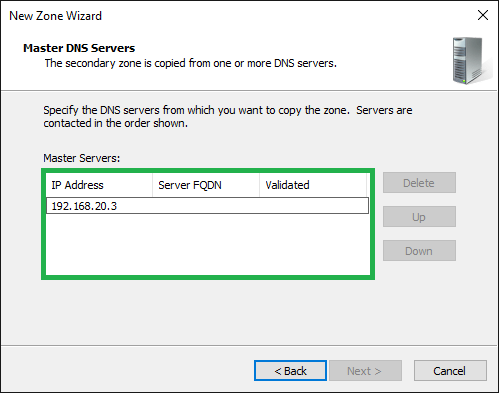
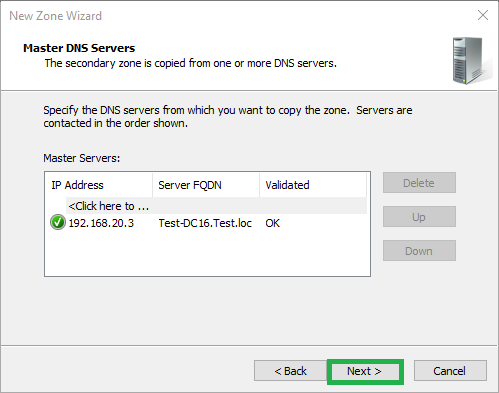
9) Add the master servers
Type in the IP address(es) or FQDN(s) of the server(s) that have the primary zone you are copying
Click Next
10) Click Finish
Click Finish to complete the process and add the secondary zone
You have now successfully added a secondary zone!
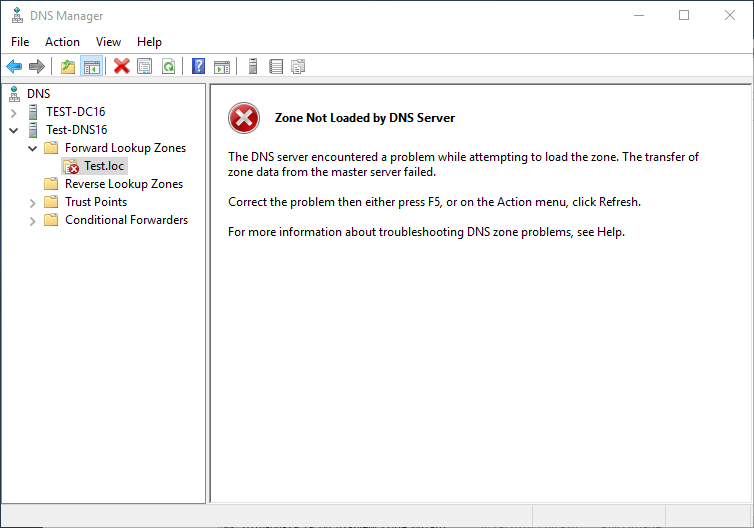
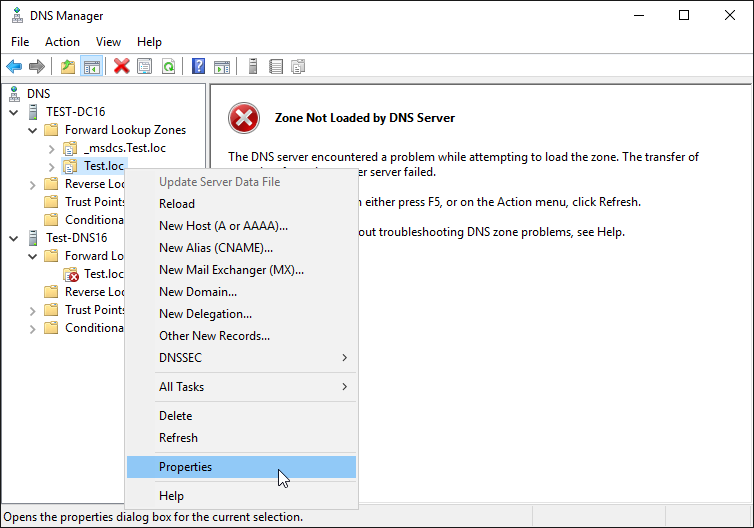
If you get the message “Zone Not Loaded by DNS Server”, please see below
Zone Not Loaded by DNS Server
If you see the following message, it is likely because the master server will not send updates to this server. See the directions below to fix this. These directions will allow zone transfers to all your DNS servers.
1) Open Properties
Right-click the zone under the master server and select Properties
2) Open the New Name Server Record window
Click the Name Servers tab and click Add
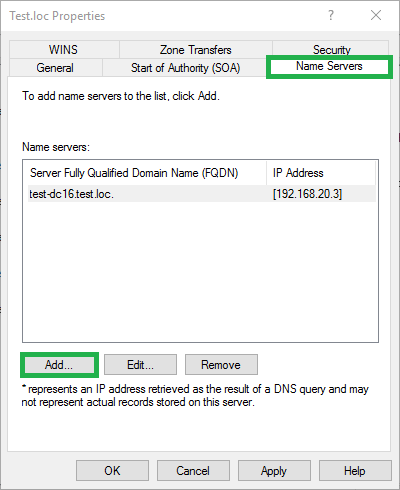
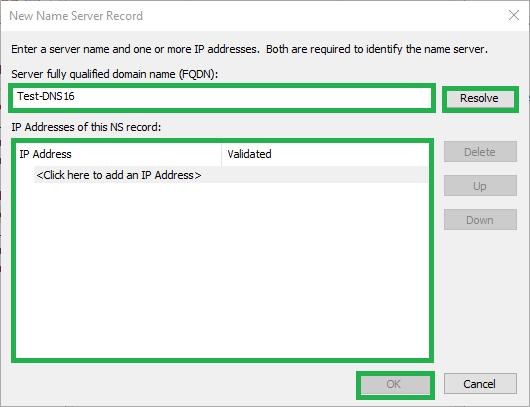
3) Enter the DNS server
Enter the FQDN of the DNS server with the secondary zone and click Resolve
or
Enter the IP address
Click OK
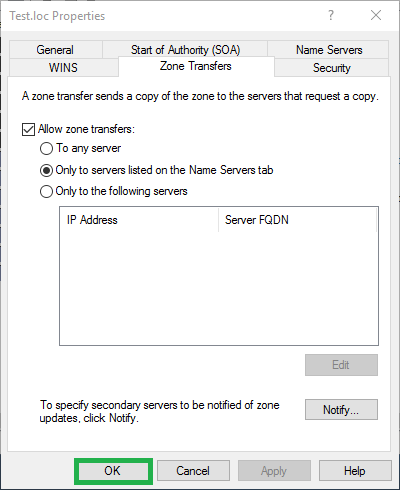
4) Configure the zone transfer settings
Click the Zone Transfers tab
Select the Allow zone transfers check box
Select the Only to servers listed on the Name Servers tab radio button
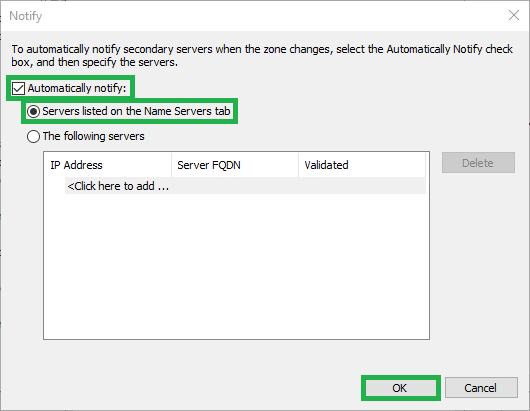
Click the Notify button
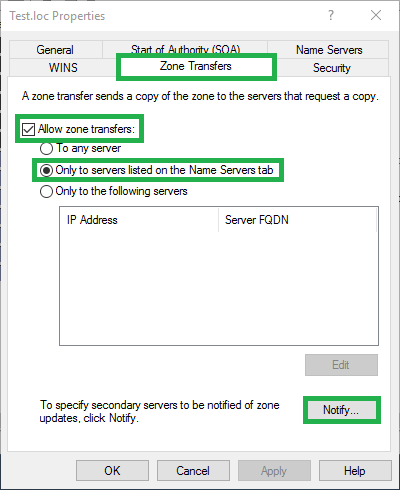
5) Open the New Name Server Record window
Click the Automatically notify check box
Click the Servers listed on the Name Servers tab radio button
Click OK
6) Apply the settings
Click OK
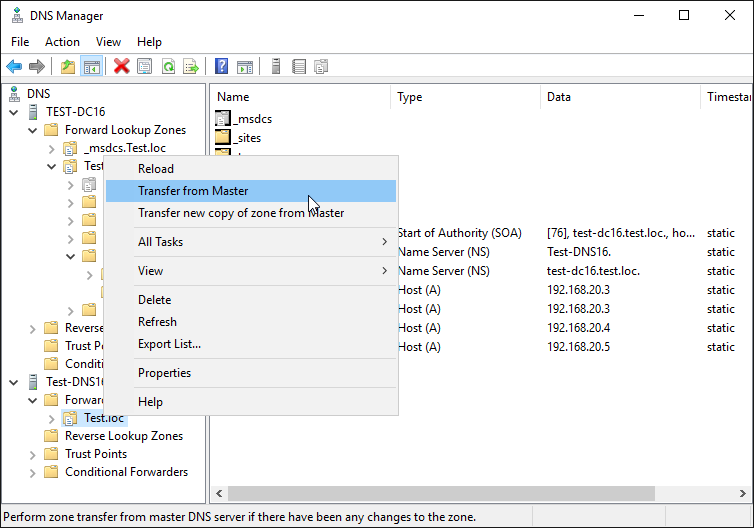
7) Transfer zone from the master
You should now be able to transfer this zone from the master
Right click the zone under the secondary server and select Transfer from Master
It should now show the records from the master server
В связке принимают участие Windows Server 2012R2 и Ubuntu 14.04.5. Первоначальной задачей была необходимость отображения имен вместо ip адресов в приложение SARG (анализатор лог-файлов) на Linux системе. Так как в нашем случае настроен домен, первичным ДНС выступает Windows.
Локальная сеть 10.10.12.0/24
Primary DNS 10.10.12.2
Secondary DNS 10.10.12.1
Первый этап:
Добавление обратной зоны Windows Server Primary DNS.
1. Открываем DNS
Панель управления — > Администрирование -> DNS
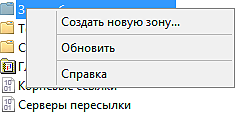
2. Нажимаем правой кнопкой мыши на Зоны обратного просмотра и выбираем Создать новую зону
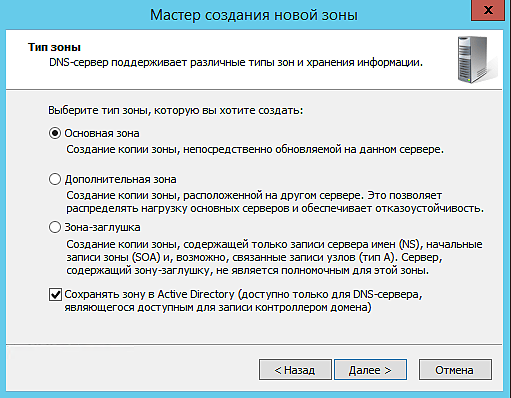
3. На 2-ом шаге «Тип зоны» выбираем Основная зона и ставим галочку на Сохранять зону в Active Directory (доступна только для DNS-сервера, являющегося доступным для записи контроллером домена)
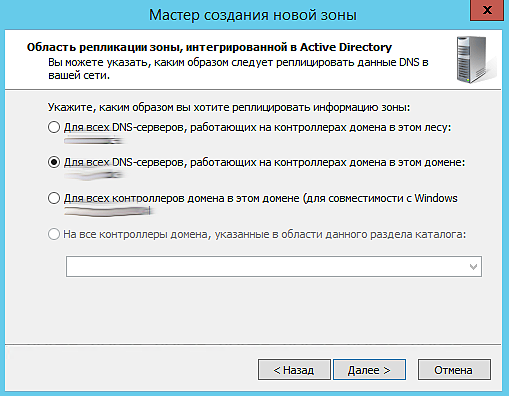
4. На 3-ем шаге выбираем Для всех DNS-серверов, работающих на контроллерах домена в этом домене (ваш домен)
5. Обратная зона будет у нас для IPv4. Выбираем на 4-ом шаге.
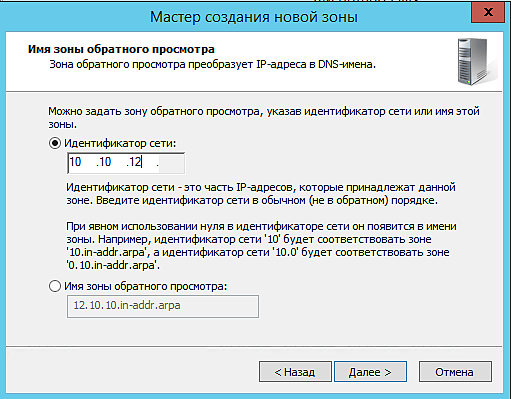
6. Далее указываем идентификатор сети
7. На следующем шаге выбираем
Разрешить только безопасные динамические обновления (рекоменд. для AD)
8. Создание обратной зоны выполнено.
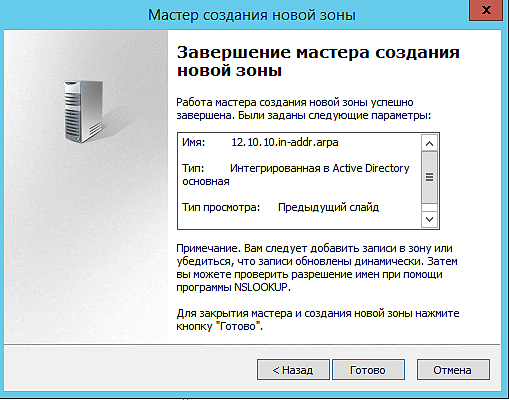
Записи PTR автоматически появятся в списке.
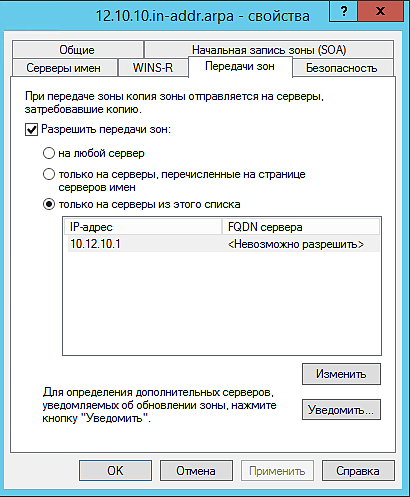
9. Дальше нам нужно разрешить передачу зон на Secondary DNS
Заходим в свойства зоны и переходим на вкладку Передачи зон
Ставим галочку на против Разрешить передачи зон:
только на серверы из этого списка
Ниже нажимаем на Изменить и добавляем ip адрес Secondary DNS
Второй этап:
Добавление обратной зоны на Ubuntu Secondary DNS
Первоначальную установку пакета описывать не буду, сразу перейдем к настройке.
1. Открываем файл /etc/bind/named.conf.options
после строчки
directory «/var/cache/bind»;
добавляем
allow-query { any; };
version «Super DNS server»;
allow-recursion { none; };
ниже находим строчку dnssec-validation auto;
её нужно за комментировать
сохраняем.
2. Открываем файл /etc/bind/named.conf.local
добавляем туда
zone «12.10.10.in-addr.arpa» IN {
type slave;
file «/var/cache/bind/12.10.10.in-addr.arpa»;
masters { 10.10.12.1; };
};
сохраняем.
3. Перезапускаем сервис bind
service bind9 restart
или
/etc/init.d/bind9 restart
Готово.