- Remove From My Forums
-
Вопрос
-
Hi guys,
I try to install a certificate to the personal store. If my device not connect network at first time, the certificate is invalid, it seems can’t build the certificate chain. The certificate status is: The issuer of this certificate could not be found.The
certificate information same as bellow:
But if my device connected network, I reinstall the certificate, the certificate status is ok.
It seems only the first time my device need to connect network. I’m sure the Root CA and the Intermediate certificates I have installed on my device.
Could you please tell my why the first time need to connect network, then the certificate chain can build successfully, otherwise it will be failed.
Best regards,
Jerry
.Net Windows C#
-
Изменено
3 апреля 2018 г. 10:26
-
Перемещено
Fei Hu
18 апреля 2018 г. 8:37
Certificated Related
-
Изменено
Security certificates are the main method for Windows to tell whether or not a software or website is made by a trusted authority. However, sometimes installing or validating these certificates themselves might be a bit of a problem.
In this article, we’re taking a look at the “Windows does not have enough information to verify this certificate” error and giving you solutions to fix the problem.
Reinstall the certificate
The most obvious fix to the problem is reinstalling the required certificates. Since certificates related to a program are usually installed with the program itself, reinstalling the whole thing is often a good idea. If not, you can always download the certificate manually and install it by double-clicking the certificate file and clicking Install certificate.
Also read: What is GPSVC? How to fix ‘Please wait for the GPVSC’?
Use incognito mode
First up, try using incognito mode to see if you can access any websites or not. If you can, chances are the error isn’t in your certificates but in your browser itself.
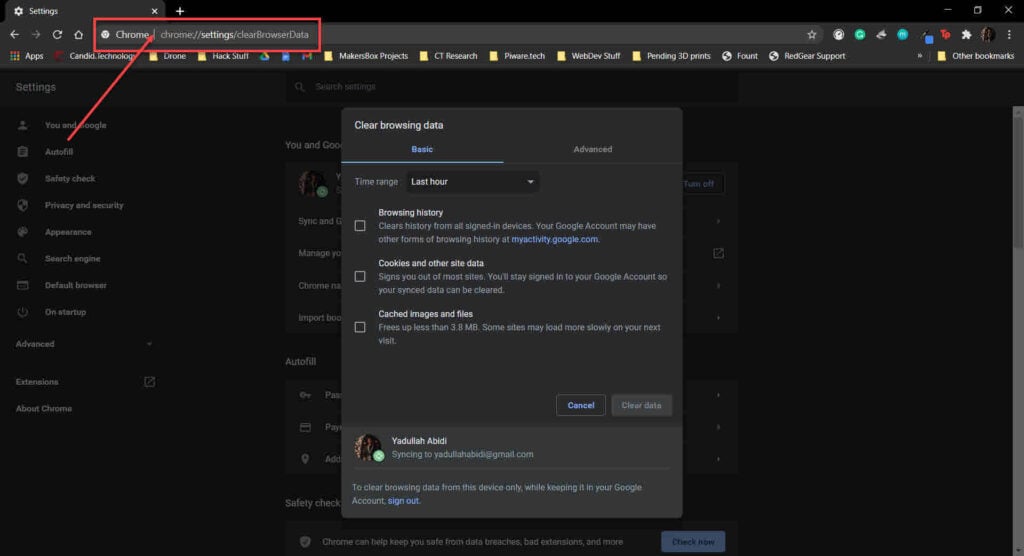
Clear your browser’s data
Corrupt files in your cache or otherwise can cause this error as well. Clear them out to see if you can get Chrome to work.
Step 1: Type in chrome://settings/clearBrowserData in your browser’s address bar and hit Enter.
Step 2: Select the cache and cookies options and ensure the Time range is set to All time. Click on the Clear now button to clear out all the data.
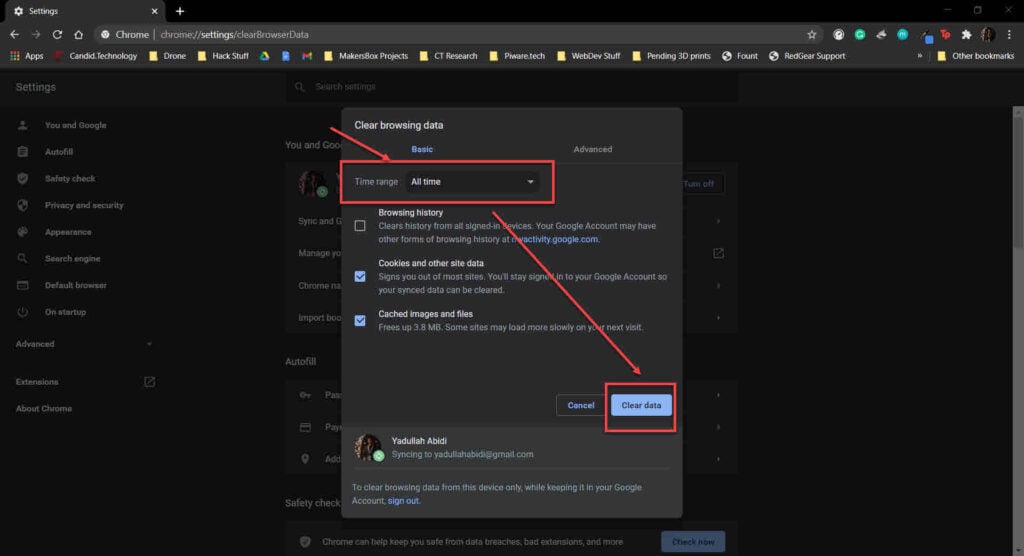
Now restart the browser and try again.
Also read: How to stop the ‘Fixing C Stage 2’ issue in Windows?
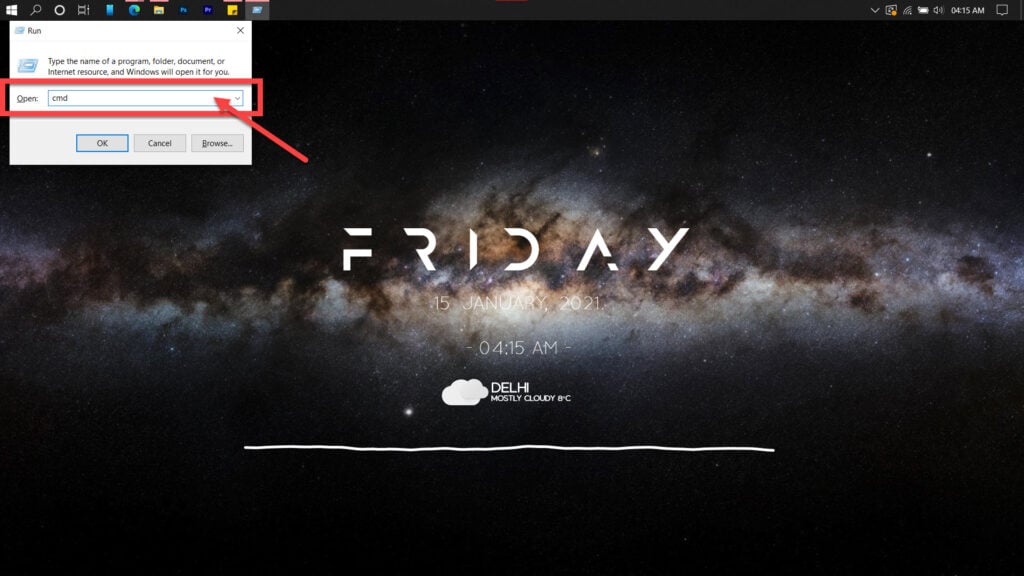
Use command prompt to flush DNS
Misconfigured DNS settings can cause a lot of headaches. Here’s how you can reset them.
Step 1: Press Windows key + R and type in cmd, and hit enter.
Step 2: Type in ipconfig /flushdns to reset DNS settings to default.
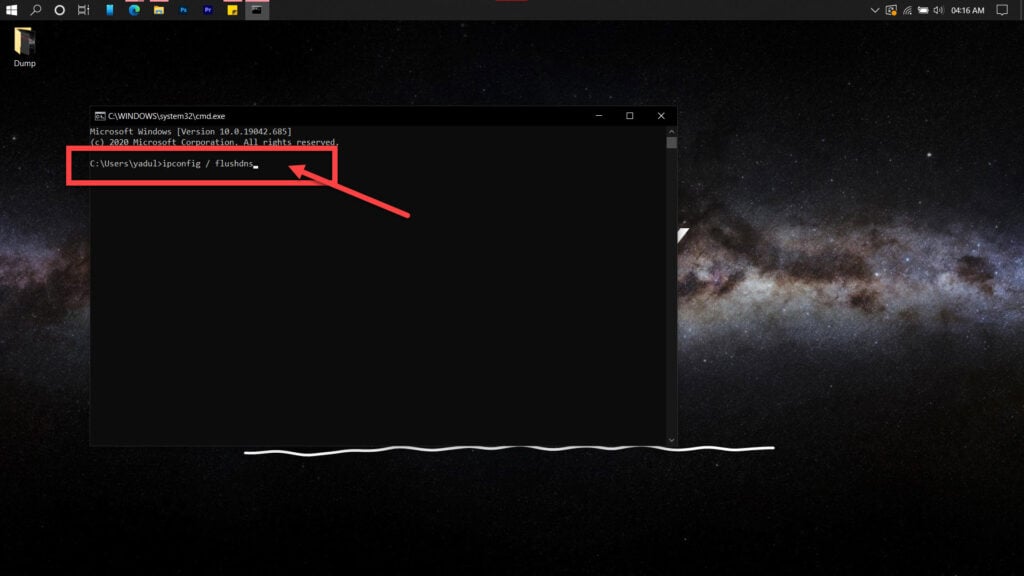
If the above command doesn’t help, try entering these commands in the Command Prompt one at a time.
netsh winsock reset
netsh int ip reset
If you suspect an issue with your router’s DHCP assignment, use these commands to release your old IP and request a new one.
ipconfig /release
ipconfig /renew
If this doesn’t work, use the following commands to reset your network stack.
ipconfig/flushdns
nbtstat -R
nbtstat -RR
netsh int ip reset C:resetlog.txt
netsh winsock reset
Try another DNS
There are multiple free DNS providers using whom you can fix this issue. In this example, we’re going to use Google’s DNS.
Step 1: Press Windows key + I to open the Windows settings and click on Network & Internet.
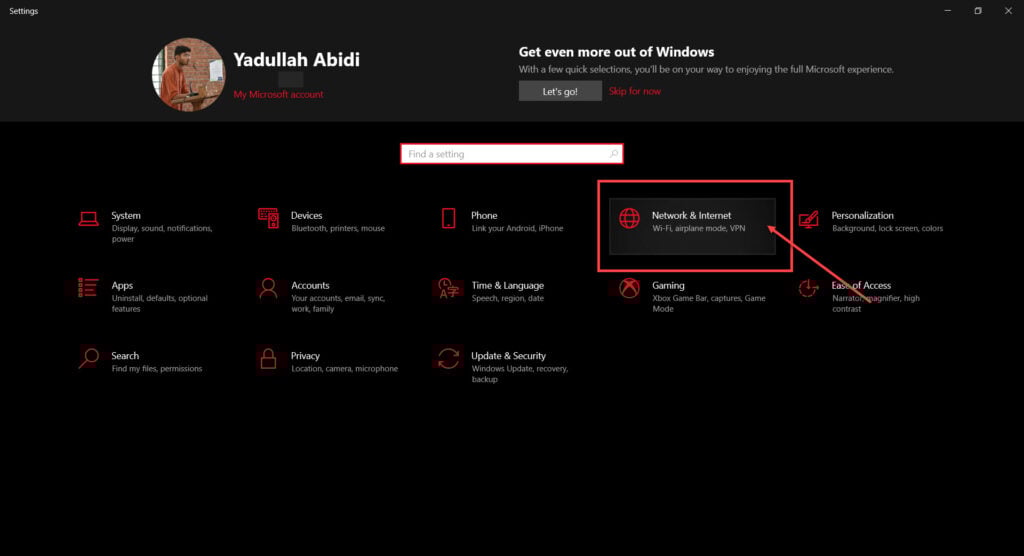
Step 2: Click on Change adaptor options.
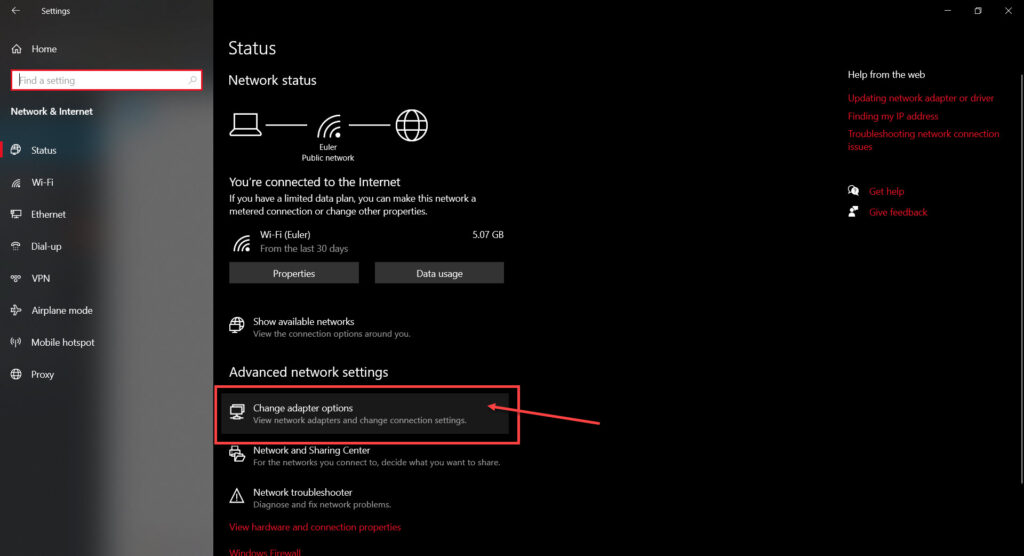
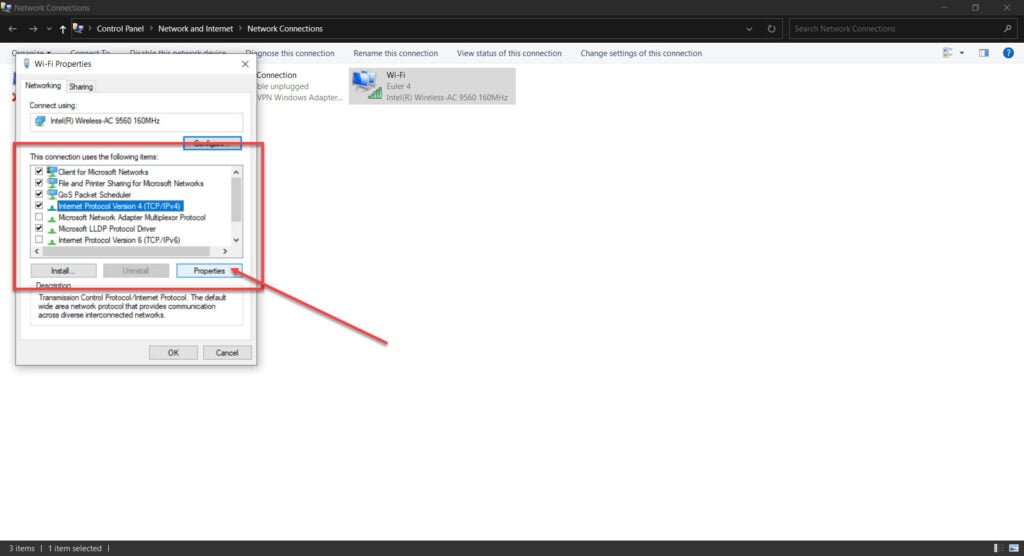
Step 3: Right-click on your active network (WiFi or LAN) and click Properties.

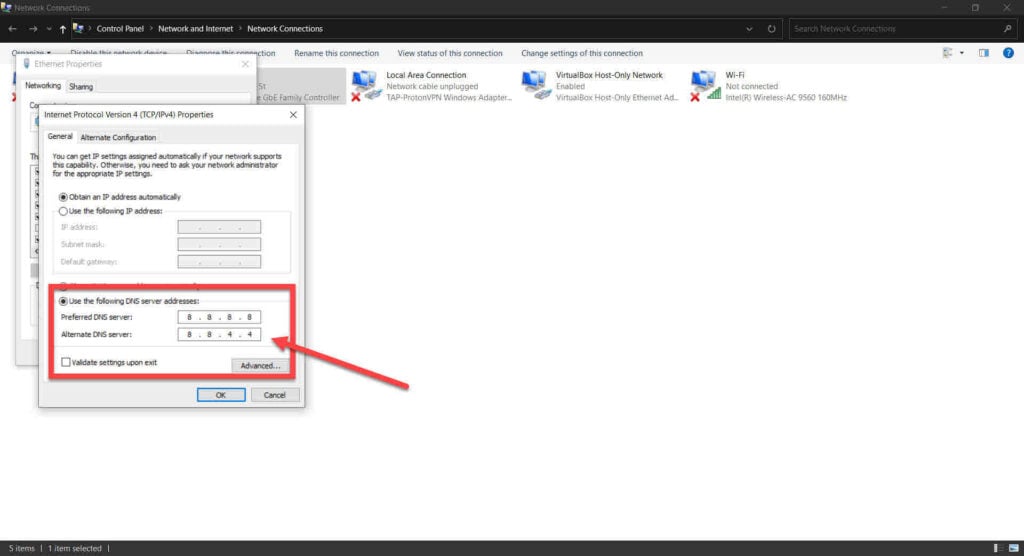
Step 4: Find Internet Protocol Version 4 in the list, click on it, and click Properties.
Step 5: Check the Use the following DNS server addresses radio button and type in 8.8.8.8 and 8.8.4.4 in the preferred and alternative DNS addresses, respectively.
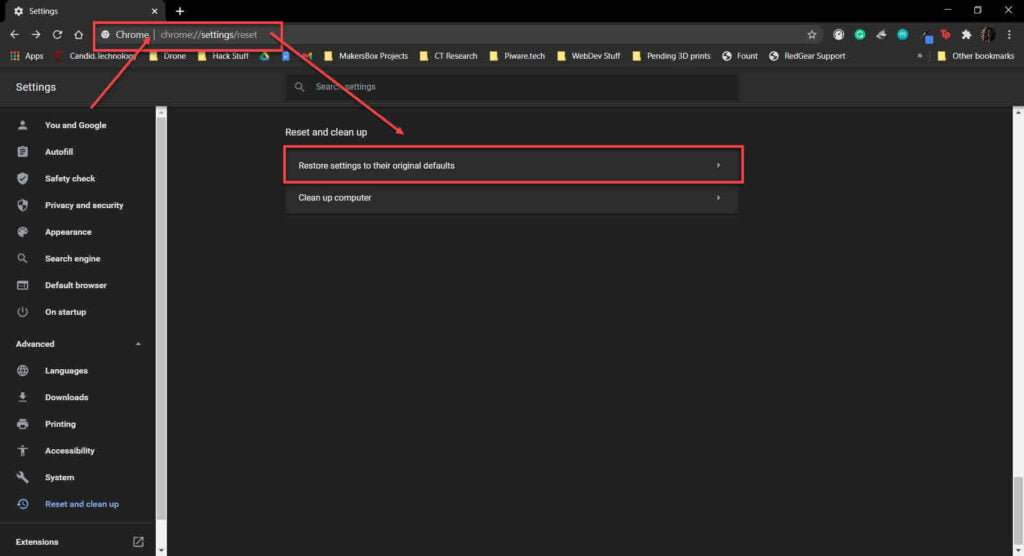
Reset Chrome
If nothing else works, you can try resetting Chrome to ensure there are no faulty settings in the browser that could be causing this issue.
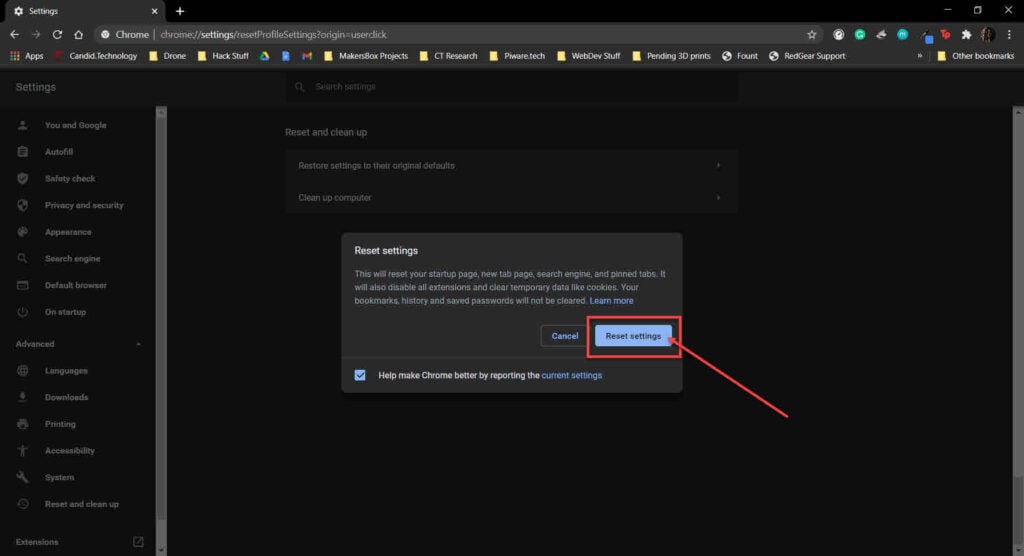
Step 1: Head over to chrome://settings/reset. Click on Restore settings to their original defaults.
Step 2: Chrome will show you a warning prompt. Click on Reset Settings, and your browser will reset to default settings.
Also read: USB power management in Windows 11 explained

Someone who writes/edits/shoots/hosts all things tech and when he’s not, streams himself racing virtual cars.
You can contact him here: [email protected]
You can resolve this error by reinstalling affected certificates
by Milan Stanojevic
Milan has been enthusiastic about technology ever since his childhood days, and this led him to take interest in all PC-related technologies. He’s a PC enthusiast and he… read more
Updated on December 20, 2022
Reviewed by
Vlad Turiceanu

Passionate about technology, Windows, and everything that has a power button, he spent most of his time developing new skills and learning more about the tech world. Coming… read more

XINSTALL BY CLICKING THE DOWNLOAD FILE
This software will keep your drivers up and running, thus keeping you safe from common computer errors and hardware failure. Check all your drivers now in 3 easy steps:
- Download DriverFix (verified download file).
- Click Start Scan to find all problematic drivers.
- Click Update Drivers to get new versions and avoid system malfunctionings.
- DriverFix has been downloaded by 0 readers this month.
Issues with domain certificates are quite common. If you’re getting the Windows doesn’t have enough information to verify this certificate error message, read on to find out how to get rid of it.
What causes this certificate error message?
In most cases, the problems with the certificate verification occur due to lack of proper certificates installed on your system. Consequently, the same goes for Windows doesn’t have enough information to verify this certificate error.
Basically, this problem occurs when either intermediate or root certificates are not installed as intended.
How can I fix Windows doesn’t have enough information to verify this certificate?
An obvious solution is to reinstall the certificates. This is easily by checking the state of certificates, where all Root and Intermediate certificates should come with the This digital signature is OK verification.
Since this usually appears on Internet Explorer, here’s the procedure how to install required certificates in no time:
- Click on these 2 links respectively to download the necessary certificates.
VeriSign_Class_1_Public_Primary_Certification_Authority _G3.cer
Symantec Class 1 Individual Subscriber CA – G4.cer - Save the certificates to desktop.
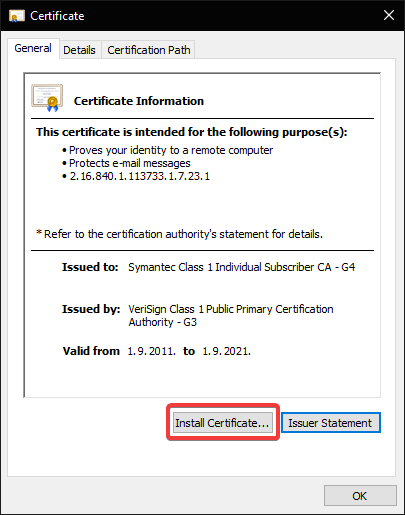
- Double-click on the certificate files one by one and run it.
- Click Install Certificate.

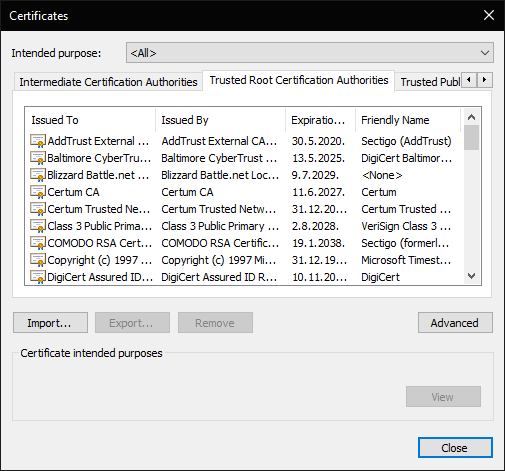
- In the Certificate Import Wizard, click Next, and select Place all certificates in the following store.
- Click Browse.
- Select Trusted Root Certification Authorities for Symantec_Class_1_Public_Primary_Certification_Authority _G3.cer
- For the Symantec Class 1 Individual Subscriber CA – G4.cer, select Intermediate Certification Authorities.
- Confirm the selection and click Next.
- Click Finish and you are done.
If you want to check whether all certificates are properly installed, follow these steps:
- Open Internet Explorer.
- In the top right corner, click on the cog-like icon and open Internet Options.
- Select the Content tab.
- Choose Certificates.
- Click on the Personal tab.

- You should see all certificates and they should say This digital signature is OK.
- Fix: HP Support Assistant Stuck on Creating a Restore Point
- Failed to Determine Source Edition Type: 5 Ways to Fix It
We hope that the Windows does not have enough information to verify this certificate error message is now a thing of the past. Let us know your thoughts in the comments section below.
![]()
Newsletter
While trying to connect to a website if you see an error message due to lack of a certificate, then you have to install the valid certificate in your system or you may be facing some network issues. You may see an error message Windows does not have enough information to verify this certificate. This error often comes when you are trying to access any websites and the certificate is not installed on your system. In this article, you will know how to fix this problem.

In Windows, the certificate will provide security to users. If the certificate has been installed in your system no unknown users can access your resources, only those users can access the resources who have the appropriate permission because the main function of a certificate is to authenticate the identity of the owner.
If you see Windows does not have enough information to verify this certificate message, follow the solutions mentioned below:
- Switch to Incognito Mode
- Clear Cache and Cookies Data
- Reset your Network
- Alter DNS Setting
- Reset the web Browser
- Reinstall the Certificate
Let’s try to resolve your issue by using these methods.
1] Switch to Incognito Mode
Opening a website in Incognito mode means your browsing activity is not saved on your computer also, it doesn’t use the stored cache allowing the website a clean slate. So, open the website in Incognito Mode on your web browser and check whether the website is working or not. If it opens in this mode, then the problem may be in your browser cache. But if the websites do not open in this mode then you can use another method to resolve this issue.
Follow the prescribed steps to enable Incognito mode in Browser.
- Open a web browser, which you have on your machine.
- On the right hand of the address bar, click on the three-dots or three-lines icon.
- Select the new Incognito window.
A new window appears and now you can open the website. If you are able to open the website without any errors, we can fairly conclude that there is something wrong with your browser, so, move straight to the next solution to clear your cache, and if that doesn’t help, execute the fifth solution.
2] Clear Cache and Cookies Data
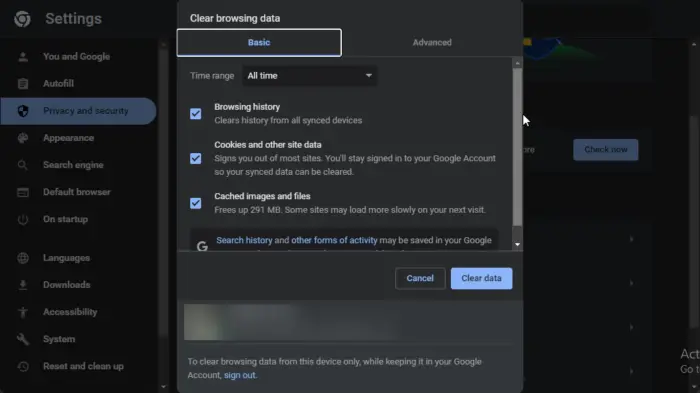
If the browser’s cache file and cookies are corrupted it will show you various errors like the one in question. To
solve this problem, you should clear your browsing data from the web browser. To do this, follow our instructions below.
Chrome:
- Click on the three-dots icon, on the right hand of the address bar of your web browser and select More tools > Clear browsing data.
- Here, select All time in the Time range and check all three options given there.
- Click on Clear data to perform this operation.
Microsoft Edge:
- Click on the three vertical dots to open the menu and then click on Settings.
- Go to Privacy, search and service.
- Click on the Choose what to clear button from Clear browsing data now.
- Set Time Range to All time, select all the options, and click on Clear now.
Firefox:
- Open Firefox, paste “about:preferences#privacy” and hit Enter.
- Scroll down and click on Clear data.
- Finally, click on Clear.
You can implement this method on browsers other than Chrome, Firefox, and Edge as well. Hopefully, this method will resolve your error.
3] Reset your Network
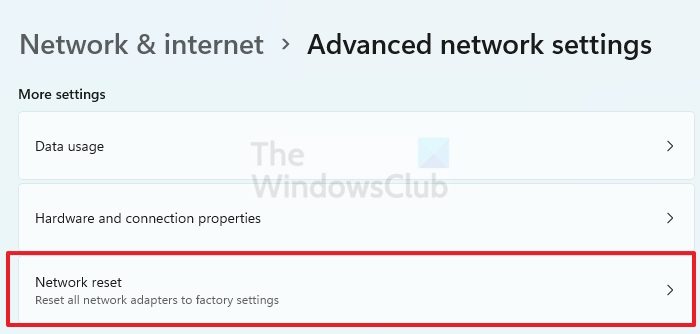
Improper network configuration settings may also cause this said error. In that case, resetting network settings and protocols can resolve the issue.
First of all, in order to reset the Network setting, follow the prescribed instructions.
- Press the Win + I button to open the setting screen and then go to Network & Internet > Advanced network setting.
- Here, click on the Network reset button.
- Click on the Reset now option, click on Yes and now restart your system.
After resetting the network setting you will check whether this issue is resolved or not.
4] Alter DNS Setting
If resetting the network configuration didn’t resolve the said error then try to use the Google Public DNS to solve this issue. Now you will learn how to change DNS settings on a Windows machine. Here, you will configure 8.8.8.8 IP as the Preferred DNS server and 8.8.4.4 IP as Alternet DNS server. To do the same, follow the prescribed steps.
- Open Control Panel.
- Go to Network and Internet > Network and Sharing Center.
- Click on your WiFi name from the Connections option.
- Click on Properties.
- Select Internet Protocol Version 4 (TCP/IP4) and click on Properties.
- Select Use the following DNS server address option and set 8.8.8.8 as the Preferred DNS server and set 8.8.4.4 as the Alternet DNS server address.
Hopefully, using this solution you have resolved your said error.
5] Reset the web Browser
It has been seen that resetting the web Browser can resolve this error. To change the browser setting to its default. So, go ahead and reset Chrome, Edge, Firefox, etc to the factory settings. Hopefully, your issue will be resolved.
6] Reinstall the Certificate
Your browser may fail to verify the certificate if it is not installed properly. To do the same, all you have to do is right-click on the certificate and install the same. Once you have installed the missing certificate, your issue will be resolved.
After installing the certificate, you need to refresh it. To do the same, you need to make sure that you are a member of the Domain Administrators group, then refresh it using the command: gpupdate /target:computer /force that must be executed in the elevated mode of Command Prompt. Finally, open the Certificate console, go to Trusted Root Certification Authorities > Certificates and then check if the certificate is installed.
In order to fix this issue, installing the certificate is the last thing we will do, first, we need to make sure that it is not a result of a network or browser issue. So, read and execute all the solutions mentioned here, and hopefully, your issue will be resolved.
Read: How to manage Trusted Root Certificates in Windows.
So I am trying to make my IIS8 webserver https, yet I can’t seem to get it to work.
I have tried almost anything… but nothing seems to work.
DON’T WORRY THE FILES BELOW ARE FAKE!

PICTURE 1 KEY

PICTURE 2 PEM
First of all, what do I need to do with these 2? It says to save them as .key and .pem files, so I thought they mend: put the private key in a text file and save it as .key and same for the certificate and save it as .pem.
I tried to convert them to .pfx because that is what I need, right?
First I tried using openssl, but I saw a nice site, so I started using that instead: https://www.sslshopper.com/ssl-converter.html. That gave me an error at first, but then I saw cloudflare also had something called DER:

Which gave me an .CRT file if I downloaded it, so now I had a .PEM, a .KEY and an .CRT file, I went back to the website and used the .CRT file and the .KEY file, and put in a password!
Now I’ve gotten my .PFX file, which I wanted! I installed it on my windows server, but got this:

Why is it not verified?!
- What files do I need to verify this?
- Am I saving the files correct?
“Windows does not have enough information to verify this cert” usually means your server certificate is not issued by a trusted CA. You would need to check what certificate is being received by client during SSL handshake with the ASA. The easiest way to do this is through a browser session to the VPN url.
An obvious solution is to reinstall the certificates. This is easily by checking the state of certificates, where all Root and Intermediate certificates should come with the This digital signature is OK verification. Install root certificates on Windows 10 with ease by following these guides.
How do I fix the site’s security certificate is not trusted?
Solution
- Open Google Chrome.
- Click Alt F, Click Settings.
- Scroll down and Click Show advanced settings…
- Scroll down to the Network section and click Change proxy settings…
- Click Advanced tab.
- Scroll down to Security category to view which SSL/TLS protocols are enabled.
- Click OK.
How can I verify a certificate online?
To verify a certificate, a browser will obtain a sequence of certificates, each one having signed the next certificate in the sequence, connecting the signing CA’s root to the server’s certificate.
What happens during certificate verification?
First, the client gets the server’s certificate as part of the SSL/TLS handshake. … For each intermediate certificate, the client completes the same process: it verifies the issuer’s name matches the certificate owner’s name, and uses the signature and public key to verify that the certificate is properly signed.
How do I view certificates in Windows 10?
View certificates with the Certificate Manager tool
- Select Run from the Start menu, and then enter certlm. msc. The Certificate Manager tool for the local device appears.
- To view your certificates, under Certificates – Local Computer in the left pane, expand the directory for the type of certificate you want to view.
Why Chrome says your connection is not private?
First and foremost, do not be afraid when this error appears — it simply means that Google Chrome is preventing you from visiting an unreliable website. “Your connection is not private” message appears when your browser notices a problem while creating an SSL connection or can’t verify the SSL certificate.
Why is my certificate not trusted?
The most common cause of a “certificate not trusted” error is that the certificate installation was not properly completed on the server (or servers) hosting the site. Use our SSL Certificate tester to check for this issue. In the tester, an incomplete installation shows one certificate file and a broken red chain.
How do I know if my SSL certificate Cannot be trusted?
An easy way to verify proper installation of SSL certificate is to check SSL certificate installation using free “SSL Checker” tool. “The security certificate was issued by a company you have not chosen to trust. View the certificate to determine whether you want to trust the certifying authority.”
Why do you think this certificate is no longer trusted?
The certificate not trusted error indicates that the SSL certificate is not signed or approved by a company that the browser trusts. This occurs most often for one of the following reasons: The web site is using a self-signed certificate.
How do I check a certificate format?
- If the certificate is in text format, then it is in PEM format.
- You can read the contents of a PEM certificate (cert.crt) using the ‘openssl’ command on Linux or Windows as follows:
- openssl x509 -in cert.crt -text.
- If the file content is binary, the certificate could be either DER or pkcs12/pfx.
How do I know if a certificate is valid?
Here’s how to check your SSL certificate’s expiration date on Google Chrome.
- Click the padlock. Start by clicking the padlock icon in the address bar for whatever website you’re on.
- Click on Valid. In the pop-up box, click on “Valid” under the “Certificate” prompt.
- Check the Expiration Data.
How can I tell if a certificate is self signed?
- Watch out, a certificate which isn’t self signed isn’t automatically authorized by a CA in your trust list — it just means some other certificate is higher in the chain. …
- Use: keytool -printcert -file <PEM format cert file> Both subject and issuer should be the same. –
What is meant by document verification?
Document verification is a process of verifying the authenticity of a document. Officially issued documents, such as ID, driving licence, bank statement or other state/federal documents are usually being verified. … The customer simply has to upload a photograph along with a government-issued ID.
How is a digital certificate verified?
Digital certificates are issued by trusted parties, called certificate authorities, to verify the identity of an entity, such as a client or server. … The CA checks your signature using your public key and performs some level of verification of your identity (this varies with different CAs).
While making an attempt to join to a web site should you see an error message due to lack of a certificate, then you definately have to set up the legitimate certificate in your system or chances are you’ll be dealing with some community points. You might even see an error message Windows does not have enough information to verify this certificate. This error usually comes if you find yourself making an attempt to entry any web sites and the certificate is not put in in your system. In this article, you’ll know the way to repair this downside.
In Windows, the certificate will present safety to customers. If the certificate has been put in in your system no unknown customers can entry your sources, solely these customers can entry the sources who have the suitable permission as a result of the principle perform of a certificate is to authenticate the id of the proprietor.
If you see Windows does not have enough information to verify this certificate message, observe the options talked about beneath:
- Switch to Incognito Mode
- Clear Cache and Cookies Data
- Reset your Network
- Alter DNS Setting
- Reset the online Browser
- Reinstall the Certificate
Let’s strive to resolve your concern through the use of these strategies.
1] Switch to Incognito Mode
Opening a web site in Incognito mode means your shopping exercise is not saved in your pc additionally, it doesn’t use the saved cache permitting the web site a clear slate. So, open the web site in Incognito Mode in your net browser and test whether or not the web site is working or not. If it opens in this mode, then the issue could also be in your browser cache. But if the web sites do not open in this mode then you should use one other methodology to resolve this concern.
Follow the prescribed steps to allow Incognito mode in Browser.
- Open an internet browser, which you have in your machine.
- On the appropriate hand of the deal with bar, click on on the three-dots or three-lines icon.
- Select the brand new Incognito window.
A brand new window seems and now you may open the web site. If you’re able to open the web site with none errors, we will pretty conclude that there’s something flawed together with your browser, so, transfer straight to the following answer to clear your cache, and if that doesn’t assist, execute the fifth answer.
2] Clear Cache and Cookies Data

If the browser’s cache file and cookies are corrupted it can present you varied errors just like the one in query. To
resolve this downside, you need to clear your shopping information from the online browser. To do this, observe our directions beneath.
Chrome:
- Click on the three-dots icon, on the appropriate hand of the deal with bar of your net browser and choose More instruments > Clear shopping information.
- Here, choose All time within the Time vary and test all three choices given there.
- Click on Clear information to carry out this operation.
Microsoft Edge:
- Click on the three vertical dots to open the menu after which click on on Settings.
- Go to Privacy, search and repair.
- Click on the Choose what to clear button from Clear shopping information now.
- Set Time Range to All time, choose all of the choices, and click on on Clear now.
Firefox:
- Open Firefox, paste “about:preferences#privacy” and hit Enter.
- Scroll down and click on on Clear information.
- Finally, click on on Clear.
You can implement this methodology on browsers aside from Chrome, Firefox, and Edge as nicely. Hopefully, this methodology will resolve your error.
3] Reset your Network

Improper community configuration settings might also trigger this mentioned error. In that case, resetting community settings and protocols can resolve the problem.
First of all, so as to reset the Network setting, observe the prescribed directions.
- Press the Win + I button to open the setting display screen after which go to Network & Internet > Advanced community setting.
- Here, click on on the Network reset button.
- Click on the Reset now choice, click on on Yes and now restart your system.
After resetting the community setting you’ll test whether or not this concern is resolved or not.
4] Alter DNS Setting
If resetting the community configuration didn’t resolve the mentioned error then strive to use the Google Public DNS to resolve this concern. Now you’ll find out how to change DNS settings on a Windows machine. Here, you’ll configure 8.8.8.8 IP because the Preferred DNS server and eight.8.4.4 IP as Alternet DNS server. To do the identical, observe the prescribed steps.
- Open Control Panel.
- Go to Network and Internet > Network and Sharing Center.
- Click in your WiFi title from the Connections choice.
- Click on Properties.
- Select Internet Protocol Version 4 (TCP/IP4) and click on on Properties.
- Select Use the next DNS server deal with choice and set 8.8.8.8 because the Preferred DNS server and set 8.8.4.4 because the Alternet DNS server deal with.
Hopefully, utilizing this answer you have resolved your mentioned error.
5] Reset the online Browser
It has been seen that resetting the online Browser can resolve this error. To change the browser setting to its default. So, go forward and reset Chrome, Edge, Firefox, and many others to the manufacturing unit settings. Hopefully, your concern might be resolved.
6] Reinstall the Certificate
Your browser could fail to verify the certificate whether it is not put in correctly. To do the identical, all you have to do is right-click on the certificate and set up the identical. Once you have put in the lacking certificate, your concern might be resolved.
After putting in the certificate, you want to refresh it. To do the identical, you want to just be sure you are a member of the Domain Administrators group, then refresh it utilizing the command: gpupdate /goal:pc /pressure that should be executed within the elevated mode of Command Prompt. Finally, open the Certificate console, go to Trusted Root Certification Authorities > Certificates after which test if the certificate is put in.
In order to repair this concern, putting in the certificate is the very last thing we’ll do, first, we’d like to be sure that it’s not a results of a community or browser concern. So, learn and execute all of the options talked about right here, and hopefully, your concern might be resolved.
Read: How to handle Trusted Root Certificates in Windows.