Where is my hard drive? While it can be fixed, the “hard drive not showing up in Windows 10” error is a distinct problem. Your computer needs a hard drive to store local information such as your files, software (including the Windows 10 system), and other important data that allow your computer to operate.
If Windows 10 doesn’t recognize your hard drive, it’s time to fix it. This guide will teach you how to troubleshoot the issue in easy-to-follow steps. Learn the solution, whether you’re installing a new system or if you’ve already been running Windows 10 and it suddenly doesn’t recognize your hard disk.
How to fix Windows 10 that doesn’t recognize my hard drive?
Where is my hard drive? If your internal hard drive is not showing up, it might be because it is not initialized or it needs formatting. Ensure your disk is properly connected to the motherboard with the SATA cable. Due to some BIOS settings, your HDD might also not be visible in Windows 10.
Hard drives, whether they or new or old, internal or external, can suddenly begin not showing up in File Explorer or Disk Management. Don’t panic — this is one of the most common issues Windows 10 users encounter.
First, you need to ask yourself why Windows 10 doesn’t recognize hard drivers. The problem can range from being a minor inconvenience to a serious matter or even malware infection. If you can boot up your device, you don’t have much to worry about as your disk is still operational. On the other hand, you might lose access to your files if Windows 10 cannot boot from the problematic drives.
The good news is we can show you some ways to help you solve the problem and potentially save your files. Let’s first determine where the problem comes from.
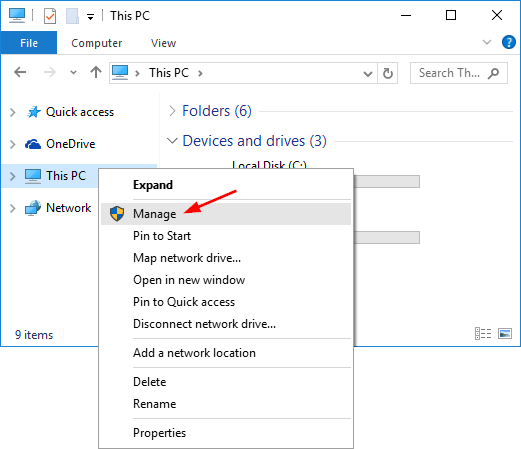
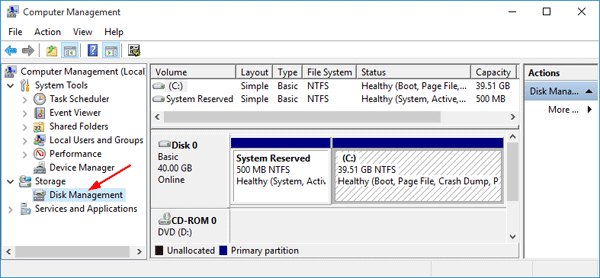
Here’s one instance where you might encounter the Windows 10 hard drive not showing by right-clicking «This PC» and selecting «Manage.» Go to «Disk Management» and find the hard drive missing or showing up as not initialized and unallocated space. If you see your hard drive here, the issue may be in not showing up in File Explorer for one or more reasons, such as the device status being unknown or not initialized or the disk space being unallocated. Let’s try these steps to initialize the disk:
- Right-click «This PC» (in Windows 10 File Explorer) and choose «Manage.»
- Go to «Disk Management» and right-click your new hard disk. Choose the «Initialize Disk.«
- In the dialog box, select the disk you wish to initialize and choose the MBR or GPT partition.
Also, try to create partitions:
- Right-click «This PC» and choose «Manage» > «Disk Management.»
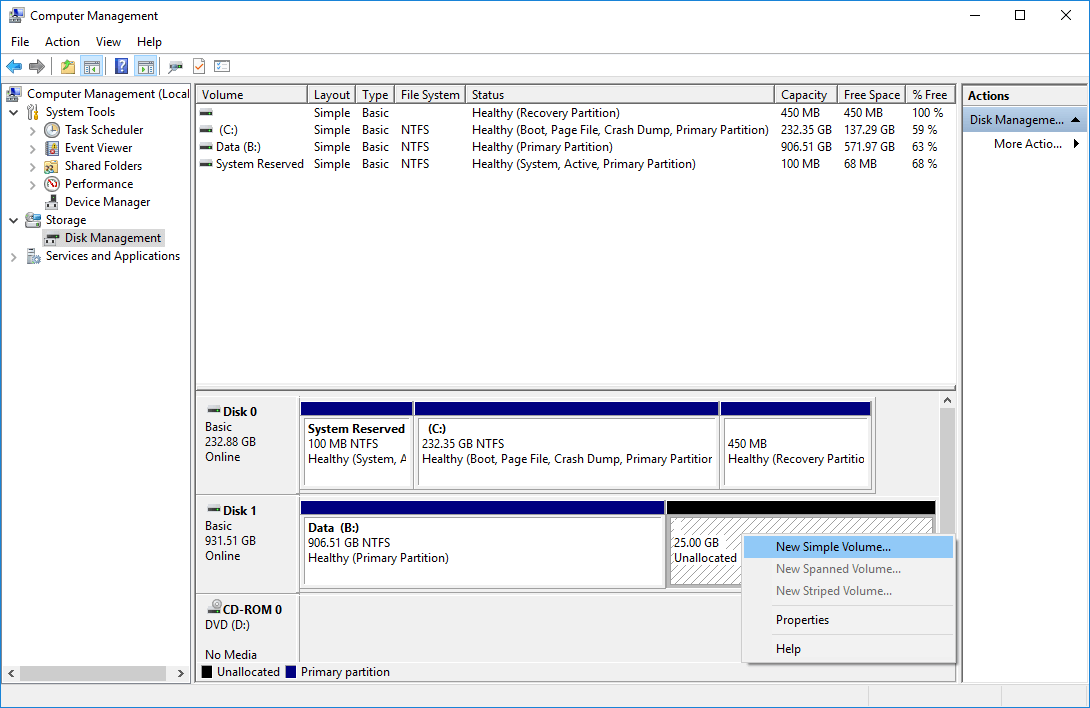
- Right-click the unallocated space and choose «New Simple Volume.»
- In New Simple Volume Wizard, click «Next» to continue.
- Follow the wizard to specify the volume size, assign a drive letter to the volume, and then format the partition.
How to fix new hard drive not detected on Windows 10
Where is my hard drive? If your new hard disk is not detected by or Disk Manager, it could be because of a driver issue, connection issue, or faulty BIOS settings. These can be fixed. Connection issues can be from a faulty USB port or a damaged cable. Incorrect BIOS settings may cause the new hard drive to be disabled. Let’s examine ways to fix these issues and see if we can get you on the road again.
- Check your connection. This is usually the quickest fix. Connect your hard drive with a SATA cable instead of a USB cable to start with. Also, change the cable port to see if this makes a difference. You can connect your hard drive to another computer to see if it operates, or if the issue is local to your device. This will let you know if the problem is with the hard drive, your computer, or the cables.
- Update your drivers. Since your hard drive isn’t detected, you can’t update drivers as you normally would by right-clicking the device and choosing «Update driver.» Instead, visit the official support site of the hardware manufacturer and download the latest driver that matches the product you purchased.
- Enable the hard drive in BIOS. Restart your computer and press the BIOS key per your computer’s instructions. Use the arrow keys on your keyboard, choose «Integrated Peripherals,» then hit «Enter.» Use the arrow keys to select «USB Controller.» Check if it’s disabled, and change the option to «Enabled.» Save the settings and restart your computer to see if the issue is fixed.
How to fix Windows 10 hard drive not visible
What if your disk doesn’t appear in Windows 10 without an error warning? You get this problem a lot, especially with used drives. Right-click “This PC” and choose “Manage.” Select “Disk Management.” Can you see the disk? Is it not showing in File Explorer? This could be because of a conflict, unallocated space, or a driver error.
Method 1. Change the assigned letter
All drives are assigned an identifying letter when they’re created. For example, the default letter of Windows drives is usually «C:». In some cases, simply changing this letter could solve the visibility issues, as long as your computer boots up.
- In Disk Management, right-click the volume and select «Change Drive Letter and Paths.»
- In the new window, click «Change.» Here you can assign a new drive letter to your USB and click «OK.» This should fix the problem.
A used device can suddenly produce unallocated space. Unallocated space cannot be used to store data. To use the space, you need to create a partition on it, or split it into multiple partitions. Accidentally deleting a partition, virus attacks, or other reasons can cause this type of partition loss on your disk. You simply need to recover data from the unallocated space and create a new disk volume to use it again.
Method 2. Recover data from the unallocated space
- Right-click on your C: drive in Disk management and click Extend Volume.
- You should be able to just click Next through the screens. If Disk Management won’t let you do it because it is your system OS partition, you can download and install one of many programs designed to do this. MiniTool Partition Wizard is our recommendation.
- After you have retrieved your files, you need to create a new partition. In “Disk Management,” right-click the unallocated space and choose «New Simple Volume.» Simply follow the wizard to complete the process. If this doesn’t work, update your drivers. Drivers can cause major issues on your computer if they are not kept up to date.
Method 3. Formatting
Your disk may be just not formatted. If you’re using an external drive, it may need to be formatted to operate properly with Windows 10. You can do this by right-clicking on the external in “Disk Management” and finding the “Format” option.
If your hard disk is not detected in the Disk Management app, the issue could be problematic connections, outdated drivers, or physical damage. If your situation doesn’t improve after checking connections, updating drivers, and completing the steps in this article, it’s very possible you just have a bad hard drive.
Final Thoughts
We believe this article was informative and helpful in opening a hard drive in Windows 10. Please return to our website for more information about how to repair Windows errors. In addition, you’ll get better deals on Microsoft Office software, along with helpful guides and articles.
Would you like to receive promotions, deals, and discounts to get our products for the best price? Don’t forget to subscribe to our newsletter by entering your email address below! Receive the latest technology news in your inbox and be the first to read our tips to become more productive.
Read Next
> How to access and use Steam screenshot folder on Windows 10
> How to Get and Use Our Ultimate Affiliate Toolkit
> How to Optimize Your Outlook Inbox in 5 Easy Steps
by Ivan Jenic
Passionate about all elements related to Windows and combined with his innate curiosity, Ivan has delved deep into understanding this operating system, with a specialization in drivers and… read more
Updated on December 14, 2022
Reviewed by
Alex Serban
After moving away from the corporate work-style, Alex has found rewards in a lifestyle of constant analysis, team coordination and pestering his colleagues. Holding an MCSA Windows Server… read more
- If your internal hard drive is not showing up, it might be because it is not initialized or it needs formatting.
- Make sure your disk is properly connected to the motherboard with the SATA cable.
- Your HDD might also not be visible in Windows 10 due to some BIOS settings.
- Updating the hardware drivers will solve the internal drive not showing up on Windows 10.
XINSTALL BY CLICKING THE DOWNLOAD FILE
- Download Restoro PC Repair Tool that comes with Patented Technologies (patent available here).
- Click Start Scan to find Windows 10 issues that could be causing PC problems.
- Click Repair All to fix issues affecting your computer’s security and performance
- Restoro has been downloaded by 0 readers this month.
There’s a chance that you might encounter specific problems when installing a new hard drive on your computer.
Perhaps the most common issue with a new HDD in Windows 10 is that the system doesn’t show them for some reason. But before we solve this problem, let us discuss some possible triggers.
Why is my new HDD not being detected?
From what we gathered from multiple users, any of the following elements may make Windows 10 not to discover your HDD:
- Driver problem – Drivers are essential in connecting software and hardware. If they are corrupted or outdated, you may expect some issues.
- Network connection problem – Some users who have issues with their network connections may also have this error.
- Incorrect BIOS settings – The BIOS may play a key role, and, if not correctly configured, may stop the OS from noticing a new HDD.
- Wire connections – Another cause could be a wire connection problem due to a malfunctioning USB port or a frayed or damaged USB cable.
Note that these causes can result in other common problems, such as:
- Internal hard drive not showing up in Windows 10, in Disk Management – If your hard drive isn’t showing in Windows at all, it’s possible that it’s not connected correctly. To fix that, enter BIOS and make sure that the drive appears.
- Can’t see the hard drive in Windows 10 – If you can’t see your hard drive in Windows 10, it’s possible that your hard drive isn’t properly initialized and formatted. However, you can fix that with ease using Disk Management.
- External hard drive not showing up – This issue can also appear with external hard drives, and we already covered how to fix problems with an external hard drive on your PC in one of our previous articles.
- Hard drive won’t appear in BIOS, on PC, or in File Explorer – In some cases, the hard drive won’t appear in BIOS. Your configuration usually causes this in BIOS or by connection issues with your hard drive.
- Internal hard drive not showing up on Windows 11 – If you are using Windows 11 and you get this error, you can still apply the below solutions but tweak them a bit.
Also, you should take a peek at our post on what to do if Windows 10/11 thinks the hard drive is removable and solve this problem for good.
Let’s jump into the solutions to the hard drive errors mentioned above without further ado. Follow along!
How do I detect hard drive on Windows 10?
First, before you go into any of these solutions, you must:
- Ensure your hard drive is correctly connected to your motherboard and power supply.
- Also, it would be best if you tried connecting the hard drive to a different port or using a different cable.
1. Update your drivers
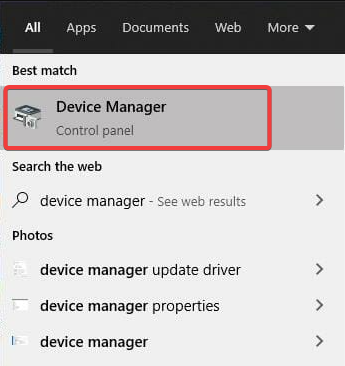
- Press the Windows Key + S, type device manager, and click the Device Manager option.
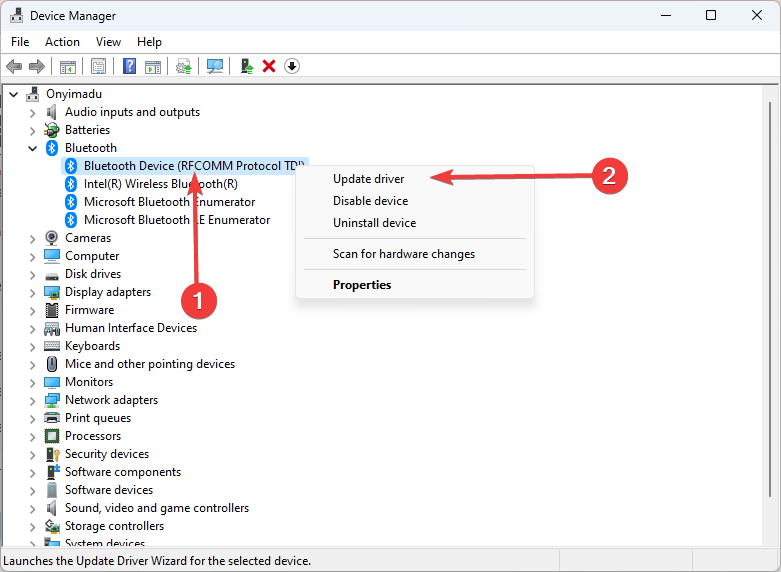
- In the Device Manager, select the device you wish to update, right-click on it, then select Update driver.
- Repeat for all the devices you want to update.
You may have a driver issue if your hard drive won’t show up in Windows. To fix the problem, ensure your drivers are up to date.
This goes for your motherboard and chipset drivers, so visit the manufacturer’s websites and download the latest ones for your motherboard.
Alternatively, you can download the missing drivers automatically using a third-party driver updater tool to keep your drivers updated.
This will save you the hustle of researching your component’s model numbers and finding compatible drivers.
Most of the time, the generic drivers for your PC’s hardware and peripherals are not properly updated by the system. There are key differences between a generic driver and a manufacturer’s driver.Searching for the right driver version for each of your hardware components can become tedious. That’s why an automated assistant can help you find and update your system with the correct drivers every time, and we strongly recommend DriverFix. Here’s how to do it:
- Download and install DriverFix.
- Launch the software.
- Wait for the detection of all your faulty drivers.
- DriverFix will now show you all the drivers that have issues, and you just need to select the ones you’d liked fixed.
- Wait for the app to download and install the newest drivers.
- Restart your PC for the changes to take effect.

DriverFix
Keep your PC components drivers working perfectly without putting your PC at risk.
Disclaimer: this program needs to be upgraded from the free version in order to perform some specific actions.
2. Initialize the disk
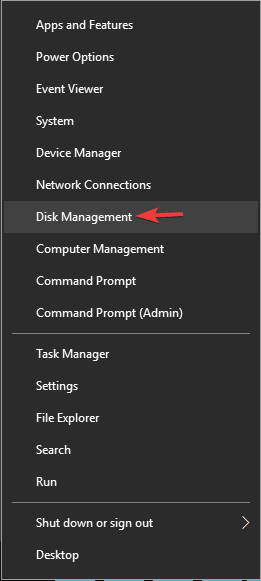
- Press Windows Key + X and choose Disk Management from the list.
- You’ll see all connected hard drives listed when the Disk Management window opens. Look at the list, and find a drive listed as Disk 1, or Disk 10 (other names are possible, as well).
- You’ll recognize this drive because it is not initialized and is listed as Unknown, and unallocated.
- Right-click on that partition, and select Initialize Disk from the right-click context menu.
- Once you initiate the process, it will ask you to choose between a Master Boot Record (MBR) or a GUID Partition Table (GPT). We advise you to choose a GPT. Click OK.
- Once you do this, you’ll get back to the main window, where your new drive will be listed as Basic and Online, but it will still have unallocated space.
- To fix that, right-click on the stripped box, and select New simple volume…
- Click Next, and assign a drive letter.
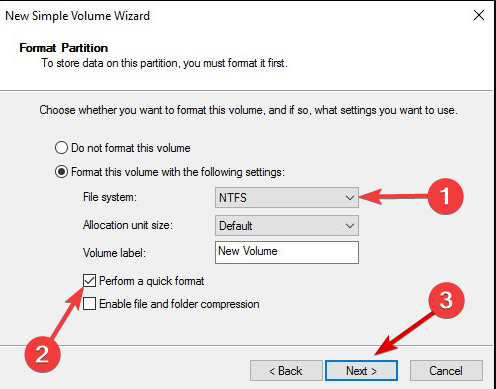
- Now you need to format your new drive. For the best results, choose the NTFS file system, and Perform a quick format, then hit Next.
- Finish the process.
There you go; This is a simple way to detect a new hard drive on Windows 10. If you’re not too fond of Disk Management, you can use any third-party disk management software.
In most cases, you need to initialize your new hard drive, after which the HDD will show up on your PC normally.
- How to enter BIOS on a Windows 7, 10 & 11 PC
- We answer: What is BIOS and how to use it?
- Fix: PC automatically goes to BIOS on startup
- Fix: Second hard drive not detected in Windows 10/11
- External hard drive not showing up on Windows 10/11 [Solved]
3. Use diskpart command to clean your drive
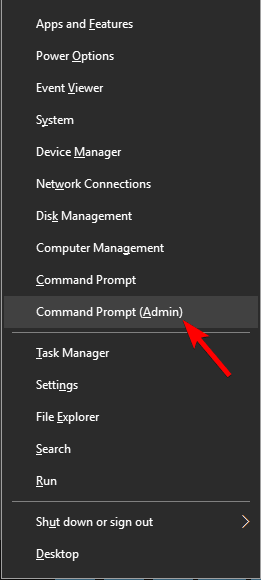
- Press Windows Key + X and choose Command Prompt (Admin) or Powershell (Admin) from the menu.
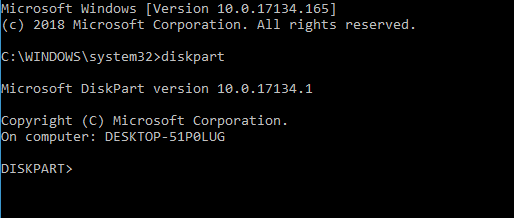
- When Command Prompt opens, enter the following command and press Enter:
diskpart - After diskpart starts, input the script below and hit Enter:
list disk- You should now see a list of all hard drives on your PC.
- You must select the correct hard drive. If you select the wrong hard disk, you’ll wipe all your files and lose them, so be extra cautious.
- Check the size of each drive to find the hard drive that is giving you trouble. Select the problematic drive by entering select disk X.
- In our example, we used select disk 0, but you’ll likely need to use a different number on your PC.
- After you select the hard drive, double-check everything and make sure that the problematic drive is selected.
- Now enter the script below and hit Enter:
clean
Some PC issues are hard to tackle, especially when it comes to corrupted repositories or missing Windows files. If you are having troubles fixing an error, your system may be partially broken.
We recommend installing Restoro, a tool that will scan your machine and identify what the fault is.
Click here to download and start repairing.
If your internal hard drive doesn’t show up, it might not be properly configured. Sometimes, you need to use a single command to completely wipe your hard drive and initialize it again.
Before we start, we have to mention that this solution will delete all files and partitions from the selected drive, so it’s best to use it with a new hard drive that doesn’t have any files.
If your hard drive has some files, it would be best to back them up to removable storage or a different drive.
After a few moments, your hard drive will be wiped, and all your files will be removed. Now go back to the Disk Management tool and initialize your hard drive.
Then, create a new partition, and assign a letter to it, as we showed you in one of our previous solutions.
Alternatively, you can initialize and format your hard drive right from disk part. Just start Command Prompt as an admin and run the following commands:
diskpart
select disk 1 (make sure to and select the disk that you just cleaned)
attributes disk clear readonly
online disk
select disk 1 (make sure to and select the disk that you just cleaned)
convert gpt
create partition primary
format quick fs=ntfs label="data" unit=64k
assign letter=“E"
4. Check if your hard drive appears in BIOS
- Keep pressing F2 or Del while your system boots to enter BIOS. Sometimes it might be a different keyboard key, so if you’re unsure, check your motherboard’s manual.
- Once you enter BIOS, look for your hard drive.
Many users reported that their internal hard drive won’t appear in Windows, and various issues can cause this. However, you can always check if your hard drive shows in BIOS.
If your hard drive appears in BIOS, it’s connected and working correctly, so Windows cause the issue.
On the other hand, if the hard drive doesn’t show in BIOS, it’s likely not properly connected.
If you’re finding it hard to access your BIOS, take a closer look at our dedicated guide that will teach you how to do it quickly.
That’s about it. If you did not know how to detect a new hard drive in Windows 10, this should have helped. In most cases, you need to initialize it, and we sincerely hope this action will be the only one required.
If you have any comments, questions, or suggestions, let us know in the comments section below.
Newsletter
Quick Fix for Second Hard Drive Not Detected In Windows 10:
- 1. Go to Search, type device manager, and press Enter.
- 2. Expand Disk drives, find the second disk drive, right-click on it, and go to Update driver software.
- 3. Follow further updates instructions and your hard disk drive will be updated.
- 4. You can also go to Settings > Update and check if overall updates offer something for your hard drive.
To fix the Windows 10 doesn’t recognize or detecting the second hard drive problem, click the four quick accesses below to start.
| Workable Solutions | Step-by-step Troubleshooting |
|---|---|
| Phrase 1. Check the hard drive in BIOS | Restart PC and press F2 to enter BIOS. Enter Boot Menu to check if the second hard drive is detected…Full steps |
| Phrase 2. Check the hard drive’s state | Click open EaseUS DriverHandy and click the blue button to scan your drivers…Full steps |
| Phrase 3. Scan and restore saved data | If you’ve saved important data in the second hard drive, you need to extract saved data in advance…Full steps |
| Phrase 4. Check the hard drive in DM | Check the second hard drive in Disk Management on your computer and make it detectable. Different state…Full steps |
Note that those fixes also work to fix hard drive not recognized issue in Windows 8.1/8/7, and even older Windows OS.
My Second Hard Drive Doesn’t Show up in Windows 10
«Hi guys, does anyone of you know how to make the second hard drive to show up in Windows? I added a second hard drive to my computer about a month ago, and my computer became much faster. Everything went so well until this morning.
I started my computer, but the second hard drive didn’t show up in File Explorer. Then I checked the Disk Management. Still, nothing was there. I saved a lot of important data on the second hard drive. How can I make it to show up? If you happen to have a solution, please let me know.»
To resolve this issue, you’ll need to diagnose the exact reason that causes your second hard drive undetectable. Follow this page, you’ll find reliable methods and tools to effectively fix a hard drive or second hard drive that’s not showing up in Windows error on your own.
Diagnose and Fix Unrecognized Second Hard Drive in Windows 10
This part is intended to help you diagnose the causes of undetectable second hard drive and offer you solutions to make it show up again.
Quick Fix: Reconnect and Re-install the 2nd Hard Drive
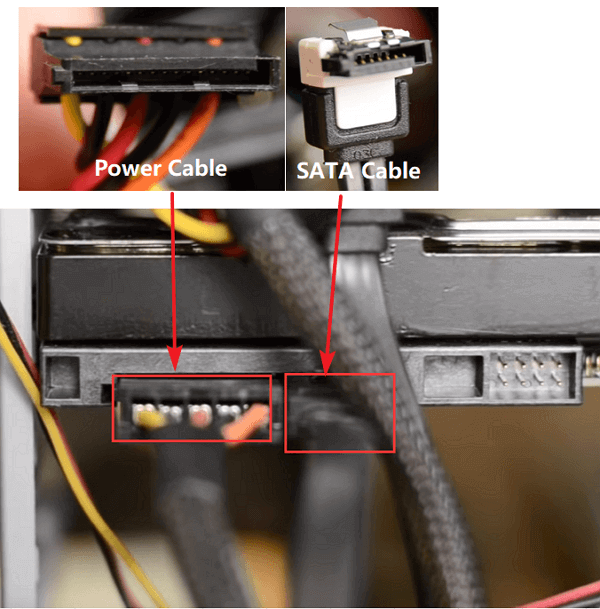
When your hard drive is disappeared from File Explorer or Disk Management, check on the hard drive power cable and SATA cable first.
Step 1: Take out the hard drive from your computer with a screwdriver.
Step 2: Check if the hard drive connection is loosened.
If yes, unplug and re-plug the hard drive from the computer case. If the cables are damaged, change the SATA/ATA cable and the power wire, reconnect the drive to the PC.
Step 3: Put the computer case back on and restart the PC, check if your hard drive shows up.
If Windows detects the second drive, you can stop here. You may also interested in How to Partition a Hard Drive.
But if the disk still not shows up in Windows File Explorer nor Disk Management, continue with the following phrases.
Phase 1. Check and Make Second Hard Drive Detectable in BIOS
Applies to: Fix Windows not recognizing hard drive in BIOS error.
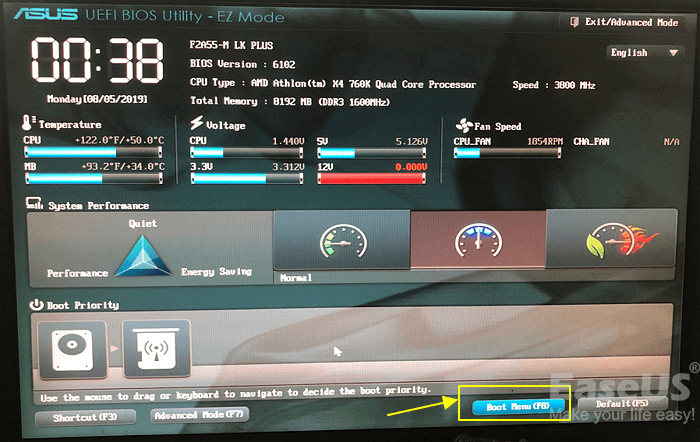
Step 1: Restart PC and press F2 to enter BIOS.
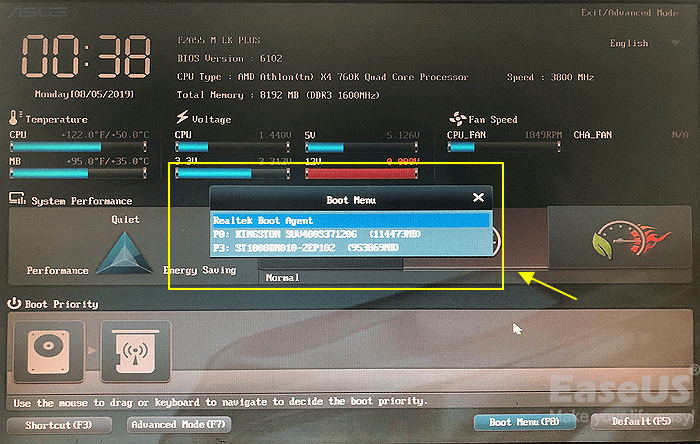
Step 2: Enter Boot Menu to check if the second hard drive is detected.
Step 3: Try the below tips if the second hard drive doesn’t show up:
First, enter the Setup section, under System Setup, check the state of the second hard drive.
Next, if the System Setup option is Off, turn it ON. Save the changes.
Remember to restart the PC each time to check if the second disk shows in BIOS. If the hard drive still doesn’t show up, it’s probably having a physical issue. The best way is to take to a local after-sales service center of the hard drive manufacturer or a device repair center to ask for device repair assistance.
If the second hard drive shows up in BIOS as the following image, move on to the next guide check the state of the problematic hard drive in Disk Management.
Phase 2. Check the State of Second Hard Drive and Update Driver in Device Manager
Works to: Fix Windows 10 doesn’t recognize the second hard drive issue due to outdated drive driver.
There is a utility for you to update your driver, EaseUS DriverHandy. This utility can automatically help you to update your drives and it is easy to use. Now, let’s see how to use it to update your drivers.
Download it and follow the guide below to try it.
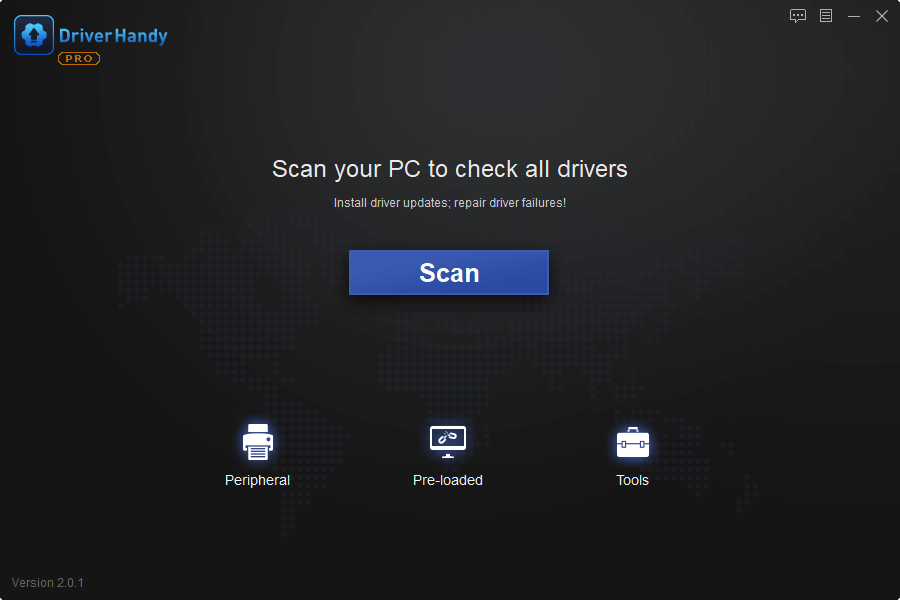
Step 1. Click open EaseUS DriverHandy and click the blue button to scan your drivers.
Step 2. Locate the target driver and choose to update.
Phase 3. Scan and Restore Saved Data from the Second Hard Drive
Mainly for: Data protection on a problematic hard drive that is not correctly recognized by Windows.
If your second hard drive is a new device, you can skip this phase and move to Phase 4 to make it detectable again.
However, if you saved important data in the second hard drive, you’re highly recommended to extract saved data in advance. Professional EaseUS Data Recovery Wizard like EaseUS Data Recovery Wizard will fully scan the second hard drive and find all saved data for you.
You can follow the guidelines below to restore all saved data from the hard drive with ease now:
Step 1. Launch EaseUS Data Recovery Wizard in Windows 11/10/8/7 and choose the place where you lost data. Then, click «Scan».
Step 2. After the scan, use the file format filter on the left or upper right corner to find the files you need. Then, you can click the «Preview» button or double-click a file to preview its content.
Step 3. Click the checkbox next to the file and click «Recover» to get back the lost data to a secure place.
Remember to save the data to another secure device, an external hard drive is preferable. Now, you can move to the last phrase and get rid of this issue from your device, making the hard drive detectable and working again.
Phase 4. Check the State of Second Hard Drive in Disk Management and Make It Detectable
Applies to: Fix Windows 10 not detecting second hard drive due to logical errors, such as RAW, unallocated, no media, etc.
If your disk shows up properly in BIOS and Device Manager, but Windows cannot detect or recognize it properly, it’s highly possible with the following four errors:
- RAW error
- Device not initialized or shows unallocated
- The second hard drive shows No Media
Open the Windows Disk Management and check the display state of the second hard drive. Then you can follow the right fix below to make the second hard drive show up.
# 1. Hard Drive Shows RAW — Format RAW Drive to NTFS
If the hard drive shows as Online, but the partition display as RAW, you can format the partition to NTFS.
Step 1: Right-click on This PC/My Computer, select «Manage».
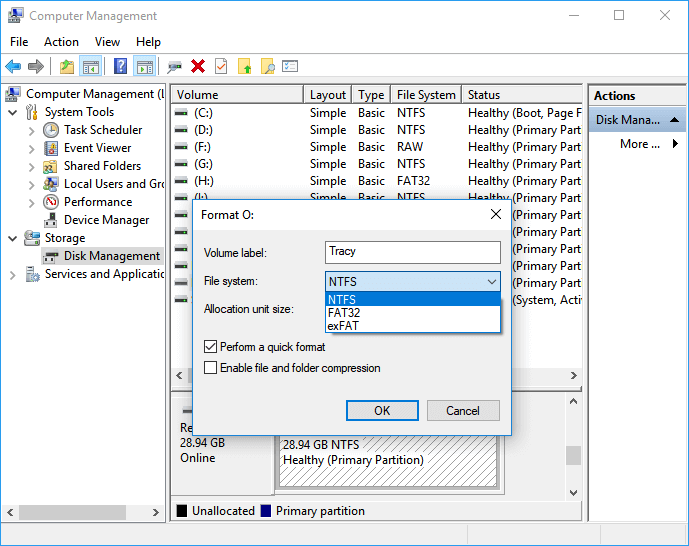
Step 2: Click «Disk Management», locate and right-click the RAW partition of the not recognizing hard drive, then choose «Format».
Step 3: Select NTFS as the file system for the partition and click «OK» to confirm.
# 2. Hard Drive Shows Not Initialized + Unallocated
If the hard drive shows as a not initialized or unknown drive, don’t worry.
You can directly apply Windows partition manager software — EaseUS Partition Master with its Initialize to MBR or Initialize to GPT feature to make the hard drive show up now:
Step 1: Launch EaseUS Partition Master on your PC.
Step 2: Right-click the target hard drive and select «Initialize to MBR» or «Initialize to GPT» accordingly.
Step 1. Open EaseUS Partition Master and got to Partition Manager.
Step 2. Right-click the target disk — HDD or SSD and select «Initialize to MBR» or «Initialize to GPT». Click «Execute Task» and «Apply» to save the changes.
0:00-0:18 Initialize to MBR; 0:19-0:44 Initialize to GPT;
Repeat the partition creation process (from Step 4 to Step 6) if you plan to create more than one partition on the second hard drive.
After following the whole process, now you can make use of the second hard drive in Windows 10 to save data again.
# 3. Hard Drive Displays as NO Media — Update Driver, Take It to Device Repair Center
If the second hard drive shows as «No Media» in Disk Management, you’ll have two choices:
- 1st. Go back to Phrase 2 and update the device driver.
- 2nd. Take the hard drive out of your computer, and send it to a local device repair center for repair.
Wrapping UP
On this page, we presented the complete process of how to check and fix a not detecting hard drive on Windows 10. These methods can be applied to fix Windows not detecting or not recognizing hard drive or second hard drive on all Windows OS.
Generally, your hard drive is not detected in Windows 10 is probably because of a driver issue, connection issue, or faulty BIOS settings. Connection issues can be from a faulty USB port a cable, it might be outdated. And incorrect BIOS settings mean the new hard drive is disabled in BIOS.
To make the hard drive or the second hard drive detectable. Here are some tips for you to follow:
- 1. Make sure the hard drive is correctly connected to PC via its power cable and SATA cable.
- 2. Make sure the second hard drive is Enabled or turned on in BIOS.
- 3. Regularly update the hard drive driver, especially when you install a new hard drive on Windows PC.
- 4. Partition or create partitions on the hard drive with a recognizable or supported file system — NTFS.
When connecting a mechanical hard drive (HDD), solid-state drive (SSD), or an external USB hard drive to a computer, Windows 10 can automatically detect and set it up. However, a newly added drive may sometimes not appear in File Explorer, which could be for a number of reasons.
For example, it could mean a physical problem with the data or power connection. If the hard drive does not appear in File Explorer, this could indicate that the device is disabled, offline, or does not have a drive letter. You may try to connect a drive previously installed on another computer, the partition on the USB drive may be corrupted, or you could be dealing with a raw drive that was never configured. Therefore it was never initialized or formatted.
Regardless of the reason, Windows 10 includes multiple ways to fix the issue and regain access to the drive using Device Manager, Disk Management, and command-line tools like diskpart.
This guide will walk you through several ways to troubleshoot a hard drive that refuses to appear in File Explorer.
How to fix missing hard drive in File Explorer using physical troubleshooting
On Windows 10, if a traditional mechanical hard drive (HDD) or solid-state drive (SSD) does not appear in File Explorer, there are many reasons to why this is happening, but before checking and modifying the system settings, try these troubleshooting steps:
- Confirm the hard drive is correctly connected to the computer and receiving power.
- If it is an external USB hard drive, disconnect and try a different USB port. If you use a USB hub, connect the drive directly to the computer.
- If it is an internal hard drive, ensure the data and power cables are correctly connected to the storage device, motherboard, and power supply. When checking the internal components, power off and unplug the computer before beginning the process.
- Connect the drive to another computer to determine whether the problem is not the device.
- Access the computer’s Basic Input Output System (BIOS) or Unified Extensible Firmware Interface (UEFI), and make sure the firmware detects the storage. Since the motherboard firmware is a different per manufacturer and even per-device model, check the manufacturer support website for more specific instructions.
Once you determine that it is not a physical problem, you can use the following recommendations to fix the most common problem preventing File Explorer from showing a hard drive.
How to fix missing hard drive in File Explorer using Device Manager
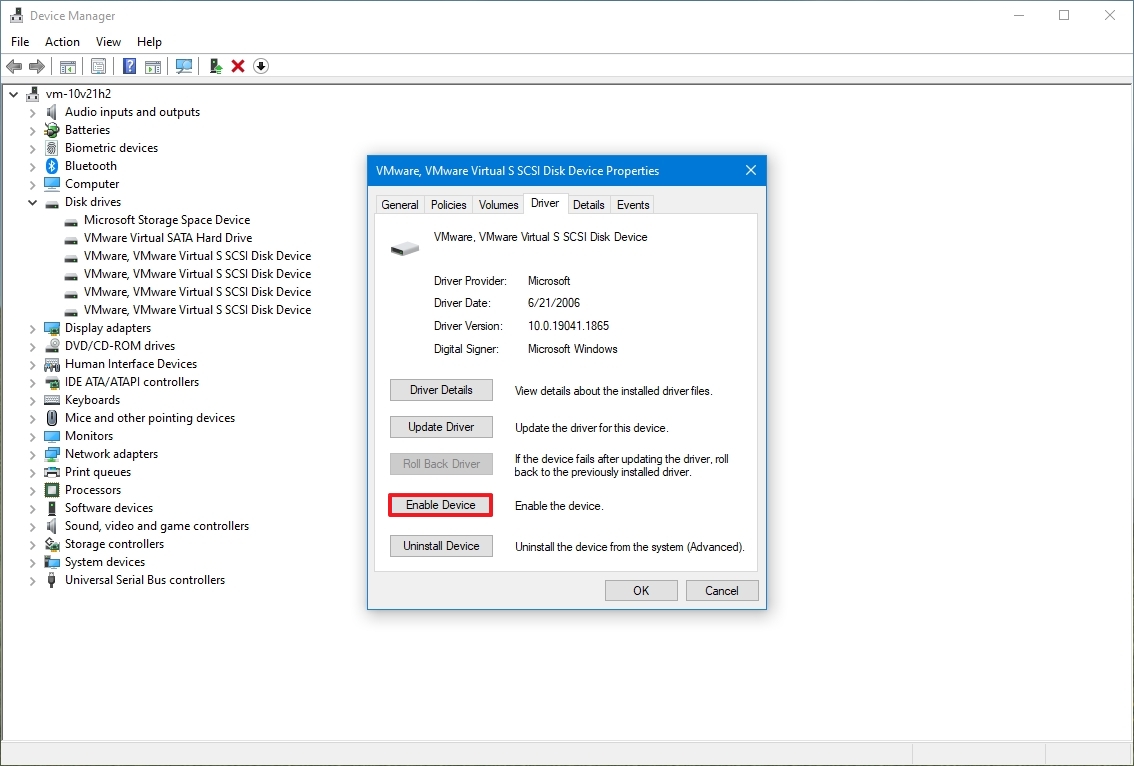
In the rare case that the storage does not appear in Disk Management and File Explorer, it could mean that the hard drive seems to be disabled. If this is the case, you can enable it quickly using Device Manager.
To enable a hard drive using Device Manager on Windows 10, use these steps:
- Open Start.
- Search for Device Manager and click the top result to open the app.
- Expand the Disk drives branch.
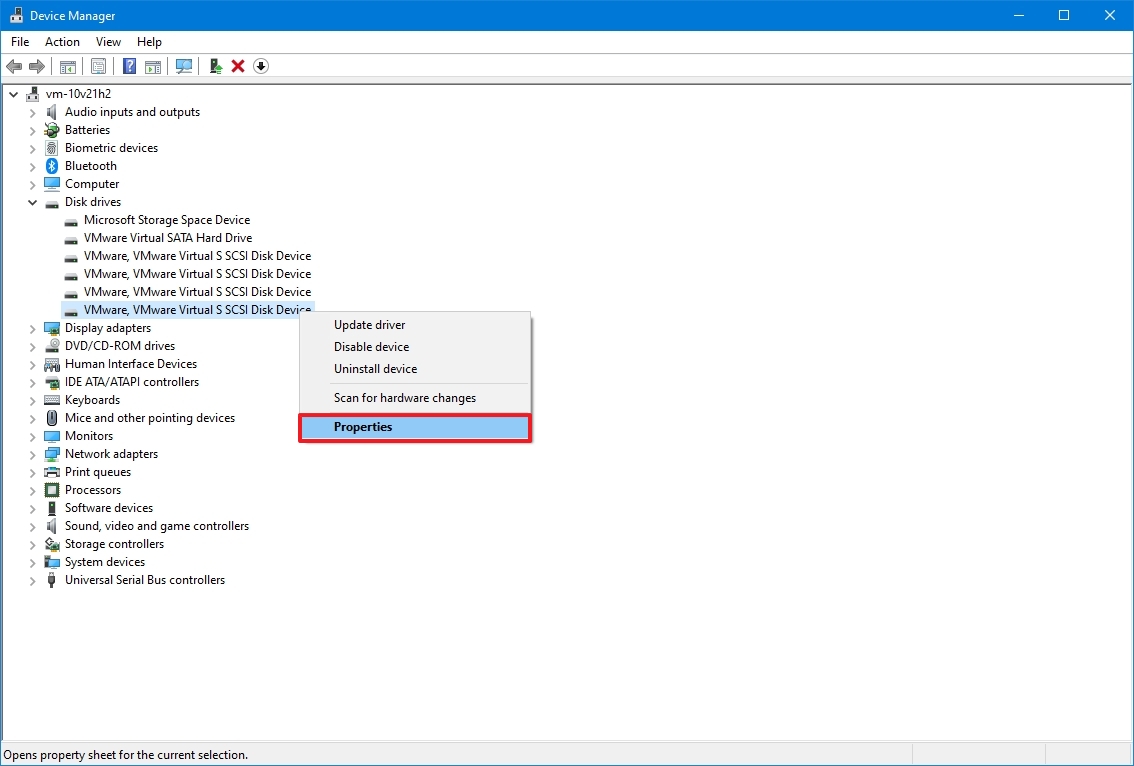
- Right-click the hard drive in question and select the Properties option.
- Click the Driver tab.
- Click the Enable Device button.
- Click the OK button.
After you complete the steps, the hard drive and data should be accessible on the computer.
How to fix missing hard drive in File Explorer using Disk Management
There are a few requirements for a hard drive to be available in File Explorer. The device must be online and initialized. It needs to have a partition properly configured. And it has to have a drive letter assigned, or it should be mounted as a folder.
If you are dealing with any of these problems, the steps below will help you to troubleshoot and fix the most common issues with Disk Management.
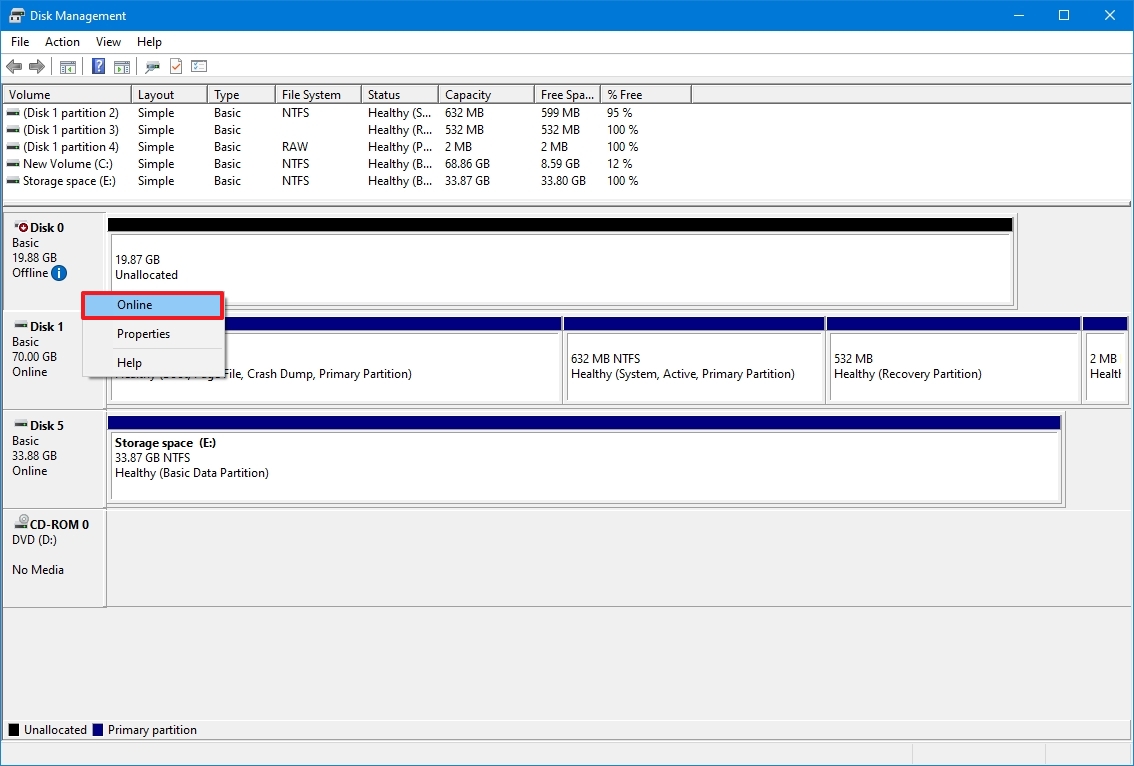
Set drive online
To bring a hard drive online, use these steps:
- Open Start.
- Search for Disk Management and click the top result to open the app.
- Right-click the disk with the «Offline label» and select the Online option.
After you complete the steps, if the hard drive was offline and previously configured, it should appear in File Explorer. If the storage was offline but never configured, continue with the steps below.
Initialize drive
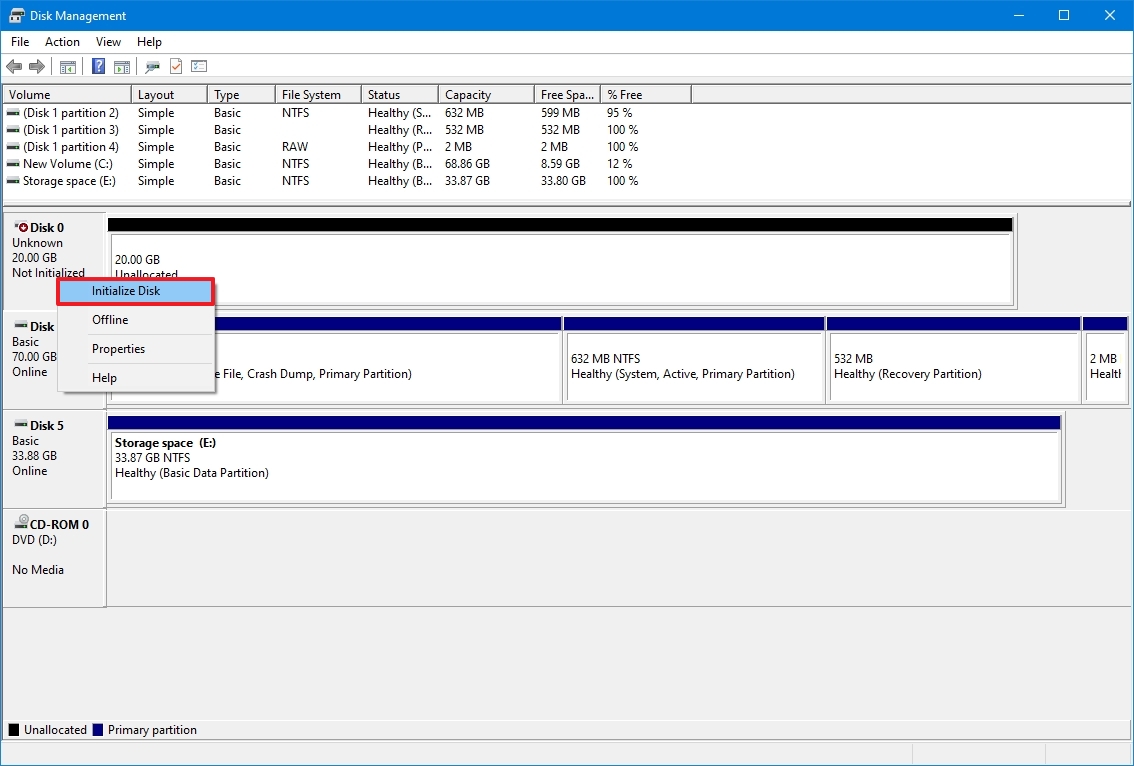
To initialize a hard drive on Windows 10, use these steps:
- Open Start.
- Search for Disk Management and click the top result to open the app.
- Right-click the disk with the «Unknown» label and select the Initialize Disk option.
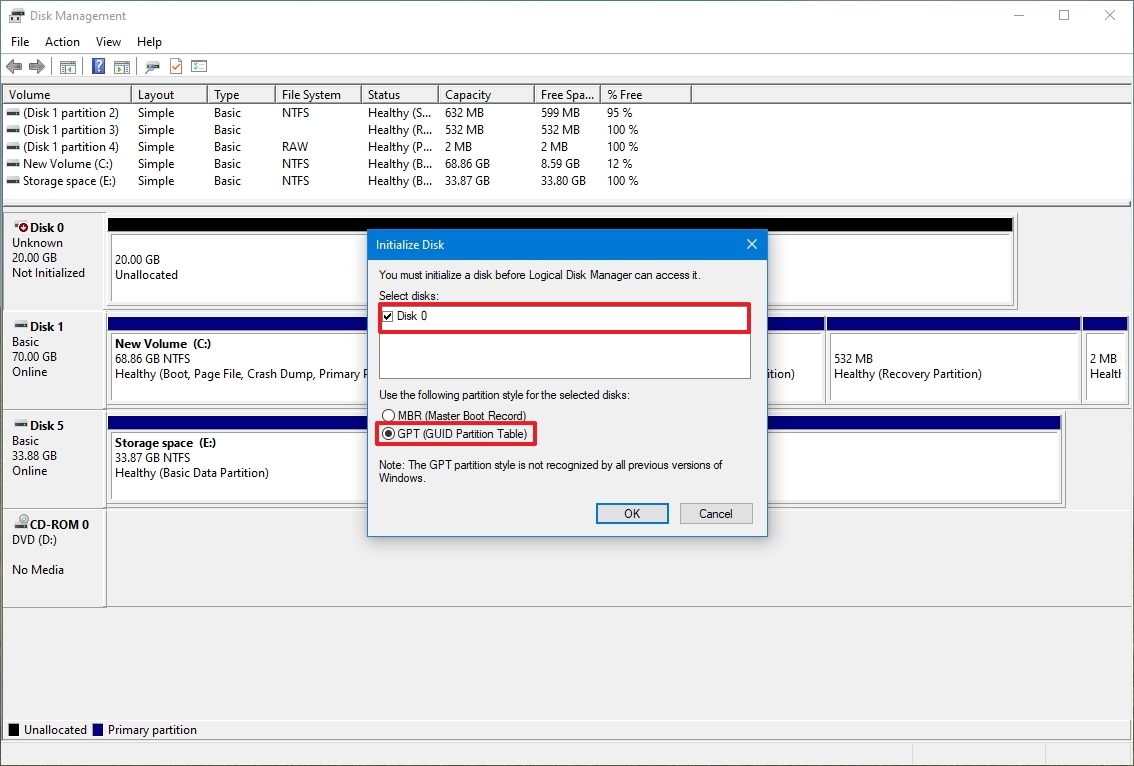
- Under the «Select disks» section, check the drive you want to initialize.
- Select the «GPT (GUID Partition Table)» option.
- Click the OK button.
Once you complete the steps, this action will erase everything on the drive and prepare it to be formatted if the storage was never initialized.
Import foreign drive
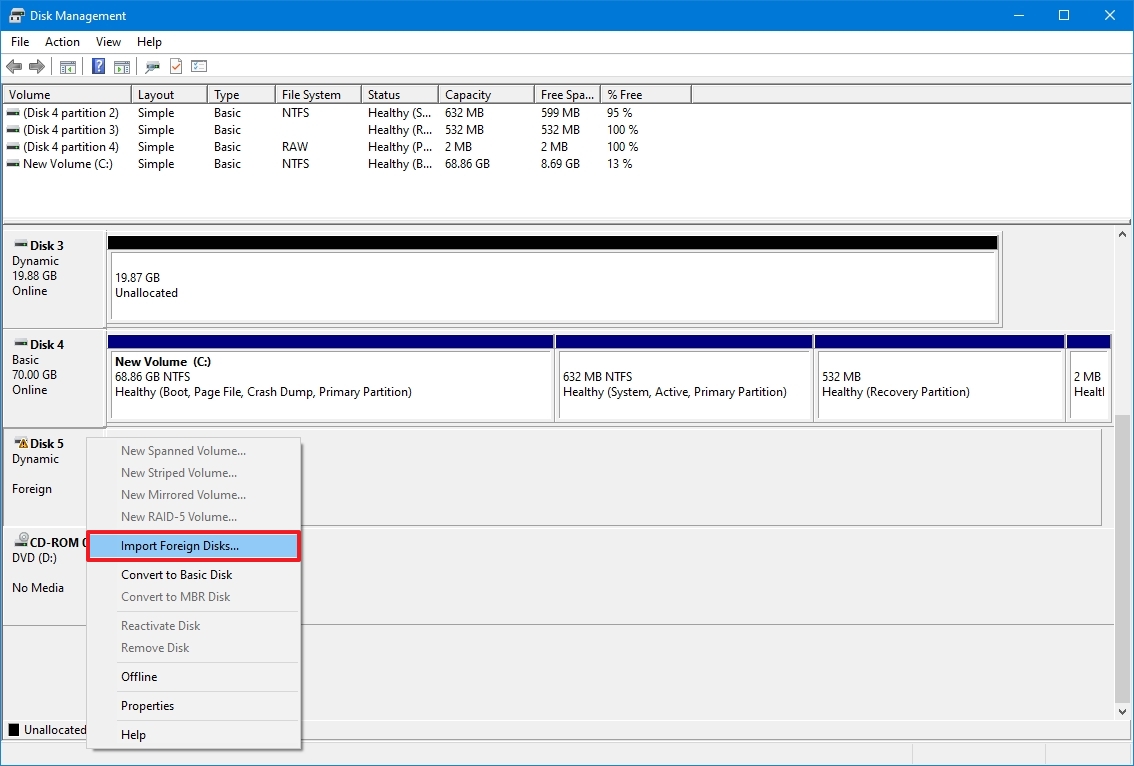
If the drive was configured as a dynamic disk on another computer, it will appear as a foreign drive on a different device, and you will need to import it using the Disk Management tool. This process should grant you access to the data without destroying it, but creating a backup of the data is still recommended before proceeding.
To import a hard drive with a dynamic configuration to make it accessible through File Explorer, use these steps:
- Open Start.
- Search for Disk Management and click the top result to open the app.
- Right-click the disk with the «Dynamic» label and select the «Import Foreign Disks» option.
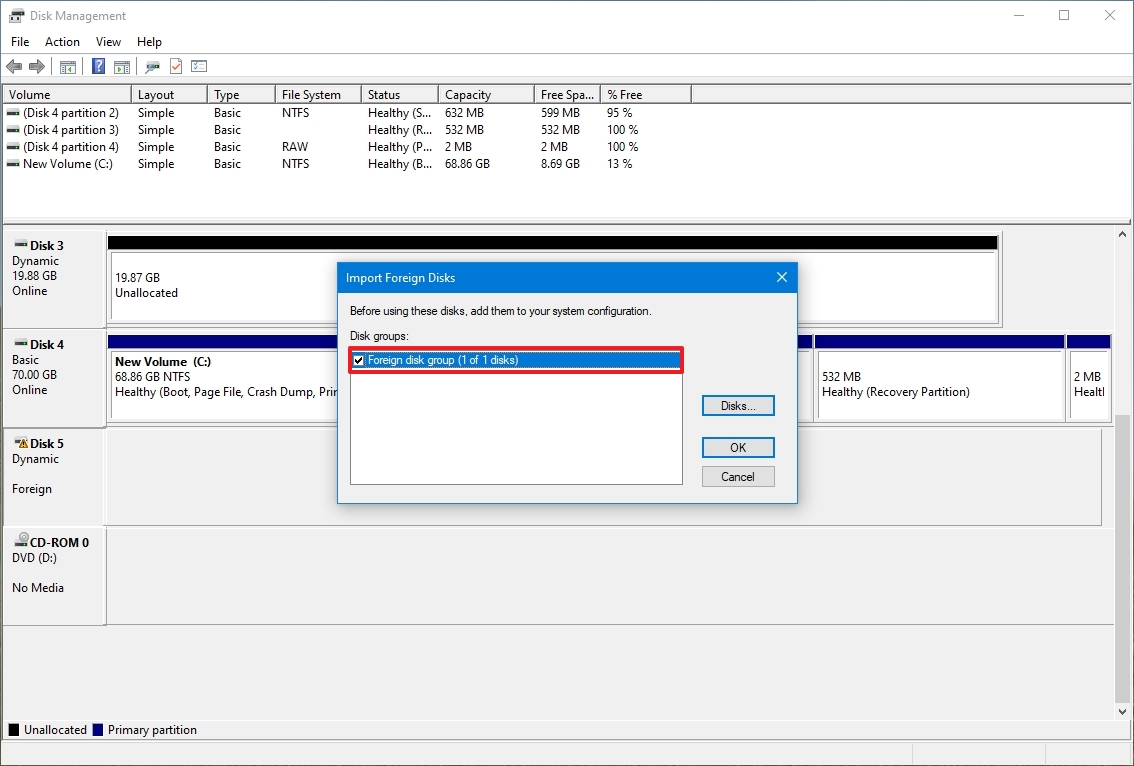
- Under the «Disk groups» section, select the «Foreign disk group (1 of 1 disks)» item.
- Click the OK button.
- Click the OK button again.
Once you complete the steps, the hard drive will be imported, and the data will be accessible from File Explorer or any other application.
Configure drive letter
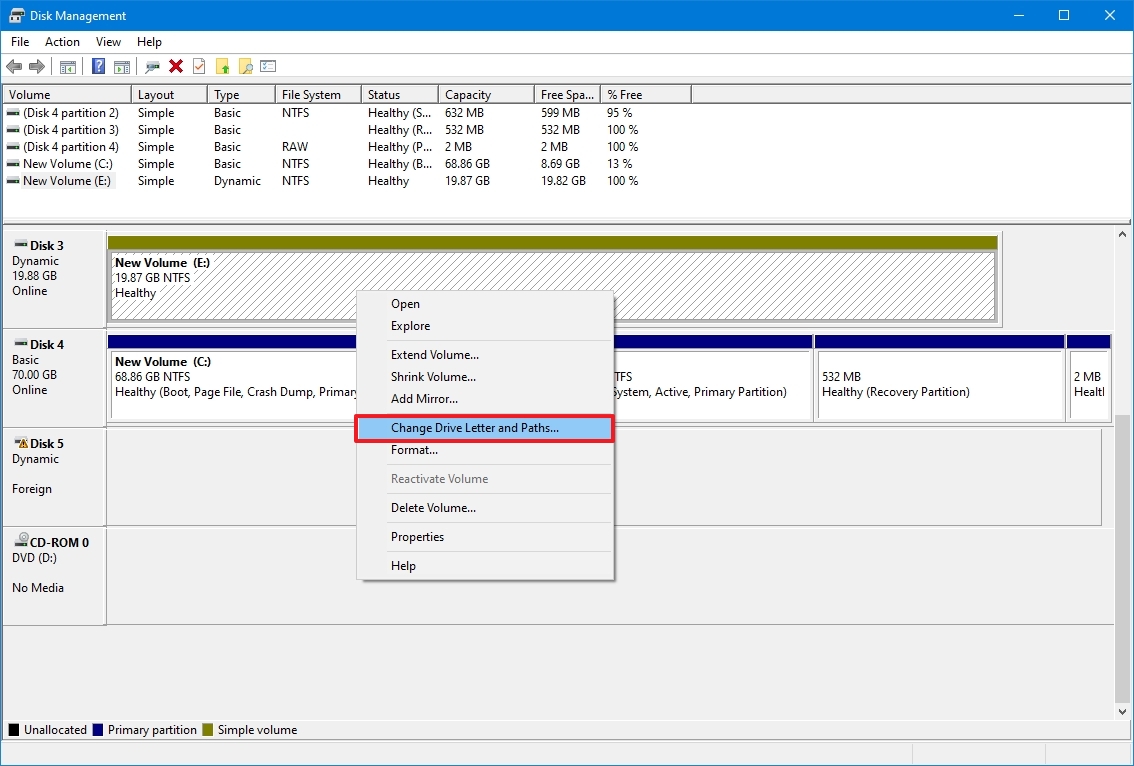
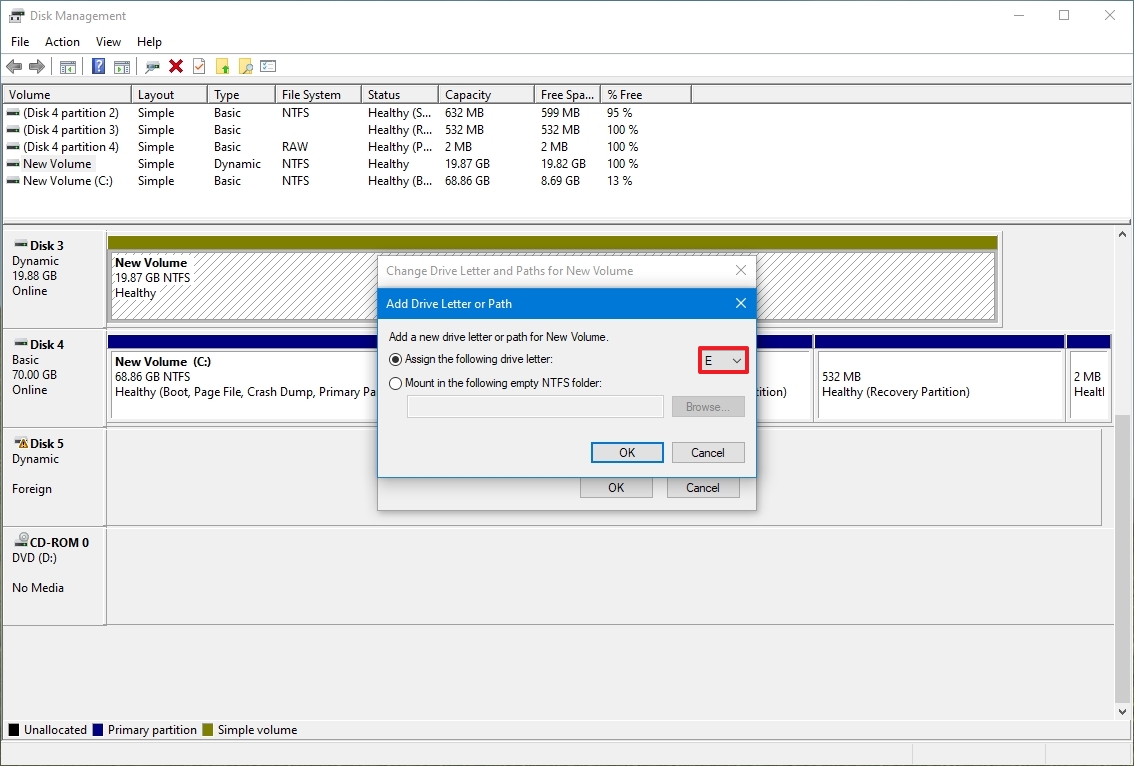
On Windows 10, when the hard drive is online and initialized and does not appear in the system, usually, it’s for one or two reasons. The drive does not have a drive letter. Or if it was connected to another computer, the new system is now trying to assign the same drive letter already assigned to another drive on the machine.
To assign a drive letter to the storage on Windows 10, use these steps:
- Open Start.
- Search for Disk Management and click the top result to open the app.
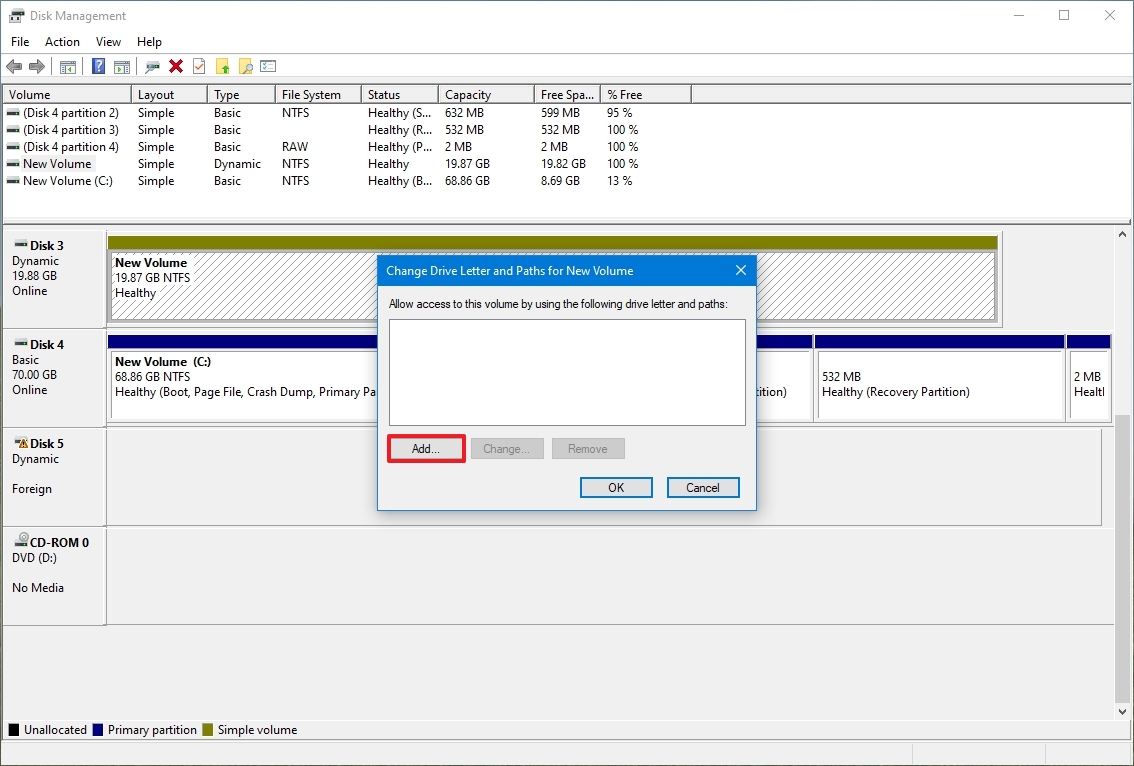
- Right-click the partition on the hard drive without a drive letter and select the «Change Drive Letter and Paths» option.
- Click the Add button.
- Select the «Assign the following driver letter» option.
- Use the drop-down menu option and select a drive letter – for example, Z, X, or Y.
- Click the OK button.
After you complete the steps, the hard drive data should now be accessible using File Explorer.
Configure new partition
If the drive is online and initialized, the drive may not have a formatted partition. In this case, you can use the Disk Management wizard to configure and assign a letter to the partition.
To set up and format a hard drive to allow it to appear in File Explorer, use these steps:
- Open Start.
- Search for Disk Management and click the top result to open the app.
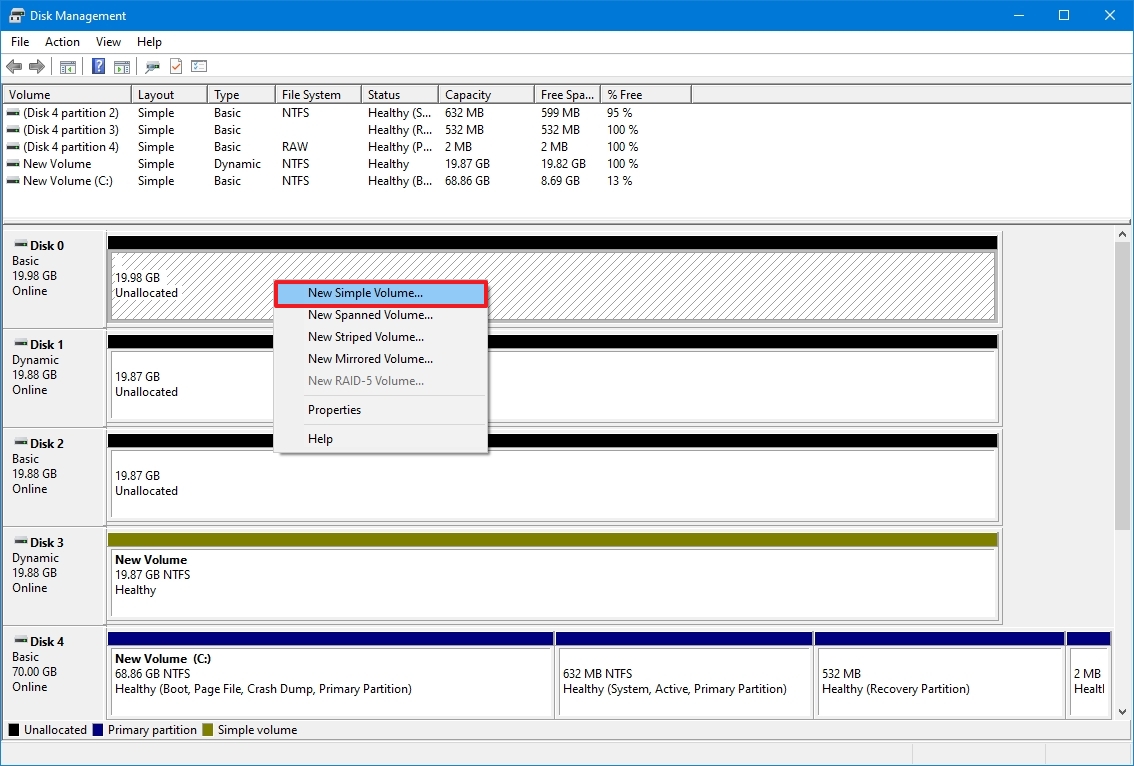
- Right-click the partition on the hard drive without a drive letter and select the «New Simple Volume» option.
- Quick tip: Usually, the «basic» drive will have a blue stripe indicating the beginning and end of the partition. Also, select the correct storage, as the following steps will erase everything on the hard drive you choose.
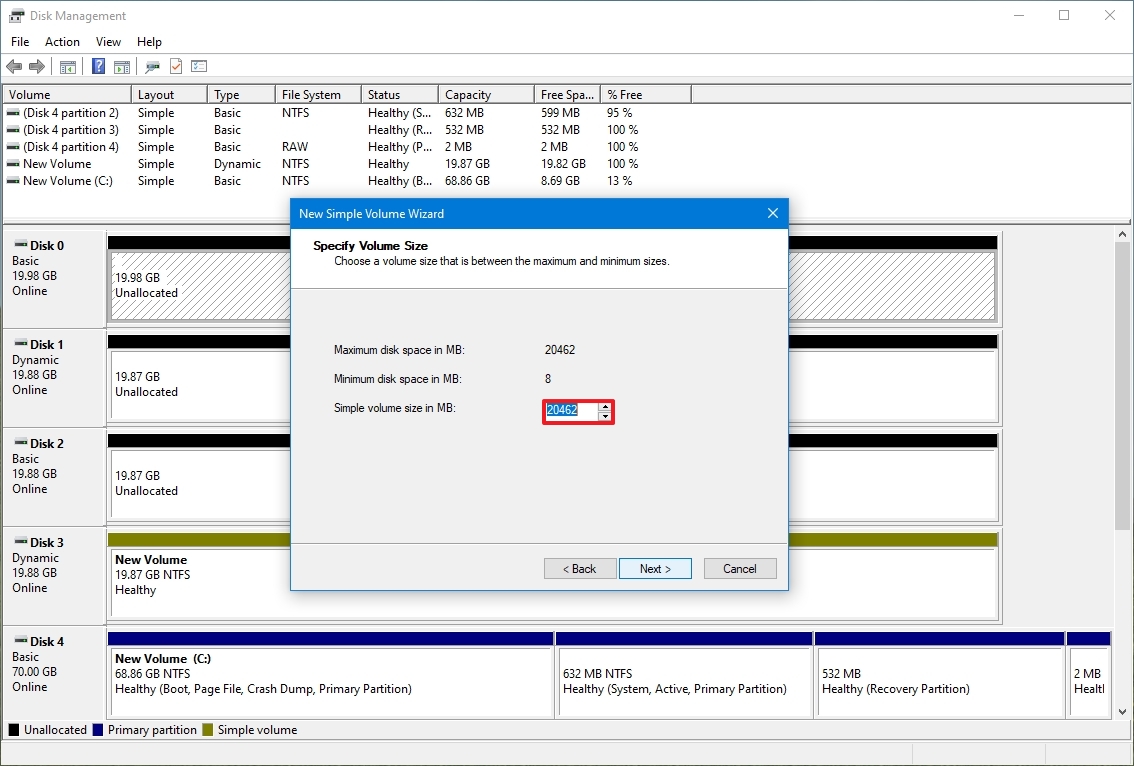
- Click the Next button.
- Click the Next button to use all the available space for the partition. Otherwise, specify the size in the «Simple volume size in MB» option.
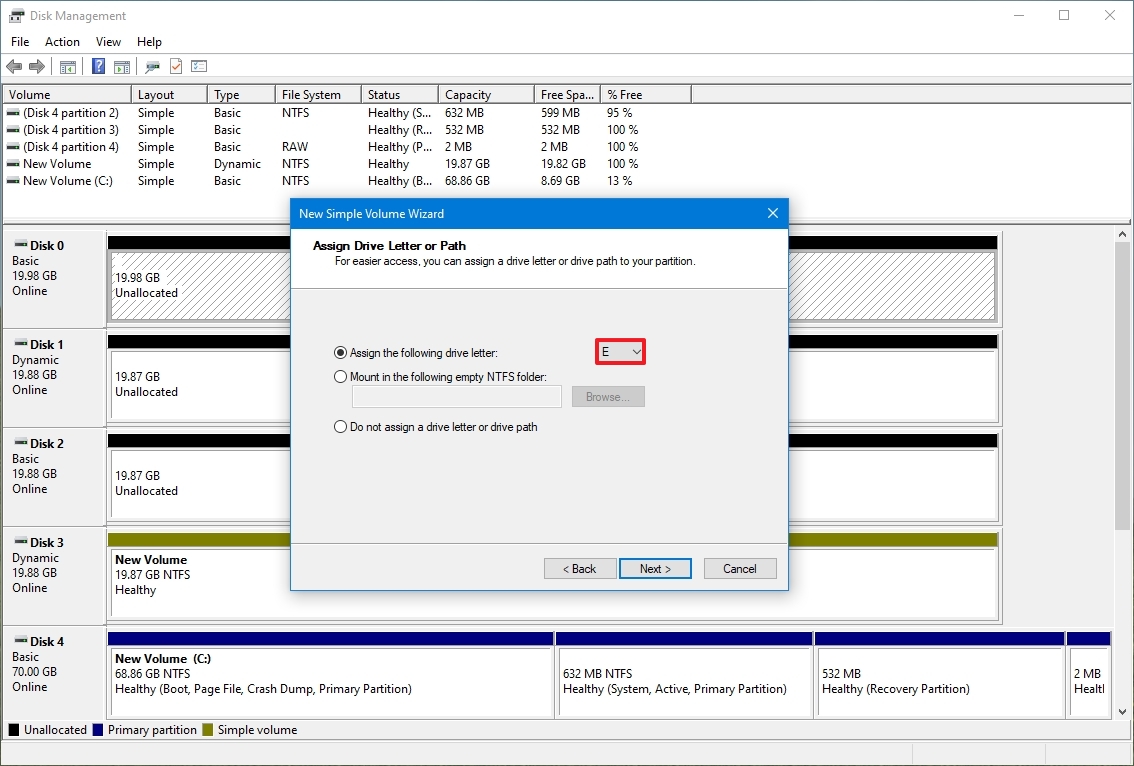
- Select the «Assign the following driver letter» option.
- Use the drop-down menu option and select a drive letter – for example, Z, X, or Y.
- Click the Next button.
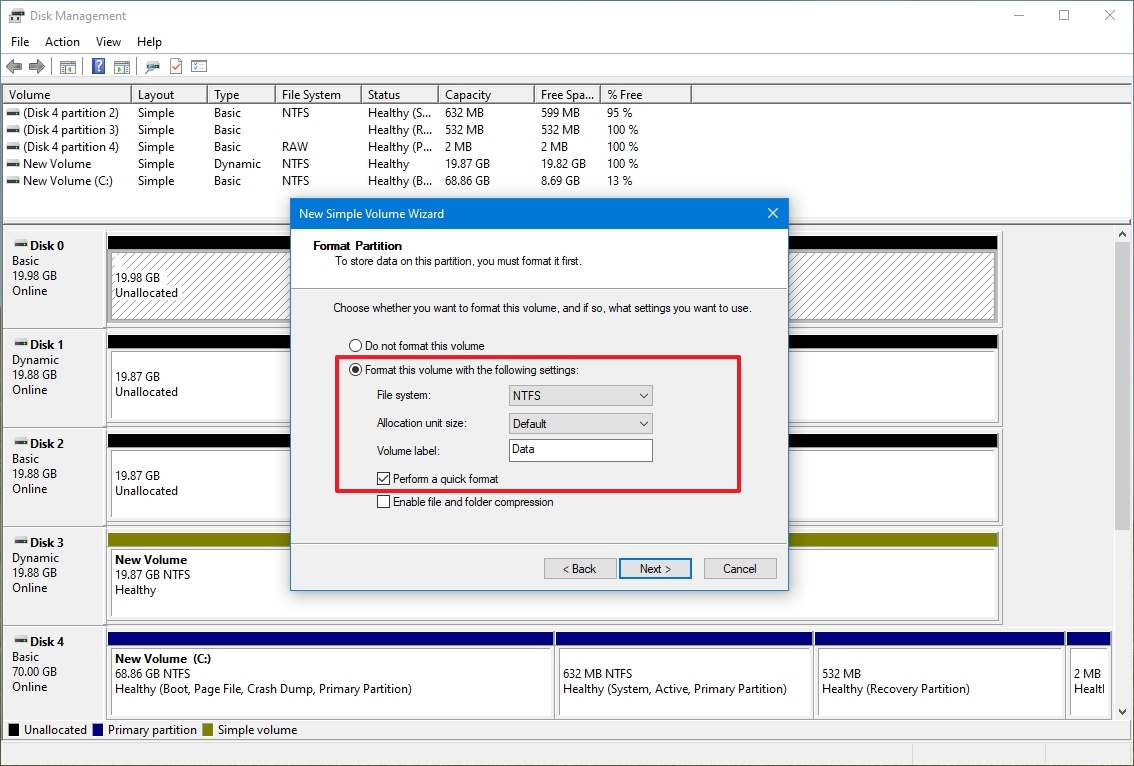
- Select the «Format this volume with the following settings» option.
- Use the «File system» drop-down menu and select the NTFS option.
- Use the «Allocation unit» size drop-down menu and select the Default option.
- In the «Volume label» field, confirm a descriptive name for the drive – for example, data.
- Check the «Perform a quick format» option.
- Click the Next button.
- Click the Finish button.
Once you complete the steps, the hard drive will be listed on the «This PC» page of File Explorer, and you can start saving files in it.
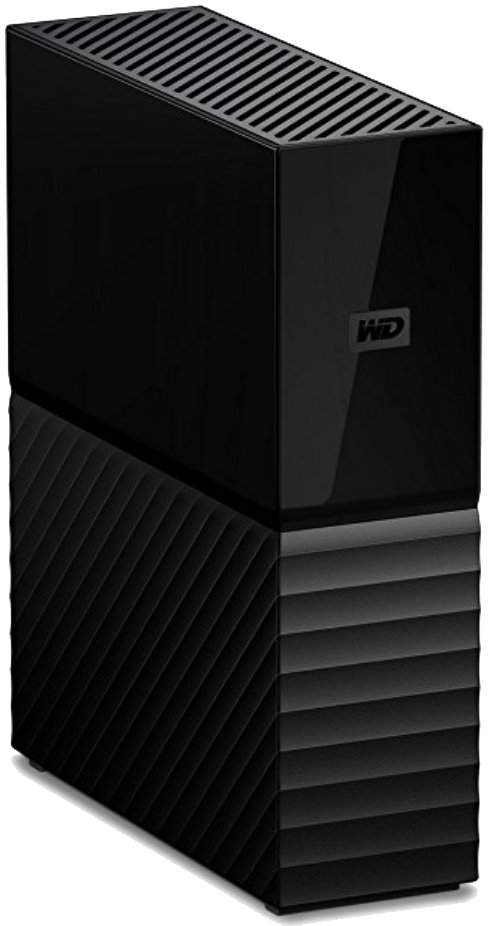
If you happen to be dealing with a damaged hard drive, we recommend the Western Digital My Book because of its reliability and affordability. Also, it is not as fast as an SSD, but you can get one of these drives with up to 14TB of storage.
(opens in new tab)
Bulk storage
The WD My Book might not be particularly fast or compact design, but it does deliver massive and reliable storage at a great price.
How to fix missing hard drive in File Explorer updating driver
If the problem is related to the storage driver, you can reinstall or update the driver to the latest version to resolve the issue.
To reinstall the hard drive driver, use these steps:
- Open Start.
- Search for Device Manager and click the top result to open the app.
- Expand the Disk drives branch.
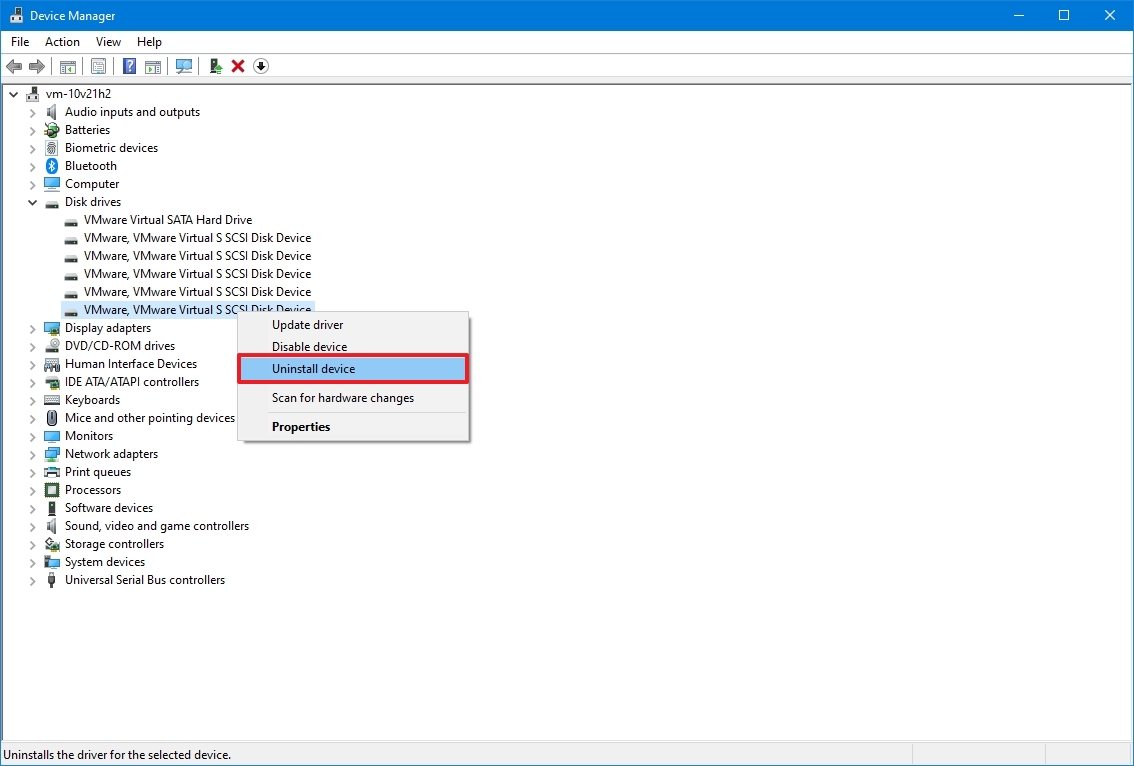
- Right-click the hard drive in question and select the Uninstall device option.
- Click the Uninstall button.
- Restart the computer
Once you complete the steps, Windows 10 should reinstall the driver automatically, and the hard drive should now appear in File Explorer.
Update hard drive driver
If the problem persists, it is recommended to download the latest available driver from the drive manufacturer support website and use their instructions to update the driver.
If the support website does not offer any instructions, unpack the driver zip folder and then use these steps:
- Open Start.
- Search for Device Manager and click the top result to open the app.
- Expand the Disk drives branch.
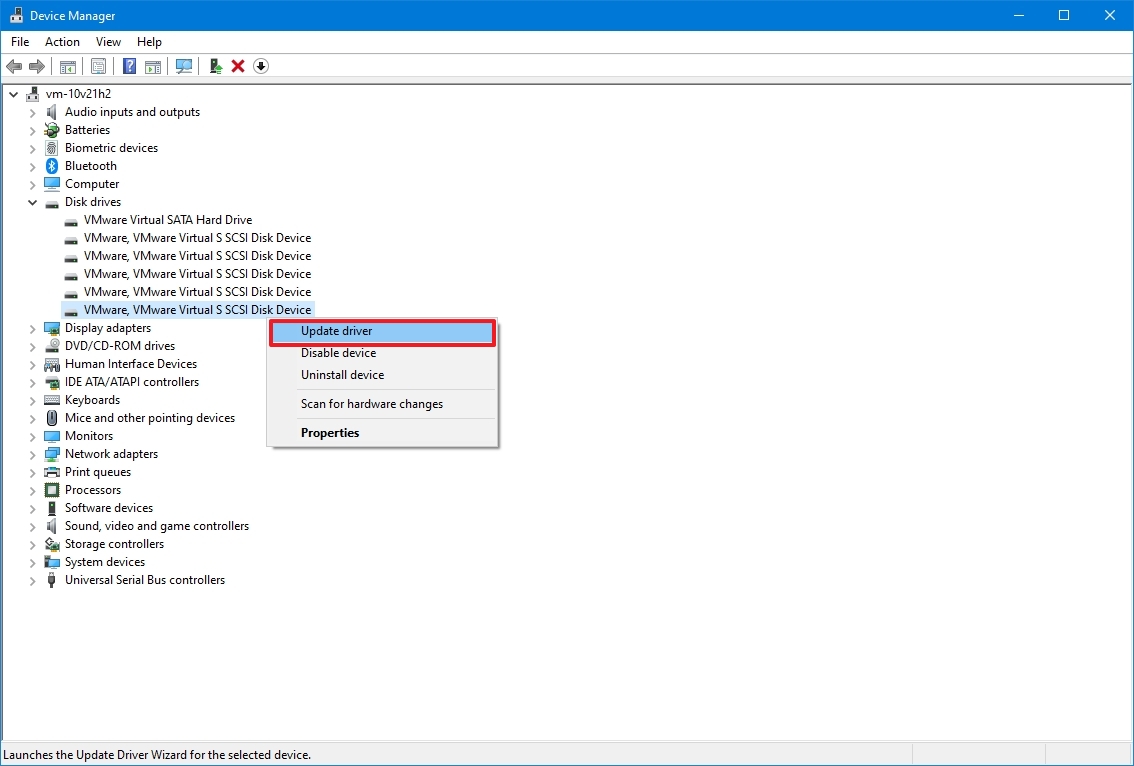
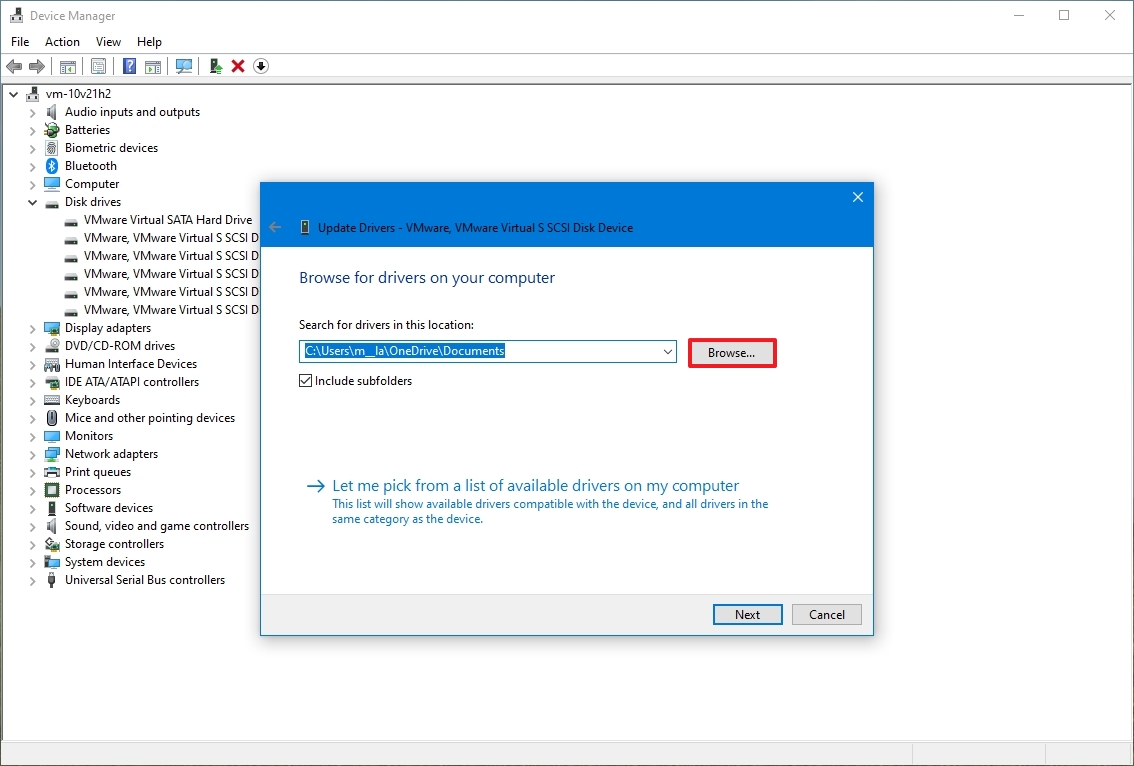
- Right-click the hard drive in question and select the Update driver option.
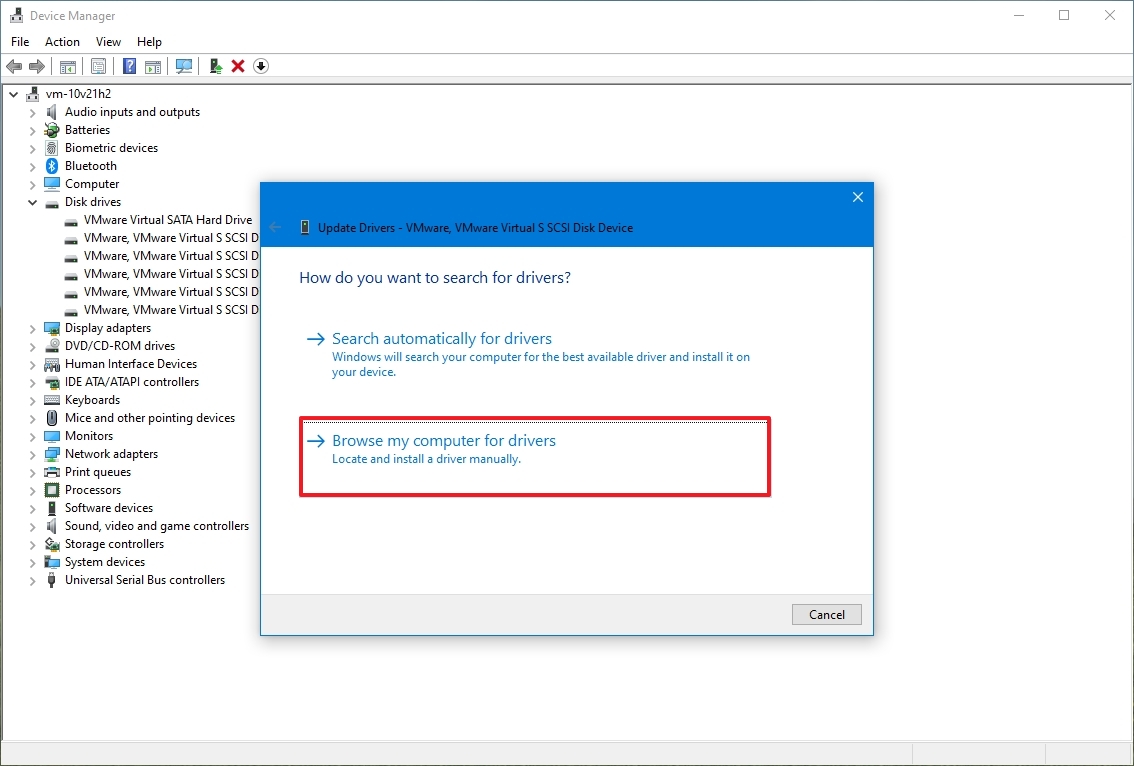
- Select the «Browse my computer for drivers» option.
- Click the Browse button.
- Select the folder with the extracted driver files.
- Click the OK button.
- Check the Include subfolders option.
- Click the Next button.
- Click the Close button.
After you complete the steps, the driver will install, and the hard drive should be accessible on Windows 10.
How to fix missing hard drive in File Explorer using DiskPart
Alternatively, if the hard drive appears in Disk Management, but the storage is not usable, meaning that you cannot access the data, and you cannot use the format option or assign a drive letter, then it could be a logical problem. If this is the case, you can use DiskPart to clean the drive and start from scratch. Here’s how:
- Open Start.
- Search for Command Prompt, right-click the top result, and select the Run as administrator option.
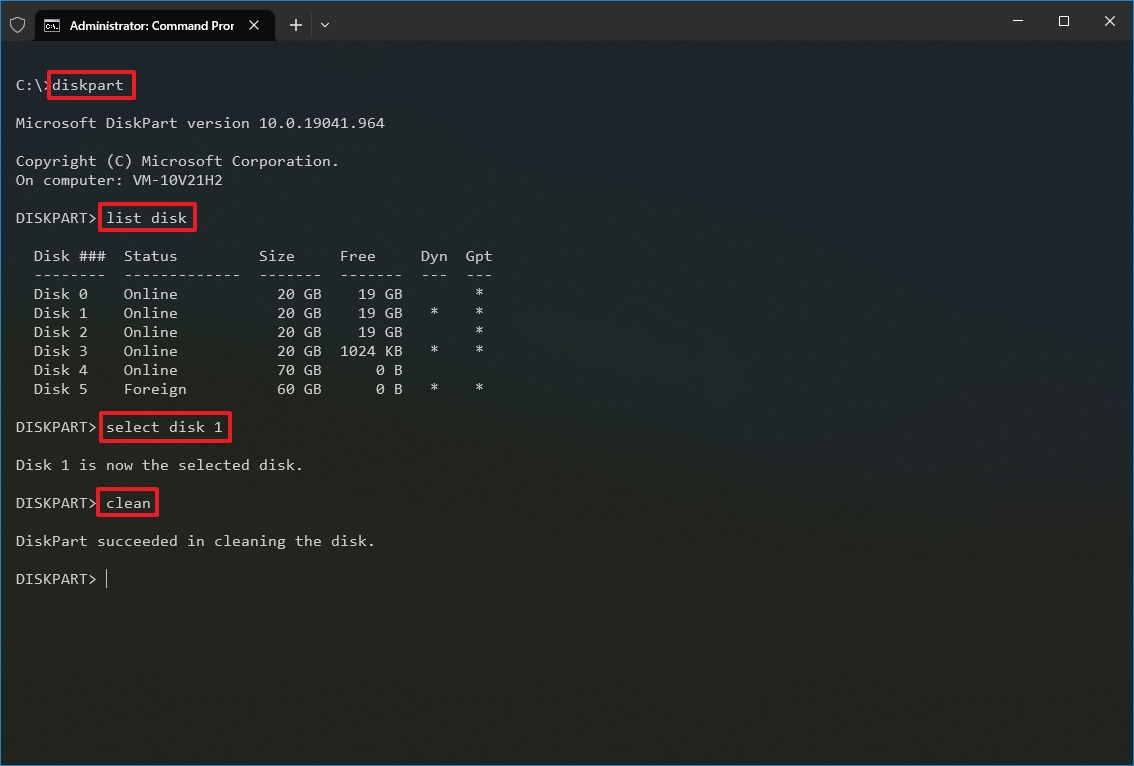
- Type the following command to launch the diskpart tool and press Enter: diskpart
- Type the following command to list the available disks and press Enter: list disk
- Type the following command to select the hard drive not showing up in File Explorer and press Enter: select disk 1
In the command, make sure to select the correct drive. Otherwise, you may end up erasing the data in the wrong storage, which cannot be undone.
- Type the following command to completely erase the drive and press Enter: clean
- Warning: The «clean» command will erase everything, including data, partition, type, and the drive will appear blank with the label unknown and not initialized.
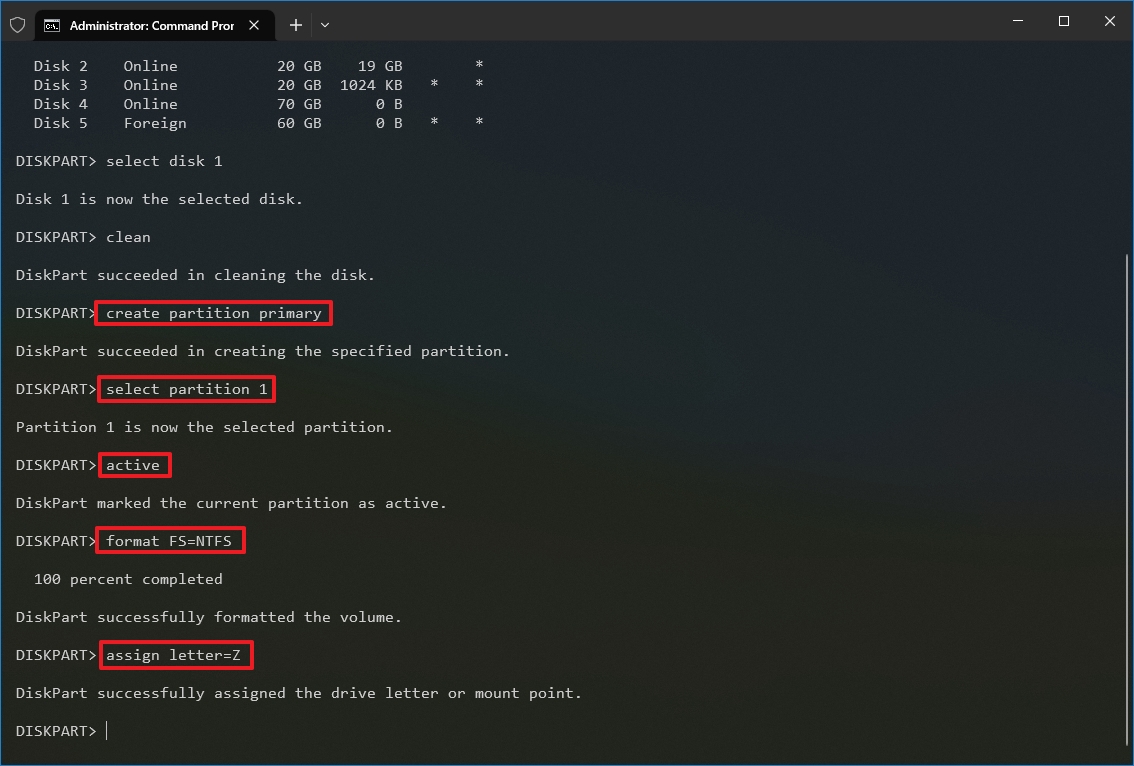
- Type the following command to create a partition using the available space and press Enter: create partition primary
- Type the following command to select the newly created partition and press Enter: select partition 1
- Type the following command to set the partition as active and press Enter: active
- Type the following command to format the partition with the NTFS file system and press Enter: format FS=NTFS
- Type the following command to assign a drive letter and press Enter:
assign letter=Z
In the command, change «Z» for another drive letter not already in use.
- Type the following command to close diskpart and press Enter:
exit
Once you complete the steps, the hard drive will be formatted with a new drive letter, and it should now appear in File Explorer.
More resources
For more helpful articles, coverage, and answers to common questions about Windows 10, visit the following resources:
- Windows 11 on Windows Central — All you need to know
- Windows 10 on Windows Central — All you need to know
(opens in new tab)
Cutting-edge operating system
A refreshed design in Windows 11 enables you to do what you want effortlessly and safely, with biometric logins for encrypted authentication and advanced antivirus defenses.
Get the best of Windows Central in in your inbox, every day!
Mauro Huculak is technical writer for WindowsCentral.com. His primary focus is to write comprehensive how-tos to help users get the most out of Windows 10 and its many related technologies. He has an IT background with professional certifications from Microsoft, Cisco, and CompTIA, and he’s a recognized member of the Microsoft MVP community.

