Windows 7 Enterprise Windows 7 Home Basic Windows 7 Home Premium Windows 7 Professional Windows 7 Starter Windows 7 Ultimate Windows Vista Business Windows Vista Enterprise Windows Vista Home Basic Windows Vista Home Premium Windows Vista Starter Windows Vista Ultimate Microsoft Windows XP Home Edition Microsoft Windows XP Professional More…Less
INTRODUCTION
Losing data because of a computer problem or a hard disk crash is discouraging, to say the least. You might lose family photos, your music collection, or financial data. And, after you get the computer just the way that you want it, it can take a long time to reconfigure your personal settings on a new computer: desktop background, sounds, screensavers, and wireless network configurations to name just a few
However, a little prevention can go a long way to avoiding this ordeal. To help save you lots of time and aggravation, we recommend that you take the precaution of regularly backing up your data and settings.
This article describes how to manually back up your personal files and settings in Windows 7, Windows Vista, Windows XP, and Windows Server 2003. It also describes how to use the data tools in Windows to back up your files and settings.
More Information
Method 1: Manually back up your files and settings to removable media or to a network location
The simplest method is to manually back up your files and settings to removable media or a network location. You can specify the files and settings that you want to back up and how often you want to perform a backup.
Note Examples of removable media include external hard disks, DVDs, CDs, and USB memory cards. You can back up files to a different computer or a network device if your computer is connected to a network such as a wireless network.
To manually copy your files to a network location or to removable media on a computer that is running Windows 7, Windows Vista, Windows XP, or Windows Server 2003, follow these steps:
-
Click Start
 , click Computer and then double-click the drive where you currently have Windows 7, Windows Vista, Windows XP, or Windows Server 2003 installed.
 -
Open the Users folder, and then open the user folder that contains the files that you want to back up.
-
Copy the necessary folders from the user folder to a network location or to removable media.
 , click Computer and then double-click the drive where you currently have Windows 7, Windows Vista, Windows XP, or Windows Server 2003 installed.
Notes
-
To back up data for all users, repeat steps 2–3.
-
To determine the size of all the files in the user folder, select all the folders, right-click those selected folders, and then click Properties.
-
The saved files can be copied to any computer. However, you must have corresponding applications installed on that computer to open those individual files.
-
Not all applications save their files to the user folder. You should make sure that you check other applications and the file system location where the applications save files by default, and then copy those files to the network location or to the removable media.
Method 2: Use the Easy Transfer feature to back up data to a different computer
The next easiest method is to use the Easy Transfer feature in Windows to transfer data to a different computer. This section discusses the following scenarios in which you can use the Easy Transfer feature to back up data to a different computer:
|
Your computer OS |
Target computer OS |
|---|---|
|
Windows 7 |
Windows 7 |
|
Windows 7 |
Windows Vista |
|
Windows Vista |
Windows Vista |
Back up a Windows 7-based computer
Transfer files and settings to another Windows 7-based computer
The Windows Easy Transfer feature lets you to back up user account files and settings. Then you can restore those files and settings to a new computer. To start Windows Easy Transfer, follow these steps:
-
Click Start, type windows easy transfer in the Start Search box, and then click Windows Easy Transfer in the Programs list.
-
Follow the instructions to transfer your files and settings.
Transfer files and settings to a Windows Vista-based computer
If you want to move your data from a Windows 7-based computer to a Windows Vista-based computer, use the Windows Vista version of Windows Easy Transfer. To do this, follow these steps:
-
On a Windows 7-based computer, insert the Windows Vista CD or DVD
-
Click to exit the Windows Vista Setup program.
-
Click Start, click Computer, right-click the CD or DVD drive, and then click Open.
-
Open the support folder, and then open the migwiz folder
-
Double-click the Migwiz.exe file.
-
Follow the instructions to begin the transfer from Windows 7.
Back up a Windows Vista-based computer
Transfer files and settings to another Windows Vista-based computer
The Windows Easy Transfer feature lets you to back up user account files and settings. Then you can restore those files and settings to the new computer. To start Windows Easy Transfer, follow these steps:
-
Click Start, type transfer in the Start Search box, and then click Windows Easy Transfer in the Programs list.
-
Click Next. If you are prompted to close programs, make sure that you have saved any open documents, and then click Close all.
-
Follow the steps to transfer files and settings.
Method 3: Use the Backup and Restore Center
As a precaution, you can use the Backup and Restore Center feature in Windows 7 and Windows Vista to back up your data.
Back up a Windows 7-based computer
Note Data that you back up by using the Windows 7 Backup and Restore Center can be restored only on a Windows 7-based operating system.
-
Click Start, type backup in the Start Search box, and then click Backup and Restore in the Programs list.
Note If you are prompted to close programs, make sure that you have saved any open documents and close those programs. Or, click Close Programs.
-
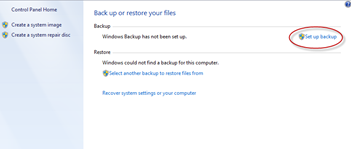
Under Back up or restore your files, click Set up backup.
-
Select where you want to save your backup, and then click Next.
Note Remember to save your backup files to removable media or a network location.
-
Click Let Windows choose or Let me choose, and then click Next.
-
Make the appropriate selections, and then click Next or Save Settings and run backup.
-
The backup will be saved to the backup location.
Back up a Windows Vista-based computer
Note Data that you back up by using Windows Vista Backup and Restore Center can be restored only on a Windows Vista operating system.
-
Click Start, type backup in the Start Search box, and then click Backup and Restore in the Programs list.
-
Click Back up files under Back up files or your entire computer.
-
Select where you want to store the file backup, and then click Next.
-
Select the disk or disks that you want to back up, and then click Next
-
Select the file type or file types that you want to back up, and then click Next.
-
Click Save Settings, and then start the backup.
-
Your backup will be saved to the selected backup location.
Method 4: Transfer files from a Windows 2000, Windows XP, or Windows Server 2003-based computer
Use the Windows XP Files and Settings Transfer Wizard
You can use the Windows XP Files and Settings Transfer Wizard to transfer files in Windows XP, or Windows Server 2003, or Windows 2000 computer.
-
Click Start, click All Programs, click Accessories, click System Tools, and then click Files and Settings Transfer Wizard.
-
Click Next, click Old computer, and then click Next.
-
Select how you want to transfer your files. If you select Other, you can save to a network location or to removable media so that you can keep a backup for your records.
-
Select what you want to back up, and then click Next.
Additional resources
We recommend the following when you back up data:
-
Don’t back up your files to a recovery partition or to the same hard disk on which Windows is installed.
Note Manufacturers frequently configure a recovery partition on a computer. Typically, a recovery partition is displayed as a hard disk drive.
-
Always store the media that you use for backups in a secure location to prevent unauthorized access to your files.
-
Try to use a fireproof location that’s separate from your computer’s location. Also, consider encrypting the backup data.
Need more help?

Первые две опции из данного диалогового окна используются при переносе настроек на новый компьютер. Третья пригодится при установке новой операционной системы на тот же компьютер.

Выбираем способ переноса данных
Если речь идет об установке нового экземпляра Windows 7 на тот же компьютер, названия представленных в данном окне опций слегка озадачивают. В таком случае, текущую версию Windows можно рассматривать как старый компьютер, а ту, что будет установлена, — как новый.

Старый компьютер или новый?
Первым делом Windows Easy Transfer составляет список всех сохраненных на компьютере файлов и оценивает их объем. Чтобы отрегулировать настройки, нажмите ссылку «Изменить» (Customize).

Что будем переносить?
При нажатии на ссылку «Изменить» появляется всплывающий список, показанный на этом рисунке. Чтобы исключить объект из списка сохранения Easy Transfer, просто снимите с него флажок. Если на компьютере установлено несколько жестких дисков, нажмите ссылку «Дополнительно» (Advanced), чтобы исключить из списка сохранения ненужные файлы и папки.

Выбираем файлы для сохранения
Если категория отмечена зеленой галочкой, значит, все заданные файлы и настройки сохранены.

Все файлы и настройки успешно сохранены
По завершении операции Easy Transfer выводит диалоговое окно с указанием пути и имени файла, в котором были сохранены указанные данные. Теперь можно ставить новую версию Windows.

Первый этап операции по переносу файлов и настроек завершен
Оцените статью: Голосов
Windows Easy Transfer – бесплатная программа от Microsoft, с помощью которой можно без особых хлопот перенести пользовательские данные со старой системы в новую.
Утилита позволяет переносить не только файлы пользователя, но и учетные записи, избранное браузеров, электронную почту, а также установленные пользователем параметры приложений. С помощью Windows Easy Transfer вы сможете перенести пользовательские данные из Windows XP в Windows 7, из Windows Vista в Windows 7 и из Windows 7 в Windows 8, или наоборот. Как уже говорилась, программа распространяется разработчиком бесплатно, скачать ее можно с официального сайта Microsoft, а также по ссылке ниже.
Скачайте бесплатно утилиту Windows Easy Transfer с нашего сайта или сайта Microsoft, затем установите ее в систему из которой собираетесь переносить пользовательские данные. После инсталляции запустите ее кликнув по значку на рабочем столе “Средство переноса данных для Windows 7”.

В стартовом окне программы появится список тех данных, которые можно перенести с помощью данного инструмента.

Для продолжения работы с программой кликните по кнопке “Далее”. Easy Transfer предлагает пользователю возможность копирования данных с помощью USB-кабеля, внешнего накопителя (например флэшки), или с помощью сети (сетевое подключение компьютер-компьютер). Выберите способ переноса данных, или устройство, которое будет выступать в качестве временного хранилища. В нашем примере это обычная USB-флэшка.

В следующем шаге программа Windows Easy Transfer попросит вас подтвердить, что все данные (файлы и параметры), которые подлежат переносу, находятся на этом компьютере. Чтобы сделать это кликните по пункту “Это мой исходный компьютер”.

Далее утилита начнет проверку возможностей переноса данных с исходного компьютера, и по завершении проверки, выдаст пользователю краткую информацию по тем файлам и параметрам, которые доступны для переноса.

В этом же окне с информацией, пользователь сможет отредактировать перечень файлов, посмотреть или изменить их. Для этого необходимо кликнут по кнопке “Настройка” и затем по “Дополнительно”. После чего на экране вашего монитора появится окно диспетчера файлов, где будут отображены все файлы и папки, которые программа отобрала для переноса.

В диспетчера файлов вы сможете отменить любые выбранные для переноса папки и файлы. Мы настоятельно рекомендуем вам очень внимательно просмотреть все эти папки, чтобы исключить возможность “забыть” какие-либо данные. Чтобы добавить какой-то файл или папку, нужно просто отметить галочками соответствующие чекбоксы. После редактирования списка данных для переноса, не забудьте кликнуть п кнопке “Сохранить”, чтобы внесенные вами изменения вступили в силу. После того как вы нажмете кнопку “Далее”, программа начнет сохранять все данные в специальный файл, но сначала она предложит вам защитить свои данные паролем. Если вы желаете защитить файл с данными, то укажите в соответствующем поле пароль для него.

Если защита файла паролем вам не требуется, то оставьте поля для ввода пароля пустыми и кликните по кнопке “Сохранить”. После чего укажите устройство, куда будет записан файл с данными, а также его имя.
")
После того, как вы укажите съемный накопитель для сохранения данных, и зададите имя будущему файлу, кликните по кнопке “Сохранить”, а затем два раза подряд по “Далее”, чтобы запустить процесс копирования пользовательских данных в специальный файл. По завершению процесса копирования закройте окно программы Windows Easy Transfer и извлеките USB-флэшку из системного блока компьютера.
Итак, чтобы восстановить сохраненные данные в новой системе (компьютере), запустите на нем программу Windows Easy Transfer, затем кликните по “Далее”, выберите пункт “Да (Если вы сохранили файлы на внешний жесткий диск или USB-устройство флэш-памяти, подключите его сейчас)”. Вставьте вашу флэшку с файлом пользовательских данных и укажите ее в качестве источника. Кликните по “Далее”, затем по “Это мой новый компьютер” и снова по “Далее”. В итоге запустится процесс переноса данных, по завершению которого вы увидите все пользовательские данные старого компьютера на новом. Удачи!
Скачать Windows Easy Transfer
- Статус распространения: бесплатно
- Сайт программы: microsoft.com
- Разработчик: Microsoft
- Документация: есть
- Интерфейс: мультиязычный
- ОС: Windows 10, 8, 8.1, 7, Vista, XP