Размеры элементов и их позиционирование в контейнере
Последнее обновление: 31.10.2015
Позиционирование
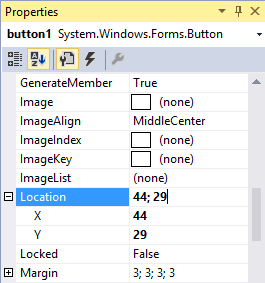
Для каждого элемента управления мы можем определить свойство Location, которое задает координаты верхнего левого угла элемента относительно контейнера.
При переносе элемента с панели инструментов на форму это свойство устанавливается автоматически. Однако потом в окне Свойств мы можем вручную поправить
координаты положения элемента:
Также мы можем установить позицию элемента в коде:
private void Form1_Load(object sender, EventArgs e)
{
    button1.Location = new Point(50, 50);
}
Установка размеров
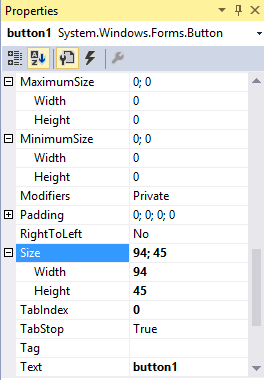
С помощью свойства Size можно задать размеры элемента:
Дополнительные свойства MaximumSize и MinimumSize позволяют ограничить минимальный и максимальный размеры.
Установка свойств в коде:
button1.Size = new Size { Width = 50, Height = 25 };
// установка свойств по отдельности
button1.Width = 100;
button1.Height = 35;
Свойство Anchor
Дополнительные возможности по позиционировании элемента позволяет определить свойство Anchor. Это свойство определяет расстояние между одной из сторон элемента
и стороной контейнера. И если при работе с контейнером мы будем его растягивать, то вместе с ним будет растягиваться и вложенный элемент.
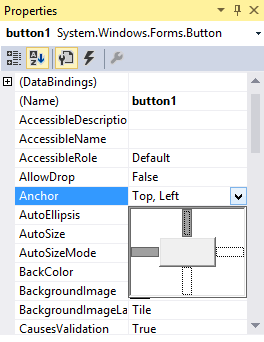
По умолчанию у каждого добавляемого элемента это свойство равно Top, Left:
Это значит, что если мы будем растягивать форму влево или вверх, то элемент сохранит расстояние от левой и верхней границы элемента до границ контейнера, в качестве которого
выступает форма.
Мы можем задать четыре возможных значения для этого свойства или их комбинацию:
-
Top
-
Bottom
-
Left
-
Right
Например, если мы изменим значение этого свойства на противоположное — Bottom, Right, тогда у нас будет неизменным расстояние между правой и нижней стороной элемента и формой.
При этом надо отметить, что данное свойство учитывает расстояние до границ контейнера, а не формы. То есть если у нас на форме есть элемент Panel, а на
Panel расположена кнопка, то на кнопку будет влиять изменение границ Panel, а не формы. Растяжение формы будет в этом случае влиять только, если оно влияет
на контейнер Panel.
Чтобы задать это свойство в коде, надо использовать перечисление AnchorStyles:
button1.Anchor = AnchorStyles.Left;
// задаем комбинацию значений
button1.Anchor = AnchorStyles.Left | AnchorStyles.Top;
Свойство Dock
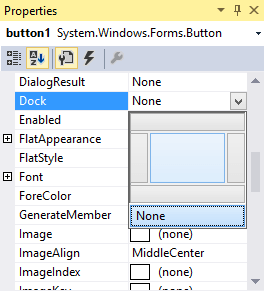
Свойство Dock позволяет прикрепить элемент к определенной стороне контейнера. По умолчанию оно имеет значение None, но также позволяет задать еще пять значений:
-
Top: элемент прижимается к верхней границе контейнера -
Bottom: элемент прижимается к нижней границе контейнера -
Left: элемент прижимается к левой стороне контейнера -
Right: элемент прикрепляется к правой стороне контейнера -
Fill: элемент заполняет все пространство контейнера
on
March 9, 2007, 8:46 AM PST
Manage WinForm controls using the Anchor and Dock properties
Many beginning WinForms developers have trouble keeping the controls on their forms uniform and organized. Often the controls look fine at design time, but when the form is resized at runtime the controls either lose their positions or don’t compensate for the resized form. Zach Smith explains how to use the built-in Anchor and Dock properties of a control to mandate its behavior during resizing.
This article is also available as a TechRepublic download, which includes Visual Studio project files with examples of the Anchor and Dock properties in action.
Many
developers who are new to WinForms programming have
trouble keeping the various controls on their forms in sync with one another
and proportional to the parent form as it is resized by the user. This can be a
very frustrating situation, especially for developers coming to WinForms
from a Web programming background. To alleviate this problem, the .NET
Framework allows you to set properties on child controls to mandate how
they will behave when the parent form is resized. The two properties that are
used to mandate a control’s resize behavior are “Dock” and
“Anchor”.
Dock
and Anchor can save an application from having an unpredictable interface by
tying controls to certain places on their parent form. Best of all, there is no
hand-written code required to set these properties up. Everything can be done
via point and click within the Visual Studio IDE.
The Anchor Property
As the
name implies, this property forces the control to anchor itself in a relative
or absolute position within the parent form or control. This property has four
values that can be turned on or off:
- Top — Indicates that the control
should keep its top edge stationary in respect to the parent form (or
control) top edge. - Bottom — Indicates that the control
should keep its bottom edge stationary in respect to the parent form (or
control) bottom edge. - Left — Indicates that the control
should keep its left edge stationary in respect to the parent form (or
control) left edge. - Right — Indicates that the control should
keep its right edge stationary in respect to the parent form (or control)
right edge.
To set
the Anchor property on a control, simply select the control in the Visual
Studio designer and go to the properties window. You should see a property
labeled “Anchor”. Clicking in the value section for this property
will bring up a little window that allows you to choose which anchor points you
wish to assign to the control. Figure A
shows the anchor settings window with “Top, Left” selected. Figure B shows this window with
“Bottom, Right” selected.
|
Figure A |
 |
| Anchor Tool top left |
|
Figure B |
 |
| Anchor Tool bottom right |
The
default anchor setting for a control when placed on a form in Visual Studio is
“Top, Left”. This instructs the control to remain stationary with
respect to the top and left edges of the form.
Anchoring
doesn’t make much sense until you actually see how the different anchor
settings affect controls. The following images should help.
|
Figure C |
 |
| Small Window |
Figure C shows a form with 10 child
controls. Each child control has different values for the Anchor property and
is labeled with its anchor settings. The dark red box behind the gray controls
is another child control — its Anchor property is set to Top, Bottom, Left,
and Right. Figure D shows the same
form after it has been resized to a larger area.
|
Figure D |
 |
| Large Window |
As you
can see, each control automatically kept its position within the parent form.
No code was written to do this; we simply set the Anchor property for the
control.
There
are a couple important points to mention here. One is that if you do not
specify that a control has Left or Right anchoring, it will retain a relative
left/right position within the parent form. The same holds true if you don’t
specify whether a control has Top or Bottom anchoring. A good example of this
is the control labeled “Anchor None”. That control has no anchoring
values, so it simply floats in the middle of the form.
At the
other extreme are controls that have all anchor values selected (Top, Bottom,
Left, Right). An example of this is the dark red square visible behind the
other controls in Figure C and Figure D. When all anchor values are
selected, the control simply grows or shrinks when the parent form is resized
— keeping all of its edges static in comparison to the form’s edges.
The Dock Property
The
Dock property forces a control to stick to a certain edge of the parent form
(or control) like glue. While this can also be accomplished with the Anchor
property, the dock property allows you to “stack” child controls on top (or
beside) each other within the parent form. If one child control changes in
size, the other controls docked next to that control move along with it.
Unlike
the Anchor property, you can set the Dock property to only a single value. The
valid values are shown below:
- Top — Forces the control to be at
the top of the parent form (or control). If there are other child controls
of the same parent set to dock top, the controls will be stacked on
top of each other. - Bottom — Forces the control to be at
the bottom of the parent form (or control). If there are other child
controls of the same parent set to dock bottom, the controls will be
stacked on top of each other. - Left — Forces the control to be at
the left of the parent form (or control). If there are other child
controls of the same parent set to dock left, the controls will be
stacked beside each other. - Right — Forces the control to be at
the right of the parent form (or control). If there are other child
controls of the same parent set to dock top, the controls will be
stacked beside each other. - Fill — Forces the control to be at
the top of the parent form (or control). If there are other child controls
of the same parent set to dock top, the controls will be stacked on
top of each other. - None — Indicates that the control
will behave normally.
To set
the Dock value of a control, select the control in Visual Studio and go to the
properties window. You will see a property labeled “Dock”. Clicking
in the value section for this property will bring up a little window that
allows you to specify how you would like the control to be docked. This form is
shown in the following images (Figures
E, F, and G) with various values assigned:
|
Figure E |
 |
| Dock Left is selected |
|
Figure F |
 |
| Dock Fill is selected |
|
Figure G |
 |
| Dock Top is selected |
Like
the Anchor property, none of this makes a lot of sense until you see it in
action. Figure H shows a form with
five child controls, all set with different dock values.
|
Figure H |
 |
| Five child controls with different dock values |
Figure I shows the same window as Figure H, except now the window has
been resized to a larger footprint.
|
Figure I |
 |
| Larger footprint |
Figure J again shows the same window as Figure H, except this time the controls
on the bottom, top, left, and right of the form have been made smaller. Notice
that the control in the middle, which is set to dock Fill, automatically grew
in size.
|
Figure J |
 |
| Smaller footprint |
One
thing to keep in mind with the Dock property is that the order in which the
controls are added to the form can affect the way that they dock. For instance,
if you add ControlA to the form, instruct it to dock
Fill, then you add ControlB to the form and instruct
it to dock Top, ControlB will appear to cover up the
top portion of ControlA. The reason for this is that ControlB is considered to be “in front” of ControlA since it was added after ControlA.
To fix this situation you must right click ControlA
in Visual Studio and choose Bring To Front
on the context menu. This will bring ControlA to the
front of ControlB and the controls will then act as
expected.
The example application
To
fully understand how to use Dock and Anchor properties, download the sample
application that is included with the download version of this article. There
are several forms within the application that demonstrate different uses of
Dock and Anchor. The best way to teach yourself about this type of
functionality is to get into the code and get your hands dirty.
-
Developer
В статье рассмотрим способ создания «резинового» интерфейса в формах Windows Forms и разберёмся, как растянуть элементы на форме при изменении размера окна программы.
Создадим в Visual Studio проект Windows Forms и разместим на форме следующие элементы управления:
- Label
- TextBox
- RichTextBox
- Button
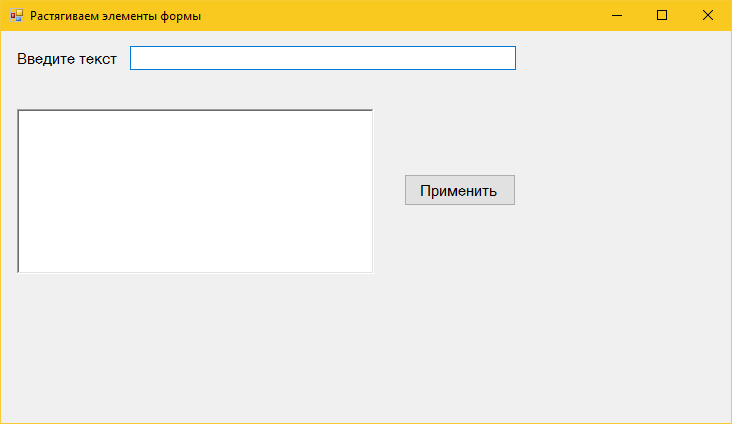
Запустим программу и с помощью мыши попробуем увеличить размеры окна, потянув правый нижний угол формы. В результате получим следующее:
Видим, что окно формы увеличилось в размере, но элементы управления никак не реагируют на данные изменения.
Теперь покажем, как создать адаптивный к изменениям размера окна интерфейс на форме Windows Forms.
Как растянуть элементы на форме Windows Forms
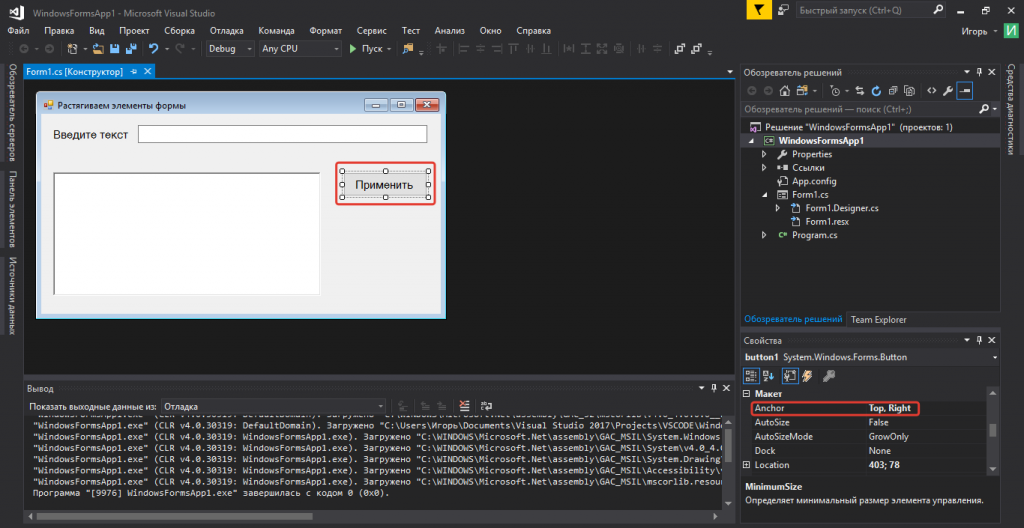
Для создания «резинового» интерфейса нужно воспользоваться свойствами элементов управления из категории Макет (Layout). А конкретно свойством Anchor.
В Windows Forms свойство Anchor определяет стороны контейнера (Top, Bottom, Left, Right) к которым привязывается элемент управления. При изменении размера контейнера расстояние между указанной стороной контейнера и ближайшей к ней стороне элемента управления остаётся неизменным.
Таким образом можно добиться растягивания и перемещения элементов в форме при изменении её размера.
В нашем случае контейнером для элементов управления является всё окно.
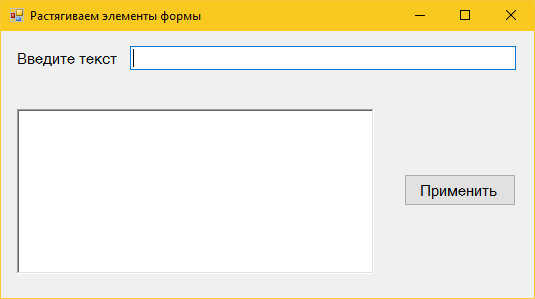
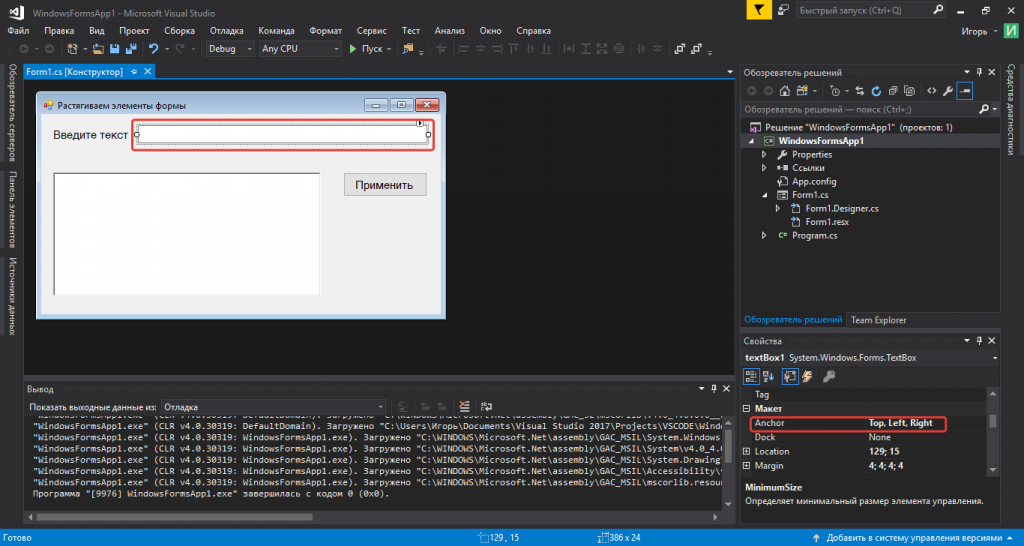
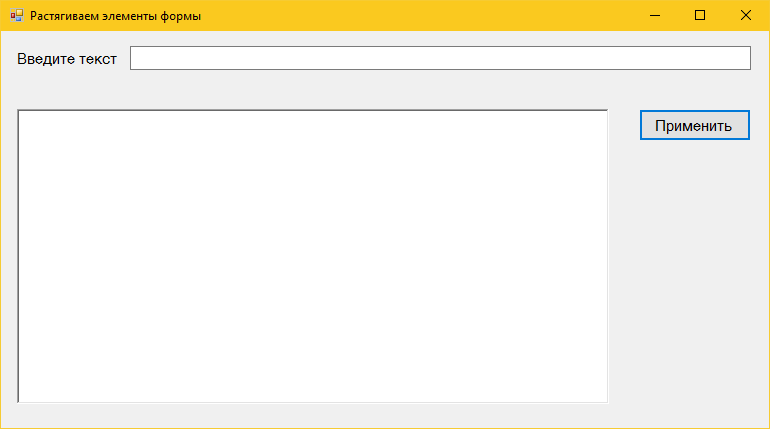
Зададим для TextBox значение атрибута Anchor = Top, Left, Right. Теперь расстояние между соответствующими сторонами ТекстБокса и окна будет неизменным. Так мы добьёмся изменения ширины контрола при изменении ширины окна.
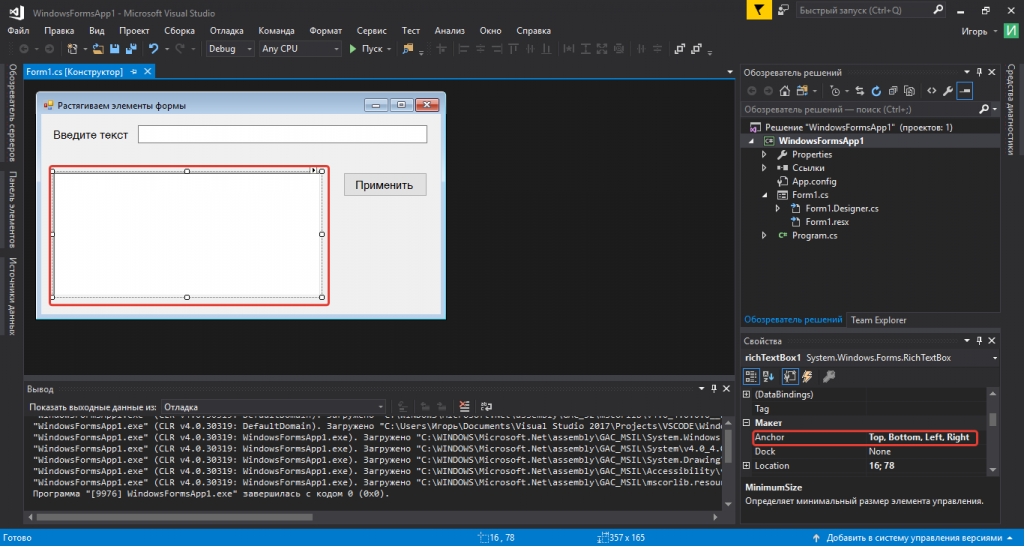
Для RichTextBox значение свойства Anchor сделаем равным Top, Bottom, Left, Right.
У кнопки Button установим Anchor, как Top, Right.
Теперь запустим программу и изменим размер окна: увидим, что элементы управления на форме растягиваются и меняют своё местоположение. Теперь интерфейс стал адаптированным к изменению размера окна.
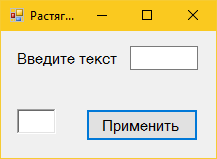
Есть ещё один момент. Когда мы будем уменьшать мышью размер формы — контролы будут скрываться из поля зрения.
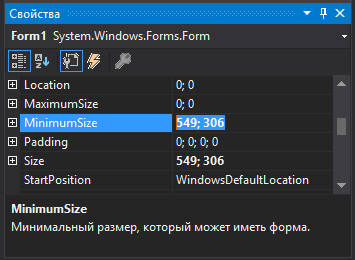
Чтобы решить данную проблему, необходимо указать минимальный размер формы Windows Form в пикселях. Тем самым форму будет невозможно сделать меньше установленного размера.
Щёлкнем по форме и в окне свойств изменим параметр MinimunSize. Установим его равным текущему размеру формы в визуальном редакторе (Size).
Минимальный размер можно указать и меньшим — таким, при котором интерфейс хорошо выглядит и сохраняет свою функциональность. Нужные значения определяются экспериментально — для этого самостоятельно изменяйте размер формы.
| title | ms.date | helpviewer_keywords | ms.assetid | description | |||||||||
|---|---|---|---|---|---|---|---|---|---|---|---|---|---|
|
Anchor Controls |
03/30/2017 |
|
59ea914f-fbd3-427a-80fe-decd02f7ae6d |
Learn how to anchor controls on Windows Forms in order to properly resize controls dynamically at run time. |
How to: Anchor controls on Windows Forms
If you’re designing a form that the user can resize at run time, the controls on your form should resize and reposition properly. To resize controls dynamically with the form, you can use the xref:System.Windows.Forms.Control.Anchor%2A property of Windows Forms controls. The xref:System.Windows.Forms.Control.Anchor%2A property defines an anchor position for the control. When a control is anchored to a form and the form is resized, the control maintains the distance between the control and the anchor positions. For example, if you have a xref:System.Windows.Forms.TextBox control that is anchored to the left, right, and bottom edges of the form, as the form is resized, the xref:System.Windows.Forms.TextBox control resizes horizontally so that it maintains the same distance from the right and left sides of the form. In addition, the control positions itself vertically so that its location is always the same distance from the bottom edge of the form. If a control is not anchored and the form is resized, the position of the control relative to the edges of the form is changed.
The xref:System.Windows.Forms.Control.Anchor%2A property interacts with the xref:System.Windows.Forms.Control.AutoSize%2A property. For more information, see AutoSize Property Overview.
Anchor a control on a form
-
In Visual Studio, select the control you want to anchor.
[!NOTE]
You can anchor multiple controls simultaneously by pressing the CTRL key, clicking each control to select it, and then following the rest of this procedure. -
In the Properties window, click the arrow to the right of the xref:System.Windows.Forms.Control.Anchor%2A property.
An editor is displayed that shows a cross.
-
To set an anchor, click the top, left, right, or bottom section of the cross.
Controls are anchored to the top and left by default.
-
To clear a side of the control that has been anchored, click that arm of the cross.
-
To close the xref:System.Windows.Forms.Control.Anchor%2A property editor, click the xref:System.Windows.Forms.Control.Anchor%2A property name again.
When your form is displayed at run time, the control resizes to remain positioned at the same distance from the edge of the form. The distance from the anchored edge always remains the same as the distance defined when the control is positioned in the Windows Forms Designer.
[!NOTE]
Certain controls, such as the xref:System.Windows.Forms.ComboBox control, have a limit to their height. Anchoring the control to the bottom of its form or container cannot force the control to exceed its height limit.
Inherited controls must be Protected to be able to be anchored. To change the access level of a control, set its Modifiers property in the Properties window.
See also
- Windows Forms Controls
- AutoSize Property Overview
- How to: Dock Controls on Windows Forms
- Walkthrough: Arranging Controls on Windows Forms Using a FlowLayoutPanel
- Walkthrough: Arranging Controls on Windows Forms Using a TableLayoutPanel
- Walkthrough: Laying Out Windows Forms Controls with Padding, Margins, and the AutoSize Property
Чтобы
завершить эту главу, давайте рассмотрим
несколько подходов, которые можно
использовать для управления размещением
элементов управления в форме. Если при
создании типа Form вы предполагаете, что
элементы управления должны отображаться
с использованием абсолютных
позиций, то
это, по сути, означает, что кнопка,
размещенная в окне проектирования формы
на 10 пикселей ниже и на 10 пикселей правее
верхнего левого угла формы, будет там
оставаться в течение всей ее «жизни».
При
создании формы, содержащей элементы
управления пользовательского интерфейса,
вы должны решить, должна ли форма
позволять изменение размеров ее окна.
Обычно главное окно допускает изменение
размеров, тогда как диалоговые окна –
нет. Напомним, что допустимость изменения
размеров формы задается свойством
FormBorderStyle. которое может принимать любое
из значений перечня FormBorderStyle.
public
enum System.Windows.Forms.FormBorderStyle {
None,
FixedSingle, Fixed3D,
FixedDialog,
Sizable,
FixedToolWindow,
SizableToolWindow
}
Предположим,
что вы захотели изменить размеры формы.
Тогда в связи с содержащимися в форме
элементами управления возникают
интересные вопросы. Например, если
пользователь сделает форму меньше, чем
необходимо для отображения всех элементов
управления, должны ли эти элементы
управления изменять свои размеры (и,
возможно, расположение) в соответствии
с размерами формы?
Свойство Anchor
В
Windows Forms свойство Anchor используется для
определения относительной фиксированной
позиции, в которой всегда должен пребывать
данный элемент управления. Каждый
производный от Control тип имеет свойство
Anchor, которое может принимать любое из
значений перечня AnchorStyles, описанных в
табл. 21.13.
Таблица
21.13.
Значения AnchorStyles
|
Значение |
Описание |
|
Bottom |
Нижний |
|
Left |
Левый |
|
None |
Элемент |
|
Right |
Правый |
|
Top |
Верхний |
Чтобы
закрепить элемент в верхнем левом углу
окна, можно связывать соответствующие
значения операцией ИЛИ (например,
AnchorStyles.Top | AnchorStyles.Left). Целью использования
свойства Anchor является указание того,
какие расстояния от краев элемента
управления до краев контейнера должны
быть фиксированы. Например, если задать
для кнопки следующее значение Anchor:
//
Закрепление элемента относительно
правого края.
myButton.Anchor
= AnchorStyles.Right;
то
вы гарантируете, что при переопределении
размеров формы данная кнопка будет
сохранять свое положение относительно
правого края формы.
Соседние файлы в предмете [НЕСОРТИРОВАННОЕ]
- #
- #
- #
- #
- #
- #
- #
- #
- #
- #
Свойство Anchor
В Windows Forms свойство Anchor используется для определения относительной фиксированной позиции, в которой всегда должен пребывать данный элемент управления. Каждый производный от Control тип имеет свойство Anchor, которое может принимать любое из значений перечня AnchorStyles, описанных в табл. 21.13.
Таблица 21.13. Значения AnchorStyles
Значение
Описание
Bottom
Нижний край элемента управления прикрепляется к нижнему краю контейнера
Left
Левый край элемента управления прикрепляется к левому краю контейнера
None
Элемент управления не прикрепляется к краям контейнера
Right
Правый край элемента управления прикрепляется к правому краю контейнера
Top
Верхний край элемента управления прикрепляется к верхнему краю контейнера
Чтобы закрепить элемент в верхнем левом углу окна, можно связывать соответствующие значения операцией ИЛИ (например, AnchorStyles.Top | AnchorStyles.Left). Целью использования свойства Anchor является указание того, какие расстояния от краев элемента управления до краев контейнера должны быть фиксированы. Например, если задать для кнопки следующее значение Anchor:
// Закрепление элемента относительно правого края.
myButton.Anchor = AnchorStyles.Right;
то вы гарантируете, что при переопределении размеров формы данная кнопка будет сохранять свое положение относительно правого края формы.
Читайте также
Свойство content
Свойство content
Это свойство используется вместе с псевдоэлементами: before и: after для генерации содержимого в документе. В примерах выше мы уже использовали это свойство. Теперь разберем его подробно.Свойство content может принимать одно из нескольких значений: строку текста,
Свойство Arguments
Свойство Arguments
В следующем примере (листинг 1.1) с помощью цикла for на экран выводятся все параметры командной строки, с которыми был запущен сценарий.Листинг 1.1. Вывод на экран всех параметров сценария/*******************************************************************//* Имя:
Свойство Arguments
Свойство Arguments
В листинге 1.20 приведен пример сценария, создающего ярлык на этот самый сценарий с двумя параметрами командной строки.Листинг 1.20. Создание ярлыка на выполняемый сценарий с аргументами командной строки/*****************************************************************//* Имя:
Свойство HotKey
Свойство HotKey
Для того чтобы назначить ярлыку «горячую» клавишу, необходимо в свойство HotKey записать строку, содержащую названия нужных клавиш, разделенные символом «+».
Замечание
«Горячие» клавиши могут быть назначены только ярлыкам, которые расположены на рабочем столе
Свойство IconLocation
Свойство IconLocation
Для того чтобы задать значок для ярлыка, необходимо в свойство IconLocation записать строку следующего формата: «путь, индекс». Здесь параметр путь определяет расположение файла, содержащего нужный значок, а параметр индекс — номер этого значка в файле (номера
Свойство HelpLink
Свойство HelpLink
Свойства Target Site и StackTrace позволяют получить информацию о данном исключении программисту, но конечному пользователю эта информация мало что дает. Вы уже видели, что для получения информации, понятной обычному пользователю, можно использовать свойство
Свойство Data
Свойство Data
Свойство Data объекта System.Exception является новым в .NET 2.0 и позволяет добавить в объект исключения дополнительную информацию для пользователя (например, штамп времени или что-то другое). Свойство Data возвращает объект, реализующий интерфейс с именем IDictionary,
Свойство Name
Свойство Name
Приведенный выше программный код достаточно понятен, но обратите внимание на то, что класс Thread предлагает свойство с именем Name (имя). Если вы не установите для него значения, свойство Name будет возвращать пустую строку. Но, назначив данному объекту Thread в
Свойство Priority
Свойство Priority
Далее заметим, что тип Thread определяет свойство с именем Priority. По умолчанию все потоки получают приоритет Normal (средний). Но вы можете изменить это значение в любой момент времени существования потока, используя свойство Priority и связанный с ним перечень
Свойство DialogResult
Свойство DialogResult
В качестве заключительного задания при создании пользовательского интерфейса выберите кнопку OK в окне проектирования формы и найдите свойство DialogResult. Назначьте DialogResult.OK кнопке OK и DialogResult.Cancel – кнопке Отмена. Формально говоря, вы можете назначить
Свойство Dock
Свойство Dock
Другой особенностью программирования Windows Forms является возможность задать cтыковочное поведение элементов управления. С помощью свойства Dock элемента управления можно указать, какой стороны (или каких сторон) формы должен касаться данный элемент. Значение,
Свойство IsPostBack
Свойство IsPostBack
Еще одним очень важным членом HttpRequest является свойство IsPostBack. Напомним, что «postback» обозначает вторичное обращение к конкретной Web-странице в ходе одного сеанса связи с сервером. С учетом этого должно быть понятно, что свойство IsPostBack возвращает true (истина),
Свойство AutoPostBack
Свойство AutoPostBack
Следует также подчеркнуть то, что многие Web-элементы управления ASP.NET поддерживают свойство AutoPostBack (это очень важно для CheckBox, RadioButton и TextBox, а также для элементов управления, получаемых из абстрактного типа ListControl). По умолчанию это свойство получает значение
Свойство Name
Свойство Name
Последним из рассматриваемых здесь свойств типа WebServiceAttribute является свойство Name, которое используется для указания имени Web-сервиса XML, водимого внешним пользователем. По умолчанию внешнее имя Web-сервиса идентично имени соответствующего типа класса (которым,
Свойство FormBorderStyle
Свойство FormBorderStyle
Свойство FormBorderStyle определяет стиль формы. По умолчанию используется стиль FormBorderStyle.FixedSingle. При этом форма заполняет все рабочее место экрана, и пользователь не может изменять размеры формы или перемещать ее по экрану. При установке значения FormBorderStyle.None
Свойство ControlBox
Свойство ControlBox
Свойство ControlBox отвечает за отображение контейнера для элемента управления. Если свойство ControlBox имеет значение True, то контейнер будет отображаться. В противном случае он на экран не выводится. Для устройств Pocket PC подобный контейнер может содержать только

