- Remove From My Forums
-
Question
-
In new Visual studio for Mac — how can I create a Windows Forms Application — or the most similar thing to one? And in the latter case — can I open an old Windows Forms Application-project
in this? This is for a collage task, where we are asked to open an old Windows Forms Project created by the professor — run it, learn from it and get inspired to create a new one. Is it possible to do so from the new Visual studio for Mac?
All replies
-
The short answer is no, Windows forms project are native to Windows operation system. To see what you can run cross platform see the following.
Visual Studio 2017 for Mac Platform Targeting and Compatibility.
You should look at Xamarin or
Wine.
Please remember to mark the replies as answers if they help and unmark them if they provide no help, this will help others who are looking for solutions to the same or similar problem. Contact via my Twitter (Karen Payne) or Facebook (Karen Payne) via
my MSDN profile but will not answer coding question on either.
VB Forums — moderator

-
Proposed as answer by
Wednesday, January 17, 2018 7:53 AM
-
Proposed as answer by
-
Google WinForm Mono. I can’t post links right now

Introduction
In the previous article we looked at the options for developing cross-platform applications in C# programming. The technology that makes this possible is Mono from Novell. In this article we’ll take an existing Windows C# application and run it on both Mac OS X and Linux. Before we dive into the details it’s important to take a quick look at what Mono is and where it came from to help you understand what’s happening behind the scenes.
The Mono project has been around for almost nine years and started out as an effort to implement an open-source version of the ECMA-standard (ECMA-334) C# programming language and the companion Common Language Infrastructure or CLI (defined in ECMA-335). These standards correspond with Microsoft’s products commonly known as the .NET framework platform. Programs written with Mono run on different platforms through the use of native run-times. If fact, you can run the exact same .EXE file on any supported platform with the Mono runtime installed.
Version 2.0 of the Mono runtime was the first release to provide robust support for native Windows Forms applications. That basically means that Novell implemented all of the System.Windows.Forms namespace. Under the cover, Mono uses the System.Drawing library along with drivers for X11, Win32 and OS X to do the heavy lifting. While Windows Forms applications will run on any supported platform, you’ll still have to use Microsoft Visual Studio for the actual design and coding if you want to use a visual designer. We’ll discuss the Mono Visual Studio add-in a little later.
Porting Considerations
While Mono makes it possible to run Windows Forms-based apps on virtually any OS, it doesn’t mean they will look great on another platform. In many cases the look and feel will be adequate, but there may be some cases where the differences are significant. The Mono team has put together a guide on their website that walks you through the process of porting an application using the Mono Migration Analyzer (MoMA) to determine potential issues.
To test out MoMA we downloaded a number of Windows Forms samples from the windowsclient.net website. The RegexTest sample illustrates an issue that tends to pop up between platforms. When you run the MoMA tool against the RegexTest.exe file, it gives the following warning:
Form.set_AutoScaleBaseSize (Size)
Setting this is probably unintentional and can cause Forms to be improperly sized. See http://www.mono-project.com/FAQ:_Winforms#My_forms_are_sized_improperly for details.
The result when you run the application on Linux is a chopped off window that doesn’t fully show the buttons at the bottom of the form. Figure 1 shows what it looks like on Windows, and figure 2 shows the same application running on Linux.

Figure 1 RegexTest application running on Windows

Figure 2 RegexTest application on Linux
The fix is a simple one in this case. All of the visual components of this application are built in code, and the line that sets the size looks like this:
this.ClientSize = new System.Drawing.Size(536, 503);
Changing it to the following fixes the problem:
this.ClientSize = new System.Drawing.Size(536, 536);

Figure 3 Updated RegexTest app running on Linux.
Things to Watch For
One of the things that can cause problems when porting apps between operating systems stems from subtle differences like file naming conventions. Windows filenames are case insensitive while both Mac OS X and Linux are case sensitive. This can lead to issues if you have filenames for things like resources or images referenced either in code or in a configuration file that aren’t consistent. You must also deal with the different usage of the “” versus the “/” in path names. Mono does offer a feature they call IOMap to specifically help with the path issue.
If you happen to be a Ubuntu, user you’ll find the latest version of Mono available through the normal update channels is 2.4.4. While that shouldn’t be a big issue, you could run into some problems if you’re using any of the Language Integrated Query (LINQ) features. The latest version of Mono also begins to implement some of the C# 4.0 features along with ParallelFX, although you’ll have to wait for at least 2.8 to get started with those.
One option for getting Mono 2.6 up and running on Ubuntu 10.4 is to build it from source. There are instructions on the Mono site on how to do it, but the process is not for a beginner. A quick Google search turned up a blog post about installing Mono 2.6.x in parallel on Ubuntu 9.10. You’ll need to have subversion installed along with libtool to get the script to work properly.
Wrapping Up
One of the things we didn’t cover in these two articles is the ability to write C# code using Mono for Apple’s iPhone, iPod Touch and iPad. While you won’t be able to take your Windows Forms apps to those platforms, you will be able to code in C#. It requires you to do all the coding on a Mac and use the Apple SDK. Building the actual interface can be done either programmatically or by using Apple’s Interface Builder. Future versions of this same tool are planned for Google’s Android platform as well.
Novell’s Mono product is essentially the only game in town if you want to take an existing Windows Forms app and run it natively on Linux or Mac. It’s also the primary force behind a number of popular open source apps like the Banshee media player and F-Spot photo manager. Mono is definitely worth a look if you have a need for cross-platform apps.
| title | description | ms.custom | ms.date | ms.topic | ms.devlang | author | ms.author | manager | ms.technology | dev_langs | ms.workload |
|---|---|---|---|---|---|---|---|---|---|---|---|
|
Create a Windows Forms app with C# |
Learn how to create a Windows Forms app in Visual Studio with C#, step-by-step. |
vs-acquisition, get-started |
1/24/2023 |
tutorial |
CSharp |
anandmeg |
meghaanand |
jmartens |
vs-ide-general |
CSharp |
multiple |
Create a Windows Forms app in Visual Studio with C#
[!INCLUDE Visual Studio]
In this tutorial, you’ll create a simple C# application that has a Windows-based user interface (UI).
::: moniker range=»vs-2019″
If you haven’t already installed Visual Studio, go to the Visual Studio downloads page to install it for free.
[!NOTE]
Some of the screenshots in this tutorial use the dark theme. If you aren’t using the dark theme but would like to, see the Personalize the Visual Studio IDE and Editor page to learn how.
::: moniker-end
::: moniker range=»vs-2022″
If you haven’t already installed Visual Studio, go to the Visual Studio 2022 downloads page to install it for free.
::: moniker-end
Create a project
First, you’ll create a C# application project. The project type comes with all the template files you’ll need, before you’ve even added anything.
::: moniker range=»vs-2019″
-
Open Visual Studio.
-
On the start window, choose Create a new project.

-
On the Create a new project window, choose the Windows Forms App (.NET Framework) template for C#.
(If you prefer, you can refine your search to quickly get to the template you want. For example, enter or type Windows Forms App in the search box. Next, choose C# from the Language list, and then choose Windows from the Platform list.)
[!NOTE]
If you do not see the Windows Forms App (.NET Framework) template, you can install it from the Create a new project window. In the Not finding what you’re looking for? message, choose the Install more tools and features link.Next, in the Visual Studio Installer, choose the .NET desktop development workload.
After that, choose the Modify button in the Visual Studio Installer. You might be prompted to save your work; if so, do so. Next, choose Continue to install the workload. Then, return to step 2 in this «Create a project» procedure.
-
In the Configure your new project window, type or enter HelloWorld in the Project name box. Then, choose Create.
Visual Studio opens your new project.


::: moniker-end
::: moniker range=»>=vs-2022″
-
Open Visual Studio.
-
On the start window, select Create a new project.
:::image type=»content» source=»media/vs-2022/create-new-project-dark-theme.png» alt-text=»Screenshot to show the Create a new project window.»:::
-
On the Create a new project window, select the Windows Forms App (.NET Framework) template for C#.
(If you prefer, you can refine your search to quickly get to the template you want. For example, enter or type Windows Forms App in the search box. Next, select C# from the Language list, and then select Windows from the Platform list.)
:::image type=»content» source=»media/vs-2022/csharp-winform-create-a-new-project.png» alt-text=»Screenshot to select the C# template for the Windows Forms App (.NET Framework).»:::
[!NOTE]
If you do not see the Windows Forms App (.NET Framework) template, you can install it from the Create a new project window. In the Not finding what you’re looking for? message, select the Install more tools and features link.:::image type=»content» source=»../get-started/media/vs-2019/not-finding-what-looking-for.png» alt-text=»Screenshot to show the The ‘Install more tools and features’ link from the ‘Not finding what you’re looking for’ message in the ‘Create a new project’ window.»:::
Next, in the Visual Studio Installer, select the .NET desktop development workload.
:::image type=»content» source=»media/vs-2022/install-dot-net-desktop-env.png» alt-text=»Screenshot to show the .NET Core workload in the Visual Studio Installer.»:::
After that, select the Modify button in the Visual Studio Installer. You might be prompted to save your work; if so, do so. Next, select Continue to install the workload. Then, return to step 2 in this «Create a project» procedure.
-
In the Configure your new project window, type or enter HelloWorld in the Project name box. Then, select Create.
:::image type=»content» source=»media/vs-2022/csharp-winform-configure-new-project.png» alt-text=»Screenshot to show the ‘Configure your new project’ window and name your project ‘HelloWorld’.»:::
Visual Studio opens your new project.
Create the application
After you select your C# project template and name your file, Visual Studio opens a form for you. A form is a Windows user interface. We’ll create a «Hello World» application by adding controls to the form, and then we’ll run the app.
Add a button to the form
-
Select Toolbox to open the Toolbox fly-out window.
:::image type=»content» source=»media/vs-2022/csharp-winform-hello-world-project-toolbox.png» alt-text=»Screenshot to select the Toolbox to open the Toolbox window.»:::
(If you don’t see the Toolbox fly-out option, you can open it from the menu bar. To do so, View > Toolbox. Or, press Ctrl+Alt+X.)
-
Expand Common Controls and select the Pin icon to dock the Toolbox window.
:::image type=»content» source=»media/vs-2022/csharp-winform-toolbox-flyout-pin.png» alt-text=»Screenshot to select the Pin icon to pin the Toolbox window to the IDE.»:::
-
Select the Button control and then drag it onto the form.
:::image type=»content» source=»media/vs-2022/csharp-winform-add-button-on-form.png» alt-text=»Screenshot to add a button to the form.»:::
-
In the Properties window, locate Text, change the name from button1 to
Click this, and then press Enter.:::image type=»content» source=»media/vs-2022/csharp-winform-button-properties-text.png» alt-text=»Screenshot to add text to the button on the form by using the Properties window.»:::
(If you don’t see the Properties window, you can open it from the menu bar. To do so, select View > Properties Window. Or, press F4.)
-
In the Design section of the Properties window, change the name from button1 to
btnClickThis, and then press Enter.:::image type=»content» source=»media/vs-2022/csharp-winform-button-properties-design-name.png» alt-text=»Screenshot to add a function to the button on the form by using the Properties window.»:::
[!NOTE]
If you’ve alphabetized the list in the Properties window, button1 appears in the (DataBindings) section, instead.
Add a label to the form
Now that we’ve added a button control to create an action, let’s add a label control to send text to.
-
Select the Label control from the Toolbox window, and then drag it onto the form and drop it beneath the Click this button.
-
In either the Design section or the (DataBindings) section of the Properties window, change the name of label1 to
lblHelloWorld, and then press Enter.
Add code to the form
-
In the Form1.cs [Design] window, double-click the Click this button to open the Form1.cs window.
(Alternatively, you can expand Form1.cs in Solution Explorer, and then choose Form1.)
-
In the Form1.cs window, after the private void line, type or enter
lblHelloWorld.Text = "Hello World!";as shown in the following screenshot::::image type=»content» source=»media/vs-2022/csharp-winform-button-click-code.png» alt-text=»Screenshot to add code to the form»:::
Run the application
-
Select the Start button to run the application.
:::image type=»content» source=»media/vs-2022/csharp-winform-visual-studio-start-run-program.png» alt-text=»Screenshot to select Start to debug and run the app.»:::
Several things will happen. In the Visual Studio IDE, the Diagnostics Tools window will open, and an Output window will open, too. But outside of the IDE, a Form1 dialog box appears. It will include your Click this button and text that says label1.
-
Select the Click this button in the Form1 dialog box. Notice that the label1 text changes to Hello World!.
:::image type=»content» source=»media/vs-2022/csharp-winform-form.png» alt-text=»Screenshot to show a Form1 dialog box that includes label1 text.»:::
-
Close the Form1 dialog box to stop running the app.
::: moniker-end
::: moniker range=»<=vs-2019″
Create the application
After you select your C# project template and name your file, Visual Studio opens a form for you. A form is a Windows user interface. We’ll create a «Hello World» application by adding controls to the form, and then we’ll run the app.
Add a button to the form
-
Choose Toolbox to open the Toolbox fly-out window.
(If you don’t see the Toolbox fly-out option, you can open it from the menu bar. To do so, View > Toolbox. Or, press Ctrl+Alt+X.)
-
Choose the Pin icon to dock the Toolbox window.
-
Choose the Button control and then drag it onto the form.
-
In the Properties window, locate Text, change the name from Button1 to
Click this, and then press Enter.(If you don’t see the Properties window, you can open it from the menu bar. To do so, choose View > Properties Window. Or, press F4.)
-
In the Design section of the Properties window, change the name from Button1 to
btnClickThis, and then press Enter.[!NOTE]
If you’ve alphabetized the list in the Properties window, Button1 appears in the (DataBindings) section, instead.


Add a label to the form
Now that we’ve added a button control to create an action, let’s add a label control to send text to.
-
Select the Label control from the Toolbox window, and then drag it onto the form and drop it beneath the Click this button.
-
In either the Design section or the (DataBindings) section of the Properties window, change the name of Label1 to
lblHelloWorld, and then press Enter.
Add code to the form
-
In the Form1.cs [Design] window, double-click the Click this button to open the Form1.cs window.
(Alternatively, you can expand Form1.cs in Solution Explorer, and then choose View Code(or press F7) from the right-click menu on Form1.cs.)
-
In the Form1.cs window, after the private void line, type or enter
lblHelloWorld.Text = "Hello World!";as shown in the following screenshot:

Run the application
-
Choose the Start button to run the application.
Several things will happen. In the Visual Studio IDE, the Diagnostics Tools window will open, and an Output window will open, too. But outside of the IDE, a Form1 dialog box appears. It will include your Click this button and text that says Label1.
-
Choose the Click this button in the Form1 dialog box. Notice that the Label1 text changes to Hello World!.
-
Close the Form1 dialog box to stop running the app.


::: moniker-end
Next steps
Congratulations on completing this tutorial. To learn more, continue with the following tutorial:
[!div class=»nextstepaction»]
Tutorial: Create a picture viewer
See also
- More C# tutorials
- Visual Basic tutorials
- C++ tutorials
You can do it if you install Mono, the alternative CLR implementation, on Mac OS X: Mono (software) — Wikipedia, the free encyclopedia[^].
Mono supports .NET BCL and part of non-standard .NET FCL, and it includes System.Windows.Forms. Then you can develop the applications on either Windows, or MAC. On Windows, you can use .NET or Mono, Visual Studio, or SharpDevelop, or MonoDevelop IDE. On Mac, you can use MonoDevelop. In all cases you can use the same assemblies for .NET, Mono for Windows, or Mono for Mac, without recompilation. However, you will face some incompatibilities.
One nice way to do development on Windows would be developing and testing everything on .NET and then testing it for Mono for Windows, and, in case of incompatibilities, fix them and test on Mono again. This way, you can do essential inner development cycle on Windows only. If some code works well on Mono for Windows, additional problems with Mono for other platforms are much less likely.
See also:
SharpDevelop — Wikipedia, the free encyclopedia[^],
SharpDevelop @ic#code[^],
MonoDevelop — Wikipedia, the free encyclopedia[^],
MonoDevelop | MonoDevelop[^].
Now, more problems: Mono is good for many platforms, but Apple platforms is notoriously hostile to the «foreigners». Even when you successfully develop correctly working Windows Forms application, it will look foreign on Mac; in particular, you will see that the standard Mac menu on top of the desktop is shown as always, but is unrelated to your application, which may have it’s own main menu, like in «normal» Windows Forms applications.
Can you develop Mono applications to behave natively on Mac. Yes, but they won’t be compatible with Windows. To develop such native interface, you can use another product, Monobjc:
Monobjc — Wikipedia, the free encyclopedia[^],
Monobjc[^].
It’s usage is much trickier for a Windows developer; you should better understand native Mac development at least a little; and it would be good to understand Objective-C, at least the basic ideas: Objective-C — Wikipedia, the free encyclopedia[^].
This may be beyond your question, but I want to mentioned another, pretty exotic possibility: I experimented with Mono development on Mac and tried out the following unusual application architecture: I managed to create two separate UI threads, one running System.Windows.Forms.Application, and another one Mac OS X API application. Roughly speaking, one operates main System.Windows.Forms.Form, and another one the main Mac-style menu, and some cross-thread code provides collaboration between the two.
|
0 / 0 / 0 Регистрация: 21.01.2018 Сообщений: 22 |
|
|
1 |
|
|
02.04.2018, 09:59. Показов 13593. Ответов 9
Я пишу приложение под windows (Windows Forms). До этого писал на винде, а недавно решил перейти на мак. Можно ли писать приложение под windows на Mac os?
__________________
0 |

|
11066 / 7623 / 1178 Регистрация: 21.01.2016 Сообщений: 28,659 |
|
|
02.04.2018, 10:04 |
2 |
|
hghd, можно, но это будет неудобно. На маке можно использовать Mono (открытую реализацию .NET Framework), в которой реализован WinForms. Но реализация кривоватая и не полная. В качестве IDE можно использовать MonoDevelopment, которая просто отвратна, но работает. Я рекомендую поставить виртуалку с виндой и работать из под неё. Хотя на фиг, тогда, вообще будет нужен мак?)
0 |
|
0 / 0 / 0 Регистрация: 21.01.2018 Сообщений: 22 |
|
|
02.04.2018, 10:07 [ТС] |
3 |
|
можно, но это будет неудобно. На маке можно использовать Mono (открытую реализацию .NET Framework), в которой реализован WinForms. Можно по подробнее?
0 |

|
11066 / 7623 / 1178 Регистрация: 21.01.2016 Сообщений: 28,659 |
|
|
02.04.2018, 10:15 |
4 |
|
hghd, чего поподробнее? Ключевые слова озвучены. Вставляйте в поисковую строку гугла и смотрите подробности.
0 |
|
20 / 35 / 14 Регистрация: 08.10.2015 Сообщений: 406 |
|
|
02.04.2018, 15:35 |
5 |
|
Так вроде visual studio c 2015 (или с 2013) версии можно установить на mac и норм программировать
0 |
|
11066 / 7623 / 1178 Регистрация: 21.01.2016 Сообщений: 28,659 |
|
|
02.04.2018, 17:05 |
6 |
|
Aumi, нет такого. Можно попробовать через Wine запустить студию с полным отсутствием гарантий. Есть поделие Visual Studio for Mac, которая, суть, просто переименованная MonoDevelopment.
0 |
|
[Bicycle Reinventor] 331 / 269 / 109 Регистрация: 19.10.2011 Сообщений: 668 Записей в блоге: 2 |
|
|
02.04.2018, 17:24 |
7 |
|
0 |
|
11066 / 7623 / 1178 Регистрация: 21.01.2016 Сообщений: 28,659 |
|
|
02.04.2018, 18:24 |
8 |
|
Exerion, это тупо блокнот с подсветкой синтаксиса. Сами в нём попробуйте WinForms-приложение написать хоть какое-нибудь, а потом поделитесь с нами впечатлениями.
0 |
|
16 / 16 / 8 Регистрация: 24.01.2014 Сообщений: 92 |
|
|
03.04.2018, 14:57 |
9 |
|
А смысл писать под винду на маке? можно писать на маке под мак
0 |
|
910 / 795 / 329 Регистрация: 08.02.2014 Сообщений: 2,391 |
|
|
03.04.2018, 15:12 |
10 |
|
wlada, смысл чтобы не ставить себе в виртуалку винду чтобы делать под неё на маке приложения. Ваш совет очень и очень странный в рамках вопроса Добавлено через 7 минут
0 |
Последнее обновление: 25.05.2019
Если рабочей машиной является MacOS, то в качестве среды разработки мы можем использовать среду разработки
Visual Studio for Mac.
Ее можно загрузить по следующему адресу: https://visualstudio.microsoft.com/downloads/ (если заходить из под MacOS)
Но даже если нашей основной средой разработки является Visual Studio на Windows, а VS for Mac даже не предполагается использовать, но при этом мы
планируем компилировать приложения для iOS, то все равно необходимо установить на MacOS все необходимые средства разработки под Xamarin.
Потому что эти средства потребуются для подключения Visual Studio из Windows к MacOS.
Прежде всего перед установкой Visual Studio for Mac, необходимо установить среду XCode, которую можно загрузить из AppStore.
Итак, после загрузки инсталлятора VS for Mac запустим его:
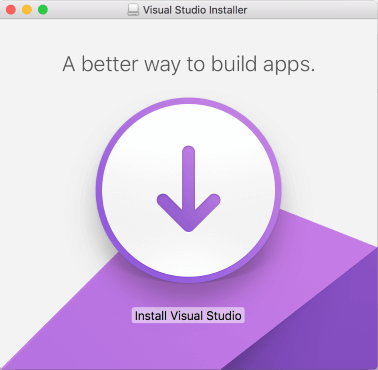
Нажмем на кнопку Install. И далее запустится окно для выбора опций для установки:
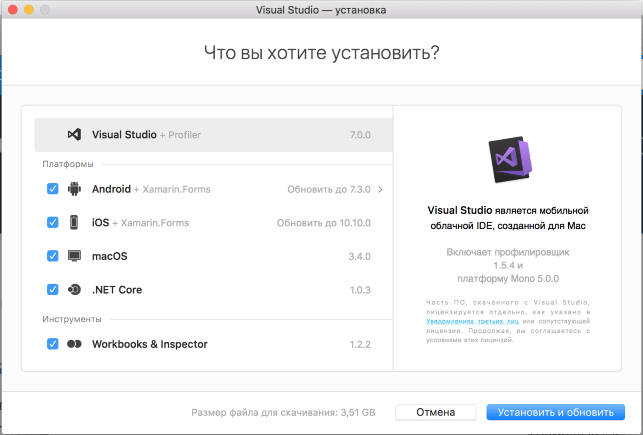
Выберем все необходимые компоненты и нажмем на кнопку установки.
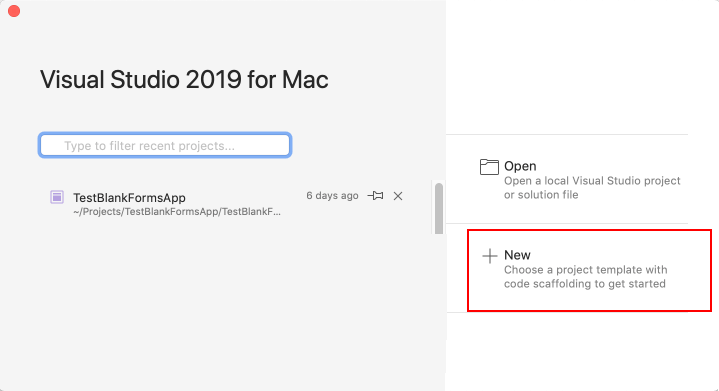
После завершения установки откроем Visual Studio и создадим первый проект. Для этого нажмем на кнопку New…File -> New Solution
Далее нам откроется окно выбора шаблона проекта:
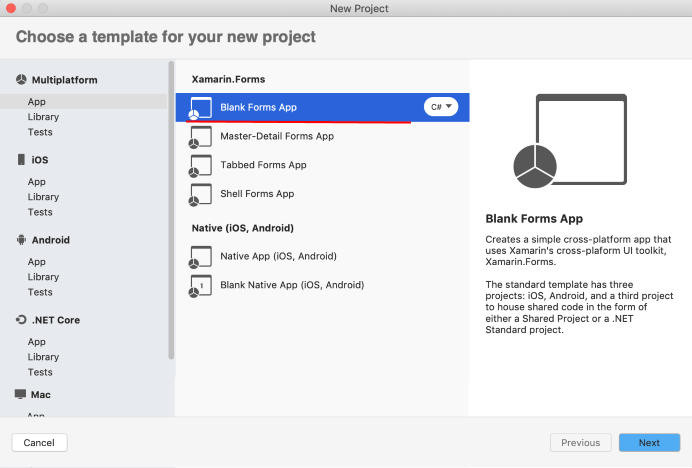
В левой части окна нам надо выбрать пункт Multiplatform -> App. В центральной части нам отобразится ряд шаблонов. которые мы могли бы
также использовать в Visual Studio на Windows:
-
Blank Forms App: пустой шаблон, создающий проект с минимальной функциональностью
-
Tabbed Forms App: проект приложения, которое использует вкладки для навигации между страницами
-
Shell Forms App: шаблон одностраничного приложения
-
Master Detail Forms App: проект для специально для тех случаев, когда должна быть функциональность для представления списка объектов и
функциональность для вывода информации по каждому отдельному элементу списка
Выберем в качестве шаблона Blank Forms App и нажмем на кнопку Next.
Далее откроется окно, где надо будет указать название проиложения и идентификатора организации:
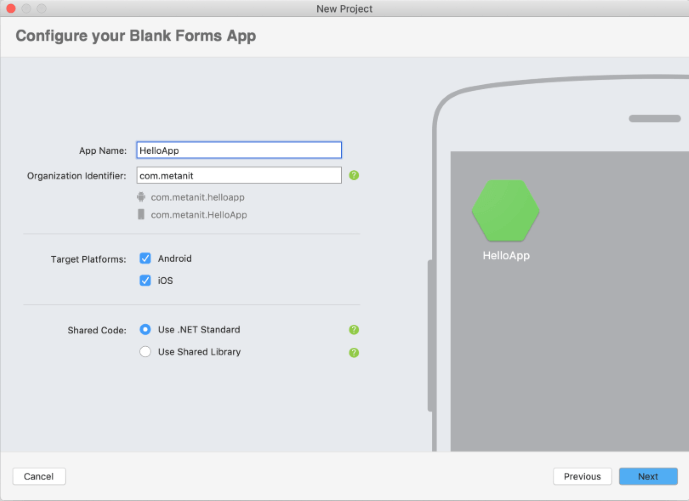
В моем случае приложение будет называться HelloApp, а идентификатор организации — com.metanit.
Поле Target Platforms позволяет указать целевые платформы, для которых будет создаваться проект.
По умолчанию отмечены платформы iOS и Android.
В поле Shared Code можно выбрать стратегию создания общего кода для проектов. Здесь есть два варианта:
-
Use .NET Standard
-
Use Shared Library
По умолчанию отмечена первая опция, собственно ее и оставим.
Оставим все остальные опции по умолчанию и нажмем на кнопку Next. После этого нам откроется окно настройки проекта:
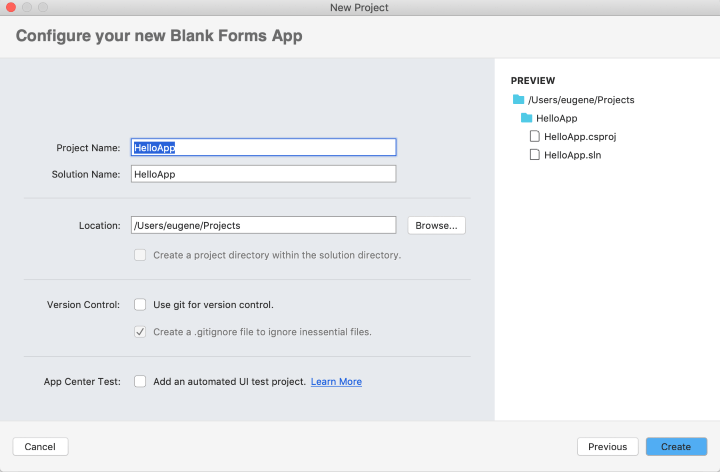
Здесь можно задать имя для проекта. По умолчанию оно совпадает с ранее указанным именем приложения. Хотя в принципе его можно изменить.
Оставим здесь все настройки по умолчанию и для создания проекта нажмем на кнопку Create. После этого будет создан проект Xamarin Forms.
В отличие от версии на Windows созданное решение будет иметь только два проекта — для iOS и Android.
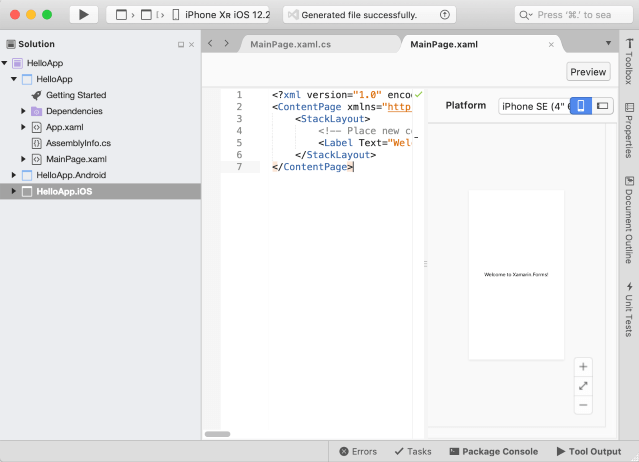
В созданный проект по умолчанию, как и в версии для Windows, добавляются файлы приложения App.xaml и App.xaml.cs, с которых
собственно и начинается выполнение программы.
А также файл интерфейса в xaml единственной страницы — HelloAppPage.xaml и файл связанного с ней кода C# —
HelloAppPage.xaml.cs.
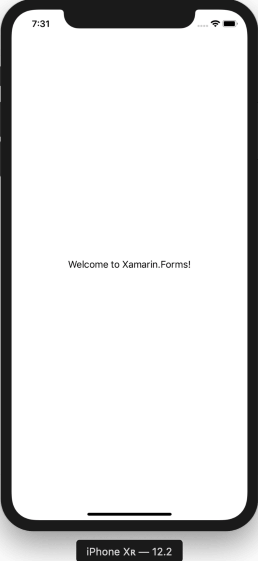
Запустим проект iOS на выполнение, выбрав нужный эмулятор и нажав вверху на черную стрелочку над структурой проекта. И отобразится
эмулятор iPhone, который отобразит содержимое страницы HelloAppPage.xaml: