About SSH key passphrases
You can access and write data in repositories on GitHub.com using SSH (Secure Shell Protocol). When you connect via SSH, you authenticate using a private key file on your local machine. For more information, see «About SSH.»
When you generate an SSH key, you can add a passphrase to further secure the key. Whenever you use the key, you must enter the passphrase. If your key has a passphrase and you don’t want to enter the passphrase every time you use the key, you can add your key to the SSH agent. The SSH agent manages your SSH keys and remembers your passphrase.
If you don’t already have an SSH key, you must generate a new SSH key to use for authentication. If you’re unsure whether you already have an SSH key, you can check for existing keys. For more information, see «Checking for existing SSH keys.»
If you want to use a hardware security key to authenticate to GitHub, you must generate a new SSH key for your hardware security key. You must connect your hardware security key to your computer when you authenticate with the key pair. For more information, see the OpenSSH 8.2 release notes.
Generating a new SSH key
You can generate a new SSH key on your local machine. After you generate the key, you can add the key to your account on GitHub.com to enable authentication for Git operations over SSH.
Note: GitHub improved security by dropping older, insecure key types on March 15, 2022.
As of that date, DSA keys (ssh-dss) are no longer supported. You cannot add new DSA keys to your personal account on GitHub.com.
RSA keys (ssh-rsa) with a valid_after before November 2, 2021 may continue to use any signature algorithm. RSA keys generated after that date must use a SHA-2 signature algorithm. Some older clients may need to be upgraded in order to use SHA-2 signatures.
-
Open TerminalTerminalGit Bash.
-
Paste the text below, substituting in your GitHub email address.
$ ssh-keygen -t ed25519 -C "your_email@example.com"Note: If you are using a legacy system that doesn’t support the Ed25519 algorithm, use:
$ ssh-keygen -t rsa -b 4096 -C "your_email@example.com"This creates a new SSH key, using the provided email as a label.
> Generating public/private ALGORITHM key pair.When you’re prompted to «Enter a file in which to save the key», you can press Enter to accept the default file location. Please note that if you created SSH keys previously, ssh-keygen may ask you to rewrite another key, in which case we recommend creating a custom-named SSH key. To do so, type the default file location and replace id_ssh_keyname with your custom key name.
> Enter a file in which to save the key (/Users/YOU/.ssh/id_ALGORITHM: [Press enter]> Enter a file in which to save the key (/c/Users/YOU/.ssh/id_ALGORITHM):[Press enter]> Enter a file in which to save the key (/home/YOU/.ssh/ALGORITHM):[Press enter] -
At the prompt, type a secure passphrase. For more information, see «Working with SSH key passphrases.»
> Enter passphrase (empty for no passphrase): [Type a passphrase]
> Enter same passphrase again: [Type passphrase again]
Adding your SSH key to the ssh-agent
Before adding a new SSH key to the ssh-agent to manage your keys, you should have checked for existing SSH keys and generated a new SSH key. When adding your SSH key to the agent, use the default macOS ssh-add command, and not an application installed by macports, homebrew, or some other external source.
-
Start the ssh-agent in the background.
$ eval "$(ssh-agent -s)"
> Agent pid 59566
Depending on your environment, you may need to use a different command. For example, you may need to use root access by running
sudo -s -Hbefore starting the ssh-agent, or you may need to useexec ssh-agent bashorexec ssh-agent zshto run the ssh-agent. -
If you’re using macOS Sierra 10.12.2 or later, you will need to modify your
~/.ssh/configfile to automatically load keys into the ssh-agent and store passphrases in your keychain.-
First, check to see if your
~/.ssh/configfile exists in the default location.$ open ~/.ssh/config > The file /Users/YOU/.ssh/config does not exist. -
If the file doesn’t exist, create the file.
$ touch ~/.ssh/config -
Open your
~/.ssh/configfile, then modify the file to contain the following lines. If your SSH key file has a different name or path than the example code, modify the filename or path to match your current setup.Host *.github.com AddKeysToAgent yes UseKeychain yes IdentityFile ~/.ssh/id_ed25519Notes:
-
If you chose not to add a passphrase to your key, you should omit the
UseKeychainline. -
If you see a
Bad configuration option: usekeychainerror, add an additional line to the configuration’s’Host *.github.comsection.Host *.github.com IgnoreUnknown UseKeychain
-
-
-
Add your SSH private key to the ssh-agent and store your passphrase in the keychain. If you created your key with a different name, or if you are adding an existing key that has a different name, replace id_ed25519 in the command with the name of your private key file.
$ ssh-add --apple-use-keychain ~/.ssh/id_ed25519Note: The
--apple-use-keychainoption stores the passphrase in your keychain for you when you add an SSH key to the ssh-agent. If you chose not to add a passphrase to your key, run the command without the--apple-use-keychainoption.The
--apple-use-keychainoption is in Apple’s standard version ofssh-add. In MacOS versions prior to Monterey (12.0), the--apple-use-keychainand--apple-load-keychainflags used the syntax-Kand-A, respectively.If you don’t have Apple’s standard version of
ssh-addinstalled, you may receive an error. For more information, see «Error: ssh-add: illegal option — K.» -
Add the SSH key to your account on GitHub. For more information, see «Adding a new SSH key to your GitHub account.»
If you have GitHub Desktop installed, you can use it to clone repositories and not deal with SSH keys.
-
Ensure the ssh-agent is running. You can use the «Auto-launching the ssh-agent» instructions in «Working with SSH key passphrases», or start it manually:
# start the ssh-agent in the background $ eval "$(ssh-agent -s)" > Agent pid 59566 -
Add your SSH private key to the ssh-agent. If you created your key with a different name, or if you are adding an existing key that has a different name, replace id_ed25519 in the command with the name of your private key file.
$ ssh-add ~/.ssh/id_ed25519 -
Add the SSH key to your account on GitHub. For more information, see «Adding a new SSH key to your GitHub account.»
-
Start the ssh-agent in the background.
$ eval "$(ssh-agent -s)"
> Agent pid 59566
Depending on your environment, you may need to use a different command. For example, you may need to use root access by running
sudo -s -Hbefore starting the ssh-agent, or you may need to useexec ssh-agent bashorexec ssh-agent zshto run the ssh-agent. -
Add your SSH private key to the ssh-agent. If you created your key with a different name, or if you are adding an existing key that has a different name, replace id_ed25519 in the command with the name of your private key file.
$ ssh-add ~/.ssh/id_ed25519 -
Add the SSH key to your account on GitHub. For more information, see «Adding a new SSH key to your GitHub account.»
Generating a new SSH key for a hardware security key
If you are using macOS or Linux, you may need to update your SSH client or install a new SSH client prior to generating a new SSH key. For more information, see «Error: Unknown key type.»
-
Insert your hardware security key into your computer.
-
Open TerminalTerminalGit Bash.
-
Paste the text below, substituting in the email address for your account on GitHub.
$ ssh-keygen -t ed25519-sk -C "YOUR_EMAIL"Note: If the command fails and you receive the error
invalid formatorfeature not supported,you may be using a hardware security key that does not support the Ed25519 algorithm. Enter the following command instead.$ ssh-keygen -t ecdsa-sk -C "your_email@example.com" -
When you are prompted, touch the button on your hardware security key.
-
When you are prompted to «Enter a file in which to save the key,» press Enter to accept the default file location.
> Enter a file in which to save the key (/Users/YOU/.ssh/id_ed25519_sk): [Press enter]> Enter a file in which to save the key (/c/Users/YOU/.ssh/id_ed25519_sk):[Press enter]> Enter a file in which to save the key (/home/YOU/.ssh/id_ed25519_sk):[Press enter] -
When you are prompted to type a passphrase, press Enter.
> Enter passphrase (empty for no passphrase): [Type a passphrase] > Enter same passphrase again: [Type passphrase again] -
Add the SSH key to your account on GitHub. For more information, see «Adding a new SSH key to your GitHub account.»
Question: How do I generate ssh private and public keys (to be used in GitHub/GitLab) using command line.
The command below generates the error
sh.exe": syntax error near unexpected token '('
I am using Windows XP.
$ ssh-keygen -t rsa -C "xxxx@gmail.com"
Generating public/private rsa key pair.
Enter file in which to save the key (/c/Users/xxxx/.ssh/id_rsa):
Enter passphrase (empty for no passphrase):
Enter same passphrase again:
Your identification has been saved in /c/Users/xxxx/.ssh/id_rsa.
Your public key has been saved in /c/Users/xxxx/.ssh/id_rsa.pub.
The key fingerprint is:
01:0f:f4:3b:ca:85:d6:17:a1:7d:f0:68:9d:f0:a2:db xxxx@gmail.com
![]()
asked Sep 30, 2010 at 8:01
![]()
1
The command to run is only
ssh-keygen -t rsa -C "you@example.com"
All the rest beginning with line 2 of your script is the output of ssh-keygen.
And replace you@example.com with your email address.
Have a look at the manual for ssh-keygen to look for additional options. You should probably use a longer key by adding -b 4096 to the option list.
answered Sep 30, 2010 at 8:08
![]()
ResiduumResiduum
11.9k7 gold badges39 silver badges70 bronze badges
6
Here is the command
ssh-keygen -t rsa -b 4096 -C "[your github's email]"
# Creates a new ssh key
# Generating public/private rsa key pair.
This will generate a key for you. You have to copy that and insert into your Github’s account (just one time).
Steps how to do It
![]()
answered May 6, 2016 at 14:54
![]()
1
Step 1: Generate Your SSH Key
$ ssh-keygen -t rsa -b 4096 -C "example@example.com"
Step 2: Use the Key
$ eval $(ssh-agent -s)
Then add the key we just generated. If you selected a different path than the default, be sure to replace that path in the command.
ssh-add ~/.ssh/id_rsa
Step 3: Add the SSH Key on GitHub
clip < ~/.ssh/id_rsa.pub
if clip not found then add the next command
cat ~/.ssh/id_rsa.pub
Finally Result something like on your cmd
ssh-rsa AAAAB3NzaC1yc2EAAAAD173Oe1kp0Ojnsn7sRWt/XT5nFH3CSTv6VWyxq4YUJ4ZykWa5opyiAJmvtjxOMCmVTuX2r1T4Livn0foHGt7+66FJXrXUQgyJ4RXanufb3bAekxbFPg3S6Gyr2kk+I3TYWcFsLLwjU0VVJwodQkpyygAUzhomx9OQ0FMpfkQa5VrZnaSLjjtNOUSAaq30e7JWYxtoVih2HfVkcmqc53QjY4T3Xb0cmLZF3EmwCeB66dgJtpTNMvM54ceD30INsaMFNqG8XjbJtGUCHYEIR5l/LI20K5F25BRTnCzRV9dB5FUJ8taVMGRHJob9PDUdxpA2HEJYilm8ZbLbRmKJtU+H91WNCG6pvy9Yf9MREkOZQHcWIuAsH8uJvTTbqm1eAY2g34FjarRdqZIpvdxkrErDHqh4k42owNEmHjSaAw53Y8M54fjBdFHTjGDqHBamlKcIzQbin/czFq1a+pgopIANDhZjWZNvMiTak7BjVrVOciKD3Pa/KKy03nSEfEGExLbFEi1Q8QEGd6idtUAjL7fyVPWatRwCnOvGLMPTk73m7t0IAYTm4n7dO0S5OeWTUPTT+8vIfFCmE9OT2aJDIpZY1+f8Q== youremail@gmail.com
copy from your cmd and go to your GitHub account
setting find ssh and gpg keys
answered Jul 14, 2021 at 7:47
![]()
Naved KhanNaved Khan
1,52114 silver badges13 bronze badges
Solution: ssh-keygen -t rsa
Explanation : ssh-keygen is a tool for creating new authentication key pairs for SSH. Such key pairs are used for automating logins, single sign-on, and for authenticating hosts
(for example cloning project from your private repo on Github straight to your aws machine).
Options: You can perform more complicated operations and using flags in order to generate a tailor-made key according to your use case, extended functionality are more powerful and secured. The basic flags are: bits (Large integers making the the RSA key be less vulnerable and hard to crack), passphrase (similar to password) , type (dsa/ecdsa/ed25519/rsa) , comment for the specific ssh token (email or user name) and output key (default store on ~/.ssh/ path)
Synopsis: ssh-keygen [-q] [-b bits] [-t dsa | ecdsa | ed25519 | rsa] [-N new_passphrase] [-C comment] [-f output_keyfile]
Example:
ssh-keygen -b 4096 -t rsa -n "tHiSiaPasSWoRd" -c "johnDoe@gmail.com" -f ~/.ssh/id_rsa
answered May 24, 2020 at 18:20
![]()
avivamgavivamg
10.9k1 gold badge62 silver badges51 bronze badges
Generate SSH key using below command
ssh-keygen -trsa -C user@xyz.com
just hit enter to apply the default value for all the inputs it asks
the output will be
Generating public/private rsa key pair.
Enter file in which to save the key (/home/user/.ssh/id_rsa):
/home/user/.ssh/id_rsa already exists.
Overwrite (y/n)? y
Enter passphrase (empty for no passphrase):
Enter same passphrase again:
Your identification has been saved in /home/user/.ssh/id_rsa
Your public key has been saved in /home/user/.ssh/id_rsa.pub
The key fingerprint is:
SHA256:xxxxxxxxxxxxxxxxxxxxxxxxxxxxxxxxxxxxxxxxxxxxxxx user@xyz.com
The key's randomart image is:
+---[RSA xxxx]----+
| ..++xX*Ox        |
| x..xx/+.x. + .   |
|.. +..*+xx x +    |
|... +x+o x.       |
|x.. + +..x        |
|xx.. x            |
|...               |
|x x               |
|x  x.             |
+----[SHA256]------+
just use the cat command to log the ssh key file contents on the terminal(use your own path here).
cat /home/user/.ssh/id_rsa.pub
the output will be
ssh-rsa xxxxxxxxxxxxxxxxxxxxxxxxxxxxxxxxxxxxxxxxxxxxxxxxxxxxxxxxxxxxxxxxxxxxxxxxxxxxxxxxxxxxxxxxxxxxxxxxxxxxxxxxxxxxxxxxxxxxxxxxxxxxxxxxxxxxxxxxxxxxxxxxxxxxxxxxxxxxxxxxxxxxxxxxxxxxxxxxxxxxxxxxxxxxxxxxxxxxxxxxxxxxxxxxxxxxxxxxxxxxxxxxxxxxxxxxxxxxxxxxxxxxxxxxxxxxxxxxxxxxxxxxxxxxxxxxxxxxxxxxxxxxxxxxxxxxxxxxxxxxxxxxxxxxxxxxxxxx user@xyz.com
copy the contents and go to your github account go to settings under Account settings>SSH and GPG keys click on New SSH key, provide the name you wish and paste the copied contents in the value and save. that’s it you are ready to commit your changes without using username, password every time.
answered Dec 3, 2021 at 17:12
![]()
Akhil SAkhil S
77510 silver badges15 bronze badges
Just apply two commands :
ssh-keygen -t rsa -b 4096
cat ~/.ssh/id_rsa.pub
Copy ssh key and paste on browser
answered Jun 2, 2022 at 8:20
![]()
4.3 Git на сервере — Генерация открытого SSH ключа
Генерация открытого SSH ключа
Как отмечалось ранее, многие Git-серверы используют аутентификацию по открытым SSH-ключам.
Для того чтобы предоставить открытый ключ, каждый пользователь в системе должен его сгенерировать, если только этого уже не было сделано ранее.
Этот процесс аналогичен во всех операционных системах.
Сначала вам стоит убедиться, что у вас ещё нет ключа.
По умолчанию пользовательские SSH ключи сохраняются в каталоге ~/.ssh домашнем каталоге пользователя.
Вы можете легко проверить наличие ключа перейдя в этот каталог и посмотрев его содержимое:
$ cd ~/.ssh
$ ls
authorized_keys2  id_dsa       known_hosts
config            id_dsa.pub
Ищите файл с именем id_dsa или id_rsa и соответствующий ему файл с расширением .pub.
Файл с расширением .pub — это ваш открытый ключ, а второй файл — ваш приватный ключ.
Если указанные файлы у вас отсутствуют (или даже нет каталога .ssh), вы можете создать их используя программу ssh-keygen, которая входит в состав пакета SSH в системах Linux/Mac, а для Windows поставляется вместе с Git:
$ ssh-keygen -o
Generating public/private rsa key pair.
Enter file in which to save the key (/home/schacon/.ssh/id_rsa):
Created directory '/home/schacon/.ssh'.
Enter passphrase (empty for no passphrase):
Enter same passphrase again:
Your identification has been saved in /home/schacon/.ssh/id_rsa.
Your public key has been saved in /home/schacon/.ssh/id_rsa.pub.
The key fingerprint is:
d0:82:24:8e:d7:f1:bb:9b:33:53:96:93:49:da:9b:e3 schacon@mylaptop.local
Сначала программа попросит указать расположение файла для сохранения ключа (.ssh/id_rsa), затем дважды ввести пароль для шифрования.
Если вы не хотите вводить пароль каждый раз при использовании ключа, то можете оставить его пустым или использовать программу ssh-agent.
Если вы решили использовать пароль для приватного ключа, то настоятельно рекомендуется использовать опцию -o, которая позволяет сохранить ключ в формате, более устойчивом ко взлому методом подбора, чем стандартный формат.
Теперь каждый пользователь должен отправить свой открытый ключ вам или тому, кто администрирует Git-сервер (подразумевается, что ваш SSH-сервер уже настроен на работу с открытыми ключами).
Для этого достаточно скопировать содержимое файла с расширением .pub и отправить его по электронной почте.
Открытый ключ выглядит примерно так:
$ cat ~/.ssh/id_rsa.pub
ssh-rsa AAAAB3NzaC1yc2EAAAABIwAAAQEAklOUpkDHrfHY17SbrmTIpNLTGK9Tjom/BWDSU
GPl+nafzlHDTYW7hdI4yZ5ew18JH4JW9jbhUFrviQzM7xlELEVf4h9lFX5QVkbPppSwg0cda3
Pbv7kOdJ/MTyBlWXFCR+HAo3FXRitBqxiX1nKhXpHAZsMciLq8V6RjsNAQwdsdMFvSlVK/7XA
t3FaoJoAsncM1Q9x5+3V0Ww68/eIFmb1zuUFljQJKprrX88XypNDvjYNby6vw/Pb0rwert/En
mZ+AW4OZPnTPI89ZPmVMLuayrD2cE86Z/il8b+gw3r3+1nKatmIkjn2so1d01QraTlMqVSsbx
NrRFi9wrf+M7Q== schacon@mylaptop.local
Более подробное руководство по созданию SSH-ключей и конфигурации клиента на различных системах вы можете найти в руководстве GitHub.
- Personal access token (PAT) based authentication
- Saving tokens in Windows
- Saving tokens in Mac
- Saving tokens in Linux
- SSH based authentication
- Checking for existing SSH keys
- Generating a new SSH key
- Adding the SSH key to the ssh-agent process
- Adding SSH key to your GitHub account
- Cloning a GitHub repo using SSH
- Converting an existing HTTPS local repo to SSH
- Avoiding the need to enter a passphrase
Prior to August 13, 2021, you were allowed to authenticate by typing a username and password every time you pushed or pulled from GitHub. For example, when pushing changes made in a local repo to GitHub, the session would look something like this:
$ git push
> Username for 'https://github.com': jdcolby
> Password for 'https://jdcolby@github.com': ******
Using your GitHub password is no longer allowed after August 13, 2021. Instead, you need to adopt one of several authentication options. Two of these options are covered here: Personal Access Token (PAT) or SSH-based authentication. Both techniques require some degree of configuration on both your GitHub account and your local machine, but the PAT will be the easiest to set up for your students.
Note that your choice of authentication will be dictated by the way you connect to your GitHub repo. If you use PAT, you will connect to your repo over HTTPS–this is the connection used in this workshop. If you use an SSH key, you will connect to your GitHub repo over SSH.
For example, if jdcolby clones repo1 from her GitHub account using HTTPS, she would type:
$ git clone https://github.com/jdcolby/repo1.gitIf jdcolby clones that same repo1 repository from her GitHub account using SSH, she would type:
$ git clone git@github.com:jdcolby/repo1.gitInstructions on setting up authentication using both techniques follow.
Personal access token (PAT) based authentication
First, you need to follow these steps on GitHub:
-
Click on your avatar (upper right-hand corner) and select Settings.
-
On the left sidebar, click on Developer settings (this should be near the bottom of the left sidebar.
-
In the left sidebar, click Personal access tokens.
-
Click Generate new token (button near the upper left-hand side).
-
In the Note field, assign a name to this token such as the local computer you are creating this token for.
-
In the next field, you can set an expiration date for this token, or make it permanent. In this example, we’ll set it for 90 days.
-
From the scopes menu, select repo. This will allow you to read/write to your repo.
-
Click Generate token at the bottom of the page.
-
Copy and temporarily save the token before closing the window.
When copying the token id, be careful not to add any empty spaces to the beginning or end of the token. It might be a good idea to temporarily paste the token into a plain text editor.
Note that you will not be able to access the token string once you exit the window! You might want to keep this window open until you’ve completed the steps outlined next.
Once you’ve created your token on GitHub, you simply substitute your GitHub password with your access token. For example, if you are cloning a private repo that your account has access to, you would enter the above token instead of your GitHub password.
$ git clone https://github.com/jdcolby/repo.git
Username: jdcolby
Password: <your token>
When you paste your token, you will not see it displayed on the command line. This might lead you to believe that it did not paste. Do not attempt a re-paste since this will only add the token to the end of the already pasted token.
Pasting your token each time you push or pull from your repo may prove cumbersome after a while. It might therefore be best to cache your token. This step is OS specific and is highlighted in the next subsections.
Saving tokens in Windows
If you are using a Windows based Git application, you might see the following window pop-up when you are first asked to enter your token.
If so, you can paste the token into the Personal Access Token field.
Alternatively, you can add a git setting via the Windows Bash environment as follows:
git config --global credential.helper wincredNote that this
configoption only works in the Git for Windows Bash shell. This option will not work in a Windows WSL Ubuntu environment. If you are using WSL Ubuntu, you need to follow the Linux instructions listed below.
The credentials get stored in Windows’ Credential Manager. You can delete this stored credential by accessing the Credential Manager via Control Panel >> All Control Panel Items >> Credential Manager or by simply typing Credential Manager in the Windows’ task bar.
Saving tokens in Mac
You’ll need the OSX keychain credential helper. If you installed Git using Homebrew or via the Xcode command line, then osxkeychain helper should be part of the installation.
You can check for its installation via the following command:
$ git credential-osxkeychainTo have Git store the token in osxkeychain, type:
$ git config --global credential.helper osxkeychainThe next time you are prompted for a user name and password, simply type your GitHub account name, then your personal access token. This will be a one time operation after which the token will be permanently stored.
Click here to for more information on using Keychain with Git.
Saving tokens in Linux
To temporarily cache the token on Linux, use the following command:
$ git config --global credential.helper cacheNote, however, that the token is only cached for 15 minutes by default. If you want the token to be cached for a longer period of time, add the 'cache --timeout=XX' option where XX is time in seconds. For example, to cache the token for 24 hours (86,400 seconds), type:
$ git config --global credential.helper 'cache --timeout=86400'To permanently cache the token on Linux, type: (https://stackoverflow.com/a/12240995):
$ git config credential.helper storeThe next time you are prompted for your GitHub user name and token, the information will be stored permanently in a .git-credentials file under your home folder. Note, however, that this file is not encrypted. For a more secure permanent solution, you might want to check the SSH based authentication option.
SSH based authentication
NOTE: If you adopt an SSH based approach to authentication, you will need to connect to your repo via
ssh. For example, if userjdcolby’s repo name isrepo1, you would connect to it via:
$ git@github.com:jdcolby/repo1.gitThis differs from the HTTPS option adopted in this workshop:
$ https://github.com/jdcolby/repo1.git Checking for existing SSH keys
You might or might not already have public keys under ~/.ssh file.
$ ls -al ~/.sshIf you do, look for the files ending with .pub. The contents of these public keys are used to link your local repos to your GitHub account. By default, the filenames of the public keys are one of the following: id_ed25519.pub or id_rsa.pub. If these files exist in your ~/.ssh folder, you can jump to the Adding SSH key to your GitHub account section of this tutorial.
Generating a new SSH key
In your Bash shell, type the following (note that the email address should be the one tied to your GitHub account). For example, jdcolby would type the following:
$ ssh-keygen -t ed25519 -C "jdcolby@my_college.edu"Generating public/private ed25519 key pair.
Enter file in which to save the key (/home/jdcolby/.ssh/id_ed25519):This creates a new SSH key, using the provided email as a label. Accept the default file location and press the Enter key.
At the prompt, type a secure passphrase. This passphrase will be used instead of your password when performing a Git/GitHub transaction from your computer, so don’t forget it!
> Enter passphrase (empty for no passphrase): [Type a passphrase]
> Enter same passphrase again: [Type passphrase again]
You will then see an output similar to this:
Your identification has been saved in /home/jdcolby/.ssh/id_ed25519
Your public key has been saved in /home/jdcolby/.ssh/id_ed25519.pub
The key fingerprint is:
SHA256:AuErG+8I8YUkRbNn1iNiGB/T3P6p4oWtmHA821i3bPO jdcolby@my_college.edu
The key's randomart image is:
+--[ED25519 256]--+
|    ..o.o        |
|.o . o o o       |
|o O o . o .    . |
|.* * o . .  . o  |
|*++ + . S  . E   |
|**oo   .    . .  |
|*++.    .    o   |
|o=o.     . .o.   |
|+o.       ..o..  |
+----[SHA256]-----+
Adding the SSH key to the ssh-agent process
Next, you need to add the previously generated key to a process called ssh-agent.
Windows and Linux
$ eval "$(ssh-agent -s)"
$ ssh-add ~/.ssh/id_ed25519
You’ll then be prompted to enter the passphrase used in the earlier step.
Enter passphrase for /home/jdcolby/.ssh/id_ed25519:
Identity added: /home/jdcolby/.ssh/id_ed25519 (jdcolby@my_college.edu)
Mac
$ eval "$(ssh-agent -s)"Edit (or create it if non-existent) the ~/.ssh/config file by adding the following lines of code.
Host *
  AddKeysToAgent yes
  UseKeychain yes
  IdentityFile ~/.ssh/id_ed25519
Next, add the key to the ssh-agent. Note the use of the -K option.
$ ssh-add -K ~/.ssh/id_ed25519Adding SSH key to your GitHub account
Now that you’ve completed the step on your computer, you will will switch to your GitHub account. But before you do, you will need to copy the SSH public key generated on the previous step to your clipboard.
In ~.ssh you should see a file ending with .pub such as id_ed25519.pub. This is the public key generated earlier in this tutorial that you will share with your GitHub account.
Open the contents of the ~/.ssh/id_ed25519.pub file in your home folder.
$ cat ~/.ssh/id_ed25519.pubCopy its contents. It should start with ssh-ed5519 ... and end with your email address.
- On GitHub, click on your avatar, then select Settings.
- On the left sidebar, click on SSH and GPG keys.
- Click on New SSH key.
- Assign a Title for this key (this is only used for your reference but is should be descriptive enough for you to know which client computer it is referencing).
- Paste the key from the
.ssh/id_ed25519.pubfile in the Key field (be careful not to add empty spaces). - Click Add SSH key. You might be prompted to type your GitHub password.
Next, you can test your connection from your Bash environment.
In Bash, type the following (do not substitute the git@github.com address).
$ ssh -T git@github.comYou might see the following warning (including the public key as shown below):
The authenticity of host 'github.com (140.82.114.3)' can't be established.
RSA key fingerprint is SHA256:nThbg6kXUpJWGl7E1IGOCspRomTxdCARLviKw6E5SY8.
Are you sure you want to continue connecting (yes/no/[fingerprint])?
Type yes to continue.
The next warning should list your account name (e.g. jdcolby in this working example).
Warning: Permanently added 'github.com' (RSA) to the list of known hosts.
Hi jdcolby! You've successfully authenticated, but GitHub does not provide shell access.
Cloning a GitHub repo using SSH
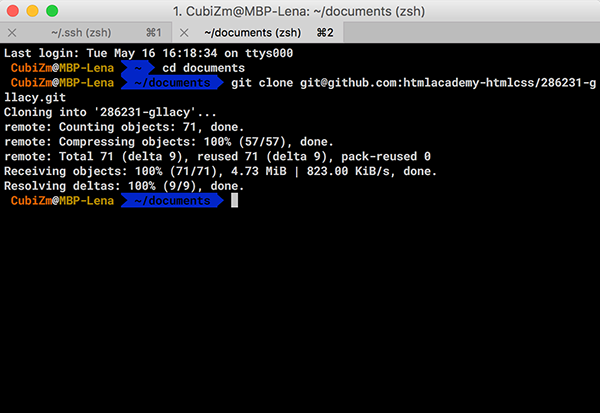
At this point, you should be all set. As mentioned at the beginning of this page, when using SSH to connect to your GitHub repo, you need to use the SSH protocol. For example, to clone repo1, you would type:
$ git clone git@github.com:jdcolby/repo1.gitYou might be prompted for the passphrase that was used in an earlier step when you created the SSH key.
Converting an existing HTTPS local repo to SSH
If you’ve already cloned a repo using HTTPS on your local computer, you will need to make a few changes to your local repo before benefitting from the SSH system.
First, check that you are indeed using HTTPS:
$ git remote -vorigin https://github.com/jdcolby/repo1.git (fetch)
origin https://github.com/jdcolby/repo1.git (push)To change from a HTTPS URL to a SSH URL, type:
$ git remote set-url origin git@github.com:jdcolby/repo1.gitAvoiding the need to enter a passphrase
If you do not wish to type your passphrase every time you perform a Git/GitHub transaction you can try one of the suggested methods below for your OS.
Windows and Linux
You need to instruct Bash to launch ssh-agent every time you start a new Bash session. One approach is to edit (or create if non existent) ~/.bashrc by adding the following lines:
env=~/.ssh/agent.env

agent_load_env () { test -f "$env" && . "$env" >| /dev/null ; }

agent_start () {
    (umask 077; ssh-agent >| "$env")
    . "$env" >| /dev/null ; }

agent_load_env

# agent_run_state: 0=agent running w/ key; 1=agent w/o key; 2= agent not running
agent_run_state=$(ssh-add -l >| /dev/null 2>&1; echo $?)

if [ ! "$SSH_AUTH_SOCK" ] || [ $agent_run_state = 2 ]; then
    agent_start
    ssh-add
elif [ "$SSH_AUTH_SOCK" ] && [ $agent_run_state = 1 ]; then
    ssh-add
fi

unset env
Once saved, every time you fire up a new Windows Bash session, you’ll be prompted for this passphrase at the beginning of the session at which point you will no longer be requested to enter the passphrase.
Mac
On most recent versions of Mac you will probably be prompted to save the passphrase to your Mac keychain, if not, you can add the following lines to your ~/.ssh/config file:
Host *
  AddKeysToAgent yes
  UseKeychain yes
  IdentityFile ~/.ssh/id_ed25519
Back to the home page
Git and GitHub are essential tools for every developer. They’re widely used in almost every kind of software development project.
There are other Git hosting services like Gitlab and Bitbucket, but GitHub is the most popular choice for developers. You can even edit your profile to seem more attractive to recruiters.
You can use Git and GitHub to organize your projects, collaborate with other developers, and — of course — at Kinsta.
But because Git and GitHub are related yet different tools, you need to update your workflow with each of them constantly.
Pro tip: use SSH keys for each one of your machines… and use this guide to get started 🔑😄. So, in this tutorial, you’ll learn what they are, some of their advantages, and how to generate and configure GitHub SSH keys.Click to Tweet
We recommend using SSH keys for each one of your machines. So, in this tutorial, you’ll learn what they are, some of their advantages, and how to generate and configure GitHub SSH keys.
Let’s get started!
What Are SSH Keys?
Simply put, SSH keys are credentials used for the SSH (Secure Shell) protocol to enable secure access to remote computers over the internet. Usually, that authentication occurs in a command-line environment.
This protocol is based on client-server architecture, which means you as the user (or “client”) need to use special software, called an SSH client, to log into a remote server and execute commands. This is basically what you’re doing when authenticating via a terminal to GitHub.
But SSH is not only used for GitHub. It’s broadly used by other platforms like Kinsta, Google Cloud, and Amazon Web services to create a secure channel to access their services.
Now, heading into how SSH keys really work, you need to understand the differences between public and private keys.
Public vs Private Keys
Let’s start with the basics.
The SSH protocol uses a technique of cryptography called asymmetric encryption. This term may sound complicated and weird, but nothing could be further from the truth.
Basically, asymmetric encryption is a system that uses a pair of keys, namely public and private keys.
As you may guess, the public key can be shared with anyone. Its main purpose is to encrypt data, converting the message into secret code or ciphertext. This key is usually sent to other systems — for example, servers — to encrypt the data before sending it over the internet.
On the other hand, the private key is the one that you must keep to yourself. It’s used to decrypt the encrypted data with your public key. Without it, it’s impossible to decode your encrypted information.
This method allows you and the server to keep a safe communication channel for transmitting the information.
Here’s what happens in the background when you connect to a server via SSH:
- The client sends the public key to the server.
- The server asks the client to sign a random message encrypted with the public key using the private key.
- The client signs the message and forwards the result to the server.
- A secure connection is established between the client and the server.
It’s important to keep your private keys safe and share them with anyone under no circumstances. They’re literally the key to all the information sent to you.
Using SSH Keys With GitHub
Since August 13, 2021, Github no longer accepts password authentication for command-line access. This means now you need to authenticate via a personal access token or use an SSH key (a little bit more convenient).
Here’s what happens when you try to authenticate with your GitHub password over HTTP in a terminal:
Username for 'https://github.com': yourusername

Password for 'https://[email protected]':

remote: Support for password authentication was removed on August 13, 2021. Please use a personal access token instead.

remote: Please see https://github.blog/2020-12-15-token-authentication-requirements-for-git-operations/ for more information.

fatal: Authentication failed for 'https://github.com/yourusername/repository.git/'
GitHub needs your public key to authorize you to edit any of your repos via SSH.
Let’s see how you can generate SSH keys locally.
How to Generate SSH Keys Locally
Now that you understand a little bit about the SSH protocol and the differences between public and private keys, it’s time to set up the secure SSH channel between your machine and your GitHub repos.
Before we move forward, you should already have a GitHub account, and a terminal/command prompt with Git installed in your system. If you’re running Windows, make sure you installed Git bash, which has all the tools you’ll need to follow along with this tutorial built-in.
The OpenSSH client is the most popular open-source software used to connect via SSH. You won’t need to worry about your operating system because it’s installed by default on Linux, macOS, and Windows 10.
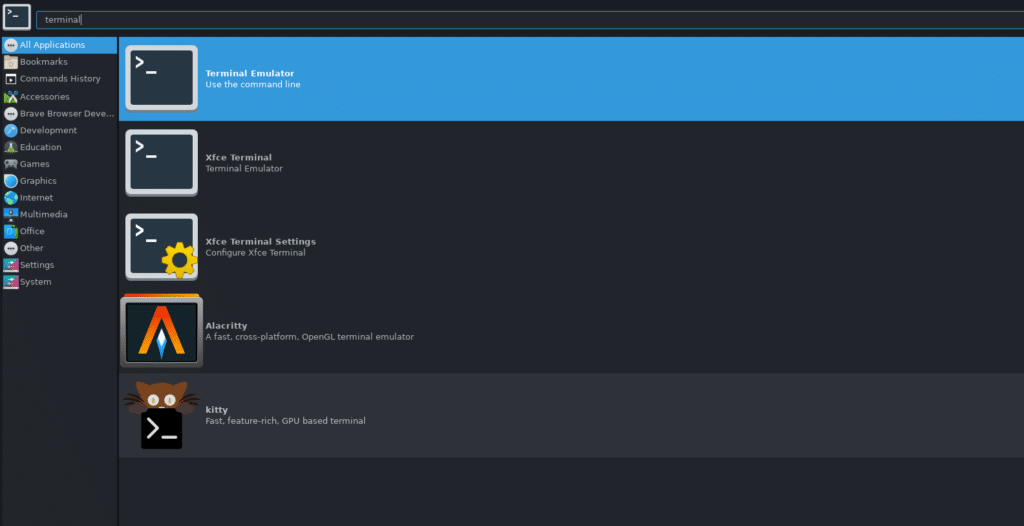
You need to fire up a command prompt on Windows or a terminal on Unix-based systems to generate local SSH keys. Usually, you can do this by searching for “terminal”, “cmd”, or “powershell” in your application panel, then clicking the icon that shows up.
After doing this, you should have a window similar to the following image.

Run the following command to generate a local SSH pair of keys:
ssh-keygen -t ed25519 -C "[email protected]"It’s time to tell you a secret: No one can really remember this command! Most developers have to Google it every time because:
- It’s a really long command, with forgettable, random-seeming numbers.
- We use it rarely, so it’s not worth it to commit it to memory most of the time.
However, it’s important to understand each command that we introduce into our terminals, so let’s see what each part of this one means.
- ssh-keygen: The command-line tool used for creating a new pair of SSH keys. You can see its flags with
ssh-keygen help - -t ed25519: The
-tflag is used to indicate the algorithm used to create the digital signature of the key pair. If your system supports it,ed25519is the best algorithm you can use to create SSH key pairs. - -C “email”: The
-cflag is used to provide a custom comment at the end of the public key, which usually is the email or identification of the creator of the key pair.
After you’ve typed the command into your terminal, you’ll have to enter the file to which you would like to save the keys. By default, it’s located in your home directory, in a hidden folder named “.ssh”, but you can change it to whatever you like.
Then you’ll be asked for a passphrase to add to your key pair. This adds an extra layer of security if, at any time, your device is compromised. It is not obligatory to add a passphrase, but it’s always recommended.
This is what the whole process looks like:
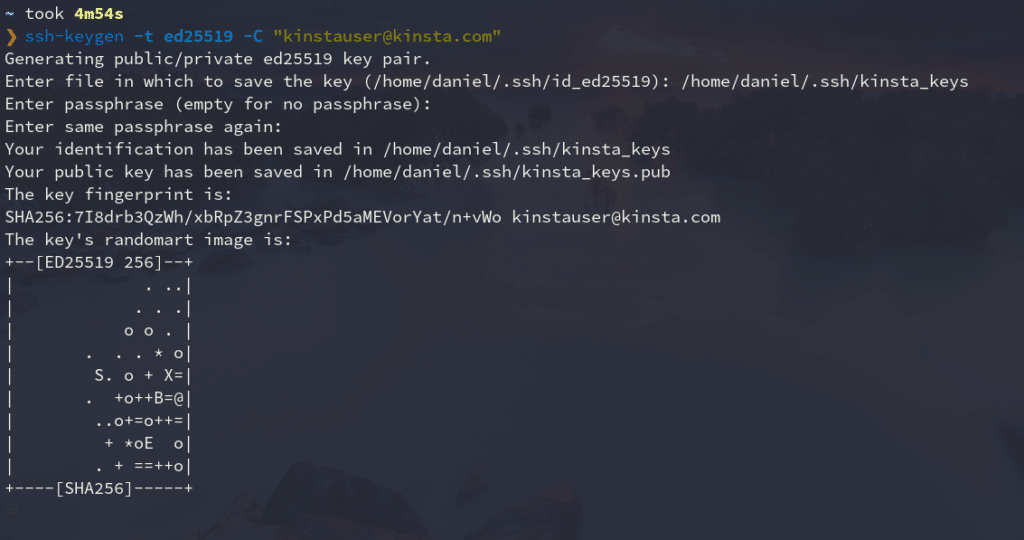
As you can see, this command generates two files in the directory you selected (commonly ~/.ssh): the public key with the .pub extension, and the private one without an extension.
We’ll show you how to add the public key to your GitHub account later.
Add SSH Key to ssh-agent
The ssh-agent program runs in the background, holds your private keys and passphrases safely, and keeps them ready to use by ssh. It’s a great utility that saves you from typing your passphrase every time you want to connect to a server.
Because of this, you’re going to add your new private key to this agent. Here’s how:
- Make sure ssh-agent is running in the background.
eval `ssh-agent`
# Agent pid 334065
If you get a message similar to this if everything is fine. It means the ssh-agent is running under a particular process id (PID).
- Add your SSH private key (the one without extension) to the ssh-agent.
ssh-add ~/.ssh/kinsta_keysReplace kinsta_keys with the name of your SSH key. If this is the first key you’ve created, it should be named “id_algorithm_used,” for instance, id_ed25519.
Add SSH Key to GitHub Account
The final step is to add your public key to your GitHub account. Just follow these instructions:
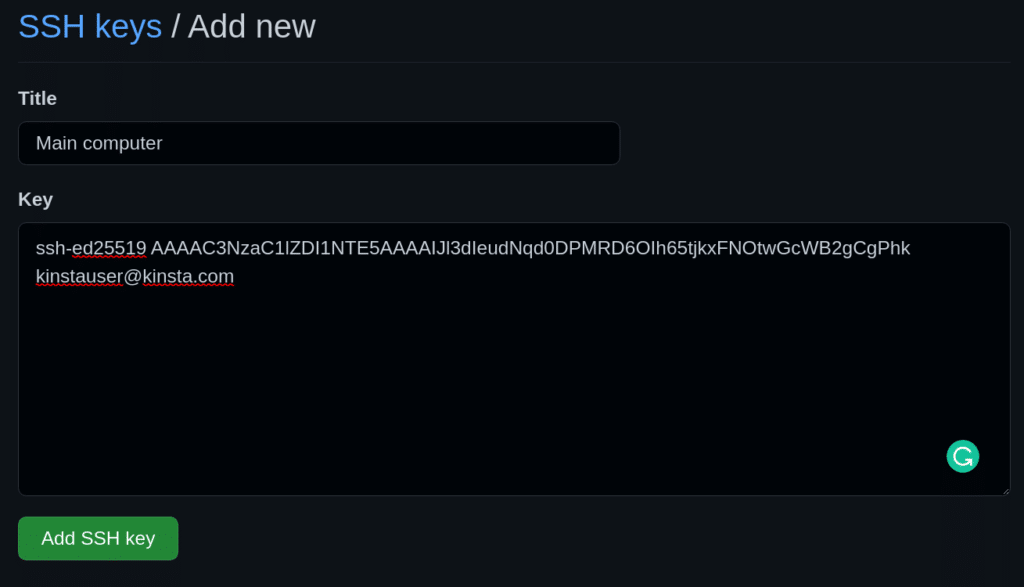
- Copy your SSH public key to your clipboard. You can open the file where it is located with a text editor and copy it, or use the terminal to show its contents.
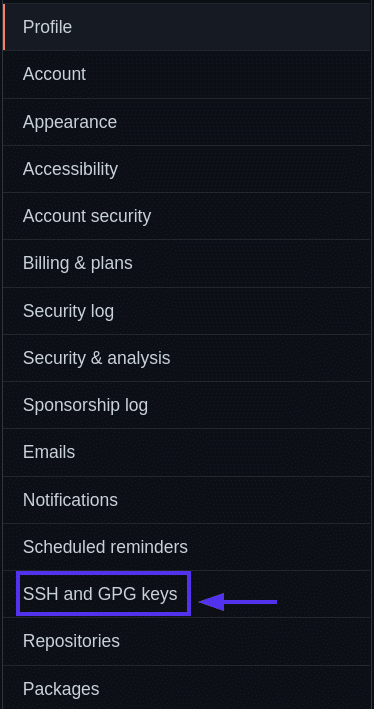
cat ~/.ssh/kinsta_keys.pub # ssh-ed25519 AAAAC3NzaC1lZDI1NTE5AAAAIJl3dIeudNqd0DPMRD6OIh65tjkxFNOtwGcWB2gCgPhk [email protected] - Log into GitHub ] and go to the upper-right section of the page, click in your profile photo, and select Settings.

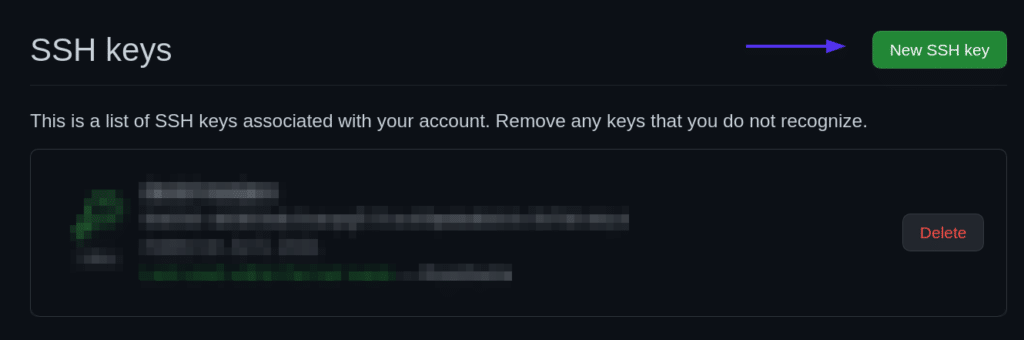
GitHub settings. - Then, in profile your settings, click SSH and GPG keys.

SSH and GPG keys. - Click the New SSH key button.

New SSH key button. - Give your new SSH key on GitHub a Title — usually, the device you’ll use that key from. And then paste the key into the Key area.

Add a new SSH key form. - Add your SSH key.

Add SSH key button.


Test SSH Connection With a Repo Push
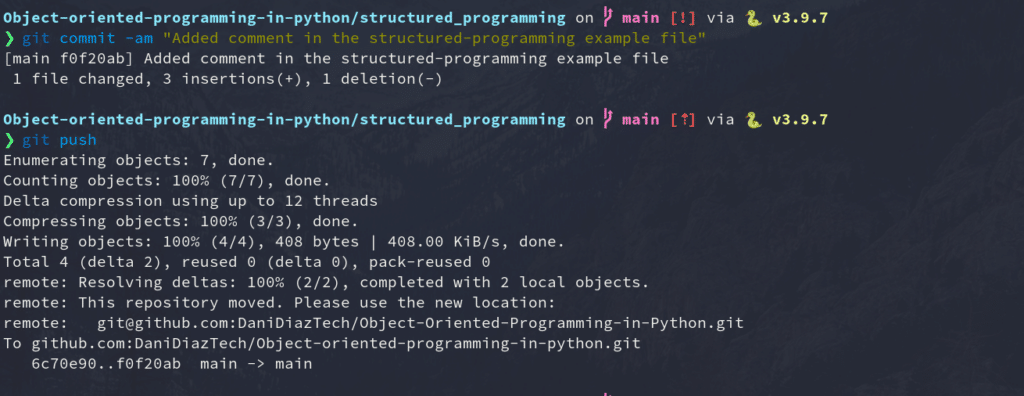
It’s time to test everything you’ve done so far. You’re going to change, commit, and push to one of your existing repos using SSH to ensure your connection is set up correctly.
For our example, we will modify the simple HTML site we created in our Git for Web Development tutorial.
First, we’ll need to clone the repository into our local machine. We can go to the repo page on GitHub and copy the SSH address it provides.
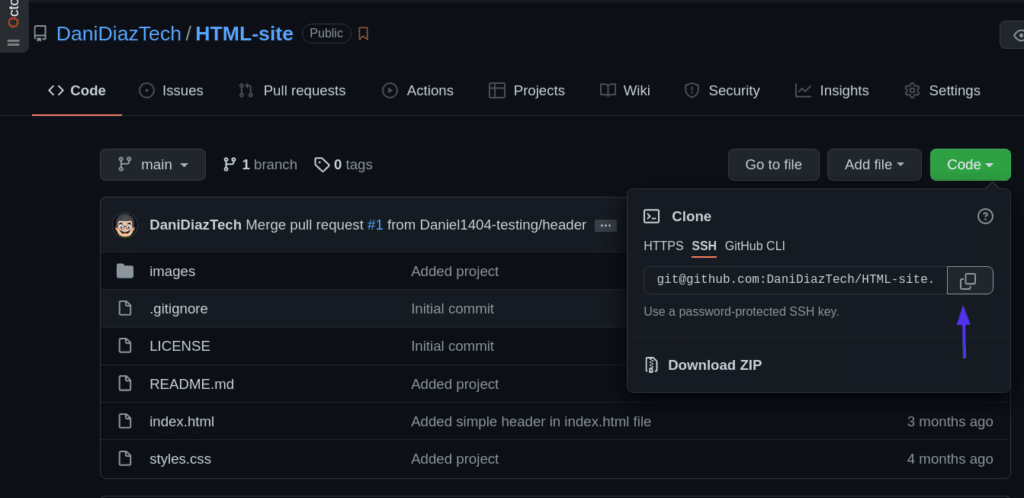
Then, clone the repo using a terminal:
git clone [email protected]:DaniDiazTech/HTML-site.gitNow, let’s add a simple <h1> tag in the index.html file:
...
<div class="container my-2">
    <h1 class="text-center">A new title!<h1>
</div>

<div class="container my-3">
...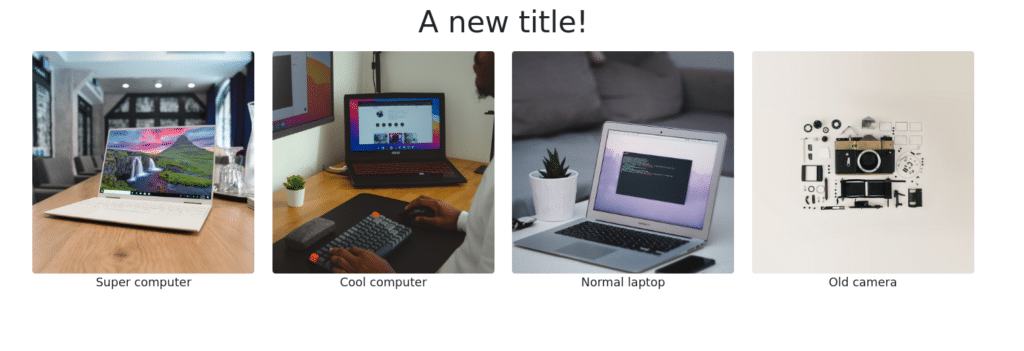
We’re not touching any JavaScript or CSS to keep this edit simple. But if you’re skilled with JavaScript, you might find a place at Kinsta. Check the coding skills you need to be part of the Kinsta team.
After doing this, commit the changes:
git commit -am "Added a simple title"And push them into GitHub just as you’d normally do.
git pushIf everything went fine, congratulations! You just set up an SSH connection between your machine and GitHub.
Manage Multiple SSH Keys for Different GitHub Accounts
If you have multiple GitHub accounts — let’s say one for your personal projects and one for your work — it’s difficult to use SSH for both of them. You would normally need separate machines to authenticate to different GitHub accounts.
But this can be solved easily by configuring the SSH config file.
Let’s get into it.
- Create another SSH key pair, and add it to your other GitHub account. Keep in mind the name of the file you’re assigning the new key to.
ssh-keygen -t ed25519 -C "[email protected]" - Create the SSH config file. The config file tells the ssh program how it should behave. By default, the config file may not exist, so create it inside the .ssh/ folder:
touch ~/.ssh/config - Modify the SSH config file. Open the config file and paste the code below:
#Your day-to-day GitHub account

Host github.com
  HostName github.com
  IdentityFile ~/.ssh/id_ed25519
  IdentitiesOnly yes

# Work account
Host github-work
  HostName github.com
  IdentityFile ~/.ssh/work_key_file
  IdentitiesOnly yes
Now, every time you need to authenticate via SSH using your work or secondary account, you tweak a bit the repo SSH address, from:
[email protected]:workaccount/project.git…to:
[email protected]:workaccount/project.gitGit and GitHub are essential tools for every developer & this guide will help you unlock a new addition: SSH Keys 🔑Click to Tweet
Summary
Congratulations — you’ve learned most of the practical knowledge you need to connect to GitHub via SSH!
This tutorial discussed the need for the SSH protocol, the differences between public and private keys, how to generate keys, add them to GitHub, and even manage multiple SSH keys for different GitHub accounts. Keep in mind that unless you want to lose access to everything, your private key needs to stay that way: private.
With this knowledge, now you’re ready to develop a flawless workflow with Git and GitHub. Keep coding!
Get all your applications, databases and WordPress sites online and under one roof. Our feature-packed, high-performance cloud platform includes:
- Easy setup and management in the MyKinsta dashboard
- 24/7 expert support
- The best Google Cloud Platform hardware and network, powered by Kubernetes for maximum scalability
- An enterprise-level Cloudflare integration for speed and security
- Global audience reach with up to 35 data centers and 275+ PoPs worldwide
Test it yourself with $20 off your first month of Application Hosting or Database Hosting. Explore our plans or talk to sales to find your best fit.
OpenSSH, the open source version of the Secure Socket Shell (SSH) tools, is a standard part of the Windows 10 and Windows Server 2019 operating systems. This greatly simplifies how to connect to GitHub with SSH on Windows.
Step-by-step Windows GitHub SSH example
To connect to GitHub with SSH from Windows, follow these steps:
- Open PowerShell
- Run the ssh-keygen command to create SSH keys
- Copy the value of the SSH public key
- Save the public key in your GitHub account settings
- Perform a Git clone operation using your repo’s SSH URL
Create SSH Keys for GitHub
To start, store a public SSH key on GitHub. This is validated against a locally stored private key that Git uses to validate and establish a connection. GitHub SSH keys are created with the ssh-keygen tool that comes prepackaged with updated versions of Windows.
In Windows PowerShell, issue the following ssh-keygen command to create GitHub SSH keys:
PS C:githubsshexample> ssh-keygen -o -t rsa -C "[email protected]"
You will be asked for an optional passphrase. It’s permissible to click enter and leave this blank.
| ssh-keygen flags | Purpose | Suggested |
|---|---|---|
| -C | Comments or metadata to add to the public key | Email address |
| -t | The type of GitHub SSH key to create | RSA |
| -o | Use the newest OpenSSH format | Leave blank |
You will also be asked for a location to save the GitHub SSH keys on Windows. Again, just click enter to accept the default location, which is the .ssh folder under the user’s home directory.
The Windows GitHub SSH keys live in the .ssh folder under the current user’s home directory. The following directory listing under the .ssh folder of a user named Cameron shows the two files created by the ssh-keygen tool:
PS C:UsersCameron.ssh> dir
LastWriteTime      Name
-------------      ----
1/1/2022           id_rsa
1/1/2022           id_rsa.pub
GitHub SSH config
Open the SSH public key in a text editor such as Notepad++, perform a Select All, and copy the key.
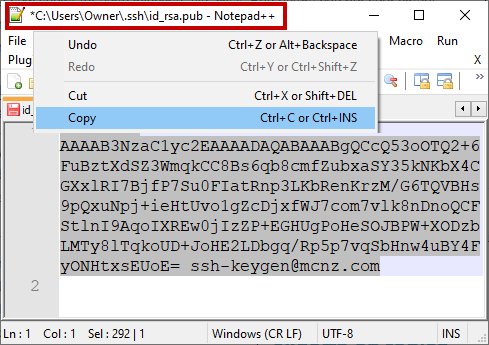
Copy the public GitHub SSH key and store this value as a registered SSH key in your GitHub account.
With the SSH key copied, log into GitHub, navigate to your account settings, and paste the public key as a new SSH key.
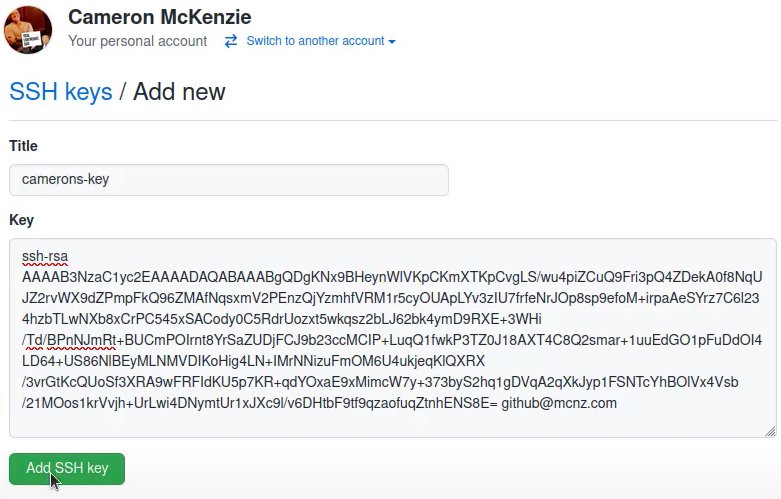
To obtain a secure, GitHub SSH Windows connection, you must register the public key in your online account settings.
SSH to GitHub on Windows
With the SSH keys generated, and the public key registered in your GitHub account, you can now use Git to connect to GitHub over SSH on Windows.
Simply copy the SSH URL from the GitHub page of the repository you wish to clone, and then provide that SSH link to the Git clone command:
PS C:githubsshexample> git clone [email protected]:cameronmcnz/java-jakarta-ee.git
Cloning GitHub SSH Windows into ‘java-jakarta-ee’…
Host authenticity cannot be established.
Do you still want to connect(yes or no)? yes
Receiving objects: 100% (55/55),5.78 MiB | 1.32 MiB/s, Windows GitHub SSH done.
Resolving deltas: 100% (66/66), Windows GitHub SSH done.
Notice the initial git clone with GitHub SSH on Windows complains about being unable to establish the host authenticity. That warning message is expected. Just type yes and allow the GitHub SSH clone operation to continue.
Once the remote repository is cloned, you can continue to use Git as you normally would, issue commits, add submodules, rebase branches and push back and forth with GitHub. All operations that use the network will automatically use an SSH connection.
And that’s how easy it is to connect to GitHub over SSH on Windows based machines.

![]()
Welcome to my first official guide on Dev.to. Today I want to explain how you can setup SSH and Git on your Windows 10 computer.
Note: This is not about 100% securing your keys but about how to generate keys for use with GitHub.
Thanks to garethdd for his constructive feedback.
What is SSH?
SSH stands for Secure Shell and is an awesome way to authenticate yourself on remote servers (for example the Github server) without typing in a password everytime.
SSH works via two keys, the Private Key and the Public Key. While the private key should always stay private and safe, the public key can be shared around the internet without any problems.
The private key allows you to get access to servers that have your public key registered, so your access can only be stolen if the attacker somehow gets your Secret Key so keep it safe!
SSH should be preinstalled on new Windows 10 machines.
What is Git?
Git is a free version management tool that helps you to versionize your code and potentially save it on a remote server (for example Github, Gitlab or Bitbucket).
You can install Git from here:
https://git-scm.com/download/win
You can also install Git via chocolatey:
Create a SSH Key
The first step is to generate a new SSH key. Use cmd or Powershell and run the following command:
ssh-keygen -t rsa -b 4096 -C "your_email@example.com"
You can but don’t need to give it a passphrase since you should never share your secret key around but using one will secure your keys. Keep in mind that everybody can have as many private keys as they want.
This generates a new private SSH key with rsa encryption and 4096 bits. It also generates a public key from the secret key which you can share around.
There will be a new folder and files in your Windows user folder.
In general you can create as many keys as you want. The id_rsa key is the default key generated by ssh and will be automatically be used by your ssh-agent if you don’t tell it to use another key.
What is an ssh-agent?
An ssh-agent is the agent process used to actually authenticate yourself with ssh. There are a few out there (PuTTY with Pageant for example) but for this example we’ll use the ssh-agent provided by the native and default Windows 10 ssh-agent.
If you want to you can use PuTTY and Pageant to make your keys even more secure. Read this post on Digital Ocean for more information.
If you want to change the key used by your ssh-agent, you must first start the service. The service will be disabled on Windows 10 by default. Search for Services and open the Services settings and look for the «OpenSSH Authentication Agent» and Activate it:

Now you will be able to access the ssh-agent from your console via ssh-agent.
For this example we’re going to try to load another key called example into our agent and use it instead of the id_rsa key. To do this you can run the following command:
Now you will have both keys available for this session.
Register your SSH Key on Github
The next step is to register your generated SSH key on Github. For that, run the following command:
type C:Usersyour_user_name.sshid_rsa.pub
and copy the output string into your clipboard. Now go to your Github keys settings and add a new SSH key with your public key and save it.
Congratulations! You now are able to get and push code to Github without any password!
Note: There should also be a C:Usersyour_user_name.sshid_rsa file. This is your private key, don’t share this around!
Setup Github in your Shell
Now it’s time to setup Git on your machine. After installing it from the link above, open a new cmd or Powershell window. Now we need to set your public Git name and Git email address. This will always be public when pushing code.
Luckily Github gives you a privatized email address for use. Go to https://github.com/settings/emails and you will find a @users.noreply.github.com email address for your account. Copy this email address.
Next register your name and email in Git:
git config --global user.name "Your Name"
git config --global user.email your_email@users.noreply.github.com
Congratulations! Now all your Commits will be registered as being commited from your Github user.
Signing your GitHub commits (Optional Step)
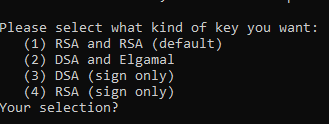
To sign your commits you first must install the GPG command line tools. After you installed the GPG toolkit, you can run the following command to generate a new gpg key:
This will ask you what kind of key you want. Go for RSA and RSA.
Now you need to enter a bit length. The recommendation is 4096 bits.
After that you can specify a expiration length or if the key should never expire. Pick as you want. Expiring keys are more secure in general because you have to renew them every now and then.
Now enter your personal informations to verifying your identity with your gpg key.
When you’re done you will be asked for a passphrase. Give it a secure passphrase and you will be done with your gpg-key generation.
After that you will be able to find your key in your users .gnupg folder as specified in the success message.
If you want to list your gpg keys, simply run
// short version
gpg --list-secret-keys

// long version
gpg --list-secret-keys --keyid-format LONG
Your GPG key you can share with Github is the key coming after sec rsa4096/ so for example in
/Users/hubot/.gnupg/secring.gpg
------------------------------------
sec   4096R/3AA5C34371567BD2 2016-03-10 [expires: 2017-03-10]
uid                          Hubot
ssb   4096R/42B317FD4BA89E7A 2016-03-10
the gpg key would be 3AA5C34371567BD2
To get your public key block, simply run
gpg --armor --export YOUR_GPG_KEY
which will output your public GPG Key Block. Copy it and paste it to your GitHub Account here.
From now on your commits will be signed when commited.
Use Git
Now you’re ready to actually use Git. From now you can clone repositories via git clone or push new code to Github. Here is a quick reference:
# Clone a repository to the current directory
git clone [REPOSITORY_CLONE_URL]

# Create a new commit with a message
git commit -m "Your commit message"

# Add files to the commit
git add .
git add ./filename.ext

# Push your commits to Github
git push origin master
git push origin [YOUR_BRANCH_NAME]

# Reset your repo to the last version
git reset --hard

# Create a new branch
git checkout -b [YOUR_BRANCH_NAME]

# Switch branches
git checkout [YOUR_BRANCH_NAME]
git checkout master

# Reset a single file
git checkout ./filename.ext
Conclusion
Thanks for reading this post. I hope it helped you with the setup. If you need help or have questions let me know!
Гитхаб — крупнейший веб-сервис для хостинга IT-проектов и их совместной разработки. Он как раз и основан на системе контроля версий Гит. Кроме размещения кода участники могут общаться, комментировать правки друг друга, а также следить за новостями знакомых. Именно в нём работаем мы в Академии и ученики на интенсивах.
Регистрация и установка
Устанавливаем Гит
Если до этого вы не работали с Гитом, то его нужно установить. Рассмотрим, как это сделать в популярных операционных системах.
Установка в Linux
Если вы хотите установить Git под Linux как бинарный пакет, это можно сделать, используя обычный менеджер пакетов вашего дистрибутива. Пользователи Fedora, могут воспользоваться yum:
$ yum install git-core
Для дистрибутивов, основанных на Debian (например Ubuntu), используйте apt-get:
$ sudo apt-get install git
Установка на Mac
Сперва устанавливаем Homebrew если он у вас ещё не стоит. Также вы можете установить его с помощью команды:
ruby -e "$(curl -fsSL https://raw.githubusercontent.com/Homebrew/install/master/install)"После установки Homebrew, введите в терминале команду: brew install git.
Эта команда установит Гит на ваш компьютер.Чтобы прописать новый путь к установке Гит введите команду:export PATH=/usr/local/bin:$PATH
Установка в Windows
Здесь всё просто. Просто скачайте exe-файл инсталлятора со страницы проекта на Гитхабе и запустите его.
После установки у вас будет как консольная версия (включающая SSH-клиент, который пригодится позднее), так и стандартная графическая.
Регистрация на Гитхабе
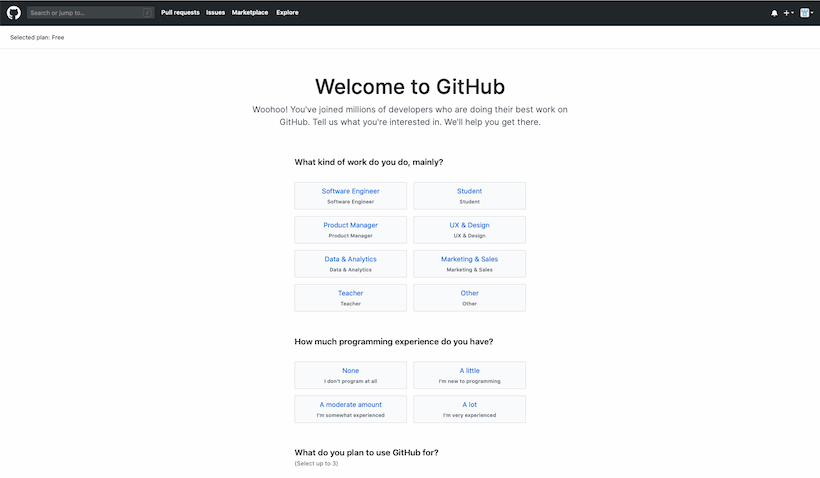
Чтобы начать работать с Гитхабом, нужно зарегистрироваться на нём, если вы ещё этого не сделали. Регистрация предельно проста:
- Переходим на сайт Гитхаба.
- Нажимаем кнопку Sign up (зарегистрироваться).
- На странице регистрации вам предложат ввести обязательные данные:
- имя пользователя;
- адрес электронной почты;
- пароль.

Страница регистрации Гитхаб - После этого вы попадёте на небольшой опрос от Гитхаба, который можете просто пропустить, нажав skip this step.
Начинаем работу
Устанавливаем SSH-ключи
SSH-ключ нужен чтобы быстро устанавливать соединение с Гитхабом, не вводя пароля. Кроме того, SSH — единственный из сетевых протоколов, предоставляющий доступ и на чтение, и на запись. Два других сетевых протокола (HTTP[S] и Git) в большинстве случаев дают доступ только на чтение, поэтому даже если они вам доступны, вам всё равно понадобится SSH для записи. К тому же SSH — протокол с аутентификацией и шифрованием трафика, что называется «из коробки». Недостаток SSH в том, что, используя его, вы не можете обеспечить анонимный доступ к репозиторию.
Доступ к удалённому репозиторию по SSH — самый распространённый вариант настройки удалённого доступа, быстрый, удобный и безопасный. Настроив авторизацию в SSH по ключам, вы будете избавлены от необходимости вводить пароли для доступа к репозиторию, сохраняя, однако, приемлемый уровень безопасности.
- Откройте используемый вами терминал.
- Введите команду
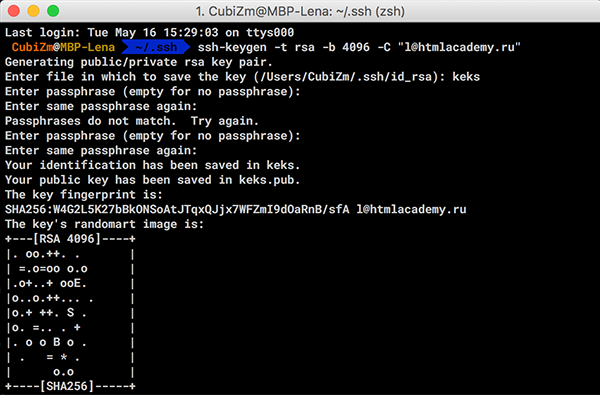
ssh-keygen -t rsa -b 4096 -C "your_email@example.com",
она создаст новый SSH-ключ, используя вашу электронную почту как метку. В качестве электронного адреса укажите электронную почту, которую использовали при регистрации аккаунта в Гитхаб. - Вам будет предложено ввести пароль к ключу. Вы можете не использовать его или назначить любой. Пароль защищает ваш ключ от нежелательных вторжений.
- После этого будет предложено дважды ввести придуманный пароль (или просто этот шаг будет пропущен, если вы решили не создавать пароль), и затем создастся ключ.
- Добавляем ключ в ssh-agent.
Проверяем доступность ключа командойeval "$(ssh-agent -s)"и добавляем командойssh-add ~/.ssh/your_key_name.

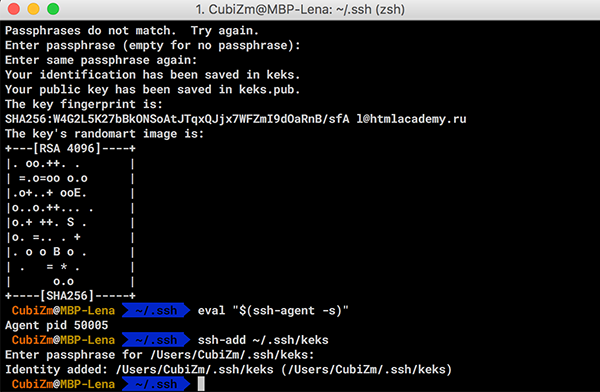
Примечание: у пользователей Windows, которые пользуются программой Cmder, могут возникнуть проблемы с командой eval "$(ssh-agent -s)". Им будет выведено вот такое сообщение об ошибке:
«eval» не является внутренней или внешней командой, исполняемой программой или пакетным файлом.
В Сmder для запуска ssh-agent можно использовать команду start-ssh-agent.
Если проблема осталась, то рекомендуем воспользоваться программой Git Bash.
Примечание: если вы используете macOS Sierra 10.12.2 или более позднюю версию, то вам нужно будет модифицировать ваш ~/.ssh/config файл, чтобы автоматически загрузить ключи в ssh-agent и хранить пароли.
Host *
 AddKeysToAgent yes
 UseKeychain yes
 IdentityFile ~/.ssh/id_rsa
Также вы можете добавить свой приватный ключ в ssh-agent и сохранить пароль к нему с помощью команды
$ ssh-add -K ~/.ssh/id_rsa.
Если вы создали свой ключ с другим именем или добавили существующий ключ с другим именем, замените в команде id_rsa на имя вашего личного ключа.
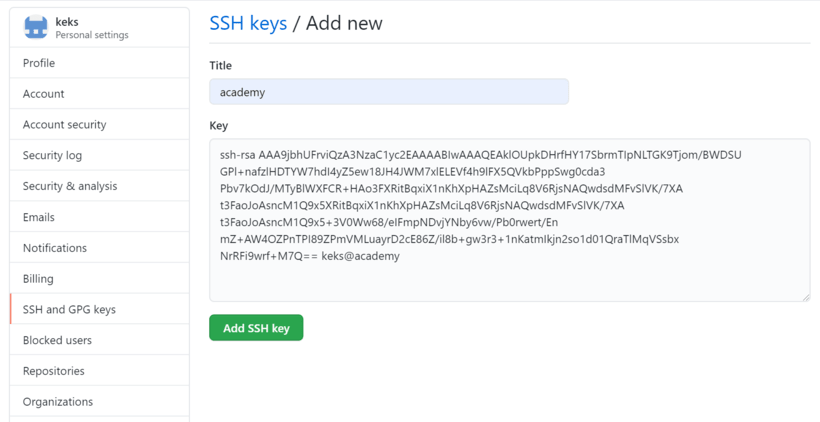
После того как создан ключ, его остаётся только добавить на Гитхаб.
Для этого скопируем его содержимое командой pbcopy < ~/.ssh/id_rsa.pub (для пользователей macOS или Linux) или clip < ~/.ssh/id_rsa.pub (для пользователей Windows).
Также вы можете просто открыть файл .pub с именем вашего ключа и скопировать его содержимое.
Переходим на страницу https://github.com/settings/keys и нажимаем кнопку New SSH key.
Введите произвольное имя ключа и вставьте код ключа из буфера обмена. После этого можно нажимать Add SSH key. Необходимо будет ввести пароль от аккаунта, чтобы подтвердить действие.
Проверить, что всё сделано верно, можно командой ssh -T git@github.com. Она должна выдать похожее сообщение:

Теперь можно клонировать любой доступный репозиторий используя его SSH-ссылку.
Более подробное описание работы с Гитхабом мы рассмотрим в статье «Pабота с Гит через консоль»
Другие статьи о Git
- Шпаргалка по Git
- Как работать в программе GitHub Desktop
- Регистрация на Гитхабе. Работа через GitHub Desktop