| stage | group | info |
|---|---|---|
|
Manage |
Authentication and Authorization |
To determine the technical writer assigned to the Stage/Group associated with this page, see https://about.gitlab.com/handbook/product/ux/technical-writing/#assignments |
Use SSH keys to communicate with GitLab (FREE)
Git is a distributed version control system, which means you can work locally,
then share or push your changes to a server. In this case, the server you push to is GitLab.
GitLab uses the SSH protocol to securely communicate with Git.
When you use SSH keys to authenticate to the GitLab remote server,
you don’t need to supply your username and password each time.
Prerequisites
To use SSH to communicate with GitLab, you need:
- The OpenSSH client, which comes pre-installed on GNU/Linux, macOS, and Windows 10.
- SSH version 6.5 or later. Earlier versions used an MD5 signature, which is not secure.
To view the version of SSH installed on your system, run ssh -V.
Supported SSH key types
To communicate with GitLab, you can use the following SSH key types:
- ED25519
- ED25519_SK (Available in GitLab 14.8 and later.)
- ECDSA_SK (Available in GitLab 14.8 and later.)
- RSA
- DSA (Deprecated in GitLab 11.0.)
- ECDSA (As noted in Practical Cryptography With Go, the security issues related to DSA also apply to ECDSA.)
Administrators can restrict which keys are permitted and their minimum lengths.
ED25519 SSH keys
The book Practical Cryptography With Go
suggests that ED25519 keys are more secure and performant than RSA keys.
OpenSSH 6.5 introduced ED25519 SSH keys in 2014, and they should be available on most
operating systems.
ED25519_SK SSH keys
Introduced in GitLab 14.8.
To use ED25519_SK SSH keys on GitLab, your local client and GitLab server
must have OpenSSH 8.2 or later installed.
ECDSA_SK SSH keys
Introduced in GitLab 14.8.
To use ECDSA_SK SSH keys on GitLab, your local client and GitLab server
must have OpenSSH 8.2 or later installed.
RSA SSH keys
Available documentation suggests ED25519 is more secure than RSA.
If you use an RSA key, the US National Institute of Science and Technology in
Publication 800-57 Part 3 (PDF)
recommends a key size of at least 2048 bits. The default key size depends on your version of ssh-keygen.
Review the man page for your installed ssh-keygen command for details.
See if you have an existing SSH key pair
Before you create a key pair, see if a key pair already exists.
-
Go to your home directory.
-
Go to the
.ssh/subdirectory. If the.ssh/subdirectory doesn’t exist,
you are either not in the home directory, or you haven’t usedsshbefore.
In the latter case, you need to generate an SSH key pair. -
See if a file with one of the following formats exists:
Algorithm Public key Private key ED25519 (preferred) id_ed25519.pubid_ed25519ED25519_SK id_ed25519_sk.pubid_ed25519_skECDSA_SK id_ecdsa_sk.pubid_ecdsa_skRSA (at least 2048-bit key size) id_rsa.pubid_rsaDSA (deprecated) id_dsa.pubid_dsaECDSA id_ecdsa.pubid_ecdsa
Generate an SSH key pair
If you do not have an existing SSH key pair, generate a new one:
-
Open a terminal.
-
Run
ssh-keygen -tfollowed by the key type and an optional comment.
This comment is included in the.pubfile that’s created.
You may want to use an email address for the comment.For example, for ED25519:
ssh-keygen -t ed25519 -C "<comment>"For 2048-bit RSA:
ssh-keygen -t rsa -b 2048 -C "<comment>" -
Press Enter. Output similar to the following is displayed:
Generating public/private ed25519 key pair. Enter file in which to save the key (/home/user/.ssh/id_ed25519): -
Accept the suggested filename and directory, unless you are generating a deploy key
or want to save in a specific directory where you store other keys.You can also dedicate the SSH key pair to a specific host.
-
Specify a passphrase:
Enter passphrase (empty for no passphrase):
Enter same passphrase again:
A confirmation is displayed, including information about where your files are stored.
A public and private key are generated. Add the public SSH key to your GitLab account
and keep the private key secure.
Configure SSH to point to a different directory
If you did not save your SSH key pair in the default directory,
configure your SSH client to point to the directory where the private key is stored.
-
Open a terminal and run this command:
eval $(ssh-agent -s)
ssh-add <directory to private SSH key>
-
Save these settings in the
~/.ssh/configfile. For example:# GitLab.com Host gitlab.com PreferredAuthentications publickey IdentityFile ~/.ssh/gitlab_com_rsa # Private GitLab instance Host gitlab.company.com PreferredAuthentications publickey IdentityFile ~/.ssh/example_com_rsa
For more information on these settings, see the man ssh_config page in the SSH configuration manual.
Public SSH keys must be unique to GitLab because they bind to your account.
Your SSH key is the only identifier you have when you push code with SSH.
It must uniquely map to a single user.
Update your SSH key passphrase
You can update the passphrase for your SSH key:
-
Open a terminal and run this command:
ssh-keygen -p -f /path/to/ssh_key
-
At the prompts, enter the passphrase and then press Enter.
Upgrade your RSA key pair to a more secure format
If your version of OpenSSH is between 6.5 and 7.8, you can save your private
RSA SSH keys in a more secure OpenSSH format by opening a terminal and running
this command:
ssh-keygen -o -f ~/.ssh/id_rsa
Alternatively, you can generate a new RSA key with the more secure encryption format with
the following command:
ssh-keygen -o -t rsa -b 4096 -C "<comment>"
Generate an SSH key pair for a FIDO/U2F hardware security key
To generate ED25519_SK or ECDSA_SK SSH keys, you must use OpenSSH 8.2 or later:
-
Insert a hardware security key into your computer.
-
Open a terminal.
-
Run
ssh-keygen -tfollowed by the key type and an optional comment.
This comment is included in the.pubfile that’s created.
You may want to use an email address for the comment.For example, for ED25519_SK:
ssh-keygen -t ed25519-sk -C "<comment>"For ECDSA_SK:
ssh-keygen -t ecdsa-sk -C "<comment>"If your security key supports FIDO2 resident keys, you can enable this when
creating your SSH key:ssh-keygen -t ed25519-sk -O resident -C "<comment>"-O residentindicates that the key should be stored on the FIDO authenticator itself.
Resident key is easier to import to a new computer because it can be loaded directly
from the security key byssh-add -K
orssh-keygen -K. -
Press Enter. Output similar to the following is displayed:
Generating public/private ed25519-sk key pair. You may need to touch your authenticator to authorize key generation. -
Touch the button on the hardware security key.
-
Accept the suggested filename and directory:
Enter file in which to save the key (/home/user/.ssh/id_ed25519_sk): -
Specify a passphrase:
Enter passphrase (empty for no passphrase):
Enter same passphrase again:
A confirmation is displayed, including information about where your files are stored.
A public and private key are generated.
Add the public SSH key to your GitLab account.
Generate an SSH key pair with a password manager
Generate an SSH key pair with 1Password
You can use 1Password and the 1Password browser extension to either:
- Automatically generate a new SSH key.
- Use an existing SSH in your 1Password vault to authenticate with GitLab.
- Sign in to GitLab.
- On the top bar, in the upper-right corner, select your avatar.
- Select Preferences.
- On the left sidebar, select SSH Keys.
- Select Key, and you should see the 1Password helper appear.
- Select the 1Password icon and unlock 1Password.
- You can then select Create SSH Key or select an existing SSH key to fill in the public key.
- In the Title box, type a description, like
Work Laptopor
Home Workstation. - Optional. Select the Usage type of the key. It can be used either for
AuthenticationorSigningor both.Authentication & Signingis the default value. - Optional. Update Expiration date to modify the default expiration date.
- Select Add key.
To learn more about using 1Password with SSH keys, see 1Password’s documentation.
Add an SSH key to your GitLab account
- Suggested default expiration date for keys introduced in GitLab 15.4.
- Usage types for SSH keys added in GitLab 15.7.
To use SSH with GitLab, copy your public key to your GitLab account:
-
Copy the contents of your public key file. You can do this manually or use a script.
For example, to copy an ED25519 key to the clipboard:macOS
tr -d 'n' < ~/.ssh/id_ed25519.pub | pbcopy
Linux (requires the
xclippackage)xclip -sel clip < ~/.ssh/id_ed25519.pub
Git Bash on Windows
cat ~/.ssh/id_ed25519.pub | clip
Replace
id_ed25519.pubwith your filename. For example, useid_rsa.pubfor RSA. -
Sign in to GitLab.
-
On the top bar, in the upper-right corner, select your avatar.
-
Select Preferences.
-
On the left sidebar, select SSH Keys.
-
In the Key box, paste the contents of your public key.
If you manually copied the key, make sure you copy the entire key,
which starts withssh-rsa,ssh-dss,ecdsa-sha2-nistp256,ecdsa-sha2-nistp384,ecdsa-sha2-nistp521,
ssh-ed25519,sk-ecdsa-sha2-nistp256@openssh.com, orsk-ssh-ed25519@openssh.com, and may end with a comment. -
In the Title box, type a description, like
Work Laptopor
Home Workstation. -
Optional. Select the Usage type of the key. It can be used either for
AuthenticationorSigningor both.Authentication & Signingis the default value. -
Optional. Update Expiration date to modify the default expiration date.
In:- GitLab 13.12 and earlier, the expiration date is informational only. It doesn’t prevent
you from using the key. Administrators can view expiration dates and use them for
guidance when deleting keys. - GitLab checks all SSH keys at 02:00 AM UTC every day. It emails an expiration notice for all SSH keys that expire on the current date. (Introduced in GitLab 13.11.)
- GitLab checks all SSH keys at 01:00 AM UTC every day. It emails an expiration notice for all SSH keys that are scheduled to expire seven days from now. (Introduced in GitLab 13.11.)
- GitLab 13.12 and earlier, the expiration date is informational only. It doesn’t prevent
-
Select Add key.
Verify that you can connect
Verify that your SSH key was added correctly.
The following commands use the example hostname gitlab.example.com. Replace this example hostname with your GitLab instance’s hostname, for example, git@gitlab.com.
-
To ensure you’re connecting to the correct server, check the server’s SSH host keys fingerprint. For:
- GitLab.com, see the SSH host keys fingerprints documentation.
- GitLab.com or another GitLab instance, see
gitlab.example.com/help/instance_configuration#ssh-host-keys-fingerprintswheregitlab.example.comisgitlab.com(for
GitLab.com) or the address of the GitLab instance.
-
Open a terminal and run this command, replacing
gitlab.example.comwith your
GitLab instance URL:ssh -T git@gitlab.example.com
-
If this is the first time you connect, you should verify the
authenticity of the GitLab host. If you see a message like:The authenticity of host 'gitlab.example.com (35.231.145.151)' can't be established. ECDSA key fingerprint is SHA256:HbW3g8zUjNSksFbqTiUWPWg2Bq1x8xdGUrliXFzSnUw. Are you sure you want to continue connecting (yes/no)? yes Warning: Permanently added 'gitlab.example.com' (ECDSA) to the list of known hosts.Type
yesand press Enter. -
Run the
ssh -T git@gitlab.example.comcommand again. You should receive a Welcome to GitLab,@username! message.
If the welcome message doesn’t appear, you can troubleshoot by running ssh
in verbose mode:
ssh -Tvvv git@gitlab.example.com
Use different keys for different repositories
You can use a different key for each repository.
Open a terminal and run this command:
git config core.sshCommand "ssh -o IdentitiesOnly=yes -i ~/.ssh/private-key-filename-for-this-repository -F /dev/null"
This command does not use the SSH Agent and requires Git 2.10 or later. For more information
on ssh command options, see the man pages for both ssh and ssh_config.
View your account’s SSH keys
- Sign in to GitLab.
- On the top bar, in the upper-right corner, select your avatar.
- Select Preferences.
- On the left sidebar, select SSH Keys.
Your existing SSH keys are listed at the bottom of the page. The information includes:
- The key’s:
- Name.
- Public fingerprint.
- Expiry date.
- Permitted usage types.
- The time a key was last used. On GitLab.com this value is unavailable, and you are unable to see if or when an SSH key has been used. For more information, see issue 324764.
Select Delete to permanently delete an SSH key.
Use different accounts on a single GitLab instance
You can use multiple accounts to connect to a single instance of GitLab. You
can do this by using the command in the previous topic.
However, even if you set IdentitiesOnly to yes, you cannot sign in if an
IdentityFile exists outside of a Host block.
Instead, you can assign aliases to hosts in the ~/.ssh/config file.
- For the
Host, use an alias likeuser_1.gitlab.comand
user_2.gitlab.com. Advanced configurations
are more difficult to maintain, and these strings are easier to
understand when you use tools likegit remote. - For the
IdentityFile, use the path the private key.
# User1 Account Identity
Host <user_1.gitlab.com>
  Hostname gitlab.com
  PreferredAuthentications publickey
  IdentityFile ~/.ssh/<example_ssh_key1>

# User2 Account Identity
Host <user_2.gitlab.com>
  Hostname gitlab.com
  PreferredAuthentications publickey
  IdentityFile ~/.ssh/<example_ssh_key2>
Now, to clone a repository for user_1, use user_1.gitlab.com in the git clone command:
git clone git@<user_1.gitlab.com>:gitlab-org/gitlab.git
To update a previously-cloned repository that is aliased as origin:
git remote set-url origin git@<user_1.gitlab.com>:gitlab-org/gitlab.git
NOTE:
Private and public keys contain sensitive data. Ensure the permissions
on the files make them readable to you but not accessible to others.
Configure two-factor authentication (2FA)
You can set up two-factor authentication (2FA) for
Git over SSH. We recommend using
ED25519_SK or ECDSA_SK SSH keys.
Use EGit on Eclipse
If you are using EGit, you can add your SSH key to Eclipse.
Use SSH on Microsoft Windows
If you’re running Windows 10, you can either use the Windows Subsystem for Linux (WSL)
with WSL 2 which
has both git and ssh preinstalled, or install Git for Windows to
use SSH through PowerShell.
The SSH key generated in WSL is not directly available for Git for Windows, and vice versa,
as both have a different home directory:
- WSL:
/home/<user> - Git for Windows:
C:Users<user>
You can either copy over the .ssh/ directory to use the same key, or generate a key in each environment.
If you’re running Windows 11 and using OpenSSH for Windows, ensure the HOME
environment variable is set correctly. Otherwise, your private SSH key might not be found.
Alternative tools include:
- Cygwin
- PuttyGen
Overriding SSH settings on the GitLab server
GitLab integrates with the system-installed SSH daemon and designates a user
(typically named git) through which all access requests are handled. Users
who connect to the GitLab server over SSH are identified by their SSH key instead
of their username.
SSH client operations performed on the GitLab server are executed as this
user. You can modify this SSH configuration. For example, you can specify
a private SSH key for this user to use for authentication requests. However, this practice
is not supported and is strongly discouraged as it presents significant
security risks.
GitLab checks for this condition, and directs you
to this section if your server is configured this way. For example:
$ gitlab-rake gitlab:check

Git user has default SSH configuration? ... no
  Try fixing it:
  mkdir ~/gitlab-check-backup-1504540051
  sudo mv /var/lib/git/.ssh/id_rsa ~/gitlab-check-backup-1504540051
  sudo mv /var/lib/git/.ssh/id_rsa.pub ~/gitlab-check-backup-1504540051
  For more information see:
  doc/user/ssh.md#overriding-ssh-settings-on-the-gitlab-server
  Please fix the error above and rerun the checks.
Remove the custom configuration as soon as you can. These customizations
are explicitly not supported and may stop working at any time.
Troubleshooting
Password prompt with git clone
When you run git clone, you may be prompted for a password, like git@gitlab.example.com's password:.
This indicates that something is wrong with your SSH setup.
- Ensure that you generated your SSH key pair correctly and added the public SSH
key to your GitLab profile. - Try to manually register your private SSH key by using
ssh-agent. - Try to debug the connection by running
ssh -Tv git@example.com.
Replaceexample.comwith your GitLab URL. - Ensure you followed all the instructions in Use SSH on Microsoft Windows.
Could not resolve hostname error
You may receive the following error when verifying that you can connect:
ssh: Could not resolve hostname gitlab.example.com: nodename nor servname provided, or not known
If you receive this error, restart your terminal and try the command again.
Key enrollment failed: invalid format error
You may receive the following error when generating an SSH key pair for a FIDO/U2F hardware security key:
Key enrollment failed: invalid format
You can troubleshoot this by trying the following:
- Run the
ssh-keygencommand usingsudo. - Verify your IDO/U2F hardware security key supports
the key type provided. - Verify the version of OpenSSH is 8.2 or greater by
runningssh -V.
Use SSH keys to communicate with GitLab (FREE)
Git is a distributed version control system, which means you can work locally,
then share or push your changes to a server. In this case, the server you push to is GitLab.
GitLab uses the SSH protocol to securely communicate with Git.
When you use SSH keys to authenticate to the GitLab remote server,
you don’t need to supply your username and password each time.
Prerequisites
To use SSH to communicate with GitLab, you need:
- The OpenSSH client, which comes pre-installed on GNU/Linux, macOS, and Windows 10.
- SSH version 6.5 or later. Earlier versions used an MD5 signature, which is not secure.
To view the version of SSH installed on your system, run ssh -V.
Supported SSH key types
To communicate with GitLab, you can use the following SSH key types:
- ED25519
- ED25519_SK (Available in GitLab 14.8 and later.)
- ECDSA_SK (Available in GitLab 14.8 and later.)
- RSA
- DSA (Deprecated in GitLab 11.0.)
- ECDSA (As noted in Practical Cryptography With Go, the security issues related to DSA also apply to ECDSA.)
Administrators can restrict which keys are permitted and their minimum lengths.
ED25519 SSH keys
The book Practical Cryptography With Go
suggests that ED25519 keys are more secure and performant than RSA keys.
OpenSSH 6.5 introduced ED25519 SSH keys in 2014, and they should be available on most
operating systems.
ED25519_SK SSH keys
Introduced in GitLab 14.8.
To use ED25519_SK SSH keys on GitLab, your local client and GitLab server
must have OpenSSH 8.2 or later installed.
ECDSA_SK SSH keys
Introduced in GitLab 14.8.
To use ECDSA_SK SSH keys on GitLab, your local client and GitLab server
must have OpenSSH 8.2 or later installed.
RSA SSH keys
Available documentation suggests ED25519 is more secure than RSA.
If you use an RSA key, the US National Institute of Science and Technology in
Publication 800-57 Part 3 (PDF)
recommends a key size of at least 2048 bits. The default key size depends on your version of ssh-keygen.
Review the man page for your installed ssh-keygen command for details.
See if you have an existing SSH key pair
Before you create a key pair, see if a key pair already exists.
-
Go to your home directory.
-
Go to the
.ssh/subdirectory. If the.ssh/subdirectory doesn’t exist,
you are either not in the home directory, or you haven’t usedsshbefore.
In the latter case, you need to generate an SSH key pair. -
See if a file with one of the following formats exists:
Algorithm Public key Private key ED25519 (preferred) id_ed25519.pubid_ed25519ED25519_SK id_ed25519_sk.pubid_ed25519_skECDSA_SK id_ecdsa_sk.pubid_ecdsa_skRSA (at least 2048-bit key size) id_rsa.pubid_rsaDSA (deprecated) id_dsa.pubid_dsaECDSA id_ecdsa.pubid_ecdsa
Generate an SSH key pair
If you do not have an existing SSH key pair, generate a new one:
-
Open a terminal.
-
Run
ssh-keygen -tfollowed by the key type and an optional comment.
This comment is included in the.pubfile that’s created.
You may want to use an email address for the comment.For example, for ED25519:
ssh-keygen -t ed25519 -C "<comment>"For 2048-bit RSA:
ssh-keygen -t rsa -b 2048 -C "<comment>" -
Press Enter. Output similar to the following is displayed:
Generating public/private ed25519 key pair. Enter file in which to save the key (/home/user/.ssh/id_ed25519): -
Accept the suggested filename and directory, unless you are generating a deploy key
or want to save in a specific directory where you store other keys.You can also dedicate the SSH key pair to a specific host.
-
Specify a passphrase:
Enter passphrase (empty for no passphrase):
Enter same passphrase again:
A confirmation is displayed, including information about where your files are stored.
A public and private key are generated. Add the public SSH key to your GitLab account
and keep the private key secure.
Configure SSH to point to a different directory
If you did not save your SSH key pair in the default directory,
configure your SSH client to point to the directory where the private key is stored.
-
Open a terminal and run this command:
eval $(ssh-agent -s) ssh-add <directory to private SSH key> -
Save these settings in the
~/.ssh/configfile. For example:# GitLab.com Host gitlab.com PreferredAuthentications publickey IdentityFile ~/.ssh/gitlab_com_rsa # Private GitLab instance Host gitlab.company.com PreferredAuthentications publickey IdentityFile ~/.ssh/example_com_rsa
For more information on these settings, see the man ssh_config page in the SSH configuration manual.
Public SSH keys must be unique to GitLab because they bind to your account.
Your SSH key is the only identifier you have when you push code with SSH.
It must uniquely map to a single user.
Update your SSH key passphrase
You can update the passphrase for your SSH key:
-
Open a terminal and run this command:
ssh-keygen -p -f /path/to/ssh_key -
At the prompts, enter the passphrase and then press Enter.
Upgrade your RSA key pair to a more secure format
If your version of OpenSSH is between 6.5 and 7.8, you can save your private
RSA SSH keys in a more secure OpenSSH format by opening a terminal and running
this command:
ssh-keygen -o -f ~/.ssh/id_rsaAlternatively, you can generate a new RSA key with the more secure encryption format with
the following command:
ssh-keygen -o -t rsa -b 4096 -C "<comment>"Generate an SSH key pair for a FIDO/U2F hardware security key
To generate ED25519_SK or ECDSA_SK SSH keys, you must use OpenSSH 8.2 or later:
-
Insert a hardware security key into your computer.
-
Open a terminal.
-
Run
ssh-keygen -tfollowed by the key type and an optional comment.
This comment is included in the.pubfile that’s created.
You may want to use an email address for the comment.For example, for ED25519_SK:
ssh-keygen -t ed25519-sk -C "<comment>"For ECDSA_SK:
ssh-keygen -t ecdsa-sk -C "<comment>"If your security key supports FIDO2 resident keys, you can enable this when
creating your SSH key:ssh-keygen -t ed25519-sk -O resident -C "<comment>"-O residentindicates that the key should be stored on the FIDO authenticator itself.
Resident key is easier to import to a new computer because it can be loaded directly
from the security key byssh-add -K
orssh-keygen -K. -
Press Enter. Output similar to the following is displayed:
Generating public/private ed25519-sk key pair. You may need to touch your authenticator to authorize key generation. -
Touch the button on the hardware security key.
-
Accept the suggested filename and directory:
Enter file in which to save the key (/home/user/.ssh/id_ed25519_sk): -
Specify a passphrase:
Enter passphrase (empty for no passphrase):
Enter same passphrase again:
A confirmation is displayed, including information about where your files are stored.
A public and private key are generated.
Add the public SSH key to your GitLab account.
Add an SSH key to your GitLab account
To use SSH with GitLab, copy your public key to your GitLab account:
-
Copy the contents of your public key file. You can do this manually or use a script.
For example, to copy an ED25519 key to the clipboard:macOS
tr -d 'n' < ~/.ssh/id_ed25519.pub | pbcopyLinux (requires the
xclippackage)xclip -sel clip < ~/.ssh/id_ed25519.pubGit Bash on Windows
cat ~/.ssh/id_ed25519.pub | clipReplace
id_ed25519.pubwith your filename. For example, useid_rsa.pubfor RSA. -
Sign in to GitLab.
-
On the top bar, in the top right corner, select your avatar.
-
Select Preferences.
-
On the left sidebar, select SSH Keys.
-
In the Key box, paste the contents of your public key.
If you manually copied the key, make sure you copy the entire key,
which starts withssh-rsa,ssh-dss,ecdsa-sha2-nistp256,ecdsa-sha2-nistp384,ecdsa-sha2-nistp521,
ssh-ed25519,sk-ecdsa-sha2-nistp256@openssh.com, orsk-ssh-ed25519@openssh.com, and may end with a comment. -
In the Title box, type a description, like
Work Laptopor
Home Workstation. -
Optional. In the Expires at box, select an expiration date. (Introduced in GitLab 12.9.)
In:- GitLab 13.12 and earlier, the expiration date is informational only. It doesn’t prevent
you from using the key. Administrators can view expiration dates and use them for
guidance when deleting keys. - GitLab checks all SSH keys at 02:00 AM UTC every day. It emails an expiration notice for all SSH keys that expire on the current date. (Introduced in GitLab 13.11.)
- GitLab checks all SSH keys at 01:00 AM UTC every day. It emails an expiration notice for all SSH keys that are scheduled to expire seven days from now. (Introduced in GitLab 13.11.)
- GitLab 13.12 and earlier, the expiration date is informational only. It doesn’t prevent
-
Select Add key.
Verify that you can connect
Verify that your SSH key was added correctly.
The following commands use the example hostname gitlab.example.com. Replace this example hostname with your GitLab instance’s hostname, for example, git@gitlab.com.
-
To ensure you’re connecting to the correct server, check the server’s SSH host keys fingerprint. For:
- GitLab.com, see the SSH host keys fingerprints documentation.
- GitLab.com or another GitLab instance, see
gitlab.example.com/help/instance_configuration#ssh-host-keys-fingerprintswheregitlab.example.comisgitlab.com(for
GitLab.com) or the address of the GitLab instance.
-
Open a terminal and run this command, replacing
gitlab.example.comwith your
GitLab instance URL:ssh -T git@gitlab.example.com -
If this is the first time you connect, you should verify the
authenticity of the GitLab host. If you see a message like:The authenticity of host 'gitlab.example.com (35.231.145.151)' can't be established. ECDSA key fingerprint is SHA256:HbW3g8zUjNSksFbqTiUWPWg2Bq1x8xdGUrliXFzSnUw. Are you sure you want to continue connecting (yes/no)? yes Warning: Permanently added 'gitlab.example.com' (ECDSA) to the list of known hosts.Type
yesand press Enter. -
Run the
ssh -T git@gitlab.example.comcommand again. You should receive a Welcome to GitLab,@username! message.
If the welcome message doesn’t appear, you can troubleshoot by running ssh
in verbose mode:
ssh -Tvvv git@gitlab.example.comUse different keys for different repositories
You can use a different key for each repository.
Open a terminal and run this command:
git config core.sshCommand "ssh -o IdentitiesOnly=yes -i ~/.ssh/private-key-filename-for-this-repository -F /dev/null"This command does not use the SSH Agent and requires Git 2.10 or later. For more information
on ssh command options, see the man pages for both ssh and ssh_config.
Use different accounts on a single GitLab instance
You can use multiple accounts to connect to a single instance of GitLab. You
can do this by using the command in the previous topic.
However, even if you set IdentitiesOnly to yes, you cannot sign in if an
IdentityFile exists outside of a Host block.
Instead, you can assign aliases to hosts in the ~/.ssh/config file.
- For the
Host, use an alias likeuser_1.gitlab.comand
user_2.gitlab.com. Advanced configurations
are more difficult to maintain, and these strings are easier to
understand when you use tools likegit remote. - For the
IdentityFile, use the path the private key.
# User1 Account Identity
Host <user_1.gitlab.com>
  Hostname gitlab.com
  PreferredAuthentications publickey
  IdentityFile ~/.ssh/<example_ssh_key1>

# User2 Account Identity
Host <user_2.gitlab.com>
  Hostname gitlab.com
  PreferredAuthentications publickey
  IdentityFile ~/.ssh/<example_ssh_key2>
Now, to clone a repository for user_1, use user_1.gitlab.com in the git clone command:
git clone git@<user_1.gitlab.com>:gitlab-org/gitlab.gitTo update a previously-cloned repository that is aliased as origin:
git remote set-url origin git@<user_1.gitlab.com>:gitlab-org/gitlab.gitNOTE:
Private and public keys contain sensitive data. Ensure the permissions
on the files make them readable to you but not accessible to others.
Configure two-factor authentication (2FA)
You can set up two-factor authentication (2FA) for
Git over SSH. We recommend using
ED25519_SK or ECDSA_SK SSH keys.
Use EGit on Eclipse
If you are using EGit, you can add your SSH key to Eclipse.
Use SSH on Microsoft Windows
If you’re running Windows 10, you can either use the Windows Subsystem for Linux (WSL)
with WSL 2 which
has both git and ssh preinstalled, or install Git for Windows to
use SSH through PowerShell.
The SSH key generated in WSL is not directly available for Git for Windows, and vice versa,
as both have a different home directory:
- WSL:
/home/<user> - Git for Windows:
C:Users<user>
You can either copy over the .ssh/ directory to use the same key, or generate a key in each environment.
Alternative tools include:
- Cygwin
- PuttyGen
Overriding SSH settings on the GitLab server
GitLab integrates with the system-installed SSH daemon and designates a user
(typically named git) through which all access requests are handled. Users
who connect to the GitLab server over SSH are identified by their SSH key instead
of their username.
SSH client operations performed on the GitLab server are executed as this
user. You can modify this SSH configuration. For example, you can specify
a private SSH key for this user to use for authentication requests. However, this practice
is not supported and is strongly discouraged as it presents significant
security risks.
GitLab checks for this condition, and directs you
to this section if your server is configured this way. For example:
$ gitlab-rake gitlab:check

Git user has default SSH configuration? ... no
  Try fixing it:
  mkdir ~/gitlab-check-backup-1504540051
  sudo mv /var/lib/git/.ssh/id_rsa ~/gitlab-check-backup-1504540051
  sudo mv /var/lib/git/.ssh/id_rsa.pub ~/gitlab-check-backup-1504540051
  For more information see:
  doc/user/ssh.md#overriding-ssh-settings-on-the-gitlab-server
  Please fix the error above and rerun the checks.
Remove the custom configuration as soon as you can. These customizations
are explicitly not supported and may stop working at any time.
Troubleshooting
Password prompt with git clone
When you run git clone, you may be prompted for a password, like git@gitlab.example.com's password:.
This indicates that something is wrong with your SSH setup.
- Ensure that you generated your SSH key pair correctly and added the public SSH
key to your GitLab profile. - Try to manually register your private SSH key by using
ssh-agent. - Try to debug the connection by running
ssh -Tv git@example.com.
Replaceexample.comwith your GitLab URL.
Could not resolve hostname error
You may receive the following error when verifying that you can connect:
ssh: Could not resolve hostname gitlab.example.com: nodename nor servname provided, or not knownIf you receive this error, restart your terminal and try the command again.
Key enrollment failed: invalid format error
You may receive the following error when generating an SSH key pair for a FIDO/U2F hardware security key:
Key enrollment failed: invalid formatYou can troubleshoot this by trying the following:
- Run the
ssh-keygencommand usingsudo. - Verify your IDO/U2F hardware security key supports
the key type provided. - Verify the version of OpenSSH is 8.2 or greater by
runningssh -v.
I’ve tried following this guide on generating an ssh key in order to use gitlab.
Before I know if I should generate a key I must check if there is one already like this:
type %userprofile%.sshid_rsa.pub
If it says this, then I must generate the key:
the system cannot find the path specified
What is the next step? Because the guide doesn’t say anything in case this is the message I get.
Edit: I’ve tried
ssh-keygen -t rsa -C "email@example.com"
And I get
'ssh-keygen' is not recognized as an internal or external command,
operable program or batch file.
Edit 2: I am on windows.
![]()
Warren P
64.1k39 gold badges178 silver badges313 bronze badges
asked Dec 14, 2016 at 17:35
![]()
8
ON windows if you have git for windows installed, run git-gui. Then click Help then click Show Ssh Key, then click Generate Key.
While you’re at it, then copy to the clipboard, and then go to your Gitlab account page and add the SSH key to your Gitlab account’s ssh settings.
![]()
answered Dec 20, 2016 at 3:46
![]()
Warren PWarren P
64.1k39 gold badges178 silver badges313 bronze badges
3
The intention here is for %userprofile% to be an environment variable present in your system that contains your actual user’s home directory. Either check why this environment variable isn’t set on your system and fix it, or for a quick fix, replace %userprofile% in the above command with your actual user’s home directory.
answered Dec 14, 2016 at 17:45
![]()
AsaphAsaph
157k25 gold badges193 silver badges197 bronze badges
3
If you want to go along with creating the key in windows without relying on git, you can go to Apps & Features > Optional Features > OpenSSH client (install).
Once that is done the keygen command will be available to you. Please note that one needs to specify the bits (-b) as the default size will not be accepted by gitlab.
Will look like this: ssh-keygen -b 2048 -t rsa -C "email@example.com"
answered Feb 21, 2021 at 16:25
![]()
augsteyeraugsteyer
9849 silver badges25 bronze badges
GitLab and SSH keys
Git is a distributed version control system, which means you can work locally
but you can also share or «push» your changes to other servers.
Before you can push your changes to a GitLab server
you need a secure communication channel for sharing information.
The SSH protocol provides this security and allows you to authenticate to the
GitLab remote server without supplying your username or password each time.
For a more detailed explanation of how the SSH protocol works, read
this nice tutorial by DigitalOcean.
Requirements
The only requirement is to have the OpenSSH client installed on your system. This
comes pre-installed on GNU/Linux and macOS, but not on Windows.
Depending on your Windows version, there are different methods to work with
SSH keys.
Installing the SSH client for Windows 10
Starting with Windows 10, you can
install the Windows Subsystem for Linux (WSL)
where you can run Linux distributions directly on Windows, without the overhead
of a virtual machine. Once installed and set up, you’ll have the Git and SSH
clients at your disposal.
Installing the SSH client for Windows 8.1 and Windows 7
The easiest way to install Git and the SSH client on Windows 8.1 and Windows 7
is Git for Windows. It provides a BASH
emulation (Git Bash) used for running Git from the command line and the
ssh-keygen command that is useful to create SSH keys as you’ll learn below.
NOTE: Alternative tools:
Although not explored in this page, you can use some alternative tools.
Cygwin is a large collection of GNU and open source
tools which provide functionality similar to a Unix distribution.
PuttyGen
provides a graphical user interface to create SSH keys.
Types of SSH keys and which to choose
GitLab supports RSA, DSA, ECDSA, and ED25519 keys. Their difference lies on
the signing algorithm, and some of them have advantages over the others. For
more information, you can read this
nice article on ArchWiki.
We’ll focus on ED25519 and RSA and here.
NOTE: Note:
As an admin, you can restrict
which keys should be permitted and their minimum length.
By default, all keys are permitted, which is also the case for
GitLab.com.
ED25519 SSH keys
Following best practices,
you should always favor ED25519 SSH keys, since they
are more secure and have better performance over the other types.
They were introduced in OpenSSH 6.5, so any modern OS should include the
option to create them. If for any reason your OS or the GitLab instance you
interact with doesn’t support this, you can fallback to RSA.
RSA SSH keys
RSA keys are the most common ones and therefore the most compatible with
servers that may have an old OpenSSH version. Use them if the GitLab server
doesn’t work with ED25519 keys.
The minimum key size is 1024 bits, defaulting to 2048. If you wish to generate a
stronger RSA key pair, specify the -b flag with a higher bit value than the
default.
The old, default password encoding for SSH private keys is
insecure;
it’s only a single round of an MD5 hash. Since OpenSSH version 6.5, you should
use the -o option to ssh-keygen to encode your private key in a new, more
secure format.
If you already have an RSA SSH key pair to use with GitLab, consider upgrading it
to use the more secure password encryption format by using the following command
on the private key:
ssh-keygen -o -f ~/.ssh/id_rsaGenerating a new SSH key pair
Before creating an SSH key pair, make sure to read about the
different types of keys to understand
their differences.
To create a new SSH key pair:
-
Open a terminal on Linux or macOS, or Git Bash / WSL on Windows.
-
Generate a new ED25519 SSH key pair:
ssh-keygen -t ed25519 -C "email@example.com"Or, if you want to use RSA:
ssh-keygen -o -t rsa -b 4096 -C "email@example.com"The
-Cflag adds a comment in the key in case you have multiple of them
and want to tell which is which. It is optional. -
Next, you will be prompted to input a file path to save your SSH key pair to.
If you don’t already have an SSH key pair, use the suggested path by pressing
Enter. Using the suggested path will normally allow your SSH client
to automatically use the SSH key pair with no additional configuration.If you already have an SSH key pair with the suggested file path, you will need
to input a new file path and declare what host
this SSH key pair will be used for in your~/.ssh/configfile. -
Once the path is decided, you will be prompted to input a password to
secure your new SSH key pair. It’s a best practice to use a password,
but it’s not required and you can skip creating it by pressing
Enter twice.If, in any case, you want to add or change the password of your SSH key pair,
you can use the-pflag:ssh-keygen -p -o -f <keyname>
Now, it’s time to add the newly created public key to your GitLab account.
Adding an SSH key to your GitLab account
-
Copy your public SSH key to the clipboard by using one of the commands below
depending on your Operating System:macOS:
pbcopy < ~/.ssh/id_ed25519.pubWSL / GNU/Linux (requires the xclip package):
xclip -sel clip < ~/.ssh/id_ed25519.pubGit Bash on Windows:
cat ~/.ssh/id_ed25519.pub | clipYou can also open the key in a graphical editor and copy it from there,
but be careful not to accidentally change anything.NOTE: Note:
If you opted to create an RSA key, the name might differ. -
Add your public SSH key to your GitLab account by clicking your avatar
in the upper right corner and selecting Settings. From there on,
navigate to SSH Keys and paste your public key in the «Key» section.
If you created the key with a comment, this will appear under «Title».
If not, give your key an identifiable title like Work Laptop or
Home Workstation, and click Add key.NOTE: Note:
If you manually copied your public SSH key make sure you copied the entire
key starting withssh-ed25519(orssh-rsa) and ending with your email.
Testing that everything is set up correctly
To test whether your SSH key was added correctly, run the following command in
your terminal (replacing gitlab.com with your GitLab’s instance domain):
ssh -T git@gitlab.comThe first time you connect to GitLab via SSH, you will be asked to verify the
authenticity of the GitLab host you are connecting to.
For example, when connecting to GitLab.com, answer yes to add GitLab.com to
the list of trusted hosts:
The authenticity of host 'gitlab.com (35.231.145.151)' can't be established.
ECDSA key fingerprint is SHA256:HbW3g8zUjNSksFbqTiUWPWg2Bq1x8xdGUrliXFzSnUw.
Are you sure you want to continue connecting (yes/no)? yes
Warning: Permanently added 'gitlab.com' (ECDSA) to the list of known hosts.
NOTE: Note:
For GitLab.com, consult the
SSH host keys fingerprints,
to make sure you’re connecting to the correct server.
Once added to the list of known hosts, you won’t be asked to validate the
authenticity of GitLab’s host again. Run the above command once more, and
you should only receive a Welcome to GitLab, @username! message.
If the welcome message doesn’t appear, run SSH’s verbose mode by replacing -T
with -vvvT to understand where the error is.
Working with non-default SSH key pair paths
If you used a non-default file path for your GitLab SSH key pair,
you must configure your SSH client to find your GitLab private SSH key
for connections to GitLab.
Open a terminal and use the following commands
(replacing other_id_rsa with your private SSH key):
eval $(ssh-agent -s)
ssh-add ~/.ssh/other_id_rsa
To retain these settings, you’ll need to save them to a configuration file.
For OpenSSH clients this is configured in the ~/.ssh/config file. In this
file you can set up configurations for multiple hosts, like GitLab.com, your
own GitLab instance, GitHub, Bitbucket, etc.
Below are two example host configurations using their own SSH key:
# GitLab.com
Host gitlab.com
  Preferredauthentications publickey
  IdentityFile ~/.ssh/gitlab_com_rsa

# Private GitLab instance
Host gitlab.company.com
  Preferredauthentications publickey
  IdentityFile ~/.ssh/example_com_rsa
Public SSH keys need to be unique to GitLab, as they will bind to your account.
Your SSH key is the only identifier you’ll have when pushing code via SSH,
that’s why it needs to uniquely map to a single user.
Per-repository SSH keys
If you want to use different keys depending on the repository you are working
on, you can issue the following command while inside your repository:
git config core.sshCommand "ssh -o IdentitiesOnly=yes -i ~/.ssh/private-key-filename-for-this-repository -F /dev/null"This will not use the SSH Agent and requires at least Git 2.10.
Deploy keys
Per-repository deploy keys
Deploy keys allow read-only or read-write (if enabled) access to one or
multiple projects with a single SSH key pair.
This is really useful for cloning repositories to your Continuous
Integration (CI) server. By using deploy keys, you don’t have to set up a
dummy user account.
If you are a project maintainer or owner, you can add a deploy key in the
project settings under the section ‘Repository’. Specify a title for the new
deploy key and paste a public SSH key. After this, the machine that uses
the corresponding private SSH key has read-only or read-write (if enabled)
access to the project.
You can’t add the same deploy key twice using the form.
If you want to add the same key to another project, please enable it in the
list that says ‘Deploy keys from projects available to you’. All the deploy
keys of all the projects you have access to are available. This project
access can happen through being a direct member of the project, or through
a group.
Deploy keys can be shared between projects, you just need to add them to each
project.
Global shared deploy keys
Global Shared Deploy keys allow read-only or read-write (if enabled) access to
be configured on any repository in the entire GitLab installation.
This is really useful for integrating repositories to secured, shared Continuous
Integration (CI) services or other shared services.
GitLab administrators can set up the Global Shared Deploy key in GitLab and
add the private key to any shared systems. Individual repositories opt into
exposing their repository using these keys when a project maintainers (or higher)
authorizes a Global Shared Deploy key to be used with their project.
Global Shared Keys can provide greater security compared to Per-Project Deploy
Keys since an administrator of the target integrated system is the only one
who needs to know and configure the private key.
GitLab administrators set up Global Deploy keys in the Admin area under the
section Deploy Keys. Ensure keys have a meaningful title as that will be
the primary way for project maintainers and owners to identify the correct Global
Deploy key to add. For instance, if the key gives access to a SaaS CI instance,
use the name of that service in the key name if that is all it is used for.
When creating Global Shared Deploy keys, give some thought to the granularity
of keys — they could be of very narrow usage such as just a specific service or
of broader usage for something like «Anywhere you need to give read access to
your repository».
Once a GitLab administrator adds the Global Deployment key, project maintainers
and owners can add it in project’s Settings > Repository section by expanding the
Deploy Key section and clicking Enable next to the appropriate key listed
under Public deploy keys available to any project.
NOTE: Note:
The heading Public deploy keys available to any project only appears
if there is at least one Global Deploy Key configured.
CAUTION: Warning:
Defining Global Deploy Keys does not expose any given repository via
the key until that repository adds the Global Deploy Key to their project.
In this way the Global Deploy Keys enable access by other systems, but do
not implicitly give any access just by setting them up.
Applications
Eclipse
How to add your SSH key to Eclipse: https://wiki.eclipse.org/EGit/User_Guide#Eclipse_SSH_Configuration
SSH on the GitLab server
GitLab integrates with the system-installed SSH daemon, designating a user
(typically named git) through which all access requests are handled. Users
connecting to the GitLab server over SSH are identified by their SSH key instead
of their username.
SSH client operations performed on the GitLab server wil be executed as this
user. Although it is possible to modify the SSH configuration for this user to,
e.g., provide a private SSH key to authenticate these requests by, this practice
is not supported and is strongly discouraged as it presents significant
security risks.
The GitLab check process includes a check for this condition, and will direct you
to this section if your server is configured like this, e.g.:
$ gitlab-rake gitlab:check
# ...
Git user has default SSH configuration? ... no
  Try fixing it:
  mkdir ~/gitlab-check-backup-1504540051
  sudo mv /var/lib/git/.ssh/id_rsa ~/gitlab-check-backup-1504540051
  sudo mv /var/lib/git/.ssh/id_rsa.pub ~/gitlab-check-backup-1504540051
  For more information see:
  doc/ssh/README.md in section "SSH on the GitLab server"
  Please fix the error above and rerun the checks.
Remove the custom configuration as soon as you’re able to. These customizations
are explicitly not supported and may stop working at any time.
Troubleshooting
If on Git clone you are prompted for a password like git@gitlab.com's password:
something is wrong with your SSH setup.
- Ensure that you generated your SSH key pair correctly and added the public SSH
key to your GitLab profile - Try manually registering your private SSH key using
ssh-agentas documented
earlier in this document - Try to debug the connection by running
ssh -Tv git@example.com
(replacingexample.comwith your GitLab domain)
Learn how to create a SSH key to work with Github and Gitlab using PuTTYGen in Windows 10.
When you work with Git either with Github or Gitlab, you will need often to authenticate yourself using your username and password. The SSH Keys are an alternative to identify yourself without providing the mentioned credentials every time you interact with your repositories. You will only need to share your public key with the service and the private key will remain stored in your computer, so when the keys match, you have full access to your stuff.
For example, if you try to clone one of your repositories through SSH like this:
git clone [email protected]:username-or-organization/repository.gitIn Windows, if you don’t have any SSH key configured properly, the following message will appear:
Cloning into 'your-git-repo'...
[email protected]: Permission denied (publickey,keyboard-interactive).
fatal: Could not read from remote repository.

Please make sure you have the correct access rights
and the repository exists.
In this article, I will explain to you how to easily generate your own SSH key to identify your device.
1. Install PuTTYGen
The first thing you gotta do to work with the SSH authentication with your repositories is to install PuTTYGen in the system. This application comes included in the installation setup of PuTTY on the official website here. However, you can download the puttygen.exe file as well if you don’t want the entire PuTTy bundle.
PuTTYGen is an RSA and DSA key generation utility that will be used to create our SSH key in the Windows environment.
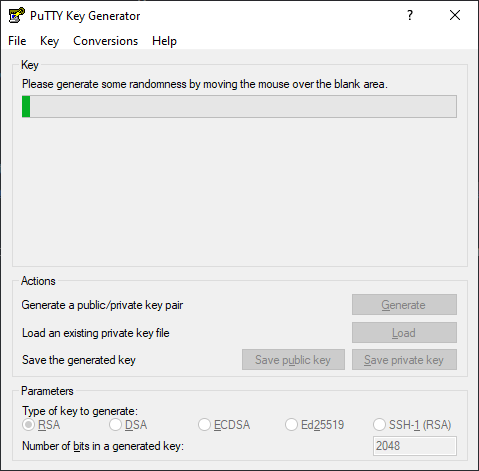
2. Generate your SSH Key
Launch the PuttyGen binary and start creating the SSH key by clicking on «Generate», after that, you will be asked to move the mouse over the blank space to generate some randomness in your key:
After moving the mouse at this point, the SSH key will be generated and you will have to fill the following fields:
- Key comment: the name to use for this key, usually the name of the computer that you are working on right now.
- Key passphrase: this will be the password that you will need to provide to unlock the key every time you need it.
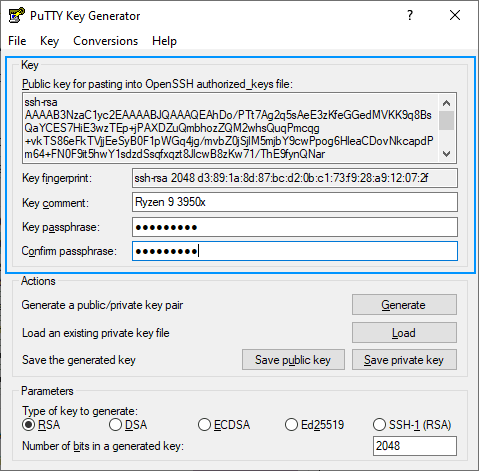
Now that we have the password of the SSH key and a name for it, you can now proceed to save in the required formats for Windows.
3. Create the .ssh folder in your user directory
Create the .ssh folder in the current user’s directory. For example, on my computer, it is located at C:/Users/sdkca. So I created the .ssh folder in there (you can obtain the directory with the environment variable %USERPROFILE%):
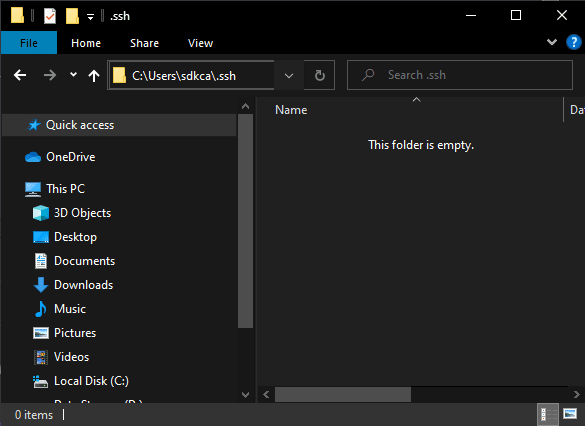
You will store all the created files in the mentioned directory.
4. Store PuTTY Private Key (PPK File)
The first file to generate from our now generated SSH key is the file with .ppk extension that you can generate by clicking on «Save private key»:

You can provide a custom name, in our case we will use the same name as the comment «ryzen93950x.ppk» and will be stored in the .ssh directory created in step #3. The content of the .ppk file looks something like this:
PuTTY-User-Key-File-2: ssh-rsa
Encryption: aes256-cbc
Comment: Ryzen 9 3950x
Public-Lines: 6
AAAAB3NzaC1yc2EAAAABJQAAAQEAhDo/PTt7Ag2q5sAeE3zKfeGGedMVKK9q8BsQ
aYCES7HiE3wzTEp+jPAXDZuQmbhozZQM2whsQuqPmcqg+vkTS86eFkTVjjEeSyB0
F1pWGq4jg/mvbZ0jSjlM5mjbY9cwPpog6HleaCDovNkcapdPm64+FN0F9it5hwY1
sdzdSsqfxqzt8JlcwB8zKw71/ThE9fynQNar+utL2LrPPWS2bR4ZlI1WlQSWAkd2
9z3vk78zxRyuL5wdQf9j7Ay42j7bwkTcjCucC0T0iDeK+KoKyMysvbQFp4SLYXQq
xsPzU/BkEZmnqLxNzp6lShT6W1PcfNeVIH1DY1BsqtghaddHlQ==
Private-Lines: 14
ksW4kvFIMD4OqwgDYbEkhiB0l1uNsfj2uXw/lch/mHmaUSS08+2RHojc4GNDD2VG
....
.....
5. Store OpenSSH Public Key for authorized keys (id_rsa.pub File)
Now you need to create the file id_rsa.pub that will contain the string in the middle of the PuTTYGen application (Public key). The string is used on the authorized_keys file of the servers so you can access them:
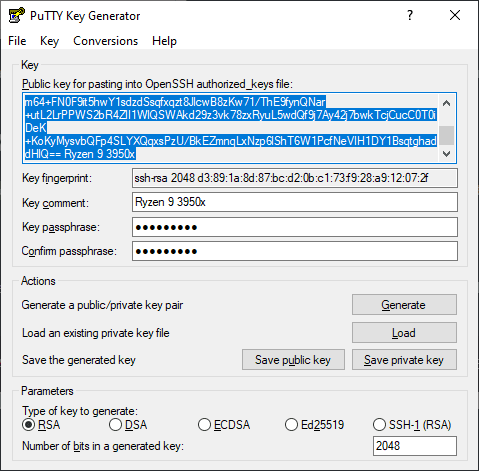
Copy the content and paste it into the mentioned id_rsa.pub file in the .ssh directory created in step #3. The file content will look something like this:
ssh-rsa AAAAB3NzaC1yc2EAAAABJQAAAQEAhDo/PTt7Ag2q5sAeE3zKfeGGedMVKK9q8BsQaYCES7HiE3wzTEp+jPAXDZuQmbhozZQM2whsQuqPmcqg+vkTS86eFkTVjjEeSyB0F1pWGq4jg/mvbZ0jSjlM5mjbY9cwPpog6HleaCDovTROLOLOLOLO-DONTUSETHISKEY-USEYOUROWNKEYJlcwB8zKw71/ThE9fynQNar+utL2LrPPWS2bR4ZlI1WlQSWAkd29z3vk78zxRyuL5wdQf9j7Ay42j7bwkTcjCucC0T0iDeK+KoKyMysvbQFp4SLYXQqxsPzU/BkEZmnqLxNzp6lShT6W1PcfNeVIH1DY1BsqtghaddHlQ== Ryzen 9 3950x6. Store OpenSSH Key (id_rsa File)
Finally, the third file will be your identity file that will be your SSH Key in Open SSH format. You will need to convert your key to this format as it’s the one you require on tools like Github and Gitlab. You can easily do this by clicking on the Conversions tab of PuTTYGen and then clicking on Export OpenSSH Key (force new file format):
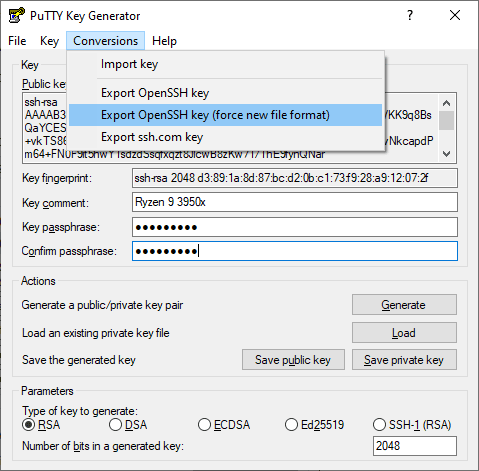
Note: if you don’t use the new file format, it will work anyway, however, you will always find the warning «load pubkey «/c/Users/USERNAME/.ssh/id_rsa»: invalid format».
This will prompt you where to save the file, use id_rsa as name and store it in the .ssh directory created in step #3. The content of this file should look like this:
-----BEGIN RSA PRIVATE KEY-----
Proc-Type: 4,ENCRYPTED
DEK-Info: DES-EDE3-CBC,920A7C839CE3CABE

qWuTR1ARsILMzEGwhmr5SYFdu/MxsLKA3XTLy1dO4RYsvLqZOmloRvtZgy9VSNpg
...............................
-----END RSA PRIVATE KEY-----
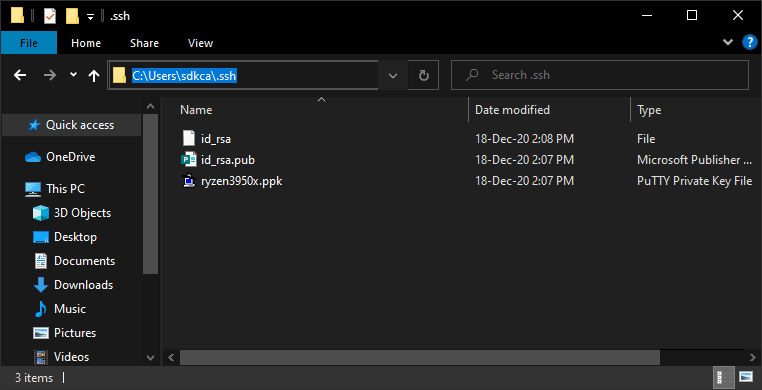
After following all the previous steps you will end up with 3 files in the .ssh directory:
7. Register SSH key in Github and Gitlab
As the final step, you need to register your OpenSSH Public Key in the platform of your choice in your SSH Keys:
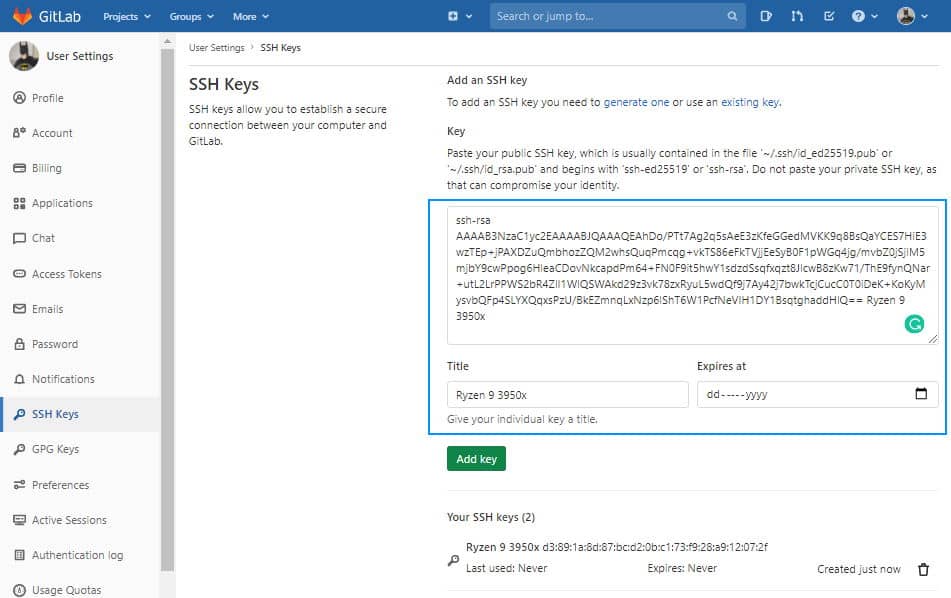
Gitlab
Login to Gitlab and open your user settings. In the left side menu, choose the SSH Keys option and register the value of your id_rsa.pub file:
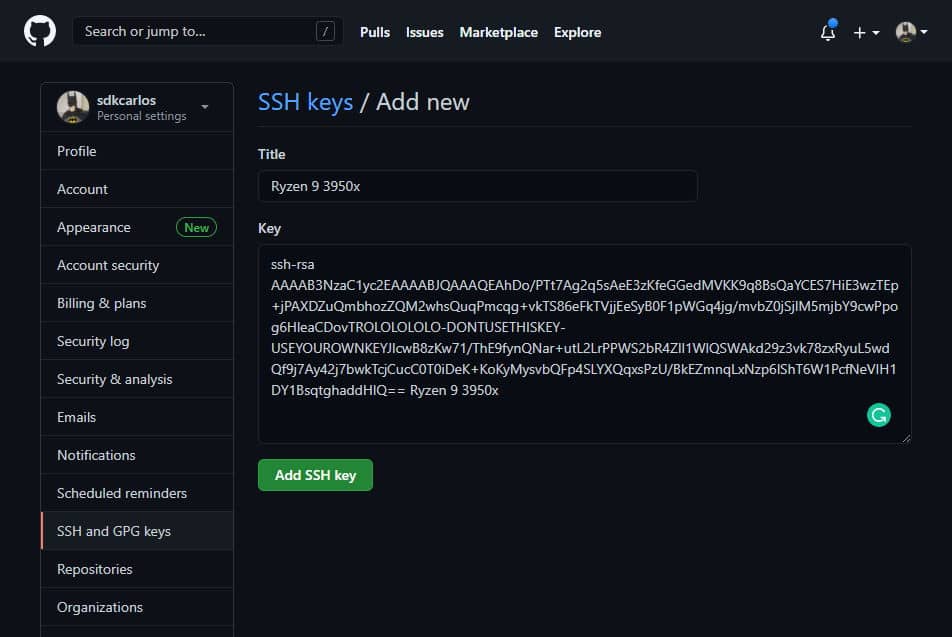
Github
Login to Github and open your user personal settings through the top right side dropdown. Select SSH AND GPG keys and register your key:
8. Using SSH Authentication
Now that you have your keys registered, you can clone your repositories and make changes to your repositories:
git clone [email protected]:username/repository-name.gitHappy coding ❤️!
Repeated username and password prompts are annoying and time-wasting. If you use password authentication with your Gitlab account, each action requires you to send over your credentials, whether as part of the command or through an interactive prompt.
Not a reader? Watch this related video tutorial!
Not seeing the video? Make sure your ad blocker is disabled.
Especially when automating the CI/CD pipelines in GitLab, password authentication can be inefficient and a possible security risk. Why not end your suffering and switch to Secure Shell (SSH) authentication using Gitlab SSH keys? Read on and learn how!
By the end of this tutorial, you will have generated an SSH key pair, used the key to authenticate and publish a new Gitlab project.
Prerequisites
This tutorial is a hands-on demonstration. To follow along, be sure to prepare the following requirements.
- Your GitLab account. If you don’t have one yet, sign up for a free account first.
- A computer to use as your Gitlab SSH client. This tutorial will be using an Ubuntu 20.04 LTS computer but should work with Windows and macOS too.
- Update or Install Git. The latest version as of this writing is 2.25.1.
Visual Studio Code (VS Code). The example in this tutorial will be using VS Code 1.62.3.
Generating a Gitlab SSH Key Pair
SSH keys or a key pair is consists of private and public keys. In a nutshell, the private key is what the client (your computer) presents to the server (Gitlab) for authentication, and the public key is what the server uses to decode your private key. And if both keys match, the authentication passes.
GitLab supports two types of SSH key pairs, the RSA and ED25519 SSH keys. But in this example, you’ll generate the ED25519 key pair as it is considered more secure than RSA keys. Follow the steps below to generate an SSH key pair.
1. On your desktop, open a terminal session and run the command below. This command opens your home directory in VS Code.
2. On the VS Code, click Terminal —> New Terminal.

3. On the VS Code terminal, run the ssh-keygen -t below to generate the ED25519 SSH key type. The comment tag -C is optional but recommended to make your keys more identifiable.
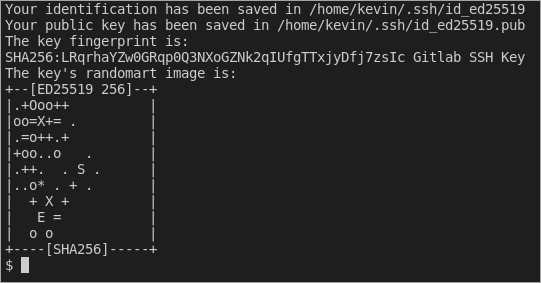
ssh-keygen -t ed25519 -C "Gitlab SSH Key"4. At the next prompt asking where to save the key, press Enter to accept the default filename. The filename should be similar to /home/<username>/.ssh/id_ed25519, where <username> is your username.

5. Next, leave the passphrase empty, and press Enter twice. As a result, you’ll be creating a passwordless SSH key pair.

You should see a similar result to the screenshot below showing the private key (id_ed25519) and public key (id_ed25519.pub) locations.
The private and public keys have the same base filename. But the public key has a .pub extension, while the private key does not have an extension.
Adding the Gitlab SSH Key to Your Profile
Remember that the private key stays on your computer, while the public key should be on the Gitlab server. So after generating the SSH Keys, your next step is to upload the public key to your Gitlab account. To do so, proceed as follows.
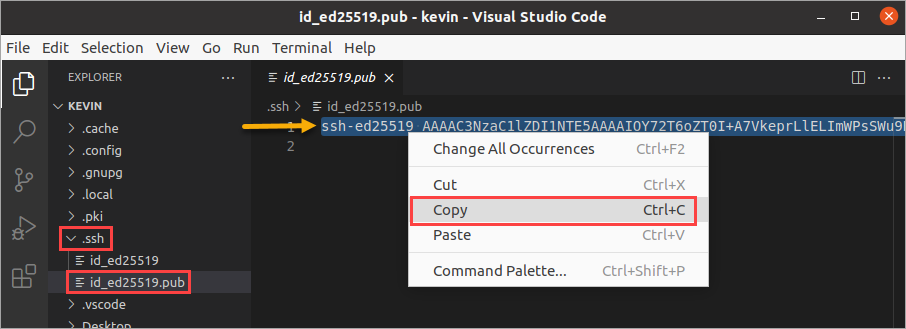
1. Open your public key file in VSCode. On the Explorer pane, expand the .ssh folder and click id_es25519.pub. Next, select the public key and copy it to the clipboard.
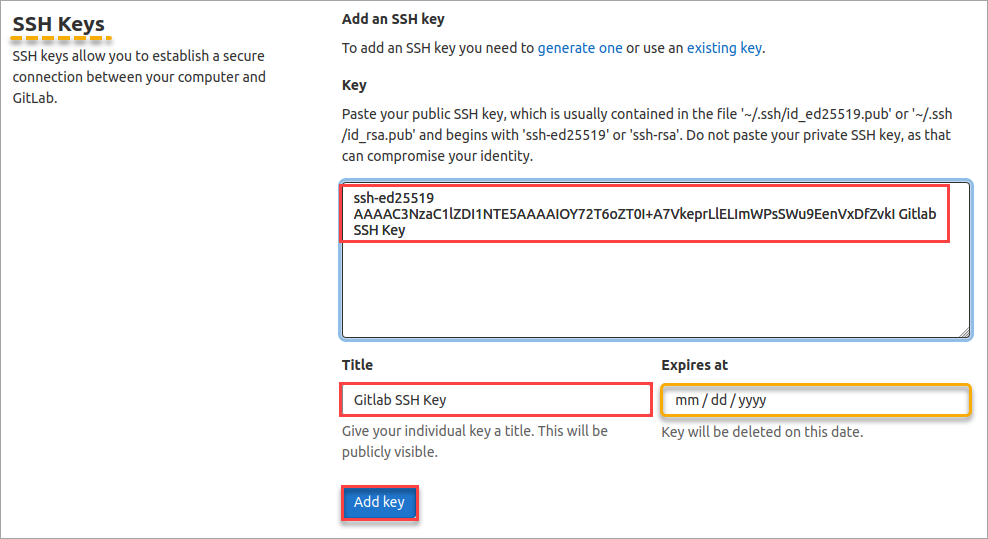
2. Now, open a web browser, navigate to https://gitlab.com, and log in to your Gitlab account.
3. After login, navigate to the SSH Keys profile settings at https://gitlab.com/-/profile/keys.
- Paste the public key that you copied earlier into the Key field.
- The Title field automatically populates with the comment portion of your public key. Leave the title value as-is or enter your preferred value.
- Optionally, specify an expiration date on the Expires at field.
- Lastly, click Add key.
Using Your Gitlab SSH Key
So far, you’ve generated the SSH key and uploaded it to your Gitlab account. What’s left is to test whether your SSH key works by using it to connect and authenticate to Gitlab.
Signing In
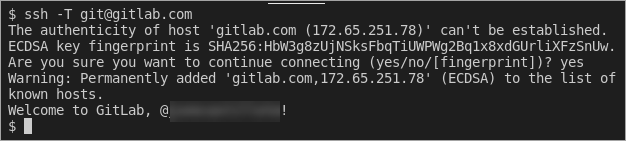
On the VS Code terminal, connect to your Gitlab account by running the command below.
Assuming you’re connecting for the first time, the command prompts you to verify the host’s authenticity and confirm the connection. Type yes at the prompt and press Enter to confirm.
Notice that you did not have to enter a username and password to log in? Instead, the ssh command automatically uses your SSH keys for authentication. After a successful login, you should see a welcome message saying, “Welcome to Gitlab @username!“.
Publishing a New Project
You’ve confirmed that your Gitlab SSH key works and lets you authenticate successfully. But does it also work when you interact with Gitlab through Git? Why not test by publishing a new Gitlab repository?
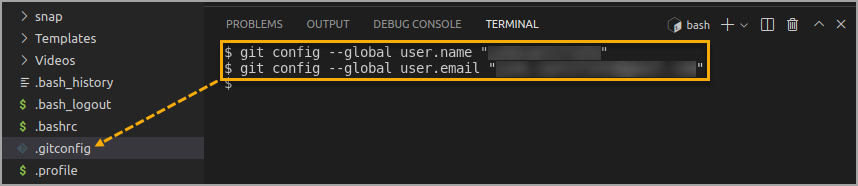
1. First, initialize the Git configuration and set it up with your Gitlab account’s username and email address. On the VS Code terminal, run the git config commands below to specify your Gitlab username and email address, respectively.
git config --global user.name "your_username"
git config --global user.email "[email protected]"
The command you ran should update or create the ~/.gitconfig file with the information you provided.
2. Next, create a folder under your home directory for your new repository. Name the new folder as my-first-project.
The folder name will also become your Gitlab repository project name.
# Create a new folder
mkdir ~/my-first-project
# Change the working directory to the new folder
cd ~/my-first-project
3. Initialize the repository by running the command below. Make sure to change the <username> with your Gitlab username.
You should see a similar confirmation message to the screenshot below.

4. Next, specify the remote Git repository address for your project. This repository address determines whether you’ll authenticate with SSH keys or with username and password.
Find the syntax below, where <username> is your Gitlab username and <project-name> is the Gitlab repository name. Notice that the repository address begins with [email protected], which indicates that you’ll be authenticating with the SSH key instead of a username and password.
Suppose the Gitlab username is kevin, and the repository name is my-first-project. Now run the command in the terminal as follows.
5. Run the command below to create an empty file in your repository called README.md.
6. Open the README.md file for editing and paste the following content into the file. Save the file after editing. My first project to demonstrate Gitlab SSH keys.
My first project to demonstrate Gitlab SSH keys.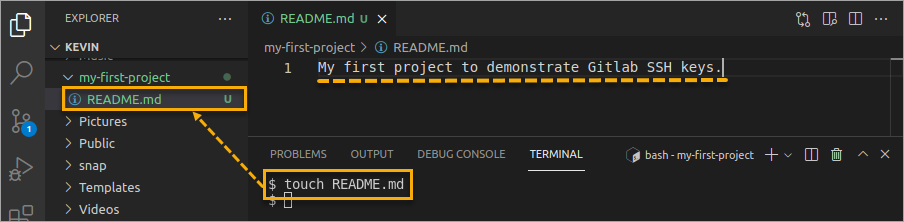
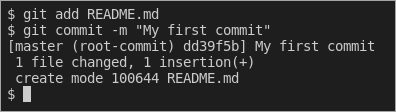
7. Now, tell Git to add the new README.md file to the repository and commit the changes.
git add README.md
git commit -m "My first commit"
You should see a similar output as shown below.
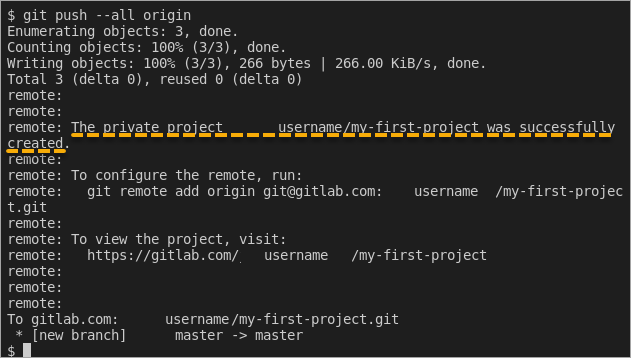
8. Finally, time to publish your new repository. Run the command below to push the repository from your computer to your Gitlab account.
As you can see below, the project creation was successful, and there were no credential prompts! Git used your SSH keys to authenticate with Gitlab.
9. Finally, confirm that your new Gitlab project exists online. Using your browser, navigate to https://gitlab.com/dashboard/projects to view a list of your existing projects. You should then see the my-first-project name on the list.
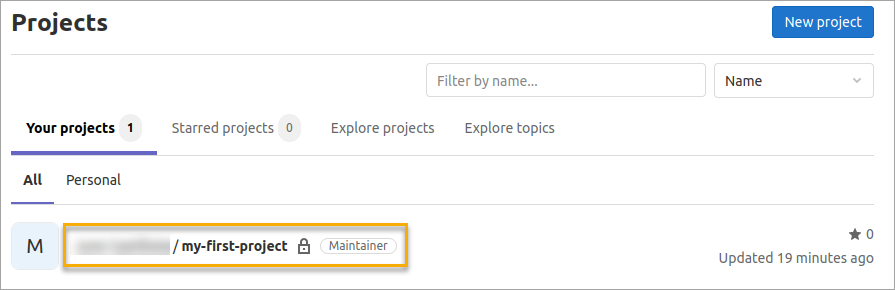
10. Furthermore, click on the project name, and you should see the README.md file and contents on display.
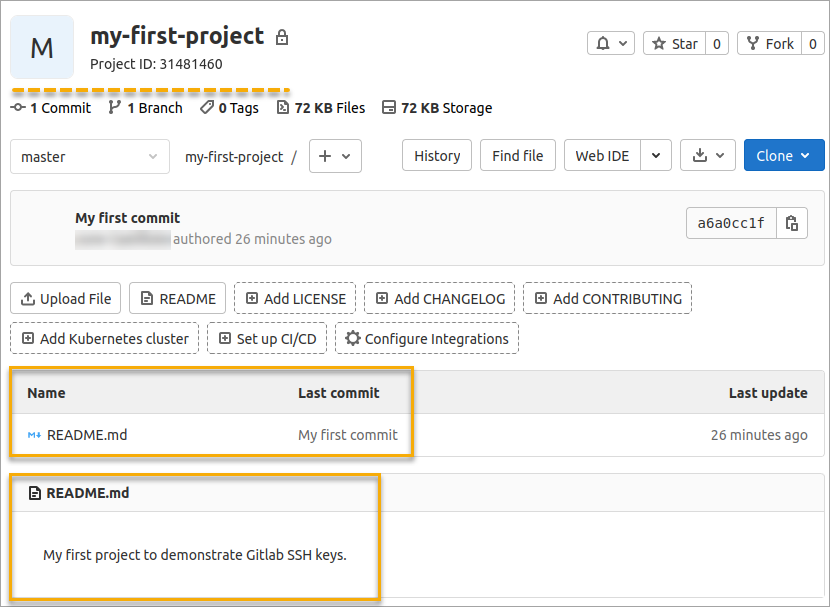
Conclusion
Congratulations on having made this far in this tutorial! Throughout this step-by-step tutorial, you’ve learned how to generate and use SSH keys to make secure version control deployments to your GitLab repository.
With this knowledge, you can now perform tasks on your Gitlab repositories without worrying about inadvertently exposing your username and password.
Have you used Gitlab SSH key authentication before? How was the experience? Do you recommend others to use SSH keys, too, or is there any reason they should stay away from it? Let us know.