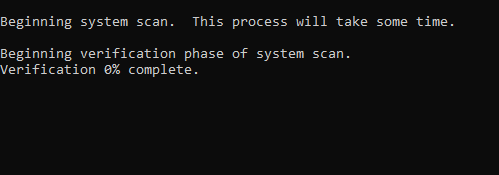
Любые зависания компьютера в части работы его операционной системы, вне зависимости от их продолжительности, всегда вызывают обоснованную негативную реакцию пользователей и множество вопросов, касающихся вариантов устранения данной проблемы. В настоящей статье речь пойдёт о довольно проблематичной ситуации, в которой пользователь при установке/обновлении операционной системы «Windows» сталкивается с зависанием работы ОС на шаге с надписью «Getting Windows ready».

Решение проблемы с зависанием при установке Windows на надписи Getting ready.
Причины и решения
Итак, как многим наверняка известно, надпись «Getting Windows ready» говорит о завершающей стадии подготовки функционирования установленной/обновлённой операционной системе. Соответственно, следует понимать, что процесс этот может действительно отнять много времени, в особенности если сама установка заняла не один десяток минут. «Getting Windows ready» при активном индикаторе рабочего процесса может занять и час, и два, и три, поэтому первый вариант – это банально подождать.

Аппаратно или программно
Статистика поисковых запросов наглядно демонстрирует, что в подавляющем большинстве случаев с рассматриваемой проблемой сталкиваются пользователи из других стран, а с чем это может быть связано, так до сих пор конкретно и неизвестно. Основными причинами зависания работы подготовительного процесса могут быть следующие моменты:
- неисправность загрузчика;
- неисправность используемого образа операционной системы;
- проблемы в кабельном соединении, в том числе и нестабильное электропитание;
- активные сетевые процессы;
- неисправность компонентов компьютера.
Исходя из приведённых причин, можно выделить следующий алгоритм действий, который при определённых обстоятельствах позволит решить проблему с зависанием.

Вариант 1
- завершите работу компьютера, но учитывайте, что аварийное выключение может привести к дополнительным ошибкам в работе операционной системе;
- отключите все внешние устройства ввода/выводы информации, сторонние накопители, колонки/наушники и т. д.;
- отключите кабель питания системного блока или извлеките аккумуляторную батарею ноутбука;
- оставьте обесточенный компьютер на некоторое время, буквально 1-2 минуты;
- снова подключите кабель питания/вставьте аккумуляторную батарею и верните при необходимости внешнюю периферию, кроме кабеля интернет-соединения.
Многим известен данный метод обесточивания в решении схожих проблем, что и в рассматриваемой теме.

Вариант 2
При возникновении зависаний на надписи «Getting Windows ready» в процессе установки операционной системы следует принимать во внимание и возможные ошибки в используемом образе ОС, а также в самом физическом носителе. Следовательно, в качестве второго варианта решения проблемы необходимо проверить качество программного обеспечения. Это можно сделать при попытке установить операционную систему на другое устройство, а также сменить загрузочный образ ОС со «сборочного материла» на чистый образ или наоборот. По сути, основываясь на том, что рассматриваемая проблема не имеет какой-либо конкретной причины и может в принципе отсутствовать или решиться сама собой, не существует стопроцентно рабочего алгоритма действий, который бы привёл к моментальному завершению установки/обновлению операционной системы.
Заключение
Последнее, что стоит отметить, — это наличие нескольких советов от пользователей на англоязычных тематических форумах, которые заключались в предложении отключить внешние USB-устройства, в частности мышь, и запустить установку/обновление ОС.
Computer is getting stuck on the screen «Getting Windows ready. Don’t turn off your computer» every time you restart? Don’t panic! Here are some effective fixes for the getting Windows ready stuck issue in Windows 11/10/8, as well as a fast disaster recovery solution.
Windows 11/Windows 10 Stuck on Getting Windows Ready
For many Windows 10/11 and Windows 8 users, it is common to experience unexpected issues with their operating systems. An issue that a lot of them encounter is their computer like Surface Pro 4 getting stuck on a loading screen with a message saying «Getting Windows ready. Don’t turn off your computer«, as shown in the following figure:

Users report this issue on forums like Reddit, saying it often happens when they are trying to turn on, turn off or restart/reboot their computers or install Windows operating system.
- Getting Windows ready boot loop, restarting loop, infinite loop, update loop
- Windows 10/11 update stuck on getting things ready
- Windows 10/11 install stuck at getting ready
How long does it take for Windows 10/11 to be ready? In some cases, this process could take more than several hours, which may prove to be a nuisance for many users.
If you also run into the Windows 11/Windows 10 stuck in loop getting Windows ready issue, here we will provide you effective solutions.
How to Fix Getting Windows Ready Stuck
Simply restarting the computer is often insufficient to get rid of Windows 11/Windows 10 getting ready loop. Fortunately, here are five workarounds you can try out below.
Solution 1: Simply Wait for Some Time
Yes, you read that right. The easiest working fix is to wait for some time. This is actually the method that some of Microsoft’s support technicians advise.
When you are prompted with the message «Getting Windows ready don’t turn off your computer», your system may be processing some tasks in the background such as downloading and installing files, starting a Windows 10/11 update process, modifying settings of the applications and modules, etc.
The system may take some time to complete these tasks depending on the number of programs installed on your PC. Thus, to let your computer boot properly, the first thing you can do is to wait until the system tasks are finished.
Usually, it is recommended to wait patiently for about 2-3 hours. However, if you still see the screen, you should try other solutions to troubleshoot getting Windows ready Windows 10 loop or Windows 11 getting ready stuck.
Solution 2: Shut Down Your PC and Power Reset It
Power resetting your PC can clear all the information in the memory, but this won’t damage the disk data. This method could help fix certain corruption issues on the computer.
Therefore, power resetting your Windows might fix the getting Windows ready stuck issue.
Here are the instructions to get Windows out of the update loop:
Step 1: Turn off your PC by pressing the power button.
Step 2: Disconnect all peripheral devices including USB flash drives, external hard drives, earphones, etc. Also, unplug the power cable or adapter from your PC.
Step 3: If you are using a laptop and the battery is detachable, remove the battery from the battery compartment.
Step 4: Press and hold the Power button on your computer for about 30 seconds to drain all the remnant charge from the capacitors.
Step 5: Connect the power cable back to the PC or insert the battery into your laptop. However, don not re-plug any of the USB devices.
Step 6: Press the Power button to boot your PC. You can now check whether the Windows 11/Windows 10 stuck in loop getting Windows ready issue is solved.
Solution 3: Perform a System Restore or System Image Recovery
If you have created a System Restore point or system image backup with Windows snap-in tools, you can try using the restore point or image file to restore the PC to a normal state when you encounter the getting Windows ready stuck issue.
But how do you perform restoration when your system is stuck on the same screen?
Step 1: Download Media Creation Tool from the Microsoft website. Run it to create a Windows installation media (USB installation drive or CD/DVD disc).
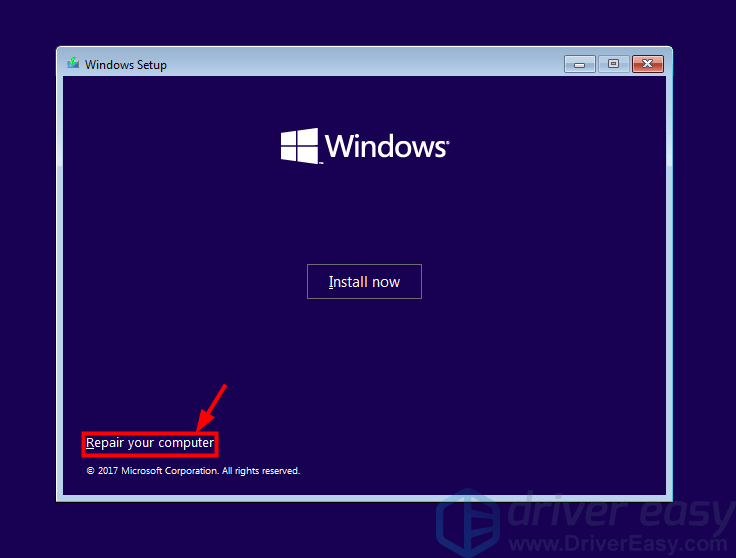
Step 2: Boot the PC from the disc or USB drive. Configure the language, time, keyboard method, and click Repair your computer.
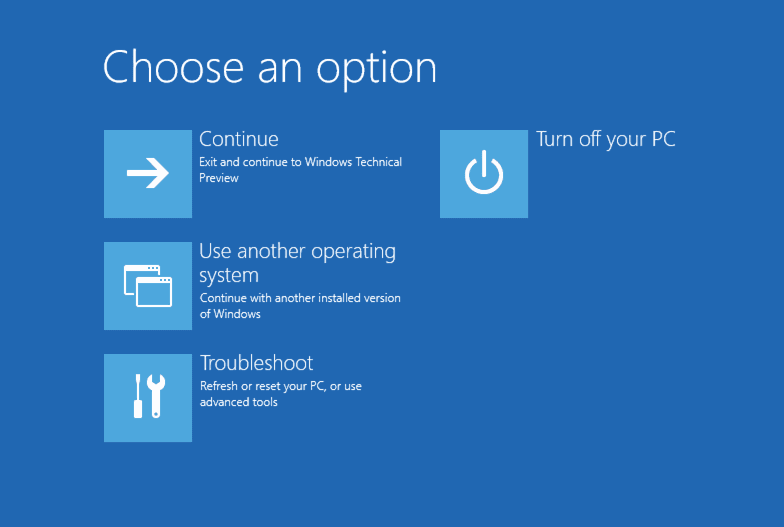
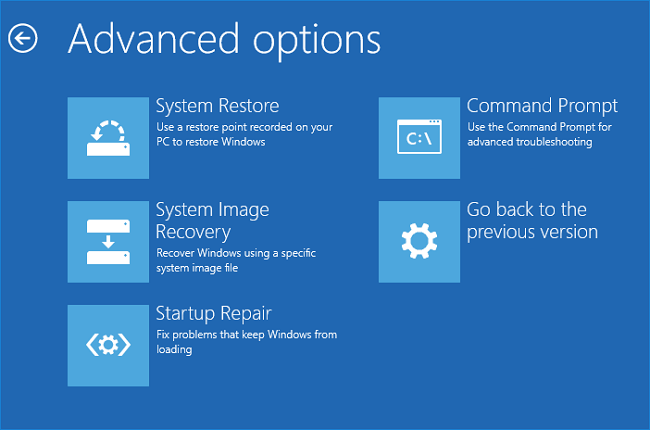
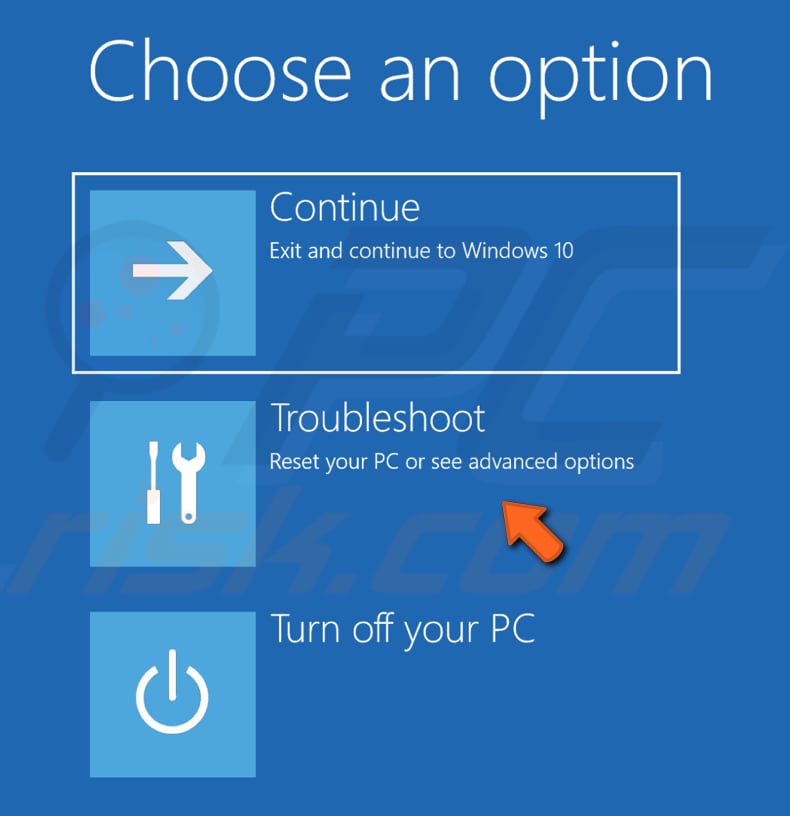
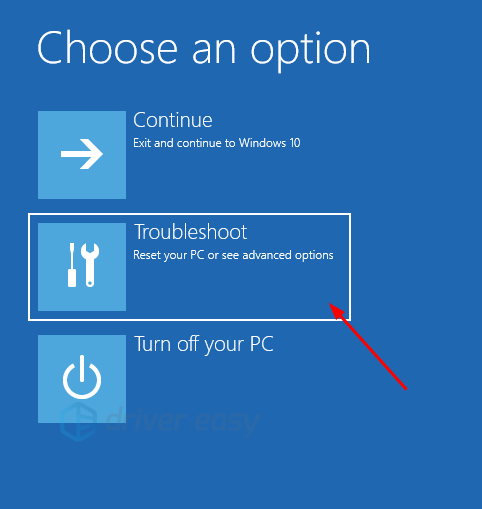
Step 3: Go to Choose an option > Troubleshoot > Advanced options > System Restore.
Step 4: Follow the wizard to finish a system restore to get you out of the Windows 11/Windows 10 getting ready loop.

If you have a system image, choose System Image Recovery under the Advanced options tab. Then, restore your computer to its earlier state using the image backup.
Tip: If you have a system backup created by the professional Windows backup software, MiniTool ShadowMaker, you can also use its Media Builder to create bootable media to restore the PC to an earlier state in WinPE. This post How Do You Restore System Image from External Hard Drive will be helpful to you.
Free Download
Solution 4: Run System File Checker
If Windows is taking too long to get Windows 8/10/11 ready or the above methods fail to troubleshoot stuck at getting Windows ready, you can try the System File Checker tool. Sometimes Window’s need to get ready for update at every reboot may be caused by the corrupted files on your computer.
Here is how to fix damaged system files:
Step 1: In the same way as above, insert the installation disc or USB drive into your PC and boot it from this drive.
Step 2: Go to Repair your computer, enter the Choose an option screen and choose Troubleshoot.
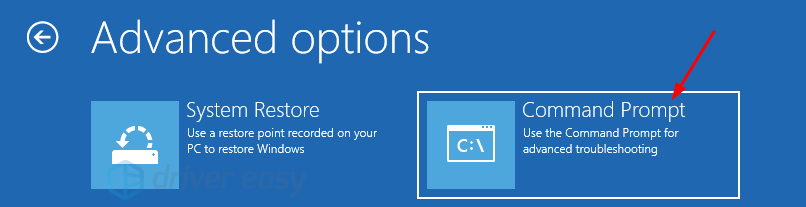
Step 3: Click Command Prompt in the Advanced options page.
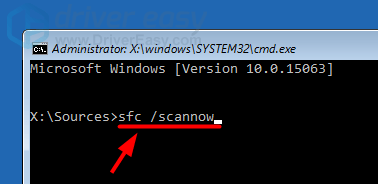
Step 4: After cmd window is opened, type the command: sfc /scannow /offbootdir=C: /offwindir=C:Windows and press Enter on the keyboard.
Tip: Sometimes System File Checker might run into error messages like «Windows resource protection could not perform the requested operation» or «Windows Resource Protection could not start the repair service» in the cmd window. To solve these errors, read Quickly Fix – SFC Scannow Not Working (Focus on 2 Cases) to find solutions. Or sometimes SFC gets stuck and go to find solutions from the post — Windows 10 SFC /Scannow Stuck at 4/5/30/40/73, etc.? Try 7 Ways
Wait patiently until the verification process 100% completes. Then reboot the computer to see whether getting Windows ready Windows 10/11 loop still exists.
Solution 5: Perform Windows 10/11 Startup Repair
When your PC is stuck in getting Windows ready every reboot, performing Windows Startup Repair might be able to fix the issue.
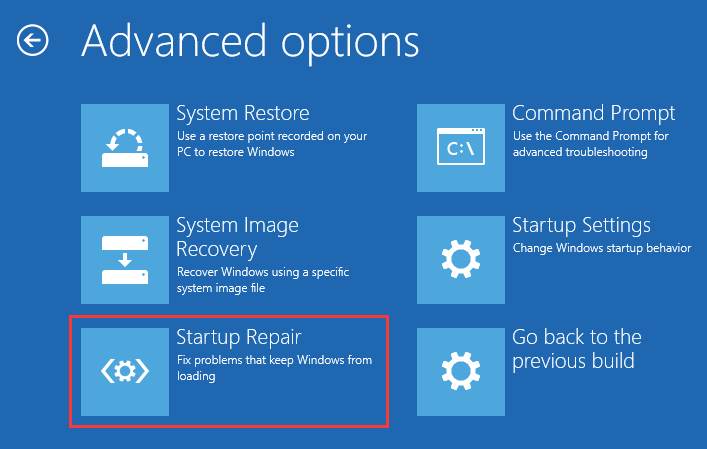
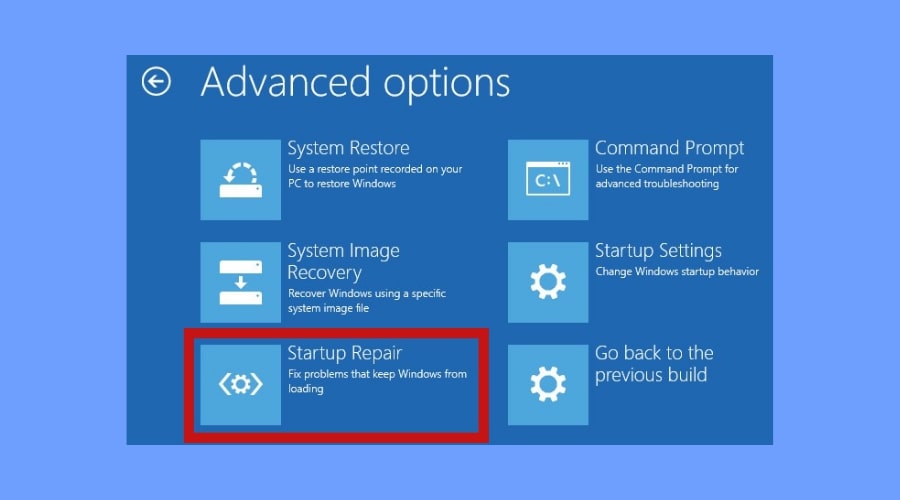
This also requires entering the Windows Recovery Environment (WinRE) using the Windows installation disc. In WinRE, navigate to Advanced options and choose Startup Repair: Fix problems that keep Windows from loading.
If the repair process results in the error «startup repair couldn’t repair your PC» or «automatic repair couldn’t repair your PC«, try another solution to fix Windows 11/Windows 10 stuck on getting Windows ready issue.
Solution 6: Uninstall Recently Installed Update in Safe Mode
An erroneous recent update might confuse Windows to get stuck in another update loop, so uninstalling these updates may fix the issue. This will need to be done through the Safe Mode.
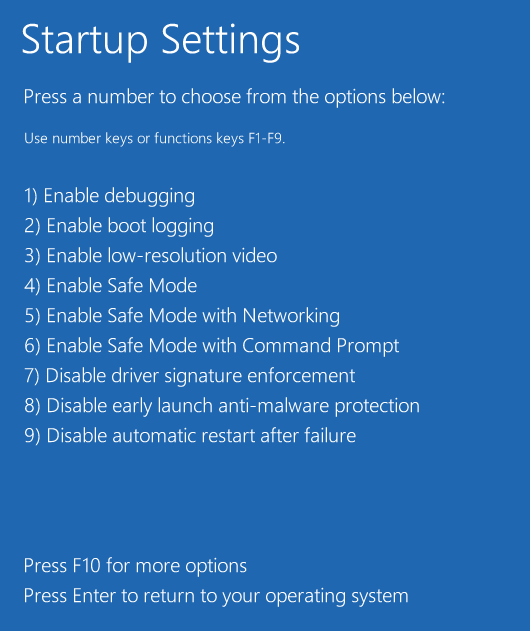
Step 1: Access the Advanced options page, then click Startup Settings and press F4 to access the computer Safe Mode.
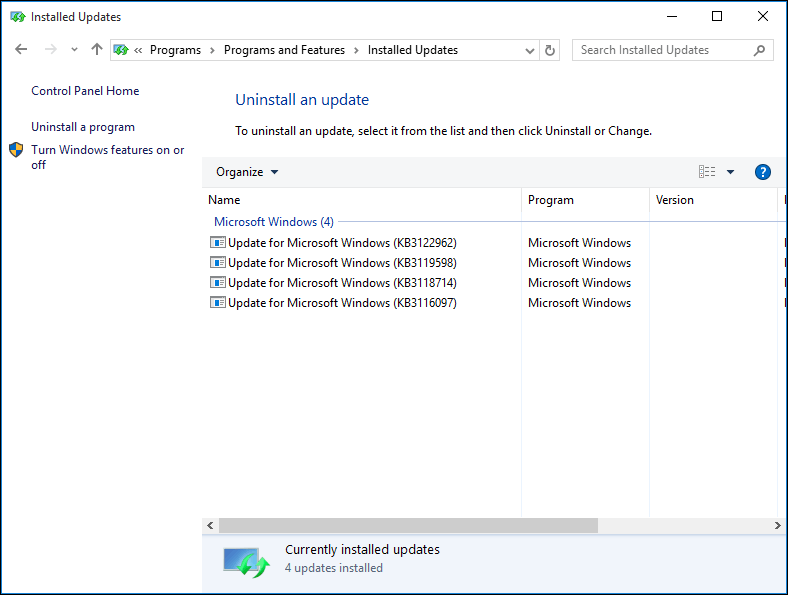
Step 2: In Windows 10/11 Safe Mode, right-click Start to choose Control Panel. Then go to Programs and Features.
Step 3: Click View installed update in the left panel. Select the recently installed updates and uninstall them to fix the Windows 11/Windows 10 stuck in loop getting Windows ready issue.
Finally, restart Windows 10/11 and the computer stuck on getting Windows ready issue should be solved.
Solution 7: Perform a Clean Windows Installation
If none of the above methods can help you out of getting Windows ready stuck issue, the operating system may have unfixable issues. The final solution will be installing a fresh copy of Windows.
Back up Important Files before Windows Installation
Windows clean install will erase some of your personal files. Thus, make sure you have backed up important data from the system partition or the Desktop. Also, have your license key ready.
To back up computer files, we recommend using the free Windows 10/11 backup software, MiniTool ShadowMaker. It is compatible with Windows 11/10/8/7 and can help you to back up files, disk, partition or OS with simple clicks. Here, you can start backing up your files by getting its Trial Edition (30-day free use is supported) from the button below.
Free Download
Step 1: Run MiniTool ShadowMaker Trial Edition and create a bootable USB drive via Media Builder. Then, boot the unbootable PC from that drive and enter the recovery environment of MiniTool ShadowMaker.
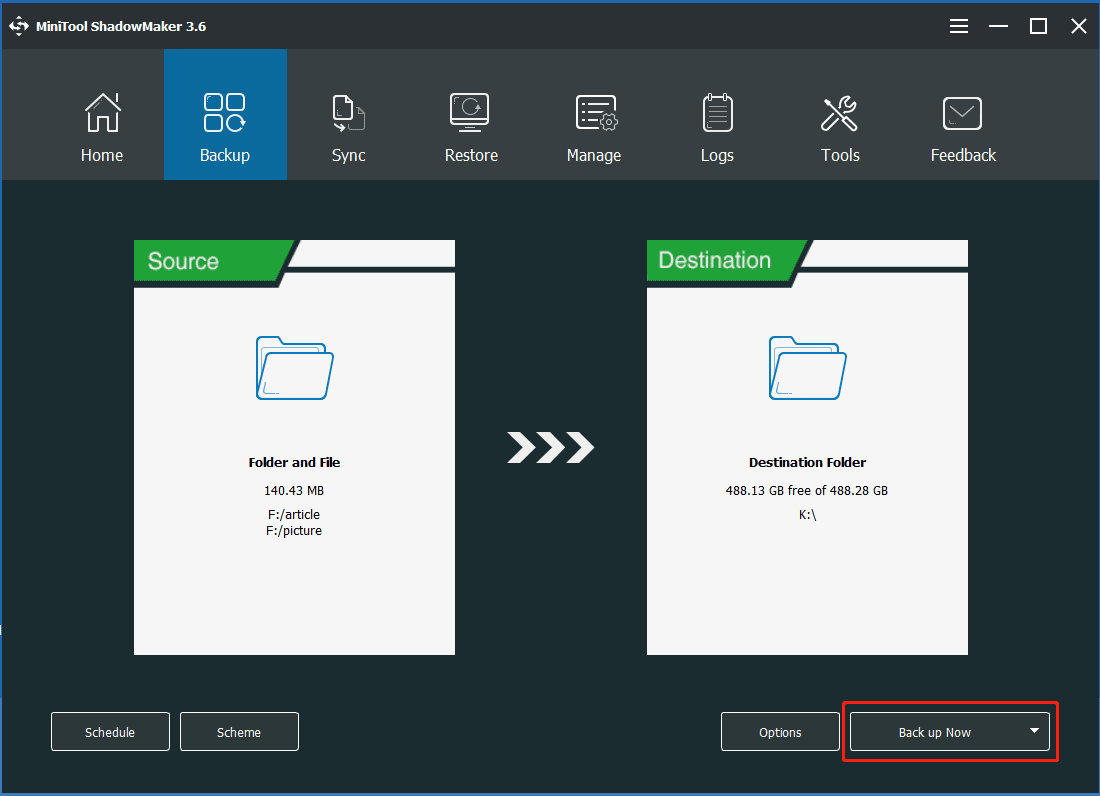
Step 2: Launch this backup software, under the Backup tab, go to Source > Folders and Files to choose the files you want to back up.
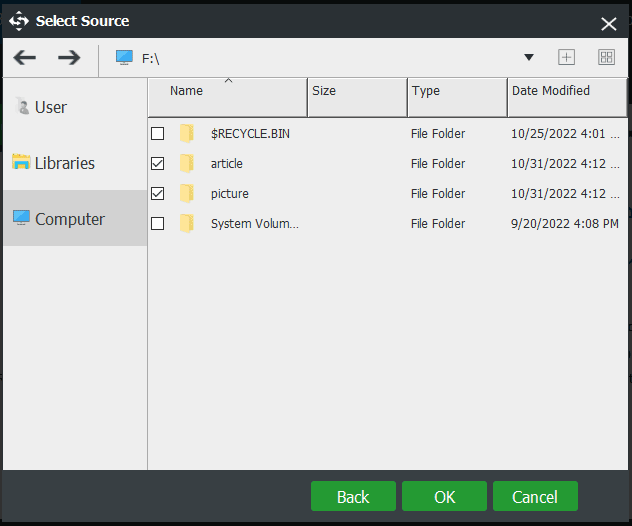
Then, select a destination path to store the backup image file. This software specifies a folder for you by default, but you can also specify a location like an external hard drive or USB drive.
Step 3: Click Back up Now to execute the backup task.
Perform a Clean Windows 10/11 Install
After finishing the file backup, now you can reinstall your Windows 10/11 to fix getting Windows ready stuck issue.
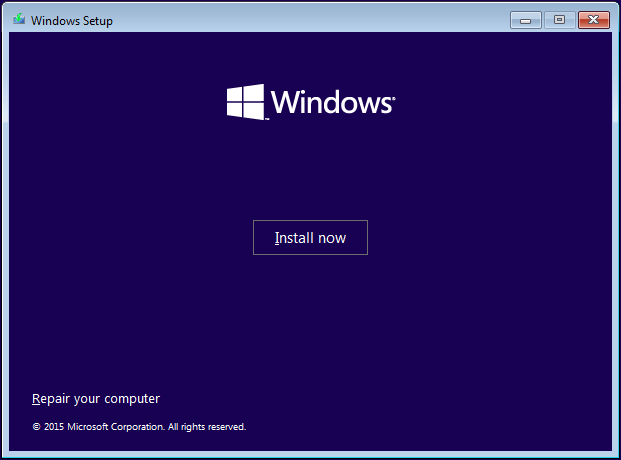
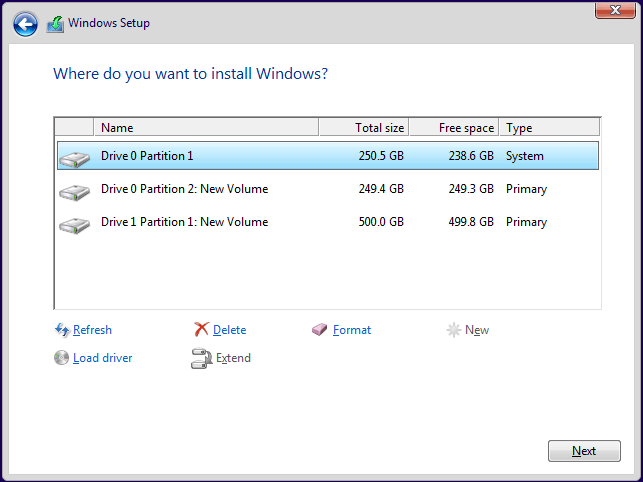
Step 1: Boot your computer from an installation disc or drive.
Step 2: Choose the language, time format, and keyboard.
Step 3: Click Install now and follow the instructions on the screen.
Note: Keep in mind that you should select the correct drive to perform the installation. Otherwise, all files from that drive will be removed. Be extra cautious.
After the setup process is complete, the problem Windows 11/Windows 10 stuck on getting Windows ready should be completely resolved.
If you are unsure of how to make a refresh copy of Windows, read How to Reinstall Windows 10. If you think it is complicated to make a clean install, you can follow this post to reset Windows 10/11 instead.
«Here are 7 solutions to fix getting Windows ready stuck issue. Try them out if you have this issue, and share it on Twitter to let more people know.»Click to Tweet
Suggestion: Back up Windows 10/11 OS to Safeguard Your PC
Regardless of what system issues occur on your computer, system image recovery is a better solution provided that a system image was created beforehand.
Similarly, restoring the PC to a previous state by using the system backup is also a good solution to Windows 11/Windows 10 getting ready loop for a long time
Therefore, after finishing fixing the issue, it is necessary to back up your OS to protect your computer from system corruption. To do this, we highly recommend using MiniTool ShadowMaker as mentioned above.
Free Download
Step 1: Launch this backup software for Windows 10/11, click Keep Trial.
Step 2: Go to the Backup page; system partitions and storage path are selected by default. Start the system backup process by clicking Back up Now.
Tip: You can also change the backup source and destination location based on your needs.
Bottom Line
Is your computer stuck on getting Windows ready? Take it easy and use the above methods! In case getting Windows ready stuck occurs again, it is best to back up your Windows 10/11 operating system with MiniTool ShadowMaker.
Overall, feel free to tell us if you have other ways to fix Windows 11/Windows 10 getting ready loop or questions regarding MiniTool software by contacting [email protected] or leaving a comment below.
Getting Windows Ready Stuck FAQ
What do I do if my computer is stuck on getting Windows Ready?
- Simply wait for some time
- Shut down your PC and power reset it
- Perform a system restore or system image recovery
- Run System File Checker
- Perform Windows 11/10 Startup Repair
- Uninstall recently installed update in Safe Mode
- Perform a clean Windows installation
How long should I wait for getting Windows Ready?
Usually, you can wait patiently for 2-3 hours. But if you still see the computer screen after that period, try some ways to get rid of the getting Windows ready loop.
Do not turn off your computer stuck?
If your computer is stuck on the screen saying “Getting Windows ready. Don’t turn off your computer”, try to fix it by running SFC, performing Startup Repair, running a system restore, etc.
What do I do if my computer is stuck updating?
- Remove Any USB Peripherals
- Run Windows Update Troubleshooter
- Rename SoftwareDistribution Folder
- Perform a Clean Boot
- Uninstall the Particular Update Causing the Issue
- Run DISM in Safe Mode
- Run Automatic Repair
- Perform System Restore in WinRE
- More details in the post — How to Fix the “Windows Updates Stuck at 100” Issue on Windows 10
«Laptop stuck on getting Windows ready don’t turn off computer» — from Microsoft Community Follow the steps to fix getting Windows ready don’t turn off your computer.
| Workable Solutions | Step-by-step Troubleshooting |
|---|---|
| Fix 1. Just Wait for A Long Time | If you want your computer to boot normally, the first thing you can try is to wait…Full steps |
| Fix 2. Shut Down and Power Reset | Unplug all peripheral devices > unplug the power cable and…Full steps |
| Fix 3. Run Windows Repair Services | Run Windows Repair Services to fix all the Windows system startup errors, including system…Full steps |
| Fix 4. Delete Problematic Files | Go to Troubleshoot > Advanced Options > Command Prompt and search…Full steps |
| Fix 5. System Restore or Reset | Choose Troubleshoot > Advanced Options > System Restore and follow the wizard…Full steps |
A Windows desktop or laptop can get stuck on «Getting Windows ready, Don’t turn off your computer». You wait and wait, and nothing changes. «Getting Windows ready stuck» occurs when you try to turn on, turn off, or restart your computer. Don’t let this annoying problem bother you anymore. We’ll provide you with a few effective solutions to quickly fix Windows 11, Windows 10, Windows 8, or Windows 7 stuck on Getting Windows ready.

How to Fix Getting Windows Ready Stuck
Don’t worry. You can fix the blue screen of death with reliable solutions. There are five ways to fix the error — getting Windows ready, don’t turn off your computer. Keep reading to fix the error. If you have problems, you can watch the video to get help first.
- 0:31 Force to restart your Windows PC
- 0:53 Stop Maintenance
- 1:06 Run services.msc command
- 1:20 Stop Windows update
- 2:07 Enter Safe Boot
- 2:47 Install Windows update
Fix 1. Just Wait for a Long Time
Is the circle animation still moving? Show some patience and try to wait it out.
Yes, this is actually what Microsoft’s support technicians advise. When your computer displays Getting Windows ready, your system may download and install files or deal with some tasks in the background. It can sometimes take a while for your system to finish these jobs.
So if you want your computer to boot normally, the first thing you can try is to wait. We advise you to wait no more than 2-3 hours, and if it is still not resolved, move on to some of these other fixes.
Fix 2. Shut Down Your PC and Power Reset Your Computer
Power resetting can clear all information in your computer memory without damaging your data. It helps fix corruption issues on your computer and gets you out of the loop of Getting Windows ready, Don’t turn off your computer.
Step 1. Turn off your computer regardless of the getting ready screen.
Step 2. Unplug your computer’s peripheral devices (USB flash drive, external hard drive, headphones, etc.).
Step 3. Press and hold the power button on your computer for 30 seconds. (Your computer should stay off afterward).
Step 4. Unplug the power cable from your computer.
Step 5. Unplug the battery(only if you are using a laptop and your laptop battery is removable).
Step 6. Reinsert the battery and plug the power cable back into your computer.
Step 7. Turn on your computer. If this method works for you, you won’t see the screen this time.
Fix 3. Fix Getting Windows Ready Stuck with Repair Services
A simple and quick way to repair Windows issues is using manual Windows repair services. EaseUS’s professional technical team can help you solve system startup errors, including system failure, BSOD, unbootable devices, etc.
Consult with EaseUS data recovery experts for one-on-one manual recovery service. We could offer the following services after FREE diagnosis:
- Fix Windows boot issues, including BSOD
- Fix Windows error and configure Windows environment
- Restore the system when it fails to boot
- Optimize Windows computer to make it run quickly
Fix 4. Delete Problematic Files
If you fail to fix the getting Windows stuck error, you can try to delete the problematic files of the system files.
Step 1. Restart your PC, and you will see the Windows Boot Options page.
Step 2. In Windows Boot Options menu, choose «Troubleshoot > Advanced Options > Command Prompt».
Step 3. In the command line, type: C: cd WindowsSystem32LogFilesSrt. SrtTrail.txt and press Enter.
Step 4. Here, if you see something like this: Boot critical file c:windowssystem32driversvsock.sys is corrupt, navigate to the specified location using the Command Prompt and enter the Del command to delete the problematic file.

Fix 5. Perform a System Restore or Reset
Before the system reset, you better export all your important data. Here, you can go with one of two options.
Option 1. Backup data without booting into Windows 10 with EaseUS Todo Backup.
Option 2. Recover data after System Restore with EaseUS Data Recovery Wizard.
Of course, the first option is the most recommended because making a backup will ensure the safety of your data, but you need to create the bootable disk on another working computer. EaseUS Data Recovery Wizard is also viable if you do not have a working computer to create the bootable disk on, but the integrity of your data is more precarious.
Step 1. Select a location and start scanning
Launch EaseUS Data Recovery Wizard and choose the partition where you lost data. Then, click «Scan».

Step 2. Filter and preview files
Use the file format filter on the left or upper right corner to find the files you need. Then, you can click the «Preview» button or double-click a file to preview its content.

Step 3. Recover lost data or files
Click the checkbox next to the file and click «Recover» to restore the lost data to a secure place.

How to perform a system restore or reset:
Step 1. In the Windows Boot Options menu, choose Troubleshoot > Advanced Options > System Restore.
Step 2. Follow the Wizard instruction and choose the appropriate restore point. Finally, click Finish to restore the system.
After the system restores, you can use EaseUS Data Recovery Wizard to locate any missing files. If this last method fails, nothing can fix the ‘getting Windows ready’ problem besides reinstalling Windows 10 from scratch with the Windows Media Creation Tool.
Getting Windows Ready Stuck FAQs
Windows updates and the installation often result in blue screen errors, black screen of death Windows 11, and green screen of death. There’s always a solution for you to fix the problem.
1. What do I do if my computer is stuck getting Windows Ready?
In conclusion, when you’re stuck on getting Windows ready, try the following methods one by one:
- Wait for some time
- Shut down your PC and power reset it
- Delete problematic update files
- Perform a system restore or reset
2. How long should I wait to get Windows Ready?
Usually, it is recommended to wait patiently for about 2-3 hours. After the period of time, if getting Windows ready is still stuck there, stop waiting and move on to troubleshooting steps.
3. Why does getting windows ready take so long?
When you are prompted with the message «Getting Windows ready, don’t turn off your computer», your system may be processing some tasks in the background, such as downloading and installing files, starting a Windows 10 update process, modifying settings of the applications, and modules, etc. The system may take some time to complete these tasks depending on the number of programs installed on your PC.
Windows computer stuck at getting ready screen after windows update installation or Recent windows 10 22H2 update? Here is every possible solution to fix the windows 10 getting ready loop or getting windows ready every reboot, getting windows ready don’t turn off your computer etc on windows 10, 8.1 and 7.
This problem windows 10 is stuck at getting ready Screen like windows getting ready don’t turn off your computer mostly occurs because of corrupted update file installation. Again an incomplete update, Windows will try to finish its installation every time you restart your PC or windows system file corruption which causes updates not installed properly. And reset windows update components probably a good solution to fix Windows 10 getting ready loop.
Well, if you have stuck on the getting ready screen, wait a few more minutes and check if this completes.
Disconnect all external devices and check if this helps.
- If you are laptop user, Unplug the battery from the battery compartment of your laptop.
- Press and hold the power button on your computer for 30 seconds.
- Plug the power (and the battery) back and turn on your laptop.
Perform Startup Repair
If your PC gets stuck with windows getting ready don’t turn off your computer before appearing on the login screen, which might restrict you from accessing your desktop completely in normal ways. Startup repair is a good solution to fix startup bugs, which cause windows to start normally.
To perform Startup repair Fallow the steps bellow
- Boot Windows from an installation media,
- Here skip the first window on the Next screen click on Repair your computer.

- This will restart windows. Now click on troubleshooting followed by the advanced option.
- This will represent the Windows Advanced Boot Options.
- Here click on Startup Repair.

When you click on startup repair, this will restart the window and start to diagnose your system. During this diagnostic phase, Startup Repair will scan your system and analyze the various settings, configuration options, and system files as it looks for corrupt files or botched configuration settings. After finished, reboot the PC and you will see the Getting Windows Ready Windows 10 error has been solved.
Uninstall Recent Update in Safe Mode
If the startup didn’t help still having problems, boot into safe mode from advanced options. And follow the steps below to remove buggy update files that may be causing the problem.
- Open Control Panel -> Programs -> Programs and Features.
- Click on View installed update > Uninstall the problematic update.
- Now Restart windows and check the problem is fixed.
Delete the Software Distribution Folder
Also, clear the old update files from the software distribution folder, following the steps below that probably a good solution to fix almost every window update problem.
- Again boot into safe mode,
- Navigate C:WindowsSoftwareDistributiondownload,
- Delete all data inside the download folder.

Restart windows normally, I am sure there are no more Windows getting ready loop.
Well, you can now open and click check for updates to download fresh windows update files from the Microsoft server without any problem.
Stop system maintenance
Also, some Windows users report the problem of windows getting ready don’t turn off your computer gets solved after stop the system maintenance on the control panel. You can do this by the following below.
- Start windows into safe mode or if you have access to normal windows desktop then
- open control panel -> System and Security -> Security and Maintenance.
- Expand the maintenance and click stop maintenance as shown below image.
- Restart windows and check the windows getting ready loop fixed.
Repair Corrupt system files
Windows have an inbuilt SFC utility that helps to repair and replace corrupted system files. Run the system file checker utility that probably helps if corrupted, or missing system files cause the Windows update loop.
Perform System Restore
If all the above methods failed to fix Windows 10 stuck at the getting ready startup problem. Then it’s the right time to utilize the Windows system Restore Features. Which helps to revert your system to the previous working state where windows work smoothly. Again you need to perform the system restore on windows safe mode as due to this problem, you cannot access the normal desktop. Check How To perform System Restore on Windows 10 Computer.
Did these solutions help to fix the windows 10 getting ready loop? Let us know on the comments below, also read:
- Laptop Stuck Getting Windows ready Don’t turn off your computer? Try these solutions
- Solved: Windows 10 Mail App Not Working, Mail app is not syncing problem.
- Windows 10 running slow after update? Here is how to fix it!
- Laptop freezes randomly after Install Windows 10 update.
- Microsoft Outlook Stuck on Loading Profile? Here is how to fix it
How to Fix Computer Stuck on «Getting Windows ready» Loop on Windows 10
The «Getting Windows ready» loop is ubiquitous and annoying, especially if you have urgent work. In this guide, we present several possible ways to fix it.
The «Getting Windows ready. Don’t turn off your computer» screen appears when you are trying to restart or turn on/off the computer after Updating Windows.
Seeing this screen is normal, but sometimes Windows may take a long time to restart. In the worst-case scenario, Windows may get stuck on the «Getting Windows ready» screen.
You may also experience a loop when this screen appears each time you boot up and turn off or restart your computer.
Read this article to find out how to prevent windows from automatically downloading and installing updates.
Video Showing How to Fix «Getting Windows ready. Don’t turn off your computer» Screen
Table of Contents:
- Introduction
- Method 1. Give It More Time
- Method 2. Hard Shut Down and Restart Your Computer
- Method 3. Run System File Checker (SFC) Scan
- Method 4. Reset Your PC
- Video Showing How to Fix «Getting Windows ready. Don’t turn off your computer» Screen
Method 1. Give It More Time
When you receive the «Getting Windows ready. Don’t turn off your computer» screen, the Windows operating system may be downloading and installing files. Depending on the upgrade, this could be a long process. If you have waited for an hour, we recommend waiting another hour or two before trying other measures.
Wait until the system completes its task, and then the screen should disappear, and the system reverts to normal. This message often appears after major Windows updates. If you prevent these updates from being applied, your system might encounter serious errors.
[Back to Table of Contents]
Method 2. Hard Shut Down and Restart Your Computer
If you have more than 2-3 hours, you can try to perform a ‘hard shut down’. This term describes the process of pressing (or pressing and holding) the power button on a computer for a few seconds. It is called hard shut down since you physically press the button instead of turning off the system through software.
Try shutting down the computer by pressing (or pressing and holding) the power button when the HDD (hard disk drive) activity lamp is not blinking (in this case, your system has finished the upgrade process but is stuck on the «Getting Windows ready. Don’t turn off your computer» screen). Windows should start normally and without problems the next time you turn your computer on.
[Back to Table of Contents]
Method 3. Run System File Checker (SFC) Scan
Command Prompt is the input field in a text-based user interface screen, a command-line interpreter application available in most Windows operating systems. It is used to execute entered commands, most of which automate tasks through scripts and batch files, perform advanced administrative functions, troubleshoot, and solve certain types of Windows issues. To use Command Prompt, you must enter a valid command and optional parameters. It then executes the command as entered and performs its specific Windows task or function.
To launch Command Prompt when receiving the «Getting Windows ready. Don’t turn off your computer» screen, you will need a Windows installation DVD (or USB). Read this article on how to create a bootable Windows 10 USB flash drive.
Insert a Windows 10 Bootable USB Drive or Windows 10 installation DVD into your PC. Turn off your computer by holding down the power button for about 5 seconds. Then, press the power button again to turn it on. While in the post screen, press Del, Delete, F2 to F8, F10, or F12 (depending on the motherboard manufacturer) to enter the BIOS.
Once in the BIOS, navigate to Boot and set the bootable USB drive or CD-DVD ROM as the first boot device. Save the changes and exit the BIOS (typically by pressing F10). Your PC will restart and boot into the Windows Installation Setup window.
When in the Windows Setup window, enter your language and other preferences. Click «Next».
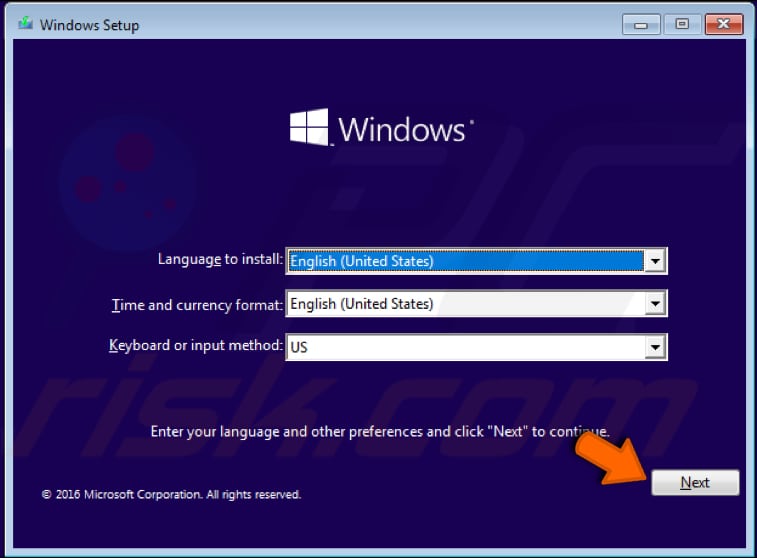
Click «Repair your computer» to launch the Windows Automatic Repair tool. Automatic Repair is a built-in troubleshooter that should help to fix some of the most common issues regarding your computer. It is a system recovery tool that automates common diagnostic and repair tasks of unbootable Windows 10 installations.
Automatic Repair is generally able to fix the boot failure error. This is a built-in option that is part of Windows. When a Windows 10 system fails to boot, the Automatic Repair option attempts to repair the operating system automatically.
In most cases, Automatic Repair fixes various issues related to boot failures, but like any other program, it has limitations and can fail. Such failures might be due to errors or corrupted/missing files in your operating system installation, preventing Windows from starting correctly.

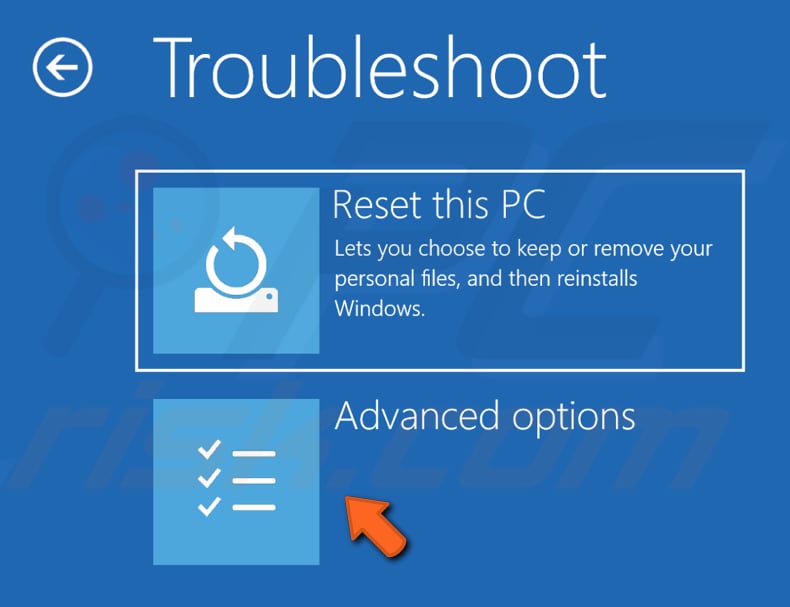
In Automatic Repair, click «Troubleshoot».

In the Troubleshoot window, select «Advanced options».
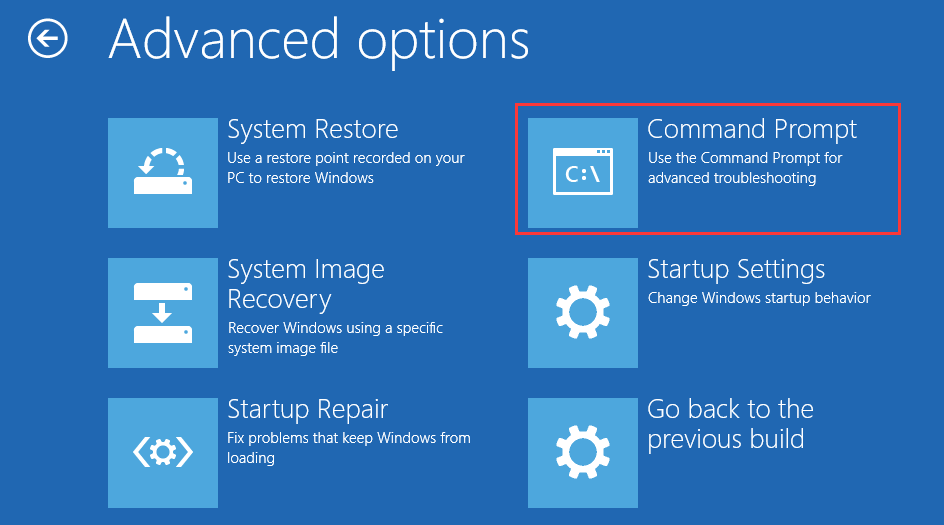
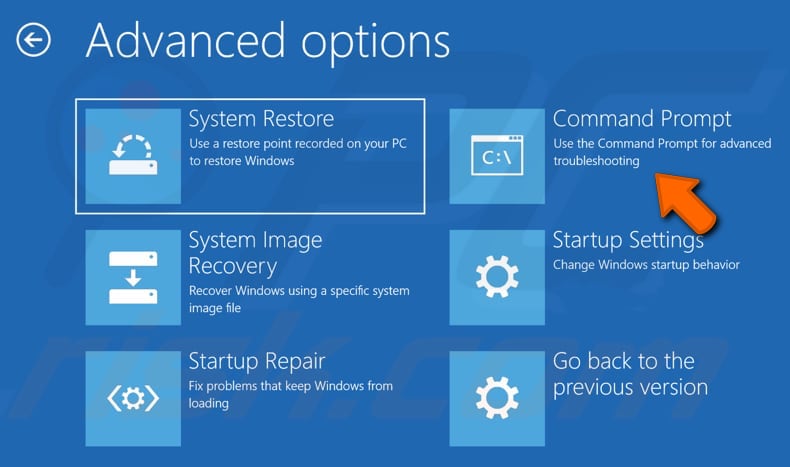
In Advanced options, click «Command Prompt».
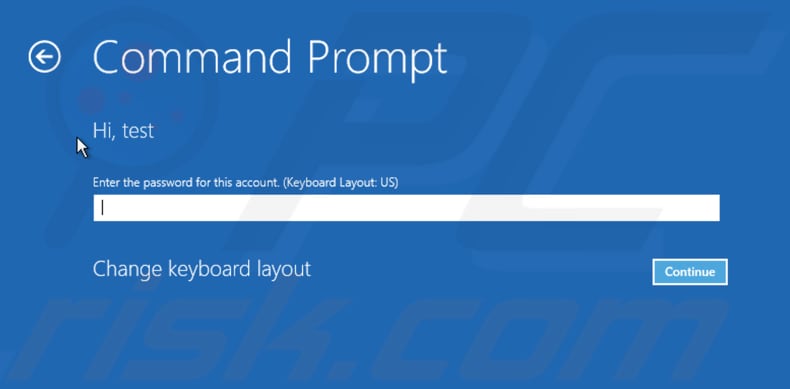
If you have more than one account on Windows, select it and enter the password to run Command Prompt.
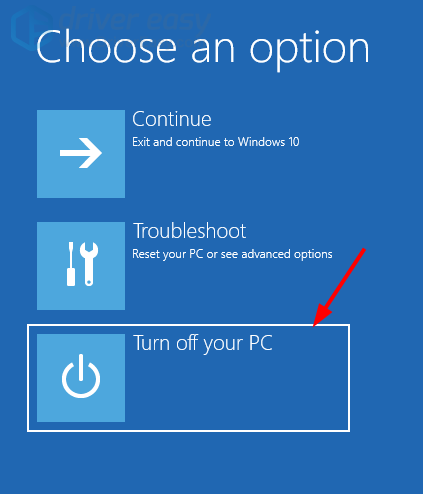
Type the «sfc /scannow» command in the Command Prompt window and press Enter on your keyboard to execute it. Wait until the scan is finished, and turn off your computer using the «Turn off your PC» option in the Automatic Repair menu.

[Back to Table of Contents]
Method 4. Reset Your PC
If none of the above methods helps, resetting Windows is a more radical solution but will resolve the issue. You need to use your Windows installation DVD (or USB) for this one. Boot the PC, and when in the Windows Setup window, enter your language and other preferences. Click «Next». Click «Repair your computer» to launch the Windows Automatic Repair tool again. In the Automatic Repair tool window, select «Troubleshoot».
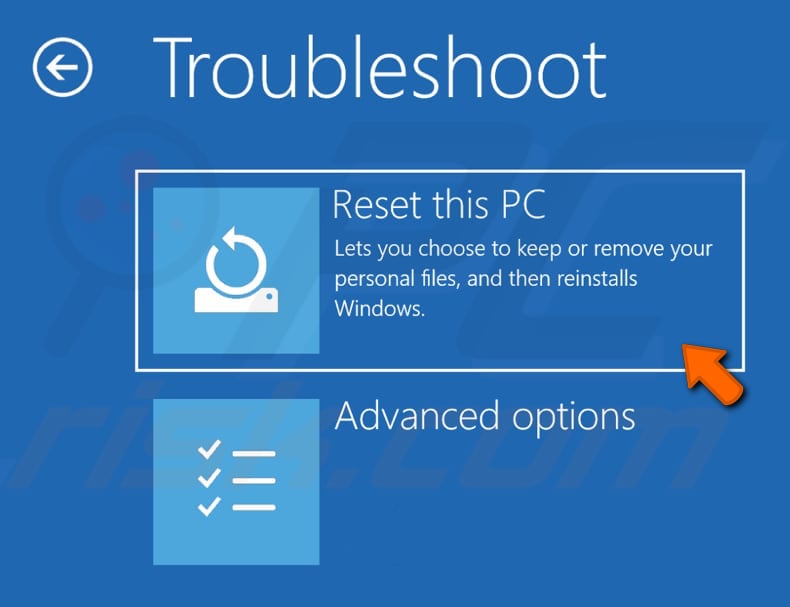
In Troubleshoot, click «Reset this PC».
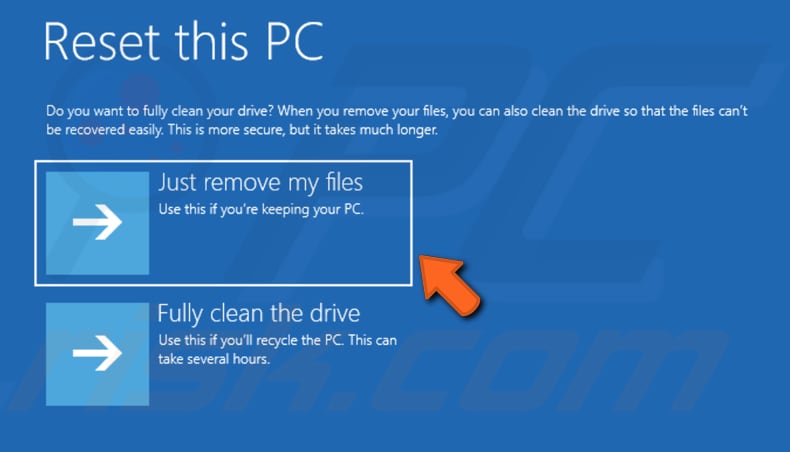
Select «Remove everything».

Then, select «Just remove my files».
Click «Reset», and it will start to reset Windows 10.
Resetting your PC is the last resort, but we hope one of the above methods helps you solve the problem with the «Getting Windows ready. Don’t turn off your computer» screen.
[Back to Top]
Windows has taken enormous steps throughout the long term and has effectively set up a good foundation for itself as the selection of millions of clients around the world. Windows 10 and Windows 8 clients encounter startling issues with their OS quite often. The issue that they mostly experience is the «Getting Windows Ready Don’t Turn Off your Computer» message on the screen. Clients report this issue on different platforms, saying it frequently happens when they turn on/off or restart/reboot their PCs. Now and again, this could take over a few hours. If you have come up with the Windows 10/11 stuck on getting Windows ready issue, here we will give you some powerful fixes.

Part 3: How to Recover Lost Data from Windows When Fixing Getting Windows Ready Issue?
Part 1: Why Is Getting Windows Ready Stuck?
Keep in mind, many components might be interfering with the smooth working of your PC. So, a few elements are almost certain than others to lead you to the getting Windows ready stuck situation. The following components might be interfering with the smooth working of your PC to cause this issue:
- A bad internet connection or a break in your network and speed.
- A slowly working computer system that can’t prepare itself rapidly.
- If your OS hasn’t been refreshed in quite a while and requires many updates to download and install.
Part 2: What Do I Do If My Computer Is Stuck on Getting Windows Ready?
Fix 1: Just Wait for Some Time
Now and again, the best thing to do is to wait. If you’re not frustrated for time, consider leaving your PC for some time. It is typical for updates to take some time, particularly if your PC has some old version updates. It can also take longer if your internet connection is weak.
Try leaving your PC to refresh for the entire day. Assuming there is still no progress, the issue most likely lies in something else.
Fix 2: Check Internet Connection
As we’ve stated above, make your internet connection stable to get over this issue. In case you are utilizing a LAN connection, investigate your wires and switches. Turn off and plug the cable into another switch to check whether it is working. In case you are on Wi-Fi, check your router if it’s working smoothly. If you believe something is still wrong, perform a troubleshoot or plug in an Ethernet cable.
Fix 3: Shut down Your PC and Power Reset It
Power resetting can clear but will not harm any data in your PC memory. It is useful for fixing a computer stuck on getting Windows ready on your PC. Using the method stated below, you can fix Windows 10/11 stuck on getting Windows ready:
Step 1: Shut down your PC and turn off every single gadget (USB drive, external drives, etc.) from it.
Step 2: Click and hold the power button for 30 seconds and remove the power cord from your device.
Step 3: Remove the battery (only if you have a laptop with a removable battery).
Step 4: Reinsert the battery and attach the power cord again to your device.
Step 5: Turn on your PC, and getting Windows ready issue might have been resolved.
Fix 4: Perform Windows 10 Startup Repair
Startup Repair is a free, convenient method in the System Recovery Options menu on your Windows OS. It assists you with naturally settling numerous complicated issues relating to the loss of data, getting Windows ready issues, and more. Follow the means beneath to get going:
Step 1: In your PC, produce a Windows Installation Media on a USB.
Step 2: Boot your PC with the USB drive and click «Repair your Computer,» and select «Troubleshoot.»
Step 3: Now, select «Startup Repair» on the «Advanced options» menu.
Fix 5: Delete Problematic Files
Step 1: Restart your PC to come up at the Windows Boot Options page.
Step 2: From the Boot Menu, click on «Troubleshoot» and from the Advanced Options > Command Prompt, type address.
Step 3: Type C: compact disc WindowsSystem32LogFilesSrt. SrtTrail.txt in the command line and press «Enter.»
Step 4: If something like «Boot critical file c:windowssystem32driversvsock.sys is corrupt» appears, go to that location utilizing the Command Prompt and enter the Del command.
Fix 6: Uninstall Recently Installed Update in Safe Mode
A faulty update may interrupt Windows functioning, so uninstalling these updates in Safe Mode may fix the issue:
Step 1: Open the Advanced options page, then, at that point, click «Startup Settings» and press «F4» to get to the Safe Mode.
Step 2: In Windows 10 Safe Mode, right-click Start > Control Panel > Programs and Features.
Step 3: From the left panel, select the recent updates and uninstall them to fix the laptop stuck on getting Windows ready issue. At last, restart Windows 10/11 to see if the problem resolves.
Fix 7: Perform a System Restore or Reset
Factory Reset deletes the copy of Windows on your PC. To do so:
Step 1: From the Windows Boot Options menu, go to Troubleshoot > Advanced Options > System Restore.
Step 2: Replicate the Wizard guidance and pick a proper location. At last, click «Finish» to restore the Windows.
If this last technique comes up short, there isn’t anything that can fix the «Windows getting ready» issue other than reinstalling Windows 10 from scratch.
Tips: Factory resetting will erased files on your hard drive, to recover lost or deleted data from computers, you can try hard drive data recovery tool. And you can move to Part 3 for the details.
Fix 8: Perform a Clean Windows Installation
If nothing from the above techniques can assist you with the solution of getting Windows ready issue, the OS might have unfixable issues. The last thing to do is install a new Windows.
Windows installation will eradicate a portion of your documents. Subsequently, ensure you have backed up your precious data from the system hard drives or the Desktop.
Part 3: How to Recover Lost Data from Windows When Fixing Getting Windows Ready Issue?
One of the ways of fixing the computer stuck on getting windows ready issue is to reset the system. Before the reset, you better backup all your essential data. But if you don’t make a backup and lost your data, you can get it back any time with Tenorshare 4DDiG Data Recovery by following the steps below:
- Recover files lost due to computer errors, accidental deletion, formatting, lost partition, corruption, crashed system, virus-attack, and so on.
- Recover data from laptop/PC, internal & external drive, USB flash disk, SD card, etc.
- Recover 1000+ file types including photos, videos, documents, and audio.
- Support photo and video repair.
- Higher success rate than competitors.
- Only three easy steps, even for non-techies.
- Step 1:Select a Local Disk
- Step 2:Scan and Preview the Files
- Step 3:Recover the Lost Data
After installing Tenorshare 4DDiG, you will go to the home interface that shows Devices and Drives. For your situation, pick the disk drive from where you lost your data and click «Start» to continue.
4DDiG quickly checks the drive to uncover the lost files all around. Then, you can see the filtering result, which shows the number of documents that have been found. If you can’t track your desired files, you can try the «Deep Scan» option.
Eventually, you can click Recover to save desired files to a safe location which should be different from its original path in case of permanently data loss in the future.
Part 4: FAQs about Windows Getting Stuck
1. How do I fix a stuck loading computer?
If your PC is stuck at the loading screen, you can:
- Try Windows Safe Mode.
- Unplug your battery.
- Unplug all external devices.
- Try an antivirus scan.
- Make use of System Restore or Startup Repair.
2. What to do if Windows restart is stuck?
If Windows takes forever to restart, try unplugging all the external devices and battery (in the case of a laptop) from your computer. That will force shut down your PC.
3. How do I fix Windows 10/11 stuck when ready?
Turn it off and wait for 20 seconds. In the case of a laptop, remove the battery, unplug it from the Internet (turn off Wi-Fi). Now plug it once more to see if the PC starts.
4. How long should I wait for getting Windows Ready?
It is better to stand by persistently for around 2-3 hours. After the timeframe, if the problem persists, quit pausing and continue to investigate using the above fixes.
Conclusion:
Delaying out in a «getting Windows ready» is a troublesome issue without a doubt. Significantly more so when you have a deadline to meet. We hope that one of the techniques recorded above will get the job done for you. If you lose any of your important data during the process, you can get it back using the Tenorshare 4DDiG Data Recovery Software by following 3 simple steps. 4DDiG is the most reliable and highly recommended option for everyone due to its features and benefits.
You May Also Like
-
Home>>
- Windows Fix >>
- How to Fix Getting Windows Ready, Don’t Turn off Your Computer in Windows 10/11
It is typical for many Windows 10 users to have unanticipated problems with their OS. A common problem they have is getting trapped on a loading screen with a notification that says, “Getting Windows Ready. Do not turn off your computer.” This article will walk you through the various methods for fixing Windows 10 install stuck on Getting Ready screen.
How to Fix Windows 10’s Getting Ready Error
To get out of a Windows 10 getting ready process, simply rebooting the system is often inadequate. Fortunately, there are different solutions listed below that you may attempt.
Method-1: Wait a while
That’s right. You read that correctly. The most straightforward solution is to wait. This is the approach that some Microsoft support experts recommend. When you see the warning “Getting Windows ready, don’t turn off your computer,” your device may be performing ongoing operations such as downloading and installing files, initiating a Windows 10 update process, changing program and module configurations, and so on.
According to the number of apps installed on your PC, the system may take a while to accomplish these operations. As a result, the first step in allowing your computer to boot correctly is to wait until the system chores are completed. Waiting patiently for around 2 to 3 hours is generally suggested. However, if the screen persists, you should attempt additional troubleshooting options to fix the Windows 10 loop.
Method-2: Restart your computer after shutting it off
Powering down your computer will wipe all of the information in its memory, but it will not affect the data on the hard drive. This approach may help resolve some device corruption concerns. As a result, powering down your computer may resolve the getting Windows ready stuck issue. To get Windows out of the update cycle, follow these procedures:
Step-1: By clicking the power button, you will turn off your computer.
Step-2: Remove all external devices, such as USB stick, external hard disks, headphones, and so on. Detach your computer’s power cable or adapter too.
Step-3: Disconnect the battery from the battery case if you’re using a laptop that has a removable battery.
Step-4: To drain any residual charge from the capacitors, push and hold the Power button on your pc for around 30 seconds.
Step-5: Place the battery in your laptop or link the power cable to the PC. Re-plugging any USB devices, though, is not recommended.
Step-6: To reboot your PC, push the Power button. You may now see if the issue with Windows 10 stuck in a loop while making Windows ready has been resolved.
Method-3: Restore the system or recover the system image
Suppose you generated a System Restore point or a system image backup employing Windows snap-in tools. In that case, you may use the return point or image file to recover the PC to a typical condition if you face the getting Windows ready stuck situation. To recover access to the system, follow the steps..
Step-1: Microsoft’s Media Creation Tool may be downloaded from their website. It will produce a Windows setup medium when you run it.
Step-2: Start the computer by inserting the disc or USB device. Set the language, time, and keyboard type before clicking Repair your computer.
Step-3: To troubleshoot, go to Choose an option and click Troubleshoot. After that, select Advanced settings before hitting Restore the computer.
Step-4: To rid out of the Windows 10 getting ready loop, complete the wizard’s instructions to perform a system restore.

Select System Image Recovery from the Advanced options section if you have a system image. Next, using image backup, recover your system to its previous condition.
Method-4: Run the System File Checker program
If your device is taking ages to get ready for Windows 10 or the preceding techniques aren’t working, you may use the System File Checker tool to diagnose the problem. Malicious files on your pc might sometimes prompt Windows to need to prepare for an update after each restart. This is how you can fix system files that have been damaged:
Step-1: Plug in the installation CD or USB stick into your computer in a similar way as before, and run it from there.
Step-2: Navigate to Repair your computer, select Troubleshoot from the Choose an option box.
Step-3: Under the Advanced options page, select Command Prompt.

Step 4: Once the cmd window is launched, run the command: sfc /scannow and hit Enter.

Patience is required till the verification procedure is completed 100 %. Then restart the device to verify if the Windows 10 getting ready loop still remains.
Method-5: Run a startup repair on Windows 10
If your PC is constantly rebooting and getting Windows ready, you might be able to recover the situation by running Windows Startup Repair.
This also demands accessing the Windows Recovery Environment via the Windows installation disk. Proceed to Advanced settings in WinRE and select Startup Repair.
Try an alternative approach to accomplish Windows 10 stuck on getting Windows ready if the resolving procedure fails with the warning “startup repair couldn’t repair your PC” or “automatic repair couldn’t repair your PC.”
Method-6: Carry out a fresh setup of Windows
If neither of the preceding techniques succeeds in resolving the Windows ready stuck problem, the operating system may be inoperable. The final remedy will be to reinstall Windows.
How to fix Windows 10 start-up problems
Installation of Windows 10 is halted on “Just a moment.”
The update and installation of Windows 10 has a strange issue where it gets stalled for minor causes. If you get the message “Just a moment” when updating Windows 10, follow these steps:
- Disconnect the internet. You may either disable Wi-Fi or unplug the ethernet cable.
- Remove any external device that isn’t absolutely essential. Windows may take a while to download a driver update or authenticate existing data.
Conclusion
If you choose one of the possibilities listed above, you won’t have to worry about your Windows 10 install stuck on getting ready. Your computer or laptop will be up and running without any more consequences. The procedures described are capable of resolving any problems that your device may be experiencing.

Многие пользователи Windows 10 или 8 испытывают проблемы с их операционной системой. Они часто застревают на экране загрузки с сообщением « Готовим Windows. Не выключайте компьютер. «Проблема возникает, когда они пытаются включить, выключить или перезагрузить компьютер. Обычно они не могут обойти этот экран, просто перезагрузив компьютер.
Это досадная проблема. И попытки исправить это могут быть столь же раздражающими, потому что вы потратите много времени на чтение предложений в Интернете, и большинство из них не сработает.
Но не волнуйтесь. Ниже приведены несколько методов, которые помогли многим пользователям выйти из экрана «Подготовка Windows».
Попробуйте эти исправления
Необязательно пробовать их все; просто продвигайтесь вниз по списку, пока не найдете тот, который вам подходит.
- Подождите некоторое время
- Перезагрузите компьютер
- Запустить проверку системных файлов
- Переустановите Windows
- Совет от профессионала: обновите драйверы
Метод 1: подождите некоторое время
Когда ваш компьютер показывает вам экран «Подготовка Windows», ваша система может загружать и устанавливать файлы или выполнять некоторые задачи в фоновом режиме. Для завершения этих работ вашей системе может потребоваться некоторое время. Поэтому, если вы хотите, чтобы ваш компьютер загружался нормально, первое, что вы можете попробовать, — это подождать. Подождите, пока система выполнит свои задачи, и вы выйдете за пределы экрана.
Но если вы ждали разумное время, скажем, около 2–3 часов, и по-прежнему не видите, как экран исчезает, вам следует попробовать что-нибудь еще.
Метод 2: перезагрузите компьютер
Сброс питания может стереть всю информацию в памяти вашего компьютера, не повредив ваши данные. Это полезно для устранения этих проблем с повреждением на вашем компьютере и вывести вас из цикла «Подготовка Windows».
Чтобы перезагрузить компьютер:
1) Выключите свой компьютер.
2) Отключите от компьютера все периферийные устройства (USB-накопитель, внешний жесткий диск, наушники и т. Д.).
3) Отключите кабель питания от компьютера.
4) Отсоедините аккумулятор от аккумуляторного отсека вашего ноутбука (только если вы используете ноутбук и аккумулятор вашего ноутбука съемный).
5) Нажмите и удерживайте кнопка питания на вашем компьютере для 30 секунд. (После этого компьютер должен оставаться выключенным.)
6) Подключите питание (и аккумулятор) к компьютеру.
7) Включите ваш компьютер. На этот раз вы не увидите экран, если этот метод вам подходит.
Метод 3: запустить проверку системных файлов
Утилита проверки системных файлов — это встроенный инструмент Windows, позволяющий пользователям Windows сканировать и восстанавливать поврежденные системные файлы. Возможно, вы не сможете остановить отображение экрана «Подготовка Windows», потому что на вашем компьютере есть поврежденные файлы. Вы можете попробовать запустить средство проверки системных файлов и посмотреть, поможет ли это исправить эти проблемы с повреждением.
ПРИМЕЧАНИЕ. Вам понадобится Установочный носитель Windows (Установочный USB-накопитель или установочный DVD-диск) для вашей системы, прежде чем вы сможете выполнить следующие действия.
- Загрузитесь с вашего Windows media
Подключите установочный носитель Windows к компьютеру и загрузиться с этого .

- Выберите регион
Выберите свой язык и местоположение. Затем нажмите следующий .
- Перейти к WinRE
Нажмите Почини свой компьютер .
- См. Дополнительные параметры
Выбрать Устранение неполадок .
- Открыть командную строку
Выбрать Командная строка .
- Запустить проверку системных файлов
Тип ‘ sfc / scannow »И нажмите Войти на клавиатуре.
- Подождите, пока процесс будет завершен
Дождитесь завершения процесса.
- Выключи свой компьютер
Закройте командную строку. Затем выберите Выключите ваш компьютер .
- Убедитесь, что это исправление работает
Включите ваш компьютер. Затем проверьте, исчезла ли ошибка.


Если ни один из вышеперечисленных способов вам не поможет, возможно, в вашей системе есть проблемы, которые нельзя исправить. В этом случае вам может потребоваться переустановка системы Windows. Для этого вы можете вставить установочный носитель Windows в свой компьютер и следовать инструкциям на экране, чтобы завершить переустановку. Затем вы можете проверить, не избавились ли вы от проблемы. ( Обратите внимание, что это приведет к удалению ваших данных в разделе, где вы разместили свою операционную систему. )
Совет от профессионала: обновите драйверы
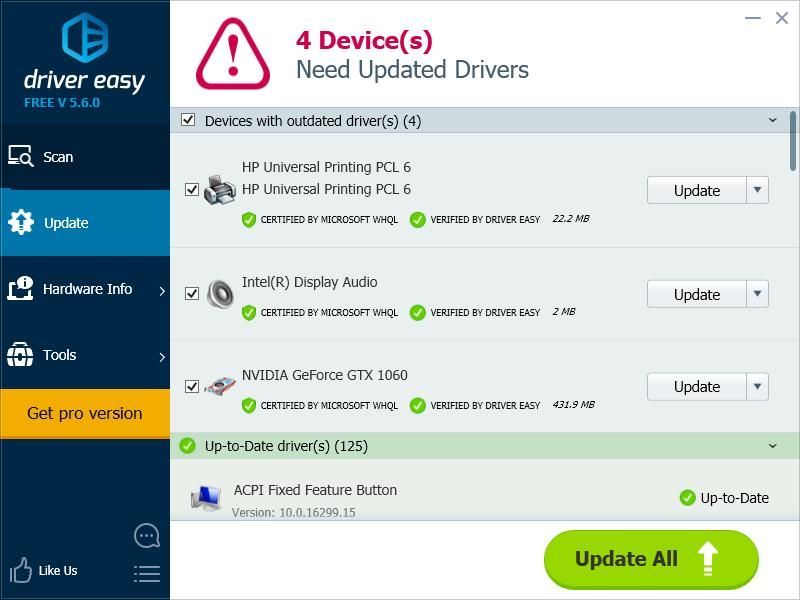
Эта проблема может быть вызвана неправильными или устаревшими драйверами на вашем компьютере. После восстановления компьютера вы можете попробовать обновить все драйверы устройств, чтобы предотвратить повторение этой проблемы и сохранить работоспособность компьютера. Фактически, вы можете автоматически и быстро обновлять драйверы с помощью Водитель Easy .
Водитель Easy автоматически распознает вашу систему и найдет для нее подходящие драйверы. Вам не нужно точно знать, на какой системе работает ваш компьютер, вам не нужно рисковать, загружая и устанавливая неправильный драйвер, и вам не нужно беспокоиться о том, чтобы сделать ошибку при установке.
Вы можете автоматически обновлять драйверы с помощью БЕСПЛАТНОЙ или Pro версии Driver Easy. Но с версией Pro требуется всего 2 шага (и вы получаете полную поддержку и 30-дневную гарантию возврата денег):
1) Скачать и установите Driver Easy.
2) Запустите Driver Easy и щелкните Сканировать сейчас кнопка. Driver Easy просканирует ваш компьютер и обнаружит проблемы с драйверами.

3) Щелкните значок Обновить рядом с каждым драйвером, чтобы автоматически загрузить и установить правильную версию этого драйвера (вы можете сделать это в БЕСПЛАТНОЙ версии). Или нажмите Обновить все для автоматической загрузки и установки правильной версии всех драйверов, которые отсутствуют или устарели в вашей системе (для этого требуется Pro версия — вам будет предложено выполнить обновление, когда вы нажмете «Обновить все»).