Мобильные приложения
[pvc1 в 09:16|03 Фев 2023]
ПК программы для PlayStation 2
[pvc1 в 09:04|03 Фев 2023]
Прошивки и приложения для PlayStation 3
[pvc1 в 09:48|02 Фев 2023]
Общая дискуссия по PlayStation 5
[pvc1 в 09:04|02 Фев 2023]
ПК софт для PlayStation 4
[pvc1 в 08:52|02 Фев 2023]
Приложения для PlayStation 2
Прошивки и приложения для PlayStation 3
[pvc1 в 10:36|01 Фев 2023]
ПК программы для PlayStation 2
[pvc1 в 09:55|01 Фев 2023]
ПК софт для PlayStation 4
[pvc1 в 09:44|01 Фев 2023]
Об играх PlayStation Vita
[pvc1 в 09:29|31 Янв 2023]
Прошивки и программы для PlayStation Vita
[pvc1 в 08:36|31 Янв 2023]
ПК софт для PlayStation 4
[pvc1 в 10:04|30 Янв 2023]
Мобильные приложения
[pvc1 в 09:02|30 Янв 2023]
Прошивки и программы для PlayStation Vita
[pvc1 в 08:59|30 Янв 2023]
Приложения для PlayStation 4
[pvc1 в 08:57|30 Янв 2023]
Прошивки и программы для PlayStation Vita
[pvc1 в 19:29|29 Янв 2023]
Прошивки и приложения для PlayStation 3
[pvc1 в 09:06|29 Янв 2023]
Приложения для PlayStation 5
[pvc1 в 11:45|26 Янв 2023]
Прошивки и приложения для PlayStation 3
[pvc1 в 09:27|24 Янв 2023]
Прошивки и программы для PlayStation Vita
[pvc1 в 11:45|23 Янв 2023]
Приложения для PlayStation 2
Приложения для PlayStation 2
ПК софт для PlayStation 4
[pvc1 в 10:48|19 Янв 2023]
Прошивки и программы для PlayStation Vita
[pvc1 в 10:35|18 Янв 2023]
Приложения для PlayStation 2
Общая дискуссия по PlayStation 3
[m951 в 03:46|18 Янв 2023]
ПК программы для PlayStation 2
[pvc1 в 15:17|16 Янв 2023]
Прошивки и приложения для PlayStation 3
[pvc1 в 14:59|16 Янв 2023]
Общая дискуссия по PlayStation 5
[pvc1 в 10:38|13 Янв 2023]
ПК софт для PlayStation 4
[pvc1 в 09:58|13 Янв 2023]
Общая дискуссия по PlayStation 2
Эмуляторы для PlayStation Vita
[pvc1 в 12:26|11 Янв 2023]
Приложения для PlayStation 4
[pvc1 в 19:37|08 Янв 2023]
ПК программы для PlayStation 3
[pvc1 в 16:58|08 Янв 2023]
Приложения для PlayStation 2
Об играх PlayStation 2
Мобильные приложения
ПК софт для PlayStation 5
[pvc1 в 09:26|04 Янв 2023]
Программы и Приложения для PlayStation Portable
[pvc1 в 19:05|03 Янв 2023]
Программы и Приложения для PlayStation Portable
[pvc1 в 18:59|03 Янв 2023]
ПК софт для PlayStation 4
[pvc1 в 16:48|01 Янв 2023]
Прошивки и программы для PlayStation Vita
[pvc1 в 16:01|25 Дек 2022]
Общая дискуссия по PlayStation 1
[pvc1 в 09:51|23 Дек 2022]
ПК программы для PlayStation 2
[pvc1 в 09:10|17 Дек 2022]
Мобильные приложения
[pvc1 в 09:31|16 Дек 2022]
Прошивки и программы для PlayStation Vita
[pvc1 в 08:59|15 Дек 2022]
Приложения для PlayStation 2
Программы и Приложения для PlayStation Portable
[pvc1 в 08:50|13 Дек 2022]
Эмуляторы для PlayStation Vita
[pvc1 в 08:49|13 Дек 2022]
Прошивки и программы для PlayStation Vita
[pvc1 в 09:39|08 Дек 2022]
This lightweight software allows users to install PlatStation 2 game files on their hard drive. Moreover, they can apply a PPF patch to make bootable images.
Developer:
winhiip.ps2hd.com
Windows version:
Windows XP, Windows Vista, Windows 7, Windows 8, Windows 10
WinHiip is a Windows program designed for PlayStation 2 users who want to install PS2 CD and DVD image files on a HDD. It works like a hard drive manager which enables you to perform various actions such as format the drive, add and remove images, edit settings and apply PPF patch.
General notes
The goal of this utility is to increase the speed at which the image files are installed onto the hard drive. While installing games from the console takes a lot of time, you can deploy them much faster by using this application on your personal computer. If you do not have a PlayStation 2 system, you may try PCSX2.
Requirements
In order for the tool to work properly, the hard disk needs to be physically connected to the target PC. The transfer speed depends on the connection method and system configuration. For example, it may be as slow as 2 Mb per second for USB1 connections, 13 Mb for USB2 and up to 40 Mb for IDE.
Functionality
Thanks to the intuitive graphical user interface, creating backups of your own original games is a simple and straightforward procedure. All of the main functions are represented by buttons located at the top and bottom of the screen.
First, you need to click Select Drive and choose the hard drive you wish to make compatible with PS2. Once you have selected the desired item, you can format it. After this step, you will be able to select the image files you want to install. When you have done this, they will be listed in the main window. Here, you are also able to select entries by checking corresponding boxes as well as edit the game’s name. Additionally, you have the ability to apply a PPF patch to bootable image files.
Features
- free to download and use;
- compatible with modern Windows versions;
- gives you ability to install games on a hard drive;
- you can apply a PPF patch to image files;
- does not require installation to run.
DecoCraft
Windows XP, Windows Vista, Windows 7, Windows 8, Windows 10, Windows 11 Free
This convenient mod for Minecraft allows you to create and build structures with custom-shaped blocks . Moreover, you have the ability to preview the placement.
ver 3.0.0.6
BiblioCraft
Windows XP, Windows Vista, Windows 7, Windows 8, Windows 10, Windows 11 Free
The modification was created to help users add improved storage mechanics to Minecraft. Additionally, it is possible to interact with containers and label them.
ver 2.4.6
Serenity HD
Windows XP, Windows Vista, Windows 7, Windows 8, Windows 10, Windows 11 Free
With the help of this program, you have the ability to customize the appearance of Minecraft’s in-game environments. It comes with lighting filters and new textures.
ver 1.19
Galacticraft
Windows XP, Windows Vista, Windows 7, Windows 8, Windows 10, Windows 11 Free
Thanks to this modification package, users are able to travel to various planets in your Minecraft world. Moreover, gravity affects the character’s movement.
ver 1.12.2
LittleBlocks
Windows XP, Windows Vista, Windows 7, Windows 8, Windows 8.1, Windows 10, Windows 11 Free
This Minecraft mod is intended for shrinking the size of individual blocks. It allows users to create a variety of projects from tiny villages to complex circuitry.
ver 2.2.4.4
Ore Spawn Mod
Windows XP, Windows Vista, Windows 7, Windows 8, Windows 10, Windows 11 Free
This program was designed to help users improve Minecraft gameplay by offering new content. Moreover, it is possible to compete against other players.
ver 1.12.2
Schematica
Windows XP, Windows Vista, Windows 7, Windows 8, Windows 10, Windows 11 Free
Using this intuitive application, you are able to open and view Minecraft maps. Additionally, you have the option to import or export different structures.
ver 1.12.2
5zig
Windows XP, Windows Vista, Windows 7, Windows 8, Windows 10, Windows 11 Free
With the help of this software distribution, you have the ability to compete against other Minecraft players in PvP mode. Moreover, you can install plugins.
ver 1.8.9
WinHIIP 1.7.6
Downloading file: winhiip_v176.zip (0.27 Mb)
Review
Download
1 Screenshots
No review
No Video
Please select a download mirror:
BytesIn US Mirror
BytesIn EU Mirror
WinHIIP is a small utility that enables you to access USB-to-IDE connected internal hard drives.
The primary use for WinHIIP is for installing PS2 CD/DVD images onto a HDD to use by HDLoader or one of its derivatives such as the optimized…full software details
If you encounter any problems in accessing the download mirrors for WinHIIP, please check your firewall settings or close your download manager.
WinHIIP is offered as a free download
Faster PC? Get Advanced SystemCare and optimize your PC.
- Bookmark & Share
- Refer to a friend
- Report broken link
- Report Spyware
Support Information
WinHIIP support is available ONLY from its developer Gadget-Freak.
Popular in CD & DVD Tools
Nero 8 8.3.20.0
Rip and burn, backup and protect your CD/DVD
264 / 212,846
Nero 7 Lite 7.11.10.0
Installer for Nero 7 based on Inno
161 / 188,674
Nero 7 Premium 7.11.10.0
Create DVDs,manage or search your media files
95 / 110,764
WinHIIP 1.7.6
Allows access to internal hard disk drives
232 / 97,064
DVDFab 12.0.9.7
All you need to backup your DVDs
32 / 65,815
Nero Platinum 2022 25.5.21.0
One of the most popular disc burning solutions that lets you easily write data on any CD or DVD
50 / 61,644
DVDFab HD Decrypter 10.0.9.2
Good HD decrypter and burner
16 / 49,926
DAEMON Tools Lite 10.8.0
application for multiprotection emulation
19 / 41,695
NTI Media Maker 9.0.1.9103
Powerful CD burning software
24 / 38,231
DVD43 4.6.0
Overrides copy-protection in DVDs
45 / 35,730
You should upgrade or use an alternative browser.
-
#1
I want to ask for your experiences please,my esteemed PlayStation 2 users.
Until today I have used WinHiip for install Games on the HDD.
Today I stumbled again over the only «weak spot» on WinHiip.The «fragments» size.
Even tough the «reduce Fragmentation» option is on,when it goes to the «End» of free space the space of the fragments is not used.
In an actual case it is about ~9 GB and the «official» free space is ~3 GB.
Now i tried to install an 8 GB image and guess what happens ?
After searching a little i get on HDL Dump Helper GUI.
Very clear and very nice UI (with Network support too) and also german.
And the best: it uses the «fragmented» space.
My only «concern» is: Are there any known issues with
Open PS2 Loader if i use 2 different programs ?
Thank you for your «student comments» and any help from you.
-
#2
-
#3
No, it’s not a problem to alternate between different PS2 game backup installers, however you should avoid using WinHiip in general because (as a 2006 program) it didn’t keep up with modern scene standards of following the official HDD standards more accurately![smile :) :)]()
Thank you.
Since i use the Sony HDD Adaptor and «old» IDE Seagate/Maxtor HDD´s (120 — 300 GB in size) I never stumbled over an issue with WinHIIP except the «fragments».Thank you for your Advise.
But yes,HDL Dump Helper GUI appeals to me a lot.
Thank you.
-
#4
No, it’s not a problem to alternate between different PS2 game backup installers, however you should avoid using WinHiip in general because (as a 2006 program) it didn’t keep up with modern scene standards of following the official HDD standards more accurately![smile :) :)]()
Is it possible to have a pinned post for the modern tools/methods? Feels like there’s a shortage of this and people end up running in circles once the old good links and such disappear (isozone, etc). Between this site and reddit and how they have pin and have wikis for everything, there’s nothing pinned for ps2, like the way it is for og xbox or even ps3.
-
#5
Is it possible to have a pinned post for the modern tools/methods? Feels like there’s a shortage of this and people end up running in circles once the old good links and such disappear (isozone, etc). Between this site and reddit and how they have pin and have wikis for everything, there’s nothing pinned for ps2, like the way it is for og xbox or even ps3.
Hello.
Also the Tools changed and getting better.
In the last days I «learned» many on PlayStation 2 and Games from HDD/over Network.
I plugged in my 3-4 Years old «Softmodded» PlayStation 2 and I am surprised what all has changed the last Years.
I no longer use WinHIIP since I «stumbled» over this great Applications:
— HDL Dumper Helper GUI v2.3
— OPL Manager 21.5 (for Covers/Editing .cfg and many more)
— and also the latest Build of Open PS2 Loader «10th Anniversayr Edition» (I used an «ancient» one before.. )
The PlayStation 2 is definetly «present» today.
Thank you.
-
#6
This was actually the method that fixed me up. Now I can update the software on my memory card again and try out that new stuff
-
#7
If you use HDLDUMP/HDLDUMB, don’t delete games using these installers because they don’t properly mark used partitions as «empty» for later use, so you end up losing that space.
HDLGameInstaller seems to be the best installer, but even it has limitations (once you go past ~500GB, it might time out too early if your HDD happens to take a little longer to set up the partitions needed for installs).
I ended up using HDLGI to install up to where it would time out, then swapped to HDLDUMP for the rest. For deleting, I use uLaunchELF’s HDD file manager to delete partitions.
In the long run, I think switching over to SMB might be best. I am thinking of using an old router with a USB3 port for setting up a dedicated share for the PS2. I don’t know if individual files within a partition could get fragmented on the HDD (I’m not too familiar with APA format), but if they do, then your save files would eventually stop working. None of this would be an issue over SMB.
-
#8
I started with WinHIIP and now staying on HDL Dump Helper GUI v2.3 over Network to get the Games directly into the OpenPlayStationLoader and complete it with OPL Manager for Covers,Infos and more,this is for me the best Solution.
Many thanks to all who gave Feedback here.
Similar threads
You may also like…
- No one is chatting at the moment.
@
K3N1:
https://youtube.com/shorts/khIrD8_Em3c?feature=share
Today at 6:07 AM
HDL Batch installer
A GUI for HDL Dump.
Learn more here
Made by Matias Israelson (AKA:El_isra)
Originally this was a personal project to practice C++ & give a try to wxWidgets…
But at the end I decided to share it here on github.
If this software was useful, please consider giving it a star here on GitHub, a rating on PSX-place or a donation via PayPal
Currently implemented features (unchecked elements are WIP)
- Install multiple Games at once
- Extract multiple Games at once
- Automatically assign the original Game Title before Installation
- Inject MBR.KELF into the HDD
- Rename Game
- View game information
- Extract MBR program from HDD
- Download Artwork, Widescreen Cheats and Game settings for OPL
- Massive
KELFand icon injection to every installed game - Mount any PFS Partition as if it was a windows supported storage device
- Automatically transfer Downloaded files to mounted partition with 1 click (use only on OPL data partition)
- Batch game transfer between two ps2 HDDs
- Modify Partitions Header (custom title & icon and more)
compilation
HDL Batch Installer was built based on wxWidgets 3.0.5 stable release, built as a win32 Monolithic unicode-enabled static library, it uses Code::blocks wxwidgets project build system, to manage the UI elements and their declaration/implementation automatically, saving precious time.
Eventually, i’ll upgrade into the latest stable release 3.2.0, wich I hope doesn´t break anything 
cross compilation
Currently the project is windows only, in order to make it cross platform, it will not only require to port parts of the code (wich sould not be too hard, since i tried to stick to wxWidgets as much as i could), but also the replacement of certain parts of the code (ie: PFSFuse manager UI)
Since no one was interested on colaborating with this project so far, i don´t expect this to happen soon… or any time…
- HomePage
Obsrv.org Info
- Rules and Privacy Policy
- FAQ
- Banning
- Reporting Server Problems and Other Problems to the Mods
- Fixing Auto-login Problems
- Check who’s online right now
Getting Set up and Connected
- Playing on PS2
- Playing on Emulator
- Ripping your original DVDs to ISO
- Network Settings for PS2 and Emulator
- Alternate DNS Setups
- Troubleshooting
Optional Improvements and Other Info
- HDD Install
- Alternate File2 Quick-loading Method
- Widescreen
Game info
- Playing Online
- File 2 Additional Area Descriptions
- Understanding the HDD modes
Cheat Sheet
- Outbreak
- Below Freezing Point
- The Hive
- Hellfire
- Decisions, Decisions
- Wild Things
- Underbelly
- Flashback
- Desperate Times
- End of the Road
- Showdown
- Character Statistics
- Weapon Statistics
- Horror Mode
PmWiki
- Basic Editing
- Documentation Index
- PmWiki FAQ
- PmWikiPhilosophy
- WikiSandbox
edit SideBar
- View
- Edit
- History
HDD Install
Whether you’re on PS2 or on PCSX2, you should install and run off of HDD if you want quicker load times.
Using HD Loader or OpenPS2 Loader vs. In-game official install
There are 2 methods for using a HDD/virtual HDD to play Outbreak:
- Copying the entire game to HDD and using HDD loading homebrew software to load it
- The official in-game install options.
In short, the vast majority of users are not using the «HDD Install» option present in the game main menu. It will work and is definitely an alternative, but will only work with other users that installed using that option. See more info in Understanding the HDD modes. However, installs using both methods can co-exist on the same HDD/virtual HDD as long as there is enough space and will not interfere with each other. Both methods are covered here, and you may set up either in any order.
Checklist for PS2, using either the HDL/OPL or in-game method
- «Fat» PS2. Slim PS2s cannot use a hard drive
- Ps2 Broadband adapter
- HDD. Either the official SONY HDD, or any IDE HDD/SATA drive with a SATA to IDE adapter for the broadband adapter. Warning: If not using the official SONY drive, you will need to format the drive, so if you have any files on it you’d like to keep, make a backup before using with PS2! The official SONY drive is likely already formatted correctly.
- If not using the official SONY HDD, you will need a way to play backup discs as you will need to patch your ISO to accept non-SONY HDDs.
- Required HDD space
- HDL/OPL Method
- 4.6GB each for File 1 and File 2
- Official Install
- 1024 MB for file 1
- 1152 MB for file 2
- HDL/OPL Method
- For using the HDL/OPL method, you need to have a way to launch homebrew software, either through using a mod chip or using a software exploit like FreeMcBoot.
- USB thumb drive, formatted as FAT32 (optional). Easy way to transfer to and run software from your PS2, such as the HDL/OPL software.
HDL/OPL method
Required software
On PS2
- An exploit installed on your PS2 that allows you to launch homebrew, whether it be a mod chip or a software exploit like FreeMcBoot. FreeMcBoot does not require any hardware modifications and some places sell memory cards with FreeMcBoot preinstalled. One guide that appears to be comprehensive, if old, is courtesy of user Jay-Jay at ps2-home.
- There is also a more recent exploit method that only requires burning a DVD, FreeDVDBoot. With FreeDVDBoot, you can run the DVD once to get your system into uLaunchELF. From there, you can run the FreeMcBoot installer by Jay-Jay and install FreeMcBoot to your memory card so that you will not have to boot from DVD.
- A way to launch .elf files, which are PlayStation 2 executable files. wLaunchELF, formerly uLaunchELF, should come pre-installed with FreeMcBoot and is available from your main PS2 boot menu. It is, among other things, a file manager and .elf launcher. If you have a mod chip, configure its menu or check documentation on how to start wLaunchElf.
- Software to transfer games onto the HDD. There are different ways to do this.
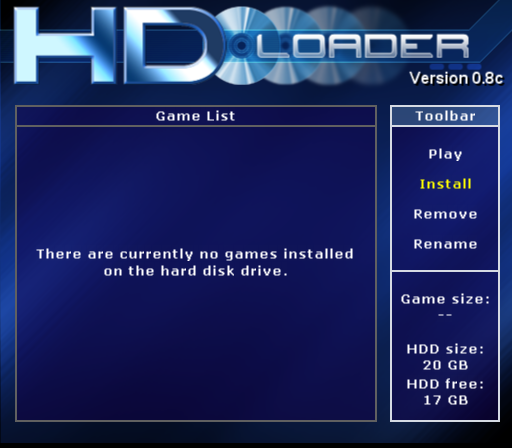
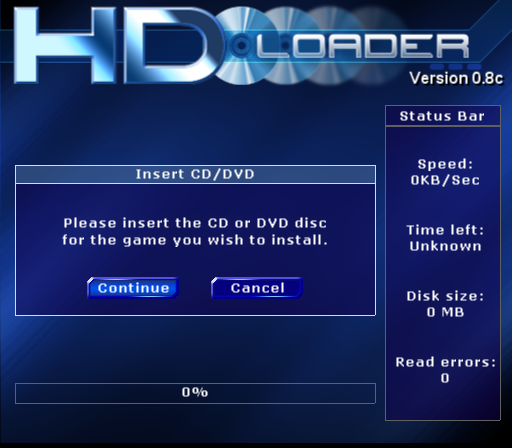
- One is to use HD Loader and rip the game from the DVD, but depending on your region PS2, you will need to first insert an original game from your region with a big enough file table (US Outbreak File 1 is a good candidate), and when you reach the «title selection» screen, insert the backup/original copy of Japanese Outbreak. You would need a flip top or some method that allows changing discs without using the «eject» button, in order to change discs after HD Loader scans your original game.
- Another is to use network transfer software such as HDL Dump/dumb. This involves running hdl_svr_093.elf on the PS2, and then opening hdl_dumb application on Windows in order to transfer the ISO over the network.
- OPL has a built-in server that you can try using with the development build of HDLdumb.
- HDLoader Installer is newer software that can transfer games, too.
On emulator
- HDLoader v. 0.8c («HDLoader/HDL»): This is the best way to format and rip the ISO file into the virtual HDD
On both PS2 and emulator
- Open PS2 Loader («OPL») (optional), newer HD loading software. Recommended to use this as the code is newer and it will allow you to access the
Network Settingsapplication in the Outbreak game. HDLoader won’t load that, so you would need to go back to ISO to setup the network if you don’t use OPL.
The full install
On PS2
Formatting the HDD
- Format your USB drive as FAT32 if it is not formatted that way already. Warning: formatting deletes any files currently present on the USB drive. Back up your files first.
- Move the .ELF files for HDLoader onto the USB stick. You’ll also want to move over any network transfer ELFs such as HDL_svr_093 or HDLInstaller.elf, and OPL if you will be using it. Note: make sure to also copy over the
langfolder for HDLInstaller.elf. - Safely eject the drive in Windows, remove the stick from your PC, and insert it into the PS2 front USB slot, either one should be fine.
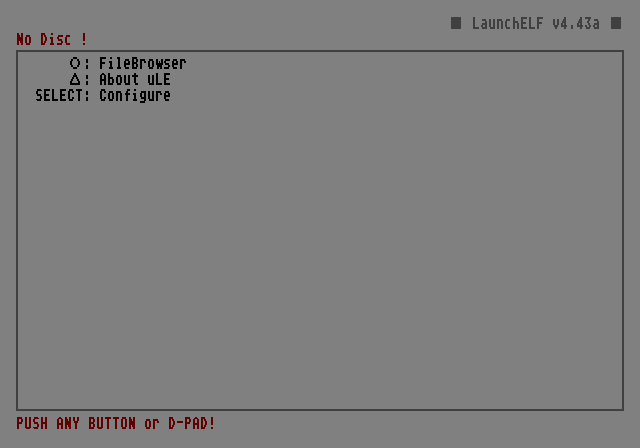
- Turn on the PS2 and start up uLaunchELF/wLaunchELF. If you installed FreeMcBoot this should be an option in your main PS2 menu.
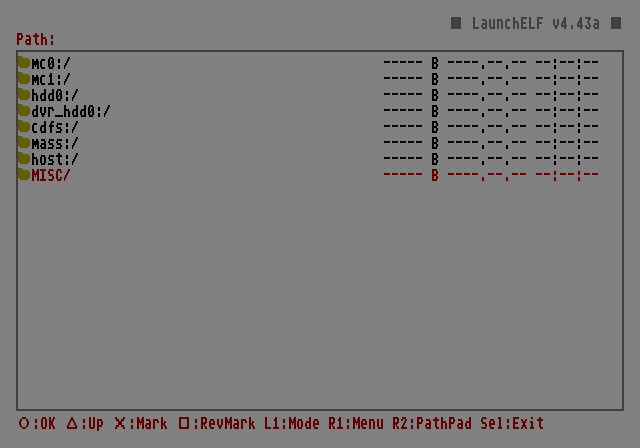
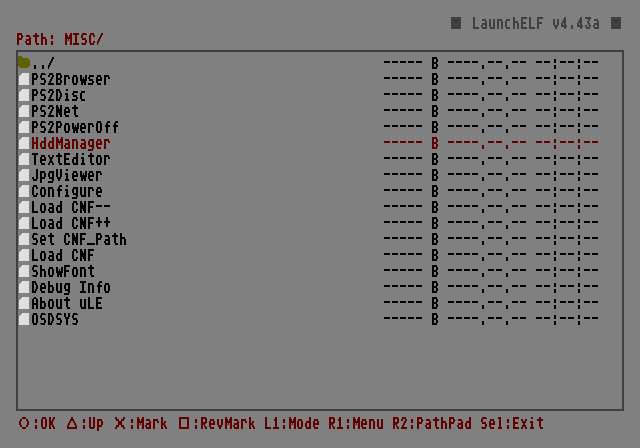
- In uLaunchELF, press O to enter
FileBrowser, navigate toMISC,thenHddManager.
| 1 | 2 |
|---|---|
 |
 |
| 3 |
|---|
 |
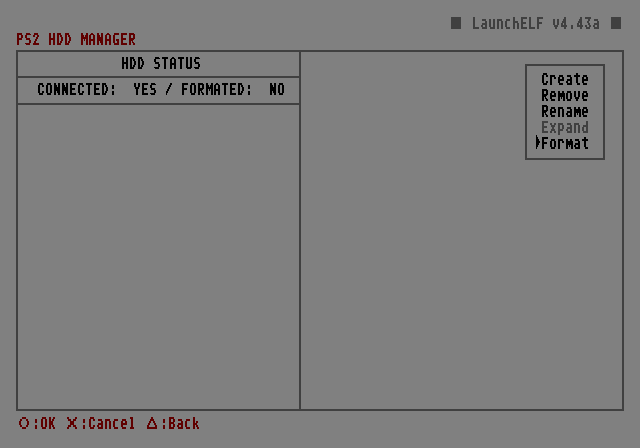
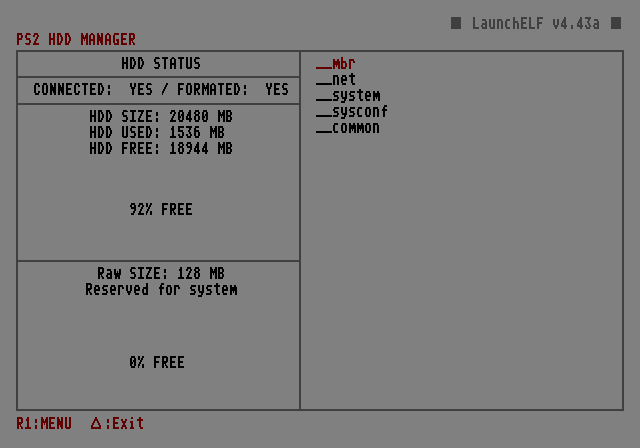
- At the
PS2 HDD MANAGERscreen, press R1 to call up the menu. »’Final warning: The steps below will format the drive, deleting all of the data present. Do not do this unless you are confident that you have backed up any files on the drive that you need to keep.
| 1 | 2 |
|---|---|
 |
 |
| 3 | 4 |
|---|---|
 |
 |
Deploying the games to the HDD
Ripping DVD direct to HDD
Although using network transfer software is recommended, it is possible to rip either the original DVDs to the HDD using HD Loader, or rip from a DVD backup, including any changes such as the translation patch. You will need a flip top, or some other way to swap the DVD without pressing open drive/eject.
- In uLaunchELF/wLaunchELF, navigate to
FileBrowser, thenMass:, then startHDL_V0.8C.ELF - In HD Loader, select
Install. Insert an original game from your region. If you are on a Japanese PS2 and are ripping original Biohazard Outbreak discs, you can simply insert the Outbreak disc now.
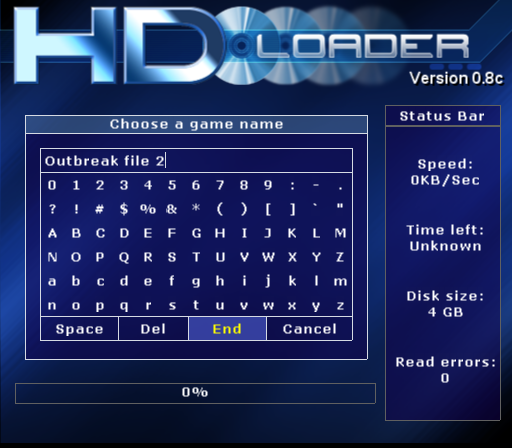
- HD Loader will prompt for a game name, and the DVD should stop spinning. At this point, swap out the original DVD from your region, if not ripping the original to a Japanese PS2, and swap in your backup disc or original Outbreak disc. Name it whatever you would like.
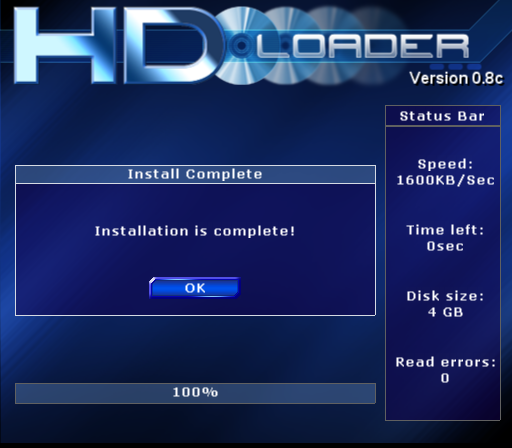
- HD Loader will rip the DVD. This may take about 20-30 minutes or so, then you will receive a complete notification.
- If you are going to play the game straight from HD Loader, you will need to press
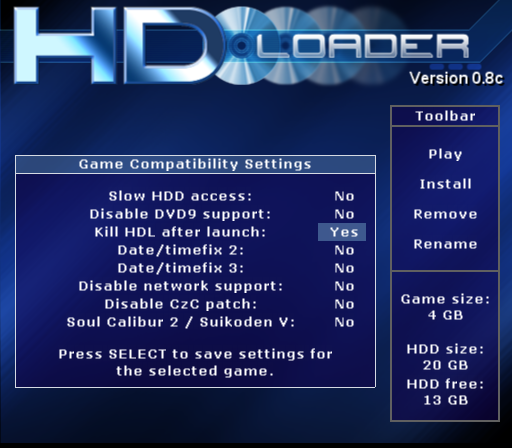
Select buttonon the name of the ripped Outbreak game, and activateKill HDL after launch.
- The game is installed to the HDD and you are now ready to play. It is recommended that you use OPL to play games instead, though, because 1) HD Loader will not allow you to edit the network settings in Outbreak since launching the network application does not work when launched from HD Loader, and 2) OPL is newer and still maintained.
Using HDLoader Installer to transfer games over the network.
Using network transfer software like HDLoader Installer is more convenient because it doesn’t involve swapping discs, the software is newer, and you can also manage your installs over the network.
- In uLaunchELF/wLaunchELF, navigate to
mass:then selectHDLGameInstaller.elf. - The application will attempt to connect if you have previous set your network settings in uLaunchElf. If you have not, you can press
Selectand enter the options screen, where you can set your network manually or enable DHCP to automatically pull the network settings from your router or other DHCP device on your network. - On your PC, open HDLGManClient program.
- In «Server IP address,» enter the IP from the upper right corner of the HDL Game Installer app on your ps2.
- You should now see a list of games installed to your PS2, if any. Click «Install new game…». Set the options, including title, the way that you like, and install the game. When you are done installing any games you would like, click «Disconnect» at the top of the program, and then press
Oon your PS2 to exit from HD Loader Installer. Your game is now installed to the HDD. - Optional: The naming convention that HDL Game Installer uses works with OPL but is incompatible with HD Loader. If you insist on using HD Loader to play the game, you will need to rename the partition that HDL Game Installer created. In order to do this:
- In uLaunchElf/wLaunchElf, navigate to
misc: - Select
HddManager - Move the cursor using the
d-paduntil your game partition is selected - Press
R1to bring up the menu, and select rename - Delete the portion of the partition that is the game ID, e.g. «SLUS,» so that the partition name is «PP.HDL.<whatever_name_you_selected>»
- In uLaunchElf/wLaunchElf, navigate to
On PCSX2
Creating a virtual drive
Optional: Creating a smaller virtual HDD file than the PCSX2 minimum
By default, the PCSX2 UI will not allow for creation of a virtual HDD file less than 40GB in 1.7.x nightlies or sizes other than preset sizes in 1.6.0. If you would like to create a virtual HDD file using the smallest possible amount of space while allowing enough room for install using either the OPL/HDL method for File 1 and File 2 or using the official install method, follow these steps:
- Open command prompt or Powershell and navigate to the folder where you would like the virtual HDD image to reside.
- Substitute whatever file name you would like in place of
dev9hdd.rawbelow. The number 13958643712 is 13.0 GB represented in bytes. This should give us just enough with a small bit of headroom:
fsutil file createnew dev9hdd.raw 13958643712 - Open the ps2 ini file with HDD parameters, and set the values to the following, making sure to set the path to the HDD file to wherever you chose to store it:
- 1.7.0 nightly with QT UI:
inisPCSX2.ini
[DEV9/Hdd]
HddEnable = true
HddFile = C:UsersgenericDownloadspcsx2hdddev9hdd.raw
HddSizeSectors = 27262976
- 1.7.0 nightly with wxWidgets UI:
inisPCSX2_vm.ini
[DEV9/Hdd]
HddEnable=enabled
HddFile=C:\Users\generic\Downloads\pcsx2\hdd\dev9hdd.raw
HddSizeSectors=27262976
- 1.6.0:
inisCLR_DEV9.ini
<Hdd>C:UsersgenericDownloadspcsx2hdddev9hdd.raw</Hdd>
<HddEnable>true</HddEnable>
<HddSize>13312</HddSize>
- 1.7.0 nightly with QT UI:
- Save the ini file. Skip ahead to formatting the virtual HDD.
On PCSX2 Nightly 1.7.x with QT or wxWidgets UI
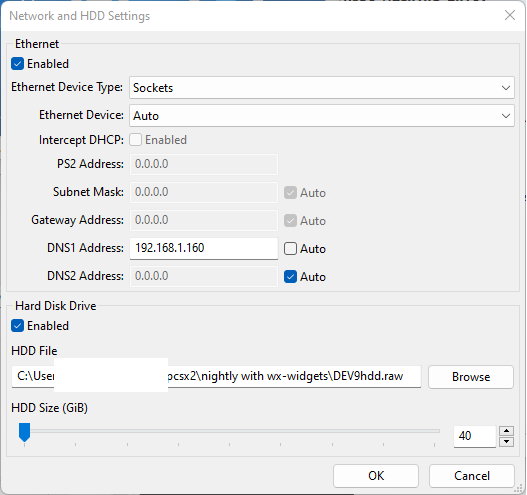
- Click Settings —> Network & HDD
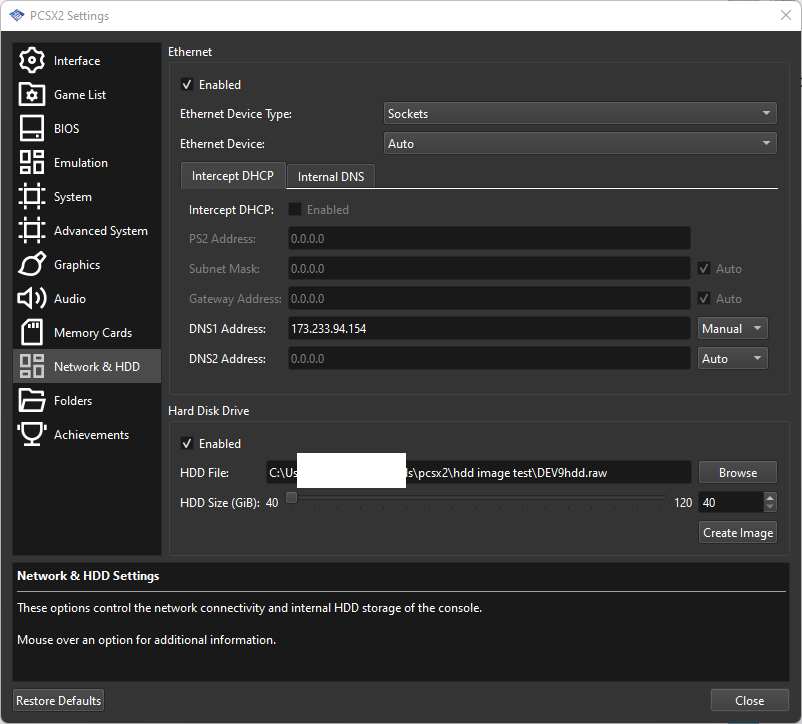
- Under «Hard Disk Drive,» check the «Enabled» box.
- Browse to where you would like to place the virtual HDD file, or use the pre-set option. Set the size to whatever you would like, but the minimum is sufficient for installing both games.
- QT UI users only: Click «Create Image.»
On PCSX2 Nightly 1.6.x and older
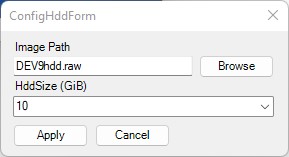
- Click config —> Dev9 —> Plugin Settings
- Check the «Enable HDD» box
- Click the «Options» button next to «Enable Hdd»
- Stay with the default file location or click «Browse» and select your own.
- Set the HddSize to 20 GiB in 1.6.0x, the minimum of 40 GiB in 1.7.0x, or more if you’d like, but 20 will be more than sufficient for both games.
- Click Apply.
Formatting the virtual drive and installing the game
We will do both through HDLoader.
- On 1.7.x with QT UI: Click «System» —> «Start File» and navigate to where you downloaded HDL_V0.8C.ELF
- On 1.7.x with wxWidgets UI or 1.6.x and older: Click «System» «Run ELF,» and do the same.
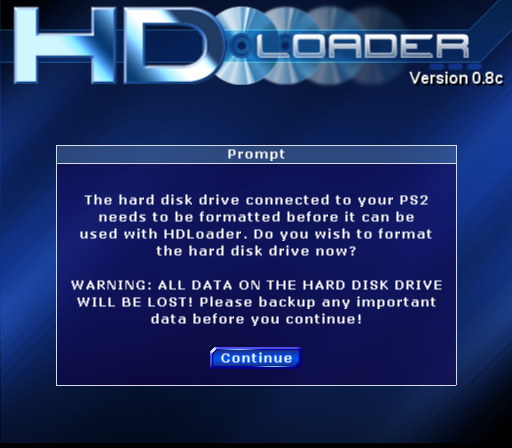
- HDLoader will start and prompt you to format the drive. Press Continue.
- Make sure the DVD is inserted into the virtual drive.
- On PCSX 1.7.x with QT UI: System —> Change Disc —> Select your Outbreak ISO
- On PCSX 1.7.x with wxWidgets UI, 1.6.x and older: CDVD —> Click «ISO», then make sure «ISO Selector» is set to the Outbreak game.
- Follow the instructions for ripping DVD games on PS2, but ignore the steps concerning swapping out any games. Simply install the game.
- As in the instructions above, be sure to enable the option
Kill HDL after launchafter pressingSelecton the game name if you want to play Outbreak from HD Loader, even though OPL is recommended.
Playing the games
- Start up OPL.
- On PS2: In uLaunchElf/wLaunchElf, enter
FileBrowserand browse tomass:, then the ELF file for OPL. - On PCSX2:
- 1.7.x with QT UI: System —> Start File —> location of OPL elf
- 1.7.x with wxWidgets or 1.6.x and older: System —> Run ELF —> Same
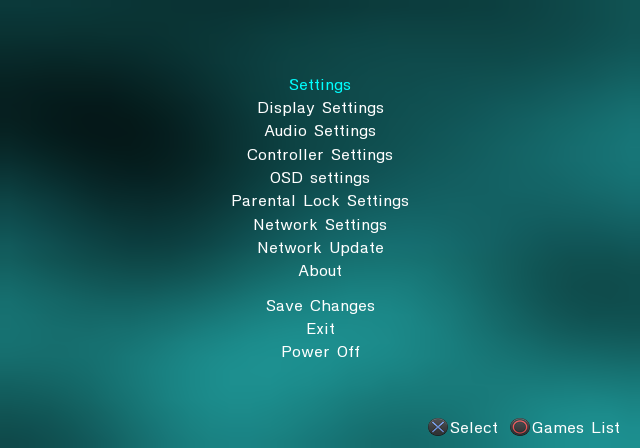
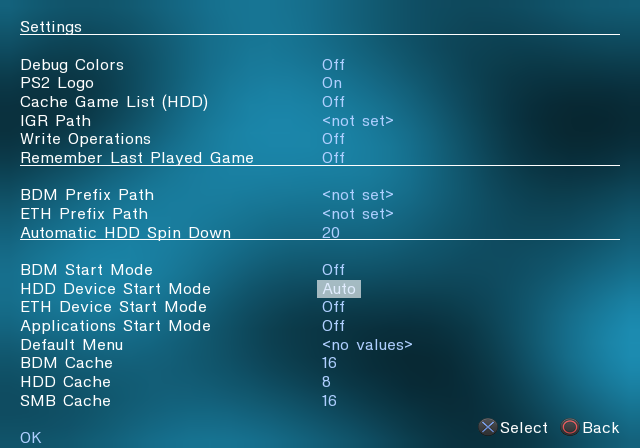
- In OPL, open
Settingsby pressingX.
- Set
HDD Device Start ModetoAuto.
- Press
D-pad downuntil you reachOK, and pressX. - Select
Save Changesand pressX.
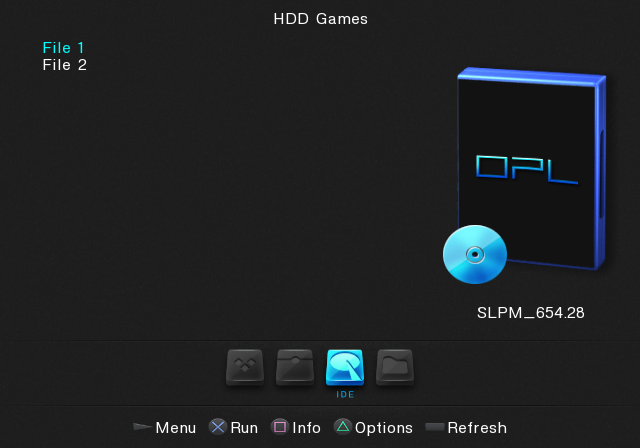
- Press
Oto access theGames List.
- Select the game, and press
Xto run.
Official HDD Install Method
The in-game HDD install method is more restrictive because the benefit of the improved loading times from HDD will only work with others that used the in-game install option. Note the following for using this mode:
- It will not conflict with the HDL/OPL methods listed above. The two may co-exist as long as you have adequate space on the HDD/virtual HDD
- Offline play will run from the HDD
- If you create a game online, the room will be joinable by official install HDD users only unless you switch the game to DVD mode
- If you attempt to join a DVD game while in HDD mode, the game will ask if you would like to change to DVD mode. If you select yes, you will be able to join the game, but will play from DVD, and for the remainder of your online session, the game will be in DVD mode. In order to switch back to HDD mode, the user would need to disconnect and reconnect, or join an HDD game.
- The game options menu allows for switching between DVD and HDD mode
As mentioned in the PS2 checklist, unless you have an official SONY HDD, you will need to patch your ISO and burn the patched ISO to a DVD.
PS2 Users without an official SONY HDD: modifying the game to use any HDD
Emulator users can skip to Install.
By default, the game will only allow installation to an official SONY HDD. However, the driver can be modified to ignore this requirement. Note you will not be able to play using the original discs if you use this option, since we need to hex edit one of the files on the DVD and then play on the PS2 using a DVD backup. Your PS2 will need to be able to play backup DVDs through the use of software or hardware modification.
Credits: a July 2003 document written by Septiego / Team PS2Ownz showing the general values to change to enable use of any HDD in PS2 games. Later, Spartian Labels created a tutorial on Biohazard Dawn that demonstrated that only one value needs to be changed for File 1. Using this information I ran checksum on the relevant files in File 1 and File 2 for HDD use and determined they are the same and can be modified the same way.
Required software:
- Any hex editor that you are comfortable with
- Software to replace a file within an ISO. One application that can do this is Apache PS2 v1.1.
- Mount your ISO File 1 or File 2 ISO. In Windows, you may right click the ISO and click Mount.
- Navigate to
IOPMODULESfor File 1 orMODULESfor File 2. - Copy the
ATAD.IRXfile to anywhere on your computer. - Open ATAD.IRX in a hex editor. Search for the hex string:
D0FFBD2700210400FFFF8430
This string is present six times in the file. - Replace the last occurrence of
D0FFBD2700210400FFFF8430within the file which begins at address 0F7Ch with:
211000000800E00300000000Before After - Save the modified
ATAD.IRXfile. If you would like to verify that you modified the file correctly, check the SHA-1 checksum using a program such as 7-zip. In 7-zip right click on the file and select CRC -> SHA-1. The SHA-1 value of the modifiedATAD.IRXfile should be:
ef57a1b168a7dab704e9ea3221a11942e8f28314 - Open the ISO in Apache and navigate to where the
ATAD.IRXmodule is located:IOPMODULESfor File 1, andMODULESfor File 2. Click on theATAD.IRX - Click ISO Tools -> Update Selected File. Select the
ATAD.IRXfile that we modified with the hex editor. - The ISO is now patched. Note that you can replace
ATAD.IRXwith the same patched file in both File 1 and File 2. TheATAD.IRXmodule is the same in both. If you would like to check to make sure the file is replaced properly, use a program that can display the checksum such as 7-zip, enter your modified ISO, navigate to theATAD.IRXfile, and verify that the SHA-1 value is:
ef57a1b168a7dab704e9ea3221a11942e8f28314 - Burn the modified ISO to DVD to play on PS2.
Install
- Either your HDD if on PS2 or your virtual HDD if on emulator will need to be formatted. This is already done if you installed HDL/OPL per above. If not, click formatting PS2 HDD or creating a virtual drive for PCSX2.
- Start the Outbreak game, File 1 or File 2.
- In the main menu, select the
HDD Installoption. - The game will ask if you would like to install. Select yes.
- Now that the game is installed to HDD, HDD will be the default play mode. You may change to DVD mode in the options menu.
More info on using the in-game HDD method above.
Alternate method for quick-loading File 2 for PCSX2 only
Fothsid created a modified SLPM_656.92 executable file for File 2 that allows for loading the game from files instead of an ISO. This is particularly convenient for modders as testing modifications will not require rebuilding the ISO file. It also loads slightly faster than running from HD Launcher and OPL. However, it is only compatible with PCSX2-1.7.0 with wxWidgets UI. Please see Alternate File 2 Quick-loading Method for more information.
israpps / hdl-batch-installer
Goto Github
PK
View Code? Open in Web Editor
NEW
5.0
8.0
191.83 MB
A GUI for HDL Dump. Featuring batch installation of PS2 games to PS2 internal hdd and some game management utilities
Home Page: https://israpps.github.io/HDL-Batch-installer/
License: GNU General Public License v3.0
C++ 99.31%
Batchfile 0.20%
Shell 0.04%
C 0.45%
ps2-hdd
hdl-dump
playstation-2
ps2-game-installer
ps2
hdl-batch-installer’s Introduction
A GUI for HDL Dump.
Learn more here
Made by Matias Israelson (AKA:El_isra)
Originally this was a personal project to practice C++ & give a try to wxWidgets…
But at the end I decided to share it here on github.
If this software was useful, please consider giving it a star here on GitHub, a rating on PSX-place or a donation via PayPal
Currently implemented features (unchecked elements are WIP)
- Install multiple Games at once
- Extract multiple Games at once
- Automatically assign the original Game Title before Installation
- Inject MBR.KELF into the HDD
- Rename Game
- View game information
- Extract MBR program from HDD
- Download Artwork, Widescreen Cheats and Game settings for OPL
- Massive
KELFand icon injection to every installed game - Mount any PFS Partition as if it was a windows supported storage device
- Automatically transfer Downloaded files to mounted partition with 1 click (use only on OPL data partition)
- Batch game transfer between two ps2 HDDs
- Modify Partitions Header (custom title & icon and more)
compilation
HDL Batch Installer was built based on wxWidgets 3.0.5 stable release, built as a win32 Monolithic unicode-enabled static library, it uses Code::blocks wxwidgets project build system, to manage the UI elements and their declaration/implementation automatically, saving precious time.
Eventually, i’ll upgrade into the latest stable release 3.2.0, wich I hope doesn´t break anything 
cross compilation
Currently the project is windows only, in order to make it cross platform, it will not only require to port parts of the code (wich sould not be too hard, since i tried to stick to wxWidgets as much as i could), but also the replacement of certain parts of the code (ie: PFSFuse manager UI)
Since no one was interested on colaborating with this project so far, i don´t expect this to happen soon… or any time…
hdl-batch-installer’s People
hdl-batch-installer’s Issues
[FR] Upload Duplicated Games
Explanation
Hi, i want a option to upload a modded version of the same game i already have unotuched in the hard drive, for example, now i want to test a spanish fan dubbed version of pal code veronica x http://www.lugerdorada.com.es, but i want to keep the original game, without remove it and share the same save in both cases, because i want only to test that patched iso as an alternative of the original game.
Thanks.
fature related
- game Installation
- Title Database
- ART Downloader
- Game management
- HDD management
- Others…
other checks
- I’ve checked if such feature exists on Latest version
- This Feature requires an update of WxWidgets
- Needs an update of HDL Dump
[bug]: Game installations result in returning a value of -1073741819 99% of the time.
[FR]: ZSO Support
Explanation
ps2homebrew/Open-PS2-Loader#225 (comment)
OPL now has ZSO support so it would be great to use HDL Batch installer to load these on the drive. Right now its only possible to load these files via FAT32-formatted USB.
fature related
- game Installation
- Title Database
- ART Downloader
- Game management
- HDD management
- Others…
other checks
- I’ve checked if such feature exists on Latest version
- This Feature requires an update of WxWidgets
[bug]: Save button in settings does nothing
Issue
None of settings are saved by GUI, they do, however, work when manually set in ini file.
expected behaviour
Just remainder it needs to be fixed in near future. 
Program version
v3.1.0 — Revision 1
other checks
- I am using the Latest version
Database update Request
Hi Matías,
I am installing the entire PS2 game library for the Americas in an HDD using the HDL Batch Installer, which by the way, it is great! My goal is to do a full setup of my HDD using your tools, not using OPL Manager or anything else to manage the games. So far, I have found 1 issue with one of the games I am trying to install.
I am trying to get Soul Calibur II to install on the HDD. The game installs successfully. However, it is getting renamed to Namco Transmission Demo Disc v1.03 [Soul Calibur II Pack-In].
I went to the gamename.csv file and found this entry: SLUS_206.43;D,Namco Transmission Demo Disc v1.03 [Soul Calibur II Pack-In]
According to redump, the internal serial number for the Namco Transmission Demo disc indeed SLUS 20643. Here is the link: http://redump.org/disc/13150/
However, Soul Calibur II also shares the exact same internal serial number SLUS 20643: http://redump.org/disc/960/
The serial number on the actual Namco Transmission Demo Disc 1.03 bundled with the Soul Calibur II game is SLUS 20643BD. Can you modify the entry for the Namco Transmission Demo Disc v1.03 [Soul Calibur II Pack-In] to have the SLUS 20643BD serial number and add a new entry for Soul Calibur II to have its correct serial number SLUS 20643?
Thanks.
[bug]: Transferring between PS2 HDDs locally results in odd «Spider-Man 2» issue.
Issue
I’m upgrading my PS2 Fat’s internal 1TB HDD to a 2TB SSD (Samsung 860 EVO).
I began by installing FHDB to it and tested to ensure it loads into OPL v1.2 without issues. Drive appears but is obviously blank. Time to transfer games by plugging both the old and new drives directly into my PC’s motherboard (Win 10). When I load both drives on HDL Batch, it recognizes both as PS2 drives — the old HDD as hdd2 and the new SSD as hdd3.
THE PROBLEM:
When I use the transfer between hdds feature, no matter which games I select from the old HDD… It could be one random game or highlighting the entire drive to try to transfer them all in one shot… the end result is ONLY Spider-Man 2 gets transferred over. I even hooked the PS2 back up with the new SSD at this juncture and tested it. Sure enough Spider-Man 2 launches and plays fine from the OPL menu.
I plugged it back into the PC, started the HDD transfer process over to choose another game… the HDL is showing a transfer happening says «Finished!» but when I refresh the SSD— no games were transferred. Just Spider-Man 2 showing.
expected behaviour
I expected the hdd transfer to copy over all of my games off the 1TB HDD to the new 2TB SSD.
Program version
version 3.4.2 Revision 1 build date: 14-11-2022
other checks
- I tested the Latest version
[bug]: game extraction halts at progress dialog casting
Issue
The problem was in last version HDLBInst [v3.4.1 — Revision 3-x64] (Windows 10)
I was unable to extract an ISO from several PS2 Formatted Disks.
I was able to extract without issues on same computer with previous release HDLBInst[v3.0.3 — Release-x64] (Windows 10)
expected behaviour
I expected to be able to extract ISO images from HDLBInst [v3.4.1 — Revision 3 menu
Program version
HDLBInst [v3.4.1 — Revision 3 x64]
other checks
- I tested the Latest version
My patched game was rejected by the program
Issue
Version: 3.3.0
Game: Initial D Special Stage 1.1/1.2
What happens: Installing unpatched ISO injects ISO no issue. After patching ISO via xdelta HDL kicks back error that ISO is not PS2 ISO, no other error message.
Patched 3 different Initial D ISOs to rule out bad ISO
Author of patch notes that patch ISO can be run on original PS2 hardware. Via author’s discord, this should be no issue running patched ISO on original hardware.
expected behaviour
Inject ISO without fault? Not sure what to submit here.
Program version
3.3.0
other checks
- I tested the Latest version
[bug]: «APA partition broken» message.
«Issue APA partition broken» message.
I have no issues installing games in batch after the first time I format the HDD but after that whenever I connect it to the PS2 console and then remove it to plug it back to my PC an error message will appear on the CMD window «hdd2:: APA partition is broken; aborting.» everytime I click on the «Search ps2 HDD’s» button.
expected behaviour
I expected the program to recognize my HDD to install more games after the first batch install.
Program version
3.4.2
other checks
- I tested the Latest version
[FR]: 32bits Build
Explanation
32 bits build of project
fature related
- game Installation
- Title Database
- ART Downloader
- Game management
- HDD management
- Others…
other checks
- I’ve checked if such feature exists on Latest version
- This Feature requires an update of WxWidgets
HDL-Batch-installer supports Japanese and Ryukyuan languages
I want to support HDL-Batch-installer in Japanese and Ryukyuan languages. How should I translate it?
[Database Update]: Add entries for a large set of missing id’s from Redump.org
Game title
a lot
Game ID
Script used to parse redump.org database:
@echo off
type PS2.DB |findstr "<rom"| findstr /V ".cue" | busybox.exe sed "s/ sha1=/;/g" | busybox.exe sed "s/ md5=/;/g" | busybox.exe sed "s/ size=/;/g" | busybox.exe sed "s/ crc=/;/g" | busybox.exe sed "s/<rom name=//g" | busybox.exe sed "s/^[[:space:]]*//" | busybox.exe sed "s//>//" >ndea

REM https://redump.org/discs/quicksearch/%d/
del LST.TXT
for /f "tokens=1,2,3,4,5 delims=;" %%a in (ndea) do (
wget -q --show-progress redump.org/discs/quicksearch/%%d/ -O - | findstr "Serial</th>" | busybox.exe grep -m 1 -o "[A-Z][A-Z][A-Z][A-Z]-[0-9][0-9][0-9][0-9][0-9]" >> LST.TXT
REM | busybox.exe tr "n" "," | busybox.exe sed "$s/,$/n/"
)

REM After running this script, the file was alphabetically ordered and cleaned (removed duplicate entries) by notepad++
KOEI_000.81
KOEI_652.47
PAPX_905.04
PAPX_905.14
PAPX_905.15
PAPX_905.16
PAPX_905.20
PAPX_905.23
PCPX_966.05
PCPX_966.09
PCPX_966.14
PCPX_966.15
PCPX_966.17
PCPX_966.18
PCPX_966.20
PCPX_966.21
PCPX_966.27
PCPX_966.31
PCPX_966.36
PCPX_966.38
PCPX_966.57
PCPX_980.17
PDSS_000.70
PDSS_023.18
SCED_503.81
SCED_505.20
SCED_506.10
SCED_506.15
SCED_507.33
SCED_507.80
SCED_509.89
SCED_509.90
SCED_511.66
SCED_512.69
SCED_512.87
SCED_513.52
SCED_515.63
SCED_515.96
SCED_515.98
SCED_516.44
SCED_516.57
SCED_517.79
SCED_519.05
SCED_519.42
SCED_520.53
SCED_520.54
SCED_521.37
SCED_521.47
SCED_521.77
SCED_522.70
SCED_522.71
SCED_523.11
SCED_524.36
SCED_524.52
SCED_524.55
SCED_525.78
SCED_528.41
SCED_528.47
SCED_528.70
SCED_529.35
SCED_530.18
SCED_531.77
SCED_532.98
SCED_533.16
SCED_533.25
SCED_533.49
SCED_535.22
SCED_536.84
SCED_537.33
SCED_538.54
SCED_539.16
SCED_539.32
SCED_539.39
SCED_539.62
SCED_540.36
SCED_541.92
SCED_542.38
SCED_543.63
SCED_544.81
SCED_544.95
SCED_545.23
SCED_545.58
SCED_545.67
SCED_546.03
SCED_546.92
SCES_510.03
SCES_517.25
SCES_521.37
SCES_544.98
SCES_545.03
SCES_545.04
SCES_545.56
SCES_547.65
SCES_547.69
SCES_548.52
SCES_548.54
SCES_548.56
SCES_550.61
SCES_550.96
SCES_550.97
SCES_551.07
SCES_551.27
SCES_551.28
SCES_551.77
SCES_552.57
SCES_552.59
SCES_552.62
SCES_554.01
SCES_554.21
SCES_554.25
SCES_554.39
SCES_554.85
SCES_555.13
SCES_555.21
SCES_555.51
SCES_555.53
SCES_556.12
SCES_556.16
SCES_556.19
SCES_556.50
SCKA_200.67
SCKA_201.40
SCPH_100.90
SCPH_701.20
SCPM_853.01
SCPM_853.02
SCPM_853.03
SCUS_280.28
SCUS_946.77
SCUS_971.78
SCUS_976.00
SCUS_978.99
SLAJ_250.15
SLAJ_250.17
SLAJ_250.28
SLAJ_250.41
SLAJ_350.07
SLED_502.86
SLED_504.39
SLED_504.84
SLED_504.89
SLED_505.87
SLED_508.95
SLED_510.12
SLED_510.47
SLED_510.48
SLED_510.62
SLED_510.74
SLED_510.91
SLED_511.27
SLED_511.86
SLED_512.12
SLED_512.25
SLED_512.64
SLED_513.38
SLED_513.64
SLED_513.80
SLED_516.51
SLED_516.76
SLED_519.02
SLED_519.21
SLED_519.75
SLED_519.87
SLED_519.92
SLED_519.93
SLED_520.14
SLED_523.04
SLED_523.26
SLED_524.85
SLED_525.06
SLED_525.97
SLED_527.36
SLED_528.73
SLED_528.75
SLED_528.79
SLED_528.90
SLED_528.91
SLED_529.79
SLED_530.66
SLED_530.97
SLED_531.37
SLED_531.98
SLED_533.30
SLED_533.65
SLED_534.40
SLED_534.42
SLED_534.45
SLED_535.37
SLED_535.91
SLED_536.19
SLED_536.25
SLED_536.37
SLED_536.50
SLED_536.64
SLED_536.81
SLED_537.11
SLED_537.70
SLED_538.88
SLED_539.54
SLED_539.77
SLED_539.83
SLED_540.22
SLED_543.15
SLED_543.27
SLED_543.28
SLED_544.01
SLED_544.45
SLED_545.09
SLED_550.22
SLES_501.21
SLES_504.20
SLES_508.55
SLES_509.01
SLES_516.45
SLES_516.47
SLES_518.27
SLES_519.61
SLES_523.92
SLES_524.47
SLES_529.07
SLES_529.34
SLES_533.96
SLES_534.20
SLES_534.65
SLES_536.34
SLES_537.93
SLES_538.05
SLES_544.33
SLES_544.34
SLES_544.35
SLES_544.36
SLES_544.47
SLES_544.72
SLES_545.32
SLES_545.36
SLES_546.12
SLES_546.94
SLES_547.12
SLES_547.37
SLES_547.44
SLES_547.46
SLES_549.00
SLES_549.23
SLES_549.38
SLES_549.40
SLES_549.85
SLES_549.87
SLES_550.23
SLES_551.66
SLES_551.72
SLES_551.96
SLES_552.01
SLES_552.64
SLES_552.65
SLES_553.38
SLES_553.43
SLES_553.66
SLES_554.11
SLES_554.33
SLES_554.34
SLES_555.02
SLES_555.26
SLES_556.04
SLKA_250.88
SLKA_251.68
SLKA_253.25
SLKA_253.85
SLKA_254.14
SLPM_252.62
SLPM_550.16
SLPM_551.58
SLPM_552.91
SLPM_610.01
SLPM_610.04
SLPM_610.07
SLPM_610.08
SLPM_610.09
SLPM_610.11
SLPM_610.13
SLPM_610.19
SLPM_610.20
SLPM_610.25
SLPM_610.26
SLPM_610.27
SLPM_610.29
SLPM_610.30
SLPM_610.35
SLPM_610.37
SLPM_610.39
SLPM_610.41
SLPM_610.42
SLPM_610.50
SLPM_610.52
SLPM_610.53
SLPM_610.54
SLPM_610.55
SLPM_610.59
SLPM_610.67
SLPM_610.72
SLPM_610.73
SLPM_610.74
SLPM_610.76
SLPM_610.77
SLPM_610.80
SLPM_610.84
SLPM_610.86
SLPM_610.87
SLPM_610.90
SLPM_610.91
SLPM_610.92
SLPM_610.93
SLPM_610.94
SLPM_610.96
SLPM_610.98
SLPM_611.00
SLPM_611.02
SLPM_611.03
SLPM_611.04
SLPM_611.05
SLPM_611.06
SLPM_611.09
SLPM_611.10
SLPM_611.12
SLPM_611.13
SLPM_611.14
SLPM_611.15
SLPM_611.16
SLPM_611.20
SLPM_611.21
SLPM_611.22
SLPM_611.23
SLPM_611.24
SLPM_611.25
SLPM_611.29
SLPM_611.30
SLPM_611.31
SLPM_611.32
SLPM_611.33
SLPM_611.34
SLPM_611.35
SLPM_611.37
SLPM_611.39
SLPM_611.40
SLPM_611.42
SLPM_611.44
SLPM_611.48
SLPM_611.50
SLPM_611.52
SLPM_611.54
SLPM_611.55
SLPM_611.57
SLPM_611.58
SLPM_611.61
SLPM_611.63
SLPM_650.31
SLPM_650.35
SLPM_651.62
SLPM_651.72
SLPM_652.01
SLPM_652.11
SLPM_654.36
SLPM_656.56
SLPM_666.99
SLPM_667.80
SLPM_668.34
SLPM_669.04
SLPM_669.25
SLPM_669.28
SLPM_675.25
SLPM_685.01
SLPM_685.02
SLPM_685.05
SLPM_685.09
SLPM_685.19
SLPM_685.21
SLPM_685.23
SLPS_256.52
SLPS_656.68
SLPS_999.99
SLUS_000.00
SLUS_123.45
SLUS_206.00
SLUS_215.11
SLUS_216.17
SLUS_219.24
SLUS_280.34
SLUS_280.52
SLUS_280.59
SLUS_280.67
SLUS_280.68
SLUS_280.69
SLUS_290.14
SLUS_290.85
SLUS_291.47
SLUS_291.51
TLES_820.43
game MD5 Checksum
dsafafafeva
other checks
- I am using the Latest version
Game source
fawvevaw
Issue with Patched ISO
I’ve looked all over and have been unable to find anything to solve this issue.
This is an english patched version of .Hack//Fragment using the method from here https://bbs.dothackers.org/viewtopic.php?f=6&p=262
I’ve tried looking at the system.cnf, but it’s no different than the original ISO. Unsure what to try to get it to work. The unpatched rom works fine.
[hdl-dump issue]: `input or output is unsupported` on HDD hdl toc request
Issue
the problem seems to be with WGET, I have tried loading everything as admin and also moved the files to the non boot HDD to make sure, I will attach a picture of the error message:
I can choose to not quit the program but nothing from there seems to work, HDD isn’t accessible etc. The HDD was formatted with WINHIIP and had some games on it installed from there, I deleted all of them just in case one was causing the overflow error. Now it only has FHDB etc and a couple of virtual memory cards.
expected behaviour
I expected… HDD to be accessible as per the instructions.
Any help would be greatly appreciated as I have heard WINHIIP is bad and I should be using this, but so far I can’t seem to get it to recognize my HDD.
Program version
3.3.0 rev 1
other checks
- I tested the Latest version
[bug]: Cannot transfer Soulcalibur 3 to my PS2 HDD
Issue
the problem was my soul calibur 3 get error when transfer to PS2 HDD. Nothing is work whenever Database is using or not
expected behaviour
I expected…
Program version
version 3.1.3 rev1
other checks
- I tested the Latest version
[bug]: Cannot install Silent Hill II unless starting HDL Batch Installer from Command Prompt
Issue
No matter how many times I try to install Silent Hill II (and a bunch of other games), when I start the HDL Batch Installer by going to the install folder, right clicking the HDL-Batch-installer.exe and selecting Run as Administrator, the installer spits out an error and does not install the game.
Please look at the attached image:
Very interestingly, if I start the HDL Batch Installer through the command prompt, the game installs without any problem.
Steps to reproduce:
- Go to your HDLBInst installation folder
- Right click on HDL-Batch-installer.exe
- Select «Run as Administrator»
- Click «Search ps2 HDD’s
- Click «Search Games»
- Select «Silent Hil II» iso
- Click «Install»
This same problem happened to me with about 30 other games. The only way I could get them installed was if I started HDL Batch Installer from the Command Prompt.
Thanks.
expected behaviour
The game should have been installed properly without any errors.
Program version
version 3.2.1 [Beta]-[64 bits] Revision: 1 build date: 07-01-2022
other checks
- I tested the Latest version
[FR]: Better way to add new icons
Explanation
Make a new repo and add me as Contributor? Or I should make a public repo which you’ll «fork» later?
I’m planning to add as many icons as possible. If you’ve any idea, tell me.
fature related
- game Installation
- Title Database
- ART Downloader
- Game management
- HDD management
- Others…
other checks
- I’ve checked if such feature exists on Latest version
- This Feature requires an update of WxWidgets
- Needs an update of HDL Dump
[FR]: Delete game partition
Explanation
Could you add Delete partition game, please? I see Delete feature but seem not working now.
Hope you update on next release.
Thanks so much.
Be careful
fature related
- game Installation
- Title Database
- ART Downloader
- Game management
- HDD management
- Others…
other checks
- I’ve checked if such feature exists on Latest version
- This Feature requires an update of WxWidgets
- Needs an update of HDL Dump
[bug]: Doesn’t detect PS2 HDD if there are a lot of drives in the system
Issue
I have about 20 drives (physical and virtual) in my system and HDL Batch Installer won’t recognize my PS2 drive (currently drive number 20). I’ve encountered the same issue with HDL Dumb (which has a hardcoded limit of 16 drives), HDLBATCH and OPL Manager.
expected behaviour
Expected behavior: my PS2 HDD is found.
Program version
3.3.0 revision 1
other checks
- I tested the Latest version
[bug]: APA partition is broken; aborting
Issue
I’m using a HDD I just formatted in uLaunchELF 2TB. I plugged it into my PC and when I click «search ps2 HDD’s» the CMD window says ERROR APA Partition is broken, aborting, and a window pops up that says «wxWidgets Debug alert» and wants to abort the program.
expected behaviour
I was hoping for HDL Batch Installer to recognize my drive without error.
Program version
3.1.1 Beta 64 Bits
other checks
- I am using the Latest version
[bug]: Warning, missing split token at external database line [4685], skipping entry…
Issue
using external database, this WARNING shows:
expected behaviour
I expected…
Program version
No response
other checks
- I tested the Latest version
[bug]: Failed Installation: -1073741819l
Issue
Getting Failed installation on all ISOs to a newly formatted drive (Formatted with uLaunchELF)
Console output during install:
index: 61
DVD 1305152KB «HOMINID» «SLUS_210.90»
media: inject_dvd
searching [SLUS_210.90]
$ found match! [Alien Homind]
Searching custom icon: No custom icon foundinject_mode: [inject_dvd ]
hdd_target: [hdd4:]
title: [Alien Homind]
ISO_PATH: [D:PS2Alien Hominid.iso]
ELF [SLUS_210.90]
DMA: *u4
Hide_switch:HDL.EXE inject_dvd hdd4: «Alien Homind» «D:PS2Alien Hominid.iso» SLUS_210.90 *u4
100%, 1 sec remaining, 32.25 MB/sec
returned value [-1073741819]
Elapsed time 31958(ms)
Console output post install:
installation process finished.
Failed installation summary:
#61
D:PS2Alien Hominid.iso
SLUS_210.90
-1073741819l
The number is 61 as this happened on all 63 games I attempted to install. Checking the games list on the drive with HDL loader however shows that they have been installed.
expected behaviour
No response
Program version
version 3.4.0 [Release Candidate]-[-[64 bits]]
other checks
- I tested the Latest version
[FR]: Support for BIN files
Explanation
It would be nice to have support from BIN files.
fature related
- game Installation
- Title Database
- ART Downloader
- Game management
- HDD management
- Others…
other checks
- I’ve checked if such feature exists on Latest version
- This Feature requires an update of WxWidgets
game renaming fails because game title doesn’t differ on the first `16`/`17` chars
Hi, I loaded about 150 games with the program. I checkmarked the Use Database option before loading. There are certain games I would like to rename to how I like. I renamed 4 games just fine, then on the fifth and every game afterwards it will not allow me to rename. For example I’m trying to rename: Ratchet & Clank — Going Commando to Ratchet & Clank 2 — Going Commando. But it doesn’t rename and says the following:
HDL.EXE modify hdd2: «Ratchet & Clank — Going Commando» «Ratchet & Clank 2 — Going Commando»
hdd2:: partition with such name already exists: «Ratchet & Clank — Going Commando».
I did find a workaround though. If I rename the game to something completely random like — hgfh. Then rename again to the desired name, it lets me.
Recommend Projects
-
React
A declarative, efficient, and flexible JavaScript library for building user interfaces.
-
Vue.js
🖖 Vue.js is a progressive, incrementally-adoptable JavaScript framework for building UI on the web.
-
Typescript
TypeScript is a superset of JavaScript that compiles to clean JavaScript output.
-
TensorFlow
An Open Source Machine Learning Framework for Everyone
-
Django
The Web framework for perfectionists with deadlines.
-
Laravel
A PHP framework for web artisans
-
D3
Bring data to life with SVG, Canvas and HTML. 📊📈🎉
Recommend Topics
-
javascript
JavaScript (JS) is a lightweight interpreted programming language with first-class functions.
-
web
Some thing interesting about web. New door for the world.
-
server
A server is a program made to process requests and deliver data to clients.
-
Machine learning
Machine learning is a way of modeling and interpreting data that allows a piece of software to respond intelligently.
-
Visualization
Some thing interesting about visualization, use data art
-
Game
Some thing interesting about game, make everyone happy.
Recommend Org
-
Facebook
We are working to build community through open source technology. NB: members must have two-factor auth.
-
Microsoft
Open source projects and samples from Microsoft.
-
Google
Google ❤️ Open Source for everyone.
-
Alibaba
Alibaba Open Source for everyone
-
D3
Data-Driven Documents codes.
-
Tencent
China tencent open source team.


