Get started for free
Please select your product experience:
Description
Microsoft Hyper-V Server is a free product that delivers enterprise-class virtualization for your datacenter and hybrid cloud. Microsoft Hyper-V Server 2019 provides new and enhanced features that can help you deliver the scale and performance needs of your mission-critical workloads.
The Windows hypervisor technology in Microsoft Hyper-V Server 2019 is the same as what’s in the Microsoft Hyper-V role on Windows Server 2019. It is a stand-alone product that contains only the Windows hypervisor, a Windows Server driver model, and virtualization components. It provides a simple and reliable virtualization solution to help you improve your server utilization and reduce costs.
Languages
- Chinese (Simplified), Chinese (Traditional), English, French, German, Italian, Japanese, Korean, Portuguese (Brazil), Russian, Spanish
Editions
- Microsoft Hyper-V Server 2019 | 64-bit ISO
Prerequisites
Prior to installing Hyper-V Server 2019, follow these steps:
- Review Hyper-V Server 2019 system requirements.
- Register, then download and install full-featured software.
- Receive emails with resources to guide you through your deployment.
Installation Guidelines
- Upon installation you will be prompted to activate.
- A product key is not required.
Resources
Supporting products
-
Windows Server is the platform for building an infrastructure of connected applications, networks, and web services, from the workgroup to the data center. It bridges on-premises environments with Azure, adding additional layers of security while helping you modernize your applications and infrastructure.
Get started with Windows Server: 2022 | 2019 | 2016 | 2012 R2
-
Windows Server Essentials edition is a cloud-connected first server designed for small businesses with up to 25 users and 50 devices. If you are considering installing any version of Windows Server Essentials, we would encourage you to consider Microsoft 365.
Get started with Windows Server Essentials: 2019 | 2016 | 2012 R2
Learn more about Microsoft 365 for business -
Hyper-V Server provides a simple and reliable virtualization solution to help organizations improve their server utilization and reduce costs. The latest release of Hyper-V Server provides new and enhanced features that can help you deliver the scale and performance needs of your mission-critical workloads.
Get started with Hyper-V Server: 2019 | 2016 | 2012 R2 | 2012
-
Windows Admin Center is a locally deployed, browser-based app for managing Windows servers, clusters, hyper-converged infrastructure, as well as Windows 10 PCs. Giving you full control over all aspects of your server infrastructure, Windows Admin Center is particularly useful for managing servers on private networks that are not connected to the Internet
Get started with Windows Admin Center
Please select your Hyper-V Server 2019 download
|
English |
ISO download 64-bit edition |
|---|---|
|
German |
ISO download 64-bit edition |
|
Spanish |
ISO download 64-bit edition |
|
French |
ISO download 64-bit edition |
|
Italian |
ISO download 64-bit edition |
|
Japanese |
ISO download 64-bit edition |
|
Korean |
ISO download 64-bit edition |
|
Portuguese (Brazil) |
ISO download 64-bit edition |
|
Russian |
ISO download 64-bit edition |
|
Chinese Simplified |
ISO download 64-bit edition |
|
Chinese Traditional |
ISO download 64-bit edition |
Prerequisites
Prior to installing Hyper-V Server 2019, follow these steps:
- Review Hyper-V Server 2019 system requirements.
- Register, then download and install full-featured software.
- Receive emails with resources to guide you through your deployment.
Installation Guidelines
- Upon installation you will be prompted to activate.
- A product key is not required.
Resources
Product Resources | Hyper-V on Windows Server technical documentation
Community | Microsoft Tech Community: Windows Server > Virtualization
Getting Started Guides | Get started with Hyper-V on Windows Server
Getting Started Guides | Plan for Hyper-V on Windows Server
Как бы не ругали пользователи Windows 10 но это самая популярная ОС. Серверные ОС Windows Server также не имеют аналогов. Это что касается относительной простоты настройки и дружелюбности к пользователю. Каждый меня поймет кто хоть когда то пытался соорудить нечто подобное Active Directory на Linux. Это небольшое отступление. Но сегодня я хочу рассказать насколько проста установка и настройка Microsoft Hyper-V Server 2019. Это бесплатный гипервизор от Microsoft.
Я долго сравнивал разные бесплатные гипервизоры (Proxmox, VMWare). Мне хотелось чтобы была возможность управлять сервером через WEB и консоль. Рассматривал Proxmox, но совсем не тривиальная настройка меня остановила.
Про Microsoft Hyper-V Server я знал, но в нем не было WEB интерфейса для управления. Хотя подкупал RDP доступ, Hype-V Manager и возможность использовать Powershell со всем его огромным функционалом.
Буквально на днях узнал о существовании WEB консоли для управления WIndows серверами Windows Admin Center. Этот факт подтолкнул меня к установке бесплатного гипервизора от Microsoft последней версии.
Установка Microsoft Hyper-V Server 2019
Перед началом установки необходимо проверить в BIOS что аппаратная виртуализация включена. У Intel — Intel VT (VT-x и VT-d), AMD — AMD-V. Скачать Hyper-V Server 2019 можно с сайта Microsoft. Обычно я использую английскую версию серверного софта для исключения различных проблем с локализацией.
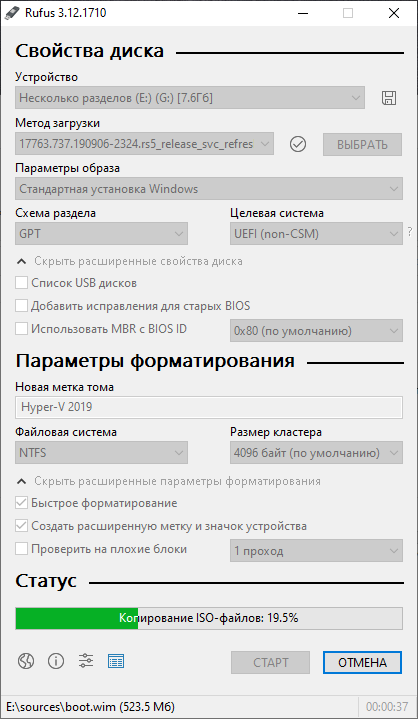
Скачанный ISO файл необходимо записать на USB Flash. Для этих целей я использую Rufus. Используйте накопитель с минимальным объемом не менее 4 Гб.
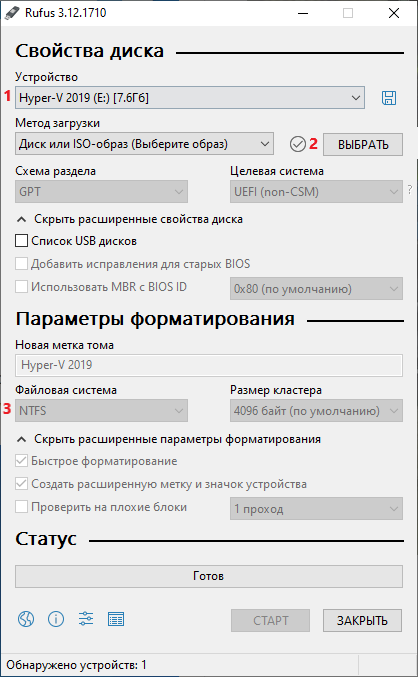
- Устройство: выбрать ваш Flash накопитель
- Метод загрузки: Диск или ISO нажать кнопку ВЫБРАТЬ и указать ISO образ Hyper-V 2019
- Файловая система: NTFS
Нажать СТАРТ и дождаться окончания записи образа на Flash накопитель.
После окончания записи на флешку можно приступить к установке системы.
Установка системы проста как любой Windows, на этом заострять внимание я не буду.
Настройка Microsoft Hyper-V Server 2019
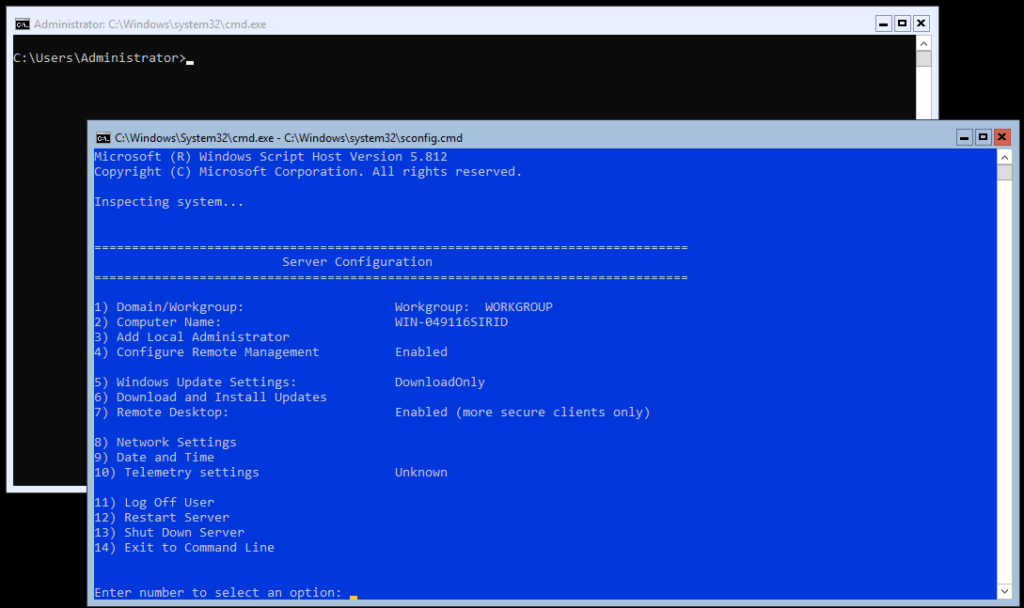
Пройдя авторизацию в Hyper-V Server возникнет окошко Server Configuration с основными настройками сервера. Для использования каждого пункта нажимаем соответствующую цифру и далее Enter.
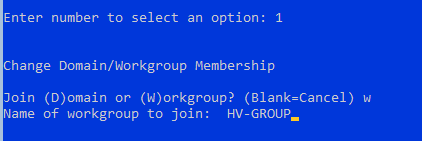
- Domain/Workgroup — добавить сервер в рабочую группу либо домен. По умолчанию используется рабочая группа WORKGROUP
- Computer Name — имя компьютера. Можно оставить автоматически присвоенное либо изменить на свое.
- Add Local Administrator — добавить локального администратора. Позволяет добавить нескольких локальных администраторов. По умолчанию включен только один администратор с логином Administrator
- Configure Remote Management — настройка разрешений удаленного управления сервером для подключения с помощью Powershell, WEB консоли и т.д.
- Windows Update Settings — установка обновлений Windows. Возможные варианты: Automatic — полностью автоматически, DownloadOnly — только скачать, Manual — ручной режим.
- Download and Install Updates — скачать и установить обновления. Непосредственный запуск установки обновлений.
- Remote Desktop — удаленный доступ к рабочему столу. Необходимо включить для удаленного доступа по RDP. Можно использовать RDP with NLA и RDP any. RDP with NLA для использования на клиентах Windows XP SP3 и выше, более безопасный и быстрый вариант. RDP any для использования на любых клиентах Windows, Linux, Android и т.д.
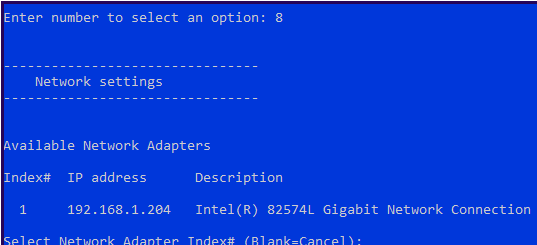
- Network Settings — доступ к настройкам сетевой карты. Изменить IP, маску, DNS и т.д.
- Date and Time — открывает окошко настройки времени с возможностью изменить сервер синхронизации
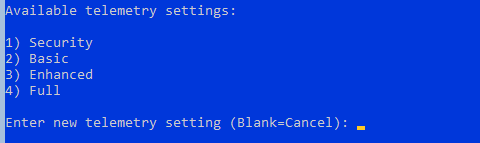
- Telemetry settings — сбор сведений телеметрии. Для выбора есть Security, Basic, Enhanced, Full.
- Log Off User — выйти из текущей сессии
- Restart Server — перезагрузить сервер
- Shut Down Server — выключить сервер
- Exit to Command Line — закрыть текущее окно настроек и оставить активным только окно командной строки.
Проведем первоначальные настройки сервера с помощью консоли Server Configuration
Изменим имя компьютера на WHS19. Включим удаленное управление Remote Management и Remote Desktop. Windows Update Settings я оставляю в изначальном состоянии DownloadOnly. Меняю часовой пояс на свой и настройки телеметрии ставлю Secutiry. Сетевые настройки приходят по DHCP (не забываем сделать резервацию) или вручную. После измененных настроек рекомендую перезагрузить сервер.
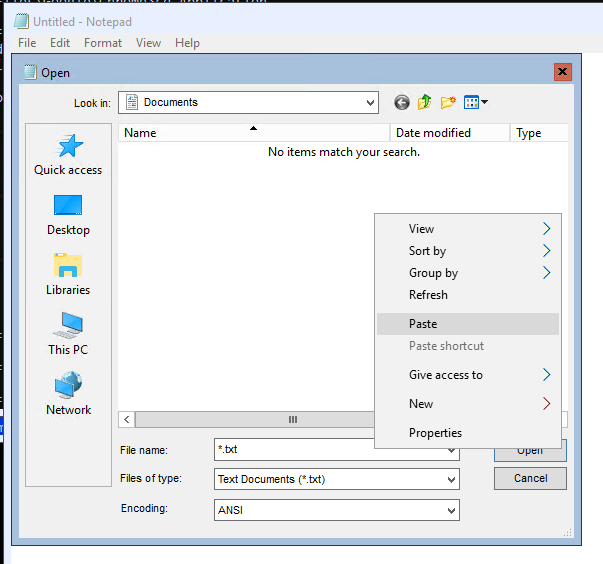
Если по чистой случайности вы закрыли оба окна (консоль cmd и Server Configuration) можно воспользоваться сочетанием клавиш Ctrl+Shift+Esc и вызвать диспетчер задач.
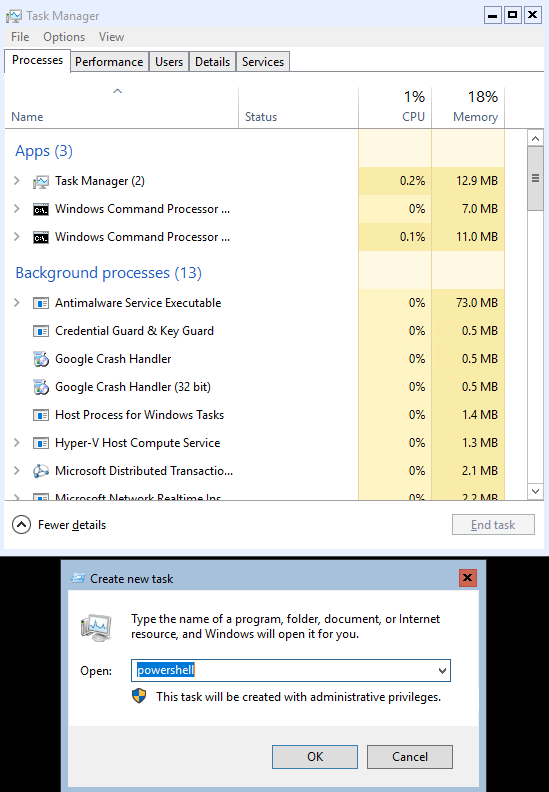
В диспетчере задач меню File — Run new task можно запустить cmd, powershell и любое приложение установленное в системе. Небольшой лайфхак: как быстро скопировать файл со своей машины на сервер Hyper-V Core. Заходим на сервер по RDP, запускаем блокнот. В блокноте нажимает File — Open. На своем компьютере выбираем нужный файл и копируем его в буфер обмена. На сервере в открытом окне блокнота нажимаем правой кнопкой и выбираем вставить. Файл скопируется в текущее место открытое в блокноте.
Настройка дисков
В моём сервере установлено 3 диска. На одном диске установлена система, два других под виртуальные машины и резервные копии. Запустим Powershell из консоли cmd.
Получим список дисков установленных в сервере
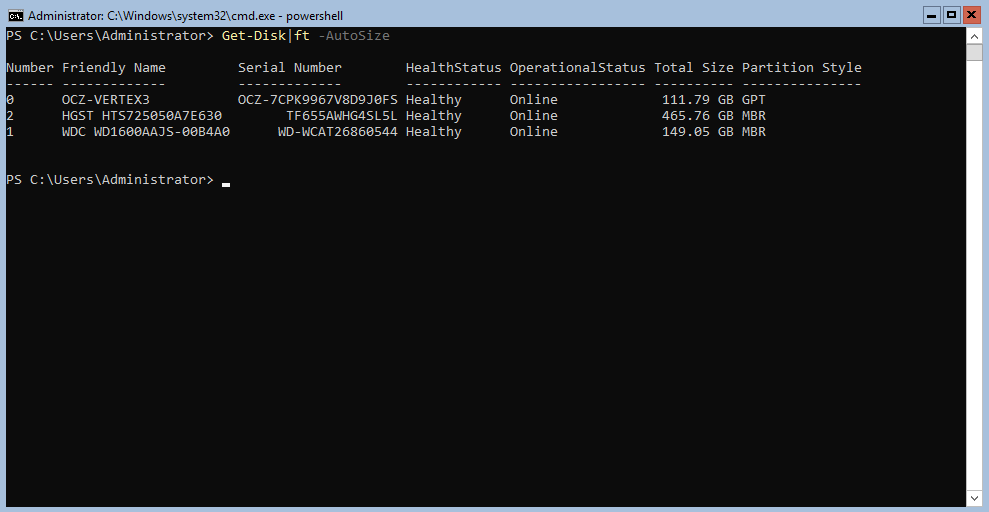
В моем случае система установлена на диск 0 — OCZ-VERTEX3. Диск 1 WDC WD1600AAJS я буду использовать под виртуальные машины. И самый емкий из установленных диск 2 HGST HTS725050A7E630 использую под резервные копии. Подготовим диски.
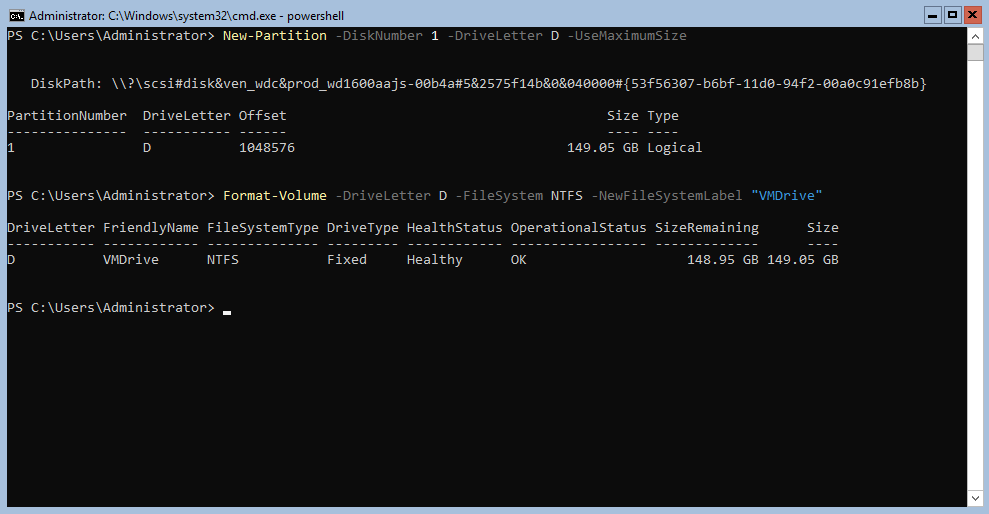
Создадим новый раздел на диске и присвоим ему букву D.
New-Partition -DiskNumber 1 -DriveLetter D –UseMaximumSize
Отформатируем диск под файловую систему NTFS
Format-Volume -DriveLetter D -FileSystem NTFS -NewFileSystemLabel "VMDrive"
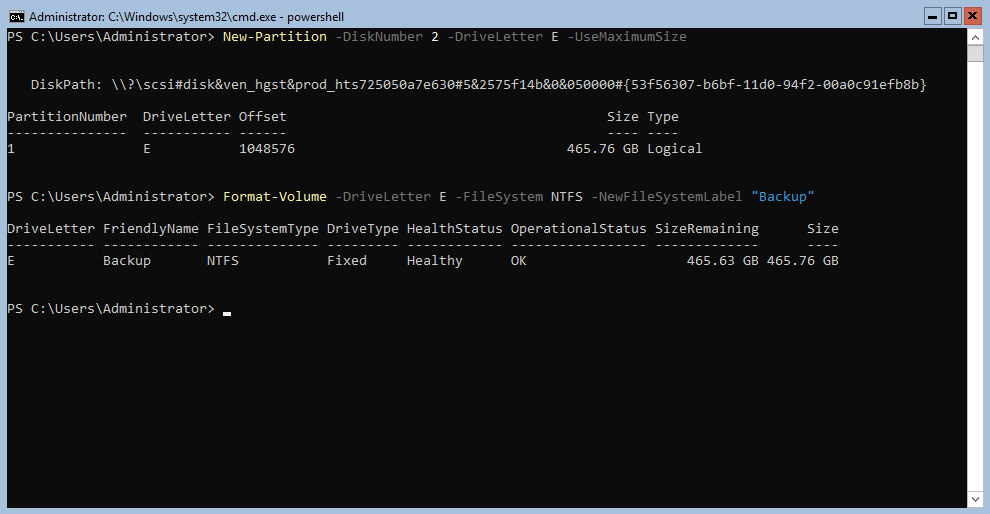
Создаем новый раздел на диске HGST для резервных копий и присвоим диску букву E
New-Partition -DiskNumber 2 -DriveLetter E –UseMaximumSize
Форматируем диск E
Format-Volume -DriveLetter E -FileSystem NTFS -NewFileSystemLabel "Backup"
Место хранения виртуальных машин
По умолчанию система сохраняет новые виртуальные машины на диск C. Изменим путь сохранения на диск D
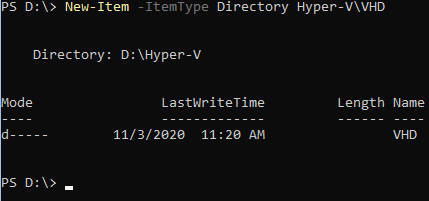
Создаем папку для хранения виртуальных машин и дисков
New-Item -ItemType Directory D:Hyper-VVHD
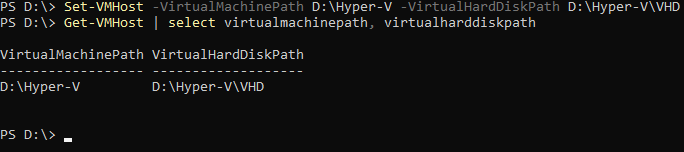
Укажем системе куда сохранять настройки и диски виртуальных машин
Set-VMHost -VirtualMachinePath D:Hyper-V -VirtualHardDiskPath D:Hyper-VVHD
Проверим что все получилось
Get-VMHost | select virtualmachinepath, virtualharddiskpath
Настройка виртуального коммутатора Hyper-V
Нам необходимо создать виртуальный коммутатор который будет связан с сетевой картой сервера Hyper-V. Он будет получать сетевые адреса также по DHCP как и остальные физические машины в сети.
Проверим поддерживает ли наша сетевая карта технологию SR-IOV (Single Root Input/Output Virtualization). Данная технология виртуализации предоставляет виртуальным машинам прямой доступ к части аппаратных возможностей сетевой карты.
Если данная технология поддерживается, необходимо ее включить командлетом Enable-NetAdapterSriov. После создания виртуального коммутатора включить данную технологию уже не получится.
Получим список всех сетевых адаптеров установленных в системе.

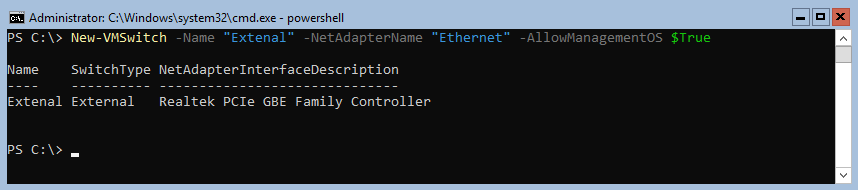
Создадим новый виртуальный коммутатор с именем External. Он будет использоваться как внешний сетевой адаптер получающий адреса по DHCP. При создании включим функцию совместного использования виртуального коммутатора и сетевой карты с виртуальной машиной.
New-VMSwitch -Name "External" -NetAdapterName "Ethernet" -AllowManagementOS $True
Просмотреть детальную информацию по сетевым настройкам можно так
Get-NetIPConfiguration –Detailed
Enhanced Session Mode
Включение функции Enhanced Session Mode позволит подключиться к консоли виртуальной машины используя RDP соединение. С той лишь разницей что подключение будет не к самой виртуальной машине а через средства интеграции гипервизора. Данный метод позволяет подключаться к виртуальной машине даже с отсутствующей сетевой картой. Для себя я вижу удобство именно в подключении к виртуальным машинам с изолированной сетью. Нет необходимости запускать консоль Hyper-V, все можно сделать через RDP.
Основные преимущества Enhanced Session Mode
- можно выбрать произвольное разрешение экрана
- использование локальных принтеров
- перенаправление USB устройств
- подключение дисков
- общий буфера обмена
- работа с аудиоустройствами
- проброс смарт-карт
- поддержка остальных plug-and-play устройств
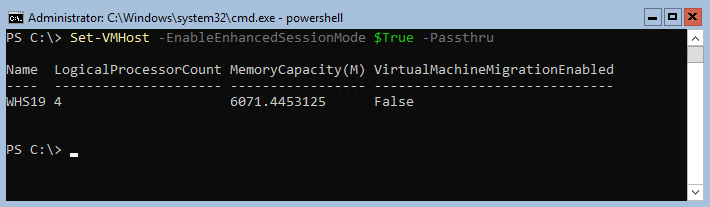
Включим данный режим сразу для всего сервера
Set-VMHost -EnableEnhancedSessionMode $True -Passthru
Удаленное управление Microsoft Hyper-V Server 2019
Удаленное управление Hyper-V сервером доступно многими средствами. Среди них консоль Hyper-V Manager, Powershell, Windows Admin Center, MMC. Для удаленного управления сервером Hyper-V необходимо произвести настройки на сервере и на каждом клиенте с которого будет подключение. Настройку клиента буду проводить на Windows 10 Pro (минимально необходимая версия).
Если сервер используется в сети с доменом, то необходимо добавить запись типа A в DNS сервер (обычно это контроллер домена). В случае рабочей группы просто добавляем имя сервера Hyper-V в файл C:WindowsSystem32driversetchosts. В моем случае запись будет выглядеть так:
Вначале идет IP адрес сервера: 172.16.169.49 далее через пробел имя WHS19. В случае использования файла hosts не забываем добавлять запись на каждой машине используемой для управления сервером.
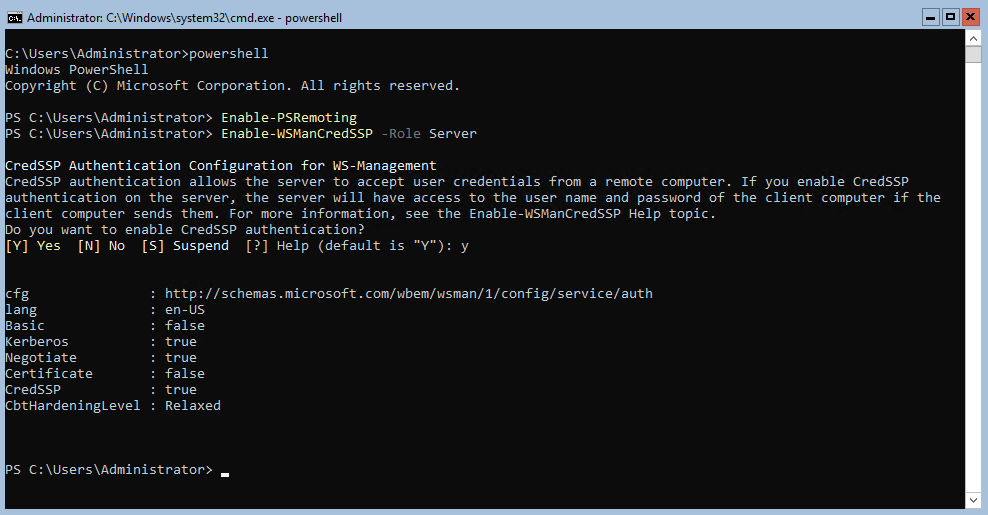
На сервере Hyper-V запустим Powershell и выполним командлет для разрешения удаленного подключения
По умолчанию данный командлет открывает доступ только из доменной и приватной сети. Разрешим доступ также из публичной сети.
Enable-PSRemoting -SkipNetworkProfileCheck -Force
Включаем поддержку проверки подлинности CredSSP на стороне сервера
Enable-WSManCredSSP -Role Server
Проверим что на сервере открыт порт WinRM
Test-NetConnection -ComputerName WHS19 -Port 5985

В выводе командлета поле TcpTestSucceeded должно иметь статус True.
Добавим в межсетевой экран правило разрешающее подключаться с любых IP адресов
Set-NetFirewallRule -Name "WinRM-HTTP-In-TCP-Public" -RemoteAddress Any
Список правил межсетевого экрана касаемо WinRM можно посмотреть с помощью командлета Get-NetFirewallRule
Get-NetFirewallRule -DisplayName "Windows Remote*" |where {$_.Enabled -eq $True}|ft displayname, Description

Добавим еще одно разрешающее правило для доступа с помощью оснасток MMC
Enable-NetFirewallRule -DisplayGroup "Remote Administration"
На данном этапе с настройкой сервера мы закончили переходим к настройке клиента.
Настройка клиента Windows 10
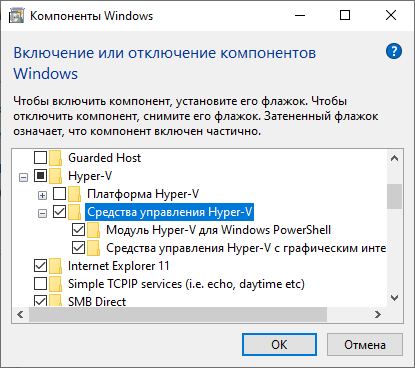
Если вы следовали четко по инструкции то прописали имя компьютера в соответствии с его адресом в файле hosts либо на DNS сервере. Следующим этапом убедимся что на компьютере установлена консоль управления Hyper-V Management. Если её нет, давайте установим.
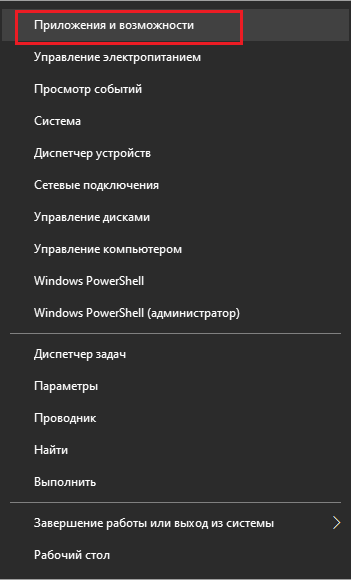
Нажимаем правой кнопкой мыши на Пуск -> Приложения и возможности -> Программы и компоненты -> Включение или отключение компонентов Windows -> Hyper-V -> Средства управления Hyper-V

Далее запускаем Powershell с правами администратора и выполняем все действия по ним.
Включим возможность удаленного подключения
Добавим сервер Hyper-V в доверенные узлы на локальном ПК
Set-Item WSMan:localhostClientTrustedHosts -Value "WHS19"
Проверим что все получилось
Get-Item WSMan:localhostClientTrustedHosts

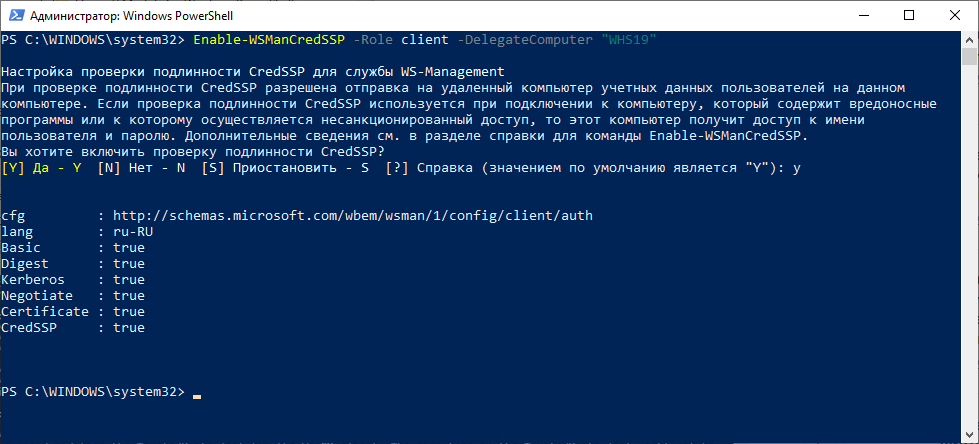
Настройка проверки подлинности CredSSP для службы WS-Management
Enable-WSManCredSSP -Role client -DelegateComputer "WHS19"
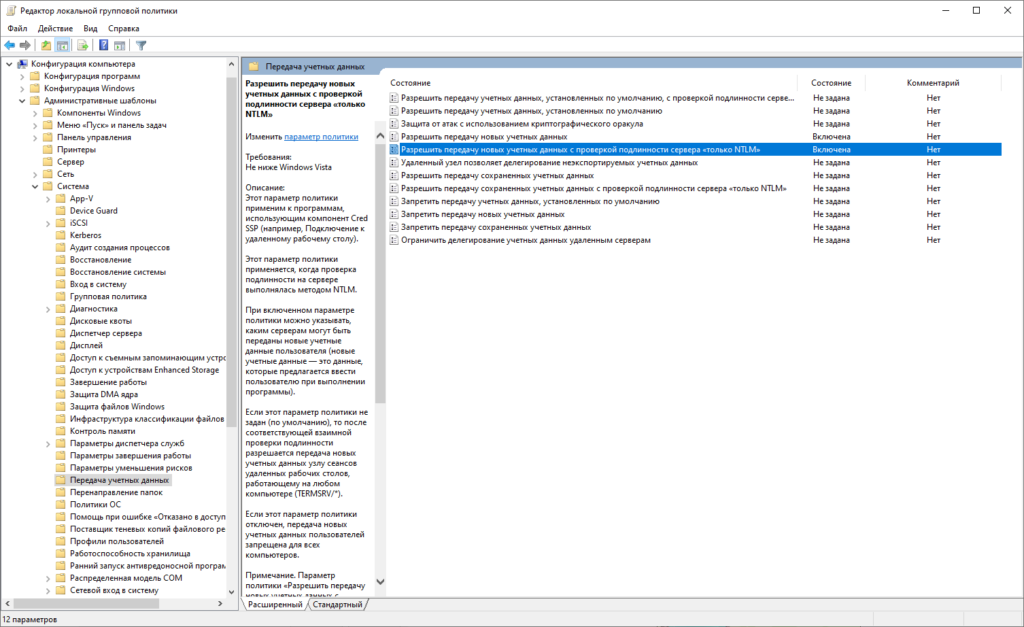
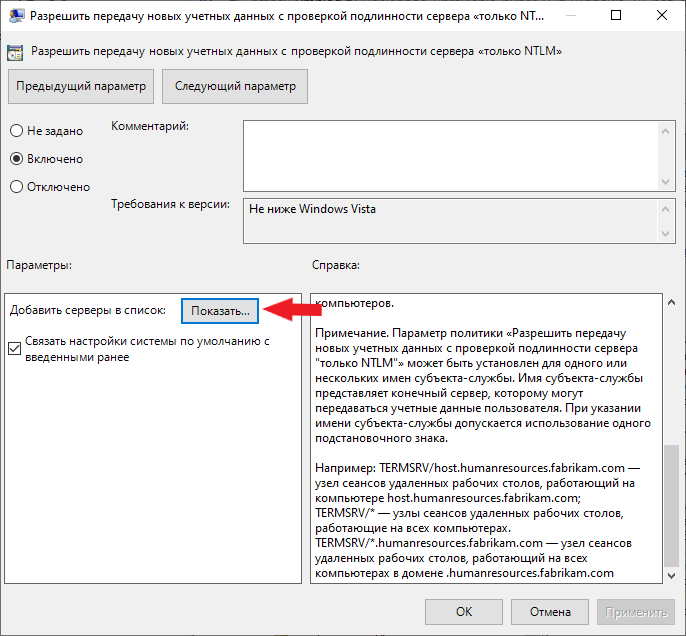
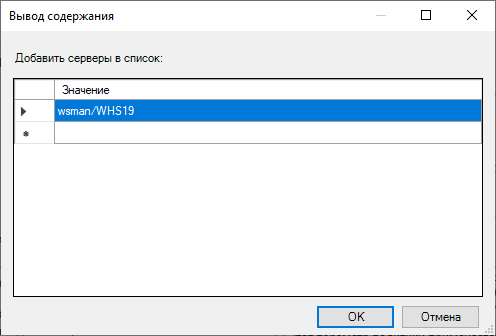
Отредактируем локальную групповую политику. Нажимаем правой кнопкой мыши Пуск -> Выполнить запускаем cmd и далее gpedit. В русской версии: Конфигурация компьютера -> Административные шаблоны -> Система -> Передача данных -> Разрешить передачу новых учетных данных с проверкой подлинности сервера «только NTLM». В английской версии: Computer Configuration -> Administrative Template -> System -> Credentials Delegation -> Allow delegating fresh credentials with NTLM-only server authentication. Включаем данную политику и добавляем сервер Hyper-V в список разрешенных.
Настройка клиента закончена. Пробуем подключится к серверу используя Hyper-V Manager.
Подключение к серверу с помощью Hyper-v Manager
Запустим Hyper-V Manager (он же Диспетчер Hyper-V). Нажимаем Подключиться к серверу. В открытом окне выбираем поле Другой компьютер пишем имя нашего сервера: WHS19. Ставим галочку Подключиться как другой пользователь.
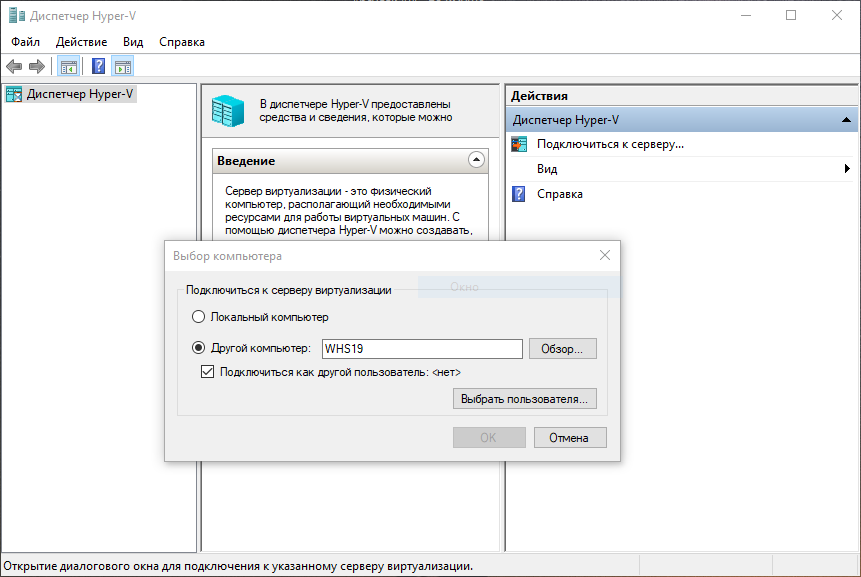
Нажимаем кнопку Выбрать пользователя
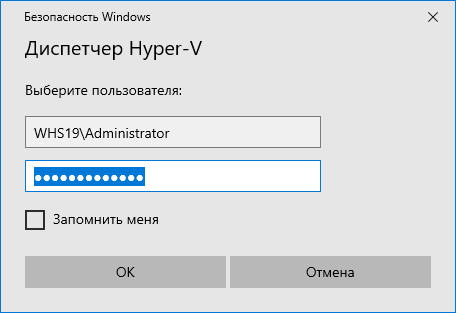
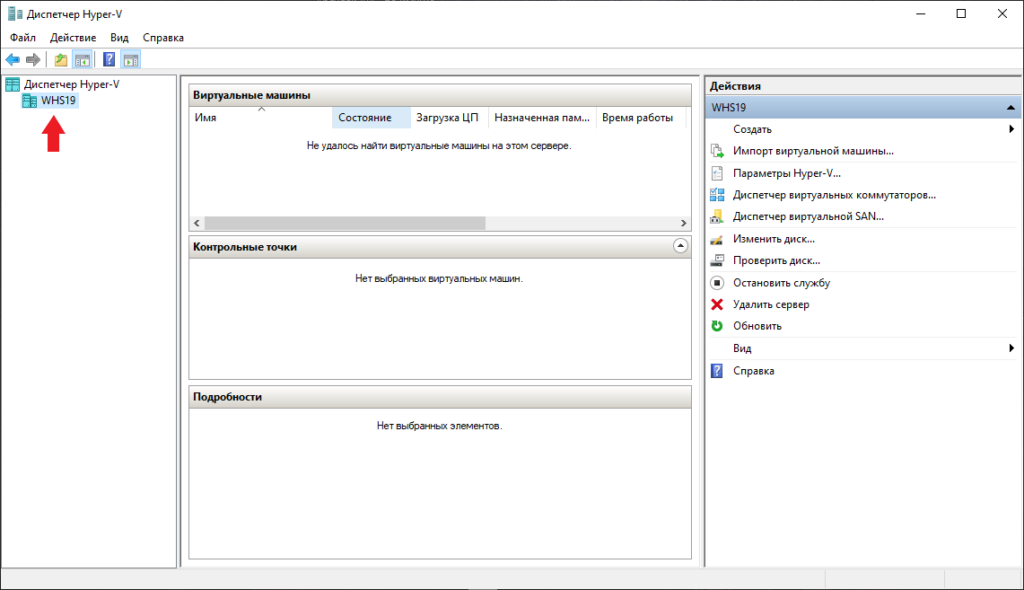
Внимательно заполняем логин и пароль для входа на сервер Hyper-V. Обязательно в поле имя пользователя вначале пишем имя компьютера затем имя пользователя. В нашем случае WHS19Administrator. Нажимаем OK. Все готово, теперь можно управлять сервером Hyper-V 2019 из удобной консоли.
Подключение к серверу с помощью Windows Admin Center
Для использования Windows Admin Center необходимо его скачать. Скопируем скачанный файл на сервер Hyper-V. Я скопировал файл WindowsAdminCenter2009.msi по пути C:UsersAdministrator. Переходим в открытую консоль cmd или powershell и запускаем установку.
msiexec /i C:UsersAdministratorWindowsAdminCenter2009.msi /qn /L*v log.txt SME_PORT=9010 SSL_CERTIFICATE_OPTION=generate
Данная команда запустит скрытую установку Windows Admin Center. Журналирование установки идет в файл log.txt, порт для подключения я использую 9010 (можно указать любой свободный). Сертификат создается автоматически. Дожидаемся окончания установки и можем пробовать подключаться.
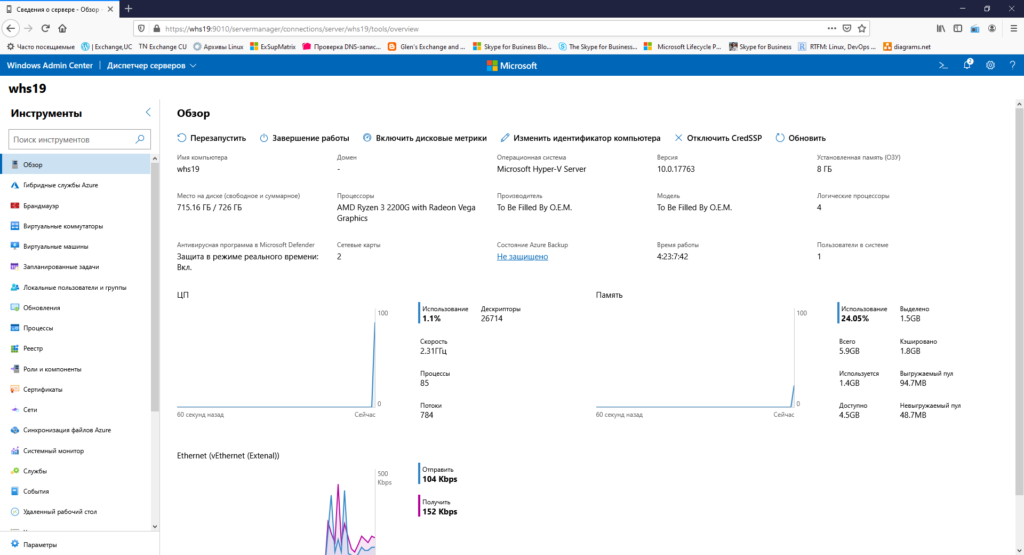
Из любого браузера открываем сайт https://whs19:9010 вводим учетные данные от сервера и попадаем в консоль управления сервером Windows Admin Center.
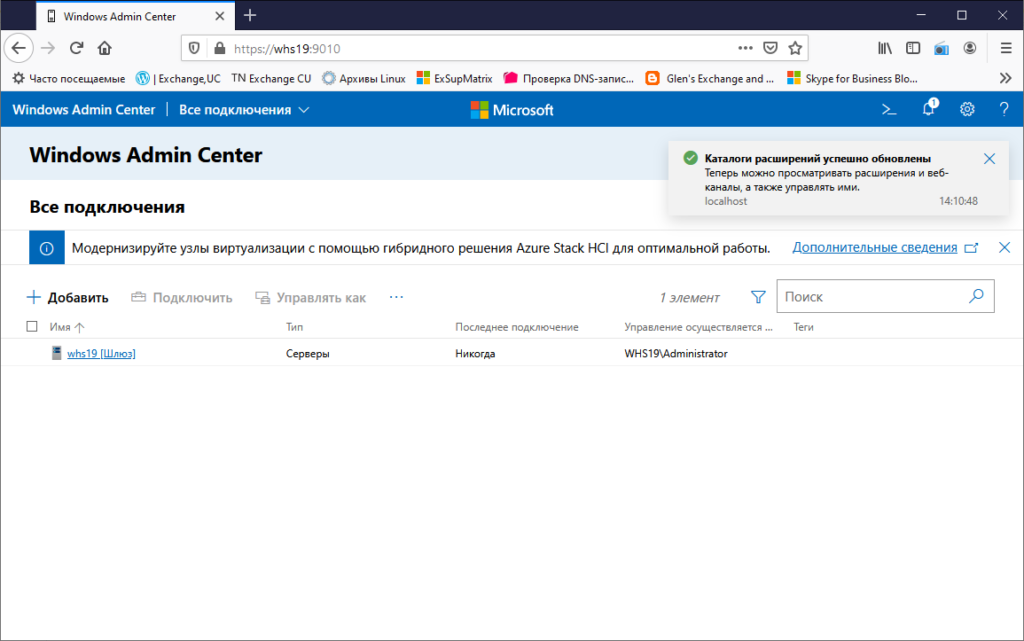
В консоли Windows Admin Center можно следить за загрузкой сервера через удобные графики расположенные на одной странице. Можно быстро выключить, перезагрузить, переименовать сервер. Большой набор функций доступен изначально, также есть воможность расширения за счет дополнительных плагинов.
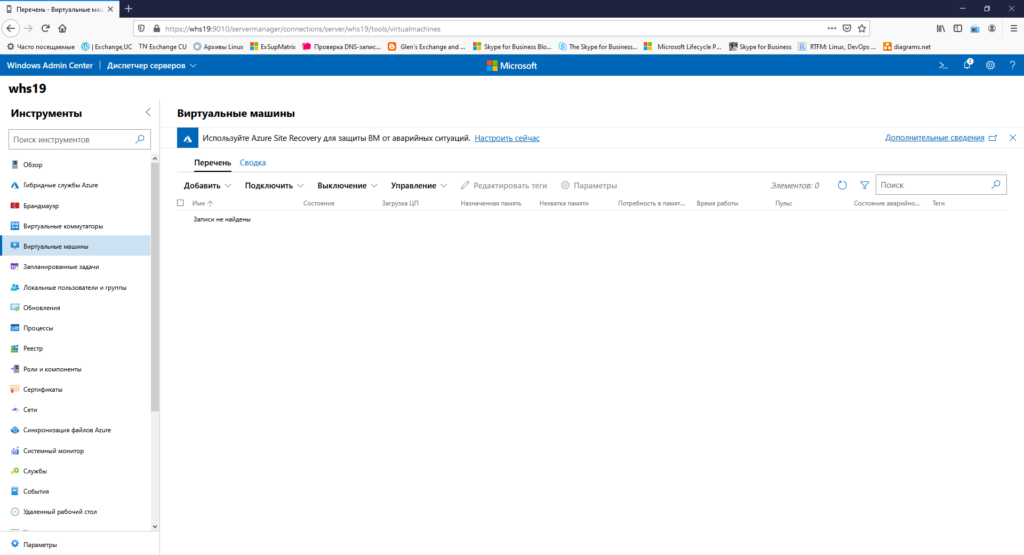
Можно создавать/удалять/управлять виртуальными машинами. Очень удобно прямо из браузера без необходимости запуска других консолей.
Резюмируя хочу сказать что WAC интересный инструмент для быстрой настройки/доступа к серверу. Хотя конечно не без недостатков. Мне лично не нравится то что просмотр логов идет сплошным текстом без выделения по цвету (warning, error и т.д.). В общем смотрите, изучайте, пользуйтесь.
Подключаться к серверу можно и с консоли mmc и с powershell. В общем большой набор инструментов для управления сервером. Установка и настройка Microsoft Hyper-V Server 2019 в целом почти идентична с версией сервера 2016. Можно использовать данную статью как мануал для старой версии.
Хотите отблагодарить автора статьи? Это даст ему дополнительный стимул к написанию новых статей.
Многие пользователи ждали этого. После выпуска Windows Server 2019 в октябре 2018 года вы смогли загрузить Windows Server 2019 Standard, Datacenter и Essentials. Сегодня вы также можете загрузить Microsoft Hyper-V Server 2019. Это бесплатная версия Hyper-V, которую вы можете найти в Windows Server 2019. Она включает в себя все замечательные функции виртуализации Hyper-V, такие как Datacenter Edition. Это особенно интересно, если вам не нужно лицензировать виртуальные машины Windows Server, и идеально подходит для запуска виртуальных машин Linux или виртуальных машин VDI.
Microsoft предоставила новый Hyper-V Server 2019 для загрузки. В отличие от другого программного обеспечения в Центре оценки Microsoft (Evaluation Center), продукт не имеет ограничений по времени использования.
Он представляет собой ядро сервера, которое не содержит задач и функций, не связанных с виртуализацией. Так как это не моя «область», я оставлю это Microsoft. Microsoft описывает это так:
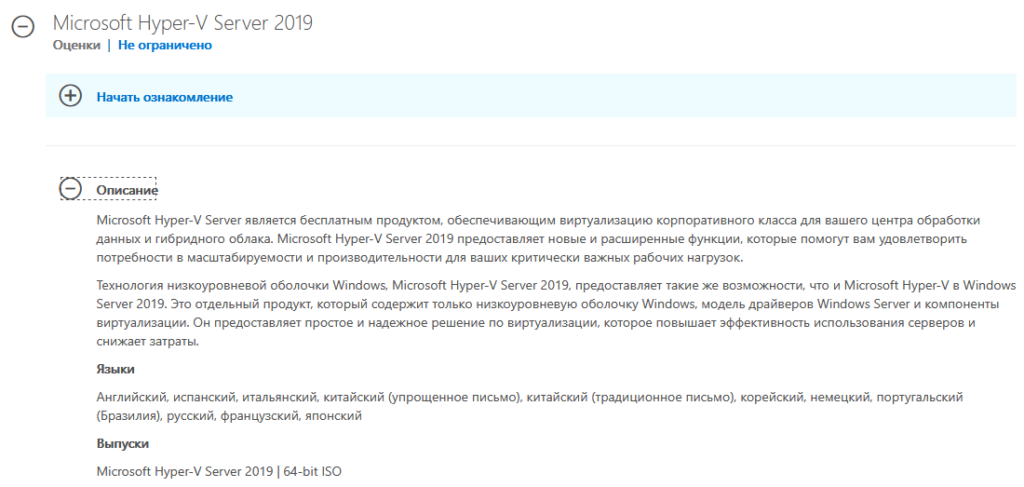
Microsoft Hyper-V Server является бесплатным продуктом, обеспечивающим виртуализацию корпоративного класса для вашего центра обработки данных и гибридного облака. Microsoft Hyper-V Server 2019 предоставляет новые и расширенные функции, которые помогут вам удовлетворить потребности в масштабируемости и производительности для ваших критически важных рабочих нагрузок.
Технология низкоуровневой оболочки Windows, Microsoft Hyper-V Server 2019, предоставляет такие же возможности, что и Microsoft Hyper-V в Windows Server 2019. Это отдельный продукт, который содержит только низкоуровневую оболочку Windows, модель драйверов Windows Server и компоненты виртуализации. Он предоставляет простое и надежное решение по виртуализации, которое повышает эффективность использования серверов и снижает затраты.
Языки
Английский, испанский, итальянский, китайский, корейский, немецкий, португальский, русский, французский, японский
Выпуски
Microsoft Hyper-V Server 2019 | 64-bit ISO
После установки вам будет предложено активировать продукт. Ключ продукта не требуется.
Информация и загрузка:
Вы можете загрузить Microsoft Hyper-V Server 2019 ISO:
- microsoft.com/evaluate-hyper-v-server-2019
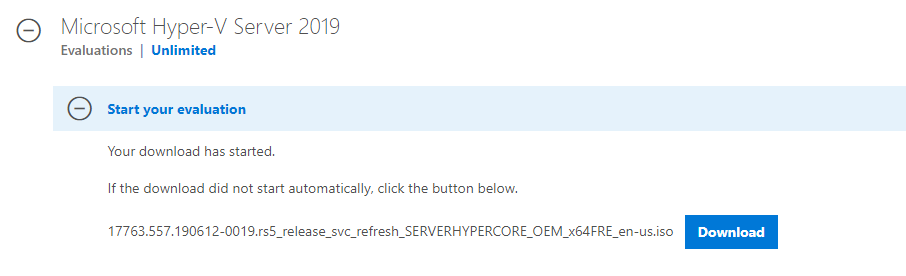
- 17763.557.190612-0019.rs5_release_svc_refresh_SERVERHYPERCORE_OEM_x64FRE_ru-ru.iso
- 17763.557.190612-0019.rs5_release_svc_refresh_SERVERHYPERCORE_OEM_x64FRE_en-us.ISO
- Другие языки: pastebin
Windows Hyper-V Server — это бесплатная серверная версия гипервизора от Microsoft, которую можно использовать для запуска виртуальных машин. В этой статье мы рассмотрим, как установить и настроить версию Windows Hyper-V Server 2019 (инструкция также применима и к Hyper-V Server 2016).
Содержание:
- Что нового в Hyper-V Server 2019?
- Установка Hyper-V Server 2019/2016
- Утилита Sconfig: базовая настройка Hyper-V Server 2019/2016
- Удаленное управление Hyper-V Server 2019/2016
- Настройка Hyper-V Server 2019 с помощью PowerShell
Microsoft анонсировала, что не будет выпускать отдельную версию Hyper-V Server 2022. Связано с тем, что сейчас они сфокусированы на другом стратегическим продуктов Azure Stack HCI.
Hyper-V Server 2019 подходит специально для тех, кто не хочет платить за систему аппаратной виртуализации. В нем доступны все функции Hyper-V и при этом он абсолютно бесплатный. Основные преимущества Windows Hyper-V Server:
- Поддержка всех популярных ОС – совместим со всеми операционными системами. Поддержка Hyper-V присутствует во всех Windows системах, в ядре всех современных систем Linux и FreeBSD;
- Поддерживаются много способов бекапа виртуальных машин — простые скрипты, бесплатные программы, платные версии популярных программ для бекапа;
- Несмотря на то, что в Hyper-V Server отсутствует графический интерфейс управления Windows Server, вы можете управлять им удаленно через стандартную консоль управления гипервизором Hyper-V Manager или веб консоль Windows Admin Center;
- В основе Hyper-V Server популярная платформа Windows Server, с которой привычно и просто работать;
- Hyper-V можно установить на псевдоRAID – например, RAID контроллер Intel, программный RAID Windows;
- Не нужно лицензировать гипервизор – подходит для запуска VDI и виртуальных машин с Linux;
- Нетребовательность к железу – x64 процессор с поддержкой аппаратную виртуализацию (у Intel — Intel-VT или VMX, у AMD — AMD-V (SVM ) и трансляцию адресов второго уровня SLAT (Intel EPT или AMD RV). Эти опции процессора должны быть включены в BIOS/UEFI/nested host. Полные системные требования можно найти на сайте Microsoft;
- Рекомендуется устанавливать на хосты с минимум 4 Гб памяти.
Не нужно путать полноценный Windows Server 2016/2019/2022 с установленной ролью Hyper-V с Free Hyper-V Server 2019/2016. Это разные продукты.
Также отметим, что использование бесплатного гипервизора не освобождает вас от обязанности лицензировать виртуальные машин. Вы можете запустить неограниченное количество ВМ с opensource ОС типа Linux, но виртуальные машины с Windows придется лицензировать. Десктопные редакции Windows лицензируются с помощью ключа продукта. Если вы используете Windows Server в качестве гостевой ОС, его нужно лицензировать по физическим ядрам вашего хоста. Подробнее о лицензировании Windows Server при запуске в среде виртуализации смотрите здесь.
Что нового в Hyper-V Server 2019?
Вкратце пробежимся по объявленным новшествам в Hyper-V Server 2019:
- Появилась поддержка Shielded Virtual Machines для Linux;
- Версия VM конфигурации 9.0 (поддержка гибернации);
- Поддержка дедупликации для ReFS;
- Core App Compatibility – возможность запуска дополнительных графических панелей управления в консоли сервера Hyper-V;
- Поддержка 2-node Hyper-V cluster, кросс-доменной миграция кластеров.
Установка Hyper-V Server 2019/2016
Скачать ISO образ гипервизора Hyper-V Server 2019 можно https://www.microsoft.com/en-us/evalcenter/evaluate-hyper-v-server-2019.

После нажатия на кнопку “Continue” откроется небольшая форма регистрации для ввода ваших данных. Заполняете, затем выбираете язык устанавливаемой системы. Настоятельно рекомендую выбрать английский. И ждете, когда закончится скачивание образа Hyper- V. Размер .iso файла около 3 ГБ.
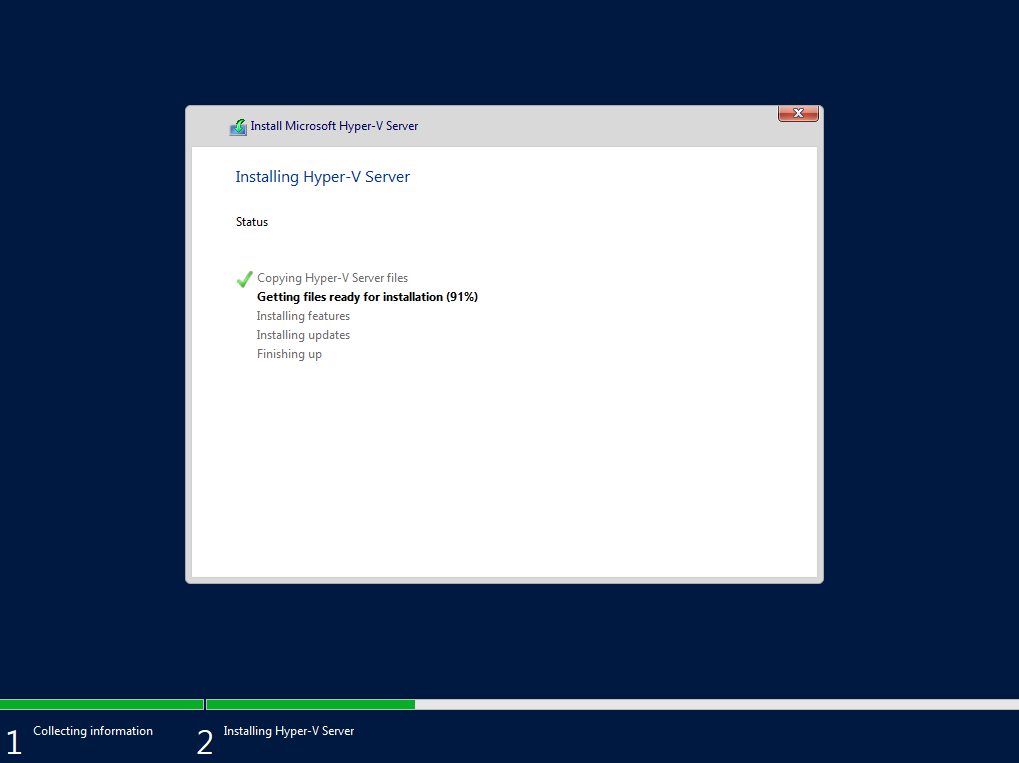
Установка Microsoft Hyper-V Server идентична установки Windows 10/11 на компьютер. Просто загрузите ваш сервер (компьютер) с установочной USB флешки с установочным образом Microsoft Hyper-V Server (для записи ISO образа на USB накопитель проще всего использовать утилиту Rufus) и следуйте инструкциям мастера установки ОС.
Утилита Sconfig: базовая настройка Hyper-V Server 2019/2016
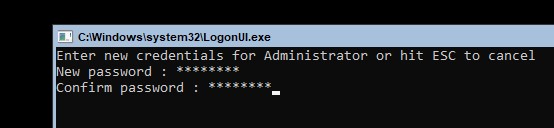
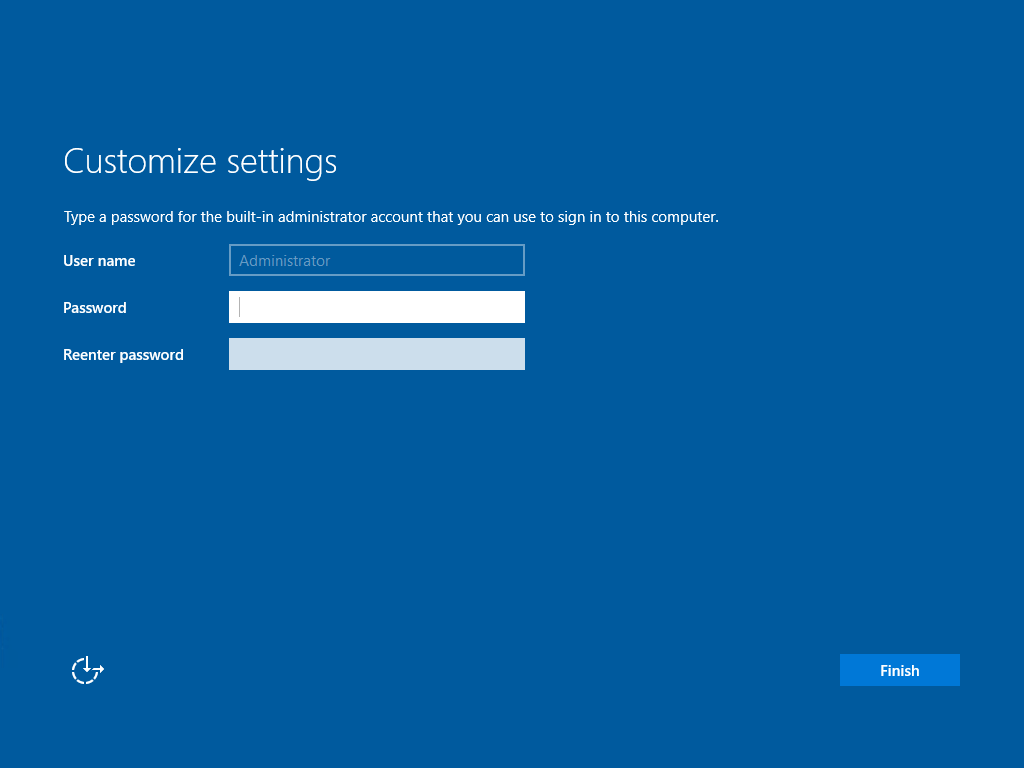
После завершения установки Hyper-V Server потребует задать пароль администратора.
После этого перед вами откроется консоль гипервизора.
Обратите внимание, что у Hyper-V Server нет привычного графического интерфейса Windows. Большинство настроек сервера придется выполнять через командную строку.
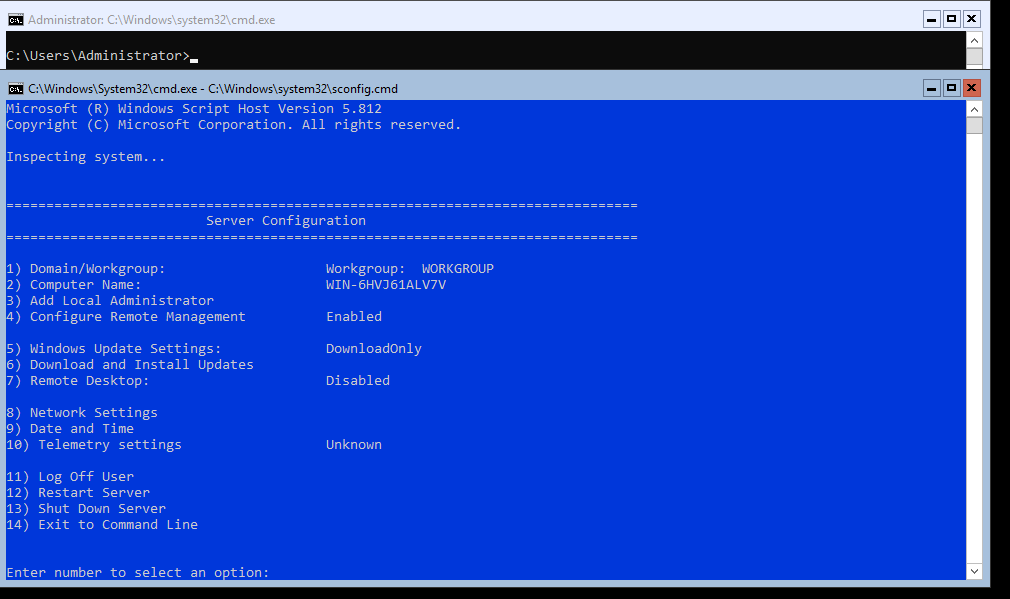
На рабочем столе два окна – стандартная командная строка и окно скрипта sconfig.cmd. С помощью данного скрипта можно выполнить первоначальную настройку сервера Hyper-V. В строке “Enter number to select an option:” введите номер пункта меню, с которым будете работать.
- Первый пункт меню позволяет ввести сервер в домен AD или в рабочую группу;

- Затем задайте имя хоста (сервера);
- Добавьте локального администратора (дополнительную учетную запись, помимо встроенного administrator). Обратите внимание, что при вводе пароля курсор остается на одном месте, тем не менее, пароль и его подтверждение успешно вносятся в систему;
- Включите удаленный доступ к серверу. Это позволить управлять им с помощью Server Manager, консолей MMC, PowerShell, проверить доступность с помощью ping или tracert;
- Настройте Windows Update. Выберите один из трех режимов:
- Automatic (автоматическая загрузка и установка обновлений)
- DownloadOnly (только загрузка без установки)
- Manual (решение о загрузке и установке обновлений принимает администратор)
- Загрузите и установите последние обновления Windows;
- Включите RDP доступ с или без NLA (Network Level Authentication);
- Настройки параметры сетевых адаптеров. По умолчанию сервер получает адрес от DHCP. Обычно тут стоит указать статический IP адрес;

- Установите дату и время системы;
- Настройте телеметрию. Полностью ее отключить система не позволит. Выберите режим, который вам больше нравится
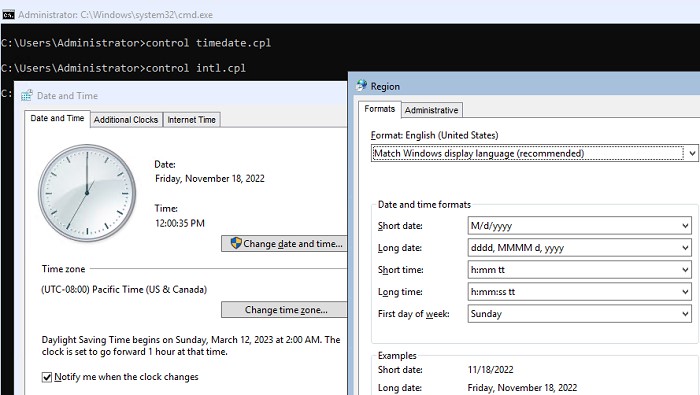
Дату, время и часовой пояс можно также настроить с помощью команды:
control timedate.cpl
Региональные параметры:
control intl.cpl
При этом открываются стандартные консоли Windows.
Внимание! Если вы закрыли все окна и оказались перед черным экраном, то нажмите Ctrl+Shift+Esc, чтобы запустить диспетчер задач данное сочетание клавиш работает в том числе и в RDP-сессии). С помощью Task Manager вы можете запустить командную строку или утилиту конфигурации Hyper-V (нажмите File -> Run Task ->
cmd.exe
или
sconfig.cmd
).
Удаленное управление Hyper-V Server 2019/2016
Для удобного управления Free Hyper-V Server 2019 из графического интерфейса вы можете использовать:
- Веб консоль Windows Admin Center (см. статью Windows Admin Center: веб-интерфейс управления серверами Windows Server);
- Стандартную консоль Hyper-V Manager – можно установить, как на Windows Server, так и на десктопных версиях Windows 10/11.
Для работы с Hyper-V Server 2016/2019 вам потребуется ПК с операционной системой Windows 10 версий Pro или Enteprise х64.
Удаленное управление Hyper-V Server с помощью Hyper-V Manager
Рассмотрим, как удаленно подключиться к хосту Hyper-V сервер с другого компьютера с помощью консоли Hyper-V Manager. В этой статье мы подразумеваем, что у вас сервер Hyper-V и компьютер с Windows 10 находятся в одной рабочей группе (WORKGROUP).
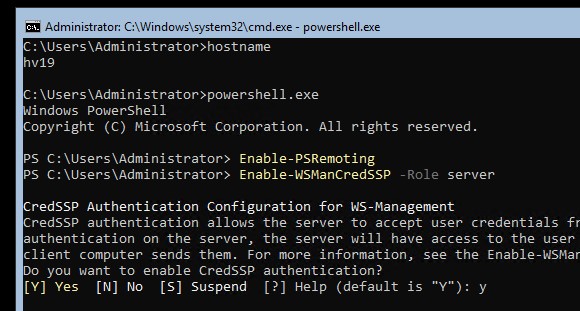
Cначала выполните настройки на сервере Hyper-V. Запустите консоль PowerShell (powershell.exe) и выполните следующие команды:
Enable-PSRemoting
Enable-WSManCredSSP -Role server
Утвердительно отвечаете на все вопросы, при этом будет настроен автоматический запуск службы WinRM и созданы разрешающие правила в брандмауэре.
Теперь переходит к настройке клиентского компьютера с Win 10.
Сервер Hyper-V должен быть доступен по своему сетевому имени, в доменной сети ему должна соответствовать A-запись на DNS-сервере. В рабочей группе такую запись потребуется нужно создать вручную на локальном DNS, либо добавить нужную запись в файл hosts (C:WindowsSystem32driversetchosts) клиентской машины. В нашем случае она выглядит следующим образом:
192.168.13.55 hv19
Можно добавить запись в файл hosts с помощью PowerShell:
Add-Content -Path "C:WindowsSystem32driversetchosts" -Value "192.168.13.55 hv19"
Добавьте Hyper-V сервер в доверенные узлы:
Set-Item WSMan:localhostClientTrustedHosts -Value "hv19"
Если учетная запись, под которой вы работаете на клиентском ПК, отличается от учетных данных администратора Hyper-V, нужно явно сохранить учетные данные для соединений с сервером в диспетчер учетных записей Windows командой:
cmdkey /add:hv19 /user:Administrator /pass:MyPa$$word
Проверьте используемый профиль сети на клиенте Windows 10. Если используется тип сети Public, ее нужно сменить на Private:
Get-NetConnectionProfile|select InterfaceAlias,NetworkCategory

Set-NetConnectionProfile -InterfaceAlias "EthernetLAN2" -NetworkCategory Private
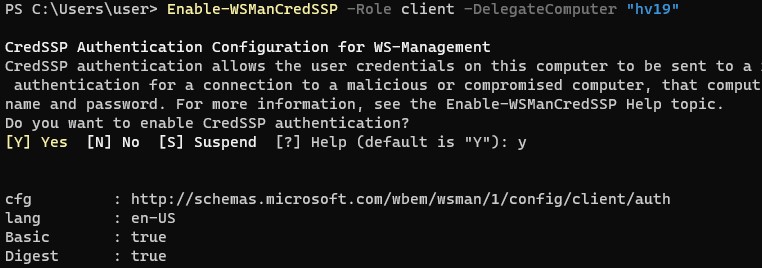
Выполите команду:
Enable-WSManCredSSP -Role client -DelegateComputer "hv19"
Теперь выполните команду
gpedit.msc
чтобы открыть редактор локальной GPO.
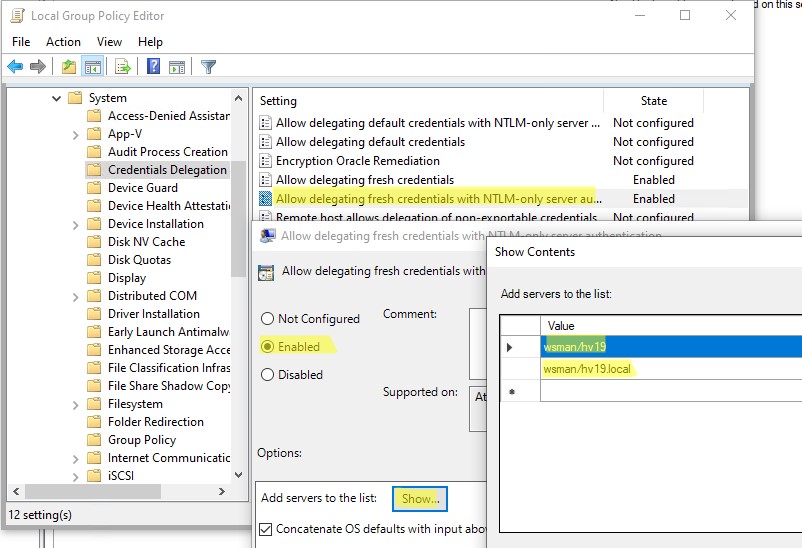
- Перейдите в раздел Local Computer Policy -> Computer Configuration -> Administrative Templates -> System -> Credentials Delegation;
- Включите параметр Allow Delegating Fresh Credentials with NTLM-only Server Authentication.
- Затем нажмите кнопку Show и добавьте два значения
wsman/hv19
и
wsman/hv19.local - Закройте консоль редактора и обновите настройки локальной групповой политики командой
gpupdate /force
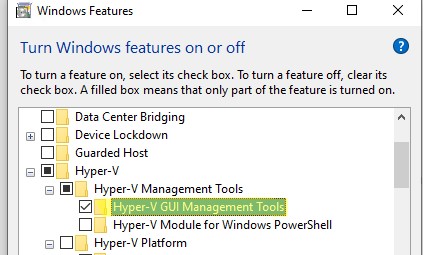
Теперь нужно установить в Windows консоль Диспетчер Hyper-V. Откройте оснастку Programs and Features и перейдите в Turn Windows Features on or off. В открывшемся окне найдите пункт Hyper-V и отметьте для установки Hyper-V GUI Management Tools.
Или вы можете установить клиент Hyper-V Manager с помощью PowerShell:
Enable-WindowsOptionalFeature -Online –FeatureName Microsoft-Hyper-V-Management-Clients
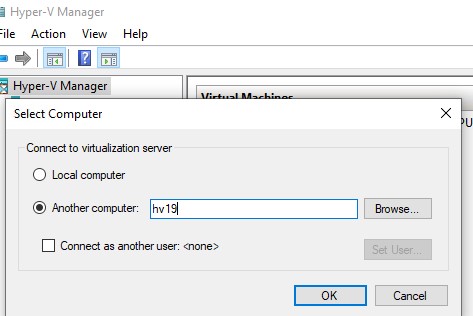
Запустите оснастку Hyper-V Manager (
virtmgmt.msc
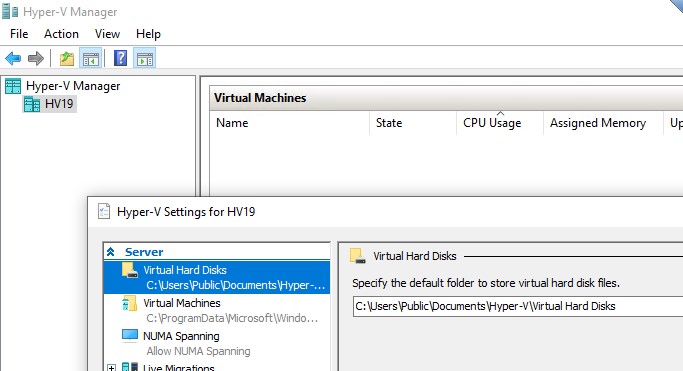
), щелкните правой кнопкой по Hyper-V Manager и выберите Connect to Server. Укажите имя вашего сервера Hyper-V.
Теперь вы можете управлять настройками Hyper-V Server, создавать виртуальный машины и управлять ими из графической консоли.
Управление Hyper-V с помощью Windows Admin Center
Для удаленного управления хостом Hyper-V можно использовать Windows Admin Center (WAC). WAC это веб консоли и дашбоард для полноценного управления Windows Server, Server Core и Hyper-V Server.
На стороне Hyper-V нужно включить разрешающие правила для SMB подключений в Windows Defender Firewall:
Set-NetFirewallRule -DisplayGroup "File and Printer Sharing" -Enabled true -PassThru
Теперь нужно скачать (https://aka.ms/WACDownload) и установить агент Windows Admin Center на ваш хост Hyper-V. Скачайте WindowsAdminCenter2110.2.msi на любом компьютере Windows с доступом в интернет. Можно скопировать установочный MSI файл на Hyper-V сервер через подключение к административной шаре C$. Для этого выполните команду:
Win+R ->
\192.168.13.55C$
и введите пароль администратора Hyper-V
Создайте папку и скопируйте в нее MSI файл.
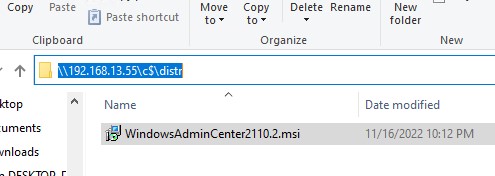
Теперь запустите установку WAC из консоли Hyper-V:
c:distrWindowsAdminCenter2110.2.msi
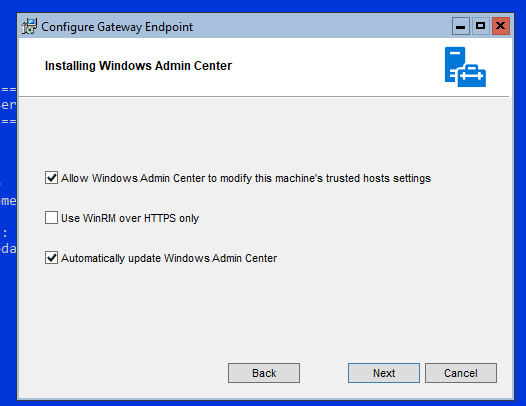
Установите WAC с настройками по-умолчанию.
После окончания установки вы можете подключиться к вашему Hyper-V Server из браузера, простой перейдите по адресу
https:\192.168.13.55:443
Перед вами откроется дашбоард вашего Hyper-V Server хоста. Вы увидите базовую информацию о сервере, используемых ресурсах и т.д.
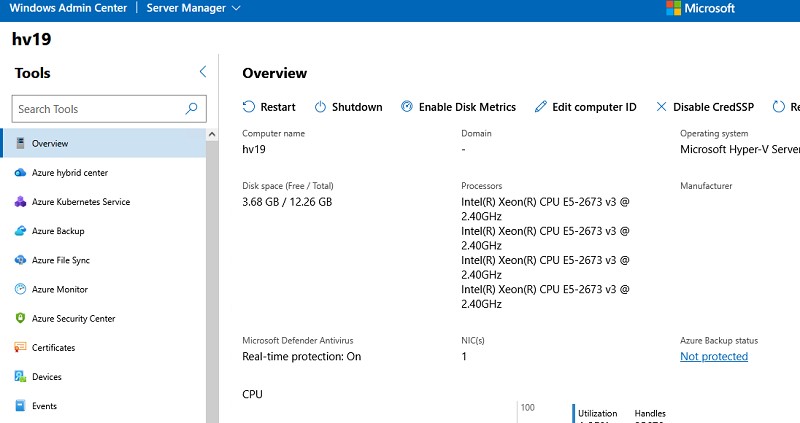
Настройки хоста Hyper-V можно задать в разделе WAC -> Settings -> Hyper-V Host Settings. Доступны следующие разделы:
- General
- Enhanced Session Mode
- NUMA Spanning
- Live Migration
- Storage Migration

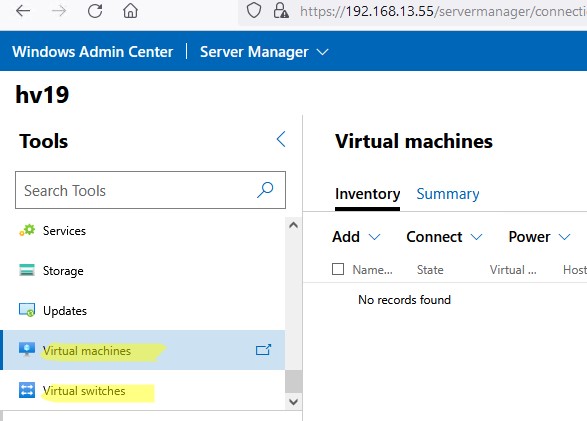
Для управления Hyper-V вы будете преимущественно использовать две секции в консоли WAC:
- Virtual Switches – нужно создать как минимум один виртуальный коммутатор, чтобы предоставить сетевой доступ для ВМ;
- Virtual Machines – в этом разделе вы можете создать, настроить, включить/выключить, импортировать/экспортировать виртуальную машину Hyper-V.
Далее я рассмотрю некоторые способы управления Hyper-V Server из PowerShell
Настройка Hyper-V Server 2019 с помощью PowerShell
Для настройки сервера рекомендую использовать PowerShell. В модуле Module Hyper-V доступно более 238 командлетов для управления сервером Hyper-V.
Get-Command –Module Hyper-V | Measure-Object
Настройте автоматический запуск консоли PowerShell (вместо cmd.exe) при входе в систему.
New-ItemProperty -path HKLM:SOFTWAREMicrosoftWindowsCurrentVersionrun -Name PowerShell -Value "cmd /c start /max C:Windowssystem32WindowsPowerShellv1.0powershell.exe -noExit" -Type string
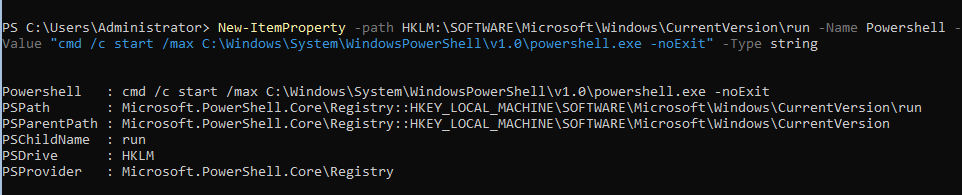
Теперь при входе в сеанс будет запускаться окно PowerShell.
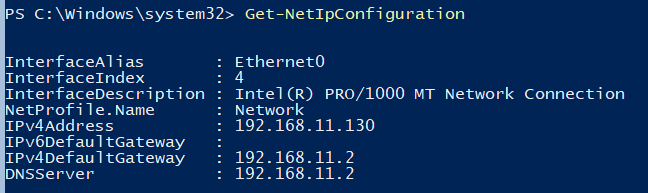
Настройка параметров сети Hyper-V Server 2019 из PowerShell
Если вы не настраивали сетевые параметры в окне sconfig.cmd, то настройте их через PowerShell. С помощью командлета Get-NetIPConfiguration можно увидеть текущую конфигурацию IP сетевых интерфейсов.
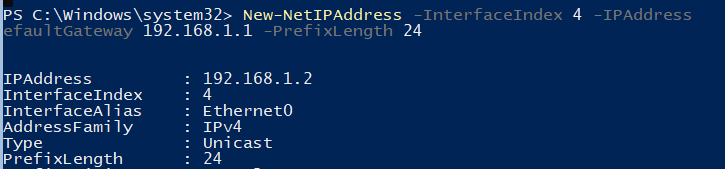
Через PowerShell назначьте статический IP адрес, маску сети, шлюз по умолчанию и адреса DNS серверов. Индекс (InterfaceIndex) сетевого адаптера берем из вывода предыдущего командлета.
New-NetIPAddress -InterfaceIndex 4 -IPAddress 192.168.1.2 -DefaultGateway 192.168.1.1 -PrefixLength 24
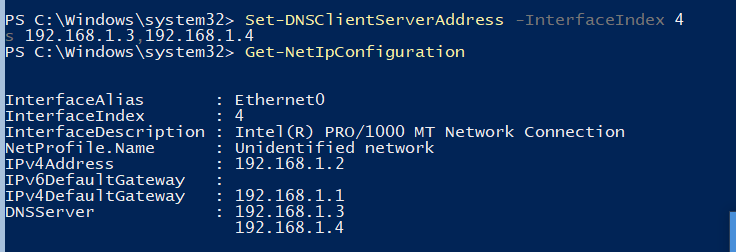
Set-DnsClientServerAddress -InterfaceIndex 4 -ServerAddresses 192.168.1.3,192.168.1.4
Для настройки IPV6 смотрим имя интерфейса командлетом Get-NetAdapter из PowerShell модуля управления сетью NetTCPIP:

Проверьте текущую настройку IPv6 следующей командой:
Get-NetAdapterBinding -InterfaceDescription "Intel(R) PRO/1000 MT Network Connection" | Where-Object -Property DisplayName -Match IPv6 | Format-Table –AutoSize

Отключить IPV6 можно так:
Disable-NetAdapterBinding -InterfaceDescription " Intel(R) PRO/1000 MT Network Connection " -ComponentID ms_tcpip6
Настройка правил Windows Defender Firewall для управления Hyper-V Server 2019
Просмотреть список командлетов для управления файерволом Windows можно с помощью Get-Command.
Get-Command -Noun *Firewall* -Module NetSecurity
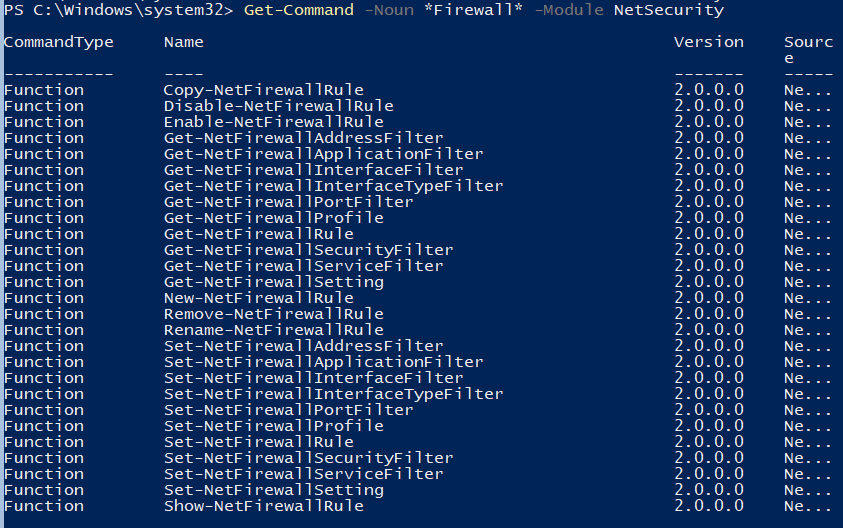
Для полноценного удаленного управления сервером выполните последовательно следующие команды для включения разрешающих правил Windows Firewall из PoSh:
Enable-NetFireWallRule -DisplayName "Windows Management Instrumentation (DCOM-In)"
Enable-NetFireWallRule -DisplayGroup "Remote Event Log Management"
Enable-NetFireWallRule -DisplayGroup "Remote Service Management"
Enable-NetFireWallRule -DisplayGroup "Remote Volume Management"
Enable-NetFireWallRule -DisplayGroup "Windows Defender Firewall Remote Management"
Enable-NetFireWallRule -DisplayGroup "Remote Scheduled Tasks Management"
Создание дискового хранилища для виртуальных машин
Для хранения данных (файлов виртуальных машин и дистрибутивов) будем использовать отдельный раздел на физическом диске. Просмотрите список физических дисков на сервере.
Get-Disk
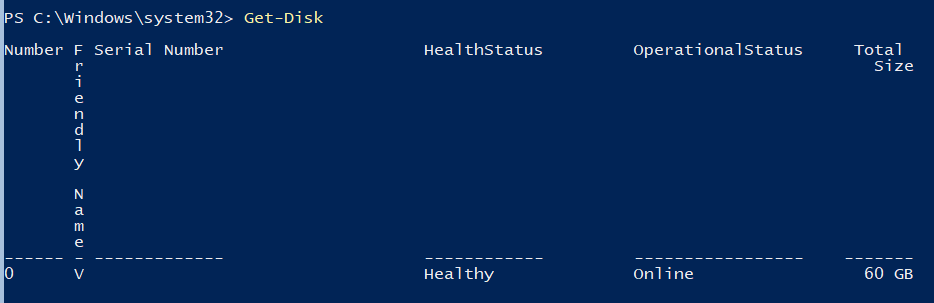
Создайте новый раздел на диске максимально возможного размера и назначьте ему букву D. Используйте DiskNumber из Get-Disk.
New-Partition -DiskNumber 0 -DriveLetter D –UseMaximumSize
После этого отформатируйте раздел в NTFS и укажите его метку.
Format-Volume -DriveLetter D -FileSystem NTFS -NewFileSystemLabel "HVStore"
Подробнее о командлетах управления дисками и разделами из PowerShell здесь.
Создайте каталог, где будете хранить настройки и файлы дисков виртуальных машин. Командлет New-Item позволяет создавать вложенные пути:
New-Item -Path "D:Hyper-VVirtual Hard Disks" -Type Directory
Создайте папку D:Distrib для хранения установоых ISO образов ОС:
New-Item -Path D:Distr -ItemType Directory
Для создания общей сетевой папки (шары) используйте командлет New-SmbShare, с помощью которого предоставьте полный доступ по сети для группы локальных администраторов сервера:
New-SmbShare -Path D:Distr -Name Distr -Description "OS Distributives" -FullAccess "BUILTINAdministrators"
Более подробно о базовой настройке Hyper-V Server и Windows Server Core из командой строки рассказано в этой статье.
Настройка параметров хоста в Hyper-V Server 2016/2019
Откроем параметры сервера командой:
Get-VMHost | Format-List

Пути виртуальных машин и виртуальных дисков находятся на одном разделе с операционной системой, что неправильно. Пропишите путь к созданным ранее папкам с помощью команды:
Set-VMHost -VirtualMachinePath D:Hyper-V -VirtualHardDiskPath 'D:Hyper-VVirtual Hard Disks'
Создание виртуального коммутатора Hyper-V
Создайте External Switch, который привязывается к сетевой карте Hyper-V Server и организует взаимодействие ВМ с физической сетью.
Проверьте поддержку SR-IOV (Single-Root Input/Output (I/O) Virtualization):
Get-NetAdapterSriov
Получите список подключенных сетевых адаптеров:
Get-NetAdapter | Where-Object -PropertyStatus –eqUp
Привяжите виртуальный свитч к сетевому адаптеру и при наличии SR-IOV включите его поддержку.
Внимание! Включить или отключить поддержку SR-IOV после создания свитча будет невозможно, для изменения этого параметра необходимо будет пересоздавать коммутатор.
New-VMSwitch -Name "Extenal_network" -NetAdapterName "Ethernet 2" -EnableIov 1
Проверить настройки виртуального коммутатора можно с помощью командлетов:
Get-VMSwitch
Get-NetIPConfiguration –Detailed
На этом первоначальная настройка Hyper-V Server 2016/2019 закончена. Можно переходить к созданию и настройке виртуальных машин.
Более подробно команды PowerShell для управления Hyper-V и виртуальными машинами описаны в этой статье.
Microsoft has finally released their free “standalone” Hyper-V Server 2019. it was over 7 months waiting for Hyper-V users to finally get the hands on this new release. It is because the previous release of Hyper-V 2019 free has been taken down due to media problems (now resolved).
Microsoft advised the users who downloaded that original release to remove it and do a clean install of the new version released recently. The product is now available for download at Microsoft evaluation center.
Some information to point out for non-virtualization admins. Hyper-V Server is a standalone product which only includes roles related to virtualization. It is free and includes the same hypervisor technology in the Hyper-V role on Windows Server 2019.
However, there is no user interface (UI) as in the Windows server version. Only a command line prompt. For remote management you can use Free Windows admin center (WAC) which is a separate download.

Manage HyperV 2019 with Windows Admin Center
As such, good use case for Free hypervisor such as Microsoft Hyper-V 2019 Free is to run VMs which don’t need to license Windows Server or a Virtual desktop infrastructure (VDI) based on Linux VMs.
The new release of Hyper-V 2019 Free version brings some new features and improvements, but also there are some add-ons for Windows Server, such as a Windows Admin Center (WAC) and some apps compatibility for stay consistent with existing Microsoft Management Console (MMC).
One of the new improvements in Hyper-V 2019 is the introduction of shielded virtual machines (VMs) for Linux. Previously this feature was available for Windows VM only, but the importance of Linux with Microsoft clears any doubts about their future strategy. They’re embracing Linux since a while and recently I saw some stats showing that the number of Linux VMs in Azure surpassed the Windows VMs.
Some additional new features were also In. We can mention the updating to VM hardware version 9.0 has some improvements or hibernation support.
What’s the latest hardware version in Hyper-V 2019 free?
You might be wondering why Microsoft did not include the latest virtual hardware 9.1? The virtual hardware 9.1 is only available for Windows Server 2019 v.1903, Windows 10, with the Hyper-V role activated.
Possibly because the 9.1 is just a minor update to virtual hardware version 9.0 and does not include any new features.
The v9.0 Introduced hibernation, allow additional processor features for Perfmon or automatically expose simultaneous multithreading configuration for VMs running on hosts using the Core Scheduler.
Improvements in Hyper-V 2019
Hyper-V Server 2019 has also some improvements on the REFS filesystem as it benefits from the general improvements done within the Windows Server 2019. So those improvements are particularly interesting as Microsoft now supports data deduplication with Resilient File System (ReFS).
Other improvements which might be interesting to point out are cross-domain cluster migration allowing you to move server clusters between domains in Microsoft Active Directory (AD).
One newer feature which is the possibility to use a file share witness on a system that is not member of an Active Directory. It can be an isolated system, in Workgroup.
Remote Management
You’ll be certainly wanting to manage Hyper-V 2019 Free remotely. Most likely like with VMware, you can remotely connect to the host, but you must use a free tool called Windows Admin Center (WAC). If you haven’t heard of WAC you’re really missing out.
The tool can be used for managing regular physical windows servers, or VMs. The possibility to manage Hyper-V 2019 Free makes this suitable for remote management but does not have the granularity of Hyper-V manager.
It is a browser-based app for managing servers, clusters, hyper-converged infrastructure, and Windows 10 PCs. It comes at no additional cost and it is ready to use in production.
WAC is an MSI which installs on a Windows system and uses browser-based tools to give you access to the remote host’s configuration after you add one. You can add as many remote hosts/VMs as you like. You can then monitor or configure the remote host, networking or VMs.
You can start/stop VMs, but also create a new VMs and do other VM related tasks.

Create New VMs with Windows Admin Center
Additionally, you can use Remote Server Administration Tools (RSAT) or PowerShell.
Windows Hyper-V manager, which is part of the Windows Server 2019 can be used as a standard for remote Hyper-V servers.
In WAC, you can import VM and export VM, which allows you to transfer VMs (by copy) in and out of the system. You cannot export to remote Hyper-V server though as this is limited to local folder only.
Hyper-V Export is giving you an option of exporting a selected VM, including its virtual hard disk files, VM configuration files, and Hyper-V snapshots, to a single file. The VM can be in running state or stopped.
Hyper-V Import allows you to recover selected VMs which you previously exported from a set of configuration files. Hyper-V VMs can be imported to a source Hyper-V host or a new one. When doing a Hyper-V Import, the VM gets registered with the Hyper-V host automatically.
Installation of Hyper-V, any changes?
Not really, you can still download Microsoft Hyper-V Server 2019 as an .iso file for free. You can download the ISO in the Microsoft Evaluation Center.
As being said, the Windows licensing prevents you to run Windows VMs without proper license. As such, if you don’t want to pay for license, the free Hyper-V Server can be used for free to run Linux VMs, servers or desktops.
For admins willing to buy the license, you must buy the required virtualization rights via the Standard or Datacenter Edition.
Upgrades are not possible with Hyper-V server Free version. Microsoft supports an in-place upgrade from Windows Server 2012 R2 or 2016 to 2019 only.
This sets you for some downtime, because most likely, you’ll have to stop your VMs, migrate theme elsewhere and do a clean install of your host with the Hyper-V 2019 free.
This is really shame as VMware on the other hand, the ESXi Free is much more flexible and allows you to upgrade from older release, via ISO or via Internet. Additionally, it carries web-based console, so you don’t need to install any software and manage ESXi directly via web browser by connecting to the ESXi host directly.
VSAN from StarWind is software-defined storage (SDS) solution created with restricted budgets and maximum output in mind. It pulls close to 100% of IOPS from existing hardware, ensures high uptime and fault tolerance starting with just two nodes. StarWind VSAN is hypervisor and hardware agnostic, allowing you to forget about hardware restrictions and crazy expensive physical shared storage.
Build your infrastructure with off-the-shelf hardware, scale however you like, increase return on investment (ROI) and enjoy Enterprise-grade virtualization features and benefits at SMB price today!
Final Words
Some user said that Hyper-V 2019 Free version is dead, and Microsoft does not really care about this release. I must say that this is not true, and that Microsoft is changing.
While their principal effort goes to Windows Server, and paid versions, they still maintain Hyper-V 2019 Free version as well. They know that if they stop doing that, their free users base would disappear completely in favor of VMware.
Microsoft Hyper-V 2019 is a good candidate for running Linux Server or desktop VMs.
- How to use a persistent memory disk in a Hyper-V virtual machine
- Enable Azure File Sync from Windows Admin Center
A lot of people have been waiting for this. After the release of Windows Server 2019 back in October 2018, you were able to download Windows Server 2019 Standard, Datacenter and Essentials. Today you can also download Microsoft Hyper-V Server 2019. This is the free version of the Hyper-V role which you can find in Windows Server 2019. It includes all the great Hyper-V virtualization features like the Datacenter Edition. This is especially interesting if you don’t need to license Windows Server VMs, and is ideal when you run Linux Virtual Machines or VDI VMs.
This version of Hyper-V also comes with a lower footprint, since it is only available as Server Core and doesn’t include any other roles and features, which are not related to virtualization. That said, it does not come with other Software Defined Datacenter features like Storage Spaces Direct (S2D). These features are only included in the Windows Server Datacenter edition.
Microsoft Hyper-V Server is a free product that delivers enterprise-class virtualization for your datacenter and hybrid cloud. Microsoft Hyper-V Server 2019 provides new and enhanced features that can help you deliver the scale and performance needs of your mission-critical workloads.
The Windows hypervisor technology is the same as what’s in the Hyper-V role on Windows Server 2019. It is a stand-alone product that contains only the Windows hypervisor, a Windows Server driver model, and virtualization components. It provides a simple and reliable virtualization solution to help you improve your server utilization and reduce costs.
You can download Microsoft Hyper-V Server 2019 ISO from the Microsoft Evaluation Center. You should also have a look at the Windows Admin Center, which is a locally deployed, browser-based app for managing servers, clusters, hyper-converged infrastructure, and Windows 10 PCs
If you want to learn more about the new Hyper-V and Windows Server 2019 features, check out my blog: Windows Server 2019 – What’s coming next
Tags: download, Evaluation Center, Free, Hyper-V, Hyper-V Server, Hyper-V Server 2019, Microsoft, Microsoft Hyper-V Server, Virtual machines, Virtualization, VM, Windows Admin Center, Windows Server Last modified: June 15, 2019
About the Author / Thomas Maurer

Thomas works as a Senior Cloud Advocate at Microsoft. He engages with the community and customers around the world to share his knowledge and collect feedback to improve the Azure cloud platform. Prior joining the Azure engineering team, Thomas was a Lead Architect and Microsoft MVP, to help architect, implement and promote Microsoft cloud technology.
If you want to know more about Thomas, check out his blog: www.thomasmaurer.ch and Twitter: www.twitter.com/thomasmaurer
This article will take you through installing Windows Server 2019 and then adding Hyper-V.
Already installed Windows Server 2019? Skip to Hyper-V installation
A Note on Hyper-V Server (Updated June 17th, 2019)
After a few initial missteps, Microsoft has finally released the gold bits for Windows Server 2019. You can receive it with new hardware or access the releases through your volume license or MSDN page. After even more missteps and multiple delays, the separate Hyper-V Server product (frequently, and incorrectly, called “Hyper-V Core”) has released! Download from the Microsoft evaluation center. Despite its presence in the evaluation center, you do not need to pay a license fee to use Hyper-V Server.
Server SKUs Only!
This article does not cover installing Client Hyper-V on Windows 10. That process has not changed since initial release. Please refer to our article on Client Hyper-V for Windows 10 installation instructions.
Download Windows Server 2019
The most common ways to get a copy of Windows Server 2019:
- Download from the evaluation center. Assuming that Windows Server 2019 works like previous releases, you can convert an evaluation installation into a permanent installation by adding a retail key. Most other keys will not work.
- Receive pre-installed on new hardware. Most of these will use OEM installations.
- Receive DVD media or a download link with new hardware.
- Receive DVD media or a download link with a retail purchase.
- Download from your volume license portal.
- Download from your MSDN portal.
Usually, the biggest difference in media types is whether or not it prompts for a license key.
Download Hyper-V Server 2019
You can download Hyper-V Server directly from the evaluation center. The product does not require a key and does not expire.
Non-DVD Install Techniques
If you have DVD media, you can simply insert it in the system’s drive and boot to it. If you have a download, you’ll need to do something else.
- Burn the ISO image to a DVD. We have done this for long enough that it should be common knowledge. You can right-click the ISO in Windows 10 and burn it that way, or you can find any of dozens of tools to do the job.
- Create bootable USB media. Download the official tool from Microsoft. It has a simple wizard interface to read install information from an ISO file and place it on a removable USB device. Use them like bootable DVDs.
- Use Windows Deployment Services.
I will use the USB-style deployment in these instructions, but I will start after boot.
Physical System Prerequisites for Hyper-V Deployment
Hyper-V was built to work on the same broad range of hardware as Windows Server. You do need to take a few pre-cursor steps. You will find all these items in your system’s BIOS/UEFI menu:
- Enable hardware-based virtualization
- Disable C States (power management)
- Consider disabling all power management
- Enable the Trusted Platform Module (TPM) if your system has one.
The Windows Server 2019 Install Procedure
The following steps walk through Windows Server 2019 Installation from media. Aside from the text fields and the license prompt in step 3, installing Hyper-V Server does not change the screens or process.
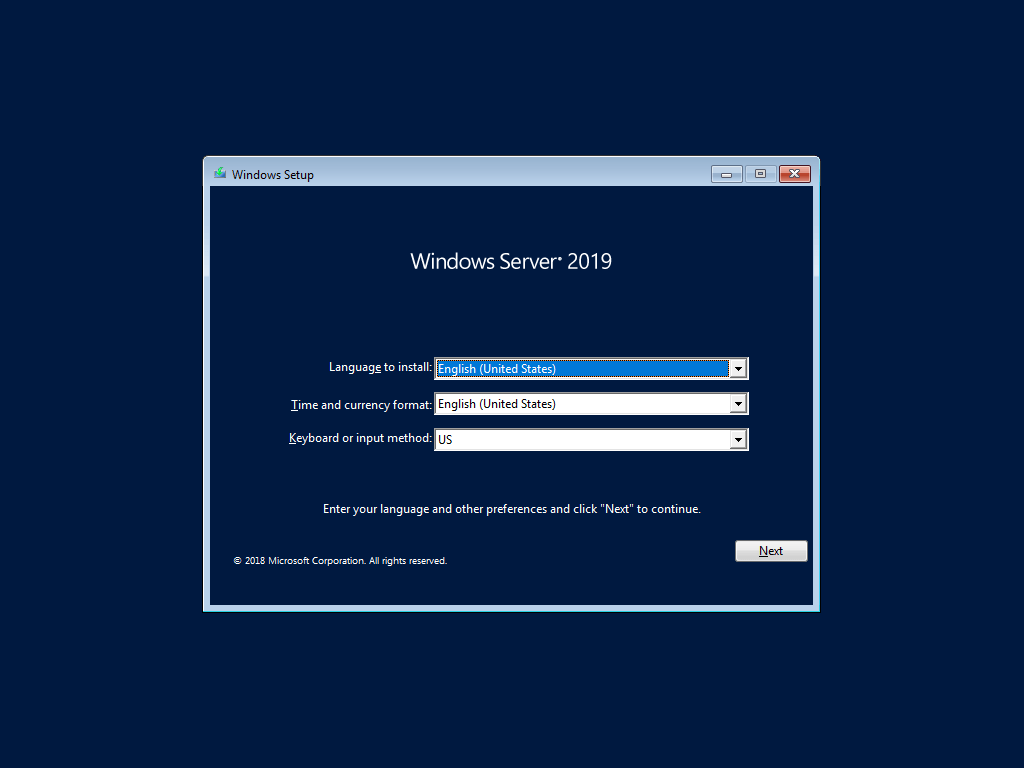
- You begin on the language, locale, and input choice screen:

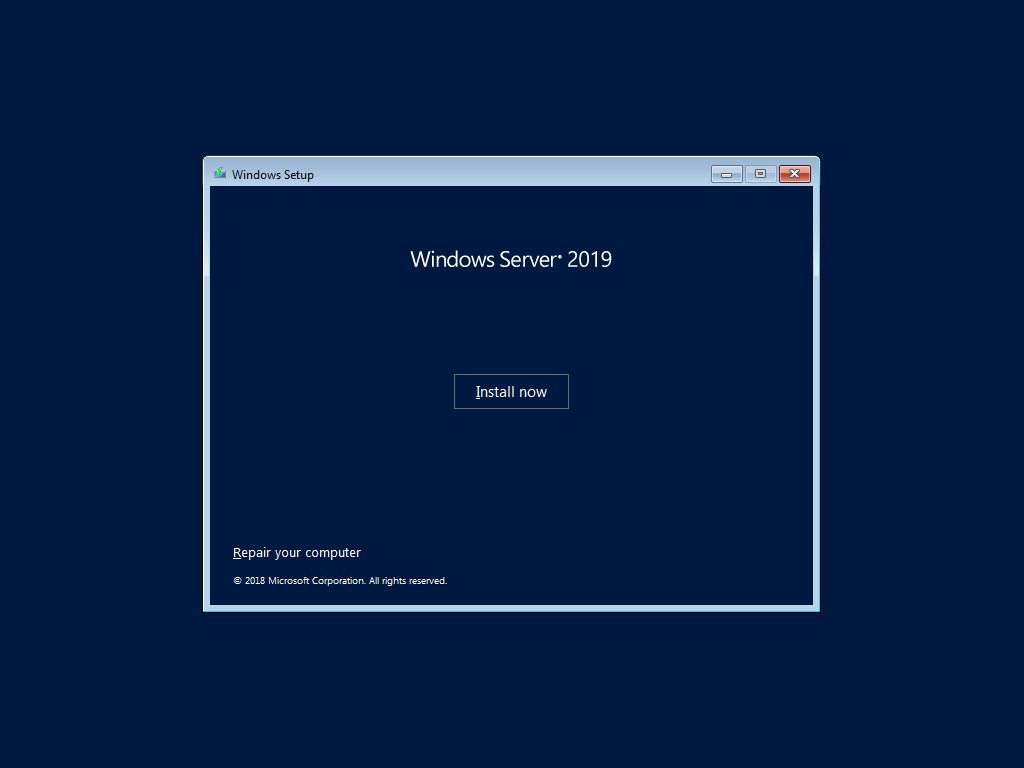
- The second screen has the lone Install now button. If you need it, you’ll find the Repair your computer link at the lower left.
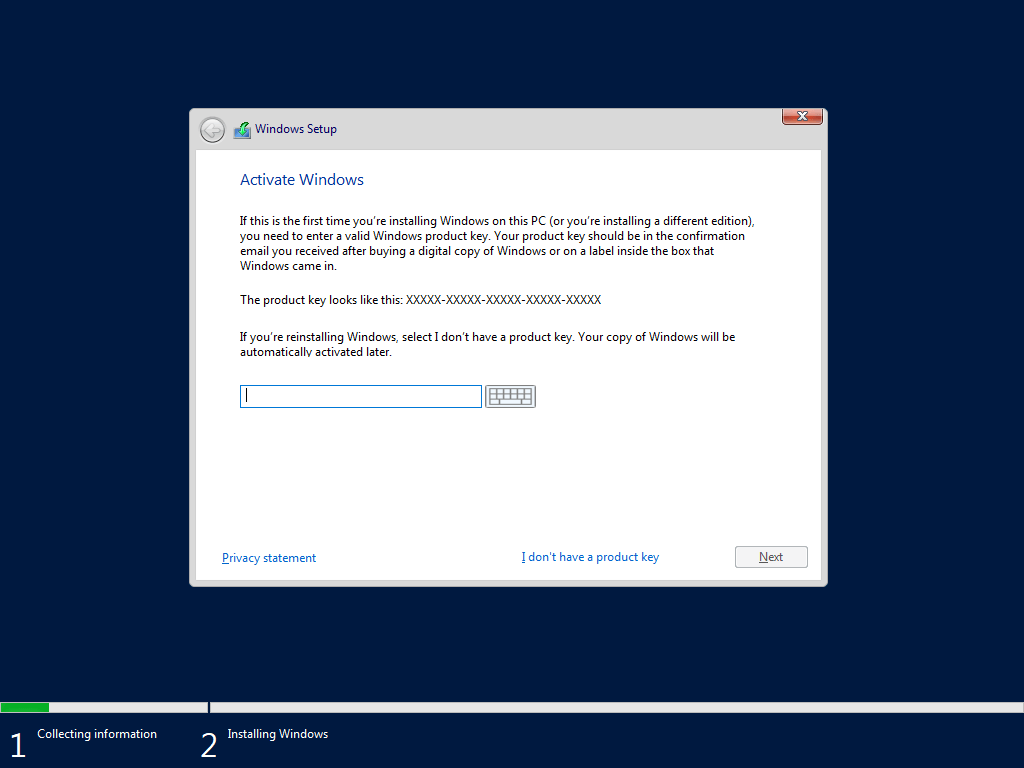
- For most installation modes, the wizard will prompt you for an activation key. You can select I don’t have a product key to enter a key later.
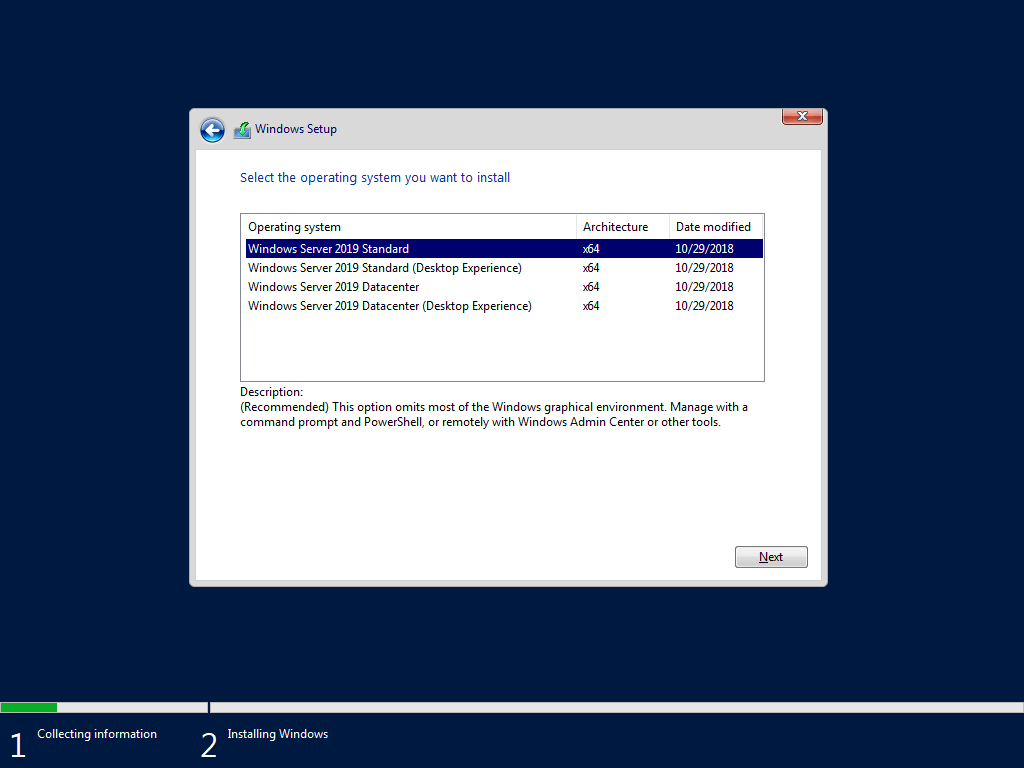
- Next you will choose the edition and install mode. The available options, and even whether or not this screen even appears, will vary based on your media. The default option will install server in core mode. “Desktop Experience” include the full Windows Server GUI.
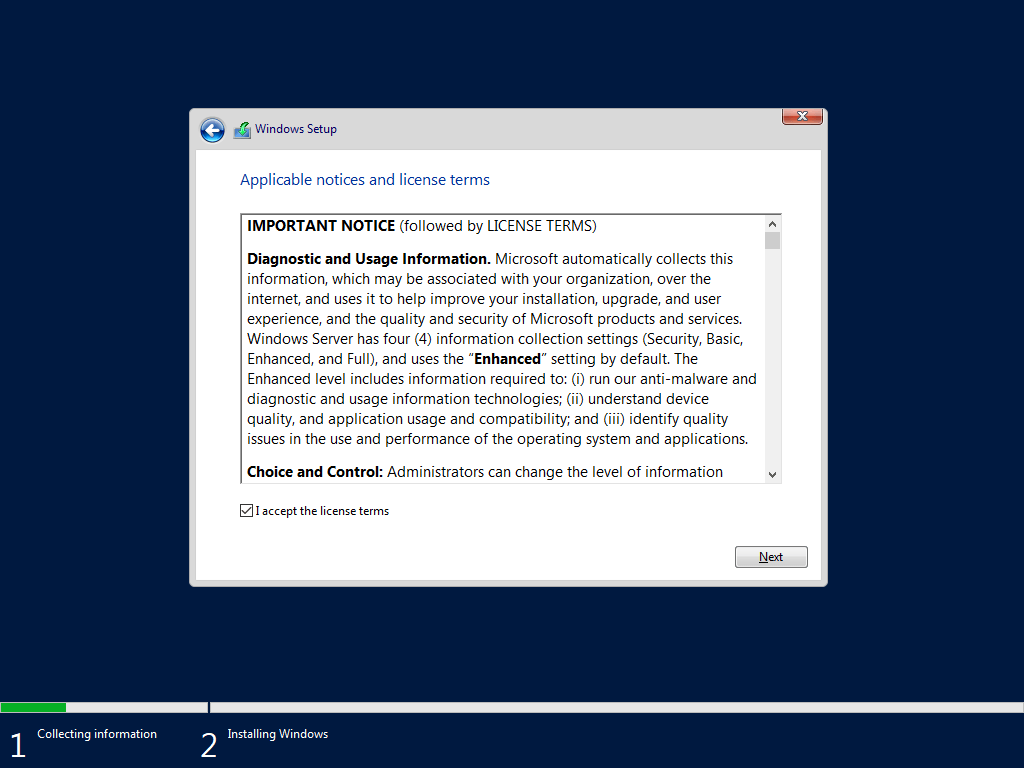
- You must accept the license terms to move on.
- Choose the disk to install on. You can use the toolbar underneath the list of disks to control where to install. If you’d like to partition a volume rather than use an entire disk, click the New button and enter the desired size. Use the Load Driver button if your disk does not appear and you have driver files from the manufacturer.
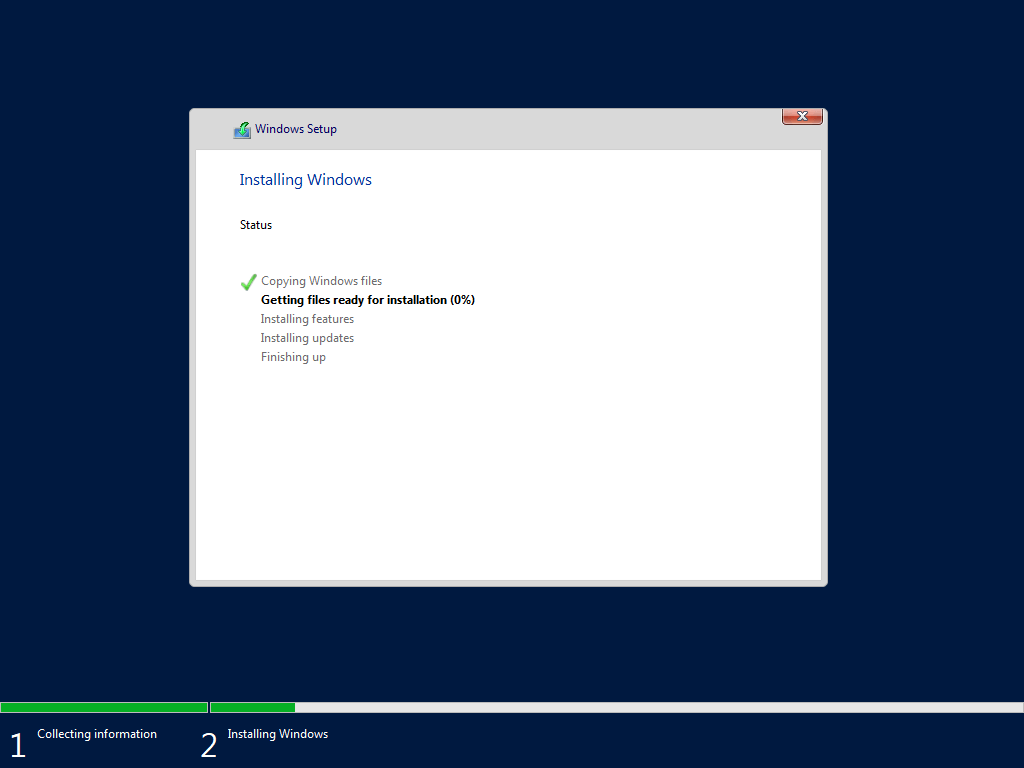
- The wizard will transfer and expand the image files for your selected edition and install mode.

This completes the installation portion. Next, you configure your Windows and Hyper-V installation. How you do that depends on the installation mode that you chose. I will show them separately.
Configuring a New Windows Server 2019 Core Installation
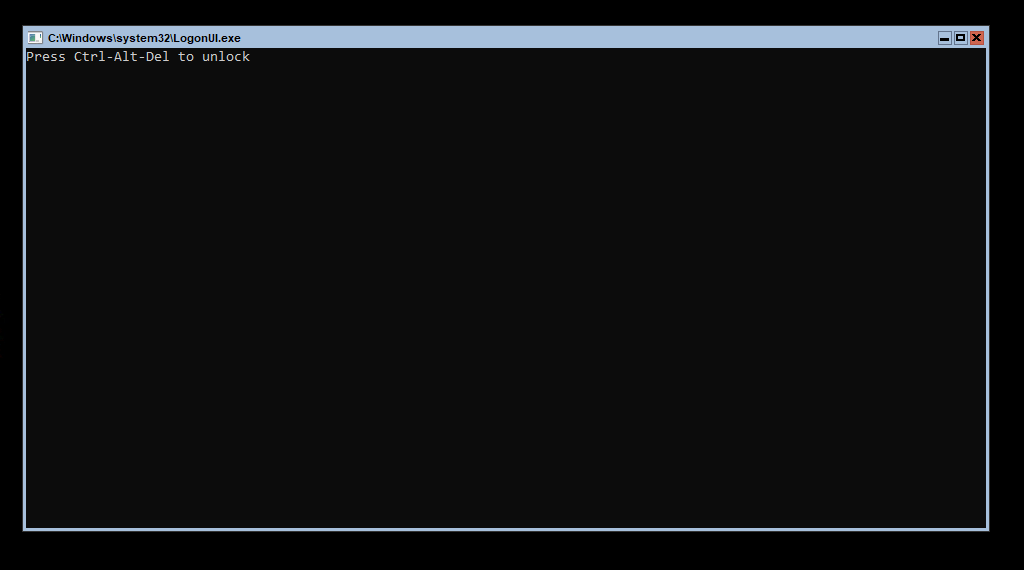
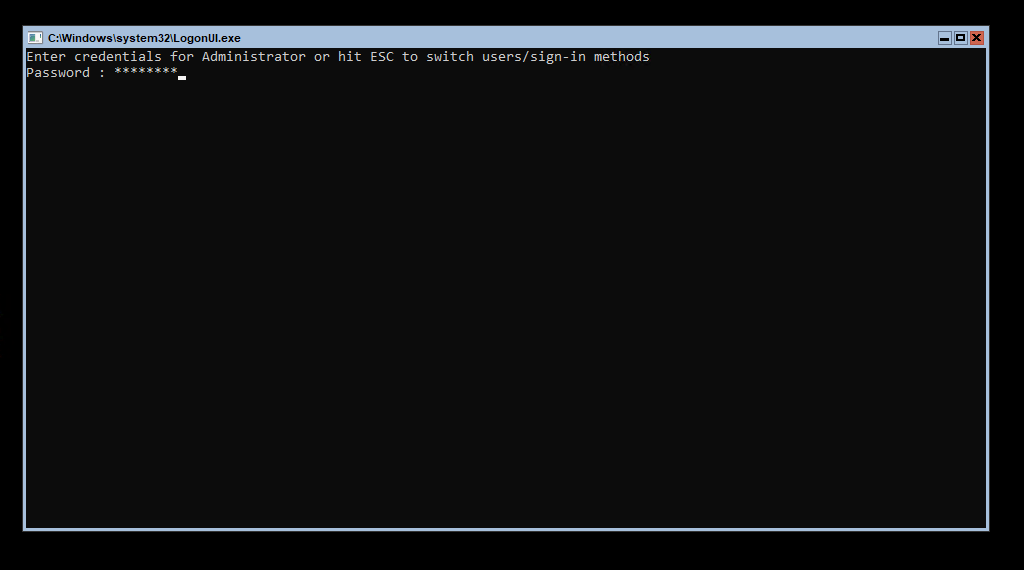
If you chose to install Windows Server in core mode, then you will begin with the standard text-based unlock screen. We begin there.
- Enter the Ctrl+Alt+Del key sequence:

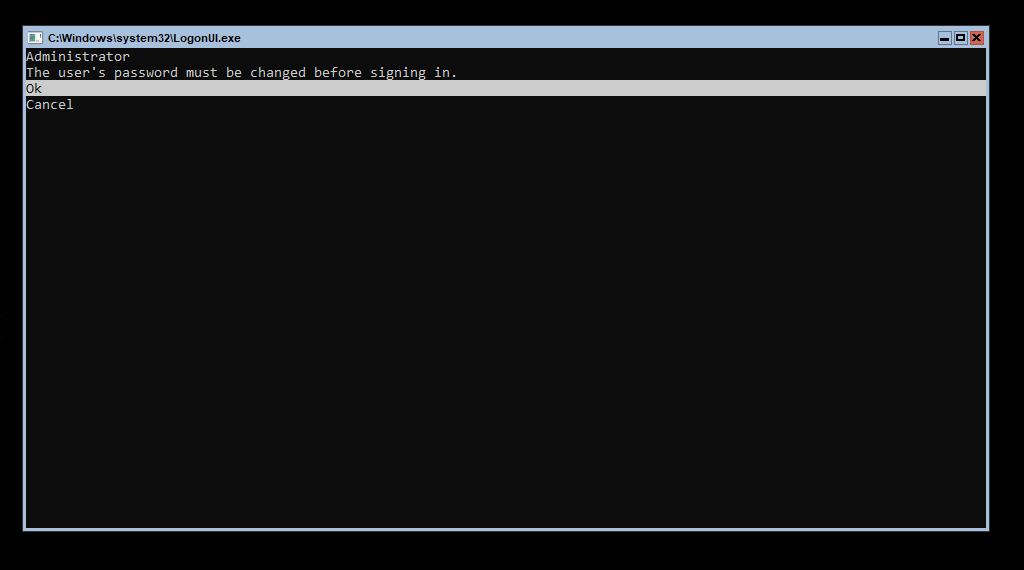
- Windows will prompt you to change the local administrator password. Press Enter:
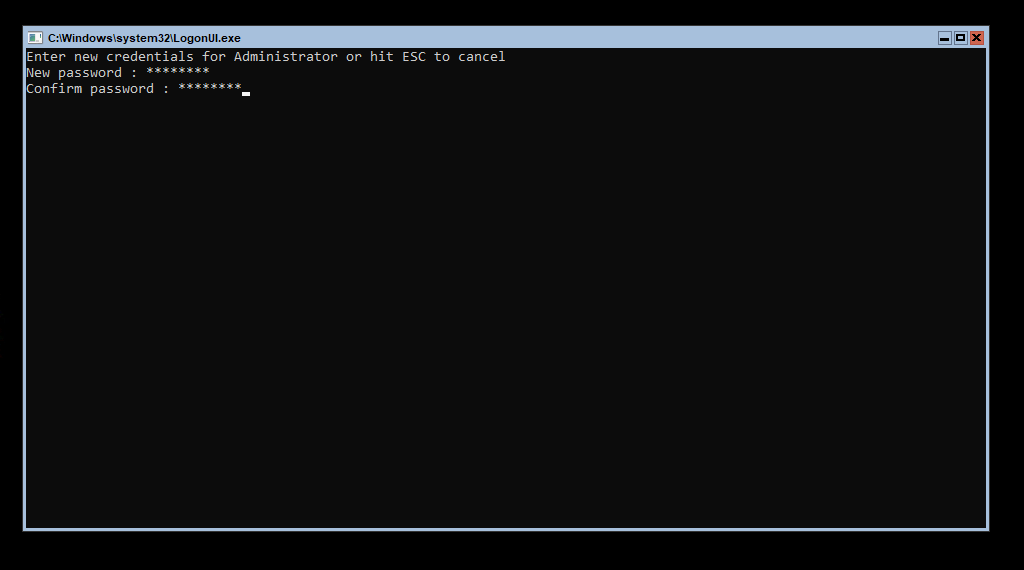
- Enter and confirm your new password. Use Tab to move between fields. Use Enter when finished:
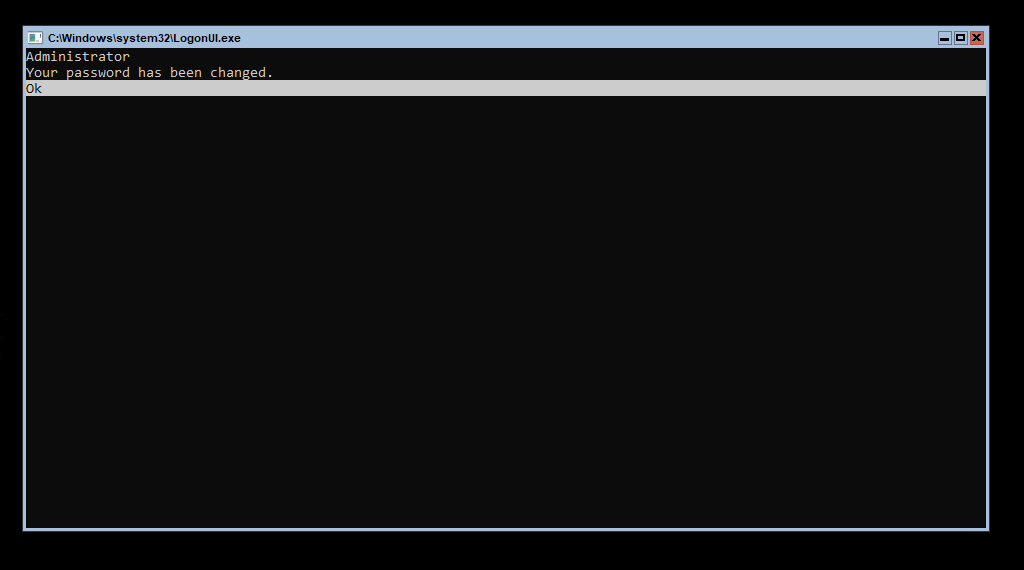
- After a brief, perhaps imperceptible delay, you will receive confirmation that your password was changed:
- From now on, you will see the standard Ctrl+Alt+Del and password challenges:
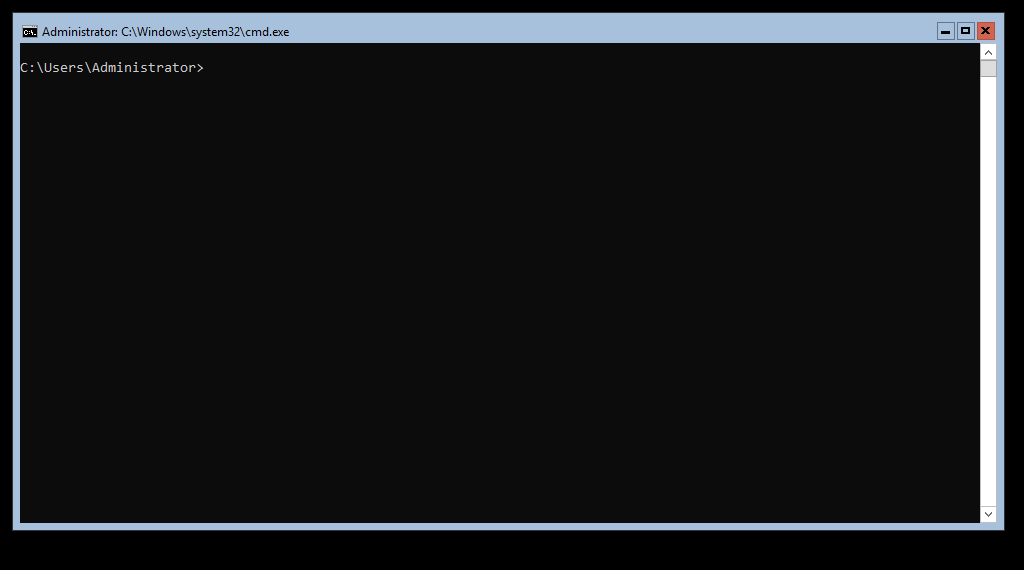
- In the default configuration, Windows will take you to a standard command prompt:
You have multiple choices on how you proceed from here. I recommend that you do not install Hyper-V until you go through a number of other steps first. To complete the section on Core mode, I will list a few options most helpful in this case. After the graphical startup walk-through, I will give you my recommended checklist. Then I will present Hyper-V installation steps.
Windows Server Core and Hyper-V Server Configuration Options
Windows Server Core (and Hyper-V Server) looks intimidating to those that have always used Windows’ graphical environment, but I strongly encourage you to stand up to the challenge. Command-line functionality greatly exceeds anything that you can accomplish with a mouse. But, if you’ve never done it before, then you might not even know where to start. You have a plethora of options:
The above list focuses on interactive tools. With more up-front effort, you can deploy and configure systems in minutes. Tools include Windows Deployment Services, System Center Virtual Machine Manager, Desired State Configuration, and others.
The next section shows the initial post-install configuration as above, but for a GUI installation. Skip over that section and continue with the vital configuration checklist.
Configuring a New Windows Server 2019 GUI Installation
Note that Hyper-V Server does not have a graphical option, so these instructions will not apply to that product.
If you chose to install Windows Server in graphical mode, then you will begin with a prompt to change the local administrator’s. Enter and confirm your desired password.
After that, Windows Server will take you to the standard lock screen, which has not changed since 2016:

When you log in, Server Manager will open automatically, as it always has. It will also encourage you to install Windows Admin Center.
I assume that most people choose to use the full GUI installation for familiarity reasons. Therefore, I classify the initial configuration of Windows Server GUI mode under “common knowledge” and will not give any further information on that. If you are new to Windows Server and don’t know how to do these things, I don’t recommend starting with a Hyper-V installation.
Hyper-V Pre-Installation Checklist
Perform these steps on your newly-installed Windows Server 2019 deployment prior to installing Hyper-V.
- Update device drivers
- Install vendor-supplied system management utilities
- Configure basic networking — delay if you will use a fully-converged design
- Update Windows Server — you might need to temporarily configure basic networking to make that possible
- Rename the computer
- Join to the domain. No, your workgroup mode is not as secure, and no, you’re not solving any problems by avoiding domain membership. You can skip this, of course, but I don’t provide any guidance on such builds. I figure that if you intentionally ask for the unsecured micro-management nightmare of a workgroup build, then I would disrespect your wishes if I helped you.
- Figure out how you want your Hyper-V networking to look. Take time to think it through. I can give you a quick nudge. That article links to deeper dives if you need them.
With the preliminary work out of the way. You can install Hyper-V on Windows Server in three ways: PowerShell, dism.exe, and Server Manager. I listed those in my preferred order.
Note: Regardless of installation method, your host will reboot twice to enable Hyper-V.
Install Hyper-V with PowerShell
PowerShell is the fastest and easiest way to install Hyper-V. It works on Core and GUI equally well. Just remember to start PowerShell in an elevated prompt if using a GUI-mode install.
Install-WindowsFeature -Name Hyper-V -IncludeManagementTools -Restart
Install Hyper-V with DISM
You have to type a bit more to get DISM to work, but you can run it from the standard elevated command prompt:
dism /Online /Enable-Feature /FeatureName:Microsoft-Hyper-V /All
Once this command completes, it will ask if you want to restart the computer.
Install Hyper-V from Server Manager
The Server Manager technique is, by far, the longest, most painful, and most confusing. I recommend that you choose either of the other two.
Most people that use Server Manager modify the local system. You can connect to a remote system from Server Manager’s home page. You can then pick it instead of the local system at the correct point.
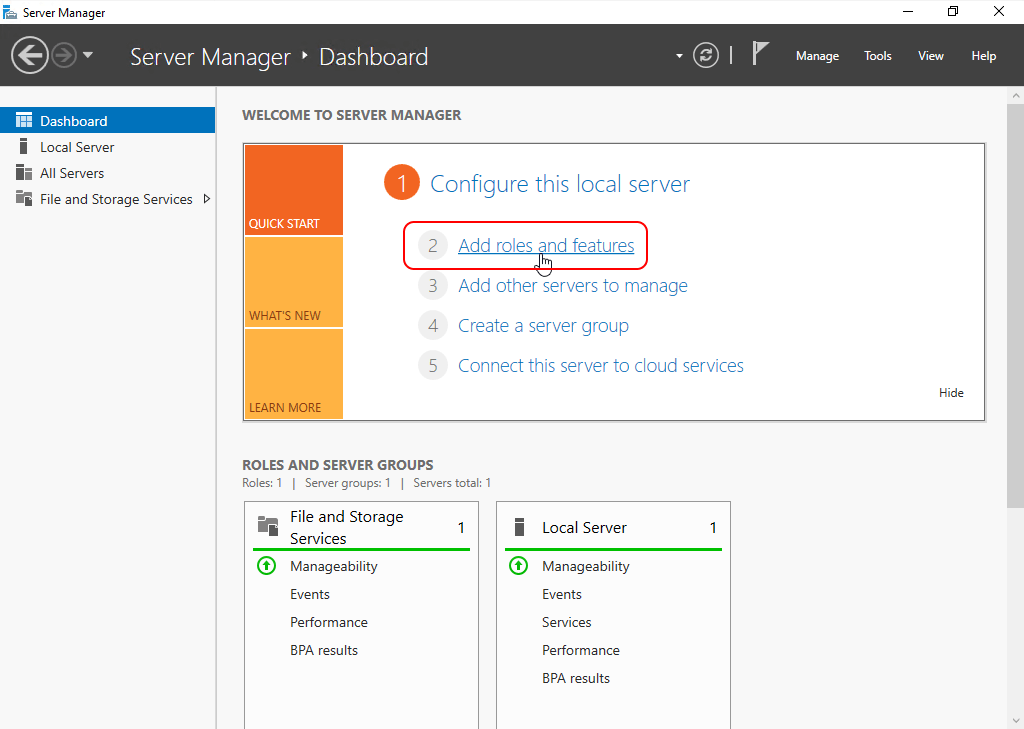
- On the home page, click Add roles and features:

- Click Next on the introductory screen.
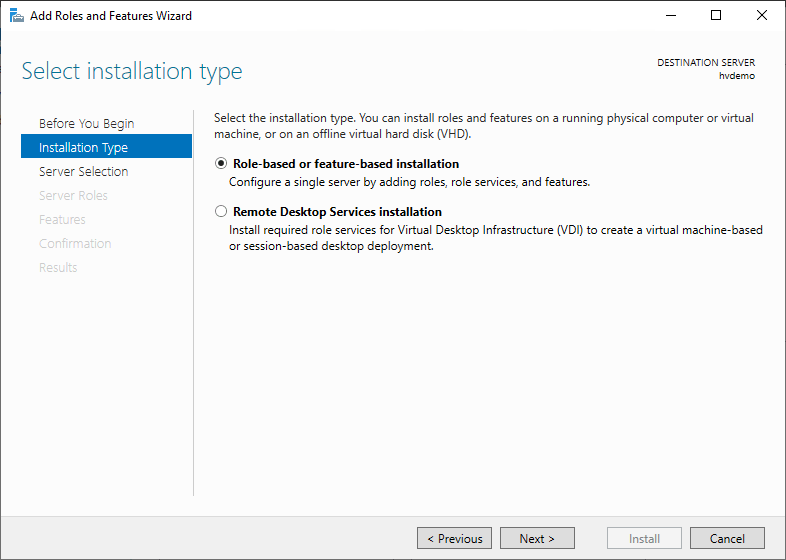
- Choose Role-based or feature-based installation.

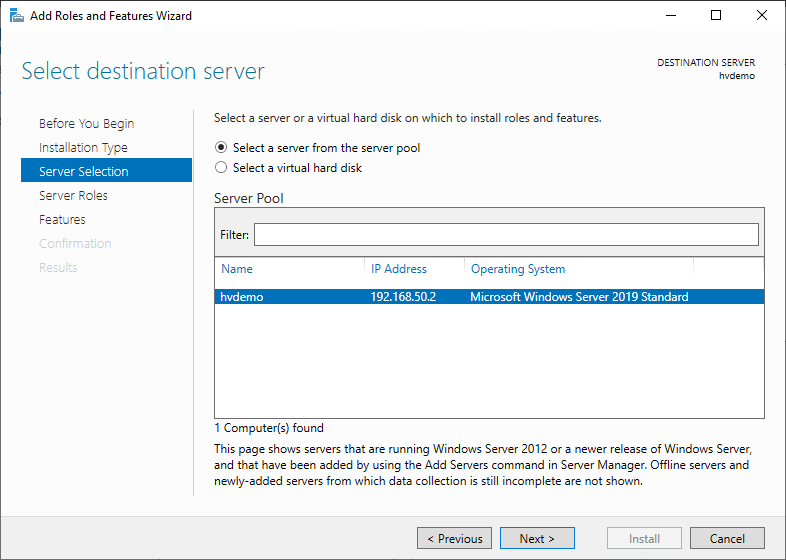
- If you do nothing on the Select destination server screen, you will change roles on the local server. If you added a remote server prior to starting the wizard, you can modify roles there. Choose the desired system and click Next.
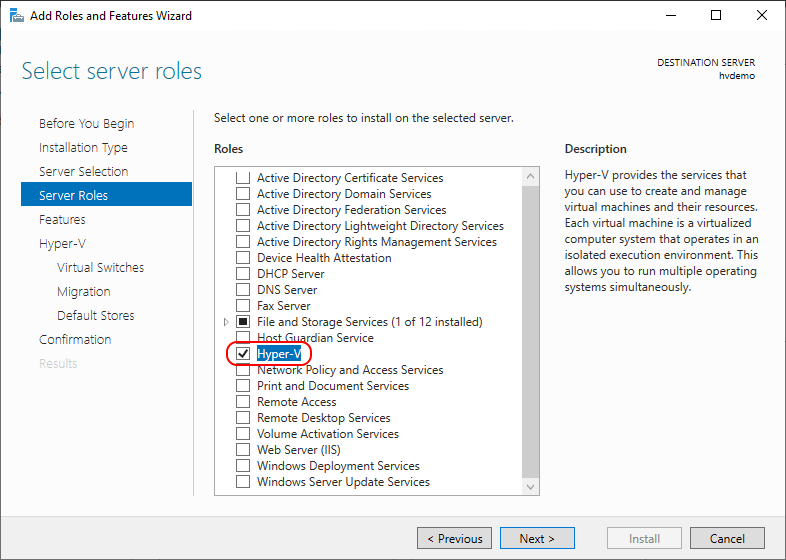
- Check the Hyper-V role.
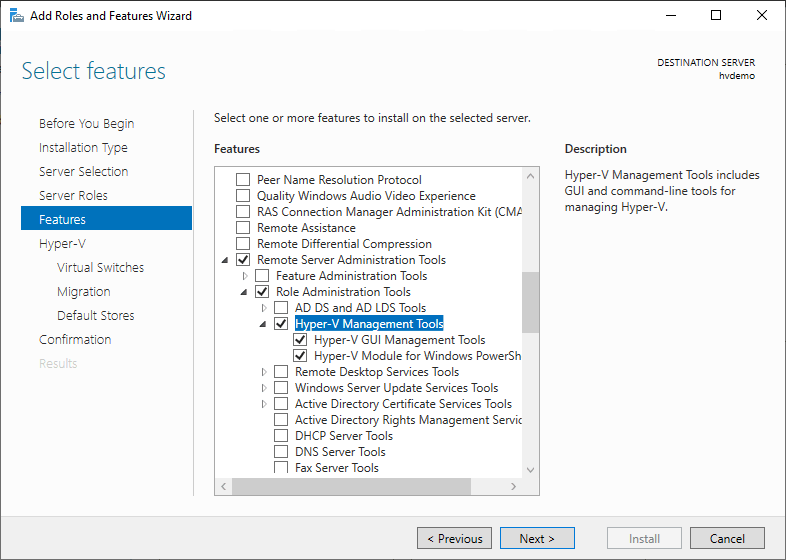
- When prompted, you can add the management tools as well. You do not need to do so. If you prefer, you can Cancel here and select individual management components on the next screen.

- On the Features page, you can pick a different selection of management tools, if you wish.
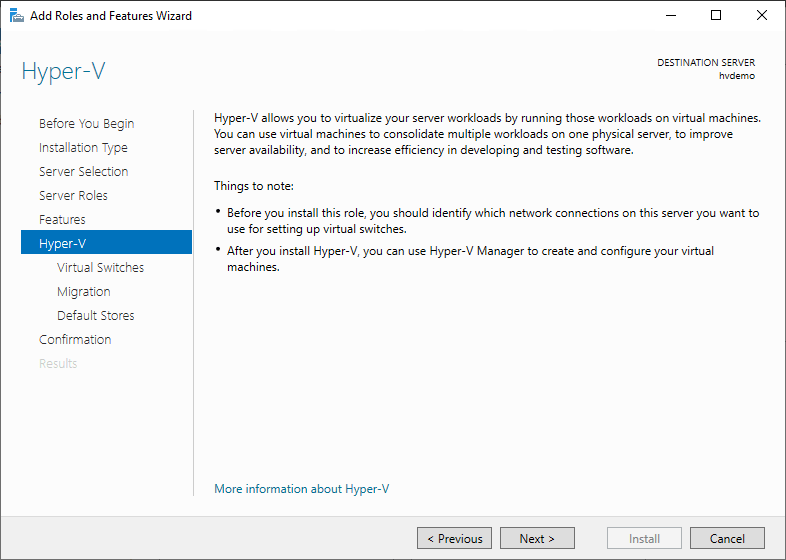
- You will get an introductory screen specific to Hyper-V. It talks about some of the same things we went over in the the pre-installation checklist above.
- You can now pick a physical Ethernet adapter to host a Hyper-V virtual switch. I highly recommend that you skip this page unless you want only defaults. You can set up networking later.
- You can choose the initial Live Migration security control. The settings shown only apply to Shared Nothing Live Migration, not clustered Live Migrations. I prefer Kerberos because of the security and the ease of initiating migrations. You can always change this option later.
- Here, you can change the default storage location for virtual machines and virtual hard disks. As with the other settings, you can change these later.
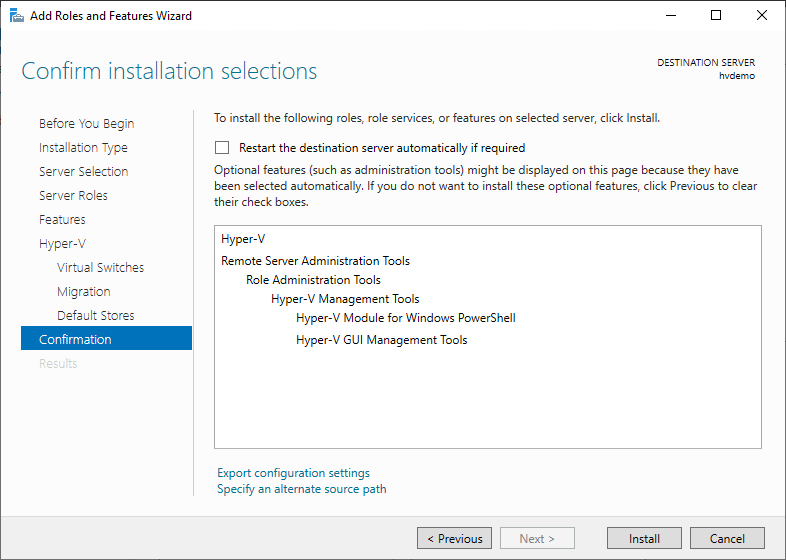
- The final screen allows you to review the basic options that you chose and optionally export them. It also allows you to enable an automatic reboot to enable Hyper-V. Click Install when ready.


Once all the reboots have completed, you’re ready to start creating and running virtual machines.
Hyper-V Post-Installation Checklist
Hyper-V in Windows Server 2019 continues the established tradition of needing very little post-install configuration. I’ve listed the options that typically draw the most interest:
- Networking — we have a full how-to guide to help you through the steps
- Create any desired teams
- Create one virtual switch
- As an alternative to the above two steps, create a switch-embedded team
- Host configuration options — use Set-VMHost or Hyper-V Manager
- Default virtual machine configuration storage location
- Default virtual machine virtual disk storage location
- Live Migration security settings (for non-cluster migrations only)
- Live Migration performance settings
I recommend that you take a look through the activities available to you. Most cannot be set in the GUI. Start your discovery in PowerShell:
Get-Command -Module Hyper-V
Take some time to go through the cmdlets to see what they can offer.
What’s Next After a New Hyper-V Installation
You’ve now set yourself up with a brand new Hyper-V installation running on Windows Server 2019. Go forth and virtualize!
If you get stuck, I’m here to help – let me know in the comments below or head on over to the Altaro Dojo Forums and ask the community! I’m also active on the forums so I’ll post my reply as soon as possible.