In this article, I’ll show you the new Windows Imaging and Configuration Designer (ICD) and how it can help with Windows 10 provisioning without having to reimage devices or use the Microsoft Deployment Toolkit (MDT) or System Center Configuration Manager.
Contents
- Configuration of personally owned BYOD devices
- Automated configuration of OEM OS loads
- What can be configured with a PPKG?
- Do I need Windows Imaging and Configuration Designer?
- Author
- Recent Posts
Kyle Beckman works as a systems administrator in Atlanta, GA supporting Office 365 in higher education. He has 17+ years of systems administration experience.
With Windows 10, Microsoft has released a new tool to allow organizations to rapidly provision or configure both corporate and personally owned Windows 10 devices. The release of Windows 10 on July 29, 2015, also requires updates to the tools that organizations use to deploy the OS, such as the Microsoft Deployment Toolkit (MDT) and System Center Configuration Manager. In addition to the updates to these products, a new tool—Imaging and Configuration Designer (ICD)—is now available to customize Windows 10 installs without the need to reimage the device.
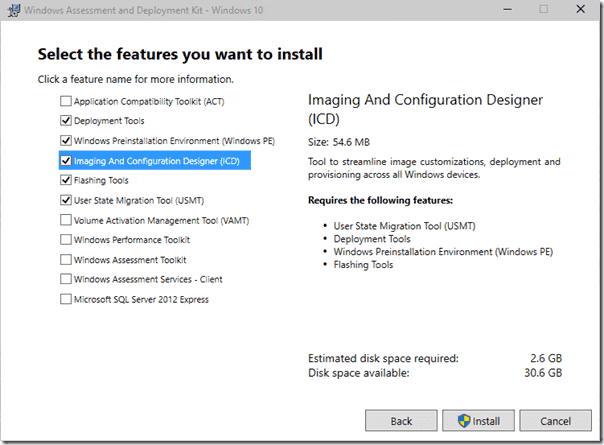
Windows Imaging and Configuration Designer in the Windows Assessment and Deployment (ADK) Setup
Imaging and Configuration Designer allows an IT admin to create provisioning packages that can customize both the mobile and computer versions of Windows 10. These provisioning packages (that have the PPKG file extension) can be used during the OS first run experience or after the OS has been set up to perform tasks such as connecting to WiFi networks, adding certificates, connecting to Active Directory, enrolling a device in MDM, and even upgrading editions—all without the need to format the drive and reinstall Windows. I can think of two scenarios where ICD will be useful: configuration of BYOD devices and automated configuration of OEM images.
Windows Imaging and Configuration Designer
Configuration of personally owned BYOD devices
If your organization supports BYOD, how do you handle setting up your users’ personally owned devices? User devices need to be set up with WiFi, VPN profiles, certificates, applications, etc. At my organization, we publish online FAQs, but many end users still need extra help with some of the more complex configurations. If your organization allows users to bring their devices to a Help Desk or to their IT person, a lot of manual configuration still has to be performed on the devices. What if you could automate all this work?
With ICD, you can build a PPKG file that contains your company’s root certificate, WiFi settings, VPN settings, line of business applications, enrollment in MDM (Mobile Device Management), etc. This PPKG file can then be distributed via USB thumb drive, URL, or even email attachment to any users needing to configure their devices. The user double-clicks the file, accepts a UAC prompt, and then is asked to allow the provisioning package installation. Their device reboots if necessary and configuration is complete with very little manual effort.
Provisioning package installation from a PPKG file
Automated configuration of OEM OS loads
Most large organizations tend to wipe new computers when they are received so IT can install their own custom image and software with MDT, Configuration Manager, or some other OS deployment solution. The primary reason for needing to reload the device is that the Enterprise Edition of Windows doesn’t come preinstalled by OEMs. New devices typically come with the Professional SKU preinstalled unless your organization has an agreement with the OEM to have a custom image installed.
Setting up and maintaining an OS deployment solution can be a lot work for a small (or even a one-person) IT shop that only images a handful of machines on a regular basis, so this is something for small- and medium-sized organizations to consider.
ICD allows you to build a PPKG file that, like the BYOD scenario, can configure certificates, WiFi, VPN, etc. It can also add the computer to Active Directory, set the computer name, and even upgrade the edition of Windows 10 from Professional to Enterprise with only a reboot or two as a requirement.
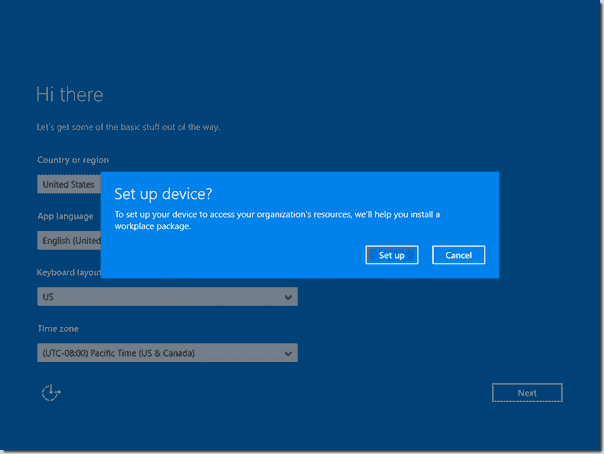
The PPKG file can also be used to remove preinstalled universal applications or Win32 applications via a script if you know which applications are preinstalled on the system. The PPKG file can either be installed after the computer is set up or during the first run experience by pressing the Windows key five times. This allows you to completely configure a new device without having to perform the steps manually as soon as you pull the computer out of the box.
Setting up a new Windows 10 device with a PPKG file by pressing the Windows key five times
What can be configured with a PPKG?
You can use ICD to create PPKG provisioning files that can perform the initial setup of a device, upgrade the Windows 10 edition, add a device to MDM/Active Directory/Azure Active Directory, configure WiFi, configure VPN, install certificates, install Universal Windows apps, install Win32 apps, run scripts, copy offline content to the device, configure browser settings, customize the Start Menu, configure Assigned Access, and configure a number of other Enterprise policies such as power and security settings.
Subscribe to 4sysops newsletter!
Do I need Windows Imaging and Configuration Designer?
If you support BYOD, want to use factory OEM images, or want to automate configurations that you’re currently performing manually, I would definitely check out ICD. ICD only works with Windows 10 and won’t completely replace tools such as your MDM solution, System Center Configuration Manager, or Group Policy; however, it does give you a great way to automate manual work with very little time investment and no infrastructure investment.
- Remove From My Forums
-
General discussion
-
Scenario
Microsoft has released Windows Assessment and Deployment Kit (Windows ADK) for Windows 10 Technical Preview, download link:
http://www.microsoft.com/en-us/download/details.aspx?id=45522Some of the customers would like to “Upgrade” from Windows 10 Technical Preview to Enterprise Version, for the earlier versions, it would need a clean installation. For Windows 10, Microsoft has released a new tool called Windows Imaging and Configuration
Designer (Windows ICD) which is new for Windows 10 Technical Preview.Windows Imaging and Configuration Designer (Windows ICD) is an easy to use tool that lets you create a provisioning package that you can use to customize Windows devices without re-imaging, or build a customized Windows image for individual markets, regions,
and mobile networks. Windows ICD is primarily designed to be used by OEMs and ODMs, system integrators, and IT professionals.Following is the steps I would like to share about how to use this new tool to “upgrade”.
Steps
- Download and install Windows Assessment and Deployment Kit (Windows ADK) for Windows 10 Technical Preview, on the following page, select Windows Imaging and Configuration Designer, then install;
- When finished the installation, click Start, find the Imaging and Configuration Designer.
- UAC prompts, click
Yes. On the start Page, click New Project, and then click
Next. - On the
Choose Workflow page, select Provisioning Package, and then click
Next. - On the
Select Windows Edition page, just click Finish. - When Project created, on the left side (Available customizations), find the
Settings->Windowslicensing, click the UpgradeWindowsLicensekey.
- As shown above, type the Enterprise key in the box, then click the Save
button next to it, after that, click Build on the right-down side. A Message would let you to rename the package and select the output path, make your own choice and then click Build on the page below:
- Wait for a while and it will notice you the build is finished:
- Click Finish, then quit the designer, find the created package under the path you selected, which should be xxx.ppkg file format. If you leave the output path as default, you could find it under:
C:UsersYour user nameDocumentsWindows Imaging and Configuration Designer (WICD)Project-1 folder - Copy the package to a Windows 10 Technical Preview professional machine, then double-click that package, it will pop-up a Windows like this:
- Click Allow, then wait for a while, Windows would restart and notice you the message below:
- After restart, you will notice that your Windows 10 Pro Technical Preview would become Windows 10 Enterprise Technical Preview!
Enjoy it!
Please click to vote if the post helps you. This can be beneficial to other community members reading the thread.
-
Edited by
Friday, March 20, 2015 10:27 AM
Update -
Edited by
Lany ZhangMicrosoft employee, Moderator
Friday, March 20, 2015 10:29 AM
Update -
Changed type
ForumFAQ
Friday, March 20, 2015 12:56 PM
What’s the purpose of Windows ICD? Well, Windows Imaging and Configuration Designer (ICD) is a tool to streamline the customization and provisioning of a Windows image.
You can use Windows ICD to do the following tasks:
- View all of the configurable settings and policies for a Windows 10 image or provisioning package.
- Create Windows provisioning answer files.
- Add third-party drivers, apps, or other assets to an answer file.
- Create variants and specify the settings that apply to each variant.
- Build and flash a Windows image.
- Build a provisioning package.
Windows ICD is primarily designed for use by:
- OEMs, ODMs, and Makers looking for a simple and streamlined process of creating and deploying a Windows image.
- System integrators who provision devices based on their customers’ needs.
- IT departments for business and educational institutions who need to provision bring-your-own-device (BYOD) and business-supplied devices.
Step 1: Create a folder so all of your ICD images/packages can be stored into. I created one in the C drive for now, but I would recommend dropping it into another partition.


- How To Windows ICD
- Windows ICD
- Windows ICD Builds
- Windows ICD How To
In this blog I will be going through the process of creating provisioning package using Windows Imaging and Configuration Designer tool. The file format used for this type of package is ppkg and is very easy to deploy on Windows 10 systems using various ways.
What is Provisioning Package
A Provisioning package (with extension ppkg) is basically a configuration settings. You can easily create and configure a Windows 10 device without having to re-image to reinstall OS over it.
This comes as a benefit of easily configuring the devices without wasting any time, and service desk team and other tools can utilize to deploy the ppkg file at your own convenience. Provisioning Package can be created through Windows Imaging and Configuration Designer (ICD) Tool.
What is Windows Configuration Designer
Windows Configuration Designer is a tool to create & configure provisioning packages. WCD comes with benefits such as quickly configuring the devices without having any network connectivity. Saving time and avoiding installing new image on device.
There are 2 ways to get Windows Configuration Designer.
- This comes as a part of Windows Assessment and Deployment kit (ADK) for Windows 10
- Install it through Microsoft Store App
Create Provisioning Package
Launch Windows Imaging and Configuration Designer on a system where ADK for Windows 10 is installed.
Once we launch WCD, we can see multiple options of creating the package for different devices, as we are going to create the provisioning package for Windows 10, lets select Provision desktop devices.
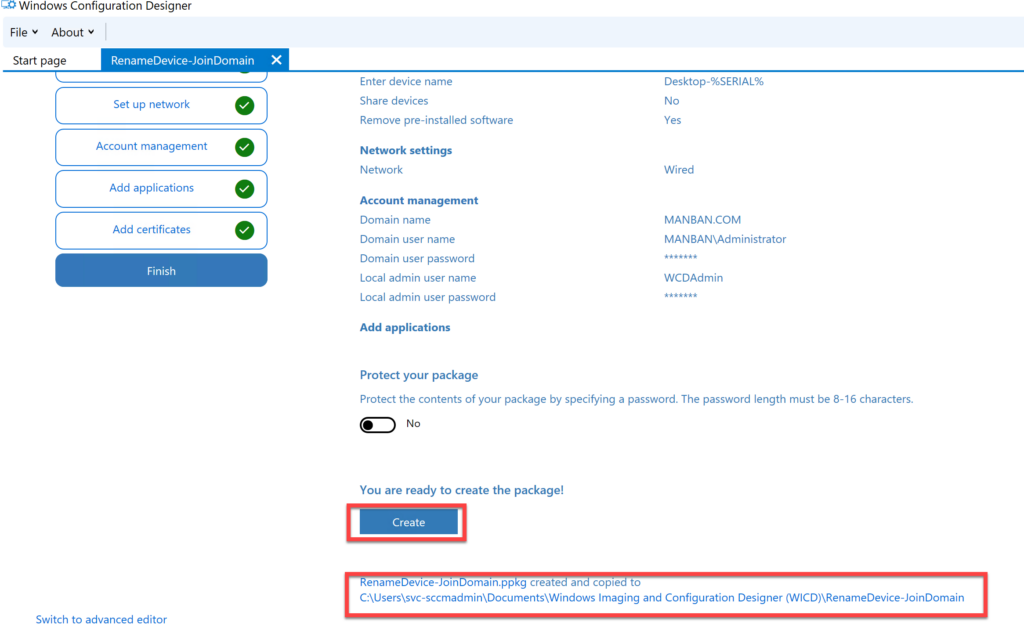
This will ask to create a new project, specify the project name, lets use a sensible name as I am going to create a package which renames the hostname and joins the domain, I am using the name RenameDevice-JoinDomain and click Finish.
Under Set up device page, we can see the option of specifying the device name. We also have option to Switch to advanced editor which opens a whole new world of thousands of options we specify and customize. To keep it simple, I won’t be going demonstrating this in this blog
Device name consists of 15 characters. This page gives us 2 options, examples as follows:
- Contoso-%SERIAL% = We will get 15 digits of hostname starting with initial 8 characters as “Contoso-“ and remaining 7 characters will be serial number of device (last 7 characters will be used in this case)
- Fabrikam-%RAND:5% = It will consists of 9 initial characters as “Fabrikam-“ and remaining 6 characters will be random number.
We are going to use the naming convention as Desktop-%SERIAL%. Click on Set up network.
Under Set up network, we have option for Connect devices to a Wi-Fi network, as we are not configuring this option, I have toggled the switch to Off. Click Account management.
Under Account management, we have several options such as Enroll into Active Directory, Enroll in Azure AD, Local Admin. As I am going to show you domain joining process, I will go with Enroll into Active Directory option.
Specify Domain name, User name, User Password who has the privilege to join a device to the domain.
We have option for creating local administrator account as well, I have provided the User name as WCD Admin and password assigned to it.
Click on Finish, verify the settings we have specified and click on Create.
Package will be created under the location which was specified while creating project.
Login to any workstation which is part of workgroup, you can run following command to check the serial number of the system.
Wmic bios get serial number
Copy the RenameDevice-JoinDomain.ppkg under c:new folder. Run the package, which will show Is this package from a source you trust ? Click on Yes, add it to continue the process.
We can use dism.exe tool to inject the ppkg package as well:
DISM.exe /Add-ProvisioningPackage /PackagePath:<package_path> [/CatalogPath:<path>]
Or, powershell command can be used:
Install-ProvisioningPackage -PackagePath "c:new folderRenameDevice-JoinDomain.ppkg"
System will go through restart phase with resetting the PC (you won’t loose any data, as we have specified “Remove pre-installed software” option on “set up device” page it will go through reset the PC option to uninstall pre-installed apps) processing all the configuration settings specified under ppkg file.
Verify the deployment status of ppkg file
Once we login to the system, we can verify the Local user admin account created, system name renamed and joined to the domain.
We can also verify through Event viewer.
Navigate to Event Viewer > Applications and Services Logs > Microsoft > Windows > Provisioning-Diagnostics-Provider > Admin
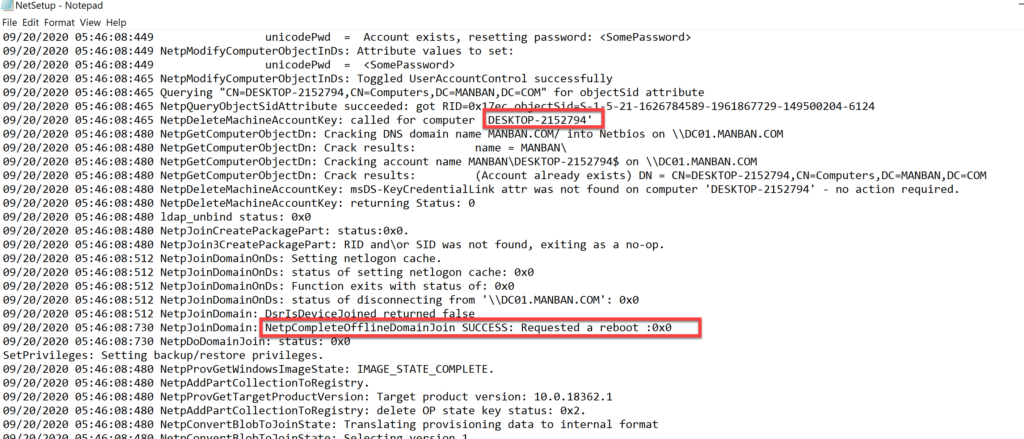
Verify Domain joining status through netsetup.log located at c:windowsdebug
Useful Links
https://docs.microsoft.com/en-us/windows-hardware/manufacture/desktop/dism-provisioning-package-command-line-options
https://www.microsoft.com/store/apps/9nblggh4tx22
В начале декабря Microsoft выпустила Windows 10 Mobile Enterprise для подписчиков MSDN. Эта редакция операционной системы предназначена для корпоративных клиентов. От версии для потребителей она отличается разве что поддержкой Магазина для бизнеса и наличием нескольких дополнительных вариантов в разделе обновлений, адресованных корпоративному миру.
Если вы хотите попробовать 10 — ую версию Mobile Enterprise по определенным причинам или просто из любопытства, тогда вы находитесь в нужном месте.
Сама Microsoft описывает новую редакцию следующим образом:
Windows 10 Mobile Enterprise создана для того, чтобы донести до корпоративных клиентов лучшие ощущения и впечатления от использования смартфонов и компактных планшетов. Операционная система обеспечивает высокую продуктивность, безопасность и возможности управления мобильным устройством, которые есть у Windows 10 Mobile, и добавляет для бизнеса гибкие возможности управления обновлениями. Кроме того, ОС принимает последние функции безопасности и инновации сразу же, как только они становятся доступны.
Итак, давайте рассмотрим процесс установки корпоративной редакции на любое устройство с Windows 10 Mobile на борту:
Скачиваем и устанавливаем на ПК «Комплект средств развертывания и оценки» для «десятки».
Открываем меню «Пуск» и находим папку «Windows Kits». Запускаем «Конструктор конфигурации и обработки изображений».
Жмем кнопку «Создать пакет подготовки».
Вводим имя проекта и при необходимости описание. Жмем кнопку «Далее».
Выбираем «Common to all Windows mobile editions» и нажимаем «Далее».
Пропускаем импорт пакета подготовки, нажав кнопку «Готово».
Скачиваем файл en_windows_10_mobile_enterprise_version_1511_x86_x64_cd_7230658.iso. При наличии соответствующей подписки вы можете скачать его непосредственно с портала MSDN. Пользователи без подписки найдут этот файл здесь.
Скачав ISO-образ, извлекаем из него файл mobileenterprise.xml.
В окне конструктора конфигурации выбираем «Параметры среды выполнения» -> «EditionUpgrade» -> «UpgradeEditionWithLicense» и жмем «Обзор».
Находим на компьютере файл mobileenterprise.xml, который мы извлекли несколькими шагами ранее, выбираем его и жмем «Открыть».
Теперь жмем «Экспорт» -> «Пакет подготовки».
В открывшемся окне оставляем все без изменений. Жмем «Далее».
Снова ничего не меняем и жмем «Далее».
Щелкаем «Далее».
Выбираем «Сборка».
В конце щелкаем на кнопку «Готово». Конструктор конфигурации можно закрыть.
Подключаем смартфон к компьютеру.
На компьютере переходим в папку C:UsersИмя пользователяDocumentsWindows Imaging and Configuration Designer (WICD)Название вашего проекта и ищем два файла, которые были экспортированы в процессе работы с конструктором конфигурации: один с расширением .cat, а другой с расширением .ppkg. Копируем их в любую папку в памяти смартфона или на карте памяти.
После копирования файлов на экране смартфона должно автоматически появиться следующее сообщение. Жмем «Да, добавить».
Переходим в «Параметры» -> «Учетные записи» -> «Подготовка», чтобы убедиться, что наш пакет подготовки был установлен.
Перезагружаем смартфон. После перезагрузки в качестве программного обеспечения будет использоваться ОС Mobile Enterprise. Убедиться в этом можно в меню «Параметры» -> «Система» -> «О системе».
Кроме того, в разделе дополнительных параметров обновления обнаружим возможность отложить обновления.
Вернуться к потребительской редакции можно путем сброса настроек.
Отличного Вам дня!
Can you imagine a modified/customized Windows 10 image OEM in a few minutes with a Microsoft free tool? Well, if you do, you’ll probably love this innovation made by Microsoft directly focused on Windows 10 distribution!
Became a feature of the new Windows Assessment and Deployment Toolkit (ADK) 10. His name is Windows Imaging and Configuration Designer (WICD) and consists on a newer and simplistic tool which help IT departments to customize their own Windows 10 images without any additional scripts or typically solutions like Microsoft Deployment Tookit (MDT) or System Center Configuration Center (ConfigMgr).
Technically, it traduces on a simpler tool which allow provisioning packages (ppkg) creation and in addiction, its integration on WIM file(s). After that, you’re be able now to distribute a customized Windows 10 image to your employees.
So what can be configured on the provisioning packages?
In a very high-level view, you can perform drivers injection, applications, features, specific updates, certificates, wifi profiles, policies, join to specific OU into a domain and so on.
One of the big doubts was about the Windows version changes, and the big answer is that you can change the Windows Version with a setting provided named “Edition Upgrade”. In my opinion, this is a major improvement which will help many IT departments on their users group standardization. This can be done for mobile (with license) and desktop (with product key) versions as well.
To be aware of all details, take a look at link.
How to Create a Provisioning Package?
As been said, the software is focused on two goals. The first one consists on performing settings packages and the second. It’s really clear as soon as you start the tool.
We selected the first option “New provisioning package”. Choose a path to save all files.
You can perform ppkg for generic or specific Windows 10 versions. Be careful on first choice, because you may customizing the wrong target, so in my opinion, the best way to do that consists on having specific and distinct ppkg for each edition/version. For this example, i choose Windows desktop edition.
In addiction, you can use a reference provisioning package for its configurations inheritance.
It will be presented the following form with all options that you can configure. It is very similar to the GPO view and in my opinion is really quite simple to fill it up.
For this example, it’ll be disabled the Windows store, performed a domain join, two local users (one standard, one administrator) added and an association of these configurations to a specific department (Vending).
Select “Deploy” if you want to deploy it through SCCM, USB or file share for example, or “Export” it as a package on the second option.
Select the owner and version. Then click “Next”.
The security wasn’t forgotten: the package can be encrypted with a key or signed with a certificate.
Set a path to the ppkg file be placed.
Check the “Resume” pane before select “Build” to start the prcess.
Wait for the successful message on the last pane.
Concluding: no scripts, no additional skills required to customize your Windows 10 OEM wim. No SCCM or MDT needed (in terms of configuration of course, because if you want to distribute the ppkg with those go ahead! 🙂 ). This method have some limitations for sure, but in a very quickest thought to perform standardization, this can be a good starting point. Is just a .ppkg file that you can run on the Windows 10 version and make it part of the standardization strategy.
Last steps to apply it.
Last minute note: Not all, but some changes may require a reboot.
Enjoy Windows Imaging and Configuration Designer!
/ Fabio


