Using Python on Windows
.. sectionauthor:: Robert Lehmann <lehmannro@gmail.com>
.. sectionauthor:: Steve Dower <steve.dower@microsoft.com>
This document aims to give an overview of Windows-specific behaviour you should
know about when using Python on Microsoft Windows.
Unlike most Unix systems and services, Windows does not include a system
supported installation of Python. To make Python available, the CPython team
has compiled Windows installers (MSI packages) with every release for many years. These installers
are primarily intended to add a per-user installation of Python, with the
core interpreter and library being used by a single user. The installer is also
able to install for all users of a single machine, and a separate ZIP file is
available for application-local distributions.
As specified in PEP 11, a Python release only supports a Windows platform
while Microsoft considers the platform under extended support. This means that
Python |version| supports Windows 8.1 and newer. If you require Windows 7
support, please install Python 3.8.
There are a number of different installers available for Windows, each with
certain benefits and downsides.
:ref:`windows-full` contains all components and is the best option for
developers using Python for any kind of project.
:ref:`windows-store` is a simple installation of Python that is suitable for
running scripts and packages, and using IDLE or other development environments.
It requires Windows 10 and above, but can be safely installed without corrupting other
programs. It also provides many convenient commands for launching Python and
its tools.
:ref:`windows-nuget` are lightweight installations intended for continuous
integration systems. It can be used to build Python packages or run scripts,
but is not updateable and has no user interface tools.
:ref:`windows-embeddable` is a minimal package of Python suitable for
embedding into a larger application.
The full installer
Installation steps
Four Python |version| installers are available for download — two each for the
32-bit and 64-bit versions of the interpreter. The web installer is a small
initial download, and it will automatically download the required components as
necessary. The offline installer includes the components necessary for a
default installation and only requires an internet connection for optional
features. See :ref:`install-layout-option` for other ways to avoid downloading
during installation.
After starting the installer, one of two options may be selected:

If you select «Install Now»:
- You will not need to be an administrator (unless a system update for the
C Runtime Library is required or you install the :ref:`launcher` for all
users) - Python will be installed into your user directory
- The :ref:`launcher` will be installed according to the option at the bottom
of the first page - The standard library, test suite, launcher and pip will be installed
- If selected, the install directory will be added to your :envvar:`PATH`
- Shortcuts will only be visible for the current user
Selecting «Customize installation» will allow you to select the features to
install, the installation location and other options or post-install actions.
To install debugging symbols or binaries, you will need to use this option.
To perform an all-users installation, you should select «Customize
installation». In this case:
- You may be required to provide administrative credentials or approval
- Python will be installed into the Program Files directory
- The :ref:`launcher` will be installed into the Windows directory
- Optional features may be selected during installation
- The standard library can be pre-compiled to bytecode
- If selected, the install directory will be added to the system :envvar:`PATH`
- Shortcuts are available for all users
Removing the MAX_PATH Limitation
Windows historically has limited path lengths to 260 characters. This meant that
paths longer than this would not resolve and errors would result.
In the latest versions of Windows, this limitation can be expanded to
approximately 32,000 characters. Your administrator will need to activate the
«Enable Win32 long paths» group policy, or set LongPathsEnabled to 1
in the registry key
HKEY_LOCAL_MACHINESYSTEMCurrentControlSetControlFileSystem.
This allows the :func:`open` function, the :mod:`os` module and most other
path functionality to accept and return paths longer than 260 characters.
After changing the above option, no further configuration is required.
.. versionchanged:: 3.6

   Support for long paths was enabled in Python.
Installing Without UI
All of the options available in the installer UI can also be specified from the
command line, allowing scripted installers to replicate an installation on many
machines without user interaction. These options may also be set without
suppressing the UI in order to change some of the defaults.
The following options (found by executing the installer with /?) can be
passed into the installer:
| Name | Description |
|---|---|
| /passive | to display progress without requiring user interaction |
| /quiet | to install/uninstall without displaying any UI |
| /simple | to prevent user customization |
| /uninstall | to remove Python (without confirmation) |
| /layout [directory] | to pre-download all components |
| /log [filename] | to specify log files location |
All other options are passed as name=value, where the value is usually
0 to disable a feature, 1 to enable a feature, or a path. The full list
of available options is shown below.
| Name | Description | Default |
|---|---|---|
| InstallAllUsers | Perform a system-wide installation. | 0 |
| TargetDir | The installation directory | Selected based on InstallAllUsers |
| DefaultAllUsersTargetDir | The default installation directory for all-user installs |
:file:`%ProgramFiles%\ Python X.Y` or :file:` %ProgramFiles(x86)%\ Python X.Y` |
| DefaultJustForMeTargetDir | The default install directory for just-for-me installs |
:file:`%LocalAppData%\ Programs\Python\ PythonXY` or :file:`%LocalAppData%\ Programs\Python\ PythonXY-32` or :file:`%LocalAppData%\ Programs\Python\ PythonXY-64` |
| DefaultCustomTargetDir | The default custom install directory displayed in the UI |
(empty) |
| AssociateFiles | Create file associations if the launcher is also installed. |
1 |
| CompileAll | Compile all .py files to.pyc. |
0 |
| PrependPath | Prepend install and Scripts directories to :envvar:`PATH` and add .PY to :envvar:`PATHEXT` |
0 |
| AppendPath | Append install and Scripts directories to :envvar:`PATH` and add .PY to :envvar:`PATHEXT` |
0 |
| Shortcuts | Create shortcuts for the interpreter, documentation and IDLE if installed. |
1 |
| Include_doc | Install Python manual | 1 |
| Include_debug | Install debug binaries | 0 |
| Include_dev | Install developer headers and libraries. Omitting this may lead to an unusable installation. |
1 |
| Include_exe | Install :file:`python.exe` and related files. Omitting this may lead to an unusable installation. |
1 |
| Include_launcher | Install :ref:`launcher`. | 1 |
| InstallLauncherAllUsers | Installs the launcher for all users. Also requires Include_launcher to be set to 1 |
1 |
| Include_lib | Install standard library and extension modules. Omitting this may lead to an unusable installation. |
1 |
| Include_pip | Install bundled pip and setuptools | 1 |
| Include_symbols | Install debugging symbols (*.pdb) |
0 |
| Include_tcltk | Install Tcl/Tk support and IDLE | 1 |
| Include_test | Install standard library test suite | 1 |
| Include_tools | Install utility scripts | 1 |
| LauncherOnly | Only installs the launcher. This will override most other options. |
0 |
| SimpleInstall | Disable most install UI | 0 |
| SimpleInstallDescription | A custom message to display when the simplified install UI is used. |
(empty) |
For example, to silently install a default, system-wide Python installation,
you could use the following command (from an elevated command prompt):
python-3.9.0.exe /quiet InstallAllUsers=1 PrependPath=1 Include_test=0
To allow users to easily install a personal copy of Python without the test
suite, you could provide a shortcut with the following command. This will
display a simplified initial page and disallow customization:
python-3.9.0.exe InstallAllUsers=0 Include_launcher=0 Include_test=0
    SimpleInstall=1 SimpleInstallDescription="Just for me, no test suite."
(Note that omitting the launcher also omits file associations, and is only
recommended for per-user installs when there is also a system-wide installation
that included the launcher.)
The options listed above can also be provided in a file named unattend.xml
alongside the executable. This file specifies a list of options and values.
When a value is provided as an attribute, it will be converted to a number if
possible. Values provided as element text are always left as strings. This
example file sets the same options as the previous example:
<Options>
    <Option Name="InstallAllUsers" Value="no" />
    <Option Name="Include_launcher" Value="0" />
    <Option Name="Include_test" Value="no" />
    <Option Name="SimpleInstall" Value="yes" />
    <Option Name="SimpleInstallDescription">Just for me, no test suite</Option>
</Options>
Installing Without Downloading
As some features of Python are not included in the initial installer download,
selecting those features may require an internet connection. To avoid this
need, all possible components may be downloaded on-demand to create a complete
layout that will no longer require an internet connection regardless of the
selected features. Note that this download may be bigger than required, but
where a large number of installations are going to be performed it is very
useful to have a locally cached copy.
Execute the following command from Command Prompt to download all possible
required files. Remember to substitute python-3.9.0.exe for the actual
name of your installer, and to create layouts in their own directories to
avoid collisions between files with the same name.
python-3.9.0.exe /layout [optional target directory]
You may also specify the /quiet option to hide the progress display.
Modifying an install
Once Python has been installed, you can add or remove features through the
Programs and Features tool that is part of Windows. Select the Python entry and
choose «Uninstall/Change» to open the installer in maintenance mode.
«Modify» allows you to add or remove features by modifying the checkboxes —
unchanged checkboxes will not install or remove anything. Some options cannot be
changed in this mode, such as the install directory; to modify these, you will
need to remove and then reinstall Python completely.
«Repair» will verify all the files that should be installed using the current
settings and replace any that have been removed or modified.
«Uninstall» will remove Python entirely, with the exception of the
:ref:`launcher`, which has its own entry in Programs and Features.
The Microsoft Store package
.. versionadded:: 3.7.2
The Microsoft Store package is an easily installable Python interpreter that
is intended mainly for interactive use, for example, by students.
To install the package, ensure you have the latest Windows 10 updates and
search the Microsoft Store app for «Python |version|«. Ensure that the app
you select is published by the Python Software Foundation, and install it.
Warning
Python will always be available for free on the Microsoft Store. If you
are asked to pay for it, you have not selected the correct package.
After installation, Python may be launched by finding it in Start.
Alternatively, it will be available from any Command Prompt or PowerShell
session by typing python. Further, pip and IDLE may be used by typing
pip or idle. IDLE can also be found in Start.
All three commands are also available with version number suffixes, for
example, as python3.exe and python3.x.exe as well as
python.exe (where 3.x is the specific version you want to launch,
such as |version|). Open «Manage App Execution Aliases» through Start to
select which version of Python is associated with each command. It is
recommended to make sure that pip and idle are consistent with
whichever version of python is selected.
Virtual environments can be created with python -m venv and activated
and used as normal.
If you have installed another version of Python and added it to your
PATH variable, it will be available as python.exe rather than the
one from the Microsoft Store. To access the new installation, use
python3.exe or python3.x.exe.
The py.exe launcher will detect this Python installation, but will prefer
installations from the traditional installer.
To remove Python, open Settings and use Apps and Features, or else find
Python in Start and right-click to select Uninstall. Uninstalling will
remove all packages you installed directly into this Python installation, but
will not remove any virtual environments
Known issues
Redirection of local data, registry, and temporary paths
Because of restrictions on Microsoft Store apps, Python scripts may not have
full write access to shared locations such as :envvar:`TEMP` and the registry.
Instead, it will write to a private copy. If your scripts must modify the
shared locations, you will need to install the full installer.
At runtime, Python will use a private copy of well-known Windows folders and the registry.
For example, if the environment variable :envvar:`%APPDATA%` is :file:`c:\Users\<user>\AppData\`,
then when writing to :file:`C:\Users\<user>\AppData\Local` will write to
:file:`C:\Users\<user>\AppData\Local\Packages\PythonSoftwareFoundation.Python.3.8_qbz5n2kfra8p0\LocalCache\Local\`.
When reading files, Windows will return the file from the private folder, or if that does not exist, the
real Windows directory. For example reading :file:`C:\Windows\System32` returns the contents of :file:`C:\Windows\System32`
plus the contents of :file:`C:\Program Files\WindowsApps\package_name\VFS\SystemX86`.
You can find the real path of any existing file using :func:`os.path.realpath`:
>>> import os
>>> test_file = 'C:\Users\example\AppData\Local\test.txt'
>>> os.path.realpath(test_file)
'C:\Users\example\AppData\Local\Packages\PythonSoftwareFoundation.Python.3.8_qbz5n2kfra8p0\LocalCache\Local\test.txt'
When writing to the Windows Registry, the following behaviors exist:
- Reading from
HKLM\Softwareis allowed and results are merged with the :file:`registry.dat` file in the package. - Writing to
HKLM\Softwareis not allowed if the corresponding key/value exists, i.e. modifying existing keys. - Writing to
HKLM\Softwareis allowed as long as a corresponding key/value does not exist in the package
and the user has the correct access permissions.
For more detail on the technical basis for these limitations, please consult
Microsoft’s documentation on packaged full-trust apps, currently available at
docs.microsoft.com/en-us/windows/msix/desktop/desktop-to-uwp-behind-the-scenes
The nuget.org packages
.. versionadded:: 3.5.2
The nuget.org package is a reduced size Python environment intended for use on
continuous integration and build systems that do not have a system-wide
install of Python. While nuget is «the package manager for .NET», it also works
perfectly fine for packages containing build-time tools.
Visit nuget.org for the most up-to-date information
on using nuget. What follows is a summary that is sufficient for Python
developers.
The nuget.exe command line tool may be downloaded directly from
https://aka.ms/nugetclidl, for example, using curl or PowerShell. With the
tool, the latest version of Python for 64-bit or 32-bit machines is installed
using:
nuget.exe install python -ExcludeVersion -OutputDirectory .
nuget.exe install pythonx86 -ExcludeVersion -OutputDirectory .
To select a particular version, add a -Version 3.x.y. The output directory
may be changed from ., and the package will be installed into a
subdirectory. By default, the subdirectory is named the same as the package,
and without the -ExcludeVersion option this name will include the specific
version installed. Inside the subdirectory is a tools directory that
contains the Python installation:
# Without -ExcludeVersion
> .python.3.5.2toolspython.exe -V
Python 3.5.2

# With -ExcludeVersion
> .pythontoolspython.exe -V
Python 3.5.2
In general, nuget packages are not upgradeable, and newer versions should be
installed side-by-side and referenced using the full path. Alternatively,
delete the package directory manually and install it again. Many CI systems
will do this automatically if they do not preserve files between builds.
Alongside the tools directory is a buildnative directory. This
contains a MSBuild properties file python.props that can be used in a
C++ project to reference the Python install. Including the settings will
automatically use the headers and import libraries in your build.
The package information pages on nuget.org are
www.nuget.org/packages/python
for the 64-bit version and www.nuget.org/packages/pythonx86 for the 32-bit version.
The embeddable package
.. versionadded:: 3.5
The embedded distribution is a ZIP file containing a minimal Python environment.
It is intended for acting as part of another application, rather than being
directly accessed by end-users.
When extracted, the embedded distribution is (almost) fully isolated from the
user’s system, including environment variables, system registry settings, and
installed packages. The standard library is included as pre-compiled and
optimized .pyc files in a ZIP, and python3.dll, python37.dll,
python.exe and pythonw.exe are all provided. Tcl/tk (including all
dependants, such as Idle), pip and the Python documentation are not included.
Note
The embedded distribution does not include the Microsoft C Runtime and it is
the responsibility of the application installer to provide this. The
runtime may have already been installed on a user’s system previously or
automatically via Windows Update, and can be detected by finding
ucrtbase.dll in the system directory.
Third-party packages should be installed by the application installer alongside
the embedded distribution. Using pip to manage dependencies as for a regular
Python installation is not supported with this distribution, though with some
care it may be possible to include and use pip for automatic updates. In
general, third-party packages should be treated as part of the application
(«vendoring») so that the developer can ensure compatibility with newer
versions before providing updates to users.
The two recommended use cases for this distribution are described below.
Python Application
An application written in Python does not necessarily require users to be aware
of that fact. The embedded distribution may be used in this case to include a
private version of Python in an install package. Depending on how transparent it
should be (or conversely, how professional it should appear), there are two
options.
Using a specialized executable as a launcher requires some coding, but provides
the most transparent experience for users. With a customized launcher, there are
no obvious indications that the program is running on Python: icons can be
customized, company and version information can be specified, and file
associations behave properly. In most cases, a custom launcher should simply be
able to call Py_Main with a hard-coded command line.
The simpler approach is to provide a batch file or generated shortcut that
directly calls the python.exe or pythonw.exe with the required
command-line arguments. In this case, the application will appear to be Python
and not its actual name, and users may have trouble distinguishing it from other
running Python processes or file associations.
With the latter approach, packages should be installed as directories alongside
the Python executable to ensure they are available on the path. With the
specialized launcher, packages can be located in other locations as there is an
opportunity to specify the search path before launching the application.
Embedding Python
Applications written in native code often require some form of scripting
language, and the embedded Python distribution can be used for this purpose. In
general, the majority of the application is in native code, and some part will
either invoke python.exe or directly use python3.dll. For either case,
extracting the embedded distribution to a subdirectory of the application
installation is sufficient to provide a loadable Python interpreter.
As with the application use, packages can be installed to any location as there
is an opportunity to specify search paths before initializing the interpreter.
Otherwise, there is no fundamental differences between using the embedded
distribution and a regular installation.
Alternative bundles
Besides the standard CPython distribution, there are modified packages including
additional functionality. The following is a list of popular versions and their
key features:
- ActivePython
- Installer with multi-platform compatibility, documentation, PyWin32
- Anaconda
- Popular scientific modules (such as numpy, scipy and pandas) and the
condapackage manager. - Enthought Deployment Manager
-
«The Next Generation Python Environment and Package Manager».
Previously Enthought provided Canopy, but it reached end of life in 2016.
- WinPython
- Windows-specific distribution with prebuilt scientific packages and
tools for building packages.
Note that these packages may not include the latest versions of Python or
other libraries, and are not maintained or supported by the core Python team.
Configuring Python
To run Python conveniently from a command prompt, you might consider changing
some default environment variables in Windows. While the installer provides an
option to configure the PATH and PATHEXT variables for you, this is only
reliable for a single, system-wide installation. If you regularly use multiple
versions of Python, consider using the :ref:`launcher`.
Excursus: Setting environment variables
Windows allows environment variables to be configured permanently at both the
User level and the System level, or temporarily in a command prompt.
To temporarily set environment variables, open Command Prompt and use the
:command:`set` command:
C:>set PATH=C:Program FilesPython 3.9;%PATH%
C:>set PYTHONPATH=%PYTHONPATH%;C:My_python_lib
C:>python
These changes will apply to any further commands executed in that console, and
will be inherited by any applications started from the console.
Including the variable name within percent signs will expand to the existing
value, allowing you to add your new value at either the start or the end.
Modifying :envvar:`PATH` by adding the directory containing
:program:`python.exe` to the start is a common way to ensure the correct version
of Python is launched.
To permanently modify the default environment variables, click Start and search
for ‘edit environment variables’, or open System properties, :guilabel:`Advanced
system settings` and click the :guilabel:`Environment Variables` button.
In this dialog, you can add or modify User and System variables. To change
System variables, you need non-restricted access to your machine
(i.e. Administrator rights).
Note
Windows will concatenate User variables after System variables, which may
cause unexpected results when modifying :envvar:`PATH`.
The :envvar:`PYTHONPATH` variable is used by all versions of Python,
so you should not permanently configure it unless the listed paths
only include code that is compatible with all of your installed Python
versions.
.. seealso::

    https://docs.microsoft.com/en-us/windows/win32/procthread/environment-variables
      Overview of environment variables on Windows

    https://docs.microsoft.com/en-us/windows-server/administration/windows-commands/set_1
      The ``set`` command, for temporarily modifying environment variables

    https://docs.microsoft.com/en-us/windows-server/administration/windows-commands/setx
      The ``setx`` command, for permanently modifying environment variables
Finding the Python executable
.. versionchanged:: 3.5
Besides using the automatically created start menu entry for the Python
interpreter, you might want to start Python in the command prompt. The
installer has an option to set that up for you.
On the first page of the installer, an option labelled «Add Python to PATH»
may be selected to have the installer add the install location into the
:envvar:`PATH`. The location of the :file:`Scripts\` folder is also added.
This allows you to type :command:`python` to run the interpreter, and
:command:`pip` for the package installer. Thus, you can also execute your
scripts with command line options, see :ref:`using-on-cmdline` documentation.
If you don’t enable this option at install time, you can always re-run the
installer, select Modify, and enable it. Alternatively, you can manually
modify the :envvar:`PATH` using the directions in :ref:`setting-envvars`. You
need to set your :envvar:`PATH` environment variable to include the directory
of your Python installation, delimited by a semicolon from other entries. An
example variable could look like this (assuming the first two entries already
existed):
C:WINDOWSsystem32;C:WINDOWS;C:Program FilesPython 3.9
UTF-8 mode
.. versionadded:: 3.7
Windows still uses legacy encodings for the system encoding (the ANSI Code
Page). Python uses it for the default encoding of text files (e.g.
:func:`locale.getencoding`).
This may cause issues because UTF-8 is widely used on the internet
and most Unix systems, including WSL (Windows Subsystem for Linux).
You can use the :ref:`Python UTF-8 Mode <utf8-mode>` to change the default text
encoding to UTF-8. You can enable the :ref:`Python UTF-8 Mode <utf8-mode>` via
the -X utf8 command line option, or the PYTHONUTF8=1 environment
variable. See :envvar:`PYTHONUTF8` for enabling UTF-8 mode, and
:ref:`setting-envvars` for how to modify environment variables.
When the :ref:`Python UTF-8 Mode <utf8-mode>` is enabled, you can still use the
system encoding (the ANSI Code Page) via the «mbcs» codec.
Note that adding PYTHONUTF8=1 to the default environment variables
will affect all Python 3.7+ applications on your system.
If you have any Python 3.7+ applications which rely on the legacy
system encoding, it is recommended to set the environment variable
temporarily or use the -X utf8 command line option.
Note
Even when UTF-8 mode is disabled, Python uses UTF-8 by default
on Windows for:
- Console I/O including standard I/O (see PEP 528 for details).
- The :term:`filesystem encoding <filesystem encoding and error handler>`
(see PEP 529 for details).
Python Launcher for Windows
.. versionadded:: 3.3
The Python launcher for Windows is a utility which aids in locating and
executing of different Python versions. It allows scripts (or the
command-line) to indicate a preference for a specific Python version, and
will locate and execute that version.
Unlike the :envvar:`PATH` variable, the launcher will correctly select the most
appropriate version of Python. It will prefer per-user installations over
system-wide ones, and orders by language version rather than using the most
recently installed version.
The launcher was originally specified in PEP 397.
Getting started
From the command-line
.. versionchanged:: 3.6
System-wide installations of Python 3.3 and later will put the launcher on your
:envvar:`PATH`. The launcher is compatible with all available versions of
Python, so it does not matter which version is installed. To check that the
launcher is available, execute the following command in Command Prompt:
py
You should find that the latest version of Python you have installed is
started — it can be exited as normal, and any additional command-line
arguments specified will be sent directly to Python.
If you have multiple versions of Python installed (e.g., 3.7 and |version|) you
will have noticed that Python |version| was started — to launch Python 3.7, try
the command:
py -3.7
If you want the latest version of Python 2 you have installed, try the
command:
py -2
If you see the following error, you do not have the launcher installed:
'py' is not recognized as an internal or external command,
operable program or batch file.
The command:
py --list
displays the currently installed version(s) of Python.
The -x.y argument is the short form of the -V:Company/Tag argument,
which allows selecting a specific Python runtime, including those that may have
come from somewhere other than python.org. Any runtime registered by following
PEP 514 will be discoverable. The --list command lists all available
runtimes using the -V: format.
When using the -V: argument, specifying the Company will limit selection to
runtimes from that provider, while specifying only the Tag will select from all
providers. Note that omitting the slash implies a tag:
# Select any '3.*' tagged runtime
py -V:3

# Select any 'PythonCore' released runtime
py -V:PythonCore/

# Select PythonCore's latest Python 3 runtime
py -V:PythonCore/3
The short form of the argument (-3) only ever selects from core Python
releases, and not other distributions. However, the longer form (-V:3) will
select from any.
The Company is matched on the full string, case-insenitive. The Tag is matched
oneither the full string, or a prefix, provided the next character is a dot or a
hyphen. This allows -V:3.1 to match 3.1-32, but not 3.10. Tags are
sorted using numerical ordering (3.10 is newer than 3.1), but are
compared using text (-V:3.01 does not match 3.1).
Virtual environments
.. versionadded:: 3.5
If the launcher is run with no explicit Python version specification, and a
virtual environment (created with the standard library :mod:`venv` module or
the external virtualenv tool) active, the launcher will run the virtual
environment’s interpreter rather than the global one. To run the global
interpreter, either deactivate the virtual environment, or explicitly specify
the global Python version.
From a script
Let’s create a test Python script — create a file called hello.py with the
following contents
#! python
import sys
sys.stdout.write("hello from Python %sn" % (sys.version,))
From the directory in which hello.py lives, execute the command:
py hello.py
You should notice the version number of your latest Python 2.x installation
is printed. Now try changing the first line to be:
Re-executing the command should now print the latest Python 3.x information.
As with the above command-line examples, you can specify a more explicit
version qualifier. Assuming you have Python 3.7 installed, try changing
the first line to #! python3.7 and you should find the 3.7
version information printed.
Note that unlike interactive use, a bare «python» will use the latest
version of Python 2.x that you have installed. This is for backward
compatibility and for compatibility with Unix, where the command python
typically refers to Python 2.
From file associations
The launcher should have been associated with Python files (i.e. .py,
.pyw, .pyc files) when it was installed. This means that
when you double-click on one of these files from Windows explorer the launcher
will be used, and therefore you can use the same facilities described above to
have the script specify the version which should be used.
The key benefit of this is that a single launcher can support multiple Python
versions at the same time depending on the contents of the first line.
Shebang Lines
If the first line of a script file starts with #!, it is known as a
«shebang» line. Linux and other Unix like operating systems have native
support for such lines and they are commonly used on such systems to indicate
how a script should be executed. This launcher allows the same facilities to
be used with Python scripts on Windows and the examples above demonstrate their
use.
To allow shebang lines in Python scripts to be portable between Unix and
Windows, this launcher supports a number of ‘virtual’ commands to specify
which interpreter to use. The supported virtual commands are:
/usr/bin/env/usr/bin/python/usr/local/bin/pythonpython
For example, if the first line of your script starts with
The default Python will be located and used. As many Python scripts written
to work on Unix will already have this line, you should find these scripts can
be used by the launcher without modification. If you are writing a new script
on Windows which you hope will be useful on Unix, you should use one of the
shebang lines starting with /usr.
Any of the above virtual commands can be suffixed with an explicit version
(either just the major version, or the major and minor version).
Furthermore the 32-bit version can be requested by adding «-32» after the
minor version. I.e. /usr/bin/python3.7-32 will request usage of the
32-bit python 3.7.
.. versionadded:: 3.7

   Beginning with python launcher 3.7 it is possible to request 64-bit version
   by the "-64" suffix. Furthermore it is possible to specify a major and
   architecture without minor (i.e. ``/usr/bin/python3-64``).
.. versionchanged:: 3.11

   The "-64" suffix is deprecated, and now implies "any architecture that is
   not provably i386/32-bit". To request a specific environment, use the new
   ``-V:<TAG>`` argument with the complete tag.
The /usr/bin/env form of shebang line has one further special property.
Before looking for installed Python interpreters, this form will search the
executable :envvar:`PATH` for a Python executable matching the name provided
as the first argument. This corresponds to the behaviour of the Unix env
program, which performs a :envvar:`PATH` search.
If an executable matching the first argument after the env command cannot
be found, but the argument starts with python, it will be handled as
described for the other virtual commands.
The environment variable :envvar:`PYLAUNCHER_NO_SEARCH_PATH` may be set
(to any value) to skip this search of :envvar:`PATH`.
Shebang lines that do not match any of these patterns are looked up in the
[commands] section of the launcher’s :ref:`.INI file <launcher-ini>`.
This may be used to handle certain commands in a way that makes sense for your
system. The name of the command must be a single argument (no spaces in the
shebang executable), and the value substituted is the full path to the
executable (additional arguments specified in the .INI will be quoted as part
of the filename).
[commands]
/bin/xpython=C:Program FilesXPythonpython.exe
Any commands not found in the .INI file are treated as Windows executable
paths that are absolute or relative to the directory containing the script file.
This is a convenience for Windows-only scripts, such as those generated by an
installer, since the behavior is not compatible with Unix-style shells.
These paths may be quoted, and may include multiple arguments, after which the
path to the script and any additional arguments will be appended.
Arguments in shebang lines
The shebang lines can also specify additional options to be passed to the
Python interpreter. For example, if you have a shebang line:
Then Python will be started with the -v option
Customization
Customization via INI files
Two .ini files will be searched by the launcher — py.ini in the current
user’s application data directory (%LOCALAPPDATA% or $env:LocalAppData)
and py.ini in the same directory as the launcher. The same .ini files are
used for both the ‘console’ version of the launcher (i.e. py.exe) and for the
‘windows’ version (i.e. pyw.exe).
Customization specified in the «application directory» will have precedence over
the one next to the executable, so a user, who may not have write access to the
.ini file next to the launcher, can override commands in that global .ini file.
Customizing default Python versions
In some cases, a version qualifier can be included in a command to dictate
which version of Python will be used by the command. A version qualifier
starts with a major version number and can optionally be followed by a period
(‘.’) and a minor version specifier. Furthermore it is possible to specify
if a 32 or 64 bit implementation shall be requested by adding «-32» or «-64».
For example, a shebang line of #!python has no version qualifier, while
#!python3 has a version qualifier which specifies only a major version.
If no version qualifiers are found in a command, the environment
variable :envvar:`PY_PYTHON` can be set to specify the default version
qualifier. If it is not set, the default is «3». The variable can
specify any value that may be passed on the command line, such as «3»,
«3.7», «3.7-32» or «3.7-64». (Note that the «-64» option is only
available with the launcher included with Python 3.7 or newer.)
If no minor version qualifiers are found, the environment variable
PY_PYTHON{major} (where {major} is the current major version qualifier
as determined above) can be set to specify the full version. If no such option
is found, the launcher will enumerate the installed Python versions and use
the latest minor release found for the major version, which is likely,
although not guaranteed, to be the most recently installed version in that
family.
On 64-bit Windows with both 32-bit and 64-bit implementations of the same
(major.minor) Python version installed, the 64-bit version will always be
preferred. This will be true for both 32-bit and 64-bit implementations of the
launcher — a 32-bit launcher will prefer to execute a 64-bit Python installation
of the specified version if available. This is so the behavior of the launcher
can be predicted knowing only what versions are installed on the PC and
without regard to the order in which they were installed (i.e., without knowing
whether a 32 or 64-bit version of Python and corresponding launcher was
installed last). As noted above, an optional «-32» or «-64» suffix can be
used on a version specifier to change this behaviour.
Examples:
- If no relevant options are set, the commands
pythonand
python2will use the latest Python 2.x version installed and
the commandpython3will use the latest Python 3.x installed. - The command
python3.7will not consult any
options at all as the versions are fully specified. - If
PY_PYTHON=3, the commandspythonandpython3will both use
the latest installed Python 3 version. - If
PY_PYTHON=3.7-32, the commandpythonwill use the 32-bit
implementation of 3.7 whereas the commandpython3will use the latest
installed Python (PY_PYTHON was not considered at all as a major
version was specified.) - If
PY_PYTHON=3andPY_PYTHON3=3.7, the commands
pythonandpython3will both use specifically 3.7
In addition to environment variables, the same settings can be configured
in the .INI file used by the launcher. The section in the INI file is
called [defaults] and the key name will be the same as the
environment variables without the leading PY_ prefix (and note that
the key names in the INI file are case insensitive.) The contents of
an environment variable will override things specified in the INI file.
For example:
- Setting
PY_PYTHON=3.7is equivalent to the INI file containing:
- Setting
PY_PYTHON=3andPY_PYTHON3=3.7is equivalent to the INI file
containing:
[defaults]
python=3
python3=3.7
Diagnostics
If an environment variable :envvar:`PYLAUNCHER_DEBUG` is set (to any value), the
launcher will print diagnostic information to stderr (i.e. to the console).
While this information manages to be simultaneously verbose and terse, it
should allow you to see what versions of Python were located, why a
particular version was chosen and the exact command-line used to execute the
target Python. It is primarily intended for testing and debugging.
Dry Run
If an environment variable :envvar:`PYLAUNCHER_DRYRUN` is set (to any value),
the launcher will output the command it would have run, but will not actually
launch Python. This may be useful for tools that want to use the launcher to
detect and then launch Python directly. Note that the command written to
standard output is always encoded using UTF-8, and may not render correctly in
the console.
Install on demand
If an environment variable :envvar:`PYLAUNCHER_ALLOW_INSTALL` is set (to any
value), and the requested Python version is not installed but is available on
the Microsoft Store, the launcher will attempt to install it. This may require
user interaction to complete, and you may need to run the command again.
An additional :envvar:`PYLAUNCHER_ALWAYS_INSTALL` variable causes the launcher
to always try to install Python, even if it is detected. This is mainly intended
for testing (and should be used with :envvar:`PYLAUNCHER_DRYRUN`).
Return codes
The following exit codes may be returned by the Python launcher. Unfortunately,
there is no way to distinguish these from the exit code of Python itself.
The names of codes are as used in the sources, and are only for reference. There
is no way to access or resolve them apart from reading this page. Entries are
listed in alphabetical order of names.
| Name | Value | Description |
|---|---|---|
| RC_BAD_VENV_CFG | 107 | A :file:`pyvenv.cfg` was found but is corrupt. |
| RC_CREATE_PROCESS | 101 | Failed to launch Python. |
| RC_INSTALLING | 111 | An install was started, but the command will need to be re-run after it completes. |
| RC_INTERNAL_ERROR | 109 | Unexpected error. Please report a bug. |
| RC_NO_COMMANDLINE | 108 | Unable to obtain command line from the operating system. |
| RC_NO_PYTHON | 103 | Unable to locate the requested version. |
| RC_NO_VENV_CFG | 106 | A :file:`pyvenv.cfg` was required but not found. |
Finding modules
These notes supplement the description at :ref:`sys-path-init` with
detailed Windows notes.
When no ._pth file is found, this is how :data:`sys.path` is populated on
Windows:
- An empty entry is added at the start, which corresponds to the current
directory. - If the environment variable :envvar:`PYTHONPATH` exists, as described in
:ref:`using-on-envvars`, its entries are added next. Note that on Windows,
paths in this variable must be separated by semicolons, to distinguish them
from the colon used in drive identifiers (C:etc.). - Additional «application paths» can be added in the registry as subkeys of
:samp:`\SOFTWARE\Python\PythonCore\{version}\PythonPath` under both the
HKEY_CURRENT_USERandHKEY_LOCAL_MACHINEhives. Subkeys which have
semicolon-delimited path strings as their default value will cause each path
to be added to :data:`sys.path`. (Note that all known installers only use
HKLM, so HKCU is typically empty.) - If the environment variable :envvar:`PYTHONHOME` is set, it is assumed as
«Python Home». Otherwise, the path of the main Python executable is used to
locate a «landmark file» (eitherLibos.pyorpythonXY.zip) to deduce
the «Python Home». If a Python home is found, the relevant sub-directories
added to :data:`sys.path` (Lib,plat-win, etc) are based on that
folder. Otherwise, the core Python path is constructed from the PythonPath
stored in the registry. - If the Python Home cannot be located, no :envvar:`PYTHONPATH` is specified in
the environment, and no registry entries can be found, a default path with
relative entries is used (e.g..Lib;.plat-win, etc).
If a pyvenv.cfg file is found alongside the main executable or in the
directory one level above the executable, the following variations apply:
- If
homeis an absolute path and :envvar:`PYTHONHOME` is not set, this
path is used instead of the path to the main executable when deducing the
home location.
The end result of all this is:
- When running :file:`python.exe`, or any other .exe in the main Python
directory (either an installed version, or directly from the PCbuild
directory), the core path is deduced, and the core paths in the registry are
ignored. Other «application paths» in the registry are always read. - When Python is hosted in another .exe (different directory, embedded via COM,
etc), the «Python Home» will not be deduced, so the core path from the
registry is used. Other «application paths» in the registry are always read. - If Python can’t find its home and there are no registry value (frozen .exe,
some very strange installation setup) you get a path with some default, but
relative, paths.
For those who want to bundle Python into their application or distribution, the
following advice will prevent conflicts with other installations:
- Include a
._pthfile alongside your executable containing the
directories to include. This will ignore paths listed in the registry and
environment variables, and also ignore :mod:`site` unlessimport siteis
listed. - If you are loading :file:`python3.dll` or :file:`python37.dll` in your own
executable, explicitly call :c:func:`Py_SetPath` or (at least)
:c:func:`Py_SetProgramName` before :c:func:`Py_Initialize`. - Clear and/or overwrite :envvar:`PYTHONPATH` and set :envvar:`PYTHONHOME`
before launching :file:`python.exe` from your application. - If you cannot use the previous suggestions (for example, you are a
distribution that allows people to run :file:`python.exe` directly), ensure
that the landmark file (:file:`Lib\os.py`) exists in your install directory.
(Note that it will not be detected inside a ZIP file, but a correctly named
ZIP file will be detected instead.)
These will ensure that the files in a system-wide installation will not take
precedence over the copy of the standard library bundled with your application.
Otherwise, your users may experience problems using your application. Note that
the first suggestion is the best, as the others may still be susceptible to
non-standard paths in the registry and user site-packages.
.. versionchanged::
   3.6

      * Adds ``._pth`` file support and removes ``applocal`` option from
        ``pyvenv.cfg``.
      * Adds ``pythonXX.zip`` as a potential landmark when directly adjacent
        to the executable.
.. deprecated::
   3.6

      Modules specified in the registry under ``Modules`` (not ``PythonPath``)
      may be imported by :class:`importlib.machinery.WindowsRegistryFinder`.
      This finder is enabled on Windows in 3.6.0 and earlier, but may need to
      be explicitly added to :attr:`sys.meta_path` in the future.
Additional modules
Even though Python aims to be portable among all platforms, there are features
that are unique to Windows. A couple of modules, both in the standard library
and external, and snippets exist to use these features.
The Windows-specific standard modules are documented in
:ref:`mswin-specific-services`.
PyWin32
The PyWin32 module by Mark Hammond
is a collection of modules for advanced Windows-specific support. This includes
utilities for:
- Component Object Model
(COM) - Win32 API calls
- Registry
- Event log
- Microsoft Foundation Classes
(MFC) user interfaces
PythonWin is a sample MFC application
shipped with PyWin32. It is an embeddable IDE with a built-in debugger.
.. seealso::

   `Win32 How Do I...? <http://timgolden.me.uk/python/win32_how_do_i.html>`_
      by Tim Golden

   `Python and COM <https://www.boddie.org.uk/python/COM.html>`_
      by David and Paul Boddie
cx_Freeze
cx_Freeze is a distutils
extension which wraps Python scripts into executable Windows programs
(:file:`{*}.exe` files). When you have done this, you can distribute your
application without requiring your users to install Python.
Compiling Python on Windows
If you want to compile CPython yourself, first thing you should do is get the
source. You can download either the
latest release’s source or just grab a fresh checkout.
The source tree contains a build solution and project files for Microsoft
Visual Studio, which is the compiler used to build the official Python
releases. These files are in the :file:`PCbuild` directory.
Check :file:`PCbuild/readme.txt` for general information on the build process.
For extension modules, consult :ref:`building-on-windows`.
Other Platforms
With ongoing development of Python, some platforms that used to be supported
earlier are no longer supported (due to the lack of users or developers).
Check PEP 11 for details on all unsupported platforms.
- Windows CE is
no longer supported
since Python 3 (if it ever was). - The Cygwin installer offers to install the
Python interpreter
as well
See Python for Windows
for detailed information about platforms with pre-compiled installers.
Let’s explore Python and Pip in this post and learn «How to install python on windows 10 properly«. We will discuss the latest version available today for Python (3.9.1) and pip (20.2.3). Also, I will explain how to modify and uninstall Python software. In case either additional feature needs to add/remove or you want to get rid of the old python version.
I am confident, even if you are new to Python, you will be able to install it easily, following this post step by step. So let’s deep dive in.
Table of Contents
- 1 What are Python and pip
- 2 Pre-requisite to install python on Windows 10
- 3 How to install Python on Windows 10 using GUI
- 4 How to Check Python and Pip version on Windows 10
- 5 How to install python on windows 10 (command line)
- 6 How to repair or modify Python in windows 10
- 7 How to uninstall Python in windows 10
- 8 Video tutorial
- 9 Conclusion
- 10 Frequently Asked Questions:-
What are Python and pip
Python is a simple, Object-oriented, interpreted, high-level programming language with dynamic semantics. Due to its non-complicated syntax and fast edit-test-debug cycle, the Programmer community loves it. Python also reduces the cost of software management due to its simple nature.
Pip is a package manager for python, it allows you to install and manage additional libraries and dependencies that are not distributed or part of the standard library.
Linux users can check out my post on «How to install the latest Python in Linux».
Pre-requisite to install python on Windows 10
- Windows 10 machine
- Internet connection
- Approx. 200MB of disk space (varies according to features and options selected).
Let’s find out the steps to install Latest Python and pip —
Step1- Python and pip download
You can download the latest python version 3.9.1 for windows or your respective operating system from python.org website.
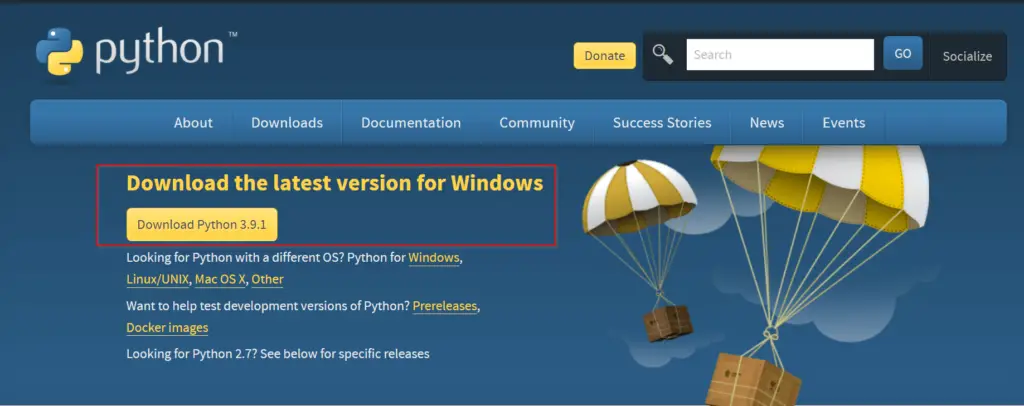
Otherwise, you can simply click on the below-mentioned button to download python for windows 10.
Click here to download an older release of Python like 3.8 or 2.7, for your project. Once you click on this link, scroll down and select your old python version as shown in the image.

You don’t need to download pip separately as it’s part of Python 3.9.1 software. You will know it while following this post further.
Step2- Run Python 3.9.1 (64-bit) installer
Once your download completes, visit your «download» directory. Then double click python-3.9.1-amd64 file to start the python setup wizard.

Step3- Choose «Install Now» or «Customize» installation
At this point, You will get two installation options —
- Install Now — This option is helpful if you are a newbie. Just select «Install now» and it will install Python 3.9 with default settings. Python default installation directory would be «C:users»your-username»AppDataProgramsPythonPython39». It will also install IDLE, pip, documentation and shortcuts.
- Customize installation — If you are a pro and need to know, what all features will be installed with python. Also, in case you already have python installed and want to test the latest version. Using the Customize installation option, you can choose a different installation folder and can keep both python versions.
Keep following this post, if you want to see options covered in Customize installation.
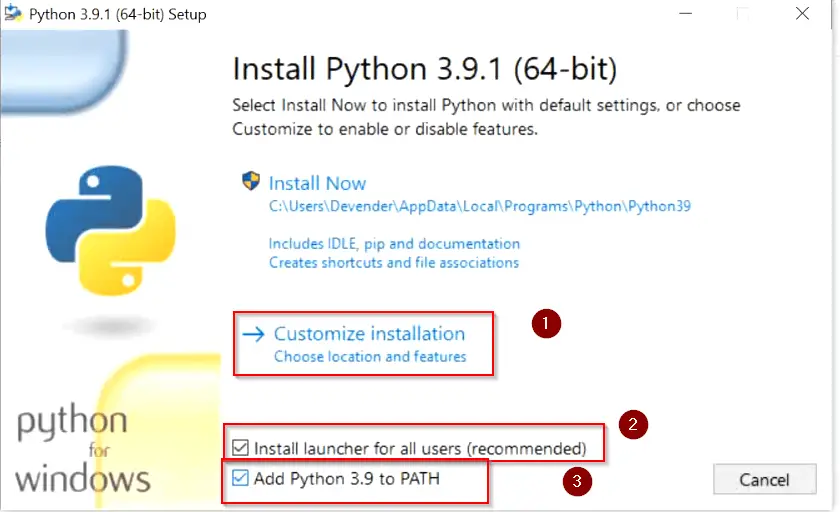
There are two more checkboxes to look into —
- «Install launcher for all users (recommended)» — Select this check box and it will make a python launcher shortcut for all user profiles exist in your machine. Whomsoever will login to your system will be able to use python 3.9.
- Add python 3.9 to path — Select this check box to add Python and pip «Path Variables» in the system environment automatically. If you will not select this option now, you need to add the path variable manually later after installation. My recommendation is to select it here itself.
So let’s click on «Customize installation» and check both the boxes as shown in the image.
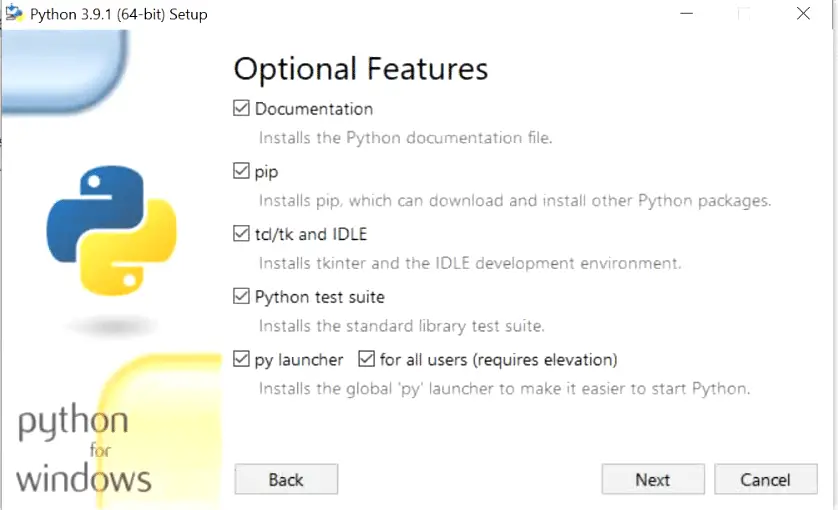
Step4- Add or remove «Optional Features«
On this window, you can add or remove optional features, available with python 3.9. Let’s see few details of each optional feature available —
- Documentation:- Selecting this box will install all the Python documentation and manuals.
- pip:- As I informed you in Step 1 download section. Pip is already part of python 3.9. Select this check box, If you want to install pip automatically with Python 3.9 (which I strongly recommend).
- tcl/tk and IDLE:- Selecting this check box will install Tkinter and the IDLE development environment. You don’t need to install it separately then.
- Python test suite:- Installs the standard library suite.
- py launcher for all users (requires elevation):- Installs the global ‘py launcher‘ for all users. It requires admin rights (elevation) to perform it. Because it will allow all users to launch python easily from their user profiles.
Choose your required optional features and click Next. I will suggest you to keep all options checked.
Step5- Choose «Advanced Options» of python 3.9
These are the advanced options available, which are self-explanatory.
- Install for all users — Python 3.9 will install for all users in your machine. In my case, I am the only user. So this option really doesn’t matter much for me.
- Associate files with Python (requires the py launcher) — Link associated files to the py launcher
- Create shortcuts for installed applications — Create shortcuts icons for Python, pip and installed optional features.
- Add python to environment variables — Add environment variable for python and pip
- Precompile standard library — Adds precompiled libraries.
- Download debugging symbols — You can download and install the debugging symbol, which attaches additional information to the symbol table.
- Download debug binaries (requires VS 2017 or later) — To install required and dependent debugging binaries.
If you are a pro and know your required options. Select those options as per your need. In case you are a newbie, you can proceed with default selected options as shown in the image.
Click Install —

Step6 (optional)- Select custom install location folder
If you already have Python version installed and want to keep it safe. Also, you want to install a newer python version for testing. To make this happen, On Step 5, click Browse — Select your destination installation folder — click OK and click Install.

Step7- Allow Python 3.9.1 to make changes
Choose «Yes» to allow Python 3.9 to make changes to your system.

Step8- Let Python 3.9 and pip setup complete
Sit back and relax. Python and pip installation will take some time to complete.

Step9- Select «Disable path length limit»
At this point, Python and pip have been installed successfully in windows 10. But you need to select «Disable path length limit» here. Because it allows python to bypass the 260 characters «MAX_PATH» limitation. Basically, it means, if the number of characters exceeds 260 in your installation directory path. Python will not be able to add it to the path variable. It’s a limitation of Windows 10.
Select «Disable path length limit» — then Allow Python 3.9 in user access control and Select Close.

How to Check Python and Pip version on Windows 10
Follow below mentioned steps to check python and pip version. Additionally, it will also validate path variable is added properly in system environment.
Step10- Validate Python and pip versions
- Open elevated command prompt «as administrator» by typing «cmd» in search bar of windows 10.
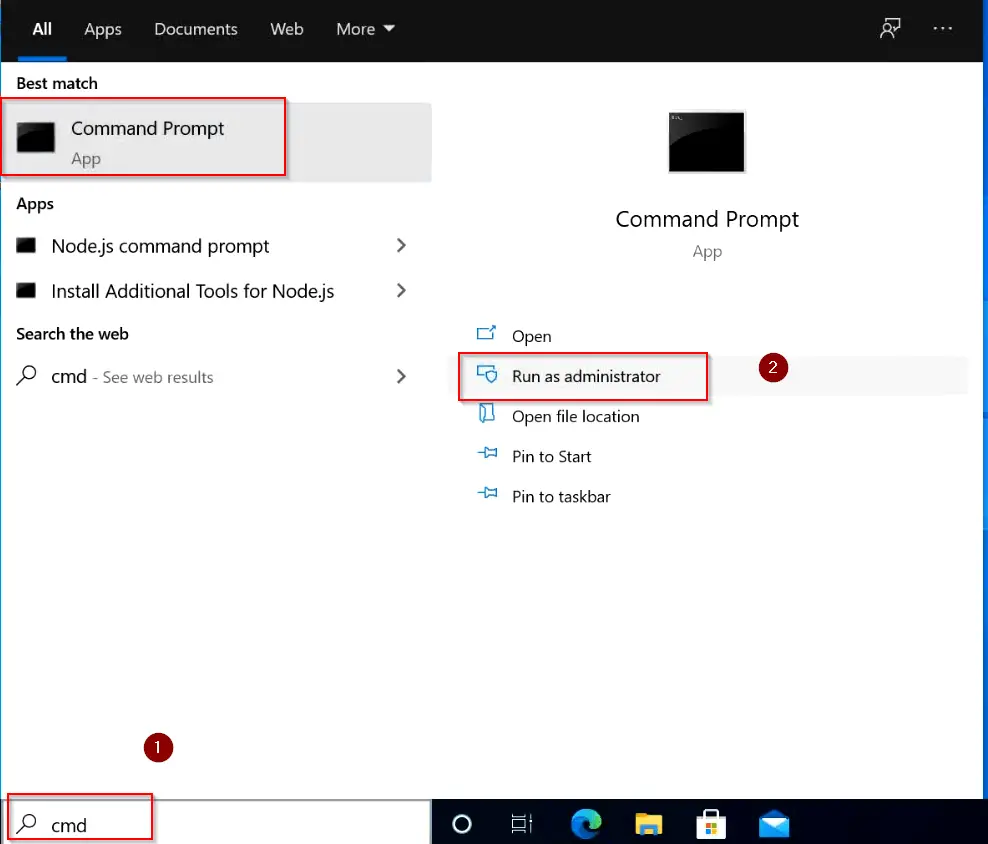
- Run python or py (short form) command to check Python version. You can see it’s version 3.9.1 installed in my case. You will see your installed version.
C:> py
### OR ###
C:> python
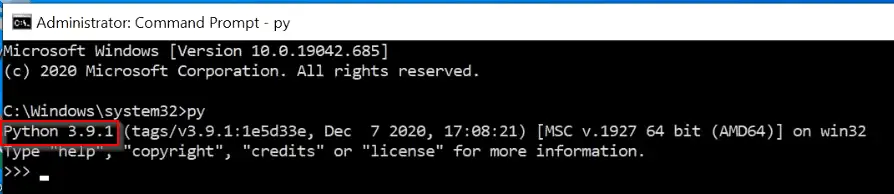
Type exit() or press «Ctrl + Z» on your keyboard to exit from python prompt.
- To check Python-pip version, type pip —version command. it will show you the pip version. it’s pip 20.2.3 in my case.
C:> pip --version

Running pip and python version command successfully also validates, that your python and pip path variables are added successfully in Windows 10. Check out this post, if you are still getting ‘pip’ is not recognized as an internal or external command, operable program or batch file.
Step11- Launch Python alternative method
I showed you how to get python prompt and version from the command prompt. Let me show you an alternate way to launch the Python console.
- Type «Python» in the search bar of windows 10. Click «open«.
- (optional) If you will check bullet 3 in the image, I have shown you that if you need open or check Python manuals or documentation. You select one of them and open. Additionally, you can open IDLE from the search bar.

- After opening, it will take you to python 3.9 window. Enjoy and start your python projects.

How to install python on windows 10 (command line)
Although preferred and recommended option to install Python and pip in windows 10 is through GUI. But in case you want to learn python 3.9 version installation from the command line. Follow these simple steps —
Step1 —
- Open elevated command prompt by typing «cmd» in search bar.
Step2 —
- Go to your Downloads directory and Run «Python-3.x.x exe» as shown. In my case, it’s Python 3.9.1-amd64.exe. Below mentioned are the arguments and options used in the command —
- /quiet — means no interactive wizard.
- InstallAllUsers=1 — Install for all users
- PrependPath=1 — Install Python variable path
- Include_test=0 — Don’t include or install test suite
0 — means disable (don’t install)
1 — enable (install)
C:> cd "path to your home directory"
C:> python-3.x.xexe /quiet InstallAllUsers=1 PrependPath=1 Include_test=0
For example —
C:> cd "usersdevenderDownloads"
C:> python-3.9.1-amd64.exe /quiet InstallAllUsers=1 PrependPath=1 Include_test=0

Just wait for a couple of minutes and latest python will install. Enjoy..
How to repair or modify Python in windows 10
There are some scenarios when you are not confident about additional features and options. Later you realize that you need that feature or advance option as shown in step4 and step5 in this post during installation. Then you don’t need to worry, it’s easy to add or remove features and advance options even after installation is done.
Follow these easy steps —
- You need to type «Control Panel» in the windows search bar. Click Open.

- Select «uninstall a program«

- Select «Python 3.9.1» or your version and click «Change«.

- Select «Modify» and press Next. You can also repair your installation using this wizard, in case installation issues.

Select Features and advanced option as per your need and complete installation. Refer Step4 and Step5 for further reference as shown in «How to install Python on Windows 10 using GUI» section.
How to uninstall Python in windows 10
If you have installed the latest Python and pip version by following this post. Now you want to get rid of your old Python version. Follow these simple steps to remove or uninstall Python in Windows 10.
Step1. Open Control panel from search bar
To start the uninstallation process of older Python and pip software from your windows 10. You need to type «Control Panel» in the windows search bar. Click Open.
Step2. Select «Uninstall a program«
Step3. Select Python and click «Uninstall or change a program».
Step 3.1 — I have shown Python version 3.9.1, but you need to select your old Python version. Once you select, click «uninstall«.
- Wait for uninstallation progress bar to complete and click «Close«.

Step 3.2(optional) — Once python uninstallation completes and if you can see Python Launcher also.
- Then, Just select «Python launcher» and click «Uninstall«.
- Select «Yes» in «uninstall python launcher» dialogue box as shown in image.

- Permit in allow «User access control» box and uninstallation of Python will be done.
Hurray, You have got rid of old version of Python.
Video tutorial
If you don’t like reading, watch this tutorial to know «How to Install Python on Windows 10«. Also «Uninstallation of Python from windows 10«.
Conclusion
Congrats!! Now you know approximately everything on how to install, modify and uninstall Python in windows 10. Also, you must have a good idea of pip installation with Python3. Nowadays, Microsoft also recommends installing development software on WSL (windows subsystem for Linux).
If you like this post, you can share it on your social media wall to help others.
Frequently Asked Questions:-
Is Python EXE safe?
Yes, Python exe is completely safe. Make sure you download it from python.org website or from legitimate source only. Then you should be good with the installation. In case you have not installed it and still, you can see in your system. Go to control panel — click on «Uninstall a program» — Then check for Python software installation. If it is visible there and you don’t want, you can uninstall it. If you don’t found it in programs, then it may be a virus or malware. Scan your system and remove it.
Is Python free to download?
Yes, Python is free opensource software. You can download and install it in your system from https://www.python.org/downloads/ website.
How do I run Python on Windows 10 from the command line?
Open elevated command prompt — type py or python and hit enter.
Can I learn Python by myself?
Yes, it’s one of the easy languages with no complex syntax. There are many websites with free tutorials. Checkout free Python tutorials.
Why Python is not working?
May be either python is not installed or you have not set up Python path variable in the system environment.
Начиная с этой статьи будет запущен цикл публикаций, посвященный языку Python, с позиции его изучения. Каждая статья будет представлена в виде урока на определенную тему. Не будем отходить от канонов и первую статью посвятим установке языка Python.
В этой статье рассмотрим следующие темы:
- Версии Python (2 и 3)
- Установка Python
- Установка Anaconda
- Установка IDE PyCharm
- Проверка работоспособности
На сегодняшний день существуют две версии Python – это Python 2 и Python 3, у них отсутствует полная совместимость друг с другом. На момент написания статьи вторая версия Python ещё широко используется, но, судя по изменениям, которые происходят, со временем, он останется только для того, чтобы запускать старый код. В нашей с вами работе, мы будем использовать Python 3, и, в дальнейшем, если где-то будет встречаться слово Python, то под ним следует понимать Python 3. Случаи применения Python 2 будут специально оговариваться.
2. Установка Python
Для установки интерпретатора Python на ваш компьютер, первое, что нужно сделать – это скачать дистрибутив. Загрузить его можно с официального сайта, перейдя по ссылке https://www.python.org/downloads/
2.1 Установка Python в Windows
Для операционной системы Windows дистрибутив распространяется либо в виде исполняемого файла (с расширением exe), либо в виде архивного файла (с расширением zip). Если вы используете Windows 7, не забудьте установить Service Pack 1!

Порядок установки.
1. Запустите скачанный установочный файл.
2. Выберет способ установки.

В данном окне предлагается два варианта Install Now и Customize installation. При выборе Install Now, Python установится в папку по указанному пути. Помимо самого интерпретатора будет установлен IDLE (интегрированная среда разработки), pip (пакетный менеджер) и документация, а также будут созданы соответствующие ярлыки и установлены связи файлов, имеющие расширение .py с интерпретатором Python. Customize installation – это вариант настраиваемой установки. Опция Add python 3.5 to PATH нужна для того, чтобы появилась возможность запускать интерпретатор без указания полного пути до исполняемого файла при работе в командной строке.
3. Отметьте необходимые опций установки (доступно при выборе Customize installation)

На этом шаге нам предлагается отметить дополнения, устанавливаемые вместе с интерпретатором Python. Рекомендуем выбрать все опции.
- Documentation – установка документаций.
- pip – установка пакетного менеджера pip.
- tcl/tk and IDLE – установка интегрированной среды разработки (IDLE) и библиотеки для построения графического интерфейса (tkinter).
4. Выберете место установки (доступно при выборе Customize installation)

Помимо указания пути, данное окно позволяет внести дополнительные изменения в процесс установки с помощью опций:
- Install for all users – Установить для всех пользователей. Если не выбрать данную опцию, то будет предложен вариант инсталляции в папку пользователя, устанавливающего интерпретатор.
- Associate files with Python – Связать файлы, имеющие расширение .py, с Python. При выборе данной опции будут внесены изменения в Windows, позволяющие запускать Python скрипты по двойному щелчку мыши.
- Create shortcuts for installed applications – Создать ярлыки для запуска приложений.
- Add Python to environment variables – Добавить пути до интерпретатора Python в переменную PATH.
- Precomple standard library – Провести прекомпиляцию стандартной библиотеки.
Последние два пункта связаны с загрузкой компонентов для отладки, их мы устанавливать не будем.
5. После успешной установки вас ждет следующее сообщение.

2.2 Установка Python в Linux
Чаще всего интерпретатор Python уже в входит в состав дистрибутива. Это можно проверить набрав в терминале
> python
или
> python3
В первом случае, вы запустите Python 2 во втором – Python 3. В будущем, скорее всего, во всех дистрибутивах Linux, включающих Python, будет входить только третья версия. Если у вас, при попытке запустить Python, выдается сообщение о том, что он не установлен, или установлен, но не тот, что вы хотите, то у вас есть два пути: а) собрать Python из исходников; б) взять из репозитория.
Для установки из репозитория в Ubuntu воспользуйтесь командой
> sudo apt-get install python3
Сборку из исходников в данной статье рассматривать не будем.
3. Установка Anaconda
Для удобства запуска примеров и изучения языка Python, советуем установить на свой ПК пакет Anaconda. Этот пакет включает в себя интерпретатор языка Python (есть версии 2 и 3), набор наиболее часто используемых библиотек и удобную среду разработки и исполнения, запускаемую в браузере.
Для установки этого пакета, предварительно нужно скачать дистрибутив https://www.continuum.io/downloads.
Есть варианты под Windows, Linux и MacOS.
3.1 Установка Anaconda в Windows
1. Запустите скачанный инсталлятор. В первом появившемся окне необходимо нажать “Next”.

2. Далее следует принять лицензионное соглашение.

3. Выберете одну из опций установки:
- Just Me – только для пользователя, запустившего установку;
- All Users – для всех пользователей.

4. Укажите путь, по которому будет установлена Anaconda.

5. Укажите дополнительные опции:
- Add Anaconda to the system PATH environment variable – добавить Anaconda в системную переменную PATH
- Register Anaconda as the system Python 3.5 – использовать Anaconda, как интерпретатор Python 3.5 по умолчанию.
Для начала установки нажмите на кнопку “Install”.

5. После этого будет произведена установка Anaconda на ваш компьютер.

3.2 Установка Anaconda в Linux
- Скачайте дистрибутив Anaconda для Linux, он будет иметь расширение .sh, и запустите установку командой:
> bash имя_дистрибутива.sh
В результате вы увидите приглашение к установке. Для продолжения процессе нажмите “Enter”.

2. Прочитайте лицензионное соглашение, его нужно пролистать до конца.

Согласитесь с ним, для этого требуется набрать в командной строке “yes”, в ответе на вопрос инсталлятора:
Do you approve the license terms? [yes|no]

3. Выберете место установки. Можно выбрать один из следующих вариантов:
- Press ENTER to confirm the location – нажмите ENTER для принятия предложенного пути установки. Путь по умолчанию для моей машины: /home/tester/anaconda3, он представлен чуть выше данного меню.
- Press CTRL-C to abort the installation – нажмите CTRL-C для отмены установки.
- Or specify a different location below – или укажите другой путь в строке ниже.
Нажмите ENTER.

4. После этого начнется установка.

4. Установка PyCharm
Если в процессе разработки вам необходим отладчик и вообще вы привыкли работать в IDE, а не в текстовом редакторе, то тогда одним из лучших вариантов будет IDE PyCharm от JetBrains. Для скачивания данного продукта нужно перейти по ссылке https://www.jetbrains.com/pycharm/download/
IDE доступна для Windows, Linux и MacOS. Существуют два вида лицензии PyCharm – это Professional и Community. Мы будем использовать версию Community, так как она бесплатна и её функционала более чем достаточно для наших задач.
4.1 Установка PyCharm в Windows
1. Запустите скачанный дистрибутив PyCharm.

2. Выберете путь установки программы.

3. Укажите ярлыки, которые нужно создать на рабочем столе (запуск 32-х и 64-х разрядной версии PyCharm) и отметить опцию из блока Create associations если требуется связать файлы с расширением .py с PyCharm.

4. Выберете имя для папки в меню Пуск.

5. Далее PyCharm будет установлен на ваш компьютер.

4.2 Установка PyCharm в Linux
1. Скачайте с сайта дистрибутив на компьютер.
2. Распакуйте архивный файл, для этого можно воспользоваться командой:
> tar xvf имя_архива.tar.gz

Перейдите в каталог, который был создан после распаковки дистрибутива, найдите в нем подкаталог bin и зайдите в него. Запустите pycharm.sh командой:
> ./pycharm.sh

В результате должен запуститься PyCharm.
5. Проверка работоспособности
Теперь проверим работоспособность всего того, что мы установили.
5.1 Проверка интерпретатора Python
Для начала протестируем интерпретатор в командном режиме. Если вы работаете в Windows, то нажмите сочетание Win+R и в появившемся окне введите python. В Linux откройте окно терминала и в нем введите python3 (или python).
В результате Python запустится в командном режиме, выглядеть это будет примерно так (картинка приведена для Windows, в Linux результат будет аналогичным):

В окне введите:
print("Hello, World!")
Результат должен быть следующий:

5.2 Проверка Anaconda
Здесь и далее будем считать, что пакет Anaconda установлен в Windows, в папку C:Anaconda3, в Linux, вы его можно найти в каталоге, который выбрали при установке.
Перейдите в папку Scripts и введите в командной строке:
ipython notebook
Если вы находитесь в Windows и открыли папку C:Anaconda3Scripts через проводник, то для запуска интерпретатора командной строки для этой папки в поле адреса введите cmd.


В результате запустится веб-сервер и среда разработки в браузере.

Создайте ноутбук для разработки, для этого нажмите на кнопку New (в правом углу окна) и в появившемся списке выберете Python.
В результате будет создана новая страница в браузере с ноутбуком. Введите в первой ячейке команду
print("Hello, World!")
и нажмите Alt+Enter на клавиатуре. Ниже ячейки должна появиться соответствующая надпись.

5.3 Проверка PyCharm
Запустите PyCharm и выберете Create New Project в появившемся окне.

Укажите путь до проекта Python и интерпретатор, который будет использоваться для запуска и отладки.

Добавьте Python файл в проект.

Введите код программы.

Запустите программу.

В результате должно открыться окно с выводом программы.

На этом первый урок закончен.
P.S.
Если вам интересна тема анализа данных, то мы рекомендуем ознакомиться с библиотекой Pandas. На нашем сайте вы можете найти вводные уроки по этой теме. Все уроки по библиотеке Pandas собраны в книге “Pandas. Работа с данными”.

Спасибо за внимание!
Python. Урок 2. Запуск программ на Python >>>
Python was created by Guido van Rossum and first released in 1991. It is an open source, interpreted programming language, and is simple to use, readable and extensible. You can split your program into modules that can be reused in other Python programs. In addition, check out the article on Self in Python.
Python supports several paradigms, such as object-oriented, functional, and procedural with the support of a large comprehensible library.
Python releases for Windows
The latest version of Python is 3.9.0, released on Oct. 5, 2020. It contains many new features and optimization. This is the first version of Python to default to the 64-bit installer on Windows. The installer now also actively disallows installation on Windows 7. Python 3.9 is incompatible with this unsupported version of Windows.
If you go to the page: you will find all releases of Python. The installation process is the same, regardless of the version.
The Python installers for the Windows platform usually include the entire standard library and often also include many additional components. For Unix-like operating systems Python is normally provided as a collection of packages, so it may be necessary to use the packaging tools provided with the operating system to obtain some or all of the optional components.
There are a number of different installers available for Windows, each with certain advantages and disadvantages.
- Web—based installers: This installer is very small in size. It could be installed in a local computer with web-access. The installer will download necessary files and install them.
- Executable installer: Best option for installing Python locally. The installer contains all important components and installs them itself. This is the best option for development of any kind of Python projects.
- The embeddable package: is a minimal package of Python suitable for embedding into a larger application. The embeddable package uses Python as runtime and allows to distribute applications on Windows.
Installing Python 3.9.0 for Windows
Step 1: Open your browser window and navigate:

Step 2: Click on button download python 3.9.0 to download Python Executable Installer for Windows. It will start downloading the installer, which is around 27 MB in size.( If you have a lower version of Windows, please click Downloads menu button and select a specific version from the downloads page.)
Step 3: Once finished with the download, double click on the downloaded file to run the installer.
Step 4: The setup windows shows following dialog window with two installation options:
A. Install Now
B. Customize Installation

A. If you select “Install Now”:
- You will not need to be an administrator.
- This option installs Python in your user directory shown in the dialog box under Install Now option.
- The standard library, test suite, launcher and pip will be installed.
- If selected, the install directory will be added to your PATH.
- If you check the install launcher for all users, it will install python launcher for all the users of your system.
Step 5: The setup process will be shown in a Python 3.9.0(64-bit) Setup pop-up window.

Step 6: After successful completion of installation the following popup window will be shown with Setup was successful message.
This dialog box also gives you the option to Disable path length limit.
Clicking the “Disable path length limit” option removes the limitation on the MAX_PATH variable. This change won’t break anything, but will allow Python to use long path names.
Removing the MAX_PATH Limitation
Windows historically has limited path lengths to 260 characters. This meant that paths longer than this would not resolve, and errors would result; this is termed as MAX_PATH Limitation. In the latest versions of Windows, this limitation can be expanded to approximately 32,000 characters.

You must save the file python-3.9 exe somewhere on your computer in case you need to reinstall, modify the settings or uninstall python.
B. Customize installation: This option allows you to select the features to install, the installation location and other options or post-install actions. If you select customized installation:
- You may be required to provide administrative credentials or approval
- Python will be installed into the Program Files directory
- The Python Launcher for Windows will be installed into the Windows directory
- The standard library can be pre-compiled to bytecode
- If selected, the install directory will be added to the system PATH
Step 5: Step 1 to 4 would be same, but as you select the customized installation, the following dialog box will appear.

This window provides a list with several optional features. You may select the respective checkboxes as per the requirement. The meaning of each option is as follows:
- Documentation: Will download the documentation, which can help you for future references.
- Pip: Pip is a tool which helps in installation of additional libraries and dependencies which are not available in the standard library. It is also called the package manager of Python. Starting from the Python 3.4 version, the pip comes bundled with the installation files, but before that we used to install this package manager separately.
- IDLE: stands for Integrated Development Learning Environment. This is CLI bundled with python. Along with IDLE editor, enabling this option will also install the “tkinter” toolkit, which is a python default GUI package.
- Python test suite: This feature will install all the standard libraries for python application testing.
- Py launcher: enables you to launch python CLI through programs like command prompt or windows shell.
- For all users: it will install python launcher for all the users of your system
Step 6: After clicking on Next button one more dialog window appears on the screen which helps developers to check or uncheck additional features.

This page provides 7 advance options:
- Install for all users: It will install python launcher for all the users of your system
- Associate files with Python (requires the py launcer): this option will link all the files Python extensions like .py, .pyd, .pyc or .pyo with the python launcher or editor.
- Create shortcut for installed applications: It will create a shortcut of application for you
- Add python to environment variables: PATH is an environment variable in Windows. It basically tells the command—line argument, what folders to look in when attempting to find a file
- The last three options tell the python installation wizard to install all the debug symbols and binaries along with the bytecode of all the standard libraries, which we will be using with our programs.
- Customize installation location: We can change the location of python installation directory. The location you will specify will be added in the environmental variable of our windows 10 operating system.
After selecting the required advance options, click on Install button.
After successful completion of installation, the following popup window will be shown with Setup was successful message.

Modifying an install
Once Python has been installed, you can add or remove features through the Programs and Features tool that is part of Windows. Select the Python entry and choose “Uninstall/Change” to open the installer in maintenance mode.
“Modify” allows you to add or remove features by modifying the checkboxes — unchanged checkboxes will not install or remove anything. Some options cannot be changed in this mode, such as the install directory; to modify these, you will need to remove and then reinstall Python completely.
“Repair” will verify all the files that should be installed using the current settings and replace any that have been removed or modified.
“Uninstall” will remove Python entirely, with the exception of the Python Launcher for Windows, which has its own entry in Programs and Features.
Setting Path
The definition of “PATH” by Wikipedia is “PATH is an environment variable on Unix-like operating systems, DOS, OS/2, and Microsoft Windows, specifying a set of directories where executable programs are located. In general, each executing process or user session has its own PATH setting”
In Windows %PATH% is a variable which provides a list of directory names separated by semicolon(;). When we enter a command on command shell , the system will search in current windows directory and after that it searches in path. It actually looks for a filename in the path which matches with the command you have given. Once it finds the matching executable file it loads the new process and gets executed.
Python Launcher for Windows
The Python launcher for Windows is a utility which helps in locating and executing different Python versions. It allows scripts (or the command-line) to indicate a preference for a specific Python version, and will locate and execute that version.
Unlike the PATH variable, the launcher will correctly select the most appropriate version of Python. It will prefer per-user installations over system-wide ones, and orders by language version rather than using the most recently installed version.
The launcher was originally specified in PEP 397.
A Python launcher is a single executable which uses a number of heuristics to locate a Python executable and launches it with a specified command line.
The launcher allows Python scripts or the Windows command-line to specify a particular Python version and will locate and launch that version.
Documentation links for python
Browse the docs online or download a copy of your own
Document release by version
Conclusion
We hope this blog “How to install Python on Windows” would help you during the Python installation process. For additional information you can visit the official site of Python.