Зачастую пользователи, переходя с Windows на Мак, не могут отказаться от какого-либо софта. Кто-то в силу привычки, а кто-то из-за отсутствия достойных аналогов. В такой ситуации выходом будет установка на Мак второй операционной системы. Пока компьютеры и ноутбуки Apple выходили на архитектуре x86, то проблем с этим никаких не было. С помощью встроенной утилиты Boot Camp можно было установить Windows в качестве второй полноценной операционной системы.

Самая популярная программа для установки Windows на Мак — это Parallels Desktop.
❗️ПОДПИСЫВАЙСЯ НА НАШ КАНАЛ В ЯНДЕКС.ДЗЕНЕ И ЧИТАЙ ЭКСКЛЮЗИВНЫЕ СТАТЬИ БЕСПЛАТНО
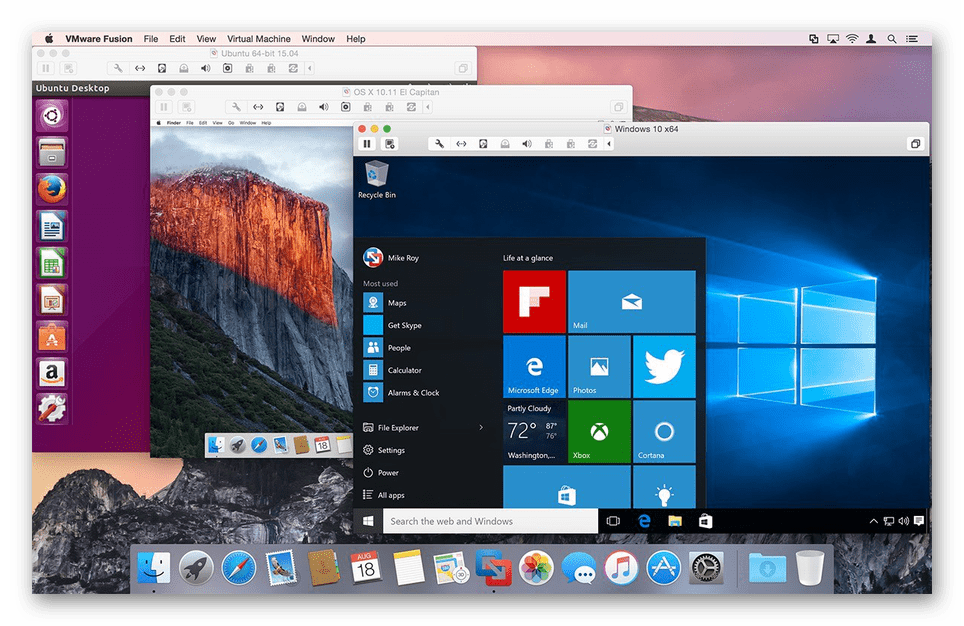
С выходом компьютеров на собственных процессорах M1 и теперь M2 утилиты Boot Camp больше нет, и остается только способ с созданием виртуальной машины. На днях VMware анонсировала новую версию VMware Fusion, которая позволяет создать на Маке с процессором Apple виртуальную машину с Windows. Давайте посмотрим, какие требования для установки предъявляет VMware Fusion и зачем вообще устанавливать Windows на Мак.
VMware Fusion для M1

Благодаря VMware у пользователей появляется выбор.
Когда пользователям компьютеров на операционной системе macOS говорят про установку на их устройства Windows, можно заметить, как начинает дымиться голова от злости. Истинные фанаты считают, что нельзя таким образом осквернять святое и использовать враждебную операционку. Те, кто более рациональны, могут увидеть хорошее в обеих системах. С выходом Маков на процессорах M1, а теперь уже M2, у пользователей, которые предпочитают иметь на устройствах обе операционные системы, была одна очень серьезная проблема. При отсутствии Boot Camp единственным способом установки «Окон» на Мак до недавнего времени была программа Parallels Desktop.
И вот для тех, кому это приложение по каким-то причинам не нравится, появилась альтернатива. Компания VMware объявила, что последнее обновление VMware Fusion привносит поддержку Windows 11 как на Маки с процессорами Intel, так и на Apple Silicon. На сегодняшний день версия программы Fusion 2H22 существует только в качестве бесплатной бета-версии и позволяет использовать Windows с помощью виртуализации.
❗️ПОДПИШИСЬ НА НАШ ЧАТИК В ТЕЛЕГРАМЕ. ТАМ СОБРАЛИСЬ ТОЛЬКО ИЗБРАННЫЕ ЧИТАТЕЛИ
Для тех, кто не знает, в двух словах поясню, как выглядит виртуализация. Операционная система запускается в отдельном окошке macOS как обычное приложение, например, Pages. Грубо говоря, VMware Fusion просто эмулирует компьютер и запускает операционку. VMware Fusion поддерживает следующие возможности:
- Установка Windows 11 на Маки с Intel и Apple Silicon.
- Улучшенная поддержка Linux на M1.
- Ускоренная аппаратная обработка 3D-графики и OpenGL 4.3 на Linux.
- Быстрое шифрование.
Хоть новые возможности и были разработаны под Windows 11, компания сообщает, что можно попробовать использовать и другие версии операционной системы, но работоспособность с ними VMware не гарантирует. У VMware Fusion есть и ряд ограничений:
- Не поддерживается запуск виртуальных машин с отличной от ARM архитектурой.
- Нельзя создавать виртуальные машины с macOS.
- Ubuntu 20.04.4 и 22.04 для ARM в настоящее время не загружаются.
VMware надеется на углубленное тестирование этой версии своей программы, чтобы доработать ее. Если вам по какой-то причине не нравится Parallels Desktop, то можно подождать VMware Fusion, но сроки ее выхода в виде официальной версии на текущий момент неизвестны.
Как на Мак установить Windows
Для установки Windows с помощью VMware Fusion на ваш Мак необходимо сделать следующее:

Сайт VMware по непонятной причине не открывается с мобильных устройств.
- Скачайте с официального сайта VMware универсальный файл для установки VMware Fusion Technology Preview 22H2, который подойдет и для процессоров Apple, и для Intel.
- Загрузите на свой компьютер установочный файл ARM-версии WIndows. Доступ к сайту Microsoft из России ограничен, поэтому используйте VPN.
- Установите VMware Fusion на ваш компьютер.
- После установки запустите программу, нажмите на «+» и выберите «New».
- В появившемся окне выберите «Install from disc or image».
- Перетащите в появившееся окно скачанный образ Windows.
- Задайте пароль на вход в систему и выберите уровень интеграции двух операционок, который вам будет удобен.
- Нажмите «Finish» и дождитесь конца установки Windows.
После этих простых действий система будет готова к работе, а вы можете устанавливать на нее необходимый вам софт. Обратите внимание, что VMware Fusion поддерживает два уровня интеграции системы:
- More Seamless — когда папки и файлы одной системы видны в другой.
- More Isolated — когда обе системы существуют в своих отдельных пространствах и файлы одной не видны в другой.
Выбирайте тот вариант, который подходит больше именно вам. Я при использовании Parallels применял вариант «More Seamless». В таком случае очень удобно скачать что-то на macOS, а потом запустить Windows и открыть нужный файл там.
Parallels Desktop для Mac M1

Личный опыт использования Parallels Desktop однозначно говорит о том, что программа стоит потраченных на нее денег.
Если же установка Windows на Мак требуется вам прямо сейчас, то можете воспользоваться Parallels Desktop. По своему опыту могу сказать, что это одна из лучших реализаций виртуальной машины для macOS. В отдельном материале я рассказывал, как использовал свой домашний iMac в течение десяти лет. Все это время на моем компьютере установлена Windows 7 именно через Parallels. Программа настолько аккуратно расходует ресурсы, что у меня получалось даже играть в Borderlands 2 по сети, проходя кампанию в кооперативе с другом. При этом не наблюдалось никаких глюков и лагов.
А самое интересное, что в этот же момент у меня был открыт Скайп в macOS, который отъедал как минимум один гигабайт оперативки для аудиозвонков. К сожалению, Ватсап тогда не умел звонить, а Телеграм не существовал, поэтому приходилось использовать такие допотопные технологии. Однако имейте в виду, что если вы используете компьютер на процессоре M1 или M2, то установить вы можете только специальную версию Windows для ARM-процессоров. В такой ситуации далеко не все приложения получится установить на виртуальную машину. А игры не будут работать почти все. Редко кто из разработчиков современных игр делает универсальную версию.
❗️ПОДПИСЫВАЙСЯ НА ТЕЛЕГРАМ-КАНАЛ СУНДУК АЛИБАБЫ. ТАМ КАЖДЫЙ ДЕНЬ ВЫХОДЯТ ПОДБОРКИ САМЫХ ЛУЧШИХ ТОВАРОВ С АЛИЭКСПРЕСС
Установка Parallels Desktop ничем не отличается от VMware Fusion и не вызывает никаких сложностей. В общем, на собственном опыте я искренне советую вам не ждать VMware Fusion, а просто использовать Parallels. Приобрести Parallels Desktop можно по цене в районе 6 тысяч рублей. За отличную функциональность виртуальной машины это, по моему мнению, отличная цена. А вообще, подумайте как следует, нужна ли вам еще одна операционная система на вашем компьютере, если нет потребности в каком-то софте, аналогов которому не существует для macOS. В противном случае просто используйте операционную систему Apple и не забивайте голову и свой компьютер лишними программами.
WindowsПроцессор Apple М1
Skip to main content
Support
Support
Sign in
Sign in with Microsoft
Sign in or create an account.
Hello,
Select a different account.
You have multiple accounts
Choose the account you want to sign in with.
Windows 10 More…Less
You can enjoy Windows 10 on your Apple Mac with the help of Boot Camp Assistant. Once installed, it allows you to easily switch between macOS and Windows by simply restarting your Mac.
For details and installation steps, follow the instructions at https://support.apple.com/HT201468. If you need more help, please contact Apple support by clicking the link at the bottom of that webpage.


SUBSCRIBE RSS FEEDS
Need more help?
Expand your skills
Explore Training
Get new features first
Join Microsoft Insiders
Was this information helpful?
(The more you tell us the more we can help.)
(The more you tell us the more we can help.)
What affected your experience?
Resolved my issue
Clear instructions
Easy to follow
No jargon
Pictures helped
Other
Didn’t match my screen
Incorrect instructions
Too technical
Not enough information
Not enough pictures
Other
Any additional feedback? (Optional)
Thank you for your feedback!
×
Содержание
- Вариант 1: BootCamp
- Шаг 1: Подготовка
- Шаг 2: Установка Windows 7
- Шаг 3: Настройка
- Вариант 2: Виртуальные машины
- Вопросы и ответы
Вариант 1: BootCamp
Наиболее функциональный из доступных методов, который позволяет установить «семёрку» второй ОС.
Шаг 1: Подготовка
Перед началом процедуры следует отметить, что данная возможность доступна не для всех устройств. Системные требования следующие:
- устройство с процессором Intel частотой не менее 1 ГГц;
- системное ПО – версия Mac OS X Lion и выше, но не выше macOS Mojave;
- объём ОЗУ – не менее 1 Гб.
Установить «семёрку» по этому методу на новейшие MacBook с процессорами архитектуры ARM не получится, поэтому если у вас именно такой девайс, воспользуйтесь вариантом с виртуальной машиной, о котором поговорим в соответствующем разделе.
Что касается непосредственно подготовки, необходимо выполнить следующее:
- Получите установочный образ Windows 7 в формате ISO, редакция значения не имеет, но для версий x64 понадобится выделить чуть больше места.
- Подготовьте флешку или оптический диск, с которого и будет происходить установка операционной системы. Носитель подбирайте объёмом не менее 4 ГБ, а диск – формата DVD от надёжного производителя (например, Verbatim или TDK), и установите его в MacBook.
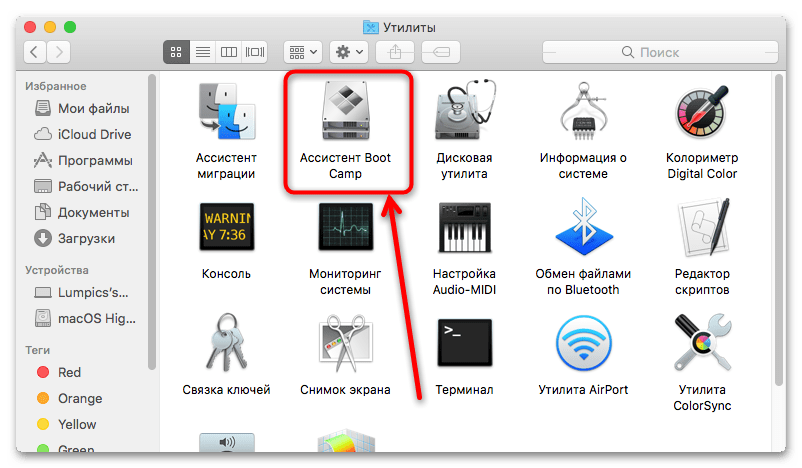
- Процедуру инсталляции покажем на примере устройства под управлением Mac OS X High Sierra — последней, где рассматриваемая возможность поддерживается. Убедитесь, что подключенный носитель распознаётся корректно, затем откройте «Программы» – «Утилиты» и выберите «Ассистент Boot Camp».
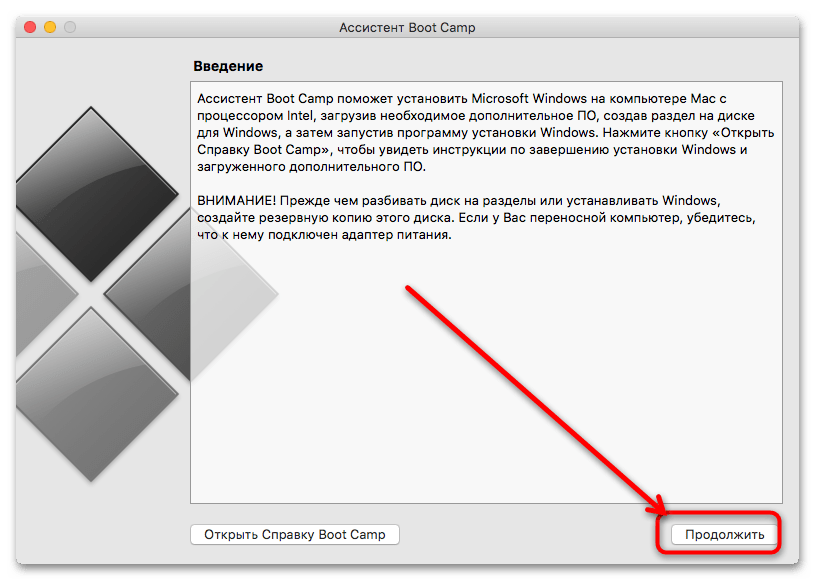
- В первом окне нажмите «Продолжить».
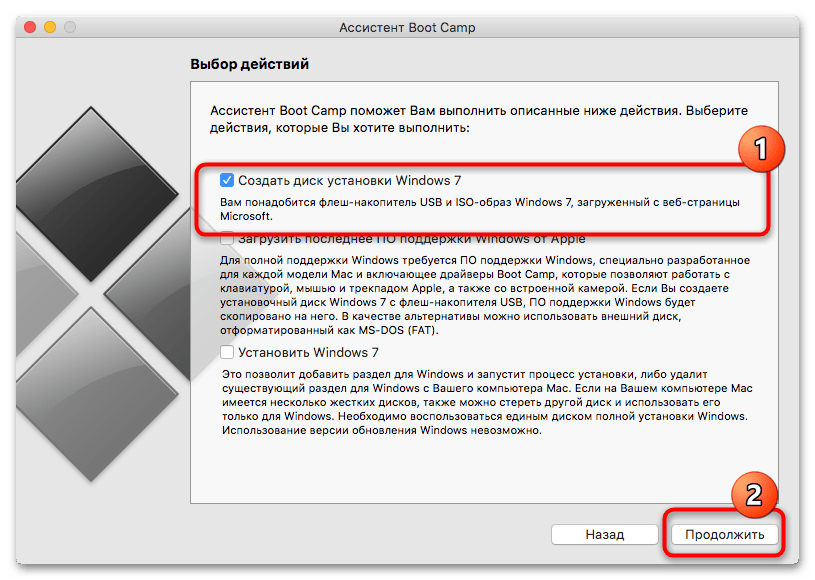
- Оставьте отмеченной только опцию «Создать диск установки Windows 7».
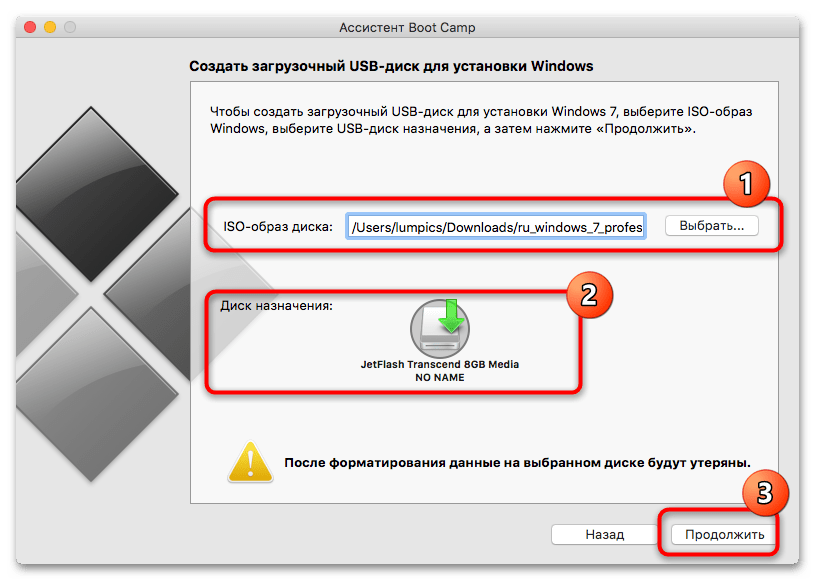
- Здесь первым делом проверьте строку с ISO-образом – как правило, ОС автоматически определяет его наличие в файловой системе. Если этого не произошло, воспользуйтесь кнопкой «Выбрать» и укажите его в диалоговом окне Finder. Также убедитесь, что в качестве диска назначения указаны ваша флешка или DVD, после чего нажмите «Продолжить».

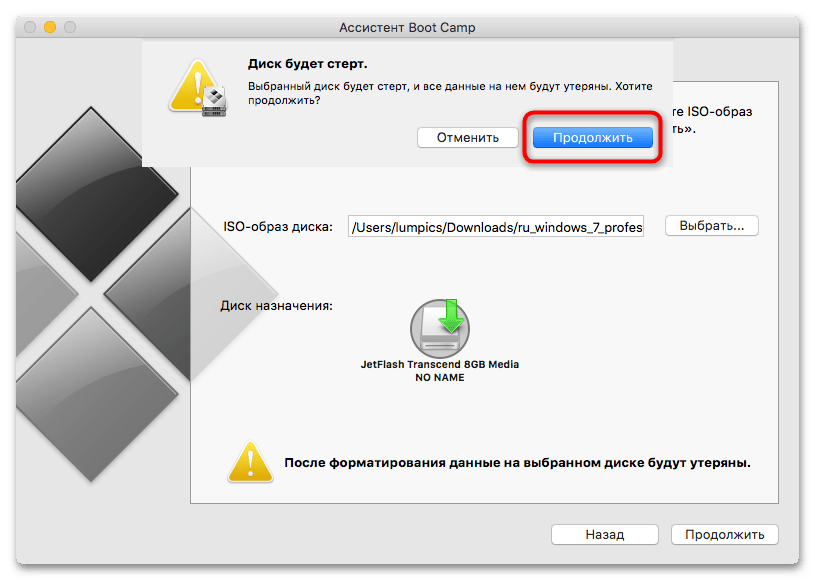
Подтвердите форматирование накопителя.
В процессе утилита может попросить ввести пароль администратора для продолжения. Сделайте это и нажмите «Снять защиту».
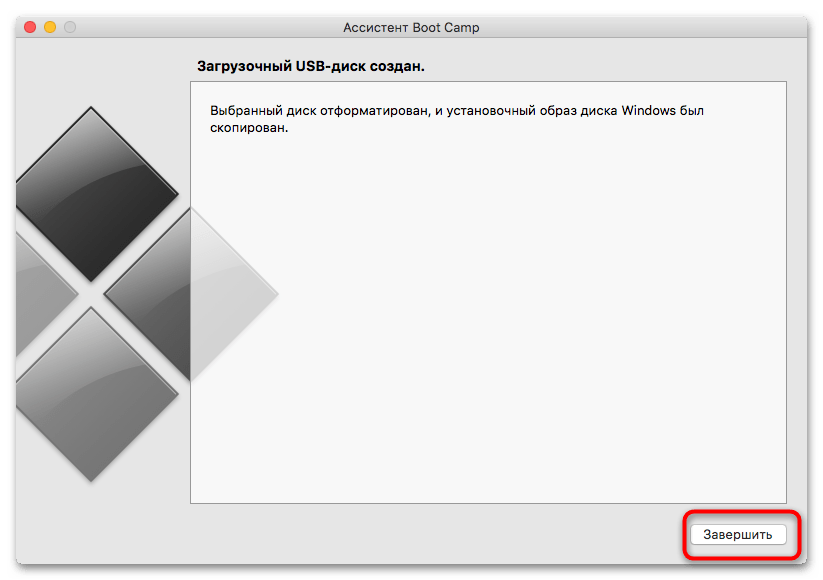
- Подождите, пока носитель будет подготовлен, затем в последнем окне средства кликните «Завершить».
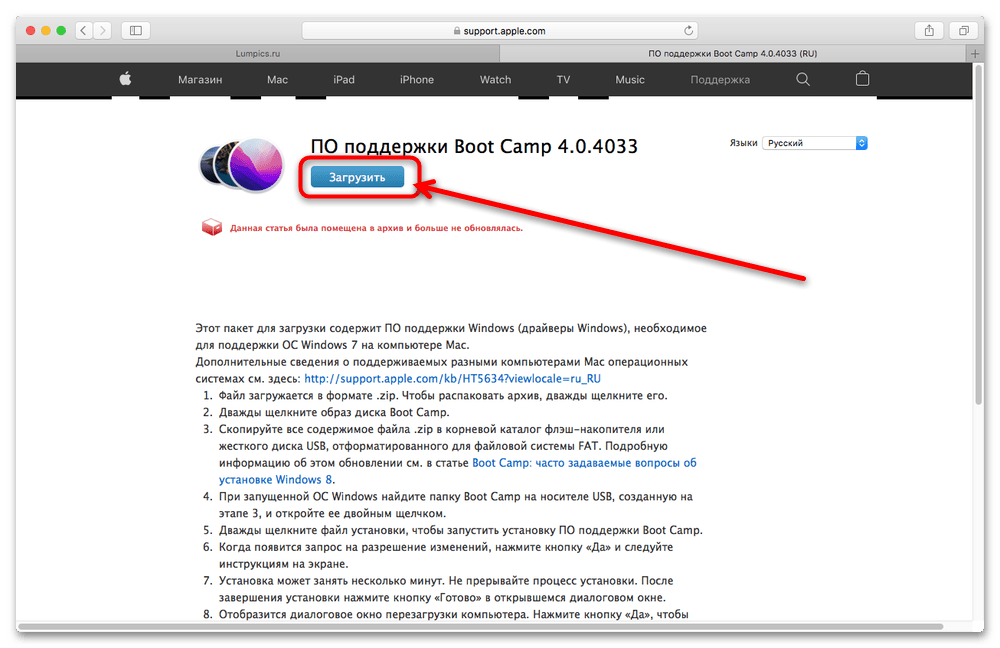
- Пока оставляем флешку/диск в покое и займёмся загрузкой необходимых дополнительных компонентов. Откройте Safari (либо другой предпочитаемый браузер) и перейдите по ссылке, предложенной ниже.
Ресурс поддержки Apple по установке Windows 7
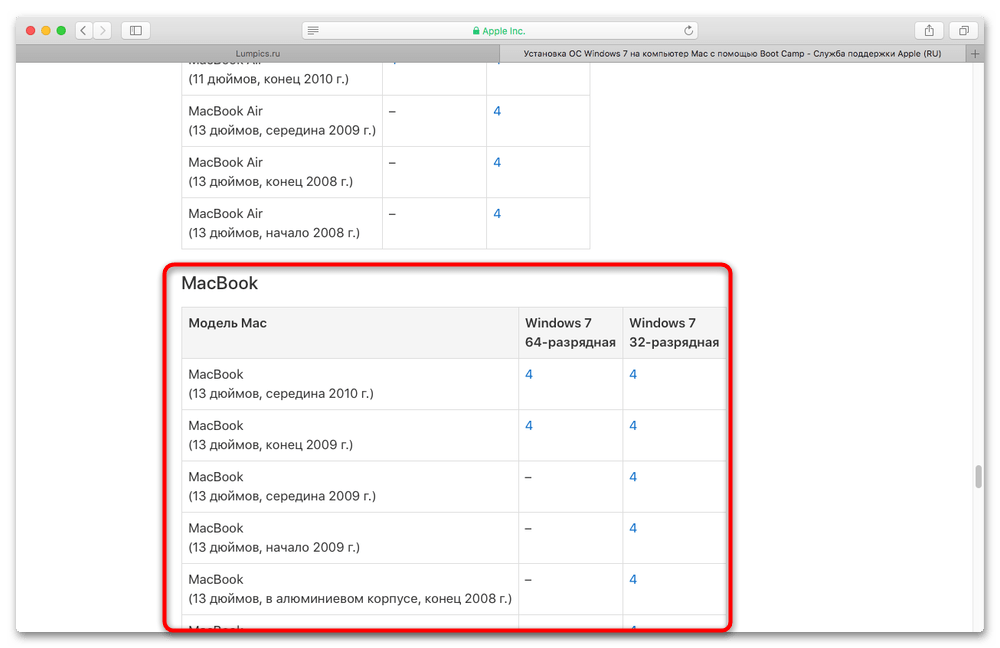
Обратите внимание на таблицы совместимости: найдите в них модель вашего МакБука, затем кликните по номеру версии дополнительного ПО, которое требуется для начала его загрузки.


На следующей странице воспользуйтесь ссылкой «Загрузить».
- После того как пакет скачается, распакуйте его и скопируйте полученную папку в корень загрузочной флешки или диска с Windows.
Важно! Папку нельзя переименовывать и/или удалять с неё файлы, а также копировать в место, отличное от корневого каталога загрузочного накопителя!


На этом подготовительный этап окончен и можно переходить к следующему шагу.
Шаг 2: Установка Windows 7
После подготовки загрузочного накопителя можно переходить к непосредственной инсталляции ОС.
- Запустите Boot Camp Assistant и в окне выбора действий снимите отметки со всех параметров, кроме «Установить Windows 7», затем кликните «Продолжить».
- Здесь предстоит разбить накопитель на разделы: один останется с macOS, на второй же будет установлена Windows 7. В зависимости от редакции последней, понадобятся 20 (x32) или 26 (x64) Гб места – это необходимый минимум. Объём выделяемого пространства можно регулировать простым перетаскиванием, а также используя разбитие на равные части по нажатию одноимённой кнопки. Определившись с этим, нажмите «Продолжить».
- Подождите, пока утилита выполнит эту операцию (в процессе понадобится ввести пароль администратора).
- По окончании разделения MacBook перезагрузится и начнётся инсталляция Windows. Первым делом выберите язык и раскладку – «Русский» или любой другой предпочтительный.
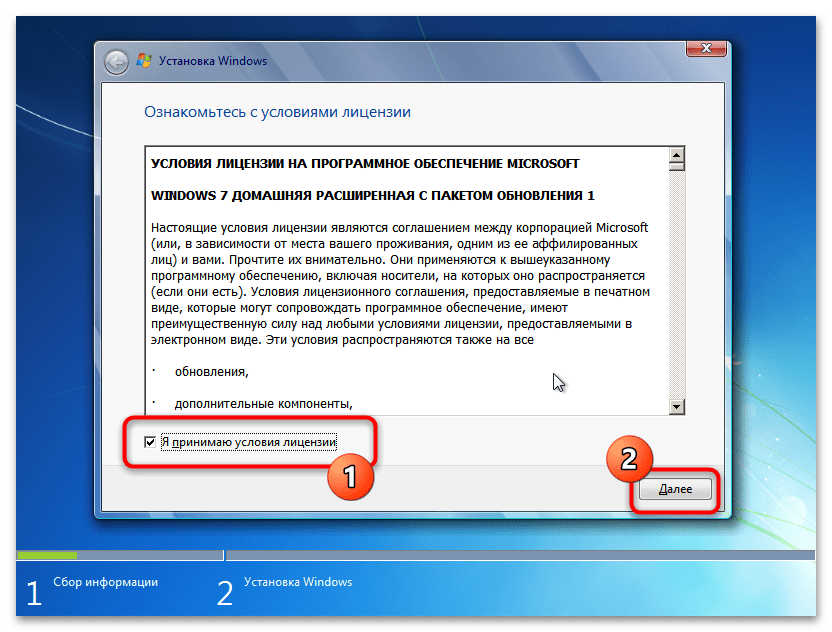
- Воспользуйтесь пунктом «Установить».
- Примите лицензионное соглашение.
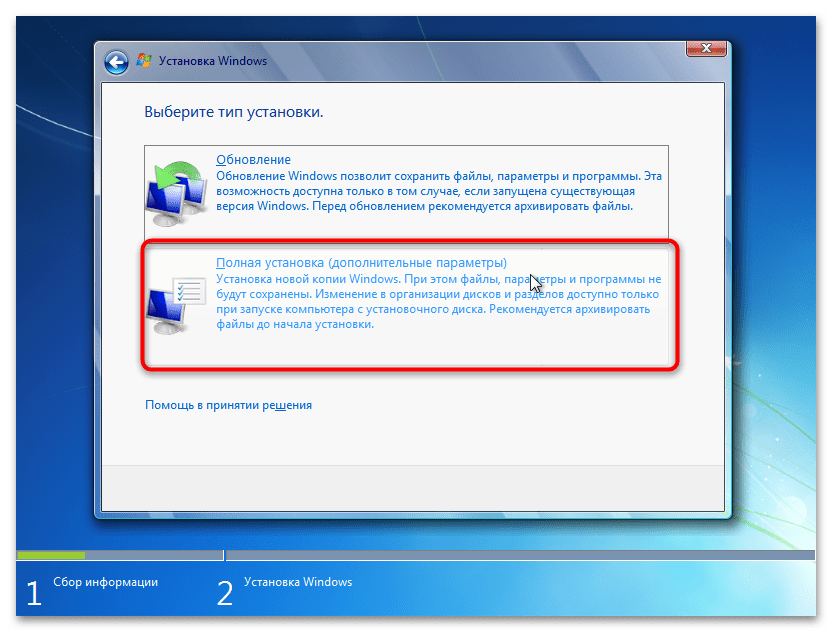
- Далее укажите тип инсталляции как «Полная».
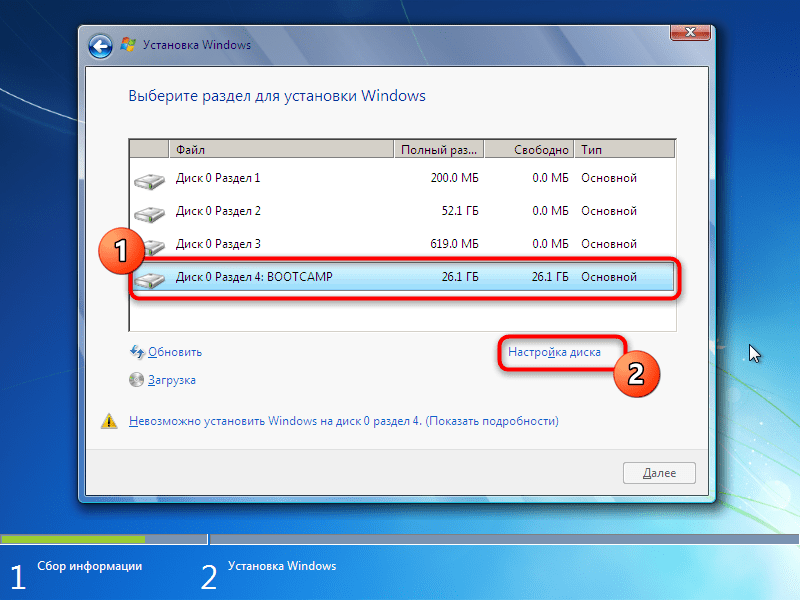
- Здесь в качестве места установки задайте раздел «BOOTCAMP».
Важно! Устанавливать Виндовс 7 нужно только на этот раздел!
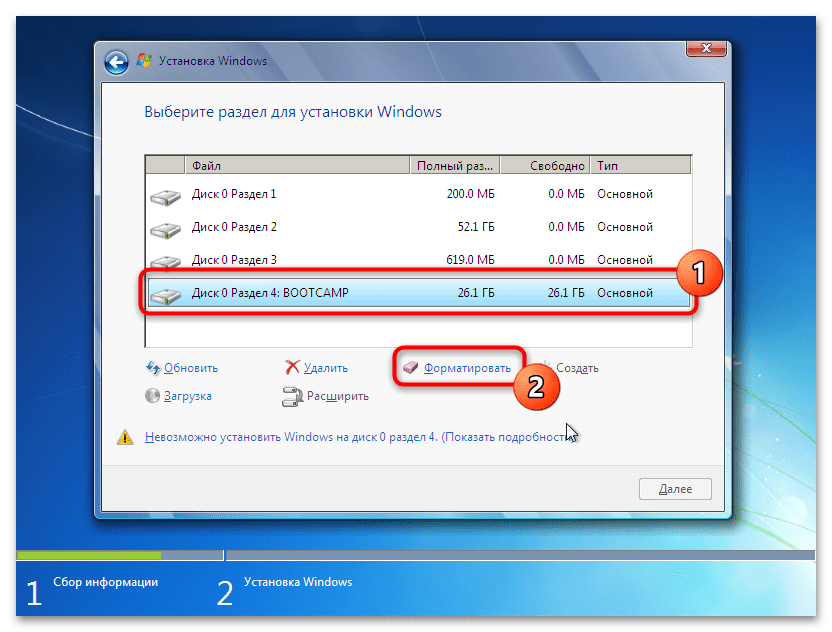
Если появилась надпись, что на этот диск установка невозможна, его понадобится отформатировать – выделите соответствующий раздел и нажмите «Настройки диска».

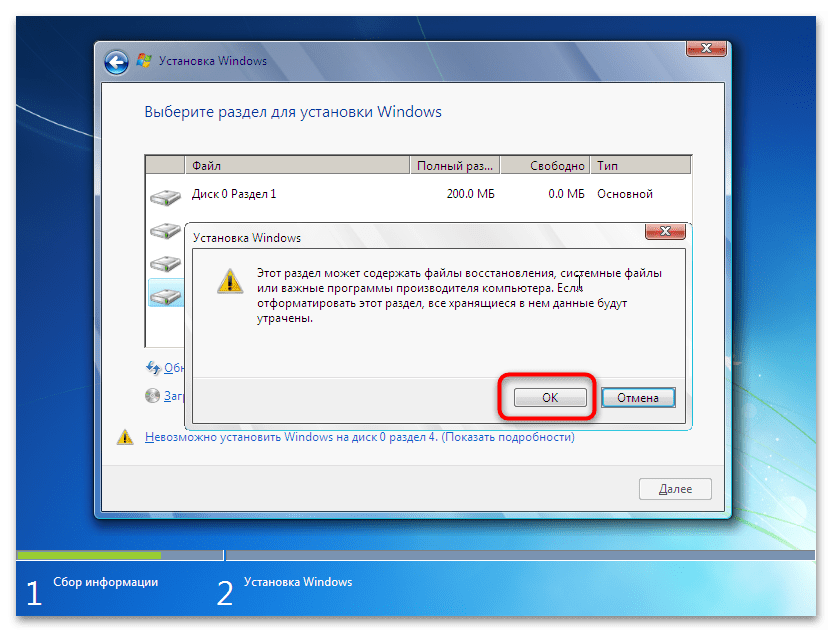
Воспользуйтесь опцией «Форматировать».

Кликните «ОК» и дождитесь окончания процедуры.
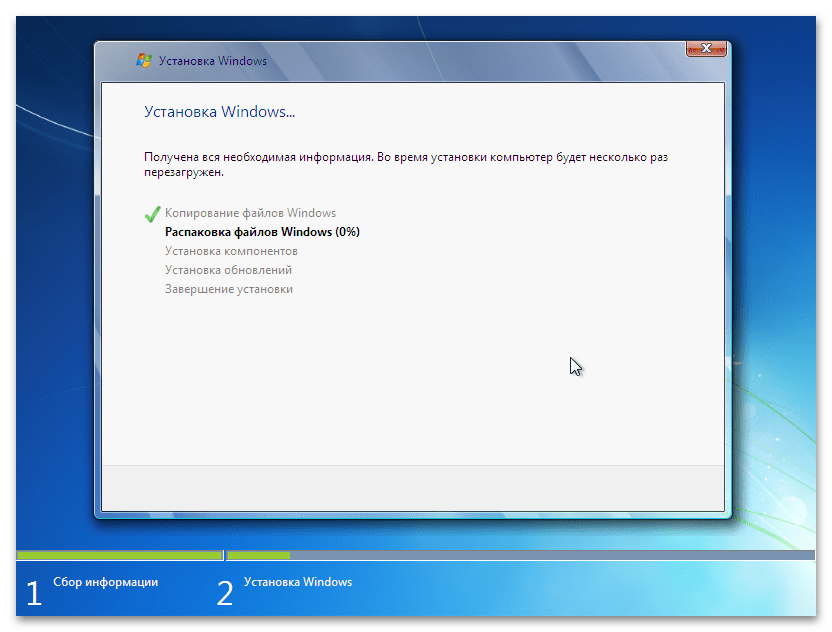
- Начнётся процесс установки «семёрки» – в зависимости от типа используемого накопителя он может занять какое-то время.
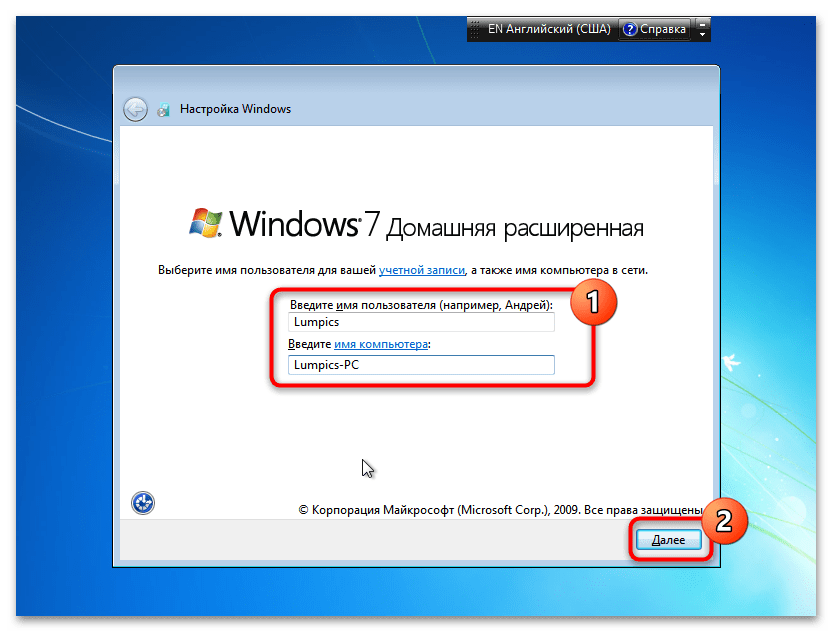
По его окончании появится окно первичной настройки – если вы знаете, что нужно делать, можете сразу переходить к следующему этапу, в противном же случае читайте далее. Первым делом введите имя будущего пользователя – во избежание проблем с совместимостью лучше на латинице, раскладка переключается сочетанием Alt (Option) + Shift.
Выберите, хотите ли вы использовать пароль – это рекомендуется в целях безопасности.
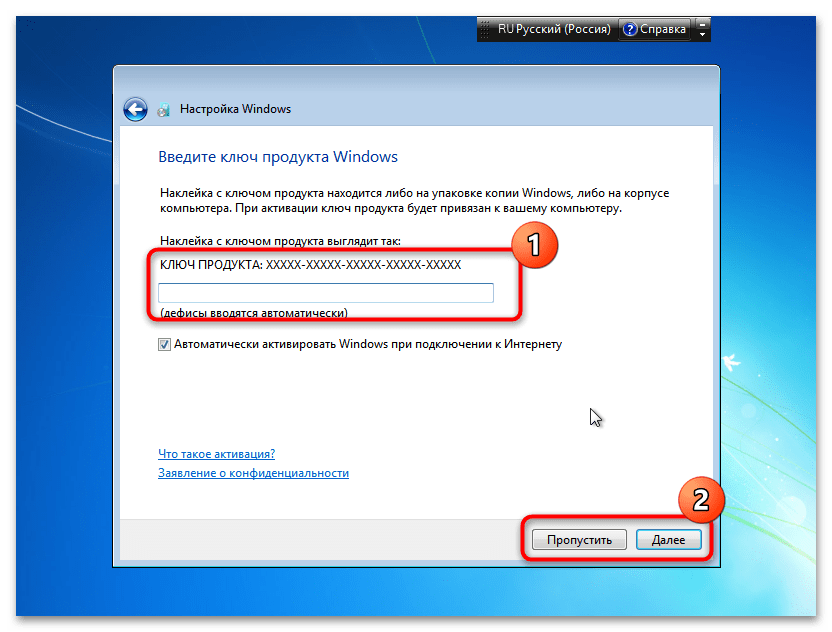
Введите ключ продукта для его активации – данную операцию можно выполнить и позже, поэтому если у вас сейчас нет времени, смело пропускайте.
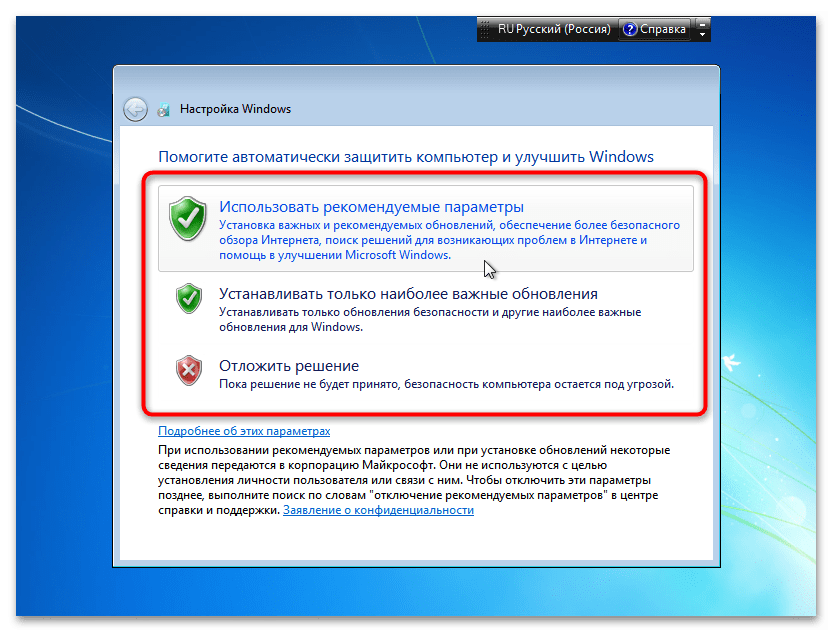
Так как на момент написания статьи (январь 2022 года) поддержка Windows 7 полностью прекращена, параметры обновления можно указывать любые.
Задайте время и дату.
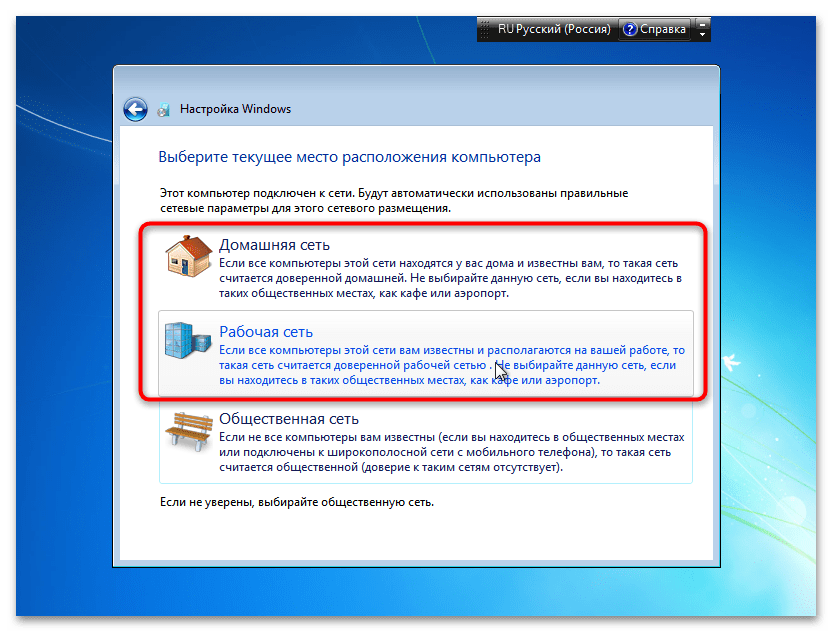
Укажите используемый тип сети – «Домашняя», если операция производится на домашнем же MacBook.


На этом инсталляция Windows 7 окончена.
Шаг 3: Настройка
Для комфортного использования «семёрки» на МакБуке понадобится также выполнить ряд дополнительных действий.
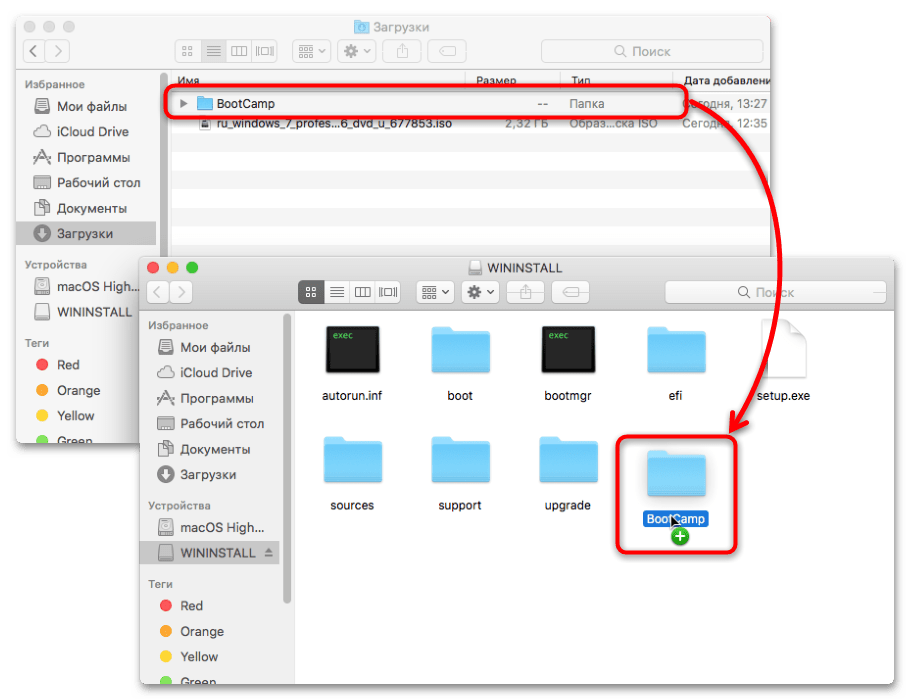
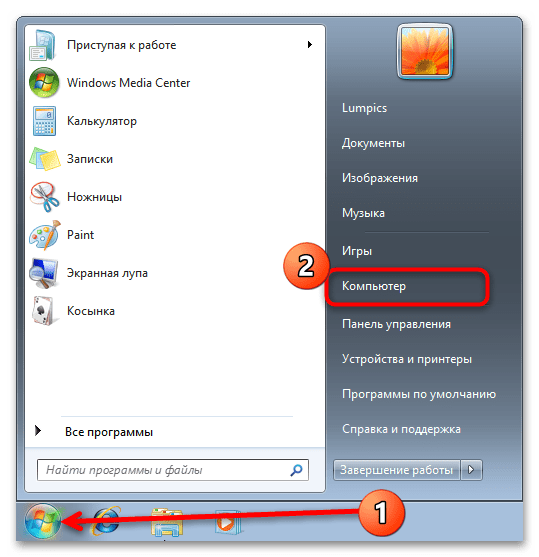
- В интерфейсе Windows откройте флешку – для этого нужно кликнуть по кнопке «Пуск» и воспользоваться пунктом «Компьютер».

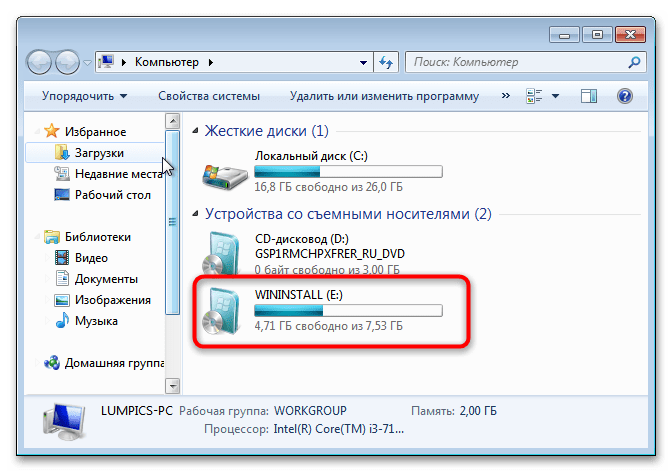
Накопитель называет WINISTALL, дважды кликните по нему левой кнопкой мыши.
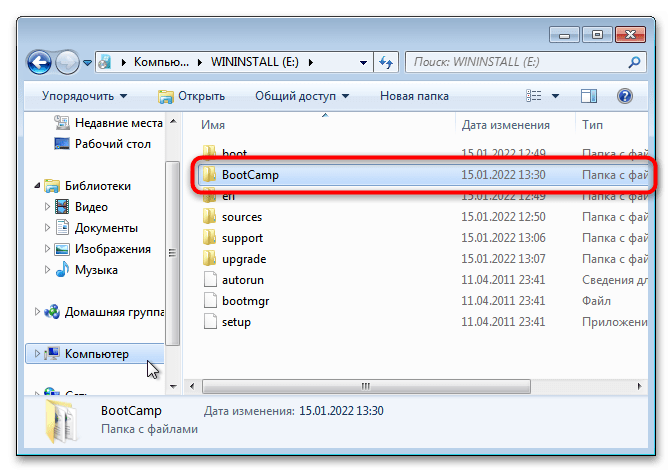
- Найдите каталог BootCamp, который мы загрузили на первом этапе, и откройте.
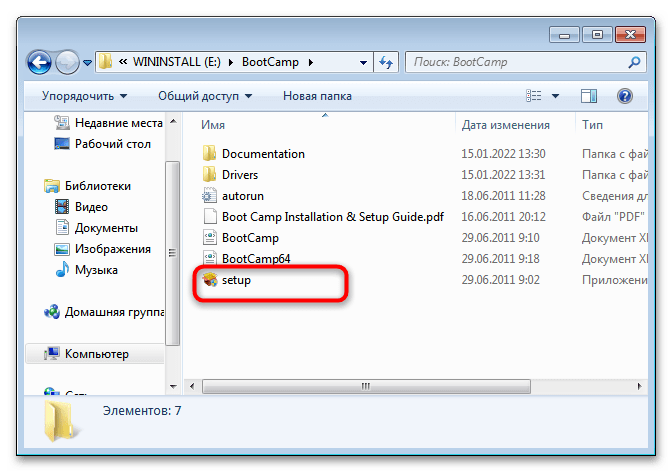
- Запустите файл с названием setup.

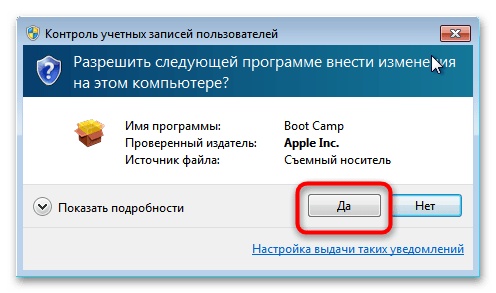
При появлении окна с просьбой запуска от имени администратора нажмите в нём «Да».
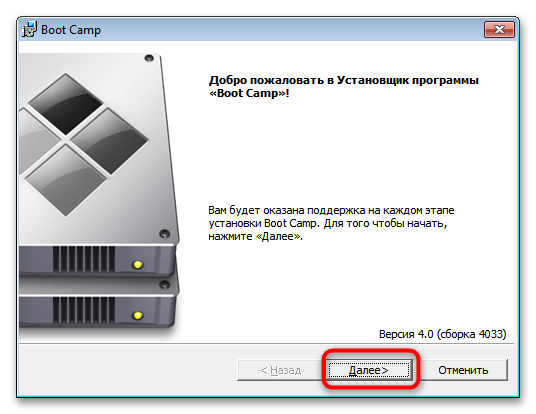
- В первом окне инсталлятора щёлкните «Далее».
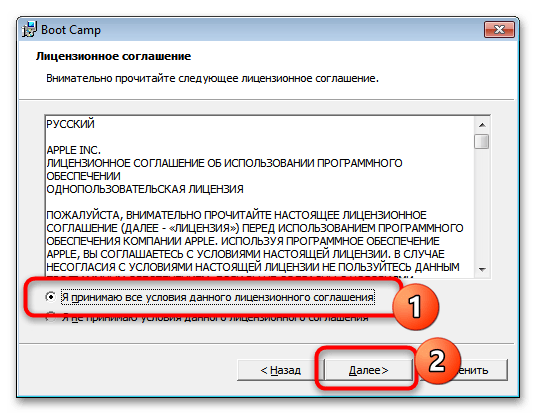
- Примите лицензионное соглашение.
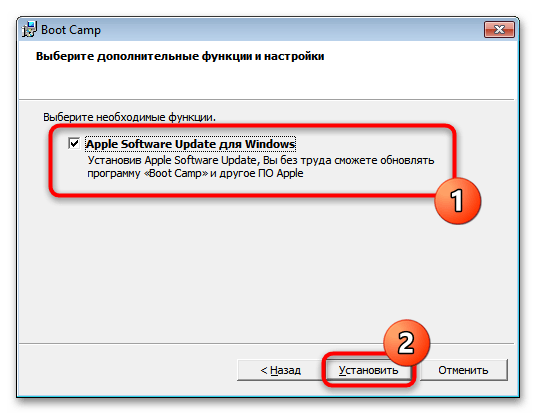
- Убедитесь, что нужный компонент отмечен галочкой, затем кликните «Установить».
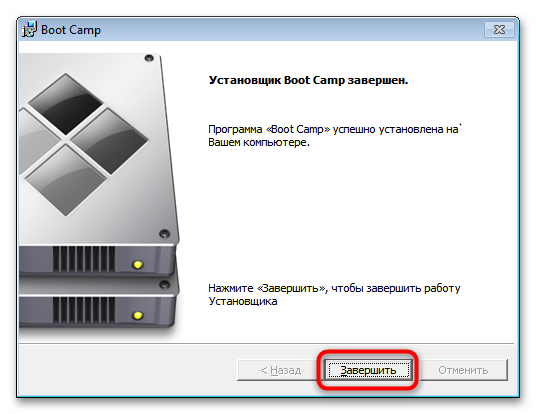
- Подождите, пока необходимое ПО будет установлено, затем нажмите «Завершить».

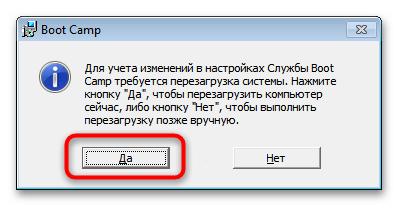
В предложении о перезагрузке кликните «Да».
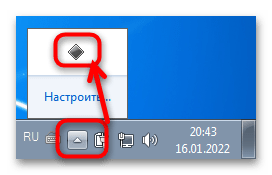
- По умолчанию первой запускается Windows 7, так что не беспокойтесь, если не увидите знакомую консоль загрузки macOS. Для того чтобы настроить запуск сначала именно «яблочной» операционки, в интерфейсе «семёрки» найдите системный трей – это область в правом нижнем углу экрана. Там находится значок Boot Camp – если его не видно, нажмите на стрелку, иконка обязательно будет там.

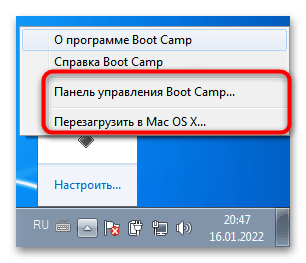
Щелчок правой кнопкой мыши по нему вызовет контекстное меню, посредством которого можно перезагрузиться в macOS, а также открыть панель управления оснасткой.

После запуска средства просто перетащите загрузочный том macOS на крайнюю левую позицию – теперь по умолчанию будет загружаться именно она. Точно так же поступите с разделом Windows, если напротив, требуется, чтобы первым стартовал именно он.

Как видим, ничего сверхсложного в установке «семёрки» посредством Boot Camp нет, главное – быть внимательным.
Вариант 2: Виртуальные машины
Если ваш MacBook официально не совместим с Windows 7, однако эта система всё равно требуется, лучшим вариантом будет использование виртуальной машины – как эксклюзивной для macOS программы Parallels Desktop, так и решения от VMWare или Oracle Virtualbox. Мы уже рассматривали принципы установки системы от Microsoft в данном ПО, поэтому ознакомьтесь с материалами по ссылке далее.
Подробнее:
Способы установки Windows на macOS
Виртуальные машины для macOS
Еще статьи по данной теме:
Помогла ли Вам статья?
It’s fairly easy to create bootable USB installation media for Windows 10 when using Microsoft’s Media creation tool. Unfortunately this tool is not available for macOS. This post explains you how to do this without using a Windows-based PC or VM and without using BootCamp assistant. This can come in handy when trying to install Windows on your mac or when there is simply only an Apple Mac available and you need to boot the Windows installer for various reasons.
YouTube Video
If you are interested, I also created a YouTube video from this blogpost. If you prefer classic text, you can just follow the rest of this article:
Introduction
Unfortunately, since some time, it became a bit more complicated to create this USB drive from macOS. The main reason for this is because macOS supports only FAT32 as filesystem that is compatible with Windows (and ExFat but that causes issues to boot from). FAT32 has a file size limit of 4GB while the installation ISO now contains one file that is larger.
To overcome this, we will need to use a tool, Wimlib, which is able to split this file in two parts. More about this later.
In case you’re looking for the instructions to create a bootable USB drive to install Windows 11 instead, have a look at the following article: https://jensd.be/1740/windows/create-a-bootable-windows-11-installation-usb-on-macos
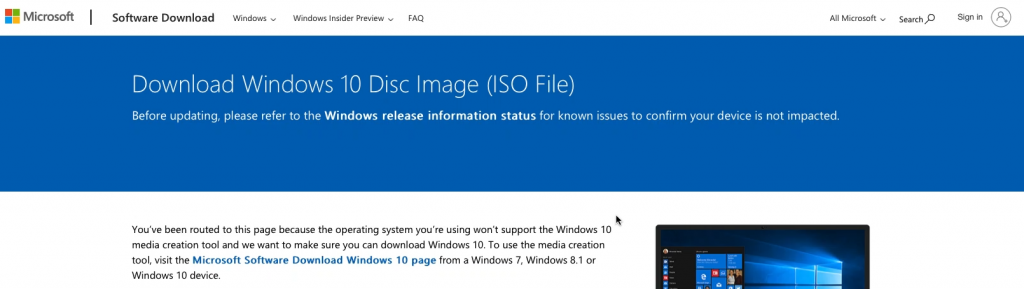
Download the Windows 10 ISO
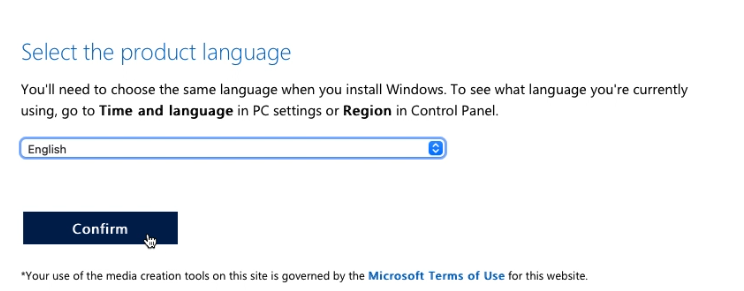
Let’s start by downloading the ISO from Microsoft. This can be done from: https://www.microsoft.com/en-us/software-download/Windows10ISO. When you open this link on macOS, it should show you the ability to download the ISO rather than the Media Creation tool, which is shown when opening the same on a Windows-based PC.
Choose for Windows 10, then select the preferred language, go for the “64-bit Download” and wait for the download to complete to get the .iso file on your Mac:
Prepare the USB drive
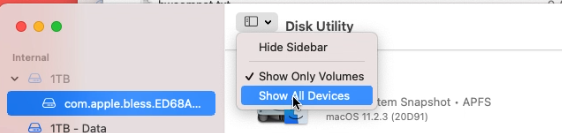
While the ISO is downloading, we can prepare our USB drive. You will need one that is at least 8GB. Insert the drive in your Mac and start Disk Utility.
In Disk Utility, choose to show all devices:
Then, on the left side, select your USB drive from the list and click Erase on the top right menu. In the dialog, enter a name for the drive (WINUSB here), choose to format as “MS-DOS (FAT)” and “Master Boot Record” as scheme. Finally click “Erase” to complete the process.

Copy all smaller files to the USB drive
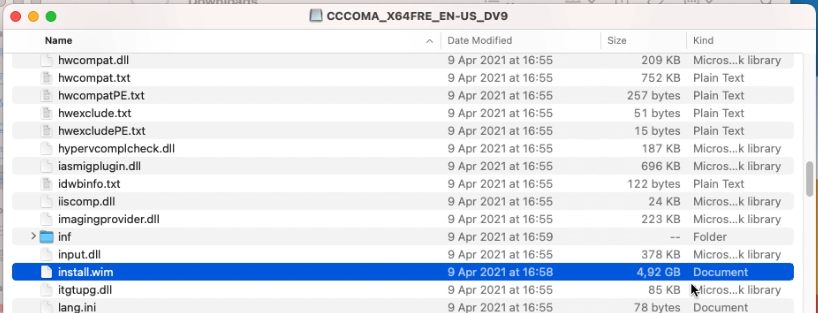
After the previous step, our USB drive is prepared. Once the ISO file is download as well, double click the ISO file to mount it. Then open it in Finder. As you can see, the sources folder contains one large file: install.wim which is over 4GB and will not fit on the FAT32-formatted USB drive:
We will take care of that later so for now, copy all remaining files to the USB drive using Finder.
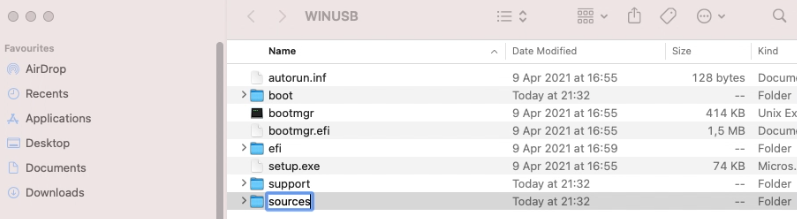
I typically start by copying all separate files and folders, except for the sources folder:
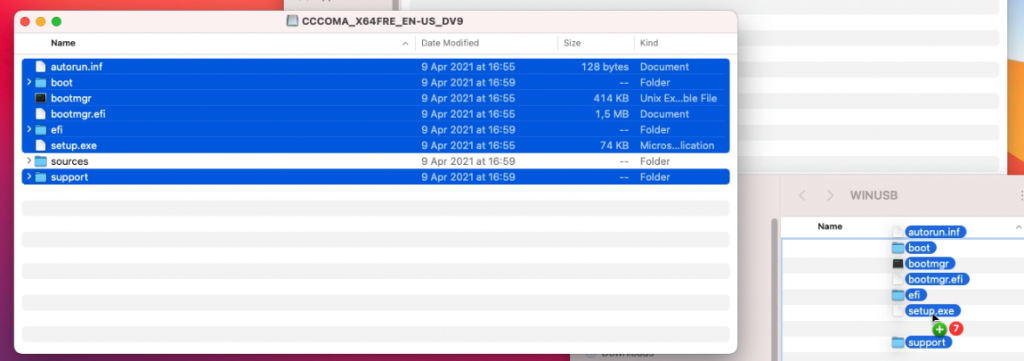
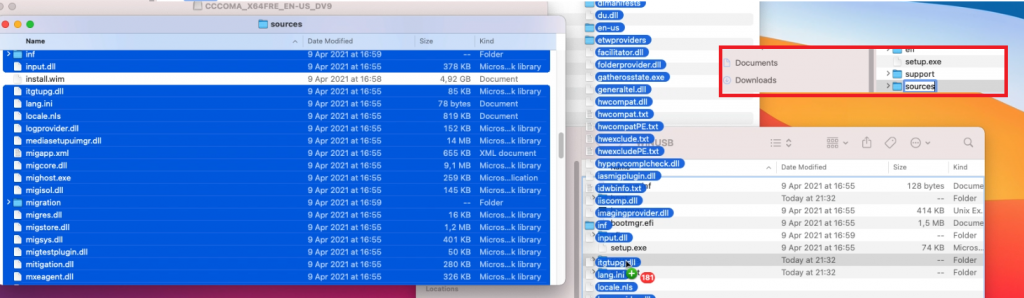
Then I create the sources folder and copy all files from sources with the exception of install.wim:
Prepare to split install.wim
So far things were pretty straightforward and if it wouldn’t be for that large file it would be a piece of cake. Unfortunately we have to work around that by splitting the file in two parts, smaller than the limit of our file system on the USB drive.
To accomplish this, we can use Wimlib (https://wimlib.net/). This is a tool that is developed to work with, and modify, .wim files. The easiest way to get this installed on your Mac is by using Brew (https://brew.sh/).
So, as just mentioned, we start by installing Brew. As is instructed on the Brew website, copy and paste the mentioned line in a terminal and execute it.
user@users-iMac ~ % /bin/bash -c "$(curl -fsSL https://raw.githubusercontent.com/Homebrew/install/HEAD/install.sh)" ==> Checking forsudoaccess (which may request your password). Password: ==> This script will install: /usr/local/bin/brew /usr/local/share/doc/homebrew ... ==> Next steps: Runbrew helpto get started Further documentation: https://docs.brew.sh user@users-iMac ~ %
Once Brew is installed, we can use it to install Wimlib:
user@users-iMac ~ % brew install wimlib
 ==> Downloading https://ghcr.io/v2/homebrew/core/openssl/1.1/manifests/1.1.1k
...
==> Installing wimlib
==> Pouring wimlib--1.13.4.big_sur.bottle.tar.gz
🍺  /usr/local/Cellar/wimlib/1.13.4: 65 files, 2.7MB
user@users-iMac ~ %
Split install.wim and get it on the USB drive
Now that we have Wimlib installed, we can use it to split the large install.wim file and copy it to our USB drive. In the same or a new Terminal session, execute the following:
user@users-iMac ~ % wimlib-imagex split /Volumes/CCCOMA_X64FRE_EN-GB_DV9/sources/install.wim /Volumes/WINUSB/sources/install.swm 4000
Splitting WIM: 4654 MiB of 4654 MiB (100%) written, part 2 of 2
Finished splitting "/Volumes/CCCOMA_X64FRE_EN-GB_DV9/sources/install.wim"
In the command above, we told to execute the wimlib-imagex tool (part of Wimlib) and passed some arguments:
- “split” to indicate that we want to split this larger file
- “/Volumes/CCCOMA_X64FRE_EN-GB_DV9/sources/install.wim” which is the source file to split. Keep in mind that the name under /Volumes depends on the ISO name so you need to adjust this accordingly. Just do ls /Volumes from the terminal to see what is there.
- “/Volumes/WINUSB/sources/install.swm” the destination of where the split files should end. As with the ISO name, here WINUSB is the volume label I gave to my USB drive when erasing it with Disk Utility. Adjust this as well when you chose something different earlier.
- 4000 the max. size of the destination file, so the file will be split in a part of 4000MB and the rest.
After this command completes, you can see that now two files were created on the USB drive:

The Windows 10 installer knows how to deal with these and will just work fine.
That should be all you need to create a bootable USB drive for Windows 10 installation.
(Optionally) download Windows 10 drivers for your Mac
If you plan to use the USB drive, which you created with the above steps, on a regular PC then you can skip this step. If you, on the other hand, plan to use this for installation on a Mac, it is a good idea to go through these additional steps.
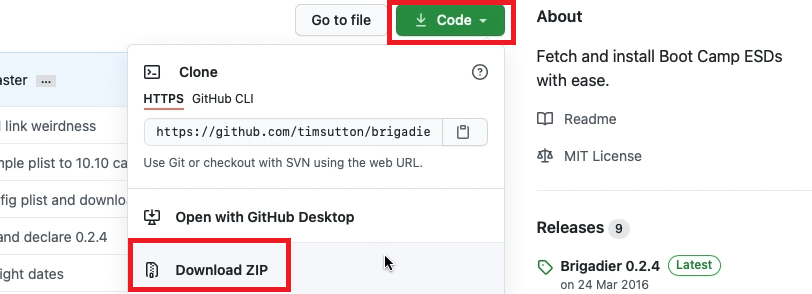
The goal of this is to fetch the necessary drivers for use on Mac. As I did from Windows in a previous article, I will use Brigadier for this. Brigadier, which is basically a script, works just from macOS directly as well.
From the author’s Github page: https://github.com/timsutton/brigadier, click the green Code button then choose to “Download ZIP”
Once the file is downloaded, open a fresh Terminal session and navigate to the “brigadier-master” in your Downloads folder, then simply execute it using ./brigadier:
user@user-iMac ~ % cd Downloads/brigadier-master
user@user-iMac brigadier-master % ./brigadier
Using Mac model: iMac13,1
...
Expanding flat package...
Extracting Payload...
Extracted to /Users/user/Downloads/brigadier-master/BootCamp-041-84821/WindowsSupport.dmg
user@user-iMac brigadier-master %
As you can see in the output, executing brigadier automatically detected the model identifier of the mac which we executed this on. If you want to download the required drivers for another model, you can simply pass it using the –model parameter. The files got downloaded as a subfolder of brigadier-master as WindowsSupport.dmg
All that is left to do is to navigate to the folder using Finder, then to open WindowsSupport.dmg to mount it and to copy those files to the USB drive:
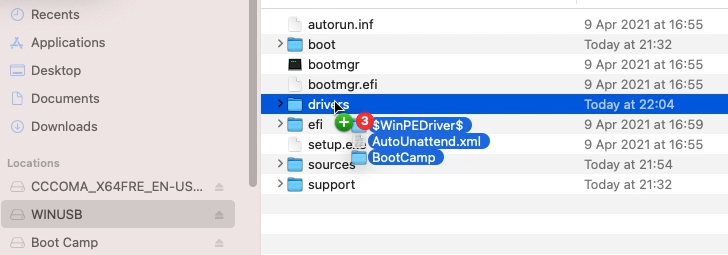
After going through the installation, executing BootCamp/setup.exe will install most of the required drivers or at least enough to continue the rest of the driver installation using Windows update.
Boot from the USB drive
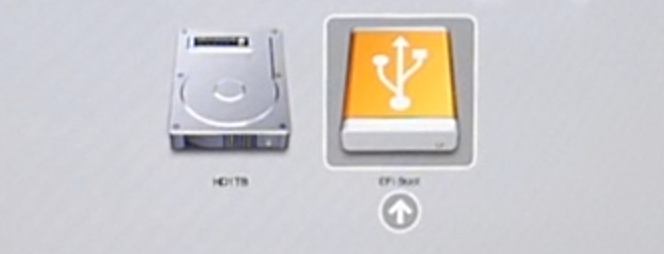
As the final step, now that the USB drive is prepared, with or without additional drivers for your Mac, you can boot from it.
On a regular PC, this is usually done by pressing a key at BIOS time to bring up a boot menu (F11 is often used for this) or, for some older BIOS, by changing the boot order from the BIOS setup.
On a Mac, you can choose to boot from USB by holding down the Alt key on boot and to select the USB drive from the boot loader:
Apple has released support for bootcamping Windows 10, but only on 2012 Macs and later. Despite not being supported. it is possible to install Windows 10 on earlier iMacs and it seems to run quite well.
IMPORTANT: Unplug all external and physical hard drives (where possible) that you won’t be installing to to avoid accidentally erasing them. Also make note of which drives and partitions remain (e.g. System and Storage hard drives), and be super careful to not erase the wrong one.
RECOVERY: If you nuke your machine, restore your time machine backup. Instructions here.
Requirements
- A mid-2011 iMac or similar running OSX El Capitan
- An 8GB or larger USB drive
- An ISO containing Windows 10 (I used Windows 10 Enterprise)
- 50GB free disk space, 100GB recommended
Step 1: Disable El Capitan’s System Integrity Protection
El Capitan ships with a new OS X feature: System Integrity Protection (SIP), also known as «rootless» mode. This reduces the attack surface for malware that relies on modifying system files by preventing any user, whether with system administrator («root») privileges or not from modifying a number of operating system directories and files.
It is necessary to disable OSX’s System Integrity Protection so you can modify the Bootcamp Utility in the next step.
- Restart your Mac.
- Before OS X starts up, hold down Command-R and keep it held down until you see an Apple icon and a progress bar. Release. This boots you into Recovery.
- From the Utilities menu, select Terminal.
- At the prompt type exactly the following and then press Return:
csrutil disable - Terminal should display a message that SIP was disabled.
- From the menu, select Restart.
Once you have finished installing Windows you should enable SIP again by following the same steps but run csrutil enable instead.
Step 2: Modify Bootcamp to allow creation of a bootable USB
For some reason Apple decided that if your Mac has an optical drive, there could be no reason you need to Bootcamp off a USB. If you’re like me, you haven’t touched an optical disk in a few years and prefer the ease and speed of using a USB flash drive instead.
- Find out your Macs Model Identifier and Boot ROM Version:
- Open Terminal and run
system_profiler SPHardwareDataType. Note down the values. - My mid-2011’s Model Identifier was «iMac12,2» and the Boot ROM Version was «IM121.0047.B23».
- Open terminal and navigate to /Applications/Utilities/Boot Camp Assistant.app/Contents
- Change directory:
cd /Applications/Utilities/Boot Camp Assistant.app/Contents - Show files in directory:
ls
- The file we are going to edit is the Info.plist file.
- Make a backup of this file by running:
sudo cp Info.plist Info.plist.bak - You will need to enter your OSX user account password.
- If you get the error saying cp: Info.plist.bak: Operation not permitted, SIP is still enabled, please refer to step 1.
- Open the Info.plist in your favorite text editor, to keep this guide simple, I’ll use nano.
sudo nano Info.plist
- You want to edit FOUR things:
- Add your Boot ROM Version to DARequiredROMVersions
- Delete the word «Pre» from UEFIModels and add your Model Identifier
- Delete the word «Pre» from USBBootSupportedModels and add your Model Identifier
- Remove your model from Win7OnlyModels (if it’s there)
- Close and save the file by pressing
Ctrl+xfollowed byyon your keyboard. - The last step is to do a code sign. Boot Camp Assitant will not run if it’s been edited. You need to resign it. Open Terminal (use spotlight to find it) and type this:
sudo codesign -fs - /Applications/Utilities/Boot Camp Assistant.app- It will probably ask for your password. Then it will say you need to download a developer tool from Apple. Agree to download it. (You don’t need to install the whole X-Code, if it asks.) Once its been installed (it’s automatic), you need to go BACK to Terminal and run that command again. This time it will work.
Step 3: Download the Bootcamp Windows Support Software
This download will contain the Windows drivers you will need to run Windows on your Mac. Windows 10 will install and run without them but not very well and a lot of hardware either won’t work, or won’t work very well until you install the drivers.
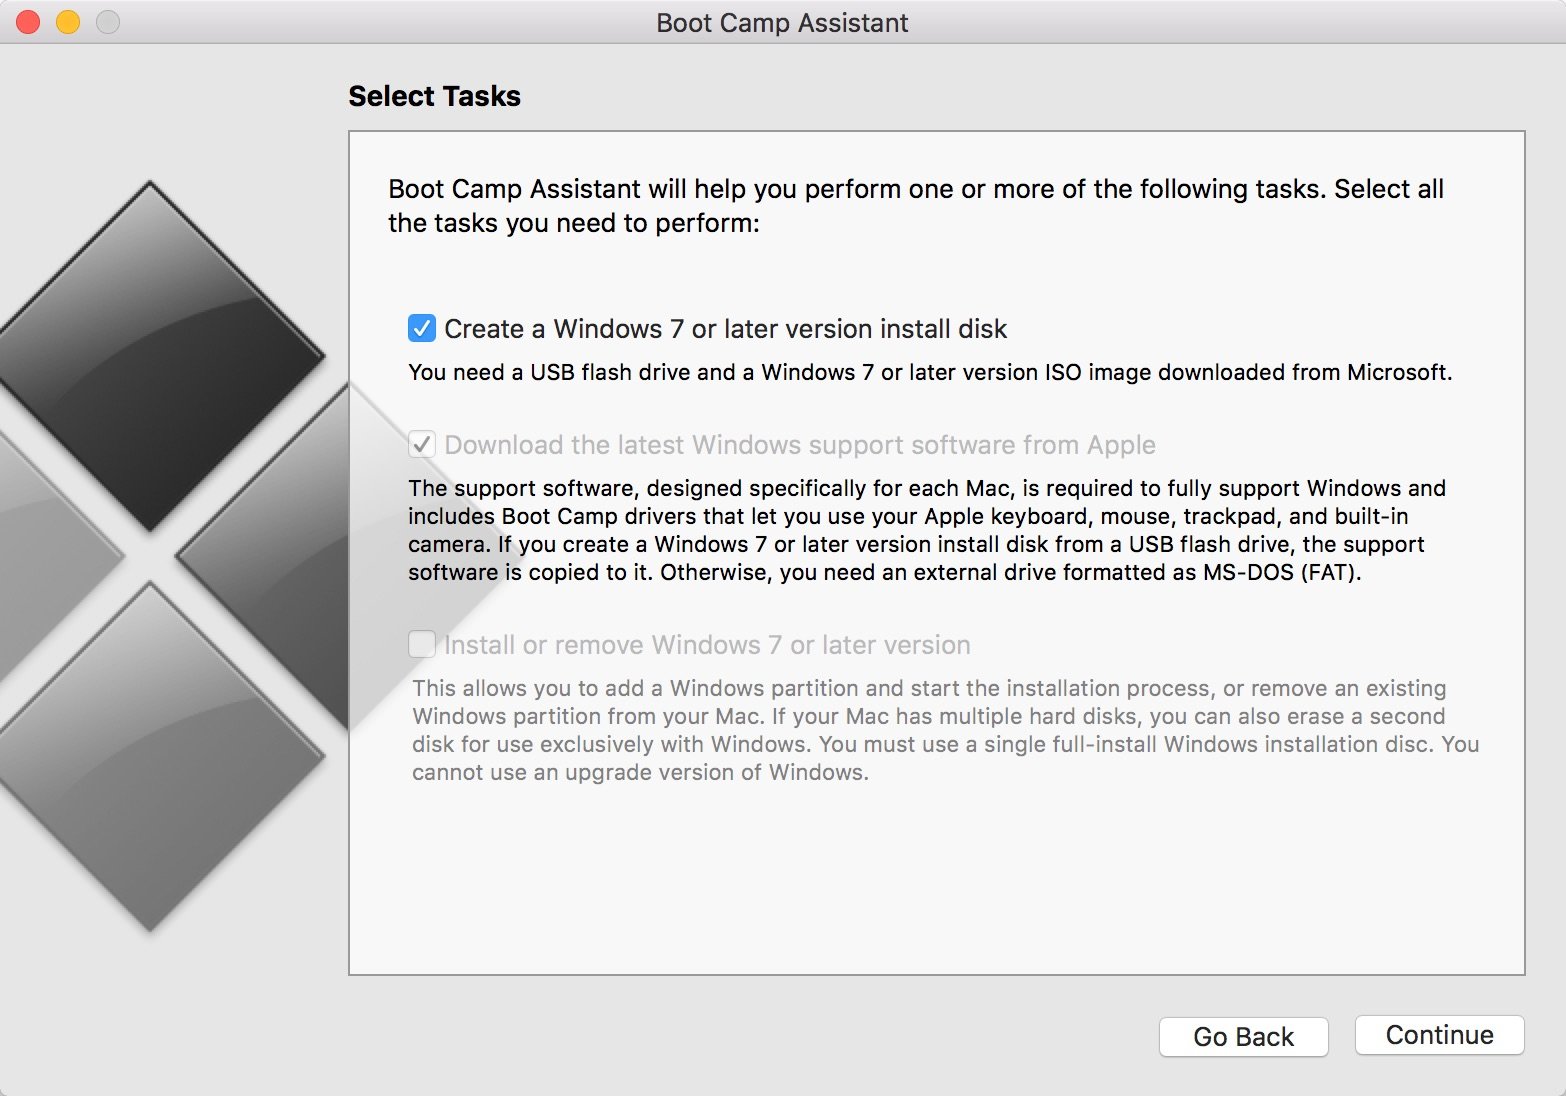
- Open Boot Camp Assistant from Applications -> Utilities
- Click continue at the introduction, if you completed step 2 correctly, you should see three options.
- Create a Windows 7 or later version install disk
- Download the latest Windows support software from Apple
- Install Windows 7 or later version
- Choose none of three options, instead:
- From the Actions menu select Download Windows Support Software
- Select your Macs Desktop or Downloads folder as the destination for the download
- The download is 1.35GB so may take a few minutes
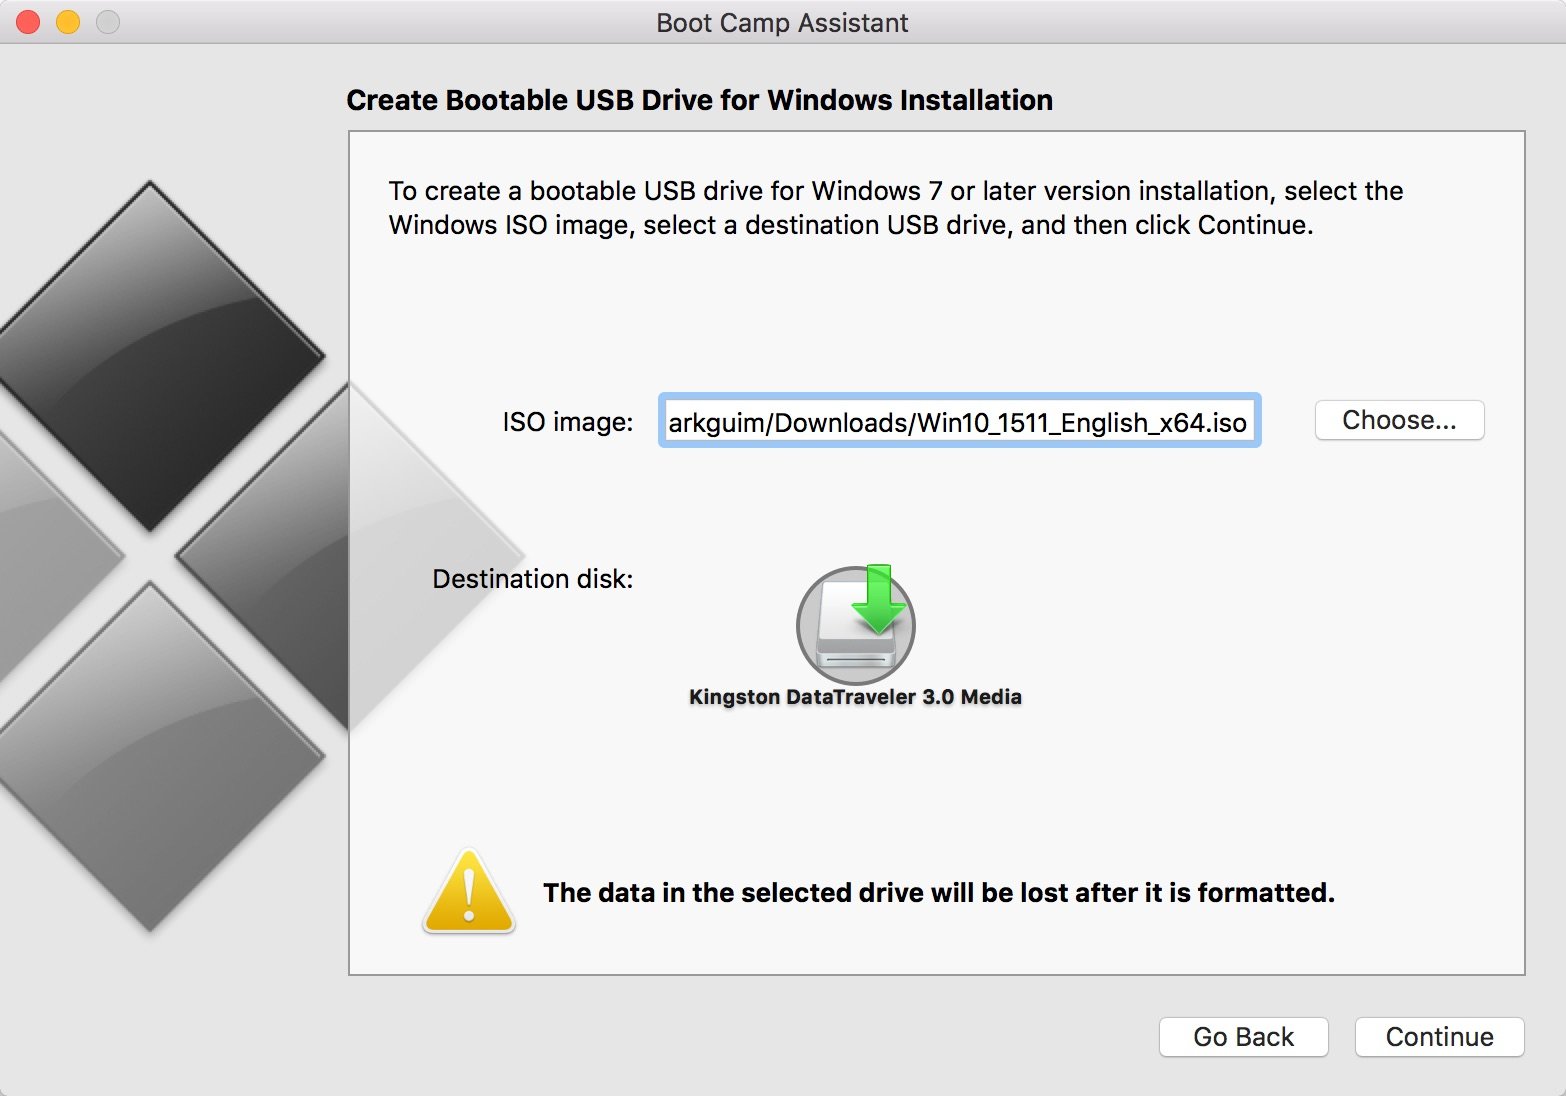
Step 4: Create the bootable Windows 10 USB
- Open Boot Camp Assistant from Applications -> Utilities
- Click continue at the introduction, and check the box in Create a Windows 7 or later version install disk. Ensure no other boxes are checked and click continue.
- If you have not already done so, insert the USB flash drive you want to burn the Windows 10 image to. Remember that any data on the USB drive you select will be erased.
- Continue the wizard, selecting the Windows 10 ISO file when prompted.
- After completing the wizard you will have your bootable Windows 10 installer USB.
- Copy the folder you downloaded in in Step 3 containing the Bootcamp Windows Support Software to root of USB flash drive.
Step 5: Create the bootcamp partition
You can do this using the Bootcamp Assistant, but it does reboot and attempt to boot from the optical drive as soon as it completes. I prefer to use the OSX Disk Utility instead.
- Open Disk Utility from Applications -> Utilities
- Choose your internal hard drive and select the Partition button along the top.
- Click the + button and create a new partition by shrinking the existing one.
- Create the new disk with at least 40GB disk space, I would recommend 60GB or higher.
- Name the partition BOOTCAMP and format using MS-DOS (FAT).
- Click Apply, this will take a few minutes, be patient.
Step 6: Delete the Hybrid MBR
During step 5, OSX tried to be helpful by converting our legal GPT disk partition into a hybrid MBR partition, which makes OSX see the disk as GPT and Windows it as MBR. Windows 10 requires a GPT disk when using EFI boot, so we need to revert this change using a tool called GPT fdisk (gdisk).
If this step is not completed you will get this error when installing Windows 10:
Windows cannot be installed to this disk. The selected disk is not of the GPT partition style
To avoid this:
- Download GPT fdisk from its Sourceforge page and install it. You will probably get a warning that it’s not a signed application, if you do open OSX System Preferences -> Security and Privacy -> General and you should see a note down the bottom about the application you just tried to open with an offer to open it again.
- Find the device number for the internal hard disk:
- Open Disk Utility from Applications -> Utilities
- Choose your internal hard drive (not one of the partitions) and note down the Device, it’s probably disk0.
- Open Terminal from Applications -> Utilities
- Launch gdisk on your internal hard disk by running
sudo gdisk /dev/disk0, if your internal hard disk was not disk0 in the previous step, replace disk0 with what it was here. - Type
pto view the partition table to verify you’re working on the correct disk. You should see the BOOTCAMP partition we created in Step 5. If not, typeqto quit without saving your changes and double check the device number. - Type
xto enter the experts’ menu. - Type
nto create a fresh protective MBR. Note that gdisk won’t confirm a change; it’ll just show you a new experts’ prompt. - Type
wto save your changes. You’ll be asked to confirm this action. Do so.
Note this action also requires OSX SIP to be disabled, if you get permission errors, make sure you have completed Step 1.
Step 7: Install Windows
- Reboot your Mac with the bootable Windows 10 Installer USB plugged in.
- Before OS X starts up, just after you hear the startup sound, repeatedly press and hold down the Option (or Alt key if your using a Windows keyboard) for a second or two until you see the boot selection options.
- You should see an option to boot from a USB device labelled «EFI Boot», choose this one.
- The Windows 10 installation will now start, follow the steps, selecting Custom Installation.
- On the screen where you select your partition be careful, ensure you select the «BOOTCAMP» partition you created earlier before proceeding with installation.
- Windows will restart 4 or so times during installation. Be ready to hold down the Options / Alt key after each reboot, but instead of selecting the USB device named «EFI Boot» select the newly created hard disk labelled the «EFI Boot» instead to ensure the installation continues smoothly. This is the same method you will use to choose between booting into OSX or booting into Windows once setup is complete.
- Finish installing Windows until you get to the desktop.
Step 8: Install the Bootcamp Windows Support Software
The Bootcamp Windows Support Software should be on the Windows 10 installer USB you created earlier.
- Open Windows Explorer and go to the USB drive
- Unless you renamed the folder, open WindowsSupport -> Bootcamp -> setup.exe.
- This will install all the required drivers and the bootcamp utility for Windows.
Step 9: Re-Enable El Capitan’s System Integrity Protection
See Step 1.
Issues
The drivers installed as part of the Bootcamp Windows Support Software work well, WiFi, Graphics, External Monitors, Webcams and Bluetooth are all working. Audio was the only immediately noticable issue, though strangely the audio provided through my 2008 Apple Cinema display works without issue.
Mid-2011 iMac Audio Does Not Work
I could not get the iMac built in sound to work on Windows 10, despite the webcam working. I tried a few things that did not work:
- Downloaded and installed Bootcamp 6.
- Tried the Cirrus 4206BCNZ audio drivers for Windows 8 as suggested might work.
As my external Apple Cinema display’s audio was working it was not to much of an issue for me to deal with, but if anyone finds a solution please let me know.
Sources & Acknowledgements
- Dual Booting on an iMac 27″ Mid 2011
- How to modify System Integrity Protection in El Capitan
- Enable Bootcamp to install from usb for OSX
- Windows detects GPT disk as MBR in EFI boot
We previously showed you how to create a Windows 10 USB installation media when performing a clean install of Windows 10, but there might be an instance where the only machine you have available is a Mac. We’ll show you to create a bootable USB flash drive with the Windows 10 installer from a Mac. It’s easier than you think, thanks to the built-in Boot Camp Assistant from Apple.
Download Windows 10 Disc Image
First, you need to download the Windows 10 ISO file. Go to the download page and select the proper edition of Windows 10 in the dropdown menu. If you don’t know what K, KN, or Single Language edition stands for, just select Windows 10 in the list.
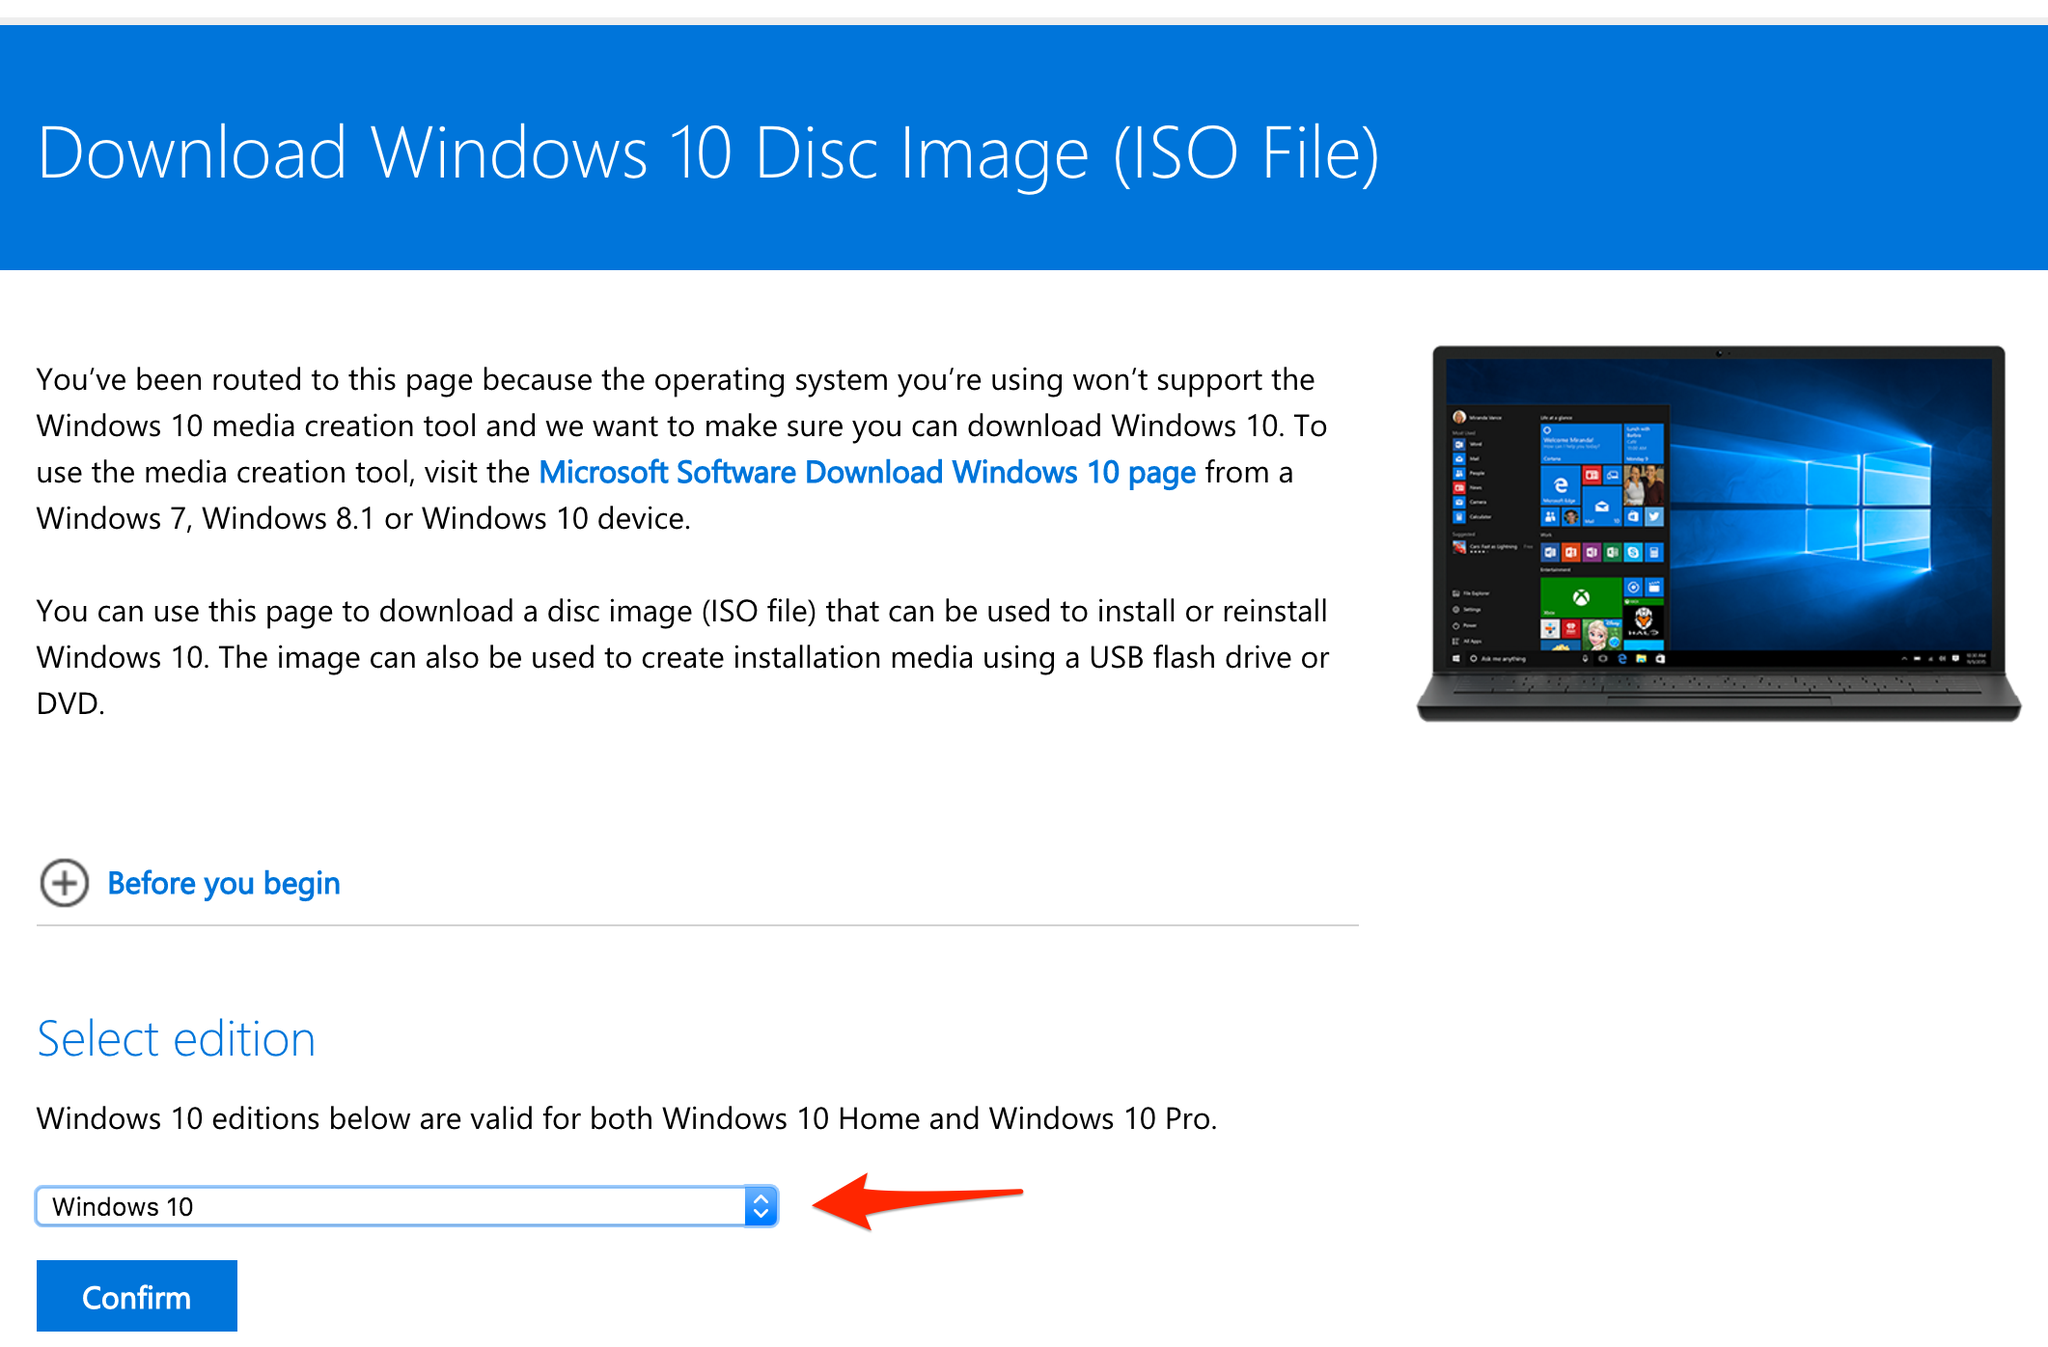
Download Windows 10 ISO (opens in new tab)
Create USB installer with Boot Camp Assistant
After downloading the ISO file, you’ll need to use Boot Camp Assistant to move it to a bootable USB drive.
- Insert a USB flash drive to your Mac. Make sure it’s at least 8GB, which is usually marked on the USB stick. You can also check by right-clicking the USB drive on your desktop and clicking Get Info. Check if the number next to Capacity is at least 8GB. All the files in the drive will be deleted, so make sure there are no important documents inside.
- Open Boot Camp Assistant. The easiest way to launch it is through Spotlight Search, which you can bring up by pressing Command and Spacebar. Press Enter to launch the app.
- Check the box for «Create a Windows 7 or later version install disk» and deselect «Install Windows 7 or later version.»
- Click Continue to proceed.
- Boot Camp Assistant will automatically locate the ISO file from your downloads folder, but make sure it is the right file. Click the «Choose…» button and locate the ISO file. Make sure the destination disk is the USB thumb drive you’ve inserted.
- Click Continue. It can take about 20 minutes to format and set up the USB installer on the Mac.
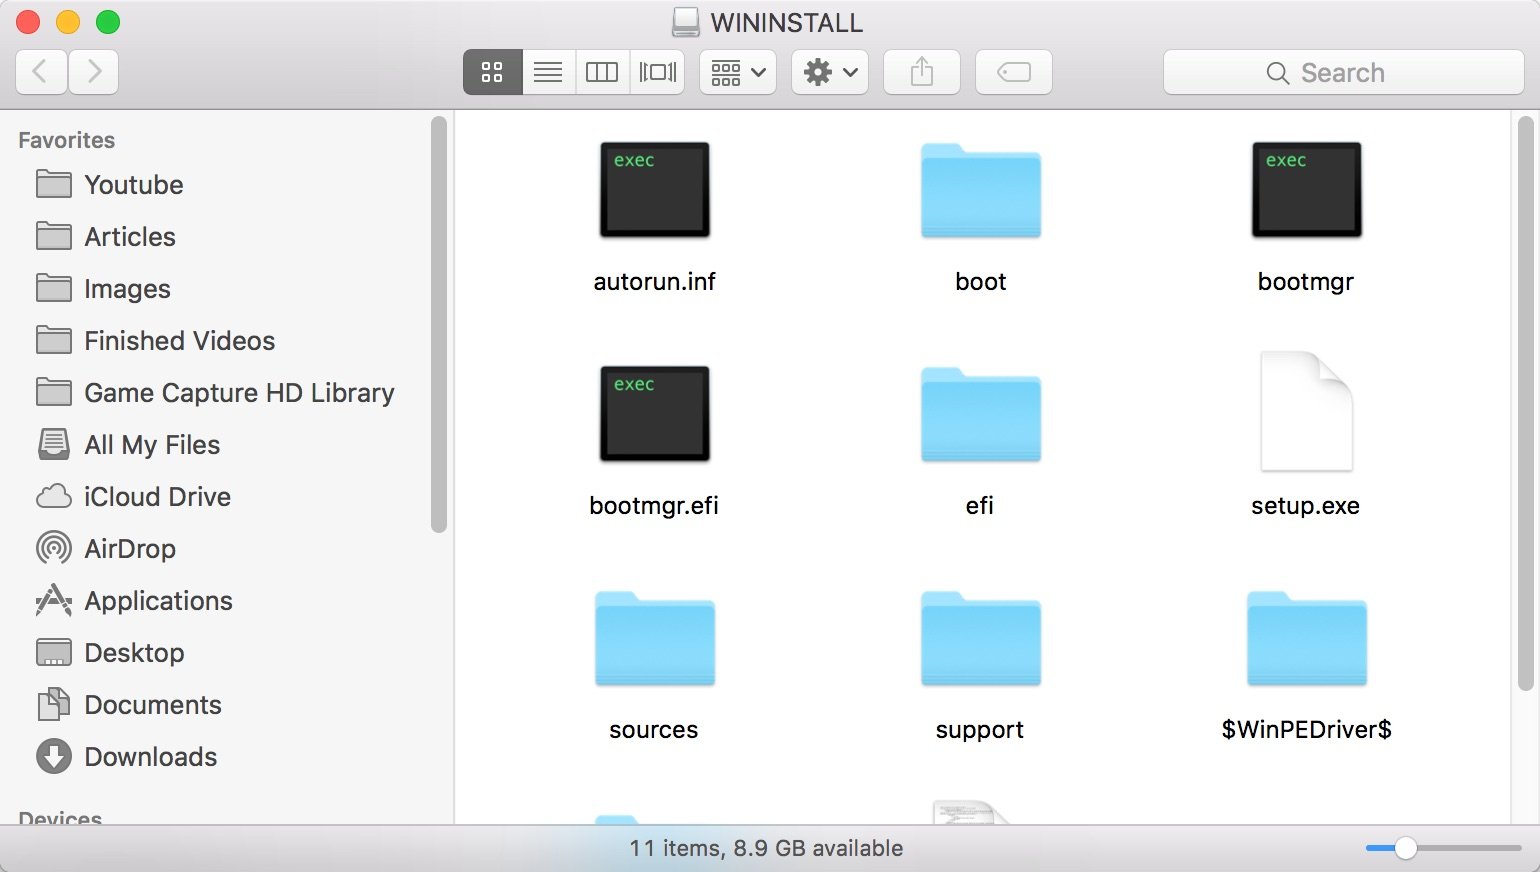
- When Boot Camp Assistant is done, the USB drive will be renamed to WININSTALL. Click Quit to close the app and then Eject the USB drive.
That’s it! You now have a bootable USB drive with the Windows 10 installer. You can use it to configure new Windows 10 PCs from scratch. We told you it was easy!
Have you tried creating a Windows 10 installer USB drive from a Mac before? Did you encounter any issues? Let us know your experience in the comments.
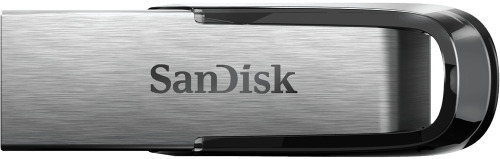 Fast USB Storage
(opens in new tab)
SanDisk 32GB Ultra Flair USB 3.0 Flash Drive
Our go-to for USB storage.
This compact USB flash drive provides affordable USB 3.0 storage flexing steady transfer speeds up to 150MB/s. Ideal for portable data storage, including any Windows installation.
Get the best of Windows Central in in your inbox, every day!
Mark Guim is Video Editor at Windows Central. He switched to Windows because the MacBook Pro isn’t Pro enough. You can follow him on Twitter at @markguim.