Download PC Repair Tool to quickly find & fix Windows errors automatically
Every time an application crashes in Windows 10, the Error Reporting Service starts checking for a solution. At times, it never finds a solution and gets stuck with the message — Windows is checking for a solution to the problem. The only option you have is to Close the program. If you would like to disable this, then you have to disable the Error Reporting Service.

Program has stopped working, Windows is checking for a solution to the problem. A problem caused the program tostop working correctly. Windows will close the program and notify you if a solution is available.
Windows Error Reporting service allows the system to report errors when programs stop working or responding. It then checks for a solution and tries to get a fix. If there is no fix, the log is sent back to Microsoft for analysis, and prepare a solution. Microsoft has been using reporting service to detect unknown threats. So it’s a good idea to keep it on, but if it’s very annoying, you can choose to disable it.
If you wish to disable this, you can follow any one of these suggestions:
- Change Group Policy Settings for Error Reporting Service
- Edit Error Reporting Service’ Registry entry, or
- Disable Windows Error Reporting Service.
When you do this, no diagnostic data will be sent back to Microsoft for analysis.
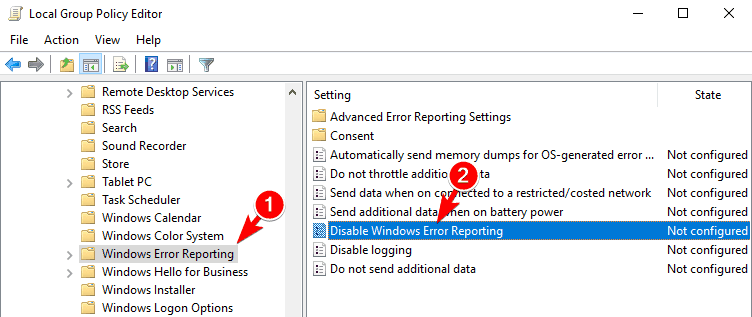
1] Change Group Policy Settings

Open gpedit.msc using the run prompt. In the Group Policy Editor navigate to:
Computer Configurations > Administrative Templates > Windows Components > Windows Error Reporting.
You have two options here.
- Disable Windows Error Reporting: It will completely stop the service. The reports will not be collected or sent to either Microsoft or internal servers within your organization.
- Display Error Notification: It makes sure that users are not notified that errors have occurred. After changing this, you will not see the message Windows is checking for a solution to the problem anymore. However, Windows will keep collecting report and send it to Microsoft or internal servers.
2] Edit Error Reporting Service’ Registry entry

This post will show you how to disable Error Reporting via the Registry.
3] Disable Windows Error Reporting Service

The reporting service is available as a Service and can be disabled easily. The process to disable Windows Error Reporting Service via Services Manager is available at that link.
Windows 10 Home users might not have access to group policy settings and registry. So it is best to disable the service.
Did Windows ever notify you if a solution was available?
If you are looking for solutions for specific programs, check these posts:
- COM Surrogate has stopped working
- Microsoft Word has stopped working
- Microsoft Setup Bootstrapper has stopped working
- Windows Shell Common DLL has stopped working
- Protection Stub has stopped working
- Adobe Reader has stopped working
- Business Contact Manager or Microsoft Outlook has stopped working
- Modern Setup Host has stopped working
- Microsoft Register Server has stopped working.
Anand Khanse is the Admin of TheWindowsClub.com, a 10-year Microsoft MVP (2006-16) & a Windows Insider MVP (2016-2022). Please read the entire post & the comments first, create a System Restore Point before making any changes to your system & be careful about any 3rd-party offers while installing freeware.
by Milan Stanojevic
Milan has been enthusiastic about technology ever since his childhood days, and this led him to take interest in all PC-related technologies. He’s a PC enthusiast and he… read more
Updated on March 25, 2021

XINSTALL BY CLICKING THE DOWNLOAD FILE
This software will keep your drivers up and running, thus keeping you safe from common computer errors and hardware failure. Check all your drivers now in 3 easy steps:
- Download DriverFix (verified download file).
- Click Start Scan to find all problematic drivers.
- Click Update Drivers to get new versions and avoid system malfunctionings.
- DriverFix has been downloaded by 0 readers this month.
Windows is checking for a solution to the problem message usually appears right after certain application crashes. In most cases Windows 10 can’t automatically fix the problem, thus making this message somewhat useless.
If you’re annoyed by this message, today we’re going to show you how to disable it on your PC.
How to disable Windows is checking for a solution to the problem?
- Edit your registry
- Disable Windows Error Reporting from Group Policy Editor
- Disable Windows Error Reporting service
Solution 1 – Edit your registry
According to users, you can fix this problem simply by editing your registry.
We have to mention that modifying the registry can be potentially dangerous, therefore we advise you to back up your registry and create a System Restore point just in case.
To disable Windows is checking for a solution to the problem message, you need to do the following:
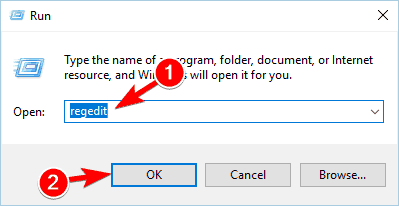
- Press Windows Key + R and enter regedit. Click OK or press Enter.

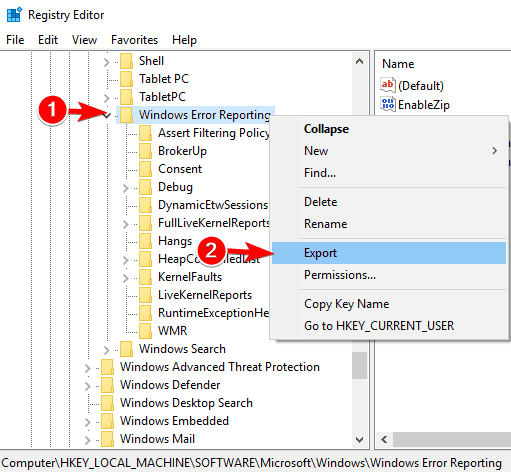
- When Registry Editor opens, in the left pane navigate to HKEY_LOCAL_MACHINESOFTWAREMicrosoftWindowsWindows Error Reporting.

- Optional: Right-click Windows Error Reporting key and choose Export.
Enter the file name for your backup, choose the save location and click on Save button to save the file.

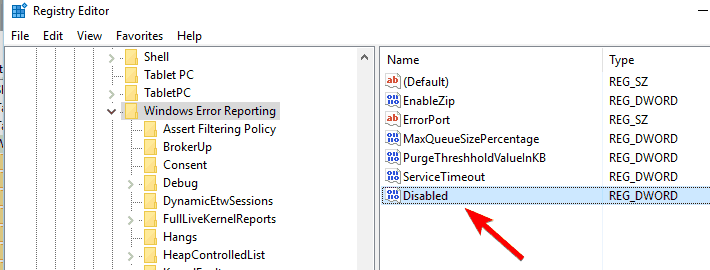
In case anything goes wrong after modifying the registry, you can easily restore it by double-clicking the file you just created. - Once you open Windows Error Reporting key, look for the Disabled DWORD in the right pane. On some computers this DWORD isn’t available, so you’ll need to create it manually. If you already have this DWORD, skip to Step 7.
- If this DWORD isn’t available, right-click the empty space, and choose New > DWORD (32-bit) Value.

- Enter the Disabled as the name of the new DWORD.
- Double click Disabled DWORD to open its properties.

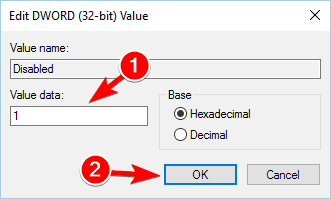
- When the Properties window opens, change Value data to 1 and click OK to save changes.

- After doing that, close Registry Editor.


- READ ALSO: ”Something went wrong” error prevents the Creators Update installation [Fix]
By performing these steps you’ll prevent Windows is checking for a solution to the problem message from appearing.
Keep in mind that this method won’t allow you to see the error code related to the crash.
To see more information regarding the crash, including the error code, you’ll need to check Reliability history in Security and Maintenance section.
Solution 2 – Disable Windows Error Reporting from Group Policy Editor
Some PC issues are hard to tackle, especially when it comes to corrupted repositories or missing Windows files. If you are having troubles fixing an error, your system may be partially broken.
We recommend installing Restoro, a tool that will scan your machine and identify what the fault is.
Click here to download and start repairing.
Another way to disable Windows is checking for a solution to the problem message is to use Group Policy Editor. This is relatively simple and you can do it by following these steps:
- Press Windows Key + R and enter gpedit.msc. Click OK or press Enter.
- When Group Policy Editor opens, navigate to User Configuration >Administrative Templates >Windows Components > Windows Error Reporting in the left pane. In the right pane locate and double click Disable Windows Error Reporting.

- When the Properties window opens, select Enabled and click on Apply and OK to save changes.


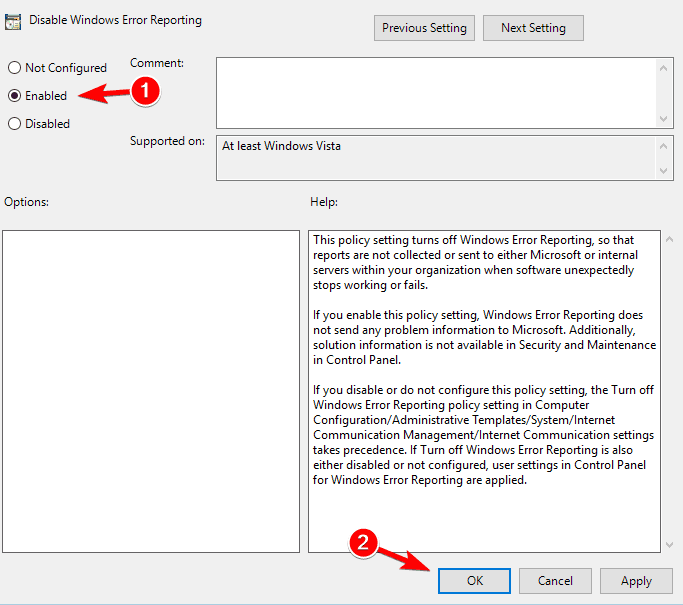
After making the aforementioned changes you shouldn’t see the error message anymore.
Solution 3 – Disable Windows Error Reporting service
According to users, you can prevent Windows is checking for a solution to the problem message from appearing simply by disabling Windows Error Reporting service.
This is rather simple, and you can do it by following these steps:
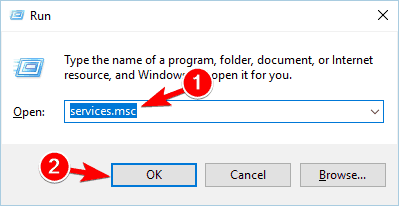
- Press Windows Key + R and enter services.msc. Press Enter or click OK.
- List of all services will now appear. Locate Windows Error Reporting Service and double click it to open its properties.

- After Properties window opens, set the Startup Type to Disabled. Now click Apply and OK to save changes.

- Close Services window.
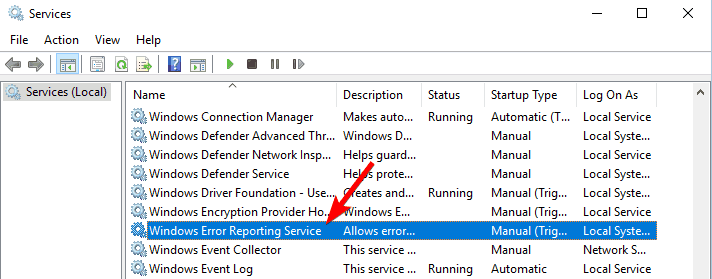

As you can see, this is a rather simple solution and after disabling the service the error message won’t appear anymore.
Windows is checking for a solution to the problem message can be annoying, but you can disable it by using one of our solutions. Users reported that changing the registry stopped the message from appearing, so be sure to try that solution first.
We hope that following these steps you will be able to solve your issue.
Please let us know if you find any other workarounds regarding this annoying dialog, that keeps checking for a solution, but is almost never able to find it.
READ ALSO:
- Fix: ‘Set up OneDrive’ keeps popping up
- Media Transfer Protocol not working on Windows 10 [Fix]
- “This installation package could not be opened” [Fix]
- High CPU usage after installing Windows 10 Creators Update [Fix]
- Unidentified Network error on Windows 10/8/7 [FIX]
![]()
Newsletter
Недавно столкнулся со странной проблемой на моем компьютере с Windows 10 . При попытке открыть с помощью правой клавиши контекстного меню любого ярлыка на рабочем столе, появляется ошибка “Прекращена работа программы Проводник / Windows Explorer has stopped working ”. После этого все ярлыки на рабочем столе на некоторое время исчезают, и через несколько секунд появляются опять. К моему удивлению, гугл подсказал, что эта проблем свойственна для всех версий (начиная с Windows XP и вплоть до Windows 10). В этой статье я постарался собрать все методы, которые могут помочь исправить эту проблему.
Окно с ошибкой выглядит таким образом:Windows Explorer has stopped working
Windows can check online for a solution to the problem and try to restart program

В том случае если Windows Explorer (или, File Explorer, как его стали называть в Windows 8 / Windows 10) вылетает при попытке открыть папку или контекстное меню любого элемента рабочего стола или файловой системы, скорее всего проблема связана с некорректной работой стороннего приложения. Как правило, причиной падения Проводника бывают:
- Некорректные сторонние элементы контекстного меню (если Explorer падает при попытке показать такое меню)
- Сторонние кодеки (если Explorer закрывается при открытии папок с видеофайлами)
- Элементы Панели управления
[content h2]
Отключите сторонние расширения оболочки (Shell Extensions)
В большинстве случаев самый простой способ решить данную проблему – воспользоваться специальной утилитой ShellExView (http://www.nirsoft.net/utils/shexview.html).
- Скачайте и распакуйте архив с утилитой (ссылка выше) и запустите с правами администратора файл shexview.exe
- Отсортируйте таблицу по столбцу Type, щелкнув по заголовку столбца
- Нас интересуют элементы типа Context Menu, у которых в значении столбца File Extensions присутствует символ *
- Последовательно отключите все элементы, разработчиком которых не является компания Microsoft. Для отключения нужно нажать на строке ПКМ и выбрать пункт меню Disable Selected Items или нажать клавишу F7

- После отключения всех сторонних расширений перезагрузите компьютер и проверьте работу Проводника
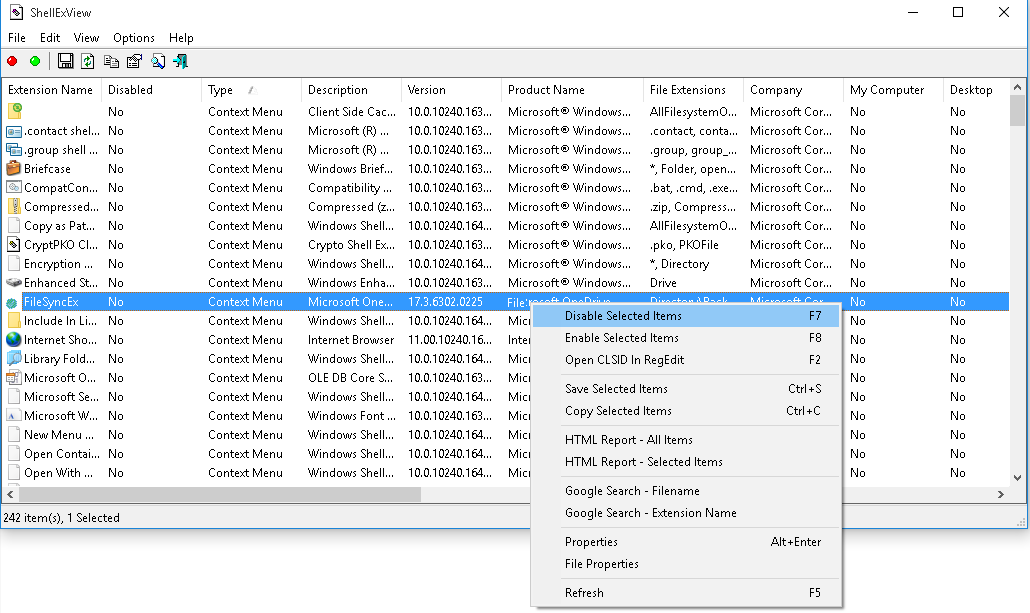
Если отключение расширений контекстных меню со * не помогло, аналогичным образом отключите все сторонние расширения (не относящиеся к Microsoft).
Обновите драйвер видеоадаптера
Попробуйте скачать и установить с сайта производителя наиболее свежую версию драйвера для вашей модели видеокарты.
Проверьте работу Windows Explorer в безопасном режиме
Если отключение сторонних расширений не помогло исправить проблему, проверьте воспроизводиться ли проблема в безопасном режиме. Для этого нужно загрузить компьютер в Safe Mode и проверьте, повторяется ли ситуация с падением Explorer. Если нет – переходите к следующему шагу.
Отключите автозапуск сторонних служб и программ
Нажмите комбинацию клавиш Win + R -> наберите msconfig -> OK, в открывшемся окне перейдите на вкладку Services (службы). Выберите опцию Hide All Microsoft Services (скрыть все службы Microsoft)
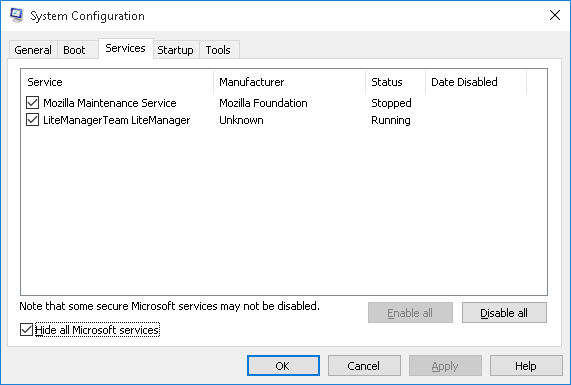
Отключите все оставшиеся сторонние службы (которые не относятся к MSFT) и перезагрузитесь. Если проблема исчезнет – значит во всем виновата одна из отключенных служб. Найдите ее, методом поочередного включения служб с перезагрузкой компьютера.
Аналогичным образом нужно попробовать отключить автозапуск программ. Откройте диспетчер задач (Task Manager) и перейдите на вкладку Автозапуск (Startup).
Совет. Отключение некоторых программ может привести к некорректной работе связанных с ними драйверов. Поэтому будьте внимательны с программами от разработчиков вашего железа (например, Intel, AMD, Nvidea). Рекомендуется отключать их в последнюю очередь или не отключать совсем.
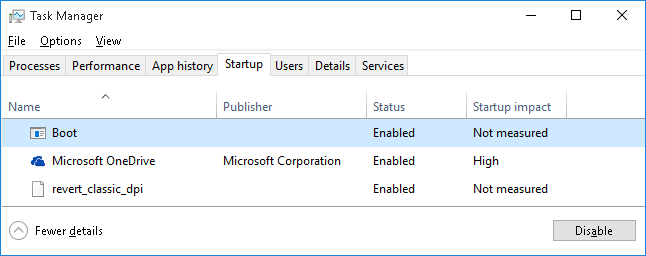
Эта методика скорее всего поможет найти программу, вызывающую падения Explorer.
Проверка целостности системных файлов
В том случае, если проблема наблюдается даже в безопасном режиме, скорее всего причина заключается в повреждении некоторых системных файлов. Желательно проверить и восстановить их целостность с помощью специальной утилиты sfc.exe (System File Checker). Для этого, откройте консоль командной строки с повышенными привилегиями и выполните команду:
sfc /scannow
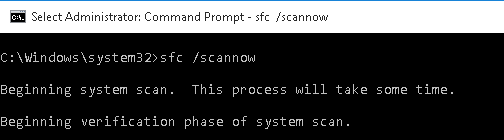
Запустите процесс сканирования системных файлов и все найденные ошибки будут автоматически исправлены (возможно понадобится установочный диск с вашей версией Windows). Если запустить утилиту с параметром «/verifyonly», будет выполнен только тест, без автоматического исправления найденных ошибок.

-
#1
Introduced in Windows Vista, the infamous «Windows is checking for a solution…» message that appears right after a program crashes is downright annoying.
I’m running Windows 7 now and this behavior has not changed. Admittedly, while running the Windows 7 betas this was rather useful as Microsoft kept up to date information on programs that suffered from compatibility problems and hinted at potential fixes (kudos for that). But now it just gets in the way after Firefox or other well-known program crashes, I just click on Cancel immediately after getting prompted.
Back in the Vista days I had disabled this message and now I’m getting it again after a fresh reinstall of 7, so I thought this time I would document how to turn this off. It’s actually very easy.
[CENTER]

[/CENTER]
In Windows Vista:
Go to Start > All Programs > Maintenance > Problem Reports and Solutions
In the Problem Reports and Solutions window, click Change settings > Advanced settings > Turn off problem settings
[CENTER]

[/CENTER]
In Windows 7:
Click on the Action Center (white flag) icon on your taskbar > Change Action Center settings > Problem reporting settings (almost at the end) > Never check for solutions
Alternatively, you can use the Windows search box by clicking start and typing “Choose how to report problems”. That will take you directly to the screen above and select your desired setting.
Note: This is a copy from the old TechSpot blog/tips archive. This is a much better home for this valuable tip for the years to come.
-
#2
Thanks for the reminder, I’ve been meaning to do this.
-
#3
Thank you so much! This never worked, so why have it… I think they finally got rid of it in Win 8. Does it send error reports to MS when it says it is «Finding a solution»?
-
#4
What is the solution from windows closing programs. Turning off the message doesn’t make any sense.
-
#5
Can you add instructions for Windows 10?
-
#7
Hi I have never seen that message in Windows 10. Has anyone seen it??
Thanks!
Содержание
- Windows is checking for a solution to the problem [FIX]
- How to disable Windows is checking for a solution to the problem?
- Solution 1 – Edit your registry
- Solution 2 – Disable Windows Error Reporting from Group Policy Editor
- Solution 3 – Disable Windows Error Reporting service
- How to disable Windows is checking for the solution to the problem
- Replies (26)
- 52 Windows problems and solutions
Windows is checking for a solution to the problem [FIX]

Windows is checking for a solution to the problem message usually appears right after certain application crashes. In most cases Windows 10 can’t automatically fix the problem, thus making this message somewhat useless.
If you’re annoyed by this message, today we’re going to show you how to disable it on your PC.
How to disable Windows is checking for a solution to the problem?
- Edit your registry
- Disable Windows Error Reporting from Group Policy Editor
- Disable Windows Error Reporting service
Solution 1 – Edit your registry
According to users, you can fix this problem simply by editing your registry.
We have to mention that modifying the registry can be potentially dangerous, therefore we advise you to back up your registry and create a System Restore point just in case.
To disable Windows is checking for a solution to the problem message, you need to do the following:
- Press Windows Key + R and enter regedit. Click OK or press Enter.

- When Registry Editor opens, in the left pane navigate to HKEY_LOCAL_MACHINESOFTWAREMicrosoftWindowsWindows Error Reporting.
- Optional: Right-click Windows Error Reporting key and choose Export.
Enter the file name for your backup, choose the save location and click on Save button to save the file.
In case anything goes wrong after modifying the registry, you can easily restore it by double-clicking the file you just created. - Once you open Windows Error Reporting key, look for the Disabled DWORD in the right pane. On some computers this DWORD isn’t available, so you’ll need to create it manually. If you already have this DWORD, skip to Step7.
- If this DWORD isn’t available, right-click the empty space, and choose New > DWORD (32-bit) Value.
- Enter the Disabled as the name of the new DWORD.
- Double click Disabled DWORD to open its properties.
- When the Properties window opens, change Value data to 1 and click OK to save changes.
- After doing that, close Registry Editor.
- READ ALSO: ”Something went wrong” error prevents the Creators Update installation [Fix]
By performing these steps you’ll prevent Windows is checking for a solution to the problem message from appearing.
Keep in mind that this method won’t allow you to see the error code related to the crash.
To see more information regarding the crash, including the error code, you’ll need to check Reliability history in Security and Maintenance section.
Solution 2 – Disable Windows Error Reporting from Group Policy Editor
Another way to disable Windows is checking for a solution to the problem message is to use Group Policy Editor. This is relatively simple and you can do it by following these steps:
- Press Windows Key + R and enter gpedit.msc. Click OK or press Enter.
- When Group Policy Editor opens, navigate to User Configuration >Administrative Templates >Windows Components > Windows Error Reporting in the left pane. In the right pane locate and double click Disable Windows Error Reporting.
- When the Properties window opens, select Enabled and click on Apply and OK to save changes.
After making the aforementioned changes you shouldn’t see the error message anymore.
Solution 3 – Disable Windows Error Reporting service
According to users, you can prevent Windows is checking for a solution to the problem message from appearing simply by disabling Windows Error Reporting service.
This is rather simple, and you can do it by following these steps:
- Press Windows Key + R and enter services.msc. Press Enter or click OK.
- List of all services will now appear. Locate Windows Error Reporting Service and double click it to open its properties.
- After Properties window opens, set the Startup Type to Disabled. Now click Apply and OK to save changes.
- Close Services window.
As you can see, this is a rather simple solution and after disabling the service the error message won’t appear anymore.
Windows is checking for a solution to the problem message can be annoying, but you can disable it by using one of our solutions. Users reported that changing the registry stopped the message from appearing, so be sure to try that solution first.
We hope that following these steps you will be able to solve your issue.
Please let us know if you find any other workarounds regarding this annoying dialog, that keeps checking for a solution, but is almost never able to find it.
How to disable Windows is checking for the solution to the problem
* Please try a lower page number.
* Please enter only numbers.
* Please try a lower page number.
* Please enter only numbers.
![]()
Thank you for posting your question on Microsoft community.
I appreciate you for providing details about the issue.
Microsoft does not recommend disabling Windows error reporting.
However, if you want to disable it, you may follow these steps:
a. Press Windows + X keys and click control panel.
b. At top-right corner, type check for solutions in the search box and then click «Choose how to cheeck for solutions«.
c. Click «Never check for solutions(not recommended)» and then click ok.
I hope this information helps.
Please do let us know if you need any further assistance.
93 people found this reply helpful
Was this reply helpful?
Sorry this didn’t help.
Great! Thanks for your feedback.
How satisfied are you with this reply?
Thanks for your feedback, it helps us improve the site.
How satisfied are you with this reply?
Thanks for your feedback.
None of those options appear to come up in the search. Nor can I find anything similar in the search results.
27 people found this reply helpful
Was this reply helpful?
Sorry this didn’t help.
Great! Thanks for your feedback.
How satisfied are you with this reply?
Thanks for your feedback, it helps us improve the site.
How satisfied are you with this reply?
Thanks for your feedback.
39 people found this reply helpful
Was this reply helpful?
Sorry this didn’t help.
Great! Thanks for your feedback.
How satisfied are you with this reply?
Thanks for your feedback, it helps us improve the site.
How satisfied are you with this reply?
Thanks for your feedback.
48 people found this reply helpful
Was this reply helpful?
Sorry this didn’t help.
Great! Thanks for your feedback.
How satisfied are you with this reply?
Thanks for your feedback, it helps us improve the site.
How satisfied are you with this reply?
Thanks for your feedback.
27 people found this reply helpful
Was this reply helpful?
Sorry this didn’t help.
Great! Thanks for your feedback.
How satisfied are you with this reply?
Thanks for your feedback, it helps us improve the site.
How satisfied are you with this reply?
Thanks for your feedback.
Had the same problem and wanted to disable windows 10 error reporting! Could not find from Microsoft so I searched Google and found answer here » http://superuser.com/questions/950997/disable-error-reporting-in-windows-10-home»
It appears that the only option available to Home users is to disable Error Reporting via modifying the Disabled key in the registry.
Open Regedit. Navigate to:
HKEY_LOCAL_MACHINESOFTWAREMicrosoftWindowsWindows Error Reporting
Find the value named «Disabled» or add a new DWORD value with this name if it doesn’t exist. The default value of this key is 0. Double click it to edit, change the value to 1 and save.
This disables the automatic appearance of the dialogue where Windows is searching online to try to find a solution. You are instead shown a dialogue stating that the application has crashed, giving you the option to Debug. However, unlike previous versions of Windows, no error code is provided in this dialogue. The specifics of the error must be accessed through:
Control PanelAll Control Panel ItemsSecurity and Maintenance
Under the tab «Maintenance», you can click «View reliability history», which will show a list of all app crashes. You can then click «View technical details» beside each crash to get more detailed information, such as a the error code(s) thrown from the application on crash.)
Worked for me! Good luck!
I swear I have been playing with and using windows going back thirty+ years started on windows 3.1 although liked Tandy Desktop way better! up until now and windows 10, I have started to play with Linux mint, It will do about all the same things you could need and I can run it off USB drive!
So never though I would but just might be giving up on window’s sorry to say, but now it is way too slow and unreliable! Sucks! Sad due to the fact that it did run so good in the past and was way cheap enough! Oh well.
52 Windows problems and solutions
Quick fixes for problems in XP, Vista and Windows 7
It’s a sad fact of life that no Windows PC performs faultlessly over time. Many of these problems are outside your control, but others can be introduced through user error.
It doesn’t matter how much simpler Microsoft makes Windows with each successive release: problems, glitches and bugs will always be a part of it.
Each month PC magazine from Future Publishing answer dozens of reader questions, so we’ve trawled our extensive archives and dug out 52 of the most relevant fixes to Windows problems.
Where possible we avoid referring to software that promises to fix these; these «miracle» cures often introduce problems of their own. Instead we try to concentrate on explaining how to fix various problems using only the tools in Windows itself.
01. Missing Taskbar icons
Version: XP, Vista, 7
If icons have disappeared from the Taskbar’s notification area, there are two things to try: first, press the Windows key and [R], type «regedit» and press [Enter].

Browse to HKEY_CURRENT_USER SoftwareClassesLocal SettingsSoftwareMicrosoftWindows CurrentVersionTrayNotify, and delete both IconStreams and PastIconsStream values.
Reboot, or log off and back on again. If the problem persists in XP, and you can live without it, open the Add or Remove Programs Control Panel, click Add/Remove Windows Components, expand Networking Services, and untick «UPnP User Interface». Then click OK > Next.
02. PC won’t sleep
Version: XP, Vista, 7
If your PC won’t stay asleep it’s often because a device is configured to bring it out of standby when triggered. Identify the culprit by pressing the Windows key and [R], type «cmd» and press [Enter].
Type the following line and press [Enter]: powercfg –devicequery wake_armed
Now press the Windows key and [R] again, but this time type «devmgmt.msc» to open Device Manager. Find any devices listed earlier, then double-click them and look for an Advanced or Power Management tab.
Check if the device is allowed to bring the PC out of standby – if it is, untick all the boxes that wake it. Click OK, close Device Manager and test it worked; repeat the process if necessary.
03. Quick fixes
Version: XP, Vista, 7
Microsoft has developed the Fix It Center tool, which includes all of the automated fixes for various Windows problems it has released over the last few years. Download and install it from http:// fixitcenter.support.microsoft.com, then launch the tool from its desktop shortcut.
A list of available troubleshooters for your version of Windows will be listed; if one describes the problem you’re having then click the Run button next to it and see if it can resolve your problem.
04. Remove printer drivers
Version: XP, Vista
To ensure all traces of an old printer are removed from your PC, open Printers or Printers and Faxes. Right-click blank space in the Printers Control Panel and choose Server Properties (in XP) or Run as Administrator > Server Properties > Continue (in Vista).
Switch to the Driver tab – if your driver is still present, select it and click Remove. If you’re using Vista you should leave «Remove driver only» selected only if the drivers were provided by Windows. Click OK followed by Yes > Close.
05. Verify system files
Version: XP, Vista, 7
The System File Checker (SFC) tool enables you to scan for – and replace – corrupt and missing fi les. If you use XP you can use it to scan your entire drive, while in Vista and Windows 7 it can verify individual fi les and folders too. If you have an installation CD, keep it handy in case it’s needed.
Step 1. In Windows XP
Click Start > Run, type «sfc /scannow» and press [Enter] to check your entire drive for errors. Have your installation CD handy in case you’re asked for it.
Step 2. Vista and Windows 7
Click Start, type «cmd», then right-click cmd.exe and choose Run as Administrator > Continue. Type «sfc /scannow» and press [Enter] to check your entire drive.
Step 3. Scan and replace
Alternatively, type «sfc /SCANFILE=path fi lename» and press [Enter], replacing pathfi lename with your chosen fi le – such as c:windowssystem32riched32.dll.
06. Program compatibility problems
Version: XP, Vista, 7
If you have issues with a program check its website or Google the program’s name, version number and your version of Windows to see if there are any issues with it.
Avoid installing system software not listed as compatible with your version of Windows, otherwise try installing it as normal; if it fails, Windows 7 may offer to apply compatibility settings to it – see if these work.
If the program installs but won’t run, right-click its program shortcut and choose Properties > Compatibility Settings. Select your old version of Windows from the list and click OK.
If this fails, try ticking «Run this program as an administrator»; in Windows 7 you can also click «Help me choose the settings» to gain access to the Program Compatibility Troubleshooter.
07. PC keeps rebooting after Windows Update
Version: XP, Vista, 7
If your PC gets stuck in a cycle of rebooting during the update process, you need to undo the updates using System Restore. If your computer came without a Windows disc, look for an option to access recovery options, or tap [F8] before Windows starts loading, and then choose «Repair your computer».
If you have an installation disc, boot from it, select your language and then choose «Repair your computer». In both cases, when the menu appears, choose System Restore to undo the update.
08. System Restore not working
Version: XP, Vista, 7
If you’re having problems restoring your computer to an earlier state, try booting into Safe Mode (tap [F8] as your PC restarts) and running System Restore from there.
In Vista and Windows 7 there’s also another option: you can also run the tool directly from your Windows disc (see tip seven, above) if you can’t access Windows.
09. Windows Media Player missing songs
Version: XP, Vista, 7
Tracks missing from Windows Media Player? Try clicking Start > All Programs > Accessories. If you’re using XP you should select the Command Prompt, or in Vista or Windows 7 right-click it and choose Run as Administrator.
Switch to the folder containing your music using the cd command (for example, cd music cd my documentsmy music), then type «attrib -s *.* /d /s» and press [Enter].
Once complete, open Media Player and press [F3], or choose Tools > Advanced > Restore Media Library (in Windows 7) to access all your music again.
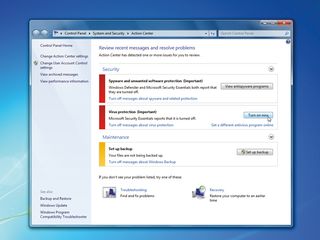
10. Action Center
Version: 7
Click the flag icon in the Taskbar’s notification area to access the Action Center. Here you can get an at-a-glance look at problems, plus launch a series of troubleshooters to help quickly fix the problems that plague you, without getting your hands dirty.
11. Show printer ink levels
Version: XP, Vista, 7
If you’ve just upgraded to a new version of Windows and can’t access your printer’s ink levels, the bad news is that Windows installed a basic driver without the function.
Check the manufacturer’s site for a dedicated driver and – if it exists – install that.
12. Fix Windows driver problems
Version: XP, Vista, 7
Most hardware problems can be traced to the drivers, the software that enables them to work with Windows. When it comes to tracking down problems, the first port of call should be Windows’ own Device Manager – here’s how to troubleshoot problems using this useful tool.
Step 1. Open Device Manager
Press [Windows] + [R], type «devmgmt. msc» and press [Enter]. Look for yellow exclamation marks next to troublesome hardware devices and double-click one.
Step 2. Get error details
Look on the General tab for an error code and description of the problem – if a troubleshoot button is present, click it to see if you can fi x the problem easily.
Step 3. Search online
If no fix is forthcoming, use the error details as part of your web search – try a general search first, then add your hardware’s make and model if necessary.
13. Resolve ReadyBoost conflict
Version: Vista, 7
Your PC can only use one ReadyBoost device at a time, and some computers come with built-in flash memory already configured for use with ReadyBoost.
To resolve this conflict click Start, rightclick Computer and select Manage, then under Storage choose «Disk Management» to verify the existence of such a drive. Look for a program called Intel Turbo Memory Console (type «Intel» into the Start menu’s Search box) and open this to disable the built-in drive in favour of your own.
14. Folder settings not remembered
Version: XP, Vista, 7
If you find you can no longer customise folders to look and behave how you want, the solution involves some editing of with two Registry subkeys – BagMRU and Bags – which are found in two separate locations: Shell and ShellNoRoam under HKEY_ CURRENT_USERSoftware MicrosoftWindows.
Think this sounds like too much hassle? No problem, just open the Microsoft Fix It Center tool (see tip three) and run the «Diagnose and repair Windows Files and Folder Problems» wizard. This will do the hard work for you.
15. PC keeps rebooting
Version: XP, Vista, 7
If your PC restarts unexpectedly after briefly displaying a blue screen, then it’s encountered a STOP error. If this keeps occurring you need to identify it.
In Vista and Windows 7 you can stop Windows automatically restarting from the Windows boot menu that should appear; if you use XP click Start, right-click My Computer and select Properties > Advanced tab. Click Settings under «Startup and Recovery» and untick «Automatically restart» before clicking OK twice.
Now when the STOP error occurs you’ll see a blue screen with details of the error message; note down the description, any files it refers to, and the STOP error code. Then search the web for these terms to hopefully find a solution.
16. Blocked startup programs
Version: XP, Vista, 7
If you get this message after starting Windows, it means one of the programs set to start with it is attempting to work with elevated privileges. This is symptomatic of older programs, so either source an update or an alternative program if you can.
Right-click the message, choose «Run blocked program» and select the errant tool in question. Then click Continue when prompted.
17. Fix file-sharing problems
Version: XP, Vista, 7
Verify your PCs are on the same network – wireless or wired – and all on the same workgroup (click Start, right-click Computer and select Properties; in XP you need the Computer Name tab). Is File and Printer Sharing enabled?
Check from the Network and Sharing Center in Vista/Windows 7 – ensure your network is Home or Work. In Windows 7 click Choose homegroup and sharing options > Change advanced sharing settings; in XP right-click a folder and choose Properties > Sharing tab.
Disable password protected filesharing in Vista or Windows 7 if sharing with PCs running XP, and check your firewall has placed your network in a trusted zone.
18. Access denied error on system files
Version: XP
Not long ago dealing with «access denied» errors relating to system files or the Registry involved downloading a tool and typing out a complex script.
Now you can resolve this issue – sometimes found when installing SP3 – by downloading a dedicated fix-it tool from http://go.microsoft.com/?linkid=9730795.
19. Low memory error
Version: XP, Vista, 7
Fix this problem by making sure Windows is set to handle your virtual memory settings; open the System Control Panel and either click «Advanced system settings» or switch to the Advanced tab.
Then under Performance click Settings, select Advanced and click Change. You need to verify that either «Automatically manage paging file for all drives» (in Vista or Windows 7) or «System managed size» (in Windows XP) is selected, then if necessary click Set > OK, rebooting when prompted.
20. No sound in Windows
Version: XP, Vista, 7
Before running the Microsoft Fix It Center tool (see tip three), open the «Sound» or «Sounds and Audio Devices» Control Panel.
Select the Playback or Audio tab, and verify the device is set to be the default; if not, select it from the list to fix the problem.
21. Create a repair disc
Version: 7
If your PC didn’t come with a Windows installation disc, click Start, type «backup» and click Backup and Restore.
Select «Create a system repair disc» and put a blank CD or DVD in your writeable drive to create a bootable disc with the «Repair your computer» options on it.
22. Where’s GPEDIT?
Version: XP, Vista
If you’re running one of the Home editions of Windows, you’ll find the gpedit.msc tool is missing. If you’re instructed to fix a problem using this tool and you’re running Windows XP, visit here to find the equivalent setting in the Registry.
Alternatively, for the Home edition of Vista you can download an Excel spreadsheet with the various settings from here.
23. System Restore problems
Version: XP, Vista, 7
Restore points are cumulative in reverse – each new one only saves what’s changed – so old points rely on newer ones to work; if one corrupts then all older ones are lost. That means the older a Restore point, the less reliable it is, so avoid using anything but the most recent one.
Open Disk Cleanup (Start > All Programs > Accessories > System tools) and – if prompted – choose «all users». On the More Options tab delete all but the newest Restore point. If all else fails, disable System Restore and lose all Restore points, then re-enable it.
For XP use the tool here; in Vista and Windows 7 open System Protection, untick all the boxes and click Turn off System Restore > Apply. Tick your system drive again and click Apply to switch it back on.
If you’re plagued with specific error messages, or System Restore doesn’t work well, you’ll find useful solutions here.
24. Text too small
Version: XP, Vista, 7
If you’re struggling to read the text on your screen simply right-click the desktop and choose «Personalization» or «Properties». In Windows 7 click Display, or in Vista select «Adjust font size (DPI)»; in XP switch to the Settings tab and click Advanced.
Select a larger size to suit you and click OK twice followed by Yes > Close, rebooting if prompted. Certain programs will throw up warnings – in Vista and Windows 7 you can right-click the program shortcut and choose Properties > Compatibility tab, then tick «Disable display scaling on high DPI settings».
25. Video display problems
Version: XP, Vista, 7
When playing back video on your PC, does the screen appear too light or dark, or is the colour balance all wrong? That’s because the video uses special «overlay» settings in place of Windows’ own.
To resolve this, right-click the desktop and look for an Nvidia or ATI option; if it’s not there, choose «Personalization» or «Properties» instead. Choose Settings or Display Settings and look on the tabs for a video or advanced option.
Once located, make sure the video settings are set to that of the player, and not your graphics adaptor. When this is done, save your settings to resolve the problem.
26. Use Event Viewer
Version: Vista, 7
Windows records all major events, including errors and warnings, which can be accessed for troubleshooting. Press the Windows key and [R], type «eventvwr.msc» and press [Enter]. Now expand Windows Logs and click on a log.
Click Filter Current Log, tick Critical, Error and Warning and click OK. Click an event that occurred around the time of your problem: each event will provide more information about your problem – if there’s a link to more help online, select it.
Some events won’t produce any extra information, but many will; you may even get possible solutions to try, but if not, make a note of any extra detail to use in a Google search.
Current page: Windows problems and solutions
As per Diago’s answer, you can completely opt-out of Windows Error Reporting. But also note that you can opt-out for specific programs. If you frequently experience hangs in a few specific applications, it would be preferable to click «Select programs to exclude from reporting» instead of disabling Windows Error Reporting. I would also recommend contacting the vendor’s technical support (if possible) and complaining about the hangs. Software shouldn’t hang on a regular basis.
Why is opting out for specific programs better than opting out for all programs? Sending Windows Error Reporting (WER) data to Microsoft uploads it to the WinQual database that software vendors (not just Microsoft) can query to find out what crashes in their software are most prevalent. Submitting this information may help software vendors identify the most important crashes in their software and fix them.
Note that this system only works if the vendor actually creates a WinQual account and examines the crash data. In general, there’s no easy way to determine whether they actually take advantage of WER data other than asking. But if a vendor takes advantage of WER, submitting WER data about a specific crash increases the chances that it will be fixed in a later version of the application.
Crashes have an associated bucket ID that identifies where the crash occurred. Hangs used to all go into the «HUNGAPP» bucket (as of Windows XP), which ends up being pretty much useless because it doesn’t distinguish between different hang reasons for the same application. Windows Vista (and 7) supposedly collect more useful information about hangs. Having looked at the WER data for software that I work on, I still don’t think that the information being collected about hangs is as useful as the information collected about crashes. However, disabling WER entirely just because hangs are annoying seems like throwing the baby out with the bath water.
When you’re trying to fix a computer or are setting it up for certain functionality for a business, it can be quite annoying always getting error messages when you know what your doing. Today we take a look at disabling those messages in XP, Vista, and Windows 7.
Usually the message says something like “Windows Mail has stopped working. Windows can check online for a solution to the problem. Check online for a solution and close the program.” It’s extremely annoying because you usually just want the program to close.
Note: Error Reporting can be valuable if Windows isn’t working correctly and shouldn’t be disabled unless you’re a system admin or power user. This is not recommended for the average home user.

Error Reporting is enabled by default on XP, Vista, and Windows 7. If an error occurs, a detailed message regarding the error pops up and you’re prompted to send the information to Microsoft. This is so they can gather error info from millions of PC’s and helps them create patches and Service Packs. In some cases it will check the error and provide solutions to fix it. When you’re setting up a machine for specific functionality, the messages get very annoying. There are a number of reasons why an experienced user or tech would want to turn them off, so lets begin.
Disable Error Reporting in Windows 7
Open up the start menu and type in problem reporting settings into the search box, or head to Action Center –> Change Action Center Settings –> Problem Reporting Settings. If you used the search, use the “Choose how to report problems” item in the list:

Then you can easily choose the option from the list:
Again, you probably should leave it enabled, but this will let you disable it.
Disable Error Reporting in Windows 7 with Group Policy
Note: This method used Local Group Policy Editor which isn’t available in Home versions of Windows 7.
Click on Start and enter gpedit.msc into the search box and hit Enter.
Local Group Policy Editor opens and you want to navigate to User Configuration Administrative Templates Windows Components Windows Error Reporting and under Setting double click on Disable Windows Error Reporting.
Change it from Not Configured to Enabled, then click Apply and Ok and close out of Local Group Policy Editor.
Disable Error Reporting in Vista
To disable Error Reporting in Vista click on Start and open Control Panel.
Make sure you’re in Classic View and double click on Problem Reports and Solutions.
Under Tasks click on the Change Settings link.
It’s worth noting here that if you choose Ask me to check if a problem occurs, error reporting is enabled but you get to choose whether or not to send the diagnostics to Microsoft. If you select Check for solutions automatically (recommended) then all data will be sent to Microsoft automatically. Since we want to disable it all together, click on the Advanced Settings link.
In the next screen under For my programs, problem reporting is…select Off then click Ok to close out of the Problem Reports and Solutions window.
Next you’ll see that everything under Choose how to check for solutions to computer problems is grayed out. Click Ok to close out of this screen.
Click Close on the message telling you that Error Reporting is turned off.
Disable Error Reporting in XP
To disable error reporting in XP right click on My computer and select Properties. In the System Properties window click the Advanced tab then the Error Reporting button.
The Error Reporting window comes up where you want to select Disable error reporting. Uncheck the box But notify me when critical error occur if you don’t want to see any errors at all then click Ok and Ok to close out of the System Properties window.
Conclusion
When you’re setting up a computer for a set of users in a company, chances are the settings will pop up error messages that you already know about, and this takes up time to click out of them. With error reporting turned off, experienced users can go about their business without being annoyed constantly. A couple of other suggestions to eliminate other annoyances is to disable Program Compatibility Assistant and disabling the delete confirmation dialog as well. So far I haven’t noticed as many errors in Windows 7 as Vista, and they seemed to be a regular occurrence on XP. Disabling Error Reporting allows the experienced user to save time by not having to constantly clicking out of them.
READ NEXT
- › The 50 Best Ways to Disable Built-in Windows Features You Don’t Want
- › The New HP Pro x360 Fortis Is a 2-In-1 Laptop Under $500
- › Get PC Power With Tablet Portability in the Surface Pro 9 for $200 Off
- › How to Change Your Age on TikTok
- › This Huge Curved Ultrawide Monitor From LG Is $337 Today
- › PSA: You Can Email Books and Documents to Your Kindle
- › How to Screen Record on iPhone