The Windows key on your keyboard makes it easy to execute shortcuts for system applications, open your Start menu, and much more. Losing this functionality can be frustrating to deal with, as it may slow down your workflow or make your system harder to navigate.
Luckily, there are many ways to solve this issue. In this article, you’ll learn several ways to potentially restore your Windows key’s functionality on internal and external keyboards. Continue reading to see how to fix the Windows key not working on your Windows 10 system.
First, Best Website to Buy Windows and Microsoft Office for Cheap and Securely
If you want a genuine Windows 10 key, you have to get it from the best places. This video explains to you how to get your genuine Windows 10 key for cheap:
What causes the Windows key not working issue?
There can be multiple different causes for your Windows key to stop working that many users have complained about. Using user reports from various sources, we were able to identify some of the most common causes of this Windows 10 problem. View the list below and verify the issue at hand. Pinpointing the cause may help later on during the troubleshooting process.
- Hardware issue. If your keyboard is damaged physically, it could lead to issues with its functioning. This is most commonly damage to the cable used to connect the hardware to your PC. Wireless keyboards are less likely to have this issue.
- A new major Windows 10 update rolled out. Sometimes major Windows 10 updates can break things on your computer. It’s possible that a driver update is required to fix your hardware, especially if you use a gaming keyboard.
- Windows 10’s Game Mode interferes with your keyboard. Specific keyboards such as Razer Blackwidow are known to have conflicts with Windows 10’s Game Mode. Disable gaming mode to fix the error following our guide below.
- The Windows key has been disabled. Some users have noticed that the Windows key isn’t functioning because it’s been disabled in the system. It might’ve been disabled by an application, a person, malware, or Game Mode.
- Windows 10’s Filter Key bug. There’s a known bug in Windows 10’s Filter Key feature which causes issues with typing on the login screen.
After identifying some common causes, we can move on to getting rid of the problem. Our article aims to bring you the most effective methods for restoring the functionality of your Windows key. Even without prior experience in troubleshooting, you can easily fix everything by following our steps.
How to Fix the Windows Key Not Working on Windows 10
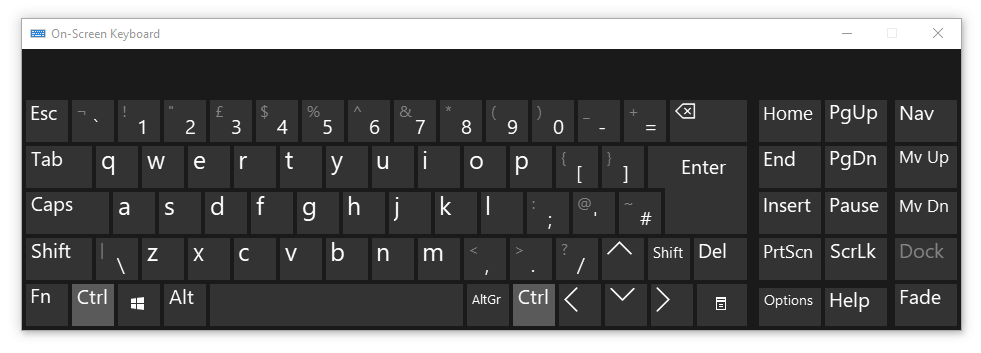
Prerequisite: Turn on the on-screen keyboard
Before troubleshooting, we recommend turning on the on-screen keyboard in Windows 10. This will allow you to navigate menus easier and follow instructions even if you need the Windows key to launch specific apps. Note that the virtual keyboard may not allow you to use the Windows key if it’s been disabled on a system level.
Here are the steps to use the on-screen keyboard in Windows 10:
- Open the Settings app by clicking on the gear icon in the Start menu. Alternatively, you can open the app by pressing down the Windows and I keys on your on-keyboard.
- Choose the Ease of Access tile.
- Scroll down in the left-side panel, then click on Keyboard listed under the Interaction section.
- Click on the toggle under “Use the On-Screen Keyboard” to turn on the virtual keyboard in Windows 10.
Now, you can get started with the troubleshooting.
Method 1: Turn off the Filter Keys feature
As mentioned above, the Filter Keys feature has a known bug that causes issues with your keyboard. You can simply turn Filter Keys off by following the steps below, and potentially restore your Windows key functionality within minutes.
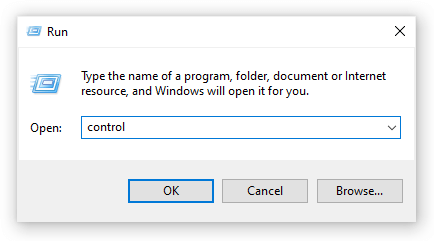
- Press the Windows + R keys using the on-screen keyboard to bring up the Run utility, then type in “control” and click the OK button. This is going to open the Control Panel.
- Make sure that your view mode is set to Category.
- Next, click on the Ease of Access heading.
- Click on the “Change how your keyboard works” link found in the Ease of Access Center.
- Make sure that the checkbox next to “Turn on Filter Keys” is empty. If you see a checkmark, simply click on it to remove it.
- Click the Apply button, then click OK. You should be able to test if your Windows key functions as intended now.
Method 2: Use a PowerShell command to restore the Windows key functionality
PowerShell is an extremely powerful tool for making adjustments to your computer, as well as troubleshooting. It gives you the ability to execute commands and directly tell your PC what to do through a scripting language. This all may sound complicated at first, but don’t worry — we’ll walk you through everything you need to do.
Note: To carry out most of the steps in the guide below, you need to have a local user account with administrative permissions. Need help? Check out our How to make a local user an administrator in Windows 10 guide.
PowerShell is an extremely powerful tool for making adjustments to your computer, as well as troubleshooting. It gives you the ability to execute commands and directly tell your PC what to do through a scripting language.
This all may sound complicated at first, but don’t worry — we’ll walk you through everything you need to do.
- Press the Windows + R keys on the on-screen keyboard. This is going to bring up the Run utility.
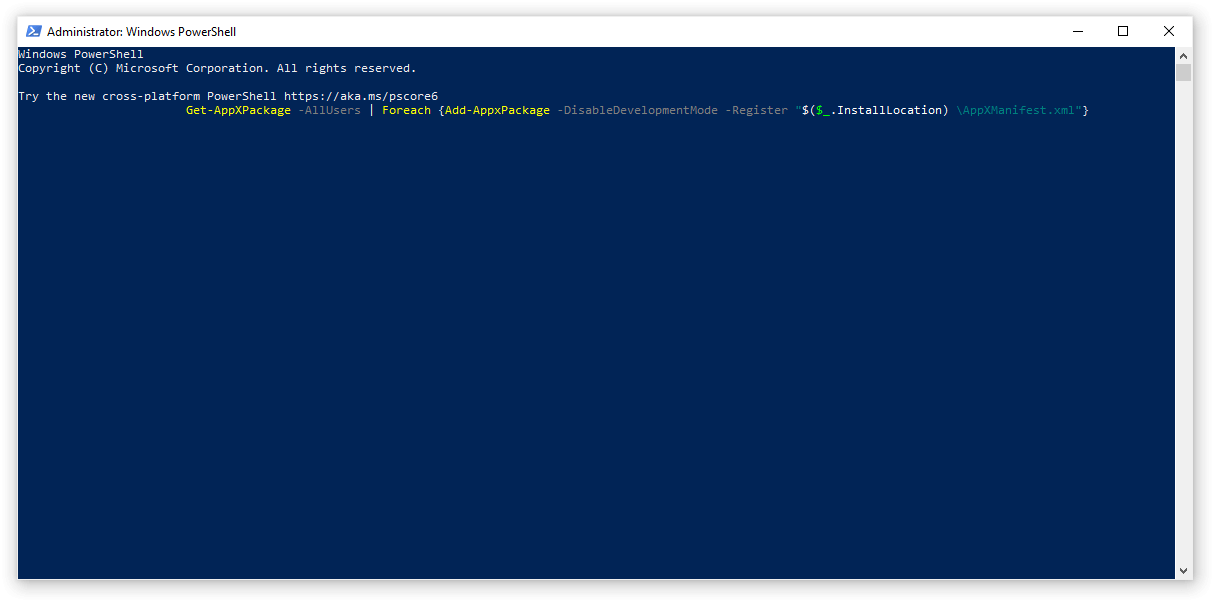
- Type in “Powershell” and press the Ctrl + Shift + Enter keys on your keyboard. Doing so, you’re launching PowerShell with administrative permissions.
- If prompted, click Yes to allow PowerShell to make changes on your device.
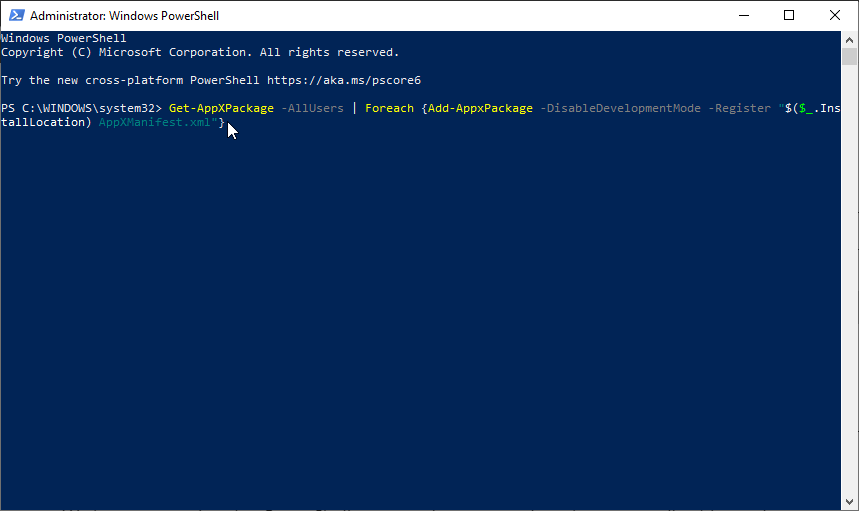
- Once in PowerShell, copy and paste in the following command, then hit the Enter key on your keyboard to execute it: Get-AppXPackage -AllUsers | Foreach {Add-AppxPackage -DisableDevelopmentMode -Register “$($_.InstallLocation) AppXManifest.xml”}
- After the command has finished running, you should be able to use the Windows key once again. If it doesn’t work just yet, proceed to a different method in our article.
Method 3: Make adjustments to your Registry
You can simply try to apply a Registry tweak to restore everything into working order.
Warning: Before beginning this guide, we recommend creating a backup of your Registry. If you’re not sure how to create and import Registry backups, watch “Registry Backup, Restore, Import And Export” from Windows Ninja.
Here’s what you need to do.
- Press the Windows + R keys on your on-screen keyboard to open Run, then type “Regedit” into the input field. Press the OK button to launch the Registry Editor.
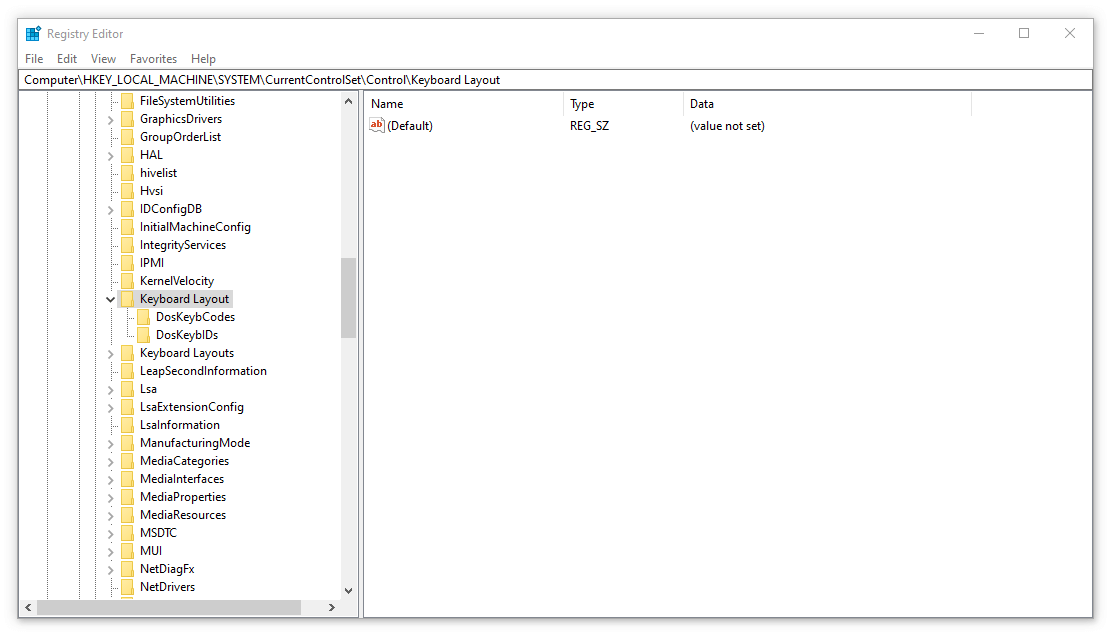
- You can navigate the Registry Editor by expanding folders using the arrow icon next to their names. Using this, locate the following Registry key: HKEY_LOCAL_MACHINESYSTEMCurrentControlSetControlKeyboard Layout
Alternatively, you can also copy and paste the key into the Registry Editor’s address bar for faster navigation and,
- Right-click on the “Scancode Map” registry key and press the “Delete” option to remove the key. If you can’t find this key, it’s most likely not available on your device — proceed with a different method below.
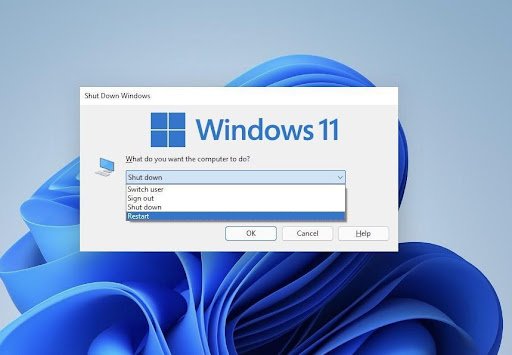
- After deleting “Scancode Map,” close the Registry Editor and restart your computer.
Method 4: Disable Game Mode in Windows
Microsoft recognizes the demand for gaming optimizations in Windows 10. This is the reason why the Game Mode feature exists. However, it’s still far from perfect and may cause conflicts, disable features you need, or overall provide a bad gaming experience.
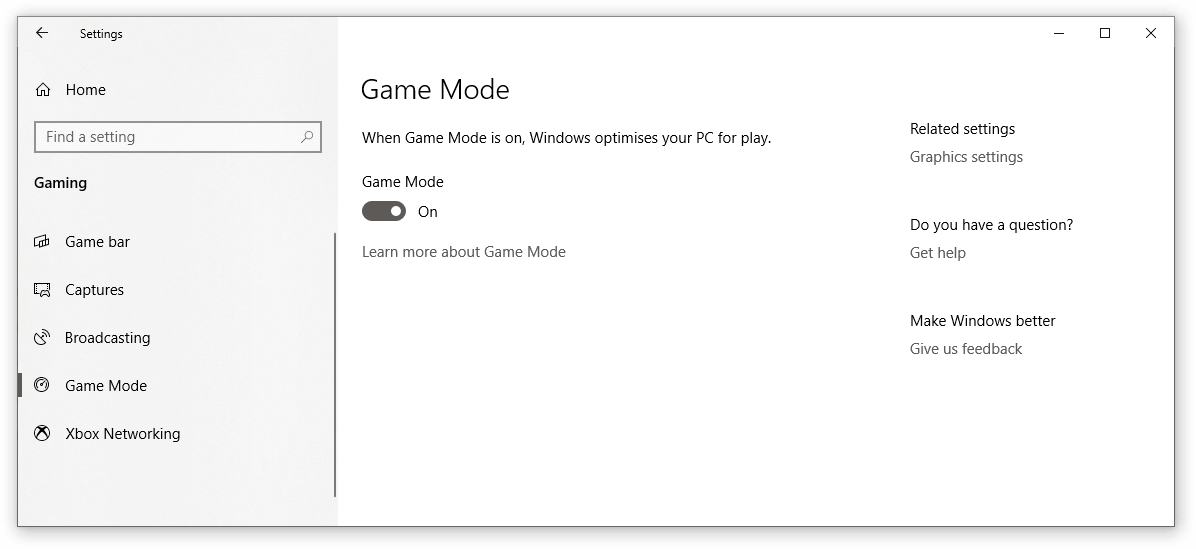
Users have reported that Game Mode causes conflicts with keyboards, making the Windows key unusable as a result. You can easily turn it off following our quick guide to verify whether or not it causes any problems.
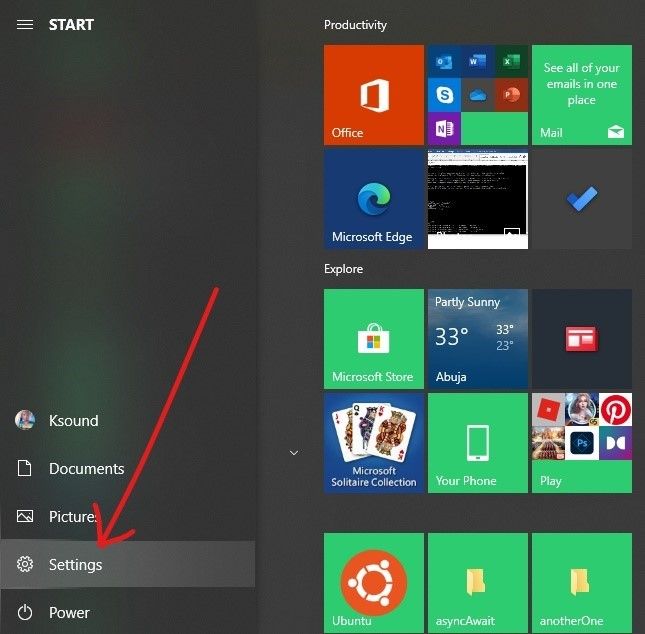
- Click on the Start menu in your taskbar (Windows icon) and choose Settings. Alternatively, you can use the Windows + I keyboard shortcut if you turned the on-screen keyboard on.
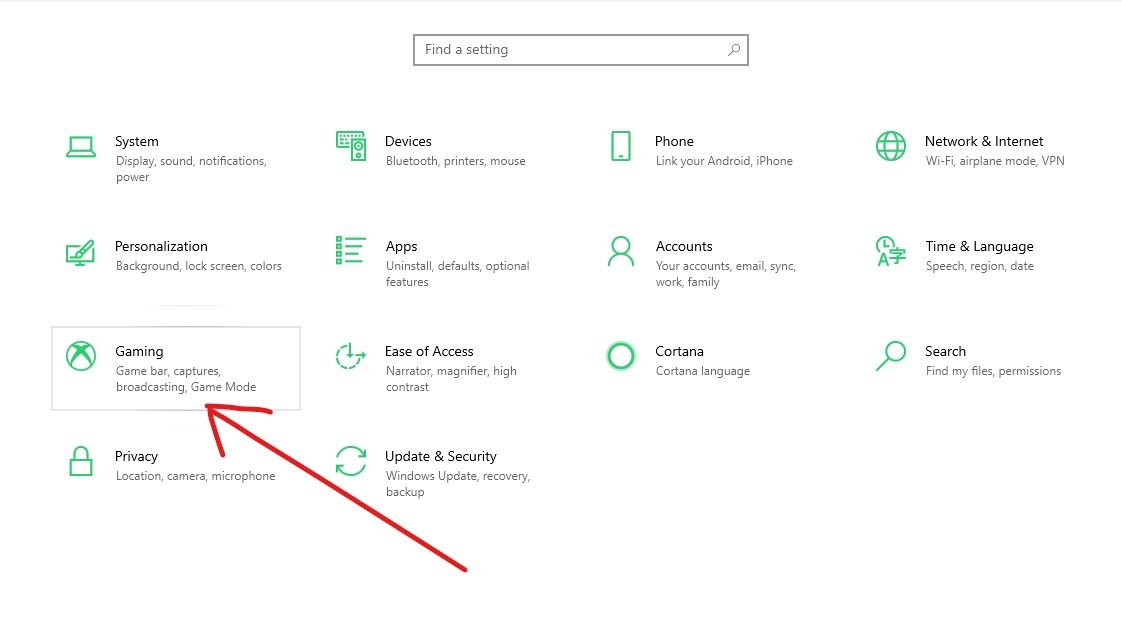
- Choose “Gaming” from the available menu options.
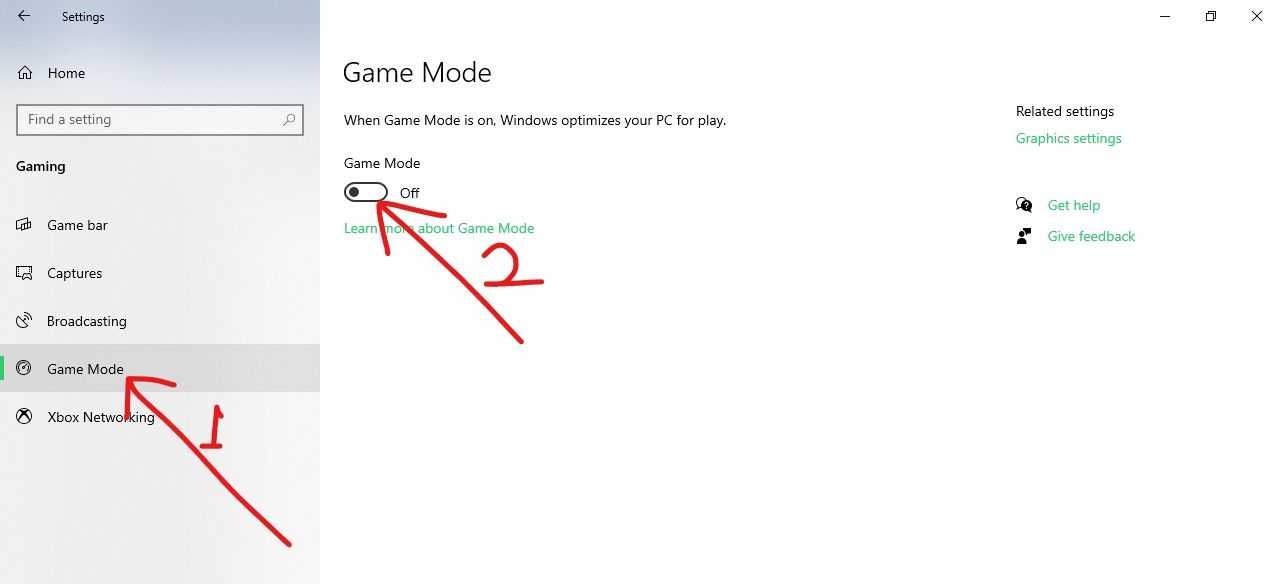
- Switch to the “Game Mode” tab using the menu in the left panel.
- Ensure that the toggle under “Game Mode” is set to display “Off.”
Method 5: Create a new user account
An interesting yet easy solution you can try to resolve issues with the Windows key is making a new user account. If everything works fine on the new user, simply transfer your files over and begin using the new account.
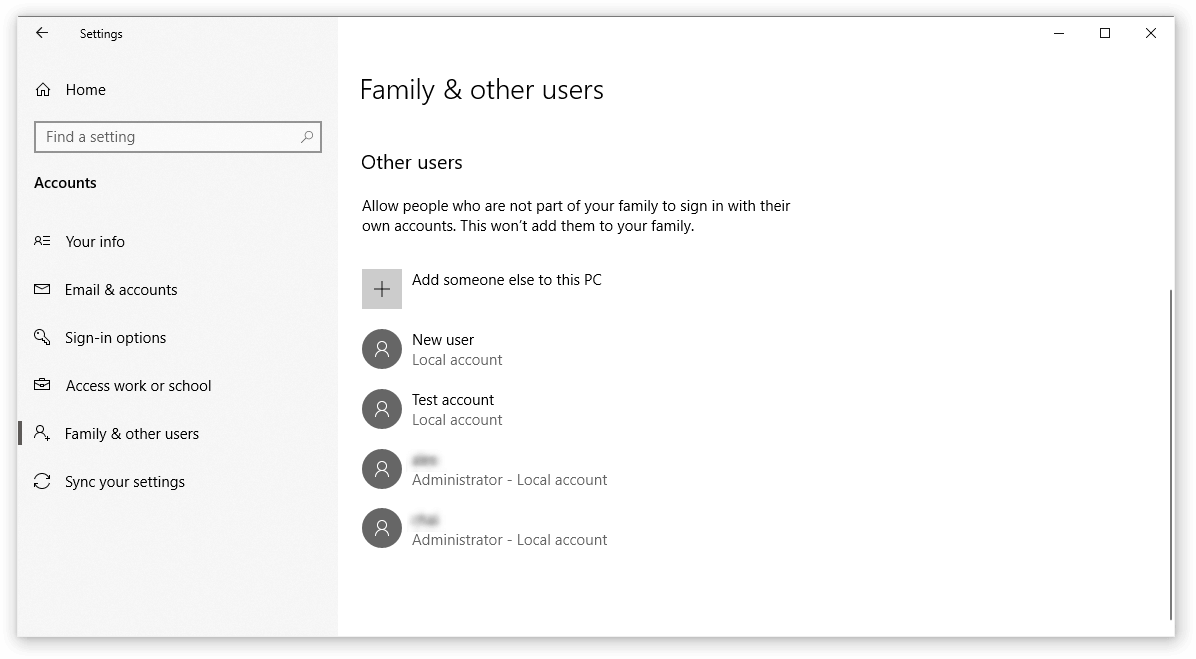
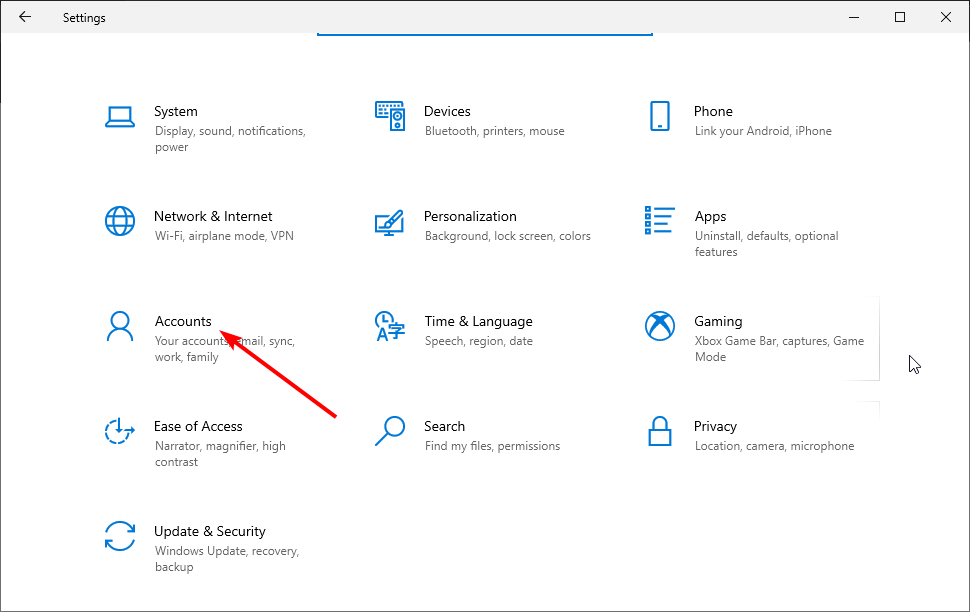
- Click on the Start menu and choose “Settings.” You can alternatively use the Windows + I keyboard shortcut from the on-screen keyboard as well.
- Click on the “Accounts” tile.
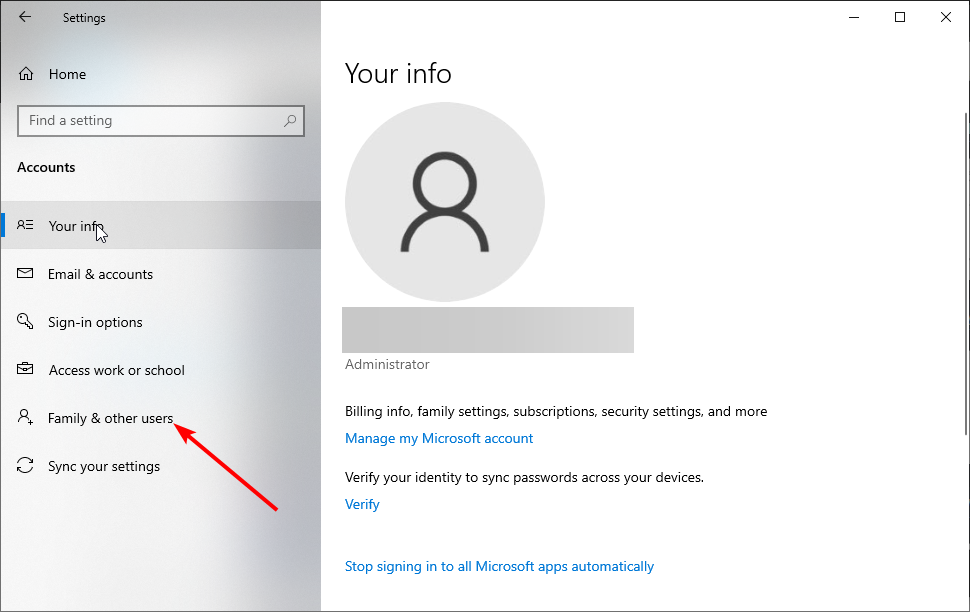
- Switch to the “Family & other users” tab using the panel navigation on the left side.
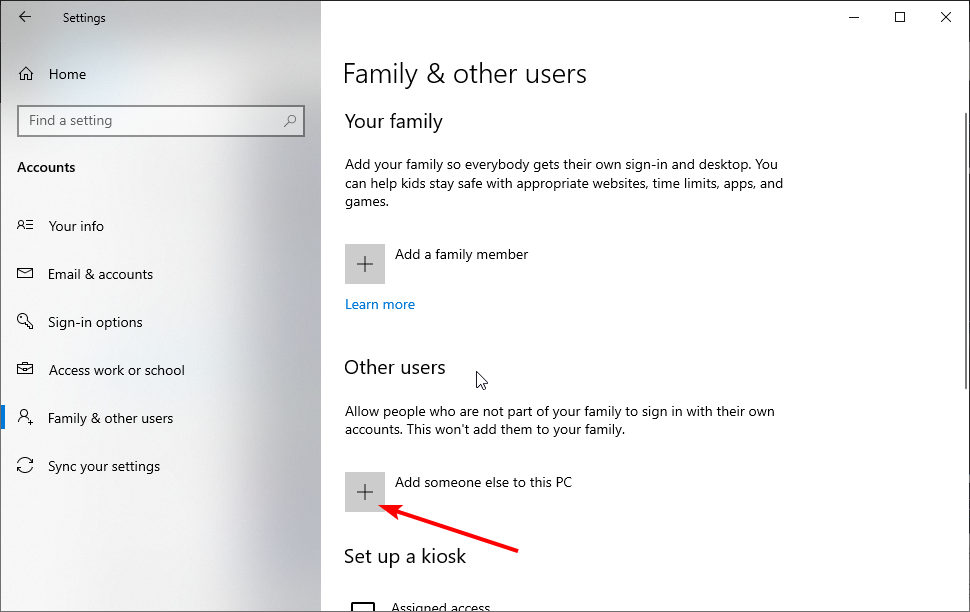
- Scroll down and click on the “Add someone else to this PC” button. The fastest way to create a new user for yourself is offline — we’ll be using this method to create the account.
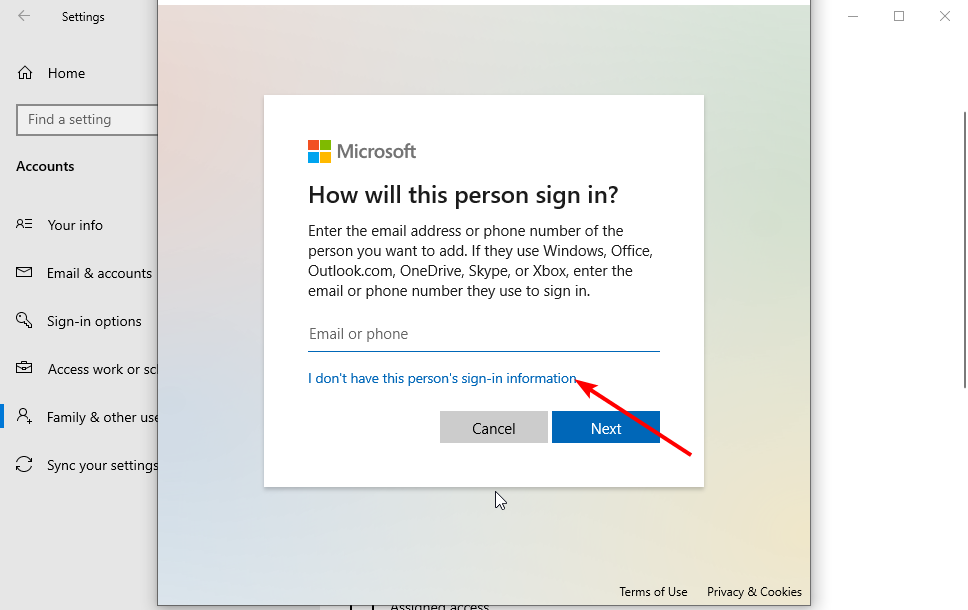
- Instead of signing in to a Microsoft account, click on the “I don’t have this person’s sign-in information” link.
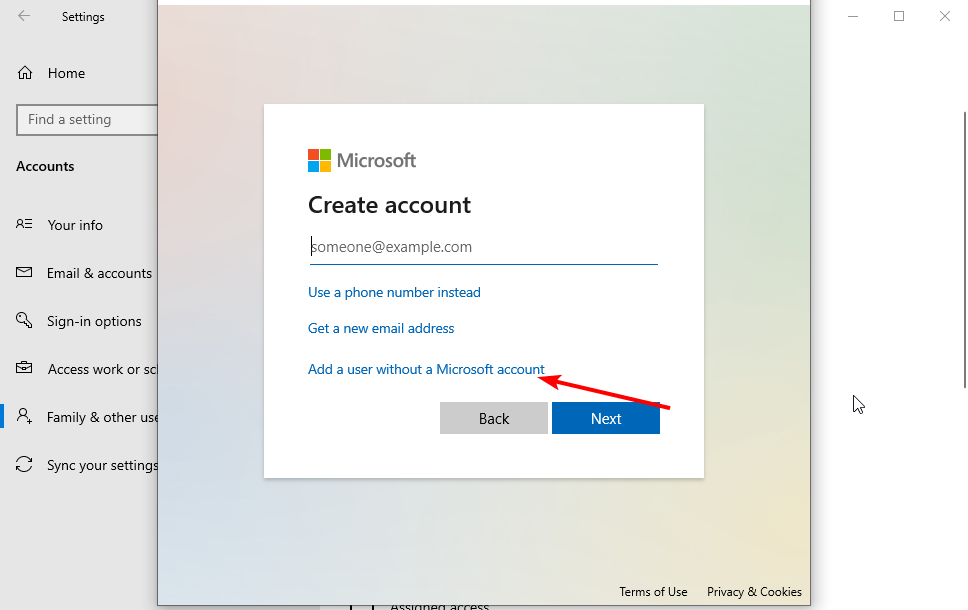
- Next, click on the “Add a user without a Microsoft account” link.
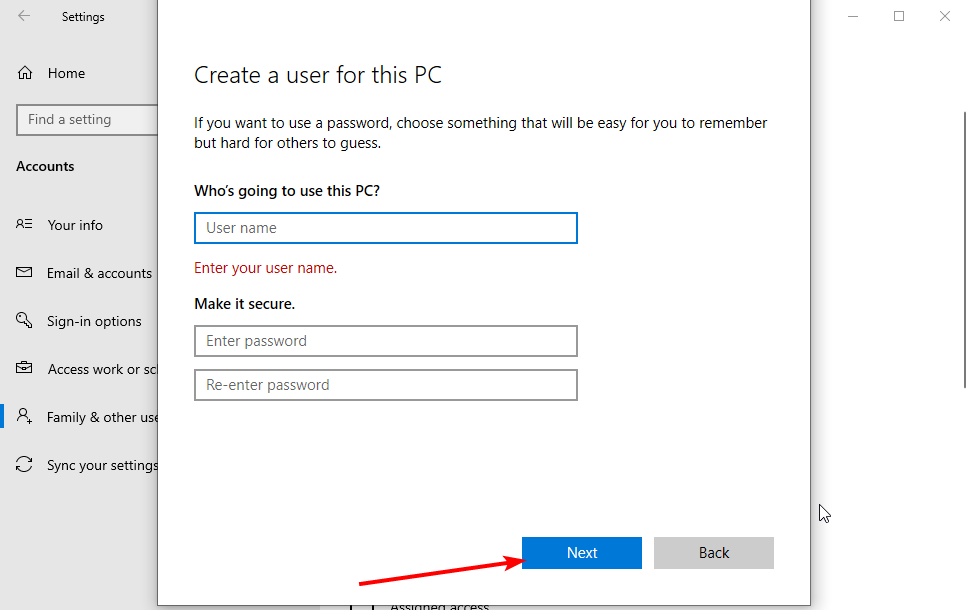
- Type in a username and optionally add a password, then click Next. You should immediately see the new user created which you can use now.
Method 6: Perform a System File Checker scan
The System File Checker is a tool available in Windows 10 by default. It’s also called an “SFC scan,” and it’s your quickest way to automatically fix corrupted system files and other issues.
Running this scan has proven to get rid of issues with the Windows 10 reset failing. Here’s what you need to do to run it.
- Press the Windows + R keys on the on-screen keyboard. This is going to bring up the Run utility.
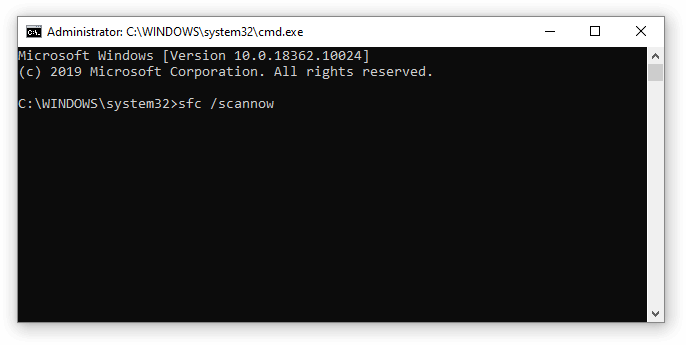
- Type in “cmd” and press the Ctrl + Shift + Enter keys on your keyboard. By doing so, you’re launching the Command Prompt with administrative permissions.
- If prompted, click Yes to allow the Command Prompt to make changes on your device.
- Once in the Command Prompt, type in the following command and press Enter to execute it: sfc /scannow
- Wait for the SFC scan to finish scanning your computer and repairing corrupt files. This may take a long time; ensure that you don’t close the Command Prompt or shut your computer down.
- Restart your device after the scan is complete.
Method 7: Use the DISM from the Command Prompt
Similar to the System File Checker, DISM is a command used to repair an image of Windows 10. By running it, you may be able to restore the problem which causes your Windows key to lose its functionality.
- Press the Windows + R keys on the on-screen keyboard. This is going to bring up the Run utility.
- Type in “cmd” and press the Ctrl + Shift + Enter keys on your keyboard. By doing so, you’re launching the Command Prompt with administrative permissions.
- If prompted, click Yes to allow the Command Prompt to make changes on your device.
- Once in the Command Prompt, type in the following two commands and press Enter after each one to execute them: Dism /Online /Cleanup-Image /StartComponentCleanup, Dism /Online /Cleanup-Image /RestoreHealth
- Wait for the commands to finish running and restart your computer. You should be able to verify if the Windows key has stopped working
Method 8: Check your computer for malware
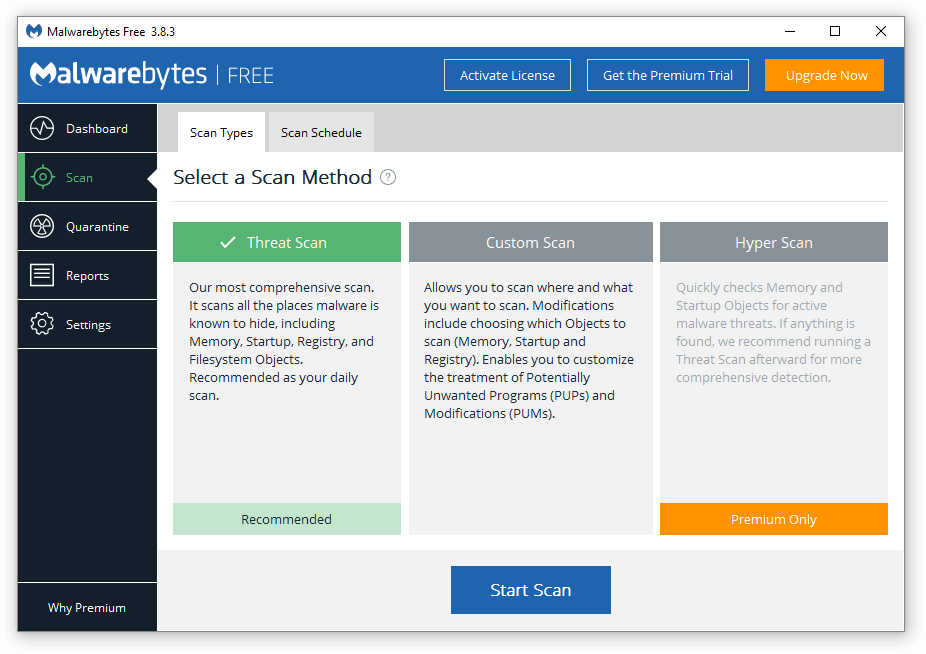
Below is a short guide on how to use Malwarebytes for scanning and removing viruses and other types of malware from your device. Doing this may remove harmful apps that disabled the functionality of your Windows key. This guide is not set in stone, so feel free to use any antivirus app — it’s up to your preference.
- Launch your antivirus application. Again, we’re using the free version of Malwarebytes to demonstrate this process.
- Click on the “Scan” option using the application’s left-side menu.
- Click the “Start Scan” button to start a malware scan on your device.
- Wait for Malwarebytes to finish scanning your PC for malware. If any malicious files are found, you can immediately neutralize them by allowing Malwarebytes to put them in quarantine.
- Optionally, allow Malwarebytes to delete the malicious files from your PC.
We hope that this guide was able to help you restore the Windows key to a working condition again.
Final Thoughts
If you notice in the future that your system is experiencing similar issues, feel free to return to our article and apply some other fixes. If nothing works, we recommend turning to either Microsoft’s customer support team or looking for an IT specialist in regards to your PC’s health.
Are you interested in learning more about Windows 10? You can browse our dedicated Help Center section and find articles about everything related to Microsoft’s groundbreaking operating system.
If you’re looking for a software company you can trust for its integrity and honest business practices, look no further than SoftwareKeep. We are a Microsoft Certified Partner and a BBB Accredited Business that cares about bringing our customers a reliable, satisfying experience on the software products they need. We will be with you before, during, and after all the sales.
You may also like
» How to Turn Off Mouse Acceleration Completely in Windows 10
» How to Use Snip & Sketch to Capture and Edit Screenshots in Windows 10
» How to Enable Dark Mode in the Windows 10 File Explorer
Contents
- 1. Check whether it is a hardware issue
- 2. Check your Start menu
- 3. Disable gaming mode
- 4. Use the Win Lock key
- 5. Disable the Filter Keys option
- 6. Enable the Windows logo key via Windows Registry
- 7. Restart your Windows/File Explorer
- 8. Update your keyboard drivers
- 9. Run System File Checker
- 10. Run the Deployment Image Servicing and Management (DISM) tool
- 11. Re-register your apps
- 12. Run a full system scan
- How to fix Windows key not working on Windows11?

‘Problems cannot be solved
at the same level of awareness
that created them’
Albert Einstein
The Windows logo key is by all means an essential component of your keyboard: it takes part in multiple shortcuts as well as evoking your Start menu. As you can see, this key is exceptionally useful, so its failure to work can evoke the feeling of frustration in any Windows 10 user.
Although there might be many reasons for WinKey not working (Windows 10), we have thoroughly investigated the issue and collected an exhaustive list of proven tips on how to fix the Windows key is not working on Windows 10 nuisance. So, be sure to examine them all since we believe we have succeeded in addressing your problem.
Before you start your troubleshooting adventure, we strongly advise you to back up your personal files. This is to secure them against permanent loss in case something goes wrong. For this purpose, you can use an external storage device or a cloud solution. You are also free to migrate your files to another laptop.
Besides, it is also a good idea to back up your registry since many of the following fixes include registry tweaks:
- To enter Registry Editor, right-click on the Windows logo icon, click Run, type regedit, and hit Enter.
- Navigate to File and select Export.
- Go to Export Range. Select All.
- Select to what location you wish to save your backup file.
- Name it and select Save.
If things do not go as planned, you will be able to restore your backup file and get your Windows Registry up and running again:
- Open Registry Editor, using the instructions above.
- Navigate to Import. Select your backup file.
Now that you have exercised deliberate prudence to ensure that your registry is safe and protected from irreparable damage, feel free to have a go at fixing your Windows logo key:
1. Check whether it is a hardware issue
Unfortunately, your keyboard is a fragile piece of hardware. Thus, it can go haywire at any moment. With this in mind, you should make sure it is not faulty right now. Check if the Windows logo key fails to perform its functions every time you press it. See if other keys on your keyboard work well. If you use an external keyboard, check if it is having the same WinKey issue when attached to another machine. The point is, the device might need replacement.
Now check if your Start menu can be accessed at all. The thing is, you might have been misled into thinking that your Windows logo key is malfunctioning while it is your Start menu that is behind the problem.
First, let’s try to enable your Start menu by doing the following:
- Right-click on your Windows logo icon on the taskbar.
- Select Run from the drop-down menu.
- Type ‘regedit’ (without quotes).
- Go to HKEY_CURRENT_USERSoftwareMicrosoftWindowsCurrentVersionExplorerAdvanced
- Go to the right panel and click on it.
- Select New -> DWORD (32-bit) value.
- Call it EnableXamlStartMenu.
Exit your registry. Then restart your PC and see if the issue persists. If the manipulation above has proved to no avail, hurry up to fix your Win 10 Start menu not working issue.
3. Disable gaming mode
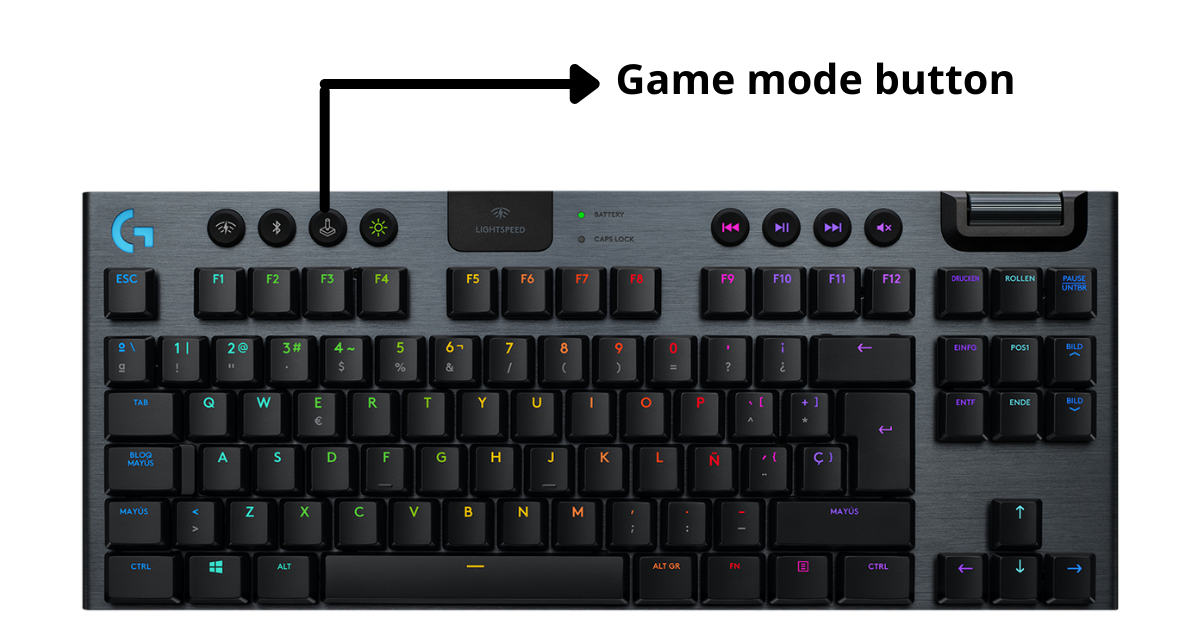
If you are using a gaming keyboard, it can be in gaming mode. This can make your Windows key unresponsive. In such a case, search for a key that enables/disables gaming mode and use it – this key is usually with a joystick drawing (or something like that) on it.
4. Use the Win Lock key
Some keyboards have a special key that is designed to turn your Windows logo key on or off. You might have accidentally pressed that Win Lock key and disabled your Windows logo key. If that is your case, you can easily resolve the issue by hitting the Win Lock key once again.
5. Disable the Filter Keys option
This feature makes your keyboard ignore brief or repeated keystrokes, which might have led to your WinKey issue in Windows 10. To disable filter keys, use the instructions below:
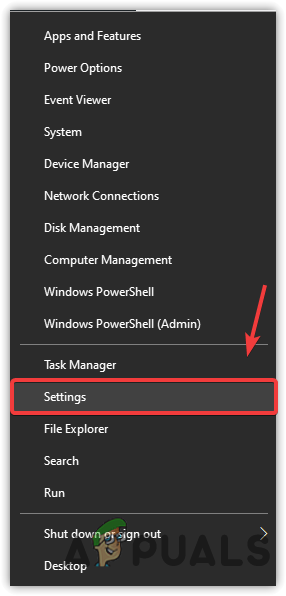
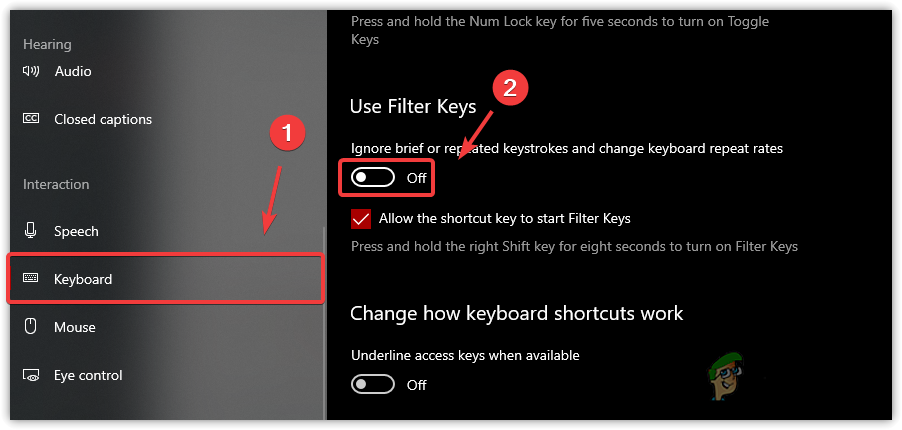
- Right-click on your Start menu icon.
- Select Settings from the menu.
- Navigate to Ease of Access and click on it.
- Go to the left pane and click Keyboard.
- Locate the Filter Keys feature.
- Toggle it off.
Check if this manoeuvre has resolved your issue.
6. Enable the Windows logo key via Windows Registry
Reportedly, ‘WinKey not working (Windows 10)’ is often resolved through this registry tweak. Here is what you should do:
- Right-click on your Start menu icon and opt for Run.
- Type ‘regedit’ without quotes to launch Registry Editor.
- Then navigate to HKEY_LOCAL_MACHINESYSTEMCurrentControlSetControlKeyboard Layout.
- In the right pane, locate Scancode Map.
- Right-click on it and select Delete.
Exit the editor. Reboot your computer to see if this method has worked for you.
7. Restart your Windows/File Explorer
If the Windows logo key issue persists, you might need to restart the explorer.exe process on your PC. This simple trick is reported to have got WinKey back on track for many users. Here is how you can perform it:
- Open your Task Manager. For this purpose, you can use the Ctrl+Alt+Delete or the Ctrl+Shift+Esc shortcut.
- Navigate to the Details tab.
- Locate explorer.exe. Right-click on it and select End task. After this procedure, your screen is supposed to go black. Do not worry – that’s part of the fix.
- Open your Task Manager again.
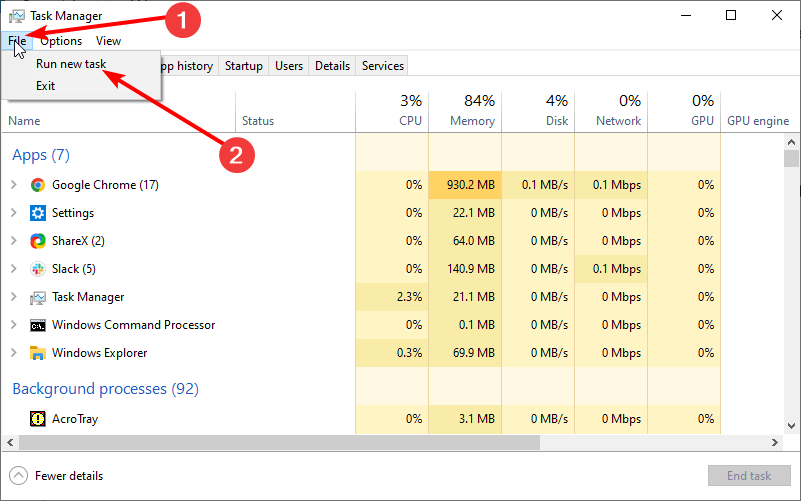
- Click File. Select Run new task from the drop-down menu.
- The Create new task window will appear. Type ‘explorer.exe’ into it (without quotes).
- Press Enter.
Now see if your Windows logo key has been fixed.
8. Update your keyboard drivers
If you are looking for a way how to fix the Windows key is not working on Windows 10 problem, updating your keyboard driver is an essential step in your troubleshooting plan.
You can search for updated driver software yourself: you will have to visit the website of your keyboard/laptop manufacturer and download the necessary driver from there.
That said, you are free to get your keyboard driver updated with the help of the built-in Device Manager utility:
- Right-click on your Start menu icon.
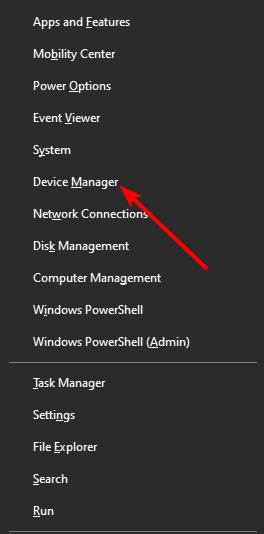
- Select Device Manager from the list of options.
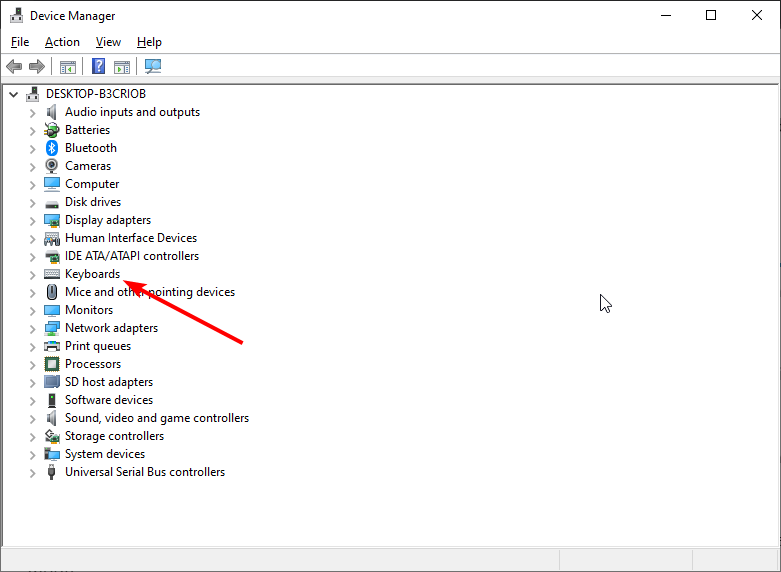
- Navigate to your keyboard.
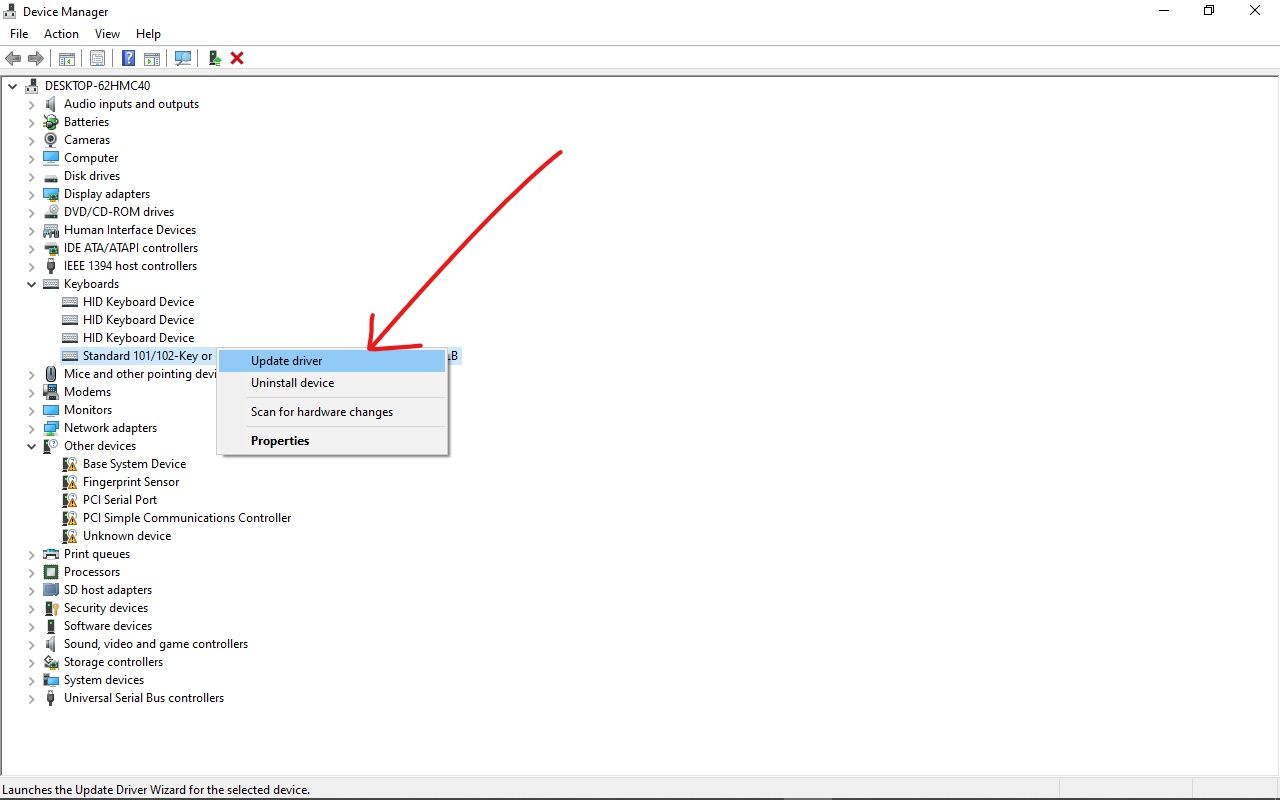
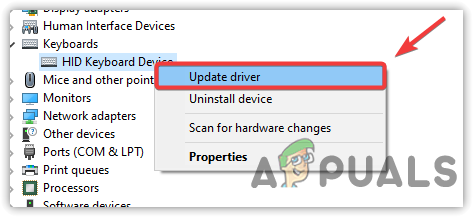
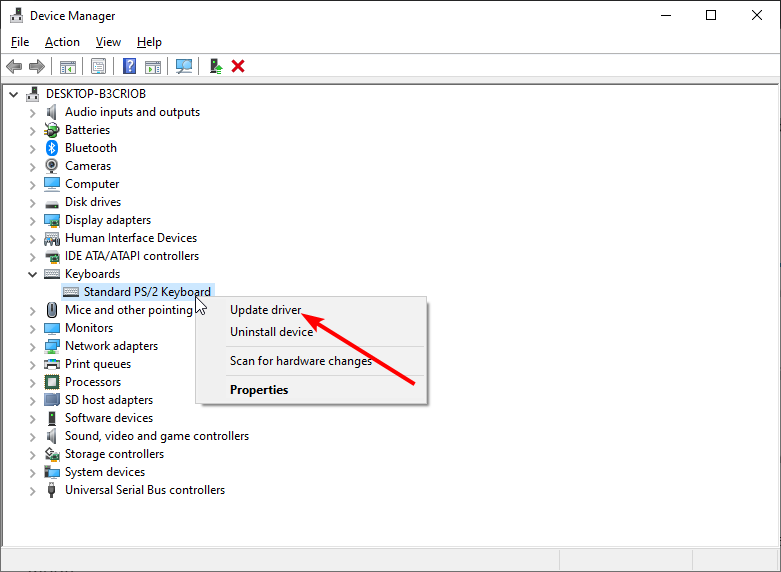
- Right-click on the device and select Update driver.
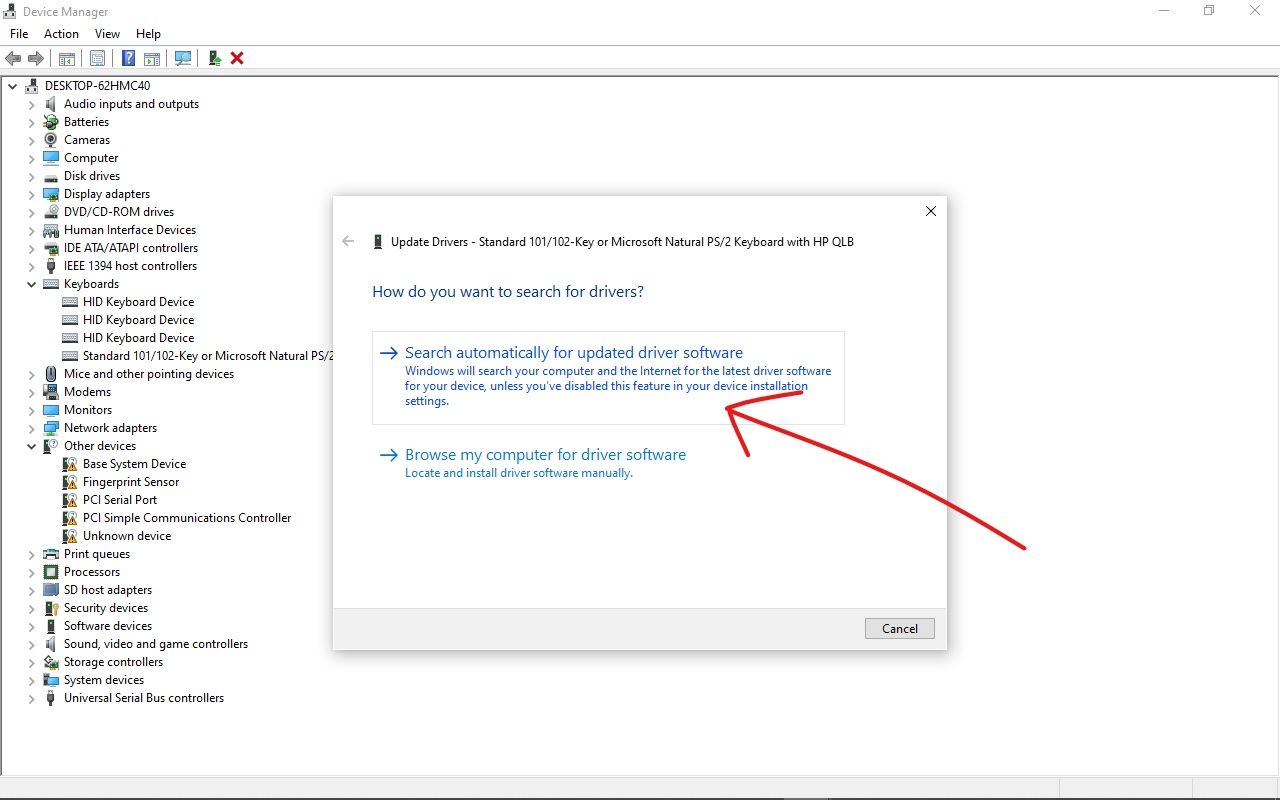
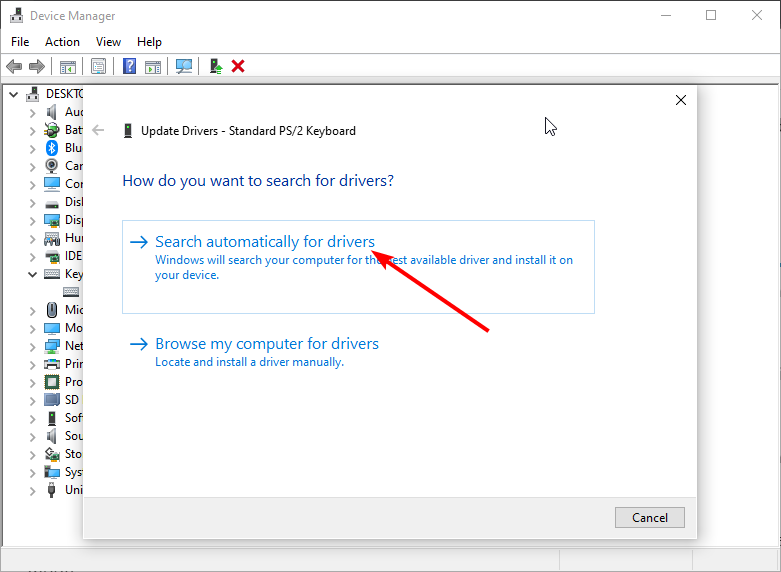
- Let Device Manager search for the necessary driver online.
Nevertheless, we recommend you to use a special tool to update all your drivers and therefore make your PC more stable. For instance, Auslogics Driver Updater will do the job for you. With just one click, you will have your system scanned for driver issues. You will end up getting the latest manufacturer-recommended driver versions for all your devices, which will fix and prevent many issues with your computer.
9. Run System File Checker
Unfortunately, your system files can go corrupt or missing, thus causing persistent keyboard issues. In a situation like this, your best bet is to run the built-in System File Checker solution, using the instructions below:
- Right-click on your Start menu icon. Select Search.
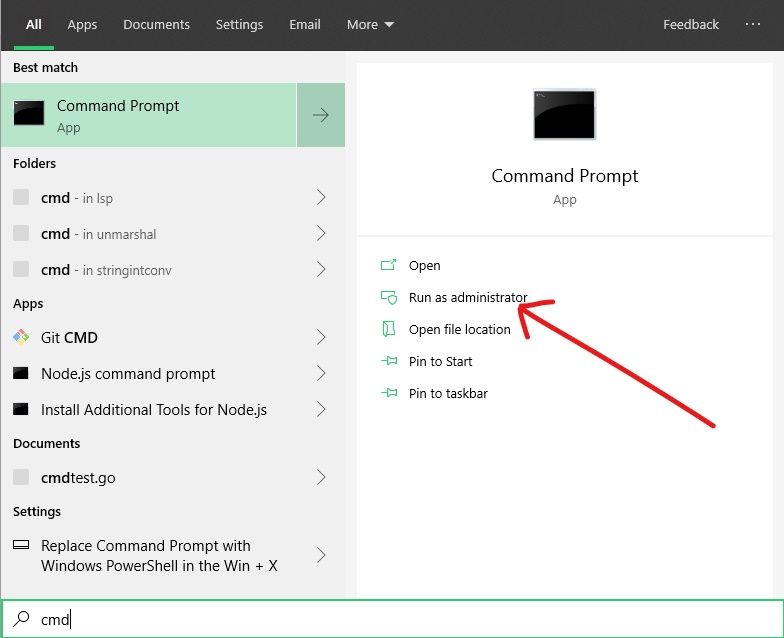
- Type cmd. Locate Command Prompt in the list of results.
- Right-click on Command Prompt. Select Run as administrator.
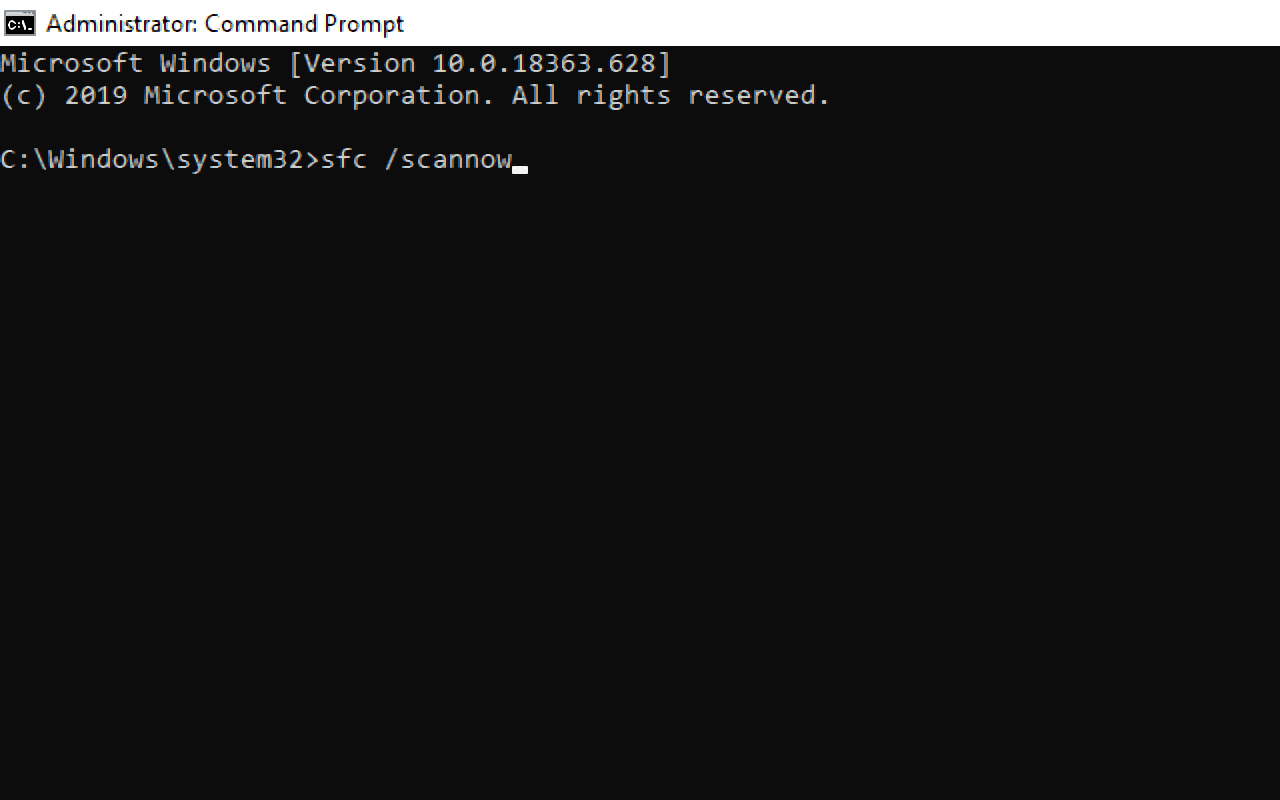
- Once your elevated Command Prompt window is open, type sfc /scannow.
- Press Enter. Wait for the scan to finish.
When the process is complete, restart your computer. Hopefully, your Windows logo key is active again.
If the previous scan has failed to help you, we advise running a DISM scan to repair your image – let’s hope this will make your WinKey issue a thing of the past:
- Open an elevated command prompt (use the instructions from the previous fix).
- One at a time, type ‘DISM /online /Cleanup-Image / ScanHealth’ and ‘DISM /Online /Cleanup-Image /RestoreHealth’ (without quotes) into your command prompt window and hit Enter after each.
Wait until the scan is complete. Then you should restart your machine. Check if your problem has been successfully solved.
11. Re-register your apps
If your Windows key keeps having issues despite all your efforts, your keyboard might be involved in some software conflict. This is the reason why you might find it useful to re-register all your apps. There is no need to worry – it is a pretty straightforward procedure. Just use the following guidelines:
- Right-click on your Start menu icon on the taskbar.
- Select the Search option. Type powershell.
- Select the PowerShell result. Right-click on it.
- From the drop-down menu, select Run as administrator.
- Paste the following command into the PowerShell window:
Get-AppXPackage -AllUsers | Foreach {Add-AppxPackage -DisableDevelopmentMode -Register “$($_.InstallLocation)AppXManifest.xml”} - Press Enter to start the procedure.
Wait until your apps are re-registered and reboot your PC. We hope this method has proved helpful.
12. Run a full system scan
The sad truth is, malware is a common cause of keyboard issues on Windows computers. Unfortunately, the chances are that is your case. This means it is time for you to scan your system.
You can do that with Windows Defender:
- Open your Start menu and click the Settings gear.
- Go to Update & Security. Select Windows Defender.
- Then click Open Windows Defender.
- Move to the shield icon, which is in the left pane.
- Click Advanced scan and select Full scan.
That said, using Windows Defender may not be enough. There might be some particularly malicious intruder lurking about. With this in mind, try running a full scan with Auslogics Anti-Malware: this tool is capable of killing the most powerful entities from the world of malware.
How to fix Windows key not working on Windows11?
If the Windows key on your keyboard isn’t working on Windows 11, you can go through all the methods above to solve the issue. The new operating system does come with a number of improvements and bug fixes — but it’s not infallible. So, you can still run into glitches and errors from time to time — and your Windows key not working may be related to these.
So, the first thing you should do is go through the fixing methods we’ve outlined above:
- Checking your Start Menu
- Disabling Game Mode
- Using the Win Lock key
- Disabling the Filter Keys option
- Enabling the Windows logo key via Windows Registry
- Restarting Windows/File Explorer
- Updating your drivers
- Running System File Checker
- Running the Deployment Image Servicing and Management (DISM) tool
- Re-registering your apps
- And running a full system scan
If the steps above don’t help, you are probably dealing with a hardware issue. In this case, the only solution would be to replace your keyboard.
If you need more assistance or have any suggestions regarding the topic, feel free to leave a comment below.
Outdated keyboard driver might cause this issue
by Milan Stanojevic
Milan has been enthusiastic about technology ever since his childhood days, and this led him to take interest in all PC-related technologies. He’s a PC enthusiast and he… read more
Published on September 19, 2022
Reviewed by
Vlad Turiceanu
Passionate about technology, Windows, and everything that has a power button, he spent most of his time developing new skills and learning more about the tech world. Coming… read more
- The Windows key is probably the most used key on any IBM-compatible keyboard.
- Some of the most likely reasons for Windows Key not functioning are driver faults and system upgrades.
- If you’re a gamer who uses keyboard settings to prevent interfering with your gameplay, you might need to disable it.
XINSTALL BY CLICKING THE DOWNLOAD FILE
- Download Restoro PC Repair Tool that comes with Patented Technologies (patent available here).
- Click Start Scan to find Windows 10 issues that could be causing PC problems.
- Click Repair All to fix issues affecting your computer’s security and performance
- Restoro has been downloaded by 0 readers this month.
Windows key has multiple functionalities, and both basic and advanced users use it. It holds many keyboard shortcuts that make tasks easier on PC.
Unfortunately, a few users reported that the key is not working on Windows 10 and 11. This is without disabling the Windows key and with no noticeable fault.
In this guide, we will show you quick ways to fix this problem and get back the dynamism and ease of use offered by the Windows key.
Why won’t my Windows key work on my keyboard?
There are different Windows key-related issues with varying causes, as reported by users. Below are some of the popular ones:
- Windows key + Tab not working Windows 10: Several users reported that the Windows key + Tab shortcut isn’t working on their PC. This isn’t a big problem, and you can fix it by using one of our solutions.
- Windows key not working after update: Sometimes, an update can cause the Windows key not working issue. If that’s the case, you must find and remove the problematic update from your PC.
- Windows key not working Razer Blade: Several users reported this problem while using the Razer Blade keyboard. This problem can appear if you have the Game Mode feature on your keyboard.
- Windows key + R, windows key + S, windows key + Q not working: Sometimes, various keyboard shortcuts do not work due to issues with the Windows key. This can be a big problem, mainly if you use keyboard shortcuts.
- Windows key not working in Remote Desktop: Remote desktop is a valuable feature of Windows that allows you to access other computers. Even though this feature is excellent, many users reported that the Windows key isn’t working while using Remote Desktop.
- Windows key shortcuts not working: Many users reported that all Windows key shortcuts on their PC aren’t working. This can be a big problem, but you should be able to fix it using our solutions.
- Windows not working: Many users reported that their Windows key is disabled. In most cases, your Windows key will become disabled if you enable Game Mode on your keyboard.
- Windows key not working after hardware change: Many users reported the issue after adding or removing a piece of hardware to the computer.
Here are some of the devices you can encounter the error with:
- Windows key not working Asus ROG
- Windows key not working Alienware
- Windows key not working on Corsair keyboard
- Windows key not working HP OMEN
How do I fix my Windows key not working?
1. Use PowerShell
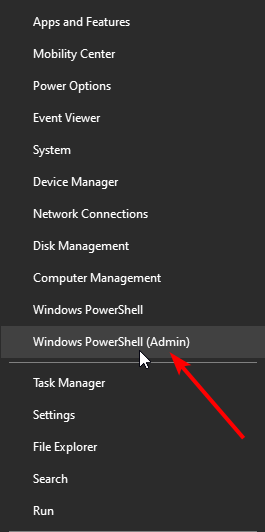
- Right-click on the Windows icon and select Windows PowerShell (Admin).
- Enter the command below and hit Enter:
Get-AppXPackage -AllUsers | Foreach {Add-AppxPackage -DisableDevelopmentMode -Register "$($_.InstallLocation) AppXManifest.xml"} - Wait for the command to finish running.
A few users reported that they fixed the Windows key problem simply by using one PowerShell command.
We have to mention that PowerShell commands can sometimes have unpredictable results on your Windows 10 installation.
Therefore it might be better to create a new System Restore point and use it to restore your Windows 10 if anything goes wrong after using PowerShell.
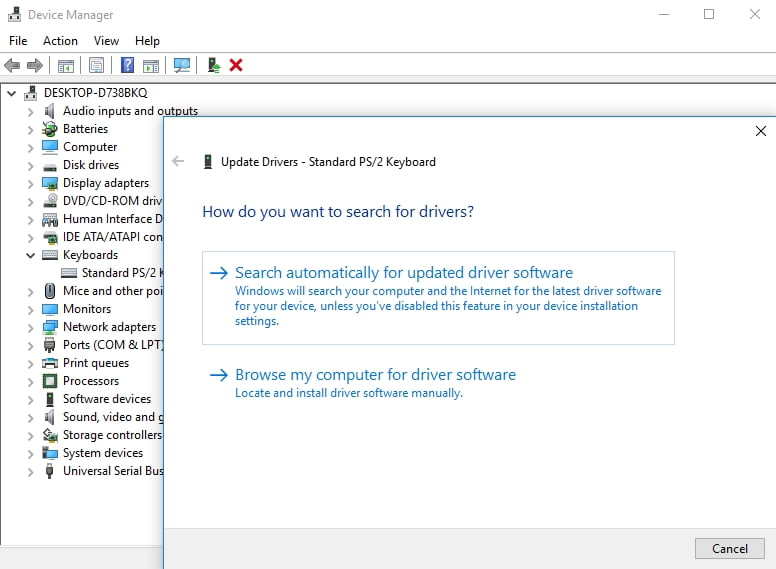
2. Update your keyboards’ drivers
- Right-click on Start and choose Device Manager from the menu.
- Expand the Keyboards option by clicking the arrow on the left side.
- Right-click on your driver and select Update driver.
- Finish with Search automatically for drivers.
According to users, the Windows key might stop working if there’s a problem with your drivers, but you should be able to fix this problem simply by updating drivers.
Having an assistant whenever this happens, saves time and eases the process of installing the right driver, avoids errors, and has backup for your driver files in a database.
In this context, we recommend DriverFix. Scans, reports, and updates are the core of this program. Manufacturers’ drivers are different from generic drivers, but DriverFix can find and update/fix them if there are any missing drivers or damaged ones.

DriverFix
A safer and faster option for keeping your drivers up-to-date and boosting your device health.
3. Disable Gaming mode
If you have a gaming keyboard, you probably have support for Gaming mode on your keyboard. Gaming mode is designed to disable specific keys during gameplay sessions that can interfere with your game.
For example, it can happen that you accidentally press the Windows key during a game, and in most cases, that will minimize your game and open the Start Menu.
This can be a problem if you’re playing an online game with your friends, and this is why gaming keyboards have support for Gaming mode.
Many users aren’t aware that their keyboard supports Gaming mode and sometimes turn it on accidentally when cleaning their keyboard.
If the Windows key is not working on your keyboard when playing a game or not, be sure to check if Gaming mode is turned on.
Many keyboards have a Gaming mode switch, so be sure the switch isn’t set to Gaming mode.
This switch is usually located above F2 and F3 buttons and has a joystick image next to it, so be sure to check your keyboard for this switch and use it to turn off Gaming mode.
Some keyboards, such as Apex M800, have a hidden Gaming mode, and to disable it, you need to hold the SteelSeries button and press the Windows key to turn off Gaming mode.
As you can see, different keyboards use different methods to disable Gaming mode, so check your keyboard’s instruction manual to see how to disable Gaming mode properly.
4. Check for the Win Lock button on your keyboard
While some keyboards have a Gaming mode switch, others have a Win Lock button.
The win Lock button is designed to disable the Windows key on your keyboard, so be sure to check if your keyboard has this key available.
Some PC issues are hard to tackle, especially when it comes to corrupted repositories or missing Windows files. If you are having troubles fixing an error, your system may be partially broken.
We recommend installing Restoro, a tool that will scan your machine and identify what the fault is.
Click here to download and start repairing.
According to users, this key should be located next to the right Ctrl button on your keyboard, so be sure to look for it. After you find the Win Lock button, press it, and your Windows key should start working again.
- Shift key not working on Windows 10 & 11 [Right Side]
- Win+X menu is not working in Windows 10
- Fix the # key not working on your computer
- Function keys not working on Windows 10/11 laptop
- Left Shift key won’t work on Windows 10/11
5. Create a new user account
- Click the Start button and select Settings.
- Choose the Accounts option.
- Click Family & other users in the left pane.
- Now, click the Add someone else to this PC button.
- Choose I don’t have this person’s sign-in information.
- Now select Add a user without a Microsoft account.
- Enter the new user account name and click Next to complete the process.
After creating a new user account, sign out of your account and switch to a new one.
Check if the Windows key works without any problems. If there are no problems with the Windows key on a new account, the software is causing this issue.
Now you need to move your files to a new account and use it as your main account.
6. Revert any changes to Windows services and packages
Windows 10 comes with a DISM tool that lets you create Windows 10 images that allow you to restore Windows 10 to an earlier state quickly.
Many people tend to use these images to reinstall their Windows 10 quickly, but we have to mention that DISM is a powerful tool that allows you to change which components of Windows 10 will be installed.
A few users reported that changing DISM packages caused the problem with the Windows key on their PC, so if you made any changes to DISM packages on your PC, be sure to remove them to fix this problem.
7. Perform an SFC scan
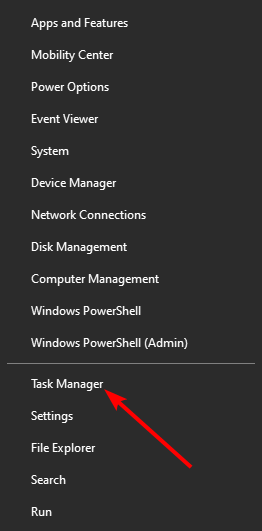
- Right-click on Start and select Task Manager.
- Click the File tab at the top, followed by Run new task.
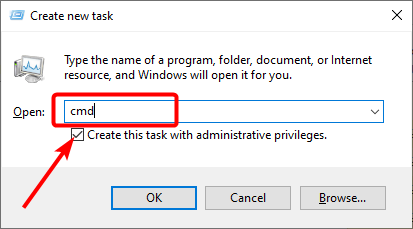
- When Create new task window opens, enter cmd and check the box to Create this task with administrative privileges.
- Now, hit Enter.
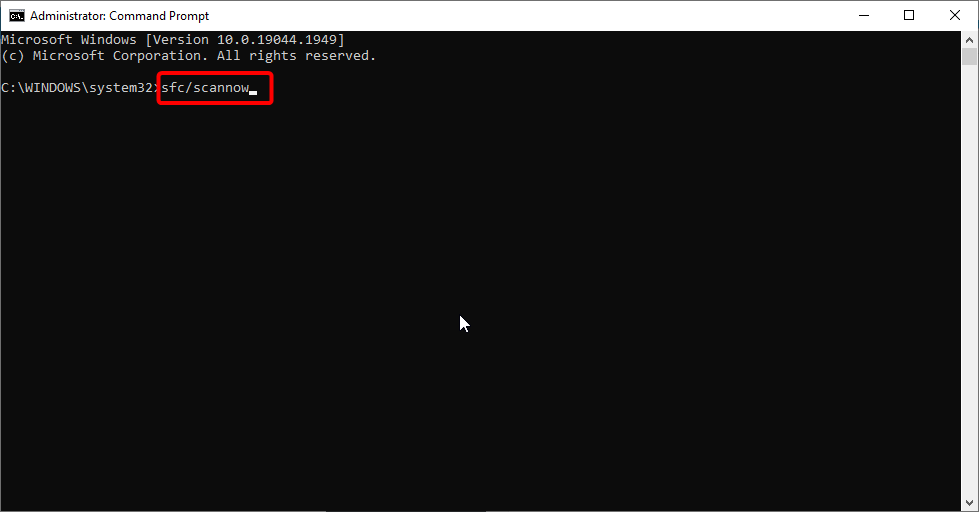
- Finally, type the command below and press Enter.
sfc /scannow - Restart your PC after the scan is completed.
Your Windows 10 installation can sometimes become corrupted, and that can cause certain features of Windows to stop working. If the Windows key is not working on your PC, you might want to perform an SFC scan.
When your PC restarts, check if the problem is resolved. If the issue persists, start Command Prompt again and run the command below: Dism /Online /Cleanup-Image /RestoreHealth
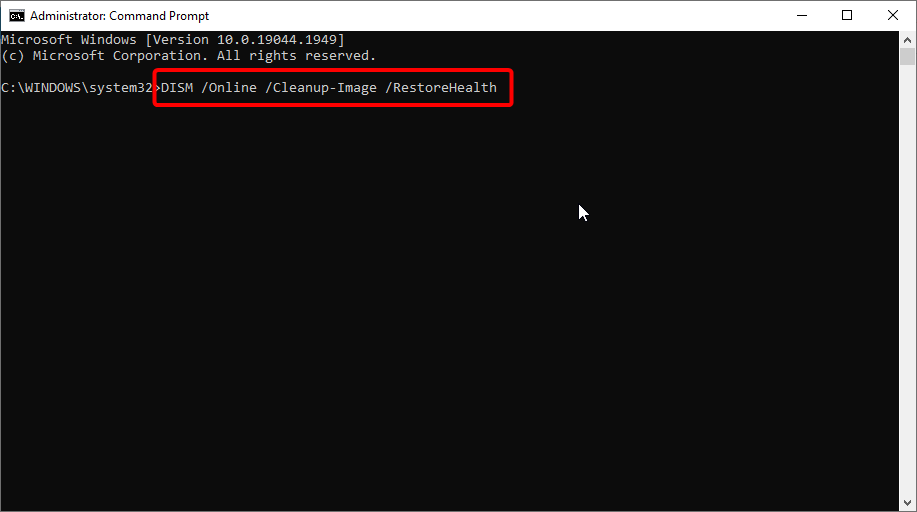
After the process is finished, check if the problem is resolved.
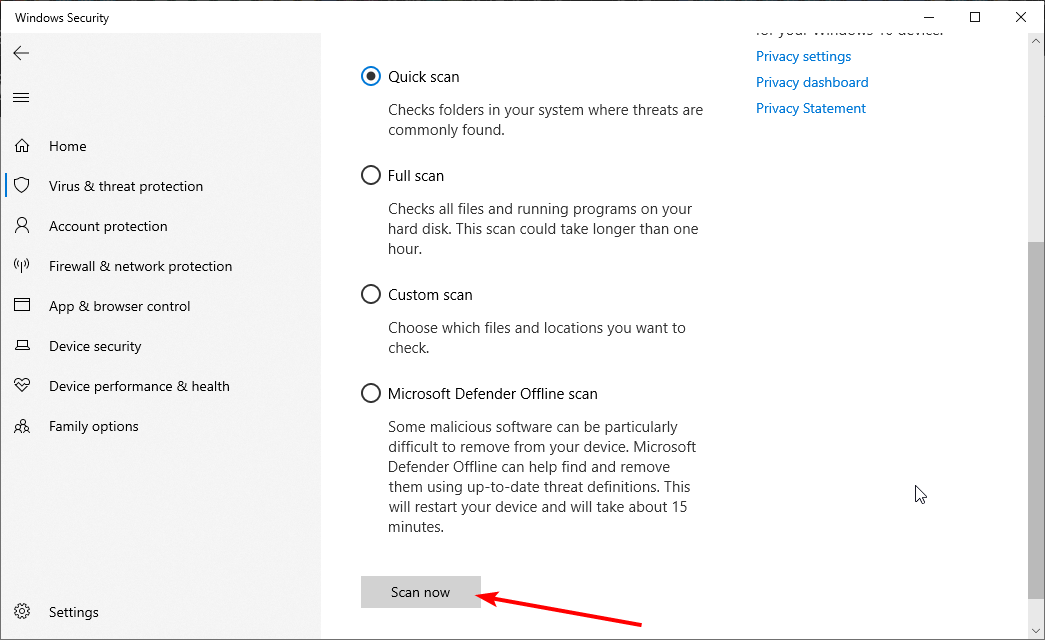
8. Check for malware
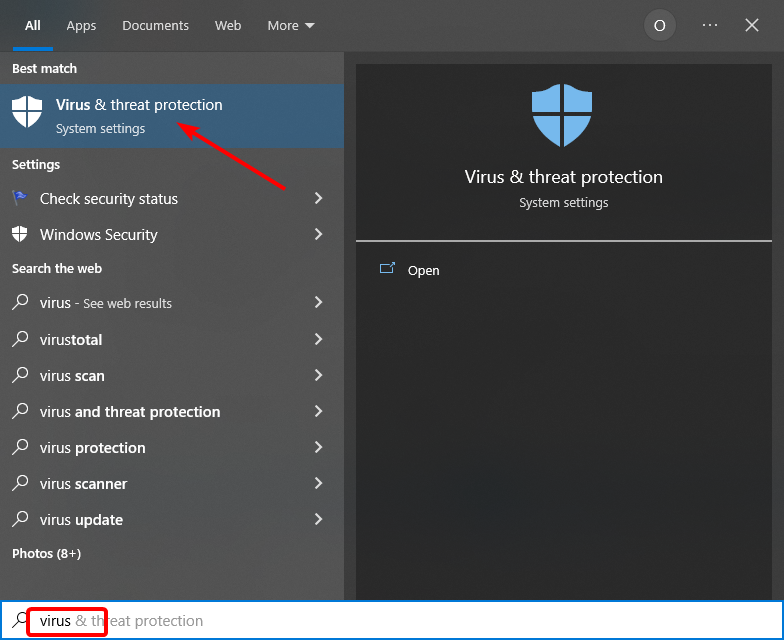
- Click the Search icon on your taskbar and type virus.
- Select the Virus & threat protection option.
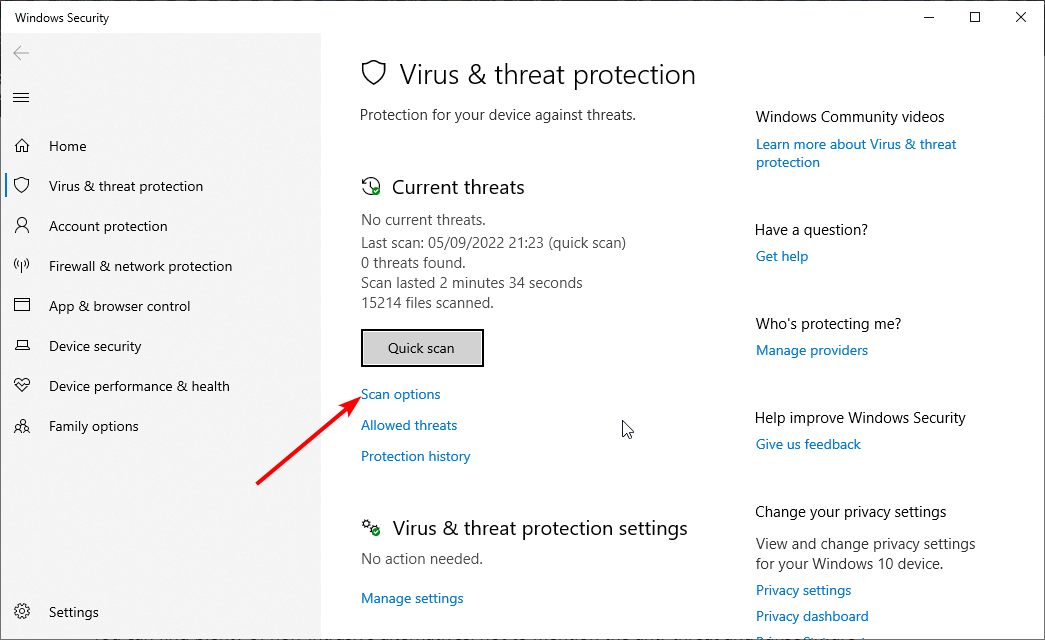
- Choose Scan options.
- Finally, click the Scan now button.
Finally, the Windows key not working or opening Start Menu can be caused by the presence of a virus on your PC. Performing a virus scan should help eliminate the problem and restore normalcy on your PC.
To perform a deeper scan and remove even the most hidden malware, we recommend using trusted antivirus software in ESET NOD32.
ESET NO32 is a top-notch software built with cutting-edge technology to protect your digital life. It detects and eliminates viruses quickly before they can affect your PC.
What’s more, it is not just limited to online protection, as it protects your system from viruses from other devices and apps. This software just about ensures your security at all times.
⇒ Get ESET NOD32
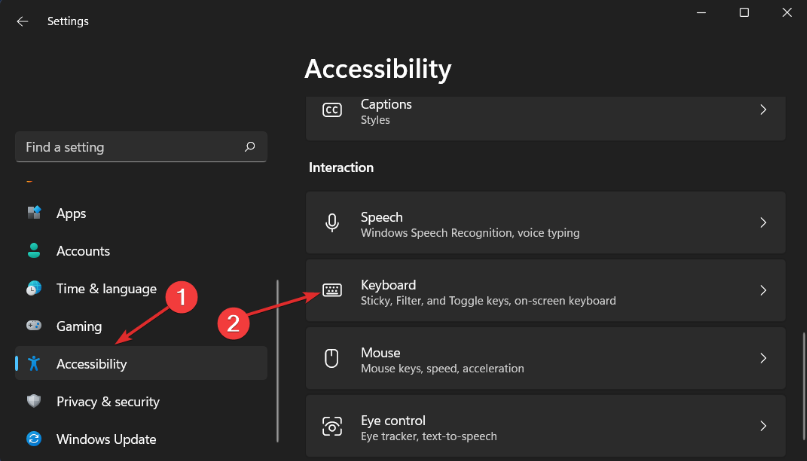
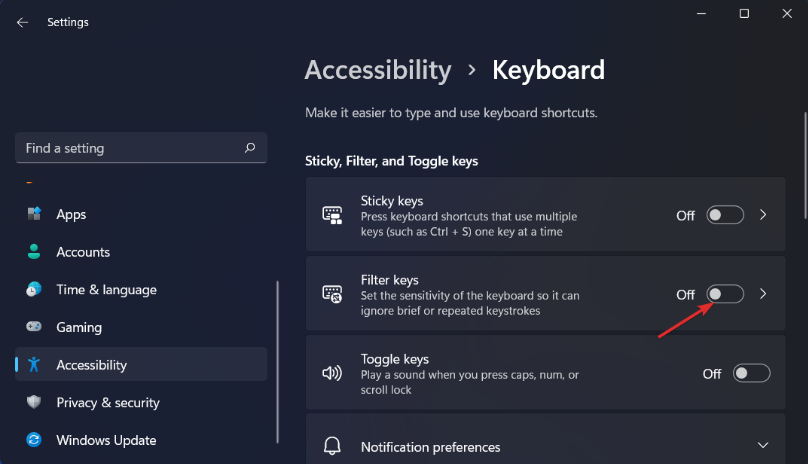
How do I fix the Windows key not working in Windows 11?
- Click the Start icon and select Settings.
- Choose Accessibility in the left pane.
- Now, select Keyboard.
- Now, toggle the switch for Filter Keys backwards to turn it off.
The Windows key not working on Windows 11 issue is similar to Windows 10. Hence, you use any solutions in this guide to tackle the problem.
Also, we have a dedicated guide for Windows key not working in Windows 11. So, feel free to check it out.
How do I know if my Windows key is working?
To know if your Windows key is working, it should open the Start Menu by default when you press it. Also, the various shortcuts, like Windows key + S for search and Windows + R for run, should open these functions.
If all these do not work as designed, your Windows key might face some problems.
Windows key has multiple functionalities, and advanced users often use it. If the Windows key isn’t working on Windows 10, check if Gaming mode is turned on.
If Gaming mode isn’t the problem, feel free to try any other solution from this article.
Are you facing other issues like @ key not working? Then check our detailed guide to fix it easily.
Feel free to let us know the solution that helped you solve this issue in the comments below.
Still having issues? Fix them with this tool:
SPONSORED
If the advices above haven’t solved your issue, your PC may experience deeper Windows problems. We recommend downloading this PC Repair tool (rated Great on TrustPilot.com) to easily address them. After installation, simply click the Start Scan button and then press on Repair All.
Newsletter
On your Windows machine, the Windows key launches the Start menu, and from there you can access anything on your computer.
When you press it in combination with other keys, it also acts as a useful shortcut to utilities you don’t get easily through your computer’s graphic user interface (GUI).
But what if you discover that your Windows key isn’t working when you press it? This could be caused by several issues such as hardware, drivers, game mode, mechanical damage, and several other reasons.
If you have this issue, you’ve come to the right place. Because in this detailed guide, I will show you several ways to fix a Windows key that stops working.
How to Fix Your Windows Key by Turning Off Game Mode
Windows 10 is optimized for games with game mode, but this can sometimes cause keyboard malfunctions and some keys might stop working. So, disabling game mode can make your Windows key work again.
How to disable game mode:
Step 1: Click on Start to launch the start menu, then the gear icon to open up settings.
Step 2: Within the menu options, select «Gaming».
Step 3: Click on the game mode tab and make sure Game mode is toggled off.
Some Logitech keyboards have keys for turning on and off game mode.
This does not optimize your computer for games but it disables some keys not used for playing games, such as the Windows key.
If you use one of these keyboards, make sure game mode is turned off right on it.
How to Fix Your Windows Key by Turning off the Windows Lock Key
Just like Caps lock and Num lock, some keyboards have a Windows lock key which toggles the Windows key on and off.
If your Windows key is not working, check your keyboard for this key and make sure it is not turned on.
If you are not sure whether your keyboard has the Windows lock key or not, search Google for your keyboard model.
How to Fix your Windows Key by Turning off Filter Keys
Filter keys are a Windows 10 accessibility feature that ignores multiple key presses. This might be interfering with your keyboard’s Windows key, so turning it off might fix the issue.
To turn off filter keys, follow the steps below:
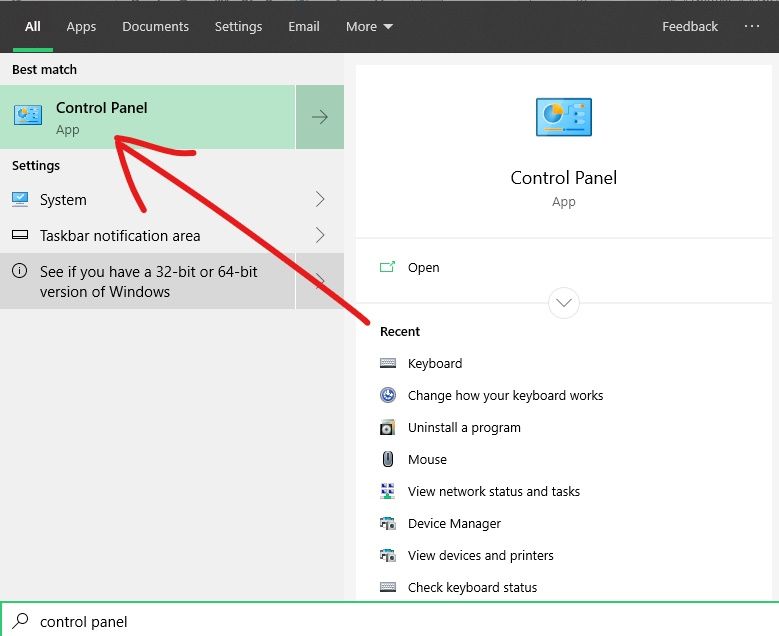
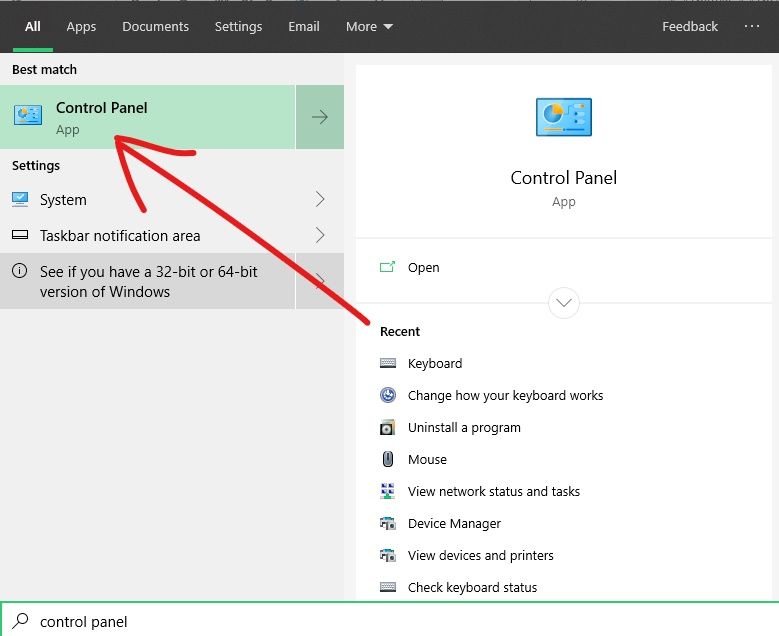
Step 1: Launch the Control Panel by clicking on start and searching for «control panel». Then press ENTER or click the first search result.
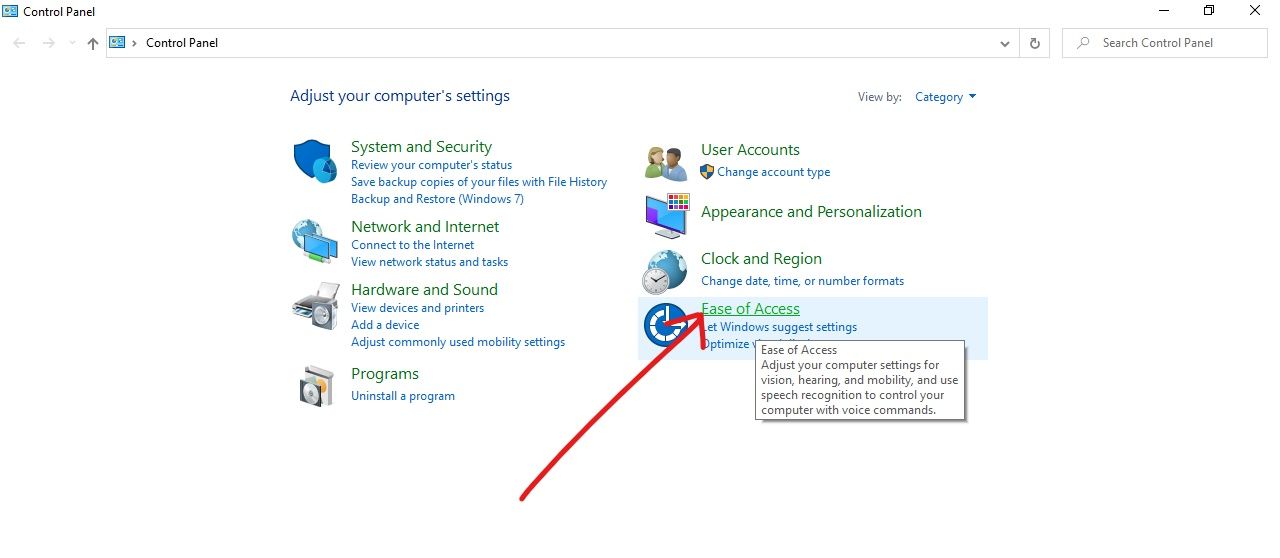
Step 2: Click on Ease of Access.
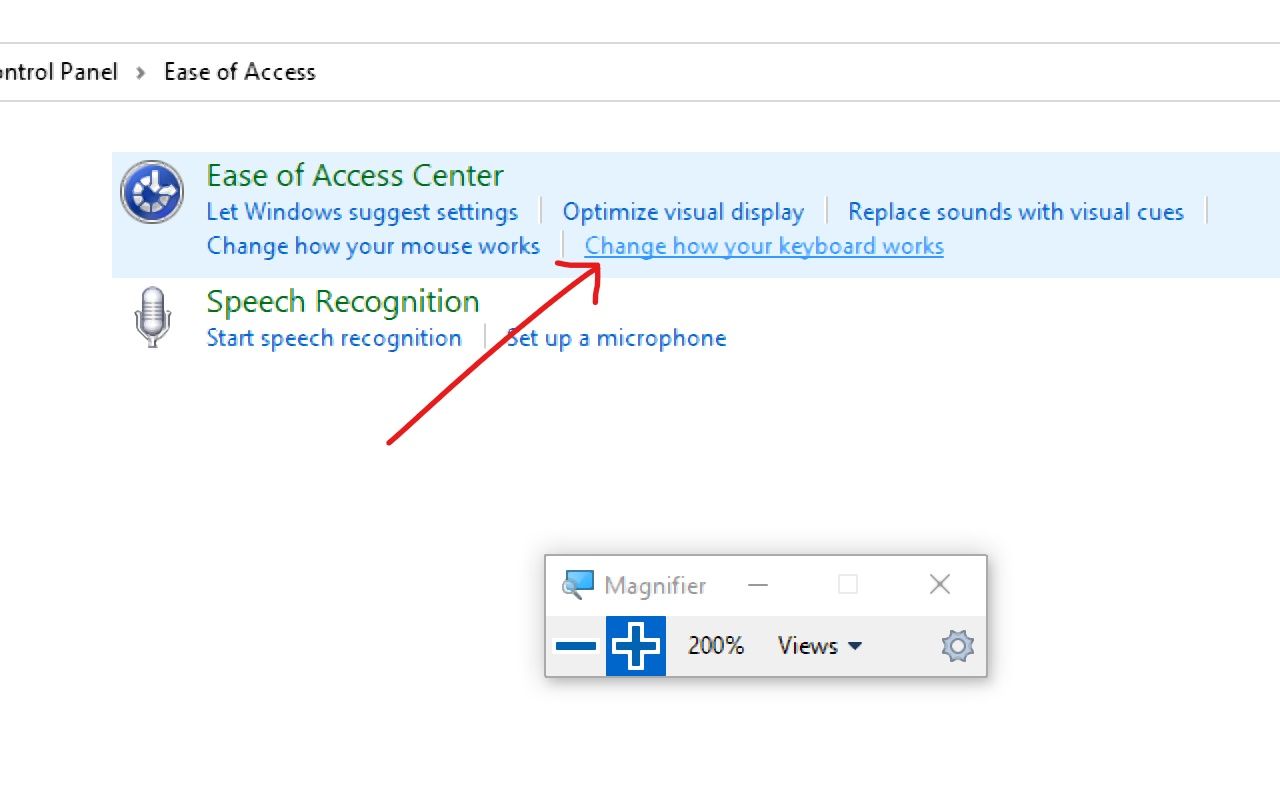
Step 3: Click on the link that says «Change how your keyboard works».
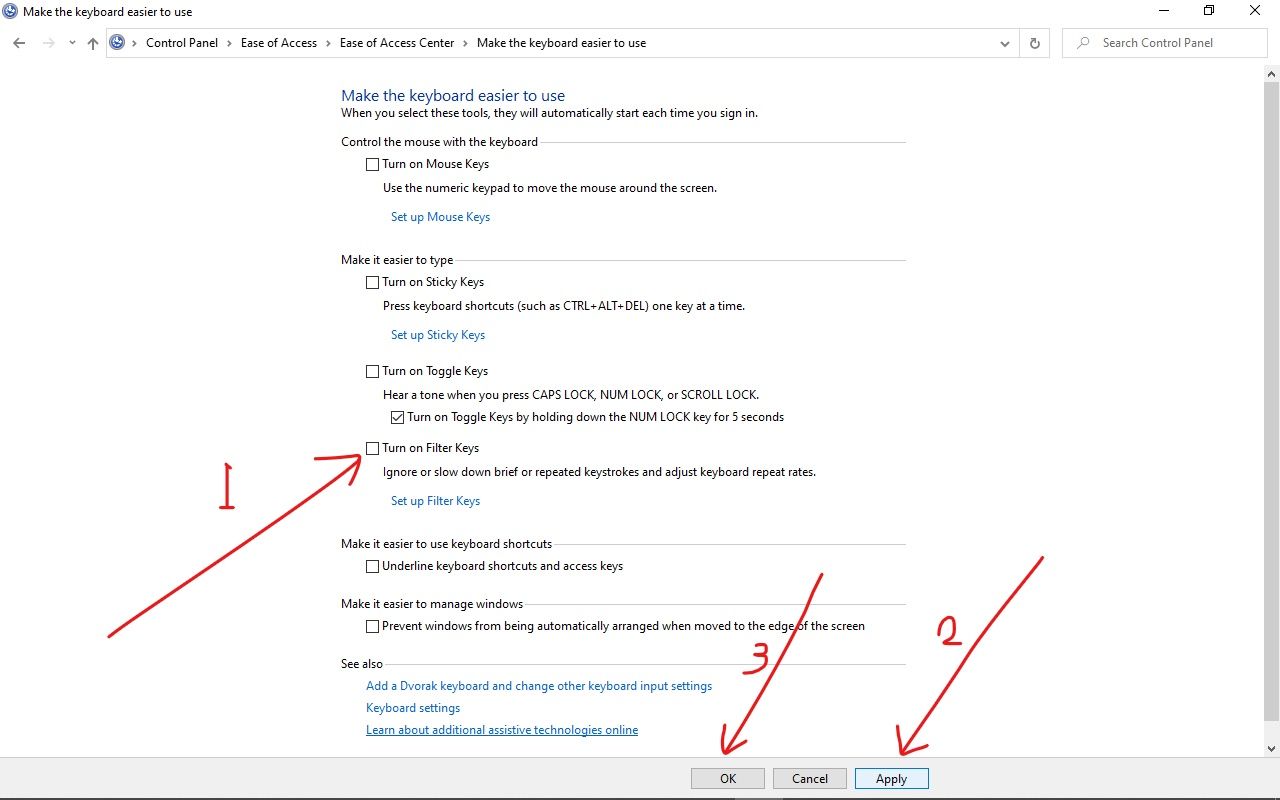
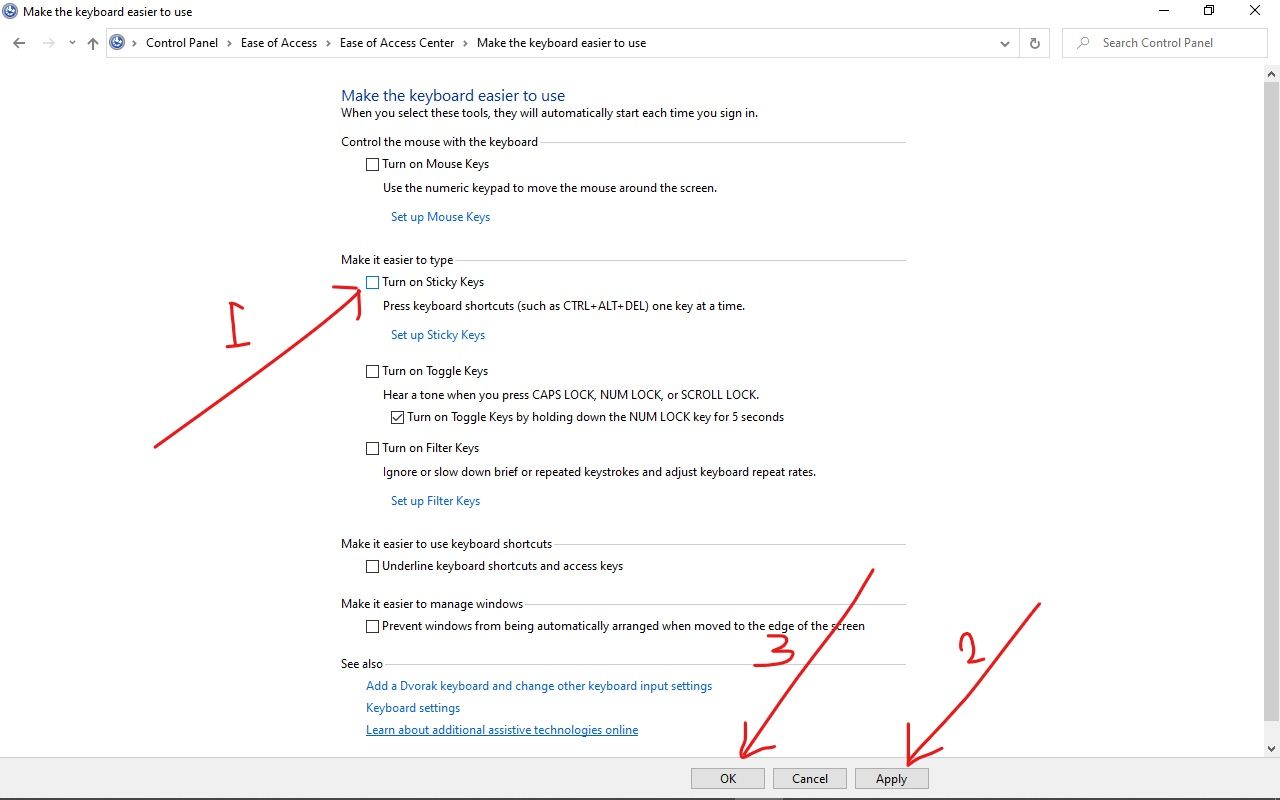
Step 4: Uncheck the «Turn off filter keys» checkbox.
Step 5: Click “Apply”, then “Ok”.
How to Fix your Windows Key by Turning off Sticky Keys
Sticky Keys are another Windows 10 accessibility feature that helps people who can’t press multiple keyboard keys efficiently use their keyboards.
This feature might interfere with the Windows key too, so turning it off could solve the issue of your Windows key not working.
Step 1: Click on Start and search for «control panel», then choose «Control Panel».
Step 2: Select Ease of Access.
Step 3: Click on the «Change how your keyboard works» link.
Step 4: Uncheck «Turn on Sticky Keys».
Step 5: Make sure the “Apply” button turns off by clicking it, then click “Ok”.
How to Fix your Windows Key by Updating Keyboard Drivers
If your computer has an outdated or corrupt driver, this could cause your keyboard’s Windows key to not work. So updating the driver, or uninstalling and reinstalling it, could end up fixing the issue.
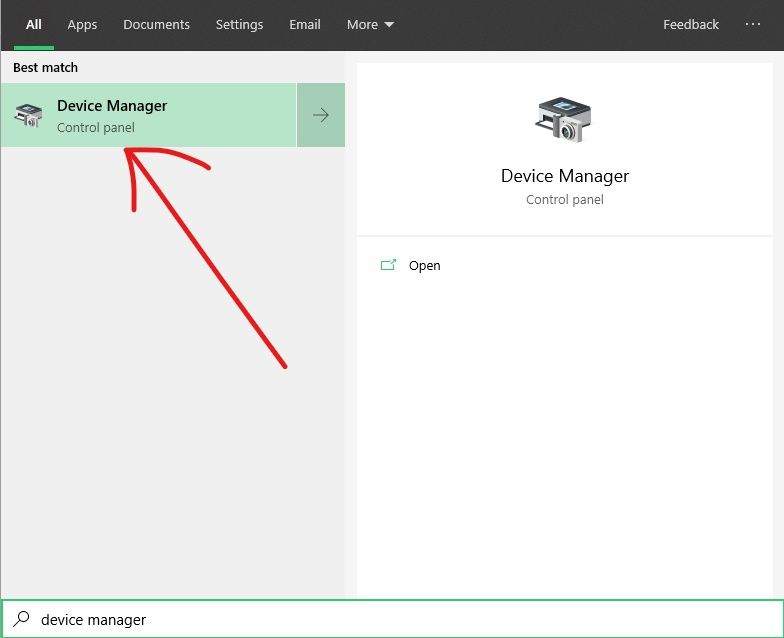
Step 1: Click on Start on your desktop, search for «device manager», then click on the first [and possibly the only] search result.
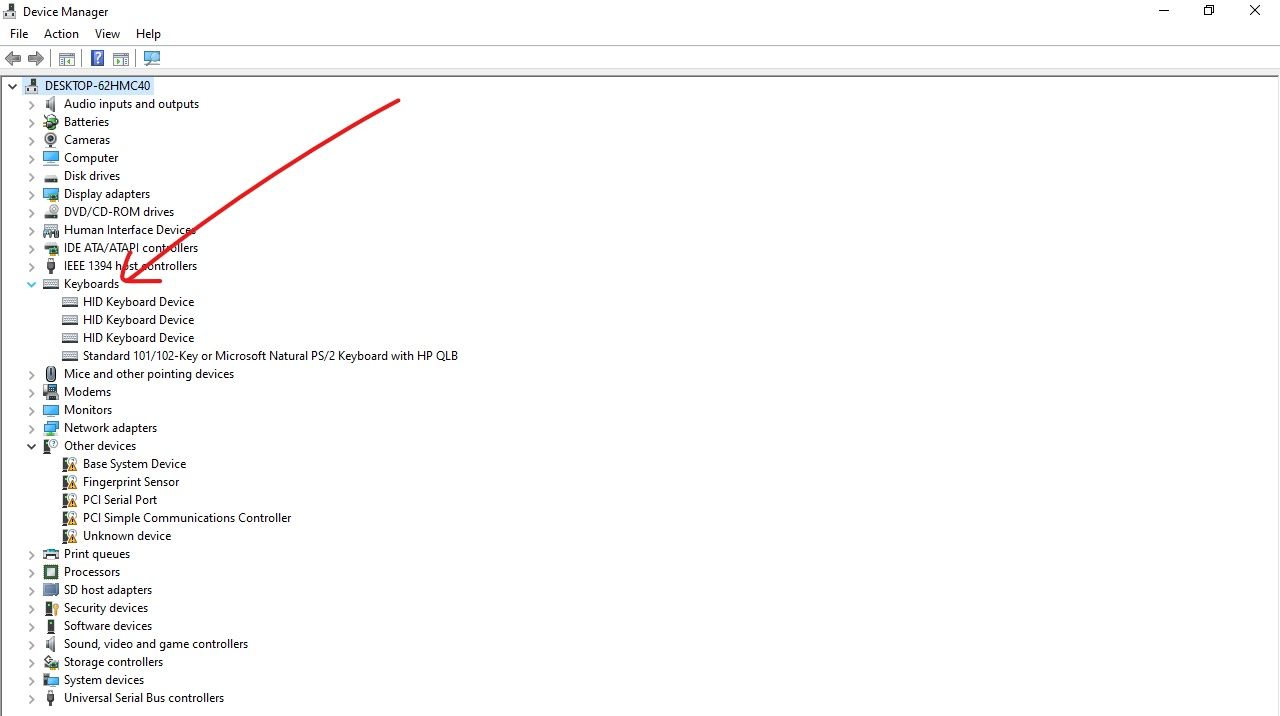
Step 2: Expand the keyboard section.
Step 3: Right-click on the keyboard you’re using and click on «Update driver».
Step 4: Choose «Search automatically for drivers». Your computer will now search online for driver updates and install them.
How to Fix your Windows Key by Performing an SFC Scan in the Command Line
You can use the system file scan to fix a lot of issues on your Windows 10 computer, including a keyboard issue like the Windows key not working.
Step 1: Click on Start (Windows logo) on your desktop and search for «cmd».
Step 2: Don’t just select the «Command Prompt» search result, click on “Run as administrator” on the right.
Step 3: Paste in this command sfc /scannow , then hit ENTER.
Step 4: The scan might take a while. Wait for it to complete, then restart your computer.
How to Fix your Windows Key Using a PowerShell Command
Just like the Command Prompt, PowerShell is a command-line app that lets you run scripts and commands which directly communicate with your computer.
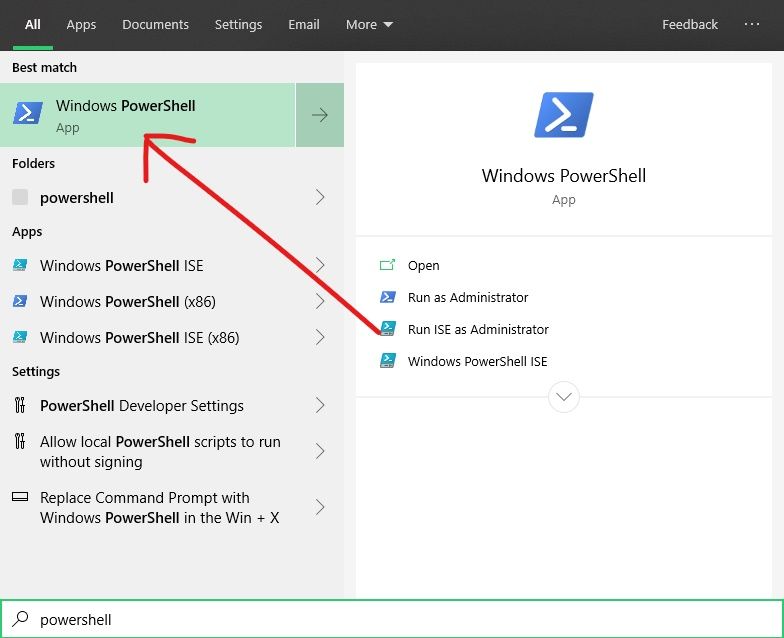
Step 1: Click on Start and search for «powershell». Then hit ENTER to open up the first search result, which should be Windows PowerShell.
Step 2: Paste the following command to the PowerShell and hit ENTER: Get-AppXPackage -AllUsers | Foreach {Add-AppxPackage -DisableDevelopmentMode -Register "$($_.InstallLocation) AppXManifest.xml"}
Don’t bother about the errors. It does the job.
Step 3: Restart your computer.
Conclusion
This article took you through several ways you can fix your Windows key when it’s not opening up the Start menu or executing your desired shortcuts.
If one of these fixes fails to work, you have several other options to try out.
Just be careful with the fixes that have to do with the command line. The commands directly interfere with your computer’s OS, and so they could have a lasting effect on your computer.
I hope this article helps you fix a Windows key that’s not working. If you find the article helpful, make sure you share it with your friends and family.
Thank you for reading.
Learn to code for free. freeCodeCamp’s open source curriculum has helped more than 40,000 people get jobs as developers. Get started
The Windows key not working issue often occurs when the Windows key is locked. If you are wondering, it might be possible that your Windows key might be blocked due to accidentally pressing the lock key on the keyboard, which the manufacturers integrated to avoid minimizing while playing games.
Even though the locked Window key might not be available on your keyboard, it is possible that some other causes, such as filter keys, corrupted driver, and enabled game mode prevent you from using the Windows key.
Now after understanding the leading cause, let’s have a look at some other contributors:
- Disabled Windows key- If your Windows key is locked, you won’t be able to use it until you unlock the Windows key. To do that, you should carefully look for the lock key on your keyboard.
- Corrupted Keyboard Driver- It might be possible that your keyboard driver is corrupted, which is why the issue is occurring. However, if your driver is corrupted, you can easily fix this by updating or reinstalling the keyboard driver.
- Hardware Issue- On the other hand, the issue can also be caused by the defective Windows key. To ensure that your Windows key is working, try plugging another keyboard into your computer to check if this is your keyboard issue. As a result, your Windows key should not work on your other keyboard if it’s locked or if some other reason is causing this issue. Otherwise, it will be your keyboard issue.
- Enabled Game Mode- Even though Game Mode is designed to increase performance for low-end and high-end computers, it sometimes stops the Windows key from functioning. Hence, try disabling Game Mode to fix this issue.
- Interference Of Filter keys- As per the affected users, the filter keys often prevent the users from using the Windows key. You can try disabling the filter key from settings to fix this issue.
Before determining and fixing this issue, you must confirm that your Windows key is not broken. Go to this website from Microsoft and press the Windows key repeatedly to test your key. If the website detects the Windows key, that means your Windows key is working fine. If that’s the case, just follow the below methods to troubleshoot your issue.
You can also try pressing the other Windows key to check if it’s working. If it’s not working, it might be disabled from your keyboard. If one Windows key is working and another is not, it might be broken.
However, you can use the PowerToys application to divert your keys. To do that, scroll down to the 8th method.
1. Unlock Your Windows Key
Some modern gaming keyboards have a “Game Mode” that disables the Windows key. There is a high chance that you accidentally pressed the lock key, which is why the Windows key is not working. To fix this, you will need to unlock the key by pressing the lock key again. You can find the lock key in the functions keys on the top of the keyboard, it should have a lock icon, which you can use to recognize the key.
HyperX has Fn + F12, which you can press to enable and disable the Windows key. If your keyboard does not have a lock key, you can try pressing FN + F6, FN + F12, or FN + Win simultaneously to unlock the Windows key. If that does not fix this issue, follow the next method.
2. Use Registry Editor
Another method to fix this issue is to delete the Scancode Map entry from the registry editor. This entry allows the user to disable the Windows key, so the game will not minimize when you accidentally press the Windows key. You can fix this issue by deleting the Scancode Map entry via the registry editor.
Before making changes to the registry editor, make a full backup. Below are the steps:
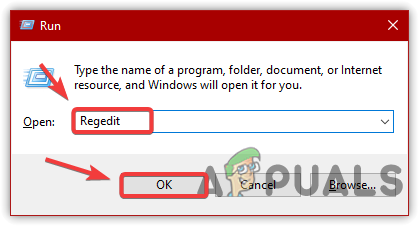
- Press the Win + R to launch Run Window
- Type Regedit and click OK to navigate
Opening Registry Editor - Go to the following directory
ComputerHKEY_LOCAL_MACHINESYSTEMCurrentControlSetControlKeyboard Layout
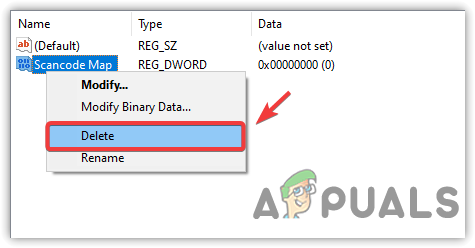
- In the right pane, locate the entry named Scancode Map
Note: If you did not find the scancode map entry, move on to the next method. - Right-click the scancode map entry, and click Delete
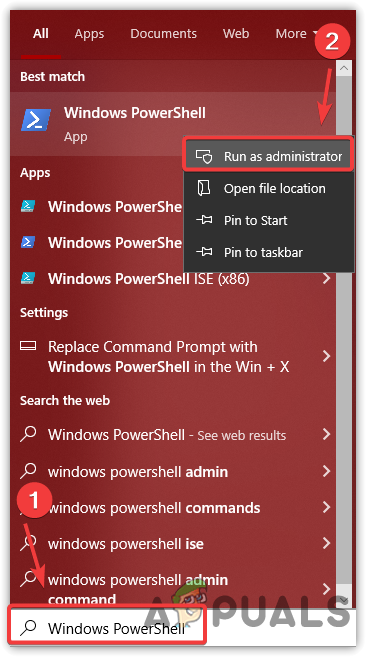
Deleting Scancode Map - After removing the entry, click Start Menu and type Windows PowerShell
- Right-click the powershell and click Run As Administrator
Launching Windows PowerShell - Now paste the following command to reset all apps
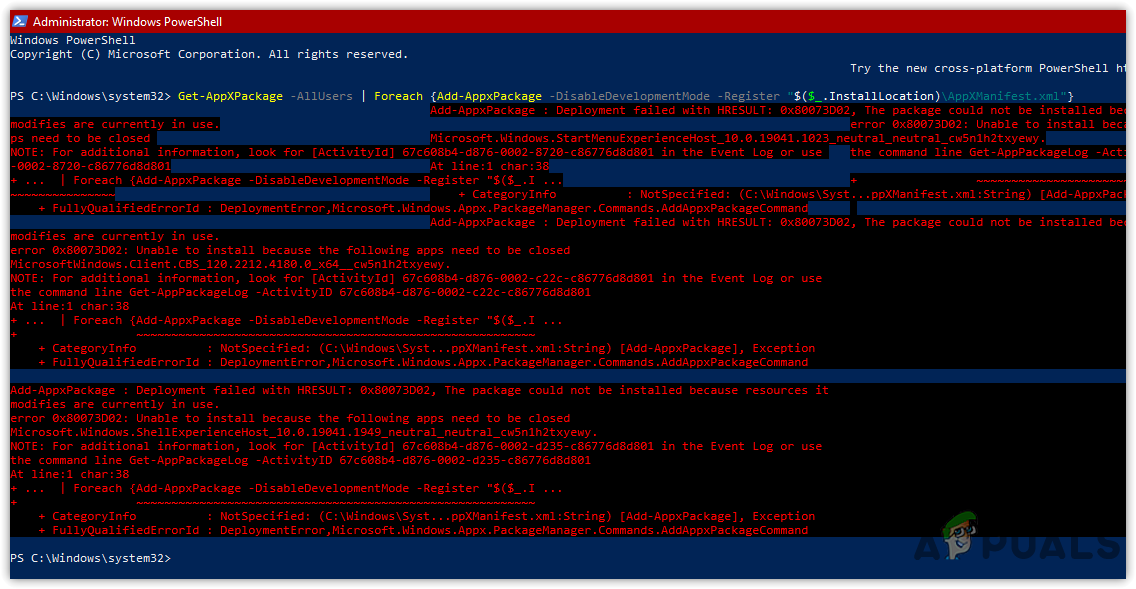
Get-AppXPackage -AllUsers | Foreach {Add-AppxPackage -DisableDevelopmentMode -Register “$($_.InstallLocation)AppXManifest.xml”}Resetting Apps - Ignore the errors and close the terminal
- Once done, restart your computer and check if the issue is fixed.
3. Run Keyboard Troubleshooter
Usually, troubleshooting tools fix various issues automatically. Microsoft developed troubleshooting tools to resolve common issues. Therefore, running the keyboard troubleshooter might fix your issue if this issue occurs due to some common reason. Here are the steps:
- Go to Settings by pressing the Win + I on the keyboard
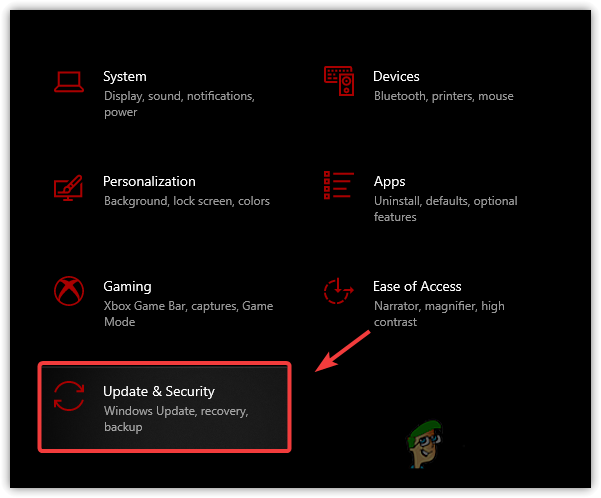
- Then, head to the Update & Security
Go to Windows Update Security Settings - Click Troubleshoot from the left sidebar
- For Windows 11 users, open the Settings and scroll down to the bottom to navigate to Troubleshoots
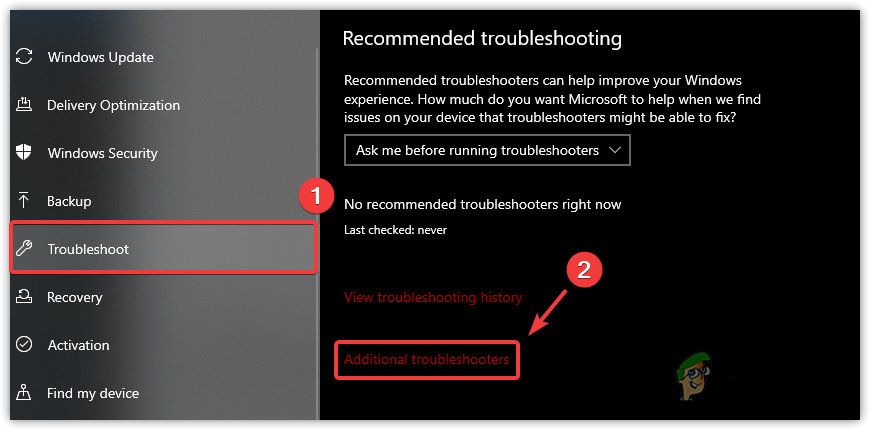
- Now click View Additional Troubleshooter
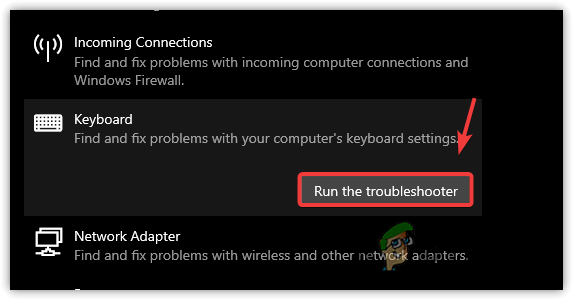
Navigating to Additional Troubleshooters - Select Keyboard under Find & Fix Other Problems
- Then click Run The Troubleshooter
Running Keyboard Troubleshooter - Once done, check if the Windows key is working.
4. Turn Off Filter Keys
Filter keys are the special keys that allow the users to write without repeated keys. Microsoft introduced filter keys to ignore brief or repeated keystrokes for users with hand tremors. However, the affected users have claimed on forums that disabling the filter keys is one of the ways to fix the Windows key not working issue. To disable the filter keys, follow the steps:
- Right-click the Start Menu icon and click Settings
Opening Settings - Navigate to the Ease Of Access, click on the keyboard from the left pane
- Scroll down a little bit and disable the Filter Keys by toggling off the Use Filter Keys option
Disabling Filter Keys - Once done, check if the Windows key start working.
5. Update or Re-Install Keyboard Driver
The issue can also be caused by the corrupted keyboard driver, if that’s the case, you will need to reinstall the driver. Reinstalling the keyboard driver is very simple, but before that, try updating the keyboard driver. If the device manager does not find the latest driver, then go for the reinstalling option. Follow the steps:
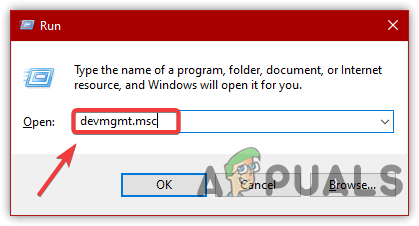
- Press Windows + R keys at the same time to launch the Run Window
- Type devmgmt.msc and click OK
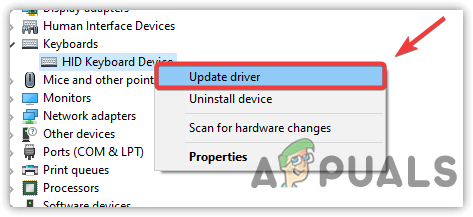
Opening Device Manager - Right-click the keyboard driver and click Update Driver
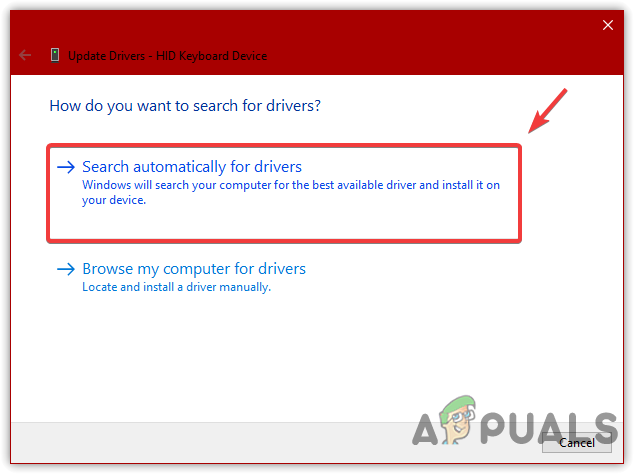
Selecting Update Driver - Choose Search Automatically For Drivers
Selecting Search Automatically For Drivers - If the device manager did not find the latest driver for your keyboard
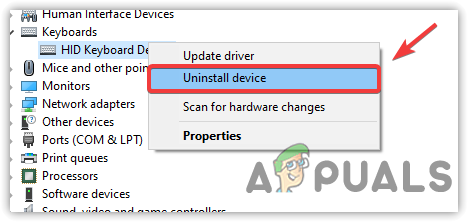
- Right-click the keyboard driver and click Uninstall Device
Uninstalling Keyboard Device - Restart your computer for complete installation
- Once done, check if the Win key is now working. If it’s not, follow the below method.
6. Switch to Generic Keyboard Driver
You can try using the generic keyboard driver if reinstalling or updating the driver does not fix your Windows key. Below are steps on how you can switch to a generic keyboard driver.
- Right-click the Start Menu and click Device Manager
- Expand the Keyboards menu
- Right-click on your keyboard driver and click Update Driver
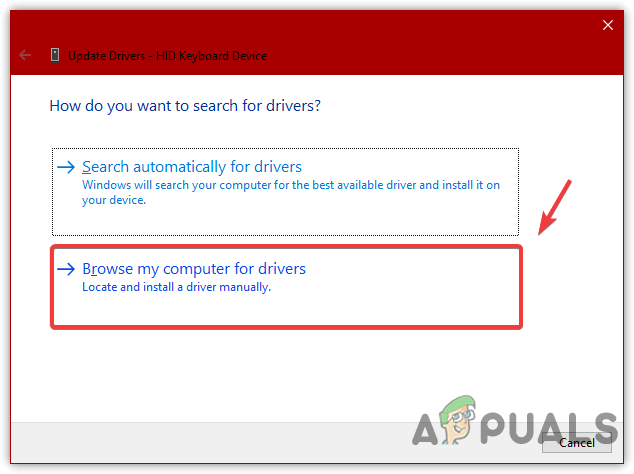
Selecting Update Driver - Select Browse My Computer For Drivers
Choosing Browse My Computer For Drivers - Then, select Let Me Pick From A List Of Available Drivers
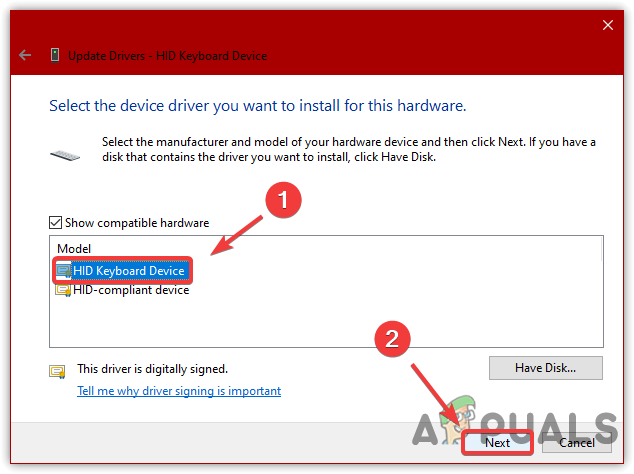
- Select HID Keyboard Device
- Then, click Next to install the driver
Selecting Keyboard Driver - Once done, check if the issue is resolved.
7. Use PowerToys to Divert Windows Key
If your Windows key is not working due to hardware damage and you need the Windows key to work temporarily, you can download the PowerToys application. PowerToys is an application that customizes Windows features and remap keys to other keys. You can simply divert the Windows key function to another key on the keyboard to use the start menu. Below are the steps you can follow to remap your Windows key:
- Open the Microsoft Store and search for PowerToys
- Install the PowerToys application from the Microsoft store
- Once it’s installed, launch the application
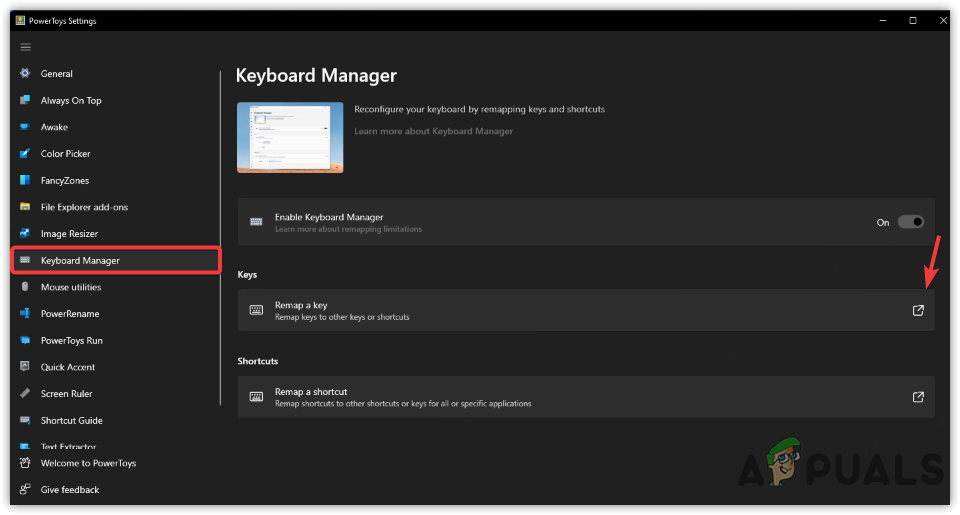
- Click on Keyboard Manager from the left pane
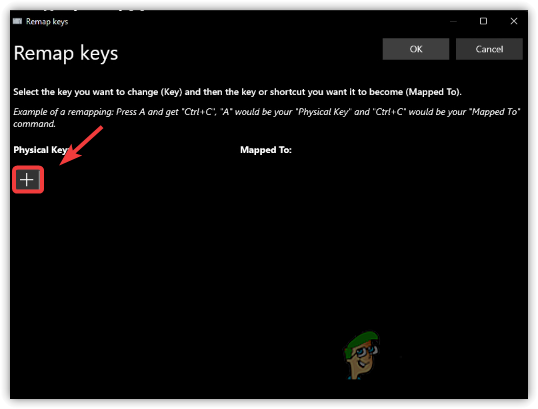
Opening Remap Keys Settings - Click Remap A Key and then click the Plus Icon
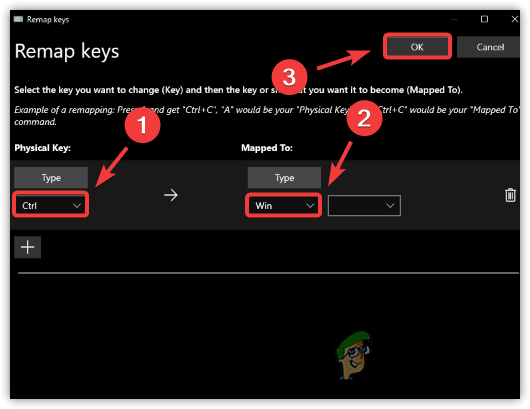
Adding Key Remap - Now under the Physical Key, select the key you want to use instead of the Win key
- After that, select the Win key under Mapped To
Remapping Key - Once done, click OK, then click Yes when the warning notification appears
- Once done, you can use the start menu function by pressing the key you selected under the physical key.
8. Enable Start Menu
It is possible that your Windows keys are working, but the start menu is not working. We have a detailed article on it that turns the start menu into a working condition if it’s not working. Here is the link to How to Fix Start Menu Not Working in Windows 10/11?
In case none of the solutions have worked, it is also possible that your taskbar is not working. To fix this issue, you can visit this article on How to Fix Taskbar Not Working on Windows 10. Despite this, if you use any start menu third-party application, uninstall it and check if the issue is resolved.
9. Replace Your Keyboard
We have described all the scenarios above that are possible in this case. However, if none of the methods have worked for you, try changing your keyboard. At the beginning of this article, we have given a link that will take you to a keyboard test, you can try pressing the Win key to check if it’s damaged or not. If it is, changing the keyboard will fix your issue.
The Windows key on the keyboard allows you to access Start menu quickly. If you are using Windows 10 and can’t use it to open Start menu. Use methods here to fix the problem.
The cause can be the problem key or problem Start menu. You can identify it by using your mouse to click the Start button to open the Start menu. If the Start menu can’t be opened either, there is problem with the Start menu. If the Start menu opens successfully in that way, there is problem with the Windows key. Just try the methods depending on the case:
Case 1: Windows Key & Start Button Not Working
Case 2: Windows Key Cannot Open Start Menu
Case 1: Windows Key & Start Menu Not Working
If you can’t access Start menu by pressing the Windows key or using the mouse, go to Windows 10 Start Button Not Working for the solutions. After trying the methods there, the problem should fix.
Case 2: Windows Key Cannot Open Start Menu
If the Windows key does not provide shortcut access to the Start button, try methods below.
Method 1: Unlock the Windows Key
On some keyboards, there is a lock key for the Windows key. You can use it to lock and unlock Windows key. If that key is on, you can’t use Windows key at all. So if that’s the case, press that key to unlock Windows key.
Method 2: Try the Keyboard on Another Computer (for external keyboard only)
If you are using a desktop PC, connect the keyboard to another computer and see if the Windows key works. If the key doesn’t work on that computer, the key might be physically broken. You might need to replace it with a new key.
Method 3: Enable the Key
If the key is disabled, the problem may occur. Follow steps below to enable the Windows key using Registry Editor. Note modifying registry incorrectly may cause serious problems. Ensure that you follow the instructions step by step. And it is recommended to back up the registry before you get started, so you can restore it if a problem occurs (See How to Back Up and Restore Registry).
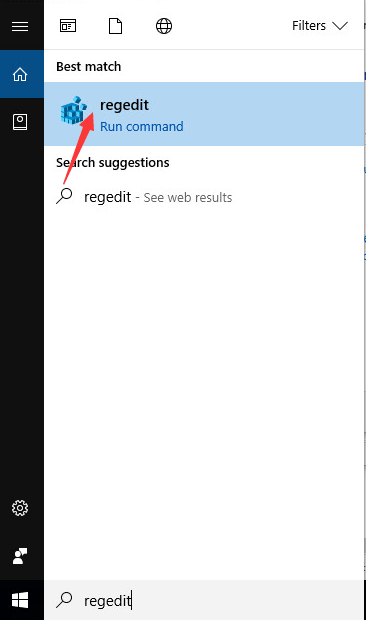
1) Click Start menu button and type “regedit“. Then click regedit on the pop-up menu. This is to open Registry Editor dialog box.
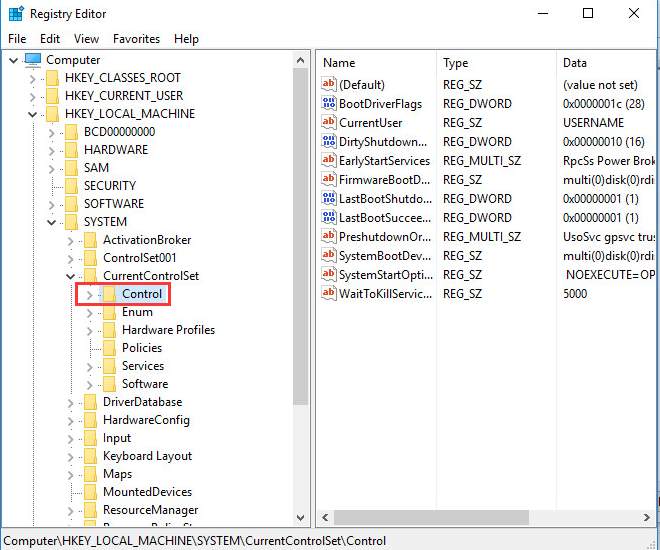
2) Go to HKEY_LOCAL_ MACHINESystemCurrentControlSetControl.
3) Under “Control” folder, find and click Keyboard Layout folder. In the right pane, right-click on Scancode Map and select Delete. Then click Yes to confirm the delete. (If you don’t see Scancode Map on the right pane, it means this method doesn’t work for you. Move on to next method.)
4.) Restart your computer and check to see if the problem is resolved.
Method 4: Update Keyboard Drivers
The problem can also be caused by outdated keyboard drivers. So to fix the problem, try to update the keyboard drivers.
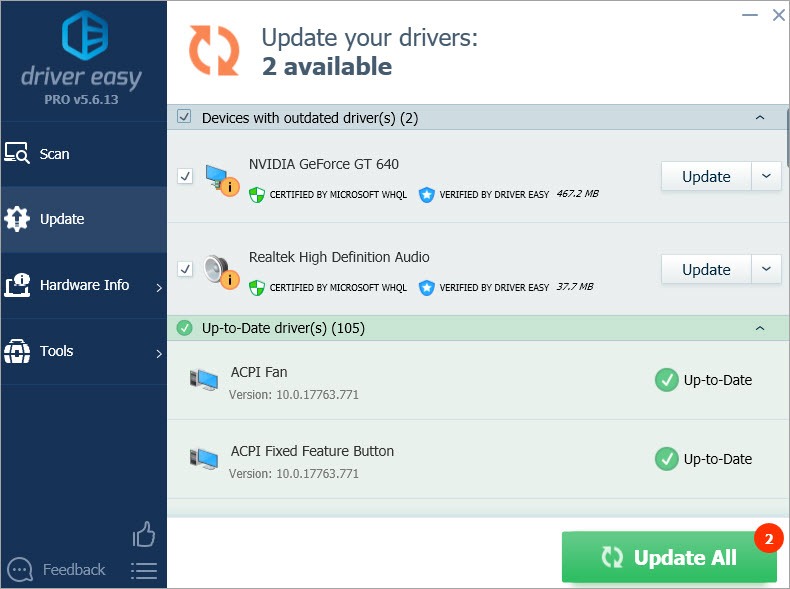
You can update your printer driver manually, but if you don’t have the time, patience or computer skills to update the drivers manually, you can do it automatically with Driver Easy.
Driver Easy will automatically recognize your system and find the correct drivers for it. You don’t need to know exactly what system your computer is running, you don’t need to risk downloading and installing the wrong driver, and you don’t need to worry about making a mistake when installing.
You can update your drivers automatically with either the FREE or the Pro version of Driver Easy. But with the Pro version it takes just 2 clicks (and you get full support and a 30-day money back guarantee):
1) Download and install Driver Easy.
2) Run Driver Easy and click Scan Now. Driver Easy will then scan your computer and detect any problem drivers.
3) Click the Update button next to a flagged keyboard driver to automatically download and install the correct version of this driver (you can do this with the FREE version).
Or click Update All to automatically download and install the correct version of all the drivers that are missing or out of date on your system (this requires the Pro version – you’ll be prompted to upgrade when you click Update All).
Hopefully the methods above will help you fix the Windows key not working issue.
35
35 people found this helpful
Available in other languages
Die Windowstaste ist besonders nützlich. Wenn diese Taste jedoch nicht funktioniert, verraten wir Ihnen in diesem Tutorial.
Votre touche Windows ne fonctionne plus sur votre PC ? Ne vous inquiétez pas, vous pouvez essayer les solutions dans notre article.
How to Fix Windows Key Not Working on Windows 10
The Windows key (button) has multiple functions, but it may stop working. This article will show you how to make it work again.
Why Is My Windows Key Not Working?
The Windows button not working is often related to Windows settings, installed third-party software, or an issue with the keyboard itself.
We suggest that you try an alternative keyboard if one is available. If the problem persists, the problem is likely with the Windows operating system.
It’s also possible that the Windows key is disabled within the Windows Registry Editor. This registry action could be triggered by malware, specific software, or even games. Another reason for this problem could be faulty, corrupted, or incompatible drivers.
In this article, we present several possible solutions to problems with the Windows key.
Video Showing How to Fix Windows Key Not Working
Table of Contents:
- Introduction
- Using Registry Editor
- Restarting the Explorer.exe Process
- Re-registering Applications Using PowerShell
- Running the SFC Scan
- Enabling the Start Menu Using Registry Editor
- Disabling Gaming Mode on Your Keyboard
- Disabling Filter Keys
- Reinstalling Your Keyboard Drivers
- Running Full System Scan
- Video Showing How to Fix Windows Key Not Working
Using Registry Editor
Windows Registry stores much of the information and settings for software programs, hardware devices, user preferences, operating system configurations, and more.
Here, we show a possible method for fixing the Windows key by modifying Windows Registry.
Note: Editing the registry is risky and can cause irreversible damage to your installation if you do not do it correctly.
Open the Run dialog box by typing «run» in Search and click the «Run» result.
In the Run dialog box, type «regedit» and click «OK» to open Registry Editor.
In Registry Editor, follow this path: «HKEY_LOCAL_MACHINESYSTEMCurrentControlSetControlKeyboard Layout». Click the «Keyboard Layout» key, find «Scancode Map» on the right pane, right-click it, and select «Delete» from the contextual menu.
Close the Registry Editor and restart the computer to see if deleting the Scancode Map registry key helps to fix the Windows key problem.
[Back to Table of Contents]
Restarting the Explorer.exe Process
To restart this process, you will need to use Task Manager, a system monitor program used to provide information about processes and programs running, and the general status of a computer.
To open it, press Ctrl+Alt+Delete or Ctrl+Shift+Esc on your keyboard. You can also access Task Manager by right-clicking on Start and selecting «Task Manager».
Once Task Manager is open, click the «Details» tab and find «explorer.exe» in the list. Right-click on this entry and select «End task» from the drop-down menu.
Your screen should now be black. Do not worry — this is normal when the explorer.exe process is terminated. Press Ctrl+Shift+Esc on your keyboard (if required) and the Task Manager will appear.
To start Explorer again, click «File» and select «Run new task» from the drop-down menu.
Type «explorer» (or «explorer.exe») and press Enter on your keyboard or click «OK», and Explorer will start again.
See if this helps to fix the Windows key problem.
[Back to Table of Contents]
Re-registering Applications Using PowerShell
PowerShell is a task automation and configuration management framework from Microsoft, consisting of a command-line shell and associated scripting language.
To open PowerShell on Windows 10, type «powershell» in Search and, right-click on the «Windows PowerShell» result, select «Run as administrator» from the contextual menu.
Alternatively, access PowerShell by right-clicking on the Start icon in Windows and selecting the «Windows PowerShell (Admin)» result.
If you are not able to right-click on the Start menu because it is not working, type «powershell» in Search and right-click on the «PowerShell» result, select «Run as administrator» from the contextual menu to run it with administrative privileges.
Now copy the command «Get-AppXPackage -AllUsers | Foreach {Add-AppxPackage -DisableDevelopmentMode -Register “$($_.InstallLocation)AppXManifest.xml”}» and paste it into the PowerShell window.
To paste it, simply right-click on the Powershell background, and the command will appear. Press Enter to execute this command. Restart the computer when you have finished re-registering Windows apps and see if this helps fix the Windows key problem.
[Back to Table of Contents]
Running the SFC Scan
System File Checker (SFC) is a utility in Windows that allows users to scan for corruptions in Windows system files and restore them.
The «sfc scannow» option is one of several specific switches available with the SFC command, the Command Prompt command used to run System File Checker.
To run it, first open Command Prompt first by typing «command prompt» in Search, right-click on «Command Prompt«, and then select «Run as administrator» from the drop-down menu to run Command Prompt with administrator privileges.
You must run an elevated Command Prompt to be able to perform an SFC scan.
In the Command Prompt window, type «sfc /scannow» and press Enter on your keyboard to execute this command. System File Checker will start and should take some time to complete the scan.
Wait for the scanning process to complete and restart the computer to see if you still have issues with the Windows key.
If the SFC scan did not fix the problem with the Windows key, or for some reason, you could not run it, try to run a DISM scan and then try to run the SFC scan again.
DISM stands for Deployment Image Servicing and Management and can repair and prepare Windows images, including the Windows Recovery Environment, Windows Setup, and Windows PE.
To run a DISM scan, open Command Prompt as administrator and type this command: «DISM /Online /Cleanup-Image /RestoreHealth». Press Enter on your keyboard to execute it.
Restart your computer and see if this solves the issue with the Windows key.
[Back to Table of Contents]
If the Windows key does not bring up the Start menu, the menu may be disabled in Windows. To enable it, you need to use Registry Editor to modify the registry.
Note: Editing the registry is risky and can cause irreversible damage to your installation if you do not do it correctly.
Type «run» in Search and open the Run dialog box.
In the Run dialog box, type «regedit» and press Enter on your keyboard or click «OK» to open Registry Editor.
Once you have opened the Windows Registry Editor, follow this path «HKEY_CURRENT_USERSoftwareMicrosoftWindowsCurrentVersionExplorerAdvanced». Click the «Advanced» key and then right-click the right panel and select «New». Then select «DWORD (32-bit) Value» to create a new DWORD key.
Name it “EnableXamlStartMenu” and press Enter.
Restart the computer or restart File Explorer (formerly Windows Explorer), as shown in the earlier method, and see if this helps fix the Windows key problem.
[Back to Table of Contents]
Disabling Gaming Mode on Your Keyboard
If you are using a keyboard that has a Gaming mode key, ensure that this mode is disabled. Gaming mode features can disable certain keys (including the Windows key) that can interfere when playing games.
The Gaming mode key/switch is usually located above the F2 and F3 buttons on the keyboard and is labeled with a joystick image or similar.
Check that this switch is toggled to the «Off» position. If you are not sure of the Gaming mode key/switch location, or you have a non-standard Gaming keyboard, read the keyboard manufacturer’s manual to find out how to turn Gaming mode off (if there is one at all).
[Back to Table of Contents]
Disabling Filter Keys
Filter Keys is an Accessibility option that you can use to control the keyboard repeat rate and ignore repeated keys. On some keyboards, this feature is also related to (and can affect) the Windows key. To disable Filter Keys, go to Settings and select «Ease of Access».
Select «Keyboard» on the left pane and locate the switch under «Filter Keys». Ensure that it is set to the «Off» position.
[Back to Table of Contents]
Reinstalling Your Keyboard Drivers
Outdated, incompatible, or corrupted drivers might also cause problems with the Windows key. You might want to try to uninstall and then reinstall the keyboard driver.
To do this, open Device Manager by typing «device manager» in Search and click the «Device Manager» result.
In Device Manager, find «Keyboards», expand it, right-click the keyboard driver, and select «Uninstall» from the drop-down menu to uninstall it. In the popped-up window, click «Uninstall». Restart your computer.
Windows will automatically install the missing keyboard drivers. Check if this fixes the Windows key problem.
[Back to Table of Contents]
Running Full System Scan
Malware can cause various issues on your computer, including keyboard issues. Perform a full system scan and see if it detects any malware on the system. You can use Windows Defender (a built-in antivirus program), which protects computers against viruses, spyware, and other malicious software.
Alternatively, use another third-party antivirus product. To run a full system scan using Windows Defender, type «defender» in Search and click the «Windows Defender settings» result.
Click «Open Windows Defender Security Center» on the right pane.
Then, click «Virus & threat protection».
In the Virus & threat protection window, click «Advanced scan».
Select «Full scan» and click «Scan now». This will start scanning your system for malware. See if this helps to solve the Windows key problem.
We hope that one of the solutions above helps you solve the Windows button (Win key) issue. If not, it is possible that the Windows key is not working and has mechanical or electrical damage, in which case you might consider a replacement.
[Back to Top]
Ключ Windows или WinKey – это один из ключевых ключей в Windows, который позволяет выполнять несколько задач. Прямо от запуска меню Пуск до Win + Tab, Win + R, Win + S и многих других. Много раз это вызывает проблемы, и вы не можете использовать его так, как вы этого хотите. Эта неприятность становится еще хуже, когда вы используете решение для удаленного рабочего стола, и вы чувствуете, что ключ Windows или WinKey отключены. В этом руководстве мы рассмотрим различные решения, чтобы исправить ключ Windows или WinKey не работает в Windows 10
Содержание
- Ключ Windows или WinKey не работает
- Отключить игровой режим на клавиатуре
- WinKey отключен?
- Используйте Powershell для включения ключа Windows
- Заставить Windows перепроверить клавиатуру
- Ищите кнопку блокировки WinKey на клавиатуре
- Проблема с драйвером клавиатуры
- Устранение неполадок в чистом состоянии загрузки
Ключ Windows или WinKey не работает
Отключить игровой режим на клавиатуре
Одним из наиболее распространенных сценариев является игровой режим Windows 10. По своему дизайну он гарантирует, что ключ Windows отключен. Это гарантирует, что если вы случайно нажмете клавишу Windows, меню «Пуск» не перестанет фокусироваться, и ваш игровой процесс будет разрушен. Тем не менее, он работает только с клавиатурами, которые поддерживают игровой режим на аппаратном уровне. Игровая клавиатура Logitech G810 предлагает это.

Вам придется использовать программное обеспечение клавиатуры от OEM-производителя для отключения клавиши Windows или WinKey, когда вы не играете.
WinKey отключен?
Проверьте, был ли ваш WinKey отключен.
Используйте Powershell для включения ключа Windows
Запустите Powershell с правами администратора. Скопируйте, вставьте указанную ниже команду и нажмите клавишу возврата. Как только он будет успешно выполнен, вы сможете использовать ключ Windows как обычно.
Get-AppXPackage -AllUsers | Foreach {Add-AppxPackage -DisableDevelopmentMode -Register «$ ($ _. InstallLocation) AppXManifest.xml»}
Обязательно создайте точку восстановления перед выполнением, чтобы на случай, если что-то пойдет не так; Вы можете вернуться к предыдущему состоянию. Шансы на то, чтобы это произошло, невелики.
Заставить Windows перепроверить клавиатуру
Windows понимает ввод от оборудования, сохраняя цифровую карту, называемую ScanMap. Каждый ключ отображается в памяти компьютера. То же самое касается Windows Key. В случае, если Windows не в состоянии понять, мы можем заставить его. Это требует редактирования реестра, поэтому обязательно сделайте резервную копию или создайте точку восстановления, а затем выполните этот шаг.
- Введите REGEDIT в меню «Пуск» и запустите его с правами администратора.
- Перейдите к HKEY_LOCAL_MACHINE SYSTEM CurrentControlSet Control Раскладка клавиатуры .
- Разверните ключ Раскладка клавиатуры , найдите запись реестра Карта кодов и удалите ее.
- Перезагрузите компьютер, и он заставит его сканировать, а затем создайте новый ключ для него.
Ищите кнопку блокировки WinKey на клавиатуре
Многие специальные клавиатуры поставляются с кнопкой Win Lock. Если ваша клавиатура отличается от других, проверьте аппаратную кнопку, которая может отключить клавишу Windows или WinKey. Отключи это.
Если ничего не работает, вы всегда можете создать новую учетную запись, чтобы посмотреть, работает ли она с этой учетной записью или запустить сканирование SFC.
Проблема с драйвером клавиатуры
Может случиться так, что проблема возникла в одном из последних обновлений драйвера для клавиатуры. Возможно, вы захотите откатить драйвер клавиатуры, чтобы увидеть, исправит ли он его для вас.
- Щелкните правой кнопкой мыши ключ Windows и откройте диспетчер устройств.
- Найдите клавиатуру под разделом клавиатуры.
-
Щелкните правой кнопкой мыши> Свойства> Драйвер
- Посмотрим, сможете ли вы откатить драйвер. Если этот параметр отключен, вы можете удалить драйвер и разрешить Windows настроить его заново.
Вы также можете загрузить последнюю версию драйвера с веб-сайта OEM и обновить его соответствующим образом. Это должно исправить любую неправильную конфигурацию с клавиатурой.
Устранение неполадок в чистом состоянии загрузки
Чистая загрузка – это состояние Windows, при котором на ПК запускаются минимально необходимые драйверы и приложения. Попав в Чистую загрузку, выполните следующие действия:
- Введите msconfig в командной строке. Откроется Конфигуратор системы.
-
На вкладке «Службы» установите флажок «Скрыть все службы Microsoft».
- Теперь отключите оставшиеся сервисы одну за другой и перезагрузите компьютер, чтобы посмотреть, решит ли он проблему.
Это громоздкий процесс и займет время, но, вероятно, последний в списке, если у вас ничего не работает.
Я надеюсь, что одно из этих предложений поможет исправить проблему с ключом Windows или WinKey в Windows 10.
Связанные чтения:
- Функциональные клавиши не работают
- Пробел или клавиша Enter не работают
- Клавиша Caps Lock не работает
- Клавиша Num Lock не работает
- Клавиша Shift не работает.









![Windows Key Not Working? Here's How to Fix It [Windows 10 PC Guide]](https://www.freecodecamp.org/news/content/images/size/w2000/2021/11/photo-1530133532239-eda6f53fcf0f.jpeg)
