Как было анонсировано ранее, в новой операционной системе Windows 7 можно легко изменять фон окна входа в систему. Для этого не потребуется изменять ресурсы в исполняемых файлах или выполнять еще какие-то особые действия. Процесс изменения изображения достаточно прост и может быть выполнен даже без привлечения дополнительных инструментов. Эта функциональность доступна и корректно работает начиная со сборки 7057.
Для того, чтобы изменить фон на экране входа в систему необходимо проделать следующие шаги.
- Открыть редактор реестра и найти раздел реестра “HKEY_LOCAL_MACHINE –> Software –> Microsoft –> Windows –> CurrentVersion –> Authentication –> LogonUI –> Background”. В этом разделе находится специальный ключ “OEMBackground” типа DWORD. Значение “1” в этом ключе говорит о том, что нужно использовать специальное оформление окна входа в систему. Если ключ отсутствует, то его можно создать вручную.
- Убедиться, что существует папка “%windir%system32oobeinfobackgrounds”. Именно здесь Windows 7 будет искать фоновые изображения для экрана входа в систему. Если этой папки не существует, то ее необходимо создать.
- Положить в эту папку все необходимые изображения. Для каждого разрешения в эту папку необходимо положить свое изображение со специфическим именем. Если изображение с нужным разрешением не будет найдено, то будет использоваться файл backgroundDefault.jpg. Важно, что каждое изображение должно быть не более 256 Кб, иначе оно будет просто проигнорировано. Список файлов, которые необходимо положить в эту папку:
- backgroundDefault.jpg
- background768×1280.jpg (0.6)
- background900×1440.jpg (0.625)
- background960×1280.jpg (0.75)
- background1024×1280.jpg (0.8)
- background1280×1024.jpg (1.25)
- background1024×768.jpg (1.33)
- background1280×960.jpg (1.33)
- background1600×1200.jpg (1.33)
- background1440×900.jpg (1.6)
- background1920×1200.jpg (1.6)
- background1280×768.jpg (1.66)
- background1360×768.jpg (1.770833)
Если все эти действия не хочется выполнять вручную, то для этих целей можно воспользоваться сторонними утилитами, которых на просторах интернета существует достаточное количество. Одна из самых простых таких утилит – Tweaks Logon Changer for Windows 7. Эта утилита выполнит все необходимые изменения в системном реестре, а также сожмет изображение до нужных размеров и положит в нужную папку.
+34
Просмотры 180K
Комментарии
68
Customize Your Windows 7 Login Background
- Open up your run command. (
- Type in regedit.
- Find HKEY_LOCAL_MACHINE > Software> Microsoft > Windows > CurrentVersion > Authentication > LogonUI > Background.
- Double-click on OEMBackground.
- Change this value to 1.
- Click Okay and close out of regedit.
Contents
- 1 How do I change my lock screen wallpaper?
- 2 How do I change my login picture on Windows 7?
- 3 Why can’t I change my lock screen wallpaper?
- 4 How do I change my lock screen picture on my laptop?
- 5 How do I change my lock screen background GPO?
- 6 What is Rsop command?
- 7 How do I remove the screensaver Password in Windows 7?
- 8 How do I disable GPO lock screen?
- 9 How can I tell if my PC has RSoP?
- 10 What is Gpedit MSC?
- 11 How do you get Gpresults?
- 12 How do I stop my screen from going to sleep Windows 7?
- 13 How do I change when Windows locks?
- 14 Will there be a Windows 11?
- 15 How do I turn off my lock screen?
- 16 How do I apply for Rsop?
- 17 Does Rsop show local policy?
- 18 What is Secpol MSC?
- 19 What is Compmgmt MSC?
- 20 What is Eventvwr MSC?
How do I change my lock screen wallpaper?
How to change the lock screen on an Android to your own photo
- Select a photo and tap the three dots in the top right corner.
- Tap “Use as.”
- Tap “Photos Wallpaper.”
- Adjust the photo, then tap “Set Wallpaper.”
- Select “lock screen” or “home screen and lock screen” to set the wallpaper.
- Tap “Settings” then “Display.”
How do I change my login picture on Windows 7?
To change your account picture in Windows 7 click on the Start button and then type Change account picture. When the the Change your account picture result appears left click on it. This will open up the Change Your Picture screen as shown in the image below.
Why can’t I change my lock screen wallpaper?
To activate it, go to [Settings] > [Home Screen & Lock Screen Magazine]> [Lockscreen magazine] and toggle on [Lock Screen Magazine]. 2. If the Lock Screen Magazine has already been activated but the lock screen wallpaper is not changing, it might be due to a temporary issue with the system. Try restarting the device.
How do I change my lock screen picture on my laptop?
Go to Settings > Personalization > Lock screen. Under Background, select Picture or Slideshow to use your own picture(s) as the background for your lock screen.
Resolution
- In GPMC right-click the GPO from step 2b and select edit.
- Go this path “Computer ConfigurationPoliciesAdministrative TemplatesControl PanelPersonalization”.
- Enable the GP “Force a specific default lock screen image”.
- Specify the path to the image file.
What is Rsop command?
The RSOP or Resultant Set of Policies command gathers all Active Directory Group Policies for the user account and computer settings applied to a device. This is similar to the gpresult command but shows the results in the same way you would when configuring a Group Policy.
How do I remove the screensaver Password in Windows 7?
Expand Control Panel, and then click Display. In the right pane, double-click Password protect the screen saver. Select Disable on the Policy tab. This prevents users from setting passwords on screen savers for this computer or domain.
How do I disable GPO lock screen?
Deploy a Power plan to the computers with GPO. –>”User Configuration–>Administrative Templates–> Control Panel–> “Personalization” folder. –>Double-click the “Password protect the screen saver” setting –> Choose the “Disabled” option, click “Apply” and click “OK.” The lock screen feature will be disabled.
How can I tell if my PC has RSoP?
How to run RSoP to determine computer and user policy settings
- Step 1: Run rsop.msc from a local computer. Open the command line, type rsop.
- Step 2: Review Policies. Now that RSoP has run its time to review the policy settings.
- Step 3: Compare the results to the group policy objects.
What is Gpedit MSC?
msc (Group Policy) in Windows. Group Policy is a way to configure computer and user settings for devices which are joined to Active Directory Domain Services (AD) as well as local user accounts.It controls a wide range of options and can be used to enforce settings and change the defaults for applicable users.
How do you get Gpresults?
gpresult Command: To see the Gpresult commands, go to the command prompt and type the command: “gpresult /?” The output shown below displays the description and parameter list of the resultant set of policies (RSoP) for a target user and the computer.
How do I stop my screen from going to sleep Windows 7?
We recommend that you go to Control Panel > Hardware and Sound > Power Options > Change Plan settings > Change advanced power settings > locate Sleep. Under Sleep after and Hibernate after, set it to “0” and under Allow hybrid sleep, set it to “Off”.
How do I change when Windows locks?
3 Answers
- Right click on the Desktop and select Personalization.
- Select the Lock screen Tab.
- Now select the option Screen Timeout settings.
- Now under the Screen click on the tab and select the time more according to your preference.
- Also you can change the Sleep time settings.
Will there be a Windows 11?
Windows 11 is here, and if you own a PC, you might be wondering whether it’s time to upgrade your operating system. After all, you are likely to get this new software free. Microsoft first revealed its new operating system in June, its first major software upgrade in six years.
How do I turn off my lock screen?
How to disable the lock screen on Android
- Open the Settings on your phone.
- Tap Security.
- Tap Screen lock. Source: Joe Maring / Android Central.
- Enter your PIN/password.
- Tap None.
- Tap Yes, remove. Source: Joe Maring / Android Central.
How do I apply for Rsop?
Use Rsop. msc
- Click Start, click Run, type mmc in the Open box, and then click OK.
- Click File, click Add/Remove Snapin, and then click Add in the Add/Remove dialog box.
- Click Resultant Set of Policy, click Add, and then click Close in the Add/Remove Standalone Snapin dialog box.
- Click OK in the Add/Remove dialog box.
Does Rsop show local policy?
By design the RSOP tool cannot access local policies: RSOP gathers policies data from a Common Information Model Object Management (CIMOM) database on the local computer. Local Group Policy was not stored in this database and cannot be queried by RSOP.
What is Secpol MSC?
In Windows 10, Secpol. msc is the local security policy editor that can administer system and security policies on machines that are not in a domain policy. A local security policy is the set of rules a business uses to protect its local network.You can import and export security policies in four easy steps.
What is Compmgmt MSC?
compmgmt.msc. Computer Management. Includes System Tools (Task Scheduler, Event Viewer, Shared Folders, Local Users and Groups, Performance and Device Manager), Storage (Disk Management), and Services and Applications (Services and WMI Control)
What is Eventvwr MSC?
msc) You can use Event Viewer (Eventvwr. msc) to view logs that can help you to identify system problems when you are able to start the system in safe or normal mode. Application logs The Application log contains events logged by applications or programs.
Windows makes it possible to change the welcome screens that appear when you start your computer to just about any image you want to use. It’s easy to do in Windows 8 and 10, but fairly well-hidden in Windows 7.
In Windows 8 and 10, you actually see two different screens at sign in. The first is the lock screen—the one you have to click or swipe to get out of the way so you can sign in. The second is the sign in screen itself where you enter your password, PIN, or picture password. You can change the lock screen background through a simple setting, but you’ll have to dive into the Registry to change the sign in screen background. In Windows 7, there’s only one sign in screen and you’ll have to enable a custom background for it in the Registry (or through Group Policy) before you can select a new background.
RELATED: How to Add a PIN to Your Account in Windows 10
Windows 8 and 10 Users: Set Custom Lock Screen and Sign In Backgrounds
RELATED: How to Customize the Lock Screen on Windows 8 or 10
Windows 8 and Windows 10 make customizing your lock screen easy—all you have to do is head to Settings > Personalization > Lock Screen. The screens look slightly different in Windows 8 than they do in Windows 10, but they’re the same settings.
RELATED: How to Change the Login Screen Background on Windows 10
Unfortunately, there’s no equally simple, built-in way to change your sign in screen background in Windows 8 and 10. Instead, you’ll have to rely on a few workarounds. We encourage you to check out our full guide for details, but in short you have a few options:
- To change the sign in background to a solid color, you’ll need make a quick edit the Windows Registry.
- To change the sign in background to a custom image, you’ll need to grab a third-party tool named Windows 10 Login Image Changer.
And again, we suggest reading our guide for the full instructions.
To use a custom login background in Windows 7, you’ll need to take two steps. First, you’ll make a Registry edit that enabled custom backgrounds, and then you’ll store the image you want in a special Windows folder. We’ll also show you a third-party tool you can use as an easier alternative.
Step One: Enable Custom Backgrounds in Windows 7
For Windows 7, the ability to set a custom logon background is intended for original equipment manufacturers (OEMs) to customize their systems, but there’s nothing stopping you from using this feature yourself. All you have to do is change a single Registry value and then put an image file in the correct location.
This feature is disabled by default, so you’ll have to enable it from the Registry Editor. You can also use the Group Policy Editor if you have a Professional version of Windows—we’ll cover that a bit later in this section.
Launch Registry Editor by hitting Start, typing “regedit,” and then pressing Enter.
In the Registry Editor, navigate to the following key:
HKEY_LOCAL_MACHINESOFTWAREMicrosoftWindowsCurrentVersionAuthenticationLogonUIBackground
In the right pane, you’ll see a value named OEMBackground. If you don’t see that value, you’ll need to create it by right-clicking the Background key, choosing New > DWORD (32-bit) Value, and then naming the new value “OEMBackground.”
Double-click the OEMBackground value to open its properties window, set its value to 1 in the “Value data” box, and then click “OK.”
Note: If you at any point select a new theme in the Appearance and Personalization window, this will reset this registry value. Selecting a theme will change the value of the key to the value stored in the theme’s .ini file—which is probably 0. If you change your theme, you’ll have to perform this Registry tweak again.
If you have a Professional or Enterprise edition of Windows, you can make this change using the Local Group Policy Editor instead of in the Registry. As an added bonus, changing the setting in group policy allows it to persist even when you change your theme.
Launch Local Group Policy Editor by pressing Start, typing “gpedit.msc,” and then hitting Enter.
On the left-hand side of the Local Group Policy Editor window, drill down to the following location:
Computer ConfigurationAdministrative TemplatesSystemLogon
On the right, you’ll find a setting named “Always use custom login background.” Double-click that setting and, in the setting’s properties window, select “Enabled” and then click “OK.”
Whether you enabled custom background images by editing the Registry or using Local Group Policy Editor, your next step is to actually set the image you want to use.
Step Two: Set A Custom Background Image
You can use any image you like, but there are two things you’ll need to keep in mind:
- Your image must be less than 256 KB in size. You may need to convert your image to something like JPG format to make that happen.
- Try to find an image that matches the resolution of your monitor so it doesn’t look stretched.
Windows looks for the custom logon screen background image in the following directory:
C:WindowsSystem32oobeinfobackgrounds
By default, the “info” and “backgrounds” folders don’t exist, so you’ll need to navigate to C:WindowsSystem32oobe folder and create the subfolders yourself.
After creating the folders, copy your desired background image to the backgrounds folder and rename the image file to “backgroundDefault.jpg.”
Note: If you’re interested, the image we’re using comes from here.
The change should take effect immediately—no need to restart your PC. The first time you log out or lock your screen, you’ll see your new background.
Alternative: Use a Third-Party Tool Instead
RELATED: Customize the Windows 7 Logon Screen
You don’t have to do this by hand. There are a variety of third-party tools that automate this process for you, like Windows Logon Background Changer, which we’ve covered in the past. Windows Logon Background Changer and other utilities just change this registry value and put the image file in the correct location for you.
To get the default logon screen back, just delete the backgroundDefault.jpg file. Windows will use the default background if no custom background image is available.
READ NEXT
- › Windows 10 Compresses Your Wallpaper, But You Can Make Them High Quality Again
- › The Top 25 How-To Geek Articles of 2012
- › How to Take Screenshots of the Windows Logon Screen: 2 Geeky Tricks
- › The Best How-To Geek Articles for April 2012
- › What Is “Group Policy” in Windows?
- › How to Change Your Age on TikTok
- › The New HP Pro x360 Fortis Is a 2-In-1 Laptop Under $500
- › PSA: You Can Email Books and Documents to Your Kindle
Экран приветствия (он же экран входа или Logon Screen) является частью Windows на протяжении десятилетий, развиваясь вместе с каждой версией операционной системы и, как и многое другое в Windows, вы можете персонализировать его. Обычно для этого используются сторонние инструменты.
В Windows 7 вы можете задать свое изображение в качестве фона экрана входа в систему без помощи каких-либо сторонних программ, хотя этот процесс является утомительным, поскольку требует редактирования реестра. Таким образом, использование сторонних инструментов является предпочтительным вариантом. К счастью, с момента выхода Windows 7 было выпущено достаточно много программ, которые позволяют легко и быстро изменить фон экрана входа «семерки», так что есть из чего выбирать.
Кстати, некоторые пользователи, которые привыкли к экрану блокировки в мобильных операционных системах и Windows 8/8.1, часто называют экран входа в систему экраном блокировки. На самом же деле в Windows 7 нет экрана блокировки, но он может быть добавлен с помощью некоторых утилит. Также есть категория программ, которые позволяют изменять и настраивать другие элементы на экране входа в систему, а не только фон.
Ниже, в произвольном порядке, перечислена четверка лучших и бесплатных инструментов для модификации экрана приветствия в Windows 7.
Windows 7 Logon Background Changer
Пожалуй, это один из самых популярных инструментов этого типа. Windows 7 Logon Background Changer обладает красивым интерфейсом, и совместим со всеми редакциями Windows 7, от Starter до Ultimate. Кроме того, имеется поддержка обеих архитектур – x86 и x64.
Как и другие инструменты в этой подборке, Windows 7 Logon Background Changer не меняет системные файлы. Чтобы скачать инструмент, перейдите по ссылке ниже.
Скачать Windows 7 Logon Background Changer
Logon Screen Rotator
Logon Screen Rotator был моим личным фаворитом, когда я использовал Window 7 в качестве основной ОС. В дополнение к своей основной функции, этот инструмент умеет чередовать фоновые изображения. Т.е. при каждом включении компьютера вы можете видеть новое фоновое изображение.
Программа является полностью бесплатной и совместима с 32-битными и 64-битными версиями операционной системы. Logon Screen Rotator также совместим с Windows 8, но не поддерживает Windows 8.1.
Скачать Logon Screen Rotator
Tweaks.com Logon Changer
Насколько я помню, Tweaks.com Logon Changer был первым инструментом, созданным, чтобы изменить фон по умолчанию на экране входа Windows 7. Logon Changer позволяет увидеть, как будет выглядеть изображение на экране входа в систему, прежде чем вы установите его в качестве фона.
Скачать Tweaks.com Logon Changer
Logon Screen
Это еще один бесплатный инструмент, с которым вы можете заменить стандартное фоновое изображение на экране входа Windows 7 своим собственным. Этот инструмент также предлагает опцию, которая добавляет пункт «Set as logon background» в контекстное меню файла, т.е. достаточно просто кликнуть правой кнопкой мыши на изображении и выбрать этот пункт в контекстном меню, чтобы установить любимую фотографию в качестве фона на экране приветствия.
Также в этом инструменте доступна возможность показывать собственное сообщение на экране приветствия.
Скачать Logon Screen
Отличного Вам дня!
Logon screen is present in Windows operating system for decades and has evolved with each version of Windows. In prior versions of Windows 7, in Windows XP and Vista, changing the logon screen was a tedious task without the help of third-party tools.
In Windows 7, it’s possible to set custom picture as logon screen background without the help of third-party tools, the procedure requires you edit the Registry though. But users who aren’t interested in using third-party tools can easily change the logon screen background.
Over the last couple of years, a number of free utilities have been released to change the background of Windows 7 logon screen. Even though users who’re used to the lock screen of mobile operating systems and Windows 8/8.1 often call the logon screen as the lock screen, lock screen doesn’t exist in Windows 7 but can be added with the help of some third-party tools.
When it comes to the customization of Windows 7 logon screen background, there are tools that not only let you change the logon screen background but also let you change or customize the other elements of the logon screen.
In this guide, we have tried to list down the best free tools out there to change the logon screen background of Windows 7. In no particular order, following are the top 4 free logon screen changers for Windows 7.
Windows 7 Logon Background Changer
Probably the most downloaded utility of the lot. Windows 7 Logon Background Changer sports a beautiful design and is compatible with all editions from Starter to Ultimate editions of Windows 7, both x86 and x64.
Just like other tools out there, Windows 7 Logon Background Changer doesn’t change system files. Visit the following page to download the same.
Download Windows 7 Logon Background Changer
Logon Screen Rotator
Logon Screen Rotator is my personal favorite when it comes to setting a custom picture as logon screen background. In addition to the core feature of changing logon background, this utility also rotates the background. That is, you can have a new background picture each time you turn on your PC.
Logon Screen Rotator is completely free and is compatible with both 32-bit and 64-bit versions. The tool is also compatible with Windows 8 but doesn’t support Windows 8.1.
Download Logon Screen Rotator
Tweaks.com Logon Changer
As far as I can remember, Tweaks.com Logon Changer was the first tool released to change default picture of Windows 7 logon screen. Logon Changer offers option to preview the selected picture before setting it as logon background.
Download Logon Changer
Another free utility to replace the default picture of Windows 7 logon screen background with custom one. The beauty of this tool is that an option has been offered to add Logon Screen option to the desktop context menu so that you can quickly launch the program.
In addition to that, it also lets add Set as logon background option to the file context menu, meaning you just need to right-click on a picture and then click Set as logon background in order to set your favorite picture as logon screen background.
An option to show custom message on the logon screen is also available in this tool.
Download Logon Screen
Если Ваш компьютер запаролен, то наверняка Вы часто наблюдаете экран приветствия. На экране входа в систему всегда бросается в глаза стандартное фоновое изображение. Такое изображение синего цвета имеет узор с ростком и птичкой. С этим сталкиваешься каждый день, поэтому сложно не заметить такую картинку.
Вот бы изменить такое изображение на свое, например на фото или какую либо абстракцию. Оказывается, фоновый рисунок изменить можно.
Этап №1. Включаем возможность использования альтернативного изображения
Самый простой способ, если не хотите заморачиваться, использовать программу Win7LogonBackgroundChanger, которая легко поменяет обои экрана приветствия. Найти ее в поисковике, я думаю, не составит особого труда.
Второй способ не такой простой, однако не требует использование каких либо программ.
Чтобы включить функцию настраиваемого фона экрана приветствия нажмем комбинацию клавиш Win+R и вобьем gpedit.msc
Далее переходим по адресу Конфигурация компьютера – Административные шаблоны – Система – Вход в систему
Нажмем «Всегда использовать настраиваемый фон входа в систему» и здесь активируем нажатием кнопки Включить, после жмем ОК
Все, возможность установить свой фоновый рисунок на экран приветствия активирована. Далее переходим ко второму этапу.
Этап №2. Скидываем изображение в необходимую папку системы
Теперь нам необходимо попасть по такому адресу:
C:WindowsSystem32oobe
Создайте здесь папку Info, после зайдем в нее и создадим папку backgrounds, и именно в ней будет храниться необходимое фоновое изображение. Имя рисунка должно быть таким: backgroundDefault.jpg. Заметьте, формат изображения должен быть jpg, это очень важно! Кстати, и размер фонового рисунка не должен превышать 256 Кб.
Когда поместили свое изображение и переименовали, то можно проверить. Для этого достаточно заблокировать компьютер путем нажатия комбинаций клавиш Win+L или как показано на скрине ниже, войдя в меню Пуск,
Удостоверились, что изображение поменялось, и радуемся новому фону. Думаю, эта инструкция поможет Вам поставить изображение на экран приветствия Windows 7.
Press the Windows key , type Themes and related settings, and then press Enter . Or, press Ctrl + I to open Settings, and click Personalization. On the left side of the window that appears, click the Lock screen option.
How do I change my lock screen wallpaper on my computer?
Go to Settings > Personalization > Lock screen. Under Background, select Picture or Slideshow to use your own picture(s) as the background for your lock screen.
How do I put wallpaper on my lock screen?
In the top right corner of the screen, tap the three dots to bring up an options menu.
- Select a photo and tap the three dots in the top right corner. …
- Tap “Use as.” …
- Tap “Photos Wallpaper.” …
- Adjust the photo, then tap “Set Wallpaper.” …
- Select “lock screen” or “home screen and lock screen” to set the wallpaper.
16 апр. 2020 г.
How do I change my Windows login background?
How to change the Windows 10 login screen
- Click the Start button and then click the Settings icon (which looks like a gear). …
- Click “Personalization.”
- On the left side of the Personalization window, click “Lock screen.”
- In the Background section, choose the kind of background you want to see.
26 нояб. 2019 г.
How do I change the lock screen?
Set or change a screen lock
- Open your phone’s Settings app.
- Tap Security. If you don’t find “Security,” go to your phone manufacturer’s support site for help.
- To pick a kind of screen lock, tap Screen lock. …
- Tap the screen lock option you’d like to use.
How do I customize my windows lock screen?
How to Personalize the Lock Screen in Windows
- With the Lock Screen displayed, click anywhere on your screen, type your password, and then click the Sign In button. …
- Click the Start button.
- Click the Settings button. …
- Click Personalization. …
- Choose Lock screen.
- Select a type from the Background list.
Why can’t I change my lock screen wallpaper?
You have to use the stock Gallery app for it. My problem was that I used another app to edit the wallpaper and set it to use as default. Once I cleared the default and used the Gallery app to crop, I could apply any lock screen wallpaper.
How do I remove my lock screen wallpaper?
The trick is very simple, head over to the galaxy store and install good lock, then from the good lock settings uninstall it, and it will remove the lock screen wallpaper and it will match your homescreen if you change your wallpaper a lot.
How do I remove the lock screen wallpaper on my laptop?
To remove a thumbnail image from the Lock Screen Background page:
- Go to Settings (keyboard shortcut: Windows + I) > Personalization > Lock screen.
- Click the ‘Browse’ button and select the wallpaper you want. …
- Repeat the step 4 more times and you’ve replaced the existing listing with your preferred items.
22 дек. 2019 г.
What is the difference between home screen and lock screen?
The Lock screen is different from the Home screen on your Android phone, although the two locations share similar traits. As with the Home screen, you can customize the Lock screen. You can set the screen lock, as well as control the Lock screen notifications. …
How do I change my wallpaper?
How to change the wallpaper on an Android device
- Open up your phone’s Gallery app.
- Find the photo you want to use and open it.
- Tap the three dots in the top-right and select “Set as wallpaper.”
- You’ll be given the choice between using this photo as wallpaper for your home screen, lock screen, or both.
6 апр. 2020 г.
How do I change my Windows login name?
Change username
- Open the Control Panel.
- Double-click the Users Accounts icon.
- Select the account you want to change.
- Click Change My Name.
- Enter the new name you want to use and click the Change Name button.
31 дек. 2020 г.
Where is the Windows login screen background?
Head to Settings > Personalization > Lock screen and enable the “Show lock screen background picture on the sign-in screen” option here. You can configure the sign-in screen background you want on the Lock screen settings page, too.
Содержание
- Изменение экрана приветствия в Виндовс 7
- Способ 1: Windows 7 Logon Background Changer
- Способ 2: Средства Windows
- Вопросы и ответы
Одним из способов кастомизировать свою операционную систему является изменение экрана приветствия. Пользователи путем нехитрых действий могут поставить на заставку любую картинку, которая им по нраву, и в любой момент вернуть все обратно.
Любители подстраивать операционную систему под себя не упустят возможности заменить стандартный приветственный фон на более интересное изображение. Это можно сделать в любой современной и относительно современной версии Виндовс, включая «семерку». Это можно сделать как при помощи специальных утилит, так и вручную. Первый вариант зачастую быстрее и удобнее, а второй подойдет более уверенным пользователям, не желающим пользоваться сторонним ПО.
Перед выбором способа настоятельно рекомендуем позаботиться о создании точки восстановления системы и/или загрузочной флешки.
Подробнее:
Как создать точку восстановления в Windows 7
Как создать загрузочную флешку
Способ 1: Windows 7 Logon Background Changer
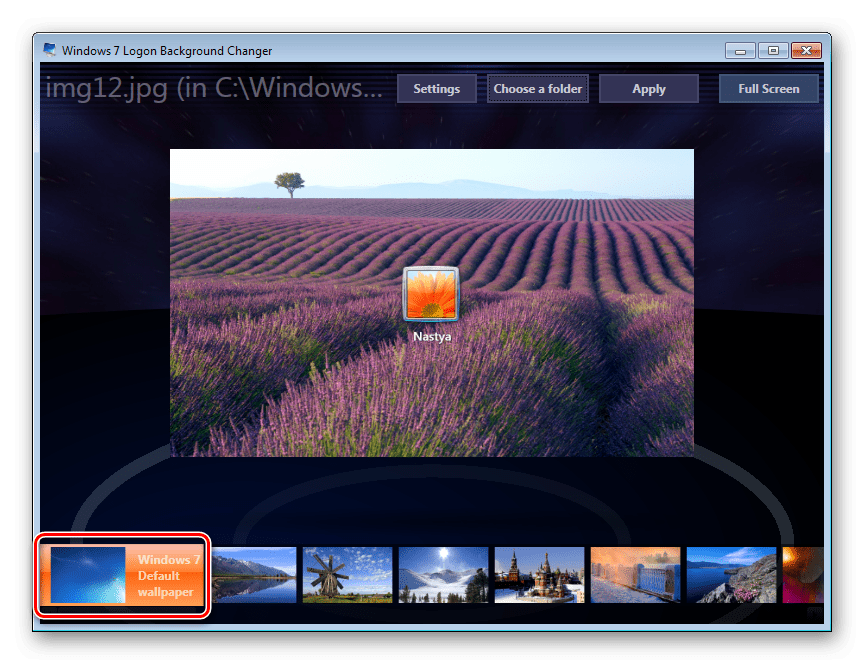
Как понятно из названия, эта программа предназначена специально для пользователей «семерки», желающих изменить приветственный фон. Этот софт имеет очень простой, приятный и современный интерфейс и наделен небольшой галереей собственных фонов.
Скачать Windows 7 Logon Background Changer с официального сайта
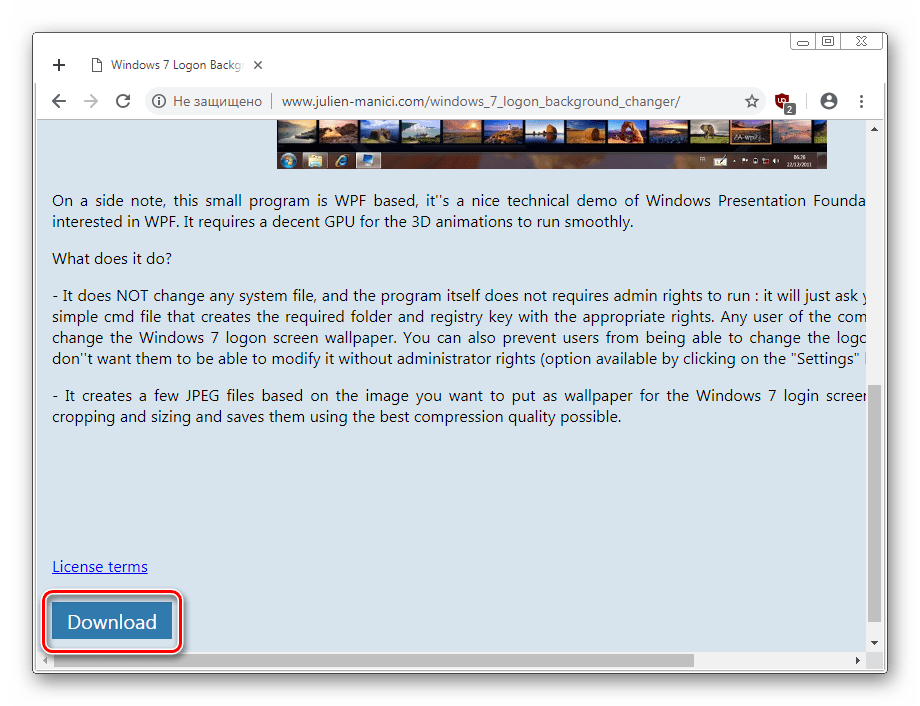
- Зайдите на официальный сайт программы и кликните по кнопке «Download».
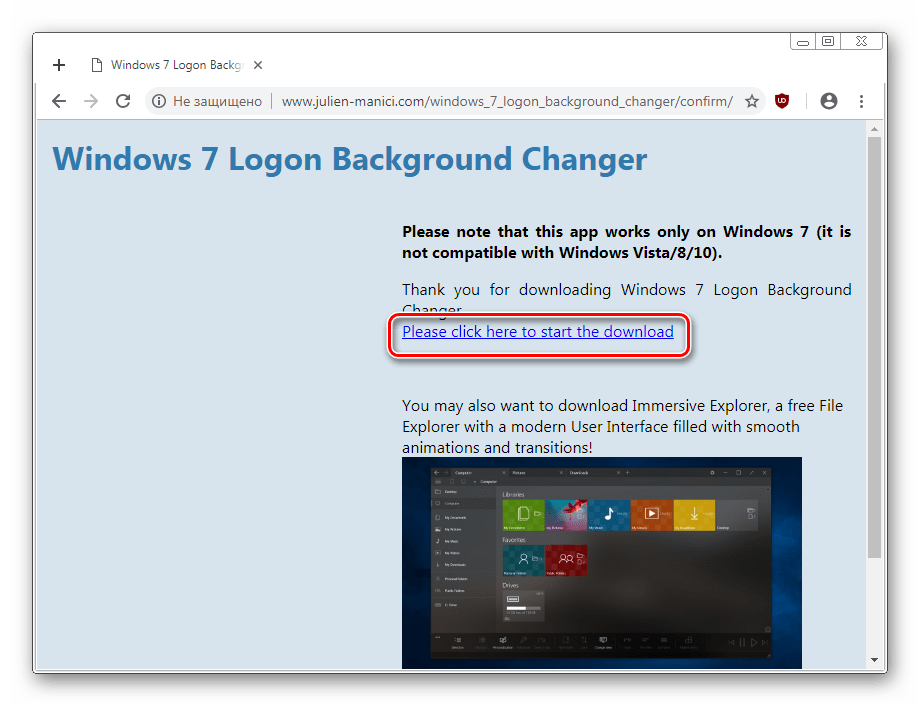
- На новой странице нажмите на ссылку «Please click here to start the download».
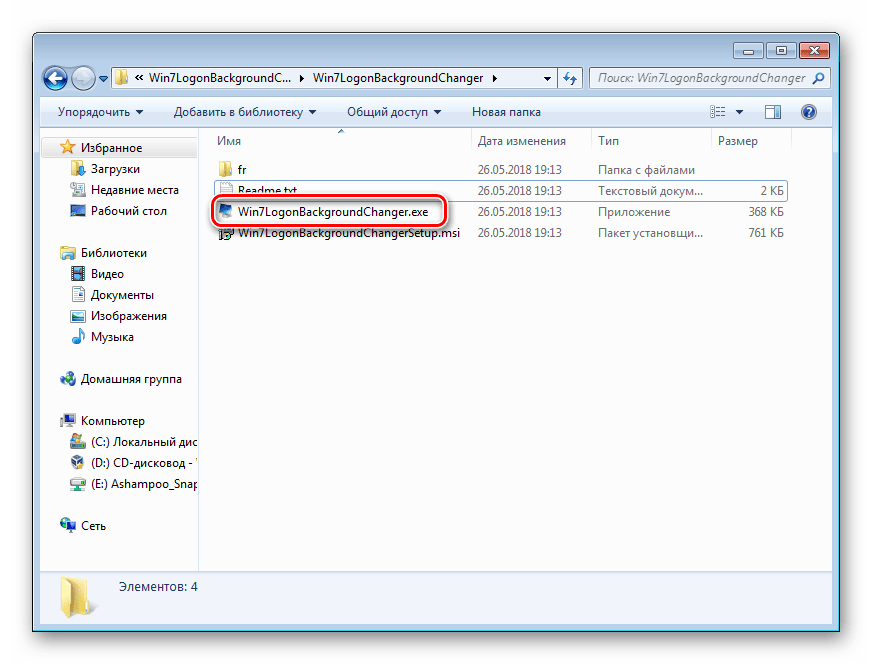
- Скачанный файл ZIP остается извлечь и запустить EXE-файл. Программа не требует установки и работает как portable-версия.
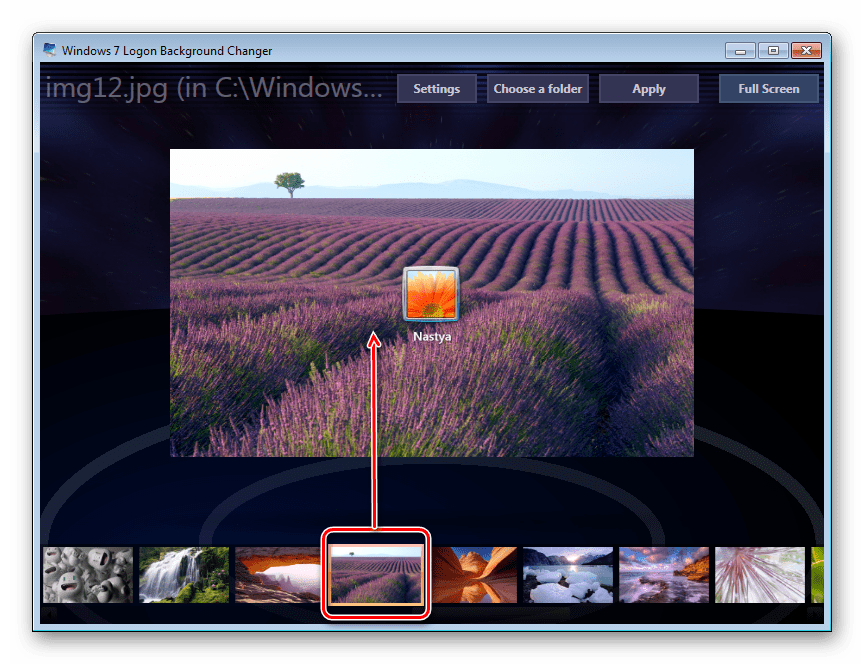
- Внизу находится набор обоев, которыми вы можете заменить стандартное изображение. При желании можно просмотреть этот список, прокручивая ее колесом вниз (вперед) и вверх (назад).
- Нажав на понравившуюся картинку, вы увидите превью — как фон будет выглядеть после изменения.
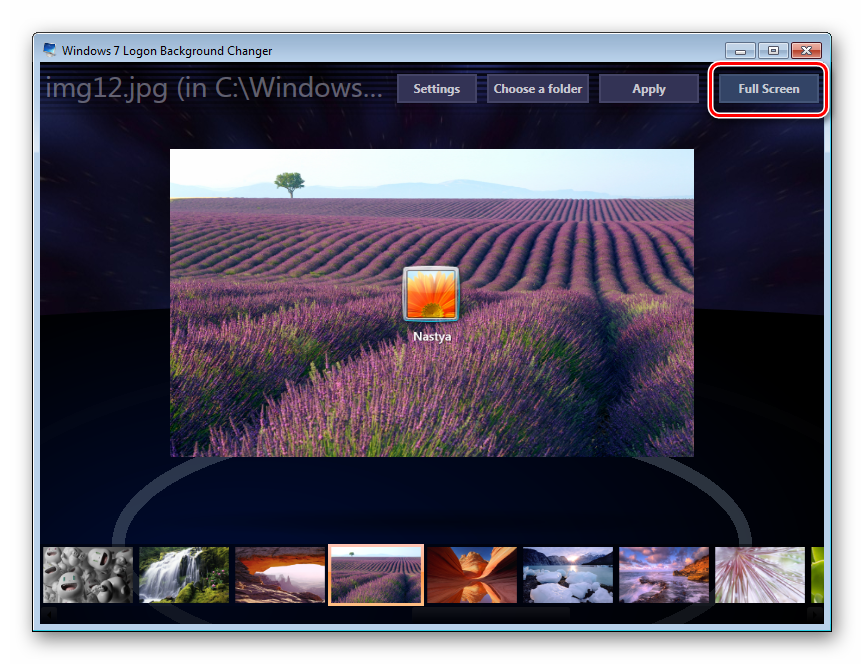
- Если необходимо, нажмите на кнопку «Full Screen» — это позволит просмотреть изображение на весь экран.
- Применить свой выбор можно кнопкой «Apply».
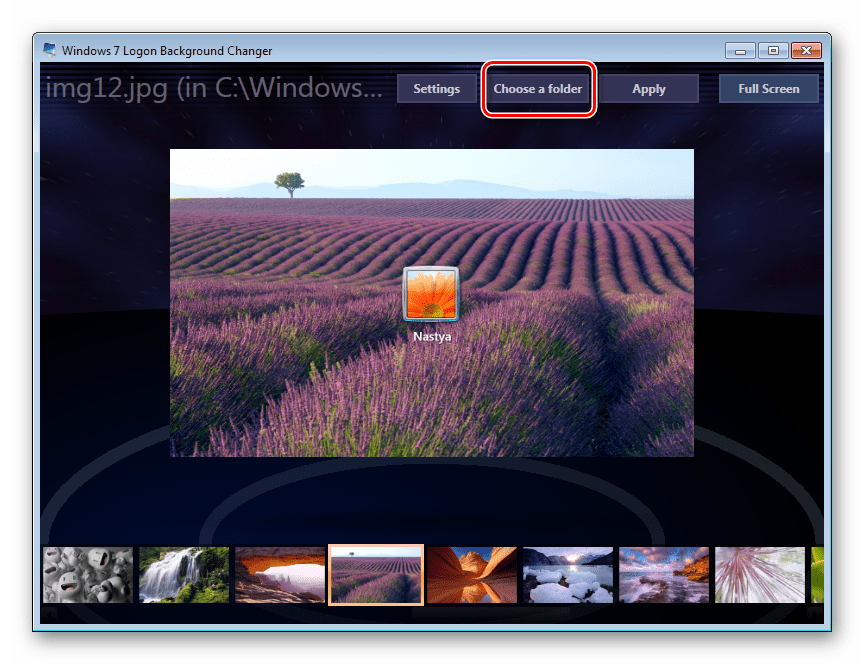
- Если вы хотите установить собственное изображение, а не предложенное программой, нажмите на кнопку «Choose a folder».
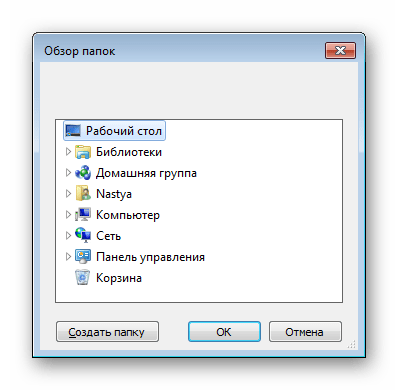
Откроется проводник, где нужно указать путь к файлу.
Выбранный файл устанавливается по умолчанию так же кнопкой «Apply».
Обратите внимание, что вы всегда можете вернуть стандартную картинку обратно. Для этого нажмите на «Windows 7 Default wallpaper» и сохраните результат на «Apply».
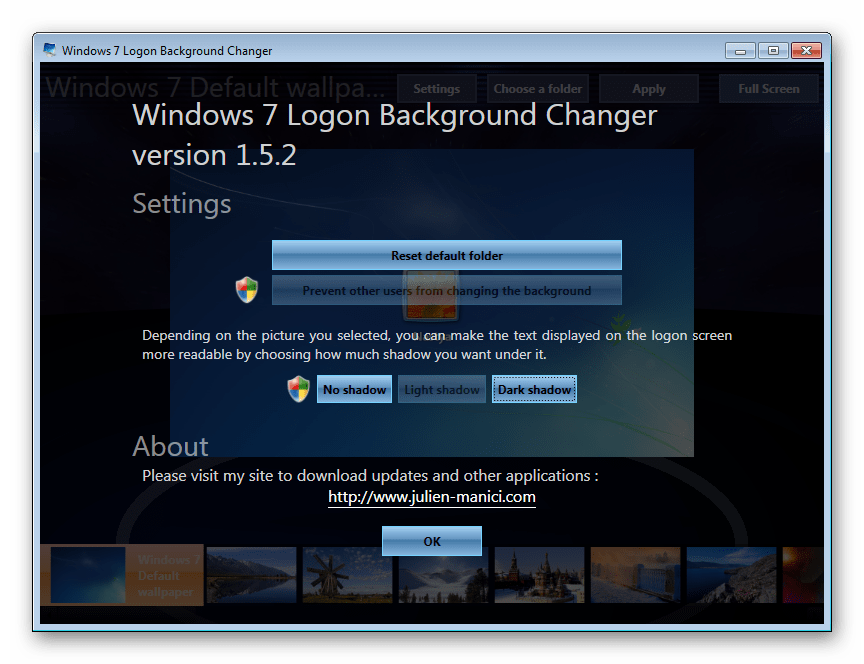
В настройках программы можно выполнить сброс папки по умолчанию, отключить изменение заставки для других учетных записей и добавить тень к тексту на экране загрузки.
Никаких дополнительных возможностей по кастомизации у программы нет, поэтому если вы хотите изменить в системе что-нибудь еще, используйте многофункциональные твикеры для Виндовс 7, в состав которых входит возможность изменения фона загрузки.
Способ 2: Средства Windows
Через инструмент «Персонализация» и какие-либо другие редакторы поменять фон приветствия нельзя, однако заменить изображение можно через редактирование реестра и замену картинки в системной папке. Минус такого способа — невозможно увидеть результат до перезагрузки компьютера.
Для такого способа есть пара ограничений: файл должен быть в формате JPG и иметь вес до 256 КБ. Кроме этого, старайтесь подобрать картинку в соответствии с размером и разрешением своего экрана, чтобы она выглядела качественно и уместно.
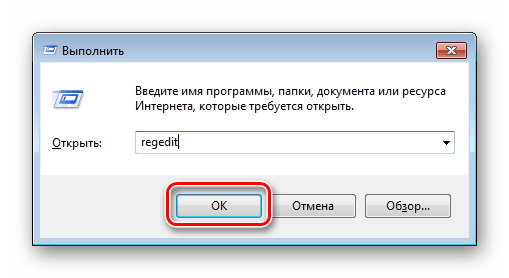
- Откройте редактор реестра сочетанием клавиш Win + R и командой
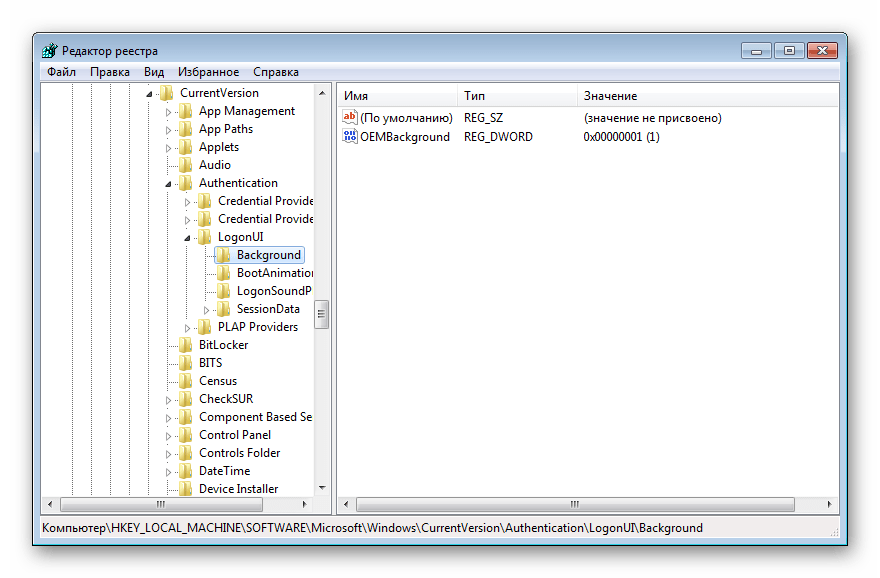
regedit. - Перейдите по пути, указанном ниже:
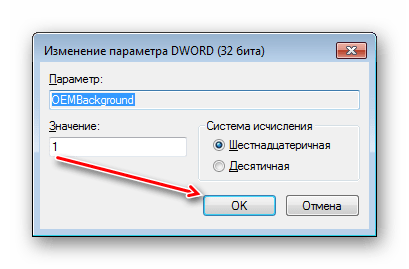
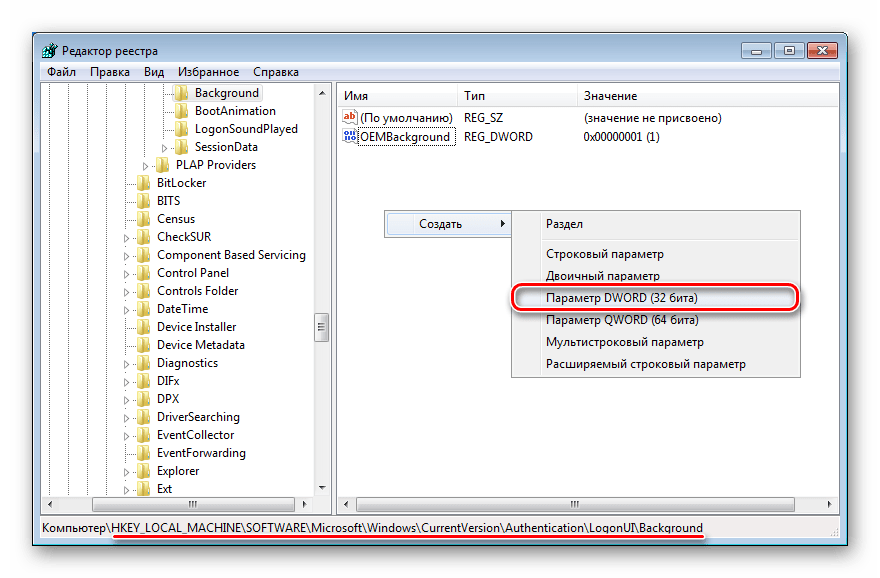
HKEY_LOCAL_MACHINESOFTWAREMicrosoftWindowsCurrent VersionAuthenticationLogonUIBackground - Дважды щелкните по параметру «OEMBackground», поставьте значение 1 и нажмите «ОК».
Если оно уже стоит, просто переходите к следующему пункту.
При отсутствии создайте этот параметр вручную. Находясь по вышеуказанному пути, кликните ПКМ по пустому месту в правой части экрана и выберите «Создать» > «Параметр DWORD (32 бита)».
Задайте ему имя OEMBackground, выставьте значение 1 и сохраните результат на «ОК».
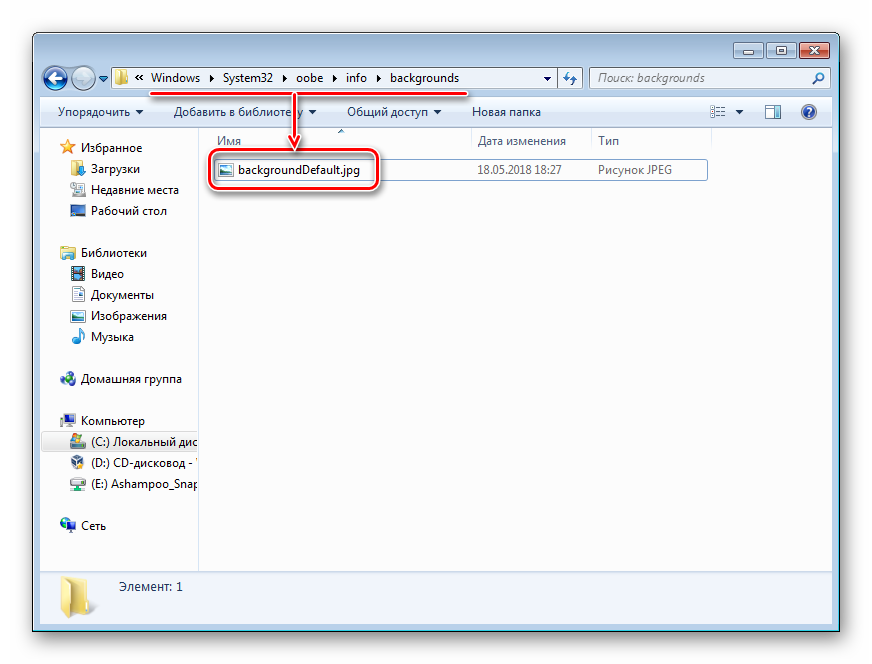
- Откройте проводник и перейдите в папку backgrounds, располагающуюся здесь:
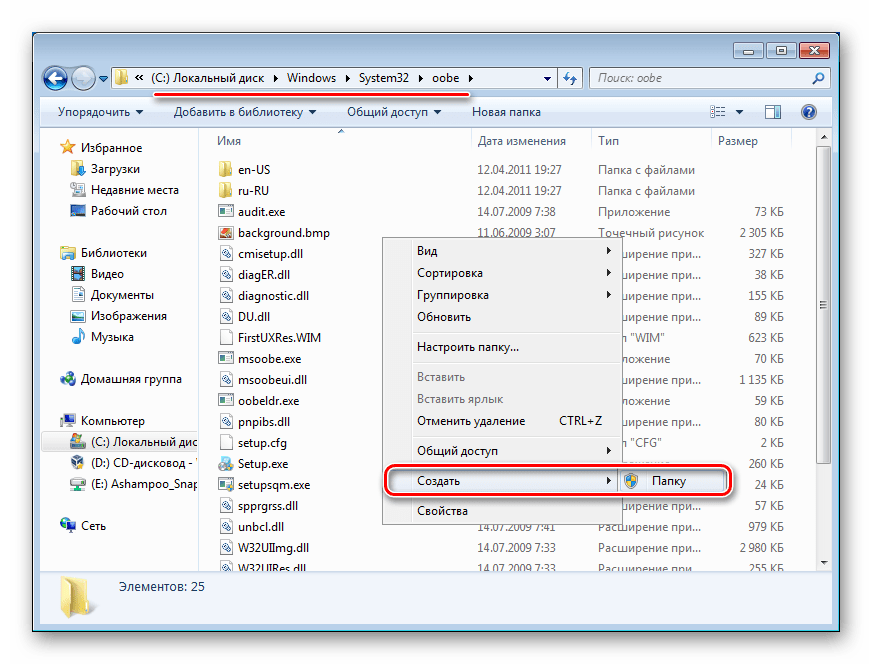
C:WindowsSystem32oobeinfoВ некоторых случаях backgrounds может отсутствовать, как и папка info. В таком случае вам потребуется создать и переименовать 2 папки вручную обычным способом.
Сперва внутри oobe создайте папку и назовите ее info, внутри которой создайте папку backgrounds.
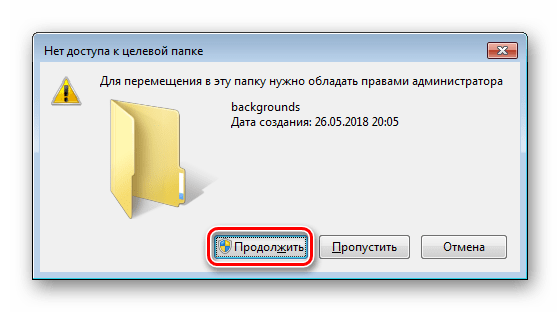
- Подберите подходящую картинку с учетом советов выше, переименуйте ее в backgroundDefault и скопируйте в папку backgrounds. Может потребоваться разрешение от учетной записи администратора – нажмите «Продолжить».
- Успешно скопированное изображение должно появиться в папке.
Чтобы увидеть измененный фон, перезагрузите ПК.
Теперь вы знаете два несложных метода изменения экрана приветствия в Виндовс 7. Используйте первый, если не уверены в своих силах и не хотите редактировать реестр и системную папку. Второй же удобен тем, кто не желает использовать либо не доверяет стороннему ПО, обладая достаточными навыками для установки фона вручную.
Еще статьи по данной теме:


