- Remove From My Forums
-
Question
-
I’m simply trying to configure Task Scheduler to run batch files in the middle of the night. So I created a task within the scheduler and have specified «Run whether the user is logged on or not». When I hit ok, it promots me for my username/password.
I’m a domain/enterprise admin logged into a domain account. It tells me;«This task requires that the user account specified has Log on as batch job rights»
Ok, so after looking this up I find myself editing the default domain policy:
Computer ConfigurationWindows SettingsSecurity SettingsLocal PoliciesUser Rights Assignment
I find the above user right, enable it and add my username. I log off, back on again and back into the scheduler. It still tells me I need this right. I checked, my username is there in the list beside the right.
Why can’t I create a schedule even with the right I’m supposed to have?
Thanks!
— Edit:
Ok I found this:
2. Type in secpol.msc /s
3. Select «Local Policies» in MSC snap in
4. Select «User Rights Assignment»
5. Right click on «Log on as batch job» and select Properties
6. Click «Add User or Group», and include the relevant user.
There’s a lot of users in here for different things but the Add User or Group button is greyed out. I’m a domain/enterprise administrator. Why can’t I add anything here?
Or put more simply, how do I give myself this right?
Thanks again
-
Edited by
Wednesday, November 30, 2011 9:27 PM
-
Edited by
Answers
-
Hi,
Thanks for your posting.
Do you mean you configured Task Scheduler on your DC, but when you tried to save the setting, you got error with “This
task requires that the user account specified has log on as batch job rights”?I think your issue is caused by “Default Domain Policy” or “Default Domain Controllers Policy”. Please
check Settings tab of these two GPOs in Group Policy Management Consult. Make sure your account is not be added in “Computer Configuration—>Policies—>Windows Settings—>Security Settings—>Local Policies—>User Rights Assignment—>Deny
log on as a batch job” and have correctly configured in “log on as a batch Job”.Or you can reset these two Default Policies
by referring to following article:
http://social.technet.microsoft.com/Forums/en/winserverDS/thread/e8a7c194-d3bf-4e1c-857c-7f779cc86705And for your question “There’s a lot of users in here for different things but the
Add User or Group button is greyed out”. I think this setting is overwritten by “Default Domain Controller Policy”, so you can’t modify the local policy.
Hope this can help! If you have any questions or confusions, please let us know.
Best Regards,
Lawrence
Please remember to click “Mark as Answer” on the post that helps you, and to click “Unmark as Answer” if a marked post does not actually answer your question. This can be beneficial to other community members reading the thread.
-
Marked as answer by
Lawrence,Lu
Friday, December 2, 2011 12:57 AM
-
Marked as answer by
-
This policy is grayed out because is overwritten by some particular domain policy. You should find that policy and edit it. Let Group Policy Management console -> Group Policy Results help you.
MCITP: Enterprise Administrator; MCT; Microsoft Security Trusted Advisor; CCNA; CCSI
-
Marked as answer by
meshman333
Thursday, December 1, 2011 1:29 PM
-
Marked as answer by
Обновлено 16.02.2017

ошибка Данное задание требует, чтобы указанная учетная запись пользователя имела права вход в качестве пакетного задания-01
При создании в планировщике windows задания и попытке его запустить выскакивает ошибка Данное задание требует, чтобы указанная учетная запись пользователя имела права вход в качестве пакетного задания. Дело в том что учетной записи от имени которой пытаюсь запустить не хватает прав.
Эта настройка безопасности позволяет пользователю входить в систему с помощью средства обработки пакетных заданий.
Например, если пользователь инициирует задание с помощью планировщика заданий, планировщик обеспечивает ему вход в систему как пакетному пользователю, а не как интерактивному.
Примечание
- В операционных системах Windows 2000 Server, Windows 2000 Professional, Windows XP Professional. и семейства Windows Server 2003 планировщик заданий автоматически предоставляет это право как обязательное.
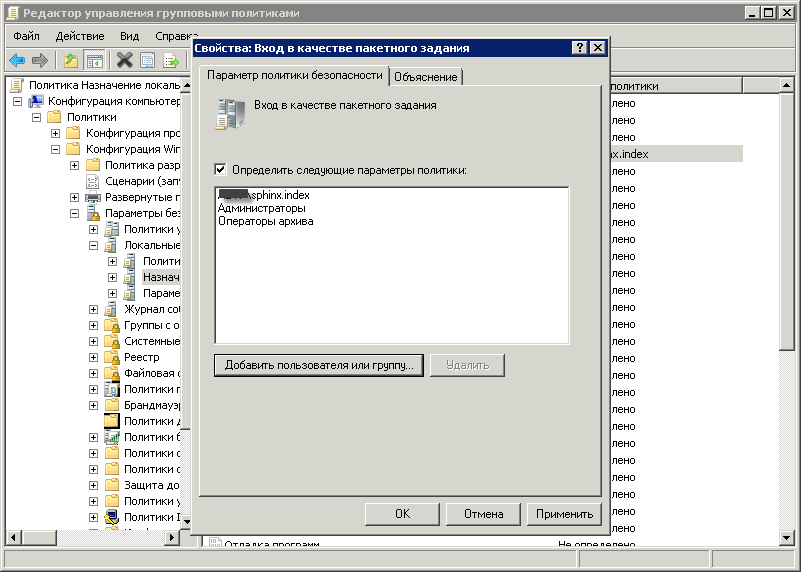
Решить данную проблему можно либо в локальной либо в групповой политике прописать нужный параметр и дать нужному пользователю права по пути Учетной записи, от имени которой должно выполнятся задание, в «Локальной политике безопасностиКонфигурация компьютераКонфигурация WindowsПараметры безопасностиЛокальные политикиНазначение прав пользователя» должно быть выделено право «Вход в качестве пакетного задания» (В аноязычном интерфейсе будет в «Local policyComputer ConfigurationWindows SettingsSecurity SettingsLocal PoliciesUser Rights Assignment» выделятся «Log on as a batch job» ).
ошибка Данное задание требует, чтобы указанная учетная запись пользователя имела права вход в качестве пакетного задания-02
по умолчанию права в этой группе имеют Администраторы и Операторы архива, их не забудьте сюда добавить в групповой политике, а то затрете их права.
ошибка Данное задание требует, чтобы указанная учетная запись пользователя имела права вход в качестве пакетного задания-03
и еще В свойствах задания (на первой странице) НЕ ДОЛЖЕН БЫТЬ ВКЛЮЧЕН пункт «Выполнять только при выполненном входе в систему» или Выполнять вне зависимости от регистрации пользователя («Run if user logon»), в самом задании.
Фев 16, 2017 10:09
Description
In this article, I am going to explain about how to set or grant Logon as batch job
rights/permission/privilege using Local Security Policy, Powershell, C# and Command Line tool.
Summary
- Set Logon as batch job rights to user using Local Security Policy
- Grant User Logon as a batch job privilege via Powershell
- Set User Logon as a batch job permission using C#
- Set User Logon as batch job right via Command Line
Set Logon as batch job rights to user using Local Security Policy GUI
Follow the below steps to set Logon as batch job rights via Local Security Policy
1. Open the Run window by pressing ‘Windows’ + ‘R’ keys.
2. Type the command secpol.msc in the text box and click OK.

3. Now the Local Security Policy window will be open, in that window navigate to the node User Rights Assignment (Security Settings -> Local Polices ->User Rights Assignment). In right side pane, search and select the policy Log on as batch job.

4. Double-click on the policy Log on as batch job, in the opened window click the button Add User or Group, select the user account you want to set logon as a batch job rights and click OK, and click Apply button to finish.

Note: If you see Log on as batch job policy with locked symbol, you can’t edit Logon as a batch job rights through this Local Security policy, because in that case this policy setting is enforced or inherited from some other Group Policy Object like Default Domain Policy or Default Domain Controller Policy. so you need to edit this policy setting via the inherited GPO.

We can set the Logon as a batch job right to user in Powershell by importing the third party DLL ( Carbon ). Before you run the below script you need to the download latest Carbon files from here Download Carbon DLL.
Steps to follow to set Logon as batch job rights via Powershell :
1. Download latest Carbon files from here Download Carbon DLL.
2. If you have downloaded the files, extract the zip file and you could see the Carbon DLL inside bin folder (In my case: C:UsersAdministratorDownloadsCarbonbinCarbon.dll).
3. Copy the below Powershell script commands and place it notepad or textfile.
4. Now you can replace your Carbon DLL path in following script for the variable $CarbonDllPath
5. You can also replace the user identity that you are going to set log on as batch job rights in the variable $Identity
6. Now run as Powershell window with Admin Privilege (Run as Administrator)
7. Copy the edited Powershell script and Run it in Powershell to set log on as batch job rights.
$Identity = "DomainNameSvc_User_account"
$privilege = "SeBatchLogonRight"

$CarbonDllPath = "C:UsersAdministratorDownloadsCarbonbinCarbon.dll"

[Reflection.Assembly]::LoadFile($CarbonDllPath)

[Carbon.Lsa]::GrantPrivileges( $Identity , $privilege )
Powershell output:

Other web site links for Carbon DLL:
https://bitbucket.org/splatteredbits/carbon/downloads
http://pshdo.com/
http://get-carbon.org/help/Grant-Privilege.html
Set or Grant User Logon as a batch job right/permission to user using C#
You can use the function GrantUserLogonAsBatchJob to set logon as a batch job right to user using C# code. This function uses the class LsaWrapper.
static void GrantUserLogonAsBatchJob(string userName)
{
    try
    {
        LsaWrapper lsaUtility = new LsaWrapper();

        lsaUtility.SetRight(userName, "SeBatchLogonRight");

        Console.WriteLine("Logon as batch job right is granted successfully to " + userName);
    }
    catch (Exception ex)
    {
        Console.WriteLine(ex.Message);
    }
}
LsaWrapper class file
public class LsaWrapper
{
// Import the LSA functions

[DllImport("advapi32.dll", PreserveSig = true)]
private static extern UInt32 LsaOpenPolicy(
    ref LSA_UNICODE_STRING SystemName,
    ref LSA_OBJECT_ATTRIBUTES ObjectAttributes,
    Int32 DesiredAccess,
    out IntPtr PolicyHandle
    );

[DllImport("advapi32.dll", SetLastError = true, PreserveSig = true)]
private static extern long LsaAddAccountRights(
    IntPtr PolicyHandle,
    IntPtr AccountSid,
    LSA_UNICODE_STRING[] UserRights,
    long CountOfRights);

[DllImport("advapi32")]
public static extern void FreeSid(IntPtr pSid);

[DllImport("advapi32.dll", CharSet = CharSet.Auto, SetLastError = true, PreserveSig = true)]
private static extern bool LookupAccountName(
    string lpSystemName, string lpAccountName,
    IntPtr psid,
    ref int cbsid,
    StringBuilder domainName, ref int cbdomainLength, ref int use);

[DllImport("advapi32.dll")]
private static extern bool IsValidSid(IntPtr pSid);

[DllImport("advapi32.dll")]
private static extern long LsaClose(IntPtr ObjectHandle);

[DllImport("kernel32.dll")]
private static extern int GetLastError();

[DllImport("advapi32.dll")]
private static extern long LsaNtStatusToWinError(long status);

// define the structures

private enum LSA_AccessPolicy : long
{
    POLICY_VIEW_LOCAL_INFORMATION = 0x00000001L,
    POLICY_VIEW_AUDIT_INFORMATION = 0x00000002L,
    POLICY_GET_PRIVATE_INFORMATION = 0x00000004L,
    POLICY_TRUST_ADMIN = 0x00000008L,
    POLICY_CREATE_ACCOUNT = 0x00000010L,
    POLICY_CREATE_SECRET = 0x00000020L,
    POLICY_CREATE_PRIVILEGE = 0x00000040L,
    POLICY_SET_DEFAULT_QUOTA_LIMITS = 0x00000080L,
    POLICY_SET_AUDIT_REQUIREMENTS = 0x00000100L,
    POLICY_AUDIT_LOG_ADMIN = 0x00000200L,
    POLICY_SERVER_ADMIN = 0x00000400L,
    POLICY_LOOKUP_NAMES = 0x00000800L,
    POLICY_NOTIFICATION = 0x00001000L
}

[StructLayout(LayoutKind.Sequential)]
private struct LSA_OBJECT_ATTRIBUTES
{
    public int Length;
    public IntPtr RootDirectory;
    public readonly LSA_UNICODE_STRING ObjectName;
    public UInt32 Attributes;
    public IntPtr SecurityDescriptor;
    public IntPtr SecurityQualityOfService;
}

[StructLayout(LayoutKind.Sequential)]
private struct LSA_UNICODE_STRING
{
    public UInt16 Length;
    public UInt16 MaximumLength;
    public IntPtr Buffer;
}
///
//Adds a privilege to an account

/// Name of an account - "domainaccount" or only "account"
/// Name ofthe privilege
/// The windows error code returned by LsaAddAccountRights
public long SetRight(String accountName, String privilegeName)
{
    long winErrorCode = 0; //contains the last error

    //pointer an size for the SID
    IntPtr sid = IntPtr.Zero;
    int sidSize = 0;
    //StringBuilder and size for the domain name
    var domainName = new StringBuilder();
    int nameSize = 0;
    //account-type variable for lookup
    int accountType = 0;

    //get required buffer size
    LookupAccountName(String.Empty, accountName, sid, ref sidSize, domainName, ref nameSize, ref accountType);

    //allocate buffers
    domainName = new StringBuilder(nameSize);
    sid = Marshal.AllocHGlobal(sidSize);

    //lookup the SID for the account
    bool result = LookupAccountName(String.Empty, accountName, sid, ref sidSize, domainName, ref nameSize,
                                    ref accountType);

    //say what you're doing
    Console.WriteLine("LookupAccountName result = " + result);
    Console.WriteLine("IsValidSid: " + IsValidSid(sid));
    Console.WriteLine("LookupAccountName domainName: " + domainName);

    if (!result)
    {
        winErrorCode = GetLastError();
        Console.WriteLine("LookupAccountName failed: " + winErrorCode);
    }
    else
    {
        //initialize an empty unicode-string
        var systemName = new LSA_UNICODE_STRING();
        //combine all policies
        var access = (int) (
                                LSA_AccessPolicy.POLICY_AUDIT_LOG_ADMIN |
                                LSA_AccessPolicy.POLICY_CREATE_ACCOUNT |
                                LSA_AccessPolicy.POLICY_CREATE_PRIVILEGE |
                                LSA_AccessPolicy.POLICY_CREATE_SECRET |
                                LSA_AccessPolicy.POLICY_GET_PRIVATE_INFORMATION |
                                LSA_AccessPolicy.POLICY_LOOKUP_NAMES |
                                LSA_AccessPolicy.POLICY_NOTIFICATION |
                                LSA_AccessPolicy.POLICY_SERVER_ADMIN |
                                LSA_AccessPolicy.POLICY_SET_AUDIT_REQUIREMENTS |
                                LSA_AccessPolicy.POLICY_SET_DEFAULT_QUOTA_LIMITS |
                                LSA_AccessPolicy.POLICY_TRUST_ADMIN |
                                LSA_AccessPolicy.POLICY_VIEW_AUDIT_INFORMATION |
                                LSA_AccessPolicy.POLICY_VIEW_LOCAL_INFORMATION
                            );
        //initialize a pointer for the policy handle
        IntPtr policyHandle = IntPtr.Zero;

        //these attributes are not used, but LsaOpenPolicy wants them to exists
        var ObjectAttributes = new LSA_OBJECT_ATTRIBUTES();
        ObjectAttributes.Length = 0;
        ObjectAttributes.RootDirectory = IntPtr.Zero;
        ObjectAttributes.Attributes = 0;
        ObjectAttributes.SecurityDescriptor = IntPtr.Zero;
        ObjectAttributes.SecurityQualityOfService = IntPtr.Zero;

        //get a policy handle
        uint resultPolicy = LsaOpenPolicy(ref systemName, ref ObjectAttributes, access, out policyHandle);
        winErrorCode = LsaNtStatusToWinError(resultPolicy);

        if (winErrorCode != 0)
        {
            Console.WriteLine("OpenPolicy failed: " + winErrorCode);
        }
        else
        {
            //Now that we have the SID an the policy,
            //we can add rights to the account.

            //initialize an unicode-string for the privilege name
            var userRights = new LSA_UNICODE_STRING[1];
            userRights[0] = new LSA_UNICODE_STRING();
            userRights[0].Buffer = Marshal.StringToHGlobalUni(privilegeName);
            userRights[0].Length = (UInt16) (privilegeName.Length*UnicodeEncoding.CharSize);
            userRights[0].MaximumLength = (UInt16) ((privilegeName.Length + 1)*UnicodeEncoding.CharSize);

            //add the right to the account
            long res = LsaAddAccountRights(policyHandle, sid, userRights, 1);
            winErrorCode = LsaNtStatusToWinError(res);
            if (winErrorCode != 0)
            {
                Console.WriteLine("LsaAddAccountRights failed: " + winErrorCode);
            }

            LsaClose(policyHandle);
        }
        FreeSid(sid);
    }

    return winErrorCode;
}
}
Grant Logon as a batch job right to user via Command Line
You can use the NTRights.exe utility to grant or deny user rights to users and groups from a command line or a batch file. The NTRights.exe utility is included in the Windows NT Server 4.0 Resource Kit Supplement 3.
Refer: http://support.microsoft.com/kb/266280
Set Logon As Batch Job right
ntrights +r SeBatchLogonRight -u "DomainSvc_Test_user"
Revoke Logon As Batch Job right
ntrights -r SeBatchLogonRight -u "DomainSvc_Test_user"
Thanks,
Morgan
Software Developer
———————
WinSecWiki > Security Settings > Local Policies > User Rights > User Rights In-Depth > Log on as a batch job
AKA: SeBatchLogonRight, Log on as a batch job
Default assignment: none
This right is required by the account that any batch job runs under. The only native component in Windows that users batch jobs are Scheduled Tasks. Deny log on as a batch job overrides this right if a user has both. Task Scheduler automatically grants this right when a user schedules a task; to override this behavior use Deny log on as a batch job.
Use of this right does not generate a Privilege Use event in the Windows security log but batch logons do generate event ID 528/4624 with logon type 4.
Changes to these logon rights assignments are logged by event IDs 621/4717 and 622/4718.
More information at Logon Rights.
Back to top
|
Upcoming Webinars |
Additional Resources |

What is «Logon as Batch job»?
This article concerns itself with the following error message:
«Logon failure: the user has not been granted the requested logon type at this computer.»
The short version
Here’s a simple outline of the problem.
- A Windows service on your computer has nearly unlimited access to your local computer.
- By default, Windows prevents that service from having access to your local network.
- Not being able to access the network becomes a problem if you need to access shared printers and file systems.
- For that reason, Windows provides «Logon as Batch job» to grant access to a single logged-in user within a service process.
The long version
Here’s the more extended version of the problem, including the step by step to fix it.
RPM Remote Print Manager® («RPM») is a Windows system service. Like any other service, it has special permissions on your local machine.
For security reasons, Microsoft decided to prevent Windows services from working the same way on the network. So, for example, RPM can’t use shared printers or shared folders directly because they are on your network, not your local computer.
On the other hand, a typical logged-in user can easily use shared printers and folders. You have this right as part of your user profile.
A service like RPM gets around this by impersonating a logged-in user while printing or opening a file. That’s one of the permissions that a service program has. So when you configure an action to use a regular user’s login credentials for the printer or folder, you accomplish that by using the RPM user interface.
The second requirement is that this user must have «Logon as batch job» permissions in their profile. Setting this permission keeps a hacker from maliciously creating user accounts to do whatever it wants. Only an admin, logged in, can assign this permission to a user profile.
To summarize, here is a chart that presents the problem:
| User | Permissions |
|---|---|
| Windows service | Can use local printers and folders |
| Logged-in users | Can use local and shared printers and folder |
| Impersonated users | Must have «logon as batch job» set in the profile |
How we first encountered this problem
Let’s set up this scenario. The customer used RPM with an «Archive to folder» action using a domain service account to write files to folders on a network share. The user account has the correct credentials.
When the user next processes a print job using this action, they get the following error.
«Error 1385 — Logon failure: the user has not been granted the requested logon type at this computer.»
The reason we had never encountered this error is this. When I wrote and tested this function in RPM, I used my login account (since we don’t share passwords around in the company). My regular user profile has «Logon as Batch Job» because I’m one of the admin users.
A typical user would not have that; hence, the error.
How to solve the «Logon as Batch job» issue
These instructions assume you are using Windows 10 or comparable.
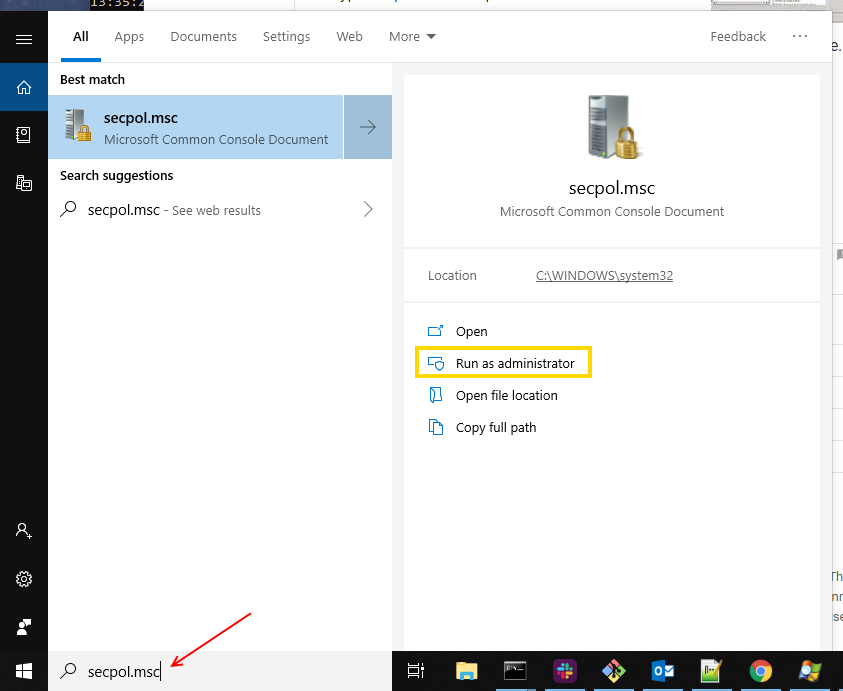
- Go to the lower left of your home screen so the search bar appears.
- As shown in the example below, type in «secpol.msc» indicated by the red arrow.
- Don’t hit Enter yet; look for the menu to appear. Notice the four options to the right; you want the highlighted option «Run as administrator»

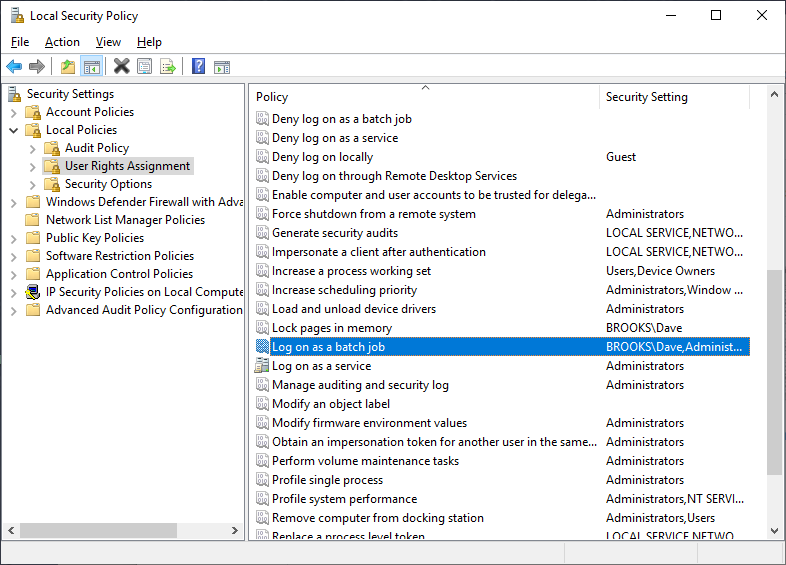
- In the «Local Security Policy» app, go to Security Settings / Local Policies / User Rights Administration. These are collapsing menus you open by clicking the «>» arrow, one at a time.
- Scroll down to «Log on as a batch job» and double click on that entry

The «Select Users» form is where you would add the user you have configured for the RPM archive to the shared folder operation.
Note that I have put myself in this form: BROOKSDave
However, you might have noticed that the security policy already includes that user. If you were adding a user, you would do that here.
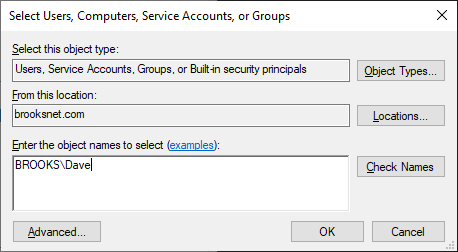
It won’t hurt anything to click «Check Names» if you have never done this before. Chances are, if you entered the domain and username correctly, you wouldn’t have a problem.
A note on interactive processes
We’ve talked about a Windows service using «Logon as Batch» to access shared printers and folders.
A Windows service can also run a process interactively. For instance, we can start up Notepad on your plain-text print job, if that’s what you want.
We’d like to advise you of two issues:
- Of course, you have to configure RPM to run your filter program this way. You will need to provide login credentials and also select the setting «Interact with Desktop» which is right below the Credentials, at the top of the Filter Action dialog. Read more
- RPM will only launch your interactive program when that user is logged in. RPM tracks user logins and logouts for that reason.
Why RPM needs «Logon as Batch Job»
![]()
RPM is a print server software and a virtual printer with the ability to process print jobs as a specific Windows user. As you well know, sometimes the permissions make this necessary; for instance, if you want to
- write to a shared folder
- print a shared printer
- run a program interactively.
We are pleased to make this page available to you. Helping our users makes us all successful, and we’re happy to share this information with the community.
If you need a print server or virtual printer, please download the free trial today! And best of luck with your «log on as batch» issues from here on out.

Log on as a batch job. This security setting allows a user to be logged on by means of a batch-queue facility and is provided only for compatibility with older versions of Windows. For example, when a user submits a job by means of the task scheduler, the task scheduler logs that user on as a batch user rather than as an interactive user. Default: Administrators and Backup Operators. Please visit the following links for more on Group Policy Objects and GPO. To learn more about these switches, see “All about GPUpdate Switches: GPUpdate vs GPUpdate /force“, what is Registry Editor and how to access the registry hives, and how to search through Windows Registry, what is Registry Editor and how to access the registry hives and how to search through Windows Registry.
I needed to grant an MBAM read only server "MBAM-RO-SVC" logon as a batch job permission and because of this, I decided to create this article for you to benefit from it. This is an MBAM Read-only service account which will have access to the reports area of the Administration and Monitoring Website.To do this, search for the “secpol.msc” from the windows search as shown below, or alternatively, launch the run dialog wizard and enter “secpol.msc” and hit ok. Regardless of the step, you chose to use, this will open the Local Security Policy console. “
Note: You can also access this from the Group Policy Management Editor dialog box, under Computer Configuration, expand Policies, Windows Settings, Security Settings, and Local Policies, and then click User Rights Assignment

Locate the Local Policies, and then click User Rights Assignment. On the right pane of the window, double-click on log on as a batch job

This will open up the Log on as a batch job Properties window. Click on Add Users or Group as shown below.

This will open up the wizard below to select users, computers, service accounts or groups. Since we are interested in adding an MBAM service account, when I am done, I will click on OK.

As you can see, the service account has been added. Click on Ok to close this window.

As you can see the policy has been configured and that is all that needs to be done.

I hope you found this blog post helpful. If you have any questions, please let me know in the comment session.
Учимся применять важнейший метод аутентификации.
Подсистема контроля доступа Windows, которая определяет пользователей, имеющих доступ к тем или иным ресурсам, основана на концепциях разрешений (permission) и пользовательских прав (user right). Разрешения связаны с объектами — например, разрешения для распечатывания файла, создания папки и добавления объекта user в Active Directory (AD). Пользовательские права связаны с системой Windows в целом — например, право пользователя регистрироваться в системе Windows или изменять системные часы.
Права пользователя Windows подразделяются на две категории: привилегии пользователя (user privilege) и права регистрации (logon right). Привилегии пользователя, такие как Change the System Time и Shut down the System, обеспечивают контроль над системными ресурсами и операциями, связанными с системой. Права регистрации задают учетные записи пользователей, которые могут регистрироваться в системе Windows, и способ регистрации учетной записи пользователя в системе. Более подробная информация об учетных записях пользователя и процедуре входа Windows приведена в статье «Все дело в доверии» (http://www.osp.ru/text/302/2599419/). В данной статье рассматривается, как использовать права регистрации в качестве инструмента контроля доступа, даны объяснения различных прав доступа и рекомендации по их применению.
Права регистрации — общая картина
В Windows Server 2003 и Windows XP определены 10 различных прав доступа, с помощью которых можно управлять разными типами попыток локальной и доменной аутентификации пользователей в системах Windows. Права регистрации также охватывают процедуры аутентификации пользователей, в том числе регистрацию в FTP-службе на базе Windows. Например, чтобы обеспечить регистрацию учетной записи пользователя в FTP-службе на базе Windows, необходимо присвоить учетной записи право Log on locally в системе Windows, на которой размещена служба FTP. В Windows 2000 было введено право регистрации «deny». Windows 2003, XP и Windows 2000 Service Pack 2 (SP2) и более поздние версии поддерживают права регистрации для Terminal Services.
В таблице 1 перечислены права регистрации Windows наряду с именами API, соответствующими каждому праву регистрации, и показаны встроенные группы, которые получают права регистрации, назначаемые по умолчанию на контроллере домена (DC), члене-сервере и автономной системе. Имена API — внутренние имена, используемые Windows для обозначения прав регистрации. Иногда их необходимо указывать при использовании инструментов командной строки, о которых будет рассказано ниже, или при просмотре журнала событий Security. Рассмотрим каждое право регистрации немного подробнее:
- Log on locally позволяет пользователям регистрироваться в Windows с помощью комбинации клавиш Ctrl+Alt+Del или из экрана Welcome. В Windows этот метод входа называется локальным или интерактивным. Пользователям Windows 2000 это право необходимо для входа через Terminal Services.
- Access this computer from the network обеспечивает подключение пользователей к компьютеру через сеть. Это право обязаны иметь все пользователи, желающие обратиться к удаленной системе для доступа к файлу, папке, приложению или другому ресурсу. В Windows данный метод регистрации называется сетевым или неинтерактивным входом.
- Log on as a batch job позволяет пользователям регистрироваться для запуска пакета команд. Это право применяется в Windows Task Scheduler и некоторых других службах для регистрации пользователей. Scheduled Tasks автоматически предоставляет это право по мере необходимости — в моменты, когда необходимо запустить запланированное задание.
- Log on as a service позволяет субъекту безопасности регистрироваться в качестве службы. Это право обеспечивает работу служб в системах Windows в фоновом режиме. Учетным записям System и Network Service на автономных системах и серверах, членах доменов, это право предоставляется по умолчанию. Если для запуска службы используется другая специальная запись, то необходимо явно назначить ей это право.
- Allow logon through Terminal Services определяет пользователей, которые могут регистрироваться с помощью Terminal Services или клиента Remote Desktop.
- Deny logon locally запрещает пользователю регистрироваться с клавиатуры или экрана Welcome компьютера. Это право имеет приоритет перед правом Log on locally.
- Deny access to this computer from the network запрещает пользователю подключаться к компьютеру через сеть. Это право имеет приоритет перед правом Access this computer from the network.
- Deny logon as a service запрещает субъекту безопасности регистрироваться в качестве службы для формирования контекста безопасности. Это право имеет приоритет перед правом Log on as a service.
- Deny logon as a batch job запрещает пользователю регистрироваться в роли пакетного файла; оно имеет приоритет перед правом Log on as a batch job.
- Deny logon through Terminal Services запрещает пользователю регистрироваться с помощью Terminal Services или Remote Desktop; это право имеет приоритет перед правом Allow logon through Terminal Services.
Права Deny logon полезны в крупных сетях Windows. Например, если нужно предоставить право Access this computer from the network всем, кроме двух конкретных учетных записей. В этом случае, гораздо проще назначить группе Authenticated Users право Access this computer from the network, а двум отдельным учетным записям — право Deny access to this computer from the network, вместо того, чтобы определять все учетные записи, имеющие доступ, объединяя их в специальную группу, а затем назначать этой группе право Access this computer from the network.
Управление правами регистрации в Windows
Чтобы назначать и управлять правами регистрации в Windows, можно использовать инструмент Local Security Policy (только на автономных системах) или оснастку Group Policy Object консоли Microsoft Management Console (MMC) (для автономных компьютеров и систем, членов доменов). В комплектах ресурсов Windows 2003 и Windows 2000 содержится два инструмента командной строки, которые помогают управлять правами регистрации: NTRights (ntrights.exe) и ShowPriv (showpriv.exe).
К инструменту Local Security Policy можно обратиться из раздела Administrative Tools Панели управления (меню Start, Settings, Control Panel, Administrative Tools, Local Security Policy). В окне Local Security Settings, право регистрации назначается путем расширения контейнеров Security Settings, Local Policies, User Rights Assignment (Экран 1).
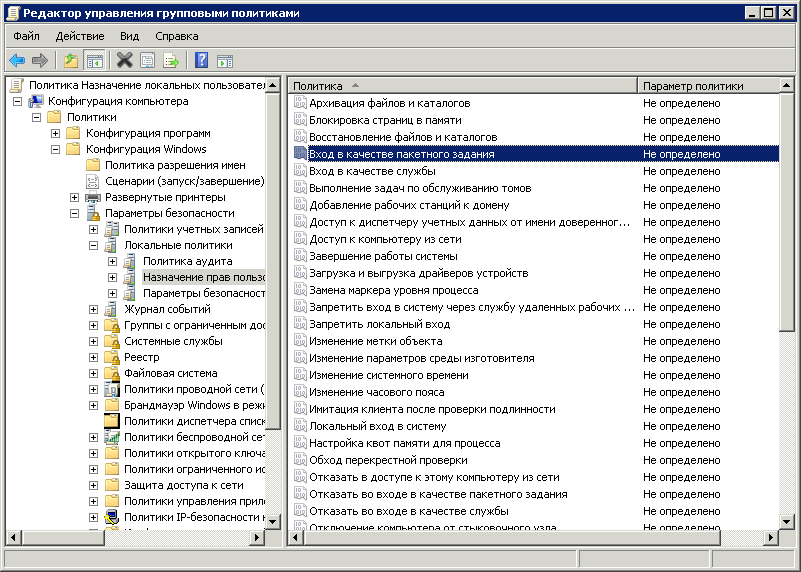
Для доступа к оснастке Group Policy Object следует запустить MMC, затем загрузить оснастку. Для управления правами входа на автономных системах следует выбрать Local Computer Group Policy Object (GPO); для управления правами входа на контроллерах домена (DC), нужно выбрать Default Domain Controllers GPO. В оснастке Group Policy Object можно назначить права регистрации, развернув контейнеры Computer Configuration, Windows Settings, Security Settings, Local Policies, User Rights Assignment (Экран 2).
С помощью утилиты NTRights можно предоставлять и отменять пользовательские права Windows (как права регистрации, так и привилегии) для пользователей и групп на локальном или удаленном компьютере. Например, чтобы предоставить учетной записи ServiceAccount1 право Logon as a service на компьютере MyComputer, следует выполнить следующую команду:
Ntrights +r SeServiceLogonRight
 -u ServiceAccount1 -m MyComputer
Отменить право Access this computer from the network для группы Authenticated Users можно с помощью команды
Ntrights -r SeNetworkLogonRight -u Everyone
С помощью утилиты ShowPriv можно вывести на экран пользователей и группы, которым назначено конкретное пользовательское право только в локальной системе. Например, чтобы отыскать пользователей и группы, которые имеют право регистрации Log on locally в данной системе, следует выполнить команду
Showpriv SeInteractiveLogonRight
Оптимальные процедуры
Для удобства управления доступом, в Windows реализована концепция групп. Вместо того, чтобы назначать разрешения и права многим отдельным пользователям, гораздо проще организовать пользователей в группы, а затем назначить разрешения и права группам. При этом упрощается также управление правами регистрации.
Еще один эффективный прием — назначать пользовательские права доменным, а не локальным учетным записям. С помощью локальной учетной записи пользователь может обойти централизованную политику безопасности, применяемую на уровне домена Windows. Как отмечалось в статье «Все дело в доверии», следует всегда стараться использовать домены Windows, независимо от размера сети.
Кроме того, полезно при любой возможности назначать служебным учетным записям права Deny logon locally, Deny access to this computer from the network и Deny logon through Terminal Services. Всегда следует руководствоваться принципом минимальных достаточных привилегий. В контексте прав регистрации, это значит, что служебной учетной записи нужно назначать только права регистрации, необходимые для работы.
Может оказаться, что стандартные права регистрации, перечисленные в таблице 1, недостаточно строги. Чтобы блокировать назначенные права регистрации, рекомендуется принять следующие меры:
- Отменить право Log on locally для групп Users, Power Users и Guest на серверах, членах доменов.
- Отменить право Access this computer from the network для группы Authenticated Users на отдельных серверах и контроллерах доменов.
Права регистрации и журналы событий
В журнале событий Windows перечислены события аудита регистрации, которые относятся к рассмотренным правам регистрации. Просматривать события аудита полезно при диагностике проблем с аутентификацией Windows. Для генерации событий аудита регистрации, следует активизировать режим Audit account logon events (как успешных, так и неудачных) в политике аудита автономной системы или домена.
Наибольший интерес для администратора представляет поле Logon Type. На Экране 3 показано событие регистрации с ID 540, которое свидетельствует об удачной регистрации. В поле Description можно увидеть поле Logon Type, содержащее значение 3, которое указывает, что успешный вход был произведен с помощью сетевой регистрации. Поле Logon Type содержать значения 2 (интерактивный вход), 3 (сетевой вход) 4 (пакетный вход) или 5 (регистрация службы). Самые часто встречающиеся значения Logon Type — 2 и 3. Logon Type 2 в журналах Event Viewer показывает, что кто-то интерактивно зарегистрировался в системе. Logon Type 3 означает, что кто-то пытался обратиться к ресурсам компьютера по сети. Logon Type 4 показывает, что служба Task Scheduler запускает сценарий или программу в пакетном режиме. Logon Type 5 означает, что была запущена служба Windows от имени конкретной пользовательской учетной записи.
Мощный инструмент управления доступом
Права регистрации Windows — важный компонент безопасности Windows. Наряду с привилегиями пользователей, они обеспечивают мощный метод управления пользовтельским доступом к системам Windows. Описанные в данной статье методы назначения прав регистрации и использования журнала событий для идентификации неполадок обеспечивают надежно защищенный доступ к системам Windows.
Экран 1. Использование инструмента Local Security Policy для назначения прав регистрации.
Экран 2. Использование оснастки Group Policy Object для назначения прав регистрации.
Экран 3. Событие аудита для для успешного входа.
Жан де Клерк (jan.declercq@hp.com) — член Security Office компании HP. Специализируется на управлении идентификационными параметрами и безопасности в продуктах Microsoft. Он автор книги Windows Server 2003 Security Infrastructures (издательство Digital Press).