Многие пользователи сталкиваются с проблемой установкой Windows 10 на компьютер или ноутбук, когда SSD диск распознается в BIOS, но не загружается с него. В большинстве случаев, пользователи не правильно создают установочную флешку при помощи различных программ или стандартной утилиты от Microsoft.
Дело в том, если у вас диск размечен под MBR, то нужно создать и установочную флешку с MBR, а не GPT таблицей. Программа Rusuf отлично подойдет для этого. Это главный момент, прежде чем приступить к проблеме, когда диск в БИОС виден, но ПК не загружается с него.
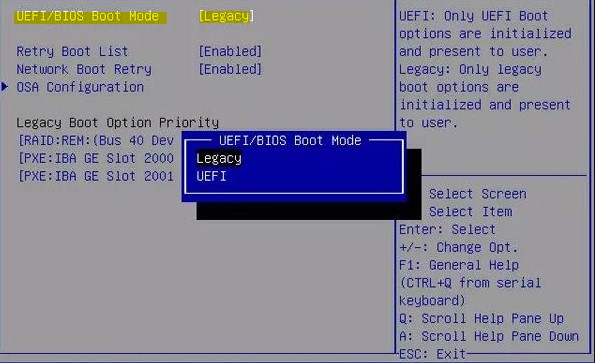
1. Изменить загрузку BIOS
Как правило, новые компьютеры и ноутбуки имеют комбинированный режим загрузки с устройства: Legacy и UEFI. Старые ПК, имеют одиночный режим, только Legacy или только UEFI. И когда пользователь создает установочную флешку под Legacy, а в BIOS установлено значение UEFI, то диск или флешка не будут читаться.
- Зайдите в параметры BIOS, нажать F2 или DEL при включении ПК, и перейдите в графу BOOT.
- Найдите UEFI/BIOS Boot Mode и выберите Legacy.
- Нажмите F10, чтобы сохранить изменения в BIOS и перезагрузитесь.
ВАЖНО: Так как материнские платы у всех разные, воспользуйтесь Google картинками, чтобы найти как правильно называется параметр для включения Legacy. Это может быть «Boot List Option», вместо «UEFI/BIOS Boot Mode», или «Параметры загрузочных устройств».
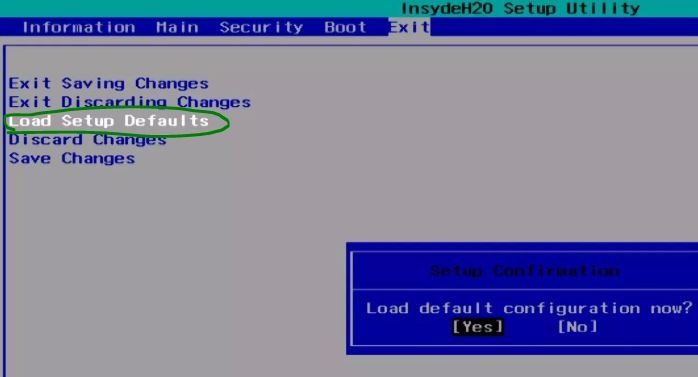
2. Сброс BIOS по умолчанию
В параметрах BIOS найдите пункт Load Setup Default, чтобы сбросить BIOS по умолчанию к заводским настройкам. Параметр Load Setup Default обычно находиться на вкладке EXIT в большинстве разновидностей BIOS.
Смотрите еще:
- Загрузочная флешка для установки windows 7/8.1/10
- Как войти в BIOS и выбрать первым загрузочный USB Flash или DVD
- Сбросить пароль BIOS на ноутбуке
- Как обновить БИОС или UEFI BIOS материнской платы
- Как включить режим AHCI в BIOS для ПК Windows 10
[ Telegram | Поддержать ]
After upgrading to a new SSD, you may encounter SSD won’t boot issue. Or due to some reasons, you may come across SSD not booting issue. This article will show you 5 ways to fix SSD won’t boot issue.
When Windows won’t boot from SSD Windows 10, you may wonder: how this problem occurs? what are the reasons? Generally, there are some causes that will lead to SSD not booting. The below has list the most possible reasons to SSD won’t boot issue. Let’s check them out.
Reasons for SSD Won’t Boot
Here are some reasons for SSD not booting. Knowing the reasons, you can always find a solution for your SSD not booting.
- SSD not booting after cloned from HDD
- The SSD was not the first boot device
- The system partition is not active
- The file system of C drive may become corrupt or damaged.
- The System files are damaged
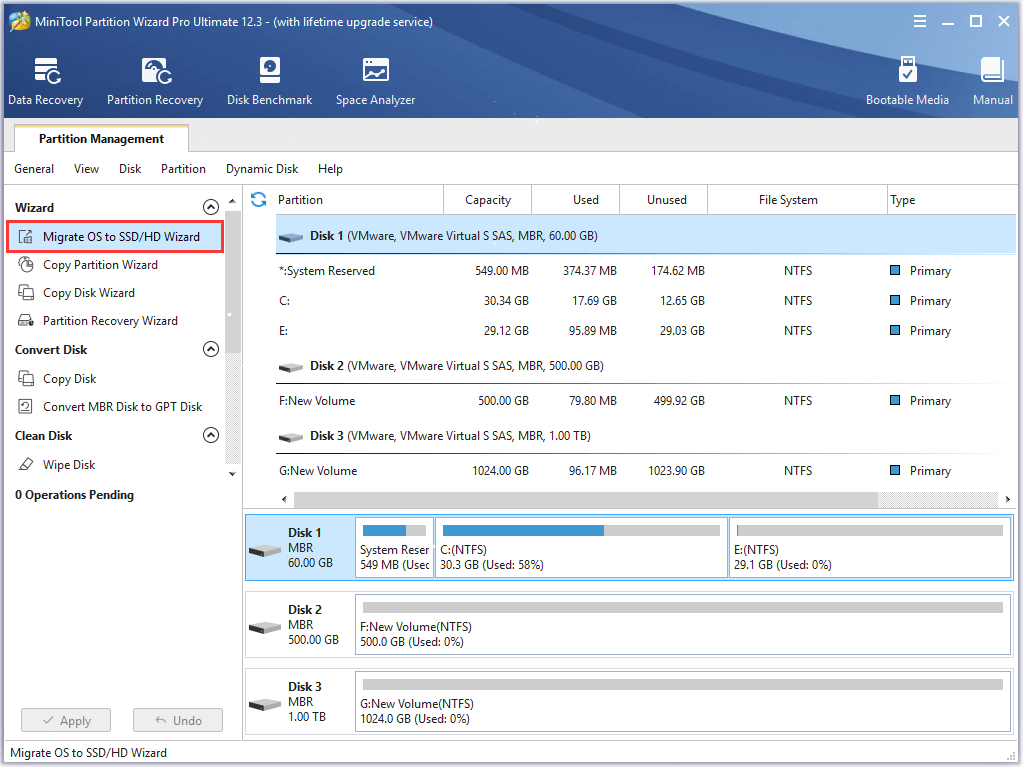
Solution 1. Migrate System Disk with Professional Software if Cloned SSD Won’t Boot
If your cloned SSD won’t boot Windows 10, you can try using MiniTool Partition Wizard Pro Ultimate to migrate OS to SSD, which is a professional system disk migration tool.
As a professional system migration tool, MiniTool Partition Wizard will not only copy all the data on system disk to your SSD, but also it will automatically fix and update the boot information and parameters, which puts an end to SSD not booting issues’ occurrence.
Besides, MiniTool Partition Wizard is an all-in-one partition manager, which enables you to manage SSD partitions in a flexible way. It’s features like align all partitions (for SSD alignment), convert MBR to GPT are very useful for SSD users.
Next, let’s see how to migrate Windows 10 to SSD with MiniTool Partition Wizard.
Step 1. Get MiniTool Partition Wizard by clicking the following button. Install it on your computer to open the main interface.
Buy Now
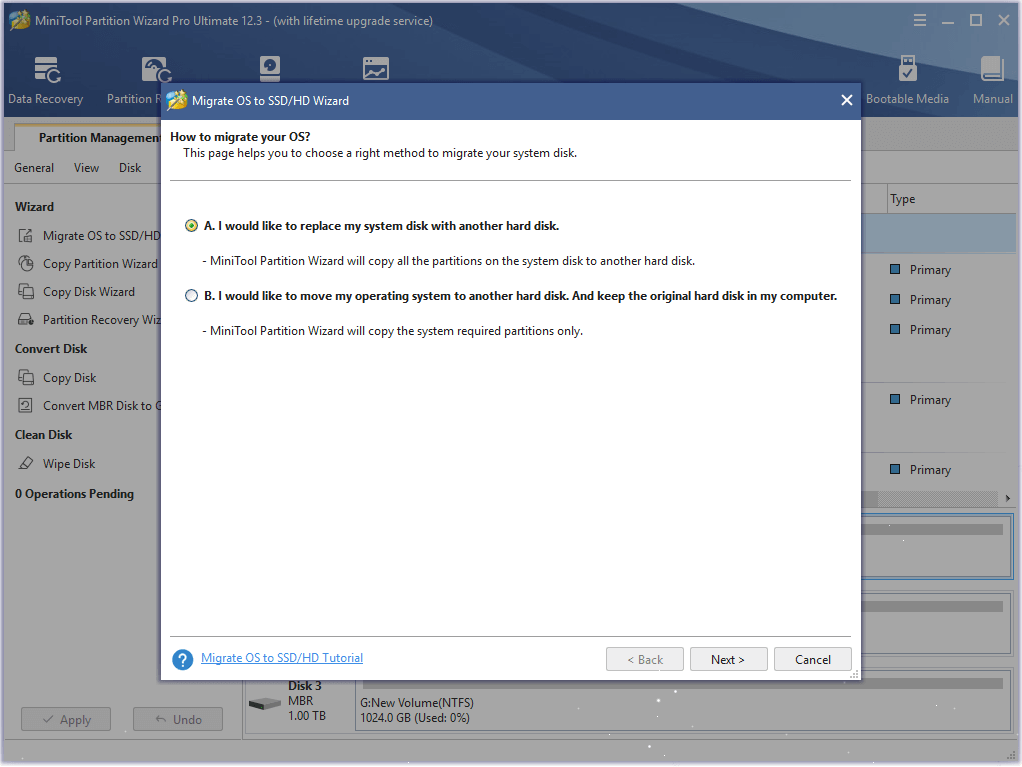
Step 2. Choose the function Migrate OS to SSD/HD Wizard from the left panel.
Step 3. Here are two ways for you to migrate. You can choose to migrate OS only or migrate the whole system disk, and then click Next button to continue. Here I choose to migrate the whole disk.
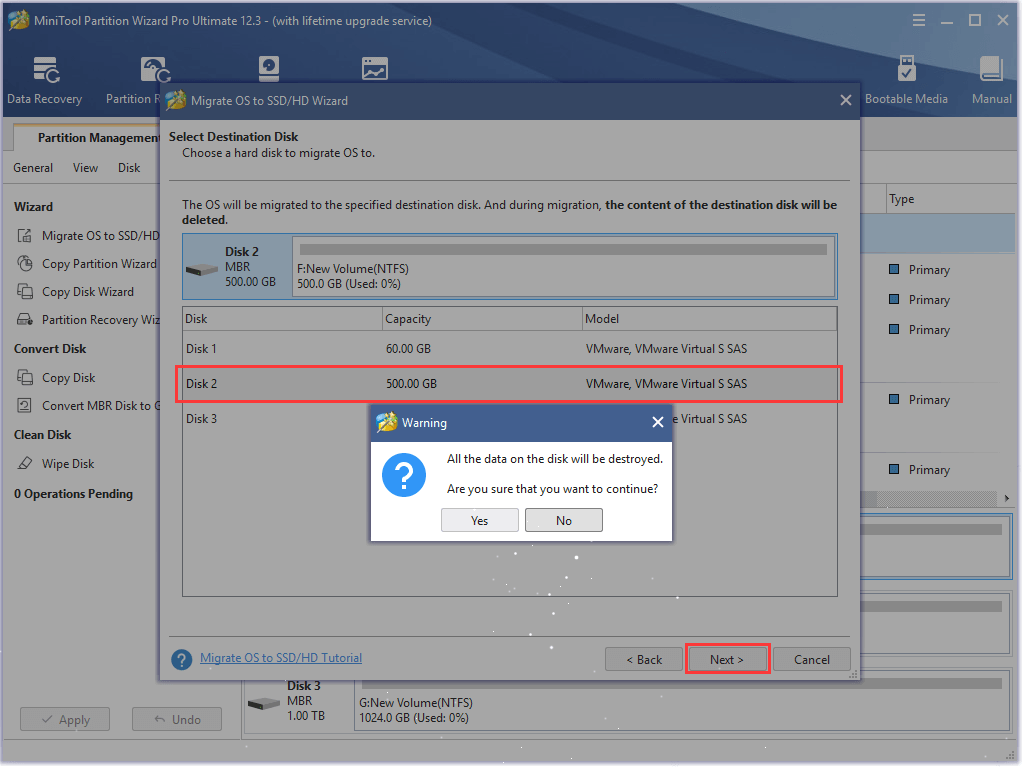
Step 4. Select the destination SSD disk to migrate OS to and click Next. Be aware that the target disk will get overwritten, so a backup in advance might be necessary.
Step 5. Here you are able to edit partition size and location of every partition on the SSD. After you set up everything, click Next.
Note: There is an option “Align partitions to 1MB” which is checked by default. With it checked, all partitions on SSD will be aligned automatically so that performance can be improved largely.

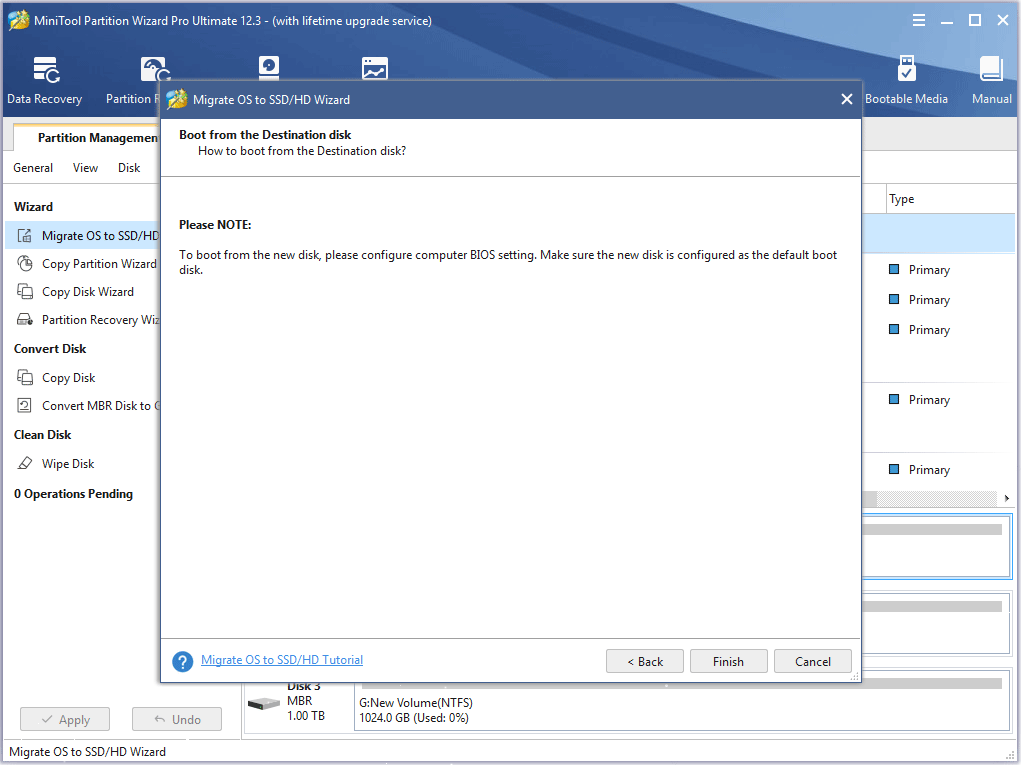
Step 6. This page will tell you how to boot from the SSD. You need to enter BIOS to set the SSD as the first boot device and click Finish to go back to the main interface.
Step 7. Click Apply button on the upper left corner to allow the pending operations.
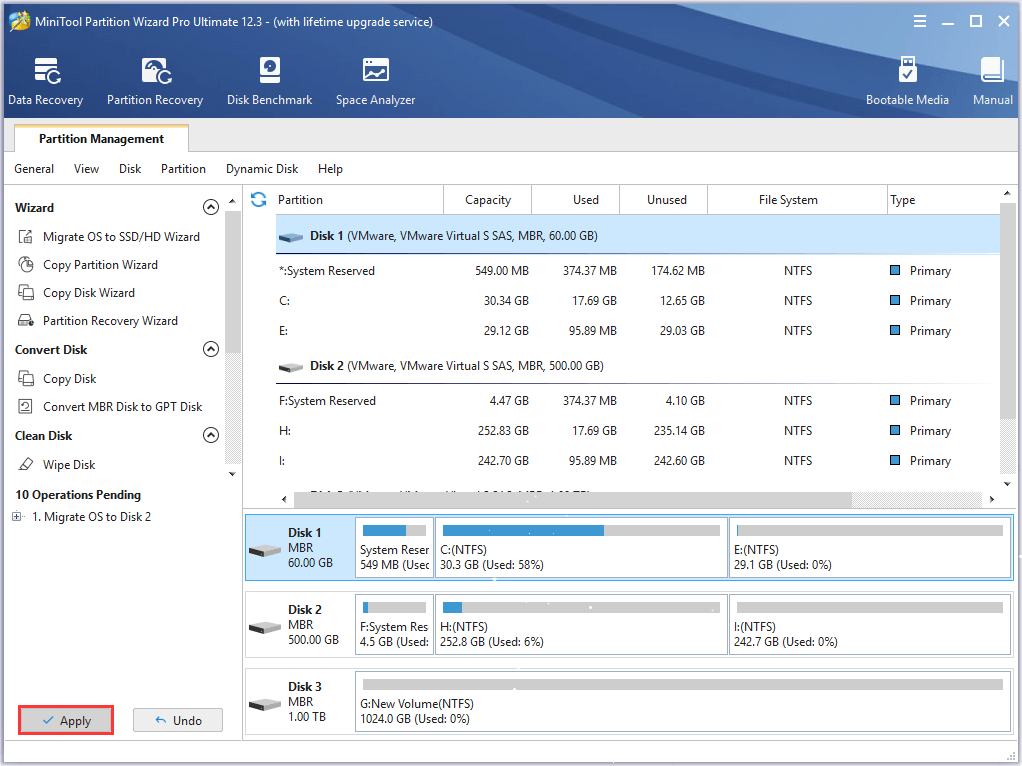
After clicking Apply, MiniTool Partition Wizard will ask for a restart, which is to protect system and data. You just need to click Restart Now, and then all changes will be made in boot mode.
Solution 2. Set BIOS Boot Order to give the SSD Boot Priority
SSD should be recognized as the primary boot device, in this case your computer can boot from SSD successfully. If not, you need to change BIOS boot order manually. Follow the steps as below to change BIOS boot order.
Step 1. Restart your PC. Continuously press a specific key (the key to enter BIOS can be different due to different computer manufactures but usually they are F2, F8, F12, Del) to enter BIOS Setup.
Step 2. Then, use the arrow keys to select Boot Option. Then select the new SSD as the new boot drive and save all the changes.
Step 3. Exit BIOS and restart your computer. Then you can check if SSD failed to boot issue has resolved or not.
Note: If you cloned the MBR HDD to GPT SSD, it is necessary to change boot mode from Legacy to UEFI. The wrong boot mode will cause the SSD won’t boot after clone.
Solution 3. Rebuild MBR for the SSD
If MBR is damaged, the system cannot be booted. In this situation, you can rebuild MBR with a reliable and professional partition magic like MiniTool Partition Wizard Pro Ultimate.
MiniTool Partition Wizard Pro Ultimate is a professional partition manager, which possesses many advanced feature compare with MiniTool Partition Wizard Free Edition. It can help you perform many advanced operations like change cluster size, recover lost partition, convert NTFS to FAT without data loss, convert dynamic disk to basic, etc.
Besides, it can resolve a lot of boot issues like Windows 10 blue screen of death. With its user-friendly interface and comprehensive functions, most users rate it as the most powerful and good-to-use partition manager.
When SSD won’t boot, you can use MiniTool Partition Wizard Bootable Edition to rebuild MBR.
Note: MiniTool Partition Wizard Bootable Edition is created by Bootable Media feature, which offers an ISO file for users to burn it to CD, DVD, or USB flash disk so as to make a bootable media.
Step 1. Get MiniTool Partition Wizard Pro Ultimate by clicking the following button. Install it on a normal computer and launch it.
Buy Now
Step 2. At the main interface, click the Bootable Media on the upper toolbar to launch Bootable Media Builder.
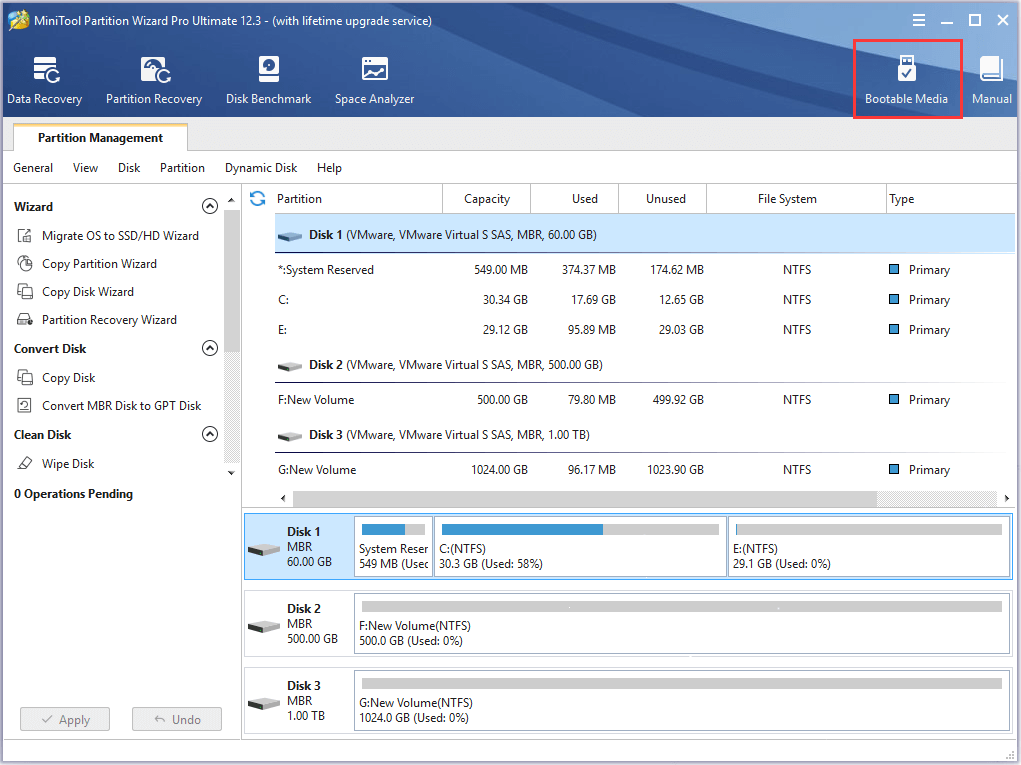
Step 3. Select WinPE-based media with MiniTool plug-in to continue.

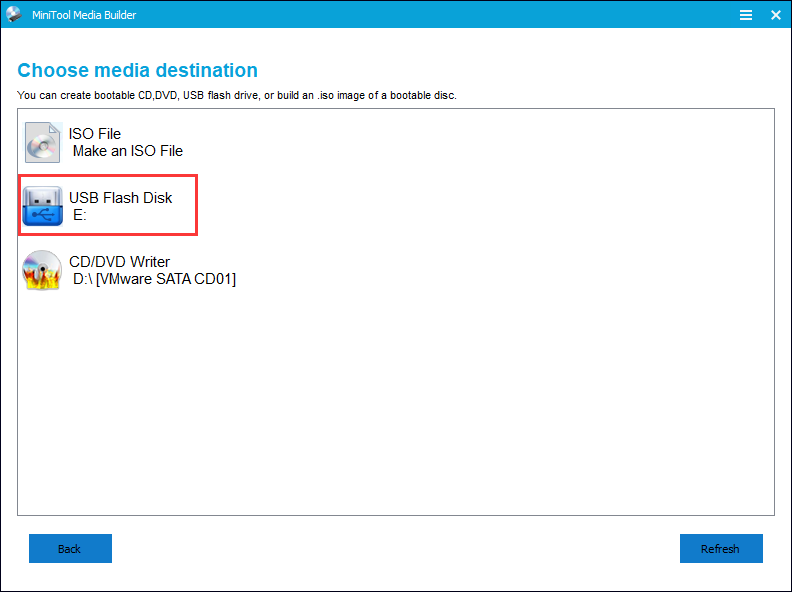
Step 4. If you are using a USB flash drive, choose USB Flash Disk. If you are using other devices like CD/DVD, you can choose CD/DVD writer. Here I use a USB drive for demonstration.
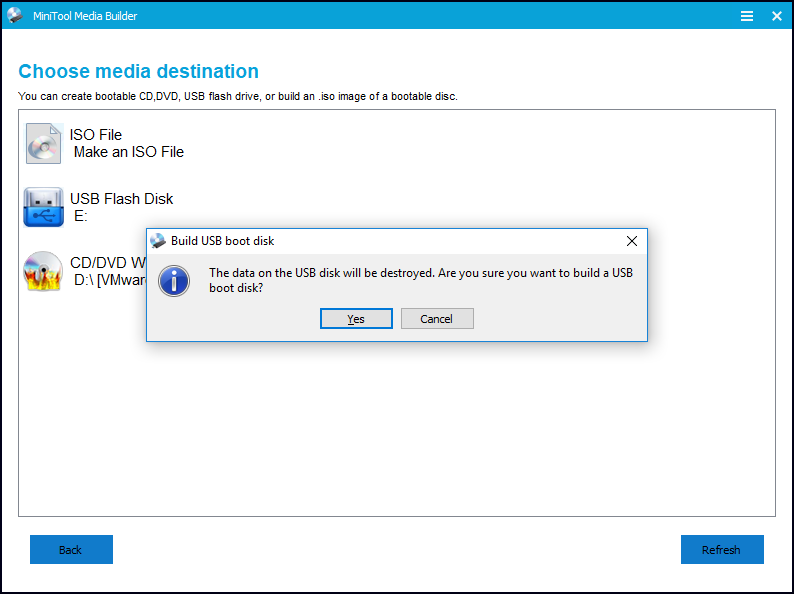
Step 5. Make sure there is no important files in the USB drive as the USB drive will be formatted to build a USB boot disk. Then click Yes to continue.
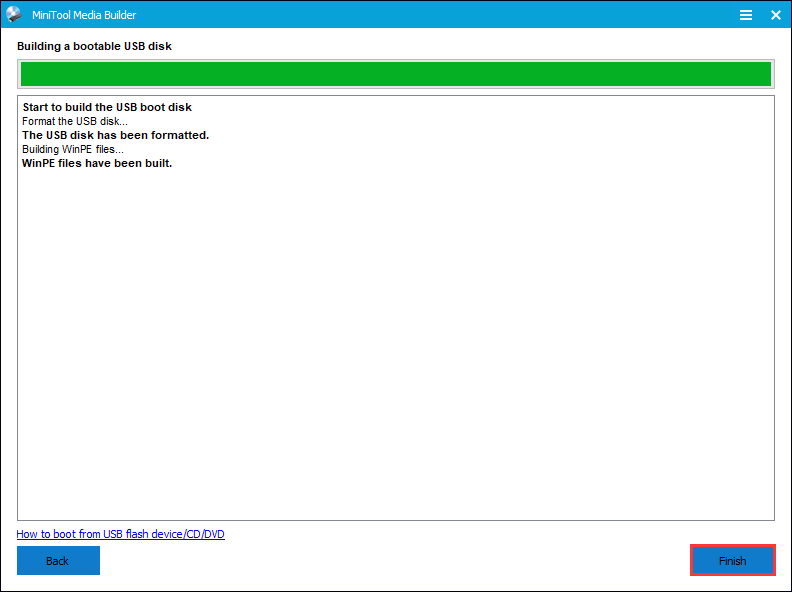
Step 6. Click Finish after it burns successfully.
Step 7. Insert the bootable USB or CD/DVD on your computer that SSD won’t boot. When you boot your computer successfully, you will receive the following page. MiniTool Partition Wizard will launch automatically.
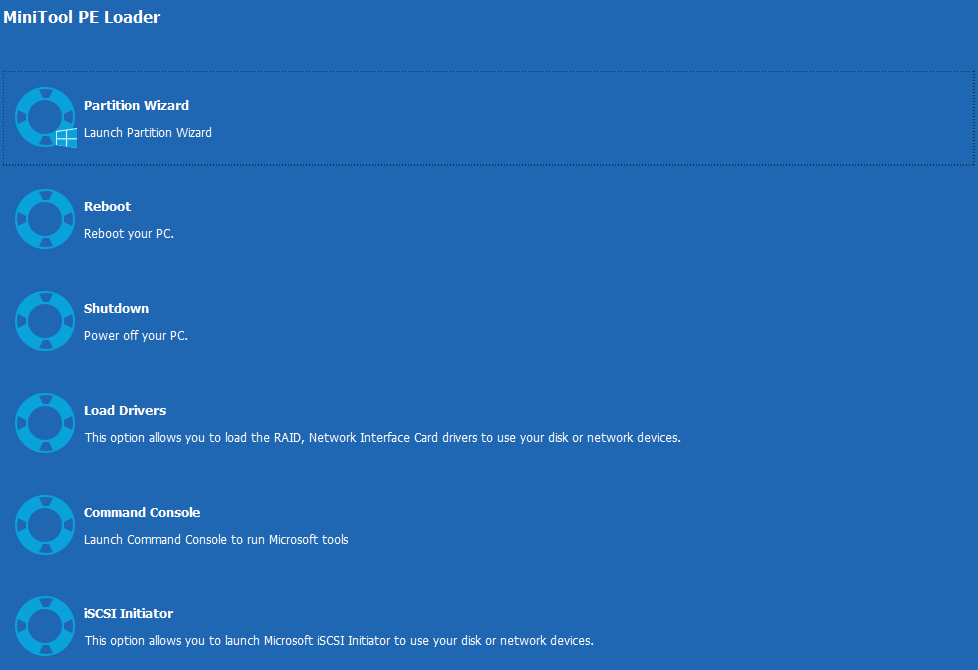
Step 8. When you get the main interface of MiniTool Partition Wizard Bootable Edition, you need to select the SSD and choose Rebuild MBR feature from the left action panel.
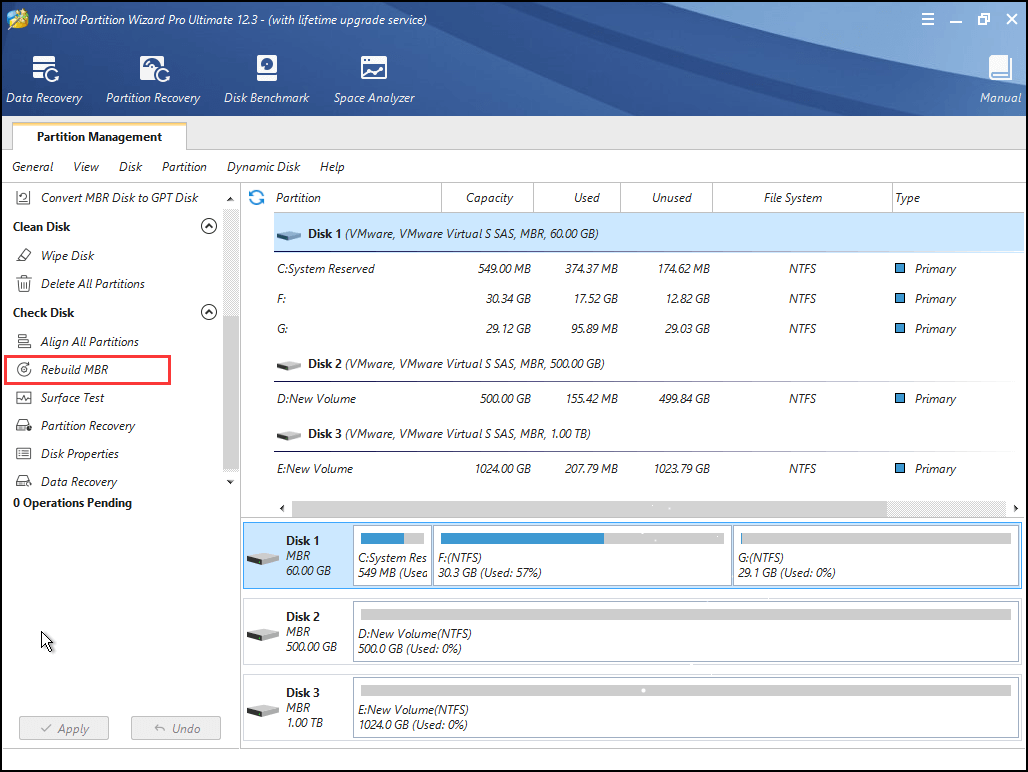
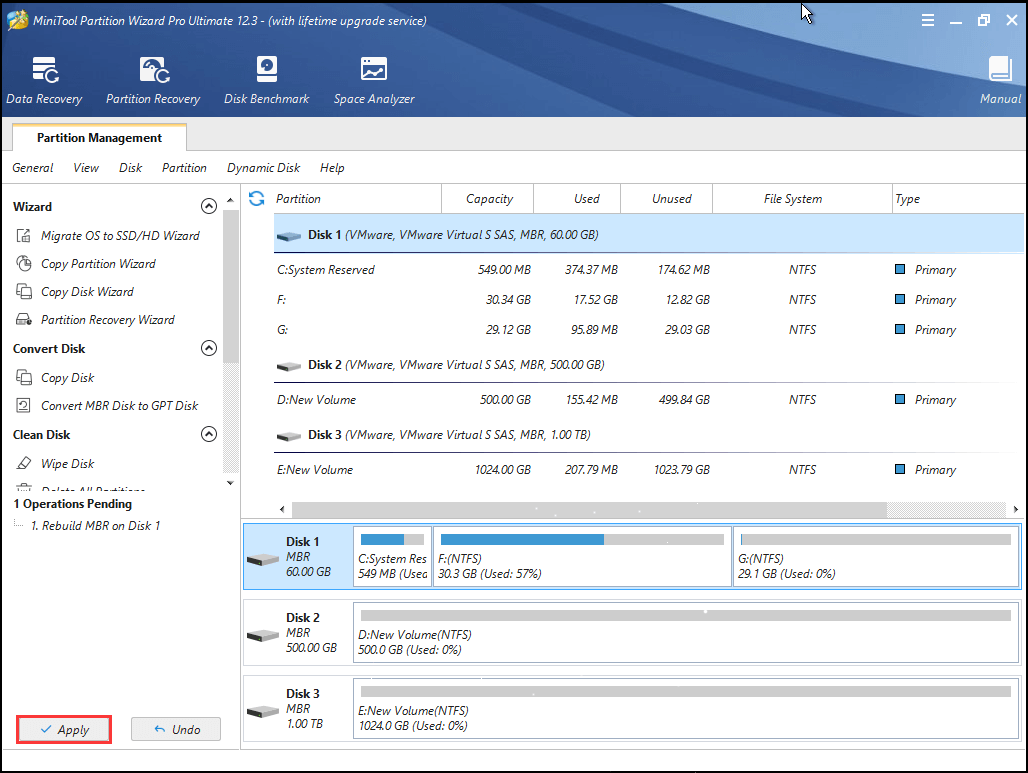
Step 9. At last, click Apply button on the top left corner to apply the change.
Once it is completed, you can take out the boot disc or USB flash drive and restart the computer. If the SSD still won’t boot, you can try the next method.
Solution 4. Set SSD Partition Active
If you didn’t set the right partition as active, you are unable to boot SSD successfully. How to set the right SSD drive active? Follow the steps as below, and then you will find it is very simple.
Step 1. Follow step 1 to step 7 in Solution 3 to launch MiniTool Partition Wizard Bootable Edition.
Buy Now
Step 2. When you get the main interface of MiniTool Partition Wizard Bootable Edition, then select the system partition (You may check the status to see which partition needs to be set active.) and click on Set Active.
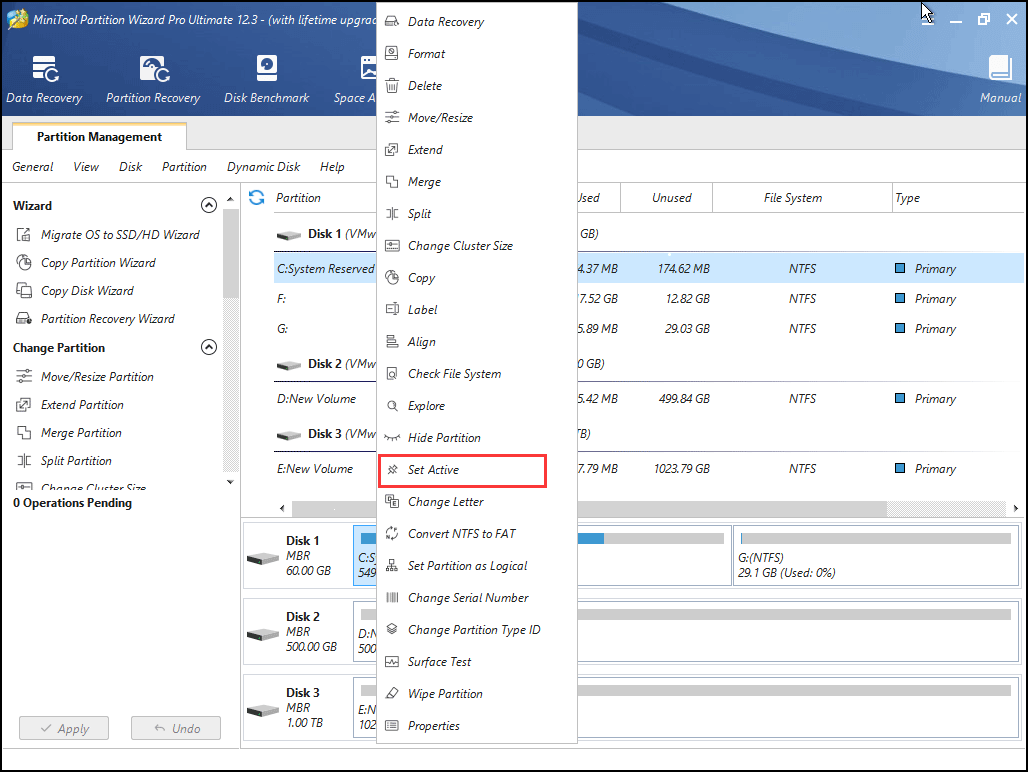
Note: In MiniTool Partition Wizard Bootable Edition, all partitions including the system reserved partition and EFI system partition will be given a drive letter, so a partition’s drive letter can be changed, for example, the original boot partition’s drive letter may not be C. In this case, you can explore partition to see if it is the partition you want to manage.
Step 3. Click on Apply button to allow the change.
Finally, restart your computer and then check if your computer can boot up successfully.
Solution 5. Check and Fix the Boot Partition’s File System Error
Step 1. Follow step 1 to step 7 in Solution 3 to launch MiniTool Partition Wizard Bootable Edition.
Buy Now
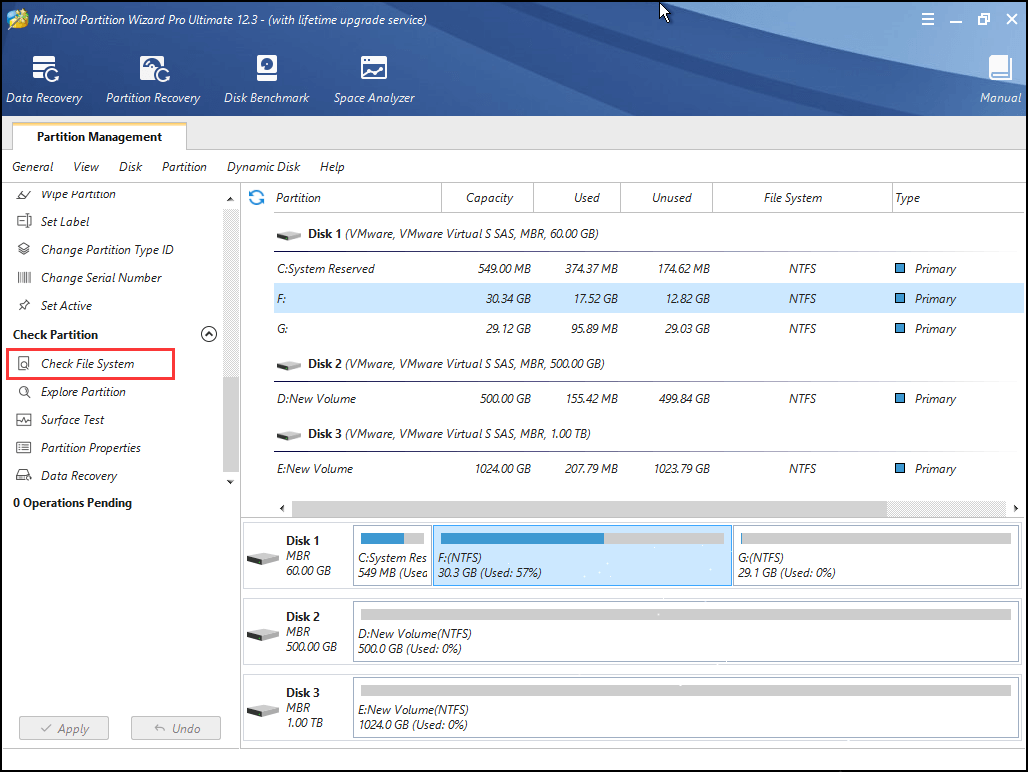
Step 2. After that, select the boot partition and choose Check File System.
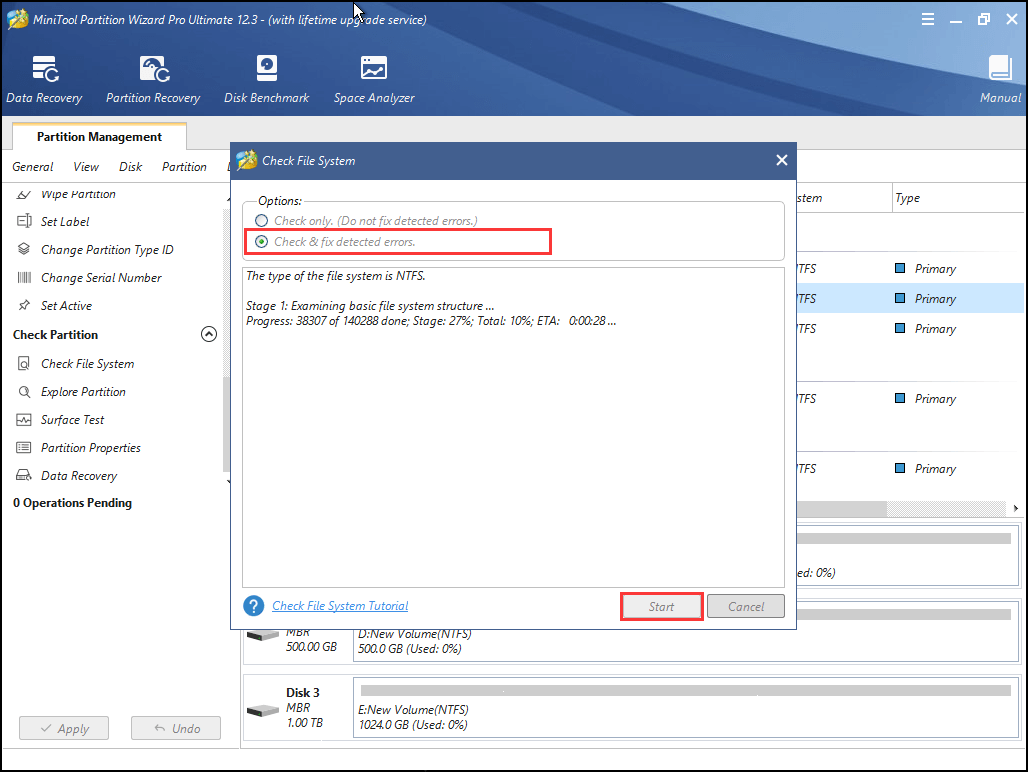
Step 3. To recover mistakes during the checking process, you should select Check & fix detected errors. After that, click Start button. Then MiniTool Partition Wizard will check/fix the file system error for you
After that, you can restart your computer and see if this method works.
Solution 6. Reinstall Window 10 on the New SSD
If none of these methods work, you’d back up important files on the SSD and reinstall Windows 10 by yourself. You can follow the steps as below to go ahead.
Step 1. Create a Windows 10 installation disc or USB flash drive with Windows 10 Media Creation Tool.
Step 2. Insert Windows 10 installation disc or USB flash drive to your computer that SSD won’t boot.
Step 3. Change the BIOS boot sequence to boot from the disc or USB drive.
Step 4. Select your language preference and click Next.
Step 4. Click Install now.
Step 5. Follow the on-screen instructions to let it install. See: How to Install Windows 10 on a New Hard Drive (with Pictures)
The installation process will start and your PC will reboot. When it’s finished, you just need to log in with your account.
After trying a few methods in this post, I successfully fixed SSD won’t boot Windows 10 issue. I would like to share this post with more friends whose Windows won’t boot from SSD.Click to Tweet
To Sum Up
After reading this post, have you learned how to fix it when SSD won’t boot? Now try these methods to fix SSD not booting issue!
If your SSD won’t boot, you can try the methods in this post to fix SSD boot failure. If you have any question about SSD won’t boot Windows 10 or you have other good solutions, you can leave a message in the following comment zone and we will reply as soon as possible. If you need any help when using MiniTool software, you can contact us via [email protected].
After upgrading to a new SSD, you may encounter SSD won’t boot issue. Or due to some reasons, you may come across SSD not booting issue. This article will show you 5 ways to fix SSD won’t boot issue.
When Windows won’t boot from SSD Windows 10, you may wonder: how this problem occurs? what are the reasons? Generally, there are some causes that will lead to SSD not booting. The below has list the most possible reasons to SSD won’t boot issue. Let’s check them out.
Reasons for SSD Won’t Boot
Here are some reasons for SSD not booting. Knowing the reasons, you can always find a solution for your SSD not booting.
- SSD not booting after cloned from HDD
- The SSD was not the first boot device
- The system partition is not active
- The file system of C drive may become corrupt or damaged.
- The System files are damaged
Solution 1. Migrate System Disk with Professional Software if Cloned SSD Won’t Boot
If your cloned SSD won’t boot Windows 10, you can try using MiniTool Partition Wizard Pro Ultimate to migrate OS to SSD, which is a professional system disk migration tool.
As a professional system migration tool, MiniTool Partition Wizard will not only copy all the data on system disk to your SSD, but also it will automatically fix and update the boot information and parameters, which puts an end to SSD not booting issues’ occurrence.
Besides, MiniTool Partition Wizard is an all-in-one partition manager, which enables you to manage SSD partitions in a flexible way. It’s features like align all partitions (for SSD alignment), convert MBR to GPT are very useful for SSD users.
Next, let’s see how to migrate Windows 10 to SSD with MiniTool Partition Wizard.
Step 1. Get MiniTool Partition Wizard by clicking the following button. Install it on your computer to open the main interface.
Buy Now
Step 2. Choose the function Migrate OS to SSD/HD Wizard from the left panel.
Step 3. Here are two ways for you to migrate. You can choose to migrate OS only or migrate the whole system disk, and then click Next button to continue. Here I choose to migrate the whole disk.
Step 4. Select the destination SSD disk to migrate OS to and click Next. Be aware that the target disk will get overwritten, so a backup in advance might be necessary.
Step 5. Here you are able to edit partition size and location of every partition on the SSD. After you set up everything, click Next.
Note: There is an option “Align partitions to 1MB” which is checked by default. With it checked, all partitions on SSD will be aligned automatically so that performance can be improved largely.
Step 6. This page will tell you how to boot from the SSD. You need to enter BIOS to set the SSD as the first boot device and click Finish to go back to the main interface.
Step 7. Click Apply button on the upper left corner to allow the pending operations.
After clicking Apply, MiniTool Partition Wizard will ask for a restart, which is to protect system and data. You just need to click Restart Now, and then all changes will be made in boot mode.
Solution 2. Set BIOS Boot Order to give the SSD Boot Priority
SSD should be recognized as the primary boot device, in this case your computer can boot from SSD successfully. If not, you need to change BIOS boot order manually. Follow the steps as below to change BIOS boot order.
Step 1. Restart your PC. Continuously press a specific key (the key to enter BIOS can be different due to different computer manufactures but usually they are F2, F8, F12, Del) to enter BIOS Setup.
Step 2. Then, use the arrow keys to select Boot Option. Then select the new SSD as the new boot drive and save all the changes.
Step 3. Exit BIOS and restart your computer. Then you can check if SSD failed to boot issue has resolved or not.
Note: If you cloned the MBR HDD to GPT SSD, it is necessary to change boot mode from Legacy to UEFI. The wrong boot mode will cause the SSD won’t boot after clone.
Solution 3. Rebuild MBR for the SSD
If MBR is damaged, the system cannot be booted. In this situation, you can rebuild MBR with a reliable and professional partition magic like MiniTool Partition Wizard Pro Ultimate.
MiniTool Partition Wizard Pro Ultimate is a professional partition manager, which possesses many advanced feature compare with MiniTool Partition Wizard Free Edition. It can help you perform many advanced operations like change cluster size, recover lost partition, convert NTFS to FAT without data loss, convert dynamic disk to basic, etc.
Besides, it can resolve a lot of boot issues like Windows 10 blue screen of death. With its user-friendly interface and comprehensive functions, most users rate it as the most powerful and good-to-use partition manager.
When SSD won’t boot, you can use MiniTool Partition Wizard Bootable Edition to rebuild MBR.
Note: MiniTool Partition Wizard Bootable Edition is created by Bootable Media feature, which offers an ISO file for users to burn it to CD, DVD, or USB flash disk so as to make a bootable media.
Step 1. Get MiniTool Partition Wizard Pro Ultimate by clicking the following button. Install it on a normal computer and launch it.
Buy Now
Step 2. At the main interface, click the Bootable Media on the upper toolbar to launch Bootable Media Builder.
Step 3. Select WinPE-based media with MiniTool plug-in to continue.
Step 4. If you are using a USB flash drive, choose USB Flash Disk. If you are using other devices like CD/DVD, you can choose CD/DVD writer. Here I use a USB drive for demonstration.
Step 5. Make sure there is no important files in the USB drive as the USB drive will be formatted to build a USB boot disk. Then click Yes to continue.
Step 6. Click Finish after it burns successfully.
Step 7. Insert the bootable USB or CD/DVD on your computer that SSD won’t boot. When you boot your computer successfully, you will receive the following page. MiniTool Partition Wizard will launch automatically.
Step 8. When you get the main interface of MiniTool Partition Wizard Bootable Edition, you need to select the SSD and choose Rebuild MBR feature from the left action panel.
Step 9. At last, click Apply button on the top left corner to apply the change.
Once it is completed, you can take out the boot disc or USB flash drive and restart the computer. If the SSD still won’t boot, you can try the next method.
Solution 4. Set SSD Partition Active
If you didn’t set the right partition as active, you are unable to boot SSD successfully. How to set the right SSD drive active? Follow the steps as below, and then you will find it is very simple.
Step 1. Follow step 1 to step 7 in Solution 3 to launch MiniTool Partition Wizard Bootable Edition.
Buy Now
Step 2. When you get the main interface of MiniTool Partition Wizard Bootable Edition, then select the system partition (You may check the status to see which partition needs to be set active.) and click on Set Active.
Note: In MiniTool Partition Wizard Bootable Edition, all partitions including the system reserved partition and EFI system partition will be given a drive letter, so a partition’s drive letter can be changed, for example, the original boot partition’s drive letter may not be C. In this case, you can explore partition to see if it is the partition you want to manage.
Step 3. Click on Apply button to allow the change.
Finally, restart your computer and then check if your computer can boot up successfully.
Solution 5. Check and Fix the Boot Partition’s File System Error
Step 1. Follow step 1 to step 7 in Solution 3 to launch MiniTool Partition Wizard Bootable Edition.
Buy Now
Step 2. After that, select the boot partition and choose Check File System.
Step 3. To recover mistakes during the checking process, you should select Check & fix detected errors. After that, click Start button. Then MiniTool Partition Wizard will check/fix the file system error for you
After that, you can restart your computer and see if this method works.
Solution 6. Reinstall Window 10 on the New SSD
If none of these methods work, you’d back up important files on the SSD and reinstall Windows 10 by yourself. You can follow the steps as below to go ahead.
Step 1. Create a Windows 10 installation disc or USB flash drive with Windows 10 Media Creation Tool.
Step 2. Insert Windows 10 installation disc or USB flash drive to your computer that SSD won’t boot.
Step 3. Change the BIOS boot sequence to boot from the disc or USB drive.
Step 4. Select your language preference and click Next.
Step 4. Click Install now.
Step 5. Follow the on-screen instructions to let it install. See: How to Install Windows 10 on a New Hard Drive (with Pictures)
The installation process will start and your PC will reboot. When it’s finished, you just need to log in with your account.
After trying a few methods in this post, I successfully fixed SSD won’t boot Windows 10 issue. I would like to share this post with more friends whose Windows won’t boot from SSD.Click to Tweet
To Sum Up
After reading this post, have you learned how to fix it when SSD won’t boot? Now try these methods to fix SSD not booting issue!
If your SSD won’t boot, you can try the methods in this post to fix SSD boot failure. If you have any question about SSD won’t boot Windows 10 or you have other good solutions, you can leave a message in the following comment zone and we will reply as soon as possible. If you need any help when using MiniTool software, you can contact us via [email protected].

Всем доброго времени суток! Есть ноут Acer 7551g, далеко не новый (2010 года), но потихоньку живёт. Купил SSD, собрал переходник на dvd-sata (подключил sata параллельно и запитал +5В)Беда такая: с одним ЖД ноут работает как надо, через переходник тоже всё хорошо, но если подключить второй диск, то комп начинает грузится, проходит инициализацию оборудования и потом выскакивает командная строка (просто мигающая, ни на что не реагирующая чёрточка). Все харды в биосе определяются нормально, но запускаться почему-то не хотят (и насПать ему на приоритет загрузки). Не грузит при двух венчиках и вставленной загрузочной флешке (решил проверить ради интереса). Вопрос понятен, но на всякий случай напишу: что надо сделать, чтобы запустилась система с двумя ЖД?
Добавлено через 12 часов 57 минут
Еще такое наблюдение: если подключить WDC на 1 ТБ и любой другой ЖД, то не запускается (вернее может запуститься с 100500 попытки), такая же ситуация и с SSD. НО если поставить старенький WDC на 500 (почти убитый), и Fujitsu на 120 Гб 2007 года выпуска, то всё нормально запускается.
Есть небольшое предположение, что не хватает питания, так как SSD по паспорту требует 5В и 1А, а последних два 0,60 А и 0.55 А соответственно. Может это тут и не причём, но в чём дело я так и не знаю
__________________
Помощь в написании контрольных, курсовых и дипломных работ, диссертаций здесь
На чтение 5 мин. Просмотров 33.2k. Опубликовано 03.09.2019
Если на вашем компьютере есть как жесткий диск, так и твердотельный накопитель, иногда вы можете столкнуться с ситуацией, когда ваш ПК выбирает загрузочный жесткий диск вместо SSD при каждом запуске. Как ни странно, проблема возникает, даже если вы успешно установили SSD и настроили систему для загрузки с SSD.
Итак, почему это так и как вы можете исправить это досадное неудобство на компьютерах с Windows? Начнем с ответа на вопрос, почему возникает эта проблема.
Содержание
- Возможные причины, почему ваш компьютер запускает загрузку с жесткого диска вместо SSD
- Как загружаться с SSD вместо HDD Windows 10
- 1. Подключите SSD с помощью кабеля SATA
- 2. Исправьте порядок загрузки (BIOS)
- 3. Включить режим AHCI
- 4. Выполните чистую установку Windows.
Возможные причины, почему ваш компьютер запускает загрузку с жесткого диска вместо SSD
Множество причин могут заставить вашу машину устанавливать приоритеты загрузки с жесткого диска, а не начинать с SSD.
- Ошибка диска . Внутренние ошибки вашего SSD обычно блокируют попытки загрузки SSD.
- Проблемы с Windows . Возможно, на вашем компьютере возникают проблемы с чтением установки Windows.
- Проблемы с обновлением . Если вы недавно обновили операционную систему, один из файлов системного обновления может мешать обычной загрузке с SSD.
- Ошибка, связанная с клонированием . В других случаях клонированные твердотельные накопители просто отказываются загружаться в зависимости от настроек.
- Неверный порядок загрузки . Ваш компьютер не будет загружаться, если в вашем порядке загрузки сначала не указан SSD. Кроме того, если не активировать другие необходимые настройки BIOS, ваш ноутбук будет вести себя странно.
- Аппаратная проблема . На материнской плате может возникнуть серьезная проблема, связанная с получением загрузочных данных с SSD.
Как загружаться с SSD вместо HDD Windows 10
- Подключите SSD с помощью кабеля SATA
- Исправьте порядок загрузки (BIOS)
- Включить режим AHCI
- Выполните чистую установку Windows .
1. Подключите SSD с помощью кабеля SATA
Дополнительные диски SSD не загружаются без проблем при подключении через USB-кабель. И поэтому, если вы использовали кабель USB для подключения SSD к материнской плате, замените его кабелем данных SATA и посмотрите, изменится ли ситуация.
- ТАКЖЕ ПРОЧИТАЙТЕ . Эти решения устраняют проблемы с медленным SSD в Windows 10 .
2. Исправьте порядок загрузки (BIOS)

Здесь вы можете настроить установку Windows для загрузки с устройства SSD в BIOS. Не забудьте убедиться, что ваш SSD-диск подключен к работающему кабелю SATA (вместо USB), как мы объясняли в предыдущем решении.
Шаги:
- Включите ваш компьютер.
- Непрерывно нажимайте соответствующую клавишу клавиатуры, чтобы войти в BIOS (обычно F12, F2, F8, Esc, Del).
- С помощью клавиш со стрелками перемещайте вверх/вниз отображаемые параметры загрузки, пока не установите клонированный SSD в качестве загрузочного устройства № 1.
- Выйдите из системы, сохранив изменения, а затем перейдите к загрузке.
Это может удалить загрузку жесткого диска вместо сбоя SSD.
- ТАКЖЕ ЧИТАЙТЕ: 5 лучших программных инструментов для клонирования Windows 10
3. Включить режим AHCI


Если описанные выше действия не позволяют преодолеть загрузку с жесткого диска вместо проблемы с SDD, попробуйте включить режим AHCI в Windows 10. Для начала AHCI ( Advance Host Controller Interface) – это технологический стандарт, обеспечивающий расширенная поддержка стандарта SATA (Serial ATA) и может помочь решить вашу проблему после включения.
Теперь, чтобы его инициализировать, вам понадобится доступ к реестру. А поскольку ваш компьютер не запускается с SDD, просто дайте ему начать использовать HDD, чтобы иметь возможность выполнить процедуру.
-
Нажмите Win + R на клавиатуре. Это открывает диалоговое окно запуска.
- Введите regedit и нажмите ОК .
- Нажмите/коснитесь Да , если вас попросит UAC. Появится редактор реестра.
-
На левой панели окна Редактор реестра перейдите в следующее расположение:
- HKEY_LOCAL_MACHINESYSTEMCurrentControlSetServicesiaStorV
- Дважды нажмите Пуск DWORD (на правой панели). Это становится редактируемым.
-
Введите 0 (ноль) и выберите ОК (, как показано ) .
-
Теперь снова перейдите к этому новому местоположению (из левой панели):
- HKEY_LOCAL_MACHINESYSTEMCurrentControlSetServicesiaStorAVStartOverride
-
Найдите клавишу StartOverride и нажмите на показанное 0 DWORD (правая панель). Введите 0 (ноль) в качестве значения данных, затем нажмите ОК .
-
Теперь отправляйтесь в это новое ключевое место:
- HKEY_LOCAL_MACHINESYSTEMCurrentControlSetServicesstorahci


- Найдите Пуск и нажмите на него.
-
Введите 0 (ноль), как и ранее для стандарта AHCI, и нажмите ОК .
-
Двигаясь дальше, перейдите по следующему пути и посмотрите, есть ли StartOverride DWORD . Если это не так, закройте редактор реестра:
- HKEY_LOCAL_MACHINESYSTEMCurrentControlSetServicesstorahciStartOverride

- Если присутствует ключ StartOverride , дважды щелкните его и убедитесь, что он имеет значение 0 (ноль), а затем нажмите ОК .
- Затем закройте редактор реестра .
Теперь измените настройки BIOS:
- Перезагрузите компьютер и нажмите нужную клавишу, чтобы войти в настройки BIOS /UEFI.
- Находясь в настройках прошивки BIOS/UEFI, найдите и включите AHCI в настройках.
- Сохранить и выйти , чтобы сохранить изменения.
- Windows автоматически установит необходимые драйверы AHCI.
- Когда закончите, выберите Перезагрузить сейчас , чтобы перезагрузить еще раз.
Обратите внимание, что вы должны выбрать вариант восстановления при запуске Windows, если вы столкнулись с ошибкой при перезагрузке после установки AHCI. Ваша система будет работать нормально после восстановления.
4. Выполните чистую установку Windows.
Если клон не будет работать вообще, а система все еще будет продолжать загрузку с жесткого диска вместо SSD, лучше всего выполнить чистую установку Windows на вашем SSD.
Не забудьте сделать резервную копию всех данных, которые вы сохранили там, прежде чем начинать чистую переустановку.
Итак, вот некоторые решения, которые вы можете попробовать, если вам трудно загружать Windows 10 с SSD.
| Автор | Сообщение | ||
|---|---|---|---|
|
|||
|
Junior Статус: Не в сети |
Всем доброго времени суток. |
| Реклама | |
|
Партнер |
|
Alex_Smile |
|
|
Member Статус: Не в сети |
Sermell ты маленькие разделы без буквы не снес с hdd + ssd у тя в gpt, hdd в mbr. В биосе выставлен csm. Короче колхоз. |
|
Sermell |
|
|
Junior Статус: Не в сети |
Alex_Smile писал(а): Sermell ты маленькие разделы без буквы не снес с hdd + ssd у тя в gpt, hdd в mbr. В биосе выставлен csm. Короче колхоз. Я понял что ты понял в чем проблемма, мне интересно ее решить!, ты знаешь как убрать колхоз, винду ставил не я к сожелению, винда была 7 щас до 10 обновился |
|
Alex_Smile |
|
|
Member Статус: Не в сети |
Sermell сносить маленькие (из под винды с помощью Acronis Disk Director), восстанавливать загрузчик http://remontka.pro/windows-10-bootloader-fix/ . Вроде можно на сам C на ssd, без создания маленьких на ssd. Не проверял. Добавлено спустя 1 минуту 37 секунд: |
|
Sermell |
|
|
Junior Статус: Не в сети |
Alex_Smile писал(а): Sermell сносить маленькие (из под винды с помощью Acronis Disk Director), восстанавливать загрузчик http://remontka.pro/windows-10-bootloader-fix/ . Вроде можно на сам C на ssd, без создания маленьких на ssd. Не проверял. Обьясни что значет маленькие?,есть какая то инструкция как это можно сделать, я не сис админ и тд, навыки базовые, и мне не особо понятно как это сделать! |
|
BBwolf |
|
|
Member Статус: Не в сети |
Загрузится с диска с виндой, без вставленного диска hdd, выполнить восстановление он сам восстановит загрузчик. |
|
Sermell |
|
|
Junior Статус: Не в сети |
BBwolf писал(а): Загрузится с диска с виндой, без вставленного диска hdd, выполнить восстановление он сам восстановит загрузчик. А есле диска с виндой у меня нету, есть еще какие то варианты? |
|
REALpredatoR |
|
|
Member Статус: Не в сети |
Sermell писал(а): есть еще какие то варианты? Sermell с такими знаниями идти в компьютерный сервис, и просить восстановить винду |


|
Sermell |
|
|
Junior Статус: Не в сети |
Есле обьяснить по человечески, то можно и самому. |
|
vork777 |
|
|
Member Статус: Не в сети |
Sermell писал(а): Есле обьяснить по человечески, то можно и самому. Если в компе стоит больше 1 диска, то винда при установке записывает загрузчик куда захочет, в данном случае на HDD. Если не хотите таких проблем, в будущем при установке |
|
Sermell |
|
|
Junior Статус: Не в сети |
vork777 писал(а): Если в компе стоит больше 1 диска, то винда при установке записывает загрузчик куда захочет, в данном случае на HDD. Если не хотите таких проблем, в будущем при установке Да ставили новую винду лицуху отжатым путем, загрузили ее с флешки дали только ключ, устанавливали win7 щас обновился до win10. |
|
dimchoos |
|
|
Member Статус: Не в сети |
Sermell писал(а): Да ставили новую винду лицуху отжатым путем, загрузили ее с флешки дали только ключ, устанавливали win7 щас обновился до win10. И чего? Тебе говорят, что надо сделать загрузучную флешку. Добавлено спустя 1 минуту 42 секунды: l писал(а): если нет, что мешает скачать образ с MS и развернуть его на Добавлено спустя 46 секунд: Sermell писал(а): Да ставили новую винду лицуху отжатым путем Это извините, как? Если мне не изменят память лицензионная вида продается, только, на дисках. Мак ось на флешках. |
|
REALpredatoR |
|
|
Member Статус: Не в сети |
dimchoos видимо продали «торрент-эдишн» за пару тысяч |
|
OldRampant |
|
|
Member Статус: Не в сети |
Можно попробовать так, записать загрузочный диск с Acronis True Image, загрузится и сделать бекап загрузочного раздела hdd и самой винды с ssd, затем отключить hdd и развернуть винду с загрузочным разделом на ssd, в биос выставить приоритет загрузки с ssd. |
|
Godlike66 |
|
|
Member Статус: Не в сети |
Sermell |
|
Riannon |
|
|
Member Статус: Не в сети |
Sermell Нужен скрин разметки из Disk management («Управление дисками», если русская винда). На десятке Win+X нажать, появится список, там будет пункт такой. Или можно Win+R, там прописать diskmgmt.msc и нажать Enter. |
—
Кто сейчас на конференции |
|
Сейчас этот форум просматривают: нет зарегистрированных пользователей и гости: 2 |
| Вы не можете начинать темы Вы не можете отвечать на сообщения Вы не можете редактировать свои сообщения Вы не можете удалять свои сообщения Вы не можете добавлять вложения |