Неделю назад купил этот диск и в целом доволен, но сразу после покупки возник вопрос. На моём компьютере второй системой установлена Windows XP и вот она не видит жёсткий диск 3 Тб преобразованный в стиль GPT.
В интернете на различных форумах в основном предлагают установить программу Paragon GPT Loader, но она платная 20$, может есть бесплатное средство?
Windows XP не видит жёсткий диск объёмом 3 Тб
Привет друзья! Данная проблема уже с бородой, но как видим, ещё не потеряла свой актуальности. Очень простой ответ несколько лет назад подсказал мне мой друг Александр Манаев.
Интерфейс EFI с поддержкой GUID Partition Table (GPT) появился практически в тоже время, что и Windows XP, но несмотря на это, Windows XP 32 бит и Windows Server 2003 32 бит совершенно не понимают, как обращаться с дисками нового стиля GPT, да и ещё объёмом 3 Тбайта, но выход из ситуации есть и достаточно простой.
Windows Server 2003 Service Pack 2 прекрасно понимает диски GPT и нужно просто взять и позаимствовать у неё два системных файла и скопировать их с заменой в Windows XP, затем перезагрузиться и диск GPT появится в управлении дисками, и в проводнике.
Например, возьмём героя нашей вчерашней статьи жёсткий диск на 3 Тбайта Toshiba DT01ACA300 и подключим его к системному блоку с установленной Windows XP 32 бит.
Войдём в «Управление дисками» и увидим такую картину.
Диск (C:), это SSD объёмом 60 Гб, а раздел исправен (защищённый GPT) 746 Гб, это не что иное, как наш жёсткий диск Toshiba DT01ACA300 3 Тбайт.
Скачиваем на моём облачном хранилище два системных файла.
Разархивируем архив partmgr — disk.rar
Копируем файлы
disk.sys
partmgr.sys
и вставляем в две системные папки
C:WINDOWSsystem32drivers
C:WINDOWSsystem32dllcache
соглашаемся на замену
Примечание: на всякий случай перед заменой скопируйте оригиналы файлов disk.sys и partmgr.sys в безопасное место.
«Заменить имеющийся файл?»
«Да — для всех»
«Файлы, нужные для правильной работы Windows были заменены неизвестными версиями. Для стабильной работы системы необходимо восстановить оригинальные версии файлов»
«Отмена»
«Вы отказались от восстановления исходных версий файлов»
«Да»
Перезагружаемся.
Входим в Управление дисками и видим наш жёсткий диск объёмом 3 Тб.
Are you using a 3TB hard drive but it is only showing 746GB in Windows 10? Read this post to search the reasons for this issue and solutions to fix 3TB HDD not showing full capacity issue right now.
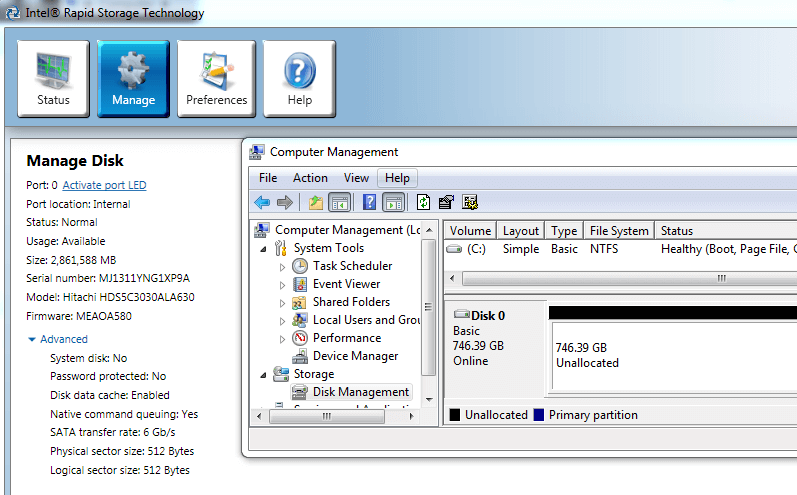
I’m sure that many people like me have encountered the following issue: when I install a new 3TB hard disk into the computer, I can only see 746GB (not 745GB or 747GB, but exactly 746GB) in my Windows Explorer as well as Disk Management.
And here, if we Google «3TB drive only shows 746GB«, we will find many users have encountered the same issue.
Let’s see one true example.
«I bought the Seagate barracuda 3TB and it shows as 746GB on my Windows Vista SP2 32-bit in GPT mode. I have asked this problem at Seagate forum and the one guy who replied didn’t know how to solve it. I am using the 3TB Seagate drive in my Rosewill RX-358-U3B enclosure, and I have read that a Hitachi 3TB had no compatibility issues in that particular enclosure. Does anyone know how to have my computer realize that the Seagate drive is 3TB?»
What’s going wrong here?
Why we cannot see the full disk of the 3TB hard disk?
Is it possible to solve this problem effectively and easily?
Need the data back from Seagate hard drive? Please follow the advice given in this Seagate data recovery article.
How to Fix: 3TB Drives Only Shows 746GB
According to a survey, we find many users don’t know what causes this to happen. And most people blame on their drive manufacturers since they think they bought the wrong hard drive.
In general, whether you are using Hitachi, Western Digital, Seagate, or Samsung drives, you might encounter this problem. It is a fairly common issue. However, do you know how to solve this issue in Windows 10?
Here, please take a look at free western digital hard drive recovery to be well prepared for any data loss accidents.
Now, 3 major reasons, as well as corresponding solutions, will be introduced. Knowing the exact reason, you can solve the problem with ease.
Reason 1: You Format 3TB Drive in MBR by Mistake
Hard drives are, as you know, typically formatted in MBR (Master Boot Record) or GPT (GUID Partition Table). However, do you know the difference between MBR and GPT? For instance, MBR disk can only support 2TB hard drive.
Here, you can see this post MBR Disk VS. GPT Disk to get more information about the two kinds of disks.
Now, in order to use and manage the 3TB hard drive, you should change it to GPT disk. Detailed steps are shown below.
Solution:
When it comes to converting MBR disk to GPT, you can turn to Windows built-in disk management tool as well as third-party free partition tool.
Method one: turn to Windows built-in disk management tool
Step 1: Right-click «My Computer» and choose «Manage -> Storage -> Disk Management».
Step 2: If the MBR hard disk which you want to convert to GPT disk contains any volumes, right-click any volumes on the disk and then click «Delete Volume» to delete all volumes.
Step 3: Right-click the MBR disk that you want to change, and then click «Convert to GPT disk» to fix 3TB hard drive only showing 746GB in Windows 10.
However, is it possible to convert MBR disk to GPT without data loss?
Want to know the best part?
Method two: turn to third-party partition tool
Here, to complete this conversion without data loss, you can try using MiniTool Partition Wizard since it offers high security as well as excellent performance. This professional partition is compatible with many operating systems including Windows 7/8/10, and Windows Server 2003/2008/2012/2016.
Before you start to fix 3TB drive only shows 746GB issue in Windows 10, please download MiniTool Partition Wizard Free Edition (only free works for the conversion on data disk) and install it on the computer. If your OS disk meets 3TB drive not showing full capacity issue, its Professional Edition should be chosen. Click to learn the edition comparison.
Free DownloadBuy Now
Here take MiniTool Partition Wizard Free Edition as an example.
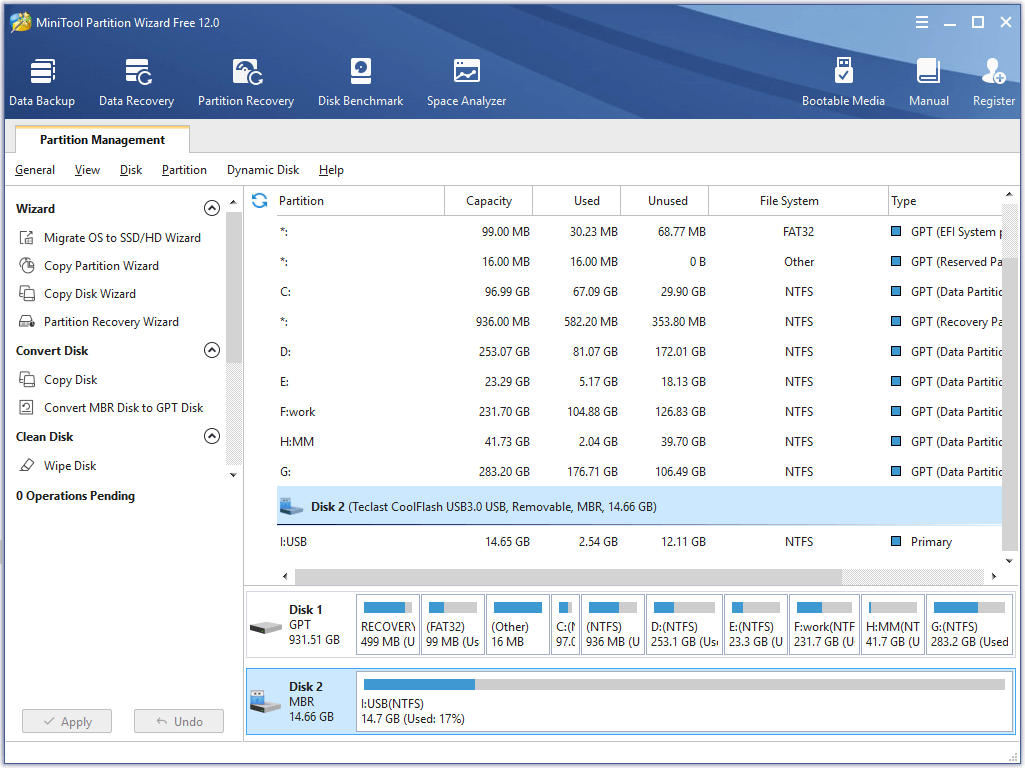
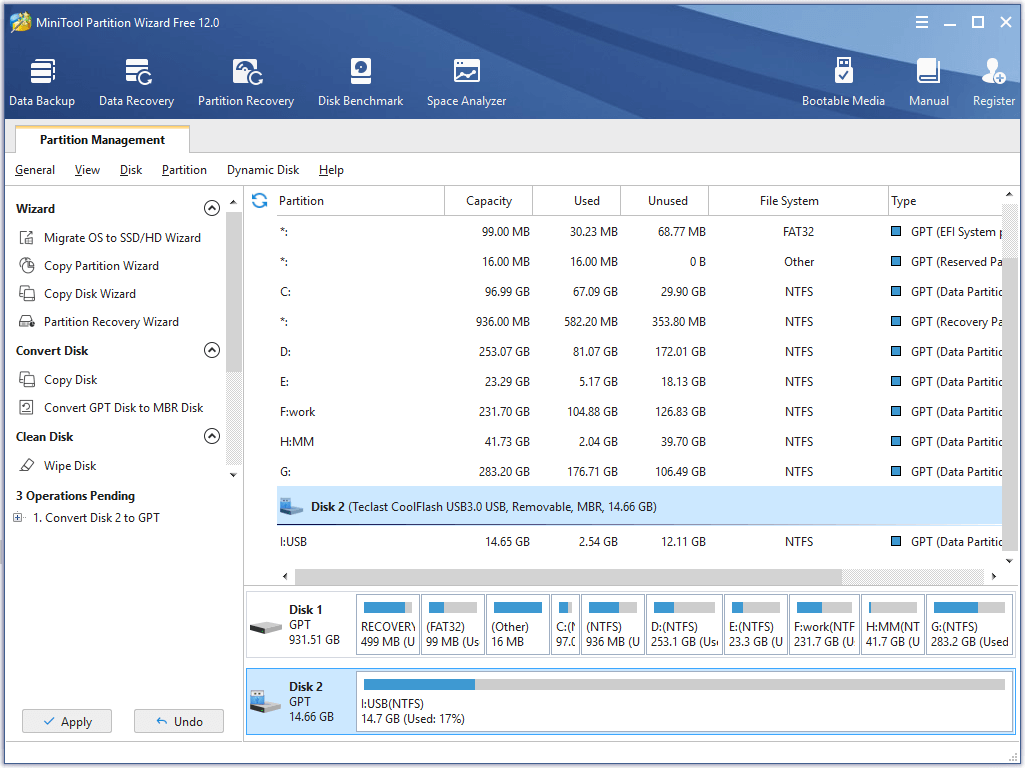
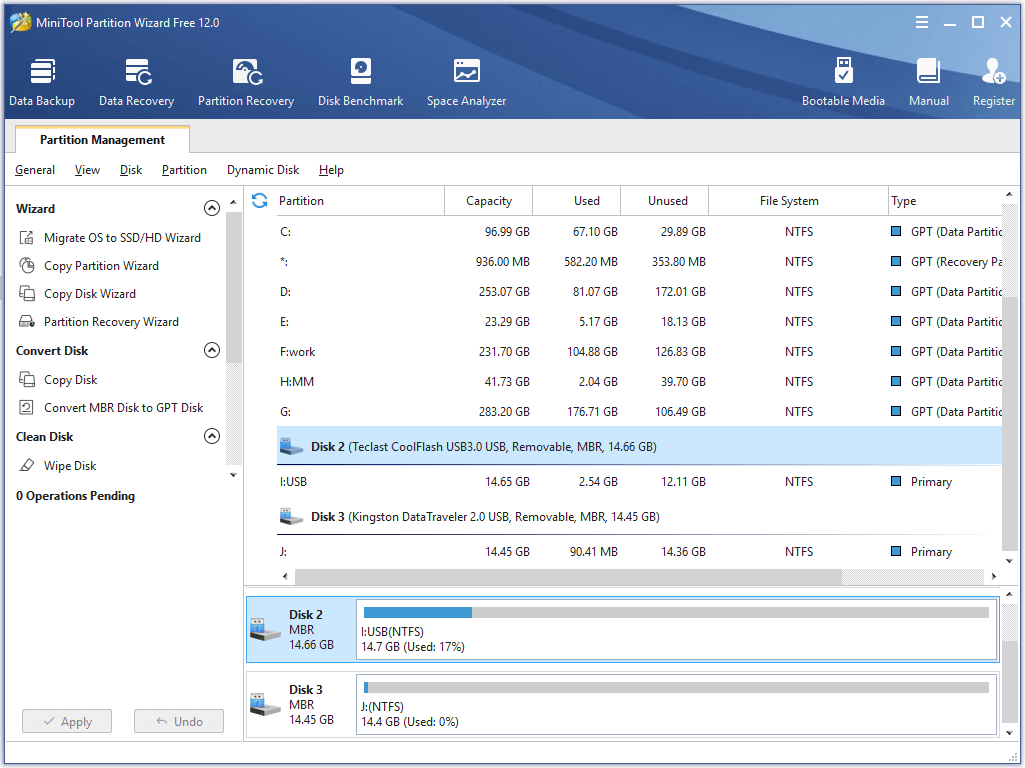
Step 1: Launch this free partition manager to its main interface. Right-click the MBR disk, and choose «Convert MBR Disk to GPT Disk» function from the pop-up menu or from the left action panel.
Step 2: Click on «Apply» button and tap «Yes» in the pop-up prompt interface to start converting.
Thus, all work has been done. After that, you might make full use of the 3TB storage space in Windows 10.
Reason 2: You are Using The Old Version of Intel® Rapid Storage Technology Driver
A study saying that Intel® Rapid Storage Technology (RST) version of 10.0.0.1046 is the culprit behind the 746GB available of the 3TB drive issue.
For 3TB drive support, one should look to Intel RST 10.1 and newer. However, before you upgrade Intel® Rapid Storage Technology driver to the latest version, you had better know more information about RST.
Intel® Rapid Storage Technology (RST), a program developed by Intel, can offer new levels of protection, performance, and expandability for desktop and mobile platforms.
Besides, this program has added support for next generation PCIe storage devices with transfer speeds up to 1 GB/s that maximizes storage performance and improves response time for everyday usages like photo editing, video loading, and office productivity.
And, Intel Rapid Storage Technology provides Intel® Smart Response technology to recognize and automatically store your most frequently used applications and data into a high-performance SSD while giving you full access to the large storage capacity of a hard disk drive (HDD).
In a word, with this program, you can take advantage of enhanced performance and lower power consumption when using one or multiple hard drives.
Solution:
Step 1: Download the latest version of Intel’s Rapid Storage Technology (Intel RST) drivers from Intel’s site.
Step 2: Install the Intel RST drivers on the computer. If your computer is unable to connect to a network, you can turn to the manufacturer’s installation media which often have older versions of things like Intel RST drivers.
Step 3: After upgrading to the latest RST version, you can open Computer Management again, and now you can see all free space of your drive in Windows 10.
What if you are using AMD instead of Intel? Suppose that you are using AMD and here are the specs:
- AMD Phenom II x4 925 @ 3ghz w/corsair H50 water cooler
- Gigabyte 770TA-UD3 mobo
- 400GB SATA HDD for OS
- Windows 7 ult x64
In this case, what should you do since Intel RST would be senseless for you? At this time, if you want to solve this issue, you might try updating the chipset and any SATA/ RAID drivers you can find.
Reason 3: SATA ports
Some users who connect their internal hard drive to a computer via a USB enclosure might encounter the 746GB available of the 3TB drive issue. What should they do to fix 3TB drive only shows 746GB issue?
Solution:
In general, there are some USB enclosures have a 2TiB limit, irrespective of the partition type. At this time, users can try connecting external hard drive to a computer via SATA.
Bottom line
After seeing the three major reasons, you might have a basic understanding of how to solve the 746GB available of the 3TB drive issue.
In a word, if a new 3TB hard drive only shows 746GB, you may convert it to GPT disk, or upgrade your Intel® Rapid Storage Technology (RST). Besides, if it’s an external disk, you had better connect it to the computer via SATA.
However, if you want to perfectly make full use of the 3TB storage space, you had better do some corresponding partition management like create partition, extend partition, clone partition, etc. Here, we will show a free partition management program which might be unfamiliar to you but can help you a lot.
Click to Tweet
3TB Hard Drive Management
As is well known, we can divide our hard drive into several independent partitions to protect data, keep running multiple operating systems on the same disk, and improve performance. However, how to manage partitions to maximize the performance of our computer?
Here, you can try using MiniTool Partition Wizard to perfectly manage hard drive partitions.
With this professional partition management freeware, you can easily and quickly create partition, move/resize partition, extend partition, delete partition, format partition, copy disk, and more.
And, we take «Copy Disk» for example to show more information about this tool.
Disk Clone
If you want to upgrade small old hard disk to larger newer one without reinstalling Windows and all other installed programs or make a backup for the disk which saves significant files, you can turn to the «Copy Disk» feature.
Detailed steps are shown here.
Step 1: In the main window of MiniTool Partition Wizard, select the disk which needs copying and then click «Disk > Copy,» or activate «Copy Disk» function from left panel to continue.
Step 2: Select the disk that will save the copy of the source disk as the target disk and then click «Next» button.
- The target disk should be large enough to hold all content on the source disk.
- It is recommended to backup all important data on this target disk in advance because all its data will be deleted.
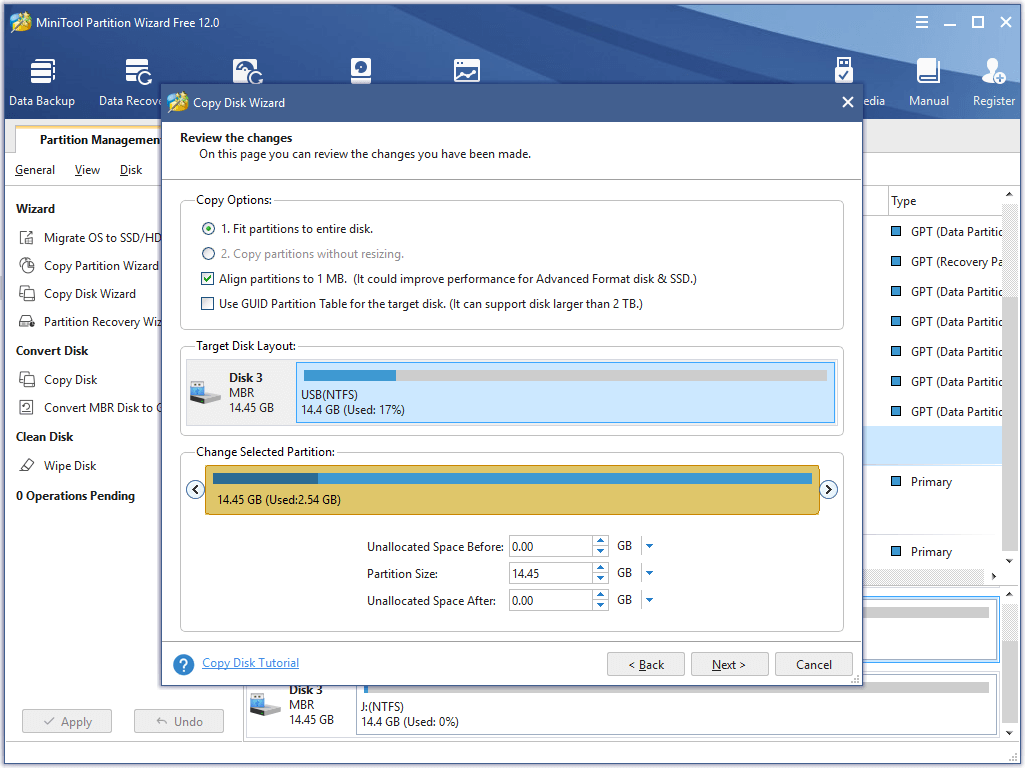
Step 3: Choose a copying method to decide the layout of target disk and then click «Next» button.
Step 4: Click «Finish» button to go back to the main interface.
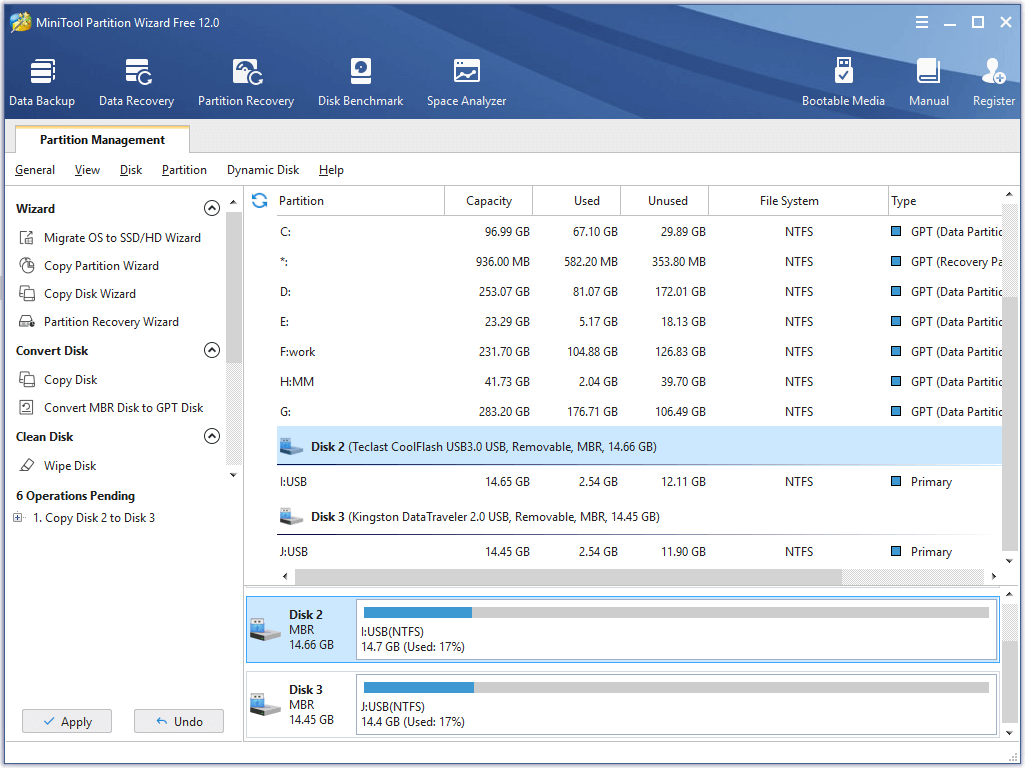
Step 5: Click «Apply» button on the top left corner to apply all pending operations. Note: if you are copying system disk, you will be asked to restart the computer. Just do as told.
In a word, if you are troubled by partitioning problems, you can ask MiniTool Partition Wizard for help.
Next, we want to show another excellent feature of this tool.
3TB Hard Drive Data Recovery
No doubt, users store massive important data including business data, working documents, precious pictures and some personal data on their hard drive.
However, data stored on the hard drive are not safe all the time, and data loss caused by various subjective or objective reasons happens from time to time.
Fortunately, if you have no idea about data recovery solution, you can try using MiniTool Partition Wizard.
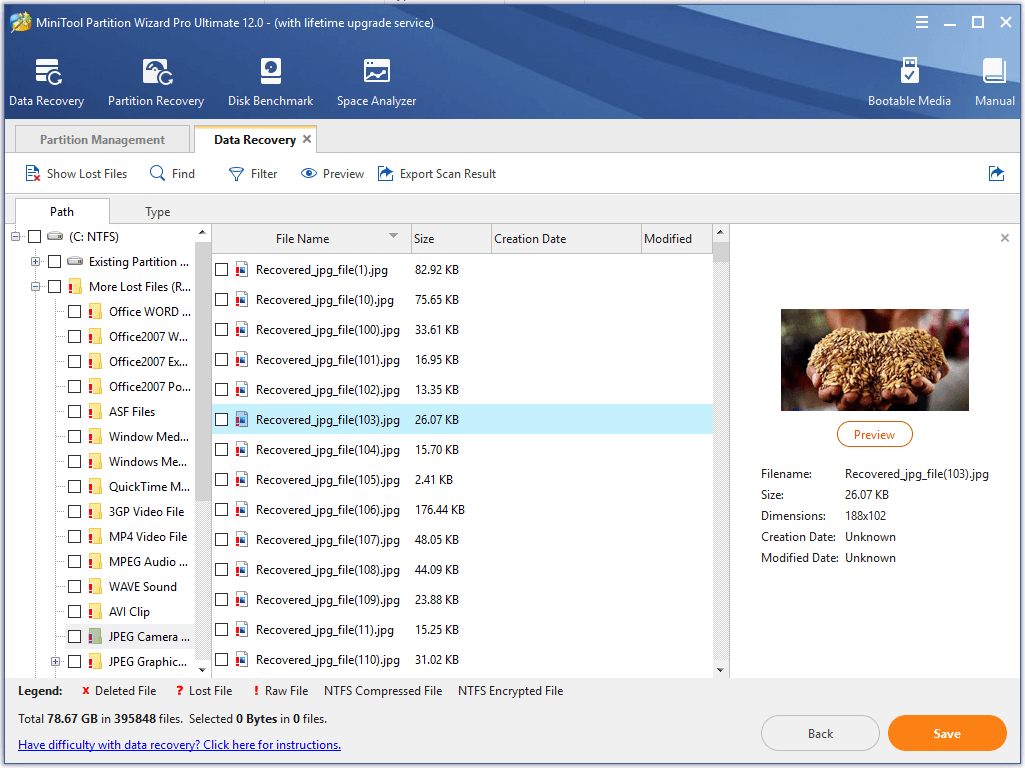
How to Recover Lost Data from Hard Drives | MiniTool Partition Wizard Tutorial.
Note: Data Recovery feature is only available in MiniTool Partition Wizard Pro Ultimate and above edition.
- Select Data Recovery feature in the main interface of MiniTool Partition Wizard.
- Scan the drive containing lost data.
- Save all needed data.
In a word, MiniTool Partition Wizard offers many excellent features to help you perfectly manage 3TB hard drive. For instance, you can use the Space Analyzer function to scan the 3TB hard drive and give you a better view of the hard drive space usage, you can use the Disk Benchmark feature to test disk speed, etc.
Click to Tweet
Conclusion
Now, I guess you might know how to solve the 3TB drive only shows 746GB issue! Besides, you know how to perfectly manage hard drive partitions and carry out hard drive data recovery.
Like this post? Share it with more users.
Should you have any question about using MiniTool Partition Wizard, please feel free to contact us.
Windows 3TB Drive FAQ
⛱️What is the largest hard drive Windows 10 will recognize?
If you use MBR disk in Windows 10, the maximum disk size is 2TB. However, if you GPT disk, you can use a 94EB hard drive. Therefore, if you want to use a large hard drive than 2TB, you need to convert MBR to GPT.
????What is the maximum partition size for NTFS?
NTFS partition can be very large. Maximum NTFS volume size = 2^64 allocation units. In another word, the larger allocation unit is, the bigger NTFS partition is. Now, the largest allocation unit for NTFS and FAT32 is 64K, therefore, the maximum NTFS partition size is 2^64*64K.
????Can Windows 7 see 4tb drive?
To use a 4TB drive, you need to make sure it is GPT hard drive since MBR disk only shows 2TB. Therefore, if your 4TB drive is MBR, you need to convert MBR to GPT disk via MiniTool Partition Wizard.
????How do I recover a drive partition?
- Launch MiniTool Partition Wizard.
- Select the disk where partition loss appears and choose Partition Recovery from the toolbar.
- Choose a scanning range and then click on the Next button.
- Set a scanning method to scan the specified range and click Next.
- Check all needed partitions and click Finish.
- Assign a drive letter.
- Click Apply to perform all changes.
В случае же если второй жесткий диск не показывается в БИОС, а произошло это после каких-либо действий внутри компьютера или просто после установки второго жесткого диска, то рекомендую в первую очередь проверить, а правильно ли все подключено: Как подключить жесткий диск к компьютеру или ноутбуку. И отдельная инструкция на тему M.2 и SATA SSD в Windows 10 — Что делать, если Windows 10 не видит SSD.
Как «включить» второй жесткий диск или SSD в Windows
Все, что нам потребуется для исправления проблемы с диском, который не виден — встроенная утилита «Управление дисками», которая присутствует в Windows 7, 8.1 и Windows 10.
Для ее запуска нажмите клавиши Windows + R на клавиатуре (где Windows — клавиша с соответствующей эмблемой), а в появившемся окне «Выполнить» наберите diskmgmt.msc после чего нажмите Enter.
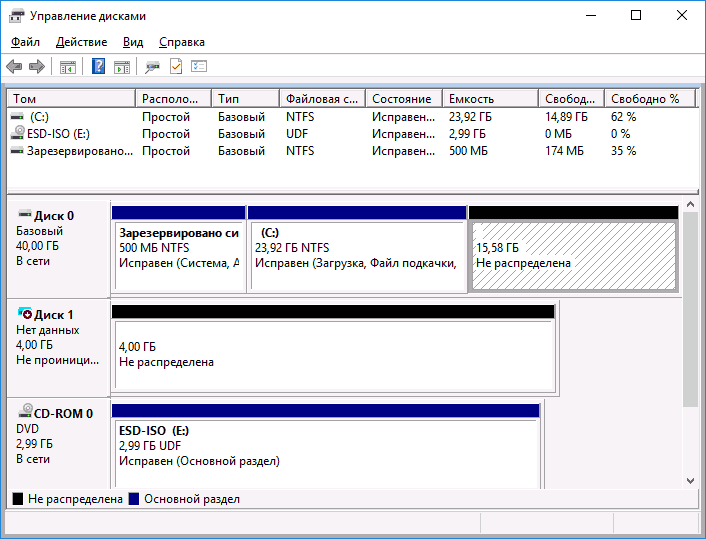
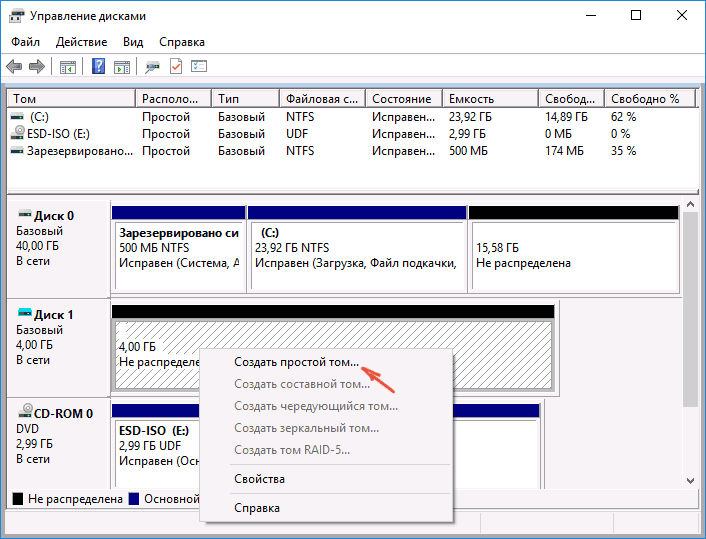
После короткой инициализации откроется окно управления дисками. В нем вам следует обратить внимание на следующие вещи в нижней части окна: есть ли там диски, в информации о которых присутствуют следующие сведения.
- «Нет данных. Не проинициализирован» (в случае, если у вас не виден физический HDD или SSD).
- Имеются ли на жестком диске области, в которых написано «Не распределена» (в случае если у вас не виден раздел на одном физическом диске).
- Если нет ни того ни другого, а вместо этого вы видите раздел RAW (на физическом диске или логический раздел), а также раздел NTFS или FAT32, который при этом не отображается в проводнике и не имеет буквы диска — просто кликните по нему правой кнопкой мыши по такому разделу и выберите либо «Форматировать» (для RAW), либо «Назначить букву диску» (для уже отформатированного раздела). Если на диске были данные, то см. Как восстановить диск RAW.
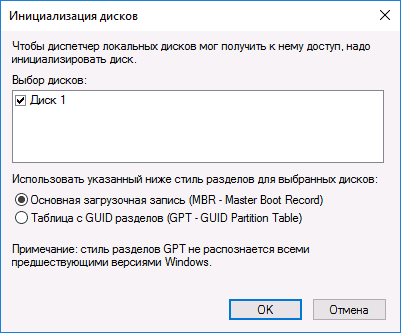
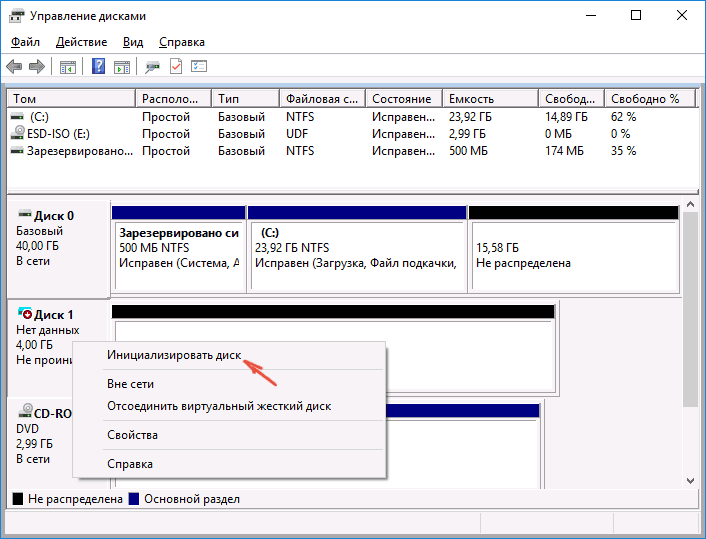
В первом случае, кликните правой кнопкой мыши по названию диска и выберите пункт меню «Инициализировать диск». В окне, которое появится вслед за этим необходимо выбрать структуру разделов — GPT (GUID) или MBR (в Windows 7 такой выбор может не появиться).
Я рекомендую использовать MBR для Windows 7 и GPT для Windows 8.1 и Windows 10 (при условии, что они установлены на современном компьютере). Если не уверены, выбирайте MBR.
По завершении инициализации диска, вы получите область «Не распределена» на нем — т.е. второй из двух описанных выше случаев.
Следующий шаг для первого случая и единственный для второго — кликнуть правой кнопкой мыши по нераспределенной области, выбрать пункт меню «Создать простой том».
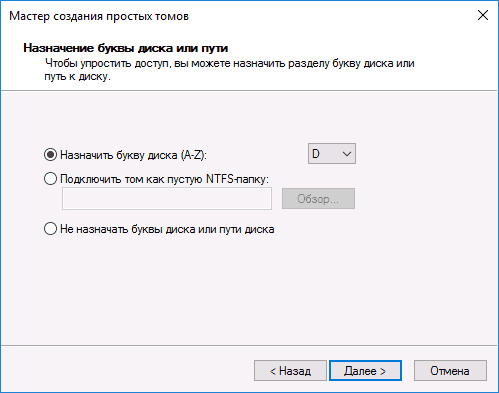
После этого останется лишь следовать указаниям мастера создания томов: назначить букву, выбрать файловую систему (если сомневаетесь, то NTFS) и размер.
Что касается размера — по умолчанию новый диск или раздел будут занимать все свободное место. Если вам требуется создать несколько разделов на одном диске, укажите размер вручную (меньше имеющегося свободного пространства), после чего проделайте те же действия с оставшимся не распределенным местом.
По завершении всех этих действий, второй диск появится в проводнике Windows и будет пригоден для использования.
Видео инструкция
Ниже — небольшое видео руководство, где все шаги, позволяющие добавить в систему второй диск (включить его в проводнике), описанные выше показаны наглядно и с некоторыми дополнительными пояснениями.
Делаем второй диск видимым с помощью командной строки
Внимание: следующий способ исправить ситуацию с отсутствующим вторым диском с помощью командной строки дается лишь в информационных целях. Если вам не помогли вышеописанные способы, а вы при этом не понимаете сути приведенных ниже команд, лучше их не использовать.
Также отмечу, что указанные действия без изменений применимы для базовых (не динамических или RAID дисков) без расширенных разделов.
Запустите командную строку от имени администратора, после чего введите по порядку следующие команды:
- diskpart
- list disk
Запомните номер диска, который не виден, либо номер того диска (далее — N), раздел на котором не отображается в проводнике. Введите команду select disk N и нажмите Enter.
В первом случае, когда не виден второй физический диск, используйте следующие команды (внимание: данные будут удалены. Если диск перестал отображаться, но на нем были данные, не делайте описанного, возможно, достаточно просто назначить букву диска или воспользоваться программами для восстановления потерянных разделов):
- clean (очищает диск. Данные будут потеряны.)
- create partition primary (здесь можно также задать параметр size=S, задав размер раздела в мегабайтах, если требуется сделать несколько разделов).
- format fs=ntfs quick
- assign letter=D (назначаем букву D).
- exit
Во втором случае (имеется нераспределенная область на одном жестком диске, не видная в проводнике) используем все те же команды, за исключением clean (очистка диска), в результате операция по созданию раздела будет произведена именно на нераспределенном месте выбранного физического диска.
Примечание: в способах с помощью командной строки я описал лишь два базовых, наиболее вероятных варианта, однако возможны и другие, так что проделывайте описанное только в том случае, если понимаете и уверены в своих действиях, а также позаботились о сохранности данных. Более подробно о работе с разделами с помощью Diskpart можно прочесть на официальной странице Microsoft Создание раздела или логического диска.
Ремонт компьютеров — Москва
Ремонт и настройка компьютера производится в основном, в течении сегодняшнего дня, иногда и ночью!
Ремонт компьютера
Система Windows не видит жесткий больше 3 тб
-
Что делать если ваша система не видит жесткий диск размером 3 тб, 4 тб и выше?
-
Система видит к примеру только 2 ТБ, а остальное куда делось, вот вопрос?
Есть решение, достаточное простое!
-
нажимаем клавиши WIN + R, далее в командной строке cmd прописываем команду — diskpart и enter!
-
Далее вы должны увидеть после проделанной команды ваши жесткие диски установленные на PC.
-
Если он под номером № 1, то дальше команда select disk 1, будет выбран диск номер 1!
-
После этого команда clean, потом завершающую команду — convert gpt
После проделанных комбинаций, ваш диск будет виден системе и там уже вы можете разбить его на разделы через управление дисков, ну это уже на ваше усмотрение!
Компьютерная помощь — Москва
Компьютерная vip помощь с технической индивидуальной поддержкой, хоть по разовому сценарию, хоть с заключением договора на обслуживание от 1 месяца до 3-х лет.
Компьютерная помощь в Москве по доступной цене
Акции на спец-услуги проводим несколько раз в месяц, компьютерная помощь может быть через удаленный доступ, может быть и с выездным характером, те с личным присутствием компьютерного мастера…
Ремонт компьютеров — Москва
Ремонт и настройка компьютера производится в основном, в течении сегодняшнего дня, иногда и ночью!
Ремонт компьютера
|
8 / 8 / 0 Регистрация: 30.12.2015 Сообщений: 342 |
|
|
1 |
|
Система не видит весь объем внешнего диска30.08.2020, 17:18. Показов 11359. Ответов 21
Купил новый комп и внешний винт на 6 Тб Western Digital Purple 6000Gb (WD60PURZ). Переформатировал еще раз через то же самое В биосе в Boot вижу только название дисков, но не объём. Дрова на мать пока обновить не могу — сайт https://www.asrock.com/ лежит. Что можно сделать? Спасибо. Миниатюры
__________________
0 |
|
8 / 8 / 0 Регистрация: 30.12.2015 Сообщений: 342 |
|
|
30.08.2020, 20:01 [ТС] |
2 |
|
В Sata Mode стоит AHCI Mode.
0 |
|
8 / 8 / 0 Регистрация: 30.12.2015 Сообщений: 342 |
|
|
30.08.2020, 22:08 [ТС] |
3 |
|
Victoria показывает 6 Тб Миниатюры
0 |
|
Native x86 5175 / 3022 / 874 Регистрация: 13.02.2013 Сообщений: 9,635 |
|
|
31.08.2020, 04:00 |
4 |
|
Скриншот менеджера дисков покажите.
1 |
|
8 / 8 / 0 Регистрация: 30.12.2015 Сообщений: 342 |
|
|
31.08.2020, 06:58 [ТС] |
5 |
|
внешний это E Миниатюры
0 |
|
8 / 8 / 0 Регистрация: 30.12.2015 Сообщений: 342 |
|
|
31.08.2020, 14:11 [ТС] |
6 |
|
Так как дисковода нет, скопировал с диска для матери на флешку (без создания загрузочной флешки). Миниатюры
0 |
|
8 / 8 / 0 Регистрация: 30.12.2015 Сообщений: 342 |
|
|
31.08.2020, 14:26 [ТС] |
7 |
|
На официальном сайте дров нет
0 |
|
1682 / 966 / 96 Регистрация: 23.01.2017 Сообщений: 3,740 |
|
|
31.08.2020, 17:48 |
8 |
|
durol, По Sata должно нормально форматировать. Пробуйте прямо управлении дисками и проверьте в свойствах GPT или нет. Делайте пока всё по Sata, и проверьте, получится ли переразметить. Схема естественно GPT.
1 |
|
8 / 8 / 0 Регистрация: 30.12.2015 Сообщений: 342 |
|
|
31.08.2020, 18:46 [ТС] |
9 |
|
Форматировали как, с подключением по Sata ? Новый системник под пломбами, поэтому через стандартный внешний корпус типа https://aziada.ru/products/vne… ernal-case. В сам корпус не вставлял, так как на винте надпись Do not block this hole.
проверьте в свойствах GPT или нет Скриншота через командную строку достаточно?
скриншот управления неполный Что еще надо запринтскринить? Миниатюры
0 |
|
8 / 8 / 0 Регистрация: 30.12.2015 Сообщений: 342 |
|
|
31.08.2020, 19:03 [ТС] |
10 |
|
Старый комп без пломбы, но может он слабый в плане питания. Материнская плата Asus (4xDDR3), процессор 4 ядра, модуль DDR-3 RAM 8192MB PC-12800, видеокарта 2Gb GDDR5. Точнее характеристики не скажу, так как компа нет под рукой. Добавлено через 8 минут
0 |
|
1682 / 966 / 96 Регистрация: 23.01.2017 Сообщений: 3,740 |
|
|
31.08.2020, 19:14 |
11 |
|
Решениеdurol, ЖД у вас 3.5 такой а показали бокс китайский для 2.5″ ? или бокс под пломбой? Не понимаю вас, где проблема для Sata, есть же старый комп.
1 |
|
8 / 8 / 0 Регистрация: 30.12.2015 Сообщений: 342 |
|
|
31.08.2020, 20:21 [ТС] |
12 |
|
показали бокс китайский для 2.5″ Точно картинку не нашел. External enclosure for 3.5″ Sata HDD.
Думаю пока на переходник USB. Надо другой Внешний корпус другой? То есть тип питания и интерфейс подключения влияют? Добавлено через 40 минут Добавлено через 20 минут
0 |
|
1682 / 966 / 96 Регистрация: 23.01.2017 Сообщений: 3,740 |
|
|
31.08.2020, 21:44 |
13 |
|
Внешний корпус другой? То есть тип питания и интерфейс подключения влияют? Нет, не корпус и питание, а контроллер и прошивка.
1 |
|
8 / 8 / 0 Регистрация: 30.12.2015 Сообщений: 342 |
|
|
31.08.2020, 21:50 [ТС] |
14 |
|
Я подключал этот кейс https://catalog.onliner.by/hdd… a1silblack к задней панели системника, где находятся 6 штук USB. Посмотрел описание корпуса, есть 2 штуки USB 2.0 и они находятся на передней панели. Есть смысл через них пробовать подключаться? Пока писал, ответили предыдущим постом.
0 |
|
1682 / 966 / 96 Регистрация: 23.01.2017 Сообщений: 3,740 |
|
|
01.09.2020, 01:00 |
16 |
|
Вот они Добавлено через 8 минут там же использовать . Не рискуйте данными! Заранее проверьте перед заполнением харда, как он будет работать в боксе.
1 |
|
8 / 8 / 0 Регистрация: 30.12.2015 Сообщений: 342 |
|
|
01.09.2020, 12:30 [ТС] |
17 |
|
Заказал указанный. Добавлено через 11 минут
У меня в закладках 20 страниц по моей проблеме и хоть бы на одной было сказано про проблемы с внешним кейсом. Поправка: в закладках 15 страниц, на 3-х говорится о Sata-контроллере, но тогда мне было не понятно.
0 |
|
8 / 8 / 0 Регистрация: 30.12.2015 Сообщений: 342 |
|
|
12.09.2020, 17:27 [ТС] |
18 |
|
Видит весь объём. Добавлено через 7 минут
1 |
|
8 / 8 / 0 Регистрация: 30.12.2015 Сообщений: 342 |
|
|
08.10.2020, 20:10 [ТС] |
20 |
|
Запускаю WD Drive utilities, подключаю внешний винт, но ничего не происходитю Миниатюры
0 |
|
IT_Exp Эксперт 87844 / 49110 / 22898 Регистрация: 17.06.2006 Сообщений: 92,604 |
08.10.2020, 20:10 |
|
20 |

В современном мире информация играет важную роль в профессиональной и личной жизни. Вы особенно это ощущаете, когда при включении ПК на экране всплывает уведомление об ошибке: «Жёсткий диск не обнаружен». В такой ситуации все файлы, хранящиеся на внутреннем или внешнем устройстве, могут быть повреждены или удалены. Читайте далее, чтобы узнать о возможных причинах и симптомах ошибки, а также способах её устранения.
Возможные причины проблем с жёстким диском
Ошибка «Жёсткий диск не обнаружен» — одна из серьёзных проблем, поскольку на устройстве содержатся данные, необходимые пользователю. Причин её возникновения может быть несколько:
- неправильное соединение проводов или их дефект;
- жёсткий диск устарел, не совместим с новым ПО;
- жёсткий диск отформатирован (его память не определяется системой);
- физические повреждения (перегрев, поломка и прочие);
- вирусы и прочие вредоносные файлы;
- повреждённые данные;
- повреждённые сектора;
- жёсткий диск отключён в биосе.
Физические и программные симптомы, свидетельствующие о неисправности жёсткого диска:
- из привода исходит щёлкающий / гудящий шум;
- повторяются сбои программ;
- у жёсткого диска возникла нераспределённая область (RAW) в управлении дисками;
- жёсткому диску не присвоена буква;
- жёлтый восклицательный знак у иконки устройства;
- постоянные уведомления об ошибках.
О способах устранения этих неполадок расскажем далее.
Способы исправления ошибок с жёстким диском
Есть разные способы исправить ошибку «Жёсткий диск не обнаружен». О них мы расскажем далее.
- Проверьте подключение кабеля

Пользователь должен убедиться, что все провода правильно подключены к жёсткому диску. Сверьте соединения с официальной инструкцией.
Иногда провод может отсоединиться или переломаться. Перед проверкой выключите ПК из розетки, затем осмотрите провода и контакты на разъёмах на предмет переломов, загибов и прочих дефектов. При повреждении кабеля (питания или SATA), замените его на новый.
Для проверки работоспособности SATA-кабеля и провода питания:
- Отсоедините и заново присоединение кабель к жёсткому диску. При этом имейте в виду, что у SATA-проводов на конце металлическая защёлка-фиксатор. Во избежание повреждения разъёма, вынимайте кабель с зажатым рычажком.
- После этого необходимо перезагрузить компьютер.
- Если проблема не решилась — используйте другой провод и включите его в другой порт (если у вашего ПК есть DVD-привод, то SATA-кабель можно взять от него). Если для подключения вы использовали переходник Molex-SATA, попробуйте обойтись без него.
Если не работает внешний жёсткий диск, аналогично необходимо проверить правильность подключения:
- включить в другой USB-разъём, например, на тыльной, а не фронтальной панели. Если диск подключается с помощью двух USB-проводов, проверьте оба подключения.
- В случае повреждения USB-провода, замените его на новый.
- Подключите накопитель к другому устройству.
2. Отформатируйте и инициализируйте жёсткий диск


Повреждённые файлы жёсткого диска — возможная причина нераспознанной памяти (RAW). Для устранения ошибки необходимо удалить повреждённую информацию путём форматирования устройства. При этом все данные, которые хранятся на диске, будут утеряны. Как восстановить удалённые файлы, расскажем в следующем разделе.
Для запуска процесса форматирования:
В разделе MBR можно создавать до 4 основных разделов (остальные — дополнительные), они не ограничены по объёму. В GPT — неограниченное число основных разделов объёмом до 2 ТБ. Соответственно, если диск объёмом больше 2 ТБ, выбирайте GPT, меньше — MBR. После выбора раздела остаётся нажать кнопку «ОК».
Если у вас не работает внешний жёсткий диск, последовательность действий следующая:
- Подключите накопитель к компьютеру.
- Откройте «Управление дисками» и щёлкните правой кнопкой мыши по внешнему жёсткому диску с чёрной областью («не распределена») или статусом RAW.
- «Форматировать» → «NTFS» /«exFAT» → «ОК».
3. Восстановите файлы из раздела RAW и создайте новый раздел
Восстановление данных с жёсткого диска
Чтобы восстановить информацию, необходимо использовать стороннее ПО (например, DiskGenius, Recoverit и прочие). Оно целиком сканирует удалённый раздел и позволяет вернуть потерянную информацию из пространства RAW.
Программа пометит потерянный раздел, после чего его можно будет напрямую отсканировать:
- Выберите нужный диск с удалённой информацией → «Сканировать».
- После завершения сканирования используйте «Фильтр» или «Поиск» для выбора файлов.
- Отметьте необходимые файлы → «Восстановить». Затем сохраните их в другом безопасном месте.
Перед выполнением дальнейших действий, удостоверьтесь, что информация действительно сохранились в указанном месте.
Создание нового раздела
После извлечения важных данных создайте новый раздел для появления жёсткого диска в системе:
4. Назначьте диску букву

Если два диска в системе имеют одинаковую букву, или у жёсткого диска нет буквы, компьютер не понимает, какое устройство открывать. В такой ситуации в разделе «Управление дисками» у устройства будет статус «Новый том».
Для указания новой буквы:
5. Запустите средство устранения неполадок оборудования и устройств

Windows предлагает пользователям средство устранения неполадок оборудования, упрощая поиск и исправление ошибок в аппаратных устройствах:
6. Проверьте наличие обновлений драйверов

Чтобы проверить, есть ли у драйверов, доступные обновления:
О том, что у жёсткого диска устарел драйвер, свидетельствует жёлтый восклицательный знак. Варианты решения:
- Щёлкните правой кнопкой мыши по устройству и выберите «Свойства» — посмотрите код ошибки, найдите её расшифровку в Google.
Однако второй способ проще:
Если внешний жёсткий диск не виден в проводнике только одного ПК, но идентифицируется другими, требуется обновить драйвер USB-контроллера компьютера, который не определяет накопитель:
7. Обновить операционную систему
Программисты Windows собирают фидбэк из системы пользователя и разрабатывают варианты устранения ошибок. Поэтому обновите Windows до последней версии с доступными исправлениями безопасности.
8. Просканируйте компьютер на вирусы
Вирусы — ещё одна возможная причина ошибки жёсткого диска. Они могут повредить данные, из-за чего в работе ОС возникают сбои. Запустите антивирусную программу для сканирования компьютера и удаления вредоносных файлов.
9. Включите диск в меню BIOS

ОС не может определить жёсткий диск, если он выключен в BIOS. Для его включения:
- Перезагрузите компьютер и нажмите F2/F3/Del в зависимости от установленной системы для входа в BIOS. По меню двигайтесь стрелками на клавиатуре.
- Выберите «Встроенные периферийные устройства» → «Ввод» → «Контроллер USB».
- Если жёсткий диск отключён (статус «disable»), поменяйте на «Enable» (включён).
- Сохраните и выйдите из BIOS.
Если вышеупомянутые способы не помогли, рекомендуем обратиться в сервисный центр для проверки жёсткого диска.




 Сообщение было отмечено durol как решение


