Содержание
- Не работает внешний жесткий диск! ПОМОГИТЕ!
- Комментарии 28
- Внешний жесткий диск не распознается — что делать?
- 1 Проверьте разъемы жесткого диска
- 2 Просмотр жесткого диска в «Управлении дисками»
- 3. Назначение буквы
- 4 Инициализация диска и создание тома
- 5 Форматирование внешнего жесткого диска
- 6 В крайнем случае: купите новый внешний жесткий диск
- Как подружить Windows с файловой системой macOS
- У APFS есть один большой недостаток
- Как исправить ситуацию
- Как это работает
- Что еще есть интересного
Не работает внешний жесткий диск! ПОМОГИТЕ!

Что мы имеем: MAC Book Pro 2012г. и внешний HDD на 2Тб USB 3.0. Когда я только купил жесткий всё работало нормально(система NTFS). Но после частого использования между двумя компами а соответственно между системами MAC OS и Windows произошел какой то сбой с жестким. Компьютер его видит, видит объем, сколько занято и свободно, а файлов на нём нет. Что делать? Через какую прогу открыть? Форматировать нельзя, ценная инфа. 🙂 Пробовал через «Dcommander», не получается. Кто что думает?
Комментарии 28

У меня самый печальный опыт работы с extFAT на маке. Парагон нтфс — единственное проверенное средство. Но если некорректно отключили диск от винды — восстановление может быть неудачным 🙁

Старый способ, зашёл на венде в систем папку а точнее его параметры, убрал галки с скрытых систем + отаброжать скрытые папки, смотришь на них ты их должен увидеть, скопируй. Если виндовс 7 то выделяешь все файлы и убираешь галку скрытый файл. Вот так 🙂 причём без тотала и комнд. строку да я в принципе не через реестр.

Под рукой нет компа с виндовсом… Попробую позже… Пока пробую варианты с маком.

Бывает такой вирус что скрывает папки, да не просто так…Через тоталкомандер заходишь он должен увидеть папки, и жмешь файл — изменить атрибуды и убираешь скрытый и все что там есть


сейчас посмотрим… СПС!

Ну там вроде в дисковой утилите есть восстановить кнопочка, не пробовали? Вообще когда используешь НТФС и под виндой и под Маком то он прописывает что то там, и может глюкнуть. Лучше восстановление делать из под винды мне кажется.
А вообще надо форматировать в формат FAT32 или ExtraFAT или как он называется, чтобы использовать с обоими системами. Либо использовать HTF Plus разметку, а из под винды читать и записывать с помощью утилиты спецомной. Но лучше универсальные форматы делать как выше описал.
Так если сделать формат под FAT32 то туда фильм размером 20 гигов не запишешь?! Или я не прав?
Прав, если нужны большие обьемы в одном файле то делай exFAT и сможешь записывать без проблем.
Во! Спасибо огромное. Будем знать.
вообще буквально недавно сам задавался этим вопросом, поищи в гугле и там куча статей где расписаны разные файловые системы и что лучше) Не ленись, пару минут всего)
Вроде бы HTF plus понадежнее будет да и файлы больше можно писать
В гугле, называется exFAT
exFat это то же fat долко уклон на работу с большими фалами и пропускная способность повше) но по надежности все равно уступает ntfs)
Человеку нужна гибкость в первую очередь) Когда там что еще ломанется не ясно, а вот используя парагоны и тд шанс больше
вообще буквально недавно сам задавался этим вопросом, поищи в гугле и там куча статей где расписаны разные файловые системы и что лучше) Не ленись, пару минут всего)
я со всех сторон ищу уже 🙂
а там одно и тоже везде)
Парагон говорят тоже ошибки делает и винт сажает. МНе кажется варианты безопасные следующие:
1. Формат под маковскую систему и на винде ставить прогу(по поиску найдется быстро) чтобы понимала HTF+
2. Формат под FAT32 или exFAT если файлы больше 4Гиг и обе ОС понимают их и никаких посредников что прописывают себя хрен знает куда.
парагон ставит дополгительные драйвера в которых прописаны файловые системы и как сними работать, по этому не верьте не кому он не как не может посадить винду)

реально, погуглите Tuxera NTFS

разбирать ЖД подключать его внутрь компа как обычный жд и прогонять на ошибки. я так спас внешний жд от формата
Источник
Внешний жесткий диск не распознается — что делать?
Разбираемся, как поступить, если Windows больше не распознает ваш внешний жесткий диск. Мы подготовили 6 советов, которые помогут решить проблему.


Если Windows не распознает внешний жесткий диск, у этого может быть множество причин. В большинстве случаев их легко найти и устранить, чтобы использовать диск без проблем. Тем не менее, дефекты самого железа также могут помешать вам получить доступ к внешнему накопителю. Здесь мы рассказывали, как понять, что жесткий диск скоро сломается.
Мы советуем проверить все возможные причины неполадок, шаг за шагом пройдя через каждый пункт этой инструкции.
1 Проверьте разъемы жесткого диска
Если ваш компьютер вообще не отображает внешний жесткий диск, проверьте, точно ли он подключен к нужному USB-порту и достаточно ли электропитания он получает. Большинство внешних жестких дисков имеют интерфейс USB 3.0. Это значит, что они должны быть подключены к соответствующему порту компьютера. Он, как правило, окрашен в синий цвет и, соответственно, хорошо виден.
Впрочем, серьезно навредить оборудованию, подключив его в неверный порт, вы не сможете, потому что стандарты USB 1.0, 2.0 и 3.0 совместимы друг с другом. Это значит, что ваш жесткий диск распознается и при подключении к порту более старого стандарта, но будет работать значительно медленнее. Если же накопитель вообще не работает, возможно, порт неисправен.
Часто для обнаружения жесткого диска помогает простое переключение в другой слот USB. Перезагрузка компьютера также может исправить ошибку. Если есть возможность, попробуйте подключить другой провод. Есть USB-кабели, которые предназначены только для зарядки и не позволяют передавать данные.
Также может помочь отключение USB-устройств, которые вы не используете сейчас, чтобы освободить необходимые USB-ресурсы в системе. Это происходит потому, что каждый USB-контроллер может работать с ограниченным количеством устройств.

В зависимости от используемого жесткого диска может оказаться, что он должен быть подключен не только к компьютеру через USB, но еще и через адаптер питания к электросети. В этом случае убедитесь, что вы используете правильный блок питания, и что жесткий диск питается от него.
Если с портами и проводами все в порядке, необходимо продолжить поиск и устранение причин неполадки, чтобы компьютер снова отображал жесткий диск.

2 Просмотр жесткого диска в «Управлении дисками»
Если ваш внешний жесткий диск больше не распознается, стоит проверить, видит ли Windows ваш внешний носитель в «Управлении дисками».

3. Назначение буквы
Если Windows распознала ваш внешний жесткий диск в разделе «Управление дисками», вы можете исключить, по крайней мере, возможный дефект кабеля USB, и будете знать, что ваш внешний носитель сам по себе работает без проблем. Поэтому теперь проверьте, была ли вообще назначена буква вашему внешнему жесткому диску. Такое назначение обязательно.
Если внешний накопитель был распознан системой, он будет указан в «Управлении дисками». Теперь там вы сможете увидеть обозначение диска, но у него может отсутствовать буква, например — (E). Чтобы ее назначить, сделайте следующее:

4 Инициализация диска и создание тома
Кроме того, перед первым использованием может потребоваться инициализация жесткого диска. Опять же, вы сможете это сделать с помощью «Управления дисками».
Шаги 2-й и 3-й могут быть пропущены, если уже установлен подходящий стиль раздела.
В конце щелкните нераспределенную область в управлении дисками и выберите «Новый простой том». Следуйте инструкциям, чтобы настроить жесткий диск.
5 Форматирование внешнего жесткого диска
Если предыдущий шаг не дал желаемого результата, то возможно, что жесткий диск неправильно отформатирован для вашей операционной системы, и процесс форматирования надо повторить. Помните, что при этом все данные на накопителе будут удалены.
6 В крайнем случае: купите новый внешний жесткий диск
Если всё это не помогает, ваш жесткий диск, скорее всего, неисправен. Но вам не придется тратить целое состояние на приобретение новой модели: загляните в наш рейтинг недорогих внешних накопителей.
Источник
Как подружить Windows с файловой системой macOS

APFS — файловая система, разработанная компанией Apple для замены использовавшейся ранее HFS+.
На данной файловой системе уже работают девайсы под управлением последних версий iOS и macOS.
У APFS есть один большой недостаток

Как и предыдущие версии файловых систем, разработанных Apple, APFS не поддерживается операционной системой Windows.
Если с родной для «окон» NTFS на Mac можно как минимум читать данные, то APFS не увидит ни один Windows-компьютер.
Об этом рано или поздно начинают задумываться все владельцы нескольких рабочих компьютеров с разными операционными системами или владельцы Mac, часто запускающие Windows через BootCamp.
Ну не на флешке же переносить данные из macOS.
Как исправить ситуацию

Простое и изящное решение проблемы предлагают ребята из Paragon Software, которые просто профи в подобных делах. Подружить враждующие файловые системы можно при помощи специальной утилиты APFS for Windows.
Программа стала логичным развитием Paragon HFS+ for Windows. Со старыми Mac, которые не обновляются до macOS Sierra, нужно использовать именно её.

APFS for Windows представляет из себя системный драйвер для Windows, который и позволяет полноценно работать с накопителями, отформатированными в APFS. Поддерживается как чтение данных, так и запись на хорошей скорости.
Для доступа к важным данным предусмотрен режим монтирования read-only, защищающий оригиналы от перезаписи. APFS можно смонтировать даже из образа диска.
Поддерживаются как bit-to-bit raw copy диски, так и виртуальные диски популярных форматов VMDK,VDI,VHD,VHDX. Разработчики уже трудятся над поддержкой .E01 и .Ex0.
Как это работает

После установки Paragon APFS автоматически находит и монтирует все APFS-разделы и накопители, подключенные к компьютеру. После этого диски доступны в стандартном проводнике и сторонних файловых менеджерах.
Искать нужные данные довольно просто, ведь структура отображаемых папок будет идентична той, которую видит пользователь Mac.
Ничего сложного – разберется любая домохозяйка.
Что еще есть интересного

В macOS Mojave появилась поддержка шифрованных томов и APFS Container, которые составлены из нескольких физических разделов. Создатели Paragon APFS намерены добавить поддержку таких томов в следующих версиях продукта.
А вот прямая ссылка для загрузки.
Для тех, у кого «не приживется» файловая система APFS, в Paragon Software готовят приятный сюрприз — возможность конвертировать APFS обратно в HFS. Это уже тема для отдельной статьи.
Пока самое необходимое для всех активных пользователей macOS и Windows – APFS for Windows
Источник
ситуация: к маку был подключён внешний HDD, который использовался только под Windows. мак произвёл какие-то действия собственные и теперь при подключении к Windows диск хоть и обнаруживается, но в Моем компьютере и проводнике его нет в списке. что делать?
-
Вопрос заданболее трёх лет назад
-
11244 просмотра
Пригласить эксперта
Отформатировать его заново через диспетчер дисков. Скорее всего там все разделы в OSX FS (HFS/HFS+).
При подключении к макбуку вы диск форматировали? Вообще универсальный вариант — под любым Linux дистрибутивом открыть диск и достать данные, а потом отформатировать в NTFS чтобы ваша Windows смогла с ним работать.
-
Показать ещё
Загружается…
05 февр. 2023, в 13:03
5000 руб./за проект
05 февр. 2023, в 12:13
20000 руб./за проект
05 февр. 2023, в 11:48
5000 руб./за проект
Минуточку внимания

����� ���������� ���� ���, ����� ������� ����, ������� �������������� ��������� ��� ������ �����������. ��� ��������.
����� ���������� ��� � ��������� ����� — �� ����� ����.
� ��� ��������?
�����������, ��� ���� ����� ������ �� — ������ ����������� ���������� � ��������� �� � ��������� ��� ��� ������� ����?
I need help!!

������� ���� �� ��� ����� ������������� ��� �� ��� ����?
���� �� ��� ���� �� ����� �� �� ����� � ������ ����� ������ ��������� ������?
��
�������� �� ��� ����( ����� ����� ��� — ��� ����, ��������� ��� � ���� � �� ��� ����� �� ����� ��������
�� ����� ����� ������ ���������� �� �����)
�� � ���� ���� 2 ������, ������� � ����������� � ���� �� �� � ������� �������� ����� � ��� ��������!
������ � ������� FAT � ��� ������� � ��� � ���, ��� ���� �� ���� ������� ��������� NTFS, ��� �� ����� �������, ���� �� ����� ��������� ����� ���������.
����� �� ����� ��������� ��������� ����

Time Machine ��������� �� ��������� �������� ������� HFS+, ��� ���� �������/����� ��� ����� �������, ���� ������������ � FAT
��� ������� ������������, ����� ���-������ ������� � ��?
��������� NTFS �� ���� ���������� ������� ��� HFS+ �� �����
��,
�� ���� ������ ��������� �� ���� — ���� ����� ����� ������������� �����?
� ����� ��� ����� �������������� �� ����� ��� ������?
������� ���� ������������ ��� ������ � NTFS, ����������� � ���� � � ����, ��� ��������� ��������� NTFS �� ����������� �������. ��� ��� ���������.
)))
��� ��� ��� ������ ��������������� ���� ��� �� �����?)))
� �������� ��� � ���� � ������ � �� ���� ���.
������� ����� ������� — ������(
� ��������������� ����������� ������� ���������� �����?
������ ������������ ����������� ������ � ����� �� ���.

������ ���������� -> ����������������� -> ���������� ����������� -> ���������� �������
��� ���� ���� ����, ������� �� ����, ������� ������ �� ����� (���� Del), ������� ����� � �����������. �ӣ. ���� ���� �� ��������� 
� ��� ������� ������� ���� ����� � MBR ����������, � �� ����� ��� ����� ����� ����, ��� GPT �� ���� �� ����
� USB ����� ����� ���� GPT?
� ޣ ��� ��, ��� ���� ���� ������ �����������. ������ ���� ��� Mac OS �������������, ������ �������� ��� ��� GPT
��� ������ ��� �������:
������ �� ��� ����� — ��� �� �����.
)))
��� ������� ����� ��� ��� ����� �� ���������� �� �������� �����������������.
����� ���� ����� ��� ������
L@M ����� � 18:37
������� ���� ������������ ��� ������ � NTFS, ����������� � ���� � � ����, ��� ��������� ��������� NTFS �� ����������� �������
�������������� ��� ������, �� ��� ���� ���:
���������� �� �������. ������ �� �� �����, �� � ����� — ����������� ������ �� ���������� �� ������ ��������� �����.
�� � ��� ���������� ��������� ��������� �������. ������ ������ �� �����.
�������������� � exfat. ��� ���������� ����� ������������ ������ ���� ��� ������. ��� �� ����� �������� �� � ���, ����� hfs+
���! �������������� � ��������� ������� � ��� ����������!
� ��� ������������ �� ����, ����� �������� � ������� ��� �� ��.
��� ����� ������ ���������� ��� � �����!
�� ������ � ���� ��� ����� ��� ������� ����)
���� �������!
������� ��� ������������ �������� ���� ������� � ���, ������ ������ ������, ����� ��� �������� �� �������� � ������…
�� �� ��������, ������ � ������ ��������…
�� ��������, ��� ���������� �� ���� �� ����� �������� � ������, ����������������� � ntfs.

� ExFAT ������ �� ����� ?
��������� � ����� ������� ������ �����?
����� ����� ��� ��� ������ � NTFS �� ���� � HFS+ �� ����� ?
�����, exfat ����� ����������� � xp.. � ���, ��. �������.

�� ���� ��������� ��� � �� �� �����?
��� ���� ����. �������� ��� � �� ������� USB ����/����, �� ����� ���� �����.
���� � ������� ���� � �������, ��� �������� �� ��������.
������� ������ �� ���ģ�. ����� ������ � ������������.
��� �� ������ � ������������? ��� �����? ����� �� �����-�� �������������� ���� ��� ����?
����� ������ �� ������� ����� �� �������� ��� ���?
��� ������� ��������� — �����.
��� ���� � �� ����� — ����� ������ ����-����
�� �� �ݣ ���.����� ��������� )) ���� — ��� ��������� ����, � �� usb ���������� �������.
��������� ���� � ���� ���� ���(
� ���� ��� ����� ��������� ����.
���� �� �� ����������� ���������� ������������ �� ������������ � �� ����? ����� ����� ��ۣ��� ������� — ��������� ����� ������ �� ���� � ���� ����-������.
�������� — ������ � ���-����. ����� � ������������� ������ � ��������� ����� ��������.
� ���� �������� ��������� ����� ������ �� ��� � �� ���� � �� ������ �� ���.
��� ����� �������?
������ ����� — ��� � ���� ��������� ���� :�)))
��� ����� ������� ����� ��������, ���� �����, ���� ��, ����� � ��� �����.
������, � �� ������� ��� ���-�����?
����.
�� ��������� ��������� ���� ���� ������� ������ �� ���� ������
����….
����� � ������ �������� ��� ���������� ��?
vdn2004 �����(�)
���������
���� ��� ����� ���� �������� ������, ������ ���������� � ��������� ����� �����, � �� ������ �������� ������ 
��� � ��� ��� �������. �� � ��� ����������, ������ ţ �� �����������.
������� ��������� ������ �� �������� — ���������� �� �� �������� ������ � ������� ��� ����������, � �� ���-� ��������� ��������� ����� (��� ��� �������� �� ����, ��� �� ���������).
� ��� ���-�� ������������, ��� �������� �� ������ �� ����� �����, ��� ������� ����-���� ������� � ������ �������.
� �� �� ������ � ���, ��� ���-������� �� ������, � �������� ����� ���������� �� � �������.
�� ������� �� ������������� — ����-����.
���� �� ��������, �� ������������ ����� ������ � ������̣���� ������ �� ������ �� �����������. �� ������ ��������� ������� �����.
К сожалению, это непростой процесс; вы не можете просто подключить диск Mac и ожидать, что он заработает. Вот все, что вам нужно знать, чтобы он заработал.
Windows и macOS используют разные файловые системы. Windows использует файловую систему NTFS для своих внутренних дисков, тогда как Apple заменила HFS + своей преемницей — файловой системой Apple (APFS) — в начале 2017 года. Сегодня APFS используется на Mac, iPhone, iPad и Apple TV.
Внешние жесткие диски и USB-накопители обычно отформатированы в файловой системе Windows FAT32 для максимальной совместимости. Большинство устройств, включая Mac, могут читать и писать с устройств FAT32.
Все новые Mac будут отформатированы с APFS. Старые диски Mac, вероятно, по-прежнему отформатированы в файловой системе HFS +. По умолчанию Windows не может читать ни одну из файловых систем.
Мы покажем вам, как получить доступ к накопителю APFS или HFS + в формате Mac в Windows.
Как читать APFS в Windows
Во-первых, давайте посмотрим, как читать новый формат файловой системы Apple в Windows. Все эти приложения позволят вам читать диски с любого обновленного устройства Apple, а не только с Mac.
1. MacDrive
MacDrive долгое время был одним из популярных приложений. Первая версия была выпущена еще в 1996 году. Если вы готовы потратить немного денег, вам не нужно искать в другом месте.
- Приложение работает с дисками APFS и HFS +.
- В отличие от некоторых опций, MacDrive позволяет читать и записывать данные на диск, отформатированный для Mac, прямо из Windows.
- Приложение ориентировано на недавно переработанное окно управления дисками. Он действует как концентратор для всех дисков Mac, подключенных к Windows.
- Вы также сможете видеть свой APFS или HFS + диск непосредственно в проводнике, что позволяет легко интегрироваться с остальной частью операционной системы Windows.
- Другие полезные функции включают возможность создавать и разбивать диски Mac прямо с вашего ПК, мощную функцию восстановления дисков и надежные инструменты безопасности.
- Стандартная версия стоит 49,99 доллара. Также есть версия Pro. Он добавляет несколько дополнительных функций, включая автоматическую дефрагментацию файлов, поддержку настроек RAID и способ создания файлов Mac ISO.
- Доступна пятидневная бесплатная пробная версия.
Скачать: MacDrive для Windows 10 (49,99 долларов США)
2. Paragon APFS для Windows
Paragon APFS для Windows — еще одно платное приложение. Это главный конкурент MacDrive.
Приложение обеспечивает доступ для чтения и записи к разделам в формате APFS, доступ для чтения и записи к сжатым и клонированным файлам, а также поддержку только для чтения для зашифрованных томов.
Он поддерживает автоматическое монтирование дисков при запуске, но не имеет инструментов для создания разделов MacDrive.
ОЗНАКОМЬТЕСЬ С ШИРОКИМ СПЕКТРОМ РЕШЕНИЙ PARAGON ЗДЕСЬ
У MacDrive есть одно большое преимущество перед приложением Paragon: поддержка HFS +. Paragon APFS для Windows поддерживает только диски в формате APFS. Если у вас есть старые диски Mac, на которых все еще работает HFS +, вам нужно будет приобрести Paragon HFS + для Windows отдельно. Таким образом, MacDrive является более экономичным вариантом.
Одна лицензия, которая стоит 49,95 доллара США, работает на трех ПК с Windows.
Скачать: Paragon APFS для Windows 10 (49,95 долларов США)
3. Стандартный доступ к UFS Explorer
Наша третья и последняя рекомендация для чтения дисков APFS в Windows — это стандартное восстановление UFS Explorer. Опять же, это платный вариант. Приложение обойдется вам в 59,95 евро.
UFS Explorer Standard Recovery — самое универсальное приложение в этом списке. Он может читать два важных для нас формата — APFS и HFS +, а также NTFS, FAT, FAT32, exFAT, SGI XFS, Linux JFS, Unix / BSD, UFS / UFS2 и VMware VMFS.
Таким образом, это приложение, которое вам следует выбрать, если вы в течение дня переключаетесь между множеством разных операционных систем.
UFS Explorer Standard Recovery также имеет стандартную поддержку RAID. В приложении есть встроенный конструктор RAID, поэтому вы можете настроить его для своего массива.
Существует бесплатная версия приложения без ограничений по времени, но она позволяет копировать только файлы размером менее 256 КБ.
Скачать: UFS Explorer Standard Access для Windows 10 (59,95 евро)
Как читать HFS + в Windows
Если на вашем Mac-отформатированном диске все еще работает HFS +, используйте вместо этого один из этих трех методов.
1. Установите драйверы Apple HFS +.
Если вам нужен только доступ для чтения, вы можете установить драйверы Apple HFS + для Windows. Перед продолжением обязательно удалите Paragon или MacDrive.
Загрузите правильный пакет драйверов для Windows и выполните следующие действия:
- Скопируйте файлы ApplsHFS.sys и AppleMNT.sys в C: Windows System32 drivers
- Объедините файл Add_AppleHFS.reg с реестром Windows.
- Перезагрузите вашу систему.
Видео выше также демонстрирует процесс.
После перезагрузки ваш Mac-отформатированный диск должен появиться в разделе «Этот компьютер». Этот метод дает вам доступ только для чтения к диску. Если вы хотите отредактировать или удалить файлы, попробуйте один из альтернативных методов ниже.
2. HFSExplorer
HFSExplorer полностью бесплатен. Вы можете использовать его для доступа к файловым системам Mac из Windows, не платя ни копейки. Разработчик не обновлял его с октября 2015 года из-за появления APFS, но он по-прежнему работает на старых системах.
HFSExplorer требует Java. Обычно мы не рекомендуем устанавливать Java, но здесь она необходима, если вы не хотите тратить деньги. Вам также необходимо запустить приложение от имени администратора.
Этот инструмент прост в использовании. Подключите диск в формате Mac к системе Windows, откройте HFSExplorer и нажмите «Файл» -> «Загрузить файловую систему с устройства».
HFSExplorer может автоматически находить любые подключенные устройства с файловыми системами HFS + и открывать их. Затем вы можете извлечь файлы из окна HFSExplorer на свой диск Windows.
Обратите внимание, что HFSExplorer доступен только для чтения, поэтому вы не можете изменять или удалять файлы на вашем Mac-диске. Он также не интегрируется с проводником Windows — файлы доступны в приложении HFSExplorer, и вы должны скопировать их в другое место.
Скачать: HFSExplorer для Windows 10 (бесплатно)
3. Paragon HFS + для Windows
Paragon HFS + for Windows — это платное приложение, но оно отличается дополнительными функциями.
В отличие от HFSExplorer, Paragon HFS + для Windows обеспечивает полный доступ для чтения / записи к дискам Mac и обещает высокую производительность. Он даже интегрирует файловые системы HFS + с проводником Windows или проводником в Windows. Любая программа Windows может читать или записывать на диск Mac.
Приложение стоит 19,95 долларов, но также предлагает 10-дневную бесплатную пробную версию. Если вам нужно восстановить файлы с диска, 10 дней — это достаточно времени, чтобы установить драйвер файловой системы, скопировать файлы и удалить его.
Paragon HFS + не требует Java для работы.
Скачать: Paragon HFS + для Windows 10 (19,95 долларов США)
Отформатируйте Mac Drive для Windows
Если у вас есть диск Mac, и у вас больше нет Mac, вы не застрянете с файловой системой Mac навсегда. После восстановления файлов с вашего диска с помощью одного из перечисленных выше инструментов вы можете затем отформатировать диск и преобразовать его в стандартный раздел FAT32, который будет работать с большинством устройств.
Форматирование приведет к удалению всех файлов на вашем диске, поэтому убедитесь, что вы создали резервные копии своих файлов. Чтобы отформатировать диск, используйте диалоговое окно, которое появляется при подключении диска к компьютеру.
Узнайте, как подружить Mac и ПК.
macOS и Windows имеют массу отличий, одно из главных — файловая система. И если на Mac NTFS-диски можно хотя бы читать, то Windows диски, отформатированные в HFS+, не видит вообще. Но если вам очень надо, то есть несколько обходных путей.
Ситуации, когда это может понадобиться, бывают разными. Самая распространённая — это доступ к вашим файлам из Windows, установленной через Boot Camp (по умолчанию доступно только чтение файлов). В таких случаях либо ставят драйвер HFS+, добавляющий поддержку файловой системы Apple в Windows, либо используют специальные утилиты, которые уже умеют работать с HFS+. Мы рассмотрим оба варианта плюс ещё один, бонусный.
Способ 1. Работаем с HFS+ через драйверы
Драйверы хороши тем, что добавляют поддержку HFS+ на системном уровне, а значит, Mac-диски будут отображаться в «Проводнике» и других приложениях. Драйвер загружается при старте Windows, и разница между файловыми системами попросту перестаёт существовать: вы можете работать с дисками любых форматов.
Главное преимущество драйверов — это поддержка как чтения, так и записи файлов. Кроме того, этот способ обеспечивает максимально возможную скорость передачи данных. В качестве минуса можно упомянуть высокую цену: все популярные драйверы, обеспечивающие стабильную работу, довольно дороги.
Paragon HFS+ for Windows
Самый популярный драйвер с полной поддержкой HFS+ на дисках любого типа (GPT и MBR) и набором дополнительных утилит. Отличается высокой производительностью при передаче файлов большого объёма по различным интерфейсам, включая SATA и USB. Совместим с Windows 10.
Лицензия стоит относительно недорого — 790 рублей. При этом есть 10-дневная пробная версия.
Попробовать Paragon HFS+ for Windows →
MacDrive
Более мощный драйвер с дополнительными возможностями. MacDrive умеет всё то же, что и драйвер от Paragon, но при этом позволяет открывать резервные копии Time Machine и копировать файлы из них на Windows-диски. Также драйвер работает в виртуальных машинах и позволяет монтировать Mac-диски в режиме Target Disk Mode для загрузки на других компьютерах.
MacDrive стоит дороже — целых 50 долларов. Пробная версия тоже есть, но на 5 дней.
Попробовать MacDrive →
Способ 2. Работаем с HFS+ через утилиты
Работа с Mac-дисками через специальные приложения предоставляет более ограниченную поддержку HFS+. Доступ к файловой системе при этом будет возможен только в них, а в «Проводнике» диски даже не будут отображаться. Обычно приложения позволяют только просматривать и копировать файлы, но не записывать.
Утилиты для работы с HFS+ стоят гораздо дешевле, причём встречаются даже бесплатные. Этот способ подойдёт тем, кому нужно только чтение файлов. Кроме того, с помощью не требующих установки утилит можно просматривать файлы с Mac-дисков на компьютерах, где нельзя установить драйвер или стороннее ПО.
HFSExplorer
Простая и, что немаловажно, бесплатная утилита, которая позволит просматривать файлы с дисков HFS+ в среде Windows. HFSExplorer открывает содержимое Mac-дисков в виде дерева каталогов, где можно выбрать нужные файлы. Для просмотра их нужно скопировать на диск Windows. Также есть возможность создания образов дисков HFS+ для последующей работы уже с ними.
Утилита HFSExplorer не так удобна, как драйверы, и умеет только просматривать файлы, зато не стоит ни копейки.
Скачать HFSExplorer →
TransMac
Как и HFSExplorer, TransMac не устанавливает драйверы в систему, а открывает доступ к дискам HFS+ внутри своего окна. Более того, приложение вообще не нужно инсталлировать, благодаря чему его можно использовать на рабочем компьютере или в гостях. При этом доступны не только чтение, но и запись данных. Есть даже поддержка изменения и форматирования разделов на дисках HFS+.
Утилита будет полезна всем, кто по каким-либо причинам не хочет (или не может) установить драйверы, но нуждается в полноценной поддержке HFS+.
Стоимость лицензии — 59 долларов, ознакомительный период — 15 дней.
Скачать TransMac →
Бонус
Если вы не хотите тратиться и заморачиваться с установкой драйверов или дополнительных утилит, можно поступить по-другому: воспользоваться Live-USB-дистрибутивом Linux. Загрузившись с него, вы получите доступ ко всем вашим дискам, включая HFS+ и NTFS, а затем сможете просмотреть или скопировать любые файлы на них. Так умеет, например, Ubuntu.
Установочный образ обычно имеет и Live USB, поэтому всё, что вам останется сделать, — это скачать образ и записать его на флешку.
What you know: When you plug in an external drive disk utility into your Mac, you expect it to pop up and be showing up on mac in Locations in Finder — next to your remote disk and the computer itself. But sometimes you meet the «external hard drive not showing us» issue. And it’s troubling.
What you might not know: There can be many reasons for an external hard drive not reading a Mac — poor connection, faulty cable, dirty USB, or, in the worst-case scenario, corrupt hard drive data.
Why you must fix it immediately: Data on your Mac is stored on a hard drive, whether it’s internal or external. If this external drive isn’t showing up on Mac system, some deeper issues might need to be fixed.
Luckily, there are many things you can try before fixing the external hard drive or external disks issue. This article will teach you how to fix your harddisks or external hard drive not showing up on Mac using built-in tools such as the Disk Utility or the Terminal.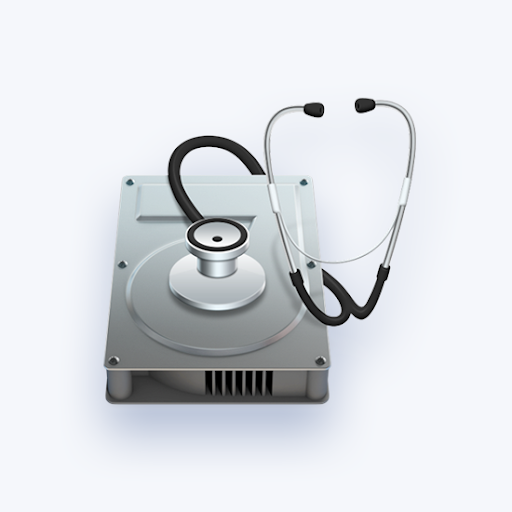
Before we start…
Fixing a problem with an external drive on Mac or other external disks can be really hard, particularly for non-tech-savvy users. If you can’t follow through with the steps we’ve provided below, just ask for help from a real pro! But, if you’re eager to fix this issue yourself, keep reading and following the solutions to fix the external hard drive not showing on Mac.
Now, let’s dive in.
Why Mac does not recognize external hard drive
- The drive isn’t properly plugged in. If the external device isn’t connected to your computer the proper way, you’ll experience connectivity issues. Make sure to check that the USB drive cable or HDMI cable used to connect the hard drive disk utility is properly plugged into your device.
- There’s something wrong with the cable, for example, the connection cable is damaged. If the external hard disk’s connection is damaged, it’s not going to allow a connection. The damage might not be visible to the eye — try using a different cable for testing.
- Your Mac hasn’t been restarted. In some cases, Mac computers may start to experience issues due to not being restarted for an extended period of time. Try giving your device a restart by holding down the power button, or choosing Apple menu → Restart.
- Faulty mac hardware, such as a power supply problem or bad USB port. If possible, try connecting a different external drive to your Mac to check if the same issue happens. If the drive shows up with no problems, the problematic drive may be damaged.
- Your external hard drive has been corrupted or broken
- The external hard drive is not set to be readable on macOS
How to access external hard drive not recognized on a Mac
Below are the methods to address the internal hard drive not showing up on Mac OS.
#1. Ensure cable has sufficient power
Some hard drives require more power supply than others. Equally, different types and brands of cables provide more or less energy. Normally, a device requires up to 500 mA, which can be provided by a standard USB 1.0 or 2.0. But if your external hard disk needs a stronger power output, it may work slower than expected or even not connect at all. So, check that your USB drive cable is delivering enough power to the hard drive and, if need be, swap to a more powerful connector or to a different USB port on your Mac.
If this doesn’t work, try Other Devices for the external hard drive’s Power Supply because the problem might be in your Mac’s hardware. You can try using another Mac or Windows PC and see if it only works on another Mac or PC.
#2. Edit preferences and change settings
If this is not your first time using an external hard drive disk utility and experiencing such a problem, it is not likely to be an issue for you. But you could still check your preferences — just in case. Why?
Your Mac settings might not be set to display external drives on the desktop. So, to fix that,
- Go to Finder and click on the Finder button in the menu bar at the top of the screen.
- Follow Preferences → General → Show these items on the desktop.

- Make sure you tick the boxes next to External disks and Hard disks.

- Then go to Sidebar and check Hard disks and External disks there as well.

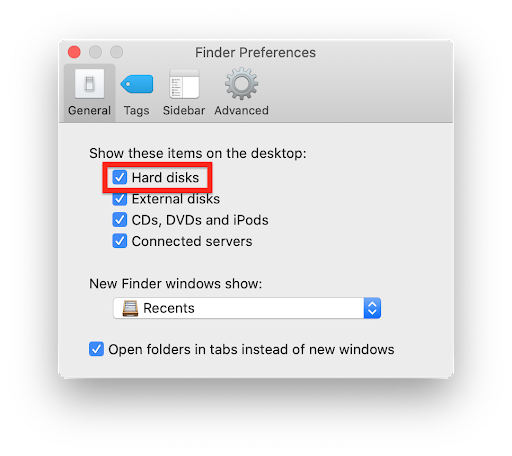


That should fix external hard drive not showing up on mac issue. If not, move to the next external hard drive not showing solution.
#3. Boot in Safe Mode
You can try booting your Mac in Safe Mode in order to fix the external hard drive disk utility not showing up on Mac. This method might allow you to do extra troubleshooting if your computer doesn’t boot up normally.
- Power down the computer.
- Press the Power button, then immediately press and hold the Shift key on your keyboard.
- Release the Shift key when the login screen is visible. Sign in using your details and see if the internal hard disk is visible in Safe Mode.
#4. Repair mac with Recovery Mode
If your Mac won’t boot up as it detects the startup disk is missing, try using Recovery Mode by following the steps below.
- Boot into Recovery Mode using the methods below, depending on the chip in your computer:
- Turn off your computer.
- Press and hold the Power button until you see that the device is booting into Recovery Mode.
- Click on Options, and then click on Continue.
- Command + R
- Command + Option + R
- Command + Shift + Option + R
- Apple Silicon M1 chip (2020 and later); Here are the steps to boot your Mac in Recovery mode if you’re using an Apple chip:
- Intel chip (more common); More common in computers or Macbooks made before 2020. Use any of the following keyboard combinations while your device is booting:
- Once in Recovery Mode, select Disk Utility from the macOS Utilities menu.

- If visible, select the internal hard drive from the left side panel by clicking on it once. Next, click on the First Aid button to begin the repair process.

Use the following methods to fix external hard drive not showing up on Mac:
#1. Repair external hard drive with First Aid
The First Aid tool allows you to potentially fix a failed external hard drive and recover data from it. The tool is able to identify issues and attempt to fix them — this may help you save your data before it’s too late.
- Click on the Launchpad in your dock.

- Search for the Disk Utility application and open it once located. You can see the current icon for the application in the image above.
- Select the external hard disk you’re having issues with by clicking on it in the left-side panel on the disk utility. Next, click First Aid and then click on Run. You’ll be notified if the system detects any issues with the hard disk.
- If the process fails to fix your external hard drive, you have two options: either try to repeat the steps and run First Aid again to attempt recovery, or save as much data as you can and attempt formatting.


#2. Use Terminal to troubleshoot
The Terminal app is a last-resort solution for average users because they tend to find it complicated. However, it’s almost always effective and isn’t actually that bad. Using the Terminal, you’re able to potentially eject the external hard drive and reconnect it properly. This can be done by entering a few commands if you carefully follow the steps:
- Open the Terminal from your Launchpad or by navigating to Applications → Utilities → Terminal in a Finder window. You can see the current icon for the application on the image above.

Type in the following command and press the Enter key to execute it: diskutil list
- You’ll see a list of your hard drives. Search for a header line that says “/dev/disk* (external, physical)” with the asterisk being your disk’s identifying number. (See image above for examples of header lines.)
- Type in the following command, but replace the asterisk with the identifying number of your disk: diskutil info disk*
- If your system is able to recognize the drive, it’ll display further information about it. In this case, type in the following command to eject the drive. Make sure to once again replace the asterisk with the identifying number of your disk: diskutil eject disk*
- Check if the drive is gone from the list, then plug it out of your Mac. Try plugging it in once again to mount it with a fresh connection.


Note: If you’re running macOS Mojave or Catalina, you might come across the “Operation not permitted” error when entering a Terminal command. This is not a software bug — it occurs due to additional System Integrity Protection security measures that Apple introduced in the newer versions of the operating system. It locks down certain areas of the system and only relieves the lockdown during updates. In this case, to fix the external hard drive not showing up error, you need to grant Terminal full disk access:
- Quit Terminal and go to the Apple Menu → System Preferences → Security and Privacy → Privacy
- Scroll down the menu on the left until you see Full Disk Access
- To make changes to the list of apps that have the permission, click on the lock symbol in the bottom left corner of the window and enter your password when prompted;
- Click on the Plus button to add a new utility to the list. Look for Terminal in Applications → Utilities
- Once you’ve added Terminal, click on the padlock again to disable access to editing.
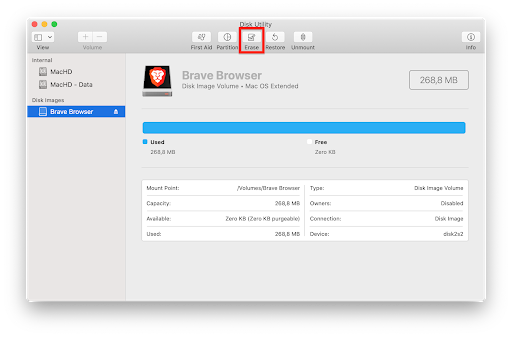
#3. Format external hard drive with disk utility
After formatting the external hard drive, users have reported that it properly connects to their Mac without any issues. This happens because some hard drives aren’t formatted to be Mac-friendly, meaning that the system is unable to recognize them. Here are the steps to format your external drive:.
- Plug in the hard drive and ensure it’s plugged in correctly. This will establish the connection between the external drive and your Mac.
- Open the Disk Utility from your Launchpad or by navigating to Applications → Utilities → Disk Utility in a Finder window. You can see the current icon for the application on the image above.
- Select the drive you’re having issues with from the left-side panel (external hard drive), then click on the Erase button. (See image above)
- Open the Format drop-down menu and select any of the Mac OS compatible formats. Keep in mind that formatting the drive will erase all of its contents!
- Click on the Erase button to begin the formatting process.


#4. Reset NVRAM
The nonvolatile random-access memory (NVRAM) stores the local settings of your Mac and can help solve the external hard drive issue. Sometimes, the NVRAM might experience issues or bugs which lead to your external disks not showing up in the system. Luckily, you can reset this easily by following the steps below.
- Click on the Apple logo in the top menu bar of your screen, then choose Restart.
- Hold the Command + Option + P + R keys on your keyboard simultaneously as your computer is booting up.
- This is going to cause your computer to restart again. When you hear the restart sound again, you can release the keys and let your Mac reboot.
Note: You don’t have to restart the computer on new generation Macs. Simply press down the keyboard combination for about 30 seconds and your NVRAM will be reset.
#5. Change hard drive format
Macs use HFS+ or APFS format, whereas Windows computers employ NTFS. FAT32 and exFAT are recognized by both Mac and Windows PCs. You can check the formatting by going to the Apple menu at the top of the screen and following About This Mac → Storage.
If you see that your device’s format is not Mac friendly, you can change it through the following steps:
- Plug in the connector of your device slowly into the port of your Mac — this ensures proper initiation
- Go to Applications → Utilities → Disk Utility
- You should be able to see the external drive under the External heading in the sidebar on the left. Click on it to open the drive’s information
- In the menu bar at the top of the window, click on Erase and choose the format compatible with your Mac device
- Initiate reformatting. Bear in mind — all of your hard drive’s contents will be erased during the process
But, if you can’t sacrifice the data on the disk, you can reformat it using a Windows PC using the following steps:
- Connect your drive to a Windows PC
- Locate the drive in the sidebar in the File Explorer
- Copy all of the drive’s contents into a separate folder on the PC
- Right-click on the drive’s icon and choose Format from the drop-down menu
- Choose a format that’s compatible with both Mac and Windows devices — exFAT is the most modern and preferred one
- Name your hard drive in the Volume label window
- Click Start to initiate formatting. It should only take a few seconds until it’s done, and then you can use your hard drive on a Mac device
- Make sure to transfer the data back to the disk from the folder you’d created
How to avoid external hard drive not mounting on Mac
- check that the disk is in the right format for your operating system,
- check that it has a strong enough power supply
- check that the connector of your USB cable is not damaged.
However, there are several additional things that you can do to avoid future complications, such as:
#1. Make sure the USB port is clean and properly connected. Dirty or loosely connected USB ports can create short currents, make the external hard drive not show up on Mac, and even make theexternal hard disk struggle to read data if it shows up. It’s common for a connector to get a bit wonky if you’ve used it for a while — the power contacts won’t align correctly and this can cause the hard disk not showing up issue. Avoid keeping dirty USB ports, get them cleaned by blowing compressed air into the port, or find new ones.
#2. Properly eject the external drive device — always. Removing the drive without safe ejection can corrupt data on the device, which in the future can make your Mac unable to recognize it. Any operating system employs write caching — files are not immediately written on your hard drive when you transfer it or back it up, but are cached until all the side writing and reading operations are finished. Always remove your USB safely to protect the hard drive.
#3. Keep your Mac operating system up to date. An out-of-date operating system causes problems in all your Mac’s functioning areas. Updates improve stability and performance, as well as ensure your Mac’s security and minimize the risk of your files getting corrupted.
Final thoughts and Recomended Further Reading
If you need any further help with Mac, don’t hesitate to reach out to our customer service team, available 24/7 to assist you. Return to us for more informative articles all related to productivity and modern-day technology!
Would you like to receive promotions, deals, and discounts to get our products for the best price? Don’t forget to subscribe to our newsletter by entering your email address below! Receive the latest technology news in your inbox and be the first to read our tips to become more productive.
Also Read:
» Fixed: MacBook Pro Booting Black Screen
» Mac Startup Disk is Almost Full: 10 Ways to Clear Space on Your Mac
» How to Change DNS Settings on a Mac
Hard Drive Not Showing on Mac FAQ
What do I do if my external hard drive is not detected?
If your external hard drive is not detected, follow these steps to fix the issue:
- Go to Applications and open Utilities
- In the Utilities folder, select Disk Utility
- In the View menu at the top of your screen, select Show All Devices
- Select your external drive and click Unmount
- Connect your external hard disk again
Why is my external hard drive not readable on Mac?
Your external hard drive is not readable on Mac because it is formatted in NTFS, HFS+, or another format not supported by macOS. A loosely connected or frayed USB cable is another possible reason the external drive is not recognized by your Mac. Change the cable to fix the issue. If your external hard drive is not readable on Mac, try plugging it in slowly. USB 2.0 connectors, which can be found on older external drives, have a design flaw making the slow connection necessary.
How do I revive a dead hard drive?
If you find your hard drive breaking down while it’s connected to your computer, it’s best to stop using it as soon as possible. To check if the problem is in the device itself, try connecting it to a different port or even a different computer. Try a different cable as well.
If these simple operations don’t work, you’ll have to open and examine the disk. Pay attention to the sounds that it makes when activated. For instance, a clicking noise indicates a malfunctioning head assembly — the part of the hard drive that reads data off its platters. The recommendation is to have it fixed by a professional most of the time. You shouldn’t attempt to repair the drive at home as there is a low chance of success and you’re likely to damage the data stored on the disk.
Why does my Mac shut down when I connect a hard drive?
Just as some hard drives are not recognized because they don’t get enough power, some of them drain too much from your Mac. In this case, the system management controller will automatically shut the laptop down to protect it. If you think that that’s the case, try connecting the disk to an external power source such as a USB hub and reset your SMC.
If your Mac has a removable battery, use these steps to recent the SMC:
- Shut down your Mac and disconnect it from all sources of power, including the battery
- Hold the power button for 5 seconds
- Reconnect your Mac to the power source and put the battery back in
- Turn the Mac back on
If your battery is unremovable:
- Shut down your Mac and disconnect it from the charger
- Hold Shift + Control + Option + Power button for 10 seconds
- Release the keys and reconnect the Mac with the power source
- Turn the Mac back on
What you know: When you plug in an external drive disk utility into your Mac, you expect it to pop up and be showing up on mac in Locations in Finder — next to your remote disk and the computer itself. But sometimes you meet the «external hard drive not showing us» issue. And it’s troubling.
What you might not know: There can be many reasons for an external hard drive not reading a Mac — poor connection, faulty cable, dirty USB, or, in the worst-case scenario, corrupt hard drive data.
Why you must fix it immediately: Data on your Mac is stored on a hard drive, whether it’s internal or external. If this external drive isn’t showing up on Mac system, some deeper issues might need to be fixed.
Luckily, there are many things you can try before fixing the external hard drive or external disks issue. This article will teach you how to fix your harddisks or external hard drive not showing up on Mac using built-in tools such as the Disk Utility or the Terminal.
Before we start…
Fixing a problem with an external drive on Mac or other external disks can be really hard, particularly for non-tech-savvy users. If you can’t follow through with the steps we’ve provided below, just ask for help from a real pro! But, if you’re eager to fix this issue yourself, keep reading and following the solutions to fix the external hard drive not showing on Mac.
Now, let’s dive in.
Why Mac does not recognize external hard drive
- The drive isn’t properly plugged in. If the external device isn’t connected to your computer the proper way, you’ll experience connectivity issues. Make sure to check that the USB drive cable or HDMI cable used to connect the hard drive disk utility is properly plugged into your device.
- There’s something wrong with the cable, for example, the connection cable is damaged. If the external hard disk’s connection is damaged, it’s not going to allow a connection. The damage might not be visible to the eye — try using a different cable for testing.
- Your Mac hasn’t been restarted. In some cases, Mac computers may start to experience issues due to not being restarted for an extended period of time. Try giving your device a restart by holding down the power button, or choosing Apple menu → Restart.
- Faulty mac hardware, such as a power supply problem or bad USB port. If possible, try connecting a different external drive to your Mac to check if the same issue happens. If the drive shows up with no problems, the problematic drive may be damaged.
- Your external hard drive has been corrupted or broken
- The external hard drive is not set to be readable on macOS
How to access external hard drive not recognized on a Mac
Below are the methods to address the internal hard drive not showing up on Mac OS.
#1. Ensure cable has sufficient power
Some hard drives require more power supply than others. Equally, different types and brands of cables provide more or less energy. Normally, a device requires up to 500 mA, which can be provided by a standard USB 1.0 or 2.0. But if your external hard disk needs a stronger power output, it may work slower than expected or even not connect at all. So, check that your USB drive cable is delivering enough power to the hard drive and, if need be, swap to a more powerful connector or to a different USB port on your Mac.
If this doesn’t work, try Other Devices for the external hard drive’s Power Supply because the problem might be in your Mac’s hardware. You can try using another Mac or Windows PC and see if it only works on another Mac or PC.
#2. Edit preferences and change settings
If this is not your first time using an external hard drive disk utility and experiencing such a problem, it is not likely to be an issue for you. But you could still check your preferences — just in case. Why?
Your Mac settings might not be set to display external drives on the desktop. So, to fix that,
- Go to Finder and click on the Finder button in the menu bar at the top of the screen.
- Follow Preferences → General → Show these items on the desktop.
- Make sure you tick the boxes next to External disks and Hard disks.
- Then go to Sidebar and check Hard disks and External disks there as well.
That should fix external hard drive not showing up on mac issue. If not, move to the next external hard drive not showing solution.
#3. Boot in Safe Mode
You can try booting your Mac in Safe Mode in order to fix the external hard drive disk utility not showing up on Mac. This method might allow you to do extra troubleshooting if your computer doesn’t boot up normally.
- Power down the computer.
- Press the Power button, then immediately press and hold the Shift key on your keyboard.
- Release the Shift key when the login screen is visible. Sign in using your details and see if the internal hard disk is visible in Safe Mode.
#4. Repair mac with Recovery Mode
If your Mac won’t boot up as it detects the startup disk is missing, try using Recovery Mode by following the steps below.
- Boot into Recovery Mode using the methods below, depending on the chip in your computer:
- Turn off your computer.
- Press and hold the Power button until you see that the device is booting into Recovery Mode.
- Click on Options, and then click on Continue.
- Command + R
- Command + Option + R
- Command + Shift + Option + R
- Apple Silicon M1 chip (2020 and later); Here are the steps to boot your Mac in Recovery mode if you’re using an Apple chip:
- Intel chip (more common); More common in computers or Macbooks made before 2020. Use any of the following keyboard combinations while your device is booting:
- Once in Recovery Mode, select Disk Utility from the macOS Utilities menu.
- If visible, select the internal hard drive from the left side panel by clicking on it once. Next, click on the First Aid button to begin the repair process.
Use the following methods to fix external hard drive not showing up on Mac:
#1. Repair external hard drive with First Aid
The First Aid tool allows you to potentially fix a failed external hard drive and recover data from it. The tool is able to identify issues and attempt to fix them — this may help you save your data before it’s too late.
- Click on the Launchpad in your dock.
- Search for the Disk Utility application and open it once located. You can see the current icon for the application in the image above.
- Select the external hard disk you’re having issues with by clicking on it in the left-side panel on the disk utility. Next, click First Aid and then click on Run. You’ll be notified if the system detects any issues with the hard disk.
- If the process fails to fix your external hard drive, you have two options: either try to repeat the steps and run First Aid again to attempt recovery, or save as much data as you can and attempt formatting.
#2. Use Terminal to troubleshoot
The Terminal app is a last-resort solution for average users because they tend to find it complicated. However, it’s almost always effective and isn’t actually that bad. Using the Terminal, you’re able to potentially eject the external hard drive and reconnect it properly. This can be done by entering a few commands if you carefully follow the steps:
- Open the Terminal from your Launchpad or by navigating to Applications → Utilities → Terminal in a Finder window. You can see the current icon for the application on the image above.
Type in the following command and press the Enter key to execute it: diskutil list - You’ll see a list of your hard drives. Search for a header line that says “/dev/disk* (external, physical)” with the asterisk being your disk’s identifying number. (See image above for examples of header lines.)
- Type in the following command, but replace the asterisk with the identifying number of your disk: diskutil info disk*
- If your system is able to recognize the drive, it’ll display further information about it. In this case, type in the following command to eject the drive. Make sure to once again replace the asterisk with the identifying number of your disk: diskutil eject disk*
- Check if the drive is gone from the list, then plug it out of your Mac. Try plugging it in once again to mount it with a fresh connection.
Note: If you’re running macOS Mojave or Catalina, you might come across the “Operation not permitted” error when entering a Terminal command. This is not a software bug — it occurs due to additional System Integrity Protection security measures that Apple introduced in the newer versions of the operating system. It locks down certain areas of the system and only relieves the lockdown during updates. In this case, to fix the external hard drive not showing up error, you need to grant Terminal full disk access:
- Quit Terminal and go to the Apple Menu → System Preferences → Security and Privacy → Privacy
- Scroll down the menu on the left until you see Full Disk Access
- To make changes to the list of apps that have the permission, click on the lock symbol in the bottom left corner of the window and enter your password when prompted;
- Click on the Plus button to add a new utility to the list. Look for Terminal in Applications → Utilities
- Once you’ve added Terminal, click on the padlock again to disable access to editing.
#3. Format external hard drive with disk utility
After formatting the external hard drive, users have reported that it properly connects to their Mac without any issues. This happens because some hard drives aren’t formatted to be Mac-friendly, meaning that the system is unable to recognize them. Here are the steps to format your external drive:.
- Plug in the hard drive and ensure it’s plugged in correctly. This will establish the connection between the external drive and your Mac.
- Open the Disk Utility from your Launchpad or by navigating to Applications → Utilities → Disk Utility in a Finder window. You can see the current icon for the application on the image above.
- Select the drive you’re having issues with from the left-side panel (external hard drive), then click on the Erase button. (See image above)
- Open the Format drop-down menu and select any of the Mac OS compatible formats. Keep in mind that formatting the drive will erase all of its contents!
- Click on the Erase button to begin the formatting process.
#4. Reset NVRAM
The nonvolatile random-access memory (NVRAM) stores the local settings of your Mac and can help solve the external hard drive issue. Sometimes, the NVRAM might experience issues or bugs which lead to your external disks not showing up in the system. Luckily, you can reset this easily by following the steps below.
- Click on the Apple logo in the top menu bar of your screen, then choose Restart.
- Hold the Command + Option + P + R keys on your keyboard simultaneously as your computer is booting up.
- This is going to cause your computer to restart again. When you hear the restart sound again, you can release the keys and let your Mac reboot.
Note: You don’t have to restart the computer on new generation Macs. Simply press down the keyboard combination for about 30 seconds and your NVRAM will be reset.
#5. Change hard drive format
Macs use HFS+ or APFS format, whereas Windows computers employ NTFS. FAT32 and exFAT are recognized by both Mac and Windows PCs. You can check the formatting by going to the Apple menu at the top of the screen and following About This Mac → Storage.
If you see that your device’s format is not Mac friendly, you can change it through the following steps:
- Plug in the connector of your device slowly into the port of your Mac — this ensures proper initiation
- Go to Applications → Utilities → Disk Utility
- You should be able to see the external drive under the External heading in the sidebar on the left. Click on it to open the drive’s information
- In the menu bar at the top of the window, click on Erase and choose the format compatible with your Mac device
- Initiate reformatting. Bear in mind — all of your hard drive’s contents will be erased during the process
But, if you can’t sacrifice the data on the disk, you can reformat it using a Windows PC using the following steps:
- Connect your drive to a Windows PC
- Locate the drive in the sidebar in the File Explorer
- Copy all of the drive’s contents into a separate folder on the PC
- Right-click on the drive’s icon and choose Format from the drop-down menu
- Choose a format that’s compatible with both Mac and Windows devices — exFAT is the most modern and preferred one
- Name your hard drive in the Volume label window
- Click Start to initiate formatting. It should only take a few seconds until it’s done, and then you can use your hard drive on a Mac device
- Make sure to transfer the data back to the disk from the folder you’d created
How to avoid external hard drive not mounting on Mac
- check that the disk is in the right format for your operating system,
- check that it has a strong enough power supply
- check that the connector of your USB cable is not damaged.
However, there are several additional things that you can do to avoid future complications, such as:
#1. Make sure the USB port is clean and properly connected. Dirty or loosely connected USB ports can create short currents, make the external hard drive not show up on Mac, and even make theexternal hard disk struggle to read data if it shows up. It’s common for a connector to get a bit wonky if you’ve used it for a while — the power contacts won’t align correctly and this can cause the hard disk not showing up issue. Avoid keeping dirty USB ports, get them cleaned by blowing compressed air into the port, or find new ones.
#2. Properly eject the external drive device — always. Removing the drive without safe ejection can corrupt data on the device, which in the future can make your Mac unable to recognize it. Any operating system employs write caching — files are not immediately written on your hard drive when you transfer it or back it up, but are cached until all the side writing and reading operations are finished. Always remove your USB safely to protect the hard drive.
#3. Keep your Mac operating system up to date. An out-of-date operating system causes problems in all your Mac’s functioning areas. Updates improve stability and performance, as well as ensure your Mac’s security and minimize the risk of your files getting corrupted.
Final thoughts and Recomended Further Reading
If you need any further help with Mac, don’t hesitate to reach out to our customer service team, available 24/7 to assist you. Return to us for more informative articles all related to productivity and modern-day technology!
Would you like to receive promotions, deals, and discounts to get our products for the best price? Don’t forget to subscribe to our newsletter by entering your email address below! Receive the latest technology news in your inbox and be the first to read our tips to become more productive.
Also Read:
» Fixed: MacBook Pro Booting Black Screen
» Mac Startup Disk is Almost Full: 10 Ways to Clear Space on Your Mac
» How to Change DNS Settings on a Mac
Hard Drive Not Showing on Mac FAQ
What do I do if my external hard drive is not detected?
If your external hard drive is not detected, follow these steps to fix the issue:
- Go to Applications and open Utilities
- In the Utilities folder, select Disk Utility
- In the View menu at the top of your screen, select Show All Devices
- Select your external drive and click Unmount
- Connect your external hard disk again
Why is my external hard drive not readable on Mac?
Your external hard drive is not readable on Mac because it is formatted in NTFS, HFS+, or another format not supported by macOS. A loosely connected or frayed USB cable is another possible reason the external drive is not recognized by your Mac. Change the cable to fix the issue. If your external hard drive is not readable on Mac, try plugging it in slowly. USB 2.0 connectors, which can be found on older external drives, have a design flaw making the slow connection necessary.
How do I revive a dead hard drive?
If you find your hard drive breaking down while it’s connected to your computer, it’s best to stop using it as soon as possible. To check if the problem is in the device itself, try connecting it to a different port or even a different computer. Try a different cable as well.
If these simple operations don’t work, you’ll have to open and examine the disk. Pay attention to the sounds that it makes when activated. For instance, a clicking noise indicates a malfunctioning head assembly — the part of the hard drive that reads data off its platters. The recommendation is to have it fixed by a professional most of the time. You shouldn’t attempt to repair the drive at home as there is a low chance of success and you’re likely to damage the data stored on the disk.
Why does my Mac shut down when I connect a hard drive?
Just as some hard drives are not recognized because they don’t get enough power, some of them drain too much from your Mac. In this case, the system management controller will automatically shut the laptop down to protect it. If you think that that’s the case, try connecting the disk to an external power source such as a USB hub and reset your SMC.
If your Mac has a removable battery, use these steps to recent the SMC:
- Shut down your Mac and disconnect it from all sources of power, including the battery
- Hold the power button for 5 seconds
- Reconnect your Mac to the power source and put the battery back in
- Turn the Mac back on
If your battery is unremovable:
- Shut down your Mac and disconnect it from the charger
- Hold Shift + Control + Option + Power button for 10 seconds
- Release the keys and reconnect the Mac with the power source
- Turn the Mac back on
Внешние жесткие диски являются одними из идеальных решений для локального хранения гигабайт данных. Вам просто нужно подключить диск к Mac и получить к ним доступ на рабочем столе или в Finder. Однако, когда внешний диск не удается смонтировать и не появляется, возникают проблемы.
Но не волнуйтесь! Я собрал лучшие исправления, чтобы устранить проблему с внешним жестким диском, который не отображается на Mac. Но сначала давайте разберемся в возможных причинах этого.
Вот 7 причин, по которым ваш внешний флэш-накопитель, жесткий диск, твердотельный накопитель или другие подобные диски могут не отображаться на вашем Mac.
- Приводы недостаточно мощные.
- Проблема с USB-портом Mac.
- Внешний диск не отформатирован в формате файла, распознаваемом macOS.
- Возникла временная проблема с вашим Mac.
- Вы решили не показывать внешние диски на рабочем столе Mac.
- Кабель, соединяющий диск и Mac, сломан, ослаблен или поврежден.
- Ваш внешний диск физически поврежден.
Примечание: если это одно из двух последних, упомянутые исправления не сработают. Вам придется купить новый кабель или обратиться в службу восстановления данных, например DriveSavers.
Теперь, когда вы знаете основы, давайте посмотрим на исправления.
Как исправить внешний диск, который не отображается на Mac
Попробуйте эти 9 лучших исправлений, чтобы решить эту проблему:
- Измените настройки Finder, чтобы показать диск
- Убедитесь, что привод правильно запитан.
- Смените USB-порты или USB-ключ
- Проверьте соединительный кабель привода.
- Перезагрузите ваш Mac
- Попробуйте использовать другой Mac или ПК
- Доступ к диску с помощью дисковой утилиты macOS
- Измените формат жесткого диска
- Сбросить NVRAM или PRAM
1. Измените настройки Finder, чтобы показать диск.
Первый шаг — убедиться, что внешние диски могут отображаться на рабочем столе Mac.
- Оставайтесь на рабочем столе Mac. Нажмите Finder в верхней строке меню и выберите «Настройки».
- Щелкните Общие.
- Убедитесь, что установлен флажок «Внешние диски».
- Затем нажмите «Боковая панель» и убедитесь, что установлен флажок «Внешние диски».
Если параметры уже отмечены, переходите к следующему исправлению.
2. Убедитесь, что привод правильно запитан.
Небольшие жесткие диски, твердотельные накопители и флэш-накопители могут не потребовать дополнительного питания. Мощность, которую они получают от USB-порта Mac, достаточна.
Но если у вас большой жесткий диск, для которого требуется внешнее питание, убедитесь, что вам это подходит. Во-вторых, некоторые диски имеют два порта, и оба должны быть подключены к компьютеру. Если здесь все хорошо, переходите к следующему шагу.
3. Поменяйте порты USB или USB-ключ.
Это довольно распространенный прием для решения таких проблем. Я уверен, что вы это уже пробовали. Но если вы этого не сделали, отключите диск от USB-порта текущего Mac и подключите его к другому. Подождите несколько секунд и посмотрите, видно ли.
Во-вторых, если вы используете ключ / концентратор USB-C, отключите его от Mac и подключите к другому порту типа C. Если ключ слишком горячий, подождите несколько минут, чтобы он остыл, а затем попробуйте. Вероятно, это должно решить проблему.
Если этого не произошло, не паникуйте! Переходите к следующему.
4. Проверьте соединительный кабель привода.
Кабель, соединяющий жесткий диск с Mac, шатается с обоих концов? Если да, не применяйте силу, так как это может усугубить проблему. Поместите Mac на стол или пол. Теперь сделайте то же самое для диска и аккуратно подключите его к Mac. Посмотрите, отображается ли он на рабочем столе или в Finder.
Если он появится, я бы посоветовал скопировать наиболее важные данные на Mac или другой диск. Вы также можете подумать о приобретении нового кабеля привода или нового привода.
Если жесткий диск не виден на вашем Mac, осторожно переместите кабель на стыках (где он соединяется с диском и Mac) и посмотрите, поможет ли это.
5. Перезагрузите Mac.
Перезапуск — один из самых простых (и моих любимых) методов решения нескольких проблем Mac и iPhone с довольно заметным успехом. Если после выполнения описанных выше исправлений вы не видите свой диск, перезагрузите Mac.
Щелкните логотип Apple в левом верхнем углу экрана и выберите «Перезагрузить». После включения Mac подключите внешний диск, и он должен быть виден на рабочем столе и в Finder.
Важный совет: если простой перезапуск не помогает, продолжайте и загрузите свой Mac в безопасном режиме. Это поможет вам понять, связана ли проблема с каким-либо программным обеспечением / приложением на вашем Mac.
Если вы видите внешний диск после загрузки в безопасном режиме, это означает, что проблема вызвана каким-то приложением или программным обеспечением (например, для очистки вашего Mac, антивирусом, приложениями безопасности и т. Д.). Возможно, вам придется удалить эти приложения.
6. Попробуйте использовать другой Mac или ПК.
Прежде чем мы перейдем к последующим исправлениям, важно определить, связана ли проблема с диском или самим Mac. Чтобы проверить это, одолжите Mac (или ПК с Windows) у члена семьи или друга. Подключите диск к этому Mac и посмотрите, появится ли он там.
Если диск отображается на ПК с Windows, но не на Mac, это означает, что существует конфликт форматирования. Мы увидим, как это исправить ниже (необходимо установить переход на 8-й шаг ниже).
7. Получите доступ к диску с помощью Дисковой утилиты macOS.
- Нажмите command + пробел, чтобы открыть поиск Spotlight. Теперь введите Дисковая утилита и откройте это приложение.
- Здесь, если диск физически не поврежден, вы должны увидеть его под заголовком «Внешний».
- Если диск не смонтирован, щелкните, чтобы выбрать его. Затем нажмите «Смонтировать». Вы также можете щелкнуть его правой кнопкой мыши и выбрать «Смонтировать».
(Если он уже смонтирован, вы увидите «Отключить». Ничего не делайте и перейдите к следующему шагу.)
- Следующее решение — запустить программу First Aid, которая проверяет наличие ошибок и выполняет необходимые исправления. Для этого выберите диск на левой боковой панели и нажмите «Первая помощь». Дайте ему поработать, завершите и попросите исправить найденные ошибки, если будет предложено.
8. Измените формат диска.
Если первая помощь не решит проблему, вам придется изменить формат диска, что приведет к удалению всего, что на нем есть. Прежде чем вы это сделаете, важно узнать об этом больше.
Формат файла Операционная система HFS + (также известная как Mac OS Extended или HFS Extended) Mac под управлением macOS Sierra и более ранней версии APFS (файловая система Apple) Mac под управлением macOS High Sierra и более поздних версий NTFS Это формат файла, используемый на ПК с Windows. macOS может читать NTFS, но не записывать в нее. exFAT или FAT32 И Windows, и Mac могут читать и записывать этот формат файла. Если вам нужно выбирать между двумя, почти во всех случаях выбирайте exFAT. Он новее и лучше, чем FAT32 (в Дисковой утилите отображается как MS-DOS (FAT)).
Глядя на приведенную выше таблицу, мы можем получить следующее:
- Если вы используете новую версию macOS и хотите использовать внешний диск только с Mac, отформатируйте его в формате APFS.
- Затем, если у вас также есть старый Mac, вы можете отформатировать его в HFS +, который можно использовать как на новых, так и на старых компьютерах Mac.
- Если вы хотите использовать внешний диск как на Mac, так и на Windows, отформатируйте его в exFAT (или FAT32, если у вас Windows XP или более ранняя версия).
- А если вы хотите использовать внешний диск в основном с ПК с Windows, отформатируйте его в NTFS. Вы все еще можете читать файлы на нем при подключении этого диска к Mac.
Таким образом, в зависимости от вашей ситуации, вот как отформатировать внешний диск с помощью Дисковой утилиты.
Примечание: все данные на нем будут удалены. Поэтому обязательно скопируйте его где-нибудь, прежде чем продолжить. Вы также можете подключить диск к ПК с Windows, скопировать все на ПК или другой диск, а затем отформатировать его с помощью Mac до нужного формата файла.
Как отформатировать внешний диск с помощью Дисковой утилиты на Mac
- Подключите диск к Mac и откройте Дисковую утилиту.
- На левой боковой панели выберите внешний диск и нажмите «Стереть».
- Дайте ему желаемое имя.
- В разделе «Формат:» выберите нужный вариант. Поскольку я хотел бы использовать диск как с Mac, так и с Windows, я выбираю ExFAT.
- Нажмите «Стереть» и дождитесь завершения процесса.
После этого вы сможете увидеть диск на своем Mac.
9. Сбросьте NVRAM или PRAM.
Наконец, правильный ли формат файла? Кабель, порты USB и все остальное работают нормально? Но вы по-прежнему не видите внешний диск? Идите вперед и сбросьте NVRAM. Если ваш Mac выключается при подключении внешнего диска, исправьте это, сбросив SMC.
Это способы решить проблему «внешний диск не отображается на Mac». Надеюсь, решения помогли, и теперь вы можете использовать свой диск. Если у вас есть вопросы, проверьте следующий раздел.
FAQs
В. Могу ли я отследить потерянный внешний жесткий диск?
Нет. Вы не можете отследить потерянный внешний жесткий диск, потому что у него нет возможности подключиться к Интернету или Bluetooth, чтобы показать свое местоположение на карте.
В. Как отключить отключение внешнего жесткого диска на Mac?
Убедитесь, что Mac и подключенный жесткий диск установлены на твердой, устойчивой и плоской поверхности, например на столе. Это предотвратит их разъединение из-за ненужного рывка. Кроме того, для подключения накопителя к Mac используйте один кабель вместо нескольких. Наконец, приобретите известный концентратор USB-C, если вы используете новые MacBook.
В. Несколько жестких дисков замедляют работу компьютера?
Нет. Но несколько жестких дисков потребляют больше энергии, что может повлиять на общую производительность. Если у вас грамотный блок питания, это не должно быть проблемой. Кроме того, после копирования больших файлов с жесткого диска на Mac все может показаться медленным. Перезагрузите компьютер, чтобы это исправить.
Есть еще вопросы или предложения? Снимайте их в комментариях ниже!
Читайте дальше: