REGISTRY TWEAKS
Inspired by Gaming Tweaks article made by Philip from speedguide.net
Everybody should know this article by now, you should read it if you haven’t. I would like to expand on that a bit & maybe fill a few gaps.
Many people question if this section even works because they don’t see any difference. Microsoft said it leaves them for future use, so many don’t respond. I see it as a potential improvement, not mandatory tweaks. That driver is not used all the time. It should help when streaming or watching a video while downloading something. In general Audio & Video streaming.
In order these tweaks to work Multimedia Class Scheduler» service (MMCSS) has to be enabled & running. It automatically turns on/off based on Audio detection.
This is what Microsoft has to say on the topic, but it’s not much:
There are more tweaks we can do here & potentially room for improvement.
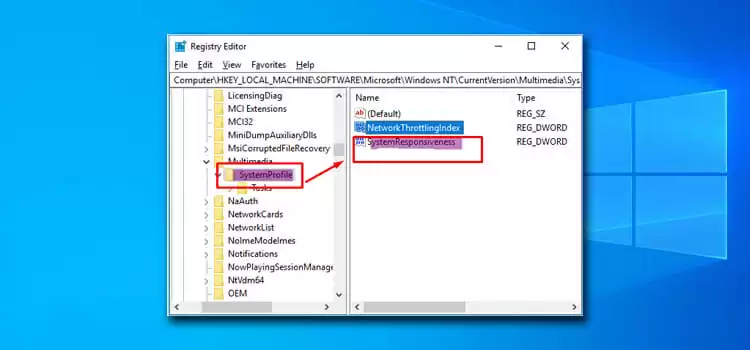
Here SystemResponsiveness means how many % are not used (saved) for low-priority/background tasks. It’s 20% by Default. The values which can’t be divided by 10 are rounded up to the nearest multiple of 10. A value of 0 is treated as 10, 1 is also 10 etc. That could change in the future. Bitsum has a Multimedia Scheduler Configuration tool that has all the %, including below 10 so I guess they also expect that, or they know something that’s not included in the sources. NetworkThrottlingIndex determines how much % of the connection stays «in reserve» in certain media-related scenarios.
I’ve seen these in old Win7 or 8 versions. I use NoLazyMode along with NetworkThrottling & SystemResponsiveness of course. I think this is a power-saving feature & hoping to override the driver but this is just an assumption..
[HKEY_LOCAL_MACHINESOFTWAREMicrosoftWindows NTCurrentVersionMultimediaSystemProfile]
«AlwaysOn»=dword:00000001
«NetworkThrottlingIndex»=dword:ffffffff
«SystemResponsiveness»=dword:00000000
«NoLazyMode»=dword:00000001
One more here which I don’t use —IdleDetectionCycles , another power-saving feature. AlwaysOn will override the auto-detection & be enabled all the time.
[HKEY_LOCAL_MACHINESOFTWAREMicrosoftWindows NTCurrentVersionMultimediaSystemProfileTasks]
In Audio everything is default except «Affinity«=dword:00000007 which is set to use 2 cores instead 4 (4 core CPU). In theory, this should free some CPU resources. 0 & ffffffff doesnt change Affinity.
[HKEY_LOCAL_MACHINESOFTWAREMicrosoftWindows NTCurrentVersionMultimediaSystemProfileTasksAudio]
«Affinity»=dword:00000007
«Background Only»=»True»
«Clock Rate»=dword:00002710
«GPU Priority»=dword:00000008
«Priority»=dword:00000006
«Scheduling Category»=»Medium»
«SFIO Priority»=»Normal»
There is one undocumented setting here. In early versions of Windows 10 (and in Win 8 too if I’m not mistaken) this Key was called «Low Latency» not «DisplayPostProcessing» & there was a String called «Latency Sensitive» in it. This key is related to picture processing.
I set IO Priority to High. I use this in Games as well (adding Latency Sensitive is completely my own doing, its not in any Windows version or document), in case Windows still recognizes this string, since both keys need reduced latency. In this example I’ve raised the priority a bit (the highest is 30), just keep the same distance b/w the Priorities. Might help with responsiveness.
[HKEY_LOCAL_MACHINESOFTWAREMicrosoftWindows NTCurrentVersionMultimediaSystemProfileTasksDisplayPostProcessing]
«Affinity»=dword:00000000
«Background Only»=»True»
«BackgroundPriority»=dword:00000018
«Clock Rate»=dword:00002710
«GPU Priority»=dword:00000012
«Priority»=dword:00000008
«Scheduling Category»=»High»
«SFIO Priority»=»High»
«Latency Sensitive»=»True»
There is not much I can add here. DisplayPostProcessing & Games have to have the highest priority but DisplayPostProcessing should be slightly higher or the same. When Scheduling Category is High, CPU Priority is treated as 2 no matter what value you set. At least that was the case in Windows Server 2016 (or it was 2013). There is almost no information for Windows 10 on the topic & it could not have this limitation any more but that’s just an assumption.
[HKEY_LOCAL_MACHINESOFTWAREMicrosoftWindows NTCurrentVersionMultimediaSystemProfileTasksGames]
«Affinity»=dword:00000000
«Background Only»=»False»
«Clock Rate»=dword:00002710
«GPU Priority»=dword:00000012
«Priority»=dword:00000006
«Scheduling Category»=»High»
«SFIO Priority»=»High»
«Latency Sensitive»=»True»
****************************************************************************************************
Nagle’s Algorithm Tweak
First of all I dont think this works any more. I see people recommend this tweak but don’t even mention MSMQParameters, or the other way around. This tweak was very popular when Windows 8 came out. But it helps in only a few games. Most FPS shooters use UDP protocol, not TCP so it’s irrelevant. It helps with World Of Warcraft for example where it uses TCP as a primary protocol to transfer data. That’s what Leatrix Latency Fix does btw. I see so many players use this and swear it helps them in BF4 or CS:GO. This is placebo effect.
If you still want to use it use TCP Optimizer or these commands, you don’t need to search for your NIC in the Registry.
Reg.exe add «HKLMSOFTWAREMicrosoftMSMQParameters» /v «TCPNoDelay» /t REG_DWORD /d «1» /f
for /f %%i in (‘wmic path win32_networkadapter get GUID ^| findstr «{«‘) do REG ADD «HKEY_LOCAL_MACHINESYSTEMCurrentControlSetServicesTcpipParametersInterfaces%%i» /v TcpAckFrequency /t REG_DWORD /d 0000001 /f
for /f %%i in (‘wmic path win32_networkadapter get GUID ^| findstr «{«‘) do REG ADD «HKEY_LOCAL_MACHINESYSTEMCurrentControlSetServicesTcpipParametersInterfaces%%i» /v TcpDelAckTicks /t REG_DWORD /d 0000000 /f
for /f %%i in (‘wmic path win32_networkadapter get GUID ^| findstr «{«‘) do REG ADD «HKEY_LOCAL_MACHINESYSTEMCurrentControlSetServicesTcpipParametersInterfaces%%i» /v TCPNoDelay /t REG_DWORD /d 0000001 /f
It will look like this in the Registry:
[HKEY_LOCAL_MACHINESYSTEMCurrentControlSetServicesTcpipParametersInterfaces{Your NIC’s GUID}]
«TcpAckFrequency»=dword:00000001
«TcpDelAckTicks»=dword:00000000
«TCPNoDelay»=dword:00000001
[HKEY_LOCAL_MACHINESOFTWAREMicrosoftMSMQParameters]
«TCPNoDelay»=dword:00000001
****************************************************************************************************
Windows Registry Editor Version 5.00
[HKEY_LOCAL_MACHINESYSTEMCurrentControlSetServicesTcpipParameters]
«EnableICMPRedirect»=dword:00000001
«EnablePMTUDiscovery»=dword:00000001
«Tcp1323Opts»=dword:00000000
«GlobalMaxTcpWindowSize»=dword:000016d0
«TcpWindowSize»=dword:000016d0
«MaxConnectionsPerServer»=dword:00000000
«MaxUserPort»=dword:0000fffe
«TcpTimedWaitDelay»=dword:00000020
«EnablePMTUBHDetect»=dword:00000000
«DisableTaskOffload»=dword:00000000
«DefaultTTL»=dword:00000040
«SackOpts»=dword:00000000
«TcpMaxDupAcks»=dword:00000002
TcpWindowSize is autotuning on Windows 8+, that’s handled by the driver automatically.
[HKEY_LOCAL_MACHINESYSTEMCurrentControlSetServicesTcpipParametersWinsock]
«UseDelayedAcceptance»=dword:00000000
«MaxSockAddrLength»=dword:00000010
«MinSockAddrLength»=dword:00000010
****************************************************************************************************
IRQL Priority
This is more for information that anything else.It can be useful in old Win7 & Win8
First I want to clarify that this is my understanding of how this shit works and I could be wrong about something. If someone has more knowledge than me Im happy to be corrected.
So whats that thing IRQL Priority and how to set it manually. IRQ = Requests = Interupts. IRQL — Interrupt Request Level. This is a way of Windows to prioritizes the CPU Requests. The faster these interupts the lower the latency.
The interrupt controller (which as my understanding is medium between the drivers & the CPU in this case although its much more than that. It handles all hardware interrupts as well) sends IRQs to the CPU with certain priority. That priority can be manually increased or lowered, depending what you want.
Type msinfo32.exe in RUN or Search (or sys in search) and System Information tool will start. You can find IRQs on Hardware Resources>IRQs. IRQ8 is always the same — System CMOS/real time clock or on newer platforms is IRQ0 (SystemTimer), it doesn’t chages. The other IRQs change so you have to find the drivers IRQ number you want to increase (or decrease). Driver has the be IRQ lane-based, not MSI which is a newer and faster way of communication between the drivers and the CPU. If you set an MSI based driver with IRQL priority it will be overridden by the driver. You can use MSI mode Utility to set these drivers but know that it will work only if the driver is supporting it & dont change the setting on its own. Drivers have priority over Registry.

You will see the IRQs numbers change when you set a driver in MSI Utility. So they are related to each-other. This method could be obsolete with modern systems & Windows versions but I decided to share it anyway. Its useful in older systems (and Win7 & Win8 & respective devices) where you can increase the priority to your drivers but don’t use it on GPU or Internet Adapter, only if they are really old. Modern GPUs & NICs use MSI or preferably MSI-X mode. Nvidia start enabling MSI-X Mode in RTX3000, before that you have to enable it manually with MSI tool or registry which I wont show here today.
Here is a registry example for IRQ lane-based:
****************************************************************************************************
Example:
Windows Registry Editor Version 5.00
[HKEY_LOCAL_MACHINESYSTEMControlSet001ControlPriorityControl]
«Win32PrioritySeparation»=dword:00000026
«IRQ4294967286Priority»=dword:00000002
«IRQ4294967287Priority»=dword:00000003
«IRQ8Priority»=dword:00000001
or
«IRQ0Priority»=dword:00000001
https://forums.guru3d.com/threads/windows-line-based-vs-message-signaled-based-interrupts.378044/
****************************************************************************************************
I never get to test with them properly. My assumption when briefly played with the registry on Desktop was if someone spends enough time tweaking, it could have the potential to help Controller & Mouse in a game because on certain settings the cursor gravitated or locked on the closest object, like icon, explorer window or program. Most likely is just settings to help laptop users on a trackpad & wont work in games. These are the default settings. Feel free to test.
[HKEY_LOCAL_MACHINESOFTWAREMicrosoftInputSettingsControllerProcessorCursorMagnetism]
«AttractionRectInsetInDIPS»=dword:00000005
«DistanceThresholdInDIPS»=dword:00000028
«MagnetismDelayInMilliseconds»=dword:00000032
«MagnetismUpdateIntervalInMilliseconds»=dword:00000010
«VelocityInDIPSPerSecond»=dword:00000168
Next to it there is another Key with 3 settings but I left only the most usable. Its a tiny difference anyway. One of those that goes into placebo territory but it works. How useful its for you … well. I set it to 1 so my cursor refreshes faster.
[HKEY_LOCAL_MACHINESOFTWAREMicrosoftInputSettingsControllerProcessorCursorSpeed]
«CursorUpdateInterval»=dword:00000001
IoPageLockLimit. This limits the use of RAM for certain tasks (in I/O situations-input/output). It can help with big programs start times and general disk work. It can speed up everything that includes transferring larger files, including over the internet (if u have your own network for ex.). The values has to be up to your RAM capacity (slightly less than that for x86. For 512mb & larger is -64mb to be exact). Setting it to 0 will force the system to check on every boot how much RAM is installed and set it accordingly. The problem is that its Microsoft & can set too low values. The values are in bytes btw (in Decimal). There is a formula for this.
(Your RAM in GB x 1024) Then multiply it to 1024 again. Then multiply to 128
08000000 is for 8Gb RAM. 10000000 is 16Gb (Hex)
[HKEY_LOCAL_MACHINESYSTEMCurrentControlSetControlSession ManagerMemory Management]
«IoPageLockLimit»=dword:08000000
to be continued…………
If You Learned Something & Want to Support My Work Please Consider Donating Or Becoming a Patreon.

Плохие твики
Здесь будет кладбище настроек встречаемых на просторах интернета, которые до сих пор распространены, но сомнительны для применения, устарели со времён Windows XP или же просто напросто не работают.
- Настройки MMCSS
- Настройки памяти

Настройки MMCSS
Windows Registry Editor Version 5.00

[HKEY_LOCAL_MACHINESOFTWAREMicrosoftWindows NTCurrentVersionMultimediaSystemProfileTasksGames]
"GPU Priority"=dword:00000012
"Priority"=dword:00000002
"Scheduling Category"="High"
"SFIO Priority"="High"

[HKEY_LOCAL_MACHINESOFTWAREMicrosoftWindows NTCurrentVersionMultimediaSystemProfileTasksDisplayPostProcessing]
"GPU Priority"=dword:00000008
"Priority"=dword:00000002
"Scheduling Category"="High"
"SFIO Priority"="High"

[HKEY_LOCAL_MACHINESOFTWAREMicrosoftWindows NTCurrentVersionMultimediaSystemProfileTasksAudio]
"GPU Priority"=dword:00000001
"Priority"=dword:00000002
"Scheduling Category"="Medium"
"SFIO Priority"="High"

[HKEY_LOCAL_MACHINESOFTWAREMicrosoftWindows NTCurrentVersionMultimediaSystemProfileTasksPro Audio]
"GPU Priority"=dword:00000001
"Priority"=dword:00000002
"Scheduling Category"="High"
"SFIO Priority"="High"
Значения по-умолчанию:
Windows Registry Editor Version 5.00

[HKEY_LOCAL_MACHINESOFTWAREMicrosoftWindows NTCurrentVersionMultimediaSystemProfileTasksGames]
"GPU Priority"=dword:00000008
"Priority"=dword:00000002
"Scheduling Category"="Medium"
"SFIO Priority"="Normal"

[HKEY_LOCAL_MACHINESOFTWAREMicrosoftWindows NTCurrentVersionMultimediaSystemProfileTasksDisplayPostProcessing]
"GPU Priority"=dword:00000008
"Priority"=dword:00000008
"Scheduling Category"="High"
"SFIO Priority"="Normal"

[HKEY_LOCAL_MACHINESOFTWAREMicrosoftWindows NTCurrentVersionMultimediaSystemProfileTasksAudio]
"GPU Priority"=dword:00000008
"Priority"=dword:00000006
"Scheduling Category"="Medium"
"SFIO Priority"="Normal"

[HKEY_LOCAL_MACHINESOFTWAREMicrosoftWindows NTCurrentVersionMultimediaSystemProfileTasksPro Audio]
"GPU Priority"=dword:00000008
"Priority"=dword:00000001
"Scheduling Category"="High"
"SFIO Priority"="Normal"
MMCSS (Multimedia Class Scheduler Service) необходима чтобы правильно распределять приоритеты CPU между мультимедиа задачами [?], но практически все приложения на сегодняшний день используют только две задачи — Audio или Pro Audio [?]. Остальные типы задач, особенно такая как Games, не используются.
Настройки памяти
Windows Registry Editor Version 5.00

[HKEY_LOCAL_MACHINESYSTEMCurrentControlSetControlSession ManagerMemory Management]
"IoPageLockLimit"=dword:00fefc00
"NonPagedPoolQuota"=dword:00000000
"NonPagedPoolSize"=dword:00000000
"PagedPoolQuota"=dword:00000000
"PagedPoolSize"=dword:000000c0
"PhysicalAddressExtension"=dword:00000001
"PoolUsageMaximum"=dword:00000060
"SecondLevelDataCache"=dword:00000400
"SessionPoolSize"=dword:000000c0
"SessionViewSize"=dword:000000c0
"SystemPages"=dword:ffffffff
Значения по-умолчанию:
Windows Registry Editor Version 5.00

[HKEY_LOCAL_MACHINESYSTEMCurrentControlSetControlSession ManagerMemory Management]
"IoPageLockLimit"=-
"NonPagedPoolQuota"=dword:00000000
"NonPagedPoolSize"=dword:00000000
"PagedPoolQuota"=dword:0000000
"PagedPoolSize"=dword:00000000
"PhysicalAddressExtension"=dword:00000001
"PoolUsageMaximum"=-
"SecondLevelDataCache"=dword:00000000
"SessionPoolSize"=dword:00000004
"SessionViewSize"=dword:00000030
"SystemPages"=dword:00000000
Большинство данных настроек относятся к 32-битным системам [?] [?], а так же к старым редакциям Windows [?].
Gaming performance depends on a lot of things. Obviously, the hardware specs you have (processor, RAM, and graphics card) play the most vital role in computer performance, smoothness, and the quality of gameplay. But beyond these, you can push your existing system harder to gain some extra performance in gaming. Registry tweaks are one of these ways to achieve that. In this article, we’re going to dig deep into the topic of how to improve gaming by editing the registry editor for gaming. By the end of this article, you will know How to Improve Gaming by Editing Registry and the best regedit settings for gaming.
As gaming is very much dependent on the graphics system of your PC. So, updating the drivers are a must. You can find and update drivers manually to get the best output from your system. You can check the task manager also to know more about the system resources.
What is Registry Editor?
Registry editor or Windows Registry is kind of like a long database, with paths and their respective values that determine the low-level settings of Windows, its drivers, UI, and many more features to optimize Windows. While editing the registry can be great for troubleshooting and optimizing, you must be cautious while doing so because you tweak the wrong values might create lots of issues with your computer. So, before doing this, we suggest you backup your data or the entire system and know the best Regedit tweaks for gaming to operate the PC in game mode. You can also set the Regedit GPU priority to optimize Windows in game mode there. It’s best to back up the registry before editing.

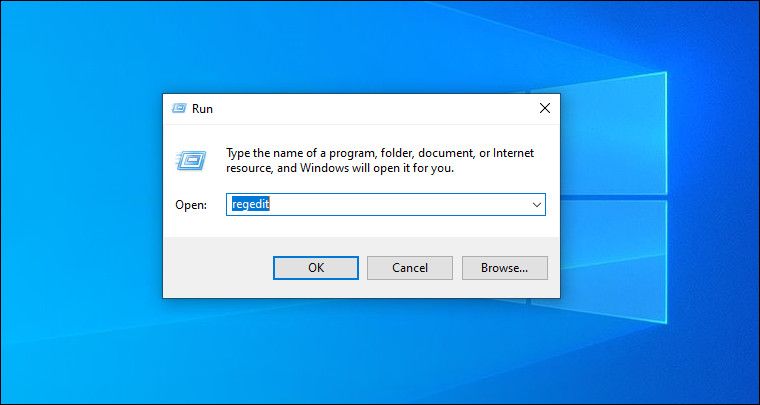
To launch the registry editor, press Windows key + R to open Run, then type “Regedit” and hit enter to enter into regedit for gaming. You can also search for it in the windows search bar.
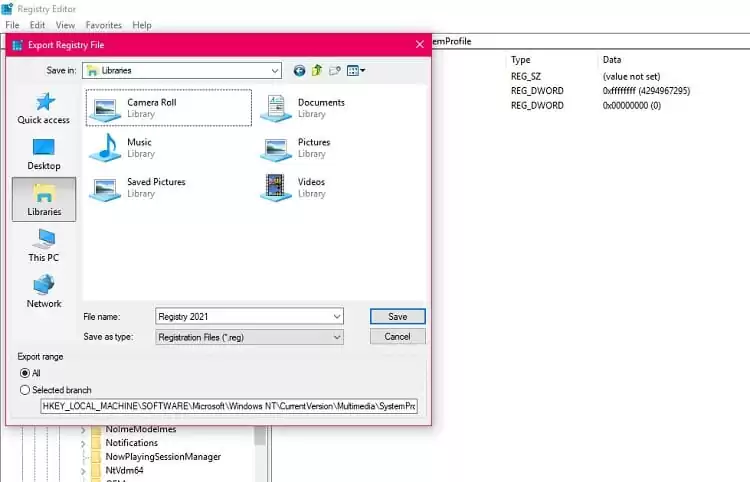
To back up your existing registry, go to File > Export, select Export Range as All, rename, and save your registry in the desired folder.
Now that we’ve launched and backed up the registry editor, it’s time to improve gaming for game mode by editing the registry and optimize Windows. You won’t see a huge difference in performance, but the general experience, fps drops, and other sectors should be improved towards the gaming experience.
If you do gaming on a laptop then you can increase the FPS also. Online gaming is very much popular. You should have a good internet connection. So, you must choose the best ethernet cable. You should also ping a port to check the connection’s stability and latency.
Now, go to these specified locations by scrolling or directly copying and pasting them on the location box of your registry editor or Regedit gaming editor, and edit the Regedit gaming tweaks given value. You may find one or two of them missing, dependent on your system. You can leave those. Note that all values given here are Hexadecimal by default.
Go to:
HKEY_LOCAL_MACHINESOFTWAREMicrosoftWindowsCurrentVersionDriverSearching
Here on the right side, you can see SearchOrderConfig. Double click on it and set the value data to 0, then click OK.
SearchOrderConfig = 0
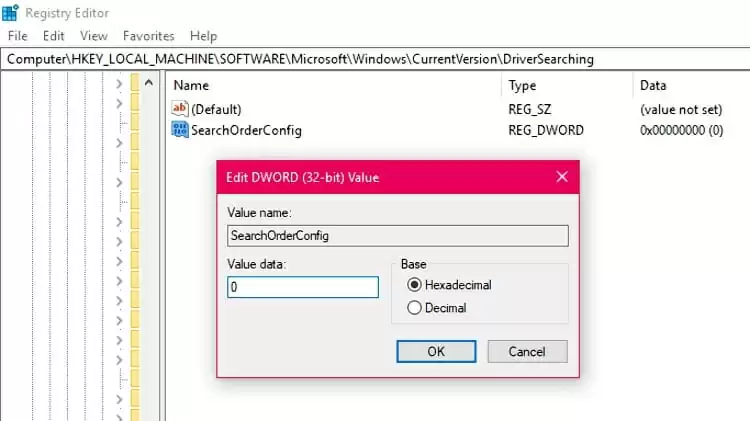
It turns on automatic driver searching when needed.
If you’re manually going into each directory, just click once on the “DriverSearching” folder to display its respective values.
HKEY_LOCAL_MACHINESYSTEMCurrentControlSetControlSession ManagerPower
Here, choose
HiberBootEnabled = 0
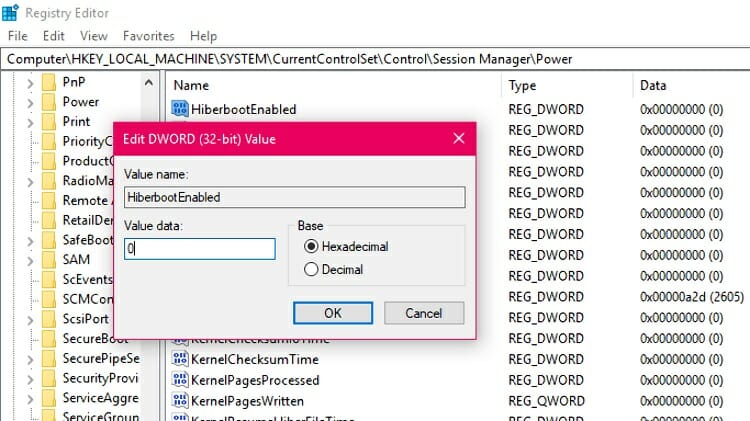
It disables the Windows Fast Startup feature. Fast Startup (or Fast Boot) is a combination of shutdown and hibernation, and it lets the computer boot up faster. You may know that you can also boot into safe mode. However, this process is known to create some issues regarding the computer not shutting down properly. Disabling Fast Startup slows the starting of PC, but improves its performance.
HKEY_LOCAL_MACHINESYSTEMCurrentControlSetControlPowerPowerThrottling
Here, choose
PowerThrottlingOff = 1
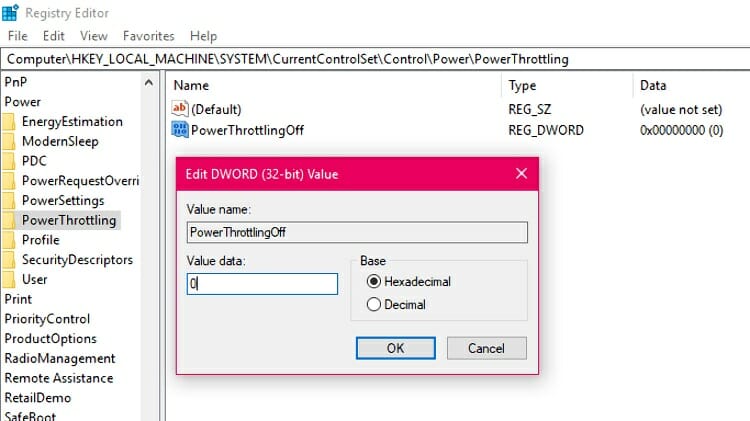
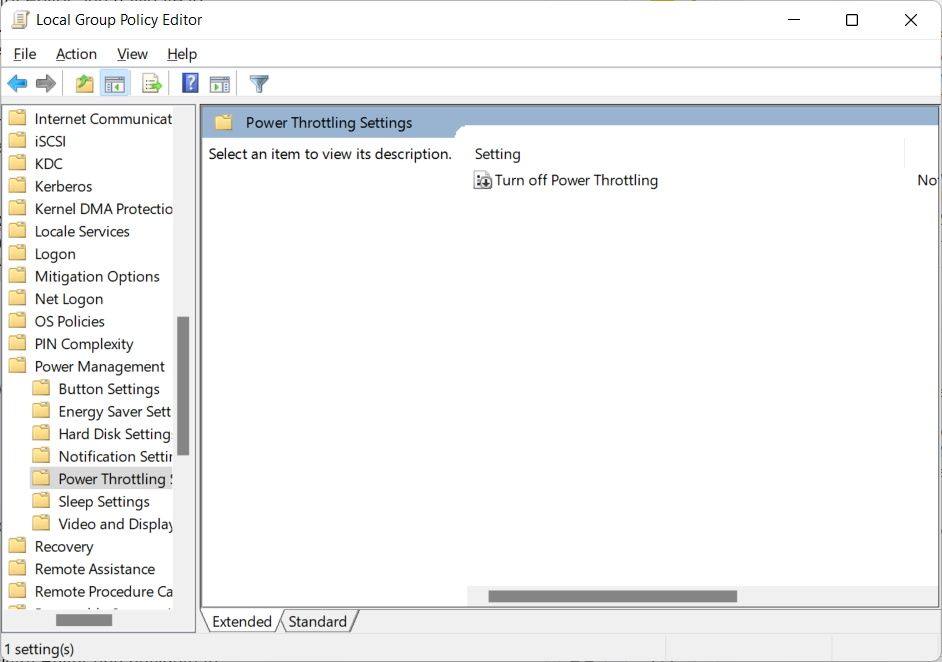
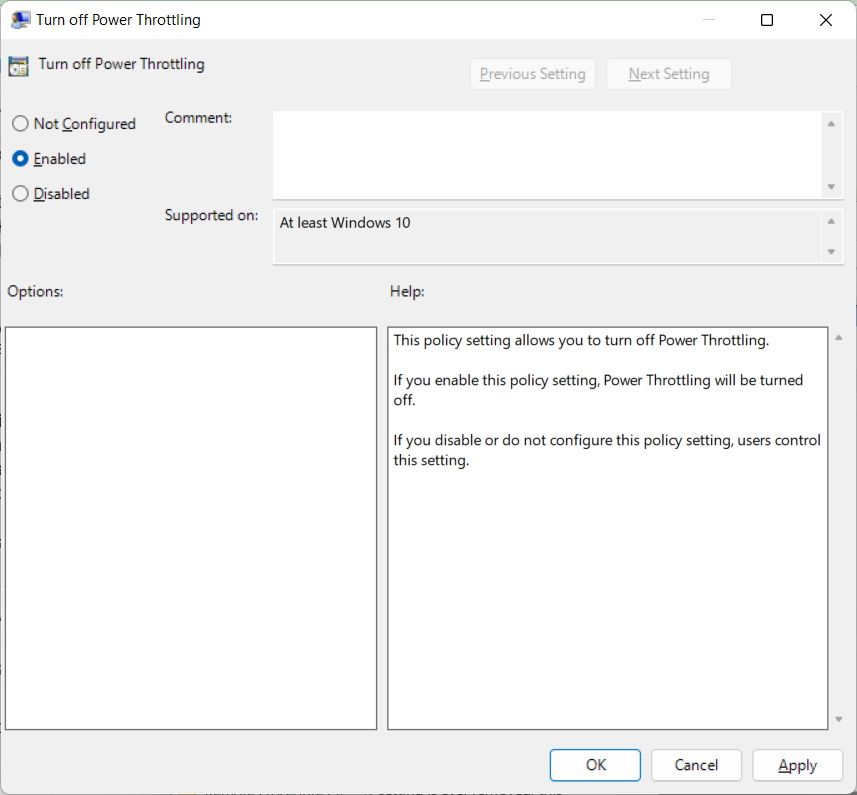
It prevents the computer from pushing other apps including the background apps into the suppressed state and triggers high performance. If you can’t find this registry key, you can alternatively go to Group Policy by searching it in the Windows search. Here, go to Administrative Templates > System > Power Management > Power Throttling Settings > Turn off Power Throttling (double click on it) and choose Enabled.
HKEY_LOCAL_MACHINESOFTWAREMicrosoftWindows NTCurrentVersionMultimediaSystemProfile
Here, choose
NetworkThrottlingIndex = ffffffff
SystemResponsiveness = 0
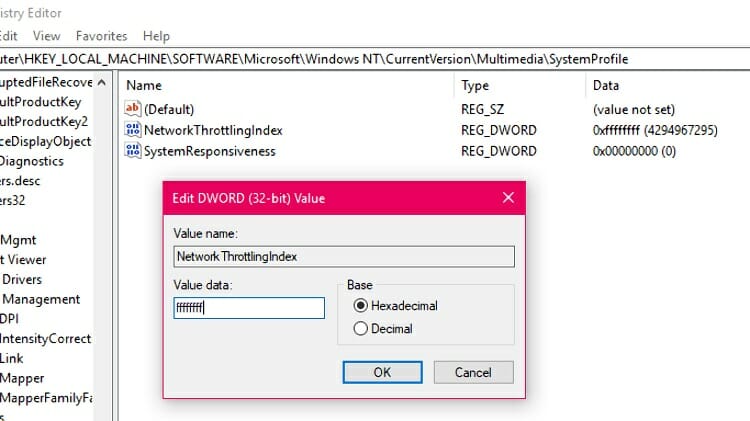
(For NetworkThrottlingIndex, type “f” 8 times in the value data. Then click OK. The bracketed value should show 4294967295)
By setting the value to “ffffffff”, you are completely disabling the network throttling which prevents non-general network traffic. It also lowers ping while playing multiplayer games. You can set up a gaming router for a pro online gaming experience. You can increase ping or decrease ping also.
HKEY_LOCAL_MACHINESOFTWAREMicrosoftWindows NTCurrentVersionMultimediaSystemProfileTasksGames
Here you have to edit multiple values.
GPU Priority = 8
Priority = 6
Scheduling Category = High
SFIO Priority = High
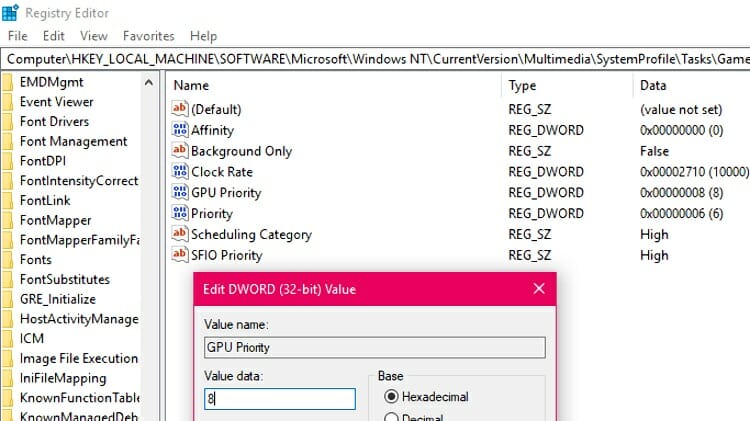
These values register the games into high priority mode while active.
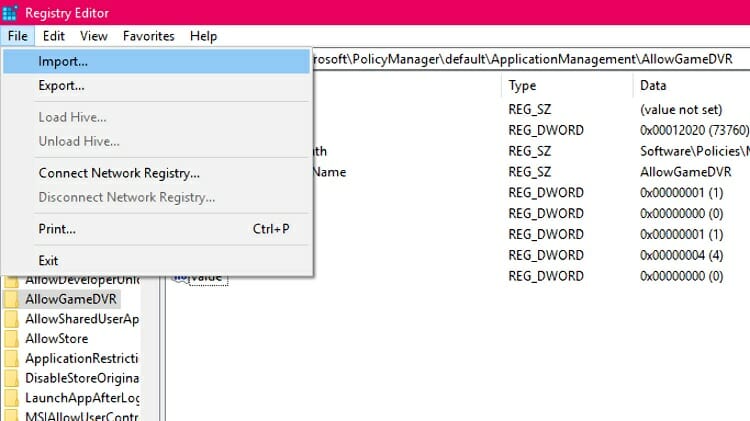
HKEY_LOCAL_MACHINESOFTWAREMicrosoftPolicyManagerdefaultApplicationManagementAllowGameDVR
Here, choose
Value = 0
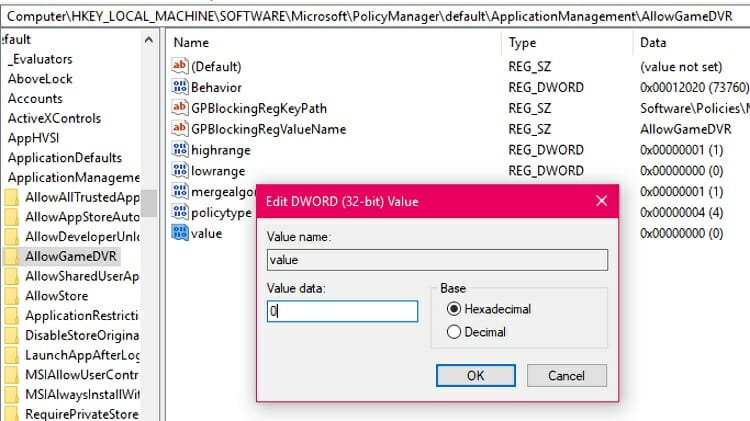
This disables the Game DVR system that often interferes with the actual game. If you use Game DVR, don’t change this value.
HKEY_LOCAL_MACHINESYSTEMCurrentControlSetControlPower
Choose:
HibernateEnabled = 0
This disables the hibernate feature to save some resources. Again, if you rely on hibernation often, don’t change the value.
ComputerHKEY_CURRENT_USERControl PanelDesktop
Choose:
MenuShowDelay = 0
This determines how long you wait for a menu to show up in milliseconds. The default value 400 means 400 milliseconds of lag. You can use 20 or so if you don’t want instant showing.
ComputerHKEY_LOCAL_MACHINESYSTEMCurrentControlSetControl
Here, set
WaitToKillServiceTimeout = 2000
This key controls how long Windows waits before shutting down to close the services properly.
HKEY_LOCAL_MACHINESYSTEMCurrentControlSetControlPowerPowerSettings54533251-82be-4824-96c1-47b60b740d00943c8cb6-6f93-4227-ad87-e9a3feec08d1
Here, set
Attributes = 2
ComputerHKEY_CURRENT_USERControl PanelMouse
Set
MouseHoverTime = 10
This controls the time before the pop-up menu opens when you hover your mouse cursor on a folder or file. Reducing this from 400 to 10 decreases the time needed to do so.
After applying these registry tweaks, restart your system to take the effects. You can also go further by tweaking the power settings, changing it to High Performance, altering the processor power management settings, overclock RAM, or optimize RAM, allocate more RAM but those will be mentioned in another article. To know about RAM and VRAM, check this article.
In Case If Anything Goes Wrong during registry tweaks for gaming…
Like mentioned before, the editing registry value can sometimes go wrong if you change the wrong values. That’s why we’ve shown you how to back up your registry edit beforehand. Now, if anything goes wrong, you can use those backups to get your Windows registry values back to their original cases.
For that, just go to File > Import in the registry editor, and then locate the previously backed up registry file and click OK. You can also double click on the registry file, click Yes on the confirmation window, and your backed-up registry will be imported.
These are the best things you can do to increase gaming performance by windows 10 gaming performance tweaks and registry hack. But you cannot expect to get the best output by just editing the registry tweak app. You must keep your Windows update regularly. We also suggest automatic update of OS should be enabled. Also if you have a hard drive instead of an SSD, you should get an SSD. We suggest you get the best or GPU from Nvidia or AMD for better gaming mode. Also, check the graphics setting if the games run in a low fps mode. We can suggest two of them:
Nvidia graphics card:

AMD graphics card:

Conclusion
In this article, we’ve mentioned the proper steps on how to improve gaming by editing registry app values in Windows operating system. Though there are a lot of ways you can improve game performance like using a G-sync monitor. We’ve also discussed the effects of changing each registry app item, backing up, and importing the registry if needed. By following these steps properly, you should see some moderate level of improvement in gaming performance, frames per second, and the general Windows performance overall. Windows 10 registry tweaks for gaming is one of the best things you can do for better gaming experience without changing any hardware.
You can tweak some additional settings for a better gaming experience like check mouse acceleration, network adapter, integrated GPU, System memory, etc.
However, if you still find it ineffective on windows 10 registry tweaks to improve performance or you’re facing severely low performance in gaming, you might need to invest in some better hardware. Try upgrading your graphics card and stress test the GPU and installing a sufficient amount of ram, upgrading the CPU, or stress test the CPU, or even overclocking the CPU and RAM. You can also increase the VRam of your computer. Check your power supply before going on major upgrades and overclocking options, as it should be able to handle the stress of the new and more powerful setup you’re installing. If you are an online gamer, then you must have good internet speed to achieve low input lag for a better and convenient experience.
As always make a system restore point before making and registry settings, make a backup of your registry too. You don’t have to, nothing should go wrong but it’s always better to be safe than sorry.
It’s crazy how much microsoft gimps your PC from it’s full gaming potential and the amount of stuff they hide from you.
How to Tweak Windows 10 for Gaming Nagle’s Algorithm
Nagle’s algorithm combines several small packets into a single, larger packet for more efficient transmissions. This is designed to improve throughput efficiency of data transmission. Disabling “nagling” can help reduce latency/ping in some games. Nagle’s algorithm is enabled in Windows by default.
To implement this tweak, modify the following registry keys.
HKEY_LOCAL_MACHINESYSTEMCurrentControlSetServicesTcpipParametersInterfaces{NIC-id} For the {NIC-id}, look for the one with your IP address listed. Under this {NIC-id} key, create the following DWORD value:
TcpAckFrequency and set it to 1 to disable “nagling” for gaming.
TCPNoDelay and set it also to 1 to disable “nagling”
TcpDelAckTicks and set it to 0
Note: Some reports say that the tweaks did reduce latency when playing Dota 2 and League of Legends but it doesn’t work for some. I have tried it and my latency improved from 110 to 90ms (SEA Server) when playing Dota 2. Network Throttling Index
Windows implements a network throttling mechanism, the idea behind such throttling is that processing of network packets can be a resource-intensive task. It is beneficial to turn off such throttling for achieving maximum throughput.
To implement this tweak, run regedit and modify the registry HKEY_LOCAL_MACHINESOFTWAREMicrosoftWindows NTCurrentVersionMultimediaSystemProfile. Under SystemProfile, create a DWORD value and name it to “NetworkThrottlingIndex” then set its Hexadecimal value to ffffffff for gaming and max throughput: ffffffff completely disables throttling. System Gaming Responsiveness
Multimedia streaming and some games that uses “Multimedia Class Scheduler” service (MMCSS) can only utilize up to 80% of the CPU. The “Multimedia Class Scheduler” service (MMCSS) ensures prioritized access to CPU resources, without denying CPU resources to lower-priority background applications.
To implement this tweak, run regedit and modify the registry key HKEY_LOCAL_MACHINESOFTWAREMicrosoftWindows NTCurrentVersionMultimediaSystemProfile. From there, create a new DWORD and name it to “SystemResponsiveness” set its hexadecimal value to 00000000 for pure gaming/streaming.
In the same Registry hive as the above tweak, you can also change the priority of Games. To implement this tweak, go to HKEY_LOCAL_MACHINESOFTWAREMicrosoftWindows NTCurrentVersionMultimediaSystemProfileTasksGames and change the following registry values:
“GPU Priority” change its values to 8 for gaming.
“Priority” set to 6 for gaming.
Update another tweak In Windows 8/8.1, just like with Windows 7, multimedia applications use the «Multimedia Class Scheduler» service (MMCSS) to ensure priritized access to CPU resources, without denying CPU resources to lower-priority background applications. However, this also reserves 20% of CPU by default for background processes, your multimedia streaming and some games can only utilize up to 80% of the CPU. This setting, in combination with the above «NetworkThrottlingIndex» can help some games and video streaming. We recommend reducing the reserved CPU for background processes from the default of 20%.
Navigate to:
HKEY_LOCAL_MACHINESOFTWAREMicrosoftWindows NTCurrentVersionMultimediaSystemProfile SystemResponsiveness=10 (DWORD, default is 20 denoting 20% of CPU reserved, recommended: decimal 10, or 0 for pure gaming/multimedia performance)
Notes: The number in this key is rounded by MMCSS to the nearest 10. In some server operating systems (Windows 2008 Server), the SystemResponsiveness may be set to 100, instead of 20 by default. This is by design, giving higher priority to background services over multimedia.
Update additional tweaks
Disable Receive Segment Coalescing State (RSC)
This is applicable to Windows 8/10/2012 Server, not available for earlier Windows versions.
Receive Segment Coalescing (RSC) allows the NIC to coalesce multiple TCP/IP packets that arrive within a single interrupt into a single larger packet (up to 64KB) so that the network stack has to process fewer headers, resulting in 10% to 30% reduction in I/O overhead depending on the workload, thereby improving throughput. Receive Segment Coalescing (RCS) is able to collect packets that are received during the same interrupt cycle and put them together so that they can be more efficiently delivered to the network stack. While this reduces CPU utilization and improves thorughput, it can also have a negative impact on latency. That is why we recommend you disable it where latency is more important than throughput.
Possible states: enabled, disabled, default. Default state: disabled Recommended: disabled for pure gaming latency, enabled for better throughput. To enable using netsh:
netsh int tcp set global rsc=disabled
To change using PowerShell cmdlets:
Disable-NetAdapterRsc -Name * (use to disable RSC for all adapters) Enable-NetAdapterRsc -Name * (use to enables RSC for all adapters that support it) Get-NetAdapterRsc -Name * (use to view adapters that support RSC)
Notes: Only supported by some network adapters. May need «Checksum Offload» enabled as well to work.
http://www.speedguide.net/articles/gaming-tweaks-5812
SystemResponsiveness (Gaming and Multimedia)
Всем привет, в этой теме я расскажу о некоторых способах ускорить работу своего ПК.
Сразу хочется отметить, что Вы должны иметь свою голову на плечах, что делать и отключать, а что нет — исключительно Ваш выбор.
Внимательно подумайте и посмотрите, используете ли Вы программу или функцию, которая будет отключаться, и нужно ли Вам вообще ее выключать.
Рекомендую сделать точку восстановления системы, на случай если что-то пойдет не так.
Все проделанные действия в теме тестировались лично мной(и не только мной) на Windows 10 и Windows 7.
За время тестирования не возникало никаких неполадок и проблем.
Я не несу ответственности за Ваш выбор.
Вы можете задавать любые вопросы в теме, отвечу каждому.
Так же, снизу есть пояснения терминов, чтобы тема была понятна любому пользователю.
Для 7 и 10 версий Windows:
1. Отключение ненужных визуальных эффектов:
Мой компьютер ¹ПКМ > Свойства > Дополнительные свойства системы > Дополнительно > Быстродействие(параметры) > Обеспечить наилучшее быстродействие, ставим галочки на:
1. Вывод эскизов вместо значков;
2. Отображение прозрачного прямоугольника выделения;
3. Отображение содержимого окна при перетаскивании;
4. Сглаживание неровностей экранных шрифтов.
> Применить > Ок.
2. Отключение ²телеметрии: [Взято с канала ]
1) Поиск > cmd ПКМ > открыть от имени администратора: Вписываем команды(поочерёдно):
sc delete DiagTrack
sc delete dmwappushservice
echo «» > C:ProgramDataMicrosoftDiagnosisETLLogsAutoLoggerAutoLogger-Diagtrack-Listener.etl
[Если у Вас 10 версия windows, Вы можете воспользоваться аналогичным пунктом внизу]
2.1. Чтобы её добить, делаем следующее:
Поиск > regedit > HKEY_LOCAL_MACHINE > Software > Microsoft > Windows > CurrentVersion > Policies > Кликаем на DataCollection > AllowTelemetry > Изменить > Значение: 0 > ОК.
КомпьютерHKEY_LOCAL_MACHINESOFTWAREMicrosoftWindowsCurrentVersionPoliciesDataCollection
2.2. Снова добиваем телеметрию: (Его нет в домашней версии Windows): [Взято с канала ]
1) Пуск> gpedit.msc ПКМ > открыть от имени администратора > Конфигурация компьютера > Административные шаблоны > Компоненты Windows > Сборки для сбора данных и предварительные сборки > Разрешить телеметрию ПКМ > Изменить > Ставим кружок на Отключено > Применить > Ок.
3. Отключение ³индексации содержимого диска:
Этот компьютер > Устройства и диски > Ждем на диск ПКМ > Свойства > Снимаем галочку на: Разрешить индексирование содержимое файлов… > К диску (Буква): и ко всем вложенным папкам > ОК > Применить > ОК.
Поиск > Панель управления > Администрирование > Службы > Windows Search > ПКМ > Общие > Тип запуска > Отключена > ОК
4. Повышение приоритета для игр: [Взято с канала ]
Пуск > regedit > HKEY_LOCAL_MACHINE > SOFTWARE > Microsoft > Windows NT > CurrentVersion > Multimedia > SystemProfile > Tasks > Games > Priority > Изменить > Значение: 6
Тут же: GPU Priority > Изменить > Значение: 8
Далее: Scheduling Category > Изменить > Параметр: High
КомпьютерHKEY_LOCAL_MACHINESOFTWAREMicrosoftWindows NTCurrentVersionMultimediaSystemProfileTasksGames
5. Отключение Windows защитника:
Пуск > regedit > HKEY_LOCAL_MACHINE > Software > Policies > Microsoft > Не разворачиваем, а просто кликаем на Windows Defender > DisableAntiSpyware > Изменить > Значение: 1 > ОК.
КомпьютерHKEY_LOCAL_MACHINESOFTWAREPoliciesMicrosoftWindows Defender
6. Включаем энергорежим максимальной производительности:
Пуск > Электропитание > Высокая производительность > Ставим галочку.
Далее: Настройка схемы электропитания > Изменить дополнительные настройки электропитания >
1. Жеский диск > Отключать жесткий диск через > Ставим значение 0;
2. Параметры адаптера беспроводной сети > Режим энергосбережения: Ставим Максимальная производительность;
Дальше по своему желанию.
7. Включаем автоматическую очистку ОЗУ при момощи MemReduct:
1) Скачиваем и устанавливаем программу по ссылке(прямая): ;
3) Далее: нажимаем F2, переходим в «Очистка памяти», можете ставить свои значения, либо как у меня:
<<Управление памятью>>
Очистка при заполнении: 70%;
Очистка каждые: 15 мин.
<<Область памяти для очистки>>

Только для 10 Windows:
1. Отключение служб слежки Windows 10:
Параметры > Конфиденциальность: Снимаем галочки во всех пунктах и разделах.
2. Отключение служб слежки, отключение телеметрии, удалении ⁴OneDrive и некоторые другие полезные функции:
1. Скачиваем и открываем ;
2. В открывшемся меню ставим галочки на:
-
Services (Связь)
-
Clear DiagTrack Log (Чистка журнала DiagTrack)
-
Telemetry (Телеметрия)
-
Uninstall OneDrive (Удаление OneDrive)
Остальное по своему желанию.
Программа зависнет, ждем пока появится лог в новом окошке, жмем ОК, программа закроется сама.
3. Отключение ненужных служб и приложений Win 10: [Взято с темы LordS по повышению фпс в играх]
1) Поиск > Powershell > ПКМ > Открыть от имени администратора: Вписываем следующие команды (Просто копируем и вставляем все вместе)
Get-AppxPackage *3dbuilder* | Remove-AppxPackage
Get-AppxPackage *WindowsAlarms* | Remove-AppxPackage
Get-AppxPackage *officehub* | Remove-AppxPackage
Get-AppxPackage *Facebook* | Remove-AppxPackage
Get-AppxPackage *WindowsFeedbackHub* | Remove-AppxPackage
Get-AppxPackage *Getstarted* | Remove-AppxPackage
Get-AppxPackage *MinecraftUWP* | Remove-AppxPackage
Get-AppxPackage *getstarted* | Remove-AppxPackage
Get-AppxPackage *bingweather* | Remove-AppxPackage
Get-AppxPackage *bingfinance* | Remove-AppxPackage
Get-AppxPackage *OneNote* | Remove-AppxPackage
Get-AppxPackage *bingweather* | Remove-AppxPackage
Get-AppxPackage *MicrosoftSolitaireCollection* | Remove-AppxPackage
Get-AppxPackage *bingfinance* | Remove-AppxPackage
Get-AppxPackage *OneNote* | Remove-AppxPackage
Get-AppxPackage *Netflix* | Remove-AppxPackage
Get-AppxPackage *MSPaint* | Remove-AppxPackage
Get-AppxPackage *Microsoft3DViewer* | Remove-AppxPackage
Get-AppxPackage *MicrosoftStickyNotes* | Remove-AppxPackage
Get-AppxPackage *WindowsStore* | Remove-AppxPackage
Get-AppxPackage *people* | Remove-AppxPackage
Get-AppxPackage *bingsports* | Remove-AppxPackage
Get-AppxPackage *maps* | Remove-AppxPackage
Get-AppxPackage *communi* | Remove-AppxPackage
Get-AppxPackage *wind owsphone* | Remove-AppxPackage
Программы которые тормозят Ваш ПК и желательны к удалению:
1. Ccleaner;
2. Семейство программ Mail.ru: Амиго, Mail.Ru спутник, Mail браузер и прочий мусорный и рекламный софт от мэйла;
3. Ненужные программы от Яндекс: Яндекс элементы, Менеджер Браузеров;
4. Metro приложения: Xbox, Новости и т.д., инструкция по их удалению так-же есть в теме.
Так же, рекомендую ознакомиться с данными полезными программами:
1. Unchecky — Автоматическое снятие «галочек» в установщиках, которые отвечают за согласие на установку стороннего, рекламного софта;
2. Unlocker — Иногда бывает, что Windows по каким-то причинам не даёт удалить файл. Эта программа поможет обойти ограничения ОС и удалить заблокированный системой файл.
Остальной полезный софт Вы можете найти тут:
(no ad)
Прирост производительности после проделанных действий на моем ПК составил: (средние значения)
GTA V — 10 Фпс
The Forest — 15 фпс
CS:GO — 25 фпс
Использование оперативки системой уменьшено с 2 ГБ до 1,2.
Также, тема регулярно обновляется и дополняется. Рекомендую нажать кнопку «Отслеживать» сверху, чтобы не пропускать новые способы ускорить Ваш ПК.
Пояснения терминов:
¹ПКМ — Правая Кнопка Мыши;
²Телеметрия — Набор служб Windows, которые следят за Вашими действиями, отслеживают местоположение и т.п.;
³Индексация содержимого диска — Функция, которая ускоряет поиск по файлам, но замедляет систему;
⁴OneDrive — Облачное хранилище данных от Microsoft.
Спасибо за просмотр темы, надеюсь она была полезной для Вас!

Shortcuts
Tweaks to optimize Windows for low latency online gaming
2014-04-01 (updated: 2021-01-08) by
Tags: gaming, mmo, tweaks

Online Gaming can often benefit from some fine-tuning of Windows TCP/IP settings and the Network Adapter properties. This article is intended to supplement our general broadband tweaks and list only TCP/IP settings that are specific to online gaming and reducing network latency. Some of these settings are also mentioned in our general tweaking articles, however, the emphasis here is on latency rather than throughput, and we have complemented the tweaks with more gaming-specific recommendations and settings that give priority to multimedia/gaming traffic, and may be outside of the scope of other broadband tweaks that focus on pure throughput.
Some proficiency in using Command Prompt/PowerShell and editing the Windows Registry is expected. The Windows Registry can be accessed from the Start/Windows button -> type: regedit. Backing up your Registry before any edits is highly recommended, as mistakes can cause serious issues for the operating system.
Disable Nagle’s Algorithm
(TCP Optimizer «Advanced Settings» tab)
This tweak works with all versions of Windows from Windows XP to Windows 8.1/10/2012 server. This is the same as listed in our general tweaking articles per OS.
Nagle’s algorithm is designed to allow several small packets to be combined together into a single, larger packet for more efficient transmissions. While this improves throughput efficiency and reduces TCP/IP header overhead, it also briefly delays transmission of small packets. Disabling «nagling» can help reduce latency/ping in some games. Keep in mind that disabling Nagle’s algorithm may also have some negative effect on file transfers. Nagle’s algorithm is enabled in Windows by default. To implement this tweak and disable Nagle’s algorithm, modify the following registry keys.
HKEY_LOCAL_MACHINESYSTEMCurrentControlSetServicesTcpipParametersInterfaces{NIC-id}
There will be multiple NIC interfaces listed there, for example: {1660430C-B14A-4AC2-8F83-B653E83E8297}. Find the correct one with your IP address listed. Under this {NIC-id} key, create a new DWORD value:
«TcpAckFrequency»=1 (DWORD value, not present by default interpreted as 2, 1=disable nagling, specifies number of outstanding ACKs before ignoring delayed ACK timer). For gaming performance, recommended is 1 (disable). For pure throughput and data streaming, you can experiment with small values over 2. Wifi performance may see a slight improvement with disabled TcpAckFrequency as well.
In the same location, add a new DWORD value:
TCPNoDelay=1 (DWORD, not present by default, 0 to enable Nagle’s algorithm, 1 to disable)
To configure the ACK interval timeout (only has effect if nagling is enabled), find the following key:
TcpDelAckTicks=0 (DWORD value, not present by default interpreted as 2, 0=disable nagling, 1-6=100-600 ms). Note you can also set this to 1 to reduce the nagle effect from the default of 200ms without disabling it.
For Server Operating Systems that have Microsoft Message Queuing (MSMQ) installed, or if you have the MSMQ registry hive present, also add TCPNoDelay to:
HKEY_LOCAL_MACHINESOFTWAREMicrosoftMSMQParameters
TCPNoDelay=1 (DWORD, not present by default, 0 to enable Nagle’s algorithm, 1 to disable)
Note: Reportedly, disabling Nagle’s algorithm can reduce the latency in many MMOs like Diablo III and WoW (World of Warcraft) by almost half! Yes, it works with Windows 7 and Windows 8.
Network Throttling Index Gaming Tweak
(TCP Optimizer «Advanced Settings» tab)
Works with all current versions of Windows from Vista to 8.1/10/2012 Server.
Windows implements a network throttling mechanism to restrict the processing of non-multimedia network traffic to 10 packets per millisecond (a bit over 100 Mbits/second). The idea behind such throttling is that processing of network packets can be a resource-intensive task, and it may need to be throttled to give prioritized CPU access to multimedia programs. In some cases, such as Gigabit networks and some online games, for example, it is beneficial to turn off such throttling all together for achieving maximum throughput.
[HKEY_LOCAL_MACHINESOFTWAREMicrosoftWindows NTCurrentVersionMultimediaSystemProfile]
«NetworkThrottlingIndex»=dword:ffffffff (DWORD, default: 10, recommended: 10 for media sharing, ffffffff for gaming and max throughput, valid range: 1 through 70 decimal or ffffffff to completely disable throttling)
It is only recommended to change this setting in saturated Gigabit LAN environments, where you do not want to give priority to multimedia playback. Reportedly, disabling throttling by using ffffffff can also help reduce ping spikes in some online games. Games that may be affected by this throttling: Source Engine games (TF2, Left 4 Dead, CS:S), HoN, CoD, Overlord series.
System Responsiveness Gaming Tweak
(TCP Optimizer «Advanced Settings» tab)
Exists in all versions of Windows from Vista to 8.1/10/2012 Server.
Multimedia applications use the «Multimedia Class Scheduler» service (MMCSS) to ensure prioritized access to CPU resources, without denying CPU resources to lower-priority background applications. This reserves 20% of CPU by default for background processes, your multimedia streaming and some games can only utilize up to 80% of the CPU. This setting, in combination with the «NetworkThrottlingIndex» can help some games and video streaming. We recommend reducing the reserved CPU for background processes from the default of 20%.
[HKEY_LOCAL_MACHINESOFTWAREMicrosoftWindows NTCurrentVersionMultimediaSystemProfile]
«SystemResponsiveness»=dword:00000000 (default: 20, recommended: decimal 10 for general applications, 0 for pure gaming/streaming)
Note: In Server operating systems (Windows 2008/2012 Server), SystemResponsiveness is set to 100 by default, denoting that background services should take priority over any multimedia applications.
Turn off LargeSystemCache
(TCP Optimizer «Advanced Settings» tab)
For local network large file transfers, this registry settings allows for better throughput and eliminates some file sharing event log errors (Event ID 2017 error). However, reportedly it has issues with some ATI Video card drivers and certain applications performance. Therefore we recommend turning it off (set to zero) for gaming.
HKEY_LOCAL_MACHINESYSTEMCurrentControlSetControlSession ManagerMemory Management
LargeSystemCache=0 (DWORD, default value: 0, recommended value: 1 for LAN throughput, 0 for gaming)
A value of zero establishes a cache of ~8 MB, a value of 1 allows the cache to expand up to the amount of physical memory minus 4 MB, as necessary.
Disable Game Bar and Game Mode under Windows 10 Creators update
Windows 10 Creators’ update introduced a «Game Bar» to to help Xbox integration and gaming in general, however, they can reportedly cause stuttering during gaming, especially with Windows 10 builds prior to v1709.
More Gaming Tweaks
This section includes gaming-specific tweaks not listed in our general tweaking articles (and not implemented by the TCP Optimizer).
In the same Registry hive as the above two tweaks, you can also change the priority of Games, compared to other types of traffic. These tweaks only affect games that communicate with e Multimedia Class Scheduler Service (MMCSS). Below is a list of the settings and default/recommended values:
[HKEY_LOCAL_MACHINESOFTWAREMicrosoftWindows NTCurrentVersionMultimediaSystemProfileTasksGames]
«Affinity»=dword:00000000 (DWORD, default: 0, recommended: 0. Both 0x00 and 0xFFFFFFFF indicate that processor affinity is not used)
«Background Only»=»False» (REG_SZ, default: «False», recommended: «False», possible values are True or False). Indicates whether this is a background task.
«Clock Rate»=dword:00002710 (DWORD, default: 2710, recommended: 2710). The maximum guaranteed clock rate the system uses if a thread joins disk task, in 100-nanosecond intervals.
«GPU Priority»=dword:00000008 (DWORD, default: 2, recommended: 8. range: 0-31). The GPU priority. Not used in Windows XP and 2003.
«Priority»=dword:00000002 (DWORD, default: 2, recommended: leave alone if using «Scheduling Category» below, set to 6 otherwise for gaming, possible values are 1-8). The task priority, ranging from 1(low) to 8(high). Note for tasks with Scheduling Category of «High», this value is always treated as 2.
«Scheduling Category»=»High» (REG_SZ, default: «Medium», recommended: «High». possible values: Low, Medium, High)
«SFIO Priority»=»High» (REG_SZ, default: «Normal», recommended: «High») The scheduled I/O priority, possible values are Idle, Low, Normal, or High.
Reference: Multimedia Class Scheduler Service
Congestion Control Provider
The TCP Congestion Control Algorithm controls how well, and how fast your connection recovers from network congestion, packet loss, and increase in latency. Microsoft changed the default «congestion provider» from CTCP to CUBIC with the Windows Creators update.
Possible settings are: none, CTCP, CUBIC, DCTCP, New-Reno
Recommended: CTCP for gaming and latency sensitive apps, CUBIC for pure throughput
To see the current setting, in PowerShell use: Get-NetTCPSetting | Select SettingName, CongestionProvider (in later Windows 10 builds, the default used template «SettingName» is «Internet». For more info se our Windows 10 Tweaks article)
Note: If using CTCP and with lossy connections (good possibility of congestion/packet loss), you may also want to enable ECN.
ECN Capability
(Editable with the TCP Optimizer)
ECN (Explicit Congestion Notification, RFC 3168) is a mechanism that provides routers with an alternate method of communicating network congestion. It is aimed to decrease retransmissions. In essence, ECN assumes that the cause of any packet loss is router congestion. It allows routers experiencing congestion to mark packets and allow clients to automatically lower their transfer rate to prevent further packet loss. Traditionally, TCP/IP networks signal congestion by dropping packets. When ECN is successfully negotiated, an ECN-aware router may set a bit in the IP header (in the DiffServ field) instead of dropping a packet in order to signal congestion. The receiver echoes the congestion indication to the sender, which must react as though a packet drop were detected. ECN is disabled by default in modern Windows TCP/IP implementations, as it is possible that it may cause problems with some outdated routers that drop packets with the ECN bit set, rather than ignoring the bit.
Possible settings are: enabled, disabled, default (restores the state to the system default).
Default state: disabled
Recommendation: «enabled» for gaming only with routers that support it, after testing. It’s effects are more noticeable in the presence of congestion/packet loss. Disable for pure throughput with no packet loss.
ECN works well for short-lived, interactive connections like gaming and HTTP requests with routers that support it, in the presence of congestion/packet loss. It can be disabled if tuning for pure bulk throughput with large TCP Window, no regular congestion/packet loss, or with outdated routers that do not support ECN.
To change using netsh:
netsh int tcp set global ecncapability=enabled
(alternative syntax: netsh int tcp set global ecn=enabled)
To change using PowerShell cmdlets in Windows 8.1/2012 Server R2 :
Set-NetTCPSetting -SettingName InternetCustom -EcnCapability Disabled
(for Windows 8/2012, the name of the template in the above command is «Custom» instead of «InternetCustom»)
Notes:
ECN is only effective in combination with AQM (Active Queue Management) router policy. It has more noticeable effect on performance with interactive connections, online games, and HTTP requests, in the presence of router congestion/packet loss. Its effect on bulk throughput with large TCP Window are less clear. Currently, we only recommend enabling this setting in the presence of packet loss, with ECN-capable routers. Its effects should be tested. We also recommend using ECN if you are enabling the CoDel scheduling algorithm to combat bufferbloat and reduce latency.
Use caution when enabling ECN, as it may also have negative impact on throughput with some residential US ISPs. Some EA multiplayer games that require a profile logon do not support ECN yet (you will not be able to logon). Note that if supported, ECN can reduce latency in some games with ECN-capable routers in the presence of packet loss (dropped packets).
See also: Wikipedia — ECN, RFC 3168
Disable Receive Segment Coalescing State (RSC)
(Editable with the TCP Optimizer) This is applicable to Windows 8/10/2012 Server, not available for earlier Windows versions.
Receive Segment Coalescing (RSC) allows the NIC to coalesce multiple TCP/IP packets that arrive within a single interrupt into a single larger packet (up to 64KB) so that the network stack has to process fewer headers, resulting in 10% to 30% reduction in I/O overhead depending on the workload, thereby improving throughput. Receive Segment Coalescing (RCS) is able to collect packets that are received during the same interrupt cycle and put them together so that they can be more efficiently delivered to the network stack. While this reduces CPU utilization and improves thorughput, it can also have a negative impact on latency. That is why we recommend you disable it where latency is more important than throughput.
Possible states: enabled, disabled, default. Default state: disabled
Recommended: disabled for pure gaming latency, enabled for better throughput.
To enable using netsh:
netsh int tcp set global rsc=disabled
To change using PowerShell cmdlets:
Disable-NetAdapterRsc -Name * (use to disable RSC for all adapters)
Enable-NetAdapterRsc -Name * (use to enables RSC for all adapters that support it)
Get-NetAdapterRsc -Name * (use to view adapters that support RSC)
Notes: Only supported by some network adapters. May need «Checksum Offload» enabled as well to work.
Disable Large Send Offload (LSO)
(Editable with the TCP Optimizer) Windows 8/10/2012 Server, not available in earlier Windows versions
Large Send Offload lets the network adapter hardware to complete data segmentation, rather than the OS. Theoretically, this feature may improve transmission performance, and reduce CPU load. The problem with this setting is buggy implementation on many levels, including Network Adapter Drivers. Intel and Broadcom drivers are known to have this enabled by default, and may have many issues with it. In addition, in general any additional processing by the network adapter can introduce some latency which is exactly what we are trying to avoid when tweaking for gaming performance. We recommend disabling LSO at both the Network Adapter properties, and at the OS level with the setting below.
Default: adapter-dependent
Recommended: disable (both in network adapter properties and in the TCP/IP stack at the OS level)
Disable-NetAdapterLso -Name * (disable LSO for all visible network adapters)
Enable-NetAdapterLso -Name * (to enable LSO for both IPv4 and IPv6 on all network adapters, not recommended)
Get-NetAdapterLso -Name * (get a list of network adapters that support LSO)
Notes: Default state is network adapter dependent. Needs Checksum Offload to be enabled to work.
Receive-Side Scaling State (RSS)
(Editable with the TCP Optimizer)
It is sometimes useful to disable RSS if you need to reduce CPU load. This is useful on systems with older/slower CPUs where games tax the processor up to 100% at times. This could be checked with «Task Monitor». Disabling RSS will only have an effect if your network adapter is capable/using RSS, and the CPU is being used up to 100%. Otherwise, you can leave it enabled.
To disable:
netsh int tcp set global rss=disabled
Advanced Concepts
Disable Coalescing: Some network adapters support advanced settings, such as DMA Coalescing, DCA Coalescing, Receive Segment Coalescing (RSC). In general, any type of packet or memory coalescing can reduce CPU utilization (also power consumption) and increases throughput, as it allows the network adapter to combine multiple packets, however, coalescing can also have negative impact on latency, especially with more aggressive settings. That is why it should be either disabled, or used very conservatively for gaming. Any type of network adapter packet/memory coalescing allows the NIC to collect packets before it interacts with other hardware. This may increase network latency. For gaming, disable «DMA coalescing» and «Receive Side Coalescing State (RSC)», where applicable.
NetDMA: This setting needs to be supported by the NIC, BIOS, and CPU (Intel I/O Acceleration Technology — I/OAT). It allows the network adapter direct memory access (DMA), theoretically reducing CPU usage. It is ok to enable for OSes that support it (according to Microsoft it is no longer supported in Windows 8/10). Note that NetDMA is not compatible with TCP Chimney Offload (Chimney offload should be disabled for gaming anyway).
TCP Offloading: TCP Offloads can improve throughput in general, however, they’ve been plagued by driver issues in the past, and, they also put more strain on the network adapter. For pure gaming, disable any TCP Offloads, such as «Large Send Offload (LSO)», for example. For pure gaming and lowest possible latency, the only safe offload that should be left to the network adapter is «Checksum Offload».
Disable Interrupt Moderation: If your Network Adapter supports this setting, it should be disabled for the lowest possible latency (at the expense of a bit higher CPU utilization).
For some of those settings specific to your OS, see our tweaking articles. To disable at the network adapter, see our Network Adapter Optimization article.
Use adequate Send/Receive buffers: low send/receive buffers values conserve a bit of memory, however they can result in dropped packets and decreased performance if exhausted, so they shouldn’t be set to values less than 256 in general. Higher-end NICS/systems can increase the values a bit to 512, or up to 1024.
Router Settings
Most broadband users have some type of NAT router that sits between them and the internet. There are some settings that may help your router better prioritize gaming traffic and improve gaming experience.
Enable upstream QoS in your router. It may be useful to enable upstream QoS at the router, if available, to prioritize the different types of traffic. Upstream QoS is important, because typically residential connections have much lower upstream cap, and when upstream bandwidth is all utilized, it can introduce some delay in the downstream traffic as well. Note this is only recommended for newer routers, where the router has ample computing power to handle the QoS overhead.
Enable WMM if using Wi-Fi. If you must use Wi-Fi, enable WMM, and try to avoid USB Wi-Fi adapters.
Use Open Source Firmware. Many NAT router models support open source firmware, such as dd-wrt, Tomato, etc. If your router’s default firmware does not support advanced functionality that you may need (QoS, WMM, VLANs, etc.), you may be able to flash dd-wrt instead. It is not uncommon for open source firmware to make your connection more stable and reduce router overhead/delay.
Enable CTF (Cut Through Forwarding) — CTF is Broadcom proprietary NAT acceleration. It is a software module that allows routers based on their hardware/firmware to achieve near-gigabit performance and lower CPU utilization through various methods, including bypassing parts of the Linux stack. It is a great feature to use, however there is a catch — it is only available when not using certain other incompatible features that need the Linux functionality (like QoS). You’d have to pick which feature you prefer by testing. In our experience CTF performs better, as the lower CPU/memory utilization and minimal processing trumps QoS in both throughput and latency.
TCP/UDP Timeouts — tweaking the TCP/UDP timeouts can have a noticeable impact on your connection by freeing up resources for active connections. Some of the more advanced router firmwares (Tomato, ASUS Merlin, dd-wrt) have a number of tweakable timeout settings that we’ve already covered in our Wireless Network Speed Tweaks article linked below.
Note: If using dd-wrt, or on Wi-Fi, check our wireless network speed tweaks, some of the advanced router settings are applicable to wired connections as well.
General Online Gaming Recommendations
- Use brand-name, wired Ethernet cards when possible — avoid Wi-Fi, especially with USB client adapters.
- When tweaking TCP/IP (using our general tweaking articles), enable CTCP, enable DCA, and try disabling most «TCP Offloading» settings, with the exception of «Checksum Offload» in both the OS and the Network Adapter Properties.
- Disable «Flow Control» and «Interrupt Moderation» in your Network adapter properties
- Disable TCP/IPv6 in Network adapter properties if not using IPv6
- Reduce the number of background processes, enable QoS at your router and give priority to your traffic.
- Test your latency to game servers using «tracert» in Command Prompt (or PowerShell).
- Disable search indexing on your SSD/hard drive (right-click on drive in Explorer -> choose «Properties» -> untick «Allow files on this drive to have contents indexed…» and wait a few minutes, ignore errors for system-protected files)
- Close unnecessary programs running on your network, you can close the processes in task manager (ctrl+shift+escape). P2P applications such as utorrent and skype open many sockets purely for passive listening and eat up a lot of your available bandwidth. Programs that check for software updates, eg google updates, adobe update, etc. can cause ping spikes.
Intel Recommended Network Adapter Settings
Optimized for quick response and low latency (Gaming):
- Minimize or disable Interrupt Moderation Rate
- Disable Offload TCP Segmentation
- Increase Transmit Descriptors
- Increase Receive Descriptors
- Increase RSS Queues
Optimized for throughput:
- Enable Jumbo Frames
- Increase Transmit Descriptors
- Increase Receive Descriptors
For low CPU utilization:
- Maximize Interrupt Moderation Rate
- Keep Receive Descriptors at default
- Avoid setting large Receive Descriptors
- Decrease RSS Queues
- Decrease the Max number of RSS CPUs in Hyper-V environments
Notes
In some situations, latency can even be reduced by using a VPN provider. Many ISPs provide fast/reliable internet locally between you and their servers, however lack in both speed in latency when it comes to their peering arrangements and backbones for longer distance connections. They could also be throttling certain traffic types. In such situations, a local to you quality VPN provider may allow you to avoid the ISP bottleneck by bypassing a lot of internal/cluttered routing and skip to a distant location faster, providing a lower latency connection.
Some of the tweaks in our general broadband tweaks articles can benefit gaming as well, like disabling «Windows Scaling Heuristics», disabling TCP 1323 Timestamps to reduce the TCP headers overhead, etc.
Most of the Registry tweaks above (with the exception of «More Gaming Tweaks») can be applied easily by using the TCP Optimizer
See Also
Wireless Network Speed Tweaks — some of the router recommendations apply to wired networks and gaming as well.
Network Adapter Optimization — tweaking your NIC settings can help improve your connection.
We appreciate any feedback and always listen to user suggestions.
The performance of your computer is extremely important when it comes to enjoying video game’s the way they were meant to be played. Things like slow frame rates and high ping can ruin the gaming experience. And when it comes to competitive online play, your computer’s performance could be the difference between winning and losing.
If you find the performance of your computer lagging when playing video games, there are a couple of things you can do to improve it. We’re going to discuss five Registry hacks that can give your PC a performance boost in the gaming department.
But First, Before You Edit the Windows Registry…
While looking for registry hacks to improve your PC’s performance, you may get suggestions to use a Registry cleaner. We advise you to not bother with registry cleaners, as they provide no noticeable performance improvement and may even mess up the registry.
Furthermore, we advise that you create a system restore point. This will create a snapshot of the state your computer is in at that time. In the event something goes wrong while editing the registry, you can use the system restore point you created to return your PC to a previous working state.
5 Registry Hacks to Improve Gaming Performance on Your Windows PC
To carry out these hacks, you’re going to need to launch the Windows Registry Editor. The easiest way to do that is to press Win + R to open Windows Run. In the text box, type regedit and then click OK. Then, click Yes on the UAC prompt to open the Registry Editor.
Now you can go ahead and use the Registry Editor to make gaming smoother on your Windows PC with the tweaks below.
1. Disable Fast Startup
Fast Startup may make your Windows PC load faster, but it also prevents it from fully shutting down. During a shutdown, the feature logs out every user, closes all the programs, and puts the rest of the system in a hibernation state before finally turning off the computer.
Coming out of this hibernation state when booting up can cause some processes to misbehave, which can make your PC slower than normal. This is not good for gaming, as this can negatively impact a game’s frames per second (FPS).
To disable Fast Startup, open the Registry Editor and navigate to HKEY_LOCAL_MACHINE > SYSTEM > CurrentControlSet > Control > Session Manager > Power. Double-click the HyperBootEnabled entry, change Value data to 1, and click OK.
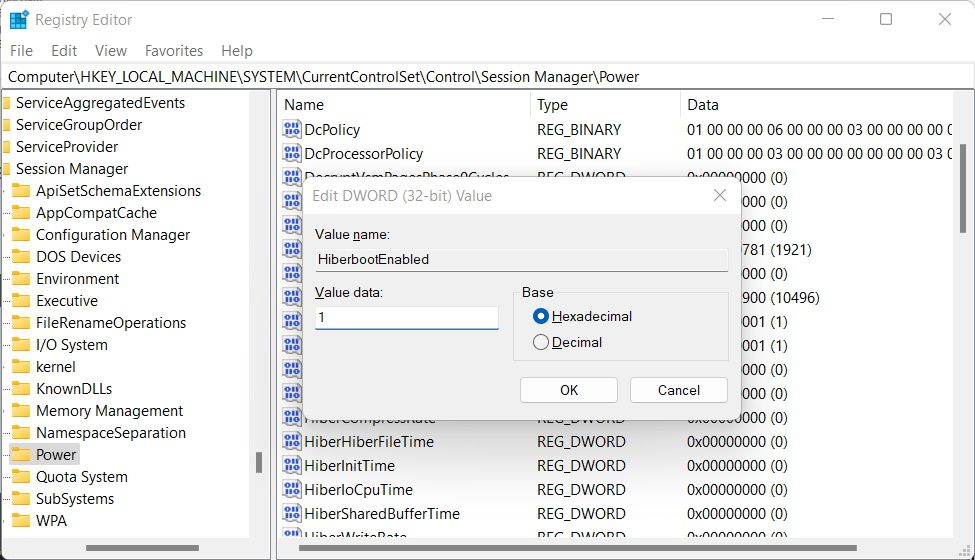
Be advised that disabling Fast Startup will increase the boot time for your Windows machine. However, it could be worth it if you get the best gaming performance out of it.
2. Disable Power Throttling
Power Throttling causes the CPU to slow down so it doesn’t consume too much battery power. Unfortunately, this can come with a small but noticeable performance loss.
Particularly, when it comes to gaming, a throttled CPU can limit the potential of the GPU, creating what is known as a bottleneck. That’s because the GPU is running at a speed higher than what the CPU can handle, which can negatively impact a game’s frame rate.
To disable Power Throttling, open the Registry Editor and navigate to HKEY_LOCAL_MACHINE > SYSTEM > CurrentControlSet > Control > Power > PowerThrottling. Double-click the PowerThrottlingOff entry, change Value Data to 1, and click OK.
In some cases, you can go to the Power key in the Registry Editor and not find the PowerThrottling key inside it. If that’s the case, you can disable Power Throttling through the Local Group Policy Editor as well.
To do that, press Win + R, type gpedit.msc in the text box, and hit the Enter key. In the Group Policy Editor, navigate to Computer Configuration > Administrative Templates > System > Power Management > Power Throttling Settings. Then, double-click the Turn off Power Throttling policy.
Click on the Enabled radial button and then click OK to close the dialog box to apply the policy.
This will disable Power Throttling, meaning Windows will no longer throttle the CPU, among other things, when trying to conserve battery power.
3. Disable Nagle’s Algorithm
Windows uses Nagle’s Algorithm to reduce the number of packets sent over a network by combining them into a larger one. This can cause problems when the packets are small, meaning it will take longer to build them up enough to be sent as one large chunk.
While this technology initially sounds useful, it can increase the ping of some online games. As such, if you’re experiencing high ping in a game, disabling Nagle’s Algorithm can help.
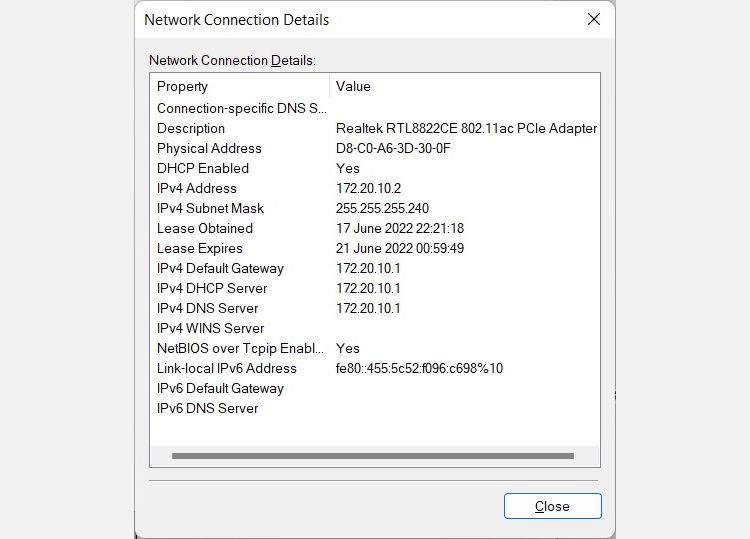
To do that, open the Registry Editor and navigate to HKEY_LOCAL_MACHINE > SYSTEM > CurrentControlSet > Services > Tcpip > Parameters > Interfaces. The goal here is to find the interface (those keys named with different characters in between curly brackets) for the connection you’re using. So, go through each one and look at the value for the DhcpIPAddress entry.
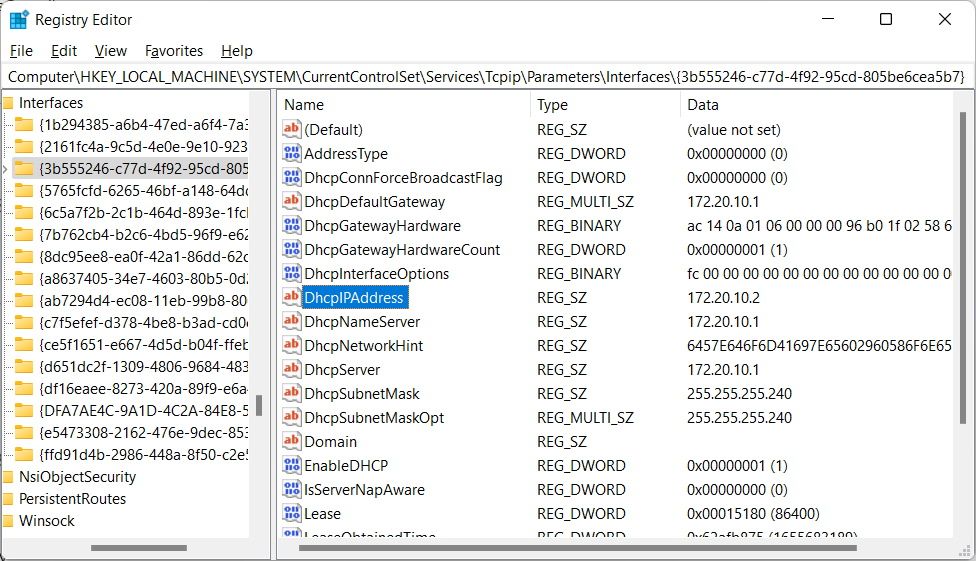
The value for this entry should match your internet connection’s IPv4 address.
To get the connection’s IPv4 address, press Win + S to open Windows Search. Then, type control panel in the search box and click on Control Panel in the search results.
In the Control Panel, head to Network and Internet > Network and Sharing Center and click on the link next to Connections for the internet connection you’re gaming with.
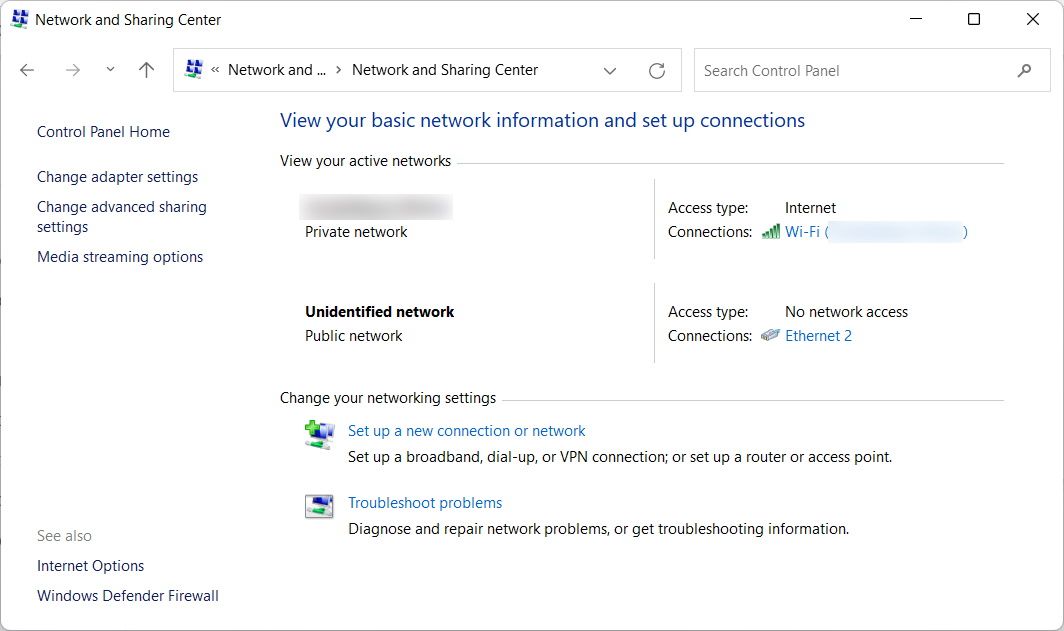
Click the Details button.
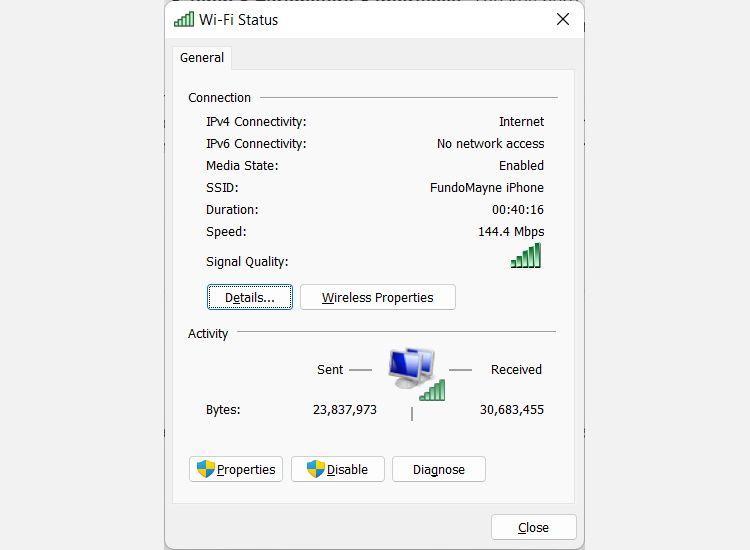
Check the IP address next to IPv4 address.
Once you find a match, right-click the interface and select New > DWORD (32-bit) Value.
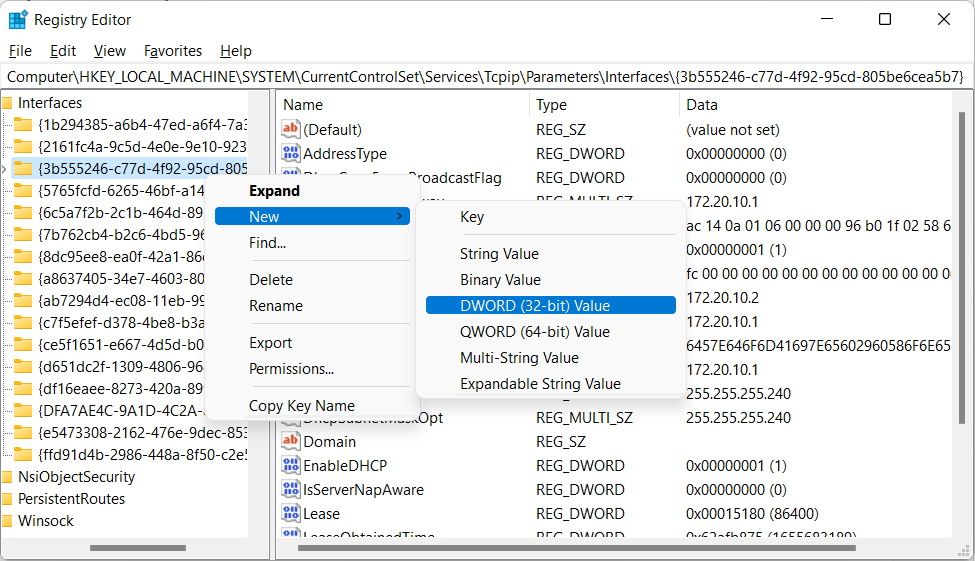
Name this new entry TcpNoDelay. Then, create another one the same way and name it TcpAckFrequency. Double-click on them one by one and change Value Data to 1 for both entries.
4. Disable Network Throttling
To keep the internet connection stable on your PC, Windows will sometimes throttle your network, which can reduce its speed. For online gaming, this can result in a higher ping. You can rectify that by disabling Network Throttling.
To do that, open the Registry Editor and navigate to HKEY_LOCAL_MACHINE > SOFTWARE > Microsoft > Windows NT > CurrentVersion > Multimedia > SystemProfile. Double-click the NetworkThrottlingIndex entry, change Value Data to ffffffff, and click OK.
5. Prioritize Gaming Tasks
Windows has a service known as Multimedia Class Scheduler service (MMCSS). Its job is to ensure that multimedia applications, such as games, get priority access to more CPU power when they’re performing time-sensitive tasks. And with a couple of Registry tweaks, you can tell MMCSS to give games a much higher priority.
To do this, launch the Registry Editor and navigate to HKEY_LOCAL_MACHINE > SOFTWARE > Microsoft > Windows NT > CurrentVersion > Multimedia > SystemProfile > Tasks > Games. Here, we are going to change the Value data of the following entries (double-click to open them):
- GPU Priority: Change it to 8.
- Priority: Change it to 6.
- Scheduling Category: Change it to High.
Enjoy Improved Gaming Performance on Your Windows PC
Tweaking the Registry to get the results you want is not that hard, but you need to know what you’re doing. Try out some of these Registry hacks, and see which ones give your PC the improved gaming performance you’ve been looking for. If they don’t work or cause problems just return the entries to their original values.
Хотите, чтобы оптимизация Windows была эффективной?
Один американский блогер, участник кубков в онлайн-соревнованиях, выложил «секретный» способ, в котором оптимизировал свой компьютер для онлайн игр через интернет. И полностью описал методы оптимизации – их работу, настройки.
Мы будем очищать наш компьютер от всего лишнего, что нам не нужно в играх. Точнее, что отрицательно влияет на их производительность и просто так нагружает систему. Позволим всей конфигурации: процессора, оперативки, видеокарты, жесткого диска (или ssd) и интернет-соединению – работать на 146%. Мощные программы для оптимизации компьютера нам не подойдут, мы будем использовать исключительно бесплатные методы и получать максимальную эффективность в оптимизации Windows, увеличивая производительность в играх и комфорт в работе.
Я знаю, вы все время ищете во что поиграть на слабом пк. Считаю, что эта инструкция решит ваш вопрос «Как повысить фпс в играх» раз и на всегда. После проделанных действий — тестируйте и оставляйте отзывы внизу страницы.
Сначала разберемся какую систему нам лучше использовать: XP, Windows 7 или 10?
Так как Linux настраивать не нужно, он и сам по себе «легкий»(как майонез).
Почему Windows 10?
Рекомендуется использовать эту систему, так как она быстрее запускается, улучшает производительность игр сама по себе, больше поддержки аппаратного обеспечения и DirectX 12, с которым можно запускать большее число игр.
Да и настройка Windows 10 более доступная для пользователя. Просто переключай чекбоксы, чтобы включить/выключить функции.
Лично я использую Windows 7 и не жалуюсь. По-моему, «семерка жрет меньше». Но несмотря, что в статье приведена оптимизация Windows 10, она подойдет и для других версий виндовс.
Основная настройка Windows
Итак, готовим нашу систему к плавной работе, без перебоев. Для этого обновляем наши драйвера до самой актуальной версии. Они позволяют лучше работать вашему ПК с играми и программами.
Компании каждый месяц трудятся над тем, чтобы сделать работу установленного софта лучше.
Одну программу для драйверов я уже советовал. Она находится в другой статье, которую писал я — Что делать, если лагает MTA.
Вам нужно скачать программу для обновления драйверов — Driver Booster. Установить, запустить и обновить. Программа найдет все сама. Это наш первый ускоритель компьютера.;)
Еще немного и вы перестанете искать онлайн игры для слабых пк.
Не даем компьютеру «халявить»
В этом разделе мы рассмотрим значения реестра. Они хорошо повлияют на производительность игр в большем числе случаев. Вам нужно перейти в реестр Windows, это не сложно:
- Нажмите Win + R (или откройте пуск, найдите и выберите «Выполнить…»).
- Введите Regedit и нажмите «Ок».
Я разжую различные вещи, которые мы делаем и для чего.
В играх, использующих «Приоритетность процессов» (MMCSS), допустимо задействовать только до 80% от мощности процессора. Служба «Планировщик мультимедийного класса» (MMCSS) обеспечивает приоритетный доступ к ресурсам ЦП, не отбрасывая их для приложений с более низким приоритетом. Т.е. теперь наш процессор будет работать на 100%, вместо 80.
Чтобы изменить эту настройку — найдите:
HKEY_LOCAL_MACHINESOFTWAREMicrosoftWindows NTCurrentVersionMultimediaSystemProfile.
Создайте новый DWORD и назовите его «SystemResponsiveness», установите его значение «00000000» для «чистой» игры/ потоковой передачи.
Также здесь вы также можете изменить приоритет Игр:
Найдите:
HKEY_LOCAL_MACHINESOFTWAREMicrosoftWindowsNTCurrentVersionMultimediaSystemProfileTasksGames
Измените еще некоторые значения реестра:
- «Приоритет GPU» изменит его значение на 8.
- «Приоритет» установлен на 6.
- «Категория планирования» установлена на «Высокий».
Панель управления Электропитание План электропитания
Стоит изменить параметры электропитания на высокую производительность.
Далее зайти в «Изменить параметры плана», здесь внизу «Изменить дополнительные параметры питания» и выставить все значения на максимальную производительность, не давать системе «засыпать» и снижать нагрузку, если батарея разряжается. То есть все значения нужно выставить на максимальную производительность и 100% (Так как компьютер «по умолчанию» снижает нагрузку для сохранения заряда батареи вашего пк).
Таким образом мы закрыли вопрос «Как разогнать процессор».


Настройка процессора и потоков
Существует отличная бесплатная программа, которая запрещает ядрам процессора «уходить в сон», пока задача не будет полностью решена.
Эффект от этого — лучшая производительность в играх и более быстрый ответ компьютера в целом.
- Загрузите утилиту CPU Unparking Utility.
- Запустите её в качестве администратора.
- Измените ползунок на 100%.
- Нажмите «Apply» и «Close».

Настройка мыши в Windows
Я честно не могу поверить в количество людей, которые все еще используют этот параметр – «Ускорение мыши».
Его необходимо отключить для игр, иначе вам тяжелее будет нацеливаться на противника (скорость мышки будет не равномерной).
В пуске кликаем «Панель управления» и «идем по пунктам»:
- Мышь.
- Параметры указателя.
- Убрать галочку под «скорость движения мыши».
Также попробуйте настроить слайдер скорости указателя, пока вам не будет удобно.
В конце статьи еще будет софт для настройки скорости мыши.

Какой DPI и чувствительность вы должны выбрать?
У некоторых компьютерных мышей есть программное обеспечение для выбора DPI и чувствительности, поэтому в большинстве игр я рекомендую 400-1600. Если сомневаетесь, то попробуйте 800, даже если ваша мышь имеет 20 миллиардов DPI.
Некоторые люди ставят свой DPI слишком высоко.
Если не знаете, о чем речь, значит не думайте, что это вам нужно. Но значение 400-1600 ставьте. 
Как повысить ФПС в играх на слабом ПК
FPS (ФПС) – количество обрабатываемх кадров в секунду. Скорость их обработки зависит от видеокарты и её настройки.
Графические настройки видеокарты NVIDIA
Войдите в панель управления NVIDIA (Правый клик на рабочем столе).
Управление настройками 3D.
Глобальные параметры:
Установите «Ускорение нескольких дисплеев / Смешанных ГП» — Режим однодисплейной производительности (если у вас есть проблемы с низкой частотой кадров на других мониторах или вы используете несколько мониторов для игры, то измените значение на «Режим многодисплейной проивзодительности»).
Предпочтительная частота обновления — самая высокая из доступных.
[ДОПОЛНИТЕЛЬНО]
Отключите «Кэширование шейдеров», некоторые люди получают пользу от него, некоторые — теряют производительность.
Остальные настройки оставить в режиме того, что предпочтительно самой видеокартой (Рядом с названием будет значок видеокарты – зеленый глазик).
Качество фильтрации текстур – производительность.


Разгон видеокарты
Это намного безопаснее и проще, чем разгон процессора. Как и с процессорами, стоит искать в гугле «разгон» и вашу видеокарту, чтобы узнать, какие настройки рекомендуются и достижимы при разгоне.
Программы для разгона видеокарт nVidia, AMD, ATI:
Оптимизация пинга в онлайн играх
В этом разделе затронем настройки реестра, которые оказывают свое влияние на производительность игр по сети — пинг, как повысить фпс в играх на Windows. Если не играете по интернету, то можете пропустить этот пункт.
Можете установить настройки вручную или использовать TCP Optimizer 4.
Для настройки вручную вам нужно перейти в реестр Windows:
- Нажмите клавиши Win и R.
- Введите Regedit, а и нажмите «выполнить».
Отключить алгоритм Нагле:
Он объединяет небольшие пакеты для отправки, в один огромный, как в магазине гуччи. И отправляет его для более «эффективной» передачи информации. То есть для игр отключение «Nagle» может помочь уменьшить пинг в некоторых играх. Алгоритм Нагле включен в Windows «по умолчанию».
Чтобы отключить его (для повышения производительности), перейдите к значению реестра:
HKEY_LOCAL_MACHINESYSTEMCurrentControlSetServicesTcpipParametersInterfaces{NIC-id}
Где {NIC-id} — ваш IP-адрес.
Под этим ключом {NIC-id} создайте следующее значение DWORD:

Если не знаете свой адрес IP – следуйте инструкции:
- Нажмите клавиши Win и R.
- Введите CMD, затем Enter.
- Введите IPCONFIG, затем Enter.
Должен отображаться ваш ЛОКАЛЬНЫЙ IP-адрес.

Отключить запрет на работу с сетью
Windows иногда любит регулировать отправку пакетов, поэтому стоит отключить этот параметр для повышения производительности.
Опять в реестре теперь найдите:
HKEY_LOCAL_MACHINESOFTWAREMicrosoftWindows NTCurrentVersionMultimediaSystemProfile
В SystemProfile создайте значение DWORD и назовите его «NetworkThrottolngIndex».
Установите шестнадцатеричное значение «ffffffff» для игр и максимальной пропускной способности.
Оптимизация интернет-соединения
Онлайн-игры связаны с сервером. Поэтому вы иногда получаете низкий пинг и ФПС — только 20 кадров в секунду, теряя производительность, а отсутствие региональных серверов также могут привести к некоторым задержкам. Настройка интернет-соединения может помочь.
TCP Optimizer 4:
Эта программа предоставляет все важные настройки, чтобы настроить ваш компьютер и сетевой адаптер для онлайн-игр, без мучений с реестром.
Скачайте бесплатно программу для оптимизации пинга — TCP Optimizer 4.
Щелкните правой кнопкой мыши по TCPOptimizer и запустите её в качестве администратора.


Вы можете сделать несколько исследований, изменяя настройки, и, возможно, получить лучшие результаты. Если что, то каждая из настроек имеет всплывающую подсказку.
В разделе «Общие настройки» некоторые параметры требуют ситуационной субъективной оптимизации, основанной на ваших потребностях. Значение настроек на «Оптимально» должно по-прежнему давать вам улучшения.
Если у вас возникли проблемы, то вы всегда можете установить значение на «Оптимально» или «Стандартно».
Отключить Windows обновления
У обновлений Windows есть параметр, в котором он может «съедать» ваш трафик. Поэтому стоит отключить Windows обновления, так как это может повлиять на ваш игровой процесс.
Чтобы отключить эту функцию, выполните следующие шаги:
- Откройте «Панель управления» в меню «Пуск.
- Откройте «Центр обновления Windows».
- В разделе «Центр обновления Windows» откройте «Настройка параметров».
- Выберите «Не проверять наличие обновлений».
Также отдельное внимание занимает настройка брандмауэра Windows – стоит отключить и его, так как он не только «перекрывает воздух» некоторым возможностям. Появляются проблемы, когда вы создаете свой сервер, например в MTA. Из-за заблокированного доступа между программой и сетью, ваши друзья не смогут подключиться.
Как исправить это:
Отключить OneDrive
Если не знаете что такое OneDrive или не используете, то отключите его. Он будет поглощать трафик. Приложение OneDrive для Windows 10 загружает ваши новые файлы на облачный интернет-сервер, чтобы вы могли получить к ним доступ в любом месте.
Чтобы отключить OneDrive:
- Щелкните правой кнопкой мыши на приложении OneDrive, которое находится на панели задач, и нажмите «Выход». Дополнительно, в настройках облака можно сделать так, чтобы он не запускался и не нагружал систему.
Системные твики (Tweaks)
Отключите гибернацию.
Режим гибернации по умолчанию включен, чтобы жесткий диск быстрее загружал программы, а не загружал систему, но для системных дисков SSD это не нужно.
Для этого откройте черную командную строку с правами администратора и введите следующую команду:
powercfg -h off
Настройка файла подкачки
- Войдите в «Мой компьютер».
- Правой кнопкой откройте «Свойства».
- Выберите «Дополнительные параметры системы».
- В разделе «Быстродействие» откройте параметры и во вкладке «Дополнительно» настройте файл подкачки на диске с системой Windows по правилу:
- 512 Mb оперативной памяти, — оптимальный размер файла подкачки от 5012-5012 Mb;
- 1024 Mb оперативной памяти, — оптимальный размер файла подкачки от 4012-4012 Mb;
- 2048 Mb оперативной памяти, — оптимальный размер файла подкачки от 3548-3548 Mb;
- 4096 Mb оперативной памяти, — оптимальный размер файла подкачки от 3024-3024 Mb;
- 8 Гб оперативной памяти, — оптимальный размер файла подкачки от 2016-2016 Mb;
- 16 Гб оперативной памяти (и больше), — чаще всего, без файла подкачки.
Все остальные диски должны быть установлены в «Отсутствует».

Я рекомендую иметь файл подкачки на отдельном или вторичном диске.
Я использую SSHD, который я также использую для хранения. После долгих испытаний я обнаружил, что я получаю улучшения после установки файла подкачки в 4 Гб, не ставя подкачку на моих основных или игровых дисках.
Однако некоторые программы и игры предназначены для работы с файлом Pagefile (файл подкачки), и для меня лучше уж иметь его, хоть и польза может казаться довольно незначительной.
Визуальные эффекты и производительность
Я рекомендую отключить некоторые из визуальных эффектов в Windows, это делает систему быстрее и более отзывчивой.
Итак, заходим, как и по предыдущей инструкции, только теперь переходим во вкладку визуальных эффектов и выключаем всё, оставляя только 3 включенными:

HDD, настройка SSD под Windows и оптимизация компьютера
Вы можете часто дефрагментировать свои жесткие диски, но не SSD. Система часто дефрагментирует их сама, что может повредить их, поэтому эту функцию нужно отключить.
Просто кликните правой кнопкой на любой из ваших дисков в системе. Во вкладке «Сервис» выберите «Дефрагментация диска» и отключите дефрагментацию по расписанию.
Также я рекомендую отключить индексирование на SSD. (Я отключаю еще и на HDD)
- Зайдите в «Мой компьютер» еще раз.
- Нажмите на свой SSD и щелкните по нему правой кнопкой мыши.
- Щелкните свойства, а затем снимите флажок «Разрешить файлам на этом диске индексировать содержимое в дополнение к свойствам файла».
- Нажмите «ОК» на все, что будет запрашивать система.

Отключить ненужные службы
Заходим на сайт и листаем в самый низ — Сайт.
Слева нажимем то, что нам не нужно и остается нужное:

Объясняю:«Bare-bones», что переводится как «голые кости». То есть компьютер будет работать нормально, но не будут работать службы интернета, поэтому вчитывайтесь в то, что отключаете. Я так освободил 1 Гб памяти ОЗУ, только отключив службы.
Как отключить ненужные службы в Windows:
- Нажмите клавишу Win + R.
- Введите services.msc.
- Найдите службу, которую хотите отключить, и щелкните ее правой кнопкой мыши.
- Щелкните «Свойства», затем нажмите «Тип запуска».
- Выберите «Отключено», нажмите «ОК».

Удалить вирусы и отслеживание Windows
Есть два разных способа, которые я рекомендую проделать, но использование более автоматизированного способа, вероятно, лучше.
Spybot Anti-Beacon
Эта программа отключает интеллектуальную слежку за данными, отправляемыми с вашего компьютера в Microsoft и его сервисов, которая в основном предназначена для блокировки и остановки различных проблем с отслеживанием (телеметрией), присутствующих в Windows 10 и снижает нагрузку на систему.
Скачайте и запустите программу, нажмите «Immunize», чтобы блокировать все уязвимости.
В опции «Дополнительно» применяются все другие настройки.
Отключите другое отслеживание интеллектуального анализа данных, увеличивая конфиденциальность и производительность.
- Щелкните правой кнопкой мыши блок уведомлений в правом нижнем углу.
- Нажмите «Открыть центр поддержки».
- Слева выберите «Настройка центра поддержки».
- И отключите все уведомления.
Приложения и функции
Зайдите в «Панель управления», далее «Программы и компоненты» и удалите все ненужные программы, которые вы давно не используете. Лучше всего для этого подойдет программа Revo Uninstaller Pro.
После этого, слева выберите «Включение и отключение компонентов Windows». Здесь тоже отключите все, что не используете. Я отключил вообще всё. Но обратите внимание на пункт «принтеры», возможно, вы им пользуетесь.
Более автоматизированный способ для защиты приватности — W10Privacy.
По-прежнему голова кругом от этой простой программы Windows 10. Она сочетает в себе множество настроек конфиденциальности, а также множество вещей, которые можно отключить в Windows для лучшего эффекта.
- Запустите программу, щелкнув правой кнопкой мыши по ярлыку, «Запуск от имени администратора».
- Отключите/ настроите все, что вам угодно.
- Затем нажмите «Set Changed Settings», подождите, перезагрузите компьютер.
Я отключил почти всё.
Если сомневаетесь, то просто прочитайте подсказку каждой настройки перед тем, как отметить ее для отключения.


Убедитесь, что «ваши разгоны» всегда под контролем.
Проверяйте свои разгоны, чтобы убедиться, что ваша система стабильная. Я запускаю серию 3D-тестов.
И я также рекомендую 3d Mark Firestrike для общего бенчмаркинга.
Базовая версия тоже БЕСПЛАТНАЯ!
Также продукты от CPUID имеют множество отличных программ мониторинга для ваших температур и напряжений.
Я могу порекомендовать бесплатную программу — HWMonitor почти для всего.
Process Lasso — Bitsum.
Программа для определения приоритетов процессов системы, а также для целого мира других функций.
Prio Process Priority Saver — Prio.
Имеет ли подобная более тонкая работа, которую делает Lasso, сохраняя приоритеты процесса, поэтому вам не нужно вручную их устанавливать.
CMark Win 10 «Fix» — Windows Mouse Things
Бесплатная программа для исправления записей реестра, которая удаляет все, что связано с ускорением мыши.