-
Partition Wizard
-
Partition Manager
- Quickly Fix: Windows Online Troubleshooting Service Is Disabled
By Amanda | Follow |
Last Updated July 22, 2020
If you come across the “Windows Online Troubleshooting Service is disabled” issue unfortunately, you are at the right place. In this guide developed by MiniTool Partition Wizard, you will learn about how to fix Windows Online Troubleshooting Service disabled error effectively.
Windows provides a set of troubleshooters that help to diagnose various computer problems. Based on the diagnostic data, it can notify you about the detected problems or automatically resolve issues as you wish.
However, some errors have been reported with this Windows feature, and the following error message is one of them.
Windows Online Troubleshooting Service is disabled
Windows Online Troubleshooting Service is not enabled for this version of Windows
You might encounter Windows Online Troubleshooting Service disabled issue when you are running a troubleshooter or installing/opening/updating a specific program. Here are some methods reported by users and you can have a try.
Fix 1: Update Windows
If the troubleshooter is downloaded from Microsoft website, you have to make sure it applies to the version of your Windows. Otherwise, it will not work on your computer if the Windows version is not supported.
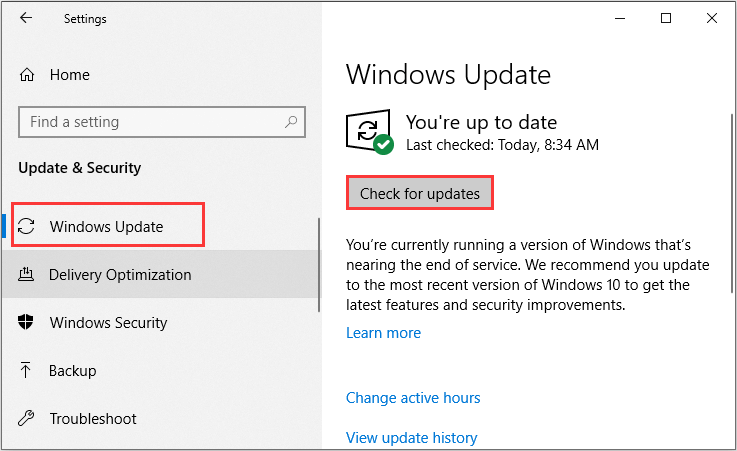
If the troubleshooter applies to your OS, perhaps you can try updating your Windows which has fixed the issue for some users. To do that, just press Windows + I to open Settings and go to Update & Security > Windows Update. Then, click Check for updates in the right pane and install any available updates according to the onscreen instruction.
Fix 2: Enable Scripted Diagnostics Policy
The Scripted Diagnostics policy is very important for Windows troubleshooting. If you are facing Windows troubleshooter not working and receive “Windows Online Troubleshooting Service is disabled” message, just go to enable this policy following the steps below.
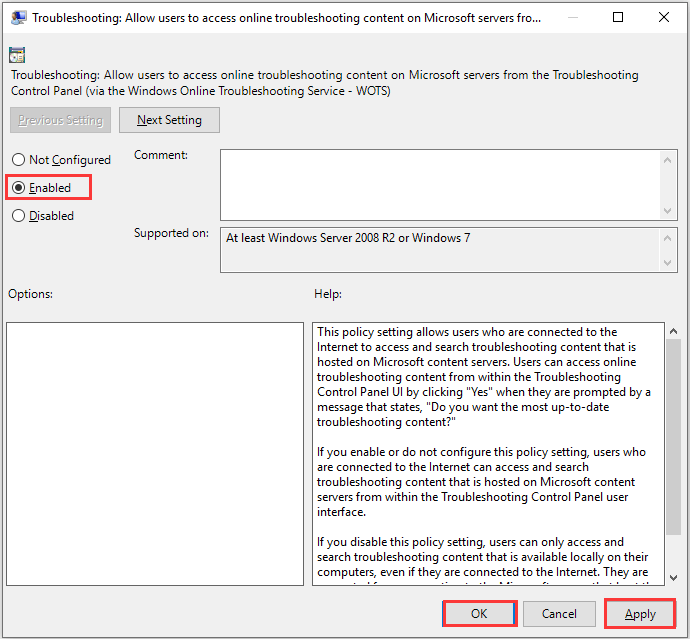
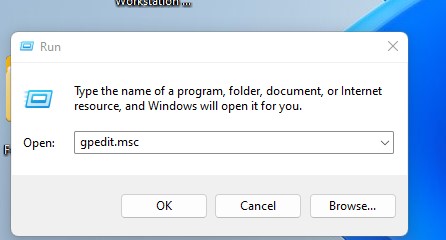
Step 1: Press Windows + R to invoke Run window. Input gpedit.msc and click OK button to open Local Group Policy Editor.
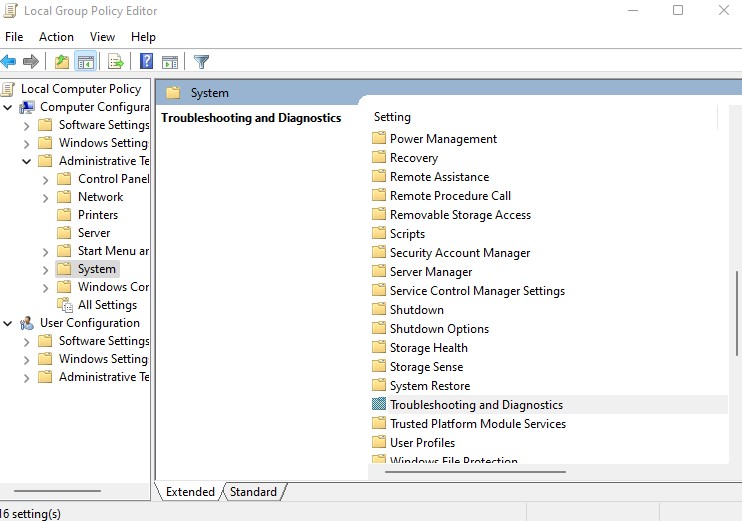
Step 2: Go to Computer Configuration > Administrative Templates > System > Troubleshooting and Diagnostics > Scripted Diagnostics.
Step 3: In the right pane, double-click the Troubleshooting item with the description “Allow users to access online troubleshooting content on Microsoft servers from the Troubleshooting Control Panel (via the Windows Online Troubleshooting Service -WOTS)”.
Tip: After selecting an item, you can view its description in the middle column.
Step 4: When you get the following window, check Enabled and click Apply and OK to enable this policy.
Fix 3: Cleanup Junk Files
Some junk files in the system drive are likely to interfere with the process of troubleshooting and trigger the “Windows Online Troubleshooting service is disabled” error message. So, it might helpful to cleanup junk files for the system.
Step 1: Double-click This PC icon to enter File Explorer.
Step 2: Under the Devices and drives section, right-click the system drive and choose Properties.
Step 3: Keep in the General tab and click Disk Cleanup. Then, click Clean up system files in the new window.
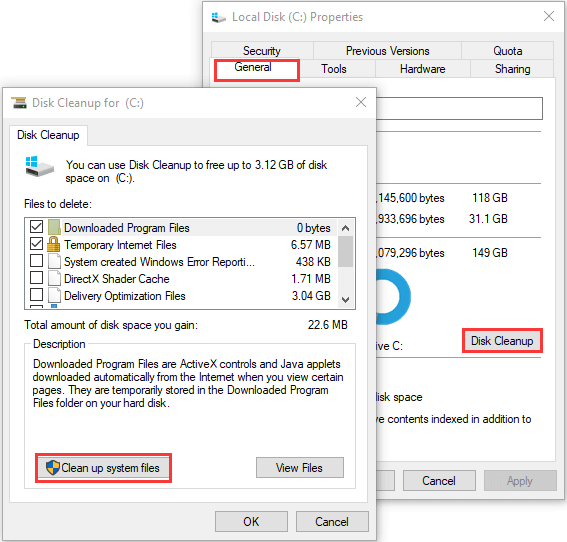
Step 4: Then, check the junk files you want to remove and click OK button.
Fix 4: Modify Windows Registry
Another method to fix Windows Online Troubleshooting Service disabled issue is to modify a certain registry. Before you make any changes, you had better back up registry in advance to avoid damage to your system.
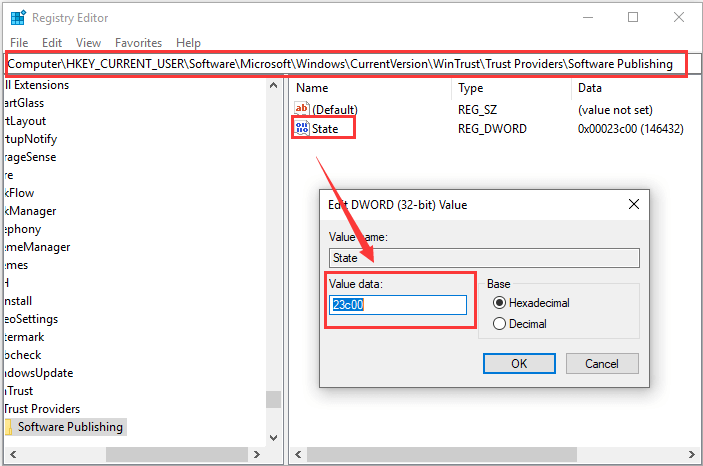
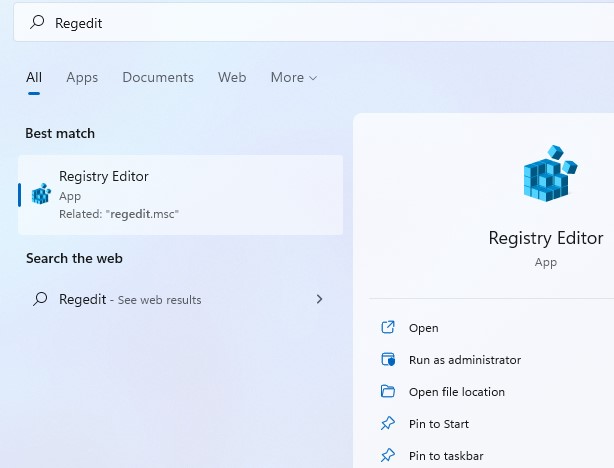
Step 1: Open Run window, input regedit and press Enter to access Registry Editor.
Step 2: Copy and paste the following directory to the address bar and press Enter: ComputerHKEY_CURRENT_USERSoftwareMicrosoftWindowsCurrentVersionWinTrustTrust ProvidersSoftware Publishing.
Step 3: Double-click State DWORD in the right pane and set its Value data to 23c00. Click OK to save changes.
Fix 5: Perform SFC Scan
If the error message still shows up after trying the above methods, perhaps there are some problems with system files. To fix system files issue, you can use System File Checker tool to perform a full scan.
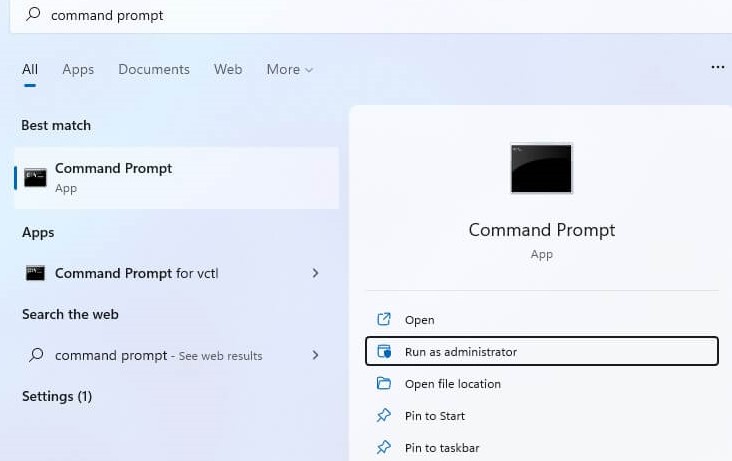
To achieve that, you need to input cmd in the Run window and press Ctrl + Shift + Enter to run Command Prompt as administrator. Then, type the command sfc/scannow and press Enter to start scanning. Once it’s done, restart your computer and check if the “Windows Online Troubleshooting Service is disabled” error message disappears.
Note: If SFC scan doesn’t work, you can continue executing the DISM command: DISM.exe /Online /Cleanup-image /Restorehealth and then reboot your system.
About The Author

Position: Columnist
Amanda has been working as English editor for the MiniTool team since she was graduated from university. She enjoys sharing effective solutions and her own experience to help readers fix various issues with computers, dedicated to make their tech life easier and more enjoyable.
She has published many articles, covering fields of data recovery, partition management, disk backup, and etc. In order to provide more useful tips and information, she is still committed to expand her technical knowledge.
Download PC Repair Tool to quickly find & fix Windows errors automatically
If you receive error Windows Online Troubleshooting Service is disabled, Windows Online Troubleshoot Service is not enabled for this version of Windows, when running a Troubleshooter then this post will be able to help you. I recently saw this error message on my Windows 10 Pro v1909.

There are multiple ways to address this issue. Let us take a look at them:
- Check if it applies to your Windows OS version
- Enable Scripted Diagnostics Policy
- Set Software Publishing State value using Registry Editor
- Run SFC & DISM tool
Windows Online Troubleshooting Service generates its own set of troubleshooting scripts. The feature was rolled in one of the features updates and is similar to “Recommended Troubleshooting.”
Based on the diagnostic data, and algorithm it can fix problems on the computer automatically if you wish or notify you about it.
1] Check if it applies to your Windows OS version
If you downloaded the Troubleshooter from Microsoft and received this message after running it, then you need to check if it applies to your Windows OS version. Some Troubleshooters and Fix-Its were made to run on Windows 7 only and so may not work on vice versa. This can apply the other way around too.
2] Enable Scripted Diagnostics Policy

Type gpedit.msc in the Run prompt followed by the Enter key to open Group Policy Editor.
In the GP Editor navigate to Computer Configuration > Administrative Templates > System > Troubleshooting and Diagnostics > Scripted Diagnostics.
Enable the policy which says —
Troubleshooting: Allow users to access online troubleshooting content on Microsoft servers from the Troubleshooting Control Panel (via the Windows Online Troubleshooting Service – WOTS)
Once enabled, when you run any of the troubleshooting methods, the error will not be displayed anymore.
3] Set Software Publishing State value using Registry Editor

Open Registry Editor
Navigate to:
HKEY_CURRENT_USERSoftwareMicrosoftWindowsCurrentVersionWinTrustTrust ProvidersSoftware Publishing
Make sure that the value of State (DWORD) is set as 23c00
If not edit, and enter the value. Click OK and close the Registry.
Next, if you run the troubleshooter, the error won’t show up again, and you will be able to run the troubleshooter.
4] Run DISM
To run DISM, do the following:

In the Command Prompt and execute the DISM command:
DISM.exe /Online /Cleanup-image /Restorehealth
Run the troubleshooter again to check if the problem was resolved.
I hope this tutorial was easy to follow, and you were able to enable the Windows Online Troubleshooting Service.

Anand Khanse is the Admin of TheWindowsClub.com, a 10-year Microsoft MVP (2006-16) & a Windows Insider MVP (2016-2022). Please read the entire post & the comments first, create a System Restore Point before making any changes to your system & be careful about any 3rd-party offers while installing freeware.
Windows Troubleshooter is one of the most impressive features or we can say tools inside the Windows computer. This tool allows us to easily check our computer for various problems and get them solved in an effective manner. Also, this tool is good at suggesting the most suitable fixes that you can apply pretty easily. But, when there is an online fix that should be done, the Troubleshooter may give you numerous types of errors because of various reasons. One of the most common reasons is Windows online troubleshooting service is disabled.
So, now you are on this page and you know this error is coming up on your PC, you must be ready to fix the problem too. This article is all about helping you fix this issue as soon as possible.
There could be numerous problems lying behind this error. But, the most common issues are caused by driver errors and some other specific types of problems. So, fixing it could become tough for most of us.
Again, it is possible to fix this issue on your own. You do not have to get in touch with an expert if you have a little bit of technical knowledge. The steps are pretty easy to do and anyone can perform them.
So, in this article, you are going to know the exact methods to get this error fixed in an effective manner.
We advise you to do these settings only if you are taking full responsibility for what you are going to do. Any wrong setting performed may end up causing various hassles for you.
We are going to start the actual process of solving this issue. But, before that, let’s know some other important things about this error and its related terms.
Why Windows Online Troubleshooting Service is Disabled Error might happen?
As we discussed earlier, this error is related to the Windows troubleshooter whenever it tries to use any specific task related to the internet. It could be an online drive update or any other online fix. It mostly occurs whenever the system has to download something from the internet.
Along with that, some other issues like Windows update, and internet drivers can cause this hassle for you. In simple words, Windows Online Troubleshooting Service is Disabled Error is mostly caused by your system itself. There are very fewer chances that it is caused by internet connectivity.
6 Efficient Ways to Fix online Windows Troubleshooting Service Error
So, fixing this problem is definitely possible by using some steps that we are going to discuss here in this article. Without any further discussion, let’s get started and see how you can effectively fix this problem in no time.
Update Windows
The first step is to update your Windows OS. Because a Windows update will update all the system drivers and refresh all other settings, it can fix this error in an effective manner. Updating Windows means you are providing the latest files to the system by allowing it to work on them.
It directly means you are going to have numerous benefits along with this fix. Now, if you don’t know how to update Windows, below is a brief process given to you.
You can simply follow these steps and update your OS without any hassle.
- Press Windows+X buttons together and click on Settings.
- Now, click on the Update and Security option
- Now, click on Check for Updates and do the pending update if available.
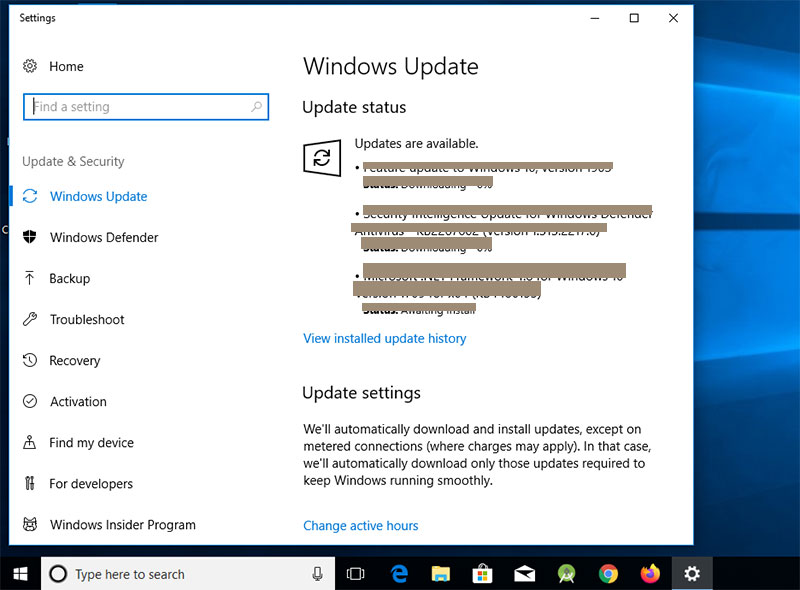
The update will take some time depending on the previous update and the total files to be downloaded. Once the update is done, you can see if the error is resolved.
If not, just proceed to the next step given below.
Clean Junk and Temporary Files
Junk and Temporary Files are highly ignored by Windows users because either they are not aware of them or do not know how to remove them from the system. But, these files can cause numerous problems for your computer along with the one you are seeing now. It is pretty easy to delete these files from your computer.
You can either use a third-party computer cleaner software or do this job manually. The manual way is the most reliable and safe. So, in this article, we are going to use it to clean our system in an adequate manner.
Just follow this procedure and see if it can help you to Fix the Windows Online Troubleshooting service is disabled error.
Follow the process given below.
- Go to Windows File Explorer and click on This PC option.
- Now, right-click on the system or C Drive and then choose the Properties option
- Go to the General Tab and then choose the Disk Cleanup option.
- Click on Clean up system files.
- Check the junk files you want to remove and then click on OK.
After doing this process, it will be good if you restart your computer to let the changes take their effects. Once your PC is restarted, see if the error is appearing again.
If it is still there, go to the next step.
Turn-On Scripted Diagnostics Policy
This is one of the main features we can use to troubleshoot Windows problems. Most importantly, if your Windows Troubleshooter option is not working or you are seeing any sort of error like Windows Online Troubleshooting Service is Disabled, you can easily use this method to get this problem solved.
Enabling this policy could be a tough job if you are doing it for the first time. But, here we are going to use the simplest and easiest method to do the same.
In fact, you would be able to do it in a couple of minutes with the procedure we are going to discuss here.
So, let’s get started with any further discussion.
- Press Windows+R button to open the Run Command Menu
- Now, type gpedit.msc and hit Enter
- Local Group Policy Editor will be opened after this.
- Go to the option Computer Configuration>>Administrative Templates>>System>>Troubleshooting and Diagnostics>>Scripted Diagnostics
- On the right side, double click on the Troubleshooting item named “Allow users to Access Online Troubleshooting content on Microsoft Servers from the Troubleshooting Control Panel”.
- In that Window, make sure to check the option Enabled and then click on Apply and OK.
After doing this method too, make sure to restart your computer to let the changes take their effects. These steps should fix your problem because lots of users have used this method to get rid of this issue.
So, you should also be able to do that. If you are not, just proceed to the next method given below.
Modify Windows Registry
Modifying the Windows Registry key is an effective way of fixing not only this but various other problems you may see in your Windows computer. But, you will have to modify a specific Windows Registry which is associated with a certain function of Windows Troubleshooter.
Note: Make sure to keep a backup of your Registry keys before modifying anything using this or another method. It will be good if you have a backup to restore later and get your registry back in the shape.
Now, without any further discussion, let’s know which windows registry you have to change and how.
- Press Windows+R buttons together to enter the Run Command.
- Enter regedit and press Enter.
- You will be taken to the Registry Editor this time
- Paste this registry path in the Registry address bar:
ComputerHKEY_CURRENT_USERSoftwareMicrosoftWindowsCurrentVersionWinTrustTrust ProvidersSoftware Publishing.
- Double click on DWORD state in the right pane and change its value data to 23c00.
- Click OK to save the changes.
Now when the changes are saved, make sure to restart your computer and see if this method solved the Windows online troubleshooting error. If you are still seeing the problem, you can go to the next step.
Run an SFC Scan
SFC scan is another one of the best methods to solve not only this but various other problems with your Windows computer. This scan can help you to solve different problems related to Windows files, registry, and trash. An SFC Scan basically scans the whole Windows computer and checks the files for errors.
If this Windows Troubleshooter error is caused by a problematic file in your computer, it can easily be fixed using an SFC Scan. Running this scan is pretty easy and once it starts, it will do everything on its own. It could be tough for you to run this scan if you don’t know how to do it.
But, using the Command Prompt, we can easily run this scan without causing any hassle for you. In fact, the Command Prompts makes it easier for you to use this feature just by entering some words.
So, let’s see and run the SFC scan to check if it can fix the Online Troubleshooting Service error.
- Go to Windows Search Bar and search for Command Prompt
- Now, right-click on Command Prompts option and click on Run as Administrator
- Now, Enter this command sfc/scannow and hit Enter
- It will take some time to get completed.
Once the scan is completed, make sure to restart your computer. After that, see if the problem is solved.
Run DISM Command
DISM (Deployment Image Servicing and Management) is another great command you can easily use to fix various problems with your Windows computer. Fortunately, it can work effectively to solve this error too. Using this command is also very simple just like the SFC Scan. Like the SFC scan, this scan is easily approachable using the Command Prompt.
This scan will basically check your Windows health and image file along with their cleanup. It means you are going to have impressive benefits whenever you run this command on your computer. We hope you will be able to fix this error using this method.
- Use the process given above to open Command Prompt as an Administrator.
- Now, enter this command
DISM.exe /Online /Cleanup-image /Restorehealth
And hit Enter.
The process will take some time to complete. Once it’s done, make sure to restart your PC to let the Windows take effect. See if the Windows Troubleshooter is working fine now.
What is the problem is still there?
In that case, you can either try to get in touch with Windows support or take your computer or laptop to the nearest service station. If you are not able to fix this error using these methods, only the expert will be able to do it now.
Along with that, you can try to restore your Windows if no important data is stored inside it. But, this step is mostly not suggested before you have connected with an expert to solve your problem.
Final Verdict
We hope you have liked this article and are able to fix the Windows online troubleshooting services is disabled error. We have researched a lot to find working and reliable methods for fixing this issue.
However, we suggest you perform these steps only if you know what you are going to do next. The methods are tested and trusted by numerous Windows users and they were able to fix this issue without any issue.
You can also try to reinstall your Windows from scratch because if it is a problem with Windows, this is the final fix that will work for sure.
If you have liked this article, make sure to share your valuable feedback in the comment section. Also, it would be appreciated if you are sharing this article with others.
Also, suggest to us new topics or the improvements you want to see in the future. We would definitely love to hear from your side now. Along with that, we keep posting new articles like this on a regular basis.
So, get in touch with us and keep reading.
Have a great day!
This error screen will not be new if you regularly use your computer. Troubleshooting is one way to resolve several errors and restore your computer to an excellent working condition. So knowing how to fix this error screen any time it pops up is something every computer user should be familiar with.
Most computers and laptops run with the Windows operating system, and one fantastic feature of this OS is the Troubleshooter tool which helps you to discover and quickly resolve errors and problems on your computer. In addition, the tool provides suggestions on the ideal fix for each problem discovered. Not all errors, however, can be resolved with this tool, and the ” windows online troubleshooting shooting is disabled” error screen of one such.
This article will shed more light on what the ” windows online troubleshooting shooting is disabled” error screen is and why it may occur. We will highlight the various steps to resolve this error screen as quickly as possible.
What Does This Error Screen Mean?
The error screen often displays when there is a problem with an online error fixing attempt. It means that your Troubleshooter’s online access has somehow been disabled and thus cannot perform its required tasks successfully. In addition, the error may also occur when your computer system has to download some updates from the internet.
Once this error message pops up on your screen, some issues can be responsible for it. They include:
- Issues resulting on the computer due to performing an online drive update.
- Windows updates from the internet can also result in this error screen occurring.
- Finally, incompatible internet drivers can also contribute to this error message showing on your screen.
How To Resolve This Error Screen

There are different steps to take when dealing with this error. Before carrying any out, however, know the Windows version installed on your computer. To do this, press the Windows key and R, type in winver, and then click Ok.
Another thing you should check is the troubleshooter your computer uses, especially if you downloaded it from Microsoft, as some of them are picky regarding OS functioning. Once you have confirmed both the Windows version and the troubleshooter tool, you can then resolve the error in the following ways:
Solution #1 – Using the scripted diagnostics policy
Some computer users find this step quite handy when faced with this error screen as it is an easy way to enable an online troubleshooting service. Follow these steps to resolve the error with this method:
- Locate the Group Policy Editor on your Windows. Do this by typing gpedit.msc in the Execute prompt and press Enter.
- After this, click on Computer Configuration and then choose Administrative Templates.
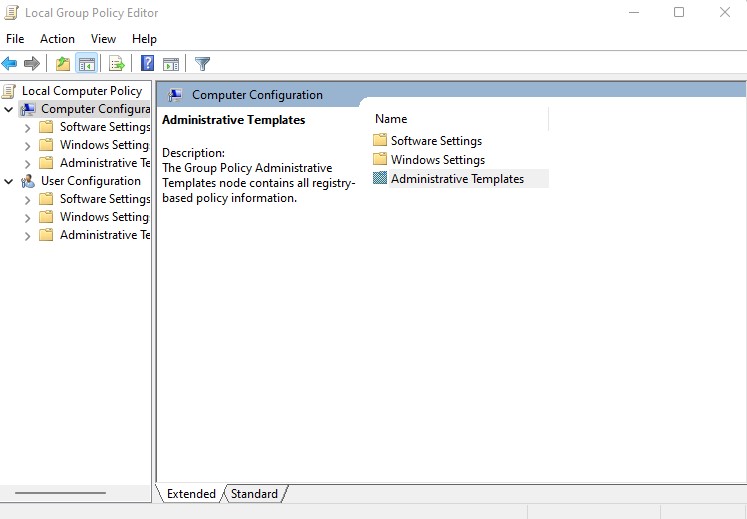
- The System interface pops up afterward, where you should select Troubleshooting and Diagnostics and then Scripted Diagnostics in the following interface.
Next, activate the “Allow users to access online troubleshooting content on Microsoft servers” policy.
Once this policy is enabled, the error screen will disappear, allowing you to run troubleshooting freely on your computer.
Solution #2 – Registry Editor
Every Windows OS comes with this tool which permits authorized users to view and make changes in the Windows registry. To fix this error, using this method will require you to edit the registry and set the software publishing state value. Editing this tool, of course, is not dangerous as long as you are well informed of the steps you take. Carry out this process with the following steps:
- Type Regedit in the search box found on your taskbar. Then select Registry Editor to open the tool.
- Once it is opened, locate the HKEY_CURRENT_USERSoftwareMicrosoftWindowsCurrentVersionWinTrustTrust ProvidersSoftware PublishingState folder.
- Next, ensure that the value of the DWORD (State) is inputted as 23c00.
- If there is a different value, input the above-stated one, click OK and close the registry.
- Once you have done this, the error will cease to appear when you run troubleshooting.
Solution #3 – Using DISM command
DISM stands for Deployment Image and Servicing Management, and you can fix the error using this method. Follow these steps to resolve the error:
Search for Command Prompt on the Windows Search Bar, click on it and as the interface opens, choose Run an Administrator.
Once this is done, type the following commands and click Enter each time: DISM/ Online/ Clean-Up Image/ CheckHealth, DISM/ Online/ Clean-Up Image/ ScanHealth, DISM/ Online/ Clean-Up Image/ RestoreHealth.
After doing this, restart your computer, and once your computer fully boots, the error screen will disappear.
Final Thoughts
Most times, the ” windows online troubleshooting service is disabled” error message appears when attempting to troubleshoot. It is often due to internet drivers, incomplete system updates, or faulty online drive updates. In addition, it can also occur due to incompatibility of the Troubleshooter or Windows version. When such an error occurs, you should not worry much as it can be fixed.
You can resolve this error screen using the scripted diagnostics policy, registry editor, or by running the DISM command. Any of these methods will effectively help you resolve this error and keep it from occurring every time you attempt to troubleshoot. With this knowledge, you can quickly resolve this error message whenever it appears on your computer screen.
Frequently Asked Questions
Why Is My Windows Troubleshooter Not Working?
Usually, when this tool suddenly stops working on a computer, it is because of file corruption. That is, the files which it runs with are already corrupted. Your Windows Troubleshooter can also stop working when you are not using the tool correctly.
How Do I Enable Online Troubleshooting Service On My Computer?
First, go to your computer Settings, click on Update & Security, then select Troubleshoot. After doing this, choose the troubleshooting you want to do and then click on Run the troubleshooter. Also, while the troubleshooter runs, you will be required to answer some questions to aid the fixing of your computer.
FTC disclaimer: This post contains affiliate links and I will be compensated if you make a purchase after clicking on my link.
When running a troubleshooter, you may experience an error such as “Windows Online Troubleshooting Service is disabled” and “Windows Online Troubleshooting Service is not enabled for this version of Windows.”.
This error may occur if you have done a recent Windows update.
While sometimes it looks like there is a problem with the virus. Also, you would have already checked by running antivirus and anti-malware software several times.
But, the problem remains unresolved.
So, to diagnose this problem we will follow some procedure which may help in rectifying the problem.
Method 1: Run DISM tool
Step 1: Open RUN as an administrator. For this, you can press Win + S and type in “Command Prompt“.

Step 2: Now, type in the below command or you can directly paste to it one by one. After each command enters and waits for the process to complete.
Dism /Online /Cleanup-Image /CheckHealth
Dism /Online /Cleanup-Image /ScanHealth
Dism /Online /Cleanup-Image /RestoreHealth

Step 3: Once all the processes completed successfully, you can restart the computer.
Method 2: Run System File Checker utility
Step 1: Open “command prompt” as administrator by pressing Win + S and type in command prompt.
Step 2: In the command prompt, type in “SFC /SCANNOW” and press ENTER. The process will take some time to evaluate it. Mostly, it will check for any integrity violations.

Step 3: After successful completion, it will show up the real cause and also include a log file for further verification. Now, restart your system for an effect.

Here, as you can see it has also repaired the Windows Resource Protection file. Sometimes Windows Resource Protection interferes with System File Checker utility.
Method 3: Run Windows Update Troubleshooter
If it has not updated for a while or some component is missing then it shows the message “Windows online troubleshooting service is disabled.”
Step 1: You can run troubleshooter to fix most of the issue related to Windows OS. Here you need to open up Troubleshooter from Settings. For this, press Win + S and type in “Troubleshoot“.

Step 2: Here, move to Windows Update and click on “Run the troubleshooter“.

Step 3: Windows troubleshooter will start to diagnose your problem. If it found any, it will resolve it.

Method 4: Check for services running properly.
You can also check for local services that are running in the background. These services are necessary to run the “Windows online troubleshooting service“.
Steps 1: You can open Services by pressing Win + S and just type in “Services“. Next, open the Services as an administrator.

Step 2: Under Services, look for “Background Intelligent Transfer Service“. Check for status whether it is “running“. If not, you can restart the service.

Step 3: Under Services, also look for “Windows Update” service is running in the background or not. Sometimes, you would have stopped update service. You can click on “Restart” to start running.

We hope that the above method would have solved the error “Windows Online Troubleshooting Service is disabled”. If not, you can comment below for more clarification.
- Why Windows Online Troubleshooting Service is Disabled Error might happen?
- 6 Efficient Ways to Fix online Windows Troubleshooting Service Error. Update Windows. Clean Junk and Temporary Files. Turn-On Scripted Diagnostics Policy. Modify Windows Registry. Run an SFC Scan. Run DISM Command.
- How do I enable Windows Online Troubleshooting service?
- How do I enable Windows troubleshooting?
- Why is my troubleshooter not working?
- How do I get rid of the blue screen on Windows 10?
- How do I use the blue screen troubleshooter?
- How do I enable online troubleshooting?
- How do I troubleshoot Windows in Safe Mode?
- How do I repair Windows 10 without a disk?
- How do you fix a problem is preventing the troubleshooter from starting?
- How can I repair my Windows 10?
- How do I boot up in safe mode?
How do I enable Windows Online Troubleshooting service?
Type gpedit. msc in the Run prompt followed by the Enter key to open Group Policy Editor. In the GP Editor navigate to Computer Configuration > Administrative Templates > System > Troubleshooting and Diagnostics > Scripted Diagnostics.
How do I enable Windows troubleshooting?
To run a troubleshooter:
- Select Start > Settings > Update & Security > Troubleshoot, or select the Find troubleshooters shortcut at the end of this topic.
- Select the type of troubleshooting you want to do, then select Run the troubleshooter.
- Allow the troubleshooter to run and then answer any questions on the screen.
Why is my troubleshooter not working?
Sometimes Windows Troubleshooter has stopped working error message can appear because your user profile is corrupted. To fix the issue, you need to create a new user account and check if the same issue appears. Once you create a new user account, switch to it and check if the issue reappears.
How do I get rid of the blue screen on Windows 10?
Things to do first – Repair Blue Screen
- Right-click This PC.
- Go to Properties.
- On the left-hand side, click Advanced System Settings.
- Under Startup and Recovery, click Settings.
- Now, under System Failure, untick the checkbox that says Automatically restart.
- Click Ok to save and continue.
How do I use the blue screen troubleshooter?
To Use Blue Screen Troubleshooter in Windows 10
- Open the Control Panel (icons view), and click/tap on the Troubleshooting icon.
- Click/tap on the View all link at the top left in Troubleshooting. ( …
- Right click or press and hold on the Blue Screen troubleshooter, and click/tap on Run as administrator. (
How do I enable online troubleshooting?
Configure the policy value for Computer Configuration -> Administrative Templates -> System -> Troubleshooting and Diagnostics -> Scripted Diagnostics -> «Troubleshooting: Allow users to access online troubleshooting content on Microsoft servers from the Troubleshooting Control Panel (via the Windows Online …
How do I troubleshoot Windows in Safe Mode?
Windows 10: Hold Shift while clicking Restart on the “Power Options” submenu of the Start Menu. Click Troubleshoot > Advanced Options > Startup Settings > Restart. Press the “4” key when you see the Startup Settings screen.
How do I repair Windows 10 without a disk?
Here are the steps provided for each of you.
- Launch the Windows 10 Advanced Startup Options menu by pressing F11.
- Go to Troubleshoot > Advanced options > Startup Repair.
- Wait for a few minutes, and Windows 10 will fix the startup problem.
How do you fix a problem is preventing the troubleshooter from starting?
How to Fix ‘A problem is preventing the troubleshooter from starting’
- Solution 1: Use the SFC Scan.
- Solution 2: Check if the Default Path to Temp Folder has been Changed.
- Solution 3: Start the Cryptographic Service.
- Solution 4: Perform a System Restore.
How can I repair my Windows 10?
How To Repair and Restore Windows 10
- Click Startup Repair.
- Click System Restore.
- Select your username.
- Type «cmd» into the main search box.
- Right click on Command Prompt and select Run as Administrator.
- Type sfc /scannow at command prompt and hit Enter.
- Click on the download link at the bottom of your screen.
- Click Accept.
How do I boot up in safe mode?
Turning on Safe Mode is as easy as it is safe. First, completely power off the phone. Then, power on the phone and when the Samsung logo appears, press and hold down the Volume Down key. If done correctly, «Safe Mode» will display on the bottom left corner of the screen.
Если вы получаете ошибку Служба устранения неполадок Windows в Интернете отключена, Служба устранения неполадок Windows в Интернете не включена для этой версии Windows, при запуске средства устранения неполадок этот пост сможет вам помочь. Недавно я видел это сообщение об ошибке на своей Windows 10 Pro v1909.
Есть несколько способов решить эту проблему. Давайте посмотрим на них:
- Проверьте, применимо ли это к вашей версии ОС Windows
- Включить политику диагностики по сценариям
- Установите значение состояния публикации программного обеспечения с помощью редактора реестра
- Запустите инструмент SFC & DISM
Служба устранения неполадок Windows Online создает собственный набор сценариев устранения неполадок. Эта функция была добавлена в одно из обновлений функций и аналогична «Рекомендуемому устранению неполадок».
Основываясь на диагностических данных и алгоритме, он может автоматически устранять проблемы на компьютере, если вы хотите, или уведомить вас об этом.
1]Проверьте, применимо ли это к вашей версии ОС Windows.
Если вы загрузили средство устранения неполадок из Microsoft и получили это сообщение после его запуска, вам необходимо проверить, применимо ли оно к вашей версии ОС Windows. Некоторые средства устранения неполадок и исправления предназначены для работы только в Windows 7 и могут не работать наоборот. Это может применяться и наоборот.
2]Включить политику диагностики по сценариям
Тип gpedit.msc в строке «Выполнить», а затем нажмите клавишу «Ввод», чтобы открыть редактор групповой политики.
В редакторе GP перейдите к Конфигурация компьютера> Административные шаблоны> Система> Устранение неполадок и диагностика> Диагностика по сценариям.
Включите политику, которая говорит —
Устранение неполадок: разрешите пользователям получать доступ к материалам для устранения неполадок в Интернете на серверах Microsoft из панели управления устранением неполадок (через службу Windows Online Troubleshooting Service — WOTS).
После включения при запуске любого из методов устранения неполадок ошибка больше не будет отображаться.
3]Установите значение состояния публикации программного обеспечения с помощью редактора реестра.
Открыть редактор реестра
Перейдите к:
HKEY_CURRENT_USERSoftwareMicrosoftWindowsCurrentVersionWinTrustTrust ProvidersSoftware Publishing
Убедитесь, что значение Состояние (DWORD) устанавливается как 23c00
Если нет, отредактируйте и введите значение. Нажмите ОК и закройте реестр.
Затем, если вы запустите средство устранения неполадок, ошибка больше не появится, и вы сможете запустить средство устранения неполадок.
4]Запустите DISM
Чтобы запустить DISM, сделайте следующее:
В командной строке выполните команду DISM:
DISM.exe /Online /Cleanup-image /Restorehealth
Снова запустите средство устранения неполадок, чтобы проверить, решена ли проблема.
Я надеюсь, что этому руководству было легко следовать, и вы смогли включить службу Windows Online Troubleshooting Service.