What is the Windows Performance Toolkit?
Windows Performance Tools are designed for analysis of a wide range of performance problems including application start times, boot issues, deferred procedure calls and interrupt activity (DPCs and ISRs), system responsiveness
issues, application resource usage, and interrupt storms.
Installation of the Windows Performance Tools
The Windows Performance Tools (WPT) is part of the Windows 8.1 SDK and the Windows Assessment and Deployment Kit. In this guide I’ll use the Windows 8.1 SDK Installer to install
the WPT.
Go to the download site of the SDK:
http://msdn.microsoft.com/en-US/windows/desktop/bg162891
and click on the button download to download the Webinstaller:

and store the installer on your HDD. Now run the setup and this screen shows up:

Click next and select the WPT from the list:

Click «Install» and the Setup downloads the required files.

and installs the WPT

After a reboot (required to add the WPT folder to the PATH variable to run the tools from every place) you are ready to use xperf.
I have a nice tip for you: The setup stores the MSI files in the folder
C:Program Files (x86)Windows Kits8.1Windows Performance ToolkitRedistributables The 32Bit version is named
WPTx86-x86_en-us.msi, the 64Bit version is named WPTx64-x86_en-us.msi. The 3rd file (WPTarm-arm_en-us.msi) is needed for ARM based tablets/notebooks which run Windows RT. You can store them and use them on a different PC. This avoids
to download the files over and over again.
To learn more about the Windows Performance Tools go to the Windows Performance Analysis Developer Center
.
See also: Windows Performance Toolkit
This post is part 2 of a 3-part series on monitoring the health and performance of the Windows operating system. Part 1 details key Windows performance counters, events, and services to monitor; this post covers data collection with native tools; and Part 3 explains how to monitor Windows with Datadog. For an in-depth webinar and Q&A session based on this series, check out this slide deck and video.
Windows offers a number of native tools to collect all of the metrics and events mentioned in part 1 of this series. In many cases, Windows offers more than one tool for the task. In this post, we will cover a few ways to access Windows metrics and performance data, using the tools that come bundled with Windows Server 2012.
Though there are many tools built into Windows Server 2012 for monitoring system health and performance, we will focus on a limited subset in this article.
Non-GUI tools:
- Powershell
- WMI and Powershell
GUI tools:
- Performance Monitor (Metrics)
- Reliability Monitor (Events)
- Resource Monitor (Metrics)
- Service snap-in (Services)
- Server Manager (Metrics, events, services)
- Task Manager (Metrics)
Powershell
Powershell is one of the most dynamic and powerful ways to get information about a Windows system (and, with Powershell available on other platforms, other systems as well).
Powershell commands are referred to as cmdlets, and follow a strict Verb-Noun naming convention. For example, Remove-Item is functionally similar to rm on Unix-like systems. A Powershell tutorial is beyond the scope of this article, but Microsoft has tutorials for the uninitiated.
All of the metrics and events listed in part one of this series can be collected with Powershell:
- CPU
- Memory
- Disk
- Network
- Events
Part of the, er, power of collecting metrics with Powershell is that you can choose between real-time performance data for spot-checking, or sampling metric values over time for historical trending (by using the -MaxSamples and -SampleInterval command line arguments).
Collecting performance metrics with Powershell using the Get-Counter cmdlet follows a straightforward syntax:
Get-Counter -Counter <Counter Class><Property Name>
If you’re unsure of a property name, you can retrieve a list of all properties by class with the following:
(Get-Counter -ListSet <Counter Class> ).Paths
For example, this command will display all of the properties of the Memory class:
(Get-Counter -ListSet Memory).Paths
CPU metrics
| Property Name | Command |
|---|---|
| PercentProcessorTime | Get-Counter -Counter "Processor(*)% Processor Time" |
| ContextSwitchesPersec | Get-Counter -Counter "Thread(_Total)Context Switches/sec" |
| ProcessorQueueLength | Get-Counter -Counter "SystemProcessor Queue Length" |
| DPCsQueuedPersec | Get-Counter -Counter "Processor(*)DPCs Queued/sec" |
| PercentPrivilegedTime | Get-Counter -Counter "Processor(*)% Privileged Time" |
| PercentDPCTime | Get-Counter -Counter "Processor(*)% DPC Time" |
| PercentInterruptTime | Get-Counter -Counter "Processor(*)% Interrupt Time" |
Memory metrics
| Property Name | Command |
|---|---|
| AvailableMBytes | Get-Counter -Counter "MemoryAvailable MBytes" |
| CommittedBytes | Get-Counter -Counter "MemoryCommitted Bytes" |
| PoolNonpagedBytes | Get-Counter -Counter "MemoryPool Nonpaged Bytes" |
| PageFaultsPersec | Get-Counter -Counter "MemoryPage Faults/sec" |
| PageReadsPersec | Get-Counter -Counter "MemoryPage Reads/sec" |
| PagesInputPersec | Get-Counter -Counter "MemoryPages Input/sec" |
| PercentUsage | Get-Counter -Counter "Paging File(*)% Usage" |
Disk metrics
| Property Name | Command |
|---|---|
| PercentFreeSpace | Get-Counter -Counter "LogicalDisk(*)% Free Space" |
| PercentIdleTime | Get-Counter -Counter "LogicalDisk(*)% Idle Time" |
| AvgDisksecPerRead | Get-Counter -Counter "LogicalDisk(*)Avg. Disk sec/Read" |
| AvgDisksecPerWrite | Get-Counter -Counter "LogicalDisk(*)Avg. Disk sec/Write" |
| AvgDiskQueueLength | Get-Counter -Counter "LogicalDisk(*)Avg. Disk Queue Length" |
| DiskTransfersPersec | Get-Counter -Counter "LogicalDisk(*)Disk Transfers/sec" |
| CacheBytes | Get-Counter -Counter "MemoryCache Bytes" |
Network metrics
| Property Name | Command |
|---|---|
| BytesSentPersec | Get-Counter -Counter "Network Interface(*)Bytes Sent/sec" |
| BytesReceivedPersec | Get-Counter -Counter "Network Interface(*)Bytes Received/sec" |
| SegmentsRetransmittedPersec | Get-Counter -Counter "TCPv4Segments Retransmitted/sec" |
Events
You can also query the event log with Powershell. The query follows this format:
Get-EventLog -LogName <Name of log> `
-EntryType <Information|Warning|Error|SuccessAudit|FailureAudit> `
-After <MM/DD/YYYY> | Where-Object {$_.EventID -eq <EventID>} `
| Format-List
This query invokes the Get-EventLog cmdlet, with the log name, entry type, and start date as parameters. The output of that cmdlet is piped to Where-Object, a cmdlet that filters the piped value ($_) for objects whose EventIDs (.EventID) are equal to (-eq) the EventID we are searching for. The output is finally piped to Format-List which prints the output in a human-readable format.
For example, this query will show all security audit failure events with EventID 4625 (failed logon) from the Security log which occurred after 10/18/2016:
Get-EventLog -LogName Security -EntryType FailureAudit -After 10/18/2016 | Where-Object {$_.EventID -eq 4625} | Format-List

Category           : (12544)
CategoryNumber     : 12544
ReplacementStrings : {S-1-0-0, -, -, 0x0...}
Source             : Microsoft-Windows-Security-Auditing
TimeGenerated      : 10/19/2016 3:21:32 PM
TimeWritten        : 10/19/2016 3:21:32 PM
UserName           :

Index              : 1305543
EntryType          : FailureAudit
InstanceId         : 4625
Message            : An account failed to log on.

                     Subject:
                         Security ID:        S-1-0-0
                         Account Name:        -
                         Account Domain:        -
                         Logon ID:        0x0

                     Logon Type:            3

                     Account For Which Logon Failed:
                         Security ID:        S-1-0-0
                         Account Name:        MATT
                         Account Domain:

                     Failure Information:
                         Failure Reason:        %%2313
                         Status:            0xc000006d
                         Sub Status:        0xc0000064
Services
All of the services listed in part one of this series can be collected via Powershell. The query follows this format:
Get-Service | where {$_.DisplayName -eq "Windows Update"}
The above command displays the status of the Windows Update service:
Status   Name               DisplayName
------   ----               -----------
Stopped  wuauserv           Windows Update
WMI + Powershell
Windows Management Instrumentation (WMI) is a set of extensions that provide a standardized interface through which instrumented components can be queried for information. WMI was introduced to make management of Windows computers easier, by providing a consistent interface across OS versions, while working alongside other popular management interfaces like SNMP or Desktop Management Interface (DMI).
The introduction of Powershell (and the Get-WmiObject cmdlet specifically) has made WMI much easier to use. Before, accessing system information via WMI required some boilerplate in VBScript or another scripting language. But with Powershell, WMI can be queried in one line.
If you’re just getting started with Windows monitoring, Powershell is generally a simpler way to access performance metrics. But since WMI is still in widespread use, we’ve included the equivalent WMI commands here for completeness. You can get started with iterating through all of the available WMI Classes by opening up a Powershell window and running the following:
$name = "Win32_perfformatteddata"
$WMIClasses = Get-WmiObject -List | Where-Object {$_.name -Match $name}

foreach($class in $WMIClasses)
{
$class.Name
}
Executing the above commands will result in substantial output, truncated and reproduced below:
[...]
Win32_PerfFormattedData_PerfDisk_LogicalDisk
Win32_PerfFormattedData_PerfDisk_PhysicalDisk
Win32_PerfFormattedData_PerfNet_ServerWorkQueues
Win32_PerfFormattedData_PerfOS_Cache
Win32_PerfFormattedData_PerfOS_Memory
Win32_PerfFormattedData_PerfOS_Objects
Win32_PerfFormattedData_PerfOS_PagingFile
Win32_PerfFormattedData_PerfOS_Processor
Win32_PerfFormattedData_PerfOS_System
You may recognize some of the names from Powershell commands, like Win32_PerfFormattedData_PerfDisk_LogicalDisk. To list performance counters for the entire LogicalDisk class, you can run a command like:
Get-WmiObject -Query "Select * from Win32_perfformatteddata_perfdisk_LogicalDisk"
which will output counters for all logical disks on the server:
[...]
AvgDiskBytesPerRead     : 0
AvgDiskBytesPerTransfer : 0
AvgDiskBytesPerWrite    : 0
AvgDiskQueueLength      : 0
AvgDiskReadQueueLength  : 0
AvgDisksecPerRead       : 0
AvgDisksecPerTransfer   : 0
AvgDisksecPerWrite      : 0
AvgDiskWriteQueueLength : 0
CurrentDiskQueueLength  : 0
DiskBytesPersec         : 0
DiskReadBytesPersec     : 0
DiskReadsPersec         : 0
DiskTransfersPersec     : 0
DiskWriteBytesPersec    : 0
DiskWritesPersec        : 0
FreeMegabytes           : 100400
Name                    : C:
PercentDiskReadTime     : 0
PercentDiskTime         : 0
PercentDiskWriteTime    : 0
PercentFreeSpace        : 77
PercentIdleTime         : 96
The table below lists the WMI queries to collect all of the metrics from part one of this series.
| Metric Class | Query |
|---|---|
| CPU | Get-WmiObject -Query "Select * from Win32_perfformatteddata_perfos_processor"Get-WmiObject -Query "Select * from Win32_perfformatteddata_perfproc_thread" |
| Memory | Get-WmiObject -Query "Select * from Win32_perfformatteddata_perfos_memory"Get-WmiObject -Query "Select * from Win32_perfformatteddata_perfos_pagingfile" |
| Disk | Get-WmiObject -Query "Select * from Win32_perfformatteddata_perfdisk_logicaldisk"Get-WmiObject -Query "Select * from Win32_perfformatteddata_perfos_memory" |
| Network | Get-WmiObject -Query "Select * from Win32_perfformatteddata_tcpip_networkinterface"Get-WmiObject -Query "Select * from Win32_perfformatteddata_tcpip_tcpv4" |
Performance Monitor (tracks counters)
Polling for performance data with WMI or Powershell is good for collecting data with scripts or other automated means. But without some means of visualizing that data, it can be hard to spot trends and issues from a sea of numbers.
Windows Performance Monitor provides a built-in interface for graphing performance counters, either in real-time or from logs of historical data. You can graph data from both local and remote hosts, as well. Performance counters are organized by class and have human-readable names as well as detailed metric descriptions.
Resource Monitor
Windows Resource Monitor is very similar to the well-known task manager, but differs in the amount of information it makes available. The resource monitor is a very good starting point for investigation; it can surface nearly all of the metrics listed in part one of this series. Its main strength is that it provides a real-time graphical interface to access CPU, memory, disk, and network metrics, allowing you to see at a glance which particular process is hogging the disk, for example.
Reliability Monitor
Windows Reliability Monitor is a graphical interface that surfaces system events and organizes them chronologically and by severity.
From this list view, you can right-click a specific event and check for a solution to the issue, view a solution to the issue, or view technical details for more information on the state of the system at the time of the event. Selecting “View technical details” will display more detailed information on the issue, like problem event name, where the error occurred, and more.
Selecting “Check for a solution” will prompt you to send details of the event to Microsoft for analysis. If you’re lucky, your problem may have a known solution and “View solution” will no longer be grayed out; clicking it will open the solution (on Microsoft’s website) in your browser.
Service snap-in
The Services management snap-in (services.msc) is an indispensable tool that provides administrators with a graphical interface to monitor and manage services on Windows machines.
With sortable rows, you can see at a glance the state, startup type, and execution privileges of all services on your system.
Right-clicking on any service and selecting Properties will give you more detail on the selected service, including a list of its dependencies and the services that depend on it.
Last but not least, you can also set alerts on service failure by selecting the Recovery tab and changing First, Second, or Subsequent failure actions to “Run a Program” and setting the program to an email script or other response.
Windows Server Manager
Like the reliability monitor, Server Manager surfaces information from disparate sources, all in a single pane.
With Server Manager, you can access a high-level overview of resource consumption, service status, and events, aggregating information from both local and remote hosts.
Also included in Server Manager is the Windows Server Best Practices Analyzer. Windows Server Best Practices Analyzer (BPA) is a tool unique to Windows Server 2008 R2 and Windows Server 2012 R2. BPA analyzes the roles enabled on your host, and provides recommendations based on Windows server management best practices. It can identify issues with configuration, security, performance, policies, and more.
Task manager
On a local machine, the venerable task manager provides immediate access to a view of what’s going on under the hood. In addition to a list of running processes, the task manager also includes tabs with more information on hardware performance and running services.
Honorable mention: Process Explorer
In the same vein as the Task Manager is Process Explorer, a third-party tool in the versatile Sysinternals Suite. Since it is not included in Windows Server 2012, we won’t go into too much detail here. However, it is worth mentioning as a more full-featured alternative to the built-in Task Manager.
Some of its noteworthy features include:
- view DLLs and handles loaded/opened by process
- dynamically modify process priority
- submit hash of process executable to VirusTotal.com for analysis
- interactive dependency visualizer (see below)
From collection to action
In this post we’ve covered several ways of surfacing Windows Server 2012 R2 metrics, events, and service information using simple, lightweight tools already available on your system.
For monitoring production systems, you will likely want a dynamic solution that not only ingests Windows Server performance metrics, but metrics from every technology in your stack.
At Datadog, we’ve developed integrations with more than
600 technologies, including Windows, so that you can make your infrastructure and applications as observable as possible.
For more details, check out our guide to monitoring Windows Server 2012 R2 performance metrics with Datadog, or get started right away with a free trial.
Microsoft Performance Toolkit SDK
![]()
![]()
The Microsoft Performance Toolkit is a collection of cross-platform tools developers can use to create
and extend performance analysis applications. It serves as the runtime of the Windows Performance Analyzer,
a Windows program included in the Windows Performance Toolkit.
By using the Microsoft Performance Toolkit SDK, Windows Performance Analyzer — or any performance analysis application —
can be configured to process and display performance data from arbitrary sources.
The Microsoft Performance Toolkit SDK provides two key functionalities:
- Facilitating the development of «SDK plugins,» which provide the SDK with logic for creating structured,
tabular data from arbitrary data sources such as Common Trace Format (.ctf) files - Allowing developers to extend an existing SDK plugin without access to its source code through an efficient,
feature-rich data-processing pipeline
These two functionalities are not mutually exclusive, and plugins may access data in another plugin’s (or, commonly, its own)
data-processing pipeline when creating tables for a given data source.
For help with getting started and developing SDK plugins, refer to our documentation.
In this Repository
devel-template: a work-in-progress .NET template for creating SDK pluginsdocumentation: instructions for how to utilize the SDK and create SDK pluginssamples: example SDK plugins’ source codesrc: the source code for the SDK
Projects in the SDK Solution
Microsoft.Performance.SDK: Software library for building SDK pluginsMicrosoft.Performance.SDK.Runtime: Runtime for loading and processing data from plugins. Plugins should not depend on this libraryMicrosoft.Performance.SDK.Runtime.NetCoreApp: .NETCore-specific functionality ofMicrosoft.Performance.SDK.RuntimeMicrosoft.Performance.SDK.Toolkit.Engine: Interface for programmatically manipulating, cooking, and accessing data from SDK pluginsMicrosoft.Performance.SDK.Tests: Tests forMicrosoft.Performance.SDKMicrosoft.Performance.SDK.Runtime.Tests: Tests forMicrosoft.Performance.SDK.RuntimeMicrosoft.Performance.SDK.Runtime.NetCoreApp.Tests: Tests forMicrosoft.Performance.SDK.Runtime.NetCoreAppMicrosoft.Performance.SDK.Toolkit.Engine.Tests: Tests forMicrosoft.Performance.SDK.Toolkit.EngineMicrosoft.Performance.SDK.Testing: General utilities for authoring testsMicrosoft.Performance.SDK.Testing.SDK: SDK-specific utilities for authoring testsPluginConfigurationEditor: description coming soon
Known SDK Driver Plugin Compatibility
This repository tracks which versions of the SDK are compatibile with certain SDK drivers such as Windows Performance Analyzer. This information can be used to determine which version of an SDK driver should be used when loading plugins compiled against a specific SDK version.
This information is listed in the known SDK driver compatibility lists document.
Getting Started
Refer to the documentation folder for help with creating SDK plugins.
Coming Soon
Team is actively working to provide better documentation, more samples, and several in-depth tutorials.
How to Engage, Contribute, and Provide Feedback
The Performance ToolKit team encourages contributions through both issues and PRs.
Community
This project uses the Microsoft Open Source Code of Conduct..
Trademarks
This project may contain Microsoft trademarks or logos for Microsoft projects, products, or services. Authorized use of these trademarks or logos is subject to and must follow Microsoft’s Trademark & Brand Guidelines. Use of Microsoft trademarks or logos in modified versions of this project must not cause confusion or imply Microsoft sponsorship.
Security
To report a security issue, please follow the guidance here: Security.
Licenses
All code in this repository is licensed under the MIT License.
The Windows Performance Toolkit allows Administrators a keen insight into the startup and login process. In this four part series, we will dive into these tools and fix common performance issues. Part 1 covers downloading and installing the Windows Performance Toolkit.
Contents
- Download
- Installation
- WPR, WPA, WHY so many acronyms?
- Author
- Recent Posts

Ever heard this one, “My computer is slow.” Or how about, “It is taking forever to login.” If you answered no to either of those comments, I envy you! These issues are incredibly frustrating to fix because of the lack of data. Most of the time, you are lucky to get an error code or a log. Instead of brushing these complaints off as user perception or older hardware, let’s dig into some troubleshooting and use the Windows Performance Toolkit!
Download
In the days of old, every single troubleshooting tool (almost) always had its own download and separate installation. Thankfully, Microsoft has combined (almost) all of the tools needed for client Assessment and desktop Deployment into a single Kit named Windows ADK. You can download the Windows ADK here.
Installation
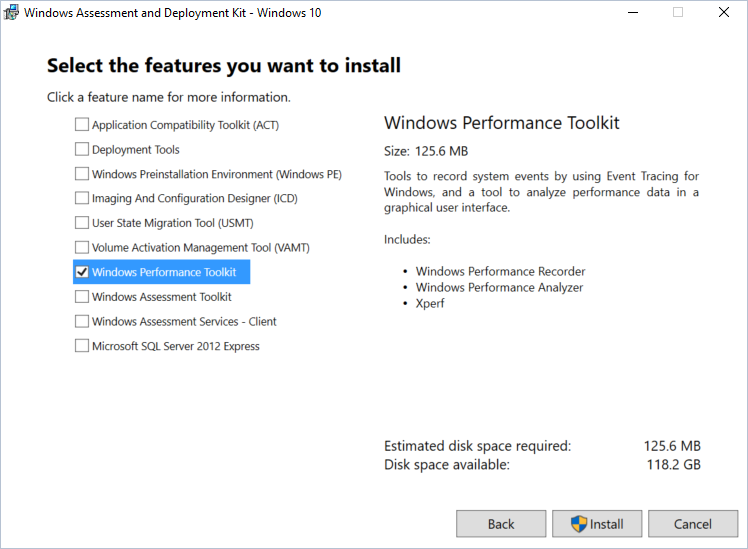
After launching the ADK setup, proceed to the feature selection screen. If you are only using the Performance toolkit, just select the Windows Performance Toolkit option. In my environment, I find that I use the Windows Assessment Toolkit quite a bit as well so I also install it as a default option.

Installing the Windows Performance Toolkit
As a note, if you followed our Deploying Windows 8 Series – you might already have ADK installed. It is perfectly fine to run the Deployment Tools, ACT, or any of the other ADK features with the Performance toolkit.
Now that you have the Windows Performance Toolkit installed on your management machine, you will also want to install it on a test client that exactly mimics your organization. This test client, preferably a virtual machine, is about to undergo a lot of changes!
WPR, WPA, WHY so many acronyms?
After installation, you will now have a few new tools at your disposal. The first tool is the Windows Performance Recorder (WPR).

The Windows Performance Recorder tool
This tool has been streamlined and replaces the functionality of two past tools: Xpref and Xbootmgr. Because a lot of existing performance documentation still reference these two obsolete tools, it is important to substitute WPR in their place.
You will use WPR to capture performance related issues on client machines. Most of the time, we will use the Reboot Cycle performance scenario to test clients. After our information has been captured, WPR will save and compress that information into a single trace file. This file is normally has an .ETL extension.
Your second main tool is the Windows Performance Analyzer (WPA). This tool will be ran on your management machines. Although you can run it on a client, you’ll likely get improved performance on administrative machines (and will find the graphs easier to read).
Let’s launch WPA and see what we get:

Windows Performance Analyzer after first launch
Not much to see here! That’s is because we have to open a trace first. After opening a trace file, we get:

The Windows Performance Analyzer with a Trace Opened
Much more informative! On the left, we have our graph explorer. This areas are broken up into four categories. The first category, System Activity, includes graphs for Services, Processes, phases, etc. It is our high level center where your initial troubleshooting will take place. The next four categories, Computation, Storage, and Memory, address potential resource bottlenecks. The Computation center shows graphs related to CPU usage, Storage shows hard drive/write usage, and memory – well, show memory usage. Later, we are going to look at specific graphs in a lot more detail.
In Part 2, we are going to create a baseline trace and start troubleshooting a slow startup! If you have any questions at all, just leave us a comment.
Вы тут: Главная → Windows → Этапы загрузки Windows под микроскопом Windows Performance Toolkit
![]() Составить полное представление о загрузке Windows можно с помощью набора Windows Performance Toolkit. Утилиты командной строки xbootmgr и xperf позволяют создать подробный отчет о запуске системы и представить его в графическом и текстовом виде для всестороннего анализа загрузки.
Составить полное представление о загрузке Windows можно с помощью набора Windows Performance Toolkit. Утилиты командной строки xbootmgr и xperf позволяют создать подробный отчет о запуске системы и представить его в графическом и текстовом виде для всестороннего анализа загрузки.
Эта статья продолжает серию материалов о загрузке Windows. Вы уже знаете, как получить подробный отчет о загрузке и устранить основные системные проблемы, а также ускорить загрузку системы, не прилагая особых усилий. Вы также познакомились со способом диагностики загрузки с помощью журнала событий. Я уверен, что после изучения этих статей и применения полученных знаний на практике ваша система стала загружаться быстрее.
Однако эти простые способы не позволяют выявить скрытые факторы или проблемы, замедляющие загрузку Windows. Теперь настало время познакомиться поближе со всеми этапами загрузки Windows и провести их детальный анализ с помощью Windows Performance Toolkit (WPT).
[+] Сегодня в программе
Загрузка и установка WPT
С выходом каждой новой Windows обновляются средства для анализа производительности Windows, поэтому я рекомендую использовать Windows Performance Analyzer (WPA) из Windows ADK для диагностики загрузки всех поддерживаемых ОС Windows. Краткое руководство по работе с WPA включено в статью об изучении автозагрузки Windows. Изложенные далее сведения об этапах загрузки применимы ко всем поддерживаемым ОС Windows.
Посмотреть устаревшие инструкции по установке WPT для Windows 7
Подготовка к работе
Следуя трем простым правилам, вы застрахуете себя от возможных проблем, обеспечите правильную работу всех команд и точно измерите длительность загрузки.
- Прежде чем выполнить первую команду, создайте точку восстановления системы и убедитесь, что у вас есть под рукой установочный диск / флэшка или диск восстановления. Предупреждение вовсе не дежурное, ибо случаи неадекватного поведения WPT были отмечены у нас на форуме, да и сам я их видел.
- Включите автоматический вход в систему, чтобы задержка на ввод пароля не влияла на измерения.
- Убедитесь, что на разделе есть несколько гигабайт свободного пространства, поскольку при анализе могут создаваться файлы большого размера.
Все команды выполняйте в командной строке, запущенной от имени администратора. Там же можно добавить в меню пункт для ее запуска в нужной папке – пригодится.
Сбор данных
Все логи загрузки лучше хранить в одной папке, допустим, C:Trace. Откройте командную строку с полными правами и введите:
md c:Trace
Здесь и далее я буду использовать пути применительно к этой папке и стандартной установке WPT в 32-разрядной Windows 7. При необходимости изменяйте пути на свои.
Закройте все программы и сохраните все документы. Процесс сбора данных о загрузке системы запускается одной командой:
xbootmgr -trace boot -traceFlags BASE+CSWITCH+DRIVERS+POWER -resultPath C:Trace
Аналогичные команды можно использовать для диагностики
гибернации:
xbootmgr -trace hibernate -traceFlags BASE+CSWITCH+DRIVERS+POWER -resultPath C:Trace
сна:
xbootmgr -trace standby -traceFlags BASE+CSWITCH+DRIVERS+POWER -resultPath C:Trace
выключения:
xbootmgr -trace shutdown -noPrepReboot -traceFlags BASE+CSWITCH+DRIVERS+POWER -resultPath C:Trace
Примечание. Если при выполнении команд вы видите сообщение «xbootmgr не является внутренней или внешней командой», установка была неудачной. Вы найдете решение в этой теме форума.
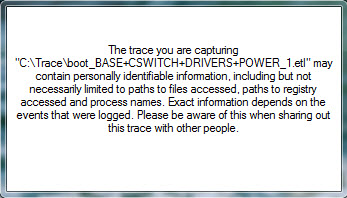
Вернемся к загрузке, однако. Компьютер будет перезагружен. Если после входа в систему вы увидите запрос UAC от xbootmgr, разрешите утилите продолжить работу. Через две минуты вы увидите примерно такое окно.
Когда оно исчезнет, в папке C:Trace должно быть три файла, как показано на рисунке ниже.
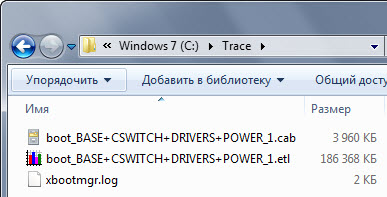
Если вы вместо файла boot_BASE+CSWITCH+DRIVERS+POWER_1.etl видите там два других файла с расширением ETL, это может означать, что утилита еще работает, над их объединением в один – подождите несколько минут. При отсутствии изменений выполните в командной строке
xperf –stop
и перезагрузите систему. После чего попробуйте заново запустить сбор данных.
Примечание. Если в результате сбоя у вас продолжают записываться отчеты после каждой перезагрузки, выполните:
xbootmgr -remove
Анализируемые файлы и первый взгляд на этапы загрузки
Для анализа используются два файла: ETL и создаваемый из него XML.
ETL
Я думаю, что вы уже успели дважды щелкнуть файл boot_BASE+CSWITCH+DRIVERS+POWER_1.etl и полюбоваться красивыми графиками и диаграммами. В левой панели графики можно отображать и скрывать, а также переходить к ним двойным щелчком мыши.
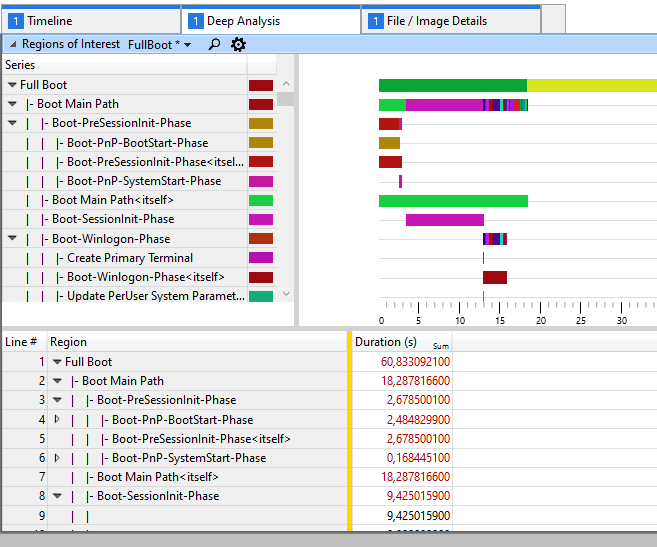
В WPA из ADK для Windows 10 сводку этапов загрузки можно получить так. Из меню Profiles — Apply — Browse Catalog выберите FullBoot.Boot.wpaprofile. При этом автоматически открывается несколько вкладок с подборками сведений. Для отображения информации на отдельной вкладке из левой панели выберите Regions of interest — FullBoot. Получите такую диаграмму и таблицу.
В ADK для Windows 7 базовый график Boot Phases был доступен сразу
XML
Для удаленной диагностики по почте или в форуме можно создать текстовый отчет в виде XML-файла. Выполните команды:
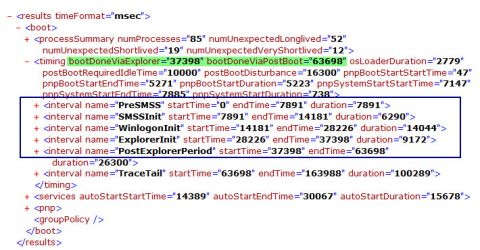
cd c:trace
xperf /tti -i boot_BASE+CSWITCH+DRIVERS+POWER_1.etl -o summary_boot.xml -a boot
Первая переходит в папку с логами, а вторая — создает требуемый XML-файл. Для его просмотра отлично подойдет Internet Explorer!
Увеличить рисунок
Сложите узлы, как показано на рисунке, чтобы лучше видеть общую картину. В узле timing указано время в миллисекундах, и там можно увидеть длительность двух больших, условно говоря, частей загрузки (выделены зеленым):
- bootDoneViaExplorer – время загрузки операционной системы вплоть до появления рабочего стола, в данном примере 37 секунд
- bootDoneViaPostBoot – полное время загрузки системы, рабочего стола и всех программ в автозагрузке, в данном примере 64 секунды (из этой цифры следует вычесть 10 секунд, в течение которых определяется полное бездействие системы)
Время первой части складывается из основных этапов загрузки операционной системы (обведены синим), вплоть до начала загрузки рабочего стола. В уже знакомом вам событии 100 журнала Diagnostics-Performance длительность этого этапа записывается в параметре MainPathBootTime.
Разница между этими двумя частями – это время от начала загрузки рабочего стола, до его полной готовности. В событии 100 журнала Diagnostics-Performance — это BootPostBootTime.
Для анализа загрузки нужно представлять, не только в какой последовательности эти этапы идут, но и что происходит на каждом из них. К сожалению, официальная документация по этому вопросу существует только на английском и достаточно сложна технически. Далее я предлагаю вам выдержки из этого документа в своем изложении, с дополнениями и в сопровождении собственных примеров диагностики.
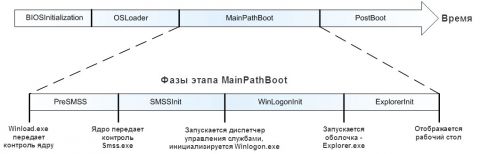
На рисунке ниже представлены три основных этапа загрузки, причем главный из них состоит из четырех фаз.
Увеличить рисунок
Давайте рассмотрим все этапы подробно.
Этап OSLoader
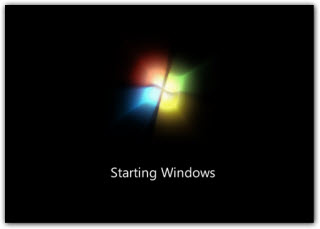
Этап OSLoader следует сразу после инициализации BIOS. Визуально он начинается после заставки и диагностических экранов BIOS, а заканчивается примерно с появлением экрана «Загрузка Windows».
На этапе OSLoader:
- загрузчик Windows (winload.exe) загружает основные системные драйверы, которые необходимы для считывания минимально необходимого набора данных с диска
- затем загрузчик инициализирует систему до момента, с которого становится возможной загрузка ядра
- когда ядро начинает загружаться, winload.exe помещает в оперативную память системный раздел реестра и дополнительные драйверы, помеченные в качестве BOOT_START
Длительность этапа отражает значение параметра osLoaderDuration в узле timing XML-файла. Обычно, она в находится в пределах 2-3 секунд.
Этап MainPathBoot
Визуально этап MainPathBoot начинается с экрана «Загрузка Windows» и завершается при появлении рабочего стола. Если не настроен автоматический вход в систему, длительность этого этапа увеличивается за счет времени, которое требуется для ввода пароля.
Во время этапа MainPathBoot происходит основная работа по загрузке операционной системы:
- инициализируется ядро
- происходит определение устройств Plug and Play (PnP)
- запускаются службы
- выполняется вход в систему
- инициализируется Explorer, т.е. система готовится к загрузке рабочего стола
Этап состоит из четырех фаз, каждая из которых обладает собственными характеристиками и может по-своему влиять на длительность загрузки системы.
Фаза PreSMSS
Визуально фаза PreSMSS начинается примерно с экрана «Загрузка Windows», но ее окончание невозможно определить на глаз.
Фаза PreSMSS (в графическом представлении WPT она обозначена как Pre Session Init) начинается с инициализации ядра. Во время нее:
- ядро инициализирует структуры данных и компоненты, а затем запускает диспетчер PnP
- диспетчер PnP в свою очередь инициализирует драйверы BOOT_START, которые были загружены с помощью winload.exe на этапе OSLoader
- когда диспетчер PnP обнаруживает устройство, он загружает необходимый драйвер и выполняет его инициализацию
Диагностика
Если фаза занимает много времени, ищите в XML-файле в узле <PNP> драйвер, который долго загружается. Диагностику в графическом режиме я покажу на примере следующей фазы.
Фаза SMSSInit
Визуально начало фазы SMSSInit невозможно определить. Ее частью является пустой экран, который отображается между заставкой и экраном входа в систему, чье появление сигнализирует о завершении фазы.
Фаза SMSSInit (в графическом представлении WPT она обозначена как Session Init) начинается с того, что ядро передает контроль диспетчеру сессий (smss.exe). Во время этой фазы система:
- инициализирует реестр
- загружает и запускает устройства и вторую волну драйверов, которые не помечены как BOOT_START
- запускает процессы подсистемы
Фаза завершается с передачей контроля процессу winlogon.exe.
Диагностика
 Наиболее распространенной причиной задержек в этой фазе являются драйвер видеокарты. Он инициализируется сначала во время системной сессии, а затем во время пользовательской. При этом инициализация во время пользовательской сессии занимает меньше времени, потому что в течение системной параллельно выполняется запуск других задач.
Сократив время запуска драйвера видеокарты, можно уменьшить длительность загрузки системы. Таким образом, если фаза SMSSInit затягивается, обновите драйвер видеокарты.
Более точную диагностику можно провести с помощью summary_boot.xml, где в узле PNP есть длительность запуска каждого драйвера. Впрочем, в Windows 10 он иногда отсутствует, и я не знаю, от чего это зависит и как это форсировать.
⚠ Показанного ниже графика Driver Delays в WPT больше нет, но во времена Windows 7 его можно было анализировать примерно так:
- На графике Boot Phases выделите фазу Session Init и выберите из контекстного меню команду Clone Selection. Выбранный период будет выделен на всех активных графиках.
- На графике Driver Delays щелкните правой кнопкой мыши и выберите из меню команду Set Delay Threshold. Она позволяет отфильтровать драйверы по времени задержки. Введите, например 2000, чтобы отобразить драйверы, загружавшиеся дольше двух секунд.
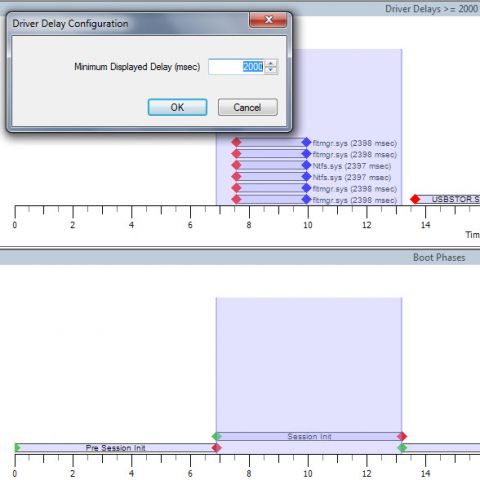
Увеличить рисунок
Вы увидите все драйверы, загружавшиеся в фазе Session Init дольше заданного времени. У меня вся фаза занимает 6 секунд, и двухсекундная задержка драйверов является нормальной. Но если у вас проблемы в этой фазе, с помощью фильтра вы сразу увидите, какой драйвер их вызывает.
Фаза WinLogonInit
Визуально фаза WinLogonInit начинается перед появлением экрана приветствия, а завершается перед появлением рабочего стола.
Фаза WinLogonInit начинается сразу после запуска winlogon.exe. Во время этой фазы:
- отображается экран приветствия
- диспетчер управления службами запускает сервисы
- происходит запуск сценариев групповой политики
Фаза завершается запуском оболочки Windows — процесса explorer.exe.
Диагностика
Во время фазы WinLogonInit выполняется множество параллельных операций. На многих системах она характеризуется нагрузкой на процессор и большим количеством операций ввода-вывода (I/O). Длительность фазы во многом зависит от поведения служб.
Чтобы обеспечить плавную загрузку системы, службы могут объявлять зависимости или использовать порядковые группы загрузки. Windows обрабатывает группы загрузки в последовательном порядке. Поэтому задержка даже одной службы в ранней группе может затягивать загрузку следующей группы служб и тормозить весь процесс загрузки.
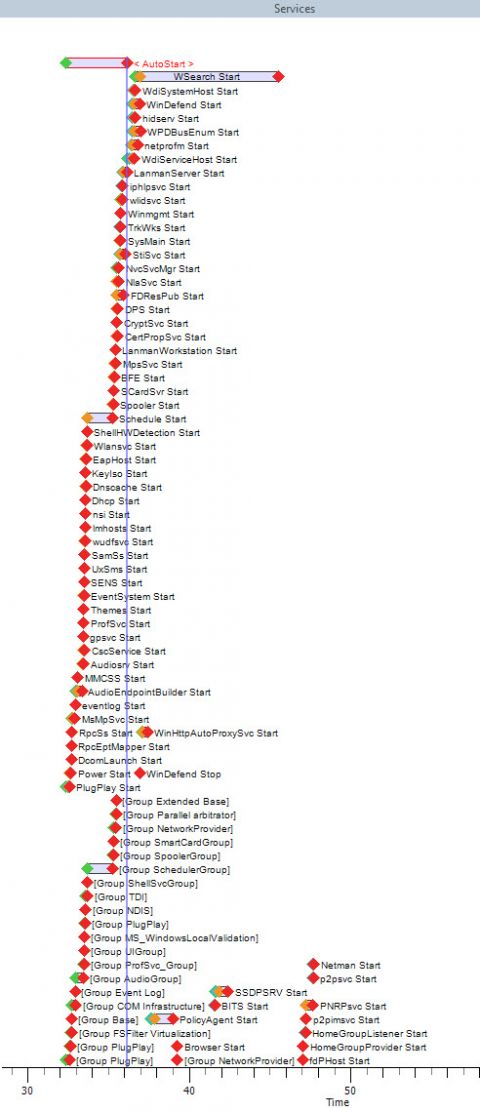
Для выявления проблемной службы удобнее всего использовать графические возможности WPT. Откройте ETL-файл двойным щелчком мыши и прокрутите отчеты вниз до графика запуска служб.
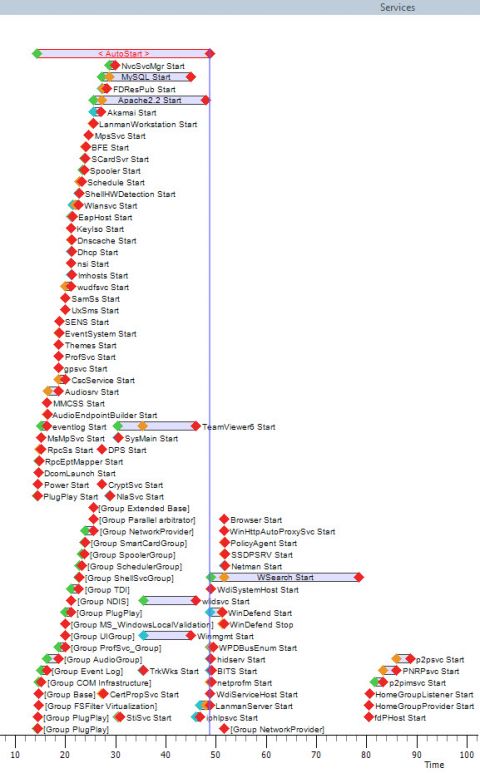
Увеличить рисунок
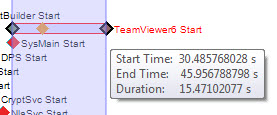
Зачастую проблема вызвана не системными, а сторонними службами. На рисунке хорошо видно, что среди автоматически стартующих служб дольше всего загружаются три:
- Apache 2.2
- MySQL
- TeamViewer
При этом Apache блокирует загрузку следующей группы служб (очевидно, в ее отсутствие это сделала бы служба TeamViewer). Поскольку ни одна из этих служб не является системной, проблему легко решить. Можно в оснастке «Службы» изменить тип ее запуска на отложенный и посмотреть, будет ли она быстрее запускаться на более позднем этапе. Если это не дает эффекта, можно вовсе отключить службу и запускать ее вручную при необходимости. Во второй волне служб, имеющих отложенный тип запуска, видна задержка WSearch, отвечающей за поиск Windows, но я не стал ее трогать пока.
Чтобы увидеть время запуска каждой службы, щелкните точку начала запуска и растяните диапазон до ее конца. Для изменения масштаба графика крутите колесо мыши, удерживая нажатой клавишу CTRL.
Отключение трех вышеперечисленных служб позволило сократить общее время загрузки почти на 40 секунд! Обратите внимание, что группа автоматического запуска служб теперь стартовала намного быстрее (смотреть нужно относительно шкалы времени, т.к. масштаб графиков разный).
Wsearch все равно запускается дольше других служб, но уже всего 8 секунд вместо 30, что не дает мне достаточно оснований к ней придираться.
Если задержку вызывает антивирусная программа, отложенный запуск службы может понизить уровень защиты, а ручной запуск или отключение службы могут нарушить работу программы. В этом случае можно лишь посоветовать обновить антивирус до последней версии. Если это не дает эффекта, вам придется сделать выбор между любимой программой и длительностью загрузки.
Фаза ExplorerInit
Визуально фаза ExplorerInit начинается перед загрузкой рабочего стола, но ее окончание определить на глаз невозможно.
В фазе ExplorerInit:
- сначала запускается процесс explorer.exe
- затем система создает процесс диспетчера окон рабочего стола (DWM)
- DWM инициализирует рабочий стол и отображает его
Инциализация DWM и рабочего стола происходит на переднем плане, но в это же время в фоне диспетчер управления службами (SCM) запускает службы, а диспетчер памяти кеширует данные. Поэтому на многих системах эта фаза сопровождается нагрузкой на процессор, и нередко задержки при загрузке на этом этапе можно отнести на счет слабости аппаратных ресурсов.
Диагностика
В течение фазы ExplorerInit ресурсы процессора могут потреблять программы, работающие в качестве служб (например, защитные программы или серверы приложений). Они запускаются либо в этой фазе, либо продолжают свою загрузку, будучи запущенными в более ранних фазах. С другой стороны, некоторые службы (например, с отложенным запуском) могут быть еще не запущены на момент окончания фазы ExplorerInit.
Этап PostBoot
Этап PostBoot начинается после появления рабочего стола и завершается после того, как будет определено бездействие системы.
На этапе PostBoot рабочий стол уже загружен, и с ним можно взаимодействовать. Но при этом параллельно в фоне выполняется различная активность. Например, продолжается запуск служб и программ автозагрузки, что может сопровождаться появлением их значков в области уведомлений.
Средства WPT определяют бездействие системы по следующему алгоритму. Каждые 100 мс проверяется наличие активности в системе. Если бездействие системы составляет не менее 80% (за исключением низкоприоритетных процессов и дисковой активности), считается, что в этом интервале система бездействует. Проверка продолжается до тех пор, пока не наберется 10 секунд бездействия. Поэтому, определяя общее время загрузки системы, вычитайте из значения bootDoneViaPostBoot 10000 мс, т.е. 10 секунд.
Диагностика
На этапе PostBoot запускаются приложения, находящиеся в автозагрузке. Чтобы сократить длительность этого этапа, нужно навести там порядок. В графическом представлении WPT используйте график Process Lifetimes, чтобы увидеть все процессы, которые запускаются или продолжают запуск на данном этапе.
Безусловно, диагностика загрузки с помощью WPT требует навыка, и с наскоку разобраться в этом вопросе непросто. Но от вас и не требуется профессиональных знаний, поскольку текстовый отчет в XML файле вкупе с полным графическим представлением всех этапов загрузки позволяет быстро определить причину задержек при запуске Windows. Мне будет очень интересно узнать, полезна ли эта статья, помогла ли она выявить и устранить задержки с помощью WPT, а также насколько ускорилась загрузка системы в результате.
Slow pages lose users: research from Bing and Google indicates that delays as small as half a second can impact business metrics. To build fast sites, developers need powerful tools to analyze the performance of their sites and debug issues. In-browser tools like the F12 Developer Tools are a great start and the primary tools for analyzing what’s happening behind the scenes when a page slows down. However, some scenarios require measuring performance characteristics in the context of other applications and the operating system itself. For these scenarios, we use the Windows Performance Toolkit.
https://channel9.msdn.com/Events/WebPlatformSummit/edgesummit2016/ES1606/
The Windows Performance Toolkit (WPT) is a powerful tool to analyze both app and operating system performance, and is used extensively by the Microsoft Edge performance team for in-depth analysis. The toolkit includes the Windows Performance Recorder, a tool for recording traces, and the Windows Performance Analyzer, a tool for analyzing traces. It uses a fast, non-impactful trace logging system called Event Logging for Windows (ETW) to sample stacks and collect app or OS-specific events.
Since WPT can record and analyze CPU and memory usage for all Windows applications, WPT can be used for tasks that in-browser developer tools can’t, like analyzing GPU usage, disk usage, and system wide memory usage. In addition, WPT can be used to analyze performance in context of the system – for example, identifying the impact of virus scanners or performing cross-window analysis or measuring across multiple tabs in multiple processes.
In this post, we’ll introduce you to WPT with a very basic step-by-step example, in which we’ll use WPT to debug a simple performance issue. This example and analysis technique can be used with the in-browser F12 Developer Tools as well, but serve as a simple introduction to WPA. In later posts, we plan to explore more sophisticated analysis techniques using the capabilities described above.
Installing the Windows Performance Toolkit
The WPT is available as a component of the Windows Assessment and Deployment Kit, available for free from the Microsoft Dev Center. This kit includes a number of additional tools, however we’ll be focusing on just the Windows Performance Toolkit for the purposes of this post.
Gathering a performance trace
The first step to analysis using WPT is gathering a performance trace. In this step, we’re recording the performance characteristics of activity across the system to identify potential culprits inside and outside of the browser. For the purposes of this tutorial, we built a simple demo page with some artificial performance problems. We’ll use this page for the trace and analysis below.
Prepare Windows Performance Recorder
To minimize noise in the recording, you should close all applications besides the browser tabs you intend to analyze for this step. Launch the Windows Performance Recorder application (installed with the Windows Performance Toolkit”) and select the “Edge Browser” and “HTML Responsiveness analysis” profiles under “More options” (as seen in the screenshot below). These settings will configure Windows Performance Recorder to gather the metrics most useful for Edge performance analysis, including subsystem stack attribution, JavaScript symbols and networking, and frame-by-frame information.

Identify scenarios
Before starting the trace, it’s best to identify the scenarios you’re analyzing and try to keep them as atomic as possible. Imagine a site with performance problems when loading the page (from start of navigation to page load complete), scrolling, and selecting something in a table. In this case it’s best to record traces for each of the three scenarios separately to keep the analysis focused for each issue.
If a scenario involves navigating to a site, consider beginning the scenario at about:blank. Starting at about:blank will avoid the overhead of the previous page. If it involves navigating away from a site, navigate to about:blank to complete the scenario. This will keep the noise of other sites out of the trace unless the specific interaction between sites is the issue under investigation.
In our example, the scenario is a simple page load. We’ll navigate the browser to about:blank, and then navigate to the example page (you can download the sample on the Performance Analysis Test Drive here).
Record and execute scenarios
Once you’re ready to gather a trace for a given scenario, click “Start” to begin recording and execute the scenario you intend to measure. In our example, we’ll simply perform the navigation to our sample page.
As the browser navigates to and loads the demo page, Windows Performance Recorder will collect information about all programs running on the computer while the trace is recording, with minimal impact on active processes. As soon as you’ve finished executing the scenario (page load is complete), click “Stop” immediately and save the trace. This helps minimize the noise in your analysis as well as keep the trace file to a manageable size, as ETL files can get quite large.
Analyzing a performance trace
To analyze the trace, open Windows Performance Analyzer and open the ETL file generated in the previous step. You may need to load symbols for the trace, which can involve a large download. We recommend restricting the symbols loaded to Microsoft Edge and web apps, unless you have a specific additional need. You can do this by selecting “Trace/Configure Symbol Paths” from the WPA menu. Here you can use the Load Settings menu to restrict symbols to MicrosoftEdgeCP.exe and WWAHost.exe (as seen in the screenshot below).

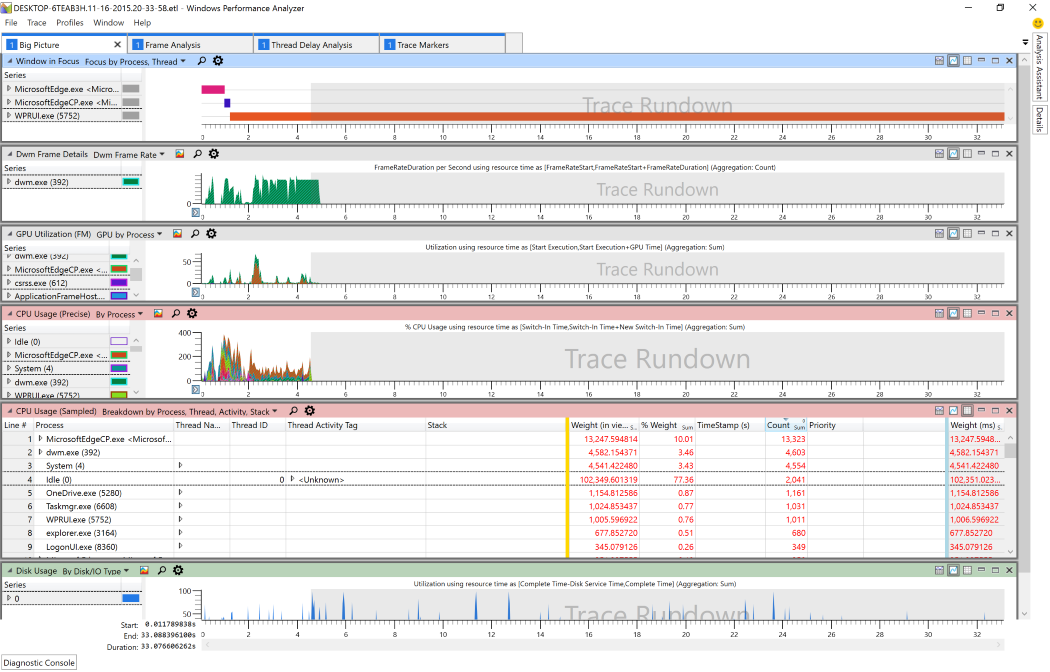
The symbols will be cached to disk and future traces will load symbols much more quickly. After symbols begin loading, apply the HTML Analysis Profile by selecting “Profiles/Apply” from the menu then clicking “Browse Catalog.” Choose HtmlResponsivenessAnalysis.wpaProfile. For nearly all web site investigations, we recommend starting with this profile since it includes the key graphs and tables necessary for analyzing the performance of a website. This profile will configure four tabs (Big Picture, Frame Analysis, Thread Delay Analysis, and Trace Markets) loaded with data and graphs useful for analysis (as seen in the screenshot below).
For more on configuring these views and the functions of each tab, see our “Analyzing a trace” walkthrough on Microsoft Edge Dev. For the purposes of this post, we’ll assume you have the views configured to your liking and walk through a single performance analysis technique – top-down analysis.
Top-down Performance Analysis
Once you have recorded and loaded a trace for analysis, there are a number of techniques to investigate performance. For this post, we’ll walk through a technique called top-down performance analysis, which is focused on finding the most obvious and impactful performance problems on a page – literally investigating operations from the top down by impact in milliseconds. This general technique can be used in many tools, including the JavaScript view in the F12 Developer Tools, as well as in WPA.
To perform this analysis, begin with in Windows Performance Analyzer’s “Frame Analysis” tab. Under CPU Usage, sort the collapsed nodes by decreasing total CPU time (weight in milliseconds). From here, review each node and look up the corresponding source code to evaluate the potential reduction in call counts until CPU time breaks into smaller pieces. Note that this step is easiest with unminified code.
On a complex page, you should apply this technique to each major component independently. Many site have several separate components competing for CPU and network time, which the top-down analysis technique will help to highlight.
Sample analysis
Using the top-down analysis technique, let’s walk through the analysis of the demo page which we recorded above. For the purposes of this example, we’ll use a performance issue that is relatively simple and contrived.
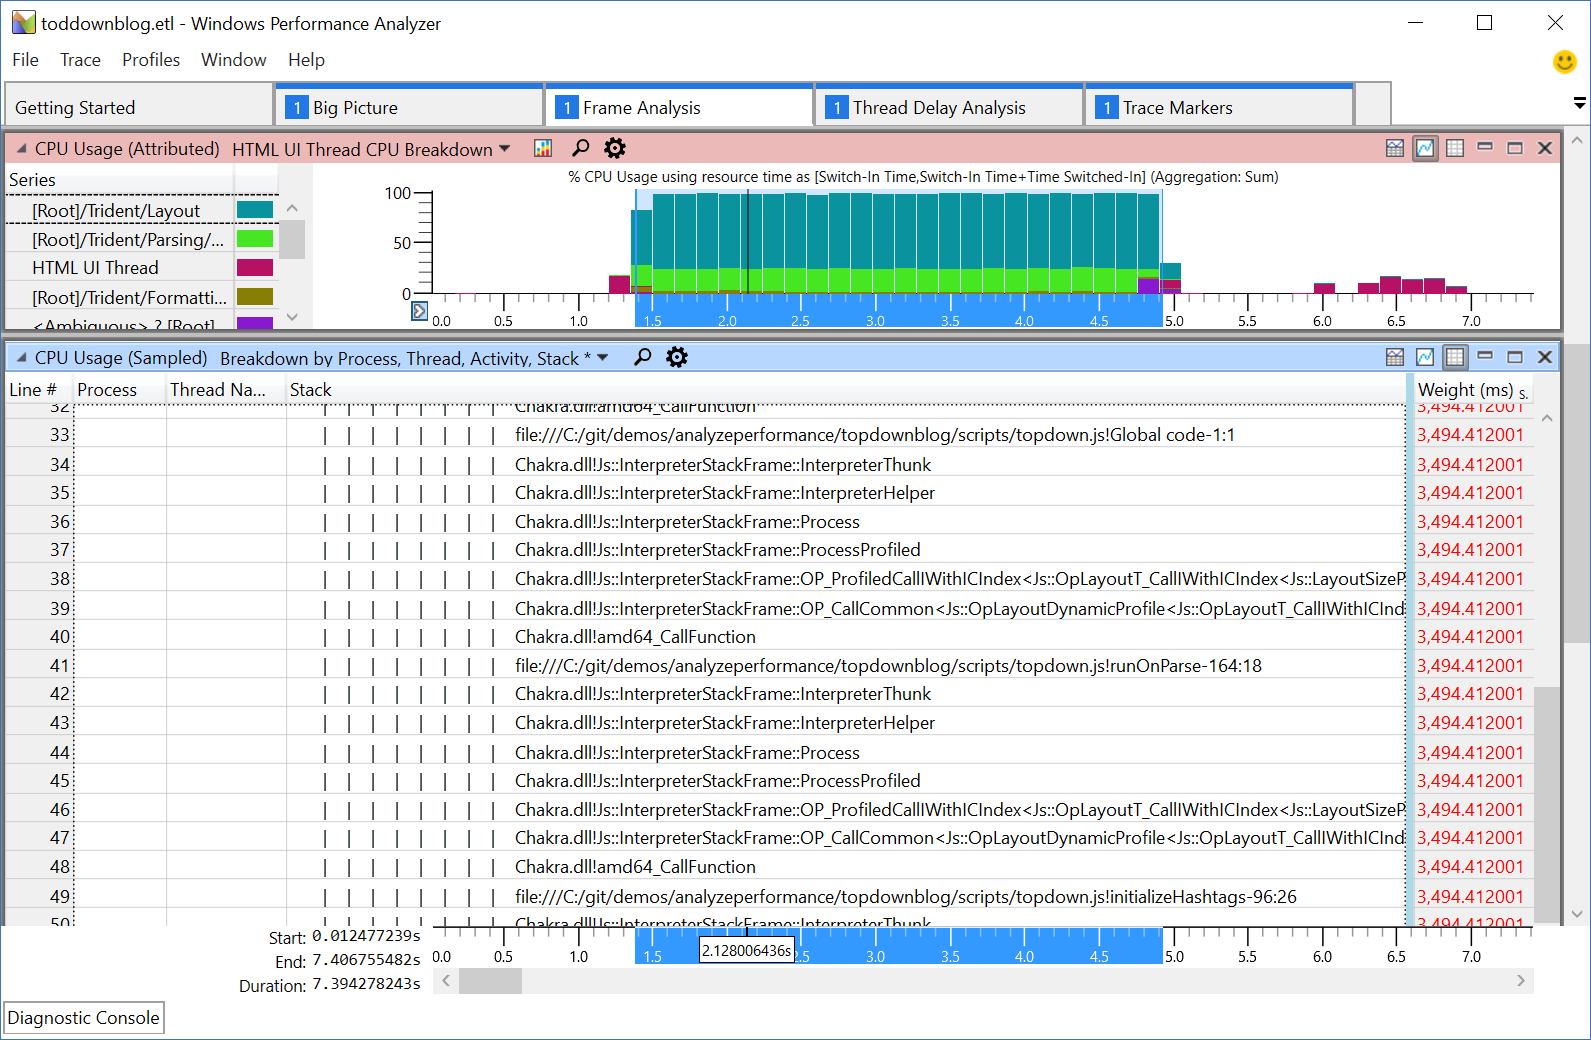
Follow the instructions above to open the recording and then open the trace of our sample page in Windows Performance Analyzer. After doing so, go to the Frame Analysis tab and scroll down to the CPU Usage (Attribute) graph. Highlight the portion of time that has a visible graph and right click to Zoom in. This will filter the information in the CPU Usage (Sampled) table down to only that section of time. Next, remove the Thread ID and Activity to get a bit more space to view the Stack.
We’ll begin our Top-down Analysis here by clicking in the UI Thread root in CPU Usage (Sampled) seen in the screenshot below. Expand the tree and review what is occurring until you find the first bit of JavaScript—this should be topdown.js!Global code-1:1 (line 1, column 1). This appears to call down into runOnParse-164:18 (line 164, column 18) which then calls into initalizeHashtags-96:26 (line 96, column 26).
If we look into the code referenced here, we can observe that Global declares a few consts, creates a number of functions and calls runOnParse. So far so good! Continuing down the stack, we’ll next look into runOnParse. This appears well structured:
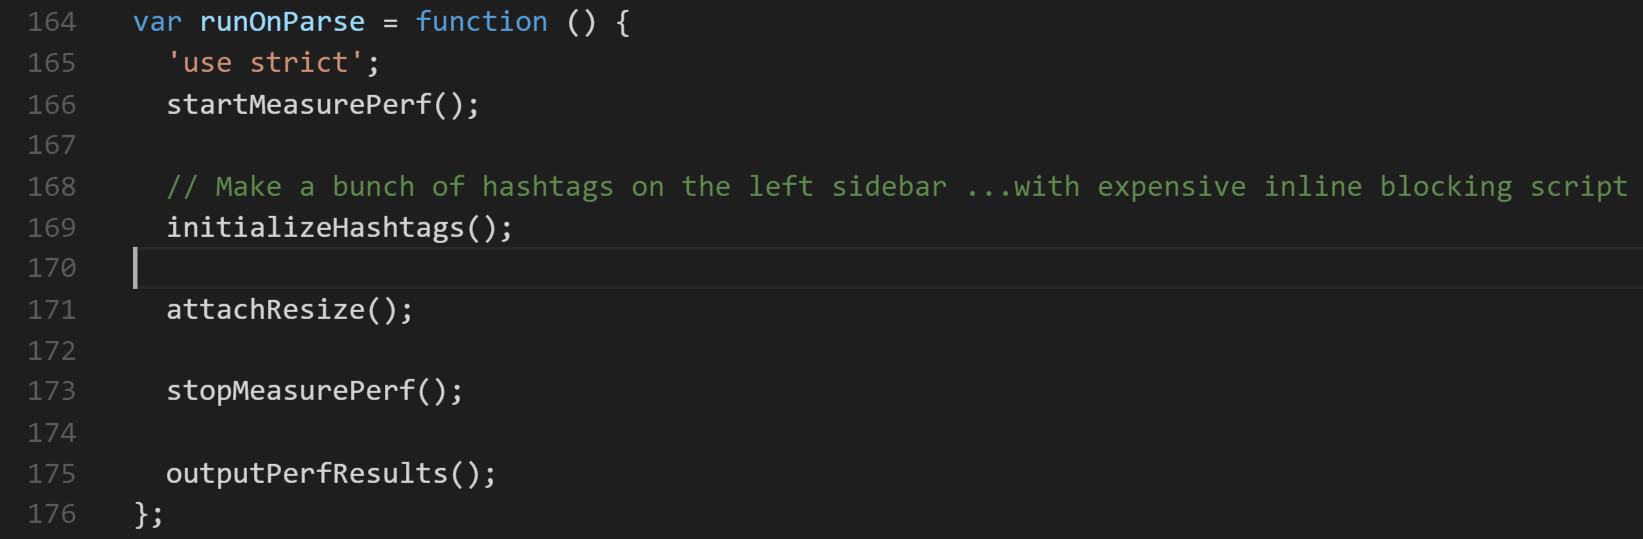
Next, we’ll look into intializeHashtags. Reviewing the code, we observe a loop that creates the hashtags. We also can observe a line at the end of the loop with a comment (lines 111-112) that it should run after the loop where all hashtags are created.
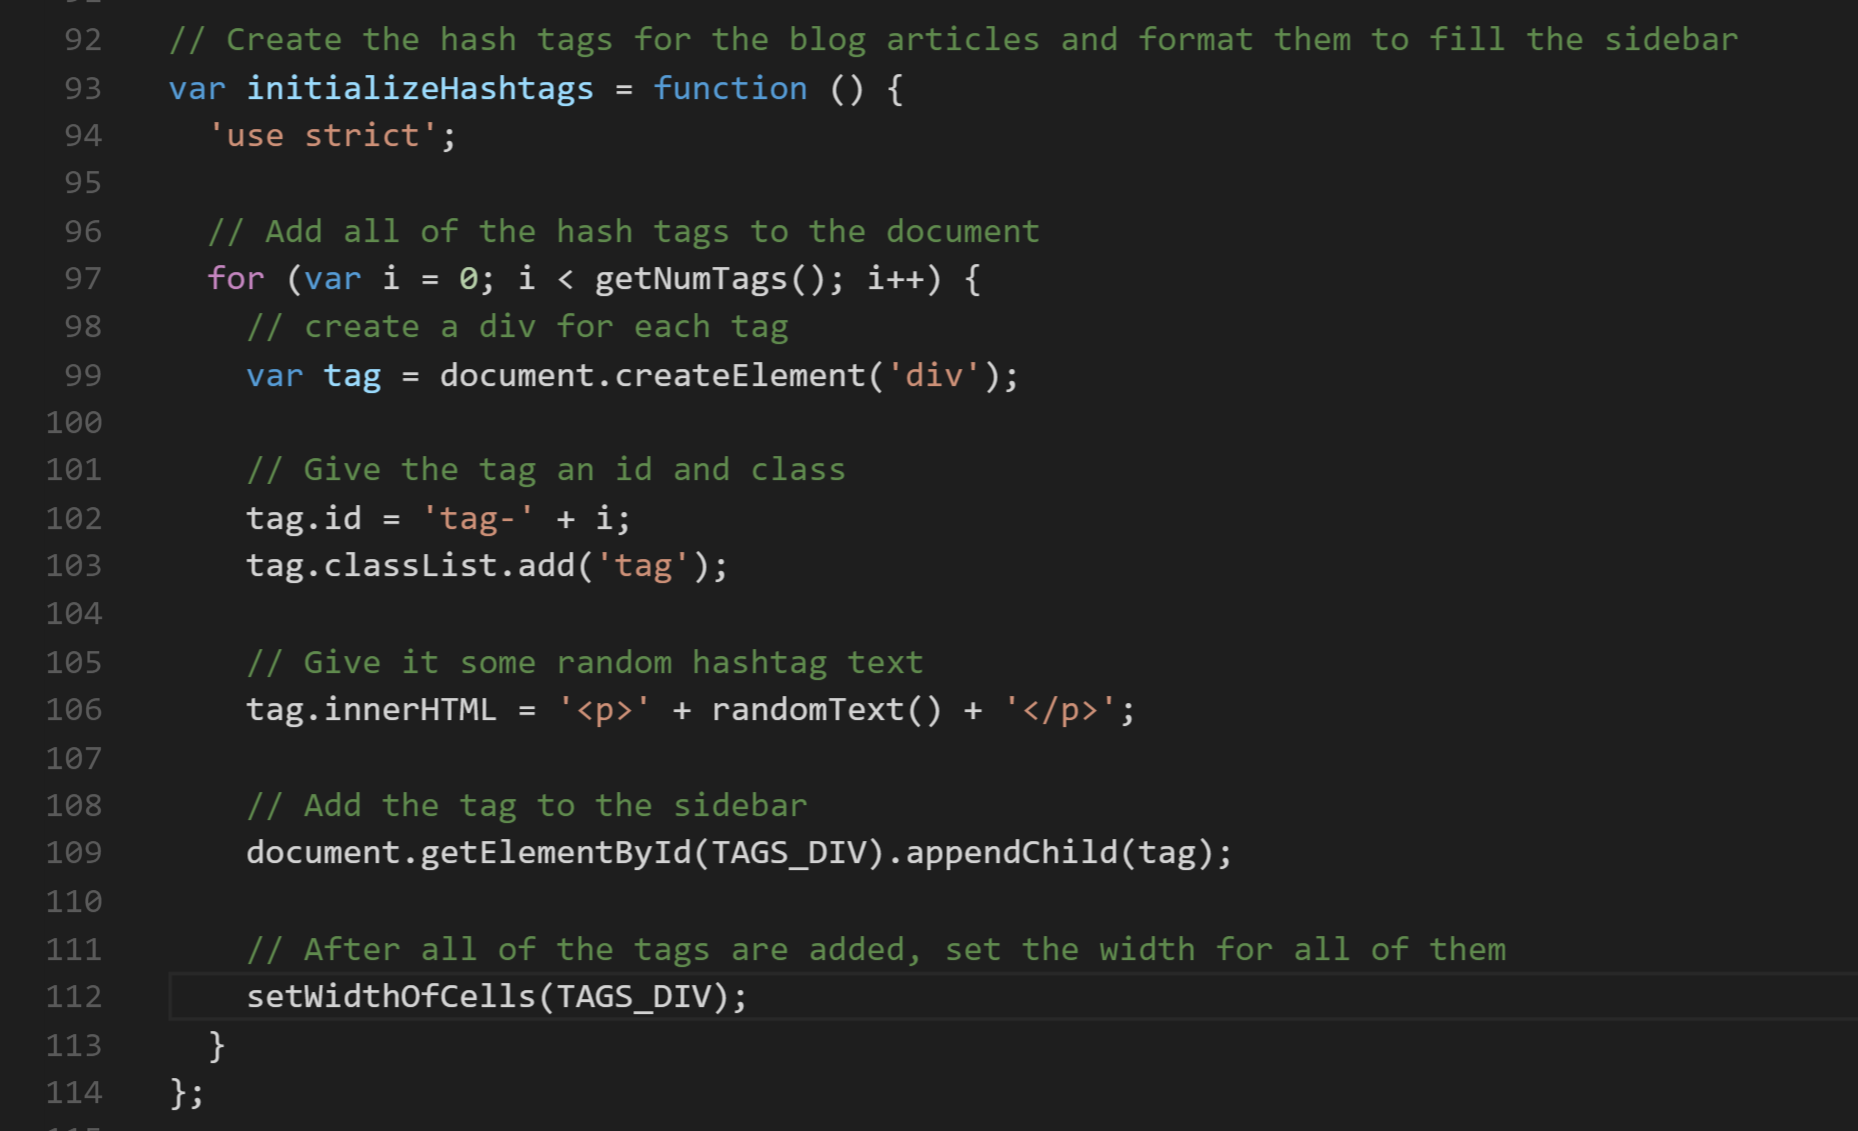
This is our problem code! Moving setWidthOfCells outside of the loop will run it after all hash tags are created, running only once instead of once for every tag, resulting in a dramatic performance improvement.
This is a relatively simple and contrived example, but illustrates the principle well. Top-down performance analysis is just one technique—while it’s a good start to debugging many simply performance problems, WPT enables more sophisticated approaches as well. Some other techniques include Bottom-up DOM API Analysis, which groups all of the API calls and then looks at the callers to find important optimizations, as well as Synchronous Layout Reduction. We plan to explore some of these techniques in more detail in future posts and demos.
Try out the Windows Performance Toolkit for yourself!
The best way to get acquainted with WPT is to try it out for yourself! We’ve published the slow web page used in the above example to our demo site and GitHub so you can follow along to identify the performance problem – see my video from Edge Web Summit to follow this debugging in real time.
WPT is powerful but it can be a steep learning curve – if you have any questions, don’t hesitate to reach out! You can get in touch via the comments below or @MSEdgeDev on Twitter with any questions or comments.
– Todd Reifsteck, Senior Program Manager, Microsoft Edge