|
|
#1 |
|
Member Регистрация: 24.01.2014 Адрес: Default City Сообщений: 73 |
Периодически(примерно 1 раз на 10 фильмов) при просмотре фильмов всплывает ошибка windows о нехватки виртуальной памяти. Я сразу смотрю в диспетчере задач занято всего 1.7Гб из 8Гб, т.е. судя по показаниям все должно быть нормально. Непонятно почему выскакивает ошибка. Данную ошибку помню и на версии xbmc 12.3, и на 13.0 и сейчас на 13.1 Всплывающее окно с ошибкой прерывает просмотр фильм и предлагает закрыть xbmc, хотя сам xbmc использует всего 265мб — это копейки на фоне имеющейся оперативной свободной памяти и свопа. Можно нажать отмену на окне с ошибкой и продолжить смотреть фильм, но такой глюк раздражает, помогите найти причину и поправить. Имя журнала: System
Последний раз редактировалось samuel; 13.06.2014 в 20:04.
|

|
|


|
|
#2 |
|
Senior Member
Регистрация: 13.04.2014 Сообщений: 132 |
Скорей всего вы наслушались вредных советов и отключили файл подкачки в виндовс. Включите обратно, а размер на авто. Почитайте на досуге, почему не надо слушать советов «кулцхакеров» Честно говоря меня эти сосунки со своими косячными «сборками» уже порядком достали. Ставьте виндовс с оригинального дистрибутива, даже если будете активировать его пиратским способом, очень много времени и нервов сбережёте. |
|
|
|

|
|
#3 |
|
Member Регистрация: 24.01.2014 Адрес: Default City Сообщений: 73 |
Цитата:
Сообщение от Lenchik Скорей всего вы наслушались вредных советов и отключили файл подкачки в виндовс. Включите обратно, а размер на авто. Как поставил винду, действительно отключил своп. НО когда первый раз появилась ошибка я его сразу включил с авто размером, вот только ошибка не прекратила появляться. Полагаю она никак не связана с отключением и включением свопа. Цитата: Ставьте виндовс с оригинального дистрибутива, даже если будете активировать его пиратским способом, очень много времени и нервов сбережёте. Виндоус стоит с оригинального образа, активирован по телефону в майкрософт. |
|
|
|

|
|
#4 |
|
Senior Member
Регистрация: 13.04.2014 Сообщений: 132 |
Виртуальная память и есть тот самый файл подкачки. Может еще чего отключили? |
|
|
|
|
|
#5 |
|
Member Регистрация: 24.01.2014 Адрес: Default City Сообщений: 73 |
Цитата:
Сообщение от Lenchik Виртуальная память и есть тот самый файл подкачки. Может еще чего отключили? Мое админское чутье подсказывало, что дело в win 8.1, стал гуглить, оказалось у многих win 8.1 ругалась на нехватку виртуальной памяти. Стал искать глубже, похоже проблема в совместимости многих программ с win 8.1, решение запускать программы в режиме совместимости с windows 7. http://it-drivers-blog.ru/wind%D0%BE…F%D1%82%D0%B8/ Настроил у себя, через пару недель расскажу помогло или нет. |
|
|
|
|
|
#6 |
|
Senior Member
Регистрация: 13.04.2014 Сообщений: 132 |
У меня на двух компьютерах XBMC под Windows 8.1. Ни разу никакой проблемы не было. «Настраивать» надо поменьше, особенно при наличии кривых рук. Запускаю без всякого режима совместимости. Единственно что запускаю в режиме совместимости, так это DVBviewer. И то по причине того что в нем плагин установлен Acamd. Вот плагин иногда и подвешивает при старте DVBviewer. Иногда ошибку виртуальной памяти вызывает глючная оперативная память. Возможно у вас комп разогнан, тогда все вопросы не по адресу. Это у оверклокеров спрашивайте зачем они себе сами проблемы создают. |
|
|
|
|
|
#7 |
|
Senior Member Регистрация: 12.12.2012 Сообщений: 1,674 |
Цитата:
Сообщение от Lenchik У меня на двух компьютерах XBMC под Windows 8.1. Ни разу никакой проблемы не было. «Настраивать» надо поменьше, особенно при наличии кривых рук. Такое впечатление, что отключение файла подкачки наносит вам личное оскорбление. Будьте вежливей. |
|
|
|
|
|
#8 |
|
Member Регистрация: 24.01.2014 Адрес: Default City Сообщений: 73 |
Цитата:
Сообщение от Lenchik Иногда ошибку виртуальной памяти вызывает глючная оперативная память. Это врятли, память проверял длительными тестами. Цитата: Возможно у вас комп разогнан Тоже нет. PS Вы обо мне ничего не знаете, давайте не будем переходить на личности. |
|
|
|
|
|
#9 |
|
Member Регистрация: 02.02.2013 Сообщений: 41 |
Цитата:
Сообщение от samuel Это врятли, память проверял длительными тестами. Тоже нет. PS Вы обо мне ничего не знаете, давайте не будем переходить на личности. была память самсунг на 4 гега, устал проверять и тайменги настраивать, беды закончились как выкинул |
|
|
|
|
|
#10 |
|
Senior Member
Регистрация: 13.04.2014 Сообщений: 132 |
Память самсунг сама Самсунг перестала ставить в собственные ноутбуки, ставят какую то нонейм. А вот почему некоторые отключают файл подкачки, никак не пойму. То ли не в курсе что это такое, то ли почитать в интернете об этом лень. По любому хочут казаться «крутыми пацанами». Отключение по любому приводит к глюкам при большой нагрузке на комп, сколько реальной памяти не ставь. Так устроен менеджер памяти в виндовс. Это в линуксе логика прямая как лом, пока реальная память не кончилась, свопинг не используется. |
|
|
|
- Remove From My Forums
-
Question
-
Hi all,
My server keep getting this error.
«Resource-Exhaustion-Detector
Windows successfully diagnosed a low virtual memory condition. The following programs consumed the most virtual memory: AAAAAAA.exe consumed 30479142912 bytes, XXXXXX.exe consumed 782999552 bytes, and YYYY.exe consumed 744374272 bytes.«From Microsoft Technet, this is normal behaviour.
However, everytime this error appear, it will stop my Antivirus services (which I need to run it back manually although it’s set as Automatically).
How can I fixed this for good?
Answers
-
Hi,
svchost is a system host process and can’t be disabled.
The error 7031 can fixed by here
From the error 7000, we can see it is caused by a memory issue. To resolve this, administrator needs to extend the «pagedpoolmemory» key by doing the following:
type regedit in Search box- change the registry key as below:
key: HKLMSYSTEMCurrentControlSetControlSession ManagerMemory Management
Value: PagedPoolSize
Data: 0xFFFFFFFFThen restart the pc.
Please remember to mark the replies as answers if they help.
If you have feedback for TechNet Subscriber Support, contact
tnmff@microsoft.com.-
Proposed as answer by
Thursday, November 16, 2017 1:20 AM
-
Marked as answer by
Danny Alan David Jones
Tuesday, November 21, 2017 1:56 AM
-
Proposed as answer by
Description
In this article, I am going to explain about Event ID 2004 Resource Exhaustion Diagnosis Events and how to configure or enable alert mail for this event. The Event ID 2004 falls under the category of Resource Exhaustion Detector component of Windows Resource Exhaustion Detection and Resolution (RADAR), it identifies the top three memory consuming programs and warns you when the system commit charge reaches a critical level.
Summary
- Event ID 2004 Log Source
- Configure Alert Notification mail for Event ID 2004
Event ID 2004 Log Source
Log Name:      System
Source:        Microsoft-Windows-Resource-Exhaustion-Detector
Date:          04/12/2013 3:17:33 PM
Event ID:      2004
Task Category: Resource Exhaustion Diagnosis Events
Level:         Warning
Keywords:      Events related to exhaustion of system commit limit (virtual memory).
User:          SYSTEM
Computer:      myPC.myDomain.local
Description:
Windows successfully diagnosed a low virtual memory condition. The following programs consumed the most virtual memory: sqlservr.exe (1956) consumed 729833472 bytes, devenv.exe (3896) consumed 404164608 bytes, and w3wp.exe (2516) consumed 240144384 bytes.
Steps to Configure Alert Notification mail for Event ID 2004
1. Open the Event Viewer MMC by running the command eventvwr.msc.
2. Expand the node Windows Logs, and select System
3. Search and and select the Event 2004, right-click on the event entry and click Attach Task To This Event..

4. Type the description like ‘This is a warning alert message for high memory usage on the following programs’ and click Next


5. Select Send an e-mail option and click Next.

6.Go to Action -> Send an e-mail section, type the From and To Address and SMTP Server address for your Mail Server and click Next.

7. Now click the Finish button to complete Alert Mail Notification for the Event ID 2004

Thanks,
Morgan
Software Developr
Hello Spiceheads. I am in a quandry with this problem. Need some guidance.
This is the owner’s workstation (w/s). It is an Acer Veriton M265 with Win 7 Pro 64bit. 4gB RAM. 160gB HDD about 1/3 full. AV suite is Symantec Enpoint Protection 12.1. The main function of this w/s is for him to pull his Outlook 2010 email and look over some documents and pdfs. Fairly lightweight usage in my opinion.
For about 2 months now we’ve been getting «Windows has resized your virtual mem» messages. OK, so I searched and suspected the swap file, took off the «Let Windows Manage this» setting and set my own page file to 4061 min/6061 max. This stopped the resize message. However we’re now facing more deeper issues with Win Resource Exhaustion. Messages are now issued, «Windows is running low on resources. Close some programs». Well, the fact is all we have open is Outlook. The computer now runs slow as molasses in January after this message appears. In the Event Viewer we have strings of Warnings: Windows succesfully diagnosed a low virtual memory condition. Event ID=2004. In an attempt to get it to respond, the owner attempts a restart at 12 noon and again at 4 pm — which fails twice. Hard reset (ouch!).
3 days ago, we had a string of 26 Schannel — fatal alert — 47 entries in Event Viewer. 2 days before that there’s another string of 31 Schannel — fatal alert — 47 entries. None in the last 3 days. Then that same day a few hours earlier we get: 20 Circular Kernel Context Logger failures with event ID=2.
So, I’m looking to find what my next step might be to bring this w/s back to normalcy. Do I go in and bump up the page file again? To me that sounds like a band-aid. I’d like to get to the root cause of this «exhaustion» issue.
I appreciate everyone’s time to look into this with me. I have LogMeIn access to the machine.
Thank you, folks
Hoib
Low disk space pop up is a warning message for filled up drive
by Henderson Jayden Harper
Passionate about technology, Crypto, software, Windows, and everything computer-related, he spends most of his time developing new skills and learning more about the tech world. He also enjoys… read more
Published on September 26, 2022
Reviewed by
Vlad Turiceanu

Passionate about technology, Windows, and everything that has a power button, he spent most of his time developing new skills and learning more about the tech world. Coming… read more
- Sometimes, the low disk space warning can pop up without having anything to delete.
- Disabling the Windows resources exhaustion detection and resolution will stop the low disk space warning from showing.
- The low disk space warning can appear in two forms.

XINSTALL BY CLICKING THE DOWNLOAD FILE
This software will repair common computer errors, protect you from file loss, malware, hardware failure and optimize your PC for maximum performance. Fix PC issues and remove viruses now in 3 easy steps:
- Download Restoro PC Repair Tool that comes with Patented Technologies (patent available here).
- Click Start Scan to find Windows issues that could be causing PC problems.
- Click Repair All to fix issues affecting your computer’s security and performance
- Restoro has been downloaded by 0 readers this month.
PCs come in a wide range of specifications that make them different. A significant feature of the computer is its RAM. RAM is a computer memory that can be read and changed. It stores working data and machine code.
Depending on how much data you have on your computer memory, your disk space can become filled up. It can also display warnings about low disk space.
However, it is annoying to see Windows low disk space warnings constantly. So, we’ll show you some ways to turn off the low disk space warning in Windows 10 & 11.
Why does the low disk space warning keep popping up?
A low disk space warning alert usually pops up when you boot the computer or access the hard drive.
Likewise, the disk space alert script for Windows may pop up when you try to perform some tasks on your PC. However, the message may show in two ways:
- You are running out of disk space on the Local Disk (D:). Click here to see if you can free space on this drive. – It indicates that your local drive is low on storage and may not be able to store any more data.
- You’re running out of space on this PC. Manage storage to view usage and free up some space. – This error is associated with the C:WindowsTemp folder getting full. It prompts the low disk alert to appear on Windows startup.
Furthermore, users complain about the low disk space warning popping but nothing to delete.
Even though you have freed up some space in your disk and cleared the recycle bin on your disk, the low disk space warning may pop up. It can be because of the temp and prefetch file on your PC.
You may be interested in how to free up disk space on Windows 10/11 PC to boost their performance. Likewise, check our guide on how to analyze your hard disk using some hard disk analysis programs.
How can I stop the low disk space warning on Windows 10 & 11?
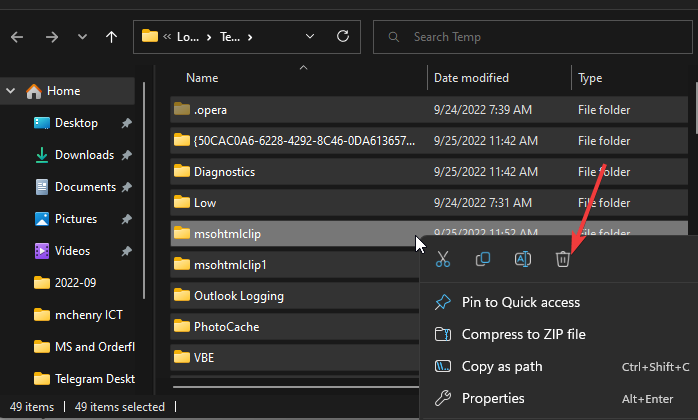
1. Delete the temporary and prefetch file
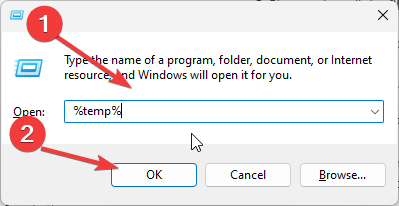
- Press the Windows + R keys to prompt the Run window.
- Type %temp% in the text box and press Enter.

- Please select all the files and press the Delete button to delete them.

- Type prefetch in the text box and press Enter.
- Please select all the files and press the Delete button to delete them.

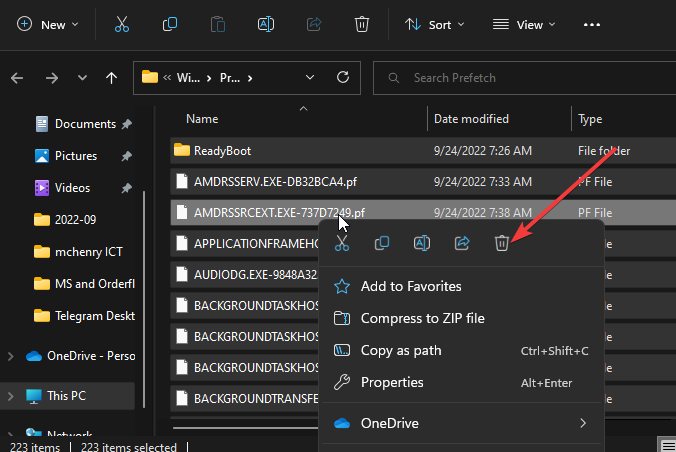
Deleting the temporary and prefetch files from your PC is safe and won’t affect your PC.
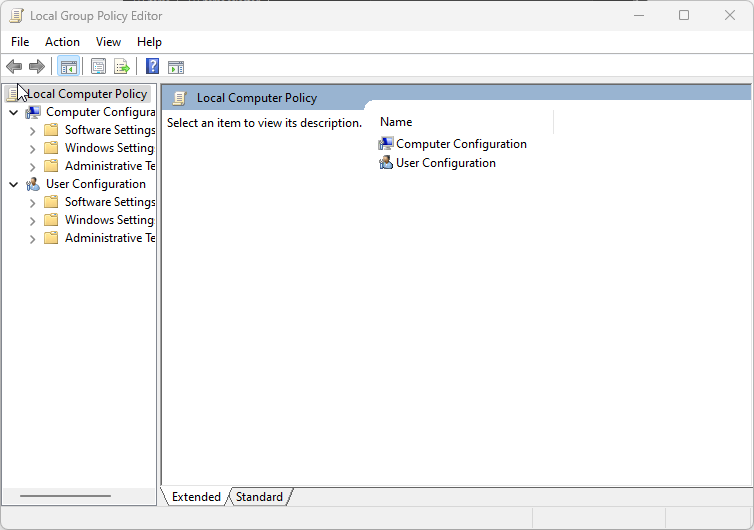
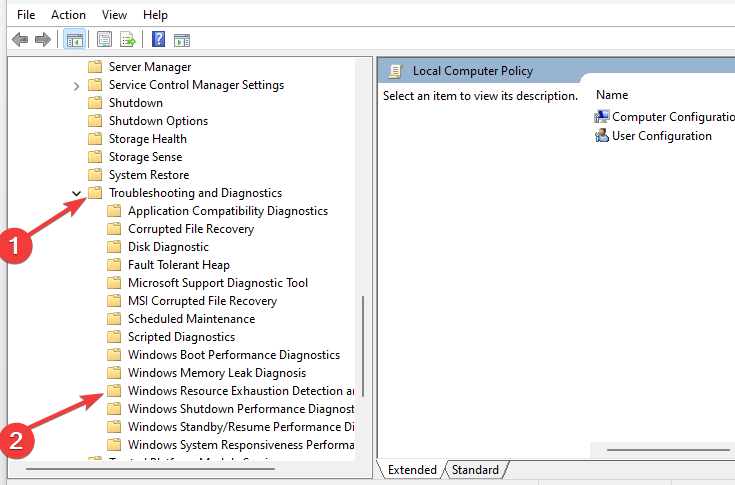
2. Adjust settings in Local Group Policy
- Press the Windows + R keys to prompt the Run window.
- Type gpedit.msc in the search space, and press Enter to open the Local Group Policy.
- The MMC (Microsoft Management Console) will launch in the Local Group Policy Editor.

- Expand the Computer Configuration option and expand Administrative Templates.
- Expand the System option and expand Troubleshooting and Diagnostics.
- Click on Windows Resource Exhaustion Detection and Resolution.

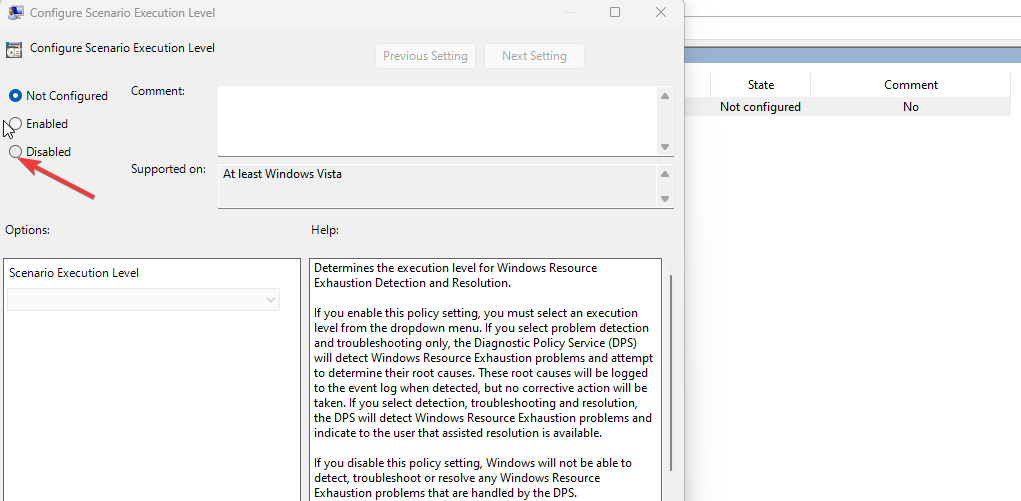
- Right-click on Configure Scenario Execution Level in the console window and select Properties.
- Click on Disabled on the Settings tab and click OK.

Some PC issues are hard to tackle, especially when it comes to corrupted repositories or missing Windows files. If you are having troubles fixing an error, your system may be partially broken.
We recommend installing Restoro, a tool that will scan your machine and identify what the fault is.
Click here to download and start repairing.
Disabling the Windows resources exhaustion detection and resolution option in the Local Group Policy will prevent low disk space warnings.
Users should note that the steps in the solution above don’t free up memory space. It stops warning alerts from interrupting your activities on the PC.
Nonetheless, you can check our article on how to compress drive on Windows 10 to save disk space.
- Reserved Storage on Windows 11: How to Enable or Disable It
- How to Remove Windows 11 File Explorer Please Sign In
- How to Change Real Time Update Speed in Task Manager
- How to Check Your Windows Experience Index on Windows 11
- Browser Not Working on Windows 11: How to Fix This
3. Perform a disk cleanup via drive properties
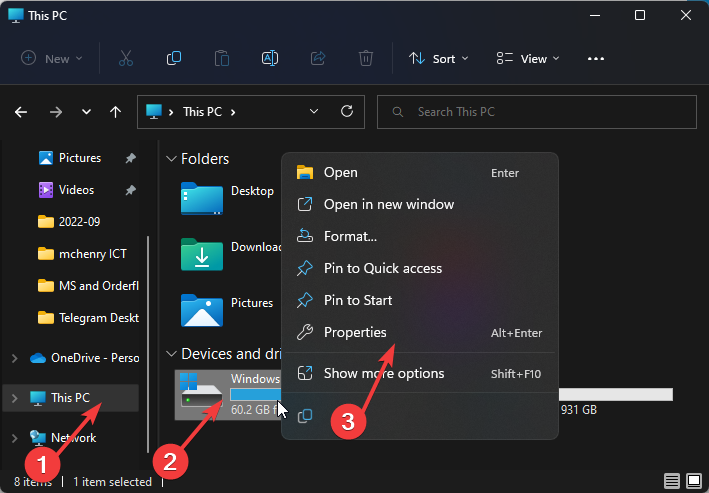
- Press Windows + E keys to open File Explorer.
- Click on This PC.
- Right-click on the C: drive and select Properties from the drop-down.

- Navigate to the General tab and click on Disk Cleanup to open the app.
- Check the boxes for the file you want to delete, then click OK.
Freeing up disk space on your PC automatically eliminates local disk-free space issues. Since your disk space is free, the low disk warning should stop popping up.
Why is C drive filled without files?
The C drive can be filled without having any files consuming the space. However, if the hard drive’s file system gets corrupted, it can display it as complete.
Also, duplicate files on your computer take up significant disk space. So, you can use an external tool to clean it up.
With a tool like CCleaner, you can clean the entire PC and remove the unnecessary files that are consuming the space on your C drive.

CCleaner
Clear all junk files and free up space for important data.
These are the best ways to turn off low disk space warnings on Windows 10/11. Kindly follow the steps outlined strictly.
Conclusively, you can check out the most reliable software for deep cleaning hard drives for better performance.
You can leave your comments and suggestions in the section below. We’d like to hear from you.
Still having issues? Fix them with this tool:
SPONSORED
If the advices above haven’t solved your issue, your PC may experience deeper Windows problems. We recommend downloading this PC Repair tool (rated Great on TrustPilot.com) to easily address them. After installation, simply click the Start Scan button and then press on Repair All.
![]()
Newsletter
Qlik products are “in memory products” which will take advantage of the operating system’s maximum available memory.
Insufficient server sizing, or a system that has outgrown its previous requirements due to additional document load and user load, can therefore lead to memory shortage.
The Microsoft Windows Event logs may log a warning in the System log in a QlikView Environment as the example below where
qvb.exe is the QlikView reload engine. This may also be the qvs.exe (QlikView server), or qv.exe (QlikView Desktop).
…
Source: Resource-Exhaustion-Detector
Event ID: 2004
Level: Warning
Windows successfully diagnosed a low virtual memory condition. The following programs consumed the most virtual memory: qvb.exe (8328) consumed 9197830144 bytes, qvb.exe (9340) consumed 635494400 bytes, and QVDistributionService.exe (2344) consumed 432857088 bytes.
…
In Qlik Sense it would reference the engine.exe instead as the example below:
…
Windows successfully diagnosed a low virtual memory condition. The following programs consumed the most virtual memory: Engine.exe (77404) consumed 66804117504 bytes, dotnet.exe (29264) consumed 581591040 bytes, and dotnet.exe (49860) consumed 523714560 bytes.
…
Environment:
- Qlik Sense Enterprise on Windows, all versions
- QlikView, all versions
Resources:
- For information on how Qlik products use memory, see QlikView and Qlik Sense resource usage and the Qlik Associative Engine Memory Management and CPU Uti….
- For information on how to deal with QlikView related resource issues, see Troubleshooting QlikView Server resource problems and crashes.
- Adding more resources to the environment is a good first step, but finding the root cause of the issue (specific App, Object, user, …) may be necessary to provide long term system stability
- Increasing the page file size maybe be required. See Pagefile recommendations in Qlik Sense and QlikView for details.
For general information on Windows and memory allocation, see the Microsoft Technet Blog post «Pushing the Limits of Windows: Virtual Memory»
About the Windows Message and Virtual Memory:
The Resource Exhaustion Detector component of Windows Resource Exhaustion Detection and Resolution (RADAR) identifies the top three consumers of committed memory and warns you when the system commit charge reaches a critical level.
What is Commit charge:
Virtual Memory is combined with Physical Memory and page files on disk. Committed Memory, also called committed virtual memory, is used or allocated Virtual Memory.
The amount of committed virtual memory for all the active processes is called the current commit charge. When a process commits a region of virtual memory, the operating system guarantees that it can maintain all the data the process stores in the memory either in physical memory or on disk. That means that a process can run up against another limit: the commit limit.
Memory% Committed Bytes in Use
Memory% Committed Bytes in Use This measures the ratio of Committed Bytes to the Commit Limit—in other words, the amount of virtual memory in use. This indicates insufficient memory if the number is greater than 80 percent.

on the problematic server, we can find this value in task manager too, i.e. Commit (GB) 10/11. [Highlighted]
Here 10 GB is Committed Bytes and
here 11 GB is Committed Limit
What is %~Committed~Bytes~in~Use»
% Committed Bytes in Use is the ratio of Memory <\Committed Bytes to the Memory\Commit Limit>.
Committed memory is the physical memory in use for which space has been reserved in the paging file should it need to be written to disk.
The commit limit is determined by the size of the paging file. If the paging file is enlarged, the commit limit increases, and the ratio is reduced. This counter displays the current percentage value only; it is not an average.
11 GB = Installed Memory 8.00 GB + Page File
This System has 8 GB Installed RAM + Currently allocated 4 GB Page File.
In this problematic server, static page file is set of Min 2048 MB to Max 2048 MB which is >= 2 GB
one for C: and other from D: drive.
Hence, the approx. commit limit is 12 GB.
This 10 GB is nothing but a Commit byte to the memory — > Committed Bytes is the amount of committed virtual memory, in bytes for all processes [server process + other processes running on the system].
10/11 = 0.90. = 90%. if this value is greater than 85%, then 2004 Error will also come Which means,
in this server system commit charge reaches a critical level.
Вы видите сообщение об ошибке «На вашем компьютере недостаточно памяти» на вашем компьютере? Эта ошибка обычно возникает из-за проблем с виртуальной памятью в вашей системе. Настройка правильного объема виртуальной памяти решит эту проблему за вас. Но прежде чем переходить к решениям, сначала попробуйте эти более простые обходные пути.
Обходные пути–
РЕКЛАМА
1. Сохраните всю свою работу и перезагрузите компьютер. Проверьте, помогает или нет.
2. Проверьте, не ожидается ли обновление для Windows на вашем компьютере. Если он находится на рассмотрении, установите его на свой компьютер.
3. Нажмите Ctrl+Shift+Esc, чтобы открыть Управление задачамир на вашем компьютере. Проверьте использование памяти приложениями, работающими на вашем компьютере.
Просто щелкните правой кнопкой мыши процесс, потребляющий огромный кусок памяти, а затем нажмите «Завершить задачу», чтобы завершить процесс.
Тем не менее, если вы видите сообщение об ошибке на своем компьютере, воспользуйтесь следующими решениями:
Fix- Настройте использование виртуальной памяти в вашей системе-
Как мы обсуждали ранее, эта ошибка вызвана нехваткой виртуальной памяти, ее настройка может вам помочь.
1. Чтобы открыть Бегать окно нужно нажать ‘Клавиша Windows+R‘.
2. Теперь введите этот код запуска и нажмите «ОК».
sysdm.cpl
Системное свойствоокно будет открыто.
3. Когда Системное свойствоОткроется окно, перейдите на вкладку «Дополнительно».
4. Затем в Представление окно нажмите «Настройки».
5. В параметры производительности окно, перейдите на вкладку «Дополнительно».
6. Затем нажмите «Изменить», чтобы изменить его на своем компьютере.
7. Что вам нужно сделать дальше, так это снимите флажок опция «Автоматически управлять размером файла подкачки для всех дисков».
7. Теперь, Размер файла подкачки для каждого диска раздел, нажмите на него, чтобы выбрать его там, где установлена Windows.
8. Затем нажмите «Размер, управляемый системой», а затем нажмите «Установить», чтобы выбрать его. Затем нажмите «ОК», чтобы сохранить изменения в настройках.
9. Возвращаясь к Свойства системы окно, вы должны нажать «Применить», а затем «ОК», чтобы сохранить изменения.
Перезагрузите компьютер, чтобы изменения вступили в силу в вашей системе.
После перезагрузки проверьте, осталась ли ошибка или нет. Если сообщение об ошибке все еще появляется, перейдите к следующему решению.
Fix-2 Изменить редактор локальной групповой политики-
Изменение Редактор локальной групповой политики может помочь вам.
1. Нажмите клавишу Windows+R.
2. Чтобы открыть Редактор локальной групповой политики окно, напишите этот код запуска и нажмите «ОК».
gpedit.msc
3. В Редактор локальной групповой политики окно, перейдите к этому заголовку политики-
Computer configuration - Administrative templates - System - Troubleshooting and Diagnostics - Windows Resource Exhaustion Detection and Resolution
4. Затем Двойной кликk в политике «Настройка уровня выполнения сценария».
5. В Настройка уровня выполнения сценария выберите «Отключено», чтобы отключить его на вашем компьютере.
6. Нажмите «Применить», а затем «ОК».
Закрывать Редактор локальной групповой политики.
Перезагрузите компьютер, чтобы сохранить изменения на компьютере. После перезагрузки компьютера проверьте, появляется ли сообщение об ошибке по-прежнему или нет.
Если проблема продолжает беспокоить вас, перейдите к следующему решению.
Fix-3 Запустите скрипт реестра-
Если до сих пор вам ничего не помогло, запуск скрипта реестра на вашем компьютере наверняка решит эту проблему.
Но прежде чем продолжить, убедитесь, что вы создали резервную копию реестра на своем компьютере.
1. Нажмите на поле поиска и напишите «regedit».
2. Затем нажмите «Редактор реестра», чтобы получить доступ к редактору.
3. Чтобы создать резервную копию реестра на вашем компьютере, нажмите «Файл», а затем нажмите «Экспорт».
Если что-то пойдет не так, вы можете просто «импортировать» его на свой компьютер.
Закрывать Редактор реестра окно.
4. Щелкните правой кнопкой мыши в пространстве Рабочий стол а затем нажмите «Создать>», а затем нажмите «Текстовый документ».
5. Теперь, Двойной клик на ‘Новый текстовый документ‘, чтобы открыть его.
Блокнот окно будет открыто.
6. В Блокнот окно, копировать вставить эти линии.
REGEDIT4

[HKEY_LOCAL_MACHINESOFTWAREPoliciesMicrosoftWindowsWDI{3af8b24a-c441-4fa4-8c5c-bed591bfa867}]
"ScenarioExecutionEnabled"=dword:00000000
7. В Блокнот окно, нажмите «Файл», а затем нажмите «Сохранить как…».
8. В Сохранить как окно, назовите файл «Regfix.reg» и выберите «Все файлы» из типа файла.
9. Выберите конкретное место для хранения файла на вашем компьютере. Наконец, нажмите «Сохранить», чтобы сохранить файл на вашем компьютере.
Закрывать Блокнот окно.
10. На следующем шаге перейдите в место, где вы только что сохранили файл.
11. Теперь, щелкните правой кнопкой мыши на «Regfix.reg», а затем нажмите «Объединить», чтобы объединить его с исходным реестром.
12. Если вы получили предупреждающее сообщение, просто нажмите «Да», чтобы запустить скрипт на вашем компьютере.
Перезагрузите компьютер.
После перезагрузки компьютера вы больше не увидите сообщение об ошибке.
Ваша проблема должна быть решена.
Последнее обновление: 05/11/2022
[Требуемое время для чтения: 3,5 мин.]
Файлы Windows 7 Event Log, такие как Microsoft-Windows-Resource-Exhaustion-Detector%4Operational.evtx, считаются разновидностью файла Система (Windows 7 Event Log). Они соотносятся с расширением EVTX, разработанным компанией CubedLabs для YouTube Download & Convert 1.1.4.
Файл Microsoft-Windows-Resource-Exhaustion-Detector%4Operational.evtx впервые был выпущен для ОС Windows 8 08/01/2012 с Windows 8.
Последним обновлением версии [v1.1.4] для YouTube Download & Convert является 1.1.4, выпущенное 04/09/2008.
Файл Microsoft-Windows-Resource-Exhaustion-Detector%4Operational.evtx входит в состав Windows 10, Windows 8.1 и Windows 8.
В этой статье обсуждаются подробные сведения о файлах, порядок устранения неполадок с файлом EVTX при проблемах с Microsoft-Windows-Resource-Exhaustion-Detector%4Operational.evtx, а также полный набор бесплатных загрузок для каждой версии файла, которая была зарегистрирована нашей командой.
Что такое сообщения об ошибках Microsoft-Windows-Resource-Exhaustion-Detector%4Operational.evtx?
Общие ошибки выполнения Microsoft-Windows-Resource-Exhaustion-Detector%4Operational.evtx
Ошибки файла Microsoft-Windows-Resource-Exhaustion-Detector%4Operational.evtx часто возникают на этапе запуска YouTube Download & Convert, но также могут возникать во время работы программы.
Эти типы ошибок EVTX также известны как «ошибки выполнения», поскольку они возникают во время выполнения YouTube Download & Convert. К числу наиболее распространенных ошибок выполнения Microsoft-Windows-Resource-Exhaustion-Detector%4Operational.evtx относятся:
- Не удается найти Microsoft-Windows-Resource-Exhaustion-Detector%4Operational.evtx.
- Microsoft-Windows-Resource-Exhaustion-Detector%4Operational.evtx — ошибка.
- Не удалось загрузить Microsoft-Windows-Resource-Exhaustion-Detector%4Operational.evtx.
- Ошибка при загрузке Microsoft-Windows-Resource-Exhaustion-Detector%4Operational.evtx.
- Не удалось зарегистрировать Microsoft-Windows-Resource-Exhaustion-Detector%4Operational.evtx / Не удается зарегистрировать Microsoft-Windows-Resource-Exhaustion-Detector%4Operational.evtx.
- Ошибка выполнения — Microsoft-Windows-Resource-Exhaustion-Detector%4Operational.evtx.
- Файл Microsoft-Windows-Resource-Exhaustion-Detector%4Operational.evtx отсутствует или поврежден.
Библиотека времени выполнения Microsoft Visual C++
![]()
Ошибка выполнения!
Программа: C:WindowsSystem32winevtLogsMicrosoft-Windows-Resource-Exhaustion-Detector%4Operational.evtx
Среда выполнения получила запрос от этого приложения, чтобы прекратить его необычным способом.
Для получения дополнительной информации обратитесь в службу поддержки приложения.

В большинстве случаев причинами ошибок в EVTX являются отсутствующие или поврежденные файлы. Файл Microsoft-Windows-Resource-Exhaustion-Detector%4Operational.evtx может отсутствовать из-за случайного удаления, быть удаленным другой программой как общий файл (общий с YouTube Download & Convert) или быть удаленным в результате заражения вредоносным программным обеспечением. Кроме того, повреждение файла Microsoft-Windows-Resource-Exhaustion-Detector%4Operational.evtx может быть вызвано отключением питания при загрузке YouTube Download & Convert, сбоем системы при загрузке или сохранении Microsoft-Windows-Resource-Exhaustion-Detector%4Operational.evtx, наличием плохих секторов на запоминающем устройстве (обычно это основной жесткий диск) или заражением вредоносным программным обеспечением. Таким образом, крайне важно, чтобы антивирус постоянно поддерживался в актуальном состоянии и регулярно проводил сканирование системы.
Как исправить ошибки Microsoft-Windows-Resource-Exhaustion-Detector%4Operational.evtx — 3-шаговое руководство (время выполнения: ~5-15 мин.)
Если вы столкнулись с одним из вышеуказанных сообщений об ошибке, выполните следующие действия по устранению неполадок, чтобы решить проблему Microsoft-Windows-Resource-Exhaustion-Detector%4Operational.evtx. Эти шаги по устранению неполадок перечислены в рекомендуемом порядке выполнения.
Шаг 1. Восстановите компьютер до последней точки восстановления, «моментального снимка» или образа резервной копии, которые предшествуют появлению ошибки.
Чтобы начать восстановление системы (Windows XP, Vista, 7, 8 и 10):
- Нажмите кнопку «Пуск» в Windows
- В поле поиска введите «Восстановление системы» и нажмите ENTER.
- В результатах поиска найдите и нажмите «Восстановление системы»
- Введите пароль администратора (при необходимости).
- Следуйте инструкциям мастера восстановления системы, чтобы выбрать соответствующую точку восстановления.
- Восстановите компьютер к этому образу резервной копии.
Если на этапе 1 не удается устранить ошибку Microsoft-Windows-Resource-Exhaustion-Detector%4Operational.evtx, перейдите к шагу 2 ниже.

Шаг 2. Если вы недавно установили приложение YouTube Download & Convert (или схожее программное обеспечение), удалите его, затем попробуйте переустановить YouTube Download & Convert.
Чтобы удалить программное обеспечение YouTube Download & Convert, выполните следующие инструкции (Windows XP, Vista, 7, 8 и 10):
- Нажмите кнопку «Пуск» в Windows
- В поле поиска введите «Удалить» и нажмите ENTER.
- В результатах поиска найдите и нажмите «Установка и удаление программ»
- Найдите запись для YouTube Download & Convert 1.1.4 и нажмите «Удалить»
- Следуйте указаниям по удалению.
После полного удаления приложения следует перезагрузить ПК и заново установить YouTube Download & Convert.
Если на этапе 2 также не удается устранить ошибку Microsoft-Windows-Resource-Exhaustion-Detector%4Operational.evtx, перейдите к шагу 3 ниже.
![]()
YouTube Download & Convert 1.1.4
CubedLabs
Шаг 3. Выполните обновление Windows.
Когда первые два шага не устранили проблему, целесообразно запустить Центр обновления Windows. Во многих случаях возникновение сообщений об ошибках Microsoft-Windows-Resource-Exhaustion-Detector%4Operational.evtx может быть вызвано устаревшей операционной системой Windows. Чтобы запустить Центр обновления Windows, выполните следующие простые шаги:
- Нажмите кнопку «Пуск» в Windows
- В поле поиска введите «Обновить» и нажмите ENTER.
- В диалоговом окне Центра обновления Windows нажмите «Проверить наличие обновлений» (или аналогичную кнопку в зависимости от версии Windows)
- Если обновления доступны для загрузки, нажмите «Установить обновления».
- После завершения обновления следует перезагрузить ПК.
Если Центр обновления Windows не смог устранить сообщение об ошибке Microsoft-Windows-Resource-Exhaustion-Detector%4Operational.evtx, перейдите к следующему шагу. Обратите внимание, что этот последний шаг рекомендуется только для продвинутых пользователей ПК.

Если эти шаги не принесут результата: скачайте и замените файл Microsoft-Windows-Resource-Exhaustion-Detector%4Operational.evtx (внимание: для опытных пользователей)
Если ни один из предыдущих трех шагов по устранению неполадок не разрешил проблему, можно попробовать более агрессивный подход (примечание: не рекомендуется пользователям ПК начального уровня), загрузив и заменив соответствующую версию файла Microsoft-Windows-Resource-Exhaustion-Detector%4Operational.evtx. Мы храним полную базу данных файлов Microsoft-Windows-Resource-Exhaustion-Detector%4Operational.evtx со 100%-ной гарантией отсутствия вредоносного программного обеспечения для любой применимой версии YouTube Download & Convert . Чтобы загрузить и правильно заменить файл, выполните следующие действия:
- Найдите версию операционной системы Windows в нижеприведенном списке «Загрузить файлы Microsoft-Windows-Resource-Exhaustion-Detector%4Operational.evtx».
- Нажмите соответствующую кнопку «Скачать», чтобы скачать версию файла Windows.
- Скопируйте этот файл в соответствующее расположение папки YouTube Download & Convert:
Windows 10: C:WindowsSystem32winevtLogs
Windows 10: C:WindowsSystem32winevtLogs
Windows 10: C:WindowsSystem32winevtLogs
Windows 10: C:WindowsSystem32winevtLogs
Windows 10: C:WindowsSystem32winevtLogs
Показать на 1061 каталогов больше +Windows 10: C:WindowsSystem32winevtLogs
Windows 10: C:WindowsSystem32winevtLogs
Windows 10: C:WindowsSystem32winevtLogs
Windows 10: C:WindowsSystem32winevtLogs
Windows 10: C:WindowsSystem32winevtLogs
Windows 10: C:WindowsSystem32winevtLogs
Windows 10: C:WindowsSystem32winevtLogs
Windows 10: C:WindowsSystem32winevtLogs
Windows 10: C:WindowsSystem32winevtLogs
Windows 10: C:WindowsSystem32winevtLogs
Windows 10: C:WindowsSystem32winevtLogs
Windows 10: C:WindowsSystem32winevtLogs
Windows 10: C:WindowsSystem32winevtLogs
Windows 10: C:WindowsSystem32winevtLogs
Windows 10: C:WindowsSystem32winevtLogs
Windows 10: C:WindowsSystem32winevtLogs
Windows 10: C:WindowsSystem32winevtLogs
Windows 10: C:WindowsSystem32winevtLogs
Windows 10: C:WindowsSystem32winevtLogs
Windows 10: C:WindowsSystem32winevtLogs
Windows 10: C:WindowsSystem32winevtLogs
Windows 10: C:WindowsSystem32winevtLogs
Windows 10: C:WindowsSystem32winevtLogs
Windows 10: C:WindowsSystem32winevtLogs
Windows 10: C:WindowsSystem32winevtLogs
Windows 10: C:WindowsSystem32winevtLogs
Windows 10: C:WindowsSystem32winevtLogs
Windows 10: C:WindowsSystem32winevtLogs
Windows 10: C:WindowsSystem32winevtLogs
Windows 10: C:WindowsSystem32winevtLogs
Windows 10: C:WindowsSystem32winevtLogs
Windows 10: C:WindowsSystem32winevtLogs
Windows 10: C:WindowsSystem32winevtLogs
Windows 10: C:WindowsSystem32winevtLogs
Windows 10: C:WindowsSystem32winevtLogs
Windows 10: C:WindowsSystem32winevtLogs
Windows 10: C:WindowsSystem32winevtLogs
Windows 10: C:WindowsSystem32winevtLogs
Windows 10: C:WindowsSystem32winevtLogs
Windows 10: C:WindowsSystem32winevtLogs
Windows 10: C:WindowsSystem32winevtLogs
Windows 10: C:WindowsSystem32winevtLogs
Windows 10: C:WindowsSystem32winevtLogs
Windows 10: C:WindowsSystem32winevtLogs
Windows 10: C:WindowsSystem32winevtLogs
Windows 10: C:WindowsSystem32winevtLogs
Windows 10: C:WindowsSystem32winevtLogs
Windows 10: C:WindowsSystem32winevtLogs
Windows 10: C:WindowsSystem32winevtLogs
Windows 10: C:WindowsSystem32winevtLogs
Windows 10: C:WindowsSystem32winevtLogs
Windows 10: C:WindowsSystem32winevtLogs
Windows 10: C:WindowsSystem32winevtLogs
Windows 10: C:WindowsSystem32winevtLogs
Windows 10: C:WindowsSystem32winevtLogs
Windows 10: C:WindowsSystem32winevtLogs
Windows 10: C:WindowsSystem32winevtLogs
Windows 10: C:WindowsSystem32winevtLogs
Windows 10: C:WindowsSystem32winevtLogs
Windows 10: C:WindowsSystem32winevtLogs
Windows 10: C:WindowsSystem32winevtLogs
Windows 10: C:WindowsSystem32winevtLogs
Windows 10: C:WindowsSystem32winevtLogs
Windows 10: C:WindowsSystem32winevtLogs
Windows 10: C:WindowsSystem32winevtLogs
Windows 10: C:WindowsSystem32winevtLogs
Windows 10: C:WindowsSystem32winevtLogs
Windows 10: C:WindowsSystem32winevtLogs
Windows 10: C:WindowsSystem32winevtLogs
Windows 10: C:WindowsSystem32winevtLogs
Windows 10: C:WindowsSystem32winevtLogs
Windows 10: C:WindowsSystem32winevtLogs
Windows 10: C:WindowsSystem32winevtLogs
Windows 10: C:WindowsSystem32winevtLogs
Windows 10: C:WindowsSystem32winevtLogs
Windows 10: C:WindowsSystem32winevtLogs
Windows 10: C:WindowsSystem32winevtLogs
Windows 10: C:WindowsSystem32winevtLogs
Windows 10: C:WindowsSystem32winevtLogs
Windows 10: C:WindowsSystem32winevtLogs
Windows 10: C:WindowsSystem32winevtLogs
Windows 10: C:WindowsSystem32winevtLogs
Windows 10: C:WindowsSystem32winevtLogs
Windows 10: C:WindowsSystem32winevtLogs
Windows 10: C:WindowsSystem32winevtLogs
Windows 10: C:WindowsSystem32winevtLogs
Windows 10: C:WindowsSystem32winevtLogs
Windows 10: C:WindowsSystem32winevtLogs
Windows 10: C:WindowsSystem32winevtLogs
Windows 10: C:WindowsSystem32winevtLogs
Windows 10: C:WindowsSystem32winevtLogs
Windows 10: C:WindowsSystem32winevtLogs
Windows 10: C:WindowsSystem32winevtLogs
Windows 10: C:WindowsSystem32winevtLogs
Windows 10: C:WindowsSystem32winevtLogs
Windows 10: C:WindowsSystem32winevtLogs
Windows 10: C:WindowsSystem32winevtLogs
Windows 10: C:WindowsSystem32winevtLogs
Windows 10: C:WindowsSystem32winevtLogs
Windows 10: C:WindowsSystem32winevtLogs
Windows 10: C:WindowsSystem32winevtLogs
Windows 10: C:WindowsSystem32winevtLogs
Windows 10: C:WindowsSystem32winevtLogs
Windows 10: C:WindowsSystem32winevtLogs
Windows 10: C:WindowsSystem32winevtLogs
Windows 10: C:WindowsSystem32winevtLogs
Windows 10: C:WindowsSystem32winevtLogs
Windows 10: C:WindowsSystem32winevtLogs
Windows 10: C:WindowsSystem32winevtLogs
Windows 10: C:WindowsSystem32winevtLogs
Windows 10: C:WindowsSystem32winevtLogs
Windows 10: C:WindowsSystem32winevtLogs
Windows 10: C:WindowsSystem32winevtLogs
Windows 10: C:WindowsSystem32winevtLogs
Windows 10: C:WindowsSystem32winevtLogs
Windows 10: C:WindowsSystem32winevtLogs
Windows 10: C:WindowsSystem32winevtLogs
Windows 10: C:WindowsSystem32winevtLogs
Windows 10: C:WindowsSystem32winevtLogs
Windows 10: C:WindowsSystem32winevtLogs
Windows 10: C:WindowsSystem32winevtLogs
Windows 10: C:WindowsSystem32winevtLogs
Windows 10: C:WindowsSystem32winevtLogs
Windows 10: C:WindowsSystem32winevtLogs
Windows 10: C:WindowsSystem32winevtLogs
Windows 10: C:WindowsSystem32winevtLogs
Windows 10: C:WindowsSystem32winevtLogs
Windows 10: C:WindowsSystem32winevtLogs
Windows 10: C:WindowsSystem32winevtLogs
Windows 10: C:WindowsSystem32winevtLogs
Windows 10: C:WindowsSystem32winevtLogs
Windows 10: C:WindowsSystem32winevtLogs
Windows 10: C:WindowsSystem32winevtLogs
Windows 10: C:WindowsSystem32winevtLogs
Windows 10: C:WindowsSystem32winevtLogs
Windows 10: C:WindowsSystem32winevtLogs
Windows 10: C:WindowsSystem32winevtLogs
Windows 10: C:WindowsSystem32winevtLogs
Windows 10: C:WindowsSystem32winevtLogs
Windows 10: C:WindowsSystem32winevtLogs
Windows 10: C:WindowsSystem32winevtLogs
Windows 10: C:WindowsSystem32winevtLogs
Windows 10: C:WindowsSystem32winevtLogs
Windows 10: C:WindowsSystem32winevtLogs
Windows 10: C:WindowsSystem32winevtLogs
Windows 10: C:WindowsSystem32winevtLogs
Windows 10: C:WindowsSystem32winevtLogs
Windows 10: C:WindowsSystem32winevtLogs
Windows 10: C:WindowsSystem32winevtLogs
Windows 10: C:WindowsSystem32winevtLogs
Windows 10: C:WindowsSystem32winevtLogs
Windows 10: C:WindowsSystem32winevtLogs
Windows 10: C:WindowsSystem32winevtLogs
Windows 10: C:WindowsSystem32winevtLogs
Windows 10: C:WindowsSystem32winevtLogs
Windows 10: C:WindowsSystem32winevtLogs
Windows 10: C:WindowsSystem32winevtLogs
Windows 10: C:WindowsSystem32winevtLogs
Windows 10: C:WindowsSystem32winevtLogs
Windows 10: C:WindowsSystem32winevtLogs
Windows 10: C:WindowsSystem32winevtLogs
Windows 10: C:WindowsSystem32winevtLogs
Windows 10: C:WindowsSystem32winevtLogs
Windows 10: C:WindowsSystem32winevtLogs
Windows 10: C:WindowsSystem32winevtLogs
Windows 10: C:WindowsSystem32winevtLogs
Windows 10: C:WindowsSystem32winevtLogs
Windows 10: C:WindowsSystem32winevtLogs
Windows 10: C:WindowsSystem32winevtLogs
Windows 10: C:WindowsSystem32winevtLogs
Windows 10: C:WindowsSystem32winevtLogs
Windows 10: C:WindowsSystem32winevtLogs
Windows 10: C:WindowsSystem32winevtLogs
Windows 10: C:WindowsSystem32winevtLogs
Windows 10: C:WindowsSystem32winevtLogs
Windows 10: C:WindowsSystem32winevtLogs
Windows 10: C:WindowsSystem32winevtLogs
Windows 10: C:WindowsSystem32winevtLogs
Windows 10: C:WindowsSystem32winevtLogs
Windows 10: C:WindowsSystem32winevtLogs
Windows 10: C:WindowsSystem32winevtLogs
Windows 10: C:WindowsSystem32winevtLogs
Windows 10: C:WindowsSystem32winevtLogs
Windows 10: C:WindowsSystem32winevtLogs
Windows 10: C:WindowsSystem32winevtLogs
Windows 10: C:WindowsSystem32winevtLogs
Windows 10: C:WindowsSystem32winevtLogs
Windows 10: C:WindowsSystem32winevtLogs
Windows 10: C:WindowsSystem32winevtLogs
Windows 10: C:WindowsSystem32winevtLogs
Windows 10: C:WindowsSystem32winevtLogs
Windows 10: C:WindowsSystem32winevtLogs
Windows 10: C:WindowsSystem32winevtLogs
Windows 10: C:WindowsSystem32winevtLogs
Windows 10: C:WindowsSystem32winevtLogs
Windows 10: C:WindowsSystem32winevtLogs
Windows 10: C:WindowsSystem32winevtLogs
Windows 10: C:WindowsSystem32winevtLogs
Windows 10: C:WindowsSystem32winevtLogs
Windows 10: C:WindowsSystem32winevtLogs
Windows 10: C:WindowsSystem32winevtLogs
Windows 10: C:WindowsSystem32winevtLogs
Windows 10: C:WindowsSystem32winevtLogs
Windows 10: C:WindowsSystem32winevtLogs
Windows 10: C:WindowsSystem32winevtLogs
Windows 10: C:WindowsSystem32winevtLogs
Windows 10: C:WindowsSystem32winevtLogs
Windows 10: C:WindowsSystem32winevtLogs
Windows 10: C:WindowsSystem32winevtLogs
Windows 10: C:WindowsSystem32winevtLogs
Windows 10: C:WindowsSystem32winevtLogs
Windows 10: C:WindowsSystem32winevtLogs
Windows 10: C:WindowsSystem32winevtLogs
Windows 10: C:WindowsSystem32winevtLogs
Windows 10: C:WindowsSystem32winevtLogs
Windows 10: C:WindowsSystem32winevtLogs
Windows 10: C:WindowsSystem32winevtLogs
Windows 10: C:WindowsSystem32winevtLogs
Windows 10: C:WindowsSystem32winevtLogs
Windows 10: C:WindowsSystem32winevtLogs
Windows 10: C:WindowsSystem32winevtLogs
Windows 10: C:WindowsSystem32winevtLogs
Windows 10: C:WindowsSystem32winevtLogs
Windows 10: C:WindowsSystem32winevtLogs
Windows 10: C:WindowsSystem32winevtLogs
Windows 10: C:WindowsSystem32winevtLogs
Windows 10: C:WindowsSystem32winevtLogs
Windows 10: C:WindowsSystem32winevtLogs
Windows 10: C:WindowsSystem32winevtLogs
Windows 10: C:WindowsSystem32winevtLogs
Windows 10: C:WindowsSystem32winevtLogs
Windows 10: C:WindowsSystem32winevtLogs
Windows 10: C:WindowsSystem32winevtLogs
Windows 10: C:WindowsSystem32winevtLogs
Windows 10: C:WindowsSystem32winevtLogs
Windows 10: C:WindowsSystem32winevtLogs
Windows 10: C:WindowsSystem32winevtLogs
Windows 10: C:WindowsSystem32winevtLogs
Windows 10: C:WindowsSystem32winevtLogs
Windows 10: C:WindowsSystem32winevtLogs
Windows 10: C:WindowsSystem32winevtLogs
Windows 10: C:WindowsSystem32winevtLogs
Windows 10: C:WindowsSystem32winevtLogs
Windows 10: C:WindowsSystem32winevtLogs
Windows 10: C:WindowsSystem32winevtLogs
Windows 10: C:WindowsSystem32winevtLogs
Windows 10: C:WindowsSystem32winevtLogs
Windows 10: C:WindowsSystem32winevtLogs
Windows 10: C:WindowsSystem32winevtLogs
Windows 10: C:WindowsSystem32winevtLogs
Windows 10: C:WindowsSystem32winevtLogs
Windows 10: C:WindowsSystem32winevtLogs
Windows 10: C:WindowsSystem32winevtLogs
Windows 10: C:WindowsSystem32winevtLogs
Windows 10: C:WindowsSystem32winevtLogs
Windows 10: C:WindowsSystem32winevtLogs
Windows 10: C:WindowsSystem32winevtLogs
Windows 10: C:WindowsSystem32winevtLogs
Windows 10: C:WindowsSystem32winevtLogs
Windows 10: C:WindowsSystem32winevtLogs
Windows 10: C:WindowsSystem32winevtLogs
Windows 10: C:WindowsSystem32winevtLogs
Windows 10: C:WindowsSystem32winevtLogs
Windows 10: C:WindowsSystem32winevtLogs
Windows 10: C:WindowsSystem32winevtLogs
Windows 10: C:WindowsSystem32winevtLogs
Windows 10: C:WindowsSystem32winevtLogs
Windows 10: C:WindowsSystem32winevtLogs
Windows 10: C:WindowsSystem32winevtLogs
Windows 10: C:WindowsSystem32winevtLogs
Windows 10: C:WindowsSystem32winevtLogs
Windows 10: C:WindowsSystem32winevtLogs
Windows 10: C:WindowsSystem32winevtLogs
Windows 10: C:WindowsSystem32winevtLogs
Windows 10: C:WindowsSystem32winevtLogs
Windows 10: C:WindowsSystem32winevtLogs
Windows 10: C:WindowsSystem32winevtLogs
Windows 10: C:WindowsSystem32winevtLogs
Windows 10: C:WindowsSystem32winevtLogs
Windows 10: C:WindowsSystem32winevtLogs
Windows 10: C:WindowsSystem32winevtLogs
Windows 10: C:WindowsSystem32winevtLogs
Windows 10: C:WindowsSystem32winevtLogs
Windows 10: C:WindowsSystem32winevtLogs
Windows 10: C:WindowsSystem32winevtLogs
Windows 10: C:WindowsSystem32winevtLogs
Windows 10: C:WindowsSystem32winevtLogs
Windows 10: C:WindowsSystem32winevtLogs
Windows 10: C:WindowsSystem32winevtLogs
Windows 10: C:WindowsSystem32winevtLogs
Windows 10: C:WindowsSystem32winevtLogs
Windows 10: C:WindowsSystem32winevtLogs
Windows 10: C:WindowsSystem32winevtLogs
Windows 10: C:WindowsSystem32winevtLogs
Windows 10: C:WindowsSystem32winevtLogs
Windows 10: C:WindowsSystem32winevtLogs
Windows 10: C:WindowsSystem32winevtLogs
Windows 10: C:WindowsSystem32winevtLogs
Windows 10: C:WindowsSystem32winevtLogs
Windows 10: C:WindowsSystem32winevtLogs
Windows 10: C:WindowsSystem32winevtLogs
Windows 10: C:WindowsSystem32winevtLogs
Windows 10: C:WindowsSystem32winevtLogs
Windows 10: C:WindowsSystem32winevtLogs
Windows 10: C:WindowsSystem32winevtLogs
Windows 10: C:WindowsSystem32winevtLogs
Windows 10: C:WindowsSystem32winevtLogs
Windows 10: C:WindowsSystem32winevtLogs
Windows 10: C:WindowsSystem32winevtLogs
Windows 10: C:WindowsSystem32winevtLogs
Windows 10: C:WindowsSystem32winevtLogs
Windows 10: C:WindowsSystem32winevtLogs
Windows 10: C:WindowsSystem32winevtLogs
Windows 10: C:WindowsSystem32winevtLogs
Windows 10: C:WindowsSystem32winevtLogs
Windows 10: C:WindowsSystem32winevtLogs
Windows 10: C:WindowsSystem32winevtLogs
Windows 10: C:WindowsSystem32winevtLogs
Windows 10: C:WindowsSystem32winevtLogs
Windows 10: C:WindowsSystem32winevtLogs
Windows 10: C:WindowsSystem32winevtLogs
Windows 10: C:WindowsSystem32winevtLogs
Windows 10: C:WindowsSystem32winevtLogs
Windows 10: C:WindowsSystem32winevtLogs
Windows 10: C:WindowsSystem32winevtLogs
Windows 10: C:WindowsSystem32winevtLogs
Windows 10: C:WindowsSystem32winevtLogs
Windows 10: C:WindowsSystem32winevtLogs
Windows 10: C:WindowsSystem32winevtLogs
Windows 10: C:WindowsSystem32winevtLogs
Windows 10: C:WindowsSystem32winevtLogs
Windows 10: C:WindowsSystem32winevtLogs
Windows 10: C:WindowsSystem32winevtLogs
Windows 10: C:WindowsSystem32winevtLogs
Windows 10: C:WindowsSystem32winevtLogs
Windows 10: C:WindowsSystem32winevtLogs
Windows 10: C:WindowsSystem32winevtLogs
Windows 10: C:WindowsSystem32winevtLogs
Windows 10: C:WindowsSystem32winevtLogs
Windows 10: C:WindowsSystem32winevtLogs
Windows 10: C:WindowsSystem32winevtLogs
Windows 10: C:WindowsSystem32winevtLogs
Windows 10: C:WindowsSystem32winevtLogs
Windows 10: C:WindowsSystem32winevtLogs
Windows 10: C:WindowsSystem32winevtLogs
Windows 10: C:WindowsSystem32winevtLogs
Windows 10: C:WindowsSystem32winevtLogs
Windows 10: C:WindowsSystem32winevtLogs
Windows 10: C:WindowsSystem32winevtLogs
Windows 10: C:WindowsSystem32winevtLogs
Windows 10: C:WindowsSystem32winevtLogs
Windows 10: C:WindowsSystem32winevtLogs
Windows 10: C:WindowsSystem32winevtLogs
Windows 10: C:WindowsSystem32winevtLogs
Windows 10: C:WindowsSystem32winevtLogs
Windows 10: C:WindowsSystem32winevtLogs
Windows 10: C:WindowsSystem32winevtLogs
Windows 10: C:WindowsSystem32winevtLogs
Windows 10: C:WindowsSystem32winevtLogs
Windows 10: C:WindowsSystem32winevtLogs
Windows 10: C:WindowsSystem32winevtLogs
Windows 10: C:WindowsSystem32winevtLogs
Windows 10: C:WindowsSystem32winevtLogs
Windows 10: C:WindowsSystem32winevtLogs
Windows 10: C:WindowsSystem32winevtLogs
Windows 10: C:WindowsSystem32winevtLogs
Windows 10: C:WindowsSystem32winevtLogs
Windows 10: C:WindowsSystem32winevtLogs
Windows 10: C:WindowsSystem32winevtLogs
Windows 10: C:WindowsSystem32winevtLogs
Windows 10: C:WindowsSystem32winevtLogs
Windows 10: C:WindowsSystem32winevtLogs
Windows 10: C:WindowsSystem32winevtLogs
Windows 10: C:WindowsSystem32winevtLogs
Windows 10: C:WindowsSystem32winevtLogs
Windows 10: C:WindowsSystem32winevtLogs
Windows 10: C:WindowsSystem32winevtLogs
Windows 10: C:WindowsSystem32winevtLogs
Windows 10: C:WindowsSystem32winevtLogs
Windows 10: C:WindowsSystem32winevtLogs
Windows 10: C:WindowsSystem32winevtLogs
Windows 10: C:WindowsSystem32winevtLogs
Windows 10: C:WindowsSystem32winevtLogs
Windows 10: C:WindowsSystem32winevtLogs
Windows 10: C:WindowsSystem32winevtLogs
Windows 10: C:WindowsSystem32winevtLogs
Windows 10: C:WindowsSystem32winevtLogs
Windows 10: C:WindowsSystem32winevtLogs
Windows 10: C:WindowsSystem32winevtLogs
Windows 10: C:WindowsSystem32winevtLogs
Windows 10: C:WindowsSystem32winevtLogs
Windows 10: C:WindowsSystem32winevtLogs
Windows 10: C:WindowsSystem32winevtLogs
Windows 10: C:WindowsSystem32winevtLogs
Windows 10: C:WindowsSystem32winevtLogs
Windows 10: C:WindowsSystem32winevtLogs
Windows 10: C:WindowsSystem32winevtLogs
Windows 10: C:WindowsSystem32winevtLogs
Windows 10: C:WindowsSystem32winevtLogs
Windows 10: C:WindowsSystem32winevtLogs
Windows 10: C:WindowsSystem32winevtLogs
Windows 10: C:WindowsSystem32winevtLogs
Windows 10: C:WindowsSystem32winevtLogs
Windows 10: C:WindowsSystem32winevtLogs
Windows 10: C:WindowsSystem32winevtLogs
Windows 10: C:WindowsSystem32winevtLogs
Windows 10: C:WindowsSystem32winevtLogs
Windows 10: C:WindowsSystem32winevtLogs
Windows 10: C:WindowsSystem32winevtLogs
Windows 10: C:WindowsSystem32winevtLogs
Windows 10: C:WindowsSystem32winevtLogs
Windows 10: C:WindowsSystem32winevtLogs
Windows 10: C:WindowsSystem32winevtLogs
Windows 10: C:WindowsSystem32winevtLogs
Windows 10: C:WindowsSystem32winevtLogs
Windows 10: C:WindowsSystem32winevtLogs
Windows 10: C:WindowsSystem32winevtLogs
Windows 10: C:WindowsSystem32winevtLogs
Windows 10: C:WindowsSystem32winevtLogs
Windows 10: C:WindowsSystem32winevtLogs
Windows 10: C:WindowsSystem32winevtLogs
Windows 10: C:WindowsSystem32winevtLogs
Windows 10: C:WindowsSystem32winevtLogs
Windows 10: C:WindowsSystem32winevtLogs
Windows 10: C:WindowsSystem32winevtLogs
Windows 10: C:WindowsSystem32winevtLogs
Windows 10: C:WindowsSystem32winevtLogs
Windows 10: C:WindowsSystem32winevtLogs
Windows 10: C:WindowsSystem32winevtLogs
Windows 10: C:WindowsSystem32winevtLogs
Windows 10: C:WindowsSystem32winevtLogs
Windows 10: C:WindowsSystem32winevtLogs
Windows 10: C:WindowsSystem32winevtLogs
Windows 10: C:WindowsSystem32winevtLogs
Windows 10: C:WindowsSystem32winevtLogs
Windows 10: C:WindowsSystem32winevtLogs
Windows 10: C:WindowsSystem32winevtLogs
Windows 10: C:WindowsSystem32winevtLogs
Windows 10: C:WindowsSystem32winevtLogs
Windows 10: C:WindowsSystem32winevtLogs
Windows 10: C:WindowsSystem32winevtLogs
Windows 10: C:WindowsSystem32winevtLogs
Windows 10: C:WindowsSystem32winevtLogs
Windows 10: C:WindowsSystem32winevtLogs
Windows 10: C:WindowsSystem32winevtLogs
Windows 10: C:WindowsSystem32winevtLogs
Windows 10: C:WindowsSystem32winevtLogs
Windows 10: C:WindowsSystem32winevtLogs
Windows 10: C:WindowsSystem32winevtLogs
Windows 10: C:WindowsSystem32winevtLogs
Windows 10: C:WindowsSystem32winevtLogs
Windows 10: C:WindowsSystem32winevtLogs
Windows 10: C:WindowsSystem32winevtLogs
Windows 10: C:WindowsSystem32winevtLogs
Windows 10: C:WindowsSystem32winevtLogs
Windows 10: C:WindowsSystem32winevtLogs
Windows 10: C:WindowsSystem32winevtLogs
Windows 10: C:WindowsSystem32winevtLogs
Windows 10: C:WindowsSystem32winevtLogs
Windows 10: C:WindowsSystem32winevtLogs
Windows 10: C:WindowsSystem32winevtLogs
Windows 10: C:WindowsSystem32winevtLogs
Windows 10: C:WindowsSystem32winevtLogs
Windows 10: C:WindowsSystem32winevtLogs
Windows 10: C:WindowsSystem32winevtLogs
Windows 10: C:WindowsSystem32winevtLogs
Windows 10: C:WindowsSystem32winevtLogs
Windows 10: C:WindowsSystem32winevtLogs
Windows 10: C:WindowsSystem32winevtLogs
Windows 10: C:WindowsSystem32winevtLogs
Windows 10: C:WindowsSystem32winevtLogs
Windows 10: C:WindowsSystem32winevtLogs
Windows 10: C:WindowsSystem32winevtLogs
Windows 10: C:WindowsSystem32winevtLogs
Windows 10: C:WindowsSystem32winevtLogs
Windows 10: C:WindowsSystem32winevtLogs
Windows 10: C:WindowsSystem32winevtLogs
Windows 10: C:WindowsSystem32winevtLogs
Windows 10: C:WindowsSystem32winevtLogs
Windows 10: C:WindowsSystem32winevtLogs
Windows 10: C:WindowsSystem32winevtLogs
Windows 10: C:WindowsSystem32winevtLogs
Windows 10: C:WindowsSystem32winevtLogs
Windows 10: C:WindowsSystem32winevtLogs
Windows 10: C:WindowsSystem32winevtLogs
Windows 10: C:WindowsSystem32winevtLogs
Windows 10: C:WindowsSystem32winevtLogs
Windows 10: C:WindowsSystem32winevtLogs
Windows 10: C:WindowsSystem32winevtLogs
Windows 10: C:WindowsSystem32winevtLogs
Windows 10: C:WindowsSystem32winevtLogs
Windows 10: C:WindowsSystem32winevtLogs
Windows 10: C:WindowsSystem32winevtLogs
Windows 10: C:WindowsSystem32winevtLogs
Windows 10: C:WindowsSystem32winevtLogs
Windows 10: C:WindowsSystem32winevtLogs
Windows 10: C:WindowsSystem32winevtLogs
Windows 10: C:WindowsSystem32winevtLogs
Windows 10: C:WindowsSystem32winevtLogs
Windows 10: C:WindowsSystem32winevtLogs
Windows 10: C:WindowsSystem32winevtLogs
Windows 10: C:WindowsSystem32winevtLogs
Windows 10: C:WindowsSystem32winevtLogs
Windows 10: C:WindowsSystem32winevtLogs
Windows 10: C:WindowsSystem32winevtLogs
Windows 10: C:WindowsSystem32winevtLogs
Windows 10: C:WindowsSystem32winevtLogs
Windows 10: C:WindowsSystem32winevtLogs
Windows 10: C:WindowsSystem32winevtLogs
Windows 10: C:WindowsSystem32winevtLogs
Windows 10: C:WindowsSystem32winevtLogs
Windows 10: C:WindowsSystem32winevtLogs
Windows 10: C:WindowsSystem32winevtLogs
Windows 10: C:WindowsSystem32winevtLogs
Windows 10: C:WindowsSystem32winevtLogs
Windows 10: C:WindowsSystem32winevtLogs
Windows 10: C:WindowsSystem32winevtLogs
Windows 10: C:WindowsSystem32winevtLogs
Windows 10: C:WindowsSystem32winevtLogs
Windows 10: C:WindowsSystem32winevtLogs
Windows 10: C:WindowsSystem32winevtLogs
Windows 10: C:WindowsSystem32winevtLogs
Windows 10: C:WindowsSystem32winevtLogs
Windows 10: C:WindowsSystem32winevtLogs
Windows 10: C:WindowsSystem32winevtLogs
Windows 10: C:WindowsSystem32winevtLogs
Windows 10: C:WindowsSystem32winevtLogs
Windows 10: C:WindowsSystem32winevtLogs
Windows 10: C:WindowsSystem32winevtLogs
Windows 10: C:WindowsSystem32winevtLogs
Windows 10: C:WindowsSystem32winevtLogs
Windows 10: C:WindowsSystem32winevtLogs
Windows 10: C:WindowsSystem32winevtLogs
Windows 10: C:WindowsSystem32winevtLogs
Windows 10: C:WindowsSystem32winevtLogs
Windows 10: C:WindowsSystem32winevtLogs
Windows 10: C:WindowsSystem32winevtLogs
Windows 10: C:WindowsSystem32winevtLogs
Windows 10: C:WindowsSystem32winevtLogs
Windows 10: C:WindowsSystem32winevtLogs
Windows 10: C:WindowsSystem32winevtLogs
Windows 10: C:WindowsSystem32winevtLogs
Windows 10: C:WindowsSystem32winevtLogs
Windows 10: C:WindowsSystem32winevtLogs
Windows 10: C:WindowsSystem32winevtLogs
Windows 10: C:WindowsSystem32winevtLogs
Windows 10: C:WindowsSystem32winevtLogs
Windows 10: C:WindowsSystem32winevtLogs
Windows 10: C:WindowsSystem32winevtLogs
Windows 10: C:WindowsSystem32winevtLogs
Windows 10: C:WindowsSystem32winevtLogs
Windows 10: C:WindowsSystem32winevtLogs
Windows 10: C:WindowsSystem32winevtLogs
Windows 10: C:WindowsSystem32winevtLogs
Windows 10: C:WindowsSystem32winevtLogs
Windows 10: C:WindowsSystem32winevtLogs
Windows 10: C:WindowsSystem32winevtLogs
Windows 10: C:WindowsSystem32winevtLogs
Windows 10: C:WindowsSystem32winevtLogs
Windows 10: C:WindowsSystem32winevtLogs
Windows 10: C:WindowsSystem32winevtLogs
Windows 10: C:WindowsSystem32winevtLogs
Windows 10: C:WindowsSystem32winevtLogs
Windows 10: C:WindowsSystem32winevtLogs
Windows 10: C:WindowsSystem32winevtLogs
Windows 10: C:WindowsSystem32winevtLogs
Windows 10: C:WindowsSystem32winevtLogs
Windows 10: C:WindowsSystem32winevtLogs
Windows 10: C:WindowsSystem32winevtLogs
Windows 10: C:WindowsSystem32winevtLogs
Windows 10: C:WindowsSystem32winevtLogs
Windows 10: C:WindowsSystem32winevtLogs
Windows 10: C:WindowsSystem32winevtLogs
Windows 10: C:WindowsSystem32winevtLogs
Windows 10: C:WindowsSystem32winevtLogs
Windows 10: C:WindowsSystem32winevtLogs
Windows 10: C:WindowsSystem32winevtLogs
Windows 10: C:WindowsSystem32winevtLogs
Windows 10: C:WindowsSystem32winevtLogs
Windows 10: C:WindowsSystem32winevtLogs
Windows 10: C:WindowsSystem32winevtLogs
Windows 10: C:WindowsSystem32winevtLogs
Windows 10: C:WindowsSystem32winevtLogs
Windows 10: C:WindowsSystem32winevtLogs
Windows 10: C:WindowsSystem32winevtLogs
Windows 10: C:WindowsSystem32winevtLogs
Windows 10: C:WindowsSystem32winevtLogs
Windows 10: C:WindowsSystem32winevtLogs
Windows 10: C:WindowsSystem32winevtLogs
Windows 10: C:WindowsSystem32winevtLogs
Windows 10: C:WindowsSystem32winevtLogs
Windows 10: C:WindowsSystem32winevtLogs
Windows 10: C:WindowsSystem32winevtLogs
Windows 10: C:WindowsSystem32winevtLogs
Windows 10: C:WindowsSystem32winevtLogs
Windows 10: C:WindowsSystem32winevtLogs
Windows 10: C:WindowsSystem32winevtLogs
Windows 10: C:WindowsSystem32winevtLogs
Windows 10: C:WindowsSystem32winevtLogs
Windows 10: C:WindowsSystem32winevtLogs
Windows 10: C:WindowsSystem32winevtLogs
Windows 10: C:WindowsSystem32winevtLogs
Windows 10: C:WindowsSystem32winevtLogs
Windows 10: C:WindowsSystem32winevtLogs
Windows 10: C:WindowsSystem32winevtLogs
Windows 10: C:WindowsSystem32winevtLogs
Windows 10: C:WindowsSystem32winevtLogs
Windows 10: C:WindowsSystem32winevtLogs
Windows 10: C:WindowsSystem32winevtLogs
Windows 10: C:WindowsSystem32winevtLogs
Windows 10: C:WindowsSystem32winevtLogs
Windows 10: C:WindowsSystem32winevtLogs
Windows 10: C:WindowsSystem32winevtLogs
Windows 10: C:WindowsSystem32winevtLogs
Windows 10: C:WindowsSystem32winevtLogs
Windows 10: C:WindowsSystem32winevtLogs
Windows 10: C:WindowsSystem32winevtLogs
Windows 10: C:WindowsSystem32winevtLogs
Windows 10: C:WindowsSystem32winevtLogs
Windows 10: C:WindowsSystem32winevtLogs
Windows 10: C:WindowsSystem32winevtLogs
Windows 10: C:WindowsSystem32winevtLogs
Windows 10: C:WindowsSystem32winevtLogs
Windows 10: C:WindowsSystem32winevtLogs
Windows 10: C:WindowsSystem32winevtLogs
Windows 10: C:WindowsSystem32winevtLogs
Windows 10: C:WindowsSystem32winevtLogs
Windows 10: C:WindowsSystem32winevtLogs
Windows 10: C:WindowsSystem32winevtLogs
Windows 10: C:WindowsSystem32winevtLogs
Windows 10: C:WindowsSystem32winevtLogs
Windows 10: C:WindowsSystem32winevtLogs
Windows 10: C:WindowsSystem32winevtLogs
Windows 10: C:WindowsSystem32winevtLogs
Windows 10: C:WindowsSystem32winevtLogs
Windows 10: C:WindowsSystem32winevtLogs
Windows 10: C:WindowsSystem32winevtLogs
Windows 10: C:WindowsSystem32winevtLogs
Windows 10: C:WindowsSystem32winevtLogs
Windows 10: C:WindowsSystem32winevtLogs
Windows 10: C:WindowsSystem32winevtLogs
Windows 10: C:WindowsSystem32winevtLogs
Windows 10: C:WindowsSystem32winevtLogs
Windows 10: C:WindowsSystem32winevtLogs
Windows 10: C:WindowsSystem32winevtLogs
Windows 10: C:WindowsSystem32winevtLogs
Windows 10: C:WindowsSystem32winevtLogs
Windows 10: C:WindowsSystem32winevtLogs
Windows 10: C:WindowsSystem32winevtLogs
Windows 10: C:WindowsSystem32winevtLogs
Windows 10: C:WindowsSystem32winevtLogs
Windows 10: C:WindowsSystem32winevtLogs
Windows 10: C:WindowsSystem32winevtLogs
Windows 10: C:WindowsSystem32winevtLogs
Windows 10: C:WindowsSystem32winevtLogs
Windows 10: C:WindowsSystem32winevtLogs
Windows 10: C:WindowsSystem32winevtLogs
Windows 10: C:WindowsSystem32winevtLogs
Windows 10: C:WindowsSystem32winevtLogs
Windows 10: C:WindowsSystem32winevtLogs
Windows 10: C:WindowsSystem32winevtLogs
Windows 10: C:WindowsSystem32winevtLogs
Windows 10: C:WindowsSystem32winevtLogs
Windows 10: C:WindowsSystem32winevtLogs
Windows 10: C:WindowsSystem32winevtLogs
Windows 10: C:WindowsSystem32winevtLogs
Windows 10: C:WindowsSystem32winevtLogs
Windows 10: C:WindowsSystem32winevtLogs
Windows 10: C:WindowsSystem32winevtLogs
Windows 10: C:WindowsSystem32winevtLogs
Windows 10: C:WindowsSystem32winevtLogs
Windows 10: C:WindowsSystem32winevtLogs
Windows 10: C:WindowsSystem32winevtLogs
Windows 10: C:WindowsSystem32winevtLogs
Windows 10: C:WindowsSystem32winevtLogs
Windows 10: C:WindowsSystem32winevtLogs
Windows 10: C:WindowsSystem32winevtLogs
Windows 10: C:WindowsSystem32winevtLogs
Windows 10: C:WindowsSystem32winevtLogs
Windows 10: C:WindowsSystem32winevtLogs
Windows 10: C:WindowsSystem32winevtLogs
Windows 10: C:WindowsSystem32winevtLogs
Windows 10: C:WindowsSystem32winevtLogs
Windows 10: C:WindowsSystem32winevtLogs
Windows 10: C:WindowsSystem32winevtLogs
Windows 10: C:WindowsSystem32winevtLogs
Windows 10: C:WindowsSystem32winevtLogs
Windows 10: C:WindowsSystem32winevtLogs
Windows 10: C:WindowsSystem32winevtLogs
Windows 10: C:WindowsSystem32winevtLogs
Windows 10: C:WindowsSystem32winevtLogs
Windows 10: C:WindowsSystem32winevtLogs
Windows 10: C:WindowsSystem32winevtLogs
Windows 10: C:WindowsSystem32winevtLogs
Windows 10: C:WindowsSystem32winevtLogs
Windows 10: C:WindowsSystem32winevtLogs
Windows 10: C:WindowsSystem32winevtLogs
Windows 10: C:WindowsSystem32winevtLogs
Windows 10: C:WindowsSystem32winevtLogs
Windows 10: C:WindowsSystem32winevtLogs
Windows 10: C:WindowsSystem32winevtLogs
Windows 10: C:WindowsSystem32winevtLogs
Windows 10: C:WindowsSystem32winevtLogs
Windows 10: C:WindowsSystem32winevtLogs
Windows 10: C:WindowsSystem32winevtLogs
Windows 10: C:WindowsSystem32winevtLogs
Windows 10: C:WindowsSystem32winevtLogs
Windows 10: C:WindowsSystem32winevtLogs
Windows 10: C:WindowsSystem32winevtLogs
Windows 10: C:WindowsSystem32winevtLogs
Windows 10: C:WindowsSystem32winevtLogs
Windows 10: C:WindowsSystem32winevtLogs
Windows 10: C:WindowsSystem32winevtLogs
Windows 10: C:WindowsSystem32winevtLogs
Windows 10: C:WindowsSystem32winevtLogs
Windows 10: C:WindowsSystem32winevtLogs
Windows 10: C:WindowsSystem32winevtLogs
Windows 10: C:WindowsSystem32winevtLogs
Windows 10: C:WindowsSystem32winevtLogs
Windows 10: C:WindowsSystem32winevtLogs
Windows 10: C:WindowsSystem32winevtLogs
Windows 10: C:WindowsSystem32winevtLogs
Windows 10: C:WindowsSystem32winevtLogs
Windows 10: C:WindowsSystem32winevtLogs
Windows 10: C:WindowsSystem32winevtLogs
Windows 10: C:WindowsSystem32winevtLogs
Windows 10: C:WindowsSystem32winevtLogs
Windows 10: C:WindowsSystem32winevtLogs
Windows 10: C:WindowsSystem32winevtLogs
Windows 10: C:WindowsSystem32winevtLogs
Windows 10: C:WindowsSystem32winevtLogs
Windows 10: C:WindowsSystem32winevtLogs
Windows 10: C:WindowsSystem32winevtLogs
Windows 10: C:WindowsSystem32winevtLogs
Windows 10: C:WindowsSystem32winevtLogs
Windows 10: C:WindowsSystem32winevtLogs
Windows 10: C:WindowsSystem32winevtLogs
Windows 10: C:WindowsSystem32winevtLogs
Windows 10: C:WindowsSystem32winevtLogs
Windows 10: C:WindowsSystem32winevtLogs
Windows 10: C:WindowsSystem32winevtLogs
Windows 10: C:WindowsSystem32winevtLogs
Windows 10: C:WindowsSystem32winevtLogs
Windows 10: C:WindowsSystem32winevtLogs
Windows 10: C:WindowsSystem32winevtLogs
Windows 10: C:WindowsSystem32winevtLogs
Windows 10: C:WindowsSystem32winevtLogs
Windows 10: C:WindowsSystem32winevtLogs
Windows 10: C:WindowsSystem32winevtLogs
Windows 10: C:WindowsSystem32winevtLogs
Windows 10: C:WindowsSystem32winevtLogs
Windows 10: C:WindowsSystem32winevtLogs
Windows 10: C:WindowsSystem32winevtLogs
Windows 10: C:WindowsSystem32winevtLogs
Windows 10: C:WindowsSystem32winevtLogs
Windows 10: C:WindowsSystem32winevtLogs
Windows 10: C:WindowsSystem32winevtLogs
Windows 10: C:WindowsSystem32winevtLogs
Windows 10: C:WindowsSystem32winevtLogs
Windows 10: C:WindowsSystem32winevtLogs
Windows 10: C:WindowsSystem32winevtLogs
Windows 10: C:WindowsSystem32winevtLogs
Windows 10: C:WindowsSystem32winevtLogs
Windows 10: C:WindowsSystem32winevtLogs
Windows 10: C:WindowsSystem32winevtLogs
Windows 10: C:WindowsSystem32winevtLogs
Windows 10: C:WindowsSystem32winevtLogs
Windows 10: C:WindowsSystem32winevtLogs
Windows 10: C:WindowsSystem32winevtLogs
Windows 10: C:WindowsSystem32winevtLogs
Windows 10: C:WindowsSystem32winevtLogs
Windows 10: C:WindowsSystem32winevtLogs
Windows 10: C:WindowsSystem32winevtLogs
Windows 10: C:WindowsSystem32winevtLogs
Windows 10: C:WindowsSystem32winevtLogs
Windows 10: C:WindowsSystem32winevtLogs
Windows 10: C:WindowsSystem32winevtLogs
Windows 10: C:WindowsSystem32winevtLogs
Windows 10: C:WindowsSystem32winevtLogs
Windows 10: C:WindowsSystem32winevtLogs
Windows 10: C:WindowsSystem32winevtLogs
Windows 10: C:WindowsSystem32winevtLogs
Windows 10: C:WindowsSystem32winevtLogs
Windows 10: C:WindowsSystem32winevtLogs
Windows 10: C:WindowsSystem32winevtLogs
Windows 10: C:WindowsSystem32winevtLogs
Windows 10: C:WindowsSystem32winevtLogs
Windows 10: C:WindowsSystem32winevtLogs
Windows 10: C:WindowsSystem32winevtLogs
Windows 10: C:WindowsSystem32winevtLogs
Windows 10: C:WindowsSystem32winevtLogs
Windows 10: C:WindowsSystem32winevtLogs
Windows 10: C:WindowsSystem32winevtLogs
Windows 10: C:WindowsSystem32winevtLogs
Windows 10: C:WindowsSystem32winevtLogs
Windows 10: C:WindowsSystem32winevtLogs
Windows 10: C:WindowsSystem32winevtLogs
Windows 10: C:WindowsSystem32winevtLogs
Windows 10: C:WindowsSystem32winevtLogs
Windows 10: C:WindowsSystem32winevtLogs
Windows 10: C:WindowsSystem32winevtLogs
Windows 10: C:WindowsSystem32winevtLogs
Windows 10: C:WindowsSystem32winevtLogs
Windows 10: C:WindowsSystem32winevtLogs
Windows 10: C:WindowsSystem32winevtLogs
Windows 10: C:WindowsSystem32winevtLogs
Windows 10: C:WindowsSystem32winevtLogs
Windows 10: C:WindowsSystem32winevtLogs
Windows 10: C:WindowsSystem32winevtLogs
Windows 10: C:WindowsSystem32winevtLogs
Windows 10: C:WindowsSystem32winevtLogs
Windows 10: C:WindowsSystem32winevtLogs
Windows 10: C:WindowsSystem32winevtLogs
Windows 10: C:WindowsSystem32winevtLogs
Windows 10: C:WindowsSystem32winevtLogs
Windows 10: C:WindowsSystem32winevtLogs
Windows 10: C:WindowsSystem32winevtLogs
Windows 10: C:WindowsSystem32winevtLogs
Windows 10: C:WindowsSystem32winevtLogs
Windows 10: C:WindowsSystem32winevtLogs
Windows 10: C:WindowsSystem32winevtLogs
Windows 10: C:WindowsSystem32winevtLogs
Windows 10: C:WindowsSystem32winevtLogs
Windows 10: C:WindowsSystem32winevtLogs
Windows 10: C:WindowsSystem32winevtLogs
Windows 10: C:WindowsSystem32winevtLogs
Windows 10: C:WindowsSystem32winevtLogs
Windows 10: C:WindowsSystem32winevtLogs
Windows 10: C:WindowsSystem32winevtLogs
Windows 10: C:WindowsSystem32winevtLogs
Windows 10: C:WindowsSystem32winevtLogs
Windows 10: C:WindowsSystem32winevtLogs
Windows 10: C:WindowsSystem32winevtLogs
Windows 10: C:WindowsSystem32winevtLogs
Windows 10: C:WindowsSystem32winevtLogs
Windows 10: C:WindowsSystem32winevtLogs
Windows 10: C:WindowsSystem32winevtLogs
Windows 10: C:WindowsSystem32winevtLogs
Windows 10: C:WindowsSystem32winevtLogs
Windows 10: C:WindowsSystem32winevtLogs
Windows 10: C:WindowsSystem32winevtLogs
Windows 10: C:WindowsSystem32winevtLogs
Windows 10: C:WindowsSystem32winevtLogs
Windows 10: C:WindowsSystem32winevtLogs
Windows 10: C:WindowsSystem32winevtLogs
Windows 10: C:WindowsSystem32winevtLogs
Windows 10: C:WindowsSystem32winevtLogs
Windows 10: C:WindowsSystem32winevtLogs
Windows 10: C:WindowsSystem32winevtLogs
Windows 10: C:WindowsSystem32winevtLogs
Windows 10: C:WindowsSystem32winevtLogs
Windows 10: C:WindowsSystem32winevtLogs
Windows 10: C:WindowsSystem32winevtLogs
Windows 10: C:WindowsSystem32winevtLogs
Windows 10: C:WindowsSystem32winevtLogs
Windows 10: C:WindowsSystem32winevtLogs
Windows 10: C:WindowsSystem32winevtLogs
Windows 10: C:WindowsSystem32winevtLogs
Windows 10: C:WindowsSystem32winevtLogs
Windows 10: C:WindowsSystem32winevtLogs
Windows 10: C:WindowsSystem32winevtLogs
Windows 10: C:WindowsSystem32winevtLogs
Windows 10: C:WindowsSystem32winevtLogs
Windows 10: C:WindowsSystem32winevtLogs
Windows 10: C:WindowsSystem32winevtLogs
Windows 10: C:WindowsSystem32winevtLogs
Windows 10: C:WindowsSystem32winevtLogs
Windows 10: C:WindowsSystem32winevtLogs
Windows 10: C:WindowsSystem32winevtLogs
Windows 10: C:WindowsSystem32winevtLogs
Windows 10: C:WindowsSystem32winevtLogs
Windows 10: C:WindowsSystem32winevtLogs
Windows 10: C:WindowsSystem32winevtLogs
Windows 10: C:WindowsSystem32winevtLogs
Windows 10: C:WindowsSystem32winevtLogs
Windows 10: C:WindowsSystem32winevtLogs
Windows 10: C:WindowsSystem32winevtLogs
Windows 10: C:WindowsSystem32winevtLogs
Windows 10: C:WindowsSystem32winevtLogs
Windows 10: C:WindowsSystem32winevtLogs
Windows 10: C:WindowsSystem32winevtLogs
Windows 10: C:WindowsSystem32winevtLogs
Windows 10: C:WindowsSystem32winevtLogs
Windows 10: C:WindowsSystem32winevtLogs
Windows 10: C:WindowsSystem32winevtLogs
Windows 10: C:WindowsSystem32winevtLogs
Windows 10: C:WindowsSystem32winevtLogs
Windows 10: C:WindowsSystem32winevtLogs
Windows 10: C:WindowsSystem32winevtLogs
Windows 10: C:WindowsSystem32winevtLogs
Windows 10: C:WindowsSystem32winevtLogs
Windows 10: C:WindowsSystem32winevtLogs
Windows 10: C:WindowsSystem32winevtLogs
Windows 10: C:WindowsSystem32winevtLogs
Windows 10: C:WindowsSystem32winevtLogs
Windows 10: C:WindowsSystem32winevtLogs
Windows 10: C:WindowsSystem32winevtLogs
Windows 10: C:WindowsSystem32winevtLogs
Windows 10: C:WindowsSystem32winevtLogs
Windows 10: C:WindowsSystem32winevtLogs
Windows 10: C:WindowsSystem32winevtLogs
Windows 10: C:WindowsSystem32winevtLogs
Windows 10: C:WindowsSystem32winevtLogs
Windows 10: C:WindowsSystem32winevtLogs
Windows 10: C:WindowsSystem32winevtLogs
Windows 10: C:WindowsSystem32winevtLogs
Windows 10: C:WindowsSystem32winevtLogs
Windows 10: C:WindowsSystem32winevtLogs
Windows 10: C:WindowsSystem32winevtLogs
Windows 10: C:WindowsSystem32winevtLogs
Windows 10: C:WindowsSystem32winevtLogs
Windows 10: C:WindowsSystem32winevtLogs
Windows 10: C:WindowsSystem32winevtLogs
Windows 10: C:WindowsSystem32winevtLogs
Windows 10: C:WindowsSystem32winevtLogs
Windows 10: C:WindowsSystem32winevtLogs
Windows 10: C:WindowsSystem32winevtLogs
Windows 10: C:WindowsSystem32winevtLogs
Windows 10: C:WindowsSystem32winevtLogs
Windows 10: C:WindowsSystem32winevtLogs
Windows 10: C:WindowsSystem32winevtLogs
Windows 10: C:WindowsSystem32winevtLogs
Windows 10: C:WindowsSystem32winevtLogs
Windows 10: C:WindowsSystem32winevtLogs
Windows 10: C:WindowsSystem32winevtLogs
Windows 10: C:WindowsSystem32winevtLogs
Windows 10: C:WindowsSystem32winevtLogs
Windows 10: C:WindowsSystem32winevtLogs
Windows 10: C:WindowsSystem32winevtLogs
Windows 10: C:WindowsSystem32winevtLogs
Windows 10: C:WindowsSystem32winevtLogs
Windows 10: C:WindowsSystem32winevtLogs
Windows 10: C:WindowsSystem32winevtLogs
Windows 10: C:WindowsSystem32winevtLogs
Windows 10: C:WindowsSystem32winevtLogs
Windows 10: C:WindowsSystem32winevtLogs
Windows 10: C:WindowsSystem32winevtLogs
Windows 10: C:WindowsSystem32winevtLogs
Windows 10: C:WindowsSystem32winevtLogs
Windows 10: C:WindowsSystem32winevtLogs
Windows 10: C:WindowsSystem32winevtLogs
Windows 10: C:WindowsSystem32winevtLogs
Windows 10: C:WindowsSystem32winevtLogs
Windows 10: C:WindowsSystem32winevtLogs
Windows 10: C:WindowsSystem32winevtLogs
Windows 10: C:WindowsSystem32winevtLogs
Windows 10: C:WindowsSystem32winevtLogs
Windows 10: C:WindowsSystem32winevtLogs
Windows 10: C:WindowsSystem32winevtLogs
Windows 10: C:WindowsSystem32winevtLogs
Windows 10: C:WindowsSystem32winevtLogs
Windows 10: C:WindowsSystem32winevtLogs
Windows 10: C:WindowsSystem32winevtLogs
Windows 10: C:WindowsSystem32winevtLogs
Windows 10: C:WindowsSystem32winevtLogs
Windows 10: C:WindowsSystem32winevtLogs
Windows 10: C:WindowsSystem32winevtLogs
Windows 10: C:WindowsSystem32winevtLogs
Windows 10: C:WindowsSystem32winevtLogs
Windows 10: C:WindowsSystem32winevtLogs
Windows 10: C:WindowsSystem32winevtLogs
Windows 10: C:WindowsSystem32winevtLogs
Windows 10: C:WindowsSystem32winevtLogs
Windows 10: C:WindowsSystem32winevtLogs
Windows 10: C:WindowsSystem32winevtLogs
Windows 10: C:WindowsSystem32winevtLogs
Windows 10: C:WindowsSystem32winevtLogs
Windows 10: C:WindowsSystem32winevtLogs
Windows 10: C:WindowsSystem32winevtLogs
Windows 10: C:WindowsSystem32winevtLogs
Windows 10: C:WindowsSystem32winevtLogs
Windows 10: C:WindowsSystem32winevtLogs
Windows 10: C:WindowsSystem32winevtLogs
Windows 10: C:WindowsSystem32winevtLogs
Windows 10: C:WindowsSystem32winevtLogs
Windows 10: C:WindowsSystem32winevtLogs
Windows 10: C:WindowsSystem32winevtLogs
Windows 10: C:WindowsSystem32winevtLogs
Windows 10: C:WindowsSystem32winevtLogs
Windows 10: C:WindowsSystem32winevtLogs
Windows 10: C:WindowsSystem32winevtLogs
Windows 10: C:WindowsSystem32winevtLogs
Windows 10: C:WindowsSystem32winevtLogs
Windows 10: C:WindowsSystem32winevtLogs
Windows 10: C:WindowsSystem32winevtLogs
Windows 10: C:WindowsSystem32winevtLogs
Windows 10: C:WindowsSystem32winevtLogs
Windows 10: C:WindowsSystem32winevtLogs
Windows 10: C:WindowsSystem32winevtLogs
Windows 10: C:WindowsSystem32winevtLogs
Windows 10: C:WindowsSystem32winevtLogs
Windows 10: C:WindowsSystem32winevtLogs
Windows 10: C:WindowsSystem32winevtLogs
Windows 10: C:WindowsSystem32winevtLogs
Windows 10: C:WindowsSystem32winevtLogs
Windows 10: C:WindowsSystem32winevtLogs
Windows 10: C:WindowsSystem32winevtLogs
Windows 10: C:WindowsSystem32winevtLogs
Windows 10: C:WindowsSystem32winevtLogs
Windows 10: C:WindowsSystem32winevtLogs
Windows 10: C:WindowsSystem32winevtLogs
Windows 10: C:WindowsSystem32winevtLogs
Windows 10: C:WindowsSystem32winevtLogs
Windows 10: C:WindowsSystem32winevtLogs
Windows 10: C:WindowsSystem32winevtLogs
Windows 10: C:WindowsSystem32winevtLogs
Windows 10: C:WindowsSystem32winevtLogs
Windows 10: C:WindowsSystem32winevtLogs
Windows 10: C:WindowsSystem32winevtLogs
Windows 10: C:WindowsSystem32winevtLogs
Windows 10: C:WindowsSystem32winevtLogs
Windows 10: C:WindowsSystem32winevtLogs
Windows 10: C:WindowsSystem32winevtLogs
Windows 10: C:WindowsSystem32winevtLogs
Windows 10: C:WindowsSystem32winevtLogs
Windows 10: C:WindowsSystem32winevtLogs
Windows 10: C:WindowsSystem32winevtLogs
Windows 10: C:WindowsSystem32winevtLogs
Windows 10: C:WindowsSystem32winevtLogs
Windows 10: C:WindowsSystem32winevtLogs
Windows 10: C:WindowsSystem32winevtLogs
Windows 10: C:WindowsSystem32winevtLogs
Windows 10: C:WindowsSystem32winevtLogs
Windows 10: C:WindowsSystem32winevtLogs
Windows 10: C:WindowsSystem32winevtLogs
Windows 10: C:WindowsSystem32winevtLogs
Windows 10: C:WindowsSystem32winevtLogs
Windows 10: C:WindowsSystem32winevtLogs
Windows 10: C:WindowsSystem32winevtLogs
Windows 10: C:WindowsSystem32winevtLogs
Windows 10: C:WindowsSystem32winevtLogs
Windows 10: C:WindowsSystem32winevtLogs
Windows 10: C:WindowsSystem32winevtLogs
Windows 10: C:WindowsSystem32winevtLogs
Windows 10: C:WindowsSystem32winevtLogs
Windows 10: C:WindowsSystem32winevtLogs
Windows 10: C:WindowsSystem32winevtLogs
Windows 10: C:WindowsSystem32winevtLogs
Windows 10: C:WindowsSystem32winevtLogs
Windows 10: C:WindowsSystem32winevtLogs
Windows 10: C:WindowsSystem32winevtLogs
Windows 10: C:WindowsSystem32winevtLogs
Windows 10: C:WindowsSystem32winevtLogs
Windows 10: C:WindowsSystem32winevtLogs
Windows 10: C:WindowsSystem32winevtLogs
Windows 10: C:WindowsSystem32winevtLogs
Windows 10: C:WindowsSystem32winevtLogs
Windows 10: C:WindowsSystem32winevtLogs
Windows 10: C:WindowsSystem32winevtLogs
Windows 10: C:WindowsSystem32winevtLogs
Windows 10: C:WindowsSystem32winevtLogs
Windows 10: C:WindowsSystem32winevtLogs
Windows 10: C:WindowsSystem32winevtLogs
Windows 10: C:WindowsSystem32winevtLogs
Windows 10: C:WindowsSystem32winevtLogs
Windows 10: C:WindowsSystem32winevtLogs
Windows 8.1: C:WindowsSystem32winevtLogs
Windows 8: C:WindowsSystem32winevtLogs
Windows 8: C:WindowsSystem32winevtLogs
Windows 7: C:WindowsSystem32winevtLogs
Windows 7: C:WindowsSystem32winevtLogs - Перезагрузите компьютер.
Если этот последний шаг оказался безрезультативным и ошибка по-прежнему не устранена, единственно возможным вариантом остается выполнение чистой установки Windows 10.
СОВЕТ ОТ СПЕЦИАЛИСТА: Мы должны подчеркнуть, что переустановка Windows является достаточно длительной и сложной задачей для решения проблем, связанных с Microsoft-Windows-Resource-Exhaustion-Detector%4Operational.evtx. Во избежание потери данных следует убедиться, что перед началом процесса вы создали резервные копии всех важных документов, изображений, установщиков программного обеспечения и других персональных данных. Если вы в настоящее время не создаете резервных копий своих данных, вам необходимо сделать это немедленно.
Скачать файлы Microsoft-Windows-Resource-Exhaustion-Detector%4Operational.evtx (проверено на наличие вредоносного ПО — отсутствие 100 %)
ВНИМАНИЕ! Мы настоятельно не рекомендуем загружать и копировать Microsoft-Windows-Resource-Exhaustion-Detector%4Operational.evtx в соответствующий системный каталог Windows. CubedLabs, как правило, не выпускает файлы YouTube Download & Convert EVTX для загрузки, поскольку они входят в состав установщика программного обеспечения. Задача установщика заключается в том, чтобы обеспечить выполнение всех надлежащих проверок перед установкой и размещением Microsoft-Windows-Resource-Exhaustion-Detector%4Operational.evtx и всех других файлов EVTX для YouTube Download & Convert. Неправильно установленный файл EVTX может нарушить стабильность работы системы и привести к тому, что программа или операционная система полностью перестанут работать. Действовать с осторожностью.
Файлы, относящиеся к Microsoft-Windows-Resource-Exhaustion-Detector%4Operational.evtx
Файлы EVTX, относящиеся к Microsoft-Windows-Resource-Exhaustion-Detector%4Operational.evtx
| Имя файла | Описание | Программа (версия) | Размер файла (байты) | Расположение файла |
|---|---|---|---|---|
| Microsoft-Windows-Term… | Windows 7 Event Log | YouTube Download & Convert 1.1.4 | 1052672 | C:WindowsSystem32winevtLogs |
| Microsoft-Windows-AppX… | Windows 7 Event Log | YouTube Download & Convert 1.1.4 | 5246976 | C:WindowsSystem32winevtLogs |
| Microsoft-Windows-Devi… | Windows 7 Event Log | YouTube Download & Convert 1.1.4 | 69632 | C:WindowsSystem32winevtLogs |
| Microsoft-Windows-Know… | Windows 7 Event Log | YouTube Download & Convert 1.1.4 | 1052672 | C:WindowsSystem32winevtLogs |
| Microsoft-Windows-Home… | Windows 7 Event Log | YouTube Download & Convert 1.1.4 | 69632 | C:WindowsSystem32winevtLogs |
Другие файлы, связанные с Microsoft-Windows-Resource-Exhaustion-Detector%4Operational.evtx
| Имя файла | Описание | Программа (версия) | Размер файла (байты) | Расположение файла |
|---|---|---|---|---|
| CBS.log | Log | YouTube Download & Convert 1.1.4 | 879376 | C:WindowsLogsCBS |
| SA.DAT | Game Data | YouTube Download & Convert 1.1.4 | 6 | C:WINDOWSTasks |
| setupapi.dev.log | Log | YouTube Download & Convert 1.1.4 | 684126 | C:Windowsinf |
| api-ms-win-core-heap-l… | ApiSet Stub DLL | Microsoft® Windows® Operating System (10.0.17134.12) | 11112 | C:UsersTesterAppDataLocalMicrosoftOneDriv… |
| diagwrn.xml | Extensible Markup Language | YouTube Download & Convert 1.1.4 | 5718 | C:WindowsSystem32SysprepPanther |
Вы скачиваете пробное программное обеспечение. Для разблокировки всех функций программного обеспечения требуется покупка годичной подписки, стоимость которой оставляет 39,95 долл. США. Подписка автоматически возобновляется в конце срока (Подробнее). Нажимая кнопку «Начать загрузку» и устанавливая «Программное обеспечение», я подтверждаю, что я прочитал (-а) и принимаю Лицензионное соглашение и Политику конфиденциальности компании Solvusoft.
First off, I wasn’t sure if this was a question better suited to Super User or one of the other communities like Cross Validated, so please let me know if this is in the wrong place.
I’m having an issue where while I am actively using RStudio, Windows 10 suspends the Rstudio App process and RStudio freezes.
This shows up in Task Manager with the new little green leaf symbol as seen here. The leaf icon shows up in Task Manager next to Apps/Background processes that have at least one sub-process that is suspended, which you can see when you expand the list on the process tab of Task Manager OR if you look at the blue/ ‘Status: Suspended’ processes in Resource Monitor.
I’ve looked for info on whether other people are having the same issue specifically with RStudio and didn’t find anything useful. I also searched for general information on how to tell Windows 10 not to suspend a particular app.
-
Most people seem to search for info on these suspended processes
because they aren’t able to kill a process once suspended.
However, I’m not having any issues killing the process once its
suspended, simply trying to avoid it being suspended in the first
place. -
Other general info I’ve found says that Windows suspends
processes like Cortana, reminders, etc. that run in the background or
are pre-launched, to save battery and/or resources. However, I am
actively using RStudio when this happens so I’d really like to find a way to create an exception or exclude RStudio from apps that
can be suspended this way.
Software Info:
I am using RStudio (Version 1.1.453 / R version 3.5.0 (2018-04-23) — «Joy in Playing») with the ‘enhanced R distribution from Microsoft (Microsoft R Open 3.5.0, CRAN mirror snapshot taken on 2018-06-01) on Windows 10 (Version 10.0.17134 Build 17134).
A few more details:
-
This happens inconsistently, but it’s usually when I run multiple code chunks in an RMarkdown file in RStudio. RStudio simply freezes and must be restarted. Specifically, it is the ‘App’ process (rstudio.exe) listed under RStudio in Task Manager that is suspended when it happens.
-
There is no apparent way to un-suspend a process in Task Manager, but in Resource Monitor you can right click on a suspended process and ‘Resume Process’. When I tried this RStudio did unfreeze but I am unable to save or do anything else (I get an error saying ‘Unable to establish connection with R Session’) until I restart RStudio.
asked Jun 25, 2018 at 19:07
![]()
4
Not sure if this helps anyone with similar issues, but I’ve had similar issues with other software (Qt and Java), and after reading a lot of advices to disable anti-virus software (I don’t have any), found the culprit. In my case it was Acronis Active Protection. Not exactly an anti-virus, but something very similar. I usually turn it off right after installing Acronis, but either didn’t do it this one time, or it turned back on after an update. After disabling it, processes no longer get suspended. Hope this helps.
answered Apr 21, 2019 at 18:24
![]()
https://www.autoitscript.com/forum/topic/177749-stopping-windows-10-from-auto-closing-programs-to-free-up-ram/
Sideways and sort of nuclear way of preventing app suspension but it seems to work.
——————————-Excerpted from Autoit ———————————-
«Jon
Noooooooo!
Jon
Administrators
878
11,270 posts
Posted October 2, 2015 (edited)
Not tested but try:
Run gpedit.msc
Computer Configuration -> Administrative Templates -> System -> Troubleshooting and Diagnostics -> Windows Resource Exhaustion Detection and Resolution.
Configure it to just detect
Edited October 2, 2015 by Jon»
answered Mar 7, 2019 at 23:33
![]()
1