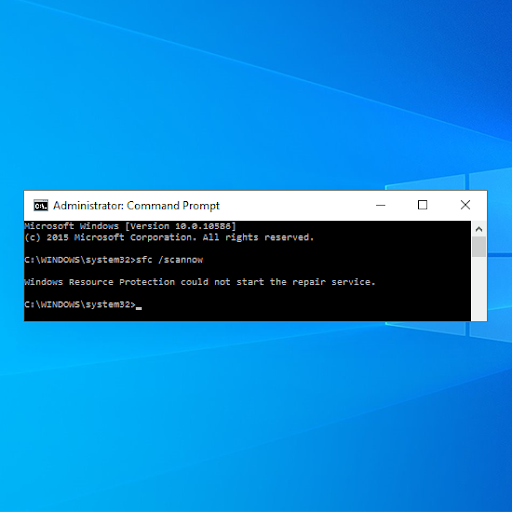
 Среди распространенных ошибок при запуске проверки и восстановления целостности системных файлов с помощью SFC /scannow сообщение «Защите ресурсов Windows не удается запустить службу восстановления».
В этой пошаговой инструкции подробно о способах исправить ошибку «Защите ресурсов Windows не удается запустить службу восстановления» при выполнении команды sfc /scannow в Windows 11, Windows 10 и предыдущих версиях системы.
Прямое указание пути к sfc.exe в команде
Первый метод решить проблему, не гарантированно работающий, но очень быстрый: указать прямой путь к файлу sfc.exe в команде для запуска проверки и восстановления системных файлов.
Шаги будут следующими:
- Запустите командную строку от имени Администратора, Терминал Windows или Windows PowerShell от администратора также подойдут. Как запустить командную строку Windows 11 от администратора, Как запустить командную строку Windows 10 от администратора.
- Введите команду
C:WindowssysNativesfc.exe /scannow
и нажмите Enter.


С большой вероятностью вы увидите стандартное сообщение «Начато сканирование системы. Этот процесс может занять некоторое время».
Командная строка x86 и x64
В 64-разрядных системах Windows присутствует 32-битные (x86) и 64-битные (x64) версии приложений командной строки и Windows PowerShell. При этом, если в 64-битной системе попробовать выполнить команду sfc /scannow в x86 варианте консоли, вы получите сообщение об ошибке «Защите ресурсов Windows не удается запустить службу восстановления».

При использовании стандартных средств Windows для запуска командной строки от имени администратора, почти всегда запускается «нужная», x64 версия. Однако, при использовании запуска из сторонних средств: какого-либо виджета, стороннего файлового менеджера, может быть запущена 32-битная x86 версия, что и будет являться причиной ошибки.
Если есть предположения о том, что это ваш случай, вы можете:
- Запустить командную строку от имени Администратора средствами Windows (ссылки на способы приведены в первой части этой инструкции).
- Зайти в папку C:WindowsSystem32 (независимо от разрядности Windows), найти файл cmd.exe, нажать по нему правой кнопкой мыши и выбрать «Запуск от имени администратора», выполнить команду sfc /scannow
Запуск служб Установщик модулей Windows и Установщик Windows
В случае, если в системе отключены необходимые службы, sfc /scannow также может сообщать о рассматриваемой ошибке. Проверить службы и включить их можно следующим образом:
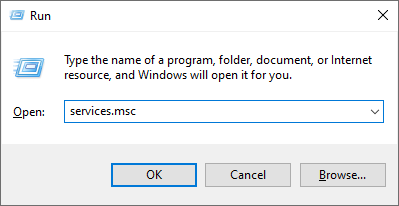
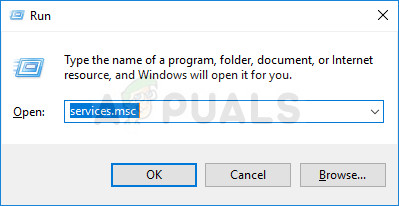
- Откройте «Службы». Для этого нажмите клавиши Win+R на клавиатуре, введите services.msc и нажмите Enter.
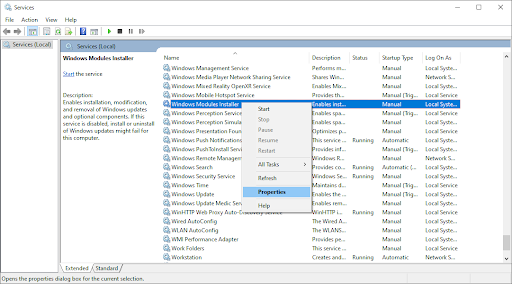
- В списке служб найдите «Установщик Windows» и «Установщик модулей Windows».

- Дважды нажмите по имени службы, чтобы открыть её свойства. По умолчанию для этих служб в «Тип запуска» должен быть установлен в значение «Вручную». Если это не так — измените тип запуска и примените настройки. В этом же окне можно вручную запустить службы с помощью соответствующей кнопки (кнопка не активна, если тип запуска — «Отключена»).

- После применения всех настроек снова запустите командную строку от имени администратора и попробуйте выполнить команду sfc /scannow


Исправление букв дисков при выполнении команды
Если ошибка «Защите ресурсов Windows не удается запустить службу восстановления» возникает при выполнении команд вида:
sfc /scannow /offbootdir=C: /offwindir=C:Windows
с загрузочного накопителя, причиной этого может быть то, что буквы разделов диска при загрузке с флешки отличаются и в результате папка Windows находится не на привычном диске C. Способ определить актуальную букву системного диска:
- В командной строке по порядку вводим команды
diskpart
list volume
- Отобразится список разделов с текущими буквами, где мы и можем посмотреть букву системного раздела, чтобы в дальнейшем использовать в командах sfc
- В некоторых случаях системный раздел может не иметь буквы. В этом случае её можно назначить командами (здесь N — номер системного тома, а Z — назначаемая буква):
select volume N
assign letter=Z
- По завершении работы с diskpart введите команду exit
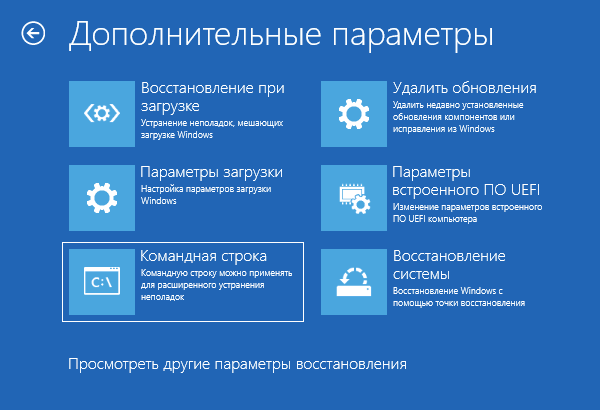
Запуск проверки целостности системных файлов в среде восстановления
Если ни один из способов выше не сработал, попробуйте выполнить команду в командной строке среды восстановления Windows 11 или Windows 10:
- Зайдите в среду восстановления — Как зайти в среду восстановления Windows 11, Как зайти в среду восстановления Windows 10.
- Перейдите в раздел Поиск и устранение неисправностей — Дополнительные параметры — Командная строка.

- Запустите сканирование sfc /scannow
Запуск sfc /scannow с загрузочной флешки
Если у вас есть загрузочная флешка с вашей версией Windows или возможность создать её, можно использовать команду sfc /scannow с неё. Для этого:
- После загрузки компьютера с флешки, нажмите клавиши Shift+F10 (на некоторых ноутбуках — Shift+Fn+F10) откроется командная строка.
- В командной строке используйте команду
sfc /scannow /offbootdir=C: /offwindir=C:Windows
Внимание: при загрузке с флешки буква системного диска может отличаться от C и в этом случае приведенная выше команда также сообщит о том, что защите ресурсов Windows не удается запустить службу восстановления. Чтобы исправить ситуации, прочтите раздел «Исправление букв дисков при выполнении команды» выше в статье.
Безопасный режим
И ещё один вариант, который иногда может сработать, если причина ошибки — какие-либо сторонние службы и процессы, мешающие выполнению команды: попробуйте запуск проверки в безопасном режиме. Здесь могут быть полезными материалы: Как зайти в безопасный режим Windows 11, Как зайти в безопасный режим Windows 10.
Are you trying to run the System File Checker (sfc /scannow) but run into the “Windows Resource Protection could not start the repair service” error message? You’ll learn how to fix it here.
The System File Checker is an incredibly useful tool millions of users rely on to fix system-wide issues by restoring missing or corrupted files. It’s able to automatically detect and fix system files causing issues on your computer. But what are you supposed to do when the feature fixing your issues needs fixing as well?
Users have been reporting that when trying to execute the “sfc /scannow” command, they get yet another error message in return: Windows Resource Protection could not start the repair service. There are a few things you can do in order to fix this and successfully run the System File Checker.
Why Is the SFC Scan Not Working?
The reason why your System File Checker isn’t able to function is the TrustedInstaller (Windows Modules Installer) service. It’s a necessary service that helps your system install, modify and remove various applications. It also “owns” your system files in order to prevent other sources from modifying or deleting them.
Despite this, you still may run into issues with corrupted system files and so, you need to use the SFC scan. TrustedInstaller has full access to Windows Resource Protection (WRP) files and registry keys, which are necessary for the SFC scan to work.
This service starts on-demand whenever you execute the “sfc /scannow” command. If the service has been completely disabled, the scan won’t be able to restore any missing or corrupted WRP files.
This issue appears most commonly in Windows 7, but may appear on Windows 8 as well as the latest Windows 10.
How Do I Fix the “sfc /scannow” Not Working? Fix Windows Resource Protection Could Not Start the Repair Service Error
There are a few different solutions to help you if you’re struggling to run the System File Checker and scan your device for corrupt files or missing resources.
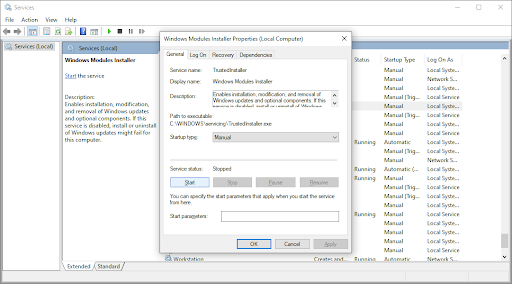
Method 1. Start the Windows Modules Installer (TrustedInstaller)
The most straightforward solution is manually starting the required service. It’s important to configure the Windows Modules Installer in a way that allows it to start whenever you try to run the SFC scan. The steps below will guide you through this setup.
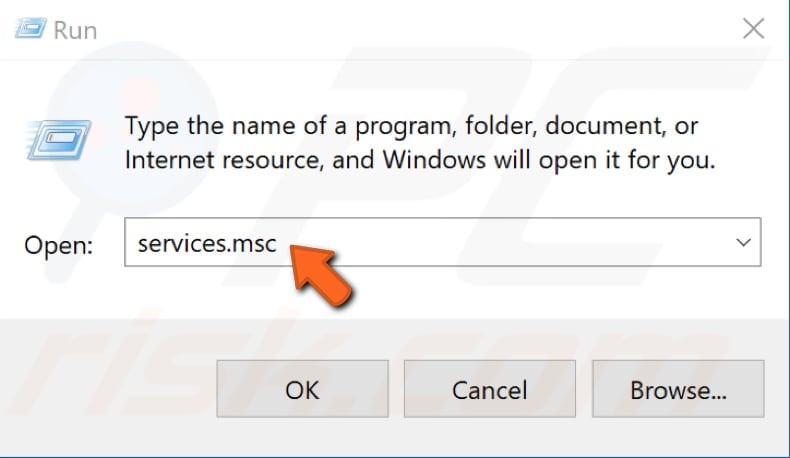
- Press the Windows + R keys on your keyboard. This is going to bring up the Run utility.
- Type in services.msc and click on the OK button. This is going to launch the Services window, which might take a few seconds to fully load.

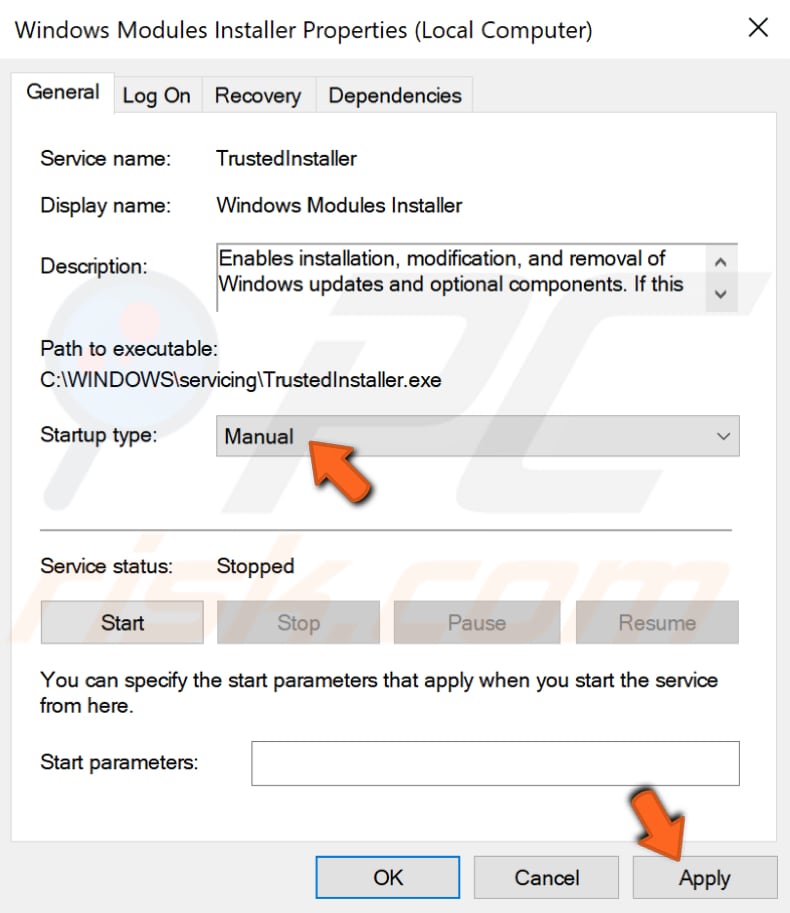
- Right-click on the Windows Modules Installer service and choose Properties.

- Set the Startup type to Manual. If the service isn’t running, click on the Start button. Click Apply, then OK. You should be back at the list of services.
- Close the Services window and try running the “sfc /scannow” command again. If the scan still doesn’t work, move on to the next solution.
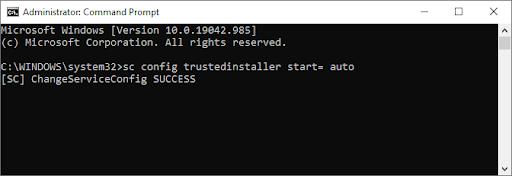
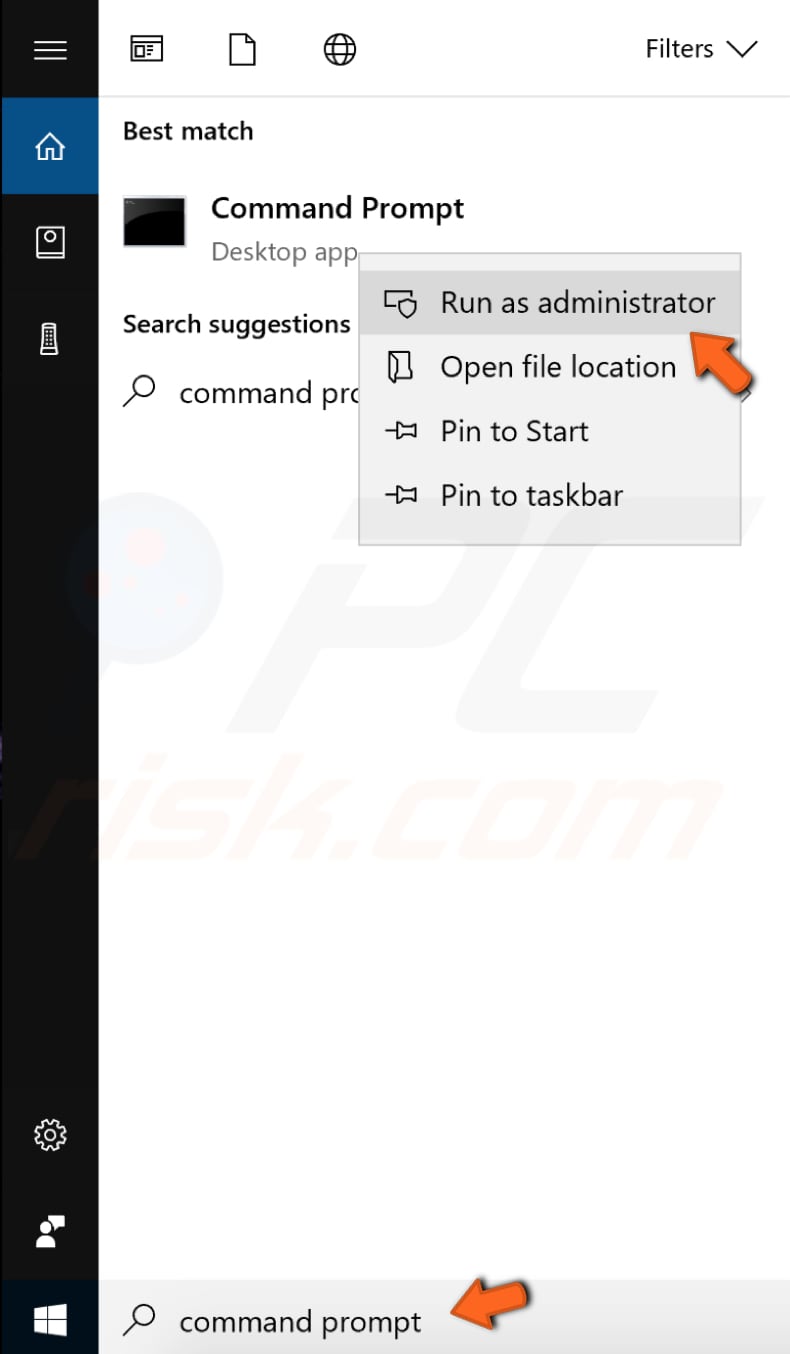
Method 2. Use the Command Prompt
This method is essentially the same one as the first but done in the Command Prompt. It’s possible that this solution may work, as you need administrative permissions to make the modification.
- Open the search bar in your taskbar by clicking on the magnifying glass icon. You can also bring it up with the Windows + S keyboard shortcut.
- Type cmd or Command Prompt in the search bar. When you see it in the results, right-click on it and choose Run as Administrator.

- When prompted by the User Account Control (UAC), click Yes to allow the app to launch with administrative permissions.
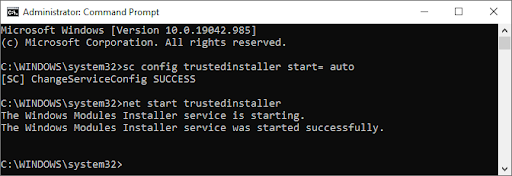
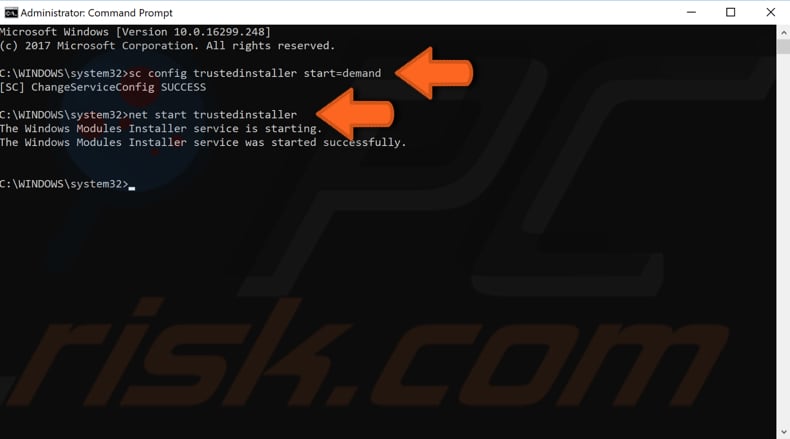
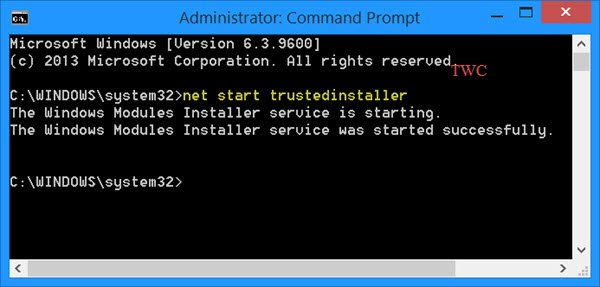
- Once the Command Prompt window is open, type in the following command and press Enter to execute it: sc config trustedinstaller start= auto. If the command worked, you should see the SUCCESS message.

- Afterwards, execute the following command: net start trustedinstaller. There should be a message about the Windows Modules Installer service starting successfully.
- Now, you can try to run the System File Checker by executing the sfc /scannow command. If you still don’t have any luck running it, try a different method below.

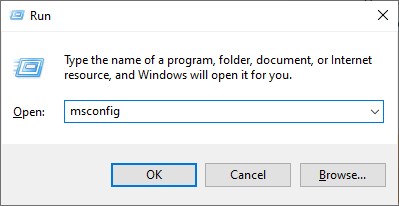
Method 3. Try To Run the System File Checker in Safe Mode
There’s a possibility that a background application or service is interfering with the System File Checker, causing it to not work. In this case, you can try simply executing the scan command in Safe mode. Safe mode boots your system with only the necessary Windows components enabled.
- Press the Windows + R keys on your keyboard. This is going to bring up the Run utility.
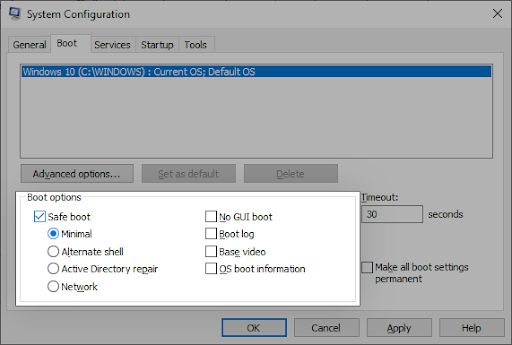
- Type in “msconfig” without the quotation marks and press the Enter key on your keyboard. This will launch the System Configuration application.
- Switch to the Boot tab. Under Boot options, check Safe boot and keep it on the Minimal setting, then click the OK button.

- Restart your computer. It should boot in Safe mode without any third-party applications, only starting the necessary services. Open the Command Prompt and execute the sfc /scannow command to see if the SFC scan is working.
Method 4. Run the DISM Command
Some users have reported that running the DISM command fixed the System File Checker. The Deployment Image Servicing and Management (DISM) tool re-deploys your system image in order to fix issues directly related to it. The step-by-step instructions to run this scan can be found below.
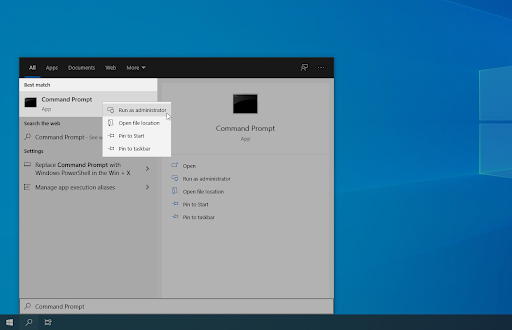
- Open the search bar in your taskbar by clicking on the magnifying glass icon. You can also bring it up with the Windows + S keyboard shortcut.
- Type cmd or Command Prompt in the search bar. When you see it in the results, right-click on it and choose Run as Administrator.
- When prompted by the User Account Control (UAC), click Yes to allow the app to launch with administrative permissions.
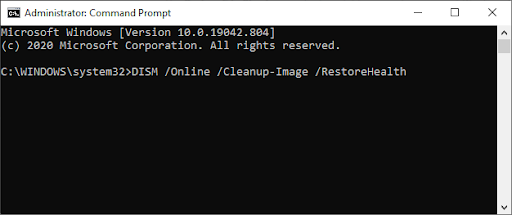
- Once the Command Prompt window is open, type in the following command and press Enter to execute it: DISM /Online /Cleanup-Image /RestoreHealth

- Wait for the scan to complete, and then restart your computer. When going back to the Command Prompt, try running the SFC scan and see if it works now.
Final Thoughts
Our Help Center offers hundreds of guides to assist you if you’re in need of further help. Return to us for more informative articles, or get in touch with our experts for immediate assistance.
One More Thing
Would you like to receive promotions, deals, and discounts to get our products for the best price? Don’t forget to subscribe to our newsletter by entering your email address below! Be the first to receive the latest news in your inbox.
You May Also Like
» How to Fix Inaccessible Boot Device Error in Windows 10
» How To Fix ‘Remote Desktop Can’t Connect to the Remote Computer’
» How to Fix the “Default Gateway Is Not Available” Error in Windows 10
How to Fix the «Windows Resource Protection could not start the repair service» Error on Windows 10
System File Checker (SFC) is a utility in Windows that allows users to scan for corrupt Windows system files and restore them. Unfortunately, you may get the «Windows Resource Protection could not start the repair service» error when running the «SFC /Scannow» command. This article will show you how to fix this problem.

Windows Resource Protection (WRP) prevents the replacement of essential system files, folders, and registry keys part of the operating system. Permission for full access to modify WRP-protected resources is restricted to TrustedInstaller.
WRP-protected resources can only be changed using the Supported Resource Replacement Mechanisms with the Windows Modules Installer service.
TrustedInstaller is a process belonging to the Windows Modules Installer service in Windows 10, 8, 7, and Vista. Its primary function is to enable installing, removing, and modifying Windows Updates and optional system components.
Sometimes TrustedInstaller.exe may become corrupted, and you may get an error message. In such a case running the System File Checker may help.
However, sometimes, even the Windows Resource Protection service, which runs the System File Checker (SFC), is affected. In such a case, if you try to run the «sfc /scannow» command, you may get the error message saying: «Windows Resource Protection could not start the repair service».
Read the guide below to fix the «Windows Resource Protection could not start the repair service» error while trying to run the System File Checker.
Video Showing How to Fix the «Windows Resource Protection could not start the repair service» Error:
Table of Contents:
- Introduction
- Enable Windows Modules Installer Service
- Run System File Checker in Safe Mode
- Run DISM Scan
- Video Showing How to Fix the»Windows Resource Protection could not start the repair service» Error
Enable Windows Modules Installer Service
Windows Services (also known as services.msc), are used to modify how Windows services run on your system. You can modify a service’s settings for security, troubleshooting, and performance-related reasons.
You will need to access the Windows Installer service, which enables installation, modification, and removal of Windows updates and optional components. If this service is disabled, install or uninstall of Windows updates might fail for your computer.
To access the Windows Modules Installer service type «run» in Search and click the «Run» result.
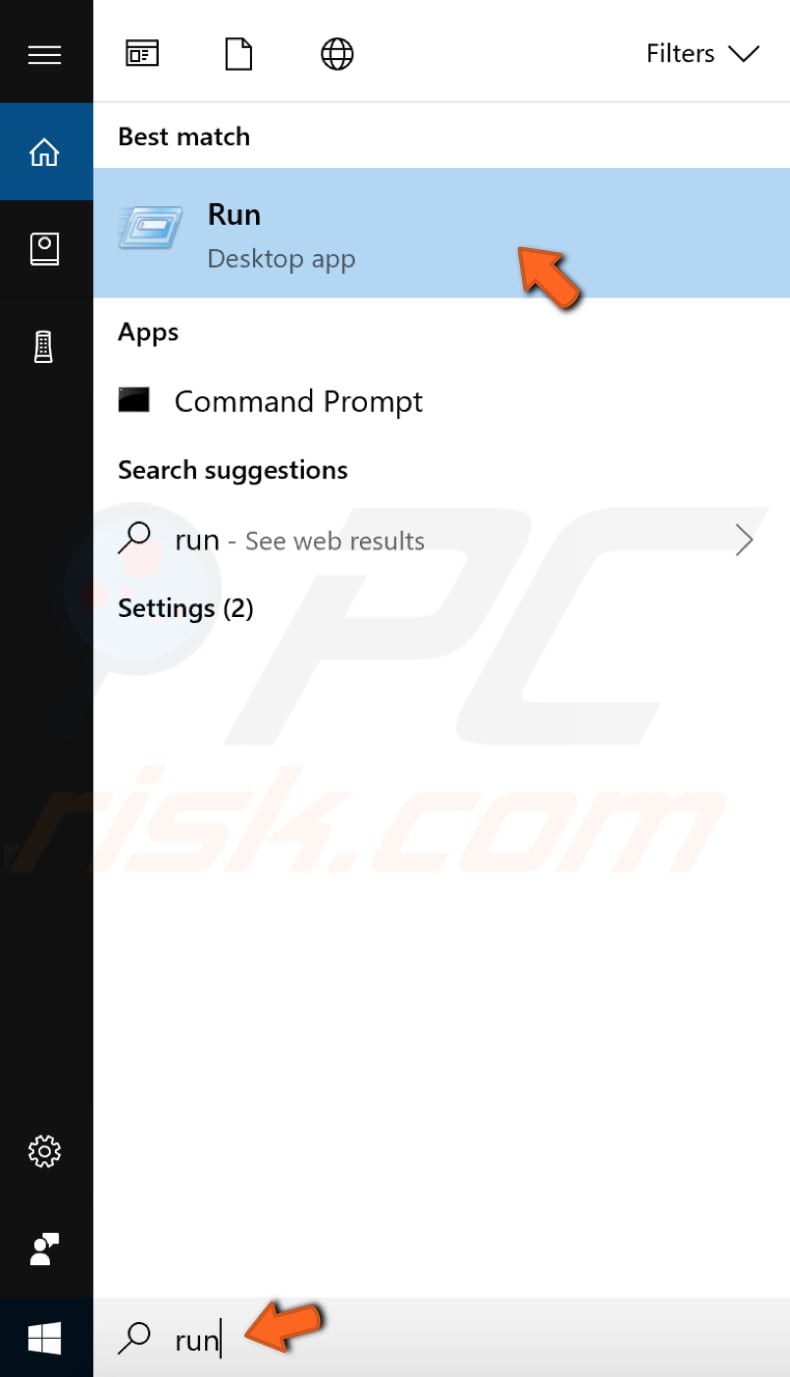
In the Run dialog box, type «services.msc» and click «OK» to open Windows Services.
Now scroll down through the services list to find the «Windows Modules Installer» service. Right-click it and select «Properties» in the dropdown menu. Or simply double-click the Windows Modules Installer service.

Make sure that «Startup type» is set to «Manual». If it is not set to Manual, then set it this way and click «Apply» to save the changes made.
You can also try to enable the TrustedInstaller using Command Prompt and its commands. Some commands available in Windows require that you run them from an elevated Command Prompt. This means you have to be running it with administrator-level privileges.
To open Command Prompt, type «command prompt» in Search and then right-click on the «Command Prompt», select «Run as administrator» from the dropdown menu to run Command Prompt with administrator privileges.
Now you will need to execute a couple of commands. Type «sc config trustedinstaller start=demand» and press Enter on your keyboard.
Then type «net start trustedinstaller», and press Enter on your keyboard again.
Now try to run the System File Checker and see if you are still getting the «Windows Resource Protection could not start the repair service» error.
[Back to Table of Contents]
Run System File Checker In Safe Mode
Another thing you might want to try is to run the System File Checker in Safe Mode. Safe Mode is a diagnostic start-up mode in Windows operating systems used to obtain limited access to Windows when the operating system does not start or function normally.
If you are not sure how to start your Windows in Safe Mode, read this article.
[Back to Table of Contents]
Run DISM Scan
DISM stands for Deployment Image Servicing and Management, and it can be used to repair and prepare Windows images, including the Windows Recovery Environment, Windows Setup, and Windows PE.
To run DISM scan, you need to open Command Prompt as administrator again and type in this command: «DISM /Online /Cleanup-Image /RestoreHealth». Press Enter on your keyboard to execute it.
See if this fixes the «Windows Resource Protection could not start the repair service» error while trying to run the System File Checker.

We hope this article was helpful in trying to fix the «Windows Resource Protection could not start the repair service» error, and now you can run the System File Checker without any problems. Do not hesitate to write a comment in the comment section below if you found another workaround for this error!
[Back to Top]
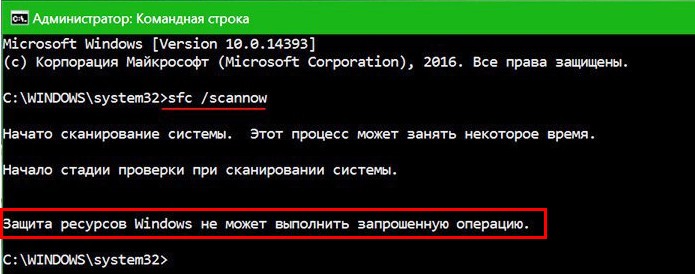
Повреждение системных файлов далеко не всегда означает крах Windows, всё зависит от того, какие именно компоненты были повреждены. Если они не являются для системы критичными, проблемы ограничатся сбоями в работе отдельных приложений и функций, к тому же такие неполадки часто удаётся устранить, запустив командой sfc /scannow встроенное средство восстановления системных файлов. Но и здесь пользователя может поджидать неприятность. Инструмент или не запускается, или запускается, но вскоре начатое сканирование завершается ошибкой «Защита ресурсов Windows не может выполнить запрошенную операцию».
Означает ли это, что всё так плохо, что даже SFC не работает? Не всегда, просто во время проверки в системе происходит сбой или инструмент не может получить доступ к каталогу WinSxS, в коем расположены важные файлы. Вероятны и другие причины — повреждение файловой системы, наличие физически нечитаемых секторов на диске, отсутствие у пользователя соответствующих прав доступа. Что делать и с чего начинать поиск причин неполадки?
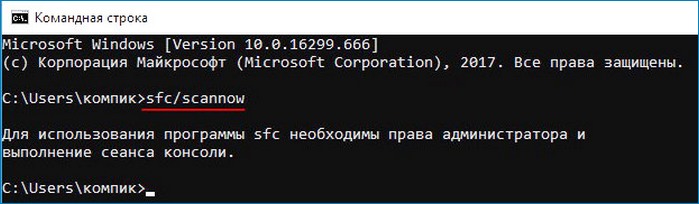
Для начала убедитесь, что командная строка запущена от имени администратора,
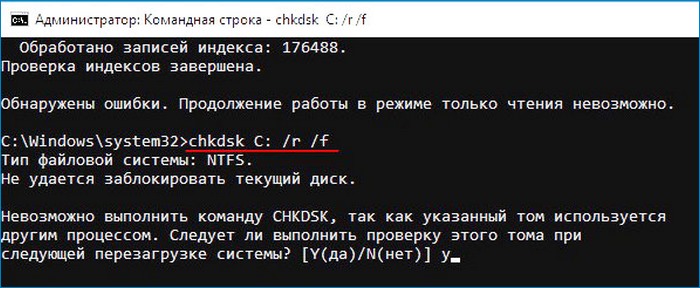
хотя вообще-то Windows должна сама об этом предупреждать. Если вы запускаете инструмент как положено с админскими привилегиями, а ошибка всё равно появляется, проверьте состояние файловой системы, выполнив тут же в консоли команду chkdsk C:
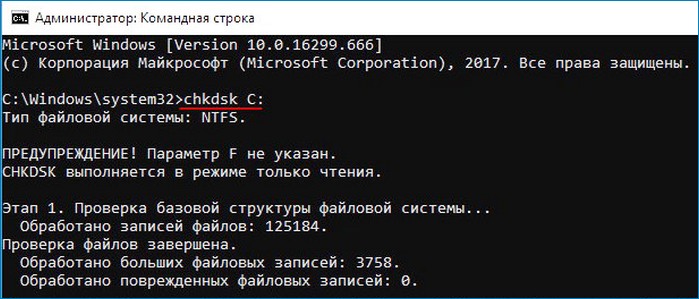
Если будут обнаружены ошибки, повторите команду, но уже с параметрами /r /f, как показано на скриншоте. Действие потребуется подтвердить вводом Y, при этом компьютер будет перезагружен, а сканирование и исправление выполнено до загрузки рабочего стола.
Причиной ошибки сканирования может быть ограничение доступа SFC к каталогу WinSxS. Попробуйте снять их, выполнив в консоли CMD команду
icacls c:windowswinsxs
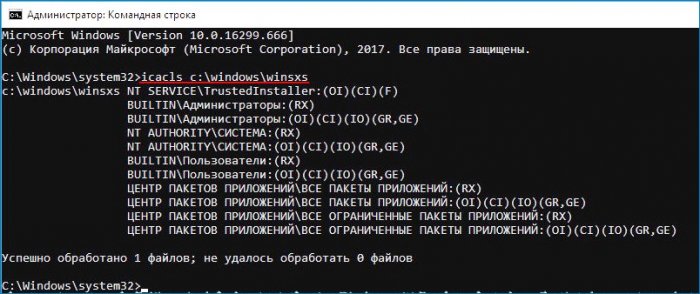
и перезагрузив компьютер.
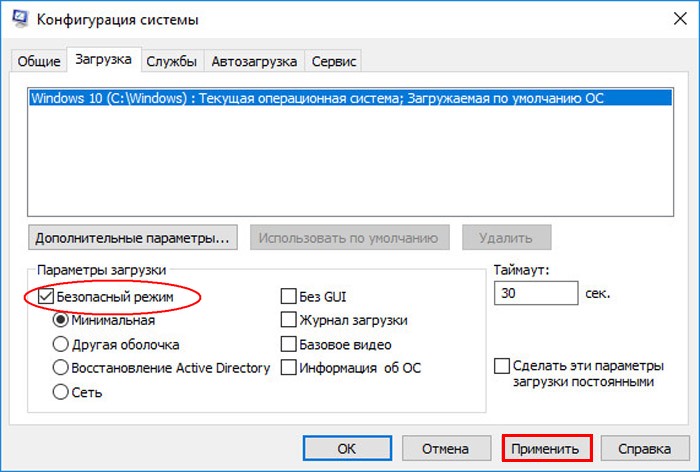
Следующий шаг — запуск процедуры сканирования SFC в безопасном режиме. Загрузиться в него проще всего с помощью утилиты msconfig, переключившись на вкладку «Загрузка» и установив галочку в соответствующем чекбоксе.
Далее всё как обычно, открываем командную строку с повышенными привилегиями и выполняем команду sfc/scannow.
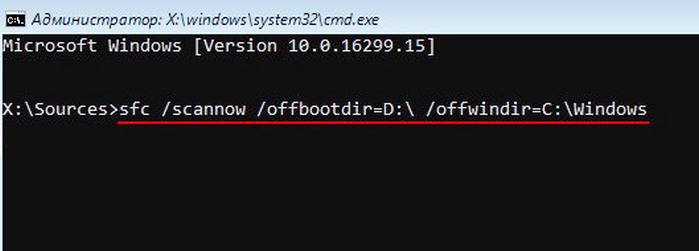
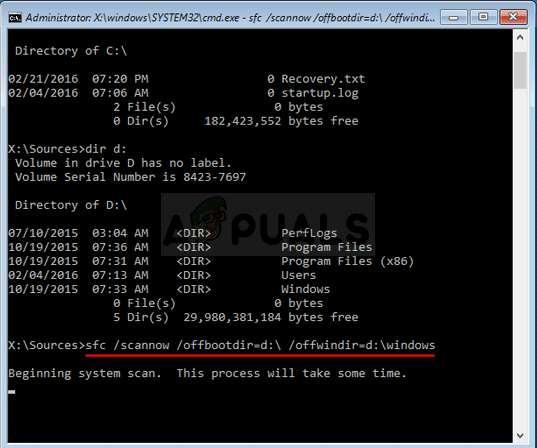
Будет еще лучше, если запустить сканирование SFC оффлайн. Для этого нужно загрузиться с установочного диска Windows, при появлении окна мастера установки нажать Shift + F10,
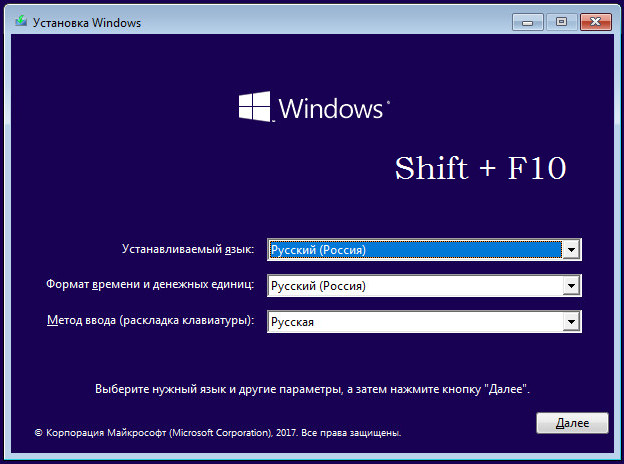
открыв тем самым командную строку, определить в ней буквы дисков, а затем выполнить такую команду:
sfc /scannow /offbootdir=D: /offwindir=C:Windows
Где:
offbootdir=D: раздел, содержащий папку WinSxS.
offwindir=C:Windows — раздел с установленной ОС.
- Примечание: определить буквы томов в загрузочной среде проще всего с помощью Блокнота, запустив его командой notepad и выбрав Файл → Сохранить как.
Если приведенные выше способы не дали результатов, высока вероятность, что отказ защиты ресурсов Windows вызван повреждением самого хранилища системных компонентов, то есть содержимого папки WinSxS. Проверить его состояние можно командой
Dism /Online /Cleanup-Image /ScanHealth
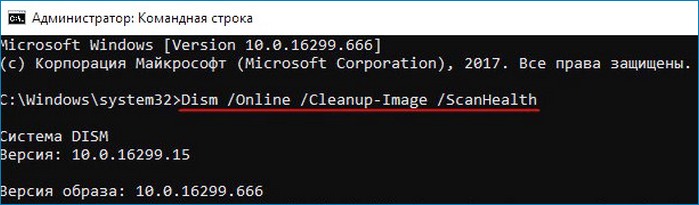
если она выдает сообщение о необходимости восстановление хранилища, выполняем в консоли такую команду:
Dism /Online /Cleanup-Image /RestoreHealth
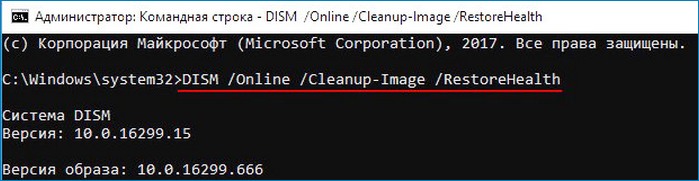
Компьютер при этом должен быть подключен к интернету, поскольку Windows может потребоваться подключиться к серверу Microsoft и скачать недостающие файлы. По завершении процедуры перезагружаемся. Теперь, когда хранилище восстановлено, sfc/scannow должна заработать как надо.
Download PC Repair Tool to quickly find & fix Windows errors automatically
If you receive Windows Resource Protection could not start the repair service, when you go on to Run sfc /scannow or System File Checker in Windows 11/10, then this post may be able to help you.

The System File Checker or sfc.exe is a utility in Microsoft Windows located in C:WindowsSystem32 folder. This utility allows users to scan for and restore corrupt Windows system files.
But sometimes while running this tool, you may receive one of the following errors – and the tool will not be able to run or complete its job successfully.
- System File Checker SFC cannot repair corrupted member file
- Windows Resource Protection found corrupt files but was unable to fix some of them
- Windows Resource Protection could not perform the requested operation.
How do I fix Windows Resource Protection cannot start the repair service?
If this happens, you may try to Run System File Checker in Safe Mode or at Boot-Time or repair the Windows Component Store using DISM and see if it works, or you may troubleshoot the errors individually, by following the individual links.
If you receive this error message, try this:
Run services.msc to open the Services Manager. Look for Windows Modules Installer or the TrustedInstaller service. Double-click on it and ensure that the Service is Started. If not press the Start button. Its startup type has to be set to Manual, by the way.
The Windows Modules Installer or TrustedInstaller service enables installation, modification, and removal of Windows updates and optional components. If this service is disabled, install or uninstall of Windows updates might fail for this computer. This service has full access to Windows Resource Protection files and registry keys and needs to be running in order to restore missing or corrupted system files.
Alternatively, you could open an elevated Command Prompt, type the following and hit Enter.
net start trustedinstaller
Once the service is started, run System File Checker and see if it works. If it still does not work, you may need to analyze its logs.
How do I fix corrupted files in Windows Resource Protection?
To fix corrupted files in Windows Resource Protection, you need to run the DISM Tool or use the Reset This PC option. That is sure to help you.
This post will show you how to how to Run sfc /scannow System File Checker on External Drives.
See this post if you receive a There is a system repair pending which requires a reboot to complete error message.
Anand Khanse is the Admin of TheWindowsClub.com, a 10-year Microsoft MVP (2006-16) & a Windows Insider MVP (2016-2022). Please read the entire post & the comments first, create a System Restore Point before making any changes to your system & be careful about any 3rd-party offers while installing freeware.
Инструмент проверки системных файлов, активируемый с помощью команды sfc / scannow в командной строке, является невероятно полезной утилитой для восстановления системы. Он сканирует все защищенные системные файлы и заменяет поврежденные файлы кэшированной копией, находящейся в вашей системе. Однако при выполнении этой команды может появиться сообщение об ошибке, которое гласит: «Защите ресурсов Windows не удалось запустить службу восстановления».
Эта ошибка часто возникает из-за проблем с разрешениями или неисправности Windows TrustedInstaller. Таким образом, давайте рассмотрим, как устранить эту ошибку, выполнив несколько простых шагов.
Почему не работает SFC Scannow?
Для работы средства проверки системных файлов необходимо, чтобы программа Windows TrustedInstaller работала. Windows TrustedInstaller — это служба, необходимая для установки, удаления и изменения обновлений Windows и других компонентов системы.
По умолчанию TrustedInstaller управляет средством защиты ресурсов Windows (WRP). WRP защищает от несанкционированных модификаций, включая изменения основных системных файлов, папок и ключей реестра. Он также обрабатывает команду «sfc / scannow», которую вы пытаетесь использовать.
Таким образом, при сбое в работе TrustedInstaller другие службы, зависящие от него, также перестанут работать. Это означает, что и WRP, и средство проверки системных файлов не будут работать должным образом. Хотя для этой проблемы нет универсального решения, мы перечислили несколько шагов по устранению неполадок, которые вы можете выполнить, чтобы исправить эту ошибку.
1. Перезапустите Windows TrustedInstaller (установщик модулей Windows).
Если Windows TrustedInstaller не запущен или работает неправильно, быстрый перезапуск службы может помочь устранить ошибку. Вы можете легко перезапустить его из консоли Windows Service Console. Вот как это сделать.
-
Нажмите Win + R, чтобы открыть окно «Выполнить».
-
Затем введите services.msc и нажмите OK, чтобы открыть Консоль обслуживания.
-
В окне Service Console найдите установщик модулей Windows.
-
Щелкните службу правой кнопкой мыши и выберите «Свойства».
-
В открывшемся окне «Свойства» установите для параметра «Тип запуска» значение «Вручную».
-
Если служба не запущена, нажмите кнопку «Пуск» в разделе «Состояние службы».
-
Нажмите Применить и ОК, чтобы сохранить изменения. Закройте служебную консоль и проверьте, можно ли запустить средство проверки системных файлов без ошибок.
2. Запустите TrustedInstaller из командной строки.
Если перезапуск установщика модулей Windows из консоли обслуживания не помог, вы можете использовать командную строку для перезапуска службы. Вот как это сделать.
-
Введите cmd в строку поиска Windows. В результатах поиска щелкните правой кнопкой мыши Командную строку и выберите Запуск от имени администратора. Нажмите Да, когда будет предложено Управление учетными записями пользователей.
-
В окне командной строки введите следующую команду и нажмите Enter, чтобы выполнить: sc config trustinstaller start = auto
-
Эта команда установит автоматический тип запуска службы установщика модулей Windows. После успешного выполнения вы увидите сообщение ChangeServiceConfig SUCCESS, отображаемое на экране.
-
Затем введите следующую команду, чтобы перезапустить службу TrustedInstaller: net start trustinstaller
-
После успешного выполнения запустите команду sfc / scannow и проверьте, устранена ли ошибка.
3. Запустите SFC Scannow в безопасном режиме.
В безопасном режиме Windows запускается в минимальном состоянии, загружая ограниченный набор файлов и дисков. Безопасный режим полезен, чтобы определить, не вызывает ли проблема в вашей системе конфликт стороннего приложения или службы.
Если вы считаете, что сторонняя программа конфликтует со средством проверки системных файлов и запуск защиты ресурсов Windows не может запустить ошибку службы восстановления, запустите команду sfc / scannow в режиме безопасной загрузки, чтобы проверить проблему.
Чтобы запустить проверку системных файлов в безопасном режиме:
-
Нажмите Win + R, чтобы открыть Выполнить.
-
Введите msconfig.msc и нажмите OK, чтобы открыть окно конфигурации системы.
-
В появившемся окне откройте вкладку Boot.
-
В разделе «Параметры загрузки» установите флажок «Безопасная загрузка». Затем выберите опцию Minimal.
-
Нажмите Применить и ОК, чтобы сохранить изменения.
-
Нажмите кнопку «Перезагрузить», если хотите сразу же перезапустить безопасный режим. В противном случае нажмите «Выйти без перезагрузки», сохраните и закройте открытые приложения, а затем перезагрузите компьютер.
После перезагрузки ваша система загрузится в безопасном режиме, при этом будут запущены только основные службы Windows.
Теперь откройте командную строку и запустите команду sfc / scannow. Если команда выполняется без каких-либо ошибок, стороннее приложение, установленное в вашей системе, скорее всего, создает конфликт с Windows Resource Protection и, следовательно, вызывает ошибку.
Чтобы отключить безопасную загрузку, запустите «Конфигурация системы», откройте вкладку «Загрузка» и снимите флажок «Безопасная загрузка» в разделе «Параметры загрузки». Затем нажмите «Применить» и перезагрузите компьютер.
4. Добавьте значение расширяемой строки TrustedInstaller в редактор реестра.
Если вы не против работать с редактором реестра Windows, вы можете исправить эту ошибку, добавив в реестр новое расширяемое строковое значение. Тем не менее, неправильные изменения в записях реестра могут заблокировать вашу систему, поэтому обязательно создайте резервную копию реестра Windows, прежде чем продолжить настройку.
Кроме того, создайте точку восстановления системы. Это поможет вам отменить изменения на уровне системы и вернуть ваш компьютер в рабочее состояние. Создав резервную копию, выполните следующие действия.
Этот процесс включает в себя поиск идентификатора TrustedInstaller, имени подпапки и создание нового значения расширяемой строки в редакторе реестра. Мы разделили шаги на две части для облегчения понимания.
4.1 Найдите идентификатор TrustedInstaller и имя подпапки в проводнике
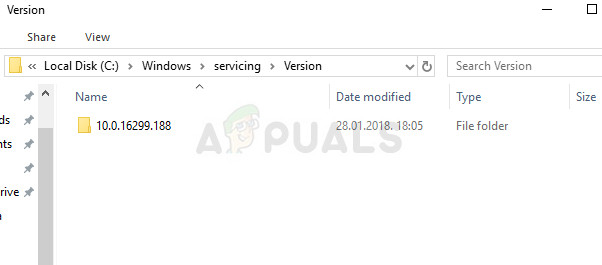
-
Нажмите Win + E, чтобы открыть проводник, и перейдите в следующее место: C: Windows Servicing Version.
-
Вы увидите папку с именем 10.0.19041.1XXX. Это ваш идентификатор TrustedInstaller. Скопируйте идентификатор / имя в буфер обмена или вставьте его в документ Блокнота, так как вы будете использовать его в дальнейшем.
-
Затем перейдите в следующее место: C: Windows WinSxS.
-
Здесь, в зависимости от используемого вами процессора, найдите одну из этих подпапок. x86_microsoft-windows-servicingstack_31bf3856ad364e35_ {TrustedInstaller ID} (32-разрядная версия Windows)
amd64_microsoft-windows-servicingstack_31bf3856ad364e35_ {TrustedInstaller ID} (64-разрядная версия Windows) -
В названии подпапки выше {TrustedInstaller ID} — это имя папки, которое вы отметили на шаге 2.
-
Скопируйте имя папки и путь в файл Блокнота.
4.2 Создание расширяемого строкового значения в редакторе реестра
Теперь, когда у вас есть необходимая информация, пора создать значение Expandable String в редакторе реестра. Вот как это сделать.
-
Нажмите Win + R, чтобы открыть Выполнить.
-
Введите regedit и нажмите ОК, чтобы открыть редактор реестра.
-
В редакторе реестра перейдите в следующее место. Вы можете скопировать и вставить путь в адресную строку редактора реестра для быстрой навигации: HKEY_LOCAL_MACHINE SOFTWARE Microsoft Windows CurrentVersion Component Based Servicing Version
-
Выберите и щелкните правой кнопкой мыши подраздел «Версии». Выберите «Создать»> «Расширяемое строковое значение».
-
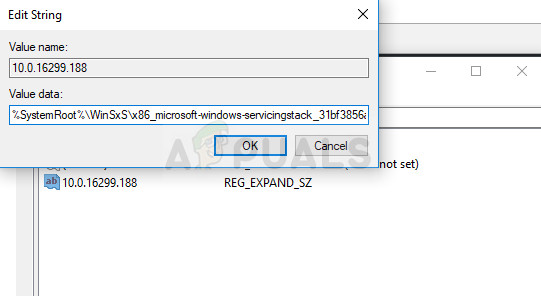
Переименуйте значение в соответствии с вашим именем идентификатора TrustedInstaller. После переименования значения оно будет выглядеть примерно так: 10.0.19041.1XXX
-
Затем дважды щелкните вновь созданное значение и вставьте путь к папке, указанной в WinSxS, в поле «Значение». Это будет выглядеть примерно так:% SystemRoot% winsxs amd64_microsoft-windows-servicingstack_31bf3856ad364e35_10.0.19041.1XXX_none_7e3d47227c694b34
-
Убедитесь, что правильно используете% SystemRoot% и удалите C: Windows из пути к папке.
-
Щелкните ОК, чтобы сохранить изменения.
Если вы видите сообщение об ошибке при создании значения при добавлении подраздела или строкового значения, вы должны стать владельцем ключа обслуживания на основе компонентов. Вы можете вручную стать владельцем ключа или использовать для этого автоматизированный инструмент.
Как стать владельцем ключа реестра
-
В редакторе реестра щелкните правой кнопкой мыши компонент «Обслуживание на основе компонентов» и выберите «Разрешения».
-
В окне «Разрешения» нажмите кнопку «Дополнительно» на вкладке «Безопасность».
-
Владелец по умолчанию установлен на TrustedInstaller. Щелкните ссылку «Изменить».
-
Введите свое имя пользователя и нажмите Проверить имена. Щелкните ОК, чтобы сохранить изменения.
-
Установите флажок Заменить владельца вложенных контейнеров и объектов и нажмите Применить к изменениям.
После смены владельца вы можете изменить ключи реестра, чтобы добавлять новые значения и подразделы без каких-либо ошибок.
Устранение ошибки защиты ресурсов Windows в Sfc / Scannow — стало проще
Одно из этих четырех исправлений позволит вам исправить ошибку защиты ресурсов Windows и выполнить команду Sfc / scannow. В большинстве случаев вы можете решить эту проблему, настроив записи реестра. Однако, если ничего не работает, попробуйте точку восстановления или сбросьте систему до заводских значений по умолчанию.
- Remove From My Forums
-
Question
-
We are trying to attempt to fix a Windows 2008 start up problem. We boot the machine from a Windows 2008 CD and go to the repair tool — command prompt.
When we do the command sfc /scannow, we are getting
«Windows Resource Protection could not start the repair service»
We did some researches there someone suggested the trustedinstaller is not running so we tried to do a net start trustedinstaller.
But We are getting
«The windows modulers instaler service is starting
The windows modulers instaler service is starting could not be startedA system error has occured
System error 1067 has occured
The process terminated unexpectedly. «Anyone can give us an idea to see why we can not run the sfc the first place. Thanks
Answers
-
Hello Chun-Chu,
Can you try to boot to the install DVD ( or a copy of WinPE if you have one available) and choose the repair option in the lower left hand corner?
If so can you try to run sfc with the offline options to see if the system will repair or identify corrupted files?
Thanks,
Darrell GorterThis posting is provided «AS IS» with no warranties, and confers no rights
-
Marked as answer by
Friday, November 6, 2009 11:43 PM
-
Marked as answer by
This error is quite an annoying one because it usually appears when you are trying to run certain services which are used to fix your computer such as the SFC (System File Scanner) and it prevents you from fixing other errors on your PC.
That is why you should give it extray attention and try to solve it using any of the methods displayed below. The problem is no stranger to any version of the Windows operating system and the methods below can be applied to all of them.
Solution 1: Start the Windows Installer Service (sometimes called TrustedInstaller)
The Windows Modules Installer or TrustedInstaller service enables installation, modification, and removal of Windows components. If this service is disabled, install of Windows updates or system repair tools might fail for this PC. This service has full access to Windows Resource Protection files and registry keys and it needs to run in order for the Repair Service to run.
- Open the Run dialog box by using the Windows Key + R key combination. Type “services.msc” without the quotation marks in the Run dialog box and click OK.
- Locate the Windows Installer Service or the TrustedInstaller service, right-click on them and select Properties.
- Make sure that the option under Startup type in Windows Store Services’ Properties is set to Automatic.
- If the service is stopped (you can check that just next to the Service status message), you can start it immediately by clicking on the Start button.
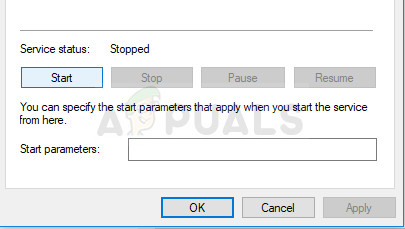
You may receive the following error message when you click on Start:
“Windows could not start the Windows Installed Service on Local Computer. Error 1079: The account specified for this service differs from the account specified for other services running in the same process.”
If this occurs, follow the instructions below to fix it.
- Follow the steps 1-3 from the instructions above in order to open Windows Installer Service properties.
- Navigate to the Log On tab and click on the Browse… button.
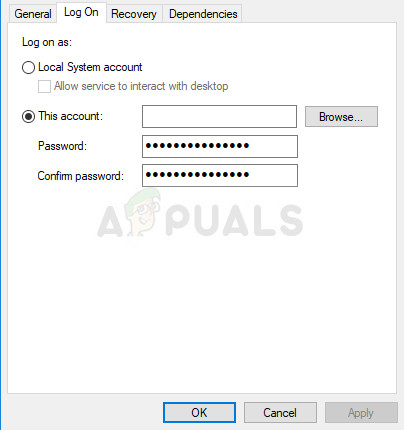
- Under the “Enter the object name to select” box, type in your computer’s name and click on Check Names and wait for the name to become authenticated.
- Click OK when you are done and type in the administrator password in the Password box when you are prompted with it.
Note: Another useful thing you can perform with the Windows Installer Service is to reregister it and check to see if that solved the problem. This will also take a minute and it can actually solve the problem.
- Click the Start menu and type in the following command in it before pressing Enter in order to run it:
%windir%system32msiexec /unregserver
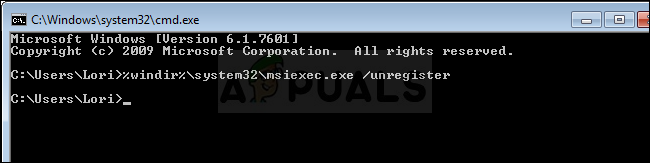
- Now you only need to repeat the same process only this time with the command below:
%windir%system32msiexec /regserver
- Make sure you provide any administrator permissions if prompted to do so. Check to see if the problem still appears.
Solution 2: Update Your Windows PC
Some users have reported that the problem was almost impossible to solve by any method they found on the Internet but simply installing the latest update helped them solve the problem. Keeping your PC up to date is very important and various bugs which appear on certain brands of computers are fixed with the latest ones.
Windows 10 updates itself automatically from time to time and the automatic update option is enabled by default. You can also check for updates by navigating to Settings >> Update & Security >> Update >> Check for updates. However, if you noticed that Windows is not updating regularly, follow the set of instructions below in order to fix this.
- Hold the Windows Key and press X in order to open this special context menu. You can also right-click on the Start menu. Choose Windows Powershell (Admin).
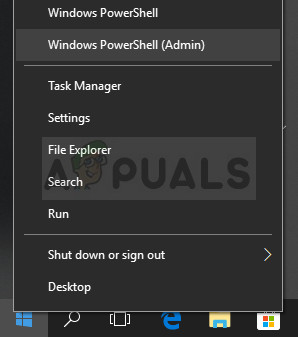
- In the Powershell console, type cmd and wait for Powershell to switch to the cmd-like environment.
- In the “cmd” console, type in the following command and make sure you click Enter afterwards:
wuauclt.exe /updatenow
- Let this command run for at least an hour and check back to see if any updates were found and/or installed successfully.
https://www.bleepingcomputer.com/forums/t/647715/windows-resource-protection-could-not-start-the-repair-service/
Solution 3: For Build 14279
The SFC tool is broken in this version of the Windows 10 operating system and users claimed that it didn’t work until a new version was released. However, if you are still stuck with this build of Windows and if you want to have access to SFC, you can use the workaround below in order to get it working.
Preparation: You will need to take ownership of the folders below so make sure you repeat this process for the two folders you are going to take ownership of. The first one is located here:
%SystemRoot%winsxs ; and its name is amd64_microsoft-windows-servicingstack_31bf3856ad364e35_10.0.14279.1000_none_25a158fc7f85c69d
- Open File Explorer, and then locate the TrustedInstaller.exe file in the following location:
C:WINDOWSservicingTrustedInstaller.exe
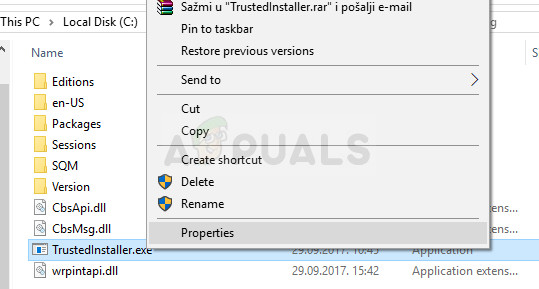
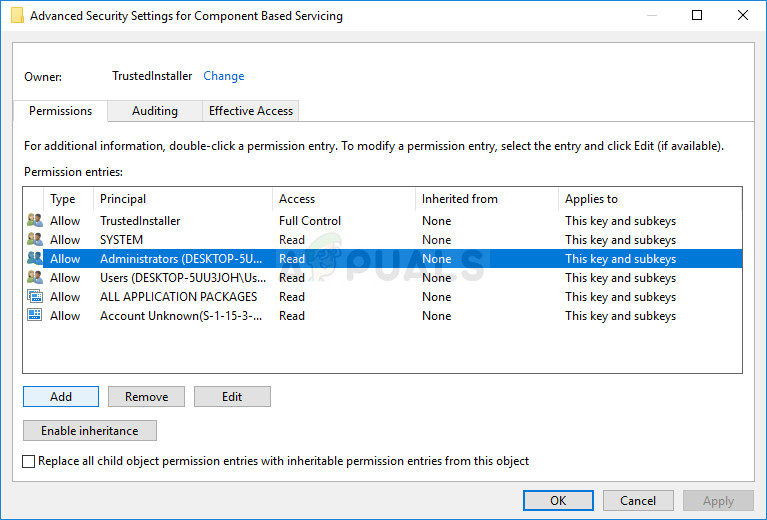
- Right-click the file, click Properties, and then click the Security tab. Click the Advanced button. The “Advanced Security Settings” window will appear. Here you need to change the Owner of the key.
- Click the Change link next to the “Owner:” label The Select User or Group window will appear.
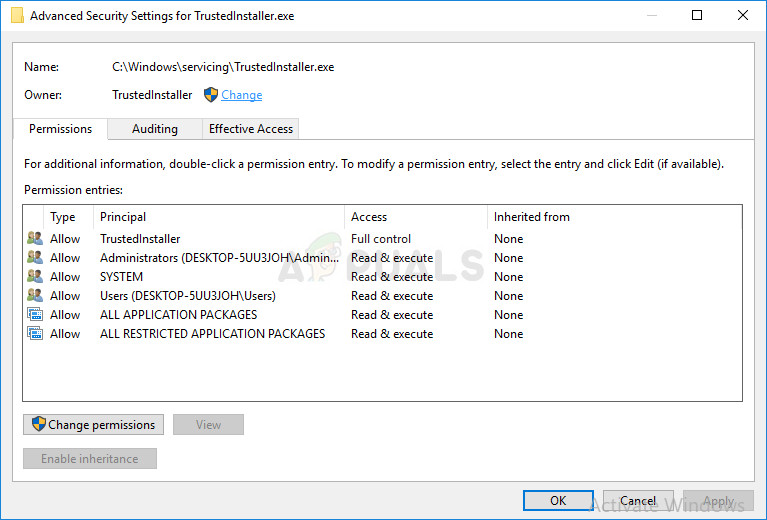
- Select the user account via the Advanced button or just type your user account in the area which says ‘Enter the object name to select’ and click OK. Add the Administrator account.
- Optionally, to change the owner of all subfolders and files inside the folder, select the check box “Replace owner on subcontainers and objects” in the “Advanced Security Settings” window. Click OK to change the ownership.
Make sure you repeat the same process for the folder located in %SystemRoot%winsxs with the name of amd64_microsoft-windows-servicingstack-onecore_31bf3856ad364e35_10.0.14279.1000_none_5a92ee0dd788e433
- Navigate to the following folder. Make sure you have admin permissions and that you have enabled hidden files and folders. Click on the “View” tab on File Explorer’s menu and click on the “Hidden items” checkbox in the Show/hide section. File Explorer will show the hidden files and will remember this option until you change it again.
%SystemRoot%winsxsamd64_microsoft-windows-servicingstack_31bf3856ad364e35_10.0.14279.1000_none_25a158fc7f85c69d
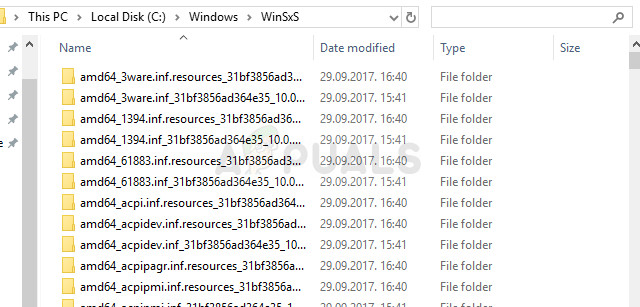
- Check to see if you are able to find a file called wrpint.dll. If the file is not there, you will need to locate it elsewhere and paste it. Navigate to this folder and locate the wrpint.dll file. Right-click on it and choose copy.
%SystemRoot%winsxsamd64_microsoft-windows-servicingstack-onecore_31bf3856ad364e35_10.0.14279.1000_none_5a92ee0dd788e433
- Paste the wrpint.dll file in the first folder where the file was missing and check to see whether SFC will start working.
Solution 4: Add a Missing Registry Key
There is a problem with certain versions of the Windows operating system where you are missing a registry key related to the ID of the TrustedInstaller service. Fixing this problem is somewhat advanced and you should follow the instructions below in order to fix it.
Before proceeding with this solution, it’s recommended that you close all of your running programs and it’s advisable to create a backup of your registry just in case something goes terribly wrong while you edit it. Backup your registry by following the instructions in our article.
- Navigate to the folder below and check the name of a subfolder which should look something like 6.1.7600.16385. That is the TrustedInstaller ID so make sure you copy the name of this folder and paste it somewhere.
C:WindowsServicingVersion
- Navigate to the C >> Windows >> WinSxS folder and find the folder whose name start with the following:
x86_microsoft-windows-servicingstack_31bf3856ad364e35_{TrustedInstaller ID} (32bit Windows)
amd64_microsoft-windows-servicingstack_31bf3856ad364e35_{TrustedInstaller ID} (64bit Windows)
- Copy the names of these folders and also keep them somewhere in a text file.
Before you proceed, you will need to take ownership of a certain registry key which can be performed quite easily if you follow the instructions below carefully.
- Navigate to the following registry key, right-click on Component Based Servicing in the tree at the left side of the screen and click on Permissions.
HKLMSoftwareMicrosoftWindowsCurrentVersionComponent Based Servicing

- After this window opens, click on Advanced and navigate to the Owner tab. Click on the Administrators entry under the Change owner to section and Apply the changes.
- After that, exit this window and the Advanced settings window as well and click on Administators under the Group or user names section in the Permissions window.
- Under the Permissions for Administrators section, click on Full Control and Apply the changes yet again.
Now it’s the time for the final part of the solution which really shouldn’t take a long time.
- Navigate to the following registry key, right-click anywhere at the right-side of the window and choose New >> Key. Name it Version.
HKLMSoftwareMicrosoftWindowsCurrentVersionComponent Based Servicing
- In this Version key, you should create an Expendable String Value and set the TrustedInstalled ID at its name. Copy it from the place where you have kept it. Right-click on this Expendable String Value and choose the Modify option.
- The value should be the full path to the folder from the WinSxS. For example:
%SystemRoot%WinSxSx86_microsoft-windows-servicingstack_31bf3856ad364e35_{TrustedInstaller ID} (32bit Windows)
- Check to see if the problem is solved.
Solution 5: Running an Offline SFC Scan
This solution has only helped several people but it has helped them and the method is highly advised my Microsoft engineers and it’s quite easy to run it even if you are having issues with the SFC scan while running it normally.
- Search for “Command Prompt”, right-click on it, and select the “Run as administrator” option. Copy and paste the following command and make sure you click Enter afterwards:
sfc /SCANNOW /OFFBOOTDIR=c: /OFFWINDIR=c:windows
- If a message appears saying that the scan was successful, you have solved your problem. If the same error appears, please try other methods in this article.
Solution 6: Rename a File
Renaming this file is helpful in many cases but it’s important that you install all pending updates on your computer before you do so because the file contains many information about the current state of your computer and the updates which are pending. Renaming it might cause these updates to not install properly.
- Navigate to C >> Windows >> WinSxS and locate a file named pending.xml. Right-click on it and choose rename.
- Rename it to pending.old.xml and check to see if the problem is solved. If it’s not, make sure you revert the changes to the file.

Kevin Arrows
Kevin is a dynamic and self-motivated information technology professional, with a Thorough knowledge of all facets pertaining to network infrastructure design, implementation and administration. Superior record of delivering simultaneous large-scale mission critical projects on time and under budget.