Contents:
What is sfc /scannow?
SFC is the short form of System File Checker and it is a Windows utility that helps users check file corruption and repair registry data. System File Checker is a function of modern Windows system including Windows Vista, Windows 7, Windows 8 and Windows 10.
System File Checker allows users to launch a command prompt window and start a system scanning so that you can check whether protected system files are corrupted or not. The sfc / scannow is the very command that enables System File Checker utility to scan all protected system files for your PC. It is capable of verifying file versions and repairing incorrect files by replacing when with those from a repair source. Thus, it is quite helpful to solve system issues caused by file corruption.
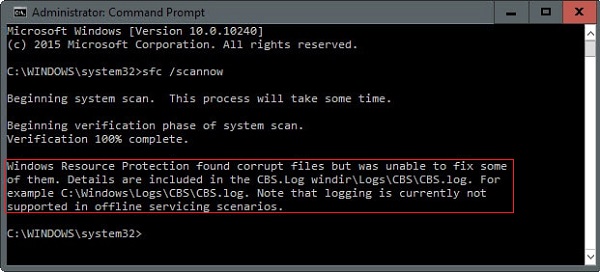
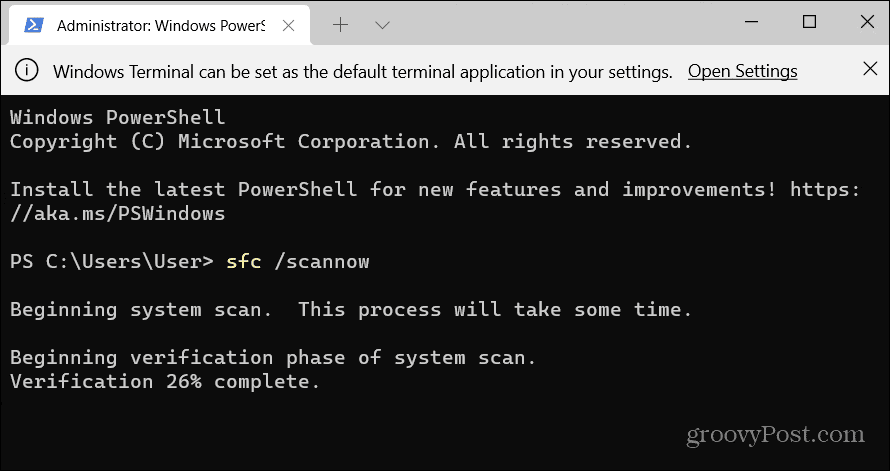
How to use sfc / scannow? It is well known that the corruption of system files that affects system running is one the most annoying problems we may encounter. In this case, we can use the command to troubleshoot such issues. Launch an elevated Command Prompt or run PowerShell (Admin), and then type in sfc / scannow and press Enter key. This triggers an SFC scan, which will analyze all system files on the computer and set aside corrupted or lost system files so as to fix them via uncorrupted cached copied.
Windows Resource Protection found corrupt files but was unable to fix some of them
Although sfc / scannow is effective in most cases, there are some situations that it cannot deal with. For instance, it counts on cached copies of normal system files to repair corrupted system files, and the command won’t be able to work as expected once the cached copies of system files are also corrupted for some reason. At this rate, you will receive error such as:
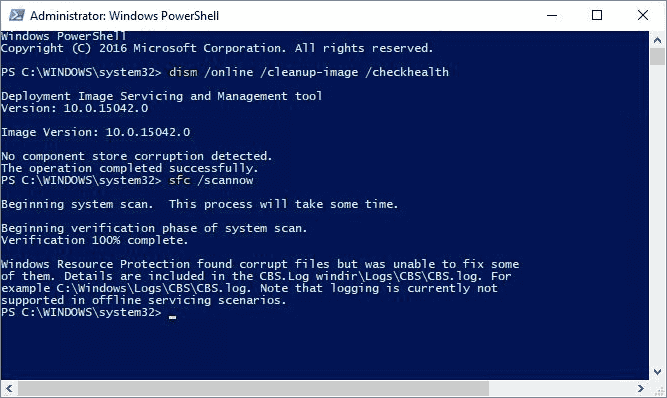
«Beginning system scan. This process will take some time. Beginning verification phase of system scan. Verification 100% complete. Windows Resource Protection found corrupt files but was unable to fix some of them. Details are included in the CBS.Log windirLogsCBSCBS.log. For example C:WindowsLogsCBS.log. Note that logging is currently not supported in offline servicing scenarios.»
Here is one the of real case about the issue:
«Hey guys, I just installed the latest system updates and made a clean installation of print driver. However, it began to periodically lock up. I thought it might be fixed with sfc / scannow , but this ended up with ‘Windows Resource Protection found corrupt files but was unable to fix some of them.’ I’m not a computer geek and cannot understand how to check that log file. I searched the issue for solution, but in vain. Hope anyone here can give me some advice to fix corrupted files and computer freezing issue.»
It is important to fix corrupted system files in order to keep operating system working smoothly. Despite that sfc / scannow cannot repair the problem, there are alternative solutions. So, without wasting any time, let’s see several solutions below and fix corrupted system files as soon as possible.
Solution #1: Check CBS.log file manually
The error message «Windows Resource Protection found corrupt files but was unable to fix some of them» mentions that details are included in the CBS.log file, thus we can check it and view the error in depth.
Step 1. Open File Explorer and type C:WindowsLogsCBS in the address bar and press Enter. Then you can see the CBS.log file.
Step 2. Double-click the file to view file content. Press Ctrl and F key and enter Corrupt to look for corrupted files. Then you can find out corrupted files that cannot be fixed by SFC. Then type the query in searching engine to look for solution.
If you are not allowed to access it, you can follow these steps to remove limitation: Right-click on the CBS.log file and select Properties; Click Security tab and click Advanced button; click Change under Owner; enter Everyone and click Check Names and click OK; Click Apply and OK; again right-click the CBS.log file to open Properties, and click Security tab to choose Everyone; make sure to select Full Control and save changes.
Solution #2: Run sfc / scannow in safe mode
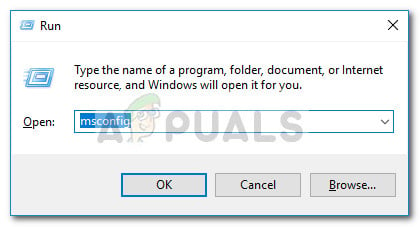
Step 1. Press Windows key and R together to open Run dialog. Type in msconfig and click OK button to open System Configuration window.
Step 2. On System Configuration window, click Boot tab and select Safe boot option. The click OK button and restart computer.

Step 3. Computer boots to Safe Mode automatically. Press Windows Key and X and select Command Prompt (Admin).
Step 4. Type sfc/scannow and press Enter. When process completes, boot to Windows and open System Configuration again, and uncheck the «Safe boot» option.
Solution #3: Check and repair hard drive errors
Hard drive errors can be the cause of many issues and you can have a check if the hard drive contains bad sectors. Here we can use free bad sector repair software to scan hard drive and verify bad sectors.
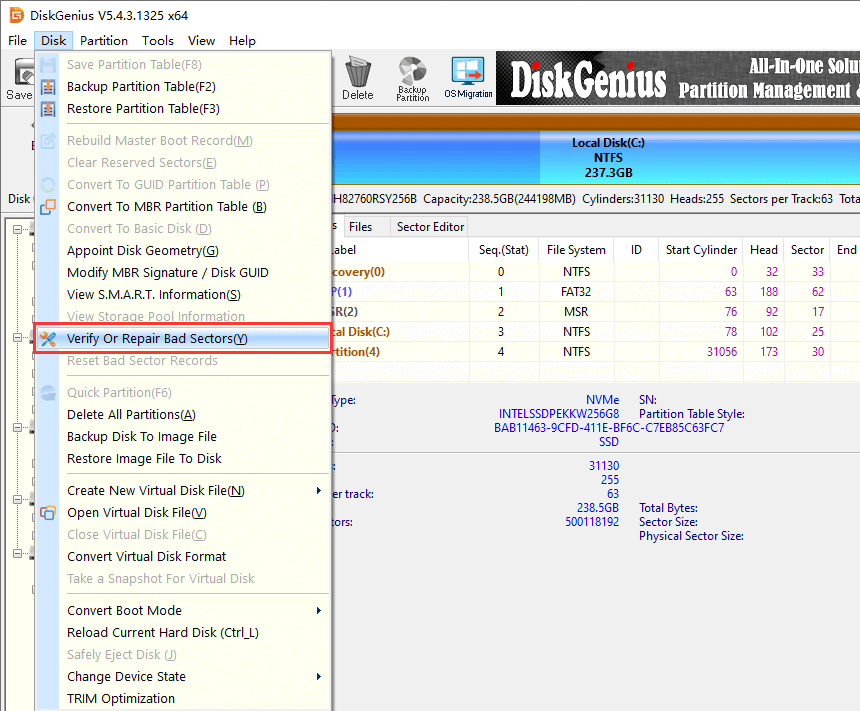
Step 1. Install and launch DiskGenius Free from your computer. Select the hard drive which contain system partition, and click Verify Or Repair Bad Sectors from Disk menu.
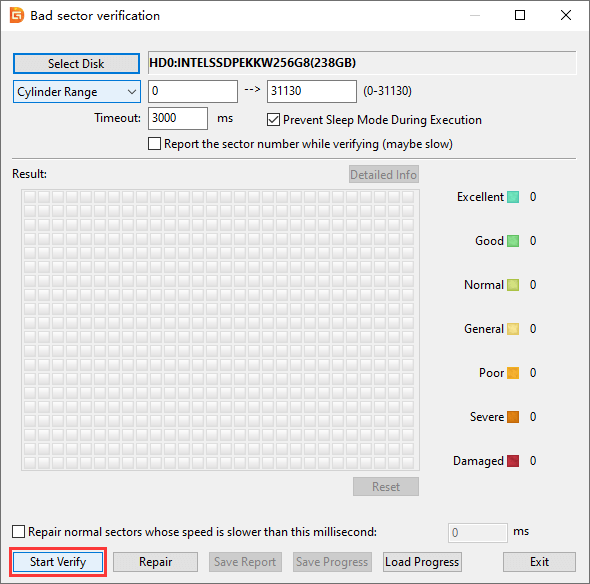
Step 2. Click «Start Verify» button and DiskGenius starts to scan the select disk and check if there are any bad sectors.
Note:
Checking bad sectors is safe, as it is read-only process. But bad sector repairing is not read-only and it may cause data loss, thus you should create a backup of important data before trying to repairing bad sectors. If your hard drive contains bad sectors, you’d better backup important files to a different disk, and then try repairing bad sectors. If bad sectors are not repairable, you may have to consider replacing the hard drive with a new one.
Solution #4: Restore system from backup
Windows System Restore is a useful function which is able to restore operating system to an earlier state. If your computer has enabled this feature and you cannot fix corrupted or missing system files, you can try restoring system.
Step 1. Type «restore» in searching box and choose «Create a restore point» from the searching result.
Selecting this option does not actually create a restore point, which opens the window that guides you to restore system.
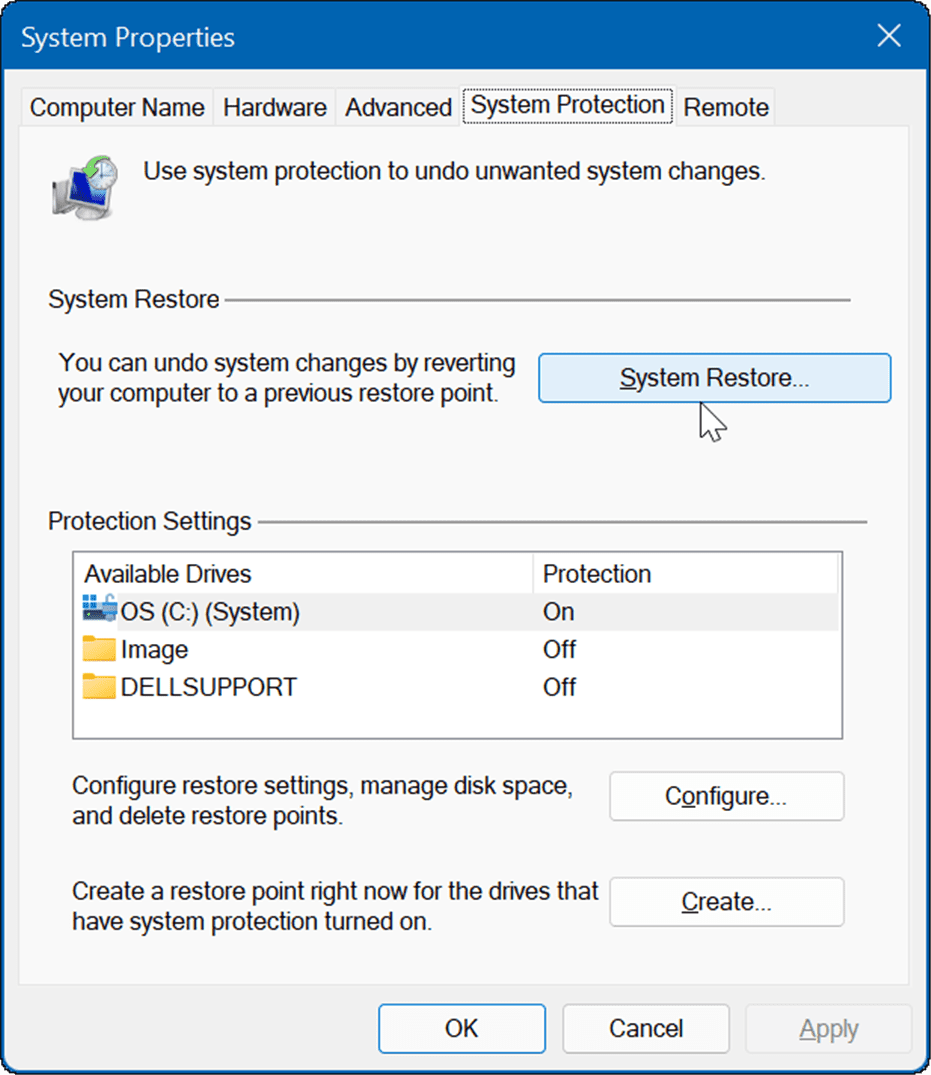
Step 2. On the System Properties window, select System Protection tab. Then click System Restore button.

Step 3. The system restore wizard shows up and click Next button from the welcome page.
Note: System restore can help fix problems that might be making your computer run slowly or stop responding. System restore does not affect any of your documents, pictures, or other personal data. Recently installed programs and drivers might be uninstalled.
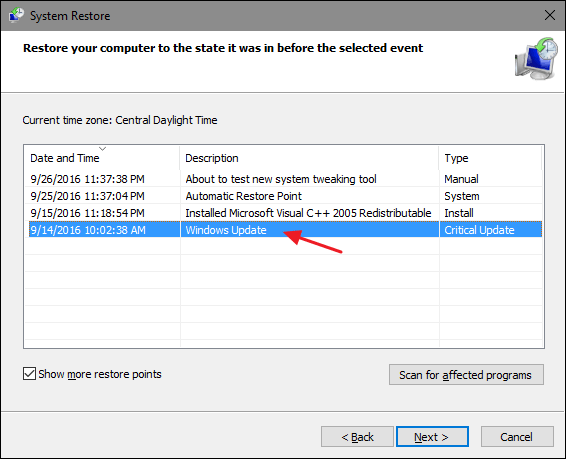
Step 4. Select the restore point you want and click Next button.
Select «Show more restore points» to let the system restore wizard show all available restore points. Select the time point you want to restore. It is recommended to select the most recent working restore point. Besides, you can click Scan for affected programs button to have a check if any software will be removed during the process.
If you’ve never enabled system restore feature in Windows, there is not any restore point here and you cannot perform system restore. Alternatively, system restore can be done if you’ve backed up with third-party software. Windows built-in system restore feature backed up data automatically regularly, however which takes more disk space. Therefore, most users prefer to backup & restore Windows and personal data with third-party software. If you haven’t created any back up for your computer, you can backup now.
DiskGenius is full-featured tool for disk and partition utilities, for example, recover lost or deleted files and partitions, resize partition, backup data, check bad sectors, etc. As to data backup functions, it is able to image partition/disk, clone partition/disk, backup partition table, copy sectors, etc. Full backup and incremental backup are supported. It is able to create a sector-level backup if necessary. Currently, hot backup of system drive is available. Now let’s have a look how the system backup works:
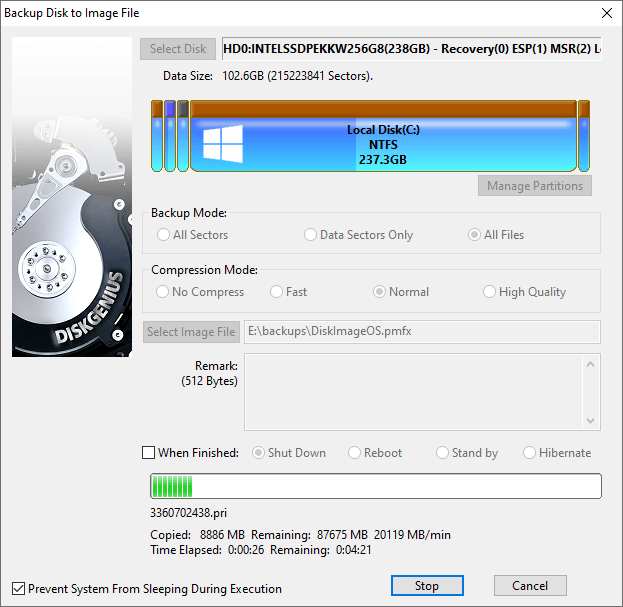
Method #1: Backup the entire system hard drive/SSD to an image file
With DiskGenius Free Edition, you can backup the entire system hard drive or SSD into an image file:
Step 1. In DiskGenius, right-click the hard drive or SSD where Windows OS is installed and choose «Backup Disk To Image File».
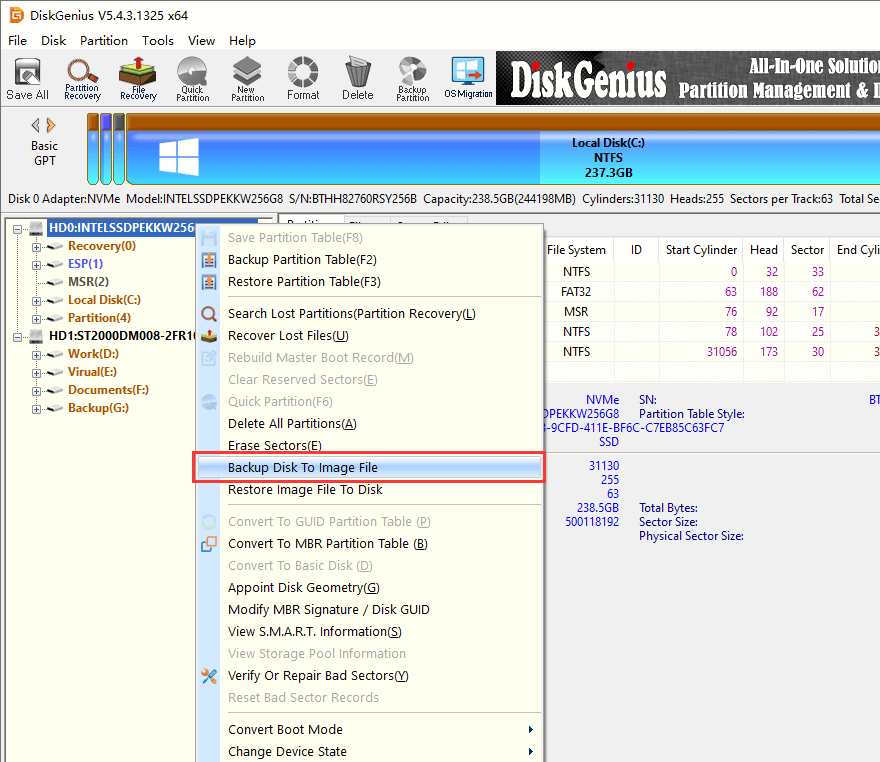
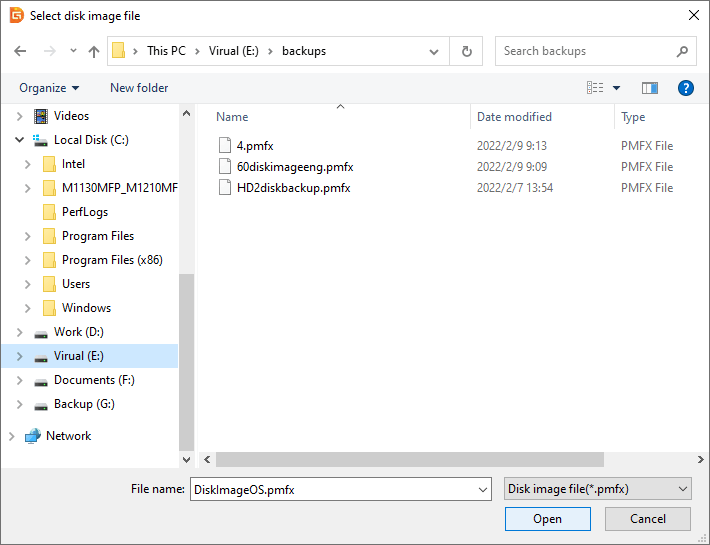
Step 2. Click «Select Image File» button to set a location and name for the backup image file.
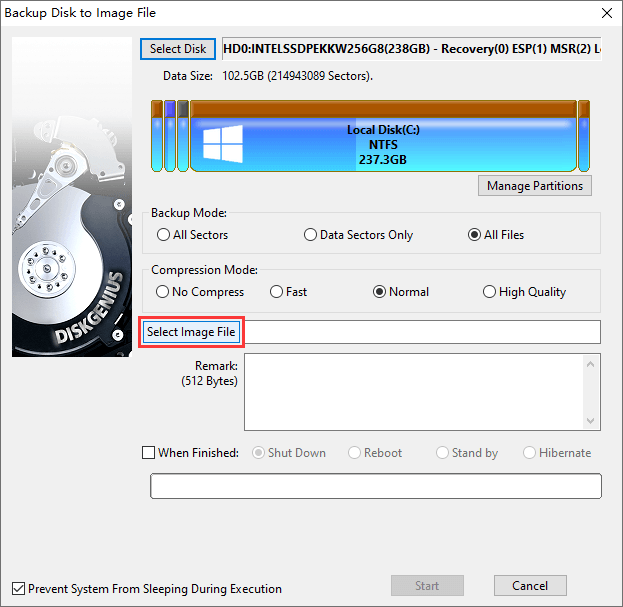
The backup image file can be stored to any disk except for the disk to be backed up. Specify a location and name for the image file, and click «Open» button.
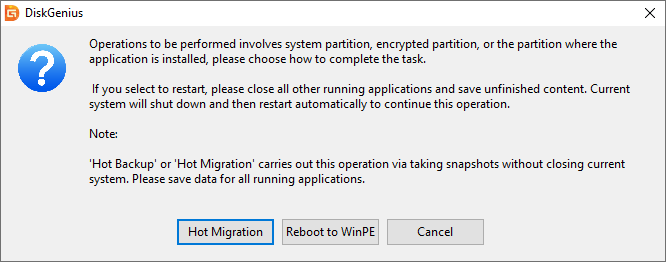
Step 3. Choose backup mode and compression method, and click «Start» button.

Select how to carry out the disk backup process. If you choose «Hot Migration», the backup process will be performed without shutting down current system.
Wait for the backup process to finish.
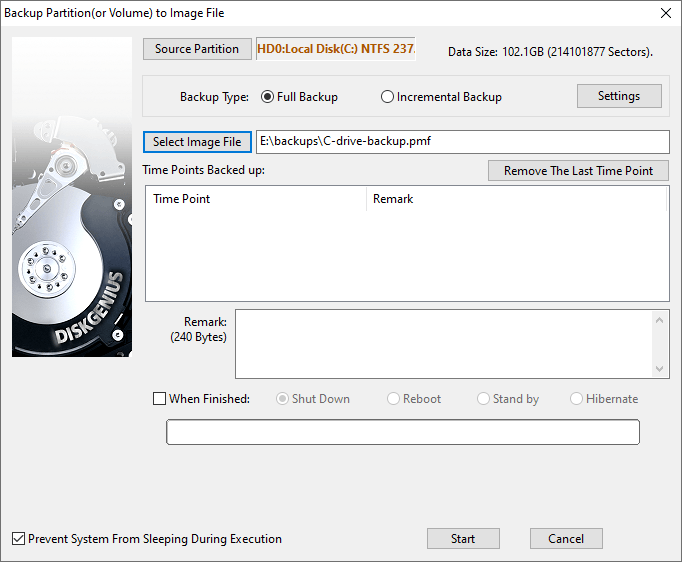
Method #2: Backup system partition to an image file
Step 1. Install and launch DiskGenius from your computer. Right-click C drive and choose «Clone Partition To Image File» from context menu.
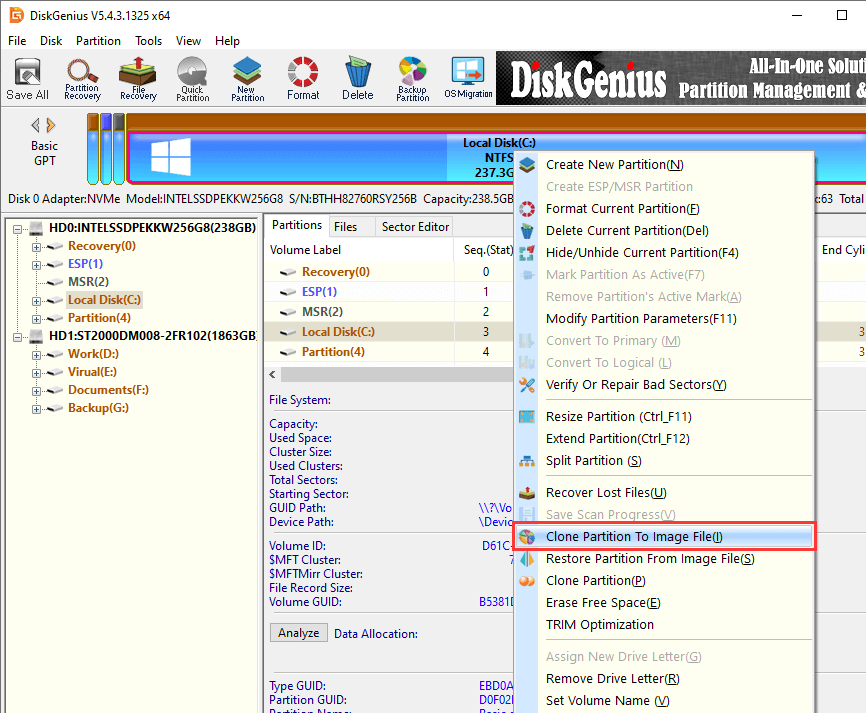
Step 2. Set a location and name for the image file, and click «Start» button.
Click «Select Image File» button to set name for backup image and select location to save it; besides, you can click «Settings» button to configure advanced settings for the backup process.
Conclusion
In brief, system file checker is a helpful tool provided by Windows system to handle corrupted system files, but sometimes SFC / scannow command does not work. According to the error message you get, you can find alternative solutions easily. In this guide you can find a couple of methods to fix system issue when SFC / scannow fails to. Last but not least, it is essential to create backup for operating system so that you can perform system restore when system issue is beyond repair. System restore helps to turn system back to the working status when it was backed up. Download DiskGenius now to backup & restore Windows and data on your own.
The following error occurred when running the SFC /SCANNOW command, to repair the system files on a Windows 10 PC: «Windows Resource Protection found corrupt files but was unable to fix some of them. Details are included in the CBS.Log windirLogsCBSCBS.log. For example C:WindowsLogsCBSCBS.log»

This tutorial contains instructions to resolve the «Windows Resource Protection found corrupt files but was unable to fix some of them» error, when running the SFC /SCANNOW command in Windows 7, 8 & 10 OS.
FIX Windows Resource Protection found corrupt files but was unable to fix
Method 1. Check and Repair Hard Disk Errors.
Method 2: FIX Windows corruption errors with the System Update Readiness tool (DISM).
Method 3: Run SFC in Safe Mode.
Method 4. Run the «SFC /SCANNOW» from the Windows Recovery Environment (WinRE).
Method 5. Examine the details of SFC SCAN.
Method 6. Repair Windows 10 with an in-place Upgrade.
Method 1. Check and Repair Hard Disk Errors.
First of all check and repair possible errors on your hard drive using the CHKDSK command. To do that:
1. Open command prompt as administrator.
2. At command prompt, give the following command and press Enter: *
- chkdsk /R
* Notes:
1. You will be required to reboot the computer if run the CHKDSK command on the system drive.
2. By default the CHKDSK command, will check your main C: drive for errors. If after checking the drive C:, you want to repair errors on another drive (e.g. the drive “E:” ), then switch to that drive (e.g. by typing E: & pressing Enter) and give the same command.
Method 2: FIX Windows corruption errors with the System Update Readiness tool (DISM).
The System Update Readiness tool is a Microsoft tool that can fix Windows corruption errors.
- Windows 7, Vista & Server 2008:
1. Download and save to your desktop the System Update Readiness tool according to your Windows version.
2. Double click to install the downloaded file (e.g. Windows6.1-KB947821-v34-x86.msu).

3. When the installation is completed, restart your computer.
4. Finally open command prompt as administrator and give the following command:
- sfc /scannow
- Windows 10, 8, 8.1 & Server 2012:
1. Right click at Windows start button ![]() and select Command Prompt (Admin).
and select Command Prompt (Admin).
2. At the command prompt window, type the following command & press Enter:
- Dism.exe /Online /Cleanup-Image /Restorehealth

3. Be patient until DISM repairs component store.
4. When the operation is completed, you should be informed that the component store corruption was repaired.

5. Finally, give the SFC command (in Administrative command prompt):
- sfc /scannow
Method 3: Run SFC in Safe Mode.
1. Press Windows ![]() + R keys to load the Run dialog box.
+ R keys to load the Run dialog box.
2. Type msconfig and press Enter.

3. Click the Boot tab and then check the Safe Boot option.
4. Click OK and restart your computer.
Note: When you finish your job, open the System Configuration utility again and uncheck the “Safe Boot” option to start Windows normally.
![windows-8-safe-mode_thumb[2]](https://www.wintips.org/wp-content/uploads/2014/04/windows-8-safe-mode_thumb2_thumb.jpg "windows-8-safe-mode_thumb[2]")
5. Finally, give the SFC /SCANNOW command (in Administrative command prompt).
Method 4. Run the «SFC /SCANNOW» from the Windows Recovery Environment (WinRE).
Another method to fix the SFC error «Windows Resource Protection found corrupt files but was unable to fix», is to Offline run the SFC /SCANNOW command. Detailed instructions on how to do that, you can found in this article: How to Run SFC OFFLINE.
Method 5. Examine the details of SFC SCAN.
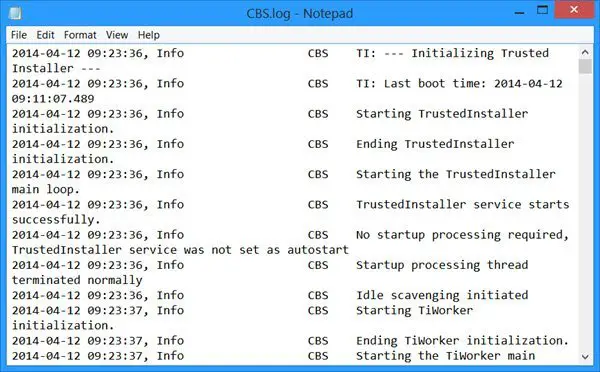
The next method to resolve the «Windows Resource Protection found corrupt files» in SFC, is to examine the SFC details in CBS.LOG file. To do that:
1. Open Command Prompt as Administrator.
2. Give the following command.
findstr /c:»[SR]» %windir%LogsCBSCBS.log >»%userprofile%Desktopsfcdetails.txt»
3. Then navigate to your desktop and open the «sfcdetails.txt» file in notepad to view which files are corrupted and replace them with a good copy.
Method 6. Repair Windows 10 with an in-place Upgrade.
The final method to fix Windows 10 problems, is to perform a Windows 10 Repair-Upgrade. For that task follow the detailed instructions on this article: How to repair Windows 10.
That’s it! Let me know if this guide has helped you by leaving your comment about which method is worked for you. Please like and share this guide to help others.
If this article was useful for you, please consider supporting us by making a donation. Even $1 can a make a huge difference for us in our effort to continue to help others while keeping this site free:

If you want to stay constantly protected from malware threats, existing and future ones, we recommend that you install Malwarebytes Anti-Malware PRO by clicking below (we
do earn a commision from sales generated from this link, but at no additional cost to you. We have experience with this software and we recommend it because it is helpful and useful):
Full household PC Protection — Protect up to 3 PCs with NEW Malwarebytes Anti-Malware Premium!
Error: Windows Resource Protection found corrupt files
«Windows Resource Protection found corrupt files but was unable to fix some of them. Details are included in the CBS.Log windirLogsCBSCBS.log. For example C:WindowsLogsCBSCBS.log.»
While running System File Checker tool (sfc) and using sfc/scannow command to repair missing or corrupted system files, the error ‘Windows Resource Protection found corrupt files but was unable to fix some of them’ is one of the most frequently received error that indicates sfc/scannow failed, and you might need to repair the corrupted files manually.
A quick overview of methods for solve Windows Resource Protection found corrupt files but was unable to fix some of them problem:
| Workable Solutions | Step-by-step Troubleshooting |
|---|---|
| Fix 1. Check and repair hard disk | First of all, check and repair possible errors and bad sectors on your hard disk to fix sfc scannow found corrupt files but |
| Fix 2. Run DISM command | When the SFC utility is unable to resolve the problem, you can use the DISM — Deployment Image Servicing and |
| Fix 3. Run SFC Scan in Safe Mode | If the issue is caused by an interfering 3rd party application, you can run SFC and DISM in a clean boot state |
| Fix 4. Run SFC from WinRE | You can offline run the SFC /SCANNOW command from the Windows Recovery Environment (WinRE) to fix SFC error |
| Fix 5. Perform a repair install | Perform a clean install or repair install is effective to get the SFC scannow found corrupt that it could not repair |
About Windows Resource Protection System File Checker
In Windows operating system, System File Check (sfc.exe) is integrated with Windows Resource Protection, which protects registry keys and folders as well as critical system files. Sfc utility can be invoked via Windows Command Prompt. And, the command sfc/scannow is used to scan all protected system files, if it finds a problem, it will attempt to replace the problematic files with a cached copy that is located in a compressed folder at %WinDir%System32dllcache.
Ideally, running sfc/scannow command would automatically fix corrupted system files for us, not in the situation when the file is not in the dll cache, or it got corrupted. At this moment, sfc/scannow will send error ‘Windows Resource Protection found corrupt files but was unable to fix some of them’.
Don’t be afraid. When you’re caught in troubles as we mentioned, go to fix it by yourself with the practical methods below.
5 Fixes for Windows Resource Protection found corrupt files but was unable to fix some of them
There are several common scenarios that are known to make the System File Checker disabled and show ‘Windows resource protection found corrupt files but was unable to fix some of them.’ error messages. Here are some general troubleshooting methods that will help resolve the case promptly.
Fix 1. Check and repair hard disk
If you have a hard drive problem, you’re bound to encounter the sfc scannow found corrupt files but was unable to fix some of them problem. First of all, check and repair possible errors and bad sectors on your hard disk. To do that, a free partition manager — EaseUS Partition Master Free will help you make it effortlessly. With its ‘Check File System’ feature, you can check and repair hard disk partition as simply as a click away.
Except for hard disk repairing, EaseUS Partition Master provides more one-stop disk partition options, such as resize/move partition to solve low disk space issue, clone disk, merge partitions, create/delete/format partition, wipe data, and disk/partition conversion (convert FAT32 to NTFS), which are totally free.
Download this powerful disk management tool and follow the steps below to repair your hard disk to solve Windows Resource Protection found corrupt files issue.
Step 1. Right-click the target partition that has a problem.
Step 2. Choose «Advanced» > «Check File System».
Step 3. Confirm if you want to hide the partition or not.
Step 4. In the Check File System window, check the «Try to fix errors if found» option.
Step 5. Click «Start» to check errors on your partition.
If you don’t prefer a third-party repair utility, you can run chkdsk in Command Prompt to check corrupted files and fix them.
- Press the Windows key and type cmd. Right-click «Command Prompt» and choose «Run as administrator».
- Enter the following command: chkdsk E: /f /r (E represents your target drive).
Fix 2. Run DISM command to fix corrupt files
When Windows resource protection found corrupt files but was unable to fix some of them, you can use the DISM (Deployment Image Servicing and Management) utility to repair the Windows image.
DISM uses the Windows Update component to do the job when the SFC scans to replace a corrupted file with a copy of the local storage that can also be corrupted. In this way, you need to make sure you have a stable Internet connection before running the scan.
Using the RestoreHealth command of DISM to automatically scan the Windows Image for any corruption and perform necessary repair automatically. Here are the steps you can follow.
Step 1. Press Windows key + R to open up a Run dialog box. Then, type cmd and press Ctrl + Shift + Esc to open up an elevated Command Prompt. Run as Administrator.
Step 2. Type the following command and press Enter. This command checks for component store corruption, records the corruption, and fixes the corruption.
dism /Online /Cleanup-Image /RestoreHealth
Or use this command if you are in repair mode of Windows DVD/USB:
Dism /Image:C: /Cleanup-Image /RestoreHealth
Wait for the process to complete. Depending on your PC configuration, it may take a while. When the process completes, and you’ll get a message saying that the file corruption was resolved. Then, restart your computer and run an SFC scan in Administrative command prompt at the next startup to see if the issue has been resolved.
If you’re still having the ‘Windows Resource Protection found corrupt files but was unable to fix some of them.’, move down to the next method.
Fix 3. Run an SFC/DISM Scan in Safe Mode
If the above solutions are not workable, running SFC command in Safe mode can avoid the Windows resource protection found corrupt file but was unable to fix some of them error caused by an interfering 3rd party application that is preventing the System File Checker utility.
In Safe Mode or a clean boot state, only some basic system programs and services will start. This will help us figure out if a third-party software, driver, service, or startup program is interfering with the SFC scan. Here’s a quick guide on how to run SFC in Safe Mode.
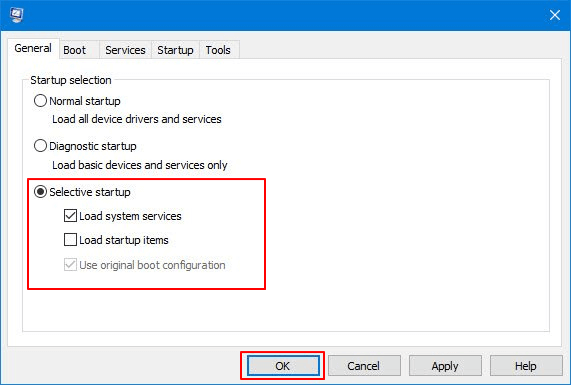
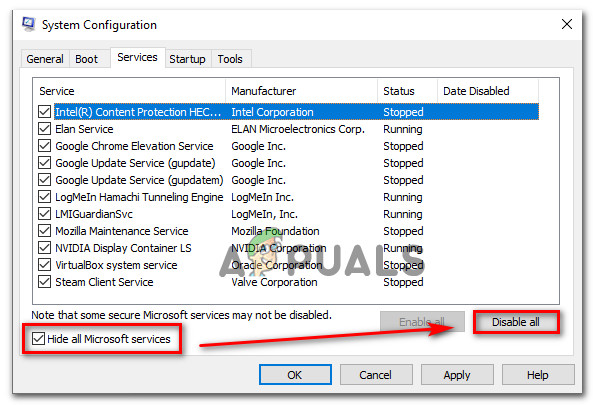
Step 1. Press Windows key + R to open up a Run dialog box. Then, type msconfig and press Enter to open up the System Configuration screen.
Step 2. Go to the «General» tab and choose «Selective startup». Under Selective startup, uncheck the «Load Startup items» box.
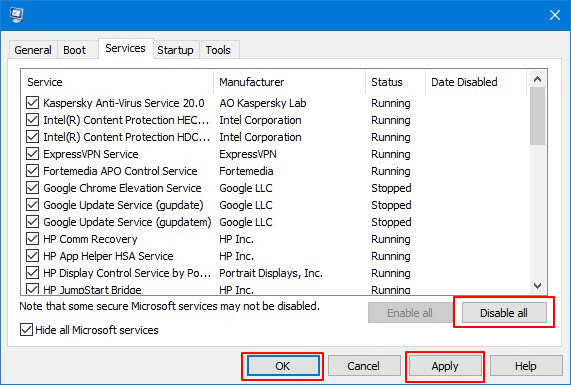
Step 3. Now, click the «Services» tab and check «Hide all Microsoft services». Then, click on the «Disable all» button to ensure that any 3rd party services are prevented from running at the next startup. Click «Apply» and restart your computer.
Step 4. Once your computer restarts in a clean boot state, press Windows key + R to open up another Run dialog box. Then, open Command Prompt, run SFC or DISM again, and input the following command lines.
DISM command line:
DISM.exe /Online /Cleanup-image /Restorehealth
SFC command line:
sfc /scannow
If the Windows Resource Protection found corrupt files and fix them successfully in Safe Mode, it indicates that the problem may be caused by software conflict.
Fix 4. Run SFC from the Windows Recovery Environment (WinRE)
Another way to fix Windows Resource Protection found corrupt files but was unable to fix some issue is running SFC utility in Windows Recovery Environment (WinRE).
Step 1. Boot from Windows installation DVD.
Step 2. Select «Repair Your Computer».
Step 3. Choose your target system.
Step 4. In the recovery tool panel, choose Command Prompt.
Step 5. In the command prompt window, type sfc scannow and press Enter.
However, if the sfc scannow found corrupt files but was unable to fix some of them error is still occurring, move to the final method below to replace all Windows components and resolve the issue.
Fix 5. Perform a Windows 10 Repair-Upgrade
The last method to fix Windows Resource Protection found corrupt files but was unable to fix some of them on Windows 10 is to perform a Windows 10 Repair-Upgrade.
A clean/repair install will overwrite all the contents on your Windows installation driver. It means that you will lose the data related to your operating system and personal files and personal preferences configuration. But it’s most likely to get the issue resolved.
For performing a repair install, follow detailed instructions on this article: How to install Windows 10 from USB.
Conclusion
That’s it! All the possible solutions to Windows resource protection found corrupt files but was unable to fix Windows 10 error have been talked about in this post.
- Tip
- If none of the methods has resolved the Windows Resource Protection found corrupt files but was unable to fix some of them issue for you, we recommend contacting our tech support team for help with 1-on-1 remote assistance via Email or LiveChat in this page.
FAQs About Windows Resource Protection found corrupt files
The following are the highly relevant questions about sfc scannow found corrupt files but was unable to fix some of them. You can check the brief demonstrations if you also have any of these problems.
How do you fix Windows Resource Protection found corrupt files but was unable to fix some of them?
To fix sfc scannow could not repair some files problem, you can try the following approaches:
- Check and repair hard drive errors
- Run DISM Command to fix corrupt files
- Run sfc / scannow in safe mode
- Run SFC from the Windows Recovery Environment (WinRE)
- Perform a Windows 10 repair install
How do I fix corrupted files in SFC Scannow?
You can run sfc/scannow to check and repair corrupted system files:
1. Click the Search button on your Windows computer. Type CMD, then right-click command prompt and choose Run as Administrator
2. Type SFC /scannow and hit enter
3. Wait for this process to complete
How do I fix SFC unable to fix corrupt files Windows 10?
Try to run the Windows update troubleshooter and see if it fixes the issue with Windows Updates.
1. Press Windows Key, then type troubleshoot and select the same from the list.
2. Select «View all» on the left panel and run Windows update troubleshooter from the list.
3. Click «Advanced», ensure to check «Apply» repairs automatically, and also select Run as administrator.
4. Click «Next» and follow the on-screen instructions to complete the troubleshooting.
After this, run SFC scan to check whether the problem still appears or not.
Can corrupted files be restored? How do I fix corrupted files?
A corrupted file is a computer file that is suddenly inoperable or unusable. There are several reasons for file corruption. In some cases, a damaged file can be recovered and fixed, while in other cases, it may be necessary to delete the file and replace it with a previously saved version.
You can use the corrupted file recovery tool — EaseUS Data Recovery Wizard within three steps:
1.Scan the hard disk for the corrupted files.
2.Select and preview the corrupted files you want to restore.
3.Fix corrupted files easily and then recover them to a storage device.

An SFC scan on Windows can fix many system stability issues, but what if you get a Windows Resource Protection found corrupt files error? Try these fixes.
If you’re running Windows, you can use the System File Checker (SFC) tool to fix many buggy operating system issues. For example, running an SFC scan can help to detect corrupt system files and replace the files with working ones.
You can use it to fix Windows 11 crashing, fix a keyboard not working, or spot (and possibly resolve) other issues. For example, if you see a Windows Resource Protection found corrupt files error message like the one shown below, you’ll know you’ve got a problem.

The error indicates that SFC found corrupt system files but it couldn’t replace the files with working ones. After receiving the error, you have a few options to repair your PC.
Here’s a look at five ways to fix the Windows Resource Protection found corrupt files error.
1. Run a DISM Scan if SFC Can’t Repair Corrupt Files
When running an SFC scan, it will replace corrupt files with known working ones. However, System File Checker may not have the correct files to replace the corrupt ones.
Instead, you can run a Deployment Image System Management (DISM) scan, which will check Windows servers to replace damaged files.
To run a DISM scan, use the following steps:
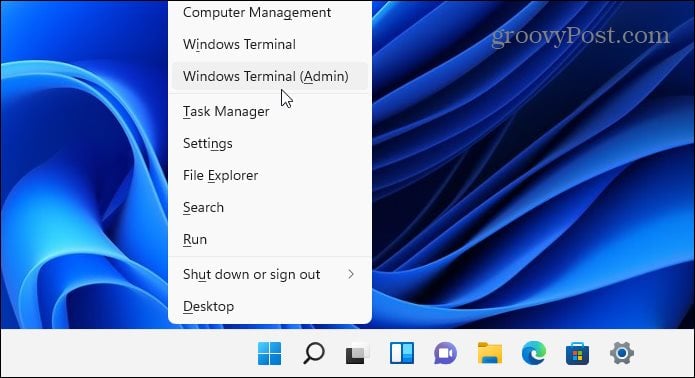
- Right-click the Start button and select Windows Terminal (Admin) from the menu.

- Enter the following command in the terminal and hit Enter:
DISM /Online /Cleanup-Image /RestoreHealth

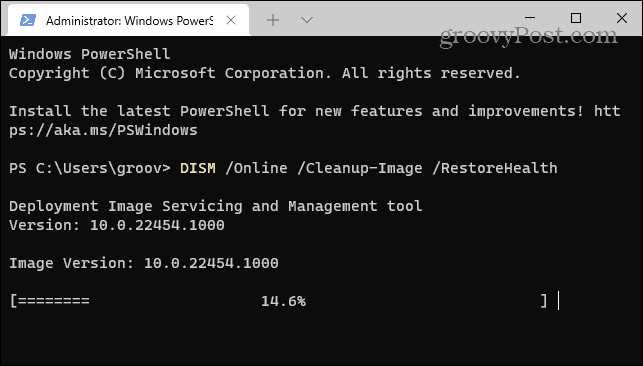
Note that it can take a while for the scan to run, and it isn’t uncommon for it to appear stuck at 20 percent. Don’t close the terminal window until the scan completes.
After the scan completes, rerun an SFC scan to see if you still receive the error.
2. Run SFC Scan in Safe Mode
The Windows Resource Protection found corrupt files error could be due to OS processes and services running. Starting Windows in Safe Mode only loads only the minimum drivers and services to boot. After booting into Safe Mode, you can then run an SFC Scan.
Note: If you’re not on Windows 11 yet, you can boot Windows 10 in Safe mode.
To boot Windows 11 into Safe Mode, do the following:
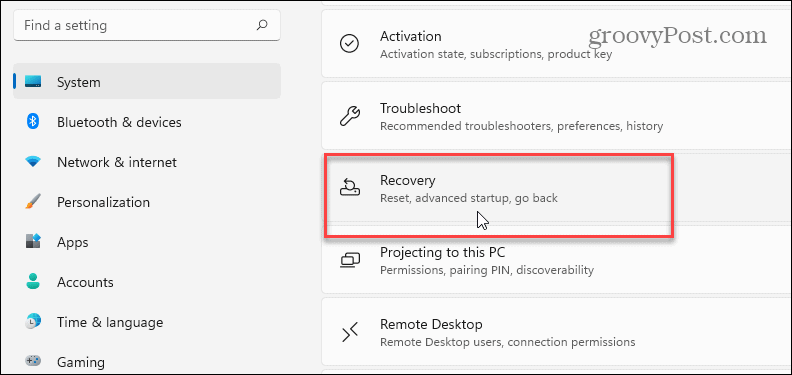
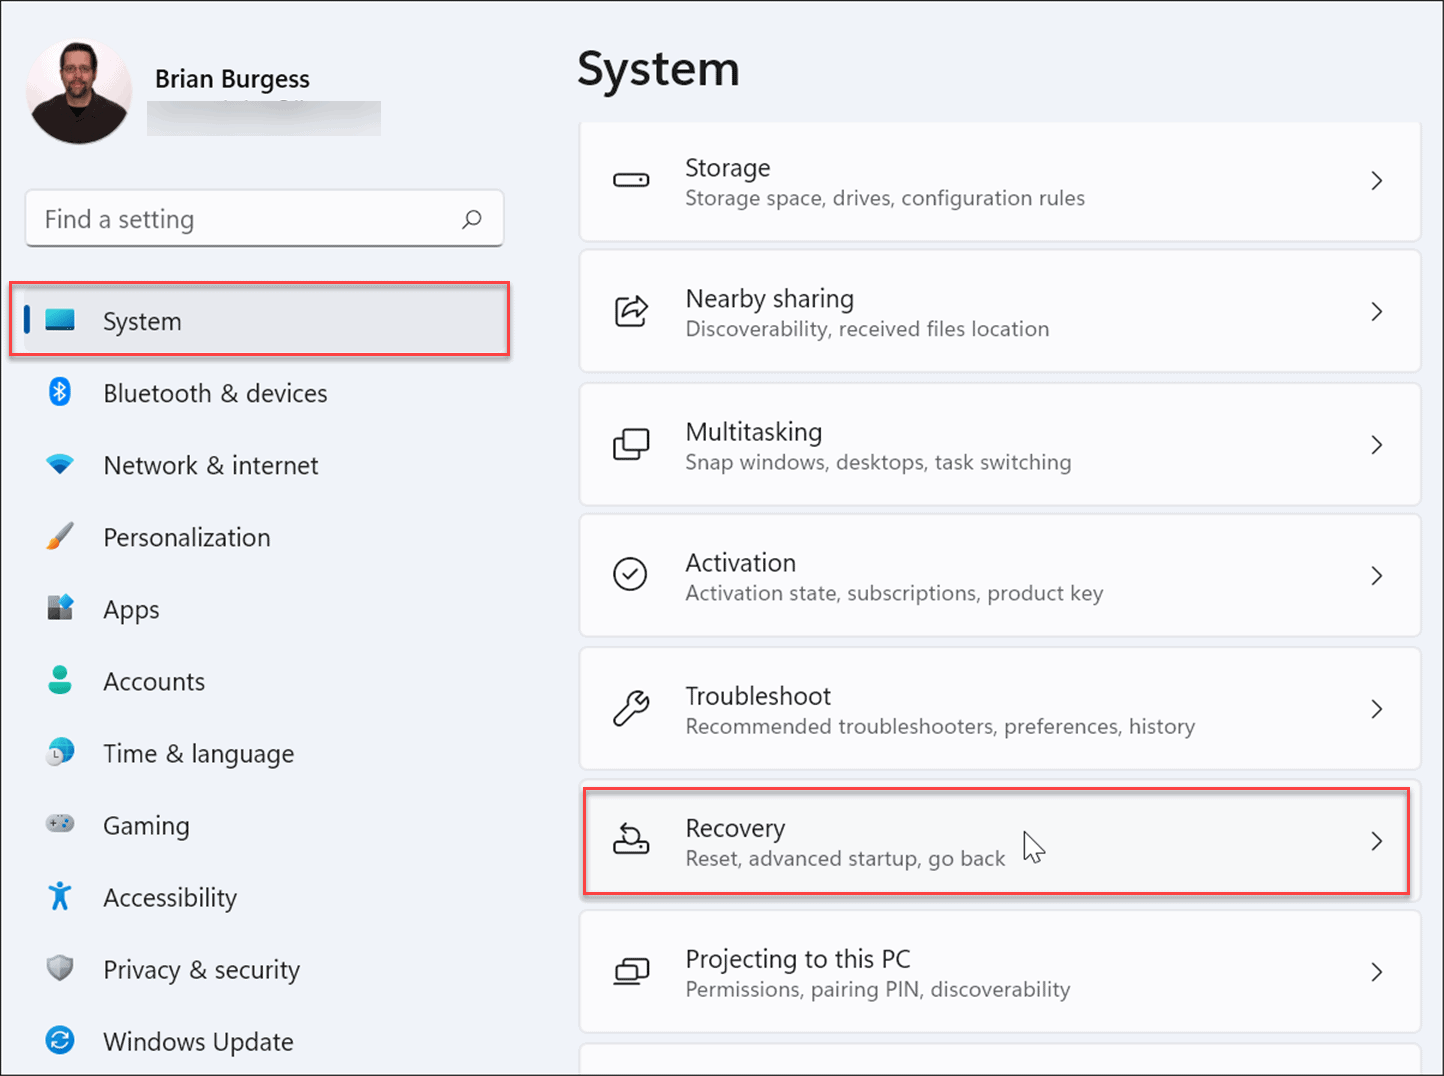
- Click the Start button or hit the Windows key and head to Start > Settings > System > Recovery.

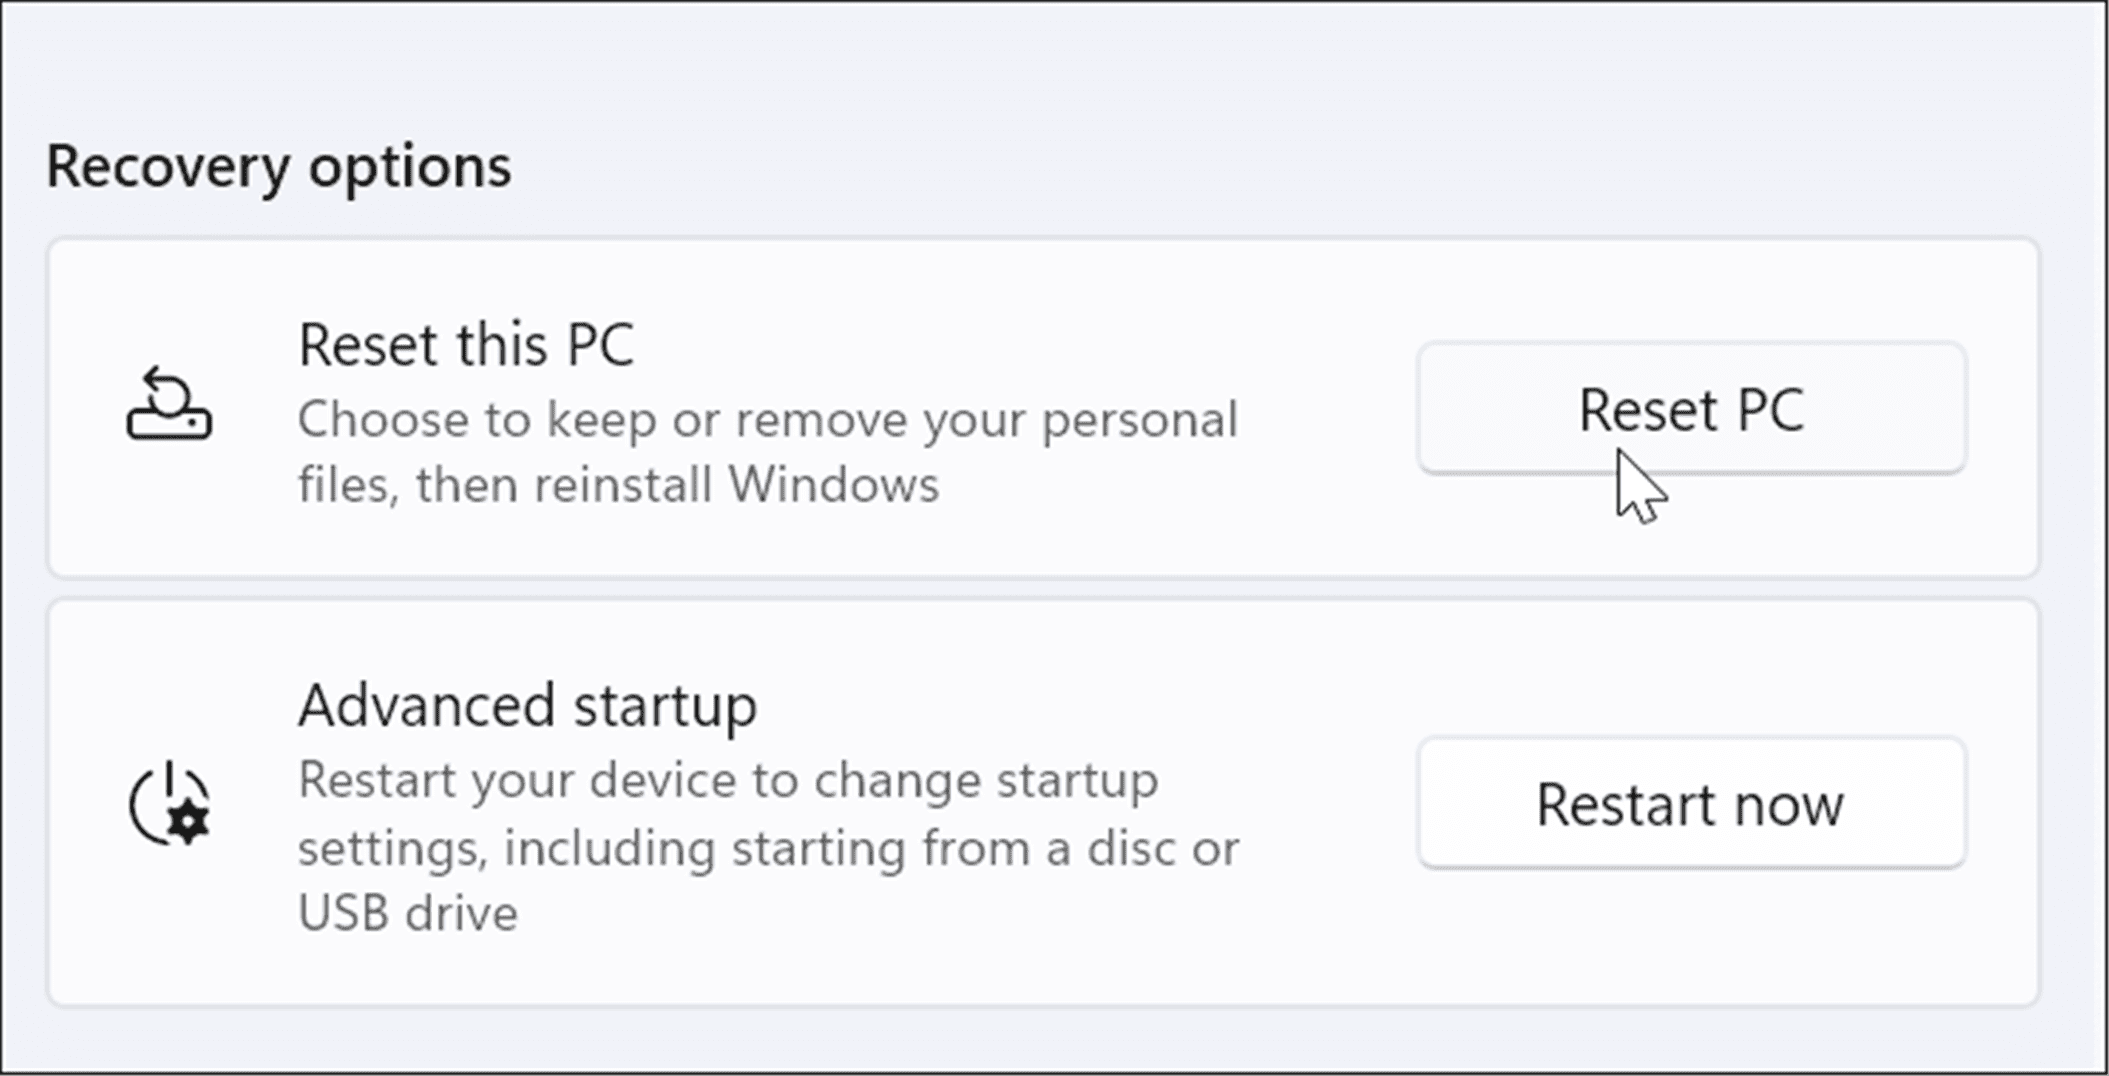
- Scroll down the menu and click the Restart now button next to the Advanced startup option.

- Click the Restart now button when the verification message pops up.

- Your computer will boot into the Windows recovery environment, and from there, you want to go to Troubleshoot > Advanced Options > Startup Settings. Choose Enable Safe Mode with Command Prompt.

- Now that you’re in Safe Mode launch the terminal as admin and run an SFC scan.
sfc /scannow


3. Uninstall Windows Updates
If you receive the Windows Resource Protection found corrupt files error after a Windows update, it could be buggy and conflicting with other system files. In that case, you can uninstall the cumulative update.
To uninstall a Windows Update, use the following steps:
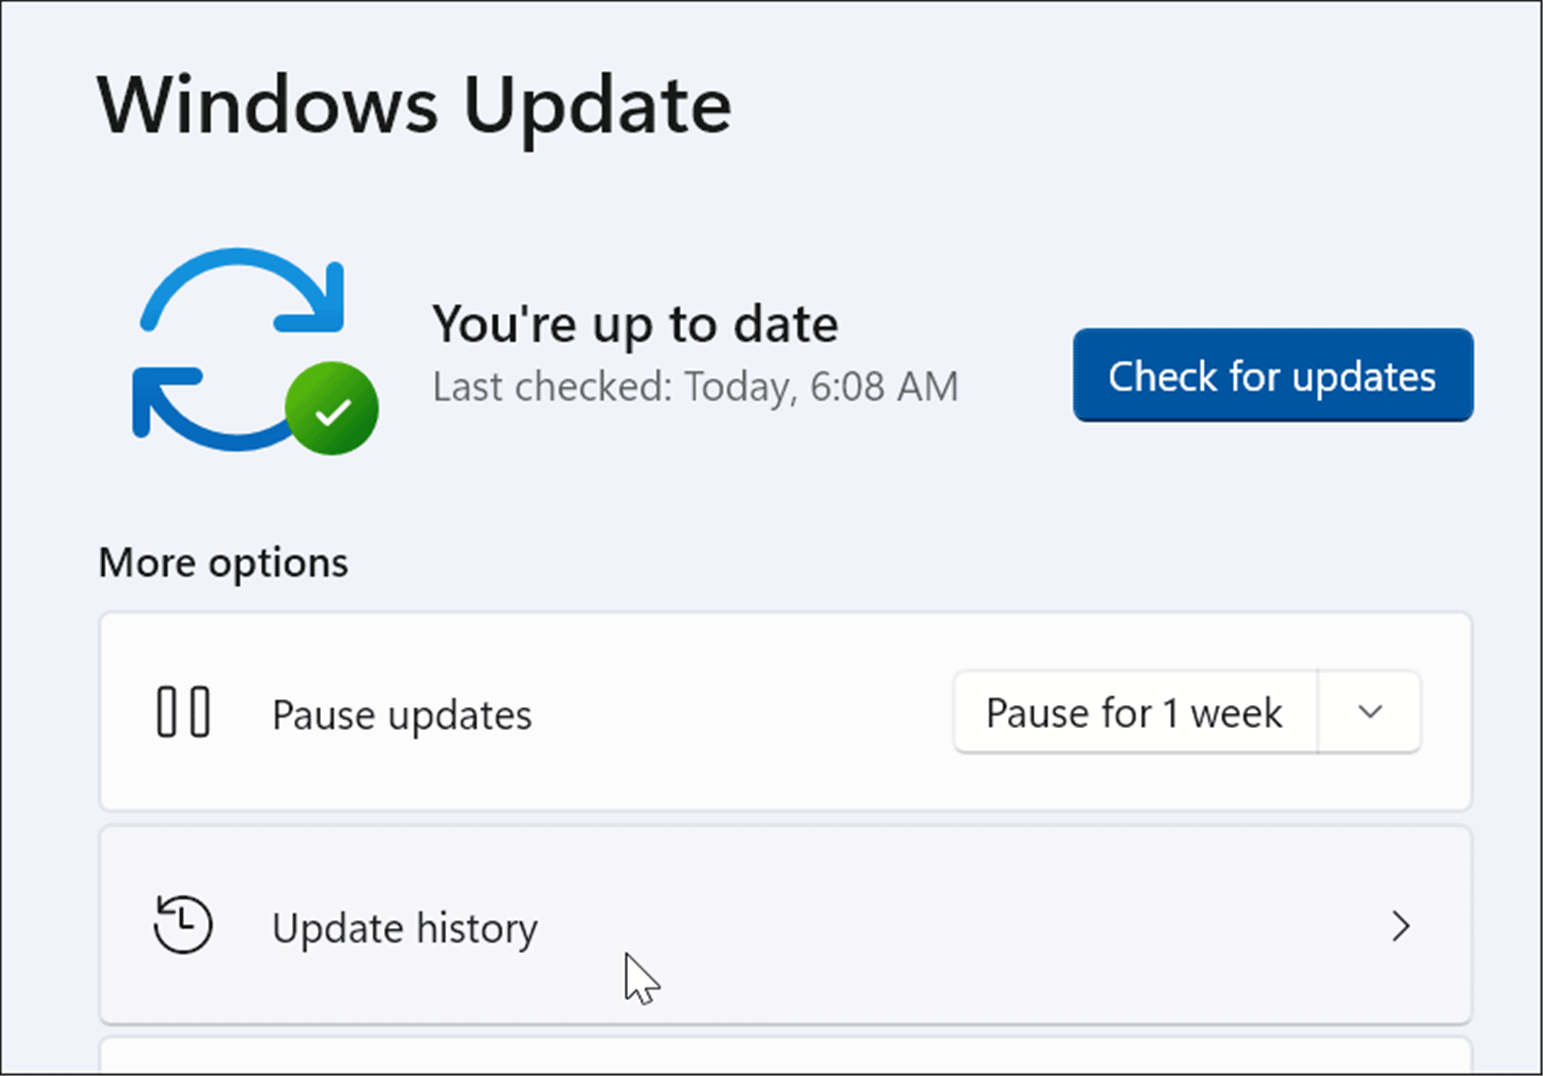
- Open Start > Settings and click on Windows Update at the bottom-left corner of the menu.
- Under the More options section, click on Update history from the list.

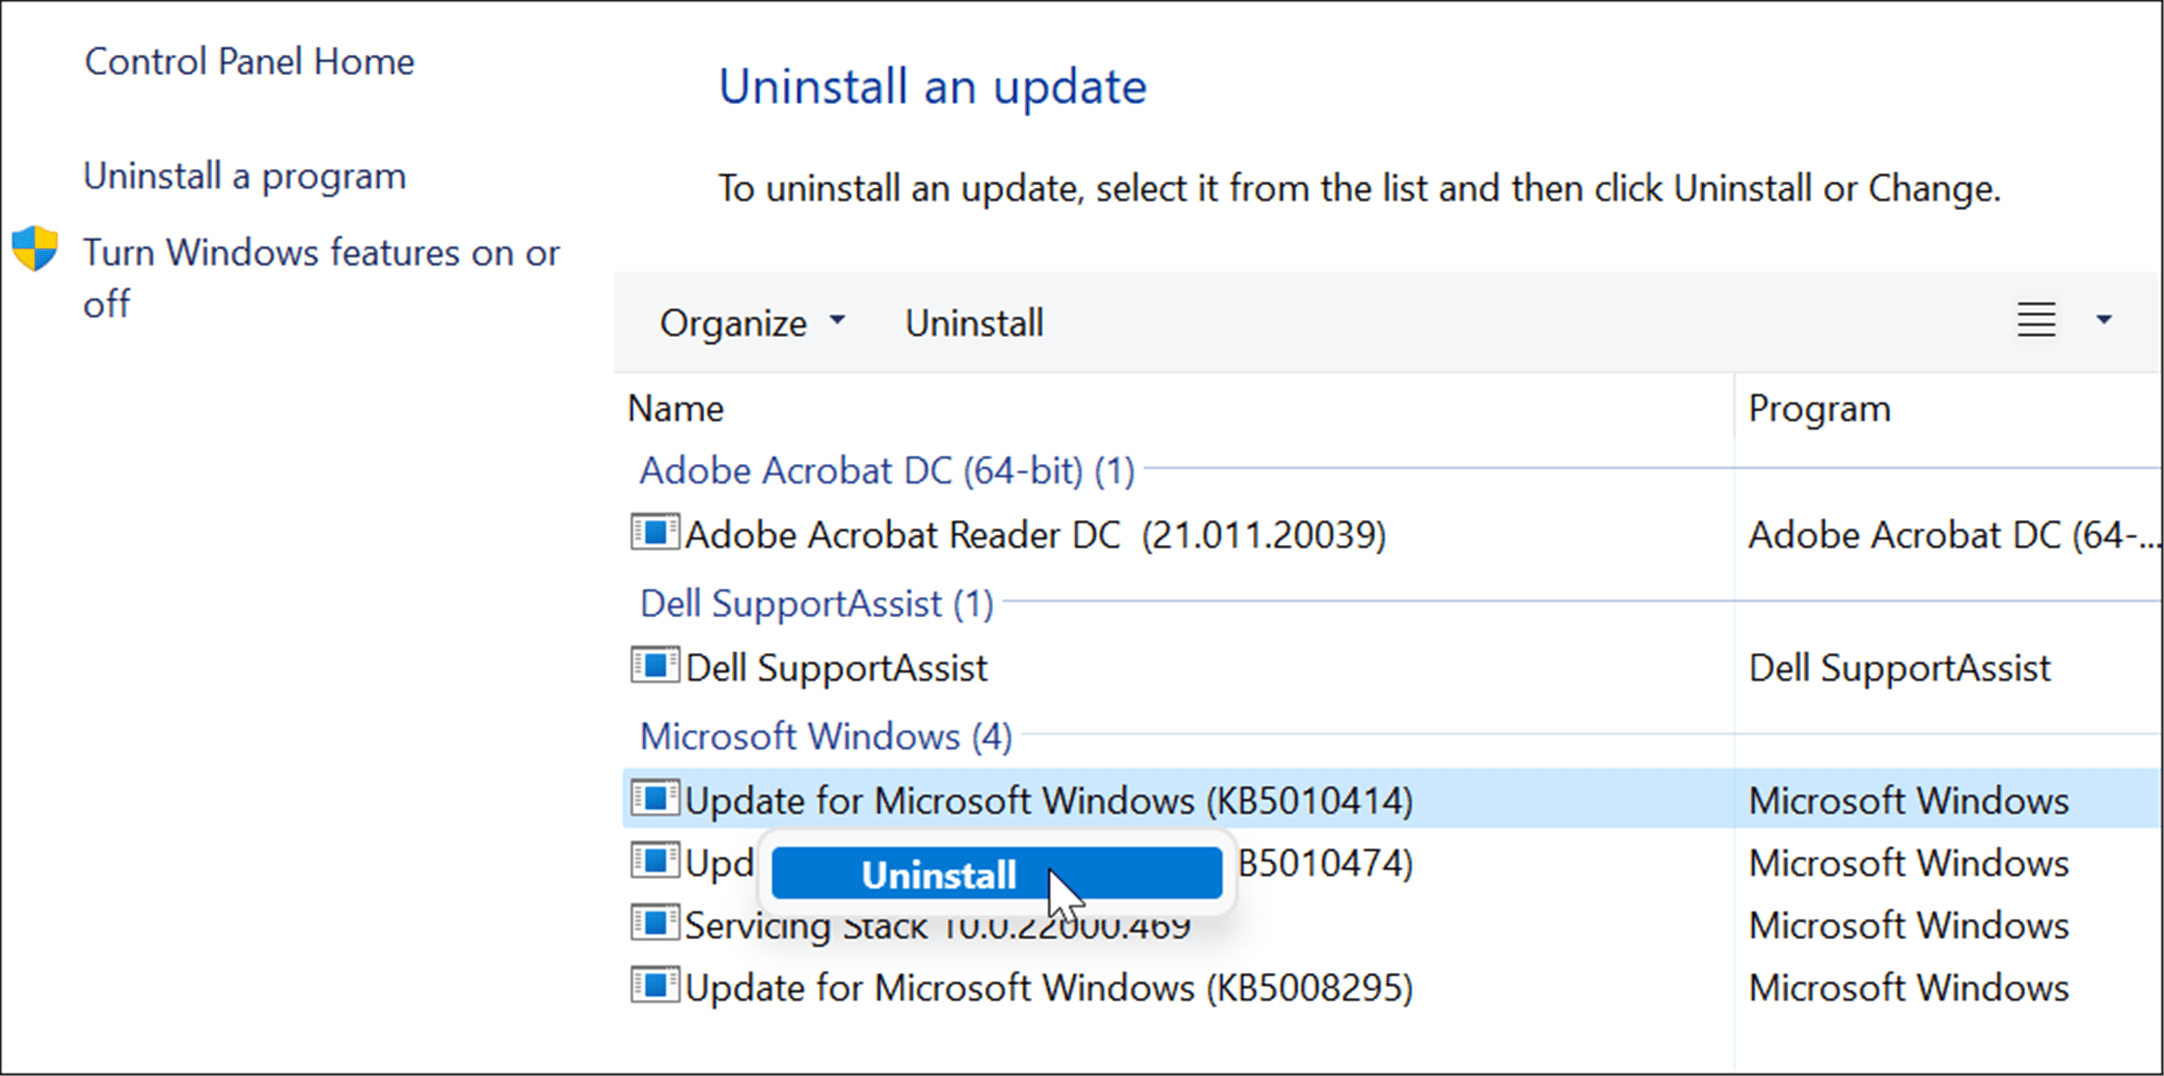
- Scroll down the list to the Related settings section and click on Uninstall updates.

- Right-click the troublesome update and select Uninstall and click Yes when the verification message appears.


After the update uninstalls, restart your system, and rerun the SFC scan to see if it fixes the error.
4. Use a Restore Point
If the SFC and DISM scans still aren’t helping, you can recover your PC from a system restore point – provided you have one.
To rollback OS changes and get your PC functioning again, use the following steps:
- Hit the Windows key, type restore point, and choose the Create a restore point option from the top result.

- From the System Properties window, click the System Restore button.

- Navigate through the on-screen wizard and choose the restore point you want and click Next.

- Once you have the restore point you want to revert to selected, click the Finish button.


Your system will reboot, and the restore point utility will apply the changes and return your PC to a working state.
5. Reset Your PC
If you’re still getting the Windows Resource Protection found corrupt files error, you can go a step further and reset your PC. Note that a PC reset is a “nuclear option,” and it will remove your apps. Also, your personal files could be lost during the process, so back up your PC first.
To reset your PC, do the following:
- Open Start > Settings and open System.
- Scroll down to the Recovery options.

- On the following screen, click the Reset PC button.

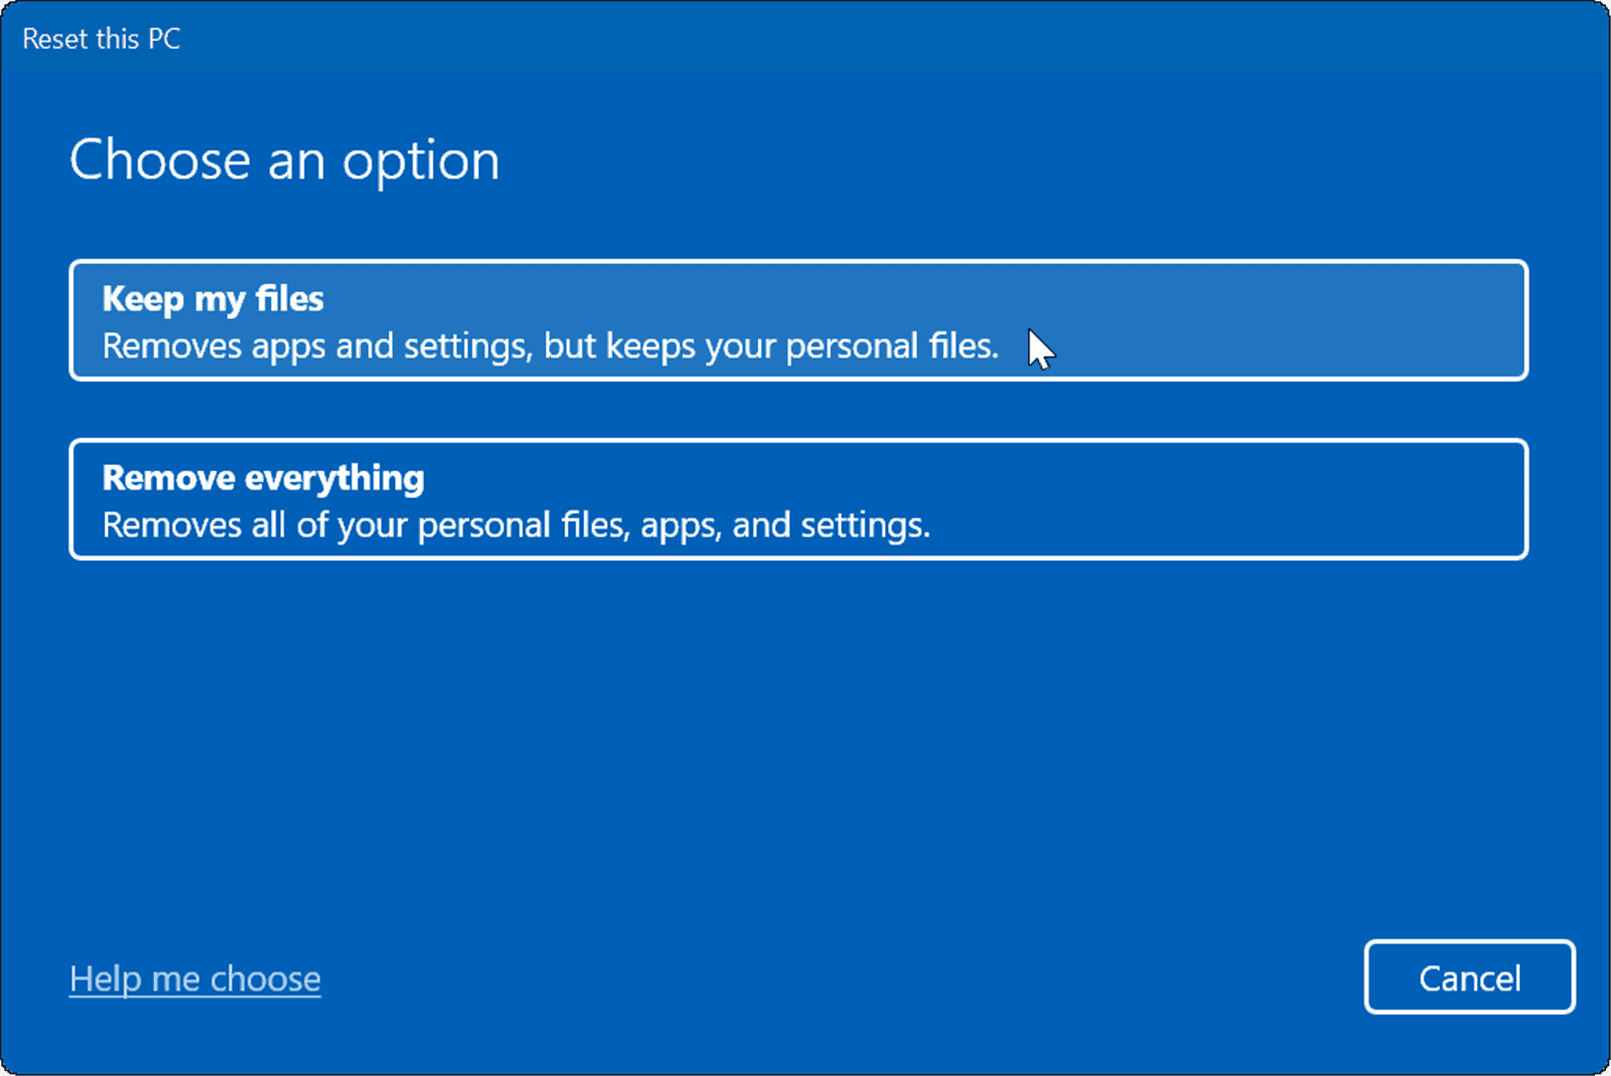
- Now, choose to keep your files and settings or remove everything and reinstall windows.

- Follow the on-screen instructions and wait while the reset process completes. Of course, your PC will reboot during the process.

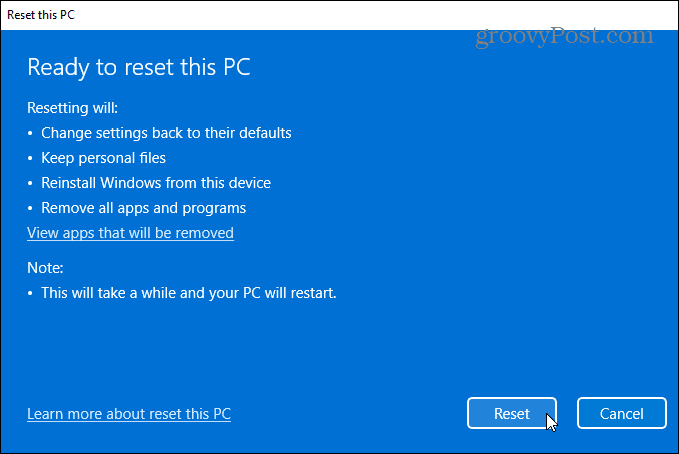
If resetting your PC still doesn’t work, you can always perform a clean installation of Windows.
Fixing Corrupt System Files on Windows
Microsoft has come a long way in providing a well-built and stable operating system. Having corrupt system files isn’t as common as in the early days, like Windows 98, for example, but it can still be an issue. If corrupt files are found during an SFC scan, running a DISM scan will often fix it. However, you might have to take more drastic actions like a reset or complete reinstall.
The SFC and DISM utilities can fix many issues on Windows like Microsoft Teams not loading or Windows 11 not working after an update. It’s not just for software issues, either. For example, you can use the scan to fix USB not working or HDMI not working on your PC.
![]()
You’re likely to see the error “Windows Resource Protection Found Corrupt Files But Was Unable to Fix Some of Them” when you’re already experiencing computer problems. Slower performance, crashes, or glitches are the expected results of corrupted system files, so it’s something that you should address and repair right away.
Often the problems can be solved by the scans fixing the errors they find, but sometimes if they can’t, you have to do more involved fixes manually.
Windows Resource Protection is a way for Windows to maintain its critical system files. Certain files are essential for Windows to operate correctly. If you don’t have them or they’re removed, the computer won’t work as intended.
Sometimes you get the Windows Resource Protection found corrupt files message after completing a System File Checker scan. It lets you know that you potentially have corrupt files.
However, this utility isn’t unheard of to mark good files as corrupt, especially if they pertain to certain third-party programs like NVIDIA. Since Windows doesn’t see the file it expects because NVIDIA stores it in a different place, it reports a missing or corrupt file.
There is no direct way to know whether the file it’s marking is good or bad. You will want to keep investigating to see whether it’s an issue when only essential files are loaded.
How to Fix Windows Resource Protection Found Corrupt Files?
Once you’ve received this message, you’ll have to troubleshoot your computer in a way that might seem a bit repetitive. Unfortunately, running the same scan in different Windows environments is necessary to determine what’s wrong precisely.
Run System Scans
The first thing you should do to figure out what files could potentially be corrupt is a few scans with built-in Windows utilities.
The Deployment Imaging and Services Management utility is one that you want to run before you run System File Checker. However, if you’re troubleshooting a computer that isn’t Windows 8 or later, it isn’t necessary, and you can move straight to running System File Checker.
- Navigate to
C:WindowsLogsDISM - Select
dism.log. - Choose Delete.

- Confirm that you want to delete the log.
- Press Windows key + X.
- Choose Windows PowerShell (Admin).
- Click Yes. You have to give the program permission to have administrator access to your computer to run these scans properly.
- Type “
dism /online /cleanup-image /scanhealth” without quotes and then press Enter.
- Let the scan finish before you continue. It can take a bit of time.
- Open
C:WindowsLogsDISMagain. Open dism.log. - Make a separate file listing any errors it reports. Delete dism.log when you’re done and return to the PowerShell window.
- Type “
dism /online /cleanup-image /restorehealth” without quotes and press Enter.
- Wait while DISM scans your drive again and attempts to repair any problems it finds. Make sure not to close the PowerShell window as soon as the scan is over. You can use the same window to run other scans.
- Reopen the new dism.log to see whether the errors are removed. If not, keep a note of the corrupted files for later. Return to the PowerShell window.
- Type “
sfc /scannow” without quotes and then press Enter.
- Wait for the scan to complete.
- Type “
chkdsk X: /f /r /x” without quotes and then press Enter.
- Type “y” without quotes to confirm that you want to run CHKDSK the next time you reboot your computer.
- Reboot the computer.
- Wait for the scan to complete.


At this point, you want to see if the error reoccurs now that you’ve run scans that can automatically fix problems. If it doesn’t, one of the scans fixed the issue that caused the error message to appear.
System File Checker will usually fix problems it finds if it finds any at all. However, you might also get the error telling you that Windows Resource Protection Found Corrupt Files and that they can’t be fixed automatically.
If you do, you’ll want to try to rerun System File Checker in a couple of different ways. If it still doesn’t work, you’ll have to replace the corrupted files manually and can do it simultaneously and in the same way as the corrupted files from dism.log.
Running Scans in Safe Mode
Windows Safe Mode gives users an environment loaded with only the most important files and drivers. You won’t have and don’t need networking for this, so make sure to select a normal safe mode when it comes time to choose.
- Hold down the Shift key.
- Click Start.
- Click the Power icon.
- Click Restart.
- Let the computer restart while you continue to hold the Shift key down. You can let go once the computer starts booting again.
- Click Troubleshoot.
- Choose Advanced Options.

- Choose Startup Settings.

- Select Restart.

- Choose Safe Mode when the new menu appears after it reboots.
- Repeat steps 1-16 from the first section in Safe Mode.


You’re trying to see whether SFC and DISM can repair corrupted files now that they aren’t prevented from accessing certain things by additional programs or drivers running.
Sometimes this will work – other times, it won’t. However, it is quicker and easier to try rather than manually replacing files from SFC and DISM when they won’t repair themselves.
Manually Replacing Files
The alternative to manually replacing files – which requires a decent working knowledge of Windows and another computer with clean, non-corrupt files – is reinstalling a clean copy of Windows. If you’d rather skip to that instead of replacing the corrupt files, it is not a bad idea.
Also, always back up your work and anything on your computer you want to save before replacing system files.
You should perform these steps in Safe Mode as well. Steps 1-4 are only necessary if the System File Checker says it can’t run the scan at all. If it’s running fine, then start at Step 5.
- Press Windows key + R.
- Type “
%windir%winsxstemp” without quotes. Click OK. - Search the folder for two other folders named PendingDeletes and PendingRenames. If no such folders appear, click in the white space of the folder, choose to create a new folder, and create a folder called PendingDeletes and one called PendingRenames.

- Close the folder.
- Press Windows key + X.
- Choose Windows PowerShell (Admin).
- Click Yes to confirm.
- Type “
sfc /scannow” to run another System File Checker scan. - Let the scan complete.
- Type “
findstr /c:”[SR]” %windir%LogsCBSCBS.log >”%userprofile%Desktopsfcdetails.txt”” without the first and last quotation mark.
- Press Enter.
- Navigate to your desktop and open the file sfcdetails.txt.

- Make a note of what files are damaged and can’t be replaced according to the document.


At this point, you need to find good copies of these corrupted files. For that, you’ll have to gain access to another copy of Windows.
Take a type of portable storage like a USB drive, locate the files on the good computer, and copy them onto your drive. When they’re copied, remove the drive safely and bring it back to the computer you’re troubleshooting. Copy the new files to the desktop of the machine on which you’re working.
- Press Windows key + X.
- Choose Windows PowerShell (Admin).
- Click Yes.
- Type the following commands, pressing Enter after each one. You need to replace “badfile” with the full filename and location of the bad file and “goodfile” with the full filename and location of the good file.
For example, if you’re trying to replacesds.dllin C:WindowsLogs, the badfile entry would read C:WindowsLogssds.dll and the goodfile entry would read C:UsersUsernameDesktopsds.dll.takeown /f badfileicacls badfile /GRANT ADMINISTRATORS:Fcopy goodfile badfile
- Type “exit” without quotes and then press Enter.
- Restart the computer
At this point, the error related to those corrupt files should be gone. If not, you should reinstall Windows if they’re Windows files. If they’re files related to third-party programs, you can try one more thing.
Removing Third-party Programs
Sometimes a third-party program has the files being reported in the error log you saved to the desktop. If that’s what you’re seeing, the best thing you can do is remove the program, get rid of any residual files, and reinstall a fresh copy.
- Press Windows key + X.
- Choose Settings.
- Click Apps.
- Type the name of the app you’re looking for in the search box. You can also scroll down the alphabetized list to find it.
- Click the app.
- Choose Uninstall.

- Follow the prompts to complete the process. The process will vary depending on which program you’re trying to uninstall.
- Close the Settings window.
- Press Windows key + R.
- Type in “
%appdata%“without quotes and press Enter. - Delete any folders related to the program you uninstalled from AppData/Roaming.

- Click AppData in the navigation window to open the AppData folder.
- Open the Local folder.
- Delete any folders related to the program you uninstalled.

- Check the instructions from the program’s manufacturer for a clean removal to make sure you delete any other folders or settings left behind.
- Reboot your computer and install a fresh copy of the program.


Doing this could help clear any errors related to non-Windows files.
How Do Files Get Corrupted
The most common way for files to get corrupted is for an error to occur while saving information. For example, if your computer saves data and your power goes out, you might end up with errors in your system files.
There are a few ways to prevent this error from occurring in the first place.
- Always properly shut down your computer. You shouldn’t hit the power button unless you have to because the computer isn’t responding to anything else. If you have a blue screen, you might want to run a scan after to ensure it hasn’t damaged anything.
- Consider purchasing an uninterruptible power supply so that if your home loses power, you have time to save your work and turn off your computer correctly.
- Run CHKDSK from time to time and ensure that your drives are in good shape. Aside from errors, you could also experience drive failure and lose your data if things go poorly. Always keep backups.
Doing these will keep your computer in a better state and help avoid any corrupted file errors.
We have already seen how the System File Checker allows users to scan for and restore corrupt Windows system files. We have also seen how to run System File Checker and more, earlier. But what if at the end of the run you see the following message?
Windows Resource Protection found corrupt files but was unable to fix some of them. Details are included in the CBS.Log windirLogsCBSCBS.log.

What this message says is that although the System File Checker completed the scan and found corrupted system files, it was unable to proceed and replace them with good system files.
The Windows Resource Protection protects registry keys and folders as well as critical system files. If any changes are detected to a protected system file, the modified file is restored from a cached copy located in the Windows folder itself.
If you receive this message and the System File Checker is not able to do its job when you run it, here are a few things you can try.
- Run SFC at Safe Mode
- Run SFC at Boot-Time
- Use DISM
- Try Reset This PC or Fresh Start
- Check the Log files
You will need admin permission to execute these suggestions.
1] Run SFC in Safe Mode
Boot into Safe Mode. Open an elevated command prompt window, type sfc/scannow, and press the Enter key.
Just make sure that the PendingDeletes and PendingRenames folders exist under %WinDir%WinSxSTemp. This may help if some start-up programs are creating a problem.
2] Run SFC at Boot Time
If you wish to or need to, you may run System File Checker at Boot Time. This is one option that may help you as it will run System File Checker before Windows loads.
Go here to learn how to run sfc /scannow at Boot Time. See if this helps.
3] Use DISM
Use DISM. Open an elevated command prompt and run the following command and hit Enter:
Dism /Online /Cleanup-Image /RestoreHealth
This command checks for component store corruption, records the corruption, and FIXES the corruption. It may take a while though! Useful if System File Checker is not working.
4] Try Reset This PC or Fresh Start
On Windows 11/10, try Reset This PC or Fresh Start. On Windows 8.1, carry out a Refresh or a Reset operation. An Automatic Repair is also an option you may want to consider if you think it applies in your situation. On Windows 7, carry out a Startup Repair or Repair Install or an In-place Upgrade as you think may best suit your situation.
To perform an In-place upgrade in Windows 7 or Windows Vista, back up your documents, close all open applications, and then insert the Windows DVD in the DVD drive. In the Setup window, click Install Now. Click Go online to obtain the latest updates for installation (recommended). Type the CD key if you are prompted to do this. Next, select the operating system on the Install Windows page you want to Upgrade or In-place and click Yes to accept the Microsoft Software License Terms. Next click Upgrade when asked Which type of installation do you want. Once the process is completed, restart your PC.
5] Check the Log files
You may also want to consider this option. Open the CBS.log file and view details of the corrupted files and replace the corrupted file with a known good copy manually. Navigate to C:WindowsLogsCBS you will be able to see and open the SBS.log file.
Check if it shows some errors or a message. That may give you a direction to proceed. You can get more details on how to do this manually, here at KB929833.
I hope something helps you.
How do I fix a corrupted CBS log file?
If the CBS log file is corrupted there is actually nothing else you can do. The best way would be to delete it and then ret Windows recreate it when the need arises.
How do I fix corrupted files in SFC Scannow?
To fix corrupted files that SFC Scannow cannot fix, you need to run the DISM Tool or use the Reset This PC option. That is sure to help you.
Can I recover corrupt files?
Since it is already corrupted, there is not much you can do about it. The only thing you should do is find what is causing the corruption and then collect the log again. If at all, then the SFC command may help, but then there is no guarantee about it.
What causes files to corrupt?
It is difficult to pinpoint one reason, but it can be both software and hardware problem. If the data that is collected gets overlapped by another program, then it can corrupt the software. Hardware corruption usually happens on old data, but if you are seeing it in more than one place, you need to check your device.
These links may interest some of you:
- System File Checker SFC not working or cannot repair corrupted member file
- Windows Resource Protection could not start the repair service
- Windows Resource Protection could not perform the requested operation
- Run sfc /scannow System File Checker on External Drives.
Running an SFC (System File Checker) scan is pretty straightforward for the most part, but what do you do if you encounter the following error message at the end of it: “Windows Resource Protection found corrupt files but was unable to fix some of them“? Several Windows users have been unsure of what to do next after the System File Checker utility has been unable to resolve the issue for them.

What is System File Checker?
System File Checker is a well-regarded Microsoft Windows utility that allows users to identify and repair Windows system files. This utility has been around since Windows 98 and is still being shipped to all the latest Windows versions.
In Windows Vista, Windows 7 and Windows 10, the SFC (System File Checker) utility is integrated with Windows Resource Protection (WRP). This provides enhanced protection for registry keys, folders, and critical system files.
What causes the “Windows Resource Protection found corrupt files but was unable to fix some of them” error?
We investigated this particular error message by looking at various user reports and the repair strategies that they followed through with in order to resolve the error message. Based on our findings, there are several common scenarios that are known to force the System File Checker to throw this particular error message:
- False positive – There are a lot of reasons why the System File Checker scan will report a false positive. A common false positive is Nvidia’s opendll.dll file which the SFC might flag even in those instances where the file is not corrupt. In this case, a DISM scan will determine whether the flagged file is indeed corrupted or not.
- 3rd party interference – This particular error can also occur if an installed application is interfering with the SFC (System File Checker) scan. Most that have been through this particular scenario reported that the SFC scan concluded without errors when they ran it during a clean boot.
- Irregular system file corruption – There are cases where this error occurs due to a degree of corruption that cannot be recovered using the default Windows utilities (SFC and DISM). In this case, the only solution is to install/reinstall the os files.
If you’re currently looking for some ways to resolve the corrupted files that have been fixed/replaced by System File Checker, this article will provide you with several verified repair strategies. Down below, you’ll discover a suite of methods that other users in a similar situation have used to eliminate corrupted system files.
To keep the whole ordeal as efficient as possible, we advise you to follow the methods below in the order that they are presented. You should eventually stumble upon a fix that will resolve the issue in your particular scenario.
Method 1: Using DISM to fix corrupt files
Chances are you already know that the next step when the SFC utility is unable to resolve the problem is to use the DISM (Deployment Image Servicing and Management) utility to repair the Windows image. DISM has been around since Windows Vista and is generally considered the superior utility when it comes to finding & resolving system file corruption conflicts.
While the SFC scan replaces corrupted files with locally stored copies (which can also become corrupted), DISM uses the Windows Update component to get the job done. Of course, this means that you’ll need to ensure that you have a steady internet connection before running a scan.
There are multiple scan parameters that can be used with DISM. But for the sake of keeping things simple, we will use RestoreHealth – a command which will automatically scan the Windows Image for any corruption and perform any necessary repair automatically. Here’s what you need to do:
- Press Windows key + R to open up a Run dialog box. Then, type “cmd” and press Ctrl + Shift + Esc to open up an elevated Command Prompt. When prompted by the UAC (User Account Control), click Yes to grant administrative privileges.

Opening Command Prompt via Run dialog box - Inside the elevated Command prompt, type the following command and press Enter to initiate a DISM scan with the Restore Health option:
DISM /Online /Cleanup-Image /RestoreHealth
- Wait for the process to complete. Depending on your PC configuration, it might take less or more than one hour.
Note: Do not close this window before the procedure is complete. Keep in mind that the DISM scan has a tendency of getting stuck when it gets around 30%. But do not close the window as it’s normal behavior – the progression will resume after a couple of minutes. - If the process completes and you get a message saying that the file corruption was resolved, restart your computer and run an SFC scan at the next startup to see if the issue has been resolved.

If you’re still encountering the “Windows Resource Protection found corrupt files but was unable to fix some of them” error when running the SFC scan, move down to the next method below.
Method 2: Removing remnants of a 3rd party Antivirus software (if applicable)
As a couple of users have suggested, the SFC error could also occur as a result of a false positive. Most commonly, remnants from a poorly uninstalled antivirus/security solution will set the grounds for an occurence of this kind. Most of the time, affected users point toward Avast and McAfee as being responsible for this particular issue.
Keep in mind that the steps of removing remnant from a manually deleted AV are not that simple. Most AV solutions will have a dedicated uninstaller – finding the one applicable to your version is not always easy.
Fortunately, we have created a detailed article that will help you completely uninstall your security program regardless of your 3-rd party AV – follow this article (here) to identify the remnant files and remove them from your system.
Once the remnant antivirus files have been removed, restart your computer and run the SFC scan again at the next startup. If you’re still seeing the “Windows Resource Protection found corrupt files but was unable to fix some of them” error at the end of the scan, move over to the next method below.
Method 3: Perform an SFC/DISM scan in a clean boot state
If the two methods above didn’t eliminate the SFC error, it’s very likely that the issue is caused by one of the following factors – It’s either an issue caused by an interfering 3rd party application or you’re dealing with an unrecoverable system file error that SFC and DISM couldn’t make sense of.
In this method, we are going to cover the scenario where the error is caused by an interfering 3-rd party application that is roadblocking the System File Checker utility. We are going to ensure that there’s no 3-rd party interference by performing a clean boot and running the two utilities above once again.
Note: If you’re in a hurry and can’t afford to spend a couple of hours repeating the methods above in a clean boot state, move directly to Method 4. But keep in mind that the next method is a little more intrusive and will make you lose some user preferences at the least (depending on which operation you choose).
A clean boot will start your computer with a minimal set of drivers and startup programs. This will help us figure out if a background program, driver, service or 3rd party program is interfering with the SFC scan.
Here’s a quick guide on how to perform a clean boot and check if any third party applications are causing the issue:
- Press Windows key + R to open up a Run dialog box. Then, type “msconfig” and press Enter to open up the System Configuration screen. If you’re prompted by UAC ( User Account Control), choose Yes to grant administrative privileges.

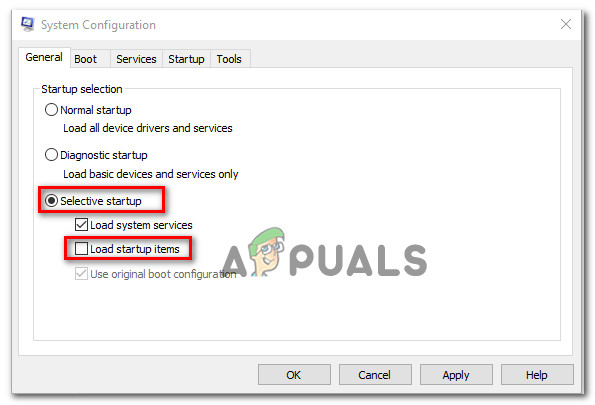
Run dialog: msconfig - Inside the System Configuration window, go to the General tab and choose Selective startup. Under Selective startup, make sure that you uncheck the box associated with Load Startup items.

Preventing Startup Items from loading - Next, move over to the Services tab and check the box associated with Hide all Microsoft services. Then, click on the Disable all button to ensure that any 3rd party services are prevented from running at the next startup.

Disabling all non-Microsoft startup items - Click Apply to save the current boot configuration and comply if you’re prompted to restart your machine. If not, do it manually.
- Once your computer restarts in a clean boot state, press Windows key + R to open up another Run dialog box. Then, type “cmd” and press Ctrl + Shift + Enter to open up an elevated Command Prompt.
Opening Command Prompt via Run dialog box - Inside the elevated Command Prompt, type the following command and press Enter to initiate another DISM scan:
DISM.exe /Online /Cleanup-image /Restorehealth
Note: This command uses Windows Update to provide the files required to fix the corrupted data. Because of this, you need to ensure that you have a stable internet connection.
- Once the process is complete, don’t close the elevated Command Prompt. Instead, type the following command and press Enter to trigger an SFC scan and see if the error is no longer occurring:
sfc /scannow
In the event that the two scans (SFC and DISM) where hindered by a 3rd application service, the “Windows Resource Protection found corrupt files but was unable to fix some of them” error will no longer occur.
However, if the error is still occurring, it’s clear that your system is suffering from a kind of system file corruption that can’t be fixed conventionally. In this case, move over to the final method below to replace all Windows components and resolve the issue.
Method 4: Performing a repair install
If you’ve come this far without a result, there are two procedures that will most likely get the issue resolved:
- Clean install – This procedure will essentially override all the other content on your Windows installation driver. On top of removing all the data related to your operating system, you will also lose any personal files & personal preferences (photos, images, music, applications, user preferences, etc.)
- Repair install – This is a different kind of installation process in which the setup will essentially reinstall the same build over the existing operating system installation. This approach is way less destructive since it will allow you to preserve all your personal files, user settings, and any installed application.
Regardless of which way you end up choosing, we’ve got you covered. If you want to keep your personal files and limit the damage as much as possible, follow this article (here) to perform a repair install. In case you want to start fresh, follow this article (here) to perform a clean install.