using «&«
As you have noticed executing the bat directly without CALL,START, CMD /C causes to enter and execute the first file and then the process to stop as the first file is finished. Though you still can use & which will be the same as using command1 & command2 directly in the console:
(
    first.bat
)&(
    second.bat
)& (
    third.bat
)&(
    echo other commands
)
In a term of machine resources this will be the most efficient way though in the last block you won’t be able to use command line GOTO,SHIFT,SETLOCAL.. and its capabilities will almost the same as in executing commands in the command prompt. And you won’t be able to execute other command after the last closing bracket
Using CALL
call first.bat
call second.bat
call third.bat
In most of the cases it will be best approach — it does not create a separate process but has almost identical behaviour as calling a :label as subroutine. In MS terminology it creates a new «batch file context and pass control to the statement after the specified label. The first time the end of the batch file is encountered (that is, after jumping to the label), control returns to the statement after the call statement.»
You can use variables set in the called files (if they are not set in a SETLOCAL block), you can access directly labels in the called file.
CMD /C, Pipes ,FOR /F
Other native option is to use CMD /C (the /C switch will force the called console to exit and return the control)
Something that cmd.exe is doing in non transparent way with using FOR /F against bat file or when pipes are used.
This will spawn a child process that will have all the environment ot the calling bat.
Less efficient in terms of resources but as the process is separate ,parsing crashes or calling an EXIT command will not stop the calling .bat
@echo off
CMD /c first.bat
CMD /C second.bat

::not so different than the above lines.
:: MORE,FINDSTR,FIND command will be able to read the piped data
:: passed from the left side

break|third.bat
START
Allows you more flexibility as the capability to start the scripts in separate window , to not wait them to finish, setting a title and so on. By default it starts the .bat and .cmd scripts with CMD /K which means that the spawned scripts will not close automatically.Again passes all the environment to the started scripts and consumes more resources than cmd /c:
:: will be executed in the same console window and will wait to finish
start "" /b /w cmd /c first.bat

::will start in a separate console window and WONT wait to be finished
:: the second console window wont close automatically so second.bat might need explicit exit command
start "" second.bat

::Will start it in a separate window ,but will wait to finish
:: closing the second window will cause Y/N prompt
:: in the original window
start "" /w third.cmd


::will start it in the same console window
:: but wont wait to finish. May lead to a little bit confusing output
start "" /b cmd /c fourth.bat
WMIC
Unlike the other methods from now on the examples will use external of the CMD.exe utilities (still available on Windows by default).
WMIC utility will create completely separate process so you wont be able directly to wait to finish. Though the best feature of WMIC is that it returns the id of the spawned process:
:: will create a separate process with cmd.exe /c
WMIC process call create "%cd%first.bat","%cd%"

::you can get the PID and monitoring it with other tools
for /f "tokens=2 delims=;= " %%# in ('WMIC process call create "%cd%second.bat"^,"%cd%" ^|find "ProcessId"') do (
    set "PID=%%#"
)
echo %PID%
You can also use it to start a process on a remote machine , with different user and so on.
SCHTASKS
Using SCHTASKS provides some features as (obvious) scheduling , running as another user (even the system user) , remote machine start and so on. Again starts it in completely separate environment (i.e. its own variables) and even a hidden process, xml file with command parameters and so on :
SCHTASKS /create /tn BatRunner /tr "%cd%first.bat" /sc ONCE /sd 01/01/1910 /st 00:00
SCHTASKS /Run /TN BatRunner
SCHTASKS /Delete /TN BatRunner /F
Here the PID also can acquired from the event log.
ScriptRunner
Offers some timeout between started scripts. Basic transaction capabilities (i.e. rollback on error) and the parameters can be put in a separate XML file.
::if the script is not finished after 15 seconds (i.e. ends with pause) it will be killed
ScriptRunner.exe -appvscript %cd%first.bat -appvscriptrunnerparameters -wait -timeout=15


::will wait or the first called script before to start the second
:: if any of the scripts exit with errorcode different than 0 will try
:: try to restore the system in the original state
ScriptRunner.exe -appvscript second.cmd arg1 arg2 -appvscriptrunnerparameters -wait -rollbackonerror -appvscript third.bat -appvscriptrunnerparameters -wait -timeout=30 -rollbackonerror
cmd /keep vs cmd /continue
If you are using /k, and you don’t need quotes, until you type exit command, the next command on the bat/cmd will never be executed.
You started a cmd /keep «interpreter» and did not leave/exit/close it, only after this that your next command will be executed…
When you use the terminal by opening a new interpreter by typing ‘cmd /k’, it works because you are interacting directly with it, in this case in bat, onli line that work is: cmd /k "...enable.bat", the bat file in command is also executed because it is on the same line.
In the bat, cmd / k somefile.bat [or] some command it will start a new interpreter and keep it open for input until the moment you type exit or close the current cmd window. Otherwise, it will stay waiting for you to insert one or more commands to execute them, and in the code, the next execution is on the next line:
(«C:ArchUpload from DB to Redcap.py»), it will never run unless you type it for this current interpreter, or type exit to quit and return to previous interpreter run you next line command.
Try replace with cmd /c and your interpreter will goon execute your code line by line…
But I think it’s not even a cmd call running his bat/cmd.
The command interpreter (cmd.exe) will execute your bat/cmd just by executing or, when you click on it, there is no need to add a specific instruction to execute your bat script.
Save this code below as file.bat and try:
@echo off

cd /d "%UserProfile%AppDataLocalContinuumAnaconda3"
call .ScriptsActivate.bat "%UserProfile%AppDataLocalContinuumAnaconda3"

py "c:ArchUpload from DB to Redcap.py"
In addition, if you are using in one bat file to to execute another batfile, so use call c:file.bat…
[√] cmd
[√] cmd /MS Docs
[√] How to run multiple bat files within a bat file
![]()
Download Article
![]()
Download Article
This wikiHow teaches you how to run a batch file (.BAT) from the Windows command line. You can run the program from the “Run” dialog or by typing commands into a terminal window.
-

1
Press ⊞ Win+R. This opens the Run dialog.
- If you need to run the batch file as an administrator, see this method instead.
-
2
Click Browse….
Advertisement
-
3
Navigate to the folder that contains the batch file.
-
4
Click the batch file once to select it. The file is now highlighted.
-
5
Click Open. This pastes the full path to the batch file into the Run box.
-
6
Click OK. The batch file will open in a terminal window and run. When it’s finished running, you’ll see a line at the bottom of the window that says “Press any key to continue.”
-
7
Press any key. This closes the terminal window after the command runs.


Advertisement
-
1
Click the
menu. It’s usually at the bottom-left corner of the screen.
-
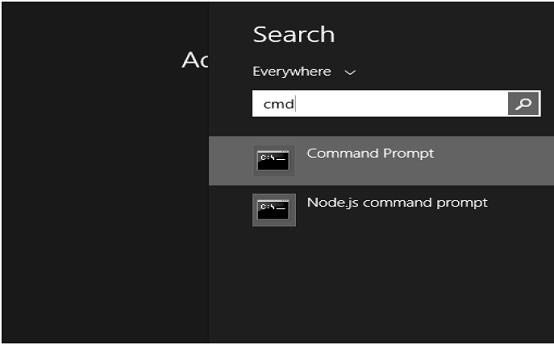
2
Type cmd into the search bar. A list of matching results will appear.
-
3
Right-click Command Prompt. A menu will expand.
-
4
Click Run as Administrator. A confirmation message will appear.
-
5
Click Yes. This opens the command line at an elevated (administrator) level.
-
6
Type cd followed by full path to the folder with the .BAT file. Here’s an example:
- If the batch file is on your desktop, type cd UsersYourLoginNameDesktop.
- If it’s in your downloads folder, type cd UsersYourLoginNameDownloads.
- If you don’t know what your login name is, type cd Users and press ↵ Enter to go to the Users folder, and then type dir and press ↵ Enter to see a list of logins.
-
7
Press ↵ Enter. This will move you into the directory.
-
8
Type the name of the batch file. For example, if it’s called “program.bat,” type program.bat.
- If you don’t know the name, type dir and press ↵ Enter to view the files in the folder. You’ll find it there.
-
9
Press ↵ Enter. This runs the batch file.


Advertisement
Add New Question
-
Question
It gives an error saying «The input line is too long. The syntax of the command is incorrect.»

Double-check the code, as there’s a command that was not correctly written. Ensure all spaces and special characters are in the proper places.
Ask a Question
200 characters left
Include your email address to get a message when this question is answered.
Submit
Advertisement
Thanks for submitting a tip for review!
About This Article
Article SummaryX
1. Press the Windows + R keys.
2. Click Browse.
3. Select the .bat file.
4. Click Open.
5. Click OK.
Did this summary help you?
Thanks to all authors for creating a page that has been read 268,057 times.
Is this article up to date?
On Windows 10, a batch file typically has a «.bat» extension, and it is a special text file that contains one or multiple commands that run in sequence to perform various actions with Command Prompt.
Although you can type commands manually to execute a particular task or change system settings on Windows 10, a batch file simplifies the work of having to re-type the commands, saving you time and avoiding mistakes.
You can also use other tools like PowerShell to write even more advanced scripts. However, running batch files in Command Prompt is still relevant for executing commands to change settings, automate routines, and launch apps or web pages on your computer.
This guide will walk you through the steps to create and run a batch file on Windows 10. Also, we will outline the steps to create advanced scripts and rum them automatically on schedule using the Task Scheduler.
How to create a batch file on Windows 10
The process of writing a batch file is not complicated. You only need Notepad or another text editor and some basic knowledge of typing commands in Command Prompt. These instructions will help you create a basic and advanced batch file to query system settings.
Create basic Windows 10 batch file
To create a basic batch file on Windows 10, use these steps:
- Open Start.
- Search for Notepad and click the top result to open the text editor.
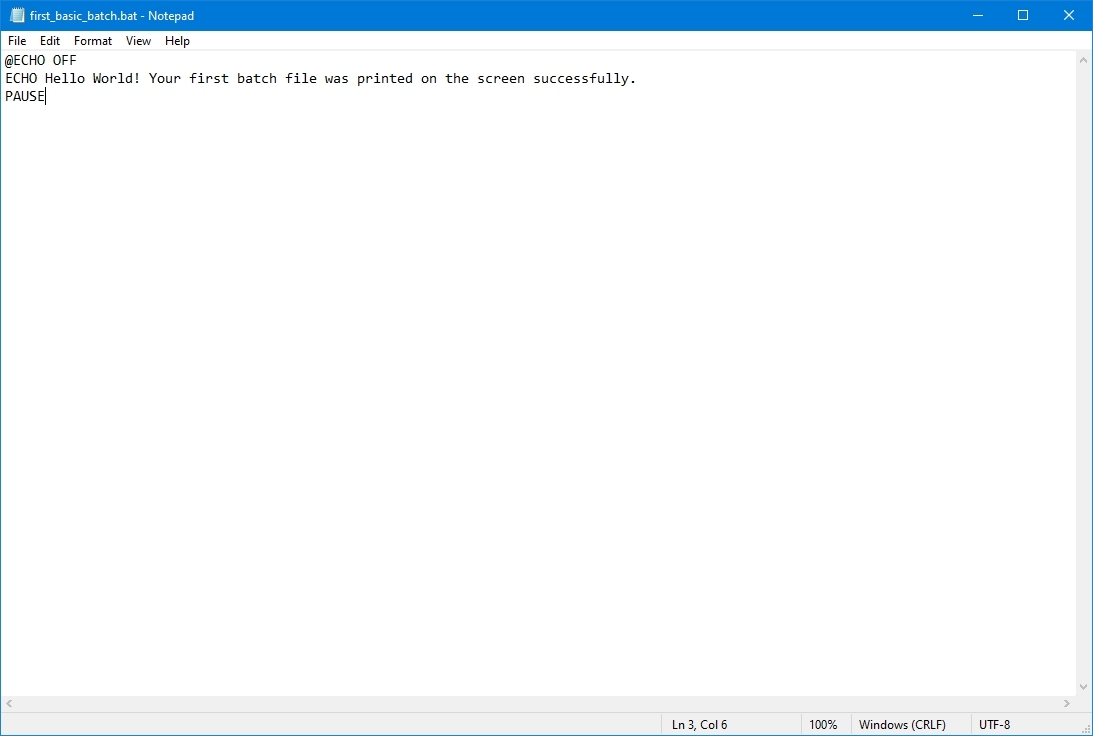
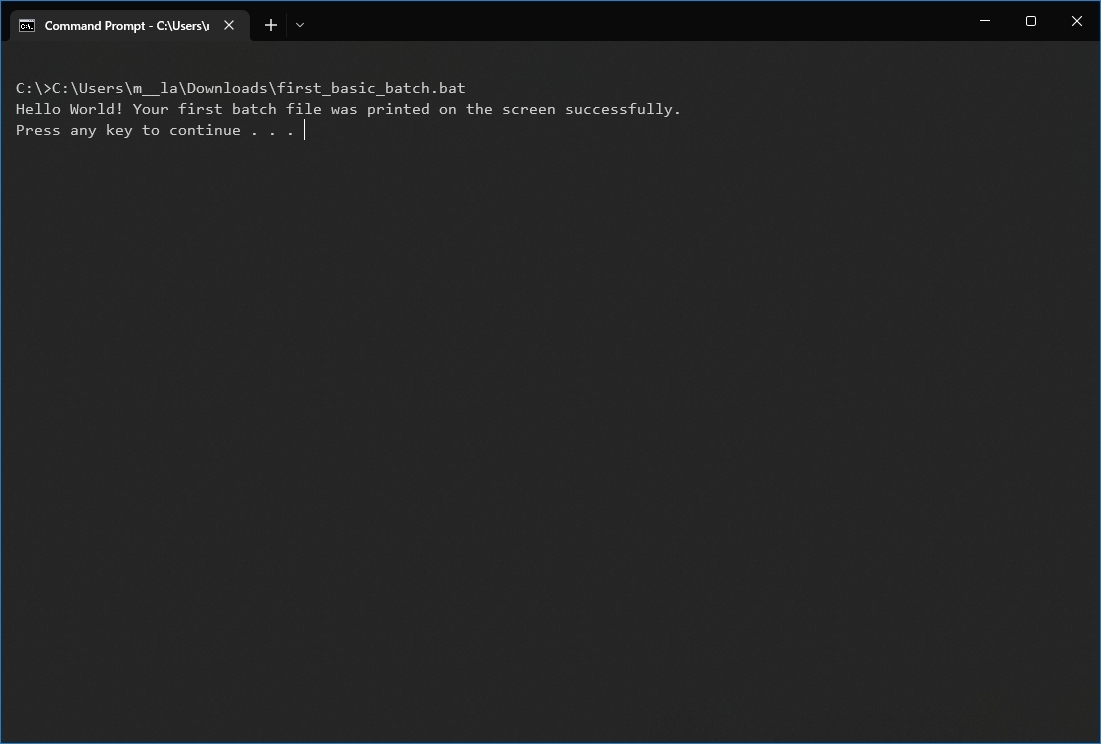
- Type the following lines in the text file to create a batch file:
@ECHO OFF
ECHO Hello World! Your first batch file was printed on the screen successfully.
PAUSE
The above script outputs the phrase, «Hello World! Your first batch file was printed on the screen successfully,» on the screen.
- @ECHO OFF — Shows the message on a clean line disabling the display prompt. Usually, this line goes at the beginning of the file. (You can use the command without the «@» symbol, but it’s recommended to include it to show a cleaner return.)
- ECHO — The command prints the text after the space on the screen.
- PAUSE — Allows the window to stay open after the command has been executed. Otherwise, the window will close automatically as soon as the script finishes executing. You can use this command at the end of the script or after a specific command when running multiple tasks and wanting to pause between each line.
- Click the File menu.
- Select the Save as option.
- Confirm a name for the script — for example, first_basic_batch.bat.
- Quick note: While batch files typically use the .bat file extensions, you can also find them using the .cmd or .btm file extensions.
Once you complete the steps, double-click the file to run it. Alternatively, you can use the steps below to learn how to run a batch file with Command Prompt, File Explorer, or Task Scheduler.
Create advanced Windows 10 batch file
To create an advanced Windows batch file with multiple commands, use these steps:
- Open Start.
- Search for Notepad and click the top result to open the text editor.
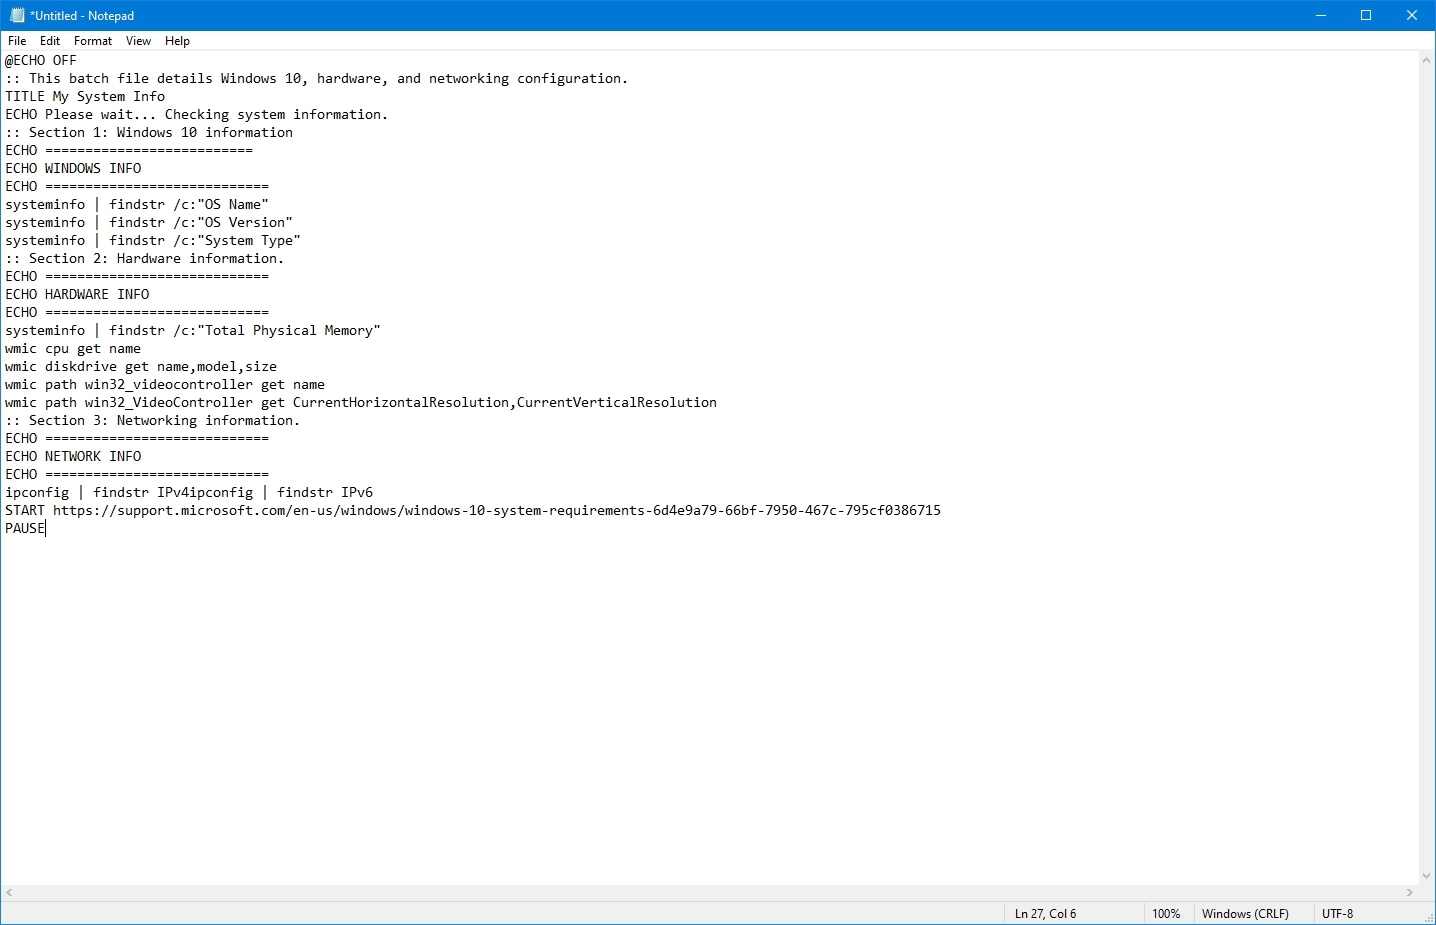
- Type the following lines in the text file to create a more advanced Windows 10 batch file:
@ECHO OFF
:: This batch file details Windows 10, hardware, and networking configuration.
TITLE My System Info
ECHO Please wait… Checking system information.
:: Section 1: Windows 10 information
ECHO ==========================
ECHO WINDOWS INFO
ECHO ============================
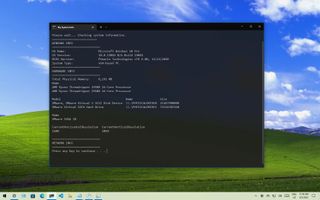
systeminfo | findstr /c:»OS Name»
systeminfo | findstr /c:»OS Version»
systeminfo | findstr /c:»System Type»
:: Section 2: Hardware information.
ECHO ============================
ECHO HARDWARE INFO
ECHO ============================
systeminfo | findstr /c:»Total Physical Memory»
wmic cpu get name
wmic diskdrive get name,model,size
wmic path win32_videocontroller get name
wmic path win32_VideoController get CurrentHorizontalResolution,CurrentVerticalResolution
:: Section 3: Networking information.
ECHO ============================
ECHO NETWORK INFO
ECHO ============================
ipconfig | findstr IPv4ipconfig | findstr IPv6
START https://support.microsoft.com/en-us/windows/windows-10-system-requirements-6d4e9a79-66bf-7950-467c-795cf0386715
PAUSE
The above script runs each line to query a series of system details, and the result will be divided into three categories, including «WINDOWS INFO,» «HARDWARE INFO,» and «NETWORK INFO.» Also, the «START» command will open the web browser in the official support page outlining the Windows 10 system requirements, which you can check against your information.
- @ECHO OFF — Shows the message on a clean line disabling the display prompt. Usually, this line goes at the beginning of the file.
- TITLE — Prints a custom name in the title bar of the console window.
- :: — Allows writing comments and documentation information. These details are ignored when the system runs the batch file.
- ECHO — Prints the text after the space on the screen.
- START — Opens an app or website with the default web browser.
- PAUSE — Tells the console window to stay open after running the command. If you do not use this option, the window will close automatically as soon as the script finishes executing.
- Click the File menu.
- Select the Save as option.
- Type a name for the script — for example, first_advanced_batch.bat.
After you complete the steps, double-click the .bat file to run it or use the steps below to execute the script with Command Prompt, File Explorer, or Task Scheduler.
Create actionable Windows 10 batch file
You can also write batch scripts for any task that does not require user interaction. For instance, to map a network drive, install an application, change system settings, and more.
To create a non-interactive batch file on Windows 10, use these steps:
- Open Start.
- Search for Notepad and click the top result to open the text editor.
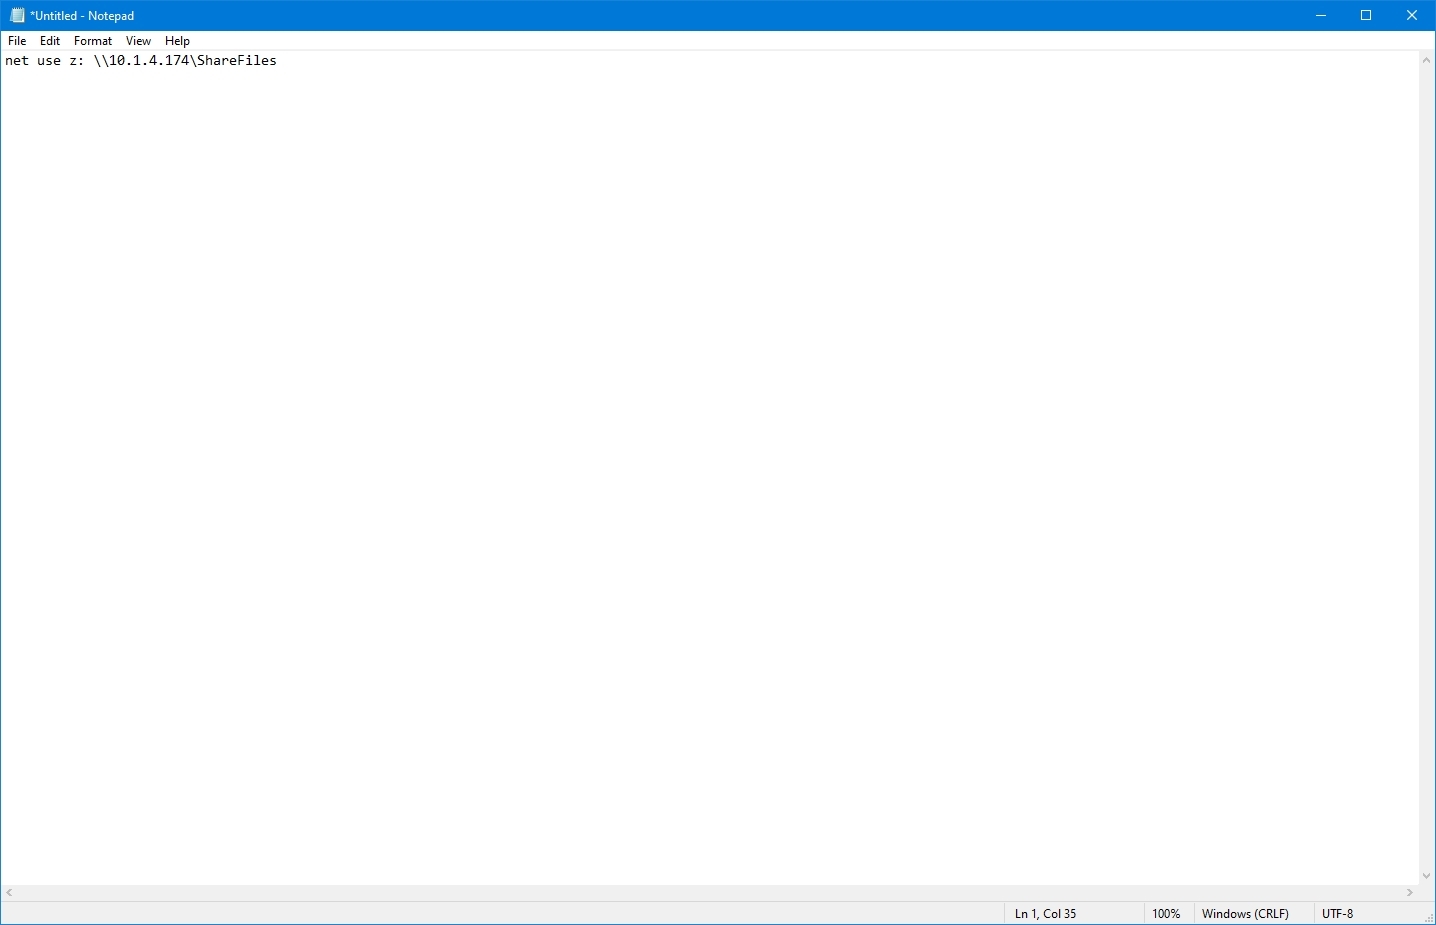
- Type the following command to map a network drive in the text file: net use z: \PATH-NETWORK-SHAREFOLDER-NAME /user:YOUR-USERNAME YOUR-PASSWORD
In the command, replace the «\PATH-NETWORK-SHAREFOLDER-NAME» for the folder network path to mount on the device and «YOUR-USERNAME YOUR-PASSWORD» with the username and password that authenticates access to the network share.
This example maps a network folder as a drive inside File Explorer using the «Z» drive letter: net use z: \10.1.4.174ShareFiles
- Quick note: If you are accessing the files from another computer that uses a specific username and password, do not forget to use the /user: option with the correct credentials.
- Click the File menu.
- Select the Save as option.
- Confirm a name for the script — for example, mount-z-network-drive.bat.
Once you complete the steps, the batch file will map the network folder without opening a Command Prompt window.
We only demonstrate a script with a single command, but you can include as many as you like, as long as you write them one per line.
How to run a batch file on Windows 10
Windows 10 has at least three ways to write batch files. You can run them on-demand using Command Prompt or File Explorer. You can configure the script using the Task Scheduler app to run it on schedule. Or you can save the batch files in the «Startup» folder to let the system run them as soon as you sign into the account.
Run batch file on-demand
If you want to run a script on-demand, you can use File Explorer or Command Prompt.
Command Prompt
To run a script file with Command Prompt on Windows 10, use these steps:
- Open Start.
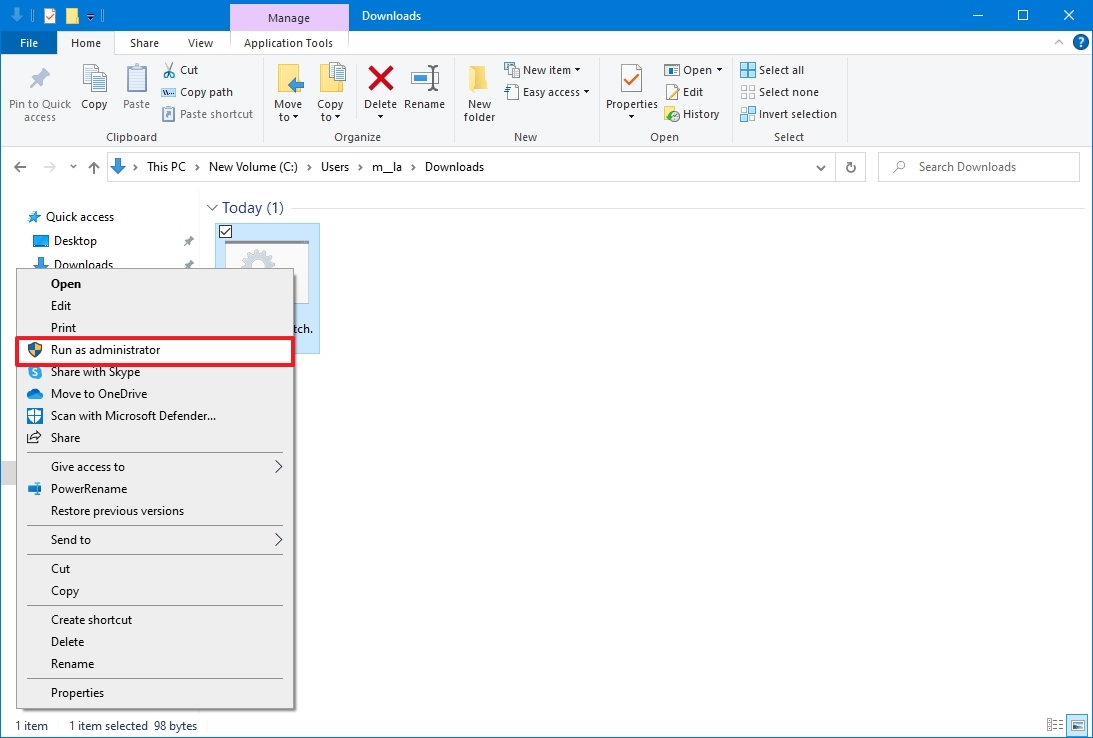
- Search for Command Prompt, right-click the top result, and select the Run as administrator option.
- Type the following command to run a Windows 10 batch file and press Enter: C:PATHTOFOLDERBATCH-NAME.bat
In the command, make sure to specify the path and name of the script.
This example runs the batch file located in the «scripts» folder inside the «Downloads» folder: C:UsersUserAccountDownloadsfirst_basic_batch.bat
After you complete the steps, the console will return the results, and the window won’t close even if the script does not include the «PAUSE» command since you are invoking the script from within a console session that was already open.
File Explorer
To run a batch file with File Explorer, use these steps:
- Open File Explorer.
- Browse to the folder with the batch file.
- Double-click the script file to run it.
- (Optional) If a command in the batch file requires administrator privileges, you will have to run the script as an admin by right-clicking the file and selecting the Run as administrator option.
- Click the Yes button
Once you complete the steps, the script will run each command in sequence, displaying the results in the console window.
Run batch files on startup
Windows 10 also features a known folder called «Startup,» which the system checks every time it starts to run applications, shortcuts, and scripts automatically without the need for extra configuration.
To run a script on the Windows 10 startup, use these steps:
- Open File Explorer.
- Open the folder containing the batch file.
- Right-click the batch file and select the Copy option.
- Use the Windows key + R keyboard shortcut to open the Run command.
- Type the following command: shell:startup
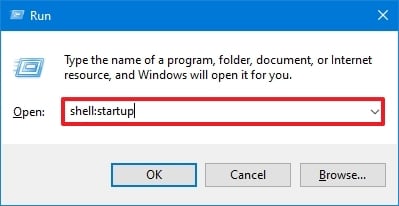
- Click the OK button.
- Click the Paste option from the «Home» tab in the Startup folder. (Or click the Paste shortcut button to create a shortcut to the batch file.)
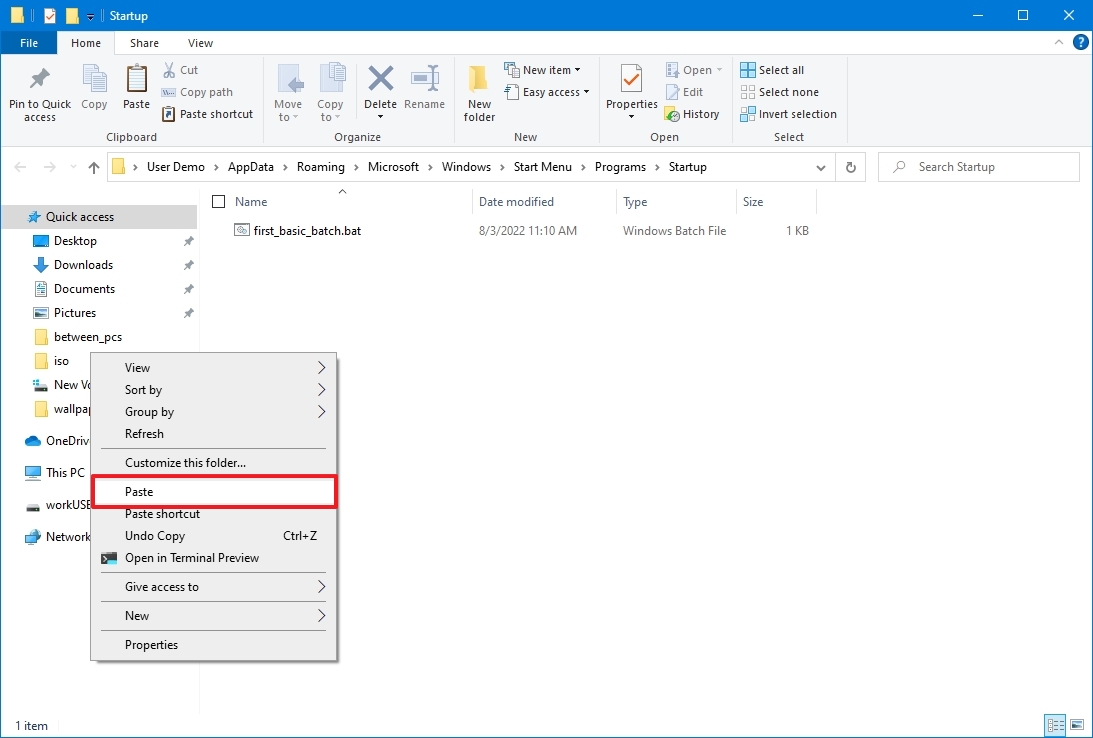
After you complete the steps, the batch file will execute automatically every time you log into your account.
Run batch file with Task Scheduler
To use Task Scheduler to run the batch file automatically at a specific time, use these steps:
- Open Start.
- Search for Task Scheduler and click the top result to open the app.
- Right-click the «Task Scheduler Library» branch and select the New Folder option.
- Confirm a name for the folder — for example, MyScripts.
- Quick note: You don’t need to create a folder, but keeping the system and your tasks separate is recommended.
- Click the OK button.
- Expand the «Task Scheduler Library» branch.
- Right-click the MyScripts folder.
- Select the Create Basic Task option.
- In the «Name» field, confirm a name for the task — for example, SystemInfoBatch.
- (Optional) In the «Description» field, write a description for the task.
- Click the Next button.
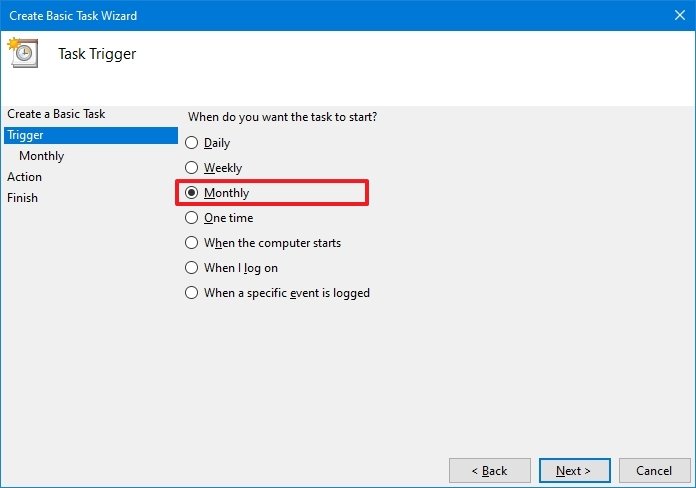
- Select the Monthly option.
- Quick note: Task Scheduler lets you choose from different triggers, including a specific date, during startup, or when a user logs in to the computer. In this example, we will select the option to run a task every month, but you may need to configure additional parameters depending on your selection.
- Click the Next button.
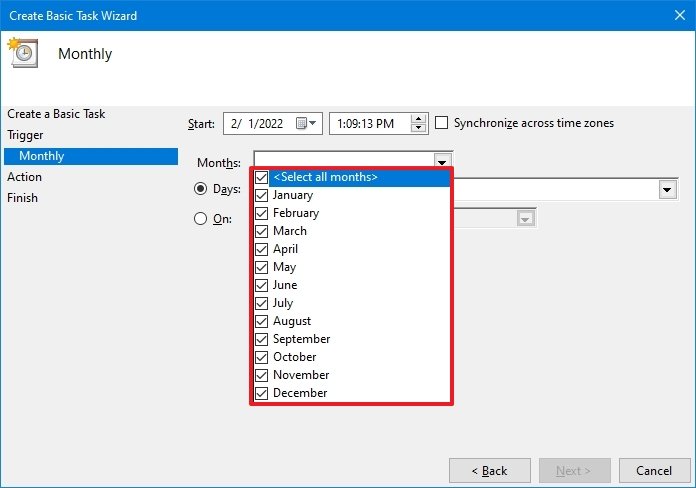
- Use the «Start» settings to confirm the day and time to run the task.
- Use the «Monthly» drop-down menu to pick the months of the year to run the task.
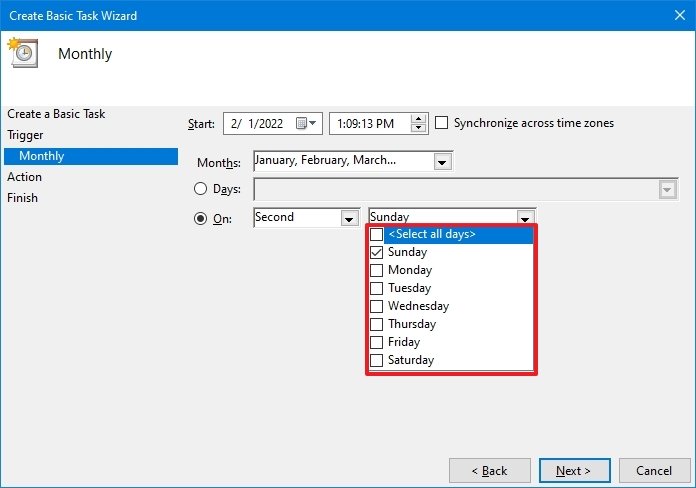
- Use the «Days» or «On» drop-down menu to confirm the days to run the task.
- Click the Next button.
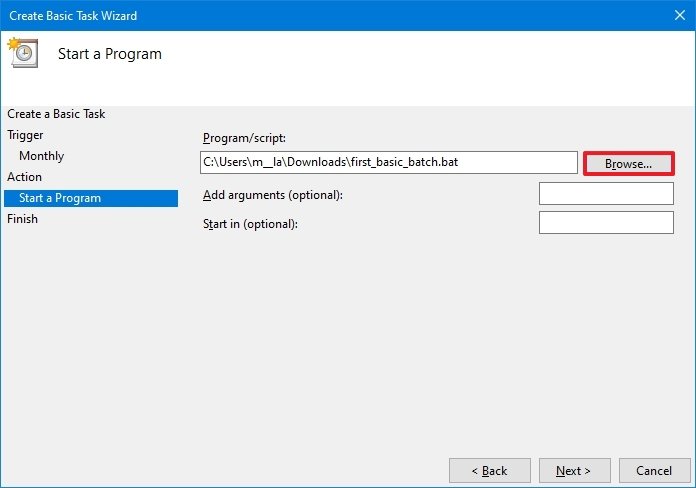
- Select the Start a program option to run the batch file.
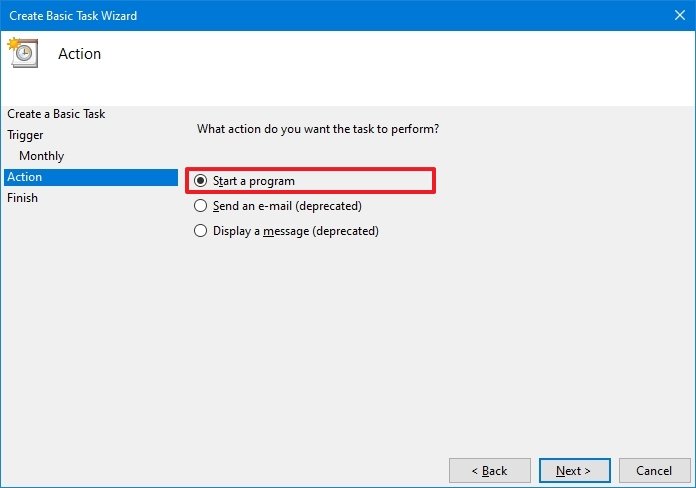
- In the «Program/script» field, click the Browse button.
- Select the batch file you want to execute.
- Click the Finish button.
Once you complete the steps, the task will run the script during the configured time and date or action.
The above instructions are meant to schedule only a basic task. You can use these instructions to create a more customizable task with the Task Scheduler.
This guide focuses on Windows 10, but the same steps will also work for older versions, including Windows 8.1 and 7. Also, you can refer to these instructions if you have Windows 11 installed on your computer.
More Windows resources
For more helpful articles, coverage, and answers to common questions about Windows 10 and Windows 11, visit the following resources:
- Windows 11 on Windows Central — All you need to know
- Windows 10 on Windows Central — All you need to know
Get the best of Windows Central in in your inbox, every day!
Mauro Huculak is technical writer for WindowsCentral.com. His primary focus is to write comprehensive how-tos to help users get the most out of Windows 10 and its many related technologies. He has an IT background with professional certifications from Microsoft, Cisco, and CompTIA, and he’s a recognized member of the Microsoft MVP community.
A batch file is a file that contains MS-DOS commands and when the batch files are clicked or called these commands are executed. Batch files are also called BAT files. Most operating systems like windows provide the ability to create and run batch files. In this tutorial, we will learn how to create a batch file for MS-DOS and PowerShell, How To Run, or Execute a Batch File?
Batch files are supported by all modern Windows operating system versions like Windows XP, Windows 7, Windows 8, Windows 10, and Windows Server versions. But the batch file contents like commands, binaries, and features should be compatible with the current operating system in order to execute in a reliable way. If specific command, binary, or feature is not supported it will be skipped and not executed but other lines of batch file will be executed.
What Is a Batch File?
Before starting to create and run batch files we should learn what is a batch file. A batch file is a simple text file that has the *.bat file extension and contains MS-DOS commands or binary files. Batch files are also balled as BAT files because of their extension. Batch files are popular among system administrators and technical people in order to complete repetitive or non-interactive jobs easily and reliably. Even interactive jobs can be completed with batch files with little or no effort or action.
Advantages of Batch/BAT Files
Batch or BAT files are a lot of advantages for Windows users. Below we will list some of them.
- Offload repetitive tasks and automate them.
- Reliable command execution
- Noninteractive command execution.
- Advanced reporting and performance tracking
- Scheduled tasks can be executed on different dates and times.
Batch files are a simple text file that contains MS-DOS and related commands and binaries. First, open Notepad and create a file and save the file whatever name you want but set the file extension as *.bat .In this example we will create the batch file named runwise.bat . Batch files may also use extensions like .cmd and .btm.

mkdir Test
@ECHO OFF
Welcome a folder named Test has been created
PAUSE
The saved batch file will look like the below. As you can see the batch files or files with *.bat extension has the following file icon which is simply used for system-related files. By default, the .bat extension is not displayed.

Run Batch File
In order to run batch files content and commands batch files should be executed properly. Batch files can be executed in the following ways.
- Clicking on Batch File
- Using Scheduled Jobs
- Calling From MS-DOS or PowerShell Command Lines
- Calling Another Batch File
Run Batch File By Clicking
The simplest and most popular method to run a batch file is just clicking on the batch file. This is a GUI method to run a batch file where it can be used from desktop or file explorer. Double-clicking on a batch file will run the batch file in an MS-DOS command prompt.

Run Batch File Using Scheduled Jobs
Scheduled Tasks is a tool used to schedule different jobs or tasks to run the future at the specified date or time or repetitively etc. It is recently called as Task Scheduler and can be opened by typing schedule in the start menu like below.

In the following screen, you can create a new task for the batch file. We will click to the Create Basic Task in order to create a new task.

In the following screen, we will set the name of the task which is not the batch file name. Then we will click to the Next . Below we can set the name of the task and also add some description about the task.

In the following screen, the date or time of the execution will be specified. The batch file will be executed at the specified date, time, or interval. We can see that Daily, Weekly, Monthly, One time, When the computer starts, When I log on, or When a specific event is logged time values are provided to trigger a task.

As we have selected daily the start date with the time and recur count will be provided in the following screen.

This step is important where we will select the Start a program in order to specify our batch file to execute.

This step is the most important to schedule our batch file. In the program script part, we will specify the script file location. Also, the Browser button can be used to select and specify a batch file location. Also, we can specify arguments to be passed into the batch script from the Add arguments textbox.

The following screen is the last screen where all information about the scheduled batch job will be displayed.

Run Batch File From MS-DOS or PowerShell Command Lines
Batch files can be run from MS-DOS or PowerShell command lines. MS-DOS command line can only run MS-DOS-based batch files and con not run PowerShell batch files. But PowerShell command line can run both MS-DOS and PowerShell batch files. In order to run a batch file from the MS-DOS command line just specify the batch file name with the full path. Alternatively, if the batch file is located in the current working directory only the name of the batch file can be called.
C:UsersismailDesktop>runwise.bat
Or alternatively, the complete path of the batch file runwise.bat can be provided from any directory like below.
C:> C:UsersismailDesktoprunwise.bat
Run Batch File From Another Batch File
Batch files can call another batch file like a regular MS-DOS command. The most important thing about running a batch file in a batch file is to provide the complete path of the batch file. Even just the name or relative path can be used to run a batch file in a batch file the most reliable way is using the absolute or complete path of the batch file.
mkdir Test
@ECHO ON
Welcome a folder named Test has been created

C:UsersismailDesktoprunwise.bat
Run Batch File As Administrator
If the batch file has commands that need to be executed as Administrator or with Administrative privileges you should open the MS-DOS or PowerShell as Administrator. Please follow the following tutorial in order to open MS-DOS, Command Prompt, or PowerShell as administrator and then use previously described steps like “Run Batch File From MS-DOS or PowerShell command line“.
In Windows you can run any program with the .exe extention from a batch file that is very useful in different automation scenarios.
For example, you may want to create a batch file to use it as a launcher for the program that you want to execute with some parameters.
In this note i am showing how to create a batch file to run an .exe program.
Cool Tip: How to comment batch files in Windows! Read more →
To create a batch file to run some .exe program in Windows, open a text editor (e.g. Notepad) and enter a command as follows:
start "C:PathProgram.exe"
If you need to run a program with some additional parameters, you should also specify a "WindowName" just after the start command:
start "MyProgram" "C:PathProgram.exe" /param1 /param2
Invalid switch: If you set some parameters without specifying the "WindowName" or at least the empty quotation marks "", you will get the “Invalid switch” error.
Save your file with the file extension .bat, e.g. run-exe-program.bat and double click on it to run the .exe program.
To prevent auto-closing of a console after execution of a batch file (useful for debugging), add the pause:
start "" "C:PathProgram.exe" /param1 /param2
pause
You may also find it useful to suppress the output by turning the @echo off:
@echo off
start "" "C:PathProgram.exe" /param1 /param2
Cool Tip: Get the return code from the last command or application! Read more →
batch files and shell scripts are developers best friend, they help to improve productivity a lot. They not only help you to automate boring, time consuming task but also saves lot of time doing and doing them again. Batch file also reduce chances of error, once tested and encourage re-usability by sharing them across team or people with similar needs. Though not every programmer, developer or computer user has mindset to use batch file, something it’s too difficult to write, some just not able to fight with initial resistance and many of them are not even aware of batch file.
As a Java programmer, you really don’t need to learn these stuff, as almost everybody who use windows operating system for more than year, knows about it. Anyway knowing is not enough, the main thing is adapting and taking full advantage of them, developing mentality towards scripting, automation and writing batch files.
Remember, shell scripting is one of the important skill to get a programming job and more important to support application running on UNIX operating sytem in Investment banking domain. Writing batch scripts are not full blown scripting, but it’s lighter form of it, It works best to train yourself and develop that scripting mentality to improve productivity.
In this article, we will learn how to write a batch file in windows 8 operating system and revisit some important things about batch file.
Sample Batch file in Windows to clean directories and remove files:
I often need to clean persistent files, logs file and other data files before running some of my testing script. If you are working in large, multi-module application and your testing involves starting and stopping multiple module than it would be pain to do it manually every time.
If you are running your application in Linux and run your test consistently, you can write a whole shell script to automate everything. Since for small tests, I prefer windows, I found myself doing same task of cleaning files, which motivates me to write following batch file, good for demonstration.
Batch file to delete directories and Files
ECHO OFF
REM batch file clean directories and remove log files

echo "clearing module1 "
rmdir /S /Q D:projectsmodule1data
del D:projectsmodule1logsmodule1.log


echo "clearing module2"
rmdir /S /Q D:projectsmodule2data
del D:projectsmodule2logsmodule2.log

echo "clearing module3"
rmdir /S /Q D:projectsmodule3data
del D:projectsmodule3logsmodule3.log


echo "clearing module4"
rmdir /S /Q D:projectsmodule4data
del D:projectsmodule4logsmodule4.log
This is one of the simplest batch file, which is just removing some directories and log files. You can even use variables here removing some hardcoding e.g. project location can be set as variable. You can use set command create an environment variable and set its value.
Two things to pay attention is REM keyword and ECHO OFF. REM keyword is used to write comments inside batch file. Comments are lines, which are not executed by windows shell. ECHO OFF is to disable echo, which means you will not see actual commands on command prompt, you will only see output of commands. Though you can also print useful information by using echo command.
This is one of the must use while writing batch file, to see clean output. For beginners, DEL command is used to delete files in widows and rmdir is to remove directories, rmdir /S /Q are two options to remove quietly, without asking and /S to remove all files and sub-directories.
How to Run Batch File in Windows
Running batch file is very simple, you can either double click on the batch file itself, or open a command prompt by typing cmd on the run window and invoke them by providing an absolute path. If you are on the same directory, then just type the name of the batch file in the command prompt as shown below.
C:test>clean.bat
"clearing module1 "
Could Not Find D:projectsmodule1logsmodule1.log
"clearing module2"
Could Not Find D:projectsmodule2logsmodule2.log
"clearing module3"
Could Not Find D:projectsmodule3logsmodule3.log
"clearing module4"
Could Not Find D:projectsmodule4logsmodule4.log
The output says could not file log files, because it was already removed from the earlier run. By the way, if you are a Java programmer, and constantly work on Eclipse, then you can invoke batch files from Eclipse itself. Just follow the steps given in that post.
Things to remember
1) You can create batch files by using any text editor e.g. notepad or WordPad. I personally prefer notepad++ because of syntax highlighting and advanced features on find and replace.
2) Make sure your batch file has extension .bat not .txt. When you write something in a text editor, windows by default provide them .txt extension. Double check the extension of your batch file. In windows 8, a batch file has a different icon the text file, so it’s easy to recognize, as shown below.
— icon for batch file
— icon for text file
3) Batch file is nothing but a set of commands. Instead of writing commands one by one in the command prompt, you write them in a file and ask the command prompt or shell to execute them. By putting multiple commands together, you can create small programs for your day-to-day task like cleaning data before running tests, taking archive or backup of log files, etc. For Java Programmers and developers, if you think you are doing the same task repeatedly, consider making a batch file to automate that task.
4) You can not only use simple batch commands e.g. MKDIR, RMDIR, DEL, or ECHO in a batch file, but also you can access environment variables e.g. JAVA_HOME, PATH or CLASSPATH by including them between % sign e.g. %PATH% will be replaced by value of PATH environment variable, when you run batch file.
5) For Eclipse User, you can even run any batch file directly from Eclipse, without opening a command prompt or clicking on batch file.
That’s all on how to create a batch file in windows guys. I know, many of you already familiar with batch files and may also be using in your day to day work, but there is no excuse for those programmers, who are familiar but not using it. They tend to lose too much time, doing trivial activities manually.
Batch Script — Overview
Batch Script is incorporated to automate command sequences which are repetitive in nature. Scripting is a way by which one can alleviate this necessity by automating these command sequences in order to make one’s life at the shell easier and more productive. In most organizations, Batch Script is incorporated in some way or the other to automate stuff.
Some of the features of Batch Script are −
-
Can read inputs from users so that it can be processed further.
-
Has control structures such as for, if, while, switch for better automating and scripting.
-
Supports advanced features such as Functions and Arrays.
-
Supports regular expressions.
-
Can include other programming codes such as Perl.
Some of the common uses of Batch Script are −
-
Setting up servers for different purposes.
-
Automating housekeeping activities such as deleting unwanted files or log files.
-
Automating the deployment of applications from one environment to another.
-
Installing programs on various machines at once.
Batch scripts are stored in simple text files containing lines with commands that get executed in sequence, one after the other. These files have the special extension BAT or CMD. Files of this type are recognized and executed through an interface (sometimes called a shell) provided by a system file called the command interpreter. On Windows systems, this interpreter is known as cmd.exe.
Running a batch file is a simple matter of just clicking on it. Batch files can also be run in a command prompt or the Start-Run line. In such case, the full path name must be used unless the file’s path is in the path environment. Following is a simple example of a Batch Script. This Batch Script when run deletes all files in the current directory.
:: Deletes All files in the Current Directory With Prompts and Warnings
::(Hidden, System, and Read-Only Files are Not Affected)
:: @ECHO OFF
DEL . DR
Batch Script — Environment
This chapter explains the environment related to Batch Script.
Writing and Executing
Typically, to create a batch file, notepad is used. This is the simplest tool for creation of batch files. Next is the execution environment for the batch scripts. On Windows systems, this is done via the command prompt or cmd.exe. All batch files are run in this environment.
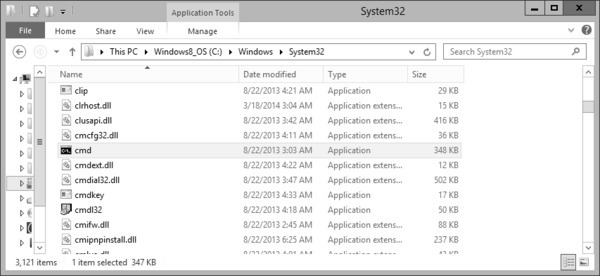
Following are the different ways to launch cmd.exe −
Method 1 − Go to C:WindowsSystem32 and double click on the cmd file.
Method 2 − Via the run command – The following snapshot shows to find the command prompt(cmd.exe) on Windows server 2012.
Once the cmd.exe is launched, you will be presented with the following screen. This will be your environment for executing your batch scripts.
Environment Variables
In order to run batch files from the command prompt, you either need to go to the location to where the batch file is stored or alternatively you can enter the file location in the path environment variable. Thus assuming that the batch file is stored in the location C:Applicationbin, you would need to follow these instructions for the PATH variable inclusion.
| OS | Output |
|---|---|
| Windows | Append the String; C:Applicationbin to the end of the system variable PATH. |
Batch Script — Commands
In this chapter, we will look at some of the frequently used batch commands.
| S.No | Commands & Description |
|---|---|
| 1 | VER
This batch command shows the version of MS-DOS you are using. |
| 2 | ASSOC
This is a batch command that associates an extension with a file type (FTYPE), displays existing associations, or deletes an association. |
| 3 | CD
This batch command helps in making changes to a different directory, or displays the current directory. |
| 4 | CLS
This batch command clears the screen. |
| 5 | COPY
This batch command is used for copying files from one location to the other. |
| 6 | DEL
This batch command deletes files and not directories. |
| 7 | DIR
This batch command lists the contents of a directory. |
| 8 | DATE
This batch command help to find the system date. |
| 9 | ECHO
This batch command displays messages, or turns command echoing on or off. |
| 10 | EXIT
This batch command exits the DOS console. |
| 11 | MD
This batch command creates a new directory in the current location. |
| 12 | MOVE
This batch command moves files or directories between directories. |
| 13 | PATH
This batch command displays or sets the path variable. |
| 14 | PAUSE
This batch command prompts the user and waits for a line of input to be entered. |
| 15 | PROMPT
This batch command can be used to change or reset the cmd.exe prompt. |
| 16 | RD
This batch command removes directories, but the directories need to be empty before they can be removed. |
| 17 | REN
Renames files and directories |
| 18 | REM
This batch command is used for remarks in batch files, preventing the content of the remark from being executed. |
| 19 | START
This batch command starts a program in new window, or opens a document. |
| 20 | TIME
This batch command sets or displays the time. |
| 21 | TYPE
This batch command prints the content of a file or files to the output. |
| 22 | VOL
This batch command displays the volume labels. |
| 23 | ATTRIB
Displays or sets the attributes of the files in the curret directory |
| 24 | CHKDSK
This batch command checks the disk for any problems. |
| 25 | CHOICE
This batch command provides a list of options to the user. |
| 26 | CMD
This batch command invokes another instance of command prompt. |
| 27 | COMP
This batch command compares 2 files based on the file size. |
| 28 | CONVERT
This batch command converts a volume from FAT16 or FAT32 file system to NTFS file system. |
| 29 | DRIVERQUERY
This batch command shows all installed device drivers and their properties. |
| 30 | EXPAND
This batch command extracts files from compressed .cab cabinet files. |
| 31 | FIND
This batch command searches for a string in files or input, outputting matching lines. |
| 32 | FORMAT
This batch command formats a disk to use Windows-supported file system such as FAT, FAT32 or NTFS, thereby overwriting the previous content of the disk. |
| 33 | HELP
This batch command shows the list of Windows-supplied commands. |
| 34 | IPCONFIG
This batch command displays Windows IP Configuration. Shows configuration by connection and the name of that connection. |
| 35 | LABEL
This batch command adds, sets or removes a disk label. |
| 36 | MORE
This batch command displays the contents of a file or files, one screen at a time. |
| 37 | NET
Provides various network services, depending on the command used. |
| 38 | PING
This batch command sends ICMP/IP «echo» packets over the network to the designated address. |
| 39 | SHUTDOWN
This batch command shuts down a computer, or logs off the current user. |
| 40 | SORT
This batch command takes the input from a source file and sorts its contents alphabetically, from A to Z or Z to A. It prints the output on the console. |
| 41 | SUBST
This batch command assigns a drive letter to a local folder, displays current assignments, or removes an assignment. |
| 42 | SYSTEMINFO
This batch command shows configuration of a computer and its operating system. |
| 43 | TASKKILL
This batch command ends one or more tasks. |
| 44 | TASKLIST
This batch command lists tasks, including task name and process id (PID). |
| 45 | XCOPY
This batch command copies files and directories in a more advanced way. |
| 46 | TREE
This batch command displays a tree of all subdirectories of the current directory to any level of recursion or depth. |
| 47 | FC
This batch command lists the actual differences between two files. |
| 48 | DISKPART
This batch command shows and configures the properties of disk partitions. |
| 49 | TITLE
This batch command sets the title displayed in the console window. |
| 50 | SET
Displays the list of environment variables on the current system. |
Batch Script — Files
In this chapter, we will learn how to create, save, execute, and modify batch files.
Creating Batch Files
Batch files are normally created in notepad. Hence the simplest way is to open notepad and enter the commands required for the script. For this exercise, open notepad and enter the following statements.
:: Deletes All files in the Current Directory With Prompts and Warnings
::(Hidden, System, and Read-Only Files are Not Affected)
::
@ECHO OFF
DEL .
DR
Saving Batch Files
After your batch file is created, the next step is to save your batch file. Batch files have the extension of either .bat or .cmd. Some general rules to keep in mind when naming batch files −
-
Try to avoid spaces when naming batch files, it sometime creates issues when they are called from other scripts.
-
Don’t name them after common batch files which are available in the system such as ping.cmd.
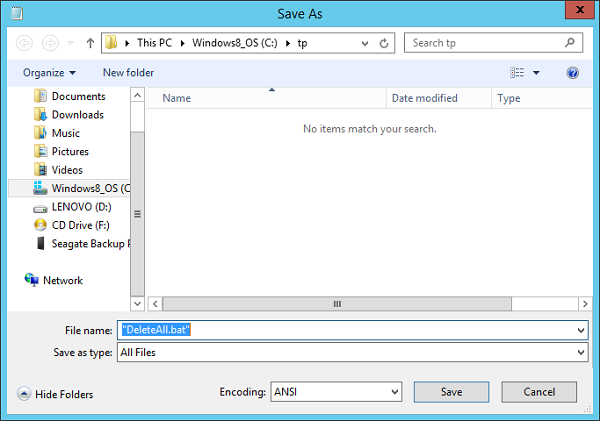
The above screenshot shows how to save the batch file. When saving your batch file a few points to keep in mind.
- Remember to put the .bat or .cmd at the end of the file name.
- Choose the “Save as type” option as “All Files”.
- Put the entire file name in quotes “”.
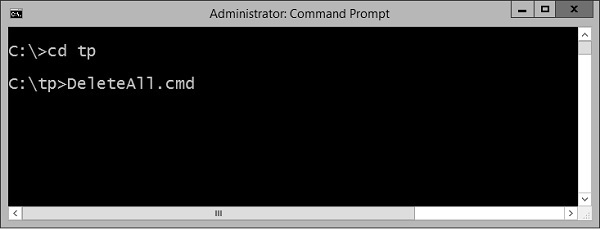
Executing Batch Files
Following are the steps to execute a batch file −
-
Step 1 − Open the command prompt (cmd.exe).
-
Step 2 − Go to the location where the .bat or .cmd file is stored.
-
Step 3 − Write the name of the file as shown in the following image and press the Enter button to execute the batch file.
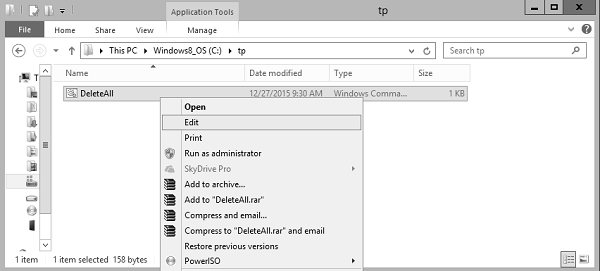
Modifying Batch Files
Following are the steps for modifying an existing batch file.
-
Step 1 − Open windows explorer.
-
Step 2 − Go to the location where the .bat or .cmd file is stored.
-
Step 3 − Right-click the file and choose the “Edit” option from the context menu. The file will open in Notepad for further editing.
Batch Script — Syntax
Normally, the first line in a batch file often consists of the following command.
ECHO Command
@echo off
By default, a batch file will display its command as it runs. The purpose of this first command is to turn off this display. The command «echo off» turns off the display for the whole script, except for the «echo off» command itself. The «at» sign «@» in front makes the command apply to itself as well.
Documentation
Very often batch files also contains lines that start with the «Rem» command. This is a way to enter comments and documentation. The computer ignores anything on a line following Rem. For batch files with increasing amount of complexity, this is often a good idea to have comments.
First Batch Script Program
Let’s construct our simple first batch script program. Open notepad and enter the following lines of code. Save the file as “List.cmd”.
The code does the following −
-
Uses the echo off command to ensure that the commands are not shown when the code is executed.
-
The Rem command is used to add a comment to say what exactly this batch file does.
-
The dir command is used to take the contents of the location C:Program Files.
-
The ‘>’ command is used to redirect the output to the file C:lists.txt.
-
Finally, the echo command is used to tell the user that the operation is completed.
@echo off
Rem This is for listing down all the files in the directory Program files
dir "C:Program Files" > C:lists.txt
echo "The program has completed"
When the above command is executed, the names of the files in C:Program Files will be sent to the file C:Lists.txt and in the command prompt the message “The program has completed” will be displayed.
Batch Script — Variables
There are two types of variables in batch files. One is for parameters which can be passed when the batch file is called and the other is done via the set command.
Command Line Arguments
Batch scripts support the concept of command line arguments wherein arguments can be passed to the batch file when invoked. The arguments can be called from the batch files through the variables %1, %2, %3, and so on.
The following example shows a batch file which accepts 3 command line arguments and echo’s them to the command line screen.
@echo off
echo %1
echo %2
echo %3
If the above batch script is stored in a file called test.bat and we were to run the batch as
Test.bat 1 2 3
Following is a screenshot of how this would look in the command prompt when the batch file is executed.
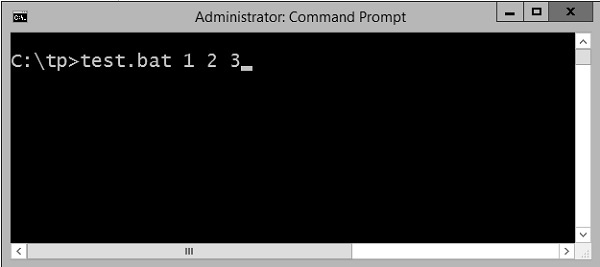
The above command produces the following output.
1
2
3
If we were to run the batch as
Example 1 2 3 4
The output would still remain the same as above. However, the fourth parameter would be ignored.
Set Command
The other way in which variables can be initialized is via the ‘set’ command. Following is the syntax of the set command.
Syntax
set /A variable-name=value
where,
-
variable-name is the name of the variable you want to set.
-
value is the value which needs to be set against the variable.
-
/A – This switch is used if the value needs to be numeric in nature.
The following example shows a simple way the set command can be used.
Example
@echo off
set message=Hello World
echo %message%
-
In the above code snippet, a variable called message is defined and set with the value of «Hello World».
-
To display the value of the variable, note that the variable needs to be enclosed in the % sign.
Output
The above command produces the following output.
Hello World
Working with Numeric Values
In batch script, it is also possible to define a variable to hold a numeric value. This can be done by using the /A switch.
The following code shows a simple way in which numeric values can be set with the /A switch.
@echo off
SET /A a = 5
SET /A b = 10
SET /A c = %a% + %b%
echo %c%
-
We are first setting the value of 2 variables, a and b to 5 and 10 respectively.
-
We are adding those values and storing in the variable c.
-
Finally, we are displaying the value of the variable c.
The output of the above program would be 15.
All of the arithmetic operators work in batch files. The following example shows arithmetic operators can be used in batch files.
@echo off
SET /A a = 5
SET /A b = 10
SET /A c = %a% + %b%
echo %c%
SET /A c = %a% - %b%
echo %c%
SET /A c = %b% / %a%
echo %c%
SET /A c = %b% * %a%
echo %c%
The above command produces the following output.
15
-5
2
50
Local vs Global Variables
In any programming language, there is an option to mark variables as having some sort of scope, i.e. the section of code on which they can be accessed. Normally, variable having a global scope can be accessed anywhere from a program whereas local scoped variables have a defined boundary in which they can be accessed.
DOS scripting also has a definition for locally and globally scoped variables. By default, variables are global to your entire command prompt session. Call the SETLOCAL command to make variables local to the scope of your script. After calling SETLOCAL, any variable assignments revert upon calling ENDLOCAL, calling EXIT, or when execution reaches the end of file (EOF) in your script. The following example shows the difference when local and global variables are set in the script.
Example
@echo off
set globalvar = 5
SETLOCAL
set var = 13145
set /A var = %var% + 5
echo %var%
echo %globalvar%
ENDLOCAL
Few key things to note about the above program.
-
The ‘globalvar’ is defined with a global scope and is available throughout the entire script.
-
The ‘var‘ variable is defined in a local scope because it is enclosed between a ‘SETLOCAL’ and ‘ENDLOCAL’ block. Hence, this variable will be destroyed as soon the ‘ENDLOCAL’ statement is executed.
Output
The above command produces the following output.
13150
5
You will notice that the command echo %var% will not yield anything because after the ENDLOCAL statement, the ‘var’ variable will no longer exist.
Working with Environment Variables
If you have variables that would be used across batch files, then it is always preferable to use environment variables. Once the environment variable is defined, it can be accessed via the % sign. The following example shows how to see the JAVA_HOME defined on a system. The JAVA_HOME variable is a key component that is normally used by a wide variety of applications.
@echo off
echo %JAVA_HOME%
The output would show the JAVA_HOME directory which would depend from system to system. Following is an example of an output.
C:AtlassianBitbucket4.0.1jre
Batch Script — Comments
It’s always a good practice to add comments or documentation for the scripts which are created. This is required for maintenance of the scripts to understand what the script actually does.
For example, consider the following piece of code which has no form of comments. If any average person who has not developed the following script tries to understand the script, it would take a lot of time for that person to understand what the script actually does.
ECHO OFF
IF NOT "%OS%"=="Windows_NT" GOTO Syntax
ECHO.%* | FIND "?" >NUL
IF NOT ERRORLEVEL 1 GOTO Syntax
IF NOT [%2]==[] GOTO Syntax
SETLOCAL
SET WSS=
IF NOT [%1]==[] FOR /F "tokens = 1 delims =  " %%A IN ('ECHO.%~1') DO SET WSS = %%A
FOR /F "tokens = 1 delims =  " %%a IN ('NET VIEW ^| FIND /I "\%WSS%"') DO FOR /F
"tokens = 1 delims = " %%A IN ('NBTSTAT -a %%a ^| FIND /I /V "%%a" ^| FIND "<03>"')
DO ECHO.%%a %%A
ENDLOCAL
GOTO:EOF
ECHO Display logged on users and their workstations.
ECHO Usage: ACTUSR [ filter ]
IF "%OS%"=="Windows_NT" ECHO Where: filter is the first part
of the computer name^(s^) to be displayed
Comments Using the Rem Statement
There are two ways to create comments in Batch Script; one is via the Rem command. Any text which follows the Rem statement will be treated as comments and will not be executed. Following is the general syntax of this statement.
Syntax
Rem Remarks
where ‘Remarks’ is the comments which needs to be added.
The following example shows a simple way the Rem command can be used.
Example
@echo off
Rem This program just displays Hello World
set message=Hello World
echo %message%
Output
The above command produces the following output. You will notice that the line with the Rem statement will not be executed.
Hello World
Comments Using the :: Statement
The other way to create comments in Batch Script is via the :: command. Any text which follows the :: statement will be treated as comments and will not be executed. Following is the general syntax of this statement.
Syntax
:: Remarks
where ‘Remarks’ is the comment which needs to be added.
The following example shows a simple way the Rem command can be used.
Example
@echo off
:: This program just displays Hello World
set message = Hello World
echo %message%
Output
The above command produces the following output. You will notice that the line with the :: statement will not be executed.
Hello World
Note − If you have too many lines of Rem, it could slow down the code, because in the end each line of code in the batch file still needs to be executed.
Let’s look at the example of the large script we saw at the beginning of this topic and see how it looks when documentation is added to it.
::===============================================================
:: The below example is used to find computer and logged on users
::
::===============================================================
ECHO OFF
:: Windows version check
IF NOT "%OS%"=="Windows_NT" GOTO Syntax
ECHO.%* | FIND "?" >NUL
:: Command line parameter check
IF NOT ERRORLEVEL 1 GOTO Syntax
IF NOT [%2]==[] GOTO Syntax
:: Keep variable local
SETLOCAL
:: Initialize variable
SET WSS=
:: Parse command line parameter
IF NOT [%1]==[] FOR /F "tokens = 1 delims =  " %%A IN ('ECHO.%~1') DO SET WSS = %%A
:: Use NET VIEW and NBTSTAT to find computers and logged on users
FOR /F "tokens = 1 delims =  " %%a IN ('NET VIEW ^| FIND /I "\%WSS%"') DO FOR /F
"tokens = 1 delims = " %%A IN ('NBTSTAT -a %%a ^| FIND /I /V "%%a" ^| FIND
"<03>"') DO ECHO.%%a %%A
:: Done
ENDLOCAL
GOTO:EOF
:Syntax
ECHO Display logged on users and their workstations.
ECHO Usage: ACTUSR [ filter ]
IF "%OS%"=="Windows_NT" ECHO Where: filter is the first part of the
computer name^(s^) to be displayed
You can now see that the code has become more understandable to users who have not developed the code and hence is more maintainable.
Batch Script — Strings
In DOS, a string is an ordered collection of characters, such as «Hello, World!».
| S.No | Strings & Description |
|---|---|
| 1 | Create String
A string can be created in DOS in the following way. |
| 2 | Empty String
Empty String |
| 3 | String Interpolation
String interpolation is a way to construct a new String value from a mix of constants, variables, literals, and expressions by including their values inside a string literal. |
| 4 | String Concatenation
You can use the set operator to concatenate two strings or a string and a character, or two characters. Following is a simple example which shows how to use string concatenation. |
| 5 | String length
In DOS scripting, there is no length function defined for finding the length of a string. There are custom-defined functions which can be used for the same. Following is an example of a custom-defined function for seeing the length of a string. |
| 6 | toInt
A variable which has been set as string using the set variable can be converted to an integer using the /A switch which is using the set variable. The following example shows how this can be accomplished. |
| 7 | Align Right
This used to align text to the right, which is normally used to improve readability of number columns. |
| 8 | Left String
This is used to extract characters from the beginning of a string. |
| 9 | Mid String
This is used to extract a substring via the position of the characters in the string. |
| 10 | Remove
The string substitution feature can also be used to remove a substring from another string. |
| 11 | Remove Both Ends
This is used to remove the first and the last character of a string. |
| 12 | Remove All Spaces
This is used to remove all spaces in a string via substitution. |
| 13 | Replace a String
To replace a substring with another string use the string substitution feature. |
| 14 | Right String
This is used to extract characters from the end of a string. |
Batch Script — Arrays
Arrays are not specifically defined as a type in Batch Script but can be implemented. The following things need to be noted when arrays are implemented in Batch Script.
- Each element of the array needs to be defined with the set command.
- The ‘for’ loop would be required to iterate through the values of the array.
Creating an Array
An array is created by using the following set command.
set a[0]=1
Where 0 is the index of the array and 1 is the value assigned to the first element of the array.
Another way to implement arrays is to define a list of values and iterate through the list of values. The following example show how this can be implemented.
Example
@echo off
set list = 1 2 3 4
(for %%a in (%list%) do (
   echo %%a
))
Output
The above command produces the following output.
1
2
3
4
Accessing Arrays
You can retrieve a value from the array by using subscript syntax, passing the index of the value you want to retrieve within square brackets immediately after the name of the array.
Example
@echo off
set a[0]=1
echo %a[0]%
In this example, the index starts from 0 which means the first element can be accessed using index as 0, the second element can be accessed using index as 1 and so on. Let’s check the following example to create, initialize and access arrays −
@echo off
set a[0] = 1
set a[1] = 2
set a[2] = 3
echo The first element of the array is %a[0]%
echo The second element of the array is %a[1]%
echo The third element of the array is %a[2]%
The above command produces the following output.
The first element of the array is 1
The second element of the array is 2
The third element of the array is 3
Modifying an Array
To add an element to the end of the array, you can use the set element along with the last index of the array element.
Example
@echo off
set a[0] = 1
set a[1] = 2
set a[2] = 3
Rem Adding an element at the end of an array
Set a[3] = 4
echo The last element of the array is %a[3]%
The above command produces the following output.
The last element of the array is 4
You can modify an existing element of an Array by assigning a new value at a given index as shown in the following example −
@echo off
set a[0] = 1
set a[1] = 2
set a[2] = 3
Rem Setting the new value for the second element of the array
Set a[1] = 5
echo The new value of the second element of the array is %a[1]%
The above command produces the following output.
The new value of the second element of the array is 5
Iterating Over an Array
Iterating over an array is achieved by using the ‘for’ loop and going through each element of the array. The following example shows a simple way that an array can be implemented.
@echo off
setlocal enabledelayedexpansion
set topic[0] = comments
set topic[1] = variables
set topic[2] = Arrays
set topic[3] = Decision making
set topic[4] = Time and date
set topic[5] = Operators

for /l %%n in (0,1,5) do (
   echo !topic[%%n]!
)
Following things need to be noted about the above program −
-
Each element of the array needs to be specifically defined using the set command.
-
The ‘for’ loop with the /L parameter for moving through ranges is used to iterate through the array.
Output
The above command produces the following output.
Comments
variables
Arrays
Decision making
Time and date
Operators
Length of an Array
The length of an array is done by iterating over the list of values in the array since there is no direct function to determine the number of elements in an array.
@echo off
set Arr[0] = 1
set Arr[1] = 2
set Arr[2] = 3
set Arr[3] = 4
set "x = 0"
:SymLoop

if defined Arr[%x%] (
   call echo %%Arr[%x%]%%
   set /a "x+=1"
   GOTO :SymLoop
)
echo "The length of the array is" %x%
Output
Output The above command produces the following output.
The length of the array is 4
Creating Structures in Arrays
Structures can also be implemented in batch files using a little bit of an extra coding for implementation. The following example shows how this can be achieved.
Example
@echo off
set len = 3
set obj[0].Name = Joe
set obj[0].ID = 1
set obj[1].Name = Mark
set obj[1].ID = 2
set obj[2].Name = Mohan
set obj[2].ID = 3
set i = 0
:loop

if %i% equ %len% goto :eof
set cur.Name=
set cur.ID=

for /f "usebackq delims==.tokens=1-3" %%j in (`set obj[%i%]`) do (
   set cur.%%k=%%l
)
echo Name = %cur.Name%
echo Value = %cur.ID%
set /a i = %i%+1
goto loop
The following key things need to be noted about the above code.
-
Each variable defined using the set command has 2 values associated with each index of the array.
-
The variable i is set to 0 so that we can loop through the structure will the length of the array which is 3.
-
We always check for the condition on whether the value of i is equal to the value of len and if not, we loop through the code.
-
We are able to access each element of the structure using the obj[%i%] notation.
Output
The above command produces the following output.
Name = Joe
Value = 1
Name = Mark
Value = 2
Name = Mohan
Value = 3
Batch Script — Decision Making
Decision-making structures require that the programmer specify one or more conditions to be evaluated or tested by the program, along with a statement or statements to be executed if the condition is determined to be true, and optionally, other statements to be executed if the condition is determined to be false.
| S.No | Strings & Description |
|---|---|
| 1 | If Statement
The first decision-making statement is the ‘if’ statement. |
| 2 | If/else Statement
The next decision making statement is the If/else statement. Following is the general form of this statement. |
| 3 | Nested If Statements
Sometimes, there is a requirement to have multiple ‘if’ statement embedded inside each other. Following is the general form of this statement. |
Batch Script — Operators
An operator is a symbol that tells the compiler to perform specific mathematical or logical manipulations.
In batch script, the following types of operators are possible.
- Arithmetic operators
- Relational operators
- Logical operators
- Assignment operators
- Bitwise operators
Arithmetic Operators
Batch script language supports the normal Arithmetic operators as any language. Following are the Arithmetic operators available.
Show Example
| Operator | Description | Example |
|---|---|---|
| + | Addition of two operands | 1 + 2 will give 3 |
| − | Subtracts second operand from the first | 2 − 1 will give 1 |
| * | Multiplication of both operands | 2 * 2 will give 4 |
| / | Division of the numerator by the denominator | 3 / 2 will give 1.5 |
| % | Modulus operator and remainder of after an integer/float division | 3 % 2 will give 1 |
Relational Operators
Relational operators allow of the comparison of objects. Below are the relational operators available.
Show Example
| Operator | Description | Example |
|---|---|---|
| EQU | Tests the equality between two objects | 2 EQU 2 will give true |
| NEQ | Tests the difference between two objects | 3 NEQ 2 will give true |
| LSS | Checks to see if the left object is less than the right operand | 2 LSS 3 will give true |
| LEQ | Checks to see if the left object is less than or equal to the right operand | 2 LEQ 3 will give true |
| GTR | Checks to see if the left object is greater than the right operand | 3 GTR 2 will give true |
| GEQ | Checks to see if the left object is greater than or equal to the right operand | 3 GEQ 2 will give true |
Logical Operators
Logical operators are used to evaluate Boolean expressions. Following are the logical operators available.
The batch language is equipped with a full set of Boolean logic operators like AND, OR, XOR, but only for binary numbers. Neither are there any values for TRUE or FALSE. The only logical operator available for conditions is the NOT operator.
Show Example
| Operator | Description |
|---|---|
| AND | This is the logical “and” operator |
| OR | This is the logical “or” operator |
| NOT | This is the logical “not” operator |
Assignment Operators
Batch Script language also provides assignment operators. Following are the assignment operators available.
Show Example
| Operator | Description | Example |
|---|---|---|
| += | This adds right operand to the left operand and assigns the result to left operand |
Set /A a = 5 a += 3 Output will be 8 |
| -= | This subtracts the right operand from the left operand and assigns the result to the left operand |
Set /A a = 5 a -= 3 Output will be 2 |
| *= | This multiplies the right operand with the left operand and assigns the result to the left operand |
Set /A a = 5 a *= 3 Output will be 15 |
| /= | This divides the left operand with the right operand and assigns the result to the left operand |
Set /A a = 6 a/ = 3 Output will be 2 |
| %= | This takes modulus using two operands and assigns the result to the left operand |
Set /A a = 5 a% = 3 Output will be 2 |
Bitwise Operators
Bitwise operators are also possible in batch script. Following are the operators available.
Show Example
| Operator | Description |
|---|---|
| & | This is the bitwise “and” operator |
| | | This is the bitwise “or” operator |
| ^ | This is the bitwise “xor” or Exclusive or operator |
Following is the truth table showcasing these operators.
| p | q | p & q | p | q | p ^ q |
|---|---|---|---|---|
| 0 | 0 | 0 | 0 | 0 |
| 0 | 1 | 0 | 1 | 1 |
| 1 | 1 | 1 | 1 | 0 |
| 1 | 0 | 0 | 1 | 1 |
Batch Script — DATE and TIME
The date and time in DOS Scripting have the following two basic commands for retrieving the date and time of the system.
DATE
This command gets the system date.
Syntax
DATE
Example
@echo off
echo %DATE%
Output
The current date will be displayed in the command prompt. For example,
Mon 12/28/2015
TIME
This command sets or displays the time.
Syntax
TIME
Example
@echo off
echo %TIME%
Output
The current system time will be displayed. For example,
22:06:52.87
Following are some implementations which can be used to get the date and time in different formats.
Date in Format Year-Month-Day
Example
@echo off
echo/Today is: %year%-%month%-%day%
goto :EOF
setlocal ENABLEEXTENSIONS
set t = 2&if "%date%z" LSS "A" set t = 1

for /f "skip=1 tokens = 2-4 delims = (-)" %%a in ('echo/^|date') do (
   for /f "tokens = %t%-4 delims=.-/ " %%d in ('date/t') do (
      set %%a=%%d&set %%b=%%e&set %%c=%%f))
endlocal&set %1=%yy%&set %2=%mm%&set %3=%dd%&goto :EOF
Output
The above command produces the following output.
Today is: 2015-12-30
Batch Script — Input / Output
There are three universal “files” for keyboard input, printing text on the screen and printing errors on the screen. The “Standard In” file, known as stdin, contains the input to the program/script. The “Standard Out” file, known as stdout, is used to write output for display on the screen. Finally, the “Standard Err” file, known as stderr, contains any error messages for display on the screen.
Each of these three standard files, otherwise known as the standard streams, are referenced using the numbers 0, 1, and 2. Stdin is file 0, stdout is file 1, and stderr is file 2.
Redirecting Output (Stdout and Stderr)
One common practice in batch files is sending the output of a program to a log file. The > operator sends, or redirects, stdout or stderr to another file. The following example shows how this can be done.
Dir C: > list.txt
In the above example, the stdout of the command Dir C: is redirected to the file list.txt.
If you append the number 2 to the redirection filter, then it would redirect the stderr to the file lists.txt.
Dir C: 2> list.txt
One can even combine the stdout and stderr streams using the file number and the ‘&’ prefix. Following is an example.
DIR C: > lists.txt 2>&1
Suppressing Program Output
The pseudo file NUL is used to discard any output from a program. The following example shows that the output of the command DIR is discarded by sending the output to NUL.
Dir C: > NUL
Stdin
To work with the Stdin, you have to use a workaround to achieve this. This can be done by redirecting the command prompt’s own stdin, called CON.
The following example shows how you can redirect the output to a file called lists.txt. After you execute the below command, the command prompt will take all the input entered by user till it gets an EOF character. Later, it sends all the input to the file lists.txt.
TYPE CON > lists.txt
Batch Script — Return Code
By default when a command line execution is completed it should either return zero when execution succeeds or non-zero when execution fails. When a batch script returns a non-zero value after the execution fails, the non-zero value will indicate what is the error number. We will then use the error number to determine what the error is about and resolve it accordingly.
Following are the common exit code and their description.
| Error Code | Description |
|---|---|
| 0 | Program successfully completed. |
| 1 | Incorrect function. Indicates that Action has attempted to execute non-recognized command in Windows command prompt cmd.exe. |
| 2 | The system cannot find the file specified. Indicates that the file cannot be found in specified location. |
| 3 | The system cannot find the path specified. Indicates that the specified path cannot be found. |
| 5 | Access is denied. Indicates that user has no access right to specified resource. |
|
9009 0x2331 |
Program is not recognized as an internal or external command, operable program or batch file. Indicates that command, application name or path has been misspelled when configuring the Action. |
|
221225495 0xC0000017 -1073741801 |
Not enough virtual memory is available. It indicates that Windows has run out of memory. |
|
3221225786 0xC000013A -1073741510 |
The application terminated as a result of a CTRL+C. Indicates that the application has been terminated either by the user’s keyboard input CTRL+C or CTRL+Break or closing command prompt window. |
|
3221225794 0xC0000142 -1073741502 |
The application failed to initialize properly. Indicates that the application has been launched on a Desktop to which the current user has no access rights. Another possible cause is that either gdi32.dll or user32.dll has failed to initialize. |
Error Level
The environmental variable %ERRORLEVEL% contains the return code of the last executed program or script.
By default, the way to check for the ERRORLEVEL is via the following code.
Syntax
IF %ERRORLEVEL% NEQ 0 (
   DO_Something
)
It is common to use the command EXIT /B %ERRORLEVEL% at the end of the batch file to return the error codes from the batch file.
EXIT /B at the end of the batch file will stop execution of a batch file.
Use EXIT /B < exitcodes > at the end of the batch file to return custom return codes.
Environment variable %ERRORLEVEL% contains the latest errorlevel in the batch file, which is the latest error codes from the last command executed. In the batch file, it is always a good practice to use environment variables instead of constant values, since the same variable get expanded to different values on different computers.
Let’s look at a quick example on how to check for error codes from a batch file.
Example
Let’s assume we have a batch file called Find.cmd which has the following code. In the code, we have clearly mentioned that we if don’t find the file called lists.txt then we should set the errorlevel to 7. Similarly, if we see that the variable userprofile is not defined then we should set the errorlevel code to 9.
if not exist c:lists.txt exit 7
if not defined userprofile exit 9
exit 0
Let’s assume we have another file called App.cmd that calls Find.cmd first. Now, if the Find.cmd returns an error wherein it sets the errorlevel to greater than 0 then it would exit the program. In the following batch file, after calling the Find.cnd find, it actually checks to see if the errorlevel is greater than 0.
Call Find.cmd

if errorlevel gtr 0 exit
echo “Successful completion”
Output
In the above program, we can have the following scenarios as the output −
-
If the file c:lists.txt does not exist, then nothing will be displayed in the console output.
-
If the variable userprofile does not exist, then nothing will be displayed in the console output.
-
If both of the above condition passes then the string “Successful completion” will be displayed in the command prompt.
Loops
In the decision making chapter, we have seen statements which have been executed one after the other in a sequential manner. Additionally, implementations can also be done in Batch Script to alter the flow of control in a program’s logic. They are then classified into flow of control statements.
| S.No | Loops & Description |
|---|---|
| 1 | While Statement Implementation
There is no direct while statement available in Batch Script but we can do an implementation of this loop very easily by using the if statement and labels. |
| 2 | For Statement — List Implementations
The «FOR» construct offers looping capabilities for batch files. Following is the common construct of the ‘for’ statement for working with a list of values. |
| 3 | Looping through Ranges
The ‘for’ statement also has the ability to move through a range of values. Following is the general form of the statement. |
| 4 | Classic for Loop Implementation
Following is the classic ‘for’ statement which is available in most programming languages. |
Looping through Command Line Arguments
The ‘for’ statement can also be used for checking command line arguments. The following example shows how the ‘for’ statement can be used to loop through the command line arguments.
Example
@ECHO OFF
:Loop

IF "%1"=="" GOTO completed
FOR %%F IN (%1) DO echo %%F
SHIFT
GOTO Loop
:completed
Output
Let’s assume that our above code is stored in a file called Test.bat. The above command will produce the following output if the batch file passes the command line arguments of 1,2 and 3 as Test.bat 1 2 3.
1
2
3
| S.No | Loops & Description |
|---|---|
| 1 | Break Statement Implementation
The break statement is used to alter the flow of control inside loops within any programming language. The break statement is normally used in looping constructs and is used to cause immediate termination of the innermost enclosing loop. |
Batch Script — Functions
A function is a set of statements organized together to perform a specific task. In batch scripts, a similar approach is adopted to group logical statements together to form a function.
As like any other languages, functions in Batch Script follows the same procedure −
-
Function Declaration − It tells the compiler about a function’s name, return type, and parameters.
-
Function Definition − It provides the actual body of the function.
Function Definition
In Batch Script, a function is defined by using the label statement. When a function is newly defined, it may take one or several values as input ‘parameters’ to the function, process the functions in the main body, and pass back the values to the functions as output ‘return types’.
Every function has a function name, which describes the task that the function performs. To use a function, you «call» that function with its name and pass its input values (known as arguments) that matches the types of the function’s parameters.
Following is the syntax of a simple function.
:function_name
Do_something
EXIT /B 0
-
The function_name is the name given to the function which should have some meaning to match what the function actually does.
-
The EXIT statement is used to ensure that the function exits properly.
Following is an example of a simple function.
Example
:Display
SET /A index=2
echo The value of index is %index%
EXIT /B 0
| S.No | Functions & Description |
|---|---|
| 1 | Calling a Function
A function is called in Batch Script by using the call command. |
| 2 | Functions with Parameters
Functions can work with parameters by simply passing them when a call is made to the function. |
| 3 | Functions with Return Values
Functions can work with return values by simply passing variables names |
| 4 | Local Variables in Functions
Local variables in functions can be used to avoid name conflicts and keep variable changes local to the function. |
| 5 | Recursive Functions
The ability to completely encapsulate the body of a function by keeping variable changes local to the function and invisible to the caller. |
| 6 | File I/O
In Batch Script, it is possible to perform the normal file I/O operations that would be expected in any programming language. |
| 7 | Creating Files
The creation of a new file is done with the help of the redirection filter >. This filter can be used to redirect any output to a file. |
| 8 | Writing to Files
Content writing to files is also done with the help of the redirection filter >. This filter can be used to redirect any output to a file. |
| 9 | Appending to Files
Content writing to files is also done with the help of the double redirection filter >>. This filter can be used to append any output to a file. |
| 10 | Reading from Files
Reading of files in a batch script is done via using the FOR loop command to go through each line which is defined in the file that needs to be read. |
| 11 | Deleting Files
For deleting files, Batch Script provides the DEL command. |
| 12 | Renaming Files
For renaming files, Batch Script provides the REN or RENAME command. |
| 13 | Moving Files
For moving files, Batch Script provides the MOVE command. |
| 14 | Batch Files – Pipes
The pipe operator (|) takes the output (by default, STDOUT) of one command and directs it into the input (by default, STDIN) of another command. |
| 15 | Batch Files – Inputs
When a batch file is run, it gives you the option to pass in command line parameters which can then be read within the program for further processing. |
| 16 | Using the SHIFT Operator
One of the limitations of command line arguments is that it can accept only arguments till %9. Let’s take an example of this limitation. |
| 17 | Folders
In Batch Script, it is possible to perform the normal folder based operations that would be expected in any programming language. |
| 18 | Creating Folders
The creation of a folder is done with the assistance of the MD (Make directory) command. |
| 19 | Listing Folder Contents
The listing of folder contents can be done with the dir command. This command allows you to see the available files and directories in the current directory. |
| 20 | Deleting Folders
For deleting folders, Batch Scripting provides the DEL command. |
| 21 | Renaming Folders
For renaming folders, Batch Script provides the REN or RENAME command. |
| 22 | Moving Folders
For moving folders, Batch Script provides the MOVE command. |
Batch Script — Process
In this chapter, we will discuss the various processes involved in Batch Script.
Viewing the List of Running Processes
In Batch Script, the TASKLIST command can be used to get the list of currently running processes within a system.
Syntax
TASKLIST [/S system [/U username [/P [password]]]] [/M [module] | /SVC | /V] [/FI filter]
[/FO format] [/NH]
| S.No. | Options & Description |
|---|---|
| 1. |
/S system Specifies the remote system to connect to |
| 2. |
/U [domain]user Specifies the user context under which the command should execute. |
| 3. |
/P [password] Specifies the password for the given user context. Prompts for input if omitted. |
| 4. |
/M [module] Lists all tasks currently using the given exe/dll name. If the module name is not specified all loaded modules are displayed. |
| 5. |
/SVC Displays services hosted in each process. |
| 6. |
/V Displays verbose task information. |
| 7. |
/FI filter Displays a set of tasks that match a given criteria specified by the filter. |
| 8. |
/FO format Specifies the output format. Valid values: «TABLE», «LIST», «CSV». |
| 9. |
/NH Specifies that the «Column Header» should not show in the output. Valid only for «TABLE» and «CSV» formats. |
Examples
TASKLIST
The above command will get the list of all the processes running on your local system. Following is a snapshot of the output which is rendered when the above command is run as it is. As you can see from the following output, not only do you get the various processes running on your system, you also get the memory usage of each process.
Image Name                    PID       Session Name       Session#     Mem Usage
========================= ========    ================ =========== ============
System Idle Process             0        Services            0              4 K
System                          4        Services            0            272 K
smss.exe                      344        Services            0          1,040 K
csrss.exe                     528        Services            0          3,892 K
csrss.exe                     612        Console             1         41,788 K
wininit.exe                   620        Services            0          3,528 K
winlogon.exe                  648        Console             1          5,884 K
services.exe                  712        Services            0          6,224 K
lsass.exe                     720        Services            0          9,712 K
svchost.exe                   788        Services            0         10,048 K
svchost.exe                   832        Services            0          7,696 K
dwm.exe                       916        Console             1        117,440 K
nvvsvc.exe                    932        Services            0          6,692 K
nvxdsync.exe                  968        Console             1         16,328 K
nvvsvc.exe                    976        Console             1         12,756 K
svchost.exe                  1012        Services            0         21,648 K
svchost.exe                   236        Services            0         33,864 K
svchost.exe                   480        Services            0         11,152 K
svchost.exe                  1028        Services            0         11,104 K
svchost.exe                  1048        Services            0         16,108 K
wlanext.exe                  1220        Services            0         12,560 K
conhost.exe                  1228        Services            0          2,588 K
svchost.exe                  1276        Services            0         13,888 K
svchost.exe                  1420        Services            0         13,488 K
spoolsv.exe                  1556        Services            0          9,340 K
tasklist > process.txt
The above command takes the output displayed by tasklist and saves it to the process.txt file.
tasklist /fi "memusage gt 40000"
The above command will only fetch those processes whose memory is greater than 40MB. Following is a sample output that can be rendered.
Image Name                    PID      Session Name     Session#     Mem Usage
=========================   ======== ================ =========== ============
dwm.exe                        916     Console             1        127,912 K
explorer.exe                  2904     Console             1        125,868 K
ServerManager.exe             1836     Console             1         59,796 K
WINWORD.EXE                   2456     Console             1        144,504 K
chrome.exe                    4892     Console             1        123,232 K
chrome.exe                    4976     Console             1         69,412 K
chrome.exe                    1724     Console             1         76,416 K
chrome.exe                    3992     Console             1         56,156 K
chrome.exe                    1168     Console             1        233,628 K
chrome.exe                     816     Console             1         66,808 K
Killing a Particular Process
Allows a user running Microsoft Windows XP professional, Windows 2003, or later to kill a task from a Windows command line by process id (PID) or image name. The command used for this purpose is the TASKILL command.
Syntax
TASKKILL [/S system [/U username [/P [password]]]] { [/FI filter]
[/PID processid | /IM imagename] } [/T] [/F]
| S.No. | Options & Description |
|---|---|
| 1. |
/S system Specifies the remote system to connect to |
| 2. |
/U [domain]user Specifies the user context under which the command should execute. |
| 3. |
/P [password] Specifies the password for the given user context. Prompts for input if omitted. |
| 4. |
/FI FilterName Applies a filter to select a set of tasks. Allows «*» to be used. ex. imagename eq acme* See below filters for additional information and examples. |
| 5. |
/PID processID Specifies the PID of the process to be terminated. Use TaskList to get the PID. |
| 6. |
/IM ImageName Specifies the image name of the process to be terminated. Wildcard ‘*’ can be used to specify all tasks or image names. |
| 7. |
/T Terminates the specified process and any child processes which were started by it. |
| 8. |
/F Specifies to forcefully terminate the process(es). |
Examples
taskkill /f /im notepad.exe
The above command kills the open notepad task, if open.
taskill /pid 9214
The above command kills a process which has a process of 9214.
Starting a New Process
DOS scripting also has the availability to start a new process altogether. This is achieved by using the START command.
Syntax
START "title" [/D path] [options] "command" [parameters]
Wherein
-
title − Text for the CMD window title bar (required.)
-
path − Starting directory.
-
command − The command, batch file or executable program to run.
-
parameters − The parameters passed to the command.
| S.No. | Options & Description |
|---|---|
| 1. |
/MIN Start window Minimized |
| 2. |
/MAX Start window maximized. |
| 3. |
/LOW Use IDLE priority class. |
| 4. |
/NORMAL Use NORMAL priority class. |
| 5. |
/ABOVENORMAL Use ABOVENORMAL priority class. |
| 6. |
/BELOWNORMAL Use BELOWNORMAL priority class. |
| 7. |
/HIGH Use HIGH priority class. |
| 8. |
/REALTIME Use REALTIME priority class. |
Examples
START "Test Batch Script" /Min test.bat
The above command will run the batch script test.bat in a new window. The windows will start in the minimized mode and also have the title of “Test Batch Script”.
START "" "C:Program FilesMicrosoft OfficeWinword.exe" "D:testTESTA.txt"
The above command will actually run Microsoft word in another process and then open the file TESTA.txt in MS Word.
Batch Script — Aliases
Aliases means creating shortcuts or keywords for existing commands. Suppose if we wanted to execute the below command which is nothing but the directory listing command with the /w option to not show all of the necessary details in a directory listing.
Dir /w
Suppose if we were to create a shortcut to this command as follows.
dw = dir /w
When we want to execute the dir /w command, we can simply type in the word dw. The word ‘dw’ has now become an alias to the command Dir /w.
Creating an Alias
Alias are managed by using the doskey command.
Syntax
DOSKEY [options] [macroname=[text]]
Wherein
-
macroname − A short name for the macro.
-
text − The commands you want to recall.
Following are the description of the options which can be presented to the DOSKEY command.
| S.No. | Options & Description |
|---|---|
| 1. |
/REINSTALL Installs a new copy of Doskey |
| 2. |
/LISTSIZE = size Sets size of command history buffer. |
| 3. |
/MACROS Displays all Doskey macros. |
| 4. |
/MACROS:ALL Displays all Doskey macros for all executables which have Doskey macros. |
| 5. |
/MACROS:exename Displays all Doskey macros for the given executable. |
| 6. |
/HISTORY Displays all commands stored in memory. |
| 7. |
/INSERT Specifies that new text you type is inserted in old text. |
| 8. |
/OVERSTRIKE Specifies that new text overwrites old text. |
| 9. |
/EXENAME = exename Specifies the executable. |
| 10. |
/MACROFILE = filename Specifies a file of macros to install. |
| 11. |
macroname Specifies a name for a macro you create. |
| 12. |
text Specifies commands you want to record. |
Example
Create a new file called keys.bat and enter the following commands in the file. The below commands creates two aliases, one if for the cd command, which automatically goes to the directory called test. And the other is for the dir command.
@echo off
doskey cd = cd/test
doskey d = dir
Once you execute the command, you will able to run these aliases in the command prompt.
Output
The following screenshot shows that after the above created batch file is executed, you can freely enter the ‘d’ command and it will give you the directory listing which means that your alias has been created.
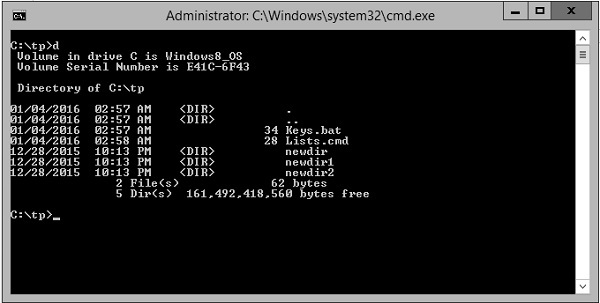
Deleting an Alias
An alias or macro can be deleted by setting the value of the macro to NULL.
Example
@echo off
doskey cd = cd/test
doskey d = dir
d=
In the above example, we are first setting the macro d to d = dir. After which we are setting it to NULL. Because we have set the value of d to NULL, the macro d will deleted.
Replacing an Alias
An alias or macro can be replaced by setting the value of the macro to the new desired value.
Example
@echo off
doskey cd = cd/test
doskey d = dir

d = dir /w
In the above example, we are first setting the macro d to d = dir. After which we are setting it to dir /w. Since we have set the value of d to a new value, the alias ‘d’ will now take on the new value.
Batch Script — Devices
Windows now has an improved library which can be used in Batch Script for working with devices attached to the system. This is known as the device console – DevCon.exe.
Windows driver developers and testers can use DevCon to verify that a driver is installed and configured correctly, including the proper INF files, driver stack, driver files, and driver package. You can also use the DevCon commands (enable, disable, install, start, stop, and continue) in scripts to test the driver. DevCon is a command-line tool that performs device management functions on local computers and remote computers.
Display driver and device info DevCon can display the following properties of drivers and devices on local computers, and remote computers (running Windows XP and earlier) −
-
Hardware IDs, compatible IDs, and device instance IDs. These identifiers are described in detail in device identification strings.
-
Device setup classes.
-
The devices in a device setup class.
-
INF files and device driver files.
-
Details of driver packages.
-
Hardware resources.
-
Device status.
-
Expected driver stack.
-
Third-party driver packages in the driver store.
-
Search for devices DevCon can search for installed and uninstalled devices on a local or remote computer by hardware ID, device instance ID, or device setup class.
-
Change device settings DevCon can change the status or configuration of Plug and Play (PnP) devices on the local computer in the following ways −
-
Enable a device.
-
Disable a device.
-
Update drivers (interactive and non-interactive).
-
Install a device (create a devnode and install software).
-
Remove a device from the device tree and delete its device stack.
-
Rescan for Plug and Play devices.
-
Add, delete, and reorder the hardware IDs of root-enumerated devices.
-
Change the upper and lower filter drivers for a device setup class.
-
Add and delete third-party driver packages from the driver store.
-
DevCon (DevCon.exe) is included when you install the WDK, Visual Studio, and the Windows SDK for desktop apps. DevCon.exe kit is available in the following locations when installed.
%WindowsSdkDir%toolsx64devcon.exe
%WindowsSdkDir%toolsx86devcon.exe
%WindowsSdkDir%toolsarmdevcon.exe
Syntax
devcon [/m:\computer] [/r] command [arguments]
wherein
-
/m:\computer − Runs the command on the specified remote computer. The backslashes are required.
-
/r − Conditional reboot. Reboots the system after completing an operation only if a reboot is required to make a change effective.
-
command − Specifies a DevCon command.
-
To list and display information about devices on the computer, use the following commands −
-
DevCon HwIDs
-
DevCon Classes
-
DevCon ListClass
-
DevCon DriverFiles
-
DevCon DriverNodes
-
DevCon Resources
-
DevCon Stack
-
DevCon Status
-
DevCon Dp_enum
-
-
To search for information about devices on the computer, use the following commands −
-
DevCon Find
-
DevCon FindAll
-
-
To manipulate the device or change its configuration, use the following commands −
-
DevCon Enable
-
DevCon Disable
-
DevCon Update
-
DevCon UpdateNI
-
DevCon Install
-
DevCon Remove
-
DevCon Rescan
-
DevCon Restart
-
DevCon Reboot
-
DevCon SetHwID
-
DevCon ClassFilter
-
DevCon Dp_add
-
DevCon Dp_delete
-
Examples
Following are some examples on how the DevCon command is used.
List all driver files
The following command uses the DevCon DriverFiles operation to list the file names of drivers that devices on the system use. The command uses the wildcard character (*) to indicate all devices on the system. Because the output is extensive, the command uses the redirection character (>) to redirect the output to a reference file, driverfiles.txt.
devcon driverfiles * > driverfiles.txt
The following command uses the DevCon status operation to find the status of all devices on the local computer. It then saves the status in the status.txt file for logging or later review. The command uses the wildcard character (*) to represent all devices and the redirection character (>) to redirect the output to the status.txt file.
devcon status * > status.txt
The following command enables all printer devices on the computer by specifying the Printer setup class in a DevCon Enable command. The command includes the /r parameter, which reboots the system if it is necessary to make the enabling effective.
devcon /r enable = Printer
The following command uses the DevCon Install operation to install a keyboard device on the local computer. The command includes the full path to the INF file for the device (keyboard.inf) and a hardware ID (*PNP030b).
devcon /r install c:windowsinfkeyboard.inf *PNP030b
The following command will scan the computer for new devices.
devcon scan
The following command will rescan the computer for new devices.
devcon rescan
Batch Script — Registry
The Registry is one of the key elements on a windows system. It contains a lot of information on various aspects of the operating system. Almost all applications installed on a windows system interact with the registry in some form or the other.
The Registry contains two basic elements: keys and values. Registry keys are container objects similar to folders. Registry values are non-container objects similar to files. Keys may contain values or further keys. Keys are referenced with a syntax similar to Windows’ path names, using backslashes to indicate levels of hierarchy.
This chapter looks at various functions such as querying values, adding, deleting and editing values from the registry.
| S.No | Types of Registry & Description |
|---|---|
| 1 | Reading from the Registry
Reading from the registry is done via the REG QUERY command. |
| 2 | Adding to the Registry
Adding to the registry is done via the REG ADD command. |
| 3 | Deleting from the Registry
Deleting from the registry is done via the REG DEL command. |
| 4 | Copying Registry Keys
Copying from the registry is done via the REG COPY command. |
| 5 | Comparing Registry Keys
Comparing registry keys is done via the REG COMPARE command. |
Batch Script — Network
Batch script has the facility to work with network settings. The NET command is used to update, fix, or view the network or network settings. This chapter looks at the different options available for the net command.
| S.No | NET Commands & Description |
|---|---|
| 1 | NET ACCOUNTS
View the current password & logon restrictions for the computer. |
| 2 | NET CONFIG
Displays your current server or workgroup settings. |
| 3 | NET COMPUTER
Adds or removes a computer attached to the windows domain controller. |
| 4 | NET USER
This command can be used for the following View the details of a particular user account. |
| 5 | NET STOP/START
This command is used to stop and start a particular service. |
| 6 | NET STATISTICS
Display network statistics of the workstation or server. |
| 7 | NET USE
Connects or disconnects your computer from a shared resource or displays information about your connections. |
Batch Script — Printing
Printing can also be controlled from within Batch Script via the NET PRINT command.
Syntax
PRINT [/D:device] [[drive:][path]filename[...]]
Where /D:device — Specifies a print device.
Example
print c:example.txt /c /d:lpt1
The above command will print the example.txt file to the parallel port lpt1.
Command Line Printer Control
As of Windows 2000, many, but not all, printer settings can be configured from Windows’s command line using PRINTUI.DLL and RUNDLL32.EXE
Syntax
RUNDLL32.EXE PRINTUI.DLL,PrintUIEntry [ options ] [ @commandfile ]
Where some of the options available are the following −
-
/dl − Delete local printer.
-
/dn − Delete network printer connection.
-
/dd − Delete printer driver.
-
/e − Display printing preferences.
-
/f[file] − Either inf file or output file.
-
/F[file] − Location of an INF file that the INF file specified with /f may depend on.
-
/ia − Install printer driver using inf file.
-
/id − Install printer driver using add printer driver wizard.
-
/if − Install printer using inf file.
-
/ii − Install printer using add printer wizard with an inf file.
-
/il − Install printer using add printer wizard.
-
/in − Add network printer connection.
-
/ip − Install printer using network printer installation wizard.
-
/k − Print test page to specified printer, cannot be combined with command when installing a printer.
-
/l[path] − Printer driver source path.
-
/m[model] − Printer driver model name.
-
/n[name] − Printer name.
-
/o − Display printer queue view.
-
/p − Display printer properties.
-
/Ss − Store printer settings into a file.
-
/Sr − Restore printer settings from a file.
-
/y − Set printer as the default.
-
/Xg − Get printer settings.
-
/Xs − Set printer settings.
Testing if a Printer Exists
There can be cases wherein you might be connected to a network printer instead of a local printer. In such cases, it is always beneficial to check if a printer exists in the first place before printing.
The existence of a printer can be evaluated with the help of the RUNDLL32.EXE PRINTUI.DLL which is used to control most of the printer settings.
Example
SET PrinterName = Test Printer
SET file=%TEMP%Prt.txt
RUNDLL32.EXE PRINTUI.DLL,PrintUIEntry /Xg /n "%PrinterName%" /f "%file%" /q

IF EXIST "%file%" (
   ECHO %PrinterName% printer exists
) ELSE (
   ECHO %PrinterName% printer does NOT exists
)
The above command will do the following −
-
It will first set the printer name and set a file name which will hold the settings of the printer.
-
The RUNDLL32.EXE PRINTUI.DLL commands will be used to check if the printer actually exists by sending the configuration settings of the file to the file Prt.txt
Batch Script — Debugging
Debugging a batch script becomes important when you are working on a big complex batch script.
Following are the ways in which you can debug the batch file.
Using echo command
A very simple debug option is to make use of echo command in your batch script wherever possible. It will display the message in the command prompt and help you debug where things have gone wrong.
Here is a simple example that displays even numbers based on the input given. The echo command is used to display the result and also if the input is not given. Similarly, the echo command can be used in place when you think that the error can happen. For example, if the input given is a negative number, less than 2, etc.
Example
@echo off
if [%1] == [] (
   echo input value not provided
   goto stop
)
rem Display numbers
for /l %%n in (2,2,%1) do (
   echo %%n
)
:stop
pause
Output
C:>test.bat
10
2
4
6
8
10
22
Press any key to continue ...
Using pause command
Another way is to pause the batch execution when there is an error. When the script is paused, the developer can fix the issue and restart the processing.
In the example below, the batch script is paused as the input value is mandatory and not provided.
Example
@echo off
if [%1] == [] (
   echo input value not provided
   goto stop
) else (
   echo "Valid value"
)
:stop
pause
Output
C:>test.bat
 input value not provided
Press any key to continue..
Logging the error messages to another file
It might get hard to debug the error just looking at a bunch of echo displayed on the command prompt. Another easy way out is to log those messages in another file and view it step by step to understand what went wrong.
Here is an example, consider the following test.bat file:
net statistics /Server
The command given in the .bat file is wrong. Let us log the message and see what we get.
Execute the following command in your command line:
C:>test.bat > testlog.txt 2> testerrors.txt
The file testerrors.txt will display the error messages as shown below:
The option /SERVER is unknown.
The syntax of this command is:
NET STATISTICS
[WORKSTATION | SERVER]
More help is available by typing NET HELPMSG 3506.
Looking at the above file the developer can fix the program and execute again.
Using ErrorLevel to detect errors and log them
Errorlevel returns 0 if the command executes successfully and 1 if it fails.
Consider the following example:
@echo off
PING google.com
if errorlevel 1 GOTO stop
:stop
   echo Unable to connect to google.com
pause
During execution, you can see errors as well as logs:
C:>test.bat > testlog.txt
testlog.txt
Pinging google.com [172.217.26.238] with 32 bytes of data:
Reply from 172.217.26.238: bytes=32 time=160ms TTL=111
Reply from 172.217.26.238: bytes=32 time=82ms TTL=111
Reply from 172.217.26.238: bytes=32 time=121ms TTL=111
Reply from 172.217.26.238: bytes=32 time=108ms TTL=111
Ping statistics for 172.217.26.238:
   Packets: Sent = 4, Received = 4, Lost = 0 (0% loss),
Approximate round trip times in milli-seconds:
   Minimum = 82ms, Maximum = 160ms, Average = 117ms
   Connected successfully
Press any key to continue . . .
In case of failure, you will see the following logs inside testlog.txt.
Ping request could not find host google.com. Please check the name and try again.
Unable to connect to google.com
Press any key to continue . . .
Batch Script — Logging
Logging in is possible in Batch Script by using the redirection command.
Syntax
test.bat > testlog.txt 2> testerrors.txt
Example
Create a file called test.bat and enter the following command in the file.
net statistics /Server
The above command has an error because the option to the net statistics command is given in the wrong way.
Output
If the command with the above test.bat file is run as
test.bat > testlog.txt 2> testerrors.txt
And you open the file testerrors.txt, you will see the following error.
The option /SERVER is unknown.
The syntax of this command is −
NET STATISTICS
[WORKSTATION | SERVER]
More help is available by typing NET HELPMSG 3506.
If you open the file called testlog.txt, it will show you a log of what commands were executed.
C:tp>net statistics /Server