Включение интернета в безопасном режиме Windows
Если компьютер заражен вирусами, полезно знать информацию о том, как включить интернет в безопасном режиме. При таком способе запуска операционной системы будут загружаться только минимальные компоненты. Основное преимущество заключается в том, что не будут грузиться приложения, которые прописаны в автозагрузке.
Содержание
- Запуск
- Назначение
- Возможные операции
- Возможно ли использовать интернет
- Причины отсутствия подключения
Запуск
Процесс входа не представляет сложности. Он может только отличаться в зависимости от используемой версии WINDOWS.
Выделяется три вида:
- Стандартный вариант, при котором запускаются только необходимые для работы операционной системы программы и службы. При таком способе не будут запускаться сетевые драйверы, поэтому вход в интернет будет невозможен.
- Второй способ предусматривает запуск сетевых драйверов. В отличие от первого варианта пользователь получает возможность выхода в сеть.
- Вход с использованием командной строки. Особенность такого способа заключается в том, что после запуска стандартного варианта появляется командная строка.

Важно! Программисты рекомендуют при возникновении неполадок использовать первый стандартный способ. Это связано с тем, что вариант с поддержкой выхода в интернет может снова дать сбой.
Чтобы подключиться в Виндовс к безопасному режиму, нужно совершить ряд действий:
- Из компьютера нужно убрать все диски, дискеты, затем осуществить перезапуск. Необходимо активировать кнопку «Пуск», выбрать параметр «Перезагрузка».
- Если у пользователя на компьютере установлена одна операционная система, то в процессе перезагрузки нужно удерживать кнопку F8. Ее нужно жать до появления надписи Виндовс. Если логотип появился до нажатия кнопки, нужно повторить действия заново. Для этого необходимо полностью загрузиться, а потом снова перезапустить.
- Если установлено несколько операционных систем, то нужно с помощью стрелок выбрать нужную. Затем нажимается кнопка F8.
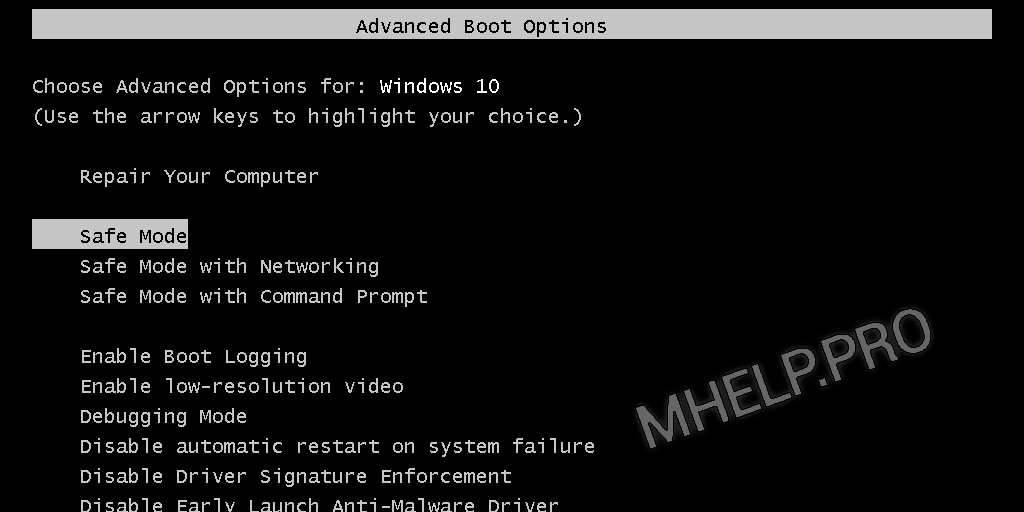
Перед пользователем откроется панель параметров дополнительных загрузок. С помощью клавиш со стрелками нужно выбрать необходимый вариант и нажать клавишу «ввод».

Способ, как подключаться, будут зависеть от вида операционки. Например, если речь идет о семерке, то есть два способа. Первый вариант предполагает вход во время запуска программы, второй в процессе работы. В первом случае режим будет работать даже в случае серьезных поломок на компьютере.
Чтобы выйти в безопасный режим на Windows 7, нужно совершить следующие действия:
- Перезагрузить компьютер, если он был включен.
- До старта нужно несколько раз нажать F8. Лучше всего это сделать не менее трех раз.
- Появится окно с выбором дополнительных параметров для загрузки.
- Выбрав безопасный режим, нужно нажать клавишу «enter».
Важно! Часто на ноутбуках приходится нажимать F8 вместе с клавишей Fn.
Назначение
В каждой операционной системе Виндовс есть такой способ загрузки. Просто так перейти в него невозможно. Если операционка работает правильно, то его не видно. Он считается одним из способов проведения диагностики.
Как только Windows будет запущен таким способом, перед пользователем откроется типичная система, но у нее будет упрощенная графика и фон рабочего стола. Основная особенность заключается в том, что в таком варианте будут работать только основные для Виндовс программы. Все службы, которые настроены на автозапуск при старте, будут отключены.
Многие пользователи задаются вопросом, зачем включаться в безопасном режиме, если многие службы функционировать не будут. Такой способ необходим в том случае, когда подключить Windows не удается совсем. Причины этому могут быть различные, как вирус, так и ошибки в работе. Если операционная система не запускается из-за какой-либо системной ошибки, то войти с использованием способа безопасности тоже может не всегда получиться.
Такой вид запуска часто помогает выявить проблему. Например, если был установлен несовместимый драйвер. В такой ситуации можно найти причину, почему операционная система не запускается в стандартном порядке.
Если включение производить безопасным способом, можно запустить в работу антивирусную программу. Она поможет очистить компьютер. После этого можно запускать систему для восстановления.

Возможные операции
Если использовать указанный способ, пользователю становится доступен ряд операций:
- Возможность проверить операционную систему на наличие вирусов. Не будут запускаться программы, которые установлены на автозапуске. А именно в них чаще всего располагаются вирусы.
- Настроить и восстановить систему. Это лучше всего делать именно при подключении.
- Обновить и установить новые драйверы. При таком режиме будут загружаться только самые минимально необходимые. Если компьютер плохо работает, а проблема кроется именно в драйверах, такой способ может решить проблему.
Также пользователь сможет проверить работу компьютера. Если дело в программном обеспечении, то при таком входе он будет функционировать хорошо. Если же проблемы сохраняются, то поломка в аппаратной системе.

Возможно ли использовать интернет
Часто пользователи сталкиваются с ситуацией, что в безопасном режиме не работает интернет. Если не удается в него выходить, значит, на компьютере установлены блокирующие программы. В такой ситуации рекомендуется перезагрузить компьютер и включиться обычным методом. Для этого во вкладке «конфигурации системы» нужно выбрать пункт «обычный запуск», затем «общие».
Затем нужно очистить компьютер от вредоносных и блокирующих программ. Также рекомендуется произвести переустановку антивирусной программы.

Причины отсутствия подключения
Если подключать безопасный режим, чаще всего выйти в интернет все равно не получается. Так бывает в том случае, если не были активированы сетевые драйверы. Такая ситуация возникает при стандартном типе загрузки. Чтобы была возможность выйти в интернет, нужно выбирать второй способ с подключением драйверов.
Программисты не советуют поступать таким образом, так как есть возможность усугубить ситуацию с поломкой. Это происходит из-за того, что при таком способе загрузки многие системы на компьютере отключены.
Благодаря запуску операционной системы с исключением лишних программ безопасный режим является одним из важных видов диагностики состояния компьютера. Он помогает восстановить работоспособность компьютера после возникновения поломок и неисправностей.

Подгорнов Илья Владимирович
Всё статьи нашего сайта проходят аудит технического консультанта. Если у Вас остались вопросы, Вы всегда их можете задать на его странице.
Booting your computer into Safe Mode with Networking causes your computer to load with only the essential drivers and services, thus limiting the impact that software and malware (viruses) have on your computer. Booting in Safe Mode can eliminate problems related to: Antivirus Program Security Settings, Software Issues, and Malware/Spyware
To boot your Windows 10 computer into Safe Mode with Networking you will need to do the following:
- Click the Start button or press the Windows key on the keyboard
- Click Power
- While holding SHIFT on the keyboard, click Restart
- Windows will reboot and prompt with a few different options
- Choose Troubleshoot
- Choose Advanced Options
- Choose Startup Settings
- Click Restart
- After rebooting, Windows will prompt with several different startup options
- Choose Safe Mode with Networking and press Enter
Windows 8.1
To boot your Windows 8.1 computer into Safe Mode with Networking you will need to do the following:
- Navigate to the desktop on your Windows 8.1 PC
- Press the WINDOWS Windows 8 Keyboard Icon and «i» key on your keyboard simultaneously, or move your mouse into the top right-hand corner of the screen to bring up your Charms bar
- Select Settings
- Select the Power icon, then hold down the SHIFT key on your keyboard and select Restart
- Your PC will now reboot and load the Advanced Start up Menu
- Choose Troubleshoot
- Select Advanced Options
- Select Startup Settings
- Click Restart
- Press the F5 key on your keyboard to select 5) Enable Safe Mode with Networking
Windows XP, Vista, and Windows 7
To boot your Windows XP, Vista, or Windows 7 computer into Safe Mode with Networking you will need to do the following:
- Power off your computer
- Restart your computer and immediately start pressing the F8 key, located on your keyboard. Continue to press F8 repeatedly until the Boot Menu appears
- Select Safe Mode with Networking from the list of options using the arrow keys on your keyboard, followed by the ENTER key
- Log on to your computer if prompted. Once logged in you will notice that the desktop looks different when compared to booting up your computer in normal mode. Your display may seem enlarged and unclear, but this is normal while in Safe Mode; the desktop will revert back to its previous state when you exit Safe Mode
When you are ready to exit Safe Mode, simply restart your computer.
214
214 people found this article helpful
Easy, 5-minute-or-less process!
Updated on November 30, 2021
What to Know
- Turn on or restart your PC. Before the splash screen appears, press F8 to enter Advanced Boot Options.
- Highlight Safe Mode, Safe Mode with Networking, or Safe Mode with Command Prompt and press Enter.
- To start Windows 7 in Safe Mode, log in with an account that has administrator permissions.
Starting Windows 7 in Safe Mode is the next step when starting Windows normally is not possible. Safe Mode only starts the most important Windows 7 processes, so depending on the problem, you might be able to troubleshoot or fix the problem from here.
As of January 2020, Microsoft is no longer supporting Windows 7. We recommend upgrading to Windows 10 to continue receiving security updates and technical support.
How to Start Windows 7 in Safe Mode
Follow these instructions to start Windows 7 in Safe mode.
-
Turn on or restart your PC.
-
Just before the Windows 7 splash screen appears, press the F8 key to enter Advanced Boot Options.
-
You should now see the Advanced Boot Options screen. If not, you may have missed the short window of opportunity to press F8 in the previous step and Windows 7 is probably now continuing to boot normally, assuming it’s able to. If this is the case, just restart your computer and try pressing F8 again.
-
Once you’re in the Advanced Boot Options, you are presented with three variations of Windows 7 Safe Mode you can enter. Using the arrow keys on your keyboard, highlight either Safe Mode, Safe Mode with Networking, or Safe Mode with Command Prompt and press Enter.
- Safe Mode: This is the default option and is usually the best choice. This mode will load only the absolute minimum processes necessary to start Windows 7.
- Safe Mode with Networking: This option loads the same processes as Safe Mode but also includes those that allow the networking functions in Windows 7 to work. You should choose this option if you think you might need to access the internet or your local network while troubleshooting in Safe Mode.
- Safe Mode with Command Prompt: This version of Safe Mode also loads a minimum set of processes but starts the Command Prompt instead of Windows Explorer, the usual user interface. This is a valuable option if the Safe Mode option didn’t work.
Screenshot
-
Wait for the Windows 7 files to load. The minimum system files necessary to run Windows 7 will now load. Each file being loaded will be displayed on the screen.
If Safe Mode freezes here, document the last Windows 7 file being loaded, then search the internet for troubleshooting advice.
You don’t need to do anything here, but this screen could provide a good place to start troubleshooting if your computer is experiencing very serious problems and Safe Mode won’t completely load.
-
To start Windows 7 in Safe Mode, you must log on with an account that has administrator permissions. If you’re not sure if any of your personal accounts have administrator privileges, log in using your own account and see if that works.
-
Entry into Windows 7 Safe Mode should now be complete. Make any changes you need to make and then restart the computer. Assuming there are no remaining problems preventing it, the computer should boot to Windows 7 normally after a restart.
As you can see in the screenshot above, it’s very easy to identify if a Windows 7 computer is in Safe Mode. The text «Safe Mode» will always appear in each corner of the screen when in this special diagnostic mode of Windows 7.
Thanks for letting us know!
Get the Latest Tech News Delivered Every Day
Subscribe
-
Apps and Tools
-
Product Agnostic
-
Malware and Technologies
- KB2268
Issue
- Start Windows 7/Vista/XP in Safe Mode with Networking
- Start Windows 8 in Safe Mode with networking
- Start Windows 10 in Safe Mode with networking
Microsoft Azure/Amazon VM users
It is not recommended to start Windows in Safe Mode. Microsoft Azure/Amazon VMs do not have RDP connectivity when in Safe Mode therefore they lock up when restarting them in Safe Mode.
![]() I am a Mac user
I am a Mac user
Solution
Safe Mode is a troubleshooting option that limits Windows operation to basic functions. Safe Mode starts Windows with only core drivers and services. Safe Mode with Networking starts Windows with only core drivers, plus networking support. To start your computer in Safe Mode or Safe Mode with Networking, follow the instructions below.
Start Windows 7/Vista/XP in Safe Mode with Networking
-
Immediately after the computer is powered on or restarted, tap the F8 key on your keyboard in 1-second intervals.
-
After your computer displays hardware information and runs a memory test, the Advanced Boot Options menu will appear.
-
Use the arrow keys to select Safe Mode or Safe Mode with Networking and press the Enter key on your keyboard. For more information about Safe Mode options, see Safe Mode options for Windows Vista/Windows 7.
Click the image to view larger in new window
-
When you have finished troubleshooting, repeat steps 1-3 and select Start Windows Normally to return to your normal Windows configuration.
Start Windows 8 in Safe Mode with networking
If you cannot start Windows 8 after installing your ESET product
At the Windows 8 login screen: hold the Shift key on your keyboard, click Power and then click Restart (click to view a screenshot). Proceed to step 3 below.
- Press the Windows
 key + C on your keyboard and then click Settings.
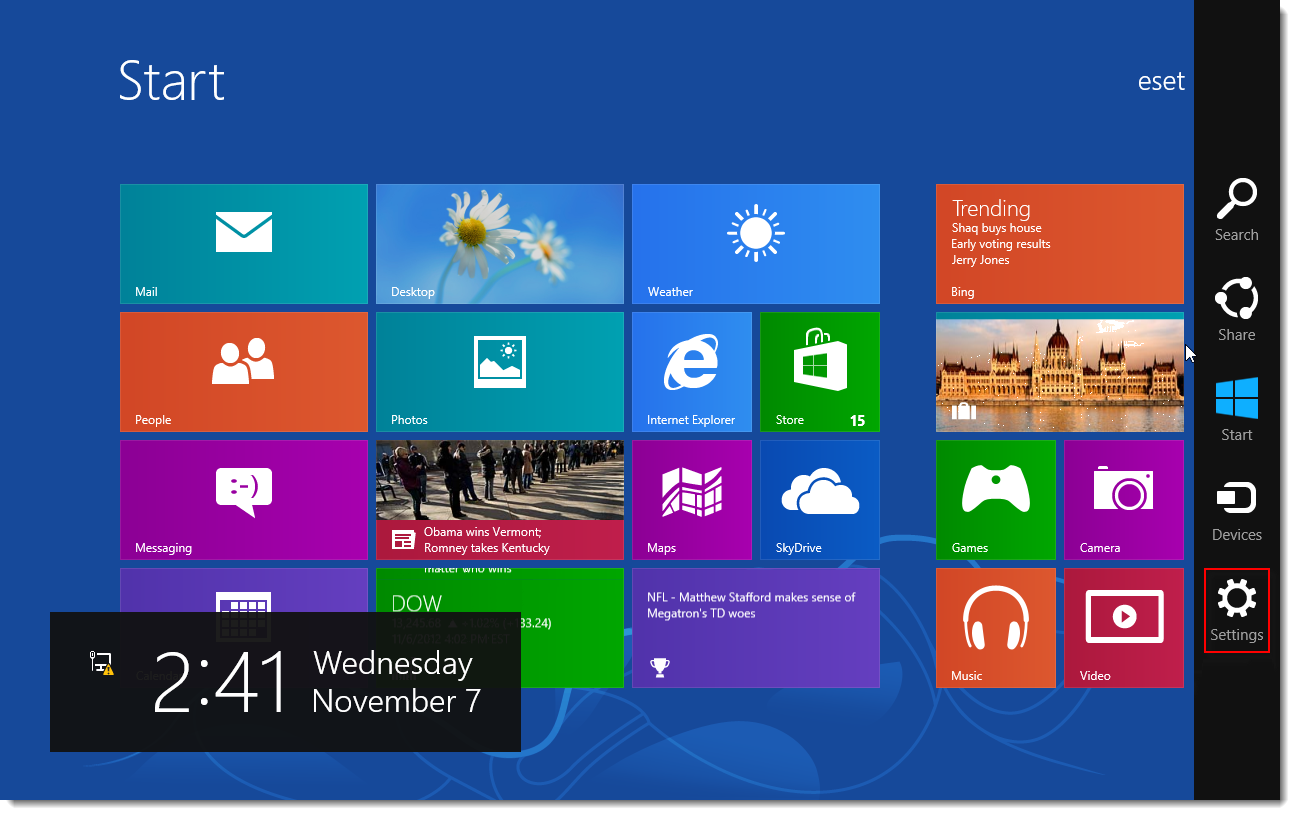
Click the image to view larger in new window
- Click Power, hold down Shift on your keyboard and then click Restart.

Click the image to view larger in new window
- Click Troubleshoot.
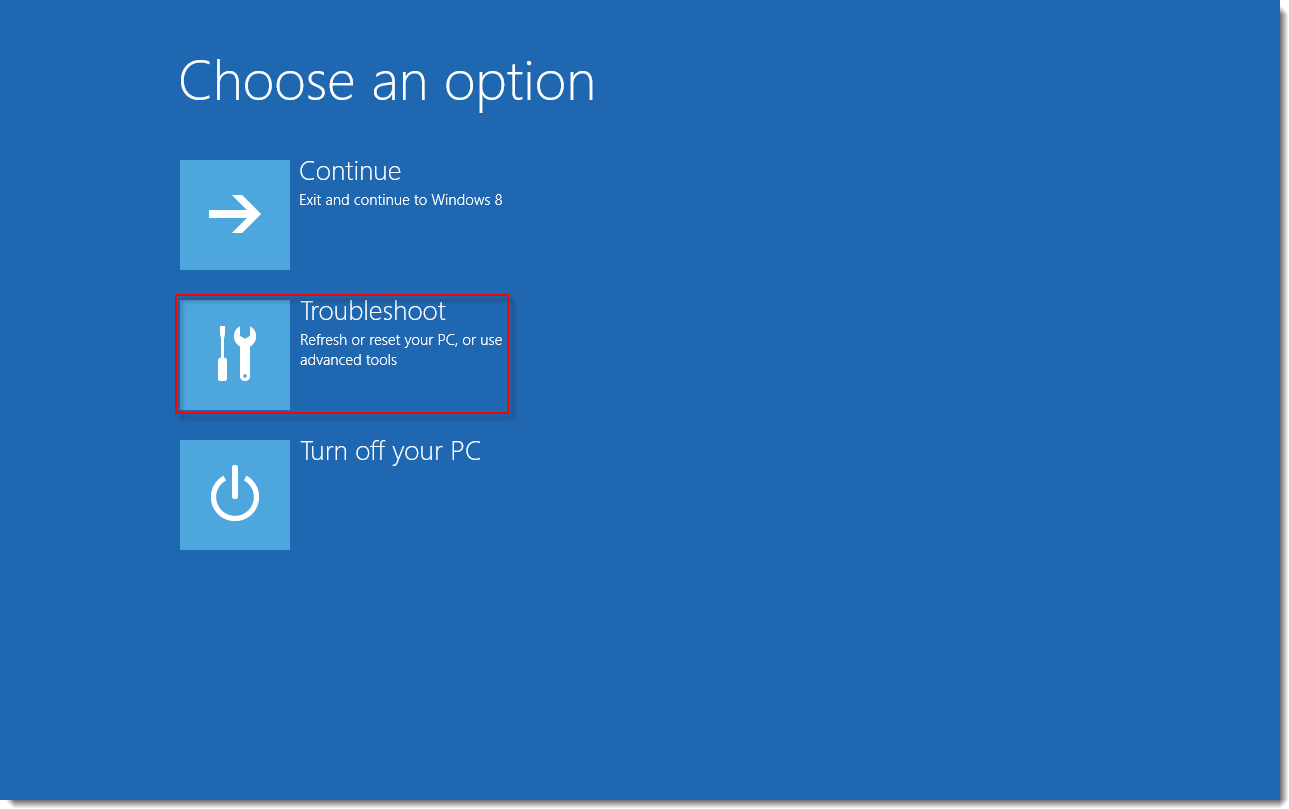
Click the image to view larger in new window
- Click Advanced options.
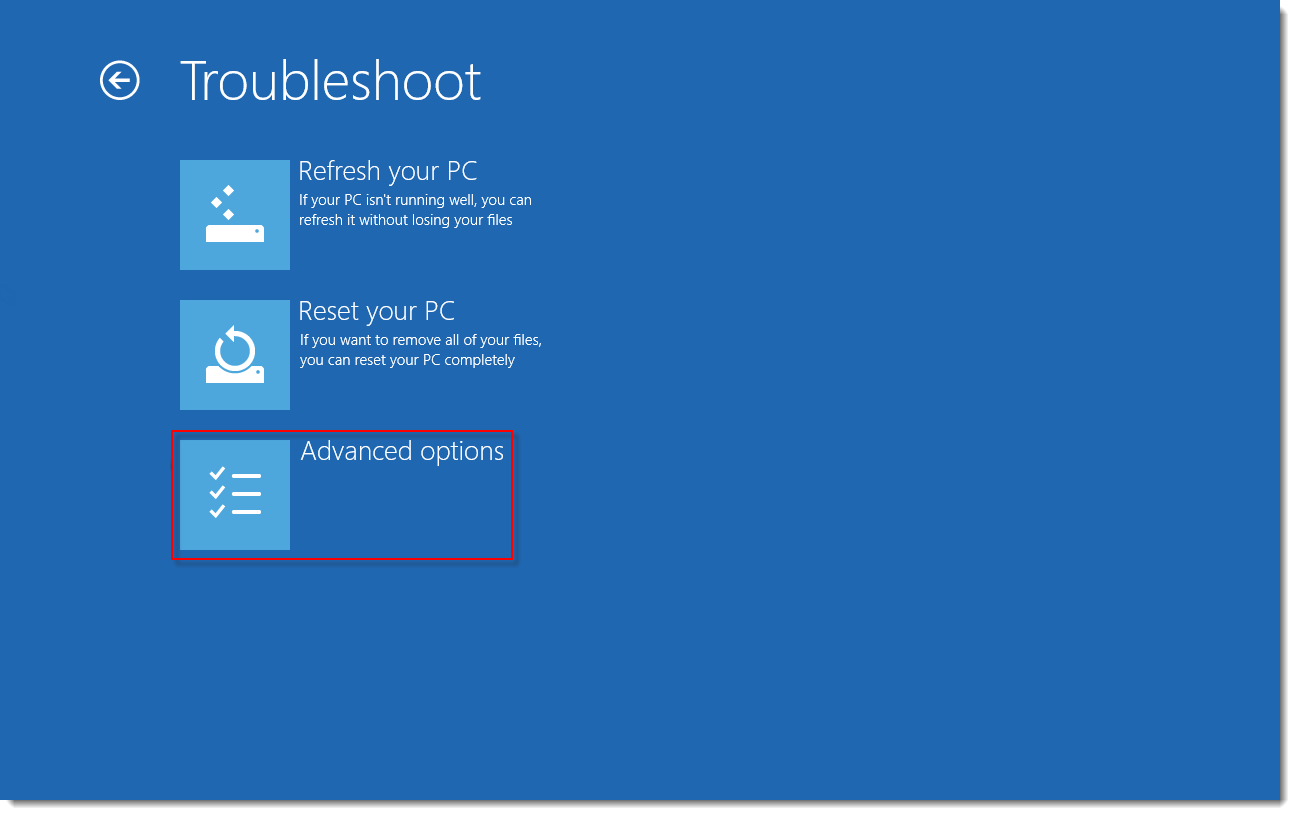
Click the image to view larger in new window
- Click Startup Settings.
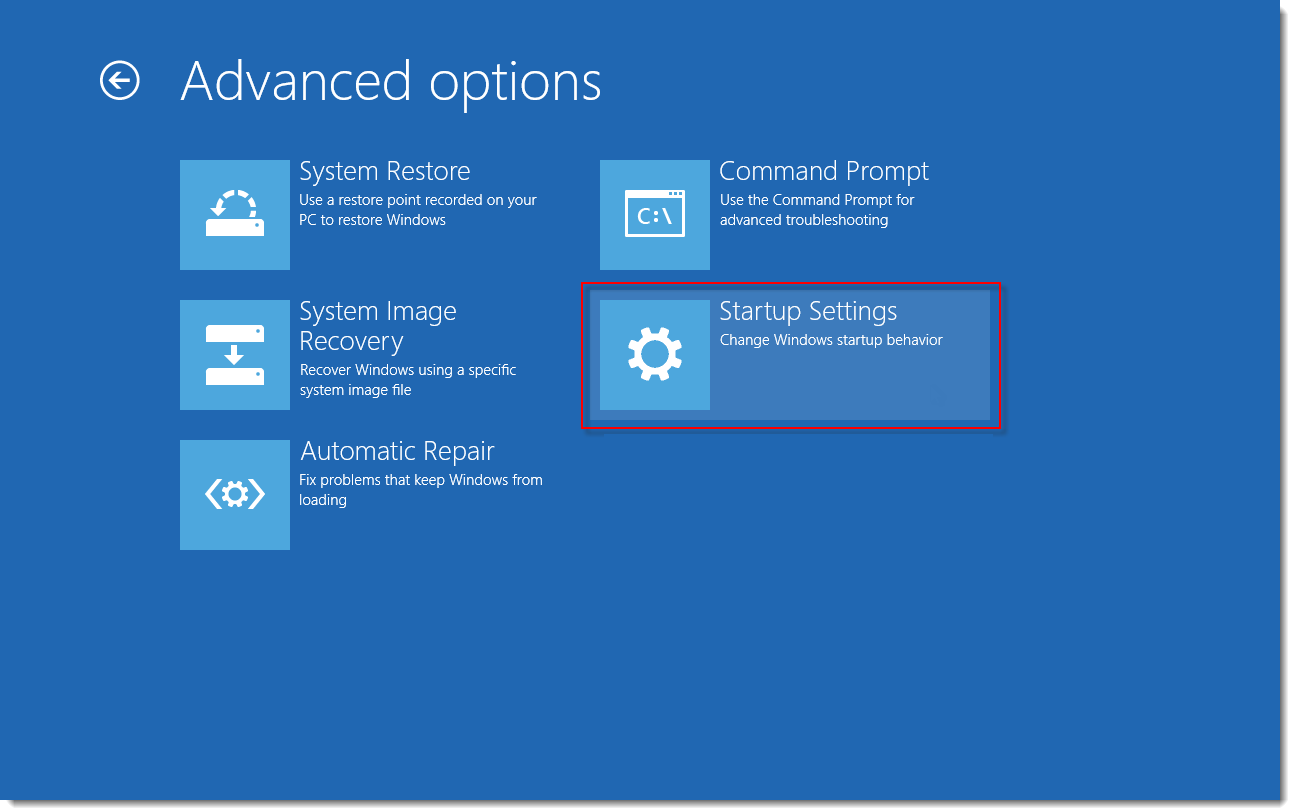
Click the image to view larger in new window
- Click Restart.
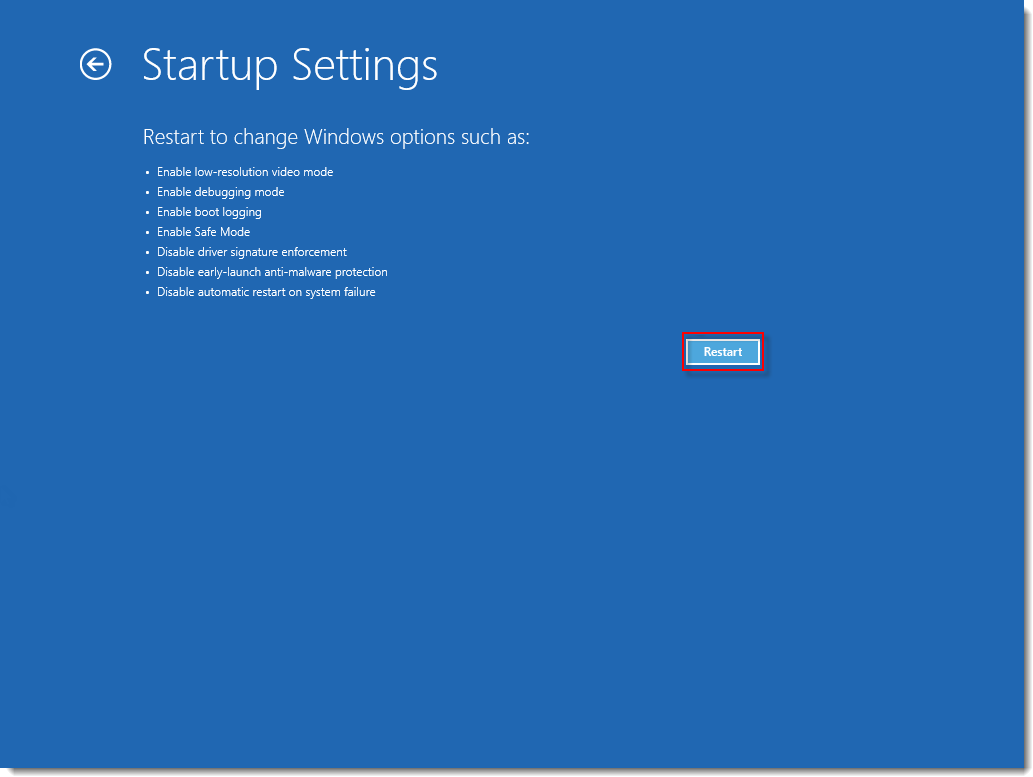
Click the image to view larger in new window
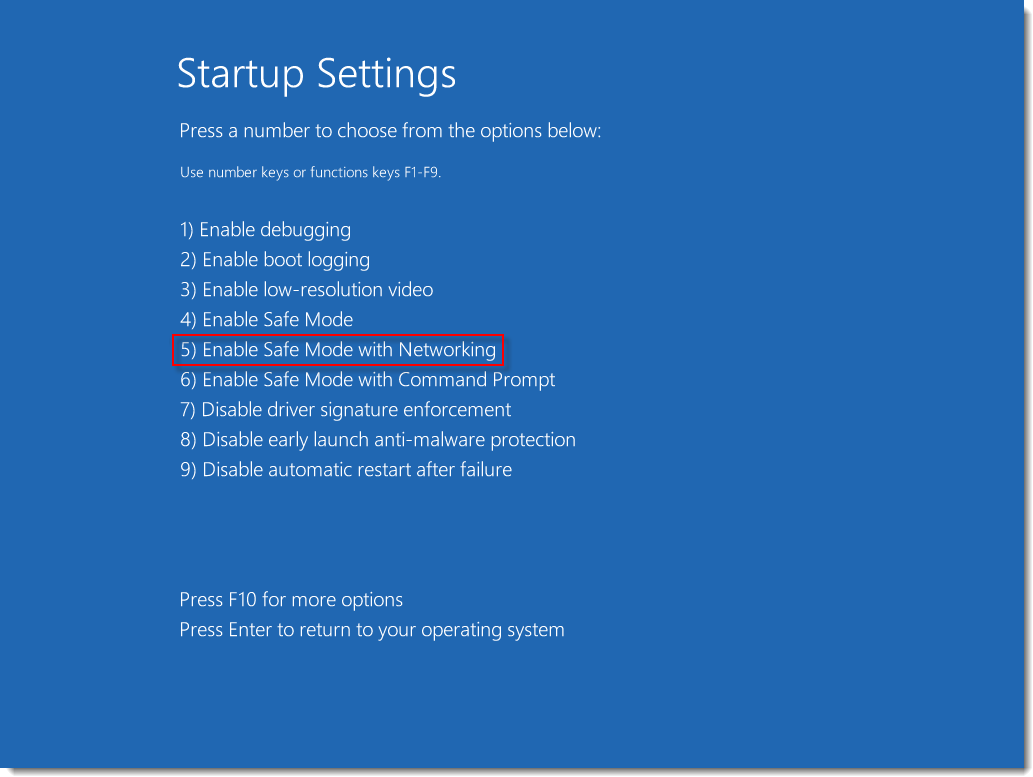
- Press 5 on your keyboard to Enable Safe Mode with Networking. Windows will start in Safe Mode with Networking.
Click the image to view larger in new window
- Click Start → Power and then click Restart to return to your normal Windows configuration.
Start Windows 10 in Safe Mode with networking
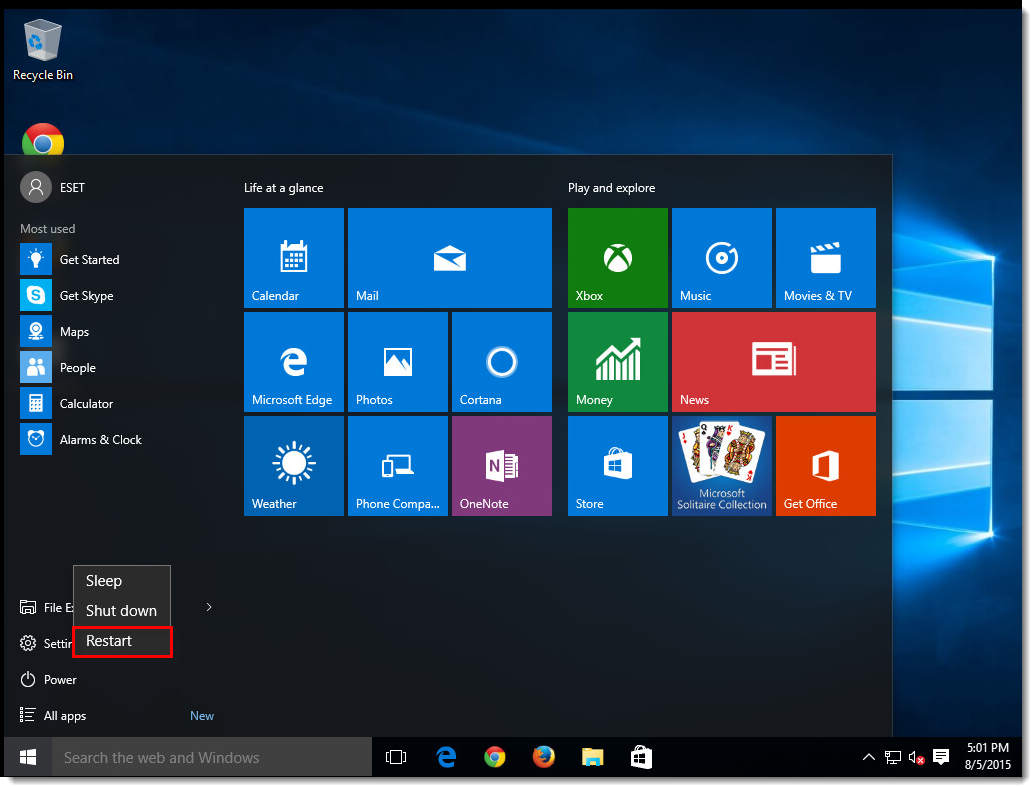
- Click Start → Power and then hold the Shift key on your keyboard and click Restart.
Click the image to view larger in new window
- Click Troubleshoot.
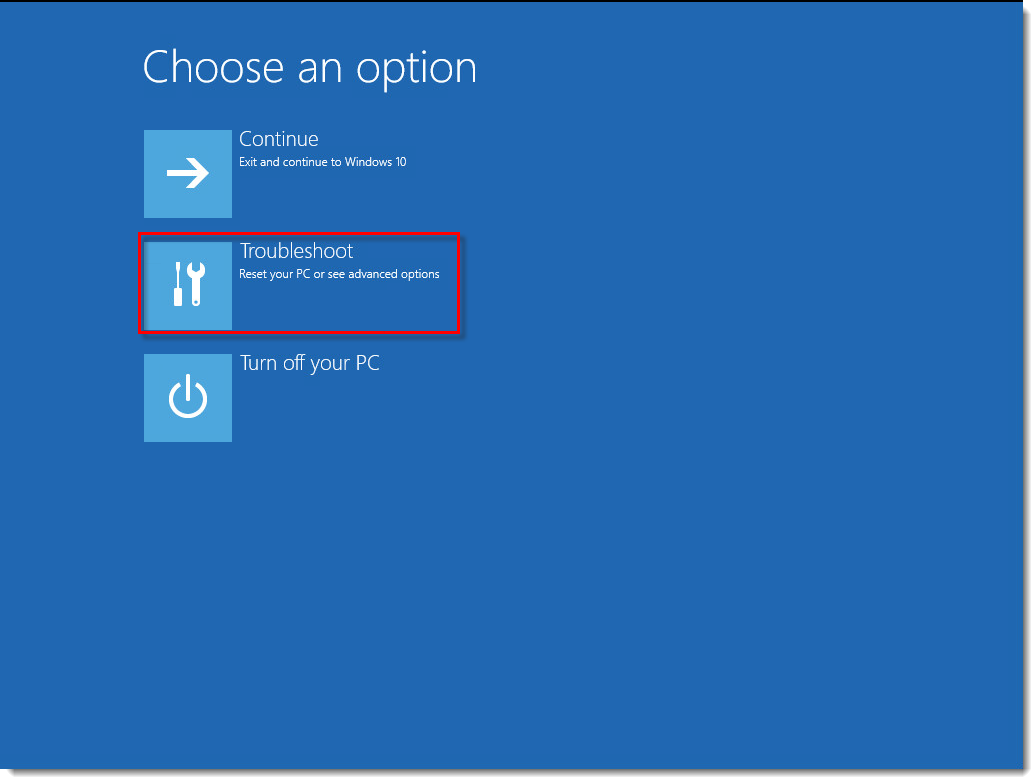
Click the image to view larger in new window
- Click Advanced options.

Click the image to view larger in new window
- Click Startup Settings.

Click the image to view larger in new window
- Click Restart.
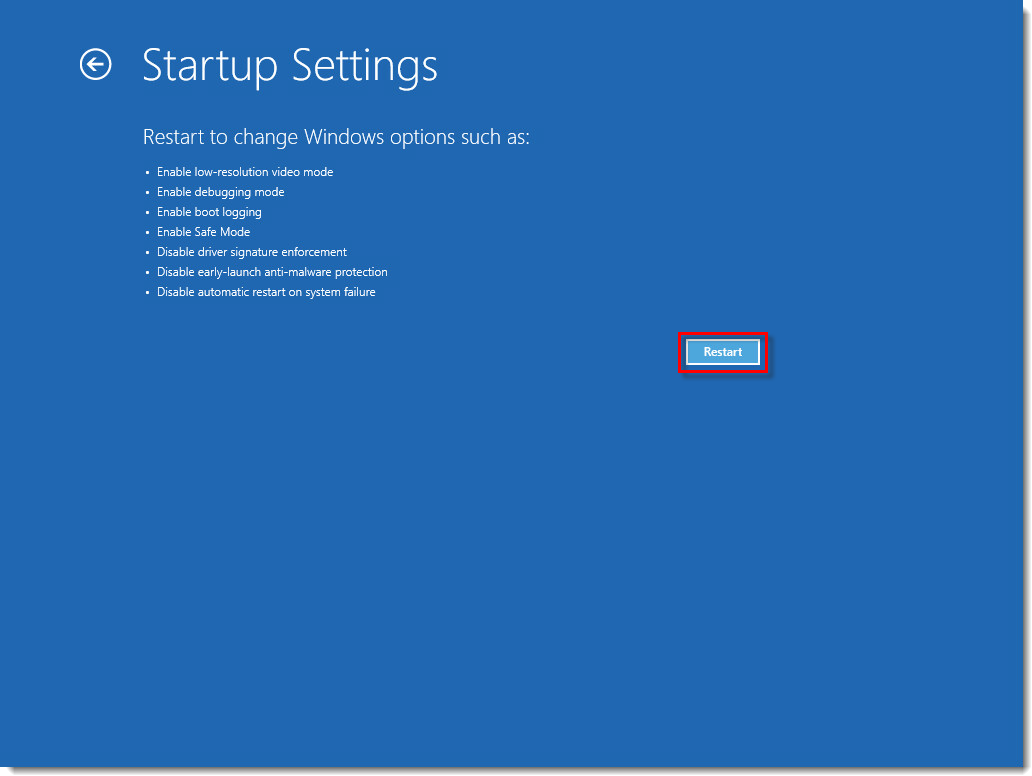
Click the image to view larger in new window
- After your computer restarts, press 5 on your keyboard to select Safe Mode with Networking.

Click the image to view larger in new window
-
Type in your username and password to start Windows in Safe Mode with Networking.
-
Click Start
→ Power and then click Restart to return to your normal Windows configuration.
Last Updated: Aug 5, 2022
Additional resources
Need further assistance?
More Information
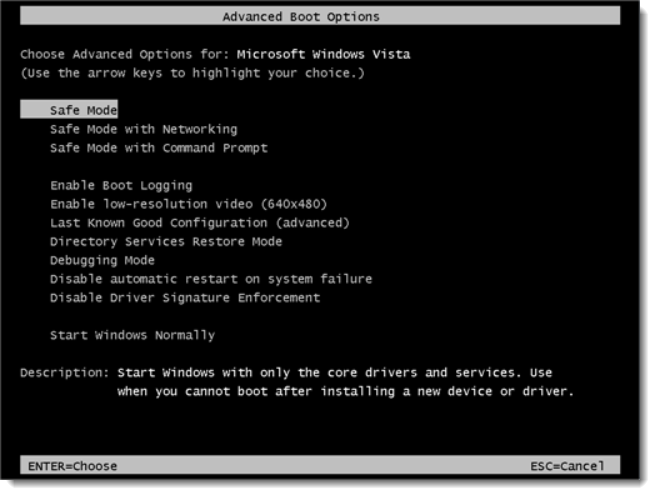
The Advanced Boot Options screen lets you start Windows in advanced troubleshooting modes. You can access the menu by turning on your computer and pressing the F8 key before Windows starts.
Some options, such as safe mode, start Windows in a limited state, where only the bare essentials are started. If a problem doesn’t reappear when you start in safe mode, you can eliminate the default settings and basic device drivers and services as possible causes. Other options start Windows with advanced features intended for use by system administrators and IT professionals. For more information, go to the Microsoft website for IT professionals.
Repair Your Computer
Shows a list of system recovery tools you can use to repair startup problems, run diagnostics, or restore your system. This option is available only if the tools are installed on your computer’s hard disk. If you have a Windows installation disc, the system recovery tools are located on that disc.
Safe Mode
Starts Windows with a minimal set of drivers and services.
To start in safe mode:
-
Remove all floppy disks, CDs, and DVDs from your computer, and then restart your computer. Click the Start button , click the arrow next to the Shut Down button (or the arrow next to the Lock button), and then click Restart.
-
Do one of the following:
-
If your computer has a single operating system installed, press and hold the F8 key as your computer restarts. You need to press F8 before the Windows logo appears. If the Windows logo appears, you’ll need to try again by waiting until the Windows logon prompt appears, and then shutting down and restarting your computer.
-
If your computer has more than one operating system, use the arrow keys to highlight the operating system you want to start in safe mode, and then press F8.
-
-
On the Advanced Boot Options screen, use the arrow keys to highlight the safe mode option you want, and then press Enter.
-
Log on to your computer with a user account that has administrator rights.
-
Safe Mode with Networking. Starts Windows in safe mode and includes the network drivers and services needed to access the Internet or other computers on your network.
-
Safe Mode with Command Prompt. Starts Windows in safe mode with a command prompt window instead of the usual Windows interface. This option is intended for IT professionals and administrators.
-
Enable Boot Logging. Creates a file, ntbtlog.txt, that lists all the drivers that are installed during startup and that might be useful for advanced troubleshooting.
-
Enable low-resolution video (640×480). Starts Windows using your current video driver and using low resolution and refresh rate settings. You can use this mode to reset your display settings. For more information, see Change your screen resolution.
-
Last Known Good Configuration (advanced). Starts Windows with the last registry and driver configuration that worked successfully.
-
Directory Services Restore Mode. Starts Windows domain controller running Active Directory so that the directory service can be restored. This option is intended for IT professionals and administrators.
-
Debugging Mode. Starts Windows in an advanced troubleshooting mode intended for IT professionals and system administrators.
-
Disable automatic restart on system failure. Prevents Windows from automatically restarting if an error causes Windows to fail. Choose this option only if Windows is stuck in a loop where Windows fails, attempts to restart, and fails again repeatedly.
-
Disable Driver Signature Enforcement. Allows drivers containing improper signatures to be installed.
-
Start Windows Normally. Starts Windows in its normal mode.
Need more help?
Приветствую Вас, уважаемые читатели! В настоящее время на большинстве настольных ПК и ноутбуках установлена операционная система Windows. И наверняка многие из Вас сталкивались с проблемой, что она (Windows) не загружается. Но не все знают, что решить проблему загрузки операционной системы можно в безопасном режиме. Сегодня мы и поговорим о том как загрузиться в безопасном режиме и что это вообще за такой режим.
Что такое безопасный режим
Безопасный режим в Windows (Safe Mode) — это специальный режим работы системы, который служит для устранения неполадок, вызванных некорректной работной программных и аппаратных ресурсов персонального компьютера (ПК). В безопасном режиме Windows загружает минимальный набор драйверов устройств и системных служб.
Поэтому всякий раз, когда у вас не получается загрузить Windows в следствии заражения компьютерными вирусами или после установки нового драйвера и программного обеспечения, то вы всегда можете загрузить ПК в безопасном режиме и устранить неисправности. Загрузившись в Safe Mode у вас появится возможность просканировать компьютер на наличие вирусов, удалить драйвер или программу после установки которых Windows перестала загружаться, либо вообще выполнить откат системы. Обычно этих действий хватает для восстановления работоспособности операционной системы. Кстати о том как удалять программы в безопасном режиме вы можете почитать в этом посте.
Как загрузить Windows 7 в безопасном режиме
Чтобы загрузить систему в безопасном режиме достаточно несколько раз нажать клавишу F8 при загрузке компьютера. В случае успеха на экране появится меню выбора вариантов загрузки:

Примечание: на некоторых компьютерах если при загрузке нажать клавишу F8 может появиться меню выбора устройства с которого производить загрузку. В этом случае выбираете нужный жесткий диск на котором установлена операционная система, нажимаете Enter и продолжаете нажимать F8. После этого появиться экран с меню выбора дополнительных вариантов загрузки.
В меню выбора способов загрузки есть несколько вариантов:
- Безопасный режим (Safe Mode) — загрузка операционной системы Windows только с основными драйверами и службами необходимыми для запуска системы.
-
Безопасный режим с загрузкой сетевых драйверов (Safe Mode with Networking) — аналогично предыдущему пункту плюс загрузка драйверов сетевого устройства и служб необходимых для доступа в сеть.
-
Безопасный режим с поддержкой командной строки (Safe Mode with Command Prompt) — запуск системы в безопасном режиме, но вместо привычного интерфейса загружается командная строка.
- Включить протоколирование загрузки (Enable Boot Logging) — перед загрузкой операционной системы создает файл ntbtlog.txt, в который записываются все драйверы, которые были загружены во время запуска Windows, включая последний файл, который был загружен перед сбоем.
- Включить режим VGA (Enable low-resolution) — загрузка системы с драйвером видеокарты установленным по умолчанию с низкими частотами и разрешении экрана 640×480. Этот режим помогает, когда при установке нового монитора windows выдает черный экран. Тогда загружаетесь в данном режиме и устанавливаете нужные настройки.
- Загрузка последней удачной конфигурации (last Known Good Configuration) — при каждом выключении компьютера windows запоминает наиболее важные параметры отвечающие за запуск системы. Поэтому в случае неудачной загрузки операционной системы, первое что следует попробовать это запустить windows в этом режиме.
- Восстановление службы каталогов (Directory Services Restore Mode) — режим запускающий службу каталогов Active Directory. Актуален для систем работающих на контроллере домена.
- Режим отладки (Debugging Mode) — запуск windows в расширенном режиме отладки.
- Отключить автоматическую перезагрузку при отказе системы (Disable automatic restart on system failure) — режим необходим для диагностики ошибок, в случае если операционная система сразу перезагружается при возникновении сбоев.
Далее с помощью клавиш со стрелками выбираете «Безопасный режим» и нажимаете клавишу «Enter». В случае необходимости можно выбрать «Безопасный режим с поддержкой командной строки» или «Безопасный режим с загрузкой сетевых драйверов» и также нажать «Enter».
После этого система загрузиться в безопасном режиме — с черным фоном рабочего стола и надписью «Безопасный режим» в углах экрана. Далее проводите необходимые операции: делаете откат системы, удаляете конфликтные драйверы или программы и другие действия.
На этом все! До новых встреч на страницах блога.
![]() Loading…
Loading…
What is Safe Mode and how to boot Safe mode Windows.
💡 For Windows 10, 8, 7; for laptop and computer.
Contents
- Safe Mode and Options
- Safe Mode after reboot (Windows 10,
- Using msconfig (Windows 10, 8, 7)
- Enable Advanced Boot Options (Windows 10,
- Safe Mode from System Restore (Windows 10,
- Safe mode from the command prompt (bcdedit)
- Safe mode using shutdown utility

Article in other languages:
🇪🇸 – Cómo iniciar Windows en Modo Seguro
🇷🇺 – Как зайти в безопасный режим Windows
🇫🇷 – Comment entrer en Mode sans échec Windows
🇩🇪 – So starten Sie Windows 10 im abgesicherten Modus
🇳🇱 – Hoe start je Windows in de veilige modus
Safe Mode and Options
Safe Mode is a diagnostic mode of a computer operating system. Safe mode is intended to help fix most, if not all problems within an operating system.
Wikipedia
Booting in Safe Mode Windows is often used to remove viruses and programs that cannot be removed during normal mode of the Operating System (OS).

In this mode, the minimum set of system programs and services necessary to start the system is loaded.
Starting non-system services from startup and not system programs is ignored.
🔔 The ability to work in this mode is limited.
There are three modes for starting Windows Safe Mode:
| Safe Mode | The minimum set of system services is loaded, the launch of not system programs and services is disabled. |
| Safe mode with Networking | The minimum set of system services and network services is loaded, the launch of not system programs and services is disabled. |
| Safe mode with Command Promt | The minimum set of system services + network services is loaded, the launch of not system programs and services is disabled. The command line starts, before starting Windows Explorer. |
The mode is designed to diagnose startup, fix problems and errors OS.
Safe mode after reboot (Windows 10,
An easy way to reboot Windows in safe mode.
💡 Suitable for Windows 10, 8.
- Press the START button;
- Click the Power button;
- Press and hold the SHIFT button and then click Restart. The advanced Windows boot menu is loading;
- Select the Troubleshoot;
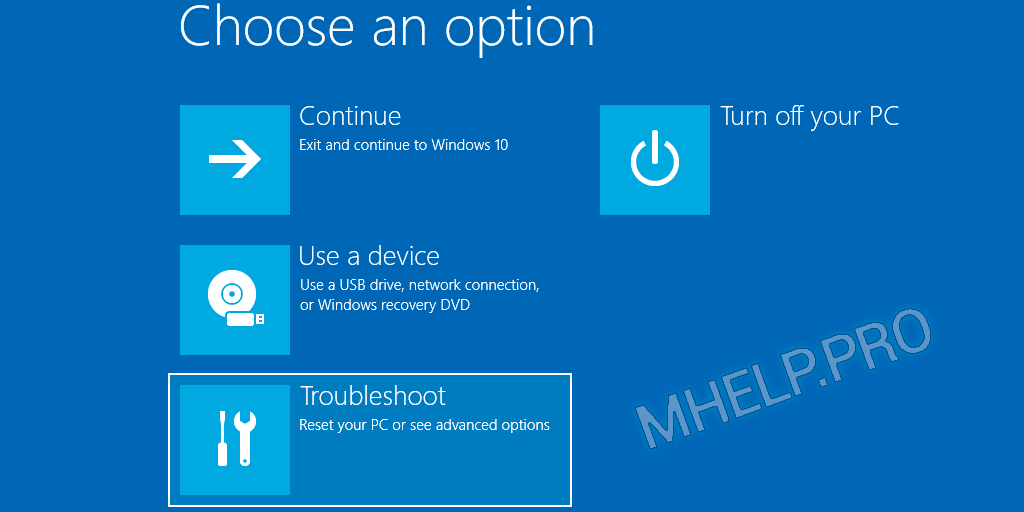
5. In the Troubleshoot window, select the Advanced options;

6. In the Advanced options window, select the Startup Settings;
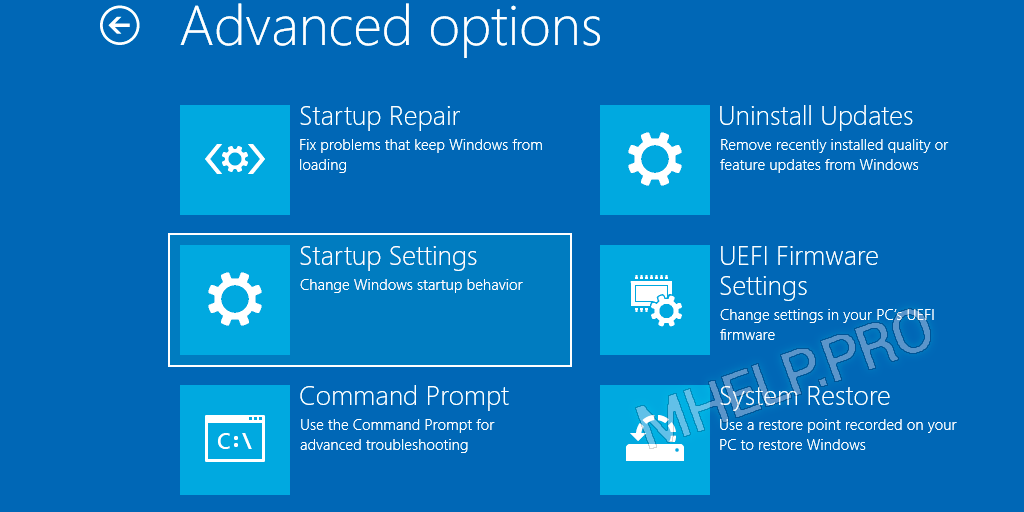
7. In the Startup Setting window, click the Restart button;

8. After restarting your computer, In the Boot Options window (Advanced Boot Options), select the required Windows boot mode.
Windows will boot in Safe mode.
To exit Safe Mode, restart your computer.
Using msconfig (Windows 10, 8, 7)
We use the msconfig utility to boot Windows in safe mode.
💡 Suitable for Windows 10, 8, 7.
- Right-click on the START button and select Run or press the key combination Windows+R;
- Enter the name of the msconfig utility and click OK;
- Switch to the Boot tab, check the Safe Mode checkbox, select Minimal and press ОК;
- Click Restart to start Windows Safe Mode.
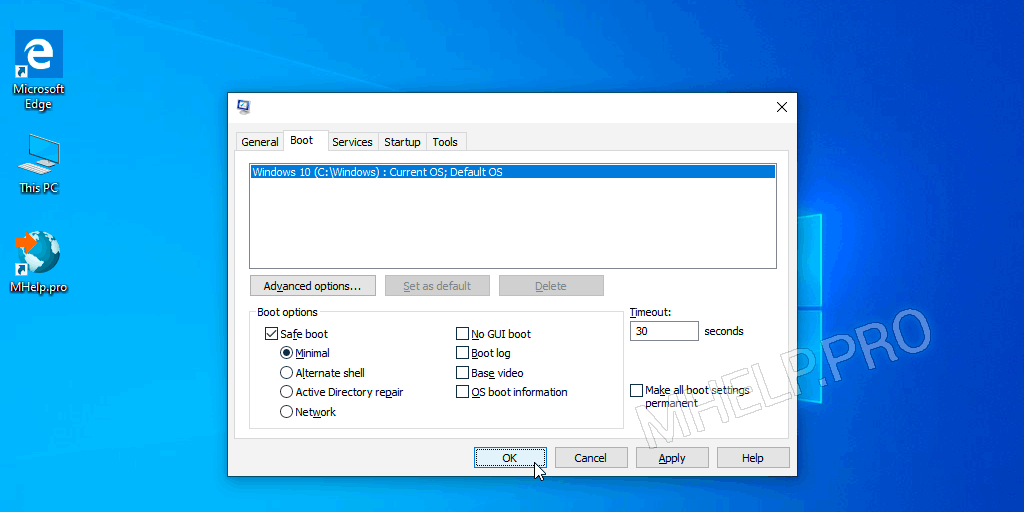
To exit Safe mode, restart your computer.
🔔 The msconfig utility provides additional options for starting the computer (disabling the launch of services and applications).
Enable Advanced boot options (Windows 10,
💡 Suitable for Windows 10, 8.
In Windows 7, XP, when loading the OS, pressing the F8 button opened the Advanced boot options menu.
In Windows 10, 8, the call to this menu with the F8 button must be turned on manually.
- Run the command prompt as administrator;
- Enter the command:
bcdedit /set {default} bootmenupolicy legacy
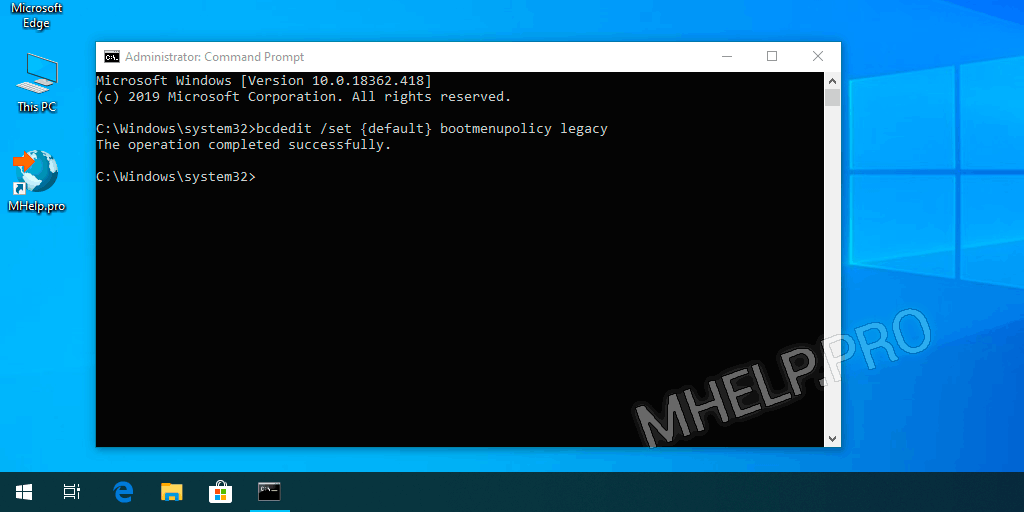
Close the command prompt window, restart the computer.
Before loading the operating system, press the F8 button, the Advanced boot options menu opens, where we can choose several options for starting Safe Mode or other Windows boot options.
🔔 If you have a laptop, you may have to press the Fn + F8 key combination.
Safe Mode from System Restore (Windows 10,
💡 Suitable for Windows 10, 8.
You can boot Safe Mode Windows 10, 8 from Recovery mode, after an incorrect OS boot.
After three consecutive power outages when loading Windows 10, 8, the system will start to boot Recovery mode.

Select See advanced repair options recovery options.
Further, the launch of Safe Mode will occur as in paragraph – Safe Mode after reboot (Windows 10, 8).
🔔 We dont recommend using this method of loading Windows Safe Mode, as this can cause permanent damage to the system!
Safe mode from the command prompt (bcdedit)
The bcdedit command changes persistent Windows boot options. After enabling Safe Mode, enter the command to change the configuration and disable booting into Safe Mode.
You can also use the bcdedit command in the command prompt in Windows Recovery mode.
You can boot Windows in Safe Mode by running the bcdedit command in the Command Prompt running with administrator rights.
Enable Safe Mode:
bcdedit /set {default} safeboot minimal
Enable Safe Mode with Networking:
bcdedit /set {default} safeboot network
Enable Safe Mode with Command Prompt (enter two commands):
bcdedit /set {default} safeboot minimal
bcdedit /set {default} safebootalternateshell yes
Restart your computer to apply the new configuration settings.
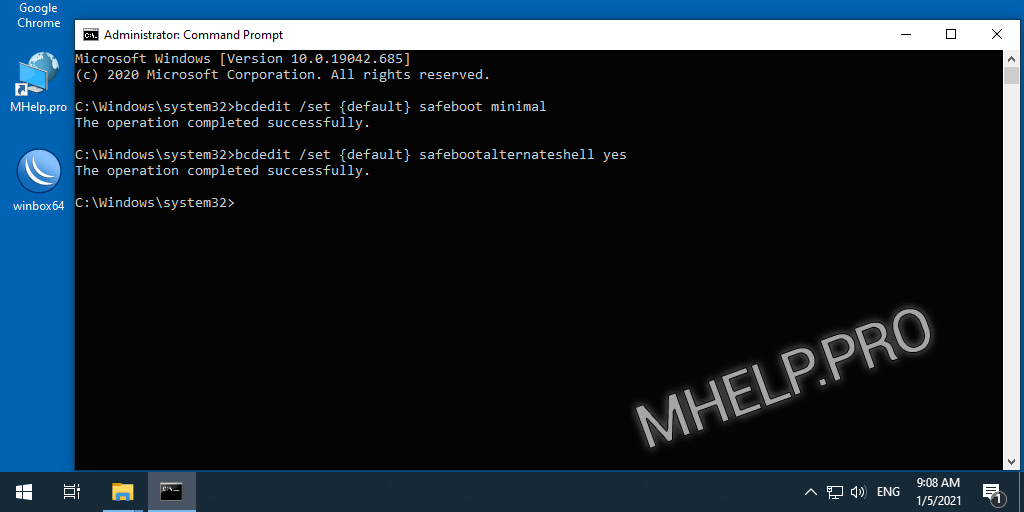
To disable booting Safe Mode, in Windows configuration, run:
bcdedit /deletevalue {default} safeboot
Safe mode using shutdown utility
The shutdown utility is a built-in Windows program that allows you to restart, shutdown, hibernate, or end a user session.
Run in Command Prompt or PowerShell:
shutdown.exe /r /o

After rebooting, in the System Restore window, select the required option.
Learn more about the startup parameters of the shutdown utility – here.
I hope you were able to boot Windows in Safe Mode in a convenient way.
How to boot Windows Safe Mode:
- SHIFT button and Reboot
Hold the SHIFT button and press Reset button. More…
- Msconfig utility
Run the msconfig utility, select the Safe Mode – Minimal option. More…
- Enabling the Advanced Boot Menu
Use the bcdedit command to enable the Advanced boot menu and the press F8 button (as on Windows 7, XP) to call up the menu, when the Windows boot. More…
- System shutdown
Three times, power off the system to enable the Recovery mode and boot Windows Safe Mode. More…
These were the available options for boot Safe Mode Windows 10, 8, 7.
🟢 How to boot Safe Mode in Windows 10, 8, 7 was discussed in this article. I hope you can now configure Windows to start in Safe Mode. However, if you run into any problems, do not hesitate to write in the comments. I will try to help.