- Remove From My Forums
-
Вопрос
-
Доброго времени суток.
Будьте добры, расскажите пошагово, как можно сделать общий полный доступ к папке на Windows Server 2008 Standart 32 чтобы на нее могли заходить кто угодно, из под какой угодно учетной записи, независимо с каким паролем.
Все попытки до этого были не совсем удовлетворительными. То вообще не заходит, то заходит, но просит имя пользователя и пароль.Заранее благодарен за нормальный ответ.
-
Перемещено
23 апреля 2012 г. 5:36
merge forums (От:Windows Server 2008)
-
Перемещено
Ответы
-
Если пользователи подключаются к общим папкам сервера, то роли файлового сервера достаточно. Но при этом получится, что запросы к базам данных «Гаранта» и «Консультанта» будут обрабатывать через сеть клиентские машины. Это заметно уменьшит скорость получения ответа от соответствующей программы, но зато для такого режима работы уже всё есть.
Если клиентских машин 2-3, то этот вариант оптимальный.
Если клиентских машин 4-6, то это пограничное состояние. Можно использовать файловый сервер и общие папки, а можно запустить службу терминалов, но за неё надо доплачивать.
Если клиентских машин больше, то предпочтительнее доплатить за лицензии терминальной службы.Как правило сервер значительно мощнее клиентских машин и с работой справляется быстрее. При работе в терминальной сессии вся работа по выборке данных из базы происходит на сервере, а клиенту на монитор пересылается только результирующая картинка. При этом клиентская машина может быть очень старой и слабой, лишь бы в сети работала. На скорость работы с программой она влияет.
Служба терминалов в демонстрационном, но полноценном режиме работает 120 дней. После этого она блокируется. Дальше надо платить.
Для пробы можно разрешить работу с «Удалённым рабочим столом». Это практически та же служба терминалов но только для 2 пользователей. Здесь ограничений по срокам нет никаких. Запусти попробуй, если понравится, установливай роль «Службы терминалов».-
Помечено в качестве ответа
Psimaster
13 февраля 2009 г. 12:56
-
Помечено в качестве ответа
| Purchase and download the full PDF and ePub versions of this eBook only $9.99
|

Given that Windows Server 2008 is a server operating system it is not surprising that a primary function of this operating system is to serve files to users on other systems on a network. The primary focus of this chapter, therefore, is the sharing of files and folders on Windows Server 2008.
Contents
Contents
|
||
Standard and Public File Sharing
Windows Server 2008 supports two types of file sharing, referred to as public file sharing and standard file sharing.
In the case of public file sharing any files to be shared must be copied to the server’s Public folder located at %SystemDrive%UsersPublic. Once placed in this folder the files are accessible to any users logged locally onto the machine and, if enabled, to any network users. Public sharing provides some control over access to the files. For example, when the server belongs to a workgroup the public folder can be password protected. In addition, network access to files within the public folder can be restricted to reading and executing only or given permission to read, write, create and delete files.
Standard file sharing, which is only permitted on NTFS volumes, allows individual folders files and volumes to be shared to specific users. This provides far greater levels of security over network access through a combination of NTFS file and folder permissions and share permissions, and avoids the necessity to move files from their existing location in order to share them.

Enabling Windows Server 2008 File Sharing
File sharing in Windows Server 2008 is managed from the Network and Sharing Center, accessed by selecting Start -> Network and clicking on the Network and Sharing Center button in the toolbar. Once invoked, the Network and Sharing Center will list the current file sharing configuration and options as illustrated in the following figure:
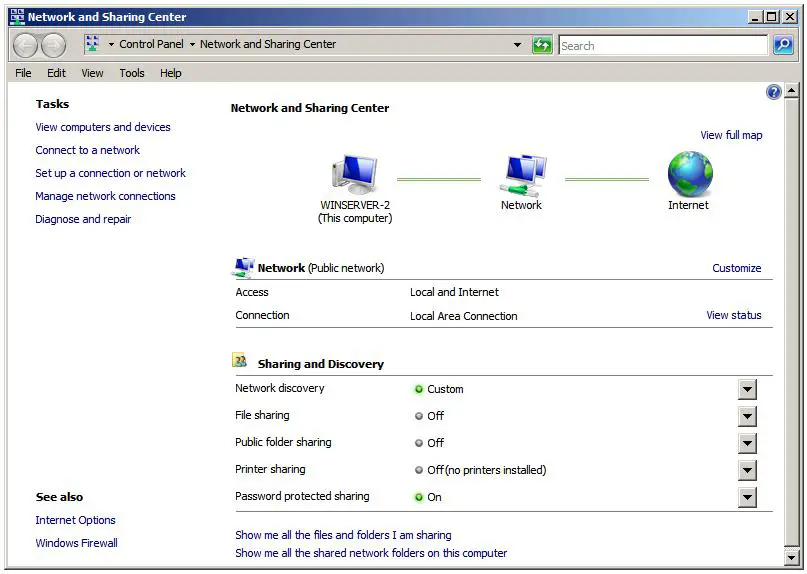
To enable public file sharing, click on the down arrow next to the Public folder sharing in the section entitled Sharing and discovery. This will provide the following list of public folder sharing options:
- Turn on sharing so anyone with network access can open files — Allows network users to open, but not delete, modify or create files in the server’s public folder.
- Turn on sharing so anyone with network access can open, change and create files — Allows network users to open, modify, delete and create files in the public folder.
- Turn off sharing (people logged on to this computer can still access this folder) — Allow public folder access only to those users locally logged on to the server. Network users are denied access.
Similarly, standard file sharing can be configured by click the down arrow next to File sharing. When unfolded, this panel provides the option to either enable or disable standard file sharing on this server. When enabled, a dialog will appear providing the option to make the shared folders available only to the private network on which the system resides, or to make sharing available to public networks. The choice here depends on the requirements of the organization but for security purposes it is typically best to limit sharing to the private network unless external access is required.
The Network and Sharing Center also allows password access to shared folders to be configured. When the arrow next to Password protected sharing is selected the options to enable or disable password protection sharing are provided. When enabled on workgroup servers, only users with user accounts and passwords on the server will be able to access shared files and folders.
Creating Shared Folders with Windows Explorer
Shared folders can be configured using Windows Explorer, simply by navigating to the folder to be shared, right clicking on the folder and selecting Properties from the menu. In the properties dialog, click on the Sharing tab to display and modify the current shared folder settings as illustrated in the following figure:
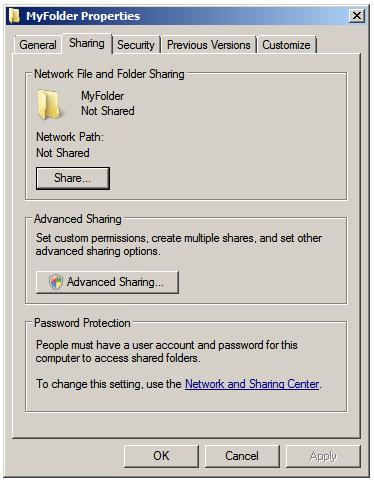
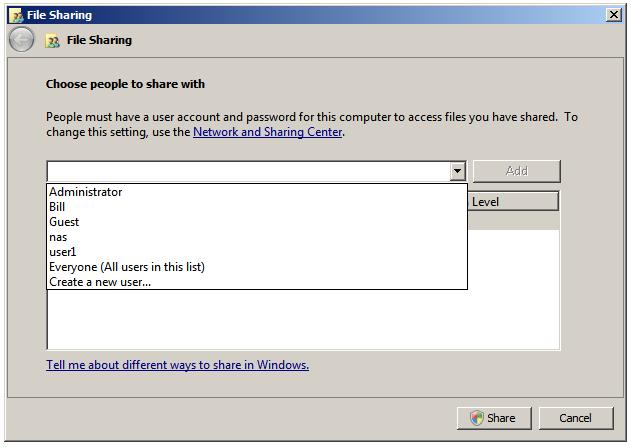
Within the sharing property panel, click on the Share… button to access the File Sharing dialog. Within this dialog, the users who may access this shared folder are specified. If file sharing has been restricted to users with local accounts and passwords, a list of users can be obtained by clicking on the down arrow. In this situation, select and add users, or select Everyone if access is to be made available to all users with local accounts:
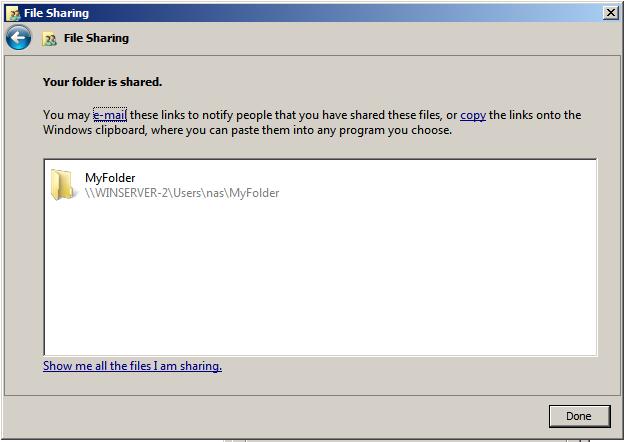
Once these settings are complete, click on the Share button to initiate the file sharing process. Once this initial phase of the share setup is complete a dialog will appear announcing this fact, listing the full Universal Naming Convention (UNC) path to the shared folder and providing the option to email users to notify them of this fact:
Having specified which users will have access to the folder the next step is to enable the sharing of the folder, specify share permissions and configure a Share Name by which the folder will be referenced and accessed. In addition caching of shared files can be configured. Caching allows users to maintain local copies of shared files so that they can be accessed off-line (for example when the server hosting the files is not available to the user’s local system). With caching configured, local copies of shared files are stored on the user’s local system so that they can be accessed without a connection to the server. When a connection is re-established, any changes made to the local copy of the file are synchronized with the original copy on the server.
To configure these settings, click on the Advanced Sharing button to display the following dialog:
<google>WIN28BOX</google>
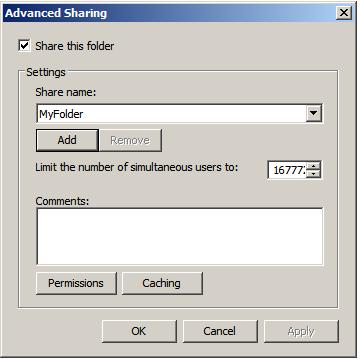
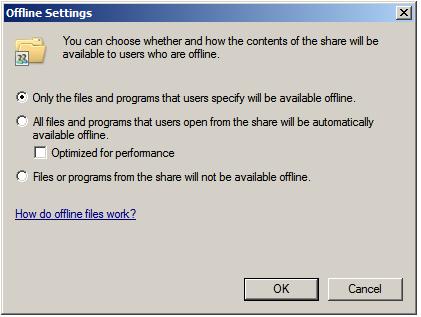
In this dialog, set the Share this folder option to enable the sharing of the folder. Once this has been selected the Share name field and associated button will activate enabling a share name to be entered. By default the name of the folder being shared will be displayed, although this may be changed to another name if desired. If the number of concurrent users accessing a shared folder is of concern, modify the number of simultaneous users accordingly. Enter optional comments about the share before clicking on Caching to configure the off-line file settings. This will invoke the Offline Settings dialog where a number of options are available including allowing each user to specify which files they would like to be able to access off-line, only having files that users actually access available off-line and disabling off-line sharing all together:
The final step in the folder sharing setup is to click on Permissions to configure the share permissions, details of which are covered in a later section of this chapter.
Creating Shared Folders on Remote Servers with Computer Management
Windows Explorer provides an excellent mechanism for configuring shares on the local system. This approach falls a little short in terms of convenience, however, when it is necessary to configure shares on a remote server. Fortunately Windows Server 2008 addresses this need by allowing shares to be configured from the Computer Management tool. One point to note is that while this section will focus on the remote configuration of file shares, the steps outlined here may equally be used to share files on a local server. In fact, the Create a Shared Folder Wizard can be invoked on a local machine either from Computer Management or by entering shrpubw at the command prompt or in a Run dialog.
After starting Computer Management on the local system, right click on Computer Management in the left panel tree and select Connect to another computer… In the resulting dialog box either enter the name of the remote computer or click on Browse and then Advanced… to search the network or domain for the remote system. Once a connection has been established to the remote server the Computer Management interface will refresh and the Computer Management link in the tree will also display the name of the selected remote server.
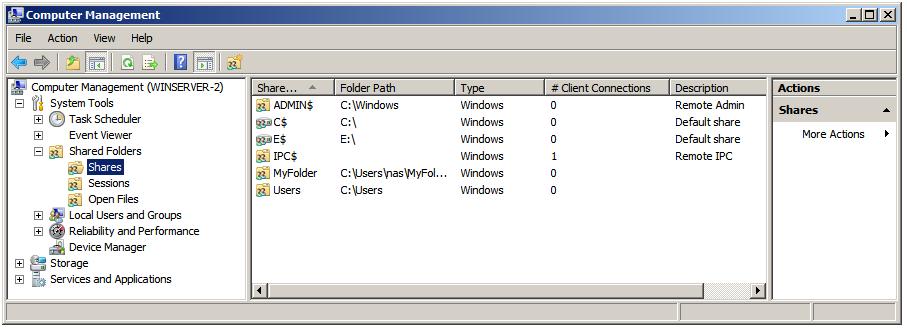
Once Computer Management is configured to administer a remote server, the next step is to begin the folder sharing process. Begin by unfolding the System Tools, then Shared Folders branches of the tree in the left panel. Select Shares to obtain a list of current shares configured on the remote system. The following figure illustrates Computer Management with a list of shares configured on a remote system named WINSERVER-2:
The creation of a new shared folder on the remote server (although as previously mentioned this can also be used on local computers) involves the use of something called the Create A Shared Folder Wizard, which, as the name suggests provides a user friendly way of configuring shared folders. To invoke this wizard, simply right click on New Share…, then click on Next on the wizard’s welcome screen. In the resulting Folder Path screen, either type in the path of the folder to be shared, or browse the file systems to locate it. With the required folder path selected click on Next to configure the name and description settings. On this screen, specify the share name by which the folder will be accessed from remote computers together with an optional description of the shared folder. Next, configure the off-line file settings for the folder contents by clicking on Change.
Once these settings are configured, click on Next once again to configure the share permissions for the selected folder. Either select one of the pre-configured options or select Customize permissions and click on Custom to configure share permissions on a per user basis.
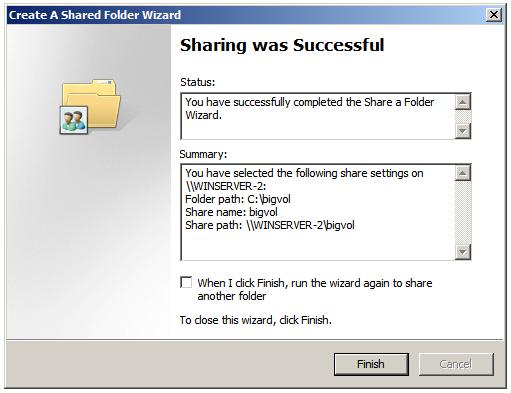
Finally, click on finish to complete the sharing process. If the configuration is successful a summary screen similar to the one illustration in the following figure will be displayed:
Creating Hidden Shares
By default, shared folders are listed when users browse for shared resources. From time to time, however, it may be necessary to share a folder but have it hidden such that only users who know of its existence can access it by referencing the share name. This concept is known as hidden share access. The most important point to note about hidden shares is that it does nothing to prevent access other than hiding the fact that the share exists. If, for example, a user learns of the existence of a hidden share (perhaps because another user tells them about it), and the share permissions are such that they have access to the folder, the fact that it is hidden will do nothing to keep the user out of that folder.
Shares are made hidden by placing a $ at the end of the share name. For example, to hide a share located at C:accounts simply give it a share name with a trailing $, such as accounts$.
As outlined at the beginning of this chapter, Windows Server 2008 provides two levels of permissions for shared files and folders, namely share permissions and file and folder permissions. Share permissions are applied when access is made via the network. When shared files and folders are accessed locally from the server on which they reside these permissions serve no purpose. File and folder permissions, on the other hand, take effect both when accessing files and folders both locally and over the network. In the case of network access to shared files and folders, the shared permissions are applied first, followed by any file and folder permissions. The key issue to note is that file and folder permissions provide a far greater level of control over access than the more general permissions options provided by share permissions. In this section, share permissions will be covered. For details on file and folder permissions refer to the chapter entitled Understanding Windows Server 2008 File and Folder Ownership and Permissions.
Share permissions are granted on a per user and per group basis. In addition to allowing a cap on the number of concurrent users accessing a share to be defined, share permissions also provide three permission options, each of which can be set to Allow or Deny:
- Full Control — Grants the specified users permission to change file and folder permissions, execute, read, modify, create and delete files and sub-folders.
- Change — Grants users permission to change file and folder attributes, read, modify, execute, create and delete files and sub folders.
- Read — Grants users permission to read and execute files and view and access file lists and sub-folders.
Permissions are cumulative in that a user will inherit the permissions of all the groups of which he or she is a member. If a permission is Denied, however, it overrides any cases where that permission may have been granted. For example, if a user is a member of a group where full control is provided over a folder, and also a member of a second group where full control is specifically denied, the user will be denied full control regardless of the fact that it was granted in the first group.
To configure share permissions, start Computer Management, connect to a remote server if not working on local shares, unfold System Tools and select Shares to list all currently shared folders. To configure share permissions for a folder, select it from the list, right click and select Properties. In the properties dialog select the Share Permissions tab as illustrated in the following figure:
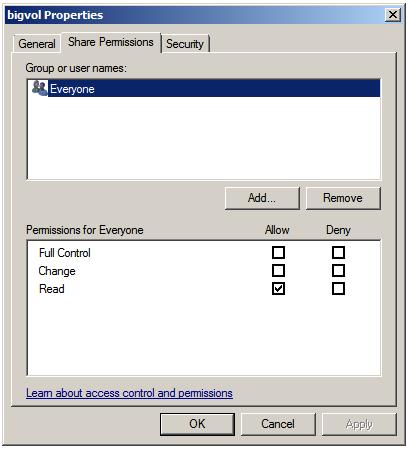
This screen displays the current share permissions and provides the ability to configure additional permission controls. To change the settings for a currently configured group or user select the user from the list, modify the permissions accordingly and click on Apply to commit the changes.
To add permissions for a specific user or group click the Add button and enter one or more users or groups into the text box (separating multiple entries with a semi-colon) and click on Check Names to verify the names are correct. Click on OK to return to the properties dialog where the added users and groups will appear in the list. Once again, select each name in turn and configure the desired share permissions. Finally, click Apply to commit the new permissions.
| Purchase and download the full PDF and ePub versions of this eBook only $9.99
|
Файловый сервер на базе Windows Server, ну что может быть проще! Открыл общий доступ и работай. Казалось бы, придумать что-то новое здесь трудно. Однако не спешите делать скоропалительные заявления. Windows Server 2008 R2 предоставляет в руки администратора богатые инструменты по управлению файловым сервером. О некоторых из них мы расскажем в этой статье.
Научиться настраивать MikroTik с нуля или систематизировать уже имеющиеся знания можно на углубленном курсе по администрированию MikroTik. Автор курса, сертифицированный тренер MikroTik Дмитрий Скоромнов, лично проверяет лабораторные работы и контролирует прогресс каждого своего студента. В три раза больше информации, чем в вендорской программе MTCNA, более 20 часов практики и доступ навсегда.
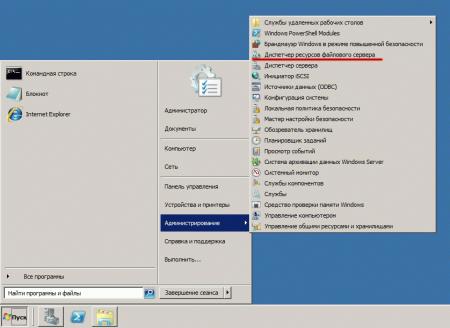
С чего начинается создание роли файлового сервера? Нет, не с создания общей папки, а, как и создание любой другой роли, с оснастки Роли в Диспетчере сервера. Выберем роль Файловые службы и посмотрим, что мы можем установить.
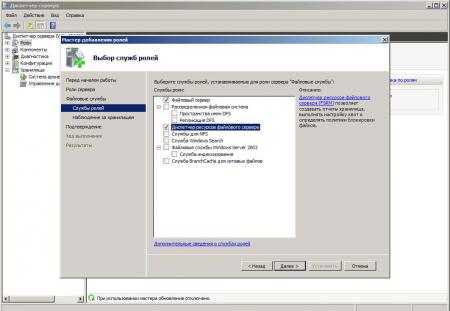
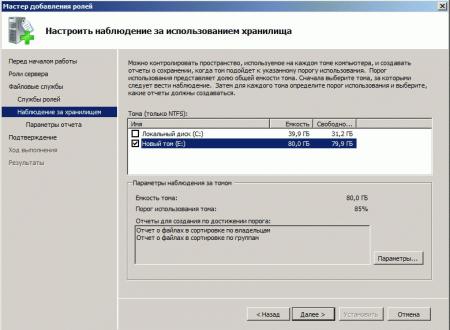
Как видим выбор довольно богат, не будем пока трогать продвинутые службы, каждая из которых требует, минимум, отдельной статьи, а установим собственно службы Файлового сервера и Диспетчера ресурсов. Следующим шагом нам будет предложено настроить наблюдение над томами хранилища. Настраивать наблюдение за системным диском мы не видим смысла, поэтому выбираем только те тома, которые будут использоваться для хранения пользовательских данных.
Завершим установку роли и создадим необходимые общие ресурсы. Но не спешите открывать доступ пользователям, сначала посмотрим какие возможности по управлению хранилищем предоставляет нам система. Для этого запустим Диспетчер ресурсов файлового сервера.
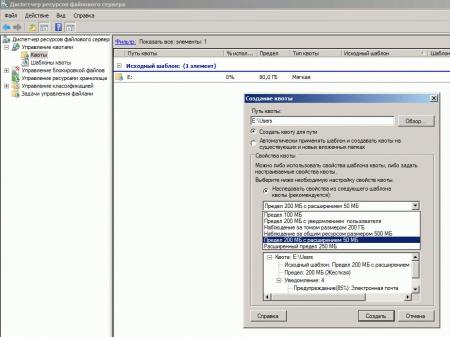
Начнем по порядку, а именно с Управления квотами, оснастка позволяет устанавливать квоты как к тому хранилища в целом, так и отдельным ресурсам. Квоты могут быть мягкими, когда о превышении квоты уведомляется администратор, и жесткими, когда запись на том (общий ресурс) блокируется. По умолчанию для тома уже выставлена мягкая квота в 85%, это позволит избежать ситуации, когда место на дисках внезапно закончится, администратор будет своевременно предупрежден и будет иметь возможность расширить том или удалить ненужные данные.
Для любого общего ресурса или папки на томе можно создать свою квоту, при создании квоты можно использовать один из шаблонов или установить все параметры вручную. В нашем случае мы создали для папки Users жесткую квоту 200+50 Мб, по превышению квоты администратор будет уведомлен, а пользователь сможет записать еще 50 Мб, после чего запись будет блокирована.
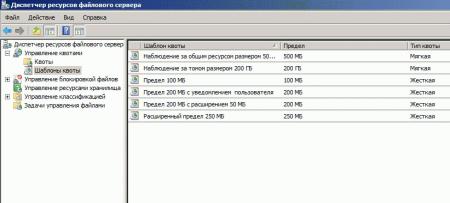
Следующим шагом перейдем к шаблонам, данный раздел уже содержит некоторое количество готовых настроек и мы можем создавать здесь новые. Мы рекомендуем задавать собственные настройки квот именно через шаблоны, это позволит быстро применить однотипные настройки сразу к нескольким ресурсам и столь-же быстро изменить их в случае необходимости.
Разобравшись с квотами, перейдем к блокировке файлов. Не секрет, что пользователи хранят на общих ресурсах и то, что надо и то, что не надо, в частности очень любят размещать там коллекции фото, видео, музыки, причем часто не ограничиваясь одной папкой, а растаскивая одно и тоже содержимое по массе папок. В результате дисковое пространство стремительно сокращается, а у администратора появляется еще одна головная боль. Можно, конечно, бороться административными мерами, но как показывает практика — это малоэффективно.
Сразу перейдем к шаблонам. Эврика! Это то, что нам надо.
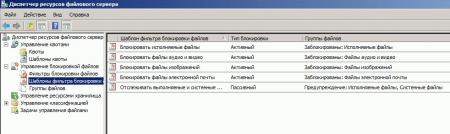
Уже готовы настройки для блокирования основных типов «проблемных» файлов. Блокировка может быть активной, когда размещение данных типов файлов не допускается, или пассивной, когда об этом только уведомляется администратор. При необходимости можно создать свои шаблоны или отредактировать текущие. Определение того, что именно относится к тому или иному типу содержимого производится в разделе Группы файлов.
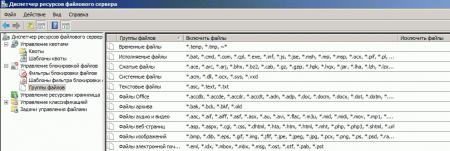
В нашем случае мы создали активную блокировку аудио и видео содержимого для общего ресурса Users.
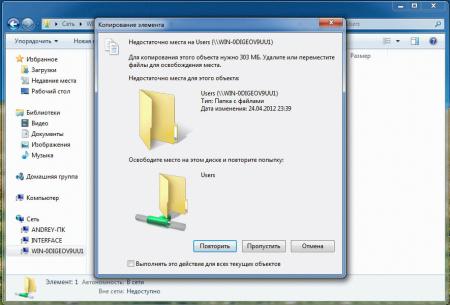
Теперь самое время проверить, как это работает на практике. Попробуем превысить квоту:
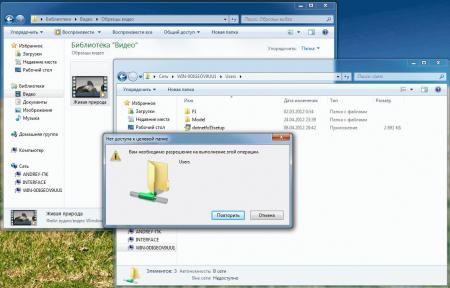
Или записать запрещенное содержимое:
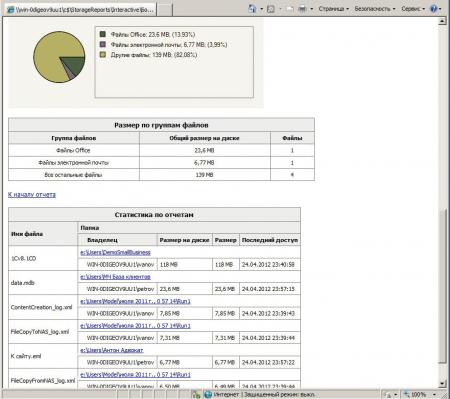
Как видим все работает и админ может спать спокойно. Но наш рассказ будет неполным, если не рассказать об отчетах, которые раскрывают перед администратором широкие возможности контроля и анализа использования файлового хранилища. Каждый из вас наверное ни раз задавался вопросом: кто из пользователей занял все место и чем именно. Теперь получить ответ можно за считанные минуты, для этого переходим в раздел Управление ресурсами хранилища и создаем новый отчет, в котором указываем интересующие нас показатели, также можно настроить автоматическое формирование необходимых отчетов по расписанию.

Отчеты формируются в формате HTML и могут быть просмотрены как локально, так и удаленно, все что вам понадобится — это браузер. Ниже несколько примеров отчетов:

Как видим, файловые службы в Windows Server 2008 R2 это не только и не столько общие папки, за которыми в админской среде закрепилось меткое название «файлопомойка», а мощные средства контроля и управления, которые позволяют создать структурированное и управляемое файловое хранилище любых масштабов.
Научиться настраивать MikroTik с нуля или систематизировать уже имеющиеся знания можно на углубленном курсе по администрированию MikroTik. Автор курса, сертифицированный тренер MikroTik Дмитрий Скоромнов, лично проверяет лабораторные работы и контролирует прогресс каждого своего студента. В три раза больше информации, чем в вендорской программе MTCNA, более 20 часов практики и доступ навсегда.

Тема управления хранением и общим доступом может, на первый взгляд, показаться не такой уж интересной. Однако для администраторов Windows, которым часто приходится работать с хранением и общим доступом в своих инфраструктурах Windows, инструмент управления хранением и общим доступом Windows Server 2008 Share and Storage Management является обязательным инструментом, который нужно использовать на ежедневной основе. Позвольте мне объяснить, что делает этот инструмент, чем он может быть полезен и как его использовать.
Что можно сделать с помощью этого инструмента?
Существует гораздо больше задач, которые можно выполнить помимо создания ресурса. Ниже приведены 6 основных задач, которые вы сможете выполнить с помощью этого инструмента:
Создать хранилища (Provision storage) ‘ это отличная функция для серверов с большим количеством хранилищ, на которых вы часто изменяете, добавляете и удаляете хранилища сервера. Хранилище, которое вы создаете, может представлять собой либо LUN, либо локальный том. Однако следует учитывать, что невозможно создать хранилище, если у вас нет специально выделенного места под это хранилище.
1.Увеличить том
2.Форматировать том
3.Изменить свойства тома, включая доступ к таким инструментам, как дефрагментация и проверка ошибок
4.Запретить общий доступ к ресурсу
5.И даже управлять общим доступом и хранилищами на других компьютерах
Диагностика Share and Storage Management
И, наконец, этот инструмент может помочь вам в диагностировании управления общим доступом и хранилищами, позволяя вам работать с сеансами и открытыми файлами. Это можно использовать для просмотра того, кто к какому ресурсу подключен, и какие файлы они открывали. При необходимости вы также можете Запретить общий доступ (Stop Sharing) к определенному ресурсу. Следует обратить внимание на то, что отсутствует возможность «Удалить ресурс» (‘Delete a Share’), она просто называется Stop Sharing.
Инструмент Share and Storage Management может также помочь вам решить общие проблемы. На самом деле в руководстве Microsoft TechNet Share and Storage Management приведен список 8 распространенных проблем, связанных с общим доступом и хранением, которые можно решить с помощью данного инструмента.

Эсть еще проблемма, думаю вы сталкивались, когда была расшереная папка с общим доступоп, и вдруг, без причины при входе на её по сети просит логин и пароль, хотя вчера работало и на другом ПК нету защиты при входе.

Причина в безопасности Windows , дабы небыло таких проблемм нужно знать IР адрес компьютера к которому вы подключаетесь, если в параметрах стоит автоватически значит нужно присвоить. И зменить в свойствах папки (Диска), имя компьютера на IP адрес, как указано ниже на рисунке:

Заключение
Инструмент управления хранением и общим доступом является отличным дополнением к Windows Server 2008 . Без мастера Share and Storage Management создание новых общих ресурсов может быть сложным, поэтому мне действительно нравится то, как мастер позволяет легко пройти через этот процесс. В целом я считаю, что компания Microsoft проделала отличную работу, создав этот инструмент.
![]() Ниже будет рассказано как настроить различные права доступа для конкретной директории в режиме работы нескольких пользователей. Операционная система в моем примере — Microsoft Windows Server 2008 R2. Но для других ОС семейства Windows действия будут аналогичными.
Ниже будет рассказано как настроить различные права доступа для конкретной директории в режиме работы нескольких пользователей. Операционная система в моем примере — Microsoft Windows Server 2008 R2. Но для других ОС семейства Windows действия будут аналогичными.
0. Задача:
На сервере в терминальном режиме работают несколько пользователей. Необходимо для папки «С:Общий ресурс» настроить права таким образом, чтобы у группы «Пользователи» были права только на чтение в этой директории, а у Администраторов и пользователя «Онянов» были права и на чтение, и на запись.
1. Решение:
Находим в проводнике необходимую папку, кликаем по ней правой кнопкой мыши и в контекстном меню выбираем «Свойства» (Properties).

В открывшемся окне свойств папки, переходим на вкладку «Безопасность» (Security) и нажимаем «Изменить…» (Edit…). Откроется окно «Разрешения для группы...» в котором видим, что для 3 системных групп уже определены параметры безопасности. В частности для группы «Администраторы» установлен полный доступ к папке. Для добавления групп и пользователей нажмем кнопку «Добавить…» (Add…).
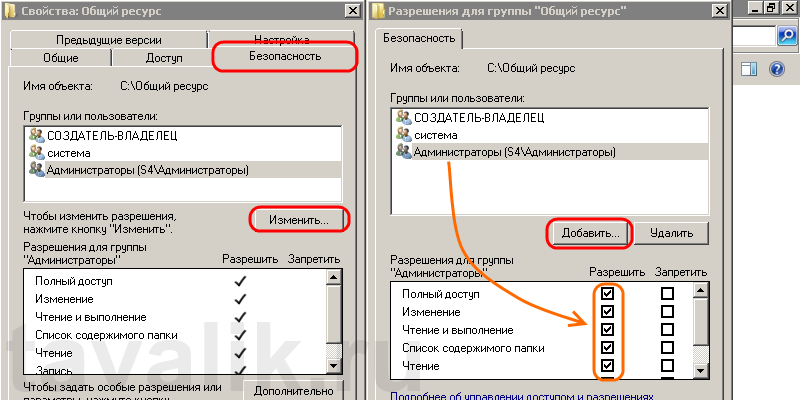
В окне выбора пользователей и групп, нажмем «Дополнительно» (Advanced…), а в окне подбора кнопку «Поиск» (Find Now), чтобы вывести все группы и всех пользователей, существующих в системе. Выберем в результатах поиска необходимую нам группу «Пользователи» и нажмем «ОК» для добавления ее в список.

Аналогичным образом добавим в список пользователя «Онянов» и нажмем «ОК» для завершения подбора.

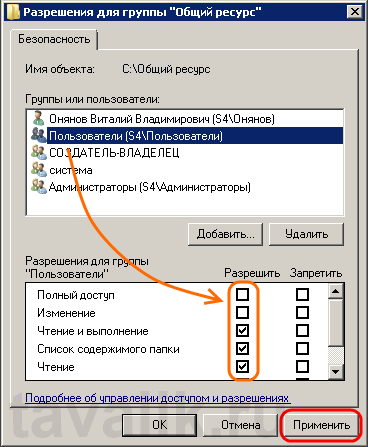
Теперь выберем разрешения для каждой добавленной позиции. Для группы «Пользователи» установим права только для просмотра списка, чтения и выполнения файлов и, соответственно, для пользователя «Онянов» отметим флаг «Полный доступ» .
(Здесь же можно как разрешить какие либо действия с папкой для выбранного пользователя, так и запретить, установив соответствующий флаг. Необходимо помнить, что запрещающие правила всегда в большем приоритете чем разрешающие. )
Выбрав необходимые параметры жмем «Применить» (Apply) для сохранения настроек и нажимая «ОК» закрываем все открытие окна.
Вот и все. Мы установили настройки безопасности для выбранной директории в соответствии с поставленной задачей.