- Remove From My Forums
-
Question
-
Hi,
I have a server with a missing boot.ini file. The complete details are as follows:
- There is no boot.ini in C:, i.e. the default location of the boot.ini
- I can ensure I have checked the Folder Options—> check «Show hidden files & folders» and uncheck «Hide protected & system specific files»
- Though it doesn’t make a difference, I’ve tried: Start—>Run—> C:boot.ini OR open notepad and browse to edit C:Boot.ini
- Searching for *.ini file on the entire server reveals no boot.ini files
- Going to System Properties—>Advanced—>Startup and Recovery Tab —>Settings shows error «The C:boot.ini file can not be opened. Operating system and Timeout settings can not be changed». Clicking OK takes me to the next screen with no booo.ini file to edit. Clicking on edit gives «Can not find C:Boot.ini file. do you want to create a new file?»
- Going to msconfig, there is no BOOT.INI tab. I can see, General, system.ini, Win.ini, Services, Startup, Tools.
I can not see how the server is booting up in first place. It gives no errors on booting up. The way I found out about this file missing is the backup of system state was reporting errors that it can not find a system specific file. I can recreate the file, but really don;t want to before knowing what is happening and how the server is booting. The Server OS is: Windows 2003 SBS SP2. Apologies if this is the wrong forum but I couldn;t find Windows 2003 server forums either, Blemy, the whole world seems to be missing essential parts & still working!
Thanks for any pointers!
Answers
-
Hi,
I performed several tests to rename boot.ini or delete it and my Windows Server 2003 restarted properly. So I suspect that there is a default entry for system boot, if you have multiple operating system, you have to have boot.ini.
Best Regards,
Vincent Hu
-
Marked as answer by
Wednesday, October 7, 2009 6:02 AM
-
Marked as answer by
Windows Server 2008 – BCD and BCDEdit
Boot.ini really was the last of Microsoft’s .ini files. In Windows Server 2008, Boot.ini is superseded by BCD (Boot configuration data). Boot Configuration Data is a wonderfully descriptive expression, more importantly, it gives you control of what should happen when a Windows Server 2008 computer starts. The BCD editor is not notepad, but a command-line program called BCDEDIT.
Topics for Windows Server 2008 – BCD and BCDEdit
- Difficulty Getting Started with BCDEdit
- Example 1 – Plain bcdedit
- Example 2 – Collect information about the switches
- Example 3 – Edit BCD Settings
- Well-known GUIDs for BCDEdit
- Windows 8 BCDEdit
♦
Difficulty Getting Started with BCDEdit
At the beginning I found it frustrating when I tried to set, or even change boot settings with BCDEdit. My aim on this page is to provide you with strategies and detailed examples, as a result, you will soon learn how to editor the menu which appears when Windows Server 2008 boots. Incidentally, the same techniques work with Vista.
Scenario: We want to inspect, and then change the Windows Server 2008’s boot options. For example, reduce the timeout, or display an option to boot into a second operating system on a dual-boot machine.
Example 1 – Plain bcdedit
Trap: Before launching the command prompt, right-click CMD and select, RunAs, administrator.
Let us get started with plain:
bcdedit
Here is the BCD code
Windows Boot Manager
——————–
identifier {bootmgr}
device partition=C:
description Windows Boot Manager
locale en-US
inherit {globalsettings}
default {default}
displayorder {current}
{3b1cb4c9-5398-11dd-88aa-a0b620d5ce11}
toolsdisplayorder {memdiag}
timeout 7
Windows Boot Loader
——————-
identifier {current}
device partition=C:
path Windowssystem32winload.exe
description Microsoft Windows Server 2008
locale en-US
inherit {bootloadersettings}
osdevice partition=C:
systemroot Windows
resumeobject {default}
nx OptOut
Windows Boot Loader
——————-
identifier {3b1cb4c9-5398-11dd-88aa-a0b620d5ce11}
device partition=D:
path Windowssystem32winload.exe
description Microsoft Windows Vista
locale en-US
inherit {bootloadersettings}
osdevice partition=D:
systemroot Windows
resumeobject {3b1cb4ca-5398-11dd-88aa-a0b620d5ce11}
nx OptIn
Note 1: Observe three sections of BCD code, one for the boot manager itself, followed by sections for the operating systems, in this instance Windows Server 2008 and Vista.
Note 2: You could also append the verbose switch /v. The advantage is that you can now see the GUID of the default identifier.
See more on Windows 8 boot loader.
Guy Recommends: A Free Trial of the Network Performance Monitor (NPM) v12
v12
 v12
v12SolarWinds’ Network Performance Monitor will help you discover what’s happening on your network. This utility will also guide you through troubleshooting; the dashboard will indicate whether the root cause is a broken link, faulty equipment or resource overload.
Perhaps the NPM’s best feature is the way it suggests solutions to network problems. Its second best feature is the ability to monitor the health of individual VMware virtual machines. If you are interested in troubleshooting, and creating network maps, then I recommend that you give this Network Performance Monitor a try.
Download your free trial of SolarWinds Network Performance Monitor.
Example 2 – Collect information about the switches
Making changes to BCD code is possible, but beware, your mind has to adjust to its logic and moreover, the syntax is tricky particularly with the hex code. The biggest problem at the outset is to sift the important commands from a long list.
Let us ask for help identifying bcdedit’s switches, we can try the famous switch /?
bcdedit /?
Here is an excerpt:
BCDEDIT – Boot Configuration Data Store Editor
Commands that control the boot manager
===================================
/bootsequence Sets the one-time boot sequence
/default Sets the default entry to boot.
/displayorder Sets the order in the multiboot menu.
/timeout Sets the boot manager time-out value.
Note 1: Try bcdedit /? TOPICS
Example 3 – How to Edit BCD Settings
- bcdedit /timeout
- bcdedit /default
- bcdedit /displayorder
- bcdedit /set
- bcdedit /bootsequence
- MSConfig Windows 8
bcdedit /timeout
I would like to start with /timeout, because it’s the easiest change to understand and to monitor.
Here is an easy change:
bcdedit /timeout 7
To see the effect, re-run this plain command: bcdedit
bcdedit /default
Here is the classic switch to control what happens after the timeout expires.
bcdedit /default {GUID}
bcdedit /default {3b1cb4c9-5398-11dd-88aa-a0b620d5ce11}
Note 1: In the above example setting the /default in this way changes the bcd code, as a result my computer now boots into Vista. Just to remind you that tweaking the default GUID only makes sense if you have a multi-boot machine.
bcdedit /displayorder
The key point with /displayorder is that you can only use particular GUIDs, furthermore, they must be encased in curly brackets. The knack is to research for GUIDs in sections starting with:
Windows Boot Loader
——————-
identifier {3b1cb4c9-5398-11dd-88aa-a0b620d5ce11}
Tip: To save typos you can ‘Mark’, ‘Copy’ and ‘Paste’ these hex blocks at the command-line. Click on the tiny icon at the top left of your cmd box, then select ‘Edit ->’
Trap: The GUIDs must exist, you cannot just make them up. Moreover they must correspond to real settings as indicated under ‘identifier’.
Example 1:
bcdedit /displayorder generic syntax {GUID-os1} {GUID-os2}
bcdedit /displayorder {current} {3b1cb4c9-5398-11dd-88aa-a0b620d5ce11}
Example 2:
bcdedit /displayorder {3b1cb4c9-5398-11dd-88aa-a0b620d5ce11} {9f25ee7a-e7b7-11db-94b5-f7e662935912}
I say again, you must use your GUIDs, and not mine; test by re-running the command: bcdedit. The key point is to synchronize with the rhythm of the syntax,
/displayorder space curly bracket os1 curly bracket space curly bracket os2 curly bracket.
bcdedit /set
It is possible to make cosmetic changes to the descriptions that appear alongside the operating systems on the boot menu.
Example 1
bcdedit /set {50487680-538e-11dd-9786-b25b83bcddca} description «Longhorn»
bcdedit /bootsequence
At present I have no use for this bootsequence switch, however, I did once see its effect when bootmgr asked me if I wished to roll-back an update I was about to make.
Guy Recommends: SolarWinds Network Topology Mapper (NTM)

NTM will produce a neat diagram of your network topology. But that’s just the start;Network Topology Mapper can create an inventory of the hardware and software of your machines and network devices. Other neat features include dynamic update for when you add new devices to your network. I also love the ability to export the diagrams to Microsoft Visio.
Finally, Guy bets that if you test drive the Network Topology Mapper then you will find a device on your network that you had forgotten about, or someone else installed without you realizing!
Download your 14 day free trial ofSolarWinds Network Topology Mapper
well-known GUIDs for BCDEdit
Apparently, these GUIDs are well-known to the bootmgr, although this bcd code is not well-known by me!
{5048767f-538e-11dd-9786-b25b83bcddca} (Meaning Windows Server 2008)
{3b1cb4c9-5398-11dd-88aa-a0b620d5ce11} (Meaning BCD for Vista)
{cbd971bf-b7b8-4885-951a-fa03044f5d71} (Another Vista GUID)
{466f5a88-0af2-4f76-9038-095b170dc21c} (Meaning BCD XP)
Further Information
On this page I have concentrated on amending the Windows Server 2008 boot menu on a dual boot machine. BCDEdit has more wide ranging capabilities, in particular ‘/copy’ for creating more Windows Boot Loader sections. While that may be useful for preparing imaging software, there is no point in complicating matters on a regular server by creating references to non-existent operating systems.
My scenario deals with cases where you have installed two or more operating systems on the same computer and now you need to control or troubleshoot what happens when the machine boots. Such control was formerly the province of boot.ini.
See more about dual booting with Windows 8 »
»
Summary of BCDEdit
If you are wondering how to control the boot menu that you see in Windows Server 2008 or Vista, then investigate the command-line bcdedit. There are switches to control the timeout and the display order for multi-boot machines.
If you like this page then please share it with your friends
Microsoft Windows Server 2008 Topics:
• Server 2008 Home • Overview • What’s New? • Migration Advice • Install • SP1 Review
• AD DC • Roles • Features • Editions • Hyper-V • UAC • IPv6 • Group Policy • Free NPM Trial
Weird one.
I have a domain controller with Server 2008 R2. It is a hack job but is reliable.
AMD system.
AM2 6000+
Asus Crosshair MB.
The server is utilizing 5 Sata ports for Hard disks of assorted size. No raid is configured. This is mostly for random storage and backup DC
When we attempted to upgrade 1 of the drives upon reboot we got a «No Operating System Detected Insert System disk and press ENTER» error. Fiddling around enough to find out the computer would only boot if the System disk and one of the storage disks (the one we removed to upgade…) were connected on boot.
What is going on here? How do I repair this issue? I would like to be able to remove that drive.
Ran BCDEDIT
I see the issue. Recomendations on the command to best resolve it. We want everything on C:.
C:Windowssystem32>bcdedit
Windows Boot Manager
——————— identifier {bootmgr} device
partition=H: description
Windows Boot Manager locale
en-US inherit
{globalsettings} default
{current} resumeobject
{c7cb3484-5288-11e0-a6a3-b7c0d75655a0}
displayorder {current}
toolsdisplayorder {memdiag}
timeout 30Windows Boot Loader
——————- identifier {current} device
partition=C: path
Windowssystem32winload.exe
description Windows Server
2008 R2 locale en-US
inherit
{bootloadersettings} recoverysequence
{c7cb3486-5288-11e0-a6a3-b7c0d75655a0}
recoveryenabled Yes osdevice
partition=C: systemroot
Windows resumeobject
{c7cb3484-5288-11e0-a6a3-b7c0d75655a0}
nx OptOutC:Windowssystem32>
Here is a screenshot of the situation. Drive 7 is of no concern its external did not feel the need to grab the sceenshot a second time to fit it in.

UPDATE
BootBCD is not on H: any ideas
Here is my output
H:Boot>xcopy /e h:boot c:
H:bootmemtest.exe
H:bootcs-CZbootmgr.exe.mui
H:bootda-DKbootmgr.exe.mui
H:bootde-DEbootmgr.exe.mui
H:bootel-GRbootmgr.exe.mui
H:booten-USbootmgr.exe.mui
H:booten-USmemtest.exe.mui
H:bootes-ESbootmgr.exe.mui
H:bootfi-FIbootmgr.exe.mui
H:bootFontschs_boot.ttf
H:bootFontscht_boot.ttf
H:bootFontsjpn_boot.ttf
H:bootFontskor_boot.ttf
H:bootFontswgl4_boot.ttf
H:bootfr-FRbootmgr.exe.mui
H:boothu-HUbootmgr.exe.mui
H:bootit-ITbootmgr.exe.mui
H:bootja-JPbootmgr.exe.mui
H:bootko-KRbootmgr.exe.mui
H:bootnb-NObootmgr.exe.mui
H:bootnl-NLbootmgr.exe.mui
H:bootpl-PLbootmgr.exe.mui
H:bootpt-BRbootmgr.exe.mui
H:bootpt-PTbootmgr.exe.mui
H:bootru-RUbootmgr.exe.mui
H:bootsv-SEbootmgr.exe.mui
H:boottr-TRbootmgr.exe.mui
H:bootzh-CNbootmgr.exe.mui
H:bootzh-HKbootmgr.exe.mui
H:bootzh-TWbootmgr.exe.mui
30 File(s) copied

H:Boot>bcdedit -store C:bootBCD -enum all
The boot configuration data store could not be opened.
The system cannot find the file specified.

H:Boot>dir

 Directory of H:Boot

03/19/2011  11:28 PM    <DIR>          cs-CZ
03/19/2011  11:28 PM    <DIR>          da-DK
03/19/2011  11:28 PM    <DIR>          de-DE
03/19/2011  11:28 PM    <DIR>          el-GR
03/19/2011  11:28 PM    <DIR>          en-US
03/19/2011  11:28 PM    <DIR>          es-ES
03/19/2011  11:28 PM    <DIR>          fi-FI
03/19/2011  11:28 PM    <DIR>          Fonts
03/19/2011  11:28 PM    <DIR>          fr-FR
03/19/2011  11:28 PM    <DIR>          hu-HU
03/19/2011  11:28 PM    <DIR>          it-IT
03/19/2011  11:28 PM    <DIR>          ja-JP
03/19/2011  11:28 PM    <DIR>          ko-KR
11/20/2010  11:24 PM           485,760 memtest.exe
03/19/2011  11:28 PM    <DIR>          nb-NO
03/19/2011  11:28 PM    <DIR>          nl-NL
03/19/2011  11:28 PM    <DIR>          pl-PL
03/19/2011  11:28 PM    <DIR>          pt-BR
03/19/2011  11:28 PM    <DIR>          pt-PT
03/19/2011  11:28 PM    <DIR>          ru-RU
03/19/2011  11:28 PM    <DIR>          sv-SE
03/19/2011  11:28 PM    <DIR>          tr-TR
03/19/2011  11:28 PM    <DIR>          zh-CN
03/19/2011  11:28 PM    <DIR>          zh-HK
03/19/2011  11:28 PM    <DIR>          zh-TW
               1 File(s)        485,760 bytes
              24 Dir(s)  177,605,242,880 bytes free
asked Jun 5, 2011 at 1:27
![]()
CampoCampo
1,60917 silver badges33 bronze badges
2
The computer was booting off one of those disks you removed, and starting the OS from the Operating System disk (which is apparently a separate disk). This is what happens when someone carelessly installs an OS.
You need to get the BCD on the OS disk and corrected for it’s new location. You may be able to boot the Installation Disk and Repair the installation into booting again.
Update — To Fix:
- First a backup: run
bcdedit -export C:bcd.backup, should probably copy this to another computer or thumbdrive. - Open Drive Management, mount the boot partition (should be 100 or 300 MB) to a drive letter, note the letter.
mkdir C:bootxcopy /e x:boot c:boot(where x: is the drive you just mounted)bcdedit -export C:bootBCD-
bcdedit -store C:bootBCD -enum all
Note the entry identifier and property of any lines where the second column sayspartition=x:For example:
Windows Boot Loader ------------------- identifier {current} osdevice partition=x: -
For each occurrence noted execute the following; be extremely careful to not screw this up!
bcdedit -store c:bootBCD -set {current} osdevice partition=c:Note: change
{current}to whatever the identifier of the section was for the property you’re changing. Then just follow it with the property and new value. Also note the newc:value instead ofx:. Also, the identifiers may/will be GUIDs. -
Once that looks all good, fire up Drive Management again, remove the drive letter from that other drive so it’s back the way it was. Mark the
C:partitionActive.
You should now be able to remove the other disk and boot off the system partition. If this doesn’t work you haven’t messed up the other disk and can put it back in.
Update 2:
Looks like you’ve got that other partition mounted as h: already, so ignore that mount and unmount stuff, just jump into the copy, edit, yada yada.
answered Jun 5, 2011 at 1:38
![]()
Chris SChris S
77.6k11 gold badges122 silver badges213 bronze badges
28
If this is just a secondary DC (no such thing as a backup DC), why not just dcpromo it out, blow away the OS and start over?
answered Jun 5, 2011 at 4:26
![]()
HostBitsHostBits
11.8k1 gold badge24 silver badges39 bronze badges
1
First, a little history since it will make clear what is going on.
In the past with Server 2003 and before for NT-based OS’es (not the 9x OS’es), you had a boot.ini, which had a line similar to this: default=multi(0)disk(0)rdisk(0)partition(1)WINDOWS . This told the NT loader where to find the OS to boot from.
So if you had a boot.ini that booted from partition(2), but you remove partition(1) because it is on a different disk (or even change the boot order of your disks in the BIOS), when you boot, it is still looking for partition(2), but it has, in effect, been moved and renamed partition(1) so it won’t boot since the required files are not in that location. The same goes for changing of disk numbers.
In Server 2008, the boot.ini has been replaced with the BCD (Boot configuration data), and needs to be edited using the BCDEdit tool. Here is a good tutorial on how to use it: http://www.computerperformance.co.uk/Longhorn/server_2008_bcdedit.htm
When you removed that disk, you changed your partitions and/or disks, and your server is not looking at the right partition/disk to boot from. When you fix the boot configuration data to look at the right disk and partition, it will boot.
answered Jun 5, 2011 at 4:19
![]()
KCotreauKCotreau
3,3713 gold badges19 silver badges24 bronze badges
3
Windows 2008 R2 (every Windows since Vista, actually) has taken the Linux approach of separating the boot loader from the operating system, by storing it in a separate partition; if you take an empty disk and tell the Windows setup to create a single big partition in it and install Windows there, it will automatically create a small (~100 MB) partition at the beginning of the drive to hold the boot manager, and then it will actually install Windows in a second partition filling the rest of the disk. This will happen automatically, and you can’t even avoid it: Windows can have the boot manager and the operating system on the same disk, but the only way to achieve this is to install it in a disk which has already been partitioned.
Ok, this was a little digression; anyway, looks like in your case the partition holding the boot manager somewhat ended up on a different drive than the one holding the operating system; but we don’t know the actual disk layout from your question: we only know the boot manager is stored on H: and the O.S. is on C:, and from your description of the problem, looks like H: resides on the disk you were trying to remove.
You should post some output from the diskpart command, or, even better, a screenshot from the Disk Management snap-in.
As for moving the boot manager, yes, that can be done, but it’s somewhat tricky, so please post more informations about your actual disk layout before we can provide you with a solution.
answered Jun 7, 2011 at 18:32
![]()
MassimoMassimo
69.3k57 gold badges197 silver badges319 bronze badges
There are a number of possible causes for the failure of a server to boot into Windows. This article deals with a problem in the boot files and demonstrates how to repair them.
Solution
IMPORTANT: Drive Letters Change in WinRE
When booting to the Windows Recovery Environment (WinRE), the drive letters are assigned on a first-come, first-serve basis. For example, the C: drive in Windows will often have a different letter in WinRE. The DiskPart utility can be used to keep track of the drives and what is stored on them.
Restoring Boot Files
Note: If there is no System Reserved partition. It is okay to select the drive containing the Windows folder .
- First Partition: 100 MB System Reserved (No drive letter)
- Second Partition: 60 GB (C:) OS
- Third Partition:1.5 TB (D:) Data
- DVD Drive: E:
Note: The DVD drive’s letter changes from E: to F: in WinRE.
- Boot to the Windows Server DVD.
- Open the command prompt.
- Server 2008 R2
- If no driver is needed, press Shift-F10 to open the command prompt.
- Continue with step 3.
- Server 2008 (or 2008 R2 if a driver is required)
- Click Next at the first screen.
Click Repair your computer.
iii. If no driver is needed, click Next and proceed to step vii below.
If a driver is needed, click Load Drivers.
- Insert the media containing the needed driver.
Note: The media can be a CD, DVD, or USB storage device
- Navigate to the folder containing the driver, select it, and click Open.
vii. Click Command Prompt.
- The command prompt appears.
Set the partition as active
4.Type DiskPart at the command prompt.
- Type List vol at the DiskPart prompt.
- Write down the drive letter of the DVD drive. In this example, it is F.
- Write down the drive letter of the system reserved drive. In this example, it is C.
- Type Select vol 1 (assuming volume 1 is the System Reserved volume, as it is here).
- Type active. This sets the selected volume as active.
- Type exit to return to the command line.
Copy Boot Manager
IMPORTANT: Replace the following example drive letters with the actual drive letters obtained in steps 5 and 6 above.
- Type Copy f:BootMgr c: at the command prompt. One of two things will happen:
- If the file Bootmgr already exists on C:, type N to avoid overwriting it.
- If the file Bootmgr doesn’t already exist on C:, it will be copied.
BootRec /FixMBR
- Type Bootrec /Fixmbr at the command prompt.
BootRec /Fixboot
- Type Bootrec /Fixboot at the command prompt.
Bootrec /rebuildBCD
14.Type Bootrec /rebuildBCD at the command prompt.
- If no OS is found, the following appears:
This means that one of the following is true:
* The boot configuration database (BCD) already exists.
* The OS is not there.
* The OS is damaged beyond the ability of BootRec to recognize it.
- If BootRec /RebuildBCD succeeds, it will list any installations of Windows that it found. Press Y to accept and add them to the BCD.
The server is now configured to boot from the proper partition. Close the command prompt and reboot the system into normal mode.
Above method cab be also performed through the MS DART CD/ISO.
- DaRT 8.1 – Windows 8.1, Windows Server 2012 R2
- DaRT 8.0 – Windows 8, Windows Server 2012
- DaRT 7.0 – Windows 7, Windows Server 2008 R2
- DaRT 6.5 – Windows 7, Windows Server 2008 R2
- DaRT 6.0 – Windows Vista, Windows Server 2008
What happened to my BOOT.INI file?
The Old Way
In legacy operating systems the boot sector (boot strap loader) loads the NTLDR that would then look for the BOOT.INI. If more than one operating system existed the BOOT.INI would provide the user with an Operating System Selection Screen. Once an operating system was chosen NTDetect.com would then take over to detect basic hardware is required for operating system startup.
The New Way
Windows Vista and later operating systems replaced the NTLDR with the Windows Boot Manager (BOOTMGR). The BOOTMGR file is located in the 100 MB system partition automatically created during the Window 7 and Server 2008 R2 installation. In Windows Vista and Server 2008 the file is located in the System Partition. Once the computer is started the boot sector loads the BOOTMGR which in turn looks for an active partition. Once an active partition is found the BOOTMGR looks for the Boot Configuration Database (BCD). The BCD store contains boot configuration parameters and controls how the operating system is started in Windows Vista® and later operating systems. These parameters were previously in the Boot.ini file. Normally this file is stored in a folder called Boot in the same partition as the BOOTMGR.
Modifying the startup environment
Depending on specifically the changes desired there are several tools to make changes to the BCD.
First of all the Bootcfg.exe utility used in legacy is no longer supported. This utility has been replaced with the Bcdedit.exe command-line tool to affect the Windows code which runs in the pre-operating system environment by adding, deleting, editing, and appending entries in the BCD store. Bcdedit.exe is located in the WindowsSystem32 directory of the operating system partition.

The Startup and recovery dialog box enables you to select the default operating system to start if you have multiple operating systems installed on your computer. You can also change the time-out value. These settings are located on the Advanced tab in the System Properties dialog box.

System Configuration utility (Msconfig.exe) is a more advanced tool used to trouble shoot the start process, It is used to enable and disable software, device drives and services during the startup process.

Windows Management Instrumentation (WMI) provider is a management interface that you can use to script utilities that modify BCD. This is the only programmatic interface available for BCD.
In my next blog we will explore the Boot Configuration Database using the BCDEDIT.exe.
Enjoy!
Rick Trader
Windows Server Instructor – Interface Technical Training
Phoenix, AZ
For more information, see the following posts in this series of posts on manipulating the Windows 7 Boot Configuration Database (BCD).
Part 1: How to install Windows 7 or Server 2008R2 from a Virtual Hard Disk
Part 2: How to install Windows 7 or Server 2008R2 from a Virtual Hard Disk (VHD)
Part 3: What happened to my BOOT.INI file?
Part 4: How to use BCDEDIT to add menu items to the selection screen in Win Server & Win7
Part 5: How to dual boot Windows 7 and Windows XP using BCD
Videos You May Like
Write a Comment
Друзья! Всем доброго дня!
Мы хотим не только пиарить себя и свои услуги здесь, но и поделиться опытом и знаниями, полученными в ходе администрирования огромного количества проектов, и в конечном итоге сделать достойный и полезный блог. Для этого мы попросили наших инженеров поучаствовать в этом. А на будущее хотим понять: будет это интересно хабровчанам? И если да — то в какой форме?
Под катом в этот раз пойдет речь об установке Windows Server 2008 по сети с Linux PXE сервера.
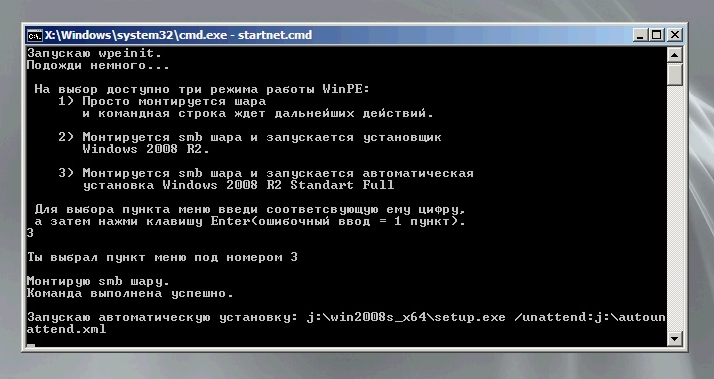
Меню загруженного WinPE.
Каждый
ленивый
хороший системный администратор стремится автоматизировать как можно больше неинтересной ручной работы, дабы больше времени посвещать медитации и дзен.
Пишутся скрипты, файлы ответов для различных визардов, настраиваются системы мониторинга и оповещения, системы управления конфигурациям…
Ничто не должно отвлекать на пути к просветлению.
В этой статье я опишу как подготовить образ среды предустановки Windows WinPE для загрузки с Linux PXE сервера.
У нас он призван решать следующие задачи:
- Выполнение каких-либо административных действий(обновление прошивки RAID контроллера например)
- Установка Windows Server 2008 в «ручном» режиме.
- Полностью автоматическая установка Windows Server 2008
Настройку серверной части PXE я опущу, т.к. тема достаточна хорошо описана в Internet(например здесь).
По ходу повествования остановлюсь лишь на тех моментах, которые неообходимы в рамках данной статьи.
Этап № 1. Windows
Для подготовки образа WinPE потребуется компьютер с Windows 7 либо Windows Server 2008, а так же установленный пакет Windows AIK
Когда нужная ОС установлена и пакет инсталирован.
запускаем Windows PE Tools Command Prompt от имени Администратора
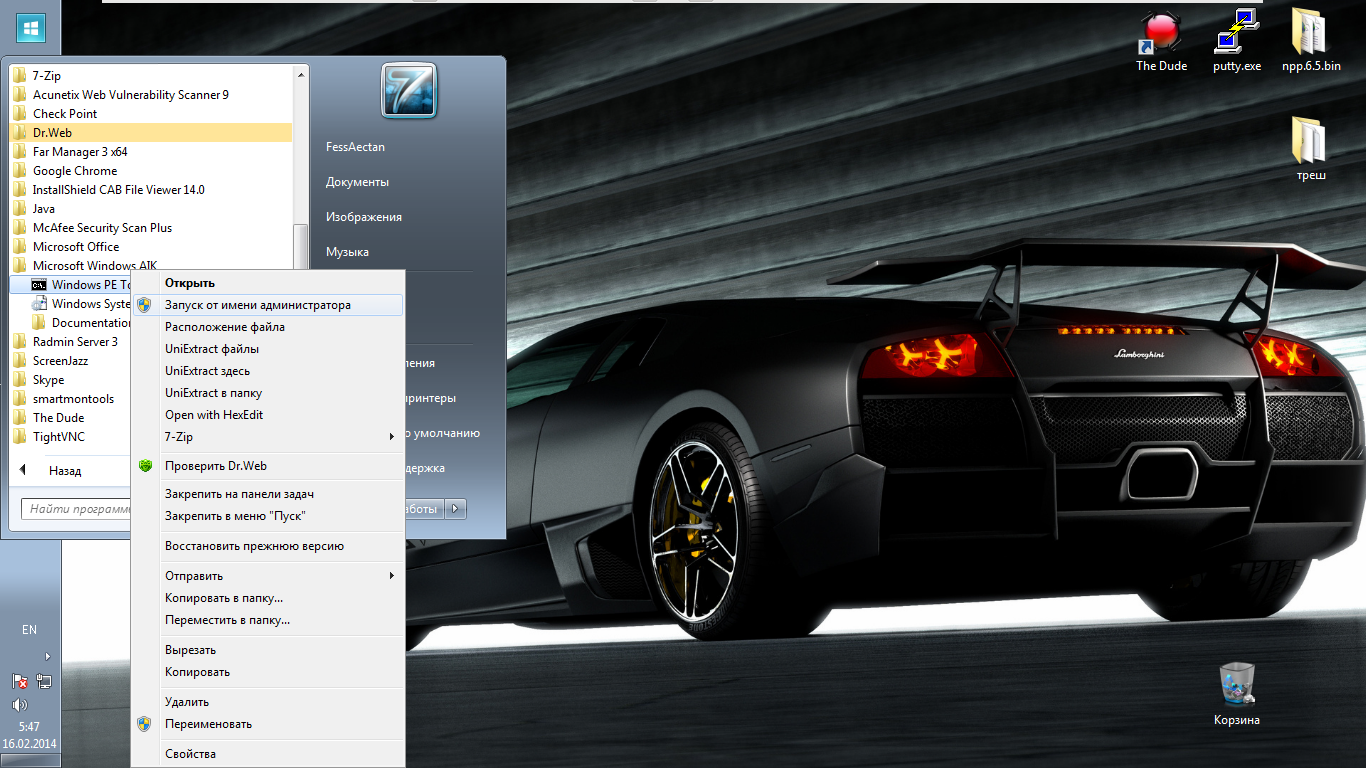
Монтируем образ winpe.wim для внесения изменений, а так же подготовим загрузчик.
В открывшейся консоли последовательно вводим команды:
mkdir c:winpe
mkdir c:winpemount
cd c:winpe
copype.cmd amd64 c:winpe
mkdir c:netbootwinboot
imagex /mountrw winpe.wim 1 mount
xcopy c:winpemountwindowsbootpxepxeboot.n12 c:netbootwin
xcopy c:winpemountwindowsbootpxebootmgr.exe c:netbootwin
xcopy c:winpeisobootboot.sdi c:netbootwinboot
Запуск оболочки WinPE осуществляет файл startnet.cmd
Так как меню у нас на русском языке, нужен редактор позволяющий менять кодировку текста(CP866 в нашем случае).
Я использую Notepad++
Путь к файлу: C:winpemountWindowsSystem32startnet.cmd
Отредактируем его для добавления меню, как на скриншоте выше.
код скрипта startnet.cmd
@echo off
echo.
echo Запускаю wpeinit.
echo Подожди немного...
echo.
wpeinit

echo  На выбор доступно три режима работы WinPE:
echo     1) Просто монтируется шара
echo        и командная строка ждет дальнейших действий.
echo.
echo     2) Монтируется smb шара и запускается установщик
echo        Windows 2008 R2.
echo.
echo     3) Монтируется smb шара и запускается автоматическая
echo        установка Windows 2008 R2 Standart Full
echo.
echo  Для выбора пункта меню введи соответсвующую ему цифру,
echo  а затем нажми клавишу Enter(ошибочный ввод = 1 пункт).
set /p ID=
echo.

if %ID%==1 goto :first
if %ID%==2 goto :second
if %ID%==3 goto :third
if %ID% GTR 3 goto :failure
if %ID% LSS 3 goto :failure
exit /b

:second
echo Ты выбрал пункт меню под номером 2
echo.
echo Монтирую smb шару.
net use j: \1.2.3.4public
echo Запускаю j:win2008s_x64setup.exe
j:win2008s_x64setup.exe
exit /b

:third
echo Ты выбрал пункт меню под номером 3
echo.
echo Монтирую smb шару.
net use j: \1.2.3.4public
echo Запускаю автоматическую установку: j:win2008s_x64setup.exe /unattend:j:autounattend.xml
j:win2008s_x64setup.exe /unattend:j:autounattend.xml
exit /b

:first
echo Ты выбрал пункт меню под номером 1
echo.
:failure
echo.
echo Монтирую smb шару.
net use j: \1.2.3.4public
exit /b
Сохраняем изменения в startnet.cmd.
Отмонтируем winpe.wim закомитив изменения и скопируем полученный образ к остальным файлам.
imagex.exe /unmount /commit mount
xcopy c:winpewinpe.wim c:netbootwinboot
Теперь займемся настройкой Данных Конфигурации Загрузки (BCD)
Что такое хранилище данных конфигурации загрузки?
Хранилище данных конфигурации загрузки содержит параметры конфигурации загрузки и контролирует запуск операционных систем Microsoft Windows Vista и Microsoft Windows Server 2008. Эти параметры ранее хранились в файле Boot.ini (для операционных систем на базе BIOS) либо в памяти NVRAM (для операционных систем на базе EFI (Extensible Firmware Interface)). Для изменения кода Windows, который запускается перед загрузкой операционной системы, можно воспользоваться программой командной строки Bcdedit.exe, с помощью которой можно добавлять, удалять, изменять и дополнять записи в хранилище данных конфигурации загрузки.
Создадим новый скрипт createbcd.cmd. Он обеспечит генерацию нужной BCD.
Вновь открываем текстовый редактор и вставляем туда следующий код:
bcdedit -createstore %1BCD
bcdedit -store %1BCD -create {ramdiskoptions} /d "Ramdisk options"
bcdedit -store %1BCD -set {ramdiskoptions} ramdisksdidevice boot
bcdedit -store %1BCD -set {ramdiskoptions} ramdisksdipath bootboot.sdi
for /F "tokens=2 delims={}" %%i in ('bcdedit -store %1BCD -create /d "MyWinPE Boot Image" /application osloader') do set guid={%%i}
bcdedit -store %1BCD -set %guid% systemroot Windows
bcdedit -store %1BCD -set %guid% detecthal Yes
bcdedit -store %1BCD -set %guid% winpe Yes
bcdedit -store %1BCD -set %guid% osdevice ramdisk=[boot]Bootwinpe.wim,{ramdiskoptions}
bcdedit -store %1BCD -set %guid% device ramdisk=[boot]Bootwinpe.wim,{ramdiskoptions}
bcdedit -store %1BCD -create {bootmgr} /d "Windows BootManager"
bcdedit -store %1BCD -set {bootmgr} timeout 30
bcdedit -store %1BCD -set {bootmgr} displayorder %guid%
Запускаем скрипт.
createbcd.cmd c:netbootwinboot
Приготовим файл ответов autounattend.xml для автоматической установки Windows Server 2008.
На первом диске сервера создается один раздел, занимающий все пространство диска. ОС ставится в этот раздел, устанавливается пароль для учетной записи Administrator, вводится ключ, но Windows не активируется.
autounattend.xml
<?xml version="1.0" encoding="utf-8"?>
<unattend xmlns="urn:schemas-microsoft-com:unattend">
        <settings pass="windowsPE">
        <component name="Microsoft-Windows-Setup" processorArchitecture="amd64" publicKeyToken="31bf3856ad364e35" language="neutral" versionScope="nonSxS" xmlns:wcm="http://schemas.microsoft.com/WMIConfig/2002/State" xmlns:xsi="http://www.w3.org/2001/XMLSchema-instance">
            <ComplianceCheck>
                <DisplayReport>Never</DisplayReport>
            </ComplianceCheck>
<DiskConfiguration>
   <WillShowUI>OnError</WillShowUI>
   <Disk>
      <DiskID>0</DiskID>
      <WillWipeDisk>true</WillWipeDisk>
      <CreatePartitions>
         <CreatePartition>
            <Order>1</Order>
            <Type>Primary</Type>
            <Extend>true</Extend>
         </CreatePartition>
      </CreatePartitions>
      <ModifyPartitions>
<!-- Modify the system partition-->
         <ModifyPartition>
            <Order>1</Order>
            <PartitionID>1</PartitionID>
            <Format>NTFS</Format>
            <Label>System</Label>
         </ModifyPartition>
      </ModifyPartitions>
   </Disk>
</DiskConfiguration>
            <ImageInstall>
                <OSImage>
                    <InstallFrom>
                        <MetaData wcm:action="add">
                            <Key>/IMAGE/NAME</Key>
                            <Value>Windows Server 2008 R2 SERVERSTANDARD</Value>
                        </MetaData>
                    </InstallFrom>
                    <InstallToAvailablePartition>false</InstallToAvailablePartition>
                    <WillShowUI>OnError</WillShowUI>
                    <InstallTo>
                        <DiskID>0</DiskID>
                        <PartitionID>1</PartitionID>
                    </InstallTo>
                </OSImage>
            </ImageInstall>
            <UpgradeData>
                <WillShowUI>OnError</WillShowUI>
                <Upgrade>false</Upgrade>
            </UpgradeData>
            <UserData>
                <ProductKey>
                    <Key></Key>
                    <WillShowUI>OnError</WillShowUI>
                </ProductKey>
                <AcceptEula>true</AcceptEula>
                <FullName>serverclub</FullName>
                <Organization>serverclub</Organization>
            </UserData>
        </component>
        <component name="Microsoft-Windows-International-Core-WinPE" processorArchitecture="amd64" publicKeyToken="31bf3856ad364e35" language="neutral" versionScope="nonSxS" xmlns:wcm="http://schemas.microsoft.com/WMIConfig/2002/State" xmlns:xsi="http://www.w3.org/2001/XMLSchema-instance">
            <SetupUILanguage>
                <UILanguage>en-US</UILanguage>
                <WillShowUI>OnError</WillShowUI>
            </SetupUILanguage>
            <UserLocale>en-US</UserLocale>
            <SystemLocale>en-US</SystemLocale>
            <UILanguage>en-US</UILanguage>
            <UILanguageFallback>en-US</UILanguageFallback>
            <InputLocale>en-US</InputLocale>
        </component>
    </settings>
    <settings pass="specialize">
        <component name="Microsoft-Windows-International-Core" processorArchitecture="amd64" publicKeyToken="31bf3856ad364e35" language="neutral" versionScope="nonSxS" xmlns:wcm="http://schemas.microsoft.com/WMIConfig/2002/State" xmlns:xsi="http://www.w3.org/2001/XMLSchema-instance">
            <InputLocale>en-US</InputLocale>
            <UILanguage>en-US</UILanguage>
            <UILanguageFallback>en-US</UILanguageFallback>
        </component>
        <component name="Microsoft-Windows-Shell-Setup" processorArchitecture="amd64" publicKeyToken="31bf3856ad364e35" language="neutral" versionScope="nonSxS" xmlns:wcm="http://schemas.microsoft.com/WMIConfig/2002/State" xmlns:xsi="http://www.w3.org/2001/XMLSchema-instance">
            <ComputerName>CHANGE-ME</ComputerName>
                <ProductKey>XXX-ZZZ-YYY-RRR-QQQ</ProductKey>
                <RegisteredOrganization>serverclub</RegisteredOrganization>
                <RegisteredOwner>serverclub</RegisteredOwner>
                <DoNotCleanTaskBar>true</DoNotCleanTaskBar>
                <TimeZone>UTC</TimeZone>
            <DisableAutoDaylightTimeSet>false</DisableAutoDaylightTimeSet>
    </component>
    </settings>
<settings pass="oobeSystem">
        <component name="Microsoft-Windows-Shell-Setup" processorArchitecture="amd64" publicKeyToken="31bf3856ad364e35" language="neutral" versionScope="nonSxS" xmlns:wcm="http://schemas.microsoft.com/WMIConfig/2002/State" xmlns:xsi="http://www.w3.org/2001/XMLSchema-instance">
            <UserAccounts>
                <AdministratorPassword>
                    <Value>ServerMegaSecurePassword111</Value>
                    <PlainText>true</PlainText>
                </AdministratorPassword>
            </UserAccounts>
        </component>
    </settings>
  <settings pass="offlineServicing">
    <component name="Microsoft-Windows-PnpCustomizationsNonWinPE" processorArchitecture="x86" publicKeyToken="31bf3856ad364e35" language="neutral" versionScope="nonSxS" xmlns:wcm="http://schemas.microsoft.com/WMIConfig/2002/State" xmlns:xsi="http://www.w3.org/2001/XMLSchema-instance">
      <DriverPaths>
        <PathAndCredentials wcm:keyValue="1" wcm:action="add">
          <Path>j:</Path>
        </PathAndCredentials>
      </DriverPaths>
    </component>
  </settings>
    <cpi:offlineImage cpi:source="wim:j:/win2008s_x64/sources/install.wim#Windows Server 2008 R2 SERVERSTANDARD" xmlns:cpi="urn:schemas-microsoft-com:cpi" />
</unattend>
Файл нужно скопировать в корень smb шары, которая монтируется скриптом startnet.cmd.
Подготовительный этап в Windows близится к завершению, остается скопировать папку c:netbootwin в корень tftp сервера, а так же разместить в папке доступной для монтирования по протоколу sbm файлы с установочного диска/образа Windows Server 2008.
Этап № 2. Linux
Структура нашего меню.
Конфигурационные файлы tftp.
/tftpboot/pxelinux.cfg/default
PROMPT 0
UI vesamenu.c32
MENU BACKGROUND pxelinux.cfg/logo.jpg
MENU TITLE ServerClub PXE Boot Menu
MENU TIMEOUT 50
MENU COLOR TITLE 0 #ffffffff #00000000
MENU COLOR SEL 7 #ffffffff #ff000000
LABEL CentOS ->
KERNEL vesamenu.c32
APPEND pxelinux.cfg/centos
LABEL Debian ->
KERNEL vesamenu.c32
APPEND pxelinux.cfg/debian
LABEL Ubuntu ->
KERNEL vesamenu.c32
APPEND pxelinux.cfg/ubuntu
LABEL BSD ->
KERNEL vesamenu.c32
APPEND pxelinux.cfg/bsd
LABEL ArchLinux ->
KERNEL vesamenu.c32
APPEND pxelinux.cfg/arch
LABEL Windows ->
KERNEL vesamenu.c32
APPEND pxelinux.cfg/windows
LABEL VmWare ->
KERNEL vesamenu.c32
APPEND pxelinux.cfg/vmware
LABEL LiveCD`s ->
KERNEL vesamenu.c32
APPEND pxelinux.cfg/live
LABEL Utilities ->
KERNEL vesamenu.c32
APPEND pxelinux.cfg/utils
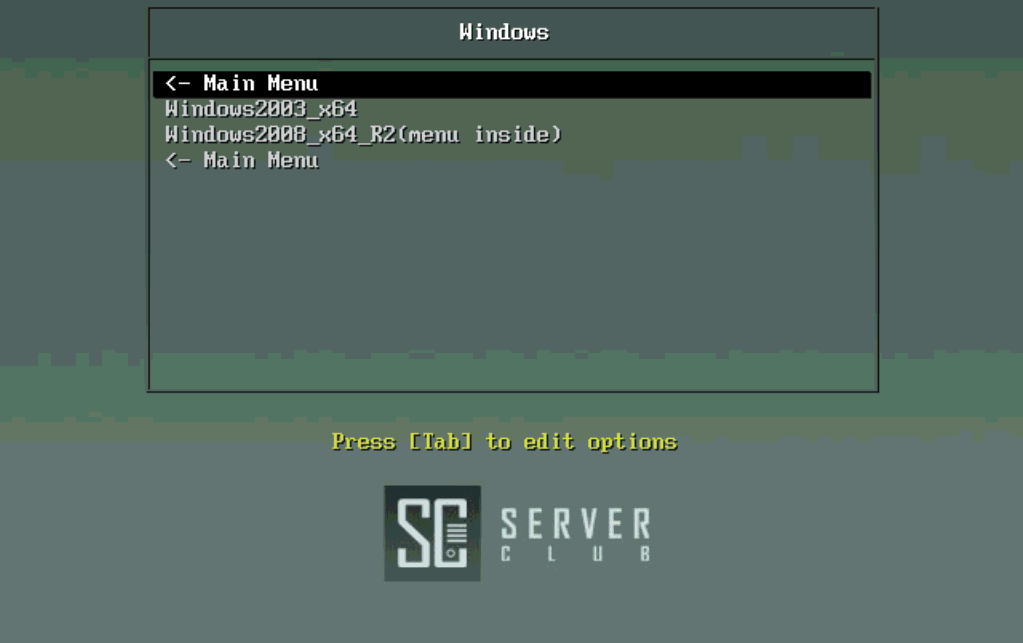
/tftpboot/pxelinux.cfg/windows
PROMPT 0
UI vesavesamenu.c32
MENU BACKGROUND pxelinux.cfg/logo.jpg
MENU TITLE Windows
MENU TIMEOUT 50
MENU COLOR TITLE 0 #ffffffff #00000000
MENU COLOR SEL 7 #ffffffff #ff000000
LABEL < — Main Menu
KERNEL vesamenu.c32
APPEND pxelinux.cfg/default
LABEL Windows2003_x64
kernel w2k3.0
LABEL Windows2008_x64_R2(menu inside)
kernel Boot/pxeboot.n12
LABEL < — Main Menu
KERNEL vesamenu.c32
APPEND pxelinux.cfg/default
Небольшая демонстрация =)
Фрагмент начала установки
На этом все.
Благодарю за внимание!
При подготовке статьи использовались следующие источники:
1. http://gnu.su/news.php?extend.1683
2. http://dice.neko-san.net/2011/02/automated-windows-server-2008r2-installation-from-a-linux-server-without-machine-imaging
3. http://technet.microsoft.com/ru-ru/library/cc749415(v=ws.10).aspx
Автор статьи и по совместительству инженер ServerClub — FessAectan
Только зарегистрированные пользователи могут участвовать в опросе. Войдите, пожалуйста.
В какой форме Вам было бы интересно увидеть развитие нашего блога?
81.33%
Цикл статей по запросам в комментариях
61
54.67%
Еженедельные посты «вопросы-ответы» на тему администрирования
41
Проголосовали 75 пользователей.
Воздержались 17 пользователей.