APPLIES TO
- Windows Server 2008 Enterprise
- Windows Server 2008 Datacenter
- Windows Server 2008 Standard
- Windows Web Server 2008
- Windows Server 2008 R2 Datacenter
- Windows Server 2008 R2 Enterprise
- Windows Server 2008 R2 Standard
- Windows Web Server 2008 R2
KB958662 lists the procedures, and includes a FixIt script, can you help expand this article with additional information, screenshots, demonstrations?
Use the FixIt on the KB page
to register the Microsoft Hyper-V VSS writer.

Important This section, method, or task contains steps that tell you how to modify the registry. However, serious problems might occur if you modify the registry incorrectly. Therefore, make sure that you follow these steps carefully. For
added protection, back up the registry before you modify it. Then, you can restore the registry if a problem occurs. For more information about how to back up and restore the registry, click the following article number to view the article in the Microsoft
Knowledge Base:
322756 (http://support.microsoft.com/kb/322756/ )
How to back up and restore the registry in Windows.
NOTE:
- Virtual machines not running Windows Server 2003 or Windows Server 2008 are put into a saved state before backup. The VM down time for these VMs is dependent on the time to save the state.
- The VSS Writer treats all VMs the same, regardless of what workload is running within it. This may or may not be the behavior you want, for example if your VM is running as a Domain Controller. Plan accordingly.
- The Hyper-V VSS Writer does not work on passthrough disks.
-
The steps in this article are for all VMs on the host. To back up only specified VMs on the host use your enterprise backup software of choice.
To register the Hyper-V VSS writer with Windows Server Backup, follow these steps:
- Click Start, click Run, type
regedit, and then click OK. - Locate the following registry key:
- HKEY_LOCAL_MACHINESOFTWAREMicrosoftWindows NTCurrentVersion
- Right-click CurrentVersion, point to
New, and then click Key. - Type WindowsServerBackup, and then press ENTER.
- Right-click WindowsServerBackup, point to
New, and then click Key. - Type Application Support, and then press ENTER.
- Right-click Application Support, point to
New, and then click Key. - Type {66841CD4-6DED-4F4B-8F17-FD23F8DDC3DE}, and then press ENTER.
- Right-click {66841CD4-6DED-4F4B-8F17-FD23F8DDC3DE}, point to
New, and then click String Value. - Type Application Identifier, and then press ENTER.
- Right-click Application Identifier, and then click
Modify. - In the Value data box, type
Hyper-V, and then click OK. - On the File menu, click
Exit.
Check whether the problem is fixed. If the problem is fixed, you are finished with this article. If the problem is not fixed, you can
contact support (http://support.microsoft.com/contactus)
.
Back up the virtual machines by using Windows Server Backup
- When you perform a backup of the virtual machines, you must back up all volumes that host files for the virtual machine. For example, if the virtual machine configuration files are stored on the D: volume, and the virtual machine virtual hard disk (VHD)
files are stored on the E: volume, you must back up both the D: and E: volumes. - Virtual machines that do not have Integration Services installed will be put in a saved state while the VSS snapshot is created.
- Virtual machines that are running operating systems that do not support VSS, such as Microsoft Windows 2000 or Windows XP, will be put in a saved state while the VSS snapshot is created.
- Virtual machines that contain dynamic disks must be backed up offline.
Note: Windows Server Backup does not support backing up Hyper-V virtual machines on Cluster Shared Volumes (CSV volumes).
Restore virtual machines by using Windows Server Backup
To restore the virtual machines, follow these steps:
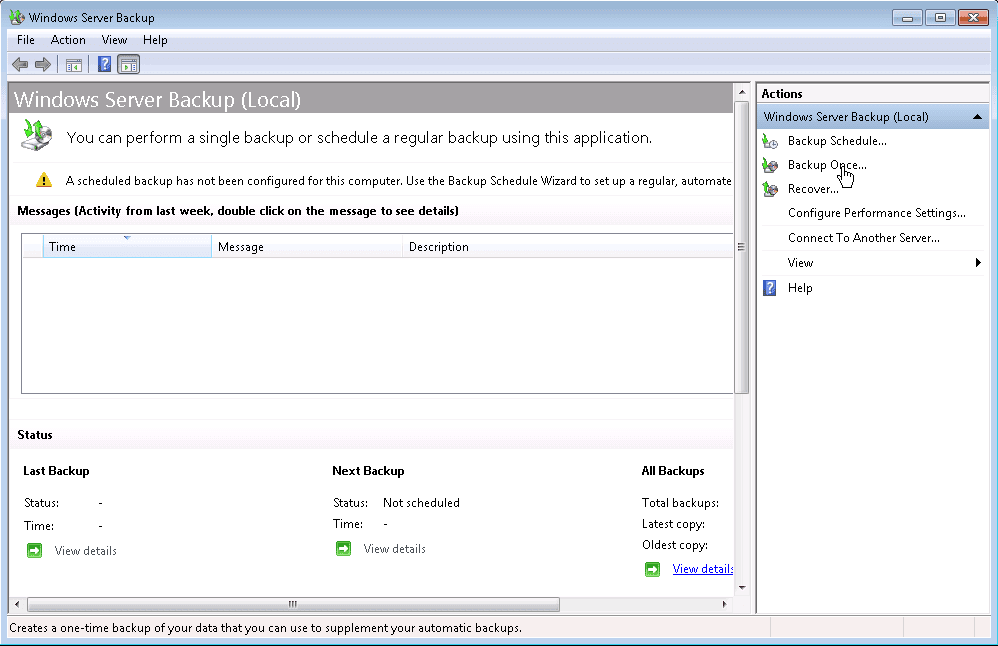
- Start Windows Server Backup in Administrative Tools.
- On the Actions menu, click
Recover. - Select the server that you want to recover data from, and then click
Next. - Select the date and time that you want to restore from, and then click
Next. - Select the Applications recovery type, and then click
Next. - Select Hyper-V, and then click
Next. - Select the restore location, and then click Next.
- Click Recover to start the restore process.
Note All volumes that host files for the virtual machine will be restored. Individual virtual machines cannot be restored by using Windows Server Backup.
Virtual machines that contain two or more snapshots will not be restored. To work around this issue, follow these steps:
- Start Hyper-V Manager in Administrative Tools.
- Delete the virtual machine that was not restored.
- Start Windows Server Backup in Administrative Tools.
- On the Actions menu, click
Recover. - Select the server that you want to recover data from, and then click
Next. - Select the date and time that you want to restore from, and then click
Next. - Select the Files and folders recovery type, and then click
Next. - Select the directory where the snapshots are stored, and then click
Next.Note By default, the snapshots are located in the following directory:
C:ProgramDataMicrosoftWindowsHyper-VSnapshots
- Select the location where the snapshots should be restored, and then click
Next. - Click Recover to start the restore process.
- After the restore has finished, perform another restore. However, use the
Applications recovery type, and select Hyper-V to correctly restore the virtual machines.
You should test that your backups are good.
Tore Lervik gives a PowerShell script to monitor your backups on his blog. His script below checks the last successful backup, and script sends email if the last successful backup is older a designated time period (24 hours by default). It will also send
a «backup succeeded» mail.
$maxHours = 24
$email = "your@mail.net"
$smtpServer = "stmp.mail.net"
$sendSuccess = $true

## Script ------------------------------------------------------------

Add-Pssnapin Windows.serverbackup
$summary = Get-WBSummary
$timeBetween = [DateTime]::Now - $summary.LastSuccessfulBackupTime
$computerName = get-content env:computername

if ($summary -eq $null)
{
 $smtp = new-object Net.Mail.SmtpClient($smtpServer)
 $smtp.Send($email, $email, "BackupCheck.ps1 failed on $computerName", "BackupCheck.ps1 failed with unknown error.")
}
elseif ($timeBetween.TotalHours -gt $maxHours)
{
 $smtp = new-object Net.Mail.SmtpClient($smtpServer)
 $smtp.Send($email, $email, "Windows Server Backup on $computerName failed", "Last successful backup on $computerName was at " + $summary.LastSuccessfulBackupTime)
}
elseif ($sendSuccess)
{
 $smtp = new-object Net.Mail.SmtpClient($smtpServer)
 $smtp.Send($email, $email, "Windows Server Backup on $computerName was successful", "Last backup on $computerName was successful at " + $summary.LastSuccessfulBackupTime)
}
Resources:
Blog:
DPM for data backup/recovery of virtualized apps and environments
TN Library:
Protecting Hyper-V with DPM 2007 SP1
Overview
Virtual machines are basically made of files. They contain configuration files, virtual hard disks, snapshot files and saved state files. While running computers are virtual machines can benefit from virtualization, a lot of thought needs to be taken in order to protect the contents of the virtual machines and the VMs themselves, so that if something goes wrong, you can perform a pre-defined list of steps to successfully restore the VMs to a functional and running state.
We will cover the fundamentals of VM backup in a future article. However, in this article we want to focus on one of the basic methods of VM backup – using Windows Server Backup.
Considerations
Before starting with the VM backups you must pay close attention to a number of considerations. Please read the full article:
Considerations when Backing Up Virtual Machines on Hyper-V
Installing Windows Server Backup
Please follow the guidelines in this article:
Installing Windows Server Backup on Windows Server 2008 R2
Note: To install Windows Server Backup, log on to the computer by using the local Administrator account or another account with Administrator privileges. To perform backups or recoveries by using Windows Server Backup, you must be a member of the Administrators or Backup Operators groups.
Registering the Microsoft Hyper-V VSS writer with Windows Server Backup
Please follow the guidelines in this article:
Registering the Microsoft Hyper-V VSS writer with Windows Server Backup
Performing the backup
To perform the actual VM backup follow these steps:
1. Open Windows Server Backup from the Administrative Tools folder. In the Actions pane, click “Backup Once” (you can, of course, create a schedule for this backup, but that will be discussed in a different article).

2. In the “Backup Options” page, select “Different Options” and click Next.

3. In the “Select Backup Configuration” page, select “Custom” and click Next.

4. In the “Select Items for Backup” page, click “Add Items“.

5. In the “Select Items” window, click to select the volumes where the VM configuration files and VM hard disks are located. Make sure you are familiar with the considerations article. Also note that while it may look possible to select individual folders, do NOT select individual folders. Only select the entire volume. Failing to select the right volumes will result in a failure for the backup procedure and even if it will seem to you that all items were backed up, in fact you will not be able to restore your VMs. Click Ok.

6. Back in the “Select Items for Backup” page, click “Advanced Settings“.

7. In the “Advanced Settings” window, click to select “VSS Full Backup” and click Ok.

8. Back in the “Select Items for Backup” page, click Ok.

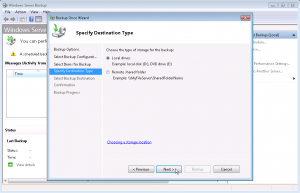
9. In the “Specify Destination Type” page, select the destination for the backup. I chose Local Drives, but you can also perform the backup on remote shares. Click Next.
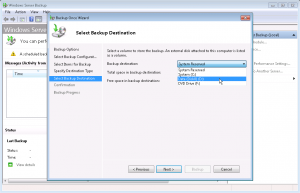
10. In the “Select Backup Destination” page, use the drop-down list to select your destination. If you plan to backup on an external USB drive, make sure the computer recognizes it before you get to this spot. Also make sure that the destination volume contains enough free disk space for the backup to be place in. Remember that volume level backup are ALWAYS full, therefore if you’ve got 500 GB worth of VMs in one volume, you’ll need to have as much space as that (and preferably more) on your destination volume. Click Ok.
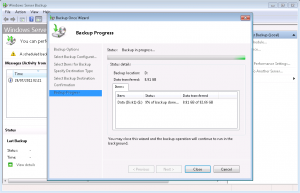
11. In the “Confirmation” page click Backup and let the backup procedure begin.

12. If you immediately switch to the Hyper-V management console, you’ll see that the VMs are being snapshotted. This is not equivalent to taking a Hyper-V snapshot, which in fact is not really a true snapshot and has nothing in relation to VSS snapshots. Because the VSS writer was registered, and because the Integration Services (Components) are installed and enabled on the VMs, they will be successfully backed up without being paused, saved or turned off. In addition, the ICs will inform the VMs that a backup procedure is taking place on the parent partition, so any VSS-aware application that is running inside the VM will also be triggered (which is very important for applications such as SQL, Exchange and so on).

13. Windows Server Backup begins to write the file(s) to disk.
14. When finished, click Close.

Summary
Backing up virtual machines can be a little different than backing up a traditional system. Because a virtual machine is nothing more than a collection of files, it is important to be especially mindful of the backup process. One oversight along the way can mean a failed VM backup. Hopefully this article has prepared you to backup your Virtual Machines with Hyper-V using Windows Server Backup.
Part of my testing of Microsoft Hyper-V Server 2008 R2 will be the built-in backup solution. But although Windows Server Backup it is a built-in feature, it is not enabled by default. Here’s how to activate it and to register the VSS writer so it will tell your virtual machines to do a snapshot for the backup.
You also can’t add features remotely using Server Manager, so type these commands at the Hyper-V Server command prompt:
1. Start PowerShell:
powershell
2. Import the server manager module so you have access to those PowerShell commands:
import-module ServerManager
3. (Optional) Check available and installed features:
Get-WindowsFeature
4. (Optional) Get help on a PowerShell cmdlet:
Get-Help [cmdlet_name] -full
For example: Get-Help Add-WindowsFeature -full
5. Install Windows Server Backup Features:
Add-WindowsFeature -Name Backup-Features -IncludeAllSubfeature
6. Quit PowerShell:
exit
7. Register the VSS writer for use with Windows Server Backup (see this TechNet article and MSKB 958662):
reg add "HKLMSoftwareMicrosoftWindows NTCurrentVersionWindowsServerBackupApplication Support{66841CD4-6DED-4F4B-8F17-FD23F8DDC3DE}"
reg add "HKLMSoftwareMicrosoftWindows NTCurrentVersionWindowsServerBackupApplication Support{66841CD4-6DED-4F4B-8F17-FD23F8DDC3DE}" /v "Application Identifier" /t REG_SZ /d Hyper-V
8. Check the registration of VSS writer for use with Windows Server Backup:
reg query "HKLMSOFTWAREMicrosoftWindows NTCurrentVersionWindowsServerBackupApplication Support{66841CD4-6DED-4F4B-8F17-FD23F8DDC3DE}" /s
Note You can also type regedit at the server’s command prompt to launch the familiar graphical registry editor and check the setting.
Once installed, it seems you are left with the Wbadmin command line tool for running backups and restores unless you have a full installation of Windows Server 2008 with the Windows Server Backup MMC plug-in. That plug-in is not available in the Remote Administration Tools available for Windows 7.
According to this TechNet article, Wbadmin has been extended for Windows Server 2008 R2 (there are some cool new backup features in R2), however as of this writing, the Wbadmin command reference has not been updated. The built-in help has been updated, so for details you can, for example, type the following at the server command line:
Wbadmin -help

Wbadmin Enable Backup -help
Here’s the command to do a one-time backup of the system drive C: and the data drive D: to an external drive F:
Wbadmin start backup -backupTarget:F: -include:C:,D: -systemState -allCritical
The -systemState flag is actually redundant since backing up the system drive C: includes the system state. The -allcritical flag means “back up everything needed to restore the operating system to bare metal,” which in this case adds the 100MB System Reserved volume used by Bitlocker.
Сложно переоценить необходимость создания резервных копий для восстановления важных данных на серверах предприятия любого уровня. В современном мире деятельность предприятий немыслима без IT инфраструктуры, баз данных, почтовых серверов, контроллеров домена и пр. Потери информации от поломки комплектующих, перебоев электричества или человеческого фактора не так уж редки и грамотный администратор должен быть готов к любым ситуациям. Сегодня я расскажу о резервном копировании виртуальных машин Hiper-V

После переноса существующих и установки новых серверов в среде Hyper-V Windows Server 2008 R2, передо мной стала задача максимально уберечь себя от незапланированных выездов и ночёвок на работе для восстановления всего этого хозяйства в случае сбоев. Как это часто бывает, несмотря на объективное обоснование предоставленное руководству, денег на эту затею не дали, поэтому вариант с Veeam Backup, на который я рассчитывал, отпал. Результаты поиска бесплатных продуктов дали два варианта – скрипт HyperV Backup Tool и утилиту HVBackup. Оба решения обладают примерно одинаковыми возможностями, я решил начать знакомство со второй утилиты.
Программа HVBackup это утилита командной строки, поэтому сценарий её работы проще всего составить CMD-файлом, в котором так же реализуем отправку себе на почту отчётов о результатах бекапа. Скачиваем HVBackup и blat (утилита командной строки для отправки почты). Распаковываем первую в папку HVBackup, в ней создаем папку blat и распаковываем в неё одноименную утилиту. В папке HVBackup создаём командные файлы по количеству виртуальных машин следующего содержания:
|
1 2 3 4 5 6 7 8 9 10 11 12 13 14 15 16 17 18 19 20 21 22 23 |
set backpath=«\SRV-BKHyper-V» set server=SRV-SC set mail=admin@domain.ru set smtp=smtp.domain.ru set sender=admin@domain.ru set login=admin@domain.ru set pass=******** set num=3 pushd %backpath% && forfiles.exe -m *.zip -d -%num% -c «cmd /c del @path» popd %~dp0HVBackup.exe —l %server% —o %backpath% 1> %~dp0lastlog_out.txt 2> %~dp0lastlog_err.txt && set error=0||set error=1 if [«%error%»] EQU [«1»] ( %~dp0blatblat —to «%mail%» —subject «%server% — Backup Error» —body «HVBackup finished» —server %smtp% —f %sender% —u %login% —pw %pass% —attacht %~dp0lastlog_out.txt,%~dp0lastlog_err.txt ) if [«%error%»] EQU [«0»] ( %~dp0blatblat —to «%mail%» —subject «%server% — Backup Successfully Finished» —body «HVBackup finished» —server %smtp% —f %sender% —u %login% —pw %pass% —attacht %~dp0lastlog_out.txt,%~dp0lastlog_err.txt ) |
Обратите внимание на блок объявления переменных, в него вам необходимо вписать ваши данные: путь к директории бекапов, имя виртуальной машины, почтовые реквизиты для отправки почты, а в параметре num задать сколько резервных копий требуется хранить. После чего необходимо создать назначенные задания на ежедневный запуск скриптов.
Листинг CMD-файла, думаю, не вызовет трудностей в понимании сценария. Первым действием удаляются устаревшие резервные копии согласно параметру num, далее выполняется непосредственно резервное копирование, по результатам которого отправляется отчёт по почте с логами бекапа.
Часть 2 — Резервное копирование виртуальных машин Hyper-V (восстановление)
Похожие записи
Introduction
Using Backup Exec to backup virtual environments that use Hyper-V 2 (Windows Server 2008 R2) as hypervisor may be not as simple as it first looks.
In this paper I want to cover some of the reasons why partners and customers struggle getting reliable backups in those environments, especially when using clustered Hyper-V installations.
Technologies
Clustered Shared Volume (CSV)
When you use Hyper-V in a clustered environment you will, in almost every environment, use Clustered Shared Volumes (CSVs) to mount your virtual machines.
Without going into deep detail, CSV is an add-on to NTFS that allows the access from multiple computers to the same storage volume, at the same time. This means, that multiple hypervisors can host their virtual machines on the same volume.
To prevent conflicts every CSV has an owner assigned who decides which computer may access which block on the volume at a given time.
In Windows Server 2008 R2 CSVs are only supported in Hyper-V environments and may not hold any other data, than those used for virtualization.
Snapshots
Snapshotting a virtual machine in Hyper-V 2 means that the machine’s memory is dumped on the hard drive of the hypervisor and that the virtual hard drive (VHD) of the machine is set to read only. In addition, a new hard drive file with the extension .AVHD is created and any future changes to the hard drive are written to that file.
If you take a second snapshot from that machine, the memory is dumped once again, the first .AVHD file is set to read only and a second .AVHD file is created.
So far there should be no issues; the process is similar to the way other hypervisors, like VMware behave. The difference (and the problematic part) is during the snapshot removal:
When you remove a snapshot via the Hyper-V management console, the snapshot is deleted from the console, but the .AVHD files remain on the disk. They are only removed, when you shut down the virtual machine. And when I say shutdown, I mean shutdown – powered down/off, a simple reboot/restart of the machine does not remove the files.
Only when the machine is really powered off, Hyper-V is able to merge the .AVHD file(s) into the VHD file and remove the .AVHD files.
With this caveat in mind it’s easy to understand that it might me not a good idea to use VM snapshots for backup purposes. (Unless you want to allow your backup software to shut down your virtual machines right after the backup has finished…)
So, what Backup Exec has to do to circumvent this caveat, is to do the snapshots not per VM but instead per volume, which means per CSV by using VSS technologies on the hypervisor itself.
Redirected Access
Redirected access means, that traffic to a CSV is not written directly to it by the use of Fiber Channel or whatever link the servers have to the storage, but is instead forwarded to the CSV’s owner via LAN and then written by the owner to the disc on behalf of the original server.
This technology is used if a server loses its entire connection to the storage, i.e. because someone pulls all the Fiber Channel cables at the same time. Instead of having all the VMs hosted on the crashing server, the server just redirects the data stream via LAN to the owner of the CSV.
There is another situation where Redirected Access is used by Hyper-V. This is when there is the need to take a snapshot from one of the CSVs. When the command for taking a snapshot is received by the CSV’s owner, the server sets the CSV into Redirected Access, blocking all other servers from directly accessing the Volume. When this is done, the snapshot is taken.
When the snapshot is deleted again, the server automatically removes the flag Redirected Access from the CSV allowing the other servers to access the volume again in a direct way.
Backup Example 1 (simple)

In this example, there is a VM named A that is hosted on Hyper-V node A and has its VHDs laying on CSV 2.
When the backup is started Backup Exec contacts the Cluster to find out which node is responsible for the VM. Backup Exec then contacts the node and asks for a snapshot of the volume(s) that host the files belonging to that particular VM.
In this example, Server A would be asked to do a snapshot of CSV 2.
To be able to do so, Server A needs to be the owner of CSV 2, so the first step is to move CSV 2 to Server A. This is done without the need for a downtime, so the VMs will not be impacted.
After the ownership is corrected Server A sets CSV 2 to Redirected Access taking the snapshot and forwarding the data for the backup to Backup Exec.
When the backup job is finished the snapshot is cleaned up and the Redirected Access mode is removed from the volume.
Backup Example 2 (still simple)

In this second example we also have two VMs on our cluster. We also have a backup strategy that forces us to backup both VMs at the same time in two different jobs. (Remember, this is just an example to show you some potential problems)
The backup of Hyper-V A will run the same way as in the first example and the backup of Hyper-V B is even more simple, since Server B is already the owner of the CSV that holds the data to be backed up.
So in this example, there shouldn’t be any real problems.
Let’s move on to the next one…
Backup Example 3 (getting more difficult)

We have the same amount of VMs, as with example 2. The difference is that someone created a second hard drive for Hyper-V B and put it on CSV 2.
So, the backup of Hyper-V A is running the same way, as it did before and all the time.
But, when we’re trying to backup Hyper-V B, Server B needs to move the ownership for CSV 2 to himself to be able to create the snapshot. Since the backup of Hyper-V A is running and therefore CSV 2 is in Redirected Access, this move cannot be done. So Server B has to wait that the backup of Hyper-V A finishes and Server A is removing the Redirected Access for CSV 2, before the backup of Hyper-V B can be started…
Backup Example 4 (real life)

In real life, we do find multiple VMs per host and quite some of those VMs have multiple VHDs on the CSVs.
Without going into details, have a look at the picture above and imagine, how you would need to setup your backup jobs to assure, they are not affecting each other.
Solution (or at least a way to get it running)
After trying lots of ideas and monitoring quite a lot of jobs, the best (and only) solution I found to solve the dependency problem in Hyper-V is to strictly sort the machines and their resources.
So try to put the files for all machines that are hosted on Server A to a dedicated CSV, set Server A as the owner of that volume and create a backup job for all machines on that CSV. Do the same with the machines hosted on Server B and so on:

This will prevent the servers from the need to wait for other servers to finish their backups and will allow you to successfully run multiple backup jobs at the same time (one per CSV).
Future
The newly released Version of Windows Server, Windows Server 2012 also brings a new version of Hyper-V with it: Hyper-V 3.0.
In Hyper-V 3 one the most important feature (at least from a backup perspective) is the ability to do online merge of snapshots. This means, that the AVHD files created at the time where the snapshot is taken, are removed from the disk, when the snapshot is deleted from the virtual machine.