Обновлено 14.11.2017
Добрый день уважаемые читатели и гости блога, сегодня мы с вами продолжим изучать, веб сервисы на базе Windows, а именно, посмотрим, как производится настройка SSL на IIS для одного или нескольких сайтов, как с одним Ip адресом, так и с несколькими. Для выполнения этой, поставленной задачи у вас должен быть установлен веб сервер iis, на Windows Server начиная от 2008 R2 и выше, на текущий момент самый последний, это Windows Server 2016.
Настройка https сайта на IIS
И так про создание сайта iis на windows server 2012, я вам уже рассказывал, подразумевается, что он у вас есть. Далее, когда вы прописали все DNS записи, вы генерировали запрос на выпуск сертификата и уже потом получали от центра сертификации ваш сертификат, но его еще приходилось затачивать под iis, так как ему нужен формат pfx.
Еще немного теории и ограничения
Если у вас один сайт на https на вашем iis сервере, то проблем с сертификатом не возникнет, если же планируется два сайта, то тут уже есть варианты:
- Купить wildcard сертификат, чтобы была возможность вешать SSL на любой сайт IIS
- Купить дополнительный ip для каждого сайта
- Воспользоваться скриптом и применить привязку нужного SSL к нужному сайту, на одном Ip адресе
- Воспользоваться технологией SNI (Server Name Indication)
Установка SSL в PFX
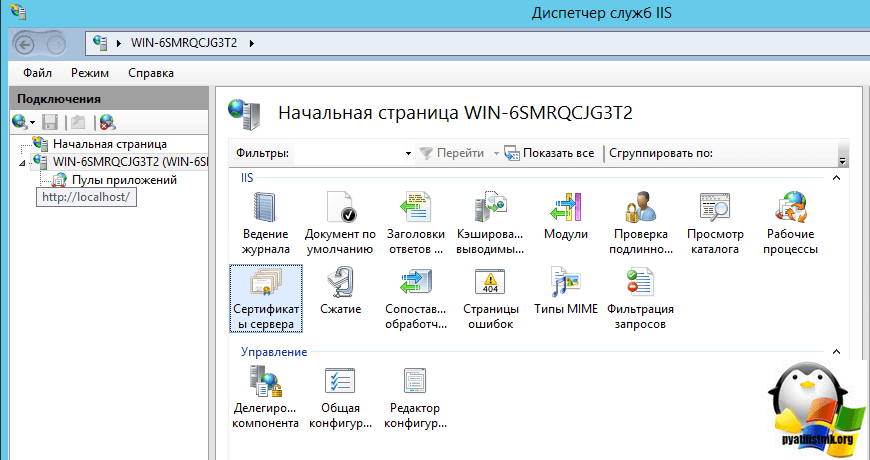
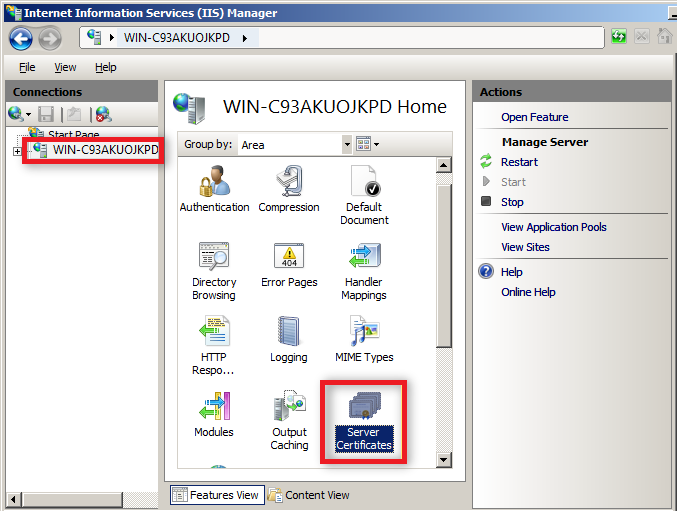
Первым делом для создания сайтов на протоколе https, вам необходимо импортировать нужный сертификат, делается это очень просто. Вы открываете, диспетчер IIS и переходите в пункт «Сертификаты сервера»
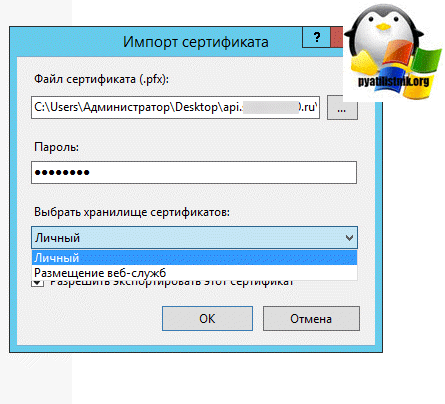
Далее в поле «Действия» вы нажимаете импортировать.

Через обзор, указываете ваш pfx архив.
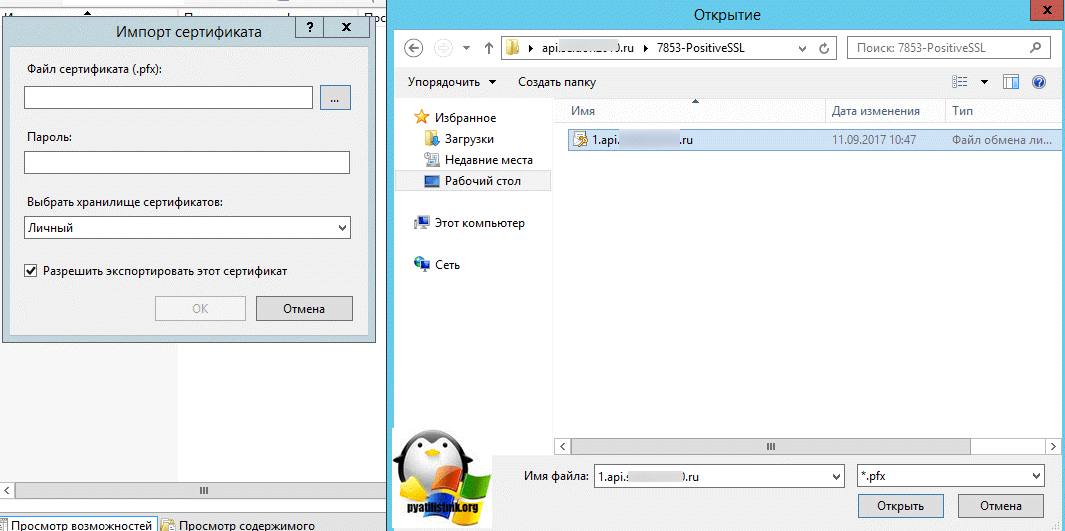
Указываете пароль, в строке «Выбрать хранилище сертификатов» укажите либо «Личный» подойдет для обычного размещение, а вот пункт «Размещение веб-служб» нужен для SNI технологии.
По сути, это и есть сложная установка SSL в iis, как вам такое.

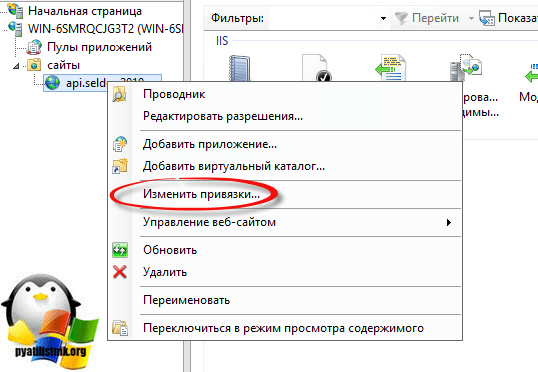
Теперь произведем привязку SSL сертификата к нужному сайту. Для начала я проверю свой сайт на протоколе http, как видите все отлично работает.

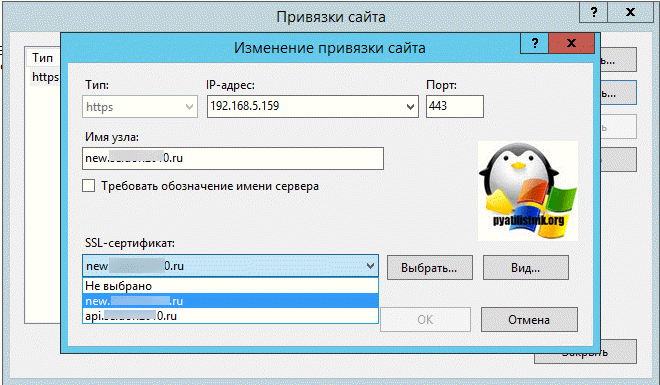
Теперь щелкаем по нужному сайту правым кликом и выберем пункт «Изменить привязки», именно там мы и произведем настройку https в iis.
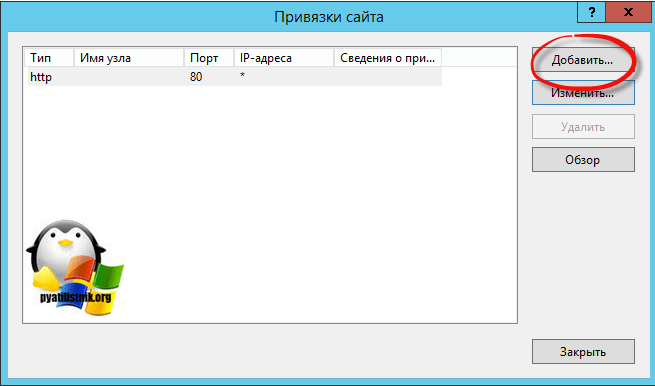
Как видите ваш сайт по умолчанию, будет работать по протоколу http, нажимаем кнопку добавить.
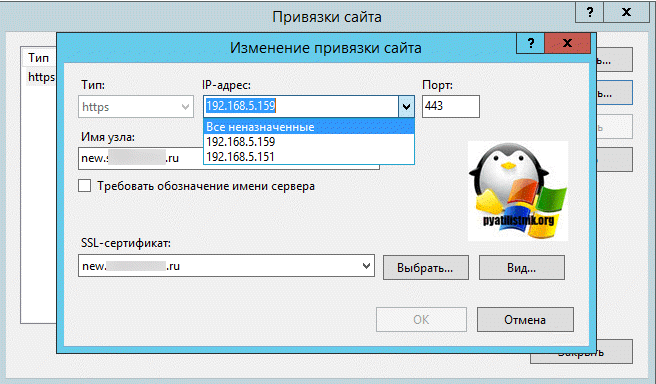
Указываем для сайта:
- Тип https и номер порта, по умолчанию, это порт 443, убедитесь, что он открыт у вас в брандмауэр.
- В имени узла, пишем полное название сайта.
- SSL-сертификат > выбираем нужный и сохраняем настройки.

Проверяем ваш сайт по протоколу HTTPS, если все отлично, то вы увидите закрытый замочек, это значит, что ssl сертификат установлен в IIS правильно.
Настройка нескольких HTTPS сайтов на разных ip
Предположим, что у вас есть два сайта:
- api.pyatilistnik2010.ru
- new.pyatilistnik2010.ru
Вам необходимо, чтобы каждый из них имел свой ip привязанный к DNS имени и так же отдельный сертификат, тут все просто. Вы так же поднимаете отдельные сайты, с той лишь разницей, что в поле ip адрес, указываете нужный и в поле имя узла, адрес вашего ресурса, ну и собственно нужный сертификат.
Сохраняем и проверяем, должно все работать, на любой из версий сервера IIS от 7,5 до 9.
Настройка нескольких HTTPS сайтов на одном ip
Теперь представим себе ситуацию, что у вас один внешний ip адрес, как быть, пробуем повесить все на него. В итоге один из сайтов у вас получит 404 ошибку, кто не в курсе, что это такое, то вам сюда.
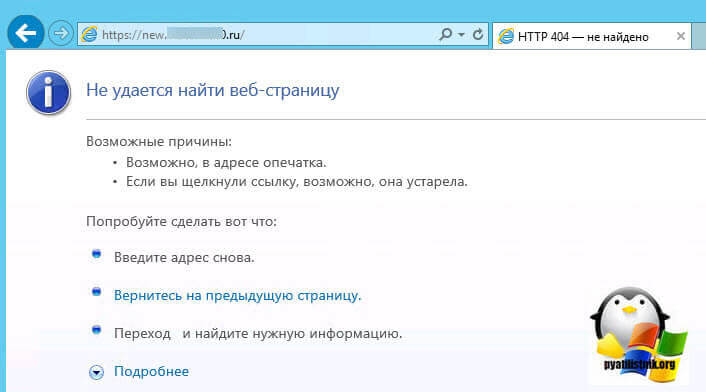
Вся проблема в том, что в IIS по такому сценарию, в веб интерфейсе может работать, только сертификат на домен, формата wildcard *.pyatilistnik.org. Звездочка подразумевает, что вы можете использовать SSL на любой домен третьего уровня. Но не смейте сдаваться, есть два выхода:
- Использование технологии SNI (Server Name Indication) в IIS, подходит для всего старше версии 7.5, так, что Windows Server 2008 R2 и ниже в пролете.
- Использовать скрипт от Microsoft.
Вот вам пример такого сертификата.
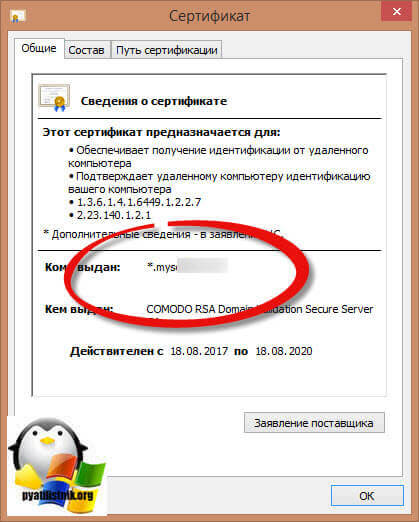
Если у вас wildcard, то все просто, либо через диспетчер IIS все меняете, либо через конфигурационный файл.
C:WindowsSystem32inetsrvconfigapplicationHost.config
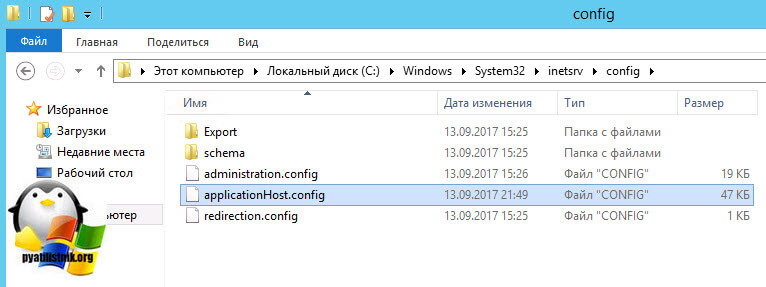
Откройте его, здесь хранятся настройки IIS. И можно задать биндинг на разные доменные имена:
<sites>
<site name=»default» id=»1″ serverAutoStart=»false»>
<application path=»/»>
<virtualDirectory path=»/» physicalPath=»%SystemDrive%inetpubwwwroot» />
</application>
<bindings>
<binding protocol=»https» bindingInformation=»192.168.5.151:443:api.ваш домен.ru» sslFlags=»1″ />
</bindings>
</site>
<site name=»api.pyatilistnik2010.ru» id=»2″>
<application path=»/» applicationPool=»api.ваш доме.ru»>
<virtualDirectory path=»/» physicalPath=»C:api.ваш доме.ru» />
</application>
<bindings>
<binding protocol=»https» bindingInformation=»*:443:api.ваш доме.ru» sslFlags=»1″ />
</bindings>
</site>
<site name=»new.ваш доме.ru» id=»3″ serverAutoStart=»true»>
<application path=»/» applicationPool=»new.ваш доме.ru»>
<virtualDirectory path=»/» physicalPath=»C:new.pyatilistnik2010.ru» />
</application>
<bindings>
<binding protocol=»https» bindingInformation=»192.168.5.159:443:new.ваш доме» sslFlags=»1″ />
</bindings>
</site>
<siteDefaults>
<logFile logFormat=»W3C» directory=»%SystemDrive%inetpublogsLogFiles» />
<traceFailedRequestsLogging directory=»%SystemDrive%inetpublogsFailedReqLogFiles» />
</siteDefaults>
<applicationDefaults applicationPool=»DefaultAppPool» />
<virtualDirectoryDefaults allowSubDirConfig=»true» />
</sites>
Теперь метод, если у вас нет wildcard и только один внешний ip на сервере, подходит для IIS 7.5 и выше. Первое, что нам необходимо сделать, это узнать ID вашего сайта, делается это просто, либо через консоль диспетчер IIS
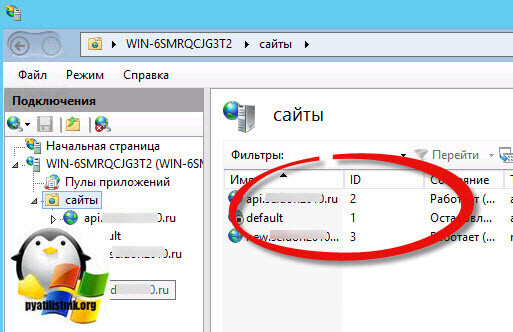
Либо все в том же файле applicationHost.config

Далее переходим в папку:
%SYSTEMDRIVE%InetpubAdminScripts
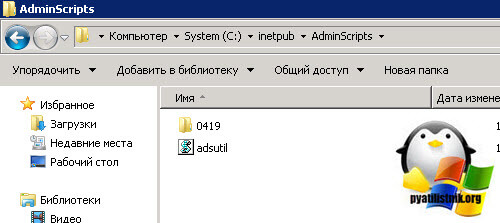
Если у вас, например, на IIS 8 и старше в данной папке нет этого файла, то вам необходимо доставить IIS Management Scripts and tools (IIS скрипты и инструменты управления
).
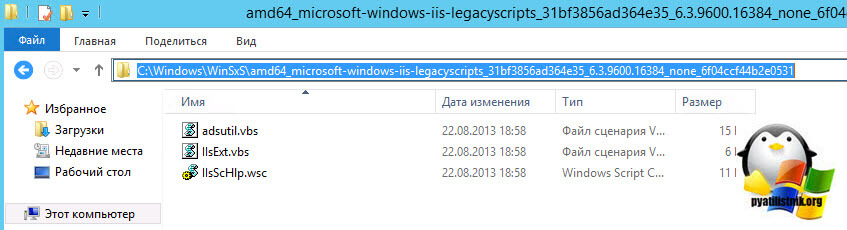
В Windows Server 2012 R2 файл adsutil.vbs set у меня появился в папке
C:WindowsWinSxSamd64_microsoft-windows-iis-legacyscripts_31bf3856ad364e35_6.3.9600.16384_none_6f04ccf44b2e0531
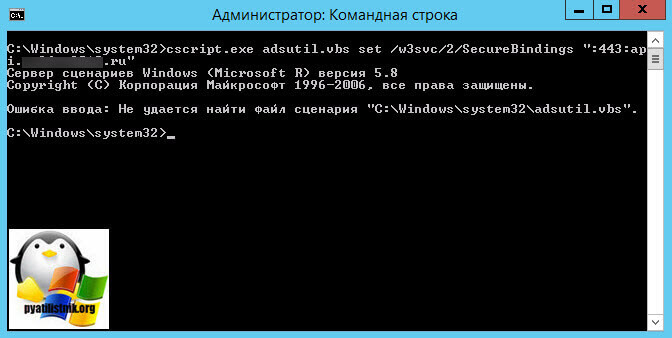
cscript.exe adsutil.vbs set /w3svc/ИДСайта/SecureBindings «:443:ИмяСайта»
в моем случае это выглядит вот так
cscript.exe adsutil.vbs set /w3svc/2/SecureBindings «:443:api.ваш сайт.ru»
Если у вас будет ошибка, что файл не найдет, то создайте в папке %SYSTEMDRIVE%Inetpub папку AdminScripts и скопируйте в нее файлы по из того каталога, что я указывал выше или воспользуйтесь поиском файла adsutil.vbs set
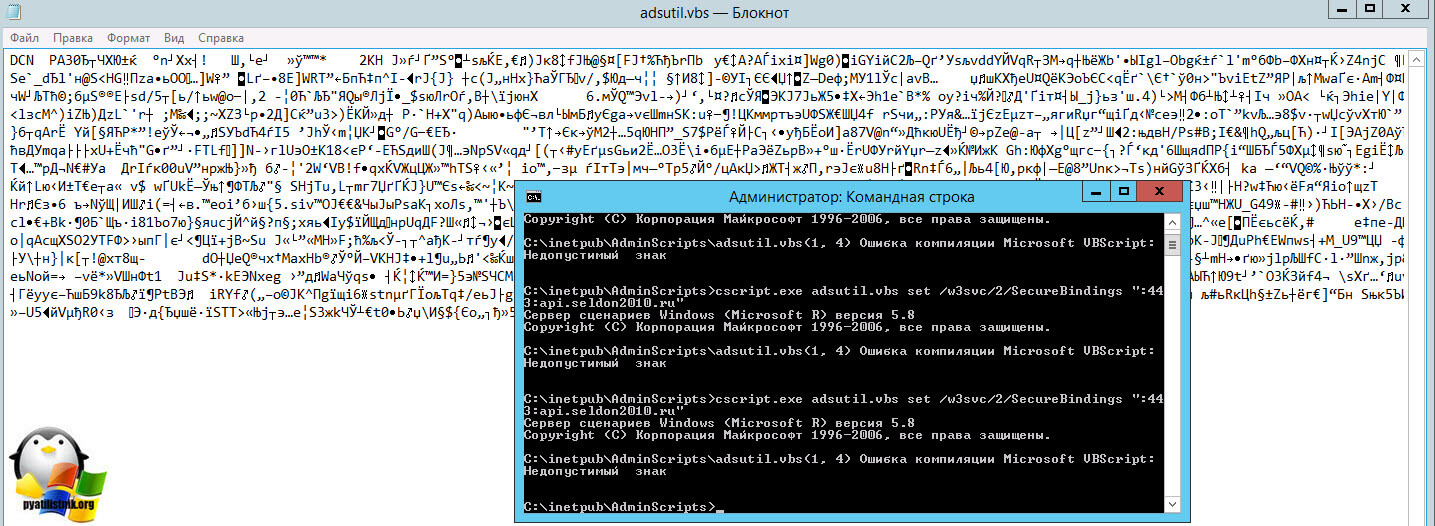
затем перейдите в командой строке в папку AdminScripts
cd %SYSTEMDRIVE%InetpubAdminScripts
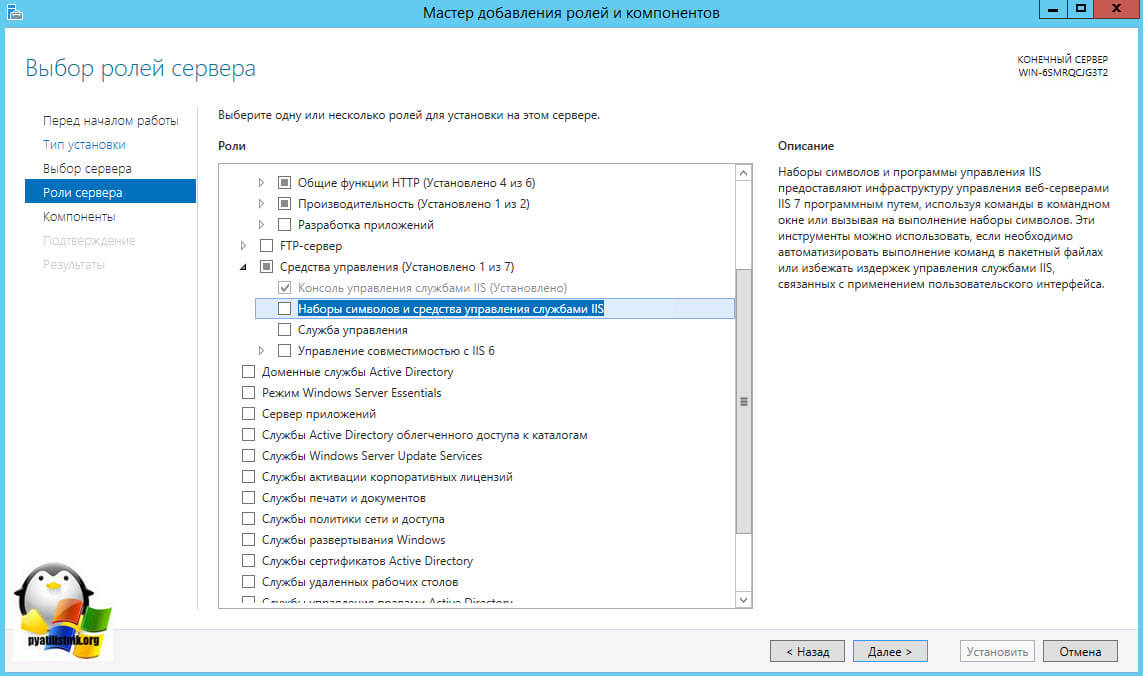
Теперь если при выполнении скрипта вы получаете ошибку компиляции и ваш файл adsutil.vbs это просто кракозябры, то делаем следующее.
Заходим в добавление ролей и выбираем компонент
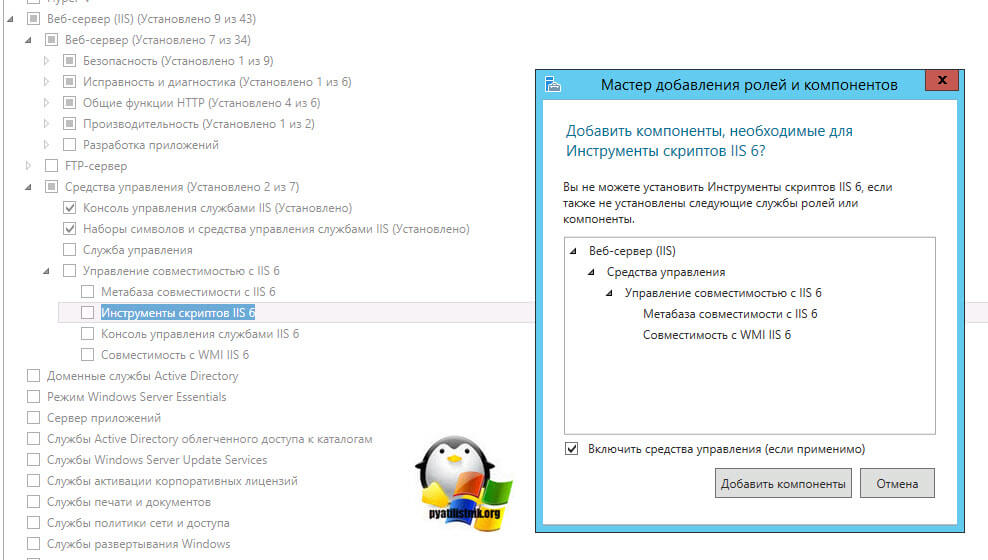
В результате чего у вас папка cd %SYSTEMDRIVE%InetpubAdminScripts со всем ее содержимым перезапишется. Пробуем снова выполнить команду, на этот раз все прошло успешно.
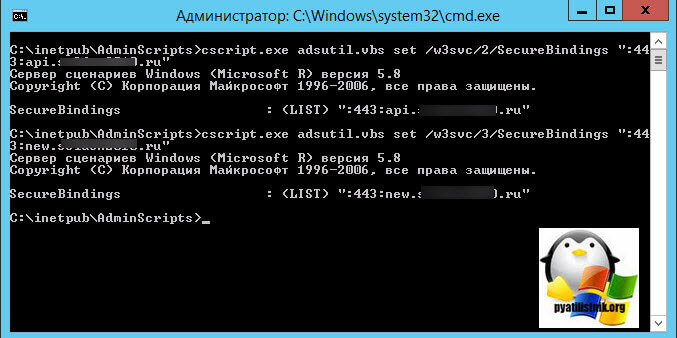
Все проверяем теперь в браузере ваши сайты, теперь при одном ip сайты должны отвечать по своим адресам и по протоколу https. Еще у нас остается технология SNI (Server Name Indication), я ее я рассмотрю в отдельной статье, так что щелкайте по ссылке.
| title | author | description | ms.date | ms.assetid | msc.legacyurl | msc.type |
|---|---|---|---|---|---|---|
|
Default FTP over SSL Settings <ssl> |
rick-anderson |
The Secure Sockets Layer (SSL) element specifies the FTP over SSL settings for the FTP service; FTP over SSL was first introduced for IIS 7 in FTP 7.0. |
09/26/2016 |
32477cb5-f8eb-485a-b95c-de0d4c629f5b |
/configreference/system.applicationhost/sites/sitedefaults/ftpserver/security/ssl |
config |
Default FTP over SSL Settings <ssl>
Overview
The <ssl> element specifies the FTP over Secure Sockets Layer (SSL) settings for the FTP service; FTP over SSL was first introduced for IIS 7 in FTP 7.0.
Unlike using HTTP over SSL, which requires a separate port and connection for secure (HTTPS) communication, secure FTP communication occurs on the same port as non-secure communication. FTP 7 supports two different forms of FTP over SSL:
- Explicit FTPS: By default, FTP sites and clients use port 21 for the control channel, and the server and client will negotiate secondary ports for data channel connections. In a typical FTP request, an FTP client will connect to an FTP site over the control channel, and then the client can negotiate SSL/TLS with the server for either the control channel or the data channel. When you are using FTP 7, you are using Explicit SSL if you enable FTPS and you assign the FTP site to any port other than port 990.
- Implicit FTPS: Implicit FTPS is an older form of FTP over SSL that is still supported by FTP 7. With Implicit FTPS, an SSL handshake must be negotiated before any FTP commands can be sent by the client. In addition, even though Explicit FTPS allows the client to arbitrarily decide whether to use SSL, Implicit FTPS requires that the entire FTP session must be encrypted. When you are using FTP 7, you are using Implicit SSL if you enable FTPS and you assign the FTP site to port 990.
Depending on the security options that you configure in the controlChannelPolicy and dataChannelPolicy attributes, an FTP client may switch between secure and non-secure multiple times in a single Explicit FTPS session. There are several ways that this might be implemented depending on your business needs:
| controlChannelPolicy | dataChannelPolicy | Notes |
|---|---|---|
SslAllow |
SslAllow |
This configuration allows the client to decide whether any part of the FTP session should be encrypted. |
SslRequireCredentialsOnly |
SslAllow |
This configuration protects your FTP client credentials from electronic eavesdropping, and allows the client to decide whether data transfers should be encrypted. |
SslRequireCredentialsOnly |
SslRequire |
This configuration requires that the client’s credentials must be secure, and then allows the client to decide whether FTP commands should be encrypted. However, all data transfers must be encrypted. |
SslRequire |
SslRequire |
This configuration is the most secure — the client must negotiate SSL by using the FTPS-related commands before other FTP commands are allowed, and all data transfers must be encrypted. |
Compatibility
| Version | Notes |
|---|---|
| IIS 10.0 | The <ssl> element was not modified in IIS 10.0. |
| IIS 8.5 | The <ssl> element was not modified in IIS 8.5. |
| IIS 8.0 | The <ssl> element was not modified in IIS 8.0. |
| IIS 7.5 | The <ssl> element of the <security> element ships as a feature of IIS 7.5. |
| IIS 7.0 | The <ssl> element of the <security> element was introduced in FTP 7.0, which was a separate download for IIS 7.0. |
| IIS 6.0 | The FTP service in IIS 6.0 did not support FTP over SSL. |
[!NOTE]
The FTP 7.0 and FTP 7.5 services shipped out-of-band for IIS 7.0, which required downloading and installing the modules from the following URL:https://www.iis.net/expand/FTP
With Windows 7 and Windows Server 2008 R2, the FTP 7.5 service ships as a feature for IIS 7.5, so downloading the FTP service is no longer necessary.
Setup
To support FTP publishing for your Web server, you must install the FTP service. To do so, use the following steps.
Windows Server 2012 or Windows Server 2012 R2
-
On the taskbar, click Server Manager.
-
In Server Manager, click the Manage menu, and then click Add Roles and Features.
-
In the Add Roles and Features wizard, click Next. Select the installation type and click Next. Select the destination server and click Next.
-
On the Server Roles page, expand Web Server (IIS), and then select FTP Server.
[!NOTE]
To support ASP.Membership authentication or IIS Manager authentication for the FTP service, you will need to select FTP Extensibility, in addition to FTP Service.
 .
. -
Click Next, and then on the Select features page, click Next again.
-
On the Confirm installation selections page, click Install.
-
On the Results page, click Close.
 .
.Windows 8 or Windows 8.1
-
On the Start screen, move the pointer all the way to the lower left corner, right-click the Start button, and then click Control Panel.
-
In Control Panel, click Programs and Features, and then click Turn Windows features on or off.
-
Expand Internet Information Services, and then select FTP Server.
[!NOTE]
To support ASP.Membership authentication or IIS Manager authentication for the FTP service, you will also need to select FTP Extensibility.
-
Click OK.
-
Click Close.

Windows Server 2008 R2
-
On the taskbar, click Start, point to Administrative Tools, and then click Server Manager.
-
In the Server Manager hierarchy pane, expand Roles, and then click Web Server (IIS).
-
In the Web Server (IIS) pane, scroll to the Role Services section, and then click Add Role Services.
-
On the Select Role Services page of the Add Role Services Wizard, expand FTP Server.
-
Select FTP Service.
[!NOTE]
To support ASP.Membership authentication or IIS Manager authentication for the FTP service, you will also need to select FTP Extensibility.
-
Click Next.
-
On the Confirm Installation Selections page, click Install.
-
On the Results page, click Close.

Windows 7
-
On the taskbar, click Start, and then click Control Panel.
-
In Control Panel, click Programs and Features, and then click Turn Windows Features on or off.
-
Expand Internet Information Services, and then FTP Server.
-
Select FTP Service.
[!NOTE]
To support ASP.Membership authentication or IIS Manager authentication for the FTP service, you will also need to select FTP Extensibility.
-
Click OK.

Windows Server 2008 or Windows Vista
-
Download the installation package from the following URL:
- https://www.iis.net/expand/FTP
-
Follow the instructions in the following walkthrough to install the FTP service:
- Installing and Troubleshooting FTP 7
How To
How to configure the default SSL options for an FTP server
-
Open Internet Information Services (IIS) Manager:
-
If you are using Windows Server 2012 or Windows Server 2012 R2:
- On the taskbar, click Server Manager, click Tools, and then click Internet Information Services (IIS) Manager.
-
If you are using Windows 8 or Windows 8.1:
- Hold down the Windows key, press the letter X, and then click Control Panel.
- Click Administrative Tools, and then double-click Internet Information Services (IIS) Manager.
-
If you are using Windows Server 2008 or Windows Server 2008 R2:
- On the taskbar, click Start, point to Administrative Tools, and then click Internet Information Services (IIS) Manager.
-
If you are using Windows Vista or Windows 7:
- On the taskbar, click Start, and then click Control Panel.
- Double-click Administrative Tools, and then double-click Internet Information Services (IIS) Manager.
-
-
In the Connections pane, click the server name.
-
In the server’s Home pane, double-click the FTP SSL Settings feature.
-
From the SSL Certificate list, select the certificate that you want to use for connections to the FTP server.
-
Under SSL Policy, select one of the following options:
-
Allow SSL connections: Allows the FTP server to support both non-SSL and SSL connections with a client.
-
Require SSL connections: Requires SSL encryption for communication between the FTP server and a client.
-
Custom: Enables you to configure a different SSL encryption policy for the control channel and the data channel. If you choose this option, click the Advanced… button. When the Advanced SSL Policy dialog box opens, select the following options:
-
Under Control Channel select one of the following options for SSL encryption over the control channel:
- Allow: Specifies that SSL is allowed for the control channel; an FTP client may use SSL for the control channel, but it is not required.
- Require: Specifies that SSL is required for the control channel; an FTP client may not switch to a non-secure mode of communication for the control channel.
- Require only for credentials: Specifies that only the user credentials have to be sent over SSL session; an FTP client must use SSL for their user name and password, but the client is not required to use SSL for the control channel after they have logged in.
-
Under Data Channel, select one of the following options for SSL encryption over the data channel:
- Allow: SSL is allowed for the data channel; an FTP client may use SSL for the data channel, but it is not required.
- Require: SSL is required for the data channel; an FTP client may not switch to a non-secure mode of communication for the data channel.
- Deny: SSL is denied for the data channel; an FTP client may not use SSL for the data channel.
-
Click OK to close the Advanced SSL Policy dialog box.
-
-
-
In the Actions pane, click Apply.


Configuration
Attributes
| Attribute | Description | ||||||||
|---|---|---|---|---|---|---|---|---|---|
controlChannelPolicy |
Optional enum attribute.
Specifies the SSL policy for the FTP control channel. Note: There is no enum value that denies SSL for the command channel; to deny SSL, do not bind an SSL certificate to the FTP site by specifying a certificate hash in the
The default value is |
||||||||
dataChannelPolicy |
Optional enum attribute.
Specifies the SSL policy for the FTP data channel.
The default value is |
||||||||
serverCertHash |
Optional string attribute.
Specifies the thumbprint hash for the server side certificate to use for SSL connections. There is no default value. |
||||||||
serverCertStoreName |
Optional string attribute.
Specifies the certificate store for server SSL certificates. The default value is |
||||||||
ssl128 |
Optional Boolean attribute.
Specifies whether 128-bit SSL is required. The default value is |
Child Elements
None.
Configuration Sample
The following configuration sample demonsrates how to enable SSL access on the control channel and the data channel of the FTP service by default.
SSL config example (temp desc).
[!code-xmlMain]
Sample Code
The following samples demonsrate how to enable SSL access on the control channel and the data channel of the FTP service by default.
AppCmd.exe
[!code-consoleMain]
[!NOTE]
You must be sure to set the commit parameter toapphostwhen you use AppCmd.exe to configure these settings. This commits the configuration settings to the appropriate location section in the ApplicationHost.config file.
C#
[!code-csharpMain]
VB.NET
[!code-vbMain]
JavaScript
[!code-javascriptMain]
VBScript
[!code-vbMain]
- Remove From My Forums
-
Question
-
User-1255969475 posted
Hi ,
Can any one please guide me how to enable HTTPS(SSL) in IIS7?
I have configured IIS7.0 on Windows 2008 R2.
Your earliest response will be highly appreciated.
Thanks in Advance,
Satya
Answers
-
User744767459 posted
Hi,
The 403.4 error means that IIS was configured to require SSL, but the page request was made over HTTP.
Please check the resolution in the following article:
http://support.microsoft.com/kb/942070
-
Marked as answer by
Tuesday, September 28, 2021 12:00 AM
-
Marked as answer by
A Quick and Straightforward Way to Install SSL on Windows Server 2008 (IIS 7.0)
 Windows Server 2008 (IIS 7) is one of the widely used web servers in the world. Lately, we have been getting a lot of queries regarding SSL installation on it. Well, we’re always here to help you. We have tried to explain the installation process as simple as we could so that you don’t face many problems.
This post will help you install the SSL certificate you got from your certificate authority. If you are still undecided for choosing the right certificate provider, click here for our detailed comparison of worldwide SSL providers.
Follow the below steps to install SSL certificate on IIS7.
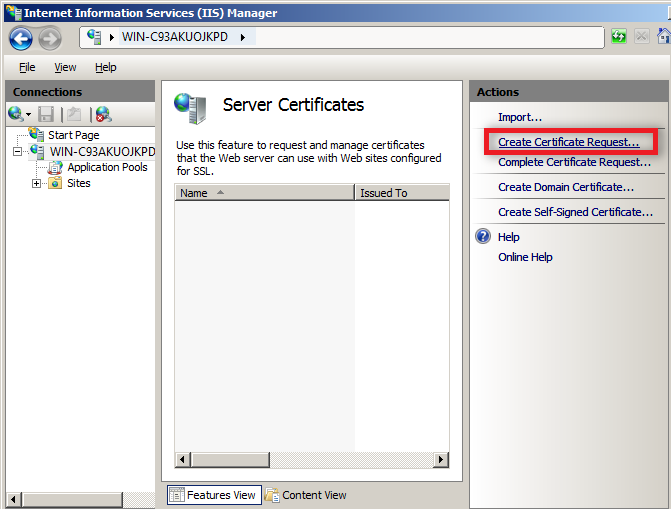
Step 1: Generate Certificate Signing Request (CSR) on IIS 7 (Window Server 2008)
Before you get to the installation part, you need to have generated a CSR first. Follow the given instructions to do so.
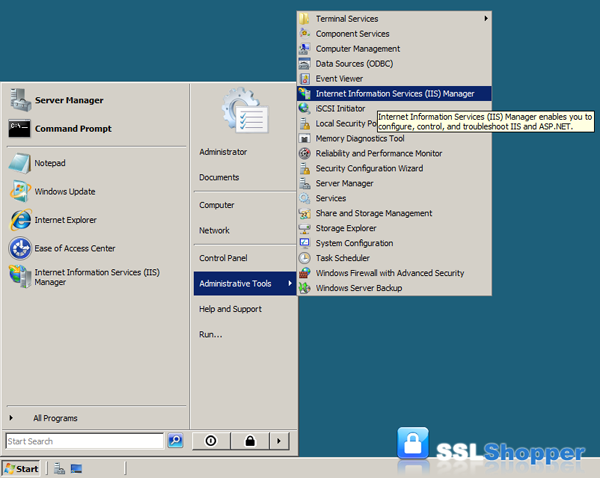
- First, go to Administrative Tools from the Start menu and click on Internet Information Services (IIS) Manager.
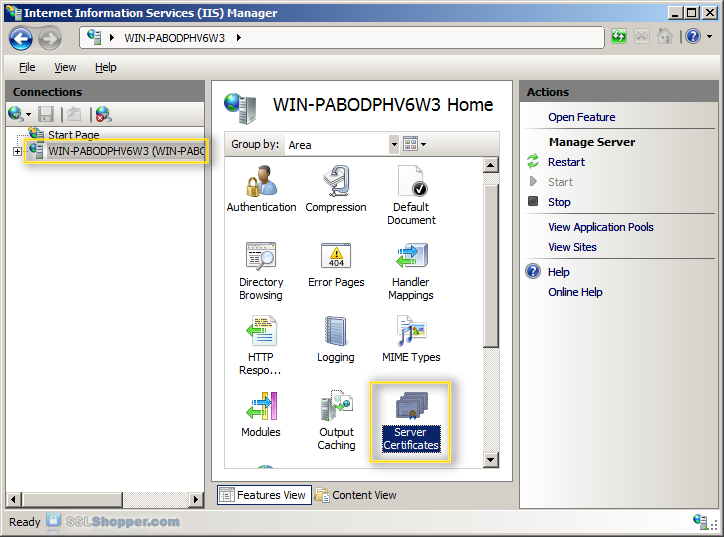
You’ll find Connections column on the left-hand side of IIS. Double-click on Server Certificates.
Now, click on Create Certificate Request… situated in the Actions column on the right-hand side.
Enter all the details in the Request Certificate and Click on Next.

Select your default Cryptographic Service Provider and set the Bit Length to 2048 bit or higher and Click on Next button.
Now browse and locate where you want to save the CSR file.
Step 2: Install the certificate
Before starting the configuration process, save the certificate files you received from the certificate authority on your server.
- First, go to Administrative Tools from the Start menu and click on Internet Information Services (IIS) Manager.
- Click on the name of your server in the Connections column on the left. Double-click on Server Certificates.
Now, click on Complete Certificate Request… situated in the Actions column on the right-hand side.

Now browse, locate, and select the server certificate file you received from the CA by clicking on the button with three dots. Click Ok once this is done.

If all went right, you will see your newly installed certificate in the Server Certificate column in the middle. Contact your SSL provider if you don’t.
Step 3: Bind the certificate
- Expand the Sites folder in the Connections column on the left. Click on the website on which you want to bind the certificate.
- Click on Bindings… in the Actions column on the right-hand side.
Now, click on the Add… Add Site Binding window will appear.
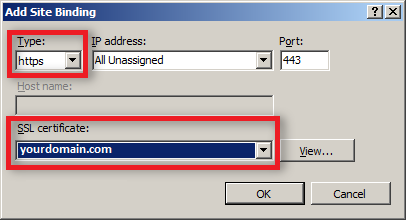
Change the Type to https. Now choose the SSL certificate that you just installed and click on OK button.
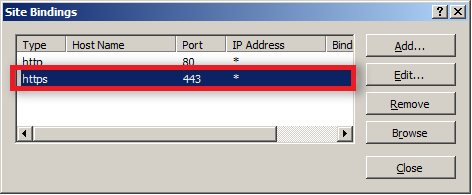
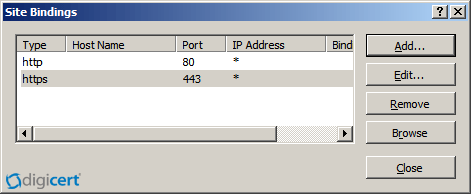
The binding for port 443 will be listed in the Site Bindings and click on Close button.
Step 4: Install Intermediate Certificate
Most of the times, the certificate authority will issue an intermediate certificate. Therefore, you must install this Intermediate Certificate on your web server. If not installed, the users might get Certificate not trusted error. You certainly don’t want that, do you? So, follow the below steps to install the intermediate certificate.
- First, download the intermediate certificate on your server.
- Open the certificate.
- A Certificate window will appear. Now click on Install Certificate This will prompt certificate import wizard to start.
Now, click on Place all certificate files in the following store and click on the browse.

Now, click on Place all certificate files in the following store and click on the browse.
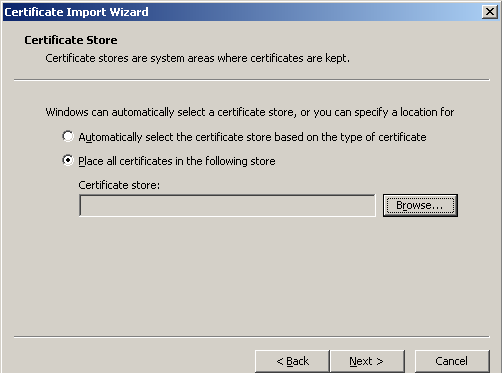
- A Select Certificate Store window will appear. Now check the Show physical stores check box and expand the Intermediate Certification Authorities.
- Now select the Local Computer folder under it.
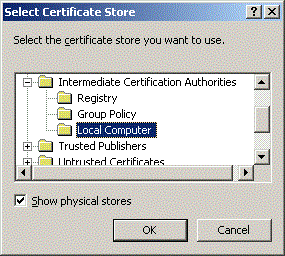
- Select OK.
- Click Next
- Finish installing the intermediate certificate.
Now close and restart the IIS manager. You can verify your SSL installation using our SSL Checker Tool.
Video Tutorial – How To Install an SSL Certificate for IIS 7 on Windows Server 2008
![]()
$6.55
Vendor Price: $41.73
Coupon Code: ASCSCPSSL4
Get It Now
![]()
$13.45
Vendor Price: $69
Coupon Code: ASRSRSSL2
Get It Now
![]()
$17.54 – 2 SAN Included
Vendor Price: $41.73
Coupon Code: ASCSCPMD4
Get It Now
AboutSSL’s Best Stuff
Disclosure: AboutSSL appreciates your continuous support. It helps us tremendously to keep moving in the competitive SSL industry. Here most of the links which direct you to buy any SSL/TLS related service or products earns us a certain percentage of referral commission. Learn More
Creating a CSR and installing your SSL Certificate on Windows Server 2008
Use the instructions on this page to create your certificate signing request (CSR) and then to install your SSL certificate in IIS 7 on Windows Server 2008.
- To create your CSR, see IIS 7: How to Create Your CSR on Windows Server 2008.
- To install your SSL certificate, see IIS 7: How to Install and Configure Your SSL Certificate on Windows Server 2008.
If you are looking for a simpler way to create CSRs and install and manage your SSL Certificates, we recommend using the DigiCert® Certificate Utility for Windows. You can use the DigiCert Utility to generate your CSR and install your SSL certificate. See Windows Server 2008: Create CSR & Install SSL Certificate with DigiCert Utility.
Step 1: Create Your CSR in IIS 7 on Windows Server 2008
Want to watch how it’s done? Check out our IIS 7 CSR video walkthrough.
IIS 7 CSR video walkthrough
-
From the Windows Start menu, find Internet Information Services (IIS) Manager and open it (click Administrative Tools > Internet Information Services (IIS) Manager).
-
In the Connections pane, locate and click the server.
-
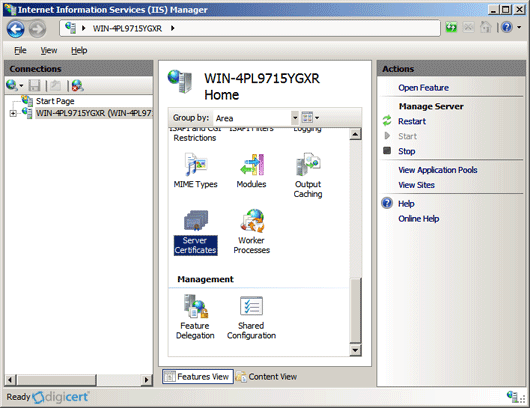
In the server Home page (center pane) under the IIS section, double-click Server Certificates.
-
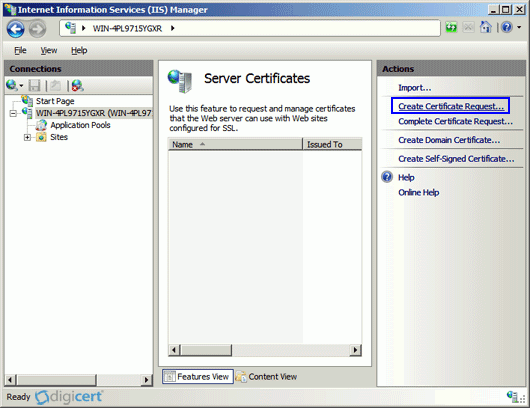
In the Actions menu (right pane), click Create Certificate Request.
-
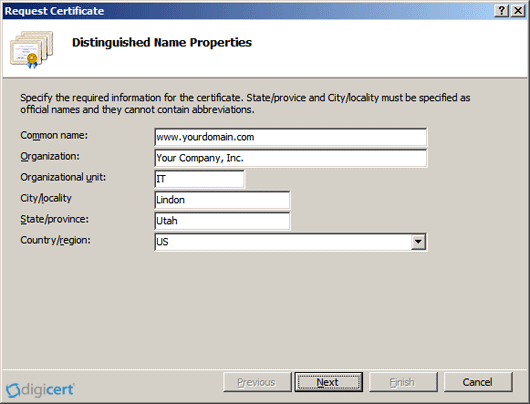
In the Request Certificate wizard, on the Distinguished Name Properties page, provide the information specified below and then click Next.
Common name: The fully-qualified domain name (FQDN) (e.g., www.example.com). Organization: Your company’s legally registered name (e.g., YourCompany, Inc.). Organizational unit: The name of your department within the organization. This entry will usually be listed as «IT», «Web Security», or is simply left blank. City/locality: The city where your company is legally located. State/province: The state/province where your company is legally located. Country/region: The country/region where your company is legally located. Use the drop-down list to select your country.
-
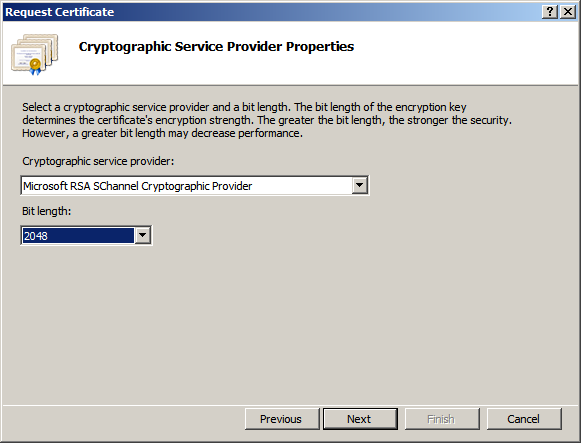
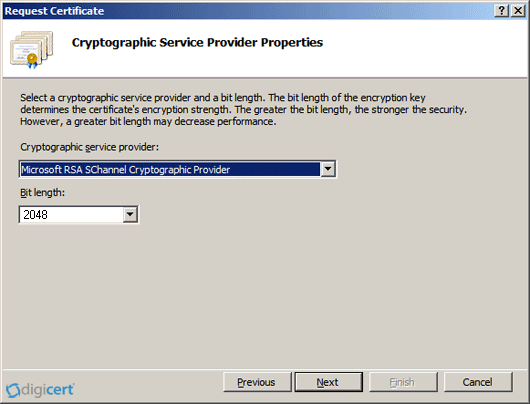
On the Cryptographic Service Provider Properties page, provide the information specified below and then click Next.
Cryptographic service provider: In the drop-down list, select Microsoft RSA SChannel Cryptographic Provider (unless you have a specific cryptographic provider). Bit length: In the drop-down list, select 2048 (unless you have a specific reason for using a larger bit length).
-
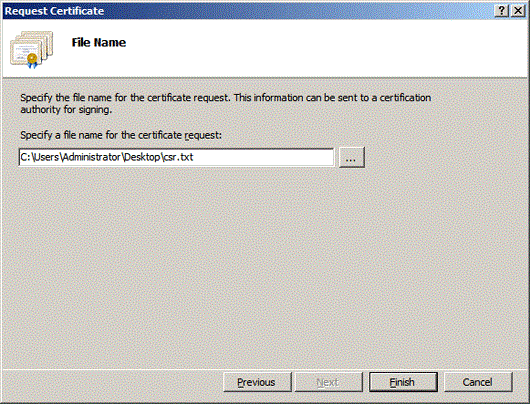
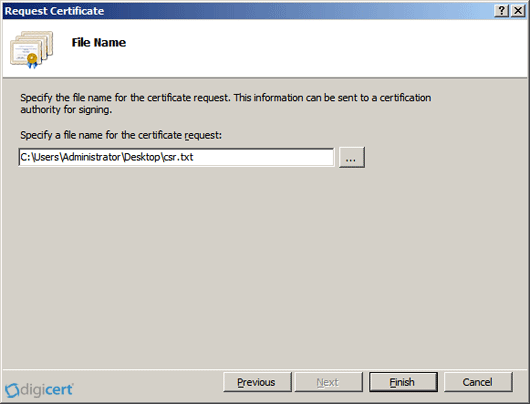
On the File Name page, under Specify a file name for the certificate request, click the … button to specify a save location for your CSR.
Note: Remember the filename and save location of your CSR file. If you enter a filename without specifying a location, your CSR will be saved to C:WindowsSystem32.
-
When you are done, click Finish.
-
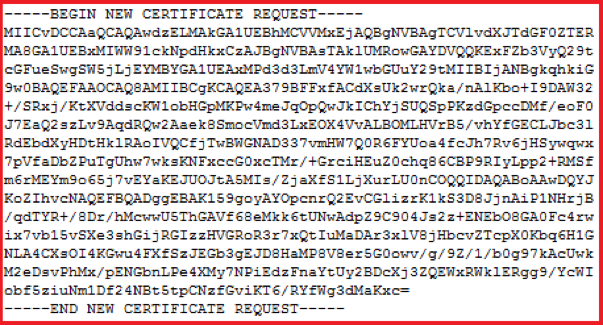
Open the CSR file using a text editor (such as Notepad), then copy the text (including the ——BEGIN NEW CERTIFICATE REQUEST—— and ——END NEW CERTIFICATE REQUEST—— tags) and paste it into the DigiCert order form.
-
After you receive your SSL certificate from DigiCert, you can install it.
Step 2: Install and Configure Your SSL Certificate in IIS 7 on Windows Server 2008
If you have not yet created a CSR and ordered your certificate, see IIS 7: How to Create Your CSR on Windows Server 2008.
After we validate and issue your SSL certificate, you need to install it on the Windows 2008 server where the CSR was generated. Then, you need to configure the server to use it.
- How to install your SSL certificate
- How to configure your server to use the SSL certificate
How to install your SSL certificate and configure the server to use it
Want to watch how it’s done? Check out our IIS 7 SSL certificate installation how to video.
IS 7 installation video walkthrough
-
On the server where you created the CSR, save the SSL certificate .cer file (e.g., your_domain_com.cer) that you received from DigiCert.
-
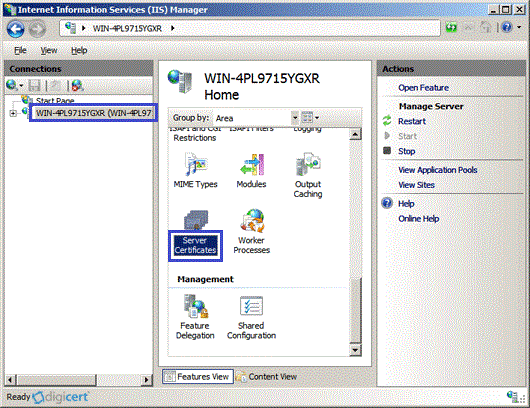
Open Internet Information Services (IIS) Manager (click Start > Administrative Tools > Internet Information Services (IIS) Manager).
-
In the Connections pane, locate and click the server.
-
In the server Home page (center pane) under the IIS section, double-click Server Certificates.
-
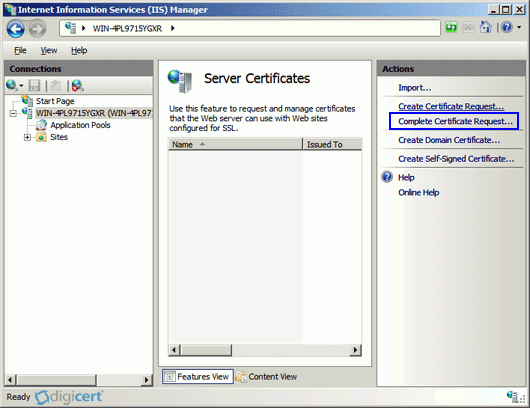
In the Actions menu (right pane), click Complete Certificate Request.
-
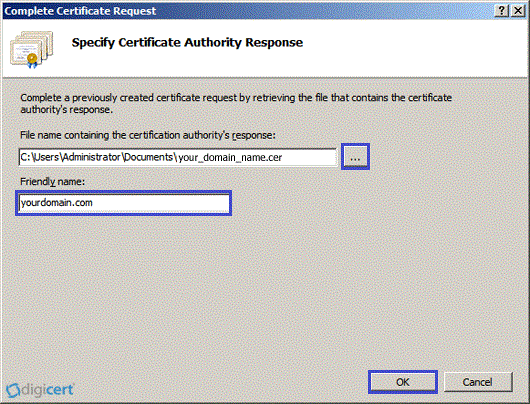
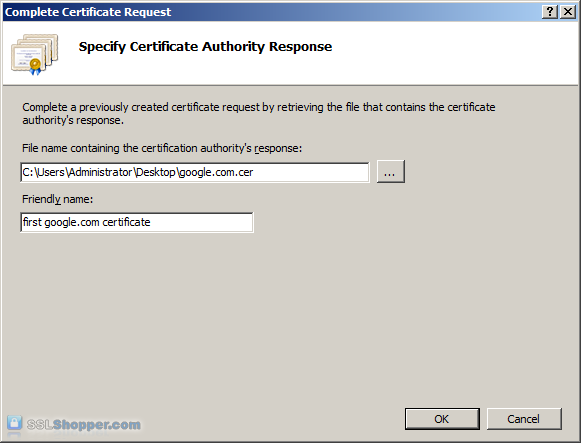
In the Complete Certificate Request wizard, on the Specify Certificate Authority Response page, provide the following information:
File name containing the certificate authority’s response: Click the … button to locate the .cer file you received from DigiCert
(e.g., your_domain_com.cer).Friendly name: Type a friendly name for the certificate. This is not part of the certificate; instead, it is used to identify the certificate. Note: We recommend that you add the issuing CA (e.g., DigiCert) and the expiration date to the end of your friendly name; for example, yoursite-digicert-(expiration date).
Doing this helps identify the issuer and expiration date for each certificate and also helps distinguish multiple certificates with the same domain name.
-
Click OK to install the certificate.
Note: There is a known issue in IIS 7 where the following message is displayed: «Cannot find the certificate request associated with this certificate file. A certificate request must be completed on the computer where it was created.» You may also receive a message stating: «ASN1 bad tag value met.»
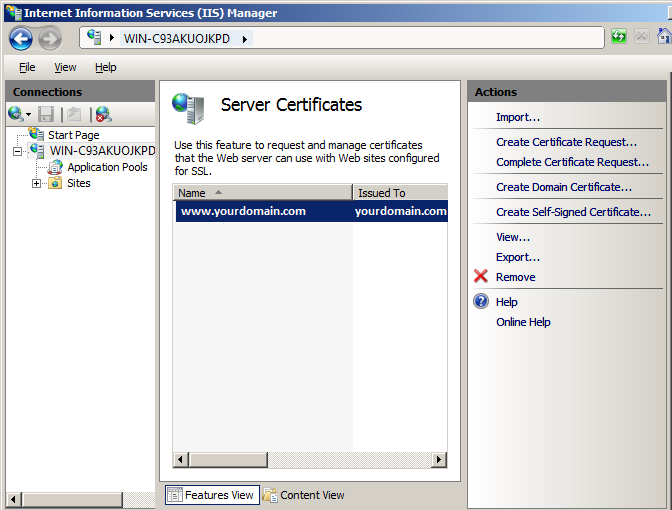
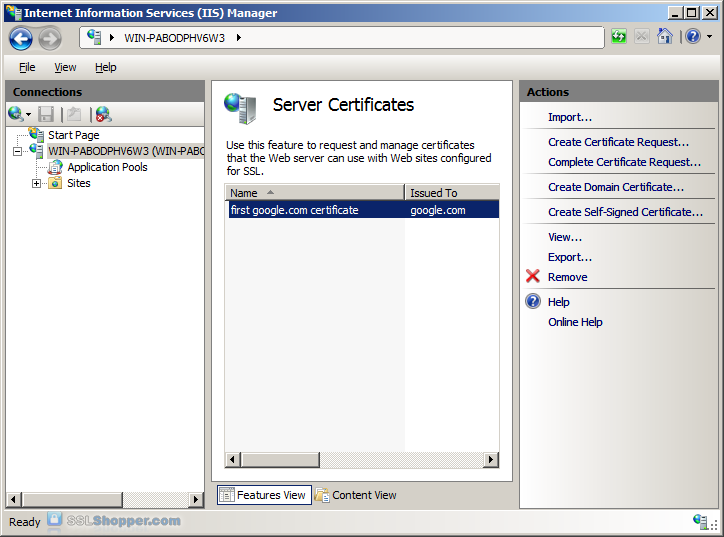
If this is the server where you generated the CSR, it’s possible the certificate is actually installed and the message can be ignored. Simply click OK, then close and reopen Internet Information Services (IIS) Manager to refresh the list of server certificates. The new certificate should appear in the Server Certificates list, and you can continue with the next step.
If the new certificate does not appear in the Server Certificate list, you need to do one of the following:
- Reissue your certificate (see Reissuing a DigiCert SSL Certificate).
- Use the DigiCert Certificate Utility to import the certificate (see SSL Certificates CSR Creation :: IIS 7).
-
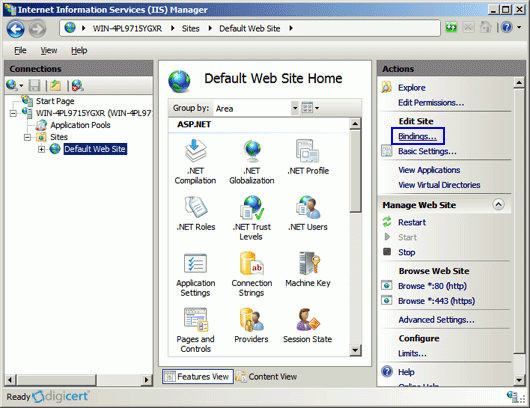
Now that you’ve successfully installed your SSL certificate, you need to configure your site to use it.
-
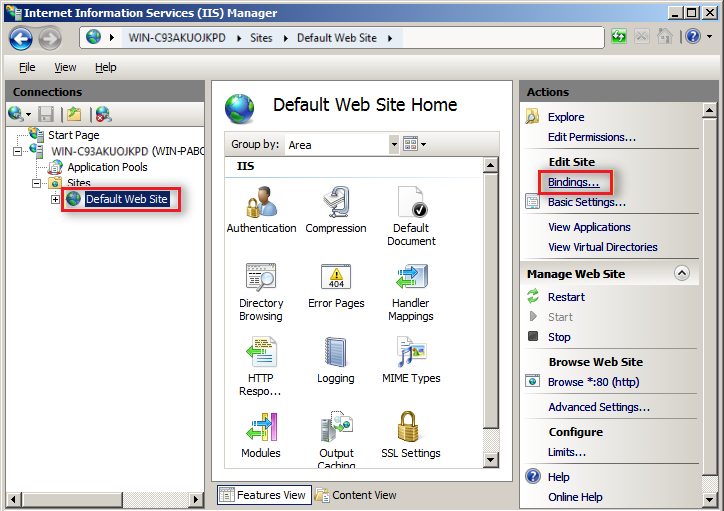
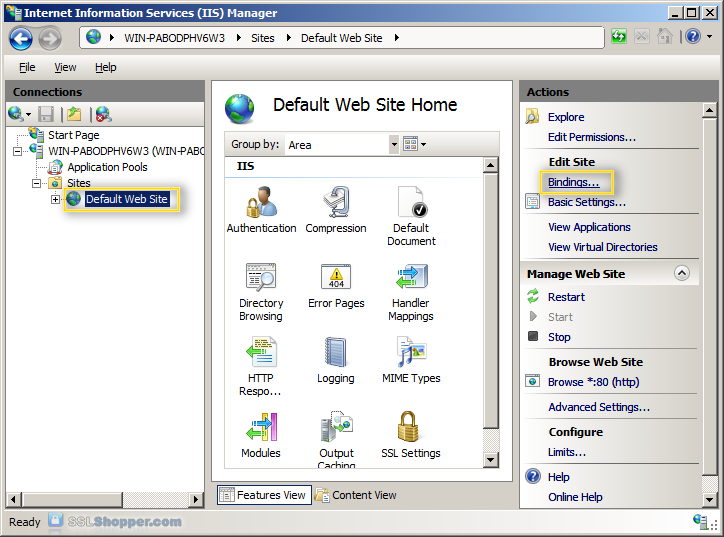
In Internet Information Services (IIS) Manager, in the Connections pane, expand the name of the server on which the certificate was installed. Then expand Sites and click the site you want to secure using the SSL certificate.
-
In the Actions menu (right pane), click Bindings.
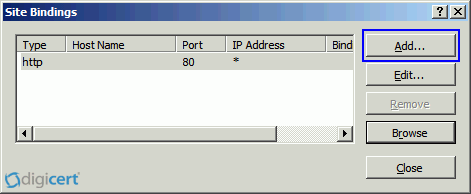
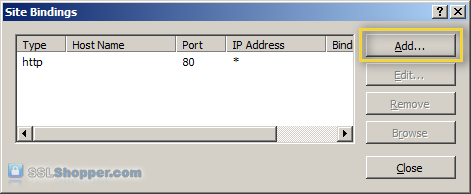
-
In the Site Bindings window, click Add.
-
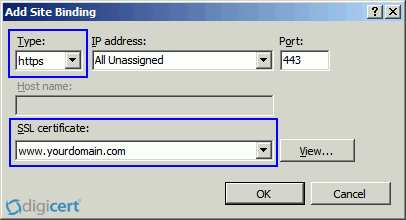
In the Add Site Binding window, do the following and then click OK.
Type: In the drop-down list, select https. IP address: In the drop-down list, select the IP address of the site or select All Unassigned. Port: Type 443. (SSL uses port 443 to secure traffic.) SSL certificate: In the drop-down list, select your new SSL certificate (e.g., yourdomain.com).
-
Your SSL certificate is now installed, and the website is configured to accept secure connections.
Install Your SSL Certificate
Assign Your SSL Certificate
Note: To enable your SSL certificate for use on other Windows servers, see PFX export instructions.
Additional Information
-
To enable your SSL certificate for use on other Windows servers, see PFX export instructions.
-
For help with your certificate installation or troubleshooting, try our Windows SSL management utility.
-
For instructions on disabling the SSLv3 protocol, see Microsoft IIS: Disabling the SSL v3 Protocol.
Windows Server 2008 includes Internet Information Services (IIS) 7.0. This new version makes several big changes in the way that SSL certificates are generated, making it much easier than previous versions of IIS. In addition to the new method of requesting and installing SSL certificates, IIS 7 includes the ability to:
- Request more than one SSL certificate at a time
- Import, export, and renew SSL certificates easily in IIS
- Quickly create a self-signed certificate for testing
This article will walk you through the process of ordering an SSL certificate from a commercial certificate authority and installing it on an IIS 7 Windows Server 2008 machine. The process will also work for later versions such as Windows Server 2016 and IIS 8 and IIS 10 with some small modifications.
Create the Certificate Signing Request
The first step in ordering an SSL certificate is generating a Certificate Signing Request. This is very easy to do in IIS7 using the following instructions. Click here to hide or show the images
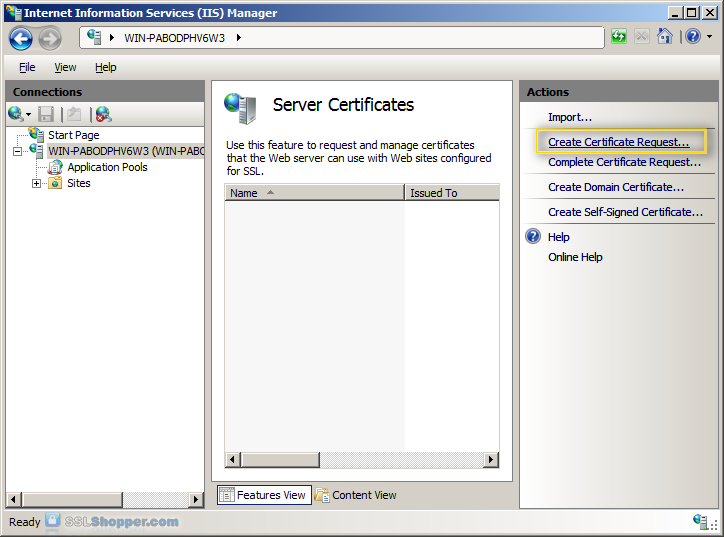
- Click on the Start menu, go to Administrative Tools, and click on Internet Information Services (IIS) Manager.
- Click on the name of the server in the Connections column on the left. Double-click on Server Certificates.
- In the Actions column on the right, click on Create Certificate Request…
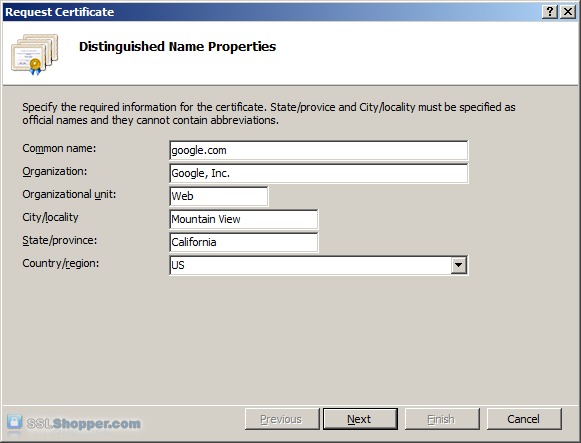
- Enter all of the following information about your company and the domain you are securing and then click Next.
Name Explanation Examples Common Name The fully qualified domain name (FQDN) of your server. This must match exactly what you type in your web browser or you will receive a name mismatch error. *.google.com
mail.google.comOrganization The legal name of your organization. This should not be abbreviated and should include suffixes such as Inc, Corp, or LLC. Google Inc. Organizational Unit The division of your organization handling the certificate. (Most CAs don’t validate this field) IT
WebCity/Locality The city where your organization is located. Mountain View State/province The state/region where your organization is located. This shouldn’t be abbreviated. California Country/Region The two-letter ISO code for the country where your organization is location. US
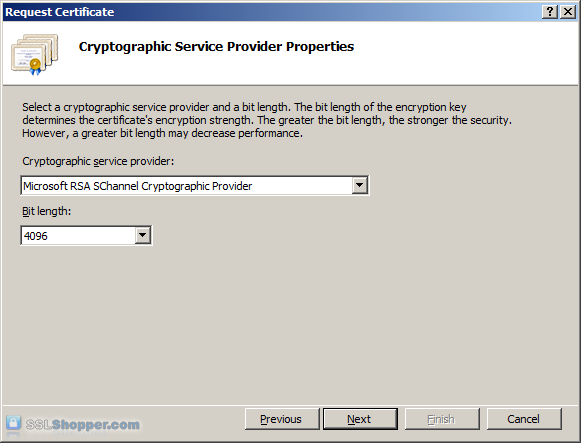
GB - Leave the default Cryptographic Service Provider. Increase the Bit length to 2048 bit or higher. Click Next.
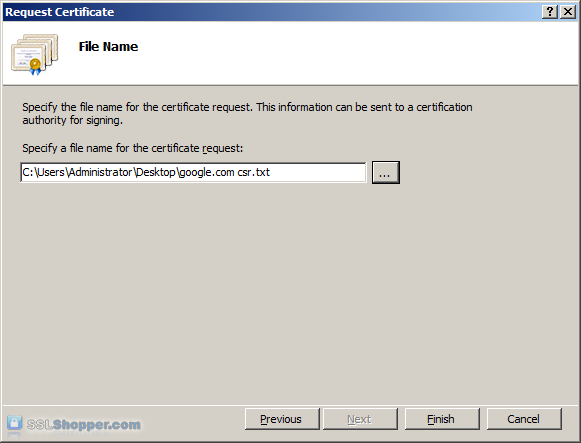
- Click the button with the three dots and enter a location and filename where you want to save the CSR file. Click Finish.
Once you have generated a CSR you can use it to order the certificate from a certificate authority. If you don’t already have a favorite, you can compare SSL features from each provider using our SSL Wizard or by comparing cheap SSL certificates, Wildcard Certificates, or EV certificates. Once you paste the contents of the CSR and complete the ordering process, your order is validated, and you will receive the SSL certificate file.
Install the Certificate
To install your newly acquired SSL certificate in IIS 7, first copy the file somewhere on the server and then follow these instructions:
- Click on the Start menu, go to Administrative Tools, and click on Internet Information Services (IIS) Manager.
- Click on the name of the server in the Connections column on the left. Double-click on Server Certificates.
- In the Actions column on the right, click on Complete Certificate Request…
- Click the button with the three dots and select the server certificate that you received from the certificate authority. If the certificate doesn’t have a .cer file extension, select to view all types. Enter any friendly name you want so you can keep track of the certificate on this server. Click OK.
- If successful, you will see your newly installed certificate in the list. If you receive an error stating that the request or private key cannot be found, make sure you are using the correct certificate and that you are installing it to the same server that you generated the CSR on. If you are sure of those two things, you may just need to create a new Certificate Request and reissue/replace the certificate. Contact your certificate authority if you have problems with this.

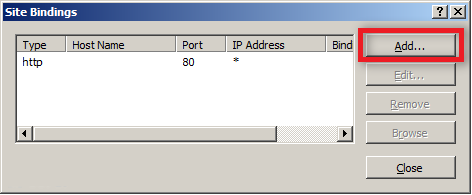
Bind the Certificate to a website
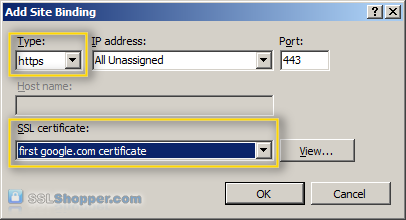
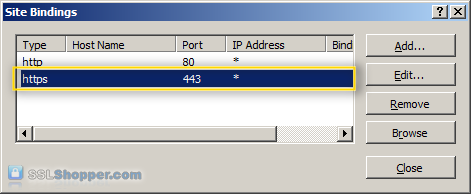
- In the Connections column on the left, expand the sites folder and click on the website that you want to bind the certificate to. Click on Bindings…in the right column.
- Click on the Add…button.
- Change the Type to https and then select the SSL certificate that you just installed. Click OK.
- You will now see the binding for port 443 listed. Click Close.
Install any Intermediate Certificates
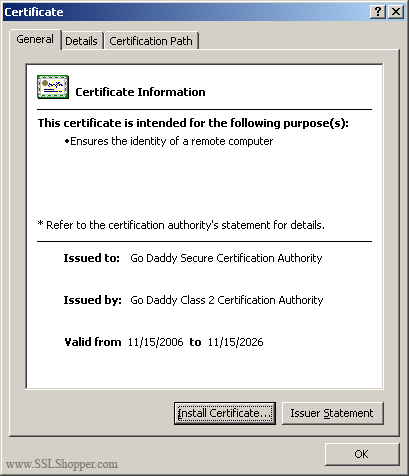
Most SSL providers issue server certificates off of an Intermediate certificate so you will need to install this Intermediate certificate to the server as well or your visitors will receive a Certificate Not Trusted Error. You can install each Intermediate certificate (sometimes there is more than one) using these instructions:
- Download the intermediate certificate to a folder on the server.
- Double click the certificate to open the certificate details.
- At the bottom of the General tab, click the Install Certificate button to start the certificate import wizard. Click Next.

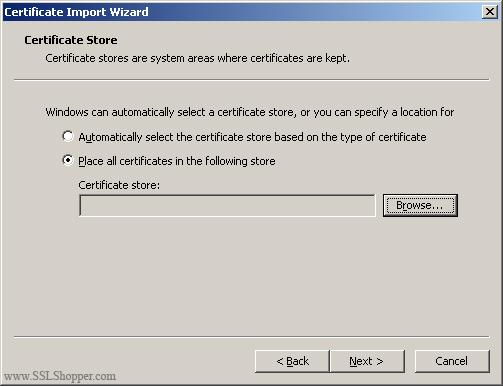
- Select Place all certificates in the following store and click Browse.

- Check the Show physical stores checkbox, then expand the Intermediate Certification Authorities folder, select the Local Computer folder beneath it. Click OK. Click Next, then Finishto finish installing the intermediate certificate.


You may need to restart IIS so that it starts giving out the new certificate. You can verify that the certificate is installed correctly by visiting the site in your web browser using https instead of http or using our SSL Checker.
Links
- Move or copy an SSL certificate from a Windows server to another Windows server
- How to Disable SSL 2.0 in IIS 7
- How to Setup SSL on IIS 7.0
- Video tutorials for installing an SSL Certificate in IIS 7 at NetoMeter
IIS 7 SSL Certificate Installation Videos
Originally posted on Sun Oct 28, 2007