- Remove From My Forums
-
Question
-
I have a problem with accessing remote session on Windows Server 2008 R2 by using this command:
mstsc /v:172.20.0.1 /shadow:2
Session ID is correct. The command is executed from another 2008 R2 server. On both there is the newest mstsc version 6.3.9600 (Remote Desktop Protocol 8.1 supported). While trying to connect this error occurs:
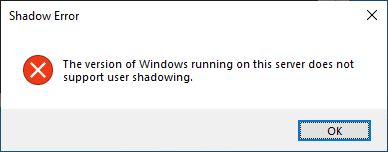
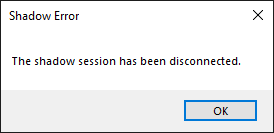
Shadow Error
The version of Windows running on this server does not support user shadowing.On the RDSH I have set up these options:
Computer Configuration/Administrative Templates/Windows Components/Remote Desktop Services/Remote Desktop Session Host/Connections
Policy: Set rules for remote control of Remote Desktop Services user session
Setting: EnabledOptions: Full Control with user’s permission
Policy: Restrict Remote Desktop Services users to a single Remote Desktop Services session
Setting: Enabled
There is no problem to connect to Windows Server 2012 R2 with these settings.
Answers
-
Hi,
When you need to shadow a session on Server 2008 R2 please connect to a 2008 R2 server using Remote Desktop and then use RDS Manager to Remote Control the user’s session or open a command prompt in the session and use shadow.exe.
Thanks.
-TP
-
Marked as answer by
Thursday, September 18, 2014 6:37 PM
-
Marked as answer by
-
Hi, thank you. It works now!
I don’t know one more thing, can I use client computer which is outside the domain? If so, how can I provide credentials to such connection? I assume that it must be an administrator login and password from the domain where the RDSH server reside or local administrator
account?-
Marked as answer by
Dharmesh SMicrosoft employee
Thursday, September 18, 2014 6:37 PM
-
Marked as answer by
Утилита Shadow
Как подключиться к сессии пользователя (просмотреть экран в режиме «Теневой копии») на Windows Server 2008?
Чтобы наблюдать за другим сеансом необходимо использовать встроенную утилиту Shadow.
Например:
Имеется VDS сервер с ОС Windows Server 2008 Standart.
На нём созданы два пользователя Администратор и User.
Допустим имя нашей учётной записи администратор и мы хотим посмотреть экран сеанса пользователя user.
Чтобы узнать ID сеанса, введите команду query user в командной строке:
Итак, зная ID сеанса, подключимся к пользователю user в режиме «Теневой копии»:
Нажмите «Пуск» —→ «Выполнить» —→ «shadow 3» —→ «Ок»:
Далее увидите следующее сообщение:

В этот момент у пользователя user всплывет окно запроса удаленного управления:
У нас появится доступ, как только пользователь user примет запрос.

Параметры подключения
Чтобы подключаться без запроса, необходимо изменить параметры удалённого управления конкретного пользователя, в данном примере это user.
Перейдите по ветке: «Пуск» —→ «Администрирование» —→ «Управление компьютером» —→ «Локальные пользователи и группы» —→ «Пользователи».
Кликните дважды по имени пользователя и выберите вкладку «Удалённое управление»:
В параметре «Запрашивать разрешение пользователя» снимите галочку и выберите желаемый уровень управления сеансом пользователя.
Нажмите «Применить» —→ «Ок»
Обновлено 15.03.2022
Добрый день! Уважаемые читатели и гости одного из крупнейших IT блогов по системному администрированию Pyatilistnik.org. В прошлый раз мы с вами разобрали установку Hyper-V в Windows 11. Сегодня я хочу с вами разобрать тему удобной поддержки пользователей встроенными средствами Windows. Речь пойдет, о теневом подключении RDP или Remote Desktop Shadowing. Мы рассмотрим, как она реализована, как предоставляются права и многое другое. Статья получиться большой, но поверьте оно того стоит. Благодаря этому вы сможете сэкономить бюджеты компании, отказавшись от стороннего ПО.
💻 Что такое теневой сеанс Remote Desktop Shadowing?
Все мы прекрасно помним 2020 год, когда массово вводились ограничения и все пользователи переходили на дистанционное положение. Это заставило все компании организовать для сотрудников рабочее окружение, и самое главное это отслеживание и предоставление удаленной помощи, при возникших проблемах. Для удаленной помощи используется много различного программного обеспечения, например teamviewer, VNC, Dameware и многое другое, большая проблема в том, что все они платные для коммерческого использования. Не все компании готовы платить за это деньги, но в Windows есть и встроенная возможность, о которой многие просто не знают.
Режим Shadow (теневой сеанс RDP/RDS) — Это встроенное средство, позволяющее системным администраторам производить подключение в RDP сессию любого пользователя, видя его экран, имея возможность производить любые манипуляции курсором и сеансом, одним словом полное взаимодействие. Remote Desktop Shadowing идет в составе начиная с Windows 8.1, Windows Server 2012 R2 и выше.
Теневое копирование служб удаленных рабочих столов имеет как графический интерфейс, так и утилиту командной строки. Есть две версии функции. Так как устаревшая версия Remote Desktop Services Shadowing несовместима с последней версией утилиты, то я не буду подробно описывать предыдущую версию, а лишь упомяну несколько слов в качестве исторической справки. В более ранних версиях Windows файл shadow.exe позволял пользователю подключаться к удаленному узлу с помощью метода теневого копирования служб удаленных рабочих столов. Короче говоря, это предшественник утилиты mstsc и ее параметра /shadow. Он был представлен в Windows Server 2003 и доступен во многих версиях Windows.
Кроме того, есть два приложения с графическим интерфейсом, и они делают одно и то же: управление службами терминалов (TSAdmin), которое присутствует с Windows Server 2003, и диспетчер служб удаленных рабочих столов (RDSM), который является частью инструментов удаленного администрирования сервера (RSAT) и заменяет TSAdmin в Windows Server 2012.
Ключевое различие между версиями RDS Shadowing заключается в том, что в устаревшей версии вы должны сначала установить соединение RDP, чтобы получить сеанс на удаленном хосте, прежде чем вы сможете затенить чей-либо еще сеанс на этом хосте. В последней версии вы можете затенить сеанс пользователя на удаленном хосте с консоли вашего собственного хоста. В этой статье мы рассмотрим, как настроить и использовать RDS Shadowing для подключения к RDP сессиям пользователей в Windows Server 2022 и Windows 11.
⚙️ Какие порты использует теневое копирование служб удаленных рабочих столов
Функция теневого копирования служб удаленных рабочих столов не использует порт 3389/TCP (RDP), вместо этого он использует порт 445/TCP (SMB) и эфемерные порты, также известные как динамический диапазон портов (RPC). Так же на удаленном компьютере, куда вы будите производить подключения должны быть добавлены правила:
- Первое правило называется «File and Printer Sharing (SMB-In)», которое позволяет подключаться к порту 445/TCP;
- Второй есть «Remote Desktop — Shadow (TCP-In)». Это позволяет %SystemRoot%system32RdpSa.exe двоичному файлу обрабатывать входящие соединения на любом локальном TCP-порту. Динамический диапазон портов в Windows обычно включает TCP-порты с 49152 по 65535.
Какой уровень прав необходим для использования Remote Desktop Services Shadowing
Для того, чтобы вы могли производить теневое подключение к пользователям RDS фермы или отдельным серверам, вам нужны права администратора на конечных серверах, но и это можно обойти, произведя точечное делегирование прав на функцию shadow, не имея при этом административного доступа на конечных серверах. Как это организовать я покажу, немного ниже.
⚒ Настройка групповой политики управления теневыми подключениями к RDS сессиям в Windows
Перед тем, как мы с вами разберем практические методы подключения Remote Desktop Shadow, нам нужно настроить групповую политику, которая будет определять, как оператор, кто будет помогать конечному пользователю, будет с ним взаимодействовать. У системного администратора есть возможность оставить пользователю одобрение подключения или же можно сделать без уведомления, существует пять вариантов политики.
- No remote control allowed — удаленное управление не разрешено (значение параметра реестра 0) — Идет по умолчанию, если политика не задана
- Full Control with users’s permission — полный контроль сессии с разрешения пользователя (значение параметра реестра 1 )
- Full Control without users’s permission — полный контроль без разрешения пользователя (значение параметра реестра 2)
- View Session with users’s permission – наблюдение за сеансом с разрешением пользователя (значение параметра реестра 3)
- View Session without users’s permission – наблюдение за сеансом без разрешения пользователя (значение параметра реестра 4).
Данный ключ реестра можно найти в разделе HKEY_LOCAL_MACHINESOFTWAREPoliciesMicrosoftWindows NTTerminal Services под названием «Shadow«
Найти данную политику можно по пути:
Конфигурация Компьютера — Политики — Административные шаблоны — Компоненты Windows — Службы удаленных рабочих столов — Узел сеансов удаленных рабочих столов — Подключения (Policies — Administrative Templates — Windows components — Remote Desktop Services — Remote Session Host — Connections)
Она будет иметь название «Установить правила удаленного управления для пользовательских сеансов служб удаленных рабочих столов (Set rules for remote control of Remote Desktop Services user sessions)«
Чтобы получить текущее значение ключа Shadow, вам необходимо на конечном компьютере открыть командную строку и ввести:
reg query «HKEY_LOCAL_MACHINESOFTWAREPoliciesMicrosoftWindows NTTerminal Services» /v Shadow
Его также можно установить вручную с помощью командной строки, введя следующую команду:
reg add «HKEY_LOCAL_MACHINESOFTWAREPoliciesMicrosoftWindows NTTerminal Services» /v Shadow /t REG_DWORD /d 4
Чтобы удалить тип теневого ключа:
reg delete «HKEY_LOCAL_MACHINESOFTWAREPoliciesMicrosoftWindows NTTerminal Services» /v Shadow /f
🌐 Подключение Remote Desktop Shadow из графического интерфейса
Данный метод является наверное самым удобным, так как позволяет визуально все видеть, контролировать. Все, что вам нужно это собранная оснастка по управлению RDS фермой в диспетчере серверов, как это делать смотрите по ссылке слева. В качестве тестового пользователя я буду использовать Барбоскина Геннадия Викторовичу (Barboskin.g). Для начала давайте его найдем, для этого в оснастке выберите нужную коллекцию, в области «Подключения» произведите поиск вашего пользователя. После его нахождения кликните по нему правым кликом, в контекстном меню вы увидите пункт «Теневая копия (Shadow)«.
У вас появится дополнительное окно с параметрами теневой копии:
- Удаленный сеанс — Просмотреть/Управление. Тут либо вы просто наблюдатель, все действия делает сам пользователь или же полный контроль.
- Запрашивать согласие пользователя
У пользователя на удаленном сервере появится окно «Запрос на удаленное наблюдение. Пользователь запрашивает удаленный просмотр вашего сеанса. Вы принимаете этот запрос? (User is requesting to view your session remotely. Do you accept the request?) «, тут он может подтвердить или отказаться.
Хочу напомнить, что вы можете управлять данным окном, будет оно требоваться или нет, через групповые политики.
Если у вас явным образом не задано отсутствие данного окна, то вы получите ошибку, если захотите подключиться без уведомления.
Согласно настройкам групповой политики требуется согласие пользователя. Проверьте настройки групповой политики (The Group Policy setting is configured to require the user’s consent)
Если конечный пользователь подтвердил запрос на удаленное наблюдение, то у вас должно открыться новое RDP окно, где будет отображена сессия удаленного пользователя и с ней можно взаимодействовать.
Если пользователь закроет окно RDP подключения, то он перейдет в статус «Отключен (Disconnected)«, то вас выкинет из сессии теневого копирования. Вы увидите:
Сеанс с теневым доступом был отключен
Подключиться к сеансу в статусе «Отключен (Disconnected)» не получиться, опция «Теневая копия (Shadow)» просто не будет присутствовать в списке
Чтобы завершить сессию пользователя и выйти из shadow-режима, нужно нажать сочетание клавиш ALT+* на рабочей станции или Ctrl+* на RDS сервере (Так же можно переопределить данные комбинации).
Второй вариант, которым я могу пользоваться при теневом копировании к пользователю RDP, это использование бесплатного ПО по работе с RDS. Оно называется Terminal Services Manager, о нем я вам делал подробный обзор. Найдите в списке пользователей нужного вам, кликните по нему правым кликом и выберите пункт «Shadow«.
У вас так же появится окно, где вы должны запросить доступ с нужным уровнем, а далее все как описано выше.
🔍 Логирование сессий теневого копирования
Если у вас появится желание отслеживать данные, о подключениях с использованием теневого копирования, то вам необходимо на сервере куда производилось затемнение сеанса перейти в журнал:
Microsoft-Windows-TerminalServices-RemoteConnectionManager/Operational
Вот такая будет последовательность.
- Событие ID 20508
Событие ID 20508: Предоставлено разрешение на теневой просмотр. Пользователь barboskin.g (идентификатор сеанса: 440) предоставил разрешение пользователю Сёмину Ивану
- Событие ID 20503
Событие ID 20503: Запущен теневой просмотр сеанса. Просмотр пользователем (Иван Сёмин) на компьютере c-10-.root.pyatilistnik.org сеанса пользователя ROOTbarboskin.g (идентификатор сеанса: 440)
- Событие ID 20504
Событие ID 20504 : Остановлен теневой просмотр сеанса. Просмотр пользователем (Семин Иван) на компьютере c-10.root.pyatilistnik.org сеанса пользователя ROOTbarboskin.g (идентификатор сеанса: 440)
- Событие ID 20513
Событие ID 20513: Сбой теневого доступа к сеансу. Пользователю (Иван Сёмин) не удалось получить теневой доступ к сеансу пользователя Rootbarboskin.g (идентификатор сеанса: 440) из-за настроек групповой политики.
- Событие ID 20510
Событие ID 20510: Предоставлено разрешение на теневое управление. Пользователь ROOTbarboskin.g (идентификатор сеанса: 440) предоставил разрешение пользователю (Иван Сёмин)
Как использовать теневое подключение через PowerShell и командную строку
Напоминаю, что в качестве клиентской ОС у меня установлена Windows 11, а подключаться я буду к сессия пользователя работающего за Windows Server 2022. Для того, чтобы мы могли из PowerShell или командной строки использовать теневое копирование, мы должны вызвать утилиту mstsc.
mstsc — это по сити встроенный RDP клиент в операционной системе Windows. Запустите оболочку PowerShell и введите:
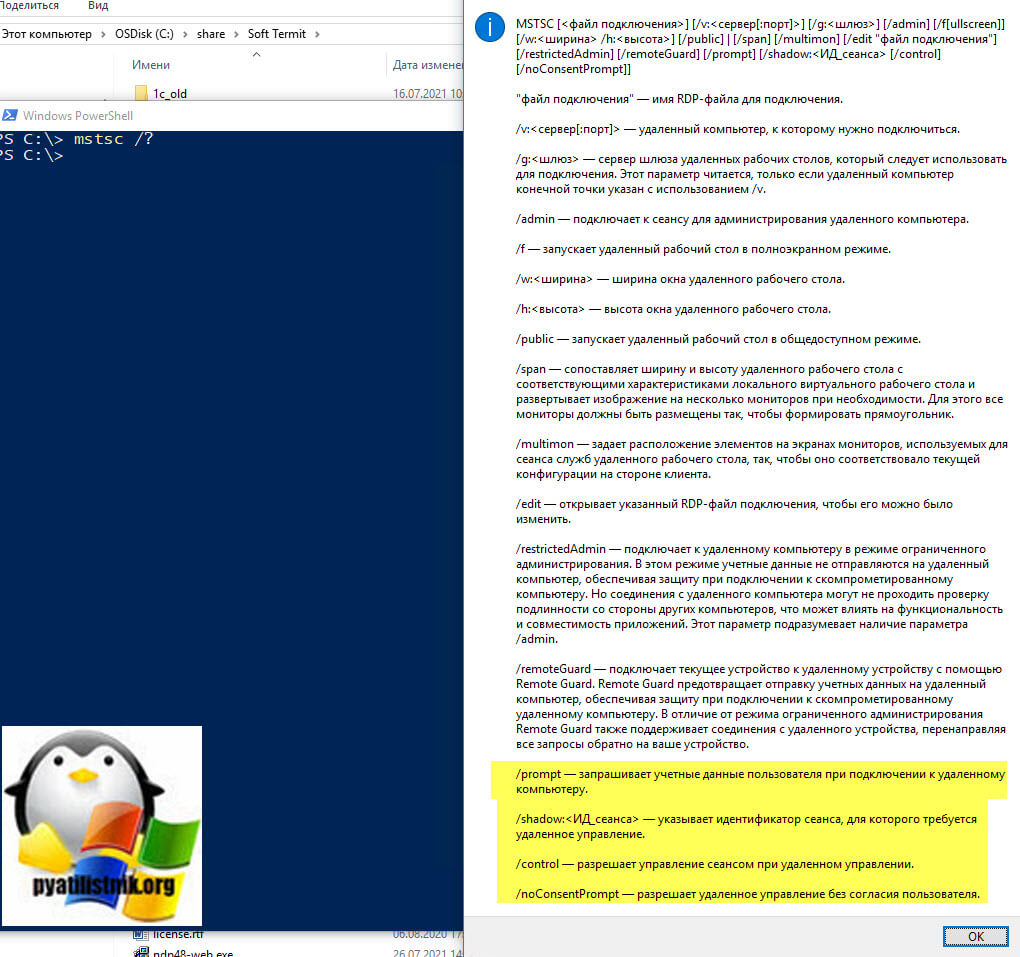
В результате вы получите полную справку по данной утилите со всеми ключами. Тут нас будут интересовать из всего перечня 4 ключа:
- /prompt — По сути это ключ для запуска процедуры от другого пользователя. Например вы локально сидите под обычной учетной записью, а команду хотите запускать из под административной.
- /shadow:sessionID – подключиться к указанной сессии пользователя по ID;
- /control – Дает вам возможность полного управления мышкой и клавиатурой при теневой сессии.
- noConsentPrompt — Разрешает удаленное управления без согласования пользователем
- /v:servername – можно указать имя удаленного хоста (RDP/RDS терминального сервера). Если имя сервера не указано, выполняется подключение к локальным сеансам на текущем хосте;
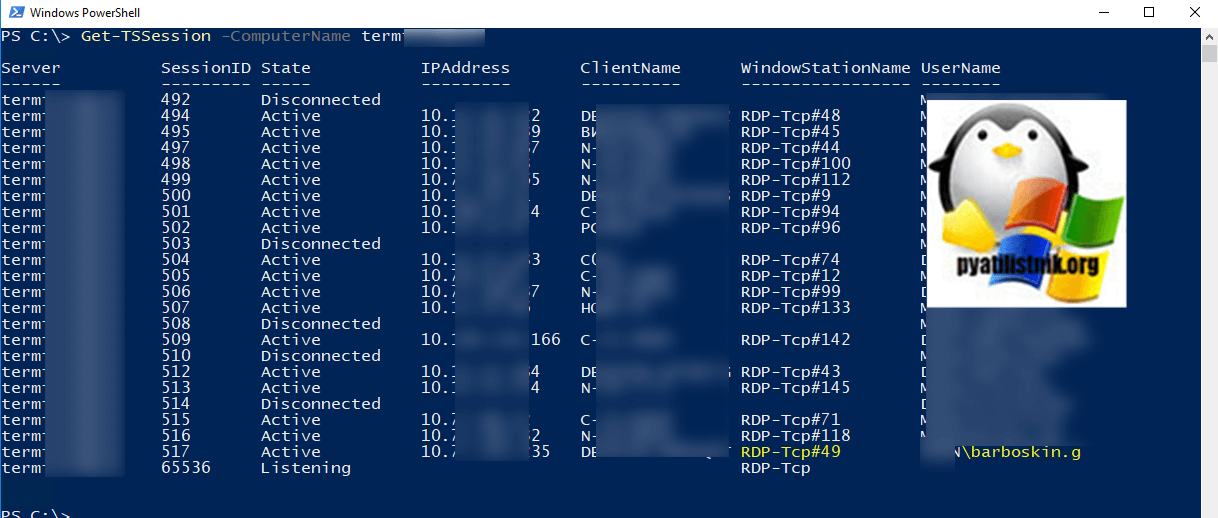
Перед использованием RDS Shadowing мне нужно выяснить SessionID клиента к которому буду подключаться, как это сделать я уже рассказывал. Я для своего обзора буду использовать камандлет Get-TSSession.
Get-TSSession -ComputerName Имя сервера
Нужный мне SessionID 517.
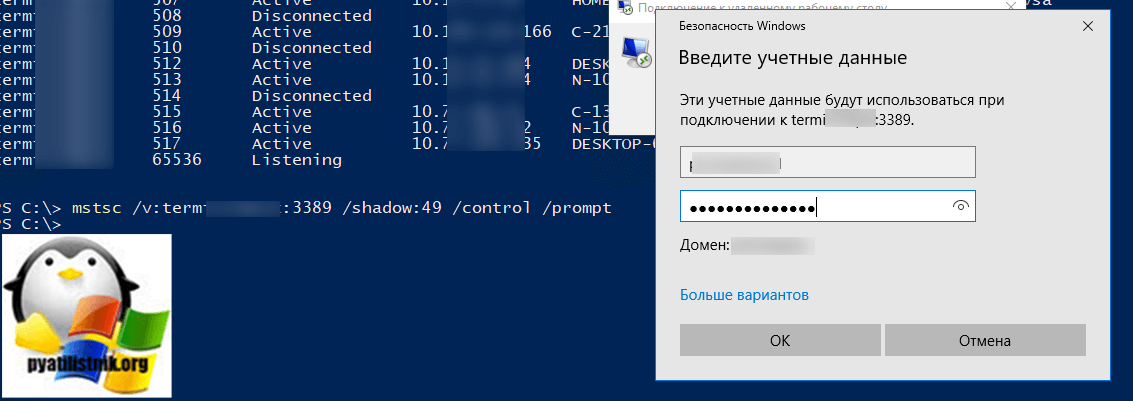
Теперь подключаемся к сессии пользователя на удаленном сервере, для этого конструкция будет такой:
mstsc /v:term /shadow:517 /control /prompt
Кстати если будет писать, что не правильное имя компьютера, то уберите в команде номер порта
Если вы запускаете с запросом учетных данных другого пользователя, то появится всплывающее окно с вводом логина и пароля.
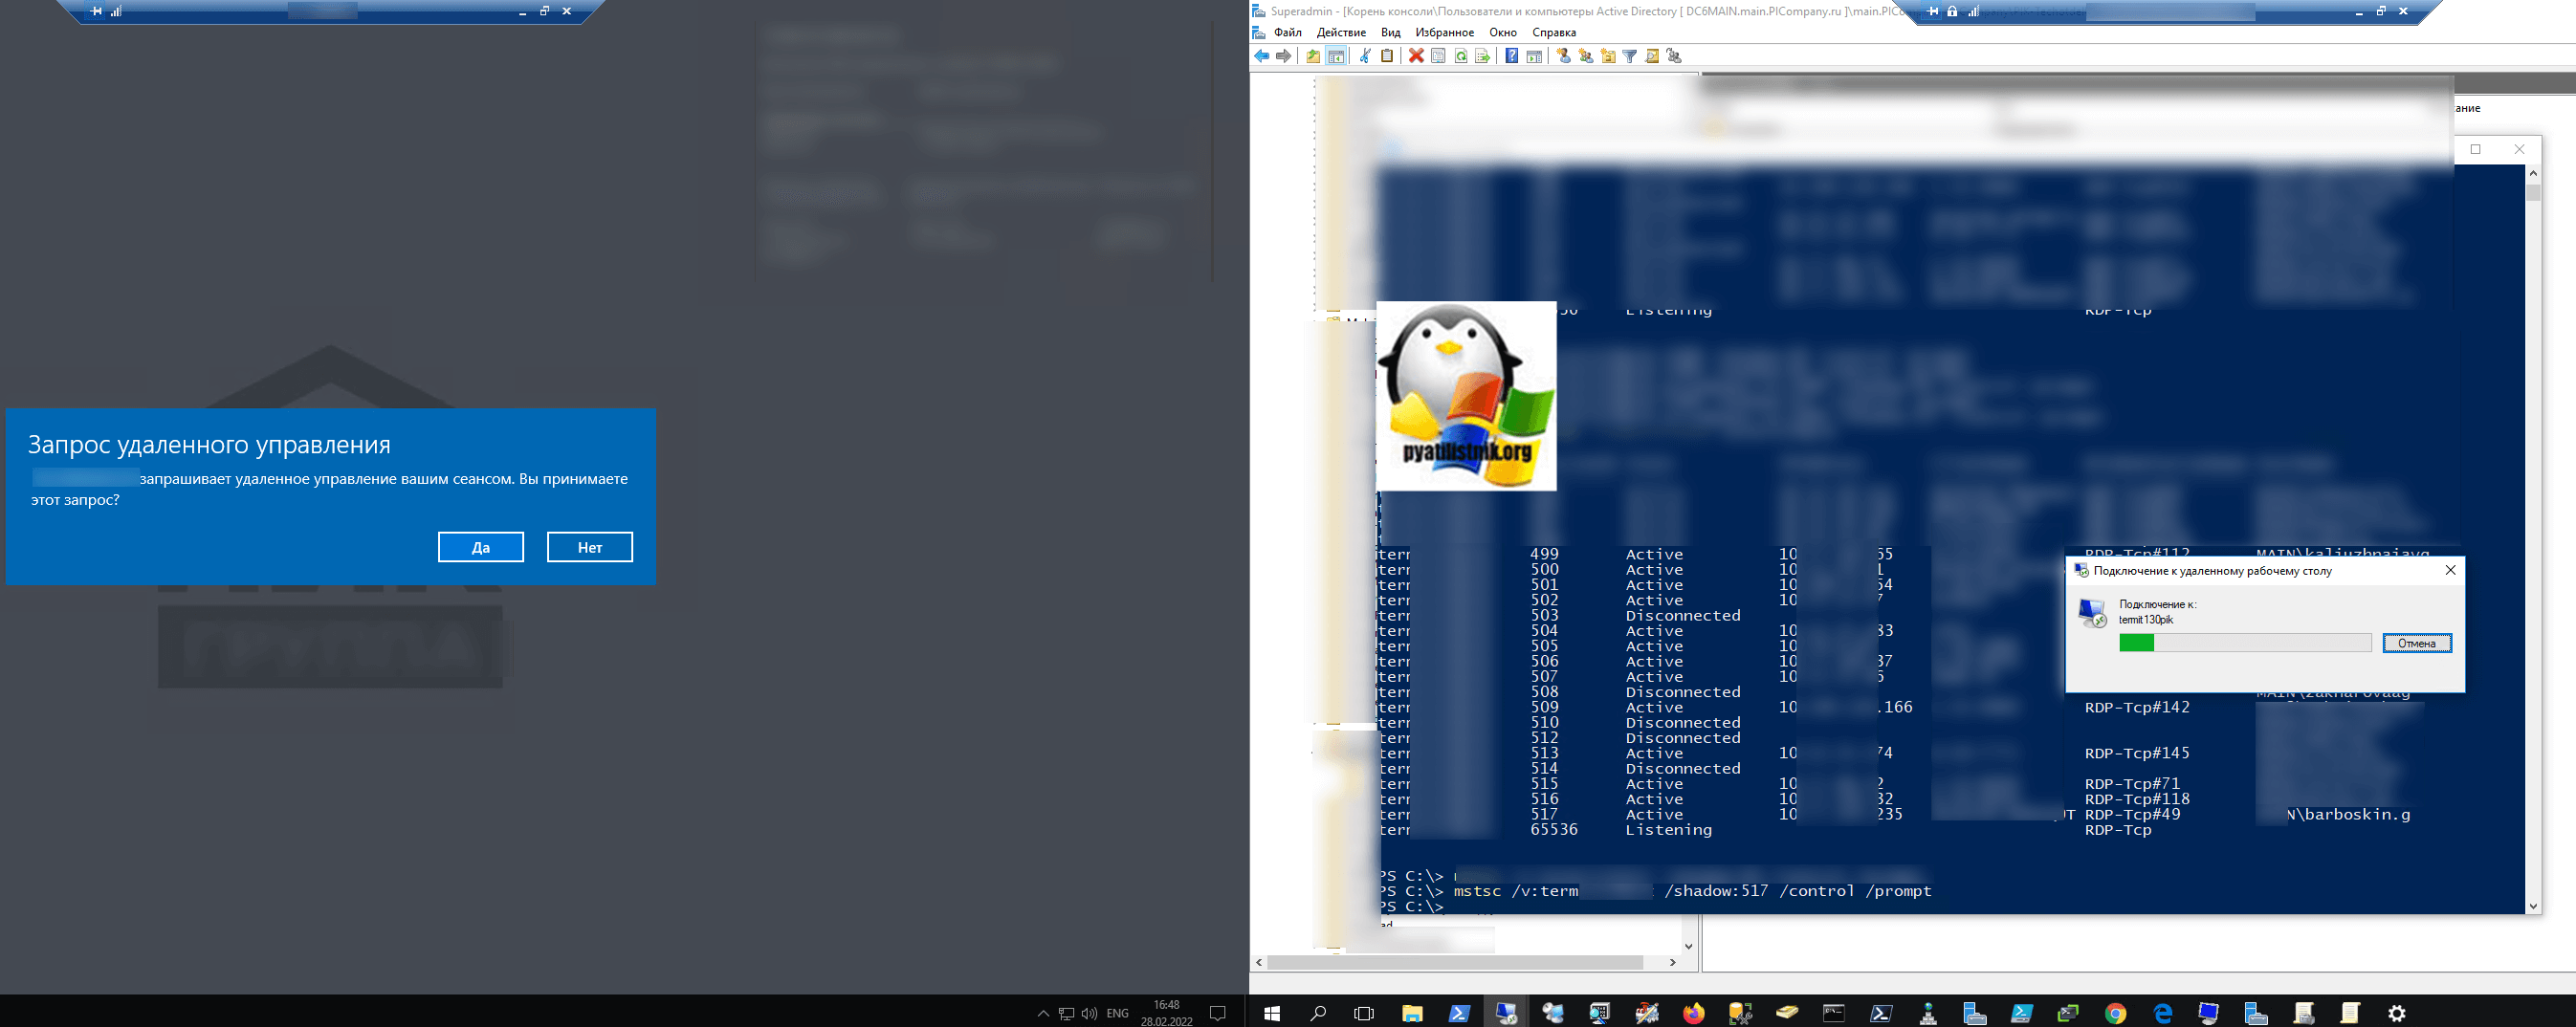
У удаленного пользователя работающего по RDP появится всплывающее окно, где он должен подтвердить ваш запрос:
Пользователь запрашивает удаленное управление вашим сеансом. Вы принимаете этот запрос?
Удобный Bat файл для использования Remote Desktop Services Shadowing в командной строке
Создайте из текстового файла batник, поменяв расширение. И добавьте вот такое содержимое, теперь при его запуске будет выводиться список сеансов и удобный запрос ID.
@echo off
mode con:cols=100 lines=30
query session
echo
set /p usersession= Enter the session ID:
mstsc /shadow:%usersession% /control /noconsentprompt
Как дать права на теневые сеансы не администраторам
Как я указывал выше, теневое копирование можно использовать по умолчанию, только администраторам конечного сервера, НО если у вас есть, например техническая поддержка, которая помогает пользователям удаленного рабочего стола устранять через теневые сеансы их проблемы, и вы не хотите их делать администраторами на серверах, то вы можете делегировать им права, только на данный функционал.
И так, режим shadow для непривилегированного пользователя в Windows Server организовывается через PowerShell. Вам необходимо имя группы, для которой будут делегированы права и выполнить команду на конечном сервере. Но для начала давайте посмотрим у кого уже есть такие права. Для этого в оболочке PowerShell выполните:
Get-WmiObject Win32_TSAccount -Namespace rootCIMV2TerminalServices -Filter «TerminalName=’RDP-Tcp'»
Для cmd:
Обратите тут на поле _GENUS — это как раз разрешение. Данная команда вам будет полезна, когда вы добавите группу и проверите, появилась ли она тут. Цифра 2 в конце определяет тип доступа:
- 0 = WINSTATION_GUEST_ACCESS
- 1 = WINSTATION_USER_ACCESS
- 2 = WINSTATION_ALL_ACCESS
Далее я дам права для группы ROOTRDP-SHADOW-SESSION, чтобы она могла использовать Remote Desktop Services Shadowing.
wmic /namespace:\rootCIMV2TerminalServices PATH Win32_TSPermissionsSetting WHERE (TerminalName=»RDP-Tcp») CALL AddAccount «ROOTRDP-SHADOW-SESSION«,2
Не забываем, что вам потребуется произвести перезагрузку сервера, чтобы все вступило в силу
Проверим, что они появились
Чтобы удалить права, выполните:
$Group = @(gwmi —Namespace RootCIMv2TerminalServices —query «select * from Win32_TSAccount where TerminalName=»RDP-TCP» AND AccountName=»ROOTRDP-SHADOW-SESSION«)
$Group.Delete()
Массовая настройка теневого подключения для не администраторов
Если у вас, как в моей компании RDS ферма состоит из 50 и более RDSH хостов, то чтобы вам не ходить по каждому из них, нужно воспользоваться вот таким моим скриптом PowerShell.
function Date {Get-Date -Format «yyyy.MM.dd HH:mm:ss»}
# Тут подгружаем файл со списком серверов
$comps_file = «$PSScriptRootservers.txt»
foreach ($server in (Get-Content $comps_file))
{
«$(Date) Trying to process server $server»
# wmic /namespace:\rootCIMV2TerminalServices PATH Win32_TSPermissionsSetting WHERE (TerminalName =»RDP-Tcp») CALL AddAccount ,2
$status = $null
$rds = Get-WmiObject -Namespace root/cimv2/terminalservices -Class Win32_TSPermissionsSetting -Filter «TerminalName = ‘RDP-Tcp'» -ComputerName $server
$status = $rds.AddAccount(«ROOTRDP-SHADOW-SESSION«,2)
if ($status.ReturnValue -eq 0)
{
«$(Date) All good»
}
else
{
«$(Date) Something went wrong»
}
}
Устранение непредвиденной ошибки
В Windows Server 2012R2-2016 вы можете получить ошибку «Неопознанная ошибка или Произошла внутренняя ошибка» при попытке использования функционала shadow. Тут все дело в том, что у вас не установлены обновления от 2018 года.
в логах вы можете обнаружить события STATUS_BAD_IMPERSONATION_LEVEL
- Windows Server 2016 — KB4057142 (от 17 января 2018)
- Windows Server 2012 R2 — KB4057401 (от 17 января 2018)
A while ago on a Sunday afternoon I was playing with an old laptop to repurpose it to be a media center for the TV. Because I prefer to use Windows’ built-in solutions over 3rd party tools, after a quick online research, I discovered that Microsoft Remote Desktop Protocol (RDP) supports a so-called “shadowing” feature and RDP is available in all Windows Server Operating Systems and the business editions of end-user Windows versions.
This shadowing feature means that, while someone is working on their machine, either physically on the console or via RDP, it is possible for another user to view that session, or even control it! This is of course ideal for my use case with the laptop connected to the TV. I am able to control the laptop connected to my TV from the couch while the TV displays what I want to see. Think of Netflix, a YouTube video or family pictures. If I would have simply used RDP to logon to the media center, it would have displayed a lock screen on the TV, which defeats the purpose of the media center setup.
This feature also immediately triggered my hacker mindset. Despite an increased usage of Windows Remote Management (WinRM), system administrators still make extensive use of RDP. Moreover, many organizations provide access to internal resources using RDP. We as Red Teamers, can also use this feature during a Red Team exercise to spy on both system administrators and users, without dropping any additional binaries on remote systems and while blending in with regular network traffic. Additionally it is possible to use the shadowing feature if the Remote Desktop port is blocked by a firewall, but the SMB port is open (yes, you read this correctly – RDP via TCP port 445). Lastly, it is possible to use this feature to create a backdoor on a remote system where a low privileged user can view and take over sessions of high-privileged users to again obtain a foothold in the network.
Demo
This demo video (no audio) shows how a remote system is configured to allow shadowing without consent. The steps in this video will be explained in the remainder of the article.
Your browser does not support the video tag.
Let’s first dive a bit deeper into Microsoft RDP’s shadowing feature. Shadowing can be performed either locally between users on the same machine as well as remotely, shadowing a user on a remote machine.
There are two implementations of the shadowing feature. The old implementation, which was part of Windows 7, its server counterpart Windows Server 2008 R2 and earlier versions of Windows, were part of the Remote Desktop Services service (termsrv.dll). Now this functionality has moved to separate binaries. In the old implementation on the client side the shadow.exe command line tool was used to initiate a shadowing session. This command line tool was included in Windows versions up to Windows 7/Windows Server 2008 R2.
The new implementation of the shadowing feature is implemented from Windows 8.1 and its server counterpart Windows Server 2012 R2. After performing the initial negotiation and setting up the session, the Remote Desktop Services service spawns the RdpSaUacHelper.exe, RdpSaProxy.exe and RdpSa.exe processes which take care of the actual shadowing. On the client side, the Remote Desktop Connection (mstsc.exe) tool is used. In this article we will focus on the new implementation.
Between the old implementation of the shadowing feature on Windows 7/Server 2008 R2 and the new implementation on Windows 8.1/Server 2012 R2, there has been another Windows version namely Windows 8/Server 2012. These Operating Systems however do not support any of the two shadowing implementations.
In order to use the RDP shadowing feature, the Remote Desktop Services (TermService) service needs to be running (which it does by default), a rule needs to be enabled in the Windows Firewall and in case of Red Teaming for stealth reasons, a setting needs to be configured to not prompt the user for permission when they are being shadowed. In this article we are walking through the steps to set this up.
Shadowing configuration
The configuration for shadowing only has a single setting which defines whether the shadowed user will get a prompt and whether it is possible to only view a session or also control it. This setting can be configured through Group Policy:
- Path: Computer Configuration -> Policies -> Administrative Templates -> Windows Components -> Remote Desktop Services -> Remote Desktop Session Host -> Connections
- Name: Set rules for remote control of Remote Desktop Services user sessions

Because we want to be stealthy and not modifying a group policy in order to target a specific machine, we will focus on configuring this setting specifically in the target machine’s registry. In the Windows registry, this setting is represented as the Shadow DWORD value in the HKLMSoftwarePoliciesMicrosoftWindows NTTerminal Services key.
The value of this key defines a combination of the following settings:
- Controls whether shadowing is allowed or not
- Whether it is possible for the user shadowing to also interact with the session
- Whether the user being shadowed will need to approve the incoming shadowing request
The following values can be set to configure the above settings1.
| Value | Name | Description |
|---|---|---|
| 0 | Disable | Remote control is disabled. |
| 1 | EnableInputNotify | The user of remote control has full control of the user’s session, with the user’s permission. |
| 2 | EnableInputNoNotify | The user of remote control has full control of the user’s session; the user’s permission is not required. |
| 3 | EnableNoInputNotify | The user of remote control can view the session remotely, with the user’s permission; the remote user cannot actively control the session. |
| 4 | EnableNoInputNoNotify | The user of remote control can view the session remotely, but not actively control the session; the user’s permission is not required. |
By default, the Shadow value does not exist in the registry in which case the value is set to 1. This will not allow to shadow a user without first prompting for consent. Because during Red Team exercises we do not want to alert any user of us peeking on their desktop, we will set that value to 2, so we can both peek and, if needed, control their desktop without them providing us consent. The Remote Desktop setting in SystemPropertiesRemote.exe does not need to be enabled to allow shadowing; if a user is logged in locally and the Remote Desktop is disabled, the user can still be shadowed. The Remote Desktop Services (TermService) service does need to be running though.

To be able to shadow, a Windows client is required as there are no open source Remote Desktop clients (yet) which support the Remote Desktop shadowing protocol. This Windows client can either be a machine in the target network which has already been compromised or an offensive Windows (virtual) machine, which using a (SOCKS) tunnel has access to the target network.
Authentication
With these prerequisites in place, let’s get to the practical part.
In order to shadow a session, we first need to make sure we are authorized to access the remote system; either an account with administrative access to the remote host is required, a user or group which has been added to the Remote Desktop Users group or an entity which has been explicitly provided access to the Remote Desktop authorization list. This latter approach will be detailed in the Backdoor section of this article.
A command shell with a custom authentication having sufficient rights can be launched using for example the runas.exe command line tool with the /netonly flag. Any processes launched from the process started using runas.exe will inherit the security tokens of the parent process and use them in case the remote host requires authentication. The runas.exe command line will then look as follows, where the domain can also be the target computer name in case of local (non-domain) credentials.
C:>runas.exe /noprofile /netonly /user:MYSERVERAdministrator powershell.exe
Enter the password for MYSERVERAdministrator:
Attempting to start powershell.exe as user "MYSERVERAdministrator" ...

C:>
Other tools like Rubeus and Kekeo can also request the appropriate Kerberos tickets in order to authenticate.
Query interactive sessions
Once the command shell is running with the appropriate security tokens, the remote system can be queried to identify the interactive sessions. There are various command line utilities which can show the sessions on a remote system. You can use the command below or one of its equivalents query.exe user /server:MYSERVER or qwinsta.exe /server:MYSERVER. Alternatively, NoPowerShell’s Get-WinStation cmdlet2 with the -ComputerName MYSERVER parameter can be used. This can also be executed in-memory using for example Cobalt Strike’s execute-assembly command. All these commands communicate over the Microsoft-DS port (445/TCP).
PS C:> quser.exe /SERVER:MYSERVER
 USERNAME              SESSIONNAME        ID  STATE   IDLE TIME  LOGON TIME
 administrator         console             1  Active      none   2/2/2021 11:09 AM
 domainuser2           rdp-tcp#0           2  Active          .  2/2/2021 11:10 AM
PS C:>
In the output, the logged in users are displayed, their session ID and some other details like logon time and idle time. This session ID will be used in the coming steps. This command will only return output if there are users logged in and the user running the query has the WINSTATION_QUERY privilege (explicitly or implicitly via group membership assigned to them). By default, this privilege is held by members of the Administrators, Remote Desktop Users and INTERACTIVE group. More about this privilege is detailed later in the Shadowing backdoor section. It is also possible to skip this step altogether and simply guess the session ID in the next steps, starting from 1 and increasing one at a time.
Configuring RDP Shadowing
Before shadowing the remote machine, first a couple of settings on the target host need to be validated, and possibly updated. There are several ways to view and change these settings and depending on the configuration of firewalls and types of traffic on the network in which you want to blend in, it is possible to choose which protocol to use.
Besides the option of using the Microsoft-DS service (445/TCP) used by commands like sc.exe, reg.exe, netsh.exe and the Microsoft Management Console (mmc.exe), configuration of the remote machine can also be performed through WinRM/WMI which are respectively running on port 5985/TCP and/or 5986/TCP and 135/TCP. In PowerShell, the DCOM connection to the remote host can be established using the following two lines:
$so = New-CimSessionOption -Protocol Dcom
$s = New-CimSession -ComputerName MYSERVER -SessionOption $so
The $s variable contains the session and will be used in all subsequent sections. Alternatively WinRM can be used by removing the -SessionOption parameter.
For more information about WMI, check my previous article on Extracting credentials from a remote Windows system — Living off the Land here.
Enabling RDP Shadowing
Before the RDP shadowing feature can be used from a remote host, the Remote Desktop Services (TermService) service needs to be running and the Remote Desktop — Shadow (TCP-In) rule needs to be enabled in the firewall. If the target machine is already used via Remote Desktop (quser.exe output shows RDP-Tcp session names), this step can be skipped. In case users access the machine only physically (so not using Remote Desktop), this step might be required.
TermService service
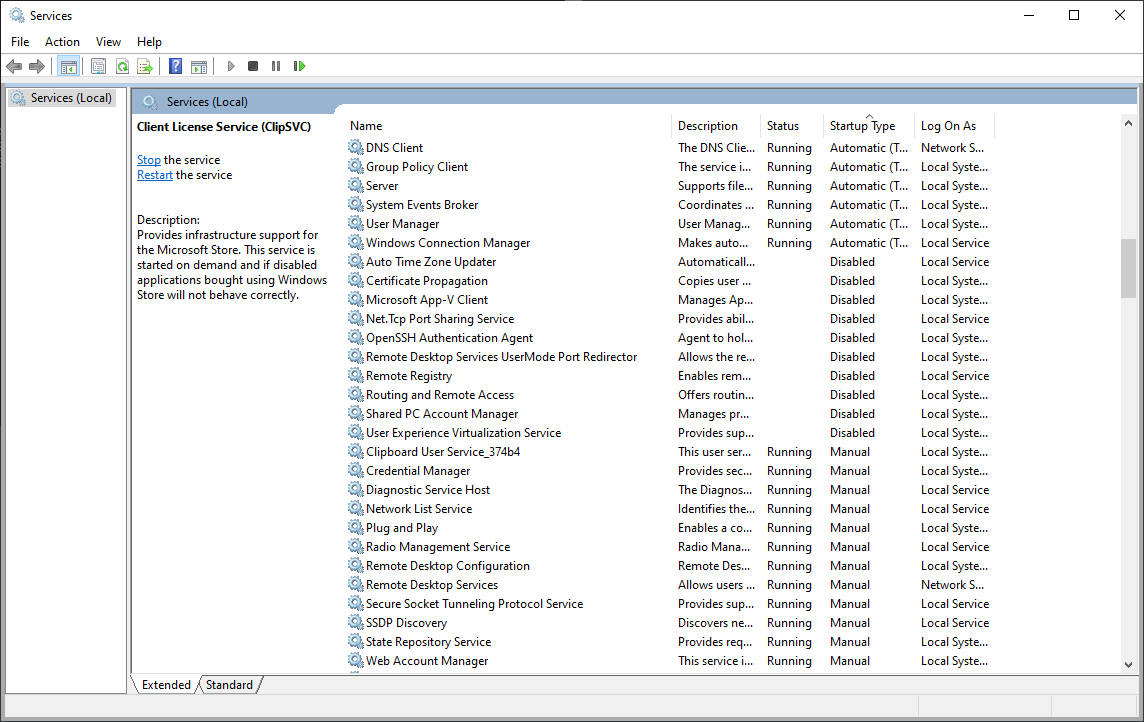
Check if service is running using either the Service Manager (445/TCP) via sc.exe or the Microsoft Management Console (mmc.exe), or via WMI over DCOM or WinRM using the $s CimSession variable described earlier. If not, service should be started.
Option #1: Service Manager
Query
sc.exe \MYSERVER query TermService
Start
sc.exe \MYSERVER start TermService
Option #2: WMI
Query
$tssvc = Get-CimInstance -Filter 'Name="TermService"' -ClassName Win32_Service -CimSession $s
$tssvc
Start
$tssvc | Invoke-CimMethod -MethodName StartService
Option #3: Service Manager via GUI
Query
Launch mmc.exe from the powershell.exe instance created in the Authentication section so it inherits the appropriate security tokens. Navigate to File -> Add/Remove Snap-In (Ctrl + M) and add the Services snap-in to the console. While adding the snap-in, make sure to specify the Another computer machine name, where the computer name or IP address of the target is entered.

Start
Simply right click the Remote Desktop Services service and choose Start.
Shadow firewall rule
In order to access the named pipe set up by the RdpSa.exe process while initiating the shadowing session, the Remote Desktop — Shadow (TCP-In) firewall rule needs to be enabled. Similarly to the Remote Desktop Services service, we will first check if it has already been enabled, and if not, we will enable it.
Option #1: WMI
Query
$fwrule = Get-CimInstance -Namespace ROOTStandardCimv2 -ClassName MSFT_NetFirewallRule -Filter 'DisplayName="Remote Desktop - Shadow (TCP-In)"' -CimSession $s
$fwrule
Enable
$fwrule | Invoke-CimMethod -MethodName Enable
Option #2: Firewall Manager via GUI
For this to work, it is required that the Windows Firewall Remote Management (WFRM) rules have already been enabled on the remote system, otherwise we will simply shift the problem where the WFRM rules need to be enabled, in order to enable the RDP Shadow rule via the GUI. The GUI will simply be empty or show an error if the WFRM rules are disabled.
Query
Launch mmc.exe from the cmd.exe window which contains the appropriate security tokens. Navigate to File -> Add/Remove Snap-In (Ctrl + M) and add the Windows Defender Firewall with Advanced Security snap-in to the console. While adding the snap-in, we specify the Another computer machine name, entering the computer name or IP address you want to shadow. After loading the snap-in, navigate to Inbound Rules and locate Remote Desktop — Shadow (TCP-In).

Enable
Simply right click the rule and choose Enable Rule.
Option #3: netsh
Same prerequisites apply as enabling it via the GUI (option 2).
Query
netsh.exe -r MYSERVER advfirewall firewall show rule name="Remote Desktop - Shadow (TCP-In)"
Enable
netsh.exe -r MYSERVER advfirewall firewall set rule name="Remote Desktop - Shadow (TCP-In)" new enable=yes
Cleanup
To clean up, the firewall rule can be disabled again via WMI, GUI or netsh.exe by respectively calling the Disable method, right clicking and disabling the rule or changing the enable parameter to no.
Configure RDP Shadowing
As mentioned before, by default, the user of the remote machine will be informed when someone is attempting to shadow or control their session. In order to silently allow the shadowing session, first the Shadow registry key needs to be configured. The registry of a remote system can be updated using several protocols, depending on the accessible ports and configuration of the services listening on those ports. Our aim is to set the Shadow value in HKLMSoftwarePoliciesMicrosoftWindows NTTerminal Services on the remote machine to 2, which allows us to both view and control the session without the user being informed.
Option #1: reg.exe
If the RemoteRegistry service is enabled on the target host, the following command line can be used:
Query
reg.exe query "\MYSERVERHKLMSoftwarePoliciesMicrosoftWindows NTTerminal Services" /V Shadow
Set
reg.exe add "\MYSERVERHKLMSoftwarePoliciesMicrosoftWindows NTTerminal Services" /V Shadow /T REG_DWORD /D 2 /F
Option #2: WMI
This option requires WMI (135/TCP) or WinRM (5985/TCP or 5986/TCP) to be accessible on the remote host.
Query
Invoke-CimMethod -ClassName StdRegProv -MethodName GetDWORDValue -Arguments @{hDefKey=[uint32]2147483650; sSubKeyName="SoftwarePoliciesMicrosoftWindows NTTerminal Services"; sValueName="Shadow"} -CimSession $s
Set
Invoke-CimMethod -ClassName StdRegProv -MethodName SetDWORDValue -Arguments @{hDefKey=[uint32]2147483650; sSubKeyName="SoftwarePoliciesMicrosoftWindows NTTerminal Services"; sValueName="Shadow"; uValue=[uint32]2} -CimSession $s
Cleanup
The Shadow value in the registry can be reverted either after completing the work on the machine or directly after establishing the connection to the remote machine (see next section). Depending on whether the Shadow value did not exist before or the it had a different value, the value can be reverted to the previous value using the methods described above, updating value 2 to the previous value or deleted using reg.exe or WMI.
reg.exe
reg.exe delete "\MYSERVERHKLMSoftwarePoliciesMicrosoftWindows NTTerminal Services" /V Shadow
WMI
Invoke-CimMethod -ClassName StdRegProv -MethodName DeleteValue -Arguments @{hDefKey=[uint32]2147483650; sSubKeyName="SoftwarePoliciesMicrosoftWindows NTTerminal Services"; sValueName="Shadow"} -CimSession $s
Shadow
After validating and, if needed, configuring the service, firewall rule and shadow policy setting, it is time to start using this functionality to spy on users. For Operating Systems Windows 8.1/Server 2012 R2 and later, the Remote Desktop Connection mstsc.exe tool is used to view a remote session. This tool however, needs to be launched from the command line as the GUI does not provide options to launch a shadowing session. mstsc.exe has a large amount of parameters, but the parameters relevant to shadowing are listed below.
MSTSC [/v:<server[:port]>] /shadow:<sessionID> [/control] [/noConsentPrompt]
| Parameter | Meaning | Notes |
|---|---|---|
/v:<server[:port]> |
Specifies the remote computer to which you want to connect. | |
/shadow:<sessionID> |
Specifies the sessionID you wish to view. | Instead of identifying the session ID as described earlier, it is also relatively easy to guess a session ID, starting with ID 1. |
/control |
Allows control of the session. | This requires the Shadow value to be set to 2. |
/noConsentPrompt |
Allows shadowing without user consent. | This requires the Shadow value to be set to 2 (or 4). |
With the session ID obtained in Query interactive sessions, we can compile the command line to connect to the remote system. Alternatively that step could be skipped and instead the session ID can simply be guessed. Make sure to always include the /noConsentPrompt flag. Even if the Shadow value in the registry is set to not require the user’s permissions, on the client side, we have to explicitly specify that we do not want to ask for permission.
mstsc.exe /v:MYSERVER /shadow:1 /noConsentPrompt
The Remote Desktop Connection tool will now show up and, within seconds, the screen of the remote session will show up. This will be a read-only session where it is possible to observe what the user is doing. If the user becomes inactive and we would like to take control, the existing shadowing session should be closed and the mstsc shadowing one-liner needs to be run again, this time also providing the /control parameter, which will make the command line looks as follows:
mstsc.exe /v:MYSERVER /shadow:1 /noConsentPrompt /control
Because it is possible to have multiple connections on Windows Server, it is also possible to omit the /v parameter and simply specify the remaining parameters to shadow a session on the local machine.
This article is not diving deep into shadowing Windows 7/Server 2008 R2 and prior Operating Systems, but in that case the command line required to start shadowing is shadow.exe 1 /SERVER:MYSERVER, where 1 has to be replaced by the session ID identified in Query interactive sessions. To quit the session, use Ctrl + *, where the asterisk symbol from the numpad needs to be used. If numpad is not available, one can possibly use a function key combination, which for example on my HP laptop is Ctrl + FN + P.
The secure desktop
Whenever the user’s session is locked, or in case the UAC prompt (right click -> Run as Administrator) on the secure desktop is enabled (which it is by default) and the /control flag of mstsc.exe is not used, the shadowing session will turn black and show a pause symbol. After the user respectively logs in or returns from the secure desktop back to the regular desktop, the shadowing session will resume.

Shadowing session is paused when UAC displays a prompt on the secure desktop.

Same screen on the console when UAC prompt is shown.
When the /control flag is used for mstsc.exe, the UAC popup is not shown on the secure desktop, regardless of the PromptOnSecureDesktop setting3 in HKLMSOFTWAREMicrosoftWindowsCurrentVersionPoliciesSystem.
Shadowing backdoor
For any future access without an administrative account, it is possible to backdoor the shadowing feature. By adding the backdoor it is possible at any future moment to use any limited, non-administrative account to spy on users interactively using the system as well as controlling these sessions. This will also make it possible to escalate privileges through these controlled – possibly – higher-privileged sessions.
Backdooring the shadowing configuration is relatively easy. The following two lines need to be executed to add any user or group to the list of accounts or groups that are allowed to shadow and control a session where the value for AccountName argument can specify any local or domain user:
$tsps = Get-CimInstance -Namespace ROOTCIMV2TerminalServices -ClassName Win32_TSPermissionsSetting -Filter 'TerminalName="RDP-Tcp"' -CimSession $s
$tsps | Invoke-CimMethod -MethodName AddAccount -Arguments @{AccountName="BITSADMINBackdoorAccount"; PermissionPreSet=[uint32]2}
Something to be aware of is that it seems that a user will appear in the quser.exe output (and it is possible to shadow them) only after a new user logged on via RDP. Users currently logged in need to fully logoff first (not just disconnect) and then login again before they can be shadowed using the backdoor account. The list of user accounts and groups that have access to the Terminal Services (either to just query or also to RDP and shadow) can be listed using the following command:
Get-CimInstance -Namespace ROOTCIMV2TerminalServices -ClassName Win32_TSAccount -Filter 'TerminalName="RDP-Tcp"' -CimSession $s
The value of the PermissionsAllowed attribute is a bitmask which represents the constants in the following table4. This value can also be obtained by reading the StringSecurityDescriptor attribute of the RDP-Tcp terminal instance of the Win32_TSPermissionsSetting WMI class.
| Value | Constant | Description |
|---|---|---|
0x00001 |
WINSTATION_QUERY |
Permission to query information about a session. |
0x00002 |
WINSTATION_SET |
Permission to modify connection parameters. |
0x00004 |
WINSTATION_LOGOFF |
Permission to log off a user from a session. |
0xF0008 |
WINSTATION_VIRTUAL | STANDARD_RIGHTS_REQUIRED |
Permission to use virtual channels. Virtual channels provide access from a server program to client devices. |
0x00010 |
WINSTATION_SHADOW |
Permission to shadow or remotely control another user’s session. |
0x00020 |
WINSTATION_LOGON |
Permission to log on to a session on the server. |
0x00040 |
WINSTATION_RESET |
Permission to reset or end a session or connection. |
0x00080 |
WINSTATION_MSG |
Permission to send a message to another user’s session. |
0x00100 |
WINSTATION_CONNECT |
Permission to connect to another session. |
0x00200 |
WINSTATION_DISCONNECT |
Permission to disconnect a session. |
For example value 983999 which is by default set for the Administrators group translates to hexadecimal value 0xF03BF, which means all of the flags in the table combined except for the WINSTATION_RESET flag.
The user or group added to the configuration is now able to both query which sessions are active, and also shadow and control these sessions. Be aware that, if explicitly configured in the group policies applicable to the machine, the Shadow value in the registry could be reset when the group policy is reapplied. In that case, administrative access is still required to set the Shadow key. In my experience I have not yet seen group policies in which the Shadowing policy is explicitly configured.
This method creates or updates the Security REG_BINARY value in the HKLMSYSTEMCurrentControlSetControlTerminal ServerWinStationsRDP-Tcp key. It is also possible to directly create/modify this key via the remote registry or WMI methods described before. An alternative way to create this backdoor is to directly update the DefaultSecurity value in the HKLMSYSTEMCurrentControlSetControlTerminal ServerWinStations key. This value is used in case the Security value of the RDP-Tcp subkey does not exist.
To clean up the backdoor, the following PowerShell commands can be used where the AccountName variable needs to be updated to the user that needs to be removed from the configuration:
$tsacc = Get-CimInstance -Namespace ROOTCIMV2TerminalServices -ClassName Win32_TSAccount -Filter 'TerminalName="RDP-Tcp" And AccountName="BITSADMIN\BackdoorAccount"' -CimSession $s
$tsacc | Invoke-CimMethod -MethodName Delete
Alternatively, it is also possible to revert all permissions to their defaults and remove all additional (backdoor) accounts using the RestoreDefaults method of the RDP-Tcp instance of the Win32_TSPermissionsSetting class:
$tsps = Get-CimInstance -Namespace ROOTCIMV2TerminalServices -ClassName Win32_TSPermissionsSetting -Filter 'TerminalName="RDP-Tcp"' -CimSession $s
$tsps | Invoke-CimMethod -MethodName RestoreDefaults
The cleanup can be validated by again executing the command above, listing the instances of the Win32_TSAccount for the RDP-Tcp terminal.
Defense
The defense section is split into a subsection which details ways to prevent attackers to use the shadowing feature and a subsection which looks into the various ways (ab)use of the shadowing feature can be monitored.
Prevention
In order to prevent spying on users abusing Remote Desktop shadowing, the following settings can be applied:
- To prevent shadowing altogether, using application whitelisting, it is possible to block the
RdpSaUacHelper.exe,RdpSaProxy.exeandRdpSa.exeprocesses from launching - In the group policy, one can explicitly set the Shadow setting to require the user’s consent before shadowing or controlling the session so the backdoor is less effective; this assumes that an attacker at a later moment does not have sufficient privileges anymore to set the Shadow key in the registry to the value of their liking
- The
WINSTATION_SHADOWpermission can be removed from all entries in theWin32_TSAccountWMI class, although an attacker with administrative permissions can provide themselves this permission again
Detection
This section outlines some techniques that can be used to detect the use of Remote Desktop shadowing.
Detect creation or changes of the Shadow value
Throw an alert in case the Shadow value in the HKLMSoftwarePoliciesMicrosoftWindows NTTerminal Services key is created or modified.
Detect launching of processes responsible for shadowing
Processes spawn on shadow session connect. The following processes are spawned when a shadowing session to the system is established:
| What | Spawn #1 | Spawn #2 | Spawn #3 |
|---|---|---|---|
| Process | C:Windowssystem32RdpSaUacHelper.exe |
C:Windowssystem32RdpSaProxy.exe |
C:Windowssystem32RdpSa.exe |
| Process description | RDP Session Agent UAC Helper | RDP Session Agent Proxy | RDP Session Agent |
| Parent | C:Windowssystem32svchost.exe -k netsvcs |
C:Windowssystem32svchost.exe -k DcomLaunch |
C:Windowssystem32RdpSaProxy.exe |
| Parent description | Remote Desktop Configuration service | DCOM Server Process Launcher service | RDP Session Agent Proxy |
Whenever the RdpSa.exe process is launched under a certain user, that user is being shadowed. Whenever the process stops, the shadowing session ended.
Network
On the network level, certain DCE/RPC packets can be observed when a shadowing session is starting on a host on the network:
| Aspect | Wireshark filter | Notes |
|---|---|---|
| In order to make a call to the UUID responsible for initiating the shadowing session, the named pipe SessEnvPublicRpc is opened | smb2.filename == "SessEnvPublicRpc" |
It might be easier to have an IDS looking for clients that access this named pipe name. There might be other (legitimate) uses of this pipe apart from shadowing which I haven’t investigated. |
DCE/RPC bind to interface UUID 1257b580-ce2f-4109-82d6-a9459d0bf6bc |
dcerpc.cn_bind_to_uuid == 1257b580-ce2f-4109-82d6-a9459d0bf6bc |
This is the UUID of the SessEnv.dll library of the Remote Desktop Configuration (SessionEnv) service. This UUID only exports a single function (opnum 0) with the name RpcShadow2. |
Detect backdoor creation
Detect modification of the Remote Desktop settings by monitoring the Security value in the HKLMSYSTEMCurrentControlSetControlTerminal ServerWinStationsRDP-Tcp key and the DefaultSecurity value in the HKLMSYSTEMCurrentControlSetControlTerminal ServerWinStations key. Normally, these keys will not be modified, so any modification might point to an attacker weakening the authorizations in the shadowing configuration.
MITRE ATT&CK techniques
In this section, the actions performed to spy and control users’ RDP sessions are mapped to the TTPs of the MITRE ATT&CK framework:
| Tactic | ID | Name | Details |
|---|---|---|---|
| Lateral Movement | T1550 | Use Alternate Authentication Material | Uses runas.exe to authenticate as a different user |
| Discovery | T1033 | System Owner/User Discovery | Queries sessions on the remote machine |
| Defense Evasion | T1112 | Modify Registry | Configures the Shadow key in the registry |
| Command And Control | T1219 | Remote Access Software | Interact with an existing user session |
| Command And Control | T1071 | Application Layer Protocol | RDP shadowing takes place over the SMB protocol |
| Persistence | T1098 | Account Manipulation | Configures Remote Desktop permissions to allow shadowing by low-privileged users |
Troubleshooting
If you are testing Remote Desktop shadowing in your lab setup or using it in a Red Team exercise and encounter any errors, this section contains a list of common errors including the causes and potential fixes.
quser
| Error | Possible cause |
|---|---|
| Error 0x00000005 enumerating sessionnames. Error [5]:Access is denied. | No permission for the current user, use runas.exe /netonly to spawn quser.exe as a different user which has sufficient authorizations on the remote machine. |
mstsc
| Error | Possible cause |
|---|---|
| No error, but mstsc window just disappears. | The shadow firewall rule is disabled on the remote host. On the network level no packets are being exchanged because the target machine’s firewall is dropping all the packets. |
| Shadow Error: The Group Policy setting is configured to require the user’s consent. Verify the configuration of the policy setting. | The Shadow registry value is not set to 2 |
| Shadow Error: The operator or administrator has refused the request. | The /noConsentPrompt parameter has not been provided to the mstsc command line. This means the user on the target system has been presented with the following dialog: Remote Monitoring Request: BITSADMINAdministrator is requesting to view your session remotely. Do you accept the request? Yes / No. Two options: Option 1, the user did not respond to the prompt within 30 seconds. It will then automatically disappear. Option 2, the user clicked the No button. |
| Shadow Error: The interface is unknown. | The Remote Desktop Services (TermService) service on the remote host is not running |
| Shadow Error: The version of Windows running on this server does not support user shadowing. | The target Operating System is Windows 8/Server 2012 or lower and does not support the new implementation of shadowing. Try using the shadow.exe tool which is shipped with Windows 7/Server 2008 R2 and lower. |
| Access Denied | Authentication failed, launch mstsc from a command prompt which has the appropriate security tokens prepared. |
Further reading
While finalizing this article, I discovered that similar research has already been performed by Roman Maximov. Our research overlaps in certain parts while it complements in other parts. If you want to read more on this topic, make sure to also check out his interesting blog post here!
References

Previous Story
Mikrotik сохранение.

Next Story
Настройка удаленного доступа MySQL и MariaDB
Latest from Blog

Связка из Postfix и Dovecot плюс стандартный обвес из антивируса, антиспама и прочих утилит. Доменные имена

Keycloak + PostgreSQL Keycloak — продукт с открытым кодом для реализации single sign-on с возможностью управления
![]()
перевод статьи: https://cloudinfrastructureservices.co.uk/install-keycloak-sso-on-ubuntu-20-04/ Keycloak – это бесплатное решение для управления идентификацией и доступом с открытым исходным кодом

Вне зависимости от того, как долго и тщательно программное обеспечение проверяется перед запуском, часть проблем проявляется

Что такое сервер freeRADIUS? RADIUS — это протокол AAA (аутентификация, авторизация и учет), который помогает контролировать
Posted by Colin7944 2016-08-05T13:43:57Z
Hi all!
we have a Windows 2008 R2 Server farm. I can shadow users on those servers when I’m logged on to one of the 2008 R2 servers using «Remote Desktop Services Manager».
Is it possible to do this from a windows 7 or 10 PC?…. i.e. shadow the Server 2008 R2 RDP users from the pc?
I’m asking simply because I’d like to get a junior Help desk guy access to help without logging on to the server. If not possible I’ll have to get him to log on to the servers.
5 Replies
-
I’m guessing this might be possible with RSAT.
Was this post helpful?
thumb_up
thumb_down
-

I was hoping so too. But I don’t see Remote Desktop Services Manager in there after installing RSAT on Windows 10.
Was this post helpful?
thumb_up
thumb_down
-
Bummer, you’d think it could be possible.
Was this post helpful?
thumb_up
thumb_down
-
It’s a built in feature of Remote desktop.
Text
Mstsc.exe /V:$server /shadow:$sessionid /control /noConsentPrompt
Should be able to run this from your desktop. I shadow sessions from my 8.1 machine to my RDS farm.
Was this post helpful?
thumb_up
thumb_down
-
You can also try adapting my Powershell script for shadowing to fit your environment.
https://community.spiceworks.com/scripts/show/3199-remote-desktop-session-shadowing-script
I haven’t tested it on an 08R2 though
Was this post helpful?
thumb_up
thumb_down

From time to time in certain situations one needs to have a possibility to view a customer’s user screen to make some proofed screenshots or to get access to an open GUI application window which contains secrets for lateral movement while the legitimate user is connected via RDP and you don’t want to kick them out of the session.
There is a number of third-party software such as VNC, radmin, TeamViewer, etc. on the market to achieve it, but it involves additional actions such as binary delivery, its installation and so on. Moreover, these actions are too noisy and leave a lot of garbage on a remote host.
Luckily, Windows-based systems have an awesome built-in feature (as part of Remote Desktop Protocol) that is unfairly ignored or forgotten. It is called Remote Desktop Services Shadowing.
There are two versions of the feature. Since the legacy version of Remote Desktop Services Shadowing is incompatible with the latest one and there are several articles on system administrator’s websites and forums about it, I’m not going to describe the former one widely, just a few words as a historical note.
In earlier versions of Windows, the shadow.exe file lets a user connect to a remote host using Remote Desktop Services Shadowing technique. Shortly, this is a predecessor to mstsc utility and its /shadow parameter. It was introduced in Windows Server 2003 and it is available on many versions of Windows.
In addition, there are two GUI applications and they do the same stuff: Terminal Services Manage (TSAdmin) which has been present since Windows Server 2003 and Remote Desktop Service Manager (RDSM) which is a part of Remote Server Administration Tools (RSAT) and replaces TSAdmin on Windows Server 2012.
The key difference between the versions of RDS Shadowing is that with the legacy one you must establish an RDP connection first to get a session on a remote host before you are able to shadow anybody else’s session on that host. With the latest version you can shadow a user’s session on the remote host from the console of your own host.
Now let’s get down to the latest version. Any modern Microsoft Windows version, starting from Windows 7, can be used to connect to a remote host with the session shadowing feature, but some of them require additional steps to be done and can be used only with several restrictions in cases mentioned below.
Requirements
There are three main requirements that a Windows-based system must meet to allow you to use the feature.
The first and the most essential part is Remote Desktop Protocol version. It must be 8.1 or higher. The following versions of Microsoft Windows can be used on a server side and as a client as they have RDP 8.1 out of the box:
- Windows 8.1 and later;
- Windows Server 2012 R2 and later.
Windows 7, Windows Server 2008, Windows 8, Windows Server 2012 versions don’t support this feature on the server side.
If you want to use these versions as client the first thing you do is install additional updates to update Remote Desktop Protocol version up to 8.1. After that you are able to connect to any Windows version on a remote host that supports the RDS Shadowing feature. For details see https://support.microsoft.com/en-us/help/2830477/update-for-remoteapp-and-desktop-connections-feature-is-available-for.
The next but not less important thing is that a remote host must have RDP services running.
Thirdly, besides software and service requirements, some additional changes must be made to firewall rules. The Remote Desktop Services Shadowing feature doesn’t use 3389/TCP port (RDP), it uses 445/TCP port (SMB), instead, and ephemeral ports, also known as dynamic port range (RPC).
These changes can be done by adding new custom rules or by enabling the following built-in ones:
- The first rule is called
File and Printer Sharing (SMB-In), which allows to connect to port 445/TCP; - The second one is
Remote Desktop - Shadow (TCP-In). It only allows the%SystemRoot%system32RdpSa.exebinary to handle inbound connections on any local TCP port.
Note: the dynamic port range on Windows usually includes TCP ports from 49152 to 65535. The current value can be determined by issuing the following command:
netsh int ipv4 show dynamicport tcpCommands qwinsta and quser described further also require the port 445/TCP to be open, otherwise you get the following error:
C:>qwinsta /server:{ADDRESS}
Error 1722 getting sessionnames
Error [1722]:The RPC server is unavailable.
Note: in the situation when the shadowing connection seems to be successful, but a window with a shadowed session doesn’t pop up, check the firewall rules (dynamic ports must be open or Shadow rule is enabled).
Establishing a Shadowing Connection
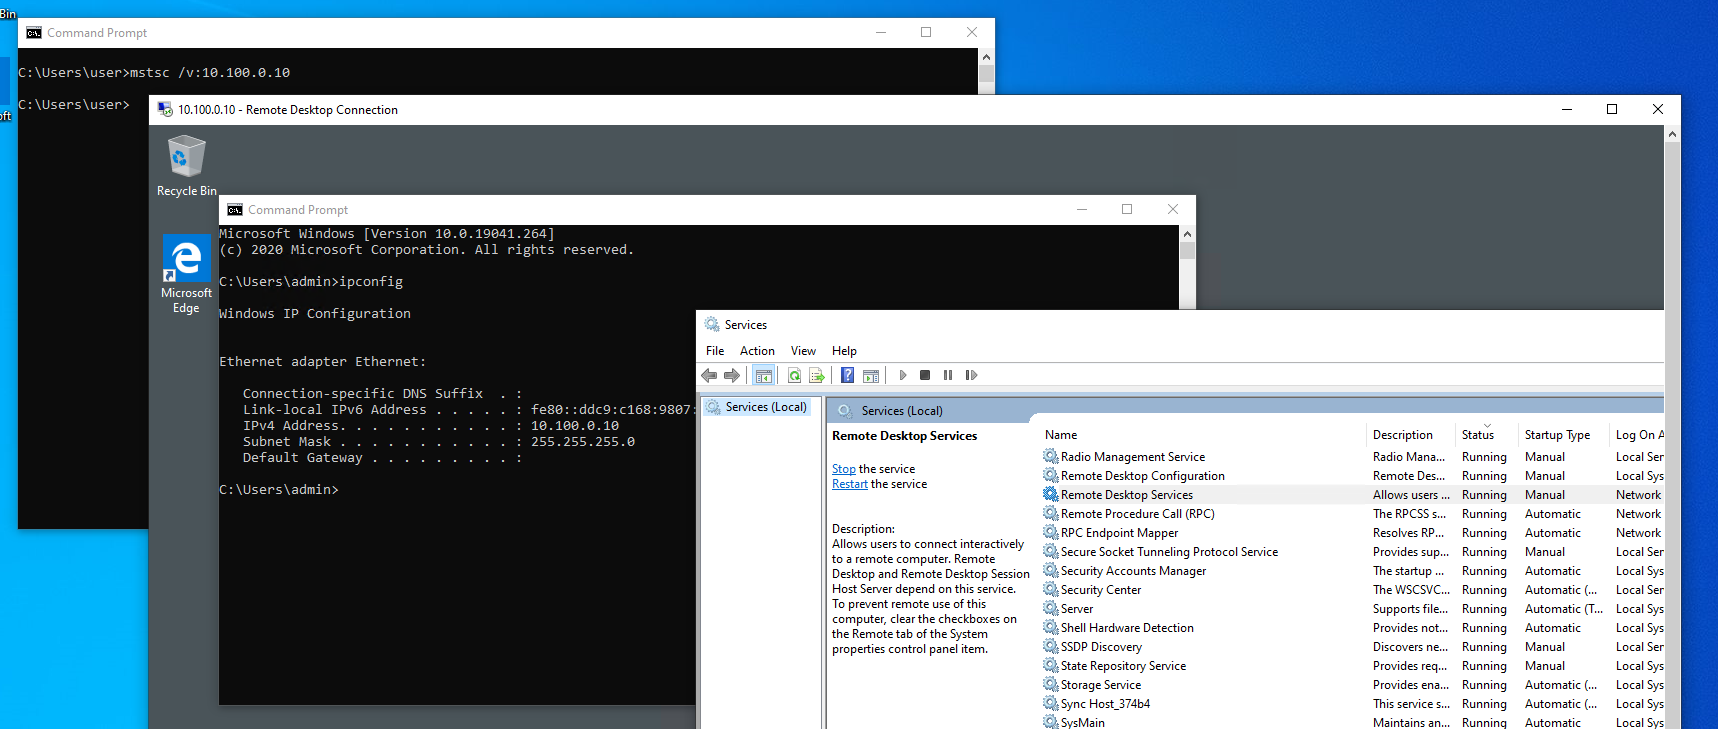
The simplest command line string to shadow a session with a functionality built into the Remote Desktop Connection Client (mstsc) utility looks as follows:
mstsc /v:{ADDRESS} /shadow:{SESSION_ID}where
/vparameter lets specify the{ADDRESS}value that could be an IP address or a hostname of a remote host;/shadowparameter is used to specify the{SESSION_ID}value that is a shadowee’s session ID.
Note: for details on all available parameters of mstsc utility issue the command
mstsc /?So, based on the parameters of the command above you have to know remote user’s session ID to establish a shadowing connection.
To list the existing sessions on a remote host you could use qwinsta command as follows:
qwinsta /server:{ADDRESS}or quser command which is equivalent to the one above
quser session /server:{ADDRESS}One interesting thing is that if a user locks their screen (Win+L) or switches to another user’s account (from a lock screen only, for details see section 5) or the UAC prompt pops up, then a window with a shadowed session automatically switches to a pause state (two parallel stripes on the screen) until the user comes back. When the user is back, the window with the shadowed session is unpaused automatically.
It should also be noted that the latest version of RDS Shadowing supports multi-monitor setup on a remote host pretty well even with a different resolution on each monitor out of the box.

Abusing the Shadow Registry Key and the NoConsentPrompt Parameter
I haven’t mentioned the Shadow registry key yet, because it doesn’t exist by default.

Shadow key doesn’t exist by default
In this case the behavior is the same as when the key value is set to 1 (described below). In other words, a shadowee must explicitly give permission to allow their session to be shadowed.
To be able to shadow it without permission, you must intentionally override this with a group policy, for example, using GUI application called Local Group Policy Editor (gpedit.msc) set the Set rules for remote control of Remote Desktop Services user sessions policy value to allow session shadowing without user permission. It is located at Local Computer Policy → Computer Configuration → Administrative Templates → Windows Components → Remote Desktop Services → Remote Desktop Session Host → Connections.

It can also be set manually with a command line interpreter by issuing the following command:
reg add "HKEY_LOCAL_MACHINESOFTWAREPoliciesMicrosoftWindows NTTerminal Services" /v Shadow /t REG_DWORD /d 4where the value of the /d parameter is one of the following:
- 0 – No remote control allowed;
- 1 – Full Control with user’s permission;
- 2 – Full Control without user’s permission;
- 3 – View Session with user’s permission;
- 4 – View Session without user’s permission.
Selecting the Not Configured value or the Disabled value deletes the Shadow registry key.
Full Control also allows to connect in the View Session mode, but to avoid a situation with the mistakenly specified /control parameter it is safer to set the Shadow value to 4.
Note: to get the current value of the Shadow key issue the following:
reg query "HKEY_LOCAL_MACHINESOFTWAREPoliciesMicrosoftWindows NTTerminal Services" /v Shadowto remove the Shadow key type
reg delete "HKEY_LOCAL_MACHINESOFTWAREPoliciesMicrosoftWindows NTTerminal Services" /v Shadow /fDefining the Shadow parameter on the remote host, it is possible to shadow a session without a user’s consent as follows:
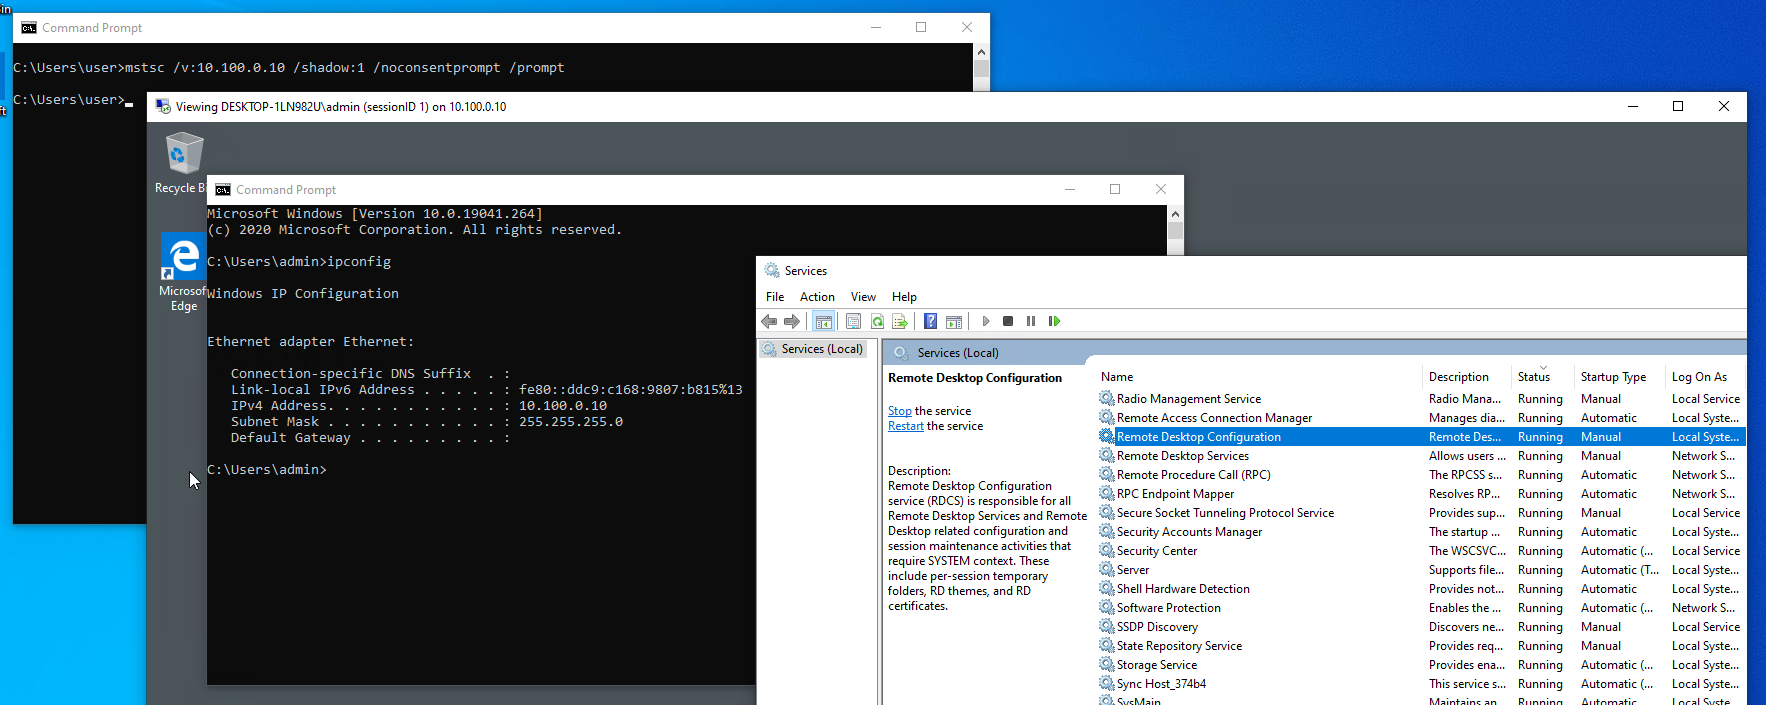
mstsc /v:{ADDRESS} /shadow:{SESSION_ID} /noconsentprompt /promptwhere
/vparameter lets specify the{ADDRESS}value that is an IP address or a hostname of a remote host;/shadowparameter is used to specify the{SESSION_ID}value that is a shadowee’s session ID;/noconsentpromptparameter allows to bypass a shadowee’s permission and shadow their session without their consent;/promptparameter is used to specify a user’s credentials to connect to a remote host.
Another way to specify user’s credentials without having to constantly type them in the pop-up window is to use the runas command as follows:
runas /netonly /noprofile /user:{USERNAME} cmdand in the new command line interpetator window run the mstsc utility
mstsc /v:{ADDRESS} /shadow:{SESSION_ID} /noconsentpromptThe same works for qwinsta and quser.
Sometimes you can face the following general error:
which can mean anything, but in some cases it may mean that
- the user in whose context the current command is issued doesn’t exist on a remote host;
- the specified user credentials are incorrect;
- you are trying to shadow a session to which you don’t have permissions.
This behavior is pretty much the same for qwinsta:
C:>qwinsta /server:{ADDRESS}
Error 5 getting sessionnames
Error [5]:Access is denied.
In a workgroup environment you can use any of the local accounts if this account is also present on a remote host.
Moreover, if you are trying to shadow a session (or list sessions using qwinsta or quser) with an unprivileged user account on a remote host, then you are able to connect only to the session (to list only information about a session) related to this user.
You will get the same behavior if you’re using a non-RID 500 administrator account, but UAC remote restrictions are enabled on the remote host, more precisely it means that the LocalAccountTokenFilterPolicy registry key is set to 0 or the key doesn’t exist (by default).
In the first screenshot UAC remote restrictions are enabled and in the second one they are disabled

qwinsta command output while UAC remote restrictions are enabled
qwinsta command output while UAC remote restrictions are disabled
This is a well-known security mechanism that strips out the administrator access token when a user is connected remotely. More details are at https://docs.microsoft.com/en-us/troubleshoot/windows-server/windows-security/user-account-control-and-remote-restriction.
To disable it change the value to 1 with the following command:
reg add HKEY_LOCAL_MACHINESOFTWAREMicrosoftWindowsCurrentVersionPoliciesSystem /v LocalAccountTokenFilterPolicy /t REG_DWORD /d 1 /fNote: to get the current value of the LocalAccountTokenFilterPolicy key, issue the following:
reg query HKEY_LOCAL_MACHINESOFTWAREMicrosoftWindowsCurrentVersionPoliciesSystem /v LocalAccountTokenFilterPolicyto remove the LocalAccountTokenFilterPolicy key type
reg delete HKEY_LOCAL_MACHINESOFTWAREMicrosoftWindowsCurrentVersionPoliciesSystem /v LocalAccountTokenFilterPolicy /fIt’s important that if you are lucky and the built-in RID 500 administrator account is enabled (by default it is disabled) on the remote host you are able to shadow a session using it since the LocalAccountTokenFilterPolicy key doesn’t affect it. There is another FilterAdministratorToken registry key that might restrict this account if it is set to 1, but by default it is set to 0.
So, in a workgroup (as well as in a domain) environment a local administrator is the only local user that can access other local user’s sessions (if the LocalAccountTokenFilterPolicy and the FilterAdministratorToken registry keys are set to the appropriate values).
In a domain environment any domain administrator is able to shadow sessions of both local and domain users.
I don’t know when it might be useful, but it is possible to enumerate the existence of a session using mstsc itself by simply incrementing the {SESSION_ID} value
mstsc /v:{ADDRESS} /shadow:{SESSION_ID}If there is no such session, then the following error occurs:
Alternatively, if a session exists, but nobody is connected to it or you have no necessary permissions you get one of the following errors:
Otherwise, you are granted permissions and a viewer’s window is opened
Abusing the StartRCM and the fDenyChildConnections Registry Keys
It’s been mentioned in the Requirements section, to successfully shadow a session the remote desktop services must be run, otherwise, the following error occurs:
The simplest way to start them all is to use a graphical user interface as follows:
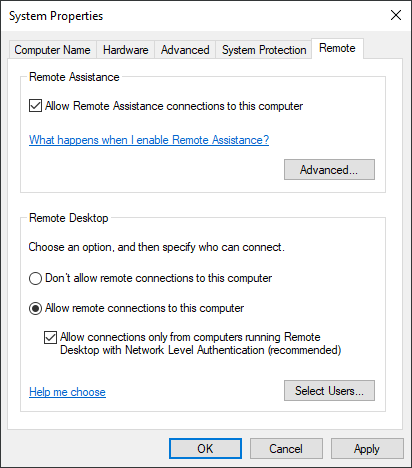
or to switch the fDenyTSConnections registry key from 1 (by default) to 0 manually
reg add "HKEY_LOCAL_MACHINESYSTEMCurrentControlSetControlTerminal Server" /v fDenyTSConnections /t REG_DWORD /d 0 /fThese actions trigger some magic that does all the necessary things.
Note: to query the current value use the following command:
reg query "HKEY_LOCAL_MACHINESYSTEMCurrentControlSetControlTerminal Server" /v fDenyTSConnectionsRunning these services like that will start a listener on the 3389/TCP port which can be found in netstat output
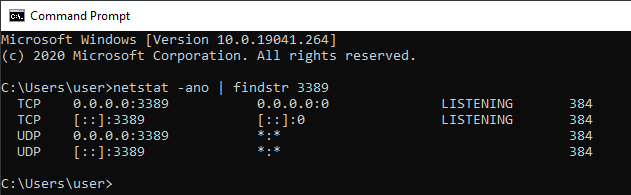
Seems good, right? It is interesting that you can simply switch the fDenyTSConnections registry key back to 1
reg add "HKEY_LOCAL_MACHINESYSTEMCurrentControlSetControlTerminal Server" /v fDenyTSConnections /t REG_DWORD /d 1 /fthen the listener is shut down and the 3389/TCP port disappears from the netstat output, but due to the fact that all the services are still running and the necessary ports (139/TCP, 445/TCP and dynamic port range) are open, you are able to shadow any user’s session.
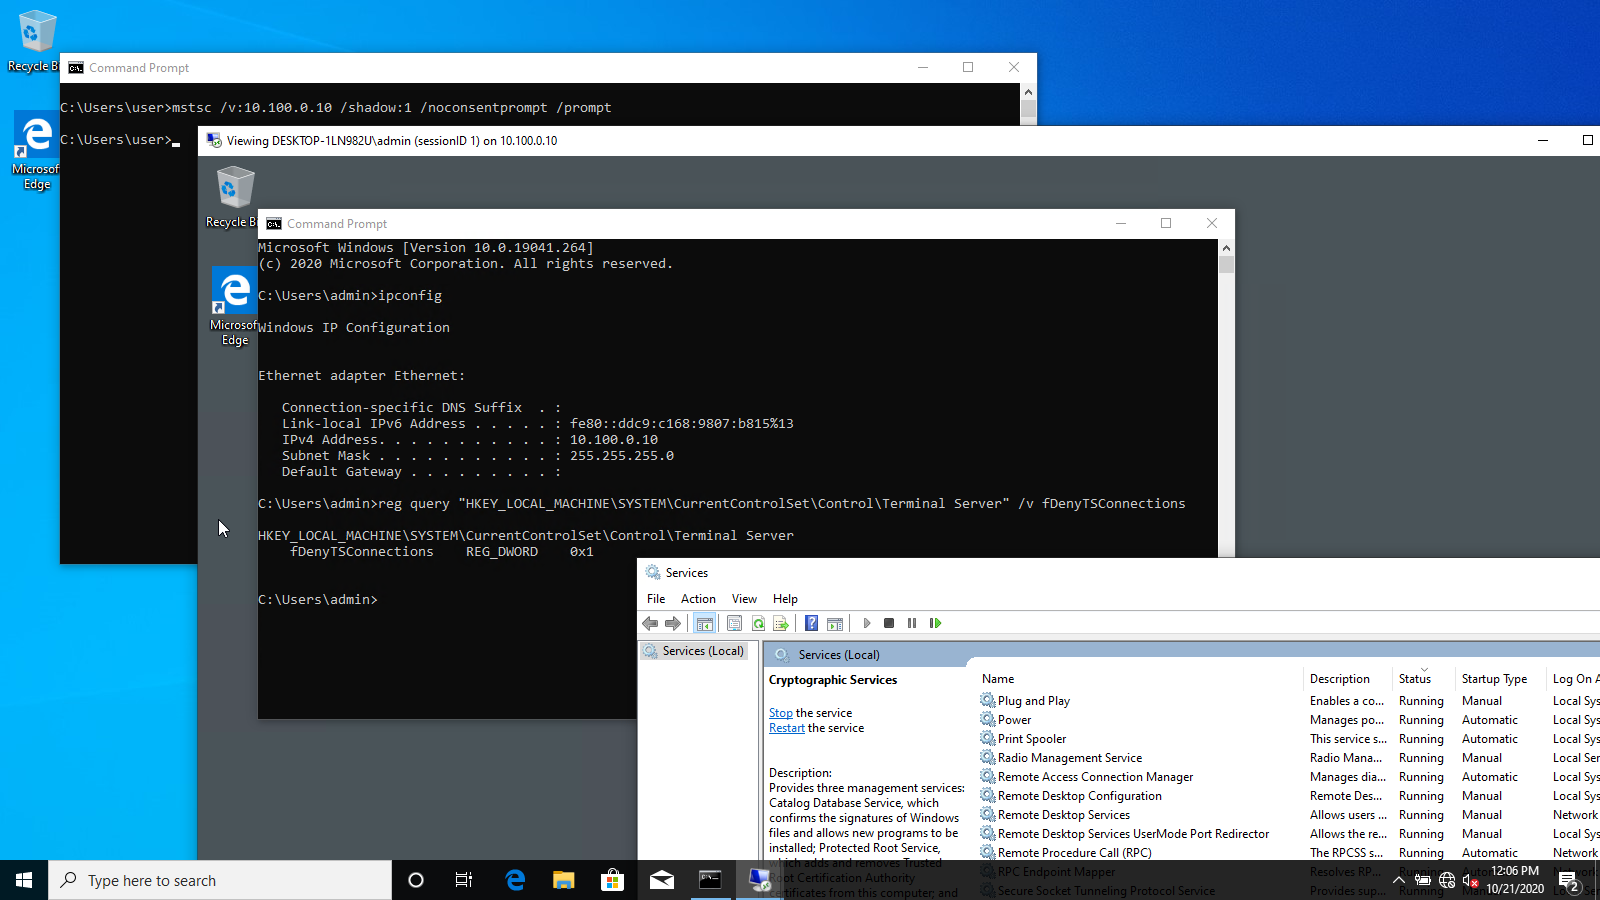
I went a bit deeper and discovered which services were still running after I’d switched the fDenyTSConnections key from 1 to 0. Here is the list:
- Remote Desktop Services (TermService),
- Remote Desktop Configuration (SessionEnv),
- Remote Desktop Services UserMode Port Redirector (UmRdpService),
- Certificate Propagation (CertPropSvc).
but only two of them are really necessary to get RDS Shadowing working:
- Remote Desktop Services (TermService),
- Remote Desktop Configuration (SessionEnv).
Also, I figured out that the RDS Shadowing won’t work if you are trying to start these services manually and some registry keys aren’t set to the appropriate values as listed below in section 5.
Let’s see who is watching the changes to fDenyTSConnections key. The key thought here is that if there is another way to start those services we will probably be able to shadow a session independently of the fDenyTSConnections key and running the listener on 3389/TCP port.
To accomplish it, start Process Monitor and set up a filter to fDenyTSConnections and switch the key fDenyTSConnections from 1 to 0.
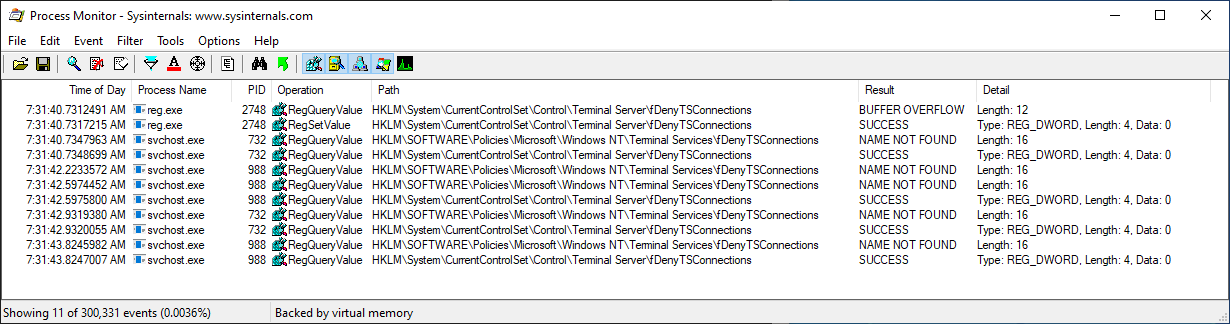
fDenyTSConnections key value
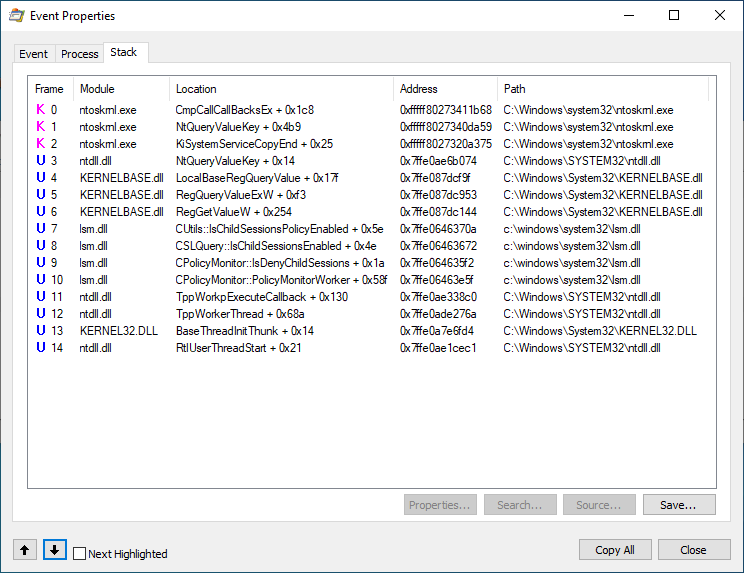
There are several unique stack traces of the processes that access the fDenyTSConnections key value. Two of them are the following:
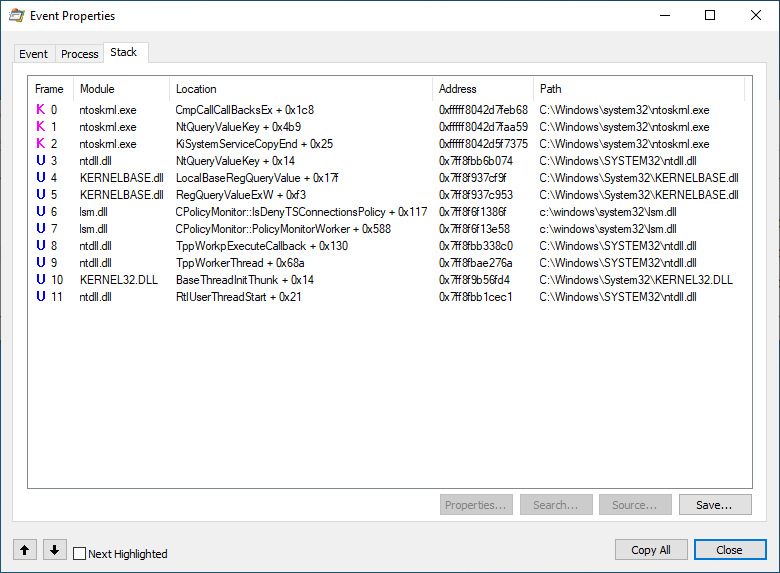
fDenyTSConnections key value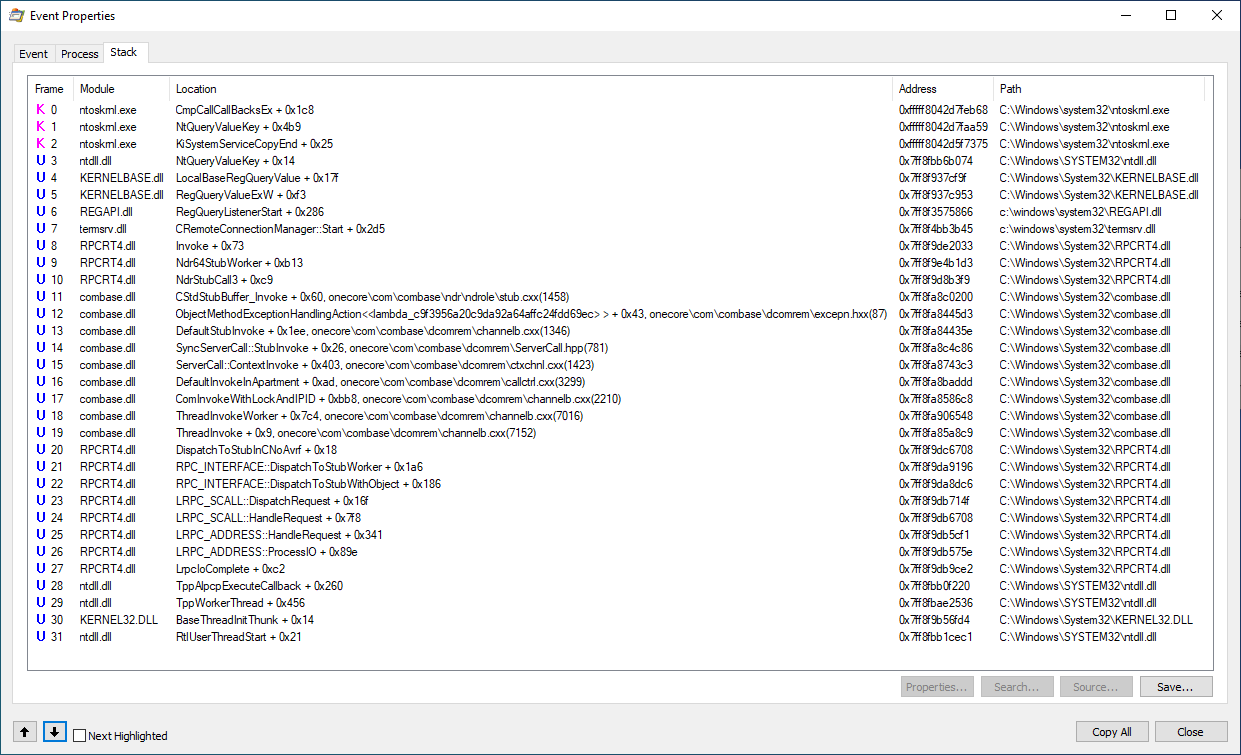
fDenyTSConnections key value
In the first stack the interesting thing is that there is the CPolicyMonitor class in the lsm.dll (Local Session Manager Service) and it has two methods PolicyMonitorWorker and IsDenyTSConnectionsPolicy that monitor the changes to the fDenyTSConnections key.
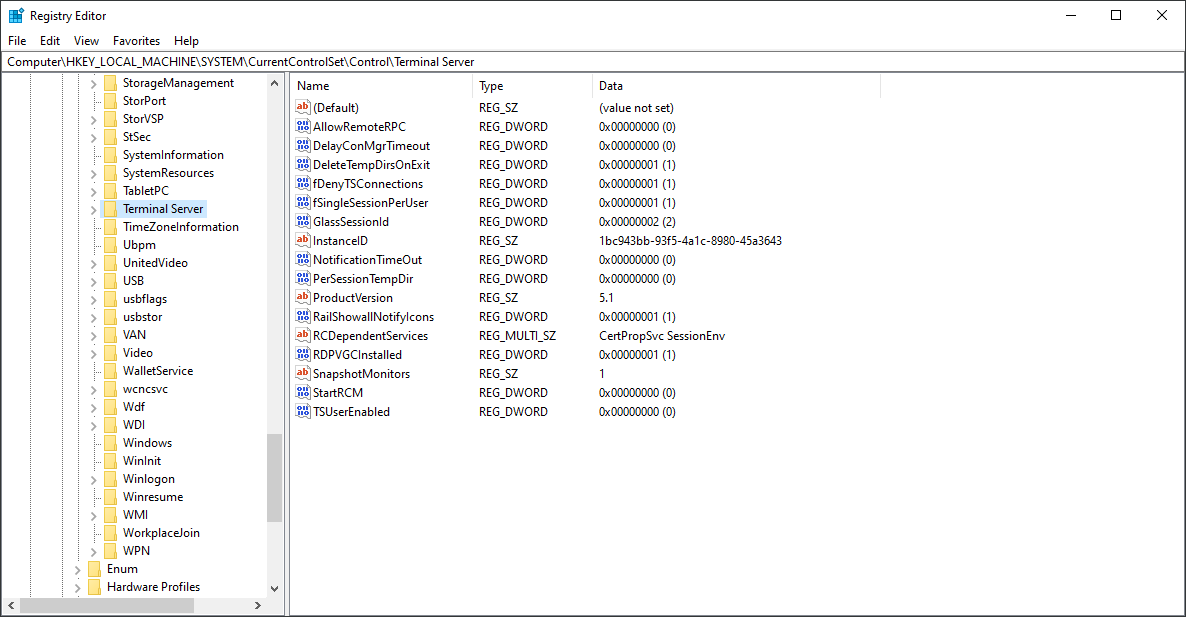
The existing CRemoteConnectionManager::Start call in the second stack trace suggests that it runs Remote Connection Manager. As you can see on the following screenshot there is the StartRCM registry key which name is too similar to “Start Remote Connection Manager”.
Additionally, I found a little information about another registry key called fDenyChildConnections that is somehow related to RDP connections at https://www.guardicore.com/2017/05/the-bondnet-army/. This key doesn’t exist by default.
fDenyChildConnections key
The fDenyChildConnections key is also present in the output of Process Monitor.
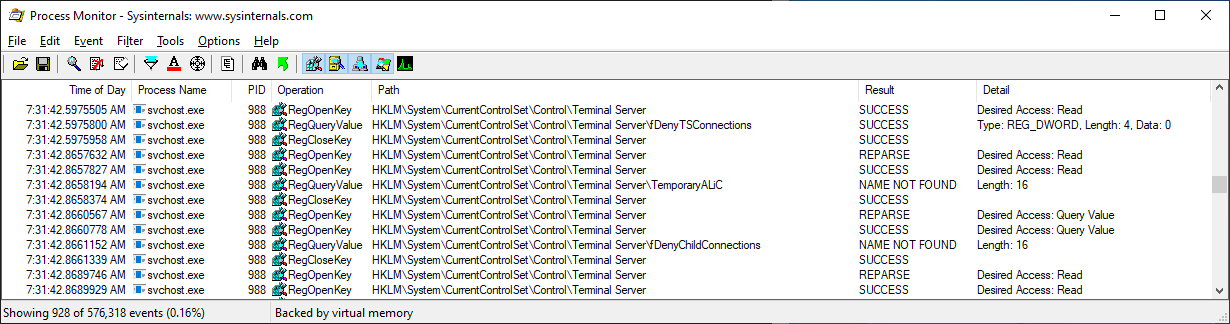
As you can see the key is monitored by the same functions we have seen in the first stack trace above, so there are some validation checks related to this key in lsm.dll.
I examined each of these registry keys and found out that both of them work as expected. Issuing the following commands independently of each other (and reverting the previous one to the default value) I successfully got shadowed connections without setting the IsDenyTSConnections to 0 and running a listener on 3389/TCP port:
reg add "HKEY_LOCAL_MACHINESYSTEMCurrentControlSetControlTerminal Server" /v StartRCM /t REG_DWORD /d 1 /f
reg add "HKEY_LOCAL_MACHINESYSTEMCurrentControlSetControlTerminal Server" /v fDenyChildConnections /t REG_DWORD /d 0 /f
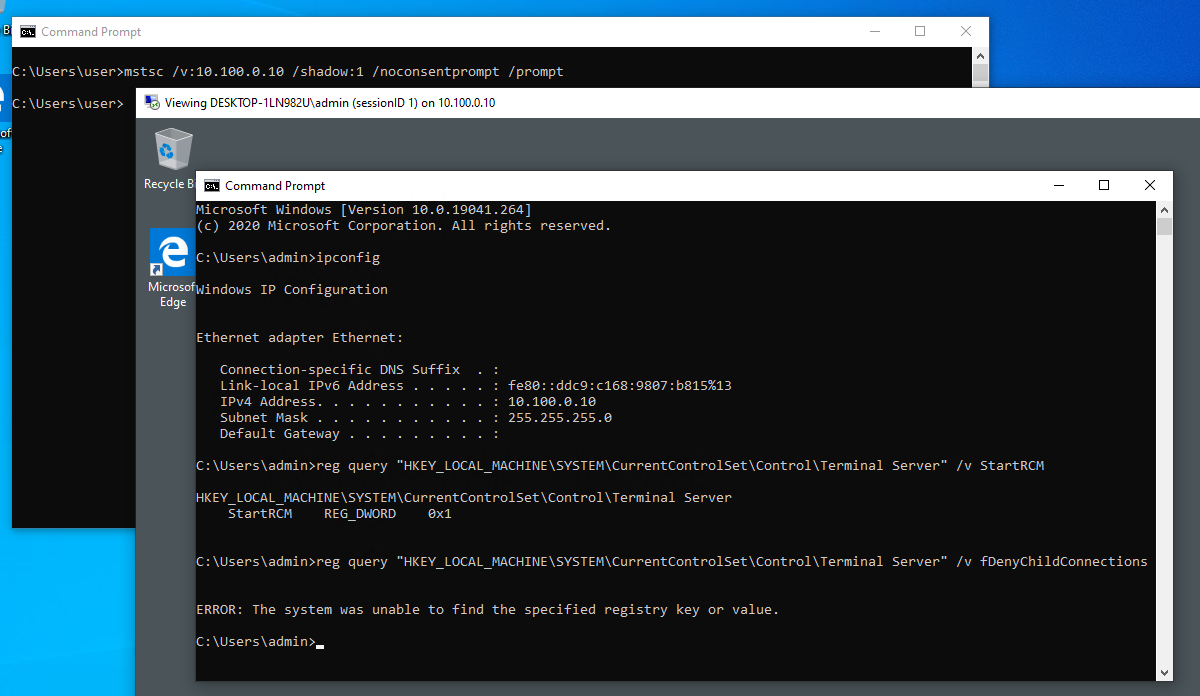
StartRCM key is set to 1
fDenyChildConnections key is set to 0
Persistence
It is possible to get a kind of persistence for RDS Shadowing technique.
No matter how the Remote Desktop Services (TermService) service is started, it cannot be stopped while one of the following is true:
fDenyChildConnectionsis 0,IsDenyTSConnectionsis set to 0,StartRCMis 1.
While this is true, you get the following error every time you try to stop it:
The bad thing is that the Remote Desktop Configuration (SessionEnv) service can be stopped and if so, you will receive the following error while trying to shadow a session:
On the other hand, once the host restarts, the Remote Desktop Configuration (SessionEnv) service starts again (under the condition that one of the keys is set to an appropriate value as mentioned above). Of course, it can be started manually at any time if you have privileged access.
Moreover, as I’ve already written in section 4, only some part of RDP services must be running, thereby you might be able to stop and disable the rest of them without getting any impact on RDP functioning (in case someone decides to turn it on later) and keep RDS Shadowing working. The services are:
- Remote Desktop Services UserMode Port Redirector (
UmRdpService), - Certificate Propagation (
CertPropSvc).
I didn’t do any tests with smart cards, so I have no idea how disabling the Certificate Propagation service will affect users or an operating system.
Here are several screenshots demonstrating this. What I did is that I disabled the services, turned the RDP on using GUI and successfully got an RDP connection. After that I disconnected and established a shadowing connection (the last screenshot).
In section 2 I’ve mentioned that a shadowed session will be paused if a user locks their session, but it doesn’t work if a user uses the Fast User Switching feature to switch to another account from their own session directly while it is unlocked. In this case a shadowing connection is closed and you receive the following error:
There is a way to deprive a user of this opportunity and hide the Fast User Switching interface from them by adding the following registry key (by default it doesn’t exist):
reg add HKEY_LOCAL_MACHINESOFTWAREMicrosoftWindowsCurrentVersionPoliciesSystem /v HideFastUserSwitching /t REG_DWORD /d 1The negative side of this is that the feature also disappears from a lock screen, hence a user won’t be able to switch to another account until the user signs out.
RDS Shadowing on *nix
As in each and every imbalanced world there is terrible news for *nix users. This is expressed in the fact that well-known utilities, like FreeRDP and rdesktop, don’t support Remote Desktop Services Shadowing feature.
More information can be found at corresponding issue pages of these projects on GitHub:
- FreeRDP
- Support /shadow
- Unable to shadow a Windows 10 console user session
- rdesktop
- Feature Request: rdesktop 1.8.4 support shadow existing RDP session
Windows Server 2008 R2 Enterprise Windows Server 2008 R2 Datacenter Windows Server 2008 R2 for Itanium-Based Systems Windows Server 2008 R2 Service Pack 1 Windows Server 2008 R2 Standard Windows Server 2008 R2 Web Edition Windows 7 Enterprise Windows 7 Home Basic Windows 7 Home Premium Windows 7 Professional Windows 7 Starter Windows 7 Ultimate More…Less
Symptoms
Consider the following scenario:
-
You start a Remote Desktop session to a computer that is running Windows Server 2008 R2 and that has the Remote Desktop Services role installed.
-
You remotely control (or «shadow») a different Remote Desktop session by using the Remote Desktop Services Manager Microsoft Management Console (MMC) snap-in.
In this scenario, the CPU usage for the Remote Desktop Services Manager MMC snap-in increases to 100 percent.
Note This issue can also occur on a computer that is running Windows 7 and that has the Remote Server Administration Tools feature installed. When the issue occurs, the CPU usage for the Server Manager MMC snap-in increases to 100 percent.
Cause
This issue occurs because there are messages in the message queue to be processed by the UI thread when the Remotecontrol option is clicked. However, the message queue is shared across threads, and other threads cannot process the messages.
Resolution
Hotfix information
A supported hotfix is available from Microsoft. However, this hotfix is intended to correct only the problem that is described in this article. Apply this hotfix only to systems that are experiencing the problem described in this article. This hotfix might receive additional testing. Therefore, if you are not severely affected by this problem, we recommend that you wait for the next software update that contains this hotfix.
If the hotfix is available for download, there is a «Hotfix download available» section at the top of this Knowledge Base article. If this section does not appear, contact Microsoft Customer Service and Support to obtain the hotfix.
Note If additional issues occur or if any troubleshooting is required, you might have to create a separate service request. The usual support costs will apply to additional support questions and issues that do not qualify for this specific hotfix. For a complete list of Microsoft Customer Service and Support telephone numbers or to create a separate service request, visit the following Microsoft website:
http://support.microsoft.com/contactus/?ws=supportNote The «Hotfix download available» form displays the languages for which the hotfix is available. If you do not see your language, it is because a hotfix is not available for that language.
Prerequisites
To apply this hotfix, you must be running one of the following operating systems. Additionally, you must have the Remote Desktop Services role installed on the computer that is running Windows Server 2008 R2 or have the Remote Server Administration Tools feature on the computer that is running Windows 7.
-
Windows 7
-
Windows 7 Service Pack 1 (SP1)
-
Windows Server 2008 R2
-
Windows Server 2008 R2 Service Pack 1 (SP1)
For more information about how to obtain a Windows 7 or Windows Server 2008 R2 service pack, click the following article number to view the article in the Microsoft Knowledge Base:
976932 Information about Service Pack 1 for Windows 7 and for Windows Server 2008 R2
Registry information
To use the hotfix in this package, you do not have to make any changes to the registry.
Restart requirement
You must restart the computer after you apply this hotfix.
Hotfix replacement information
This hotfix does not replace a previously released hotfix.
File information
The global version of this hotfix installs files that have the attributes that are listed in the following tables. The dates and the times for these files are listed in Coordinated Universal Time (UTC). The dates and the times for these files on your local computer are displayed in your local time together with your current daylight saving time (DST) bias. Additionally, the dates and the times may change when you perform certain operations on the files.
Windows 7 and Windows Server 2008 R2 file information notes
Important Windows 7 hotfixes and Windows Server 2008 R2 hotfixes are included in the same packages. However, hotfixes on the Hotfix Request page are listed under both operating systems. To request the hotfix package that applies to one or both operating systems, select the hotfix that is listed under «Windows 7/Windows Server 2008 R2» on the page. Always refer to the «Applies To» section in articles to determine the actual operating system that each hotfix applies to.
-
The files that apply to a specific product, milestone (RTM, SPn), and service branch (LDR, GDR) can be identified by examining the file version numbers as shown in the following table:
Version
Product
Milestone
Service branch
6.1.760
0.21xxxWindows 7 and Windows Server 2008 R2
RTM
LDR
6.1.760
1.21xxxWindows 7 and Windows Server 2008 R2
SP1
LDR
-
The MANIFEST files (.manifest) and the MUM files (.mum) that are installed for each environment are listed separately in the «Additional file information for Windows 7 and for Windows Server 2008 R2» section. MUM and MANIFEST files, and the associated security catalog (.cat) files, are critical to maintaining the state of the updated component. The security catalog files, for which the attributes are not listed, are signed with a Microsoft digital signature.
For all supported x86-based versions of Windows 7
|
File name |
File version |
File size |
Date |
Time |
Platform |
|---|---|---|---|---|---|
|
Tsadmin.dll |
6.1.7600.21177 |
450,560 |
29-Mar-2012 |
04:56 |
x86 |
|
Tsadmin.dll |
6.1.7601.21953 |
450,560 |
29-Mar-2012 |
05:17 |
x86 |
For all supported x64-based versions of Windows 7 and of Windows Server 2008 R2
|
File name |
File version |
File size |
Date |
Time |
Platform |
|---|---|---|---|---|---|
|
Tsadmin.dll |
6.1.7600.21177 |
450,560 |
29-Mar-2012 |
05:38 |
x64 |
|
Tsadmin.dll |
6.1.7601.21953 |
450,560 |
29-Mar-2012 |
19:38 |
x64 |
For all supported IA-64-based versions of Windows Server 2008 R2
|
File name |
File version |
File size |
Date |
Time |
Platform |
|---|---|---|---|---|---|
|
Tsadmin.dll |
6.1.7600.21177 |
450,560 |
29-Mar-2012 |
04:29 |
IA-64 |
|
Tsadmin.dll |
6.1.7601.21953 |
450,560 |
29-Mar-2012 |
04:25 |
IA-64 |
Status
Microsoft has confirmed that this is a problem in the Microsoft products that are listed in the «Applies to» section.
More Information
For more information about software update terminology, click the following article number to view the article in the Microsoft Knowledge Base:
824684 Description of the standard terminology that is used to describe Microsoft software updates
Additional file information
Additional file information for Windows 7 and for Windows Server 2008 R2
Additional files for all supported x86-based versions of Windows 7
|
File name |
X86_5dccb495988700aa6a5d312ce69709dc_31bf3856ad364e35_6.1.7600.21177_none_8c09b372cfdf7606.manifest |
|
File version |
Not applicable |
|
File size |
727 |
|
Date (UTC) |
29-Mar-2012 |
|
Time (UTC) |
23:23 |
|
Platform |
Not applicable |
|
File name |
X86_abab6769c7617364aff561bd6291e6cc_31bf3856ad364e35_6.1.7601.21953_none_d1b1b861dfed65f5.manifest |
|
File version |
Not applicable |
|
File size |
727 |
|
Date (UTC) |
29-Mar-2012 |
|
Time (UTC) |
23:23 |
|
Platform |
Not applicable |
|
File name |
X86_microsoft-windows-t..ager-snapin-nonmsil_31bf3856ad364e35_6.1.7600.21177_none_8c44ad211d13fd71.manifest |
|
File version |
Not applicable |
|
File size |
10,897 |
|
Date (UTC) |
29-Mar-2012 |
|
Time (UTC) |
05:18 |
|
Platform |
Not applicable |
|
File name |
X86_microsoft-windows-t..ager-snapin-nonmsil_31bf3856ad364e35_6.1.7601.21953_none_8e3cd29b1a2d9604.manifest |
|
File version |
Not applicable |
|
File size |
10,897 |
|
Date (UTC) |
29-Mar-2012 |
|
Time (UTC) |
05:42 |
|
Platform |
Not applicable |
Additional files for all supported x64-based versions of Windows 7 and of Windows Server 2008 R2
|
File name |
Amd64_5dccb495988700aa6a5d312ce69709dc_31bf3856ad364e35_6.1.7600.21177_none_e8284ef6883ce73c.manifest |
|
File version |
Not applicable |
|
File size |
729 |
|
Date (UTC) |
29-Mar-2012 |
|
Time (UTC) |
23:23 |
|
Platform |
Not applicable |
|
File name |
Amd64_749a9a9eef1cb88feacc5d3b08cc8157_31bf3856ad364e35_6.1.7601.21953_none_cd303bda34be5edd.manifest |
|
File version |
Not applicable |
|
File size |
731 |
|
Date (UTC) |
29-Mar-2012 |
|
Time (UTC) |
23:23 |
|
Platform |
Not applicable |
|
File name |
Amd64_abab6769c7617364aff561bd6291e6cc_31bf3856ad364e35_6.1.7601.21953_none_2dd053e5984ad72b.manifest |
|
File version |
Not applicable |
|
File size |
729 |
|
Date (UTC) |
29-Mar-2012 |
|
Time (UTC) |
23:23 |
|
Platform |
Not applicable |
|
File name |
Amd64_d99da1f3fac7655be92ec2edacbc2f4a_31bf3856ad364e35_6.1.7600.21177_none_be913d4bfe31ed14.manifest |
|
File version |
Not applicable |
|
File size |
731 |
|
Date (UTC) |
29-Mar-2012 |
|
Time (UTC) |
23:23 |
|
Platform |
Not applicable |
|
File name |
Amd64_microsoft-windows-t..ager-snapin-nonmsil_31bf3856ad364e35_6.1.7600.21177_none_e86348a4d5716ea7.manifest |
|
File version |
Not applicable |
|
File size |
10,903 |
|
Date (UTC) |
29-Mar-2012 |
|
Time (UTC) |
06:13 |
|
Platform |
Not applicable |
|
File name |
Amd64_microsoft-windows-t..ager-snapin-nonmsil_31bf3856ad364e35_6.1.7601.21953_none_ea5b6e1ed28b073a.manifest |
|
File version |
Not applicable |
|
File size |
10,903 |
|
Date (UTC) |
29-Mar-2012 |
|
Time (UTC) |
20:04 |
|
Platform |
Not applicable |
Additional files for all supported IA-64-based versions of Windows Server 2008 R2
|
File name |
Ia64_9fa8083dc2a326a82aac3d95e3d0c2cd_31bf3856ad364e35_6.1.7601.21953_none_cbe11571c90b9aaf.manifest |
|
File version |
Not applicable |
|
File size |
1,100 |
|
Date (UTC) |
29-Mar-2012 |
|
Time (UTC) |
23:23 |
|
Platform |
Not applicable |
|
File name |
Ia64_c1395b13e8cf325a89354cf3bbc72fec_31bf3856ad364e35_6.1.7600.21177_none_fc8c43d768ec418a.manifest |
|
File version |
Not applicable |
|
File size |
1,100 |
|
Date (UTC) |
29-Mar-2012 |
|
Time (UTC) |
23:23 |
|
Platform |
Not applicable |
|
File name |
Ia64_microsoft-windows-t..ager-snapin-nonmsil_31bf3856ad364e35_6.1.7600.21177_none_8c4651171d12066d.manifest |
|
File version |
Not applicable |
|
File size |
10,900 |
|
Date (UTC) |
29-Mar-2012 |
|
Time (UTC) |
05:59 |
|
Platform |
Not applicable |
|
File name |
Ia64_microsoft-windows-t..ager-snapin-nonmsil_31bf3856ad364e35_6.1.7601.21953_none_8e3e76911a2b9f00.manifest |
|
File version |
Not applicable |
|
File size |
10,900 |
|
Date (UTC) |
29-Mar-2012 |
|
Time (UTC) |
06:26 |
|
Platform |
Not applicable |
Need more help?
Вы можете использовать возможности теневых подключений (Remote Desktop Shadowing) для удалённого подключение к сессиям пользователей на компьютерах Windows. Это функционал является по сути аналогом Remote Assistance и позволяет администраторам удаленно просматривать и взаимодействовать с рабочим столом пользователей как на десктопных версиях (Windows 11 или 10), так и на RDS серверах Windows Server.
Содержание:
- Настройка клиентов Windows для удаленного подключения через теневые сессии
- Удаленное подключение к сессии пользователя Windows через RDP Shadowing
Настройка клиентов Windows для удаленного подключения через теневые сессии
Вам нужно определенным образом настроить компьютеры, к которым вы хотите подключаться через теневое подключение.
- Включите удаленный рабочий стол (RDP) на компьютерах пользователей (вручную или через GPO);
- Ваша учетная запись должна обладать правами локального администратора на компьютере пользователей (вы можете добавить пользователя в группу администраторов вручную или с помощью групповых политик);
- Настройте режим теневого подключения (нужно ли запрашивать подтверждение пользователя, и возможно управления в сессии или только наблюдение). Можно настроить режим через групповую политику “Установить правила удаленного управления для пользовательских сеансов служб удаленных рабочих столов” (Set rules for remote control of Remote Desktop Services user sessions) в разделе Конфигурация компьютера -> Административные шаблоны –> Компоненты Windows –> Службы удаленных рабочих столов –> Узел сеансов удаленных рабочих столов –> Подключения (Policies -> Administrative Templates -> Windows components -> Remote Desktop Services -> Remote Session Host -> Connections).
Доступны 5 режимов:0 – запретить удаленное управление;
1 — полный контроль с разрешения пользователя;
2 — полный контроль без разрешения пользователя;
3 — наблюдение за сеансом с разрешения пользователя;
4 — наблюдение за сеансом без разрешения пользователя. - Вы можете включить нужный режим напрямую в реестре. Отредактируйте реестр вручную или с помощью команды (в этом примере мы установили 4 режим – разрешить просмотр сеанса пользователя без уведомления):
reg add "HKEY_LOCAL_MACHINESOFTWAREPoliciesMicrosoftWindows NTTerminal Services" /v Shadow /t REG_DWORD /d 4По умолчанию данный теневое подключение выполняется в режиме полного контроля с разрешения пользователя.
- Настройте правила Windows Defender Firewall, разрешающие трафик теневых подключений по сети. Для трафика session shadowing в Windows вместо стандартного порта 3389/RDP используются порты 139/TCP, 445/TCP и диапазон динамических RPC портов (49152 по 6553). Чтобы разрешить входящий трафик теневых подключений, нужно включить два преднастроненных правила в Windows:
File and Printer Sharing (SMB-In)
и
Remote Desktop - Shadow (TCP-In)
. Последнее правило разрешает удаленный доступ к процессу
RdpSa.exe
. Вы можете включить правила Windows Defender на компьютерах пользователей через GPO или с помощью PowerShell командлета Enable-NetFirewallRule.
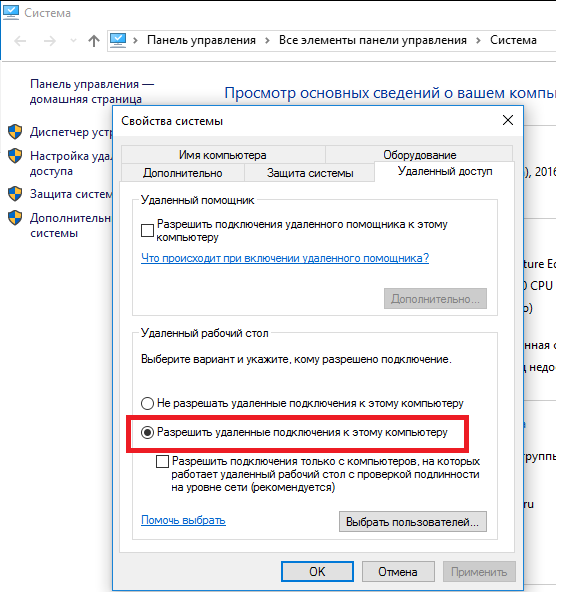
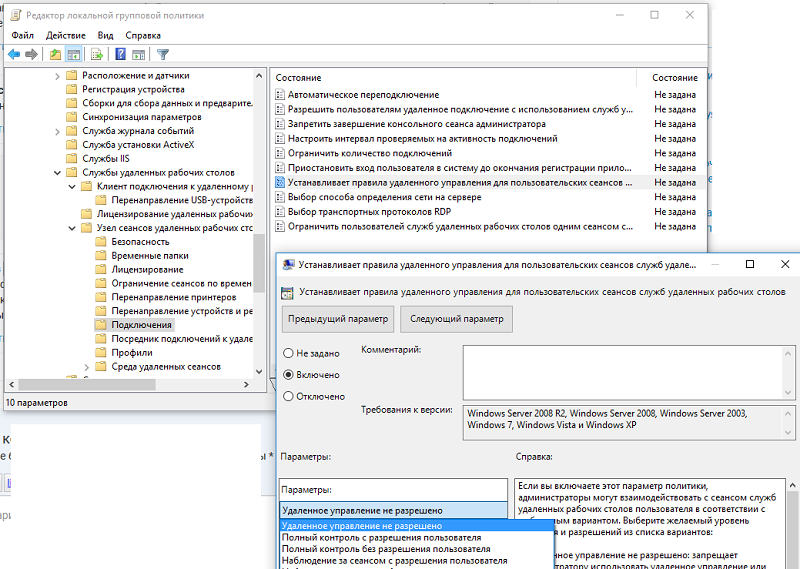
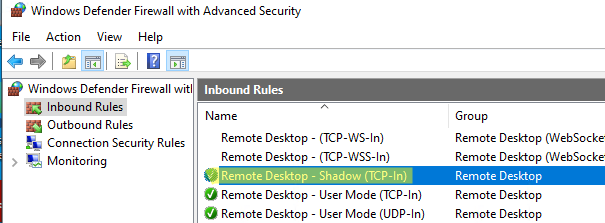
Удаленное подключение к сессии пользователя Windows через RDP Shadowing
Рассмотрим, как удаленно подключиться рабочему столу сессии другого пользователя на удаленном компьютере Windows через теневые подключения RDP. В этом примере я покажу, как подключиться с компьютера Windows 11 к сессии пользователя на рабочей станции пользователя с Windows 10.
Для теневого подключения к сессии пользователя используется стандартная RDP утилита mstsc.exe. Формат команды такой:
Mstsc.exe /shadow:<ID сессии> /v:<Имя или IP адрес компьютера>
Также можно использовать одну из опций:
- /prompt – запросить имя и пароль пользователя, под которым выполняется подключение (если не указано, подключение выполняется под текущим пользователем).
- /control – режим взаимодействия с сеансом пользователя. Если параметр не задан, вы подключитесь в режиме просмотра (наблюдения) сессии пользователя, т.е. вы не сможете управлять его мышью и вводить данные с клавиатуры;
- /noConsentPrompt – не запрашивать у пользователя подтверждение на подключение к сессии.
Теперь нужно узнать имя пользователя и ID его сессии на удаленном компьютере (если пользователь работает непосредственно за консолью компьютера, то ID его сессии всегда будет равно 1).
Выведем список сессий пользователей на удаленном компьютере (это может быть как десктопный компьютер с Windows 11/10 или Windows Server с ролью Remote Desktop Services Host (RDSH).
qwinsta /server:wks-w10b01
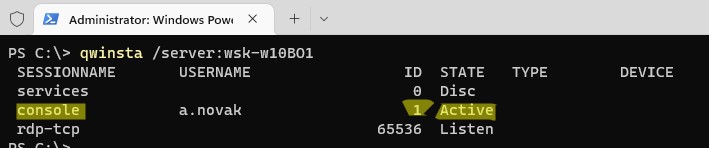
В данном примере видно, что на компьютере залогинен один пользователь a.novak, который работает непосредственно за компьютером (
SESSIONNAME=console
). Идентификатор сессии ID=1.
Чтобы подключиться к рабочему столу этого пользователя через теневое подключение, выполните команду:
mstsc.exe /shadow:1 /v:wks-w10b01
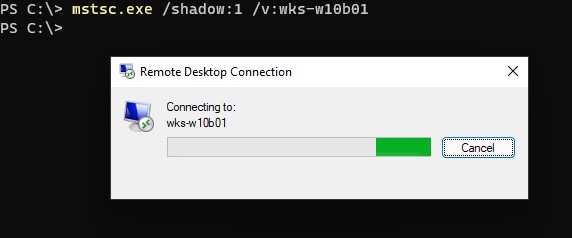
На экране пользователя Windows появится запрос подтверждения подключения администратора к его сеансу:
Запрос на удаленное подключение
Username запрашивает удаленный просмотр вашего сеанса. Вы принимаете этот запрос.

Если служба TermService на удаленном компьютере отключена, то при попытке удалённого подключения через RDP shadow появится ошибка:
The version of Windows running on this server does not support user shadowing

Если пользователь разрешит соединение, вы подключитесь к его консольному сеансу и увидите его рабочий стол. Вы будете видеть все действия пользователя, но не сможете взаимодействовать с его сессией. Если вы хотите управлять его сессией, добавьте в команду параметр /control. В этом случае надпись в заголовке окна сменится с
Viewing username (sessionID 1) on computername
на
Controlling…
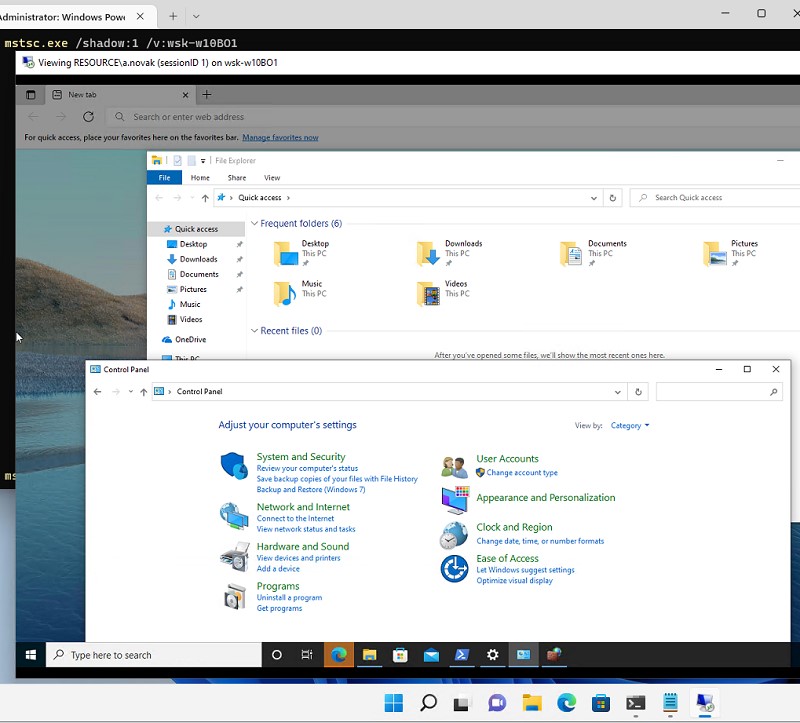
В данном случае вы подключились непосредственно подключиться к консольной сессии пользователя без блокировки его сеанса. При удаленном подключении к Windows 10 через обычный RDP, то сессия локального отключается (даже если вы включите возможность использования нескольких одновременных RDP сессий в Windows 10).
Если сессия пользователя заблокирована, или появляется запрос повышения привилегий UAC, то без исопльзования режима
mstsc /control
окно с теневой сессией становится черным и на нем появляется символ паузы.
Теневая сессия переходит в приостановленное состояние, если у пользователя появляется запрос UAC на Secure desktop. После того, как пользователь подтвердит действие UAC, ваша сессия возобновится.
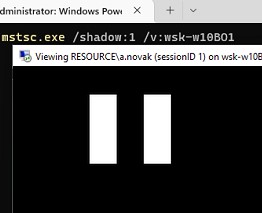
Чтобы развернуть окно теневой сессии во весь экран, воспользуйтесь комбинацией клавиш Ctrl + Alt + Break.
Для завершения теневой сессии нажмите на компьютере
alt+*
(или
ctrl+*
на RDS сервере).
Вы можете оповестить пользователя о том, что кто-то удаленно подключится к его сессии через теневое подключение с помощью следующего PowerShell скрипта:
while($true){
if (Get-Process -Name "RdpSa" -ErrorAction SilentlyContinue){[console]::beep(1000,500);Write-Host "RdpSa is running at $(Get-Date)"}
Start-Sleep -Seconds 1
}
В данном примере мы оповещаем пользователя звуковым оповещением, но вы можете вывести всплывающее уведомление на рабочий стол. Можно запустить этот PowerShell скрипт как службу Windows.
Вы можете получить историю теневых подключений к компьютеру пользователя из журнала событий Windows. Все интересующие вас логи находятся в разделе Microsoft-Windows-TerminalServices-RemoteConnectionManager/Operational:Event Viewer
- Event ID 20508 — Shadow View Permission Granted
- Event ID 20503 — Shadow View Session Started
- Event ID 20504 — Shadow View Session Stopped
Вы можете получить логи теневых подключений к компьютеру с помощью PowerShell:
$EventIds = 20508,20503,20504
Get-WinEvent -FilterHashTable @{LogName='Microsoft-Windows-TerminalServices-RemoteConnectionManager/Operational';ID=$EventIds}
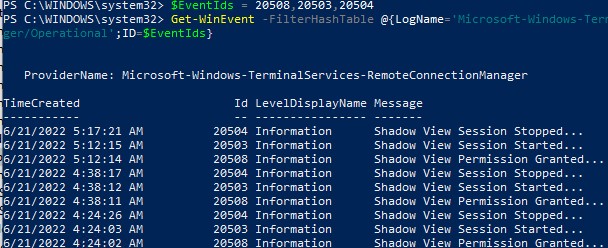
Функционал теневого подключения Remote Desktop Shadowing работает в Windows 11/10/ 8.1 и Windows Server 2022/2019/2016/2012 R2. Таким образом Remote Desktop Shadowing можно использовать как аналог Remote Assistance (Удаленный помощник) или TeamViewer/Anydesk для локальной или корпоративной сети.
Пятница, 22 — Июль — 2011
1. Remote Desktop и оказание удалённой помощи.
Одна из типовых задач системного администратора — оказание помощи пользователям, работая удалённо. Действительно, ездить между филиалами компании (или даже бегать между этажами одного здания) лишь ради того, чтобы прочесть непонятное пользователю окошко и нажать нужный Yes/No/Cancel, было бы крайне неэффективной идеей.
Технология Remote Desktop, поставляемая с Microsoft Windows XP, Windows Vista и Windows 7 (кроме версий Home), позволяет через сеть подключаться к рабочему столу удалённого компьютера, запускать все программы и настраивать систему, как будто сидя прямо перед ним. Но что получится при попытке соединиться с помощью Remote Desktop с рабочей станцией, на которой уже вошёл и работает пользователь? Обычно мы видим вопрос системы: «Желаете ли отключить пользователя Peter от компьютера?»

Вот же незадача — если мы выберем принудительное завершение сессии Peter, оказать ему помощь не удастся. Мы даже не сможем посмотреть, как выглядит собственно проблема. И технологию Remote Assistance также не засчитываем, так как для её работы от пользователя требуется проявление инициативы, на которое он зачастую просто неспособен. Поэтому, как правило, большинство администраторов для просмотра удалённого экрана рабочей станции применяют различные сторонние программы — платные и не очень, хорошие и «так себе».
2. А можно ли как-то решить вопрос встроенными средствами?
Одно из свойств Remote Desktop, называемое Remote Shadowing, позволяет подключиться к экрану удалённого пользователя и оказать ему помощь. Для её применения полноценный терминальный сервер не требуется, достаточно наличия в удалённом филиале одной незанятой реальной или виртуальной рабочей станции на базе Windows Professional/Business (или выше), с которой можно установить Remote Desktop-соединение. Впрочем, если это будет Windows Server, никто не обидится!

Схема применения Remote Shadowing выглядит следующим образом: сначала специалист технической поддержки, работающий на компьютере ALPHA, устанавливает Remote Desktop-соединение (RDP) с выделенным (или просто свободным в настоящий момент) компьютером BRAVO. Это инициализирует RDP-протокол, с помощью которого реализуется Remote Shadowing. Внутри окна компьютера BRAVO специалист выполняет команду подключения к компьютеру CHARLIE, на котором работает нуждающийся в поддержке пользователь:
Start → Run → shadow console /server:CHARLIE
Console в данном выражении означает название сессии пользователя. Если на компьютере CHARLIE установлена Windows XP, вместо console можно использовать номер сессии 0 (ноль); на более новых системах номера сессий начинаются с 1 и продолжают увеличиваться по мере параллельного входа в систему нескольких пользователей.
В то время как экран компьютера BRAVO остаётся заблокированным и недоступным для всех других пользователей, специалист на дисплее компьютера ALPHA получает изображение экрана CHARLIE и может оказать техническую поддержку:

3. Какие настройки необходимо выполнить, чтобы всё это заработало?
-
Включите Remote Desktop на компьютерах в удалённом филиале. Это нужно сделать как на BRAVO, с которым будет устанавливаться первоначальное соединение, так и на всех остальных CHARLIE, пользователям которых потребуется помогать;
-
В случае, если сеть REMOTE OFFICE отделена от интернета NAT-маршрутизатором, настройте пропускание порта 3389 снаружи на компьютер BRAVO. Также убедитесь, что настройки межсетевого экрана (firewall) BRAVO и CHARLIE позволяют соединяться с ними с помощью Remote Desktop;
-
Компьютер CHARLIE производит опознание (аутентифицирует) человека, который пытается удалённо перехватить экран пользователя. Для этого компьютер BRAVO высылает имя и пароль инициатора соединения — работника техподдержки — через службу Client for Microsoft Networks. Чтобы эти коммуникации произошли успешно, убедитесь, что межсетевой экран (firewall) компьютера CHARLIE не блокирует порты службы Fil
-
Начиная с Windows XP Service Pack 2, Remote Shadowing требует наличия в реестре компьютера CHARLIE определённого значения. Если его нет, создайте его вручную и перезагрузите систему:
[HKEY_LOCAL_MACHINESYSTEMCurrentControlSetControlTerminal Server]
«AllowRemoteRPC»=dword:00000001 -
Перехват чужих экранов — операция, требующая определённых привилегий. Убедитесь, что учётная запись работника технической поддержки является членом группы Administrators на компьютере CHARLIE. Если компьютеры организованы в рабочую группу, лучше всего создать идентичную учётную запись для техподдержки на всех BRAVO и CHARLIE, если в домене — используйте единую доменную учётную запись;
Зачастую, требуется исполнять определённые законодательные требования. Например, пользователь должен получать уведомление о том, что к его экрану кто-то подключается; к тому же, следует определить, намерены мы подключаться только для просмотра экрана, либо для полного контроля, управления. Для этого настройте Group Policy на машине CHARLIE:
Start → Run → gpedit.msc
На системах Windows XP и Windows Server 2003 в контейнере Administrative Templates → Windows Components → Terminal Services настройте параметр Set Rules for Remote Control.. согласно организационным требованиям доступа. В случае, если внутри Windows Components нет папки Terminal Services, щёлкните правой кнопкой мыши по папке Administrative Templates и выберите команду Add/Remove Templates. Добавьте шаблон System.adm из папки WINDOWSInf, и контейнер Terminal Services появится.
На системах Windows Vista, Windows 7 и Windows Server 2008 в контейнере Administrative Templates → Windows Components → Remote Desktop Services → Remote Desktop Session Host → Connections настройте параметр Set Rules for Remote Control.. согласно организационным требованиям доступа.
Технология Remote Shadowing не является идеальной с точки зрения удобства использования или богатого выбора возможностей, но обладает своими преимуществами — это довольно быстрый, безопасный и не требующий дополнительного лицензирования инструмент удалённого управления. Возможно, именно такой, как вы искали!
Last Content Update: 26-Aug-2010