Привет друзья, меня зовут Ro8! В предыдущей статье мы с вами установили Windows Server 2008 R2 в режиме Server Core, в сегодняшней статье мы установим на Windows Server 2008 R2 (Server Core) средство автоматизации PowerShell 2.0.
Установка Windows PowerShell 2.0 на Windows Server 2008 R2 (Server Core)
В статье «Установка Windows Server 2008 R2 в режиме Server Core» мы установили на компьютер операционную систему Windows Server 2008 R2 в режиме Server Core.
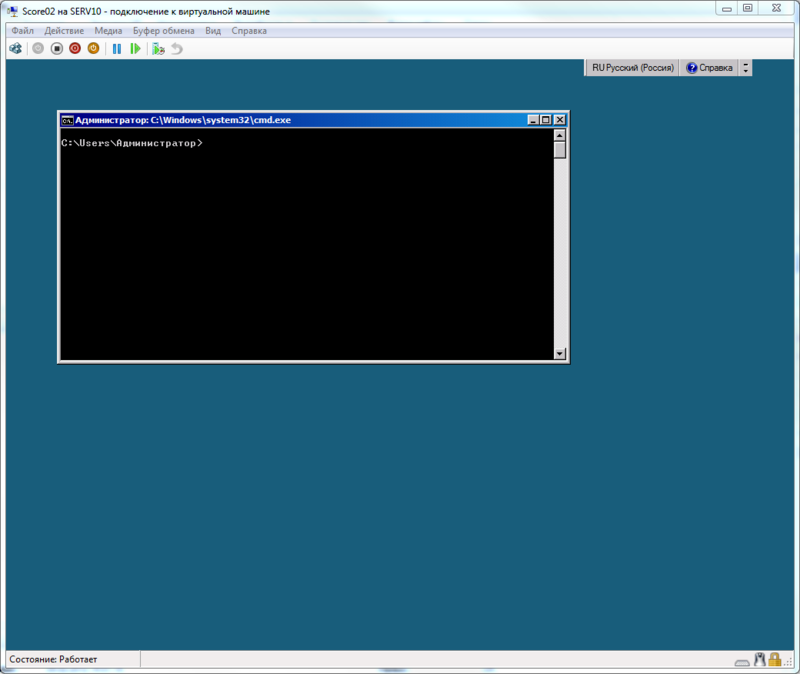
После входа в систему перед нами появляется окно командной строки

Запустим Диспетчер задач введя в командной строке команду taskmgr

Откроется окно диспетчера задач

Выбираем «Новая задача».

Введем команду cmdи запустим еще один экземпляр командной строки

В итоге у нас есть два запущенных экземпляра командной строки

Перед тем, как выполнять установку Windows PowerShell, нам необходимо установить на компьютер компонент .net Framework 2.0
Для просмотра компонентов, доступных для установки выполним в первом экземпляре командной строки команду oclist

После выполнения команды oclist можно увидеть, что компонент .net Framework 2.0 (NetFx2-ServerCore)не установлен

Для установки компонента NetFx2-ServerCore воспользуемся командой ocsetup NetFx2-ServerCore(выполняем данную команду во втором экземпляре командной строки)

После того, как команда ocsetup NetFx2-ServerCore отработает, в первом экземпляре командной строки выполним команду oclist для просмотра установленных компонентов

Как видим, компонент NetFx2-ServerCore уже установлен

Таким же образом используя команду oclistвидим, что компонент MicrosoftWindowsPowerShell пока не установлен

Для установки компонента MicrosoftWindowsPowerShell выполним во втором экземпляре командной строки команду ocsetup MicrosoftWindowsPowerShell

Выполняем в первом экземпляре командной строки команду oclist и видим, что компонент MicrosoftWindowsPowerShell установлен

Перейдем по пути C:WindowsSystem32WindowsPowerShellv1.0 выполнив команду cd WindowsSystem32WindowsPowerShellv1.0

Посмотрим содержимое папки v1.0 выполнив команду dir /b. Как видим, в папке v1.0 присутствует файл powershell.exe

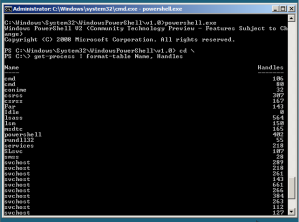
Запустим файл powershell.exe, выполнив команду powershell.exe

Как видим, мы запустили экземпляр PowerShell, о чем свидетельствуют буквы PS

Выполним к примеру в PowerShell команду get-processдля просмотра процессов на данном компьютере

Question
PowerShell feature is a very useful management tool for system administrators, especially on Server Core server and Microsoft Hyper-V Server 2008 R2 which do not have UI. How can I install PowerShell feature on a Windows Server 2008 R2 Server Core server?
Answer
PowerShell feature depends on the NetFx2-ServerCore feature to be installed properly. To install the PowerShell feature, we need to first install NetFx2-ServerCore feature and then install MicrosoftWindowsPowerShell feature. To do so, please perform the following steps:
1. Use the following command to displays a list of features and their status:
DISM /Online /Get-Features
2. Enables the NetFx2-ServerCore feature:
DISM /Online /Enable-Feature /FeatureName: NetFx2-ServerCore
3. Enables the PowerShell feature:
DISM /Online /Enable-Feature /FeatureName: MicrosoftWindowsPowerShell
When you finish the above steps, you will be able to find the C:Windowssystem32WindowsPowerShell folder and launch the shell.
Note: It is recommend that you use DISM to install the features instead of OCSETUP in Windows Server 2008 R2. DISM is a new tool in Windows Server 2008 R2 and is more intelligent than OCSETUP.
In addition, there are some other useful CMDLET you can use:
DISM /online /enable-feature /featurename=ServerManager-PSH-Cmdlets
DISM /online /enable-feature /featurename=BestPractices-PSH-Cmdlets
More Information
Microsoft® Hyper-V™ Server 2008 R2
http://www.microsoft.com/hyper-v-server/en/us/default.aspx
Windows PowerShell Getting Started Guide
http://msdn.microsoft.com/en-us/library/aa973757(VS.85).aspx
Applies to
Windows Server 2008 R2
Microsoft® Hyper-V™ Server 2008 R2
Сегодня я хотел бы познакомить читателя с Windows Server Core 2008 R2.
Как показывают мои личные наблюдения, многие администраторы его боятся. Причина проста: в головах прочно засело Windows=GUI, а вот GUI-то в нем как раз и нет. Как следствие все воспринимают Server Core как «не такой» Windows. Он действительно не такой, но ничего страшного в нем нет. Более того, в нем есть свои плюсы и прелести. Из очевидных — экономия ресурсов. Из не очевидных — отсутствие возможности тыкать во все места дисциплинирует и заставляет разбираться в том что хочешь сделать.
Меньшая требовательность к ресурсам позволяет эффективнее распределять оные при виртуализации серверов.
Поясню:
Есть, положим, сервер (не важно физический или виртуальный). На нем Windows Server 2008R2, AD (не основной контроллер), WSUS. Чтобы это хоть как-то ворочалось минимум нужно 2GB памяти. Вместо него можно сделать две виртуалки с Server Core, на одной AD, на второй WSUS. При этом обе эти виртуалки будут жить с полугигом памяти и прекрасно себя чувствовать. При этом лишаемся мы только GUI, которым я, например, и так не пользуюсь практически, по крайней мере с консоли сервера.
Теперь расскажу с чего начинать и как делать:
Рассказывать и показывать процесс установки не вижу смысла. Там все просто и банально. Накосячить просто негде.
Первый успешный логин являет нашему взгляду вот такую радостную картину.
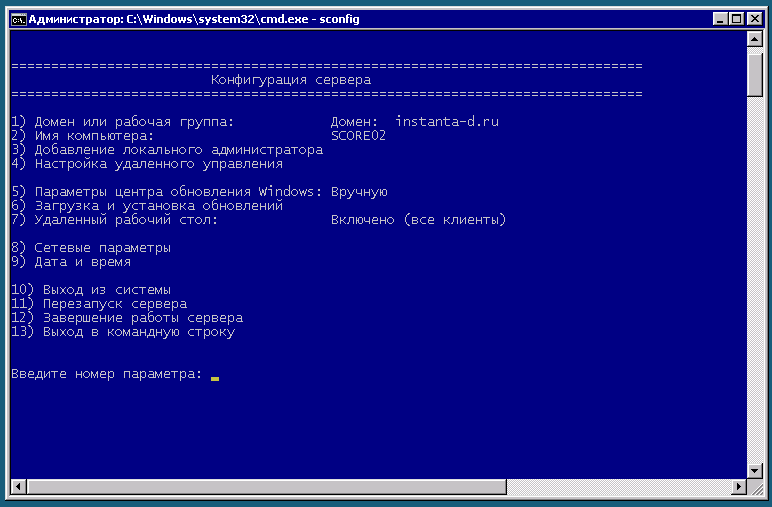
Первым делом запускаем sconfig.
Настраиваем сеть, вводим в домен, разрешаем RDP, в общем делаем все что нужно.
Отдельно хочу заметить, что в русской версии не работает разрешение удаленного управления MMC через sconfig. При попытке это сделать вы получите сообщение о невозможности перенастройки брандмауэра. Обходится просто:
netsh advfirewall set domainprofile firewallpolicy allowinbound,allowoutbound
Если паранойя не позволяет открыть все порты, то можно настраивать тонко.
Следующий этап: Установка PowerShell. Установки ролей и компонентов делается с помощью команды DISM. С ее помощью также можно посмотреть список доступных компонентов и ролей (DISM /online /Get-Features).
DISM /online /Enable-Feature /FeatureName:NetFx2-ServerCore /FeatureName:NetFx2-ServerCore-WOW64 /FeatureName:NetFx3-ServerCore /FeatureName:NetFx3-ServerCore-WOW64 /FeatureName:MicrosoftWindowsPowerShell /FeatureName:ServerManager-PSH-Cmdlets
Эта команда поставит нам .NET2, .NET3, сам PowerShell, и наборы управляющий командлетов.
Если есть желание, можно поставить файловый менеджер, например, FAR:
PS C:Dist>msiexec /package Far20.x64.msi

PS C:Dist> cd Env:

PS Env:> $cur = get-item -Path Path

PS Env:> $cur.Value+=";C:Program FilesFar2"

PS Env:> Set-Item -Path Path -Value $cur.Value
Теперь у нас есть платформа. Все дальнейшие настройки и аналитику можно уже получать с помощью MMC оснасток со своего ПК или другого сервера.
Далее собственно установка ролей, все делается до умопомрачения просто.
Сначала рассмотрим установку WSUS:
1-е: Включаем IIS.
DISM /Online /Enable-Feature /FeatureName:NetFx2-ServerCore /FeatureName:IIS-WebServer /FeatureName:IIS-WebServerRole /FeatureName:IIS-ASPNET /FeatureName:IIS-WindowsAuthentication /FeatureName:IIS-HttpCompressionDynamic /FeatureName:IIS-IIS6ManagementCompatibility /FeatureName:IIS-ISAPIFilter /FeatureName:IIS-ISAPIExtensions /FeatureName:IIS-NetFxExtensibility /FeatureName:IIS-Metabase
2-е: Ставим сам WSUS (http://www.microsoft.com/download/en/details.aspx?id=5216). И настраиваем как обычно, через визард. (если указать в качестве хранилища имеющийся SQL-сервер, то надо иметь ввиду, что имя базы WSUS не спрашивает а использует имя SUSDB, и если на этом сервере есть такая база, то WSUS ее просто грохнет).
3-е: Ставим из того-же дистрибутива на свой ПК оснастку управления. И в общем-то все. WSUS сервер готов.
Контроллер домена:
Тут все еще проще.
DISM /online /Enable-Feature /FeatureName: DNS-Server-Core-Role - ставим DNS.

dcpromo /replicaornewdomain:replica /replicadomaindnsname:domain.name /safemodeadminpassword:<AD_recovery_password> /autoconfigdns:yes

 - ставим AD.
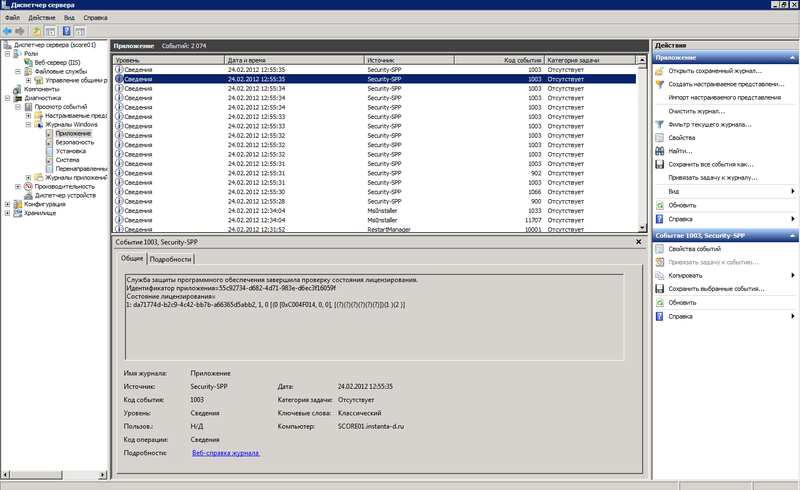
Ролью DNS и AD можно управлять оснастками со своего рабочего ПК точно так же как это обычно делается с консоли сервера. Вот, например, запущенный удаленно диспетчер сервера.
То есть весь процесс установки и настройки Server Core ничуть не сложнее, чем настройка обычного сервера. Однако информации по нему гораздо меньше и вообще он как-то не заслужено обделен вниманием.
P.S. Я сознательно обошел вопросы лицензирования и тот факт, что лицензии стоят дороже чем железо, так что прошу меня за это не пинать. Ситуации бывают всякие, и иногда использование Server Core вполне себе оправдано.
[UPDATE] Instructions below are for Windows Server 2008 which does not have PowerShell or .NET support for Server Core. Windows Server 2008 R2 released later, has native support for these, so you can simply follow these Microsoft instructions to enable PowerShell there: http://support.microsoft.com/kb/976736
Below is a step-by-step instruction on installing Windows PowerShell on Windows Server 2008 in Server Core mode.
Note that these are in no way official or supported by Microsoft. Microsoft is working on official version of .NET and PowerShell for Server Core installations, so eventually you will be able to get this fully supported. Until then below are the instructions you can use at your own risk, etc., etc.
Quick Introduction
Windows Server 2008 has a command-line installation option – Server Core – which significantly reduces the attack surface and patch requirements by the virtue of not having Explorer and other UI components not needed in datacenter.
The problem is that it only ships with traditional cmd.exe and not PowerShell. To make things worse neither PowerShell nor .NET as they are today can be installed on such systems.
Below are the steps you can take to create packages of these tools which can be installed. Basically the whole procedure consists of just four main steps:
- Installing Visual C++ Redistributable Packages (required for .NET).
- Installing .NET 2.0 SP1
- Installing PowerShell.
- Jumping around the computer and shouting “I’ve got it!”
So let’s get started!
1. Visual C++ Redistributable Packages
This is the easiest one. All you need to do is download the packages you need:
- Microsoft Visual C++ 2005 SP1 Redistributable Package (x64)
- Microsoft Visual C++ 2005 SP1 Redistributable Package (x86)
After that, copy these files to your Server Core computer (e.g. using Robocopy) and simply run them there.
If your Server Core is 32-bit – just run vcredist_x86.exe.
If it is 64-bit, you need to install both x86 and x64 versions (vcredist_x86.exe and vcredist_x64.exe).
2. .NET Framework
This is the most tricky part. PowerShell needs .NET 2.0 and .NET 2.0 is supposed to be a component of Windows Server 2008 so we will have to get a package of the framework which can get installed on such a system. To accomplish that we will:
- Download .NET Framework 3.5.
- Unpack the setup to get access to the .NET 2.0 Service Pack 1 installation files.
- Download and install the Orca MSI editor.
- Use Orca to remove the Windows version check.
- Run the updated MSI.
2.1. Download .NET: Go to Microsoft’s web site and download full redistributable package of .NET 3.5.
2.2. Unpack the file:
a. Create a folder c:deploy
b. Save the downloaded .NET framework package to this folder.
c. Download the wonderful deploy.cmd script which Artem has posted and put it into the same folder.
d. Run the script.
After the script executes, the C:DeployAIP folder will have both NetFx20_x64 and NetFx20_x86 folders with .NET 2.0 framework files you need.
2.3. Install Orca:
This is great but unfortunately you cannot just install the files because the MSIs are specifically checking for Windows version. So now we need to disable this check. To do this we will use Microsoft’s Orca MSI editor.
Note: This all needs to be done on a regular, not Server Core, machine. We will copy the results of our Orca operations to the Core box later on.
If you don’t have Orca, follow these steps to download it:
a. Download the Windows SDK for Windows Server 2008 and .NET Framework 3.5 installer.
b. Run the installer and deselect everything except Win32 Developer Tools (this will make sure that you only download the few megs you need.)
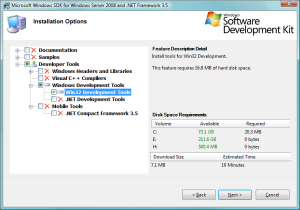
c. After the installation completes, go to C:Program FilesMicrosoft SDKsWindowsv6.1Bin and install Orca.msi.
2.4. Tweak the setup:
Now its time to do some patching.
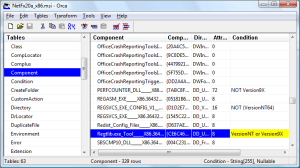
a. Start Orca and open the MSI you need (C:DeployAIPNetFx20_x86NetFx20a_x86.msi for 32-bit version or C:DeployAIPNetFx20_x64NetFx20a_x64.msi for x64).
b. Click Component.
c. In x86 locate: Regtlib.exe_Tool_____X86.3643236F_FC70_11D3_A536_0090278A1BB8
In x64 locate that one and Regtlib.exe_Tool_____A64.3643236F_FC70_11D3_A536_0090278A1BB8
d. Change the Condition from (VersionNT < 600) or Version9X to just VersionNT or Version9X.
e. Save changes (either to that same MSI or a transform file.)
2.5. Install .NET
Copy the files (the whole folder) to your core machine and start the MSI via this command line (note that you need to use msiexec in order to pass the vsextui=1 parameter):
If you saved a transformed file and are running 64-bit version you will probably run:
%SystemRoot%system32msiexec.exe /package "NetFx20_x64NetFx20a_x64.msi" vsextui=1 transforms="ServerCore.mst"
On x86 without a transform that would be:
%SystemRoot%system32msiexec.exe /package "NetFx20_x86NetFx20a_x86.msi" vsextui=1
That’s it. Now we have .NET installed and can go to the final step – PowerShell installation!
3. Windows PowerShell
There is no PowerShell v1 setup for Windows 2008 (again, because it is supposed to be a component) but you can actually download and install the CTP (note: this is a pre-beta code – not for production use). PowerShell v2 CTP2 is available from Microsoft’s downloads page.
Download the version you need, copy the msi over to the Server Core box and simply run the msi.
4. Enjoy!
Now you can start PowerShell!
Just run:
c:WindowsSystem32WindowsPowerShellv1.0powershell.exe
And you will see the prompt change to: PS C:>
That’s it. Now you are among the first geeks in the Universe to have PowerShell on Server Core!
Acknowledgments: I could only have this all accomplished thanks to the help I got from Alex Kibkalo and a great post by Artem Pronichkin on installing .NET on Server Core.
Tags: PowerShell, PowerShell v2, Server Core, Windows Server 2008, hack
Включить PowerShell на сервере Windows Server 2008 можно одним из двух способов.
«Управление сервером»
Во-первых, установить PowerShell можно с помощью утилиты «Управление сервером» (Server manager). Для этого достаточно поставить флажок «Windows PowerShell» в разделе «Компоненты» (Features) (рис. A).

Рисунок A. Нажмите на изображении для увеличения.
Установка с помощью сценариев
Другой способ позволяет автоматизировать установку PowerShell и других компонентов Windows с помощью сценариев, что очень удобно для многих администраторов. Команда ocsetup дает возможность включить PowerShell в Windows Server 2008 одной строкой:
start ocsetup MicrosoftWindowsPowerShell
После выполнения сценария достаточно обновить окно «Управление сервером» — и PowerShell переместится в список установленных компонентов, а в меню «Пуск» (Start) в подпапке «Windows PowerShell 1.0» появится соответствующий ярлык. PowerShell готова к использованию.
Автор: Rick Vanover
Перевод: SVET
Оцените статью: Голосов

Посмотрим список доступных компонентов для установки
oclist
Установите следующие компоненты:
- NetFx2 ServerCore
- NetFx3 ServerCore
- NetFx2-ServerCore-WOW64
- NetFx3-ServerCore-WOW64
- MicrosoftWindowsPowerShell
- MicrosoftWindowsPowerShell WOW64
Устанавливаем NetFx2-ServerCore
DISM.exe / online /enable-feature /featurename:NetFx2-ServerCore

Устанавливаем NetFx3-ServerCore
DISM.exe / online /enable-feature /featurename:NetFx3-ServerCore
Устанавливаем NetFx2-ServerCore-WOW64
DISM.exe / online /enable-feature /featurename:NetFx2-ServerCore-WOW64
Устанавливаем NetFx3-ServerCore-WOW64
DISM.exe / online /enable-feature /featurename:NetFx3-ServerCore-WOW64
Устанавливаем MicrosoftWindowsPowerShell
DISM.exe /online /enable-feature /featurename:MicrosoftWindowsPowerShell
Устанавливаем MicrosoftWindowsPowerShell WOW64
DISM.exe / online /enable-feature /featurename:MicrosoftWindowsPowerShell-WOW64

После всех установок необходимо перезагрузить сервер
shutdown -r
Второй вариант установки PowerShell
Все эти действия можно реализовать с помощью скрипта первичной настройки sconfig
sconfig

Выберите вариант 4 (Настройка удаленного управления) и затем параметр 2 (включить Windows PowerShell) и нажмите кнопку «ОК»

Ждем окончания установки

Ссылки и документация по PowerShell для вкуривания:
- http://technet.microsoft.com/ru-ru/scriptcenter/powershell.aspx
- http://technet.microsoft.com/en-US/scriptcenter/dd742419.aspx
- https://www.youtube.com/watch?v=SBVD5Cm0wjM&feature=player_embedded
- http://support.microsoft.com/kb/976736
After you install Windows 2008 R2 Core Server from media, you notice that powershell is installed by default. PowerShell is essential in Core environment to administer core operating system. So, it is recommended to install powershell after you install Core operating system to take full advantage of this powerful programming language in configuring the several OS parameters. Today, I installed a core server and thought of writing a articles on how to install powershell in Core.
Procedure to install powershell in Windows 2008 R2 Server Core:
- Logon to the Server with administrator account and start server configuration wizard by typing “SCONFIG” in command prompt.

- Select option “4” in Server Configuration wizard to enter into “Configure Remote Management”

- Select option “2” to install powershell (Enable Windows PowerShell)

- Reboot the server if prompted


This completes the installation. Now you can start powershell by starting the process “powershell.exe” either from command prompt or from task manager.
Hope this helps…
The past few days at work I’ve been working on a Windows Server 2008 R2 Server Core server. The coolest addition to Windows Server 2008 R2 Server Core is the ability to install PowerShell as a feature. Once I installed PowerShell, I was able to do all the administration on the box without having to use the native commands that are included with Server Core.
Before you install PowerShell you can view the available features on the server by running the following command:
Dism /online /get-features /format:table
Before you install PowerShell you have to install the .NET Framework 2.0 using the following command:
Dism /online /enable-feature /featurename:NetFx2-ServerCore
Now you can install PowerShell using the following command:
Dism /online /enablefeature /featurename:MicrosoftWindowsPowerShell
There are also two modules included with Server Core R2 that you can install. The modules are ServerManager and BestPractices. Use the following commands to install the modules:
Dism /online /enable-feature /featurename:ServerManager-PSH-Cmdlets
Dism /online /enable-feature /featurename:BestPractices-PSH-Cmdlets
To start PowerShell use the following command:
c:windowssystem32WindowsPowerShellv1.0powershell.exe
Now that PowerShell is installed and running, I renamed the computer using the following command:
$comp=Get-WMIObject –class win32_ComputerSystem
$comp.Rename(“NewName”)
I also want PowerShell to start automatically when I start the server. I will use the following command to add a key in the registry for PowerShell to start automatically:
New-ItemProperty –Path “HKLM:SoftwareMicrosoftWindowsCurrentVersionRun” –Name “PowerShell” –Value “C:WindowsSystem32WindowsPowerShellv1.0powershell.exe”
If you need to install any roles or features, you can use the Server Manager module. First you need to load the module using the following command:
Import-Module ServerManager
This module includes the following three cmdlets:
- Get-WindowsFeature
- Add-WindowsFeature
- Remove-WindowsFeature
Get-WindowsFeature provides you with a list of features and roles that are available on the server. If you want to view just the roles or features that are installed you can use the following command:
Get-WindowsFeature | Where {$_.installed –eq $true}
Add-WindowsFeature allows you to install a feature or role on the server. For example, to install the Hyper-V role:
Add-WindowsFeature Hyper-V
Remove-WindowsFeature allows you to remove any roles or features you currently have installed.
Remove-WindowsFeature Hyper-V