Telnet-клиент позволяет вам подключаться к удаленному Telnet-серверу и запускать на нем различные приложения. После входа в систему, пользователь получает в свое распоряжение командную строку сервера, на котором запущена служба telnet. Команды, которые вы вводите в командной строке клиента telnet направляются на сервер telnet и выполняются там, точно так же как если бы вы вошли локально в эту систему и пользовались командной строкой. Вывод этих команд возвращается обратно в клиент Telnet, где они становятся доступными для просмотра. Также,например с помощью telnet можно отправить почту из командной строки.
Клиент Telnet встроен в Microsoft Windows Server 2008 и Windows 7, однако, он по умолчанию отключен. Т.е. при первом запуске из командной строки команды telnet, система ответит, что такая команда не найдена. Удобство протокола Telnet заключается в том, что его можно использовать для доступа к различным ОС (Linux, Unix или Windows) и устройствам (модемы, коммутаторы, маршрутизаторы). Однако в последнее время специалисты Microsoft перестали жаловать telnet, теперь если вам нужен доступ к командной строке другого компьютера, работающего под ОС Windows, они рекомендуют использовать функции Windows Remote Desktop, ведь это намного проще. В ОС Windows Server 2008 также возможно использовать функцию Remote Shell (WinRS), который считается более безопасным, чем telnet. Я, кстати, во многих случаях предпочитаю вместо telnet использовать для удаленного управления системами psexec.
Как было отмечено выше, клиент Telnet считается дополнительной функцией в обеих операционных системах, и может быть легко установлен:
В Windows Server 2008, вы можете установить клиент Telnet с помощью мастера Add Features Wizard в Server Manager. В Windows 7, вы можете установить клиент Telnet, воспользовавшись опцией Turn Windows Features On or Off на панели управления.
Чтобы установить клиент Telnet в Windows Server 2008, выполните следующие действия:
- Откройте Server Manager, нажав кнопку Start > Server Manager, или с помощью контекстного меню значка «Мой компьютер».
- В левой панели Server Manager, нажмите на Features.
- Нажмите кнопку Add Features.

- В списке доступных функций, прокрутите ползунок вниз и выберите Telnet Client, а затем нажмите кнопку Далее.

 5. На странице Подтверждение нажмите на Install.
6. После завершения установки, нажмите на «Close«.
Кстати, установить клиент telnet можно и из командной строки, для этого нужно набрать следующую команду:
Servermanagercmd –I Telnet-Client
 Чтобы установить клиент Telnet в Windows 7, выполните следующие действия:
- Перейдите в Start > Control Panel > Programs, а затем нажмите кнопку Turn Windows features on or off. От вас может потребоваться введение пароля администратора, выполните это.

- В окне функций Windows найдите Telnet Client и отметьте его галочкой.

 3. Нажмите кнопку ОК. Процесс установки может занять несколько минут, а когда он завершает вы можете приступить к использованию клиента Telnet.

![]()
Telnet Client is not installed by default on Windows 7, Windows Server 2008 R2, Windows Vista, or Windows Server 2008. The procedures to install Telnet Client vary based on the operating system you are using. Microsoft has documented the following instructions on TechNet in this article.
To install Telnet Client by using a command line.
- Open a command prompt window. Click Start, type cmd in the Start Search box, and then press ENTER.
- Type the following command: pkgmgr /iu:”TelnetClient”.
- If the User Account Control dialog box appears, confirm that the action it displays is what you want, and then click Continue.
- When the command prompt appears again, the installation is complete.
To install Telnet Client on Windows Server 2008 R2 or Windows Server 2008
- Start Server Manager. Click Start, right-click Computer, and then click Manage.
- If the User Account Control dialog box appears, confirm that the action it displays is what you want, and then click Continue.
- In the Features Summary section, click Add features.
- In the Add Features Wizard, select Telnet Client, and then click Next.
- On the Confirm Installation Options page, click Install.
- When installation finishes, on the Installation Results page, click Close.
To install Telnet Client on Windows 7 or Windows Vista
- Click Start, and then click Control Panel.
- On the Control Panel Home page, click Programs.
- In the Programs and Features section, click Turn Windows features on or off.
- If the User Account Control dialog box appears, confirm that the action it displays is what you want, and then click Continue.
- In the Windows Features list, select Telnet Client, and then click OK.
This div height required for enabling the sticky sidebar
Problem
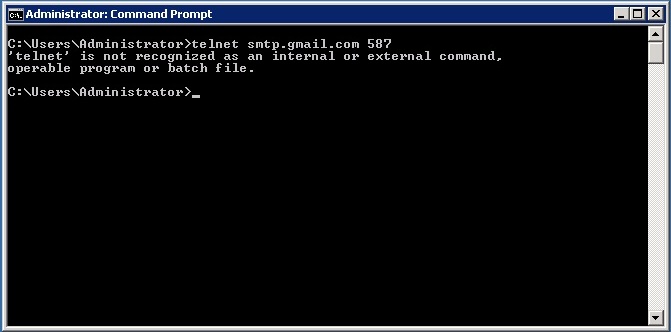
I tried to telnet on my windows server 2008 R2 but got the below error.
C:Windowssystem32>telnet
'telnet' is not recognized as an internal or external command,
operable program or batch file.
Solution
I got the above error because the telnet client was not installed on my server. Here I have shown the process of how to enable telnet in windows server 2008 R2. Telnet is a windows feature which can be turned on or off, by default it is turned off.
Enable Telnet in Windows Server 2008 R2
Now you may verify that the telnet client has been successfully installed.
C:Windowssystem32>telnet


Welcome to Microsoft Telnet Client

Escape Character is 'CTRL+]'

Microsoft Telnet>
Last Updated: September 25, 2020
Related Posts
- Windows 10: ‘telnet’ is not recognized as an internal or external command, operable program or batch file.
- telnet: Unable to connect to remote host: No route to host in RHEL
Telnet Client allows a computer to connect to a remote Telnet server and run applications on that server. Once logged on, a user is given a command prompt that can be used as if it had been opened locally on the Telnet server’s console. Commands that you type at the Telnet client command prompt are sent to the Telnet Server and executed there, as though you were locally logged on to a command prompt session at the server. Output from the commands that you run are sent back to the Telnet client where they are displayed for you to view.
The Telnet client is a feature included with Microsoft Windows Server 2008 and Windows Vista, however, it is not enabled by default. The nice part about Telnet is that it can be used across computers that use different operating systems, such as Linux, Unix, or Windows. However, unless you need it for specific text-based commands on those remote machines, and if you are only using computers running the Windows operating system, you might find it easier to use the Windows Remote Desktop feature. On Windows Server 2008 machines you can also use the Remote Shell feature (winrs) which is considered to be more secure than Telnet.
As noted above, the Telnet client is considered to be a “Feature” on both operating systems, and can be easily installed:
On Windows Server 2008, you can install Telnet client by using the Add Features Wizard in Server Manager. On Windows Vista, you install the Telnet client through the Turn Windows Features On or Off link in Control Panel.
Unless you first install it, when you first try to run a telnet command, Windows will inform you that telnet is not recognized as a command.
To install the Telnet client on Windows Server 2008 follow this procedure:
-
- Open Server Manager by clicking Start > Server Manager, or by using the My Computer context menu.
- From the left panel in Server Manager, click on Features.
- Click on Add Features.
-
- From the available list of features, scroll down and select Telnet Client, then click Next.
-
- On the Confirmation page, click on Install.
- Installation of the selected feature will be initialized and started. Once installation is completed, click on Close.
BTW, this can easily be done also by typing the following command in the command prompt:
Servermanagercmd –I Telnet-Client
Now open Command Prompt, and run the telnet command. For some examples of using Telnet see my Related Articles section below.
As you can see, Telnet is now recognized by Windows Server 2008 and you can start using it to connect to your telnet servers.
To install the Telnet client on Windows Vista follow this procedure:
-
- Click the Start button > Control Panel > Programs, and then click Turn Windows features on or off. If you are prompted for an administrator password or confirmation, type the password or provide confirmation.
-
- In the Windows Features dialog box, select the Telnet Client check box.
-
- Click OK. The installation process might take several minutes and when it completes you can begin using the Telnet client.
Some of the commands available in Telnet include:
Open or o – Establish a Telnet connection with a host computer or remote server. You can use the full command, open, or abbreviate it to just o. For example, o mail.kuku.co.il 25 will connect your computer to a computer named mail.kuku.co.il using port 25.
Close or c – Close an existing Telnet connection. It can be combined with a host name and port number.
Set – Set the terminal type for the connection, turn on local echo, set authentication to NTLM, set the escape character, and set up logging.
To see which commands are available, type a question mark (?) and then press Enter.
Conclusion
In this article, you have learned how to install the Telnet client on Windows Server 2008 or Windows Vista. This will allow you to enter commands used to access programs and services on a remote computer, whether that machine runs the Linux, Unix, or Windows operating system.
Got a question? Post it on our Windows Vista Forums!

Sometimes I need to get back to the basics to diagnose a problem. Although the telnet client is not a secure protocol, and you should be using secure shell (SSH) whenever possible, telnet is still useful when debugging SMTP issues. But, it’s missing from the default Windows 2008R2 installation. How do you install it? Do you need access to the original ISO disks?
Turns out that installing telnet on Windows 2008R2 is trivial, once you know where it’s hidden. You do not need the original ISO disks. Here are the steps to take:
- Open the Service Manager:
- From the Start menu | Administrative Tools | Service Manager
(Note: if this menu is missing, open Control Panel | Administrative Tools | Service Manager)
- From the Start menu | Administrative Tools | Service Manager
- Add the telnet feature:
- Highlight the “Features” on the left pane.
- Click the “Add Features” button.
- Scroll down until you see the “Telnet Client”.
- Check the box next to the “Telnet Client” and then click the Next button.
- Click the Install button.
- Click the Close button to confirm installation as successful.
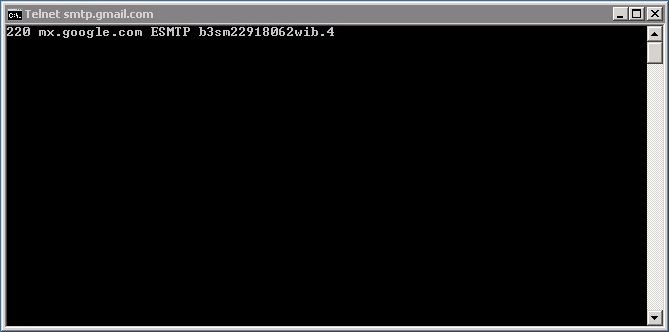
Now, if you open a DOS command line prompt, you can use telnet. For instance, to see if an Exchange server is responding to SMTP, assuming your email server happens to be named “exchange.abc.com” then type: telnet exchange.abc.com 25
Alternatively, if you are having trouble with DNS, you can use the IP address of the server, such as: telnet 10.10.10.11 25
If you are able to get a response when running locally on the server, but not when running from another server in your domain, a firewall is probably blocking the SMTP port. Check whether windows firewalls are enabled on both servers, and if those are allowing SMTP traffic, then check with your network administrator.
To totally unlock this section you need to Log-in
Login
On a fresh build of Server 2008, Server 2008 R2 and Windows 7, the telnet client is not installed so running a normal telnet command will yield the following response:
'telnet' is not recognized as an internal or external command, operable program or batch file
The quickest and easiest way to install the telnet client is to run the following command:
pkgmgr /iu:"TelnetClient"
It installs the client silently in the background and only takes a few seconds after which you can telnet to your heart’s content:
Install via GUI
To install Telnet Client on Windows Server 2008 R2 or Windows Server 2008:
- Start Server Manager. Click Start, right-click Computer, and then click Manage.
- If the User Account Control dialog box appears, confirm that the action it displays is what you want, and then click Continue.
- In the Features Summary section, click Add features.
- In the Add Features Wizard, select Telnet Client, and then click Next.
- On the Confirm Installation Options page, click Install.
When installation finishes, on the Installation Results page, click Close.
Install Telnet Client on Windows 7 or Windows Vista:
On Windows 7, Windows Vista, you can use the Windows Features tool to install optional components. To install Telnet Client on Windows 7 or Windows Vista:
- Click Start, and then click Control Panel.
- On the Control Panel Home page, click Programs.
- In the Programs and Features section, click Turn Windows features on or off.
- If the User Account Control dialog box appears, confirm that the action it displays is what you want, and then click Continue.
- In the Windows Features list, select Telnet Client, and then click OK.
|
|
|

