Written on 05 Декабря 2008. Posted in Windows Server 2008
Администраторы безопасности Microsoft всегда были немного осторожны с публикацией серверов терминала в Интернете. И на то была веская причина – не было возможности для предварительной аутентификации соединения или использования политики для определения того, какие пользователи могли получить доступ к тому или иному серверу терминала (Terminal Servers). Отсутствие предварительной аутентификации было особенно сложной проблемой. Без предварительной аутентификации анонимные пользователи могли использовать свое анонимное подключение для компрометации опубликованных серверов терминала. Скомпрометированный сервер терминала, возможно, представлял собой самое опасное средство атаки вашей сети, так как атакующий пользователь имеет доступ ко всей ОС, чтобы запустить свою атаку.
Windows Server 2008 предоставляет решение для этой проблемы безопасности: шлюз служб терминала (Terminal Services Gateway). Используя шлюз служб терминала, вы можете предварительно аутентифицировать пользователей и контролировать, к каким серверам терминала пользователи могут получить доступ на основе мандатов и политики. Этот дает вам гибкий контроль, необходимый для RDP решения по безопасному удаленному доступу.
В этой серии статей, состоящей из двух частей, о том как заставить это решение работать, мы будем использовать лабораторную сеть, показанную на рисунке ниже. Стрелки показывают поток соединений внешнего RDP клиента с сервером терминала.

Рисунок 1
На каждом сервере в этом примере стоит Windows Server 2008 Enterprise Edition.
В этой сети я использую Windows Server 2008 NAT сервер в качестве Интернет-шлюза. Вы можете использовать любое другое простое устройство NAT или маршрутизатор с фильтрацией пакетов, например PIX, или даже расширенный брандмауэр типа Microsoft ISA Firewall. Ключевая опция конфигурации здесь заключается в том, что вы будете направлять соединения TCP порта 443 на компьютер шлюза служб терминала.
На контроллере домена установлены DNS, DHCP, служба сертификации в режиме Enterprise CA, а также WINS.
На сервере терминала установлена только базовая операционная система. Мы установим другие службы в ходе статьи.
На шлюзе TS установлена только базовая ОС. Мы будем устанавливать другие сервисы по ходу этой серии статей.
В этой серии статей я опишу следующие процессы и процедуры, которые вы должны будите выполнить, чтобы ваше решение работало:
- Установка служб терминала (Terminal Services) и лицензий этих служб на сервере терминала
- Настройка лицензирования служб терминала (Terminal Services Licensing)
- Установка Desktop Experience на сервер терминала (не обязательно)
- Настройка режима лицензирования служб терминала (Terminal Services Licensing Mode)
- Установка сервиса шлюза служб терминала (Terminal Services Gateway Service) на шлюзе TS
- Запрос сертификата для шлюза TS
- Настройка шлюза TS на использование сертификата
- Создание RAP шлюза TS
- Создание САР шлюза TS
- Настройка клиента RDP на использование шлюза TS
Установка служб терминала и лицензирования служб терминала на сервере терминала
Первым шагом будет установка служб терминала на компьютере служб терминала.
Для этого нужно выполнить следующие шаги:
- На компьютере служб терминала отрываем менеджера Server Manager. В Server Manager жмем по вкладке Роли в левой панели консоли.
- Переходим по ссылке Добавить роли в правой панели консоли.

Рисунок 2
- Жмем Далее на странице Прежде чем вы начнете.
- На странице Выберите роли сервера ставим галочку напротив строки Службы терминала. Жмем Далее.

Рисунок 3
- Жмем Далее на странице Службы терминала.
- На странице Выберите роль служб ставим галочку напротив стоки Сервер терминала и TS лицензирование. Жмем Далее.

Рисунок 4
- Жмем Далее на странице Удалить и переустановить приложение для совместимости.
- На странице Укажите способ аутентификации для сервера терминала выбираем опцию Требовать сетевой уровень аутентификации. В данном случае мы можем выбрать эту опцию, поскольку мы используем только Vista SP1 клиентов для подключения к серверу терминала через TS шлюз. Мы бы не смогли использовать эту опцию, если бы нам пришлось поддерживать Windows XP SP2 клиентов. Однако вы сможете поддерживать аутентификацию на сетевом уровне (Network Level Authentication) для клиентов Windows XP SP3. Но эта информация еще не подтверждена, поэтому прочтите инструкцию к Windows XP SP3, когда она будет выпущена. Жмем Далее.

Рисунок 5
- На странице Укажите способ лицензирования выбираем опцию Настроить позже. Мы могли бы выбрать опцию и сейчас, но я решил, что мы выберем опцию Настроить позже, чтобы я смог показать вам, где в консоли служб терминала вы можете настроить режим лицензирования. Жмем Далее.

Рисунок 6
- На странице Выберите использование групп, которым разрешен доступ к этому серверу терминала выбираем опцию по умолчанию. Вы можете добавлять или удалять группы, если хотите более точный контроль доступа к серверу терминала. Однако если все пользователи будут проходить через шлюз TS, вы сможете контролировать, кто из них сможет подключаться к серверу терминала, используя параметры политики шлюза TS. Оставляем стандартные настройки, как они есть, и жмем Далее.

Рисунок 7
- На странице Настроить границы обнаружения (Discovery Scope) для TS лицензирования выбираем опцию Этот домен. Мы выбираем эту опцию в данном случае, потому что у нас есть только один домен. Если бы у нас был мультидоменная среда, мы могли бы выбрать опцию Среда. Жмем Далее.

Рисунок 8
- На странице Подтвердите выбранные компоненты установки проверяем окно предупреждения, указывающее на то, что нам, возможно, придется переустановить приложения, которые уже были установлены на эту машину, если мы хотим, чтобы они корректно работали в окружении сеанса служб терминала. Также следует обратить внимание на то, что расширенные настройки безопасности IE будут выключены. Жмем Установить.

Рисунок 9
- На странице Результаты установки вы увидите предупреждение о том, что нужно перезагрузить сервер, чтобы завершить процесс установки. Жмем Далее.

Рисунок 10
- Жмем Да в диалоговом окне Мастер добавления ролей, которое спрашивает, хотим ли мы перезагрузить сервер.
- Входим от имени администратора. Процесс установки продолжится в течение пары минут после того, как появится страница Прогресс установки после открытия менеджера Server Manager.
- Жмем Закрыть на странице Результаты установки после того, как появилось сообщение Установка успешно завершена.

Рисунок 11
- Может появиться подсказка, говорящая, что Режим лицензирования служб терминала не настроен. Вы можете пропустить это предупреждение, поскольку мы настроим лицензирование служб терминала и режим лицензирования на сервер терминала позже.

Рисунок 12
Настройка лицензирования служб терминала
На данный момент мы готовы настроить лицензирование служб терминала. В этом примере я буду использовать некоторые подложные данные, которые не отвечают действительным требованиям лицензирования служб терминала клиентских подключений, но послужат примером того, как работает этот процесс. Пожалуйста, НЕ используйте ту же процедуру, которую я буду показывать здесь, для лицензирования ваших клиентов служб терминала, поскольку в этом случае вы не будете соответствовать действительным требованиям лицензирования.
Для активации вашего сервера лицензирования служб терминала выполните следующие шаги:
- В меню инструменты администрирования выберите меню Службы терминала, а затем нажмите Менеджер лицензирования TS.
- В левой панели консоли TS Licensing Manager правой клавишей кликните на имени сервера. Нажмите Активировать сервер.

Рисунок 13
- Нажмите Далее на приветственной странице Welcome to the Activate Server Wizard.
- На странице Способ соединения выберите опцию Автоматическое подключение (рекомендуется). Нажмите Далее.

Рисунок 14
- На странице Информация о компании введите информацию о своей компании и нажмите Далее.

Рисунок 15
- Если нужно введите информацию в необязательные поля на странице Информация о компании. Нажмите Далее.

Рисунок 16
- На странице завершения работы мастера Completing the Activate Server Wizard проверьте, что опция Запустить мастера установки лицензий (Start Install Licenses Wizard) теперь выбрана. Нажмите Далее.

Рисунок 17
- Нажмите Далее на приветственной странице Welcome to the Install Licenses Wizard.
- На странице Программа лицензированиянажмите стрелку вниз в списке Программа лицензирования и выберите программу лицензирования, в которой вы хотите участвовать. В этом примере я выбрал опцию Другое соглашение поскольку данное лабораторное окружение не участвует ни в одной лицензионной программе. Нажмите Далее.

Рисунок 18
- На странице Программа лицензирования введите свой Номер соглашения. В этом примере я просто ввел 1234567. Нажмите Далее.

Рисунок 19
- На странице Версия продукта и тип лицензии выберите Версию продукта, Тип лицензии и Количество, которые соответствуют нуждам вашего окружения. В этом примере мы используем Windows Server 2008 Terminal Servers, поэтому мы выбрали Windows Server 2008. Мы будем использовать CAL для каждого пользователя в примерной сети, поэтому выбрали Windows Server 2008 TS Per User (для каждого пользователя) CAL. Мы также введем 50 в текстовом окне Количество. Нажмите Далее.

Рисунок 20
- Нажмите Закончить на странице завершения работы мастера Completing the Install Licenses Wizard.
Установка Desktop Experience на сервере терминала (необязательно)
Когда клиенты Windows Vista подключаются к серверу терминала Windows Server 2008 Terminal Server, они смогут использовать функцию Vista-like desktop experience во время сеанса с сервером терминала, если установить опцию Desktop Experience на сервере терминала.
Для установки функции Desktop Experience на сервере терминала выполните следующие шаги:
- На странице Выберите параметры поставьте галочку напротив строки Desktop Experience. Нажмите Далее.

Рисунок 21
- Нажмите Установить на странице Подтвердите выбранные компоненты установки.
- На странице Результаты установки прочтите предупреждение, говорящее о том, что необходимо перезагрузить компьютер для завершения процесса установки. Нажмите Закрыть.
- Нажмите Да в диалоговом окне, запрашивающем ваше согласие на перезагрузку компьютера.
- Войдите от имени администратора. Процесс установки возобновится и займет пару минут, так что наберитесь терпения.
- Нажмите Закрыть на странице Результаты установки, которая показывает, что процесс установки успешно завершен.
Настройка режима лицензирования служб терминала
Сейчас мы завершим настройку севера терминала путем установки режима лицензирования служб терминала. Для этого нужно выполнить следующие шаги:
- В меню Инструменты администрирования выбираем элемент Службы терминала и жмем Конфигурация служб терминала.
- В средней панели консоли Конфигурация служб терминала дважды жмем на строку Режим лицензирования служб терминала.

Рисунок 22
- В диалоговом окне Свойства выбираем опцию Для каждого пользователя (Per User) для строки Укажите режим лицензирования служб терминала. Выбираем Автоматически определять сервер лицензирования для опции Укажите режим определения сервера лицензирования. Нажимаем OK.

Рисунок 23
- Переходим по вкладке Диагностика лицензирования в левой панели консоли. В средней панели вы увидите подробности конфигурации лицензирования для этого сервера терминала.

Рисунок 24
Закрываем консоль Конфигурация служб терминала
Установка службы шлюза TS на шлюзе служб терминала
Теперь мы перенесем наше внимание на компьютер шлюза TS. Это та машина, к которой внешние клиенты сначала будут подключаться при создании соединений клиента служб терминала.
Выполните следующие шаги для установки шлюза TS на компьютере шлюза служб терминала:
- Откройте менеджера Server Manager на компьютере шлюза TS. Перейдите по вкладке Роли в левой панели консоли и нажмите по ссылке Добавить роль в правой панели.
- Нажмите Далее на странице Прежде чем начать.
- На странице Выбор роли сервера поставьте галочку напротив строки Службы терминала.
- На странице Службы терминала нажмите Далее.
- На странице Выбор служб роли поставьте галочку напротив строки TS шлюз. У вас появится диалоговое окно Мастера добавления ролей с вопросом, действительно ли вы хотите Добавить службы и параметры роли, требующиеся для шлюза TS. Нажмите кнопку Добавить требующиеся службы роли.

Рисунок 1
- Нажмите Далее на странице Выбор служб роли.
- На странице Выберите сертификат аутентификации сервера для шифрования SSL выберите опцию Выбрать сертификат для SSL шифрования позже. Мы выбираем эту опцию, поскольку у нас еще не создан сертификат шлюза TS для использования его в SSL соединении шлюза и RDP клиента. Мы сделаем запрос на этот сертификат позже, а затем настроим шлюз TS на использование данного сертификата. Нажмите Далее.

Рисунок 2
- На странице Создание политик авторизации для TS шлюза выберите опцию Позже. Мы выбираем эту опцию, поскольку я хочу продемонстрировать вам консоль шлюза TS и показать, как с ее помощью настраивать политики авторизации. Нажмите Далее.

Рисунок 3
- Нажмите Далее на странице Политика сети и службы доступа.
- На странице Выбор служб роли убедитесь, что строка Сервер сетевой политики отмечена галочкой. Нажмите Далее.

Рисунок 4
- На странице Веб сервер (IIS) нажмите Далее.
- На странице Выбор служб роли примите службы по умолчанию, выбранные мастером. Это службы, требуемые для запуска службы шлюза TS. Нажмите Далее.

Рисунок 5
- Посмотрите информацию на странице Подтверждение выбранных параметров установки и нажмите Установить.

Рисунок 6
- Нажмите Закрыть на странице Результаты установки, которая показывает, что процесс установки успешно завершен.
Запрос сертификата для шлюза TS
Теперь мы можем сделать запрос сертификата, который веб сайт шлюза TS сможет использовать для создания SSL соединений с RDP клиентом.
Для запроса сертификата компьютера шлюза нужно выполнить следующие шаги:
- В меню Инструменты администрирования выбираем менеджера Internet Information Services (IIS) Manager.
- В консоли менеджера Internet Information Services (IIS) Manager жмем на имени сервера в левой панели. Дважды жмем на иконке Сертификаты сервера в средней панели консоли.

Рисунок 7
- В правой панели консоли жмем по ссылке Создать сертификат домена.

Рисунок 8
- На странице Определенные свойства имени вводим информацию, указанную на этой странице. Самым важным элементом здесь будет запись Общее имя. Имя, которое вы введете здесь, должно быть тем же именем, которое стоит в настройке клиента служб терминала для связи с компьютером шлюза TS. Это будет также и именем, которое в соответствии с настройками будут использовать ваши публичные DNS серверы, чтобы предоставлять публичный адрес для доступа к шлюзу TS. В большинстве случаев, это будет внешний интерфейс маршрутизатора или устройства NAT, или, возможно, внешний интерфейс расширенного брандмауэра, такого как Microsoft ISA Firewall. Жмем Далее.

Рисунок 9
- На странице Интерактивный центр сертификации жмем кнопку Выбрать. В диалоговом окне Выбор центра сертификации выбираем имя Enterprise CA, с которого хотим получить сертификат. Следует помнить, что мы можем получить сертификат домена и автоматически установить его, поскольку используем Enterprise CA. Если бы мы использовали отдельный CA, нам пришлось бы испытать неудобства сайта веб регистрации, и это было бы только после того, как мы создали автономный запрос, а также нам пришлось бы устанавливать сертификат компьютера вручную. Жмем OK после выбора Enterprise CA.

Рисунок 10
- Вводим Сетевое имя на странице Интерактивный цент сертификации. В этом примере мы дали сертификату сетевое имя TSG Cert. Жмем Закончить.

Рисунок 11
- После получения сертификата, у нас появится информация о нем в средней панели консоли. Если мы дважды нажмем на сертификате, то увидим диалоговое окно Сертификат, показывающее нам общее имя в поле Назначено для и тот факт, что У вас есть личный ключ, соответствующий данному сертификату. Это решающий момент, поскольку сертификат не будет работать, если у вас нет личного ключа. Жмем OK, чтобы закрыть диалоговое окно Сертификат.

Рисунок 12
Настройка шлюза TS на использование сертификата
Когда сертификат установлен в хранилище сертификатов компьютера, вы можете назначить шлюз TS на использование этого сертификата.
Для настройки шлюза на использование сертификата выполняем следующие шаги:
- В консоли Инструменты администрирования жмем по элементу Службы терминала и затем выбираем Шлюз TS.
- В менеджере TS Gateway Manager жмем по имени компьютера шлюза TS в левой панели консоли. В средней панели появляется полезная информация о шагах настройки, которые необходимо закончить для завершения процесса установки. Переходим по ссылке Показать или изменить свойства сертификата.

Рисунок 13
- В диалоговом окне Свойства для шлюза TS, во вкладке SSL Сертификат убеждаемся, что опция Выбрать существующий сертификат для SSL шифрования активна и жмем кнопку Просмотр сертификатов. Это вызовет диалоговое окно Установить сертификат. Жмем на сертификате, которым в нашем случае будет tsg.msfirewall.org, а затем жмем кнопку Установить.

Рисунок 14
- Теперь во вкладке SSL сертификат будет показана информация о сертификате, который шлюз TS будет использовать для создания SSL соединений. Жмем OK.

Рисунок 15
- Содержимое в средней панели измениться, указывая на то, что сертификат теперь установлен на шлюзе TS. Однако теперь мы видим в разделе Статус конфигурации, что нам нужно создать политику авторизации соединения и политику авторизации ресурсов.

Рисунок 16
Создание политики авторизации соединения шлюза TS
Политика авторизации соединения (connection authorization policy (CAP)) позволяет контролировать, кто сможет подключаться к серверу терминала через шлюз TS.
Для создания политики авторизации соединения выполняем следующие шаги:
- В левой панели консоли переходим по вкладке Политики авторизации соединения, которая расположена во вкладке Политики. В правой панели консоли жмем на стрелке справа от Создать новую политику, а затем нажимаем Мастер.

Рисунок 17
- На странице Политики авторизации выбираем опцию Создать только TS CAP. Жмем Далее.

Рисунок 18
- На странице Политика авторизации соединений вводим имя для CAP. В этом примере мы назовем CAP General CAP. Нажимаем Далее.

Рисунок 19
- На странице Требования ставим галочку напротив строки Пароль. Если вы собираетесь использовать аутентификацию Smartcard, тогда вам нужно выбрать опцию Smartcard. Теперь нам нужно настроить группы, которые будут иметь доступ к серверу терминала через шлюз TS. Для этого нажимаем кнопку Добавить группу. В диалоговом окне Выберите группы вводим имя группы, которой мы хотим разрешить доступ и жмем Проверить имена (Check Names). В данном примере мы ввели Domain Users и нажали OK.

Рисунок 20
- Обратите внимание на странице Требования, что у вас также есть возможность создавать группы компьютеров и позволять доступ только указанным компьютерам. Теперь мы настроим эту опцию в данном примере. Жмем Далее.

Рисунок 21
- На странице Перенаправление устройства выбираем опцию Разрешить перенаправление устройств для всех клиентских устройств. Обратите внимание на то, что если вы хотите более безопасное окружение, вы можете выбрать опцию Запретить перенаправление устройств для следующих типов клиентских устройств и затем выбрать опции Приводы и Буферная память. Для еще большей безопасности вы можете выбрать Отключить перенаправление устройств для всех типов клиентских устройств, кроме смарт-карт. Жмем Далее.

Рисунок 22
- На странице Результаты параметров TS CAP читаем данные о результатах нашего выбора и жмем Закончить.

Рисунок 23
- Жмем Закрыть на странице Подтвердите создание политики.
Создание политики авторизации ресурсов для шлюза TS
Следующая политика, которую нам нужно создать, это политика авторизации ресурсов (Resource Authorization Policy – RAP). RAP используется для контролирования того, к каким серверам терминала можно получить доступ через шлюз TS.
Выполните следующие шаги для создания RAP:
- Перейдите по узлу Политика авторизации ресурсов в левой панели консоли TS Gateway Manager. В правой панели консоли нажмите на стрелку справа от ссылки Создать новую политику и затем нажмите Мастер.

Рисунок 24
- На странице Политики авторизации выберите опцию Создать только TS RAP.

Рисунок 25
- На странице Политика авторизации ресурсов задайте имя для RAP в текстовом окне Введите имя для TS RAP. В этом примере мы назвали RAP General RAP. Нажмите Далее.

Рисунок 26
- На странице Группы пользователей выберите группы, к которым будет применена политика RAP. Это даст вам возможность четко контролировать, какие пользователи смогут получать доступ к серверу терминала A, и некоторым другим группам, возможно, тоже понадобится доступ к серверу терминала B. Политика RAP дает вам такой контроль. В этом примере мы переходим по ссылке Добавить группу и добавляем группу Domain Users. Нажимаем Далее.

Рисунок 27
- На странице Группа компьютеров у вас есть возможность определения того, к каким серверам терминала можно получить доступ с помощью политики RAP. У вас есть возможность выбора определенной группы компьютеров Active Directory, или вы можете создавать управляемую группу шлюза TS. В этом примере, поскольку у нас есть только один сервер терминала, мы выберем самую простую опцию, которой является опция Разрешить пользователям подключаться к любому ресурсу (компьютеру) сети. Это позволит пользователям подключаться ко всем серверам терминала сети. Жмем Далее.

Рисунок 28
- На странице Общая информация TS Rap проверьте параметры и нажмите Закончить.

Рисунок 29
- Нажмите Закрыть на странице Подтвердите создание политики.
- В левой панели консоли нажмите на имени сервера. Вы увидите, что больше нет проблемных моментов, которые необходимо решить. Теперь шлюз TS готов к работе с новыми входящими соединениями с любым сервером терминала в сети.

Рисунок 30
Настройка RDP клиента на использование шлюза TS
Мы сделали практически все! Сервер терминала и шлюз TS настроены и готовы к работе. Последним шагом будет настройка RDP клиента на компьютере Vista. Нам нужно настроить клиента с именем сервера терминала, к которому он будет подключаться, и именем компьютера шлюза TS, который он будет использовать для подключения к серверу терминала.
Заметка: Я настроил компьютер клиента Vista с записью HOSTS файла для tsg.msfirewall.org, чтобы он смог преобразовать имя шлюза TS в IP адрес внешнего интерфейса устройства NAT в передней части сети.
Для настройки RDP клиента на компьютере Windows Vista нужно выполнить следующие шаги:
- На компьютере Vista нажимаем кнопку Пуск, а затем жмем Аксессуары. Дважды жмем Подключение к удаленному компьютеру.
- В диалоговом окне Подключение к удаленному компьютеру во вкладке Общие, вводим имя компьютера для сервера терминала в текстовом окне Компьютер. Вводим имя пользователя в текстовом окне Имя пользователя. Если вы хотите, чтобы клиент сохранил ваши мандаты, вы можете поставить галочку напротив строки Разрешить мне сохранять мандаты.

Рисунок 31
- Жмем по вкладке Дополнительно. В разделе Аутентификация сервера убеждаемся, что опция Предупреждать меня выбрана. Жмем кнопку Параметры в разделе Подключаться из любого места.

Рисунок 32
- В диалоговом окне Параметры сервера шлюза TS выбираем опцию Использовать эти параметры сервера шлюза TS. Вводим имя шлюза TS в текстовое окно Имя сервера. Для Способа регистрации выбираем опцию Запрашивать пароль (NTLM). Обратите внимание, что опция Автоматически определять параметры сервера шлюза TS позволяет вам настроить RDP клиента так, что он будет получать свои параметры посредством групповой политики. Жмем OK.

Рисунок 33
- Переходим по вкладке Общие и затем жмем Подключить.

Рисунок 34
- У нас появится диалоговое окно Безопасность Windows. Вводим пароль и жмем OK.

Рисунок 35
- Открывается сеанс служб терминала, и вы видите рабочий стол и приложения запущенные для вашей учетной записи в сеансе служб терминала.

Рисунок 36
- Переходим на компьютер шлюза TS и жмем на вкладке Мониторинг в левой панели консоли шлюза TS. Здесь у нас есть информация о сеансах служб терминала, запущенных через шлюз TS.

Рисунок 37
Томас Шиндер (Thomas Shinder)
Executive Summary:
Terminal Services Gateway in Windows Server 2008 encapsulates Remote Desktop Protocol (RDP) within HTTPS (HTTP Secure) and provides users the ability to connect to the TS Gateway server by using HTTPS’s port, TCP port 443. Learn how to configure and deploy the TS Gateway server and configure a TS client.
Windows Terminal Services (TS) lets users run applications on servers and administrators fully manage remote servers by connecting to the servers’ desktop through RDP. In this article, I describe a new feature of TS in Windows Server 2008 called Terminal Services Gateway (TS Gateway), which lets you securely establish a terminal session with a remote machine over the Internet by using HTTP Secure (HTTPS).
How It Works
No matter if you’re talking about remote administration of or running applications on remote servers, you have a potential security risk when you expose these resources to the Internet. If you want to make a server accessible via RDP to remote clients, you can use several approaches. You can open TCP port 3389 on the firewall and forward requests from Internet clients to the private IP address of the TS server in the local network. However, besides the fact that opening port 3389 can pose a security risk because it directly exposes hosts to the Internet, you also need multiple public IP addresses if you want to make more than one internal host available.
Alternatively, you can require remote users to establish a VPN connection before they start an RDP session to a server on your network. Although this solution is more secure and flexible, it can be inconvenient because many public Internet Access Points (APs) don’t have ports open for PPTP or L2TP traffic. A user on a business trip will likely be accessing the Internet via a hotel network or Internet cafe and won’t have the ability to initiate a VPN connection.
TS Gateway in Windows Server 2008 solves this problem. Simply speaking, it encapsulates RDP within HTTPS (also known as RDP over HTTPS) and provides users the ability to connect to the TS Gateway server by using HTTPS’s port, TCP port 443. TS Gateway authenticates the client, unpacks the RDP from HTTPS, and then forwards the connection to the desired resources by using port 3389. With TS Gateway, a client needs access only to port 443 to establish a secure RDP session.
In addition to using just one port, RDP over HTTP works with proxy servers that allow only HTTP and HTTPS for outgoing traffic. You need only one public IP address on the external network on which you’ll publish the TS Gateway server. And, you can authenticate users on TS Gateway first, and then based on that authentication, allow or deny them access to specified (or all) computers in the local network configured for RDP access.
Configuring TS Gateway
Before you can configure a server as a TS Gateway, you must add the TS Gateway service to it. On the Windows 2008 server, go to Administrative Tools, Server Management, and start the Add roles wizard. Look for the TS Gateway service under the Terminal Services role, and select it. Adding the TS Gateway service also adds some other necessary services and features such as Network Policy Server, Microsoft IIS, and an RPC-over-HTTP proxy server. The wizard asks whether you want to configure a Secure Sockets Layer (SSL) certificate, Terminal Services policies, and Network Policy Server, but I recommend you do that configuration later. (I describe these steps later on in the article.) After you’ve finished the wizard, TS Gateway Manager will appear under Terminal Services in Administrative Tools.
Open TS Gateway Manager (which Figure 1 shows), and open the Properties dialog box of the server that you want to make a TS Gateway. On the General tab, you can limit the number of simultaneous connections to TS Gateway or disable new connections completely. The default value is to allow the maximum number of supported connections, and if you have no specific reason to change the value, leave the default.
The SSL Certificate tab has a setting that you must configure. By default, Transport Layer Security (TLS) 1.0 is used to encrypt communications between TS clients and TS Gateway servers over the Internet. In order to use encryption, you must select an appropriate computer certificate on the TS Gateway server. The certificate must have Server Authentication as its purpose and can be issued by a local Certificate Authority (CA). The certificate must have a Subject Name value equal to the public DNS name of the TS Gateway server—that is, the name users will use to connect to the server (e.g., tsg.domain.com)—or the connection won’t work.
Be aware that you can’t use the standard Certificate Request wizard from the Microsoft Management Console (MMC) Certificates snap-in to request the certificate. This wizard issues only certificates with the host name of the machine, and in this case, you want a certificate for a publicly available name, which is typically not the same as the local host name.
If you have an online CA, you can prepare the certificate request by using the certreq.exe utility. Or, if you don’t like command line–based utilities, you can use IIS Manager to request the certificate through a wizard. To do so, open IIS Manager, click the server name, and click Server Certificates in the right-hand pane. Select the Create Domain Certificate option, and enter the DNS name of your TS Gateway in the Common Name field. A certificate will be automatically issued and installed.
Alternatively, if you have an offline or standalone CA (i.e., a CA that’s not on the network or not in Active Directory—AD), you can prepare an offline request through IIS Manager. Note that this certificate will be trusted only by domain clients. Non-domain clients will have to manually add a root (or issuing) CA certificate to their Trusted Root Certification Authorities list.
If no CA is available, you can select an option in TS Gateway Manager to create and install a self-signed certificate. I don’t recommend this approach because although the encryption will work, clients won’t trust the certificate for server authentication unless their users explicitly add the issuing CA to their client’s Trusted Root Certification Authorities list.
The best solution, if possible, is to use a commercial certificate because most clients will probably trust it by default. After you receive a certificate from a commercial CA, you can import it by using the Certificates snap-in.
After the certificate is installed in the TS Gateway computer’s personal store, you can use the SSL Certificates tab of the TS Gateway computer’s Properties dialog box to configure the gateway to use the certificate. Click Select an existing certificate for SSL encryption (recommended), then click Browse Certificates and select the certificate, as Figure 2 shows.
You use the TS CAP Store tab to configure connection authorization policies. Because TS Gateway uses Network Policy Server to control client access, all the policies that you create by using TS Gateway Manager are actually created on the Network Policy Server. (Network Policy Server is Windows 2008’s replacement for Windows Server 2003’s Internet Authentication Service—IAS.) You can choose a local Network Policy Server (installed on the TS Gateway system) or a remote one. On this tab, you can also enable an option to request clients to declare their state of health before they can connect if you have Network Access Protection (NAP) configured. For the purposes of this article, select the local Network Policy Server and don’t select the option for clients to declare their state of health. (For information about configuring NAP, see the Windows IT Pro article “Network Access Protection in Windows Server 2008,” http://www.windowsitpro.com/articles/articleid/95617/95617.html.)
The Server Farm tab lets you group multiple TS Gateways to create a server farm for high availability of the TS Gateway service. You can’t configure Network Load Balancing (NLB) on this tab; you must configure it earlier by using Windows tools. But after you’ve established NLB, you can use the Server Farm tab to add NLB members to a TS Gateway server farm.
The Auditing tab lets you configure logging options for TS Gateway. Simply click events that you want to log to turn on logging. TS Gateway server events appear in the MMC Event Viewer snap-in under Application and Services LogsMicrosoftWindowsTerminalServices-Gateway. I recommend that you select all available options.
The SSL Bridging tab, which Figure 3 shows, is an interesting one. It lets you configure how Microsoft ISA Server or another SSL bridging-capable device will connect to TS Gateway.
I recommend ISA Server as the bridging-capable solution because it helps enhance security by decrypting incoming SSL traffic, statefully inspecting the traffic for malicious code, and then blocking connections that contain suspicious packets or packets that reflect known exploits. ISA Server also performs stateful HTTP filtering, which provides deep inspection of HTTP application content. These functions protect TS Gateway from SSL- and HTTPS-based attacks and from attacks on lower layers of the TCP/IP stack.
The only available option on the SSL Bridging tab—Use HTTPS-HTTP bridging—isn’t selected by default, which means that HTTPS-HTTPS (or SSL) bridging is used to maintain encryption from the client through ISA Server to TS Gateway. In this configuration, ISA Server will terminate the SSL session from the client, preauthenticate the user (if the listener is configured to do so), inspect the packets, and establish a new SSL session with TS Gateway server for maximum security.
Selecting the Use HTTPS-HTTP bridging option lets you terminate the SSL connection on ISA Server and, after authentication and inspection, create a new, unencrypted HTTP connection to TS Gateway. This setting, while not as secure as HTTPS-HTTPS bridging, lets you offload encryption/decryption and authentication from TS Gateway to ISA Server. Be aware that if you enable HTTPS-HTTP bridging, the TS Gateway server will depend on ISA Server to perform user authentication. If for any reason, you remove ISA Server without disabling HTTPS-HTTP bridging on TS Gateway, the gateway will let anyone connect without any authentication.
In order to allow clients to establish SSL sessions by using TS Gateway’s public name, ISA Server must have the same certificate installed as the TS Gateway server.
Configuring TS Gateway Policies
After configuring the server properties, you must create connection authorization polices and resource authorization policies. By default, TS Gateway has no polices, and it won’t work until you define at least one of each type.
Connection authorization policies let you select users or groups who will be allowed to pass through TS Gateway, the authentication method (smart card or password), and options for device redirection through RDP. You use resource authorization policies to select the hosts that will be available through TS Gateway, among other things.
First, we’ll create a connection authorization policy. In the left-hand pane of TS Gateway Manager, right-click Connection Authorization Policies under YourTSGatewayServerPolicies, and select Create New Policy with the Custom (not wizard) option. On the General tab of the resulting dialog box, enter a name for the policy.
Go to the Requirements tab (Figure 4) to select user and computer groups that are allowed to connect to TS Gateway. You must add at least one user group (local or from AD). Note that adding a group lets the group connect only to TS Gateway; it doesn’t permit the group to connect to other hosts via TS Gateway. You can also optionally add one or more computer groups if you want to restrict users to connecting from specific computers. The Requirements tab also lets you choose one or more authentication methods (password and/or smart card).
The Device Redirection tab’s set of options is useful for both security and functionality reasons. It’s possible to enable redirection of all devices from a remote computer, disable redirection completely, or selectively disable redirection of specific types of devices. Because device redirection through RDP can pose a potential security risk, it’s a good idea to restrict it. Configure multiple connection authorization policies that set varying device redirection permissions depending on the user group and authentication method. For example, you can create one policy that forces members of the Administrators group to authenticate with a smart card but allows them full device redirection and another policy for ordinary users that allows authentication with a password but limited device redirection. Keep in mind that TS Gateway applies connection authorization policies in the same order that RRAS policies are applied.
Next, you must configure a resource authorization policy. In the left-hand pane of TS Gateway Manager, right-click Resource Authorization Policies under YourTSGatewayServerPolicies and select Create New Policy (custom). On the General tab of the resulting dialog box, enter a policy name and description. Go to the User Groups tab, and select one or more user groups (local or from AD) for the policy. Note that the user groups you specify here don’t have to be the same as in your connection authorization policy because here you’re specifying groups that will have access to resources, not just to TS Gateway.
Go to the Computer Group tab (Figure 5), which is the most important one in configuring a resource authorization policy. Here you specify the computer group that the user groups you specified on the User Groups tab will have access to. You have three options. You can select an existing computer group from AD. You can select a TS Gateway–managed computer group. (After selecting this option and clicking Browse, you can create this group by entering the computers’ Fully Qualified Domain Names—FQDNs—or IP addresses.) Or, you can choose to allow access to all internal computers, which is useful only if you’re going to have just one resource authorization policy. As with connection authorization policies, it’s a good idea to create multiple resource authorization policies in order to precisely control access to resources.
The Allowed Ports tab can be used to configure on which port the RDP session will be established. The default is TCP port 3389, but you can configure other ports or even allow all ports, which isn’t recommended. Port 3389 is the well-known port for RDP. If you want to practice security by obscurity, you could configure a port other than the default.
Deploying TS Gateway
After you’ve configured the TS Gateway and its policies, you must properly deploy the server. If you’re using ordinary firewalls, you should place the TS Gateway server in your demilitarized zone (DMZ), open TCP port 443 between your Internet-facing firewall and your TS Gateway server, and open TCP port 3389 between TS Gateway and your network-facing firewall. Note that the TS Gateway server must be a domain member, so additional ports on the network-facing firewall might be required.
If you’re using ISA Server 2006 or ISA Server 2004, you can safely place the TS Gateway server on the local network and publish it via ISA Server. In this case, you’ll have to copy the certificate from TS Gateway to ISA Server and optionally configure HTTPS bridging, as mentioned earlier.
Besides configuring firewalls, you must create a host in a public DNS with the name of the TS Gateway server (which must be the same as the certificate subject name) and the IP address.
Configuring TS Clients
For clients to use the TS Gateway, they must have Remote Desktop Connection 6.0 installed. To download the client, go to the Microsoft article «Remote Desktop Connection (Terminal Services Client 6.0)» (http://support.microsoft.com/kb/925876). To configure a client, start the RDP client software and enter the local DNS name of the computer that you want to connect to, click Advanced, and click Settings to configure TS Gateway–related options (which Figure 6 shows).
The default value is to automatically detect TS Gateway settings, which is sufficient if these settings are forced through Group Policy. Alternatively, you can manually enter the public name of the TS Gateway server. You can also choose to bypass TS Gateway when connecting to hosts with local IP addresses, which will allow the user to use the same RDP connection whether he or she is on the LAN or connecting from the Internet. You can also choose not to use TS Gateway at all.
After configuring these options and clicking Connect, you will first see a dialog box for authenticating to TS Gateway and then one for authenticating on the remote host. If both authentications are successful, an RDP session will start.
Windows Server® 2008 Terminal Services Gateway (TS Gateway) is a role service that enables authorized remote users to connect to resources on an internal corporate or private network, from any Internet-connected device that can run the Remote Desktop Connection (RDC) client. The network resources can be terminal servers, terminal servers running RemoteApp™ programs, or computers with Remote Desktop enabled.
TS Gateway encapsulates Remote Desktop Protocol (RDP) within RPC, within HTTP over a Secure Sockets Layer (SSL) connection. In this way, TS Gateway helps improve security by establishing an encrypted connection between remote users on the Internet and the internal network resources on which their productivity applications run.
The procedures in this guide will help you set up a TS Gateway server, enabling remote users to access terminal servers, terminal servers running RemoteApp programs, or computers with Remote Desktop enabled on your internal corporate or private network.
Who should use TS Gateway?
This guide is targeted at these audiences:
• IT administrators, planners, and analysts who are evaluating remote access and mobile solution products
• Enterprise IT architects and designers
• Early adopters
• Security architects who are responsible for implementing trustworthy computing
• IT professionals who are responsible for terminal servers or remote access to desktops
Benefits of TS Gateway
TS Gateway provides many benefits, including the following:
• TS Gateway enables remote users to connect to internal network resources over the Internet, by using an encrypted connection, without needing to configure virtual private network (VPN) connections.
• TS Gateway provides a comprehensive security configuration model that enables you to control access to specific internal network resources. TS Gateway provides a point-to-point RDP connection, rather than allowing remote users access to all internal network resources.
• TS Gateway enables most remote users to connect to internal network resources that are hosted behind firewalls in private networks and across network address translators (NATs). With TS Gateway, you do not need to perform additional configuration for the TS Gateway server or clients for this scenario.
In earlier versions of Windows Server, security measures prevented remote users from connecting to internal network resources across firewalls and NATs. This is because port 3389, the port used for RDP connections, is typically blocked for network security purposes. TS Gateway transmits RDP traffic to port 443 instead, by using an HTTP Secure Sockets Layer/Transport Layer Security (SSL/TLS) tunnel. Because most corporations open port 443 to enable Internet connectivity, TS Gateway takes advantage of this network design to provide remote access connectivity across multiple firewalls.
• The TS Gateway Manager snap-in console enables you to configure authorization policies to define conditions that must be met for remote users to connect to internal network resources. For example, you can specify:
• Who can connect to network resources (in other words, the user groups who can connect).
• What network resources (computer groups) users can connect to.
• Whether client computers must be members of Active Directory® security groups.
• Whether device and disk redirection is allowed.
• Whether clients need to use smart card authentication or password authentication, or whether they can use either method.
• You can configure TS Gateway servers and Terminal Services clients to use Network Access Protection (NAP) to further enhance security. NAP is a health policy creation, enforcement, and remediation technology that is included in Windows Vista® RTM, Windows Server 2008, and Windows Vista Service Pack 1 (SP1) and Windows XP Service Pack 3 (SP3).
With NAP, system administrators can enforce health requirements, which can include software requirements, security update requirements, required computer configurations, and other settings.
• You can use a TS Gateway server in conjunction with Microsoft Internet Security and Acceleration (ISA) Server to enhance security. In this scenario, you can host TS Gateway servers in a private network rather than a perimeter network, and host ISA Server in the perimeter network. Or, ISA Server can serve as an isolation point for either or both ends of the perimeter network. The SSL connection between the Terminal Services client and ISA Server can be terminated at the ISA Server, which is Internet-facing.
• TS Gateway Manager provides tools to help you monitor TS Gateway connection status, health, and events. By using TS Gateway Manager, you can specify events (such as unsuccessful connection attempts to the TS Gateway server) that you want to monitor for auditing purposes.
Additional references
• For product support, see the Terminal Services page on the Windows Server 2008 TechCenter (http://go.microsoft.com/fwlink/?LinkId=48555).
• To access newsgroups for Terminal Services, see the Terminal Services Community page on the Microsoft TechNet Web site (http://go.microsoft.com/fwlink/?LinkId=85730).
Prerequisites for TS Gateway
For TS Gateway to function correctly, you must meet these prerequisites:
• You must have a server with Windows Server 2008 installed.
• You must obtain an SSL certificate for the TS Gateway server if you do not have one already.
By default, on the TS Gateway server, the RPC/HTTP Load Balancing service and the IIS service use Transport Layer Security (TLS) 1.0 to encrypt communications between clients and TS Gateway servers over the Internet. For TLS to function correctly, you must install an SSL certificate on the TS Gateway server.
Note
You do not need a certification authority (CA) infrastructure within your organization if you can use another method to obtain an externally trusted certificate that meets the requirements for TS Gateway. If your company does not maintain a stand-alone CA or an enterprise CA and you do not have a compatible certificate from a trusted public CA, you can create and import a self-signed certificate for your TS Gateway server for technical evaluation and testing purposes.
For information about certificate requirements for TS Gateway and how to obtain and install a certificate, see “Obtain a certificate for the TS Gateway server” in Configuring the TS Gateway Core Scenario.
• TS Gateway servers must be joined to an Active Directory domain in the following cases:
• If you configure a TS Gateway authorization policy that requires that users be domain members to connect to the TS Gateway server.
• If you configure a TS Gateway authorization policy that requires that client computers be domain members to connect to the TS Gateway server.
• If you are deploying a load-balanced TS Gateway server farm.
Role, role service, and feature dependencies
To function correctly, TS Gateway requires several role services and features to be installed and running. When you use Server Manager to install the TS Gateway role service, the following additional roles, role services, and features are automatically installed and started, if they are not already installed:
• Remote Procedure Call (RPC) over HTTP Proxy
• Web Server (IIS) [Internet Information Services 7.0]
IIS 7.0 must be installed and running for the RPC over HTTP Proxy feature to function.
• Network Policy and Access Services
You can also configure TS Gateway to use Terminal Services connection authorization policies (TS CAPs) that are stored on another server that runs the Network Policy Server (NPS) service. By doing this, you are using the NPS server—formerly known as a Remote Authentication Dial-In User Service (RADIUS) server—to centralize the storage, management, and validation of TS CAPs. If you have already deployed an NPS server for remote access scenarios such as VPN and dial-up networking, using the existing NPS server for TS Gateway scenarios as well can enhance your deployment.
Administrative credentials
You must be a member of the Administrators group on the computer that you want to configure as a TS Gateway server.
Special Considerations for TS Gateway
The following are special considerations for TS Gateway in Windows Server 2008.
TS Gateway server considerations
Following are special considerations for the TS Gateway server.
Name resolution issues
When remote users attempt to access a computer on the internal corporate network through a TS Gateway server, they can specify either a NetBIOS name or a fully qualified domain name (FQDN) for the computer that they are attempting to connect to. When users specify the FQDN name of the target computer, and the associated Terminal Services resource authorization policy (TS RAP) that is configured on the TS Gateway server uses a NetBIOS name for the target computer, the client connection will succeed.
However, if the user attempts to connect to the target computer by using its NetBIOS name when the TS RAP configured on the TS Gateway server uses an FQDN name for the target computer, name resolution will fail and the user will not be able to connect to the target computer.
To avoid name resolution failure, and to support either NetBIOS names or FQDNs, include each possible computer name in the computer group that you create when you configure a TS RAP. For example, the computer names MySAPReportingServer and MySAPReportingServer.seattle.corp.microsoft.com would each need to be included in the computer group that you create, although both names represent the same computer.
Terminal Services client considerations
Following are special considerations for the Terminal Services client, when the client is used for connections through a TS Gateway server.
Automatic reconnection to a TS Gateway server might fail after the Terminal Services client comes out of hibernation
After you establish a remote connection through a TS Gateway server to another computer, if the Terminal Services client that initiated the connection hibernates and then comes out of hibernation, the client might not automatically reconnect to the remote computer through the TS Gateway server. To resolve this problem, open Task Manager, end the mstsc (Remote Desktop Connection) process, and then attempt the remote connection again. Closing mstsc will not resolve this problem.
TS Gateway server connection requests from a client running Windows XP with SP2 might fail if a smart card is used for authentication
If you are using a client running Windows® XP with SP2 to connect to a remote computer through a TS Gateway server, you will receive an error message stating that the remote computer is misconfigured if you do the following:
1. Connect to a remote computer and leave your smart card in the smart card reader during the session.
2. End the session, leaving the smart card in the smart card reader.
3. Start another connection while leaving the smart card in the smart card reader.
To resolve this problem, remove the smart card, reinsert it, and then try to connect to the remote computer again.
Configuring the TS Gateway Core Scenario
The following steps are required for the successful setup and demonstration of the TS Gateway core scenario described as an example in this guide. This scenario enables you to configure a TS Gateway server so that a remote user can access an internal network resource over the Internet, through the TS Gateway server. In this scenario, the internal network resource can be either a terminal server, a terminal server running RemoteApp programs, or a computer with Remote Desktop enabled.
1. We recommend that you set up three computers to evaluate this scenario. These computers are:
• The TS Gateway server (known as “TSGSERVER” in this example)
• The Terminal Services client (known as “TSCLIENT” in this example)
• An internal network resource (known as “CORPORATERESOURCE” in this example)
The computers must meet the system requirements described in System requirements for the TS Gateway core scenario.
2. Configure the TS Gateway server by following the instructions in Steps for configuring the TS Gateway server for the TS Gateway core scenario.
3. Configure the Terminal Services client by following the instructions in Steps for configuring a
Terminal Services client for the TS Gateway core scenario.
4. Configure the internal network resource.
5. Demonstrate that the Terminal Services client can connect to the internal network resource through the TS Gateway server by following the instructions in Verify that end-to-end connectivity through TS Gateway is functioning correctly.
System requirements for the TS Gateway core scenario
The three computers used in the TS Gateway core scenario must meet the following system requirements.
|
Computer |
Required configuration |
|
TS Gateway server (TSGSERVER) |
• Windows Server 2008. The installation can be an upgrade from Windows Server® 2003 Service Pack 1 (SP1) or Windows Server 2008 Release Candidate 0 (RC0). For more information, see “Supported upgrade paths” in Installing Windows Server 2008 (http://go.microsoft.com/fwlink/?LinkId=104 824). |
|
Terminal Services client (TSCLIENT) |
• Windows Vista SP1 or Windows XP SP3. |
|
Computer |
Required configuration |
|
• Windows Vista. The installation can be an upgrade from Windows XP with Service Pack 2 (SP2). • Windows XP SP2 and Remote Desktop Connection (RDC) 6.0. To download RDC 6.0, see article 925876 in the Microsoft Knowledge Base (http://go.microsoft.com/fwlink/?LinkId=793 73). • Windows Server 2008. The installation can be an upgrade. • Windows Server 2003 with Service Pack 1 (SP1) or SP2 and RDC 6.0. |
|
|
Internal network resource (CORPORATERESOURCE) |
For computers with Remote Desktop enabled: • Windows Vista SP1 or Windows XP SP3. • Windows Vista. The installation can be an upgrade from Windows XP with SP2. • Windows XP with SP2. • Windows Server 2003 with SP1 or SP2. For terminal servers: • Windows Server 2008. The installation can be an upgrade. • Windows Server 2003 with SP1 or SP2. |
Setting up the TS Gateway core scenario
The following diagram illustrates the core scenario for TS Gateway.
Note
The steps in this setup guide describe how to set up the core TS Gateway scenario for remote access from a Terminal Services client through a TS Gateway server to an internal network resource. The guide does not describe how to set up the firewalls illustrated in the diagram, terminal servers running RemoteApp programs, or the Active Directory infrastructure. The diagram is provided to suggest one of many ways in which the TS Gateway core remote access scenario might be implemented in a production environment.
For information about how to set up a terminal server, see the Help topic “Terminal Server” (http://go.microsoft.com/fwlink/?LinkId=72052).
For information about setting up RemoteApp programs, see the Terminal Services RemoteApp Step-by-Step Guide (http://go.microsoft.com/fwlink/?linkId=84895).
For information about how to enable Remote Desktop, see the topic “Using Remote Desktop” in the Windows Server 2008 Help.
Connection sequence for the TS Gateway core scenario
Following is a simplified description of the sequence that TSCLIENT follows when connecting through TSGSERVER to CORPORATERESOURCE:
1. The user on the Terminal Services client, TSCLIENT, might initiate the connection by doing one of the following:
• Clicking an RDP file that the administrator has configured, to access his or her full desktop.
• Clicking a RemoteApp program icon. RemoteApp programs are represented in an RDP file that the administrator has configured.
• Visiting a Web site (either from the Internet or from an intranet) to access a list of RemoteApp programs that the administrator has made available by using Terminal Services Web Access (TS Web Access), and then clicking a RemoteApp program icon.
• Opening the Remote Desktop Connection client and manually specifying the appropriate settings for the connection.
2. An SSL tunnel is established between TSCLIENT and TSGSERVER by using the TS Gateway server’s SSL certificate. Before a connection between TSCLIENT and TSGSERVER is established, TSGSERVER must authenticate and authorize the user according to Terminal Services connection authorization policies (TS CAPs) that the administrator has configured on TSGSERVER.
3. After authentication and authorization succeed, TSGSERVER signals TSCLIENT to continue with the connection sequence.
4. TSCLIENT requests a connection from TSGSERVER to CORPORATERESOURCE. Before authorizing the request, TSGSERVER verifies that both of the following conditions are met simultaneously, for at least one Terminal Services resource authorization policy (TS RAP) that is configured on TSGSERVER:
• CORPORATERESOURCE is a member of a computer group that is specified in the TS RAP; and
• The user is a member of a user group that is specified in the TS RAP. If both requirements are met, TSGSERVER authorizes the request.
5. An SSL connection is established between TSCLIENT and TSGSERVER, and an RDP connection is established between TSGSERVER and CORPORATERESOURCE. From this point, any packets that TSCLIENT sends to TSGSERVER are forwarded to CORPORATERESOURCE, and any packets that CORPORATERESOURCE sends to TSGSERVER are forwarded to TSCLIENT.
6. TSCLIENT will attempt to create a user session on CORPORATERESOURCE.
CORPORATERESOURCE performs Windows authentication to validate the identity of the user requesting the connection and the privileges that the user has on CORPORATERESOURCE. (These are the same steps that would be followed if TSCLIENT were to request a remote connection to CORPORATERESOURCE without using TSGSERVER.)
7. TSCLIENT exchanges encrypted RDP packets encapsulated within SSL with TSGSERVER over port 443. TSGSERVER forwards the RDP packets to CORPORATERESOURCE over port 3389.
Steps for configuring the TS Gateway server for the TS Gateway core scenario
To configure the TS Gateway server, complete these tasks.
|
Task |
Reference/Step-by-step instructions |
|
1. Install the TS Gateway role service. |
Install the TS Gateway role service |
|
2. Obtain a certificate for the TS Gateway server. |
Obtain a certificate for the TS Gateway server |
|
3. Configure a certificate for the TS Gateway server. |
Configure a certificate for the TS Gatewayserver |
|
4. Create a Terminal Services connection authorization policy (TS CAP). |
Create a TS CAP |
|
5. Create a Terminal Services resource authorization policy (TS RAP). |
Create a TS RAP |
|
6. Limit the maximum number of simultaneous connections though TS Gateway (optional). |
Limit the maximum number of simultaneousconnections through TS Gateway |
1. Install the TS Gateway role service
Follow these steps to install the TS Gateway role service. Optionally, during the role service installation process, you can select an existing certificate (or create a new self-signed certificate), and you can create a TS CAP and a TS RAP.
To install the TS Gateway role service
1. Open Server Manager. To open Server Manager, click Start, point to Administrative Tools, and then click Server Manager.
2. If the Terminal Services role is not already installed:
a. In Server Manager, under Roles Summary, click Add roles.
b. In the Add Roles Wizard, if the Before You Begin page appears, click Next. This page will not appear if you have already installed other roles and you have selected the Skip this page by default check box.
c. On the Select Server Roles page, under Roles, select the Terminal Services check box, and then click Next.
d. On the Terminal Services page, click Next.
e. On the Select Role Services page, in the Role services list, select the TS Gateway check box.
f. If prompted to specify whether you want to install the additional role services required for TS Gateway, click Add Required Role Services.
g. On the Select Role Services page, confirm that TS Gateway is selected, and then click Next.
If the Terminal Services role is already installed:
a. Under Roles Summary, click Terminal Services. b. Under Role Services, click Add Role Services.
c. On the Select Role Services page, select the TS Gateway check box, and then click Next.
d. If prompted to specify whether you want to install the additional role services required for TS Gateway, click Add Required Role Services.
e. On the Select Role Services page, click Next.
3. On the Choose a Server Authentication Certificate for SSL Encryption page, specify whether to choose an existing certificate for SSL encryption (recommended), create a
self-signed certificate for SSL encryption, or choose a certificate for SSL encryption later.
If you are completing an installation for a new server that does not yet have certificates, see Obtain a certificate for the TS Gateway server for certificate requirements and information about how to obtain and install a certificate.
Under the Choose an existing certificate for SSL encryption (recommended) option, only certificates that have the intended purpose (server authentication) and Enhanced Key Usage (EKU) [Server Authentication (1.3.6.1.5.5.7.3.1)] that are appropriate for the TS Gateway role service will appear in the list of certificates. If you select this option, click Import, and then import a new certificate that does not meet these requirements, the imported certificate will not appear in the list.
4. On the Create Authorization Policies for TS Gateway page, specify whether you want to create authorization policies (a TS CAP and a TS RAP) during the TS Gateway role service installation process or later. If you select Later, follow the procedures in Create a TS CAP to create this policy. If you select Now, do the following:
a. On the Select User Groups That Can Connect Through TS Gateway page, click Add to specify additional user groups. In the Select Groups dialog box, specify the user group location and name, and then click OK as needed to check the name and to close the Select Groups dialog box.
b. To specify more than one user group, do either of the following: Type the name of each user group, separating the name of each group with a semi-colon; or add additional groups from different domains by repeating the first part of this step for each group.
c. After you finish specifying additional user groups, on the Select User Groups that Can Connect Through TS Gateway page, click Next.
d. On the Create a TS CAP for TS Gateway page, accept the default name for the TS CAP (TS_CAP_01) or specify a new name, select one or more supported Windows authentication methods, and then click Next.
e. On the Create a TS RAP for TS Gateway page, accept the default name for the TS RAP (TS_RAP_01) or specify a new name, and then do one of the following: Specify whether to allow users to connect only to computers in one or more computer groups, and then specify the computer groups; or specify that users can connect to any computer on the network. Click Next.
5. On the Network Policy and Access Services page (which appears if this role service is not already installed), review the summary information, and then click Next.
6. On the Select Role Services page, verify that Network Policy Server is selected, and then click Next.
7. On the Web Server (IIS) page (which appears if this role service is not already installed), review the summary information, and then click Next.
8. On the Select Role Services page, accept the default selections for Web Server (IIS), and then click Next.
9. On the Confirm Installation Options page, verify that the following roles, role services, and features will be installed:
• Terminal ServicesTS Gateway
• Network Policy and Access ServicesNetwork Policy Server
• Web Server (IIS)Web ServerManagement Tools
• RPC over HTTP Proxy
• Windows Process Activation ServiceProcess ModelConfiguration APIs
10. Click Install.
11. On the Installation Progress page, installation progress will be noted.
If any of these roles, role services, or features has already been installed, installation progress will be noted only for the new roles, role services, or features that are being installed.
12. On the Installation Results page, confirm that installation for these roles, role services, and features was successful, and then click Close.
Verify successful role service installation and TS Gateway service status Use the following procedure to verify that the TS Gateway role service and dependent roles, role services, and features are installed correctly and running.
To verify that installation was successful
1. Open Server Manager. To open Server Manager, click Start, point to Administrative Tools, and then click Server Manager.
2. In the console tree, expand Roles, and then double-click Terminal Services.
3. On the Terminal Services summary page, in the System Services area, verify that the status of Terminal Services Gateway is Running and that the startup type is set to Auto.
4. Close Server Manager.
5. Open Internet Information Services (IIS) Manager. To open IIS Manager, click Start, point to Administrative Tools, and then click Internet Information Services (IIS) Manager.
6. In the console tree, expand <TS Gateway_Server_Name>SitesDefault Web Site, and then click Default Web Site.
7. Right-click Default Web Site, point to Manage Web Site, and then click Advanced Settings.
8. In the Advanced Settings dialog box, under (General), verify that Start Automatically is set to True. If it is not set to True, click the drop-down arrow to display the list, and then click True.
9. Click OK.
10. Close IIS Manager.
2. Obtain a certificate for the TS Gateway server
This section assumes an understanding of certificate trust chaining, certificate signing, and general certificate configuration principles. For information about PKI configuration in Windows Server 2008, see ITPROADD-204: PKI Enhancement in Windows Vista and Windows Server 2008 (http://go.microsoft.com/fwlink/?LinkId=93995). For information about PKI configuration in Windows Server 2003, see Public Key Infrastructure (http://go.microsoft.com/fwlink/?LinkID=54917).
As mentioned earlier in this guide, by default TLS 1.0 is used to encrypt communications between Terminal Services clients and TS Gateway servers over the Internet. TLS is a standard protocol that helps to secure Web communications on the Internet or intranets. TLS is the latest and most secure version of the SSL protocol. For more information about TLS, see:
• SSL/TLS in Windows Server 2003 (http://go.microsoft.com/fwlink/?LinkID=19646)
• RFC 2246: The TLS Protocol Version 1.0 (http://go.microsoft.com/fwlink/?LinkID=40979) For TLS to function correctly, you must install an SSL-compatible X.509 certificate on the TS Gateway server.
Certificate requirements for TS Gateway
Certificates for TS Gateway must meet these requirements:
• The name in the Subject line of the server certificate (certificate name, or CN) must match the DNS name that the client uses to connect to the TS Gateway server, unless you are using wildcard certificates or the SAN attributes of certificates. If your organization issues certificates from an enterprise certification authority (CA), a certificate template must be configured so that the appropriate name is supplied in the certificate request. If your organization issues certificates from a stand-alone CA, you do not need to do this.
Note
If you are using the SAN attributes of certificates, clients that connect to the TS Gateway server must be running Remote Desktop Connection (RDC) 6.1. (RDC 6.1 [6.0.6001] supports Remote Desktop Protocol 6.1.). RDC 6.1 is included with Windows Server 2008 and Windows Vista SP1 and Windows XP SP3.
• The certificate is a computer certificate.
• The intended purpose of the certificate is server authentication. The Extended Key Usage
(EKU) is Server Authentication (1.3.6.1.5.5.7.3.1).
• The certificate has a corresponding private key.
• The certificate has not expired. We recommend that the certificate be valid one year from the date of installation.
• A certificate object identifier (also known as OID) of 2.5.29.15 is not required. However, if the certificate that you plan to use contains an object identifier of 2.5.29.15, you can only use the certificate if at least one of the following key usage values is also
set: CERT_KEY_ENCIPHERMENT_KEY_USAGE, CERT_KEY_AGREEMENT_KEY_USAGE, andCERT_DATA_ENCIPHERMENT_KEY_USAGE.
For more information about these values, see Advanced Certificate Enrollment and Management (http://go.microsoft.com/fwlink/?LinkID=74577).
• The certificate must be trusted on clients. That is, the public certificate of the CA that signed the TS Gateway server certificate must be located in the Trusted Root Certification Authorities store on the client computer.
Using existing certificates
If you already have a certificate, you can reuse it for the TS Gateway server if the certificate:
• Is issued by one of the trusted public CAs that participate in the Microsoft Root Certificate Program Members program [as listed in article 931125 in the Microsoft Knowledge Base (http://go.microsoft.com/fwlink/?LinkID=59547)]; and
• Meets the certificate requirements for TS Gateway server.
If the certificate is not trusted by the Microsoft Root Certificate Program Members program (for example, if you create and install a self-signed certificate on the TS Gateway server and you do not manually configure the certificate to trust the Terminal Services client computer), a warning stating that you do not have a trusted certificate appears when the client attempts to connect through the TS Gateway server, and the connection will not succeed. To prevent this error from occurring, install the certificate onto the computer certificate store on the client computer before the client attempts to connect through the TS Gateway server.
Certificate installation and configuration process overview
The process of obtaining, installing, and configuring a certificate for TS Gateway server involves the following steps:
1. Obtain a certificate for the TS Gateway server by doing one of the following:
• If your company maintains a stand-alone or enterprise CA that is configured to issue SSL- compatible X.509 certificates that meet TS Gateway requirements, you can generate and submit a certificate request in several ways, depending on the policies and configuration of your organization’s CA. Methods for obtaining a certificate include:
• Initiating auto-enrollment from the Certificates snap-in.
• Requesting certificates by using the Certificate Request Wizard.
• Requesting a certificate over the Web.
Note
If you have a Windows Server 2003 CA, be aware that the Windows Server 2003 Certificate Services Web enrollment functionality relies on an ActiveX control that is named Xenroll. This ActiveX control is available in Microsoft Windows 2000, Windows Server 2003, and Windows XP. However, Xenroll has been deprecated in Windows Server 2008 and Windows Vista. The sample certificate enrollment Web pages that are included with the original release version of Windows Server 2003, Windows Server 2003 Service Pack 1 (SP1), and Windows Server 2003 Service Pack 2 (SP2) are not designed to handle the change in how Windows Server 2008 and Windows Vista perform Web-based certificate enrollment operations. For information about the steps that you can take to address this issue, see article 922706 in the Microsoft Knowledge Base (http://go.microsoft.com/fwlink/?LinkId=94472).
• Using the Certreq command-line tool.
For more information about using any of these methods to obtain certificates for Windows Server 2008, see the “Obtain a Certificate” topic in the Certificates snap-in Help and the “Certreq” topic in the Windows Server 2008 Command Reference. To review the Certificates snap-in Help topics, click Start, click Run, type hh certmgr.chm, and then click OK. For information about how to request certificates for Windows Server 2003, see Requesting Certificates (http://go.microsoft.com/fwlink/?LinkID=19638).
A stand-alone or enterprise CA-issued certificate must be co-signed by a trusted public CA that participates in the Microsoft Root Certification Program Members program (http://go.microsoft.com/fwlink/?LinkID=59547). Otherwise, users connecting from home computers or kiosks might not be able to connect to TS Gateway servers. These connections might fail because the enterprise CA-issued root might not be trusted by computers that are not members of domains, such as home computers or kiosks.
• If your company does not maintain a stand-alone or enterprise CA that is configured to issue SSL-compatible X.509 certificates, you can purchase a certificate from a trusted public CA that participates in the Microsoft Root Certificate Program Members program (http://go.microsoft.com/fwlink/?LinkID=59547). Some of these vendors might offer certificates at no cost on a trial basis.
• Alternatively, if your company does not maintain a stand-alone or enterprise CA and you do not have a compatible certificate from a trusted public CA, you can create and import a self- signed certificate for your TS Gateway server for technical evaluation and testing purposes. For step-by-step instructions, see Create a self-signed certificate for TS Gateway.
In the example configurations described in this guide, a self-signed certificate is used.
Important
If you use either of the first two methods to obtain a certificate (that is, if you obtain a certificate from a stand-alone or enterprise CA or a trusted public CA), you must also install the certificate on the TS Gateway server and map the certificate. However, if you create a self-signed certificate by using the Add Roles Wizard during installation of the TS Gateway role service or by using TS Gateway Manager after installation (as described in Create a self-signed certificate for TS Gateway), you do not need to install or map the certificate to the TS Gateway server. In this case, the certificate is automatically created, installed in the correct location on the TS Gateway server, and mapped to the TS Gateway server.
Note
Terminal Services clients must have the certificate of the CA that issued the server certificate in their Trusted Root Certification Authorities store. Therefore, if you create a self-signed certificate by following the procedure in this guide, you must copy the certificate to the client computer (or to a network share that can be accessed from the client computer) and then install the certificate in the Trusted Root Certification Authorities store on the client computer. For step-by-step instructions, see Install the TS Gateway server root certificate in the Trusted Root Certification Authorities store onthe Terminal Services client.
If you use one of the first two methods to obtain a certificate and the Terminal Services client computer trusts the issuing CA, you do not need to install the certificate of the CA that issued the server certificate in the client computer certificate store. For example, you do not need to install the certificate of the issuing CA in the client computer certificate store if a VeriSign or other public, trusted CA certificate is installed on the TS Gateway server.
If you use the third method to obtain a certificate (that is, if you create a self-signed certificate), you do need to copy the certificate of the CA that issued the server certificate to the client computer. Then, you must install that certificate in the Trusted Root Certification Authorities store on the client computer. For more information, see Install the TS Gateway server root certificate in the Trusted Root Certification Authorities store on the Terminal Services client.
2. Install the certificate.
Install a certificate on the TS Gateway server. Use this procedure, described later in this guide, to install the certificate on your TS Gateway server.
3. Map the certificate.
Map the TS Gateway certificate. This procedure, described later in this guide, allows you to specify that the existing certificate be used by the TS Gateway server.
Create a self-signed certificate for TS Gateway
This procedure describes how to use TS Gateway Manager to create a self-signed certificate for technical evaluation and testing purposes, if you did not already create one by using the Add Roles Wizard when you installed the TS Gateway role service.
Important
We recommend that you use self-signed certificates only for testing and evaluation purposes. After you create the self-signed certificate, you must copy it to the client computer (or to a network share that can be accessed from the client computer), and then install it in the Trusted Root Certification Authorities store on the client computer.
If you create a self-signed certificate by using the Add Roles Wizard during installation of the TS Gateway role service, or by using TS Gateway Manager after installation (as described in this procedure), you do not need to install or map the certificate to the TS Gateway server.
To create a self-signed certificate for the TS Gateway server
1. Open TS Gateway Manager. To open TS Gateway Manager, click Start, point
to Administrative Tools, point to Terminal Services, and then click TS Gateway Manager.
2. In the console tree, click to select the node that represents your TS Gateway server, which is named for the computer on which the TS Gateway server is running.
3. In the results pane, under Configuration Status, click View or modify certificate properties.
4. On the SSL Certificate tab, click Create a self-signed certificate for SSL encryption, and then click Create Certificate.
5. In the Create Self-Signed Certificate dialog box, do the following:
a. Under Certificate name, verify that the correct common name (CN) is specified for the self-signed certificate, or specify a new name. The CN must match the DNS name that the client uses to connect to the TS Gateway server, unless you are using wildcard certificates or the SAN attributes of certificates.
b. Under Certificate location, to store the root certificate in a specified location so that you can manually distribute the root certificate to clients, verify that the Store the root certificate check box is selected, and then specify where to store the certificate. By default, this check box is selected and the certificate is stored under the %Windir%Users<Username>Documents folder.
c. Click OK.
6. If you selected the Store the root certificate check box and specified a location for the certificate, a message will appear stating that TS Gateway has successfully created the self-signed certificate, and confirming the location of the stored certificate. Click OK to close the message.
7. Click OK again to close the TS Gateway server Properties dialog box.
3. Configure a certificate for the TS Gateway server
The process of configuring a certificate for a TS Gateway server involves these steps: Install a certificate on the TS Gateway server Map the TS Gateway server certificate
Install a certificate on the TS Gateway server
After you obtain a certificate, use this procedure to install the certificate in the correct location on the TS Gateway server, if the certificate is not already installed. After you complete this procedure, you must map the certificate.
Note
This procedure is not required if you created a self-signed certificate by using the Add Roles Wizard during installation of the TS Gateway role service, or by using TS Gateway Manager after installation, as described in Create a self-signed certificate for TS Gateway. In either case, a certificate is automatically created, installed in the correct location on the TS Gateway server, and mapped to the TS Gateway server.
To install a certificate on the TS Gateway server
1. Open the Certificates snap-in console. If you have not already added the Certificates snap-in console, you can do so by doing the following:
a. Click Start, click Run, type mmc, and then click OK. b. On the File menu, click Add/Remove Snap-in.
c. In the Add or Remove Snap-ins dialog box, in the Available snap-ins list, click Certificates, and then click Add.
d. In the Certificates snap-in dialog box, click Computer account, and then click Next.
e. In the Select Computer dialog box, click Local computer: (the computer this console is running on), and then click Finish.
f. In the Add or Remove snap-ins dialog box, click OK.
2. In the Certificates snap-in console, in the console tree, expand Certificates (Local Computer), and then click Personal.
3. Right-click the Personal folder, point to All Tasks, and then click Import.
4. On the Welcome to the Certificate Import Wizard page, click Next.
5. On the File to Import page, in the File name box, specify the name of the certificate that you want to import, and then click Next.
6. On the Password page, do the following:
a. If you specified a password for the private key associated with the certificate earlier, type the password.
b. If you want to mark the private key for the certificate as exportable, ensure that Mark this key as exportable is selected.
c. If you want to include all extended properties for the certificate, ensure that Include all extended properties is selected.
d. Click Next.
7. On the Certificate Store page, accept the default option, and then click Next.
8. On the Completing the Certificate Import Wizard page, confirm that the correct certificate has been selected.
9. Click Finish.
10. After the certificate import has successfully completed, a message appears confirming that the import was successful. Click OK.
11. With Certificates selected in the console tree, in the details pane, verify that the correct certificate appears in the list of certificates on the TS Gateway server. The certificate must be under the Personal store of the local computer.
Map the TS Gateway server certificate
You must use TS Gateway Manager to map the TS Gateway server certificate. If you map a TS Gateway server certificate by using any other method, TS Gateway will not function correctly.
Note
This procedure is not required if you created a self-signed certificate by using the Add Roles Wizard during installation of the TS Gateway role service, or by using TS Gateway Manager after installation, as described in Create a self-signed certificate for TS Gateway.
To map a certificate to the local TS Gateway server
1. Open TS Gateway Manager. To open TS Gateway Manager, click Start, point
to Administrative Tools, point to Terminal Services, and then click TS Gateway Manager.
2. In the TS Gateway Manager console tree, right-click the local TS Gateway server, and then click Properties.
3. On the SSL Certificate tab, click Select an existing certificate for SSL encryption (recommended), and then click Browse Certificates.
4. In the Install Certificate dialog box, click the certificate that you want to use, and then click Install.
5. Click OK to close the Properties dialog box for the TS Gateway server.
6. If this is the first time that you have mapped the TS Gateway certificate, after the certificate mapping is completed, you can verify that the mapping was successful by viewing the TS Gateway Server Status area in TS Gateway Manager.
Under Configuration Status and Configuration Tasks, the warning stating that a server certificate is not yet installed or selected and the View or modify certificate properties hyperlink are no longer displayed.
Understand authorization policies for TS Gateway
After you install the TS Gateway role service and configure a certificate for the TS Gateway server, you must create Terminal Services connection authorization policies (TS CAPs), computer groups, and Terminal Services resource authorization policies (TS RAPs).
TS CAPs
TS CAPs allow you to specify who can connect to a TS Gateway server. You can specify a user group that exists on the local TS Gateway server or in Active Directory Domain Services. You can also specify other conditions that users must meet to access a TS Gateway server. For example, you can specify that all users who connect to a specific terminal server that is hosting a human resources (HR) database through a TS Gateway server must be members of the “HR Users” security group. You can also specify that the client computer that is initiating the connection must be a member of an Active Directory security group in the internal network to connect to the
TS Gateway server. By requiring that the computer be a member of a specific Active Directory security group in the internal network, you can exclude users who are attempting to connect to the internal network from kiosks, airport computers, or home computers that are not trusted.
For enhanced security when clients are connecting to the internal network through TS Gateway, you can also specify whether to disable client device redirection for all devices supported by the Terminal Services client, or just for a specific type of device such as a disk drive or supported Plug and Play devices. If you disable client device redirection for all devices supported by the client, all device redirection is disabled, except for audio and smart card redirection.
When you select the option to disable device redirection for specific device types or to disable all device types except for smart cards, the TS Gateway server will send the request back to the client with a list of the device types to be disabled. This list is a suggestion only; it is possible for the client to modify the device redirection settings in the list.
Warning
Because the TS Gateway server relies on the client to enforce the device redirection settings suggested by the server, this feature should not be considered to provide guaranteed security. The suggested device redirection settings can only be enforced for Remote Desktop Connection (RDC) clients; the settings cannot be enforced for clients that do not use RDC. Additionally, it is possible for a malicious user to modify an RDC client so that the client ignores the suggested settings. In such cases, this feature cannot provide guaranteed security, even for RDC clients.
Additionally, you can specify whether remote clients must use smart card authentication or password authentication to access internal network resources through a TS Gateway server. When both of these options are selected, clients that use either authentication method are
allowed to connect.
Finally, if your organization has deployed Network Access Protection (NAP), you can specify that the client must send a statement of health (SoH). For information about how to configure TS Gateway for NAP, see Configuring the TS Gateway NAP Scenario.
Important
Users are granted access to a TS Gateway server if they meet the conditions specified in the TS CAP. You must also create a TS RAP. A TS RAP allows you to specify the internal network resources (computers) that users can connect to through TS Gateway. Until you create both a TS CAP and a TS RAP, users cannot connect to internal network resources through this TS Gateway server.
TS RAPs
TS RAPs allow you to specify the internal network resources that remote users can connect to through a TS Gateway server. When you create a TS RAP, you can create a computer group (a list of computers on the internal network to which you want the remote users to connect) and associate it with the TS RAP. For example, you can specify that users who are members of the “HR Users” user group be allowed to connect only to computers that are members of the “HR Computers” computer group, and that users who are members of the “Finance Users” user group be allowed to connect only to computers that are members of the “Finance Computers” computer group.
Remote users connecting to an internal network through a TS Gateway server are granted access to computers on the network if they meet the conditions specified in at least one TS CAP and one TS RAP.
Note
When you associate a TS Gateway-managed computer group with a TS RAP, you can support both fully qualified domain names (FQDNs) and NetBIOS names by adding both names to the TS Gateway-managed computer group separately. When you associate an Active Directory security group with a TS RAP, both FQDNs and NetBIOS names are supported automatically if the internal network computer that the client is connecting to belongs to the same domain as the TS Gateway server. If the internal network computer belongs to a different domain than the TS Gateway server, users must specify the FQDN of the internal network computer.
Together, TS CAPs and TS RAPs provide two different levels of authorization to provide you with the ability to configure a more specific level of access control to computers on an internal network.
Security groups and TS Gateway-managed computer groups associated with TS RAPs
Remote users can connect through TS Gateway to internal network resources in a computer group. The computer group members can be any one of the following:
• Members of an existing security group. The security group can exist in Local Users and
Groups on the TS Gateway server, or it can exist in Active Directory Domain Services.
• Members of an existing TS Gateway-managed computer group or a new TS Gateway- managed computer group. You can configure a TS Gateway-managed computer group by using TS Gateway Manager after installation.
A TS Gateway-managed group will not appear in Local Users and Groups on the TS Gateway server, nor can it be configured by using Local Users and Groups.
• Any network resource. In this case, users can connect to any computer on the internal network that they could connect to when they use Remote Desktop Connection.
4. Create a TS CAP for the TS Gateway server
This procedure describes how to use TS Gateway Manager to create a custom TS CAP. Alternatively, you can use the Authorization Policies Wizard to quickly create a TS CAP and a TS RAP for TS Gateway.
Important
If you configure more than one TS CAP, keep in mind that TS Gateway uses the following policy lookup behavior: policies are applied in the numerical order shown in the TS Gateway Manager results pane, and access to the TS Gateway server is granted by the first matching policy. That is, if a client does not meet the requirements of the first TS CAP in the list, TS Gateway will evaluate the second policy in the list, and so forth, until it locates a TS CAP whose requirements are met. If a client does not meet the requirements of any TS CAP in the list, TS Gateway denies access to the client.
To create a TS CAP for the TS Gateway server
1. Open TS Gateway Manager.
2. In the console tree, click to select the node that represents the TS Gateway server, which is named for the computer on which the TS Gateway server is running.
3. In the console tree, expand Policies, and then click Connection Authorization Policies.
4. Right-click the Connection Authorization Policies folder, click Create New Policy, and then click Custom.
5. On the General tab, type a name for the policy, and then verify that the Enable this policy check box is selected.
6. On the Requirements tab, under Supported Windows authentication methods, select one or both of the following check boxes:
• Password
• Smart card
When both of these options are selected, clients that use either authentication method are allowed to connect.
7. Under User group membership (required), click Add Group, and then specify a user group whose members can connect to the TS Gateway server. You must specify at least one user group.
8. In the Select Groups dialog box, specify the user group location and name, and then click OK as needed to check the name and to close the Select Groups dialog box To specify more than one user group, do either of the following:
• Type the name of each user group, separating the name of each group with a semi- colon.
• Add additional groups from different domains by repeating this step for each group.
9. To specify computer domain membership criteria that client computers should meet (optional), on the Requirements tab, under Client computer group membership (optional), click Add Group, and then specify the computer groups. In the example configurations, no computer group is specified.
To specify computer groups, you can use the same steps that you used to specify user groups.
10. On the Device Redirection tab, select one of the following options to enable or disable redirection for remote client devices:
• To permit all client devices to be redirected when connecting through the TS Gateway server, click Enable device redirection for all client devices. By default, this option is selected.
• To disable device redirection for all client devices except for smart cards when connecting through the TS Gateway server, select Disable device redirection for all client devices except for smart card.
• To disable device redirection for only certain device types when connecting through the TS Gateway server, click Disable device redirection for the following client device types, and then select the check boxes that correspond to the client device types for which device redirection should be disabled.
Important
Device redirection settings can be enforced only for Microsoft Remote Desktop Connection (RDC) clients.
11. Click OK.
12. The new TS CAP that you created appears in the TS Gateway Manager results pane.
When you click the name of the TS CAP, the policy details appear in the lower pane.
5. Create a TS RAP and specify computers that users can connect to through the TS Gateway server
This procedure describes how to use TS Gateway Manager to create a custom TS RAP, and to specify computers that users can connect to through the TS Gateway server. Alternatively, you can use the Authorization Policies Wizard to complete these tasks.
Important
If users are connecting to members of a terminal server farm, you must configure a TS RAP that explicitly specifies the name of the terminal server farm. To do so, when you create the TS RAP, on the Computer Group tab, select the Select existing TS Gateway-managed computer group or create a new one option, and then explicitly specify the name of the terminal server farm. If the name of the terminal server farm is not explicitly specified, users will not be able to connect to members of the farm. For optimal security and ease of administration, to specify the terminal servers that are members of the farm, create a second TS RAP. On the Computer Group, select the Select an Active Directory security group option, and then specify the security group that contains the terminal servers in the farm. Doing this optimizes security by ensuring that the members of the farm are trusted members of an Active Directory security group.
To create a TS RAP and specify computers that users can connect to through the TS Gateway server
1. Open TS Gateway Manager.
2. In the console tree, click to select the node that represents your TS Gateway server, which is named for the computer on which the TS Gateway server is running.
3. In the console tree, expand Policies, and then click Resource Authorization Policies.
4. Right-click the Resource Authorization Policies folder, click Create New Policy, and then click Custom.
5. On the General tab, in the Policy name box, enter a name that is no longer than 64 characters.
6. In the Description box, enter a description for the new TS RAP.
7. On the User Groups tab, click Add to select the user groups to which you want this TS RAP to apply.
8. In the Select Groups dialog box, specify the user group location and name, and then click OK. To specify more than one user group, do either of the following:
• Type the name of each user group, separating the name of each group with a semi- colon.
• Add additional groups from different domains by repeating Step 7 for each group.
9. On the Computer Group tab, specify the computer group that users can connect to through TS Gateway by doing one of the following:
• To specify an existing security group, click Select an existing Active Directory security group, and then click Browse. In the Select Group dialog box, specify the user group location and name, and then click OK. Note that you can select a security group in Local Users and Groups, rather than in Active Directory Domain Services.
• To specify a TS Gateway-managed computer group, click Select an existing TS Gateway-managed computer group or create a new one, and then click Browse. In the Select a TS Gateway-managed Computer Group dialog box, do one of the following:
Select an existing TS Gateway-managed computer group by clicking the name of the computer group that you want to use, and then click OK to close the dialog box.
Create a new TS Gateway-managed computer group by clicking Create New Group. On the General tab, type a name and description for the new group. On the Network Resources tab, type the name or IP address of the computer or Terminal Services farm that you want to add, and then click Add. Repeat this step as needed to specify additional computers, and then click OK to close the New TS Gateway-Managed Computer Group dialog box. In the Select a TS Gateway-managed Computer Group dialog box, click the name of the new computer group, and then click OK to close the dialog box.
Important
When you add an internal network computer to the list of TS Gateway- managed computers, keep in mind that if you want to allow remote users to connect to the computer by specifying either its computer name or its IP address, you must add the computer to the computer group twice (by specifying the computer name of the computer and adding it to the computer group, and then specifying the IP address of the computer and adding it to the computer group again). If you specify only an IP address for a computer when you add it to a computer group, users must also specify the IP address of that computer when they connect to that computer through TS Gateway. To ensure that remote users connect to the internal network computers that you intend, we recommend that you do not specify IP addresses for the computers, if the computers are not configured to use static IP addresses. For example, you should not specify IP addresses if your organization uses DHCP to dynamically reconfigure IP addresses for the computers.
• To specify any network resource, click Allow users to connect to any network resource, and then click OK.
10. After you specify a computer group, the new TS RAP that you created appears in the TS Gateway Manager results pane. When you click the name of the TS RAP, the policy details appear in the lower pane.
6. Limit the maximum number of simultaneous connections through TS Gateway (optional)
By default, with the exception of TS Gateway servers that are running on Windows Server® 2008
Standard, no limit is set for the number of simultaneous connections that clients can make to internal network resources through a TS Gateway server. To optimize TS Gateway server performance or to ensure compliance with the connection/security policies of your organization, you can set a limit for the number of simultaneous connections that clients can make to network
resources through a TS Gateway server.
Note
For TS Gateway servers that are running on Windows Server 2008 Standard, a maximum of 250 simultaneous connections is supported.
To limit the maximum number of allowable connections for TS Gateway
1. Open TS Gateway Manager.
2. In the console tree, click to select the node that represents your TS Gateway server, which is named for the computer on which the TS Gateway server is running.
3. In the console tree, expand Monitoring.
4. With the Monitoring folder selected, right-click the Monitoring folder, and then click Edit Connection Limit.
5. On the General tab, under Maximum Connections, do one of the following:
• To set a limit for the maximum number of simultaneous connections that Terminal Services clients can make to internal network resources through TS Gateway, click Limit maximum allowed simultaneous connections to, and then specify the number of allowable connections.
• To set no limit on the number of allowable connections between clients and internal network resources through TS Gateway, click Allow the maximum supported simultaneous connections. This is the default option. Keep in mind that for TS Gateway servers that are running on Windows Server 2008 Standard, a maximum of 250 simultaneous connections is supported.
• To prevent new connections from being made between clients and internal network resources through TS Gateway, click Disable new connections. If you select this option, only new connection attempts will be rejected. Current connections will not be ended by TS Gateway.
6. Click OK.
Steps for configuring a Terminal Services client for the TS Gateway core scenario
To configure the Terminal Services client for the TS Gateway core scenario, complete these tasks.
|
Task |
Reference/Step-by-step instructions |
|
1. Install the TS Gateway server root certificate in the Trusted Root Certification Authorities store on the Terminal Services client (optional). Note This procedure is not required if a |
Install the TS Gateway server root certificate inthe Trusted Root Certification Authorities storeon the Terminal Services client |
|
Task |
Reference/Step-by-step instructions |
|
certificate that is issued by one of the trusted public CAs that participate in the Microsoft Root Certificate Program Members program is installed on the TS Gateway server, and the Terminal Services client computer trusts the certificate. |
|
|
2. Configure Remote Desktop Connection settings. |
Configure Remote Desktop Connection settings |
|
3. Verify that end-to-end connectivity through the TS Gateway server is functioning correctly. |
Verify that end-to-end connectivity through the TS Gateway server is functioning correctly |
1. Install the TS Gateway server root certificate in the Trusted Root Certification Authorities Store on the Terminal Services client (optional)
The client computer must verify and trust the identity of the TS Gateway server before the client can send the user’s password and logon credentials securely and complete the authentication process. To establish this trust, the clients must trust the root of the server’s certificate. That is, clients must have the certificate of the certification authority (CA) that issued the server certificate in their Trusted Root Certification Authorities store. You can view this store by using the Certificates snap-in.
As mentioned, this procedure is not required if:
• A certificate that is issued by one of the trusted public CAs that participate in the Microsoft Root Certificate Program Members program [as listed in article 931125 in the Microsoft Knowledge Base (http://go.microsoft.com/fwlink/?LinkID=59547)] is installed on the TS Gateway server; and
• The Terminal Services client computer already trusts the issuing CA.
If the TS Gateway server is using a certificate that is issued by one of the trusted public CAs, and the certificate is recognized and trusted by your client computer, proceed to complete the steps in the Configure remote desktop connection settings section.
Important
Do not install certificates from any untrusted sources or individuals.
Note
If you are configuring the Terminal Services client for use with Network Access Protection (NAP), you must install the TS Gateway server root certificate by using the computer account. If not, you can install the TS Gateway server root certificate by using the user account.
Before completing the steps in the following procedure, you must have already copied the certificate to the client computer. For example, if you created a self-signed certificate for the
TS Gateway server by using TS Gateway Manager, you must have already copied that certificate from the TS Gateway server to the client computer.
To install the TS Gateway server root certificate in the Trusted Root Certification Authorities store on the Terminal Services client
1. Open the Certificates snap-in console. If you have not already added the Certificates snap-in console, you can do so by doing the following:
a. Click Start, click Run, type mmc, and then click OK.
b. On the File menu, click Add/Remove Snap-in.
c. In the Add or Remove Snap-ins dialog box, in the Available snap-ins list, click Certificates, and then click Add.
d. In the Certificates snap-in dialog box, to open the snap-in for a computer account, click Computer account, and then click Next. To open the snap-in for a user account, click My user account, and then click Finish.
e. If you opened the Certificates snap-in for a computer account, in the Select Computer dialog box, click Local computer: (the computer this console is running on), and then click Finish.
f. In the Add or Remove snap-ins dialog box, click OK.
2. In the Certificates snap-in console, in the console tree, expand Certificates (Local Computer), expand Trusted Root Certification Authorities, right-click Certificates, point to All Tasks, and then click Import.
3. On the Welcome to the Certificate Import Wizard page, click Next.
4. On the File to Import page, in the File name box, browse to the TS Gateway server root certificate, click Open, and then click Next.
5. On the Certificate Store page, accept the default option (Place all certificates in the following store – Trusted Root Certification Authorities), and then click Next.
6. On the Completing the Certificate Import Wizard page, confirm that the following certificate settings appear:
• Certificate Store Selected by User: Trusted Root Certification Authorities
• Content: Certificate
• File Name: FilePath<Root_Certificate_Name.cer>, where <Root_Certificate_Name> is the name of the TS Gateway server root certificate.
7. Click Finish.
8. After the certificate import has successfully completed, a message appears confirming that the import was successful. Click OK.
9. With Certificates selected in the console tree, in the details pane, verify that the root certificate of the TS Gateway server appears in the list of certificates on the client. Ensure that the certificate appears under the Trusted Root Certification Authorities store.
2. Configure Remote Desktop Connection settings
To configure Remote Desktop Connection settings
1. Open the Remote Desktop Connection client. To open the Remote Desktop Connection client, click Start, point to All Programs, point to Accessories, and then click Remote Desktop Connection.
2. In the Remote Desktop Connection dialog box, click Options to expand the dialog box and view settings.
3. On the Advanced tab, in the Connect from anywhere area, click Settings.
4. In the TS Gateway Server Settings dialog box, select the appropriate options:
• Automatically detect TS Gateway server settings (default). If you select this option, the Terminal Services client attempts to use Group Policy settings that determine the behavior of client connections to TS Gateway servers or TS Gateway server farms, if these settings have been configured and enabled. For more information, see the “Using Group Policy to Manage Client Connections Through TS Gateway” topic in the TS Gateway Help.
• Use these TS Gateway server settings. If a TS Gateway server name or
TS Gateway server farm name and a logon method are not already enabled and enforced by Group Policy, you can select this option and specify the name of the TS Gateway server or TS Gateway server farm that you want to connect to and the logon method to use for the connection. The name that you specify for the server must match the name in the Issued to field of the TS Gateway server certificate. If
you create a self-signed certificate by using the Add Roles Wizard during installation of the TS Gateway role service or by using TS Gateway Manager after installation, specify the fully qualified domain name (FQDN) of the TS Gateway server.
• Bypass TS Gateway server for local addresses. This option is selected by default.
If you want the Terminal Services client to automatically detect when TS Gateway is required, select this check box. If you use a mobile computer, selecting this option will optimize client connectivity performance and minimize latency because TS Gateway will only be used when it is required. If your computer is always connected to the local area network (LAN) or if it is hosted inside the internal network firewall, TS Gateway will not be used. If you are outside the internal network and connecting to the internal network over the Internet, TS Gateway will be used.
If you are in a LAN, but want to test connectivity through a TS Gateway server or TS Gateway server farm, clear this check box. Otherwise, the client will not connect through the TS Gateway server or TS Gateway server farm in this case.
• Do not use a TS Gateway server. Select this option if your computer is always connected to the LAN or if it is hosted inside the internal network firewall. This option is appropriate if you know that you do not need to use TS Gateway to traverse a firewall.
5. Do one of the following:
• To save the settings and close the Remote Desktop Connection dialog box, click Save, and then click Cancel. The settings will be saved as an RDP file to a default location (by default, the file is saved to Drive:<Username>Documents).
• To save the RDP file to a specified location (you can customize and distribute the file later to multiple clients as needed), click Save As. In the Save as dialog box, in the File name box, specify the file name and location, and then click Save.
• To proceed with a connection to an internal network resource, click Save, click Connect, and then proceed to Step 5 in the next procedure (“Verify that end-to- end connectivity through TS Gateway is functioning correctly”).
3. Verify that end-to-end connectivity through TS Gateway is functioning correctly
To verify that end-to-end connectivity through TS Gateway is functioning correctly
1. Open the Remote Desktop Connection client. To open the Remote Desktop Connection client, click Start, point to All Programs, point to Accessories, and then click Remote Desktop Connection.
2. In the Remote Desktop Connection dialog box, click Options to expand the dialog box and view settings.
3. On the General tab, type the name of the computer (terminal server or computer running Remote Desktop) to which you want to connect remotely through TS Gateway.
4. Click Connect.
5. In the Enter your credentials dialog box, select the user account that you want to use to log on remotely to the computer, enter the required credentials, and then click OK.
6. In the Gateway server credentials dialog box, select the user name that you want to use to log on to the TS Gateway server, enter the required credentials, and then
click OK.
7. After a few moments, the connection completes and a connection will be established through the TS Gateway server to the computer.
Configuring the TS Gateway NAP Scenario
To enhance security, you can configure TS Gateway servers and clients to use Network Access Protection (NAP). NAP is a health policy creation, enforcement, and remediation technology that is included in Windows Vista and Windows Server 2008. By using NAP, you can enforce health requirements on clients that connect to the TS Gateway server, which can include firewalls being enabled, security update requirements, and other required computer configurations.
By using NAP, you can help ensure that clients meet the health policy requirements of your organization before they are allowed to connect to internal network resources through TS Gateway servers.
The following steps are required for the successful setup and demonstration of the TS Gateway NAP scenario described as an example in this guide.
1. We recommend that you set up three computers to evaluate this scenario. These computers are:
• The TS Gateway server/Network Policy Server (NPS server) (known as “TSGSERVER” in this example)
• The Terminal Services client (known as “TSCLIENT” in this example)
• An internal network resource (known as “CORPORATERESOURCE” in this example)
The computers must meet the system requirements described in System requirements for the
TS Gateway NAP scenario.
2. Complete the core TS Gateway server configuration by following the instructions in “Steps for configuring the TS Gateway server for the TS Gateway core scenario” in Configuring the TSGateway Core Scenario.
3. Configure the TS Gateway server for NAP health policy checking by following the instructions in Steps for configuring TS Gateway for the NAP scenario.
4. Complete the core Terminal Services client configuration for TS Gateway by following the instructions in “Steps for configuring a Terminal Services client for the TS Gateway core scenario” in Configuring the TS Gateway Core Scenario.
5. Configure the client as a NAP enforcement client by following the instructions in Steps for configuring a Terminal Services client as a NAP enforcement client.
6. Configure the internal network resource. As mentioned, this resource can be any terminal server or any computer with Remote Desktop enabled.
7. Verify that the NAP health policies created on the TS Gateway server are successfully applied to the Terminal Services client by completing the following two tasks:
• Testing for a successful blocked connection. If the health policies are correctly applied to the Terminal Services client, the client connection attempt will be blocked by the NPS server when automatic updating is disabled on the Terminal Services client computer.
• Testing for a successful allowed connection. If the health policies are correctly applied to the Terminal Services client, the client connection attempt will be allowed by the NPS server when automatic updating is enabled on the Terminal Services client computer.
To complete these two testing tasks, follow the instructions in Test to confirm that the TS Gateway NAP health policy is successfully applied to the Terminal Services client.
System requirements for the TS Gateway NAP scenario
The three computers used in the TS Gateway NAP scenario must meet the following system requirements.
|
Computer |
Required configuration |
|
TS Gateway server (TSGSERVER) |
• In this scenario, TSGSERVER is used as the TS Gateway server and as an NPS server, and it must run Windows Server 2008. The installation can be an upgrade from Windows Server 2003 SP1 or Windows Server 2008 Release Candidate 0 (RC0). For more information, see “Supported upgrade paths” in Installing Windows Server 2008 (http://go.microsoft.com/fwlink/?LinkId=104 824). |
|
Terminal Services client (TSCLIENT) |
In this scenario, TSCLIENT is used as a Terminal Services client and as a NAP client, and it can run any of the following: • Windows Vista SP1 or Windows XP SP3. • Windows Vista. The installation can be an upgrade from Windows XP with SP2. • Windows Server 2008. The installation can be an upgrade. |
|
Internal network resource (CORPORATERESOURCE) |
• Windows Vista SP1 or Windows XP SP3. • Windows Vista. The installation can be an upgrade from Windows XP with SP2. • Windows XP with SP2. • Windows XP with SP3. • Windows Server 2008. The installation can be an upgrade. • Windows Server 2003 with SP1 or SP2. |
Setting up the TS Gateway NAP scenario
The following diagram illustrates how TS Gateway can be used with NAP.
Note
The steps in this setup guide describe how to set up remote access from a Terminal Services client through a TS Gateway server to an internal network resource, with health policy checking for Terminal Services (the NPS server is used to perform the health policy checking). The guide does not describe how to set up the firewalls illustrated in the diagram, the terminal servers running RemoteApp programs, or the perimeter network or Active Directory infrastructure. The diagram is provided to suggest one way in which this scenario might be implemented in a production environment.
Steps for configuring TS Gateway for the NAP scenario
To configure the TS Gateway server NAP scenario, complete these tasks.
|
Task |
Reference/Step-by-step instructions |
|
1. Enable NAP health policy checking on the TS Gateway server. |
Enable NAP health policy checking on the TSGateway server |
|
2. Delete existing TS CAPs and create three |
Delete existing TS CAPs and create three new |
|
Task |
Reference/Step-by-step instructions |
|
new TS CAPs on the TS Gateway server. |
TS CAPs on the TS Gateway server |
|
3. Configure a Windows Security Health Validator on the TS Gateway server. |
Configure a Windows Security Health Validatoron the TS Gateway server |
|
4. Create NAP policies on the TS Gateway server by using the Configure NAP Wizard. |
Create NAP policies on the TS Gateway serverby using the Configure NAP W izard |
1. Enable NAP health policy checking on the TS Gateway server To enable NAP health policy checking on the TS Gateway server, you enable a setting on the server that requests that the Terminal Services client send an SoH.
To enable health checking on the TS Gateway server
1. Open TS Gateway Manager. To open TS Gateway Manager, click Start, point to Administrative Tools, point to Terminal Services, and then click Terminal Services Gateway.
2. In the TS Gateway Manager console tree, right-click the local TS Gateway server, and then click Properties.
3. On the TS CAP Store tab, select the Request clients to send a statement of health check box.
4. A message will appear, stating that you must also configure TS CAPs for NAP to ensure that health policies are enforced. Click OK to close the message.
5. Click OK again to close the TS Gateway server Properties dialog box.
2. Delete existing TS CAPs and create three new TS CAPs on the TS Gateway server
If you have already created one or more TS CAPs on the TS Gateway server by using TS Gateway Manager and following the procedures in “Create a TS CAP for the TS Gateway server” in Configuring the TS Gateway Core Scenario, we strongly recommend that you delete those TS CAPs by following the steps in this procedure.
Warning
Failure to delete existing TS CAPs might result in security vulnerabilities for your internal network because these TS CAPs might bypass the NAP authorization policies that you will create for the TS Gateway NAP scenario. If the NAP authorization policies are bypassed, Terminal Services clients that do not meet NAP authorization policy requirements will be allowed access to the TS Gateway server.
To delete existing TS CAPs on the TS Gateway server
1. Open TS Gateway Manager.
2. In the console tree, click to select the node that represents the TS Gateway server, which is named for the computer on which the TS Gateway server is running.
3. In the console tree, expand Policies, and then click Connection Authorization Policies.
4. In the details pane, right-click any existing TS CAPs, and then click Delete.
After you delete any previously created TS CAPs from TS Gateway Manager, create three new identical TS CAPs (TSCAP1, TSCAP2, and TSCAP3) by following the procedures in “Create a TS CAP for the TS Gateway server” in Configuring the TS Gateway Core Scenario.
If you have not already done so, also create a TS RAP in TS Gateway Manager. If you have already created a TS RAP that meets your security requirements, you do not need to delete the existing TS RAP and create a new TS RAP. For step-by-step instructions about how to create a TS RAP, see “Create a TS RAP for the TS Gateway server” in Configuring the TS Gateway Core Scenario.
3. Configure a Windows Security Health Validator on the TS Gateway server
When you configure a Windows Security Health Validator (WSHV), you are creating a client health policy that establishes the requirements for client computers that are allowed to connect to your network. When client computers attempt to connect to your network and their configuration does not match the WSHV, their network connection is blocked until the clients meet the conditions of the WSHV.
In this example, the WSHV only requires that automatic updating be enabled.
To configure a Windows Security Health Validator on the TS Gateway server
1. Open the Network Policy Server snap-in console. To open Network Policy Server, click Start, point to Administrative Tools, and then click Network Policy Server.
2. In the console tree, click Network Access Protection.
3. In the details pane, under System Health Validators, click Configure System Health Validators.
4. In the details pane, under Name, right-click Windows Security Health Validator, and then click Properties.
5. In the Windows Security Health Validator Properties dialog box, on the Settings tab, click Configure.
6. On the Windows Vista and/or the Windows XP tab (depending on the operating system that the Terminal Services client is running), clear every check box except for Automatic updating is enabled, Restrict access for clients that do not have all available security updates installed, and Windows Update.
7. Click OK to close the Windows Security Health Validator Properties dialog box (with the Windows Vista and Windows XP tabs), and then click OK again to close the Windows Security Health Validator Properties dialog box with the Settings tab.
4. Create NAP policies on the TS Gateway server by using the Configure NAP Wizard
You can use the Configure NAP wizard to easily create the policies required to configure the TS Gateway server as a NAP enforcement client. This section describes how to create the following policies for TS Gateway:
• Health policies: Health policies allow you to define client configuration requirements for the NAP-capable computers that attempt to connect to internal network resources through the TS Gateway server.
• Connection request policy: Connection request policies are an ordered set of rules that allow the NPS service to determine whether a specific connection attempt request or an accounting message received from a RADIUS client should be processed locally or forwarded to another RADIUS server. When you are configuring the NPS server to perform NAP health determination and enforcement, NPS is acting as a RADIUS server. The TS Gateway server is the RADIUS client.
• Network policies: Network policies allow you to designate who is authorized to connect to the network and the circumstances under which they can connect. During the authorization process, NAP performs client health checks.
To create NAP policies on the TS Gateway server by using the Configure NAP Wizard
1. Open the Network Policy Server snap-in console. To open Network Policy Server, click Start, point to Administrative Tools, and then click Network Policy Server.
2. In the console tree, click NPS (Local).
3. In the details pane, under Standard Configuration, click Configure NAP.
4. In the Configure NAP wizard, on the Select Network Connection Method for Use with NAP page, do the following:
a. Under Network connection method, select Terminal Services Gateway (TS Gateway).
b. Under Policy Name, accept the default name (NAP TS Gateway) or type a new name, and then click Next.
5. On the Specify NAP Enforcement Servers Running TS Gateway page, under TS Gateway servers, confirm that TS Gateway server is specified, and then click Next.
6. On the Configure Client Device Redirection and Authentication Methods page, do the following:
a. Under Device redirection, select the option that is appropriate for your environment.
b. Under Authentication Method, select the authentication method(s) that is appropriate for your environment. When both authentication methods are selected, clients that use either method will be allowed to connect.
7. On the Configure User Groups and Machine Groups page, do the following:
a. Under User Groups: (Required), click Add User, and then specify a user group whose members can connect to the TS Gateway server. You must specify at least one user group.
b. In the Select Groups dialog box, specify the user group location and name, and then click OK as needed to check the name and to close the Select Groups dialog box.
To specify more than one user group, do either of the following:
c. Type the name of each user group, separating the name of each group with a semi- colon.
d. Add additional groups from different domains by repeating this step for each group. e. Under Machine Groups: (Optional), to specify computer domain membership criteria that client computers must meet (optional), click Add Machine, and then specify the computer groups. In the example configurations, no computer group is specified.
f. To specify computer groups, you can use the same steps that you used to specify user groups.
8. Click Next.
9. On the Define NAP Health Policy page, verify that the Windows Security Health Validator check box is selected and that Deny client access to terminal servers or computers running Remote Desktop is selected, and then click Next.
10. On the Completing New Network Access Protection Policies and RADIUS clients
page, confirm that the following policies appear:
• Under Health Policies: NAP TS Gateway Compliant, NAP TS Gateway Noncompliant
• Under Connection Request Policy: NAP TS Gateway
• Under Network Policies: NAP TS Gateway Compliant, NAP TS Gateway Noncompliant, and NAP TS Gateway Non NAP-Capable
11. Click Finish.
Steps for configuring a Terminal Services client as a NAP enforcement client
To configure a Terminal Services client computer as a Network Access Protection (NAP) enforcement client, you must complete these tasks.
|
Task |
Reference/Step-by-step instructions |
|
1. Download and run the Terminal Services NAP client configuration command. |
Download and run the Terminal Services NAP client configuration command |
|
2. Test to confirm that the NAP health policy is successfully applied to the Terminal Services client. |
Test to confirm that the NAP health policy issuccessfully applied to the Terminal Servicesclient |
1. Download and run the Terminal Services NAP client configuration command
The Terminal Services NAP client configuration command (Tsgqecclientconfig.cmd) performs the following tasks to configure the Terminal Services client as a NAP enforcement client:
• Adds the TS Gateway server name to the Trusted Server list on the client.
• Starts the Network Access Protection Agent service and sets the service startup type to
Automatic.
The NAP agent collects and manages health information. The NAP agent processes statements of health (SoH) from the various system health agents (SHAs) and reports client health to the NAP administration server. For NAP to function correctly, you must start the Network Access Protection Agent service on the client, and then set the service startup type to Automatic. By default, this service does not start automatically.
• Enables the TS Gateway Quarantine Enforcement client.
To run this example script, use the following procedure. Note that you must run the script as a member of the local Administrators group on the TS Gateway server.
To download and run the Terminal Services NAP client configuration command
1. To download the Terminal Services NAP client configuration command, go to the Terminal Services NAP Client Configuration Command page on the Download Center (http://go.microsoft.com/fwlink/?LinkId=103093). When you open the command prompt, right-click the command prompt, and then click Run as Administrator. You must run this command with elevated privileges for the command to succeed. For information about how to run this command with elevated privileges in Windows XP, see article 294676 in the Microsoft Knowledge Base (http://go.microsoft.com/fwlink/?LinkId=87531). For information about how to do this in Windows Server 2003, see Run a program with administrative credentials (http://go.microsoft.com/fwlink/?LinkId=87533).
2. At the command prompt, type:
tsgqecclientconfig TS_GATEWAY_SERVER_NAME
where TS_GATEWAY_SERVER_NAME is the fully qualified domain name (FQDN) of the TS Gateway server that you want to add to the list of trusted TS Gateway servers on the client.
The name that you specify for the server must match the name in the Issued to field of the TS Gateway server certificate. If you create a self-signed certificate by using the Add Roles Wizard during installation of the TS Gateway role service or by using TS Gateway Manager after installation, specify the fully qualified domain name (FQDN) of the
TS Gateway server.
To specify more than one TS Gateway server, separate each server name with a (for example, SERVER_NAME10SERVER_NAME20SERVER_NAME3).
3. Restart the client computer to implement the configuration changes, and then log back on to the client computer by using the same account that you used to run the client configuration command.
4. Open Registry Editor. To open Registry Editor, in the Start search box, type regedit, and then press ENTER.
5. Navigate to the following registry subkey: HKEY_LOCAL_MACHINESoftwareMicrosoftTerminal Server ClientTrustedGateways
6. Under TrustedGateways, verify that the following value exists:
<TS_Gateway_Server_NAME>
where TS_GATEWAY_SERVER_NAME is the fully qualified domain name (FQDN) of the
TS Gateway server that you specified in Step 2. If you specified more than one
TS Gateway server, ensure that each TS Gateway server is listed.
2. Test to confirm that the TS Gateway NAP health policy is successfully applied to the Terminal Services client
Use the following procedures to verify that the health policy that you configured on the TS Gateway server is being applied to the Terminal Services client.
Recall that the Windows Security Health Validator (WSHV) policy that you created on the TS Gateway server requires that you enable automatic updating for the connection to succeed. To test whether the health policy is correctly applied to the Terminal Services client, perform the following tasks:
• Test for successful blocked connection for NAP-capable client. If the health policy is correctly applied to the Terminal Services NAP-capable client, the client connection attempt will be blocked by the server when automatic updating is disabled on the client.
• Test for successful allowed connection for NAP-capable client. If the health policy is correctly applied to the Terminal Services NAP-capable client, the client connection attempt will be allowed by the server when automatic updating is enabled on the client.
• Test for successful blocked connection for non-NAP capable client. If the health policy is correctly applied to the Terminal Services non-NAP capable client, the client connection attempt will be blocked by the server because the client cannot send a statement of health (SoH).
Test for successful blocked connection for NAP-capable client
Perform the following procedure on the client computer to test whether at least one NAP health policy is correctly configured to block the NAP-capable Terminal Services client connection to the TS Gateway server when automatic updating is disabled on the client.
To attempt an end-to-end connection through the TS Gateway server when automatic updating is disabled on the client
1. Open Control Panel. To open Control Panel, click Start, and then click Control Panel.
2. In Control Panel, double-click Security Center.
3. Under Security Essentials, check whether Automatic Updating is set to On. If so, proceed to the next step. If Automatic Updating is already set to Off, skip to Step 7.
4. In the navigation pane, click Windows Update.
5. In Windows Update, in the navigation pane, click Change Settings.
6. In the Choose how Windows can install updates dialog box, click Never check for updates (not recommended), and then click OK.
7. Open the Remote Desktop Connection client. To open the Remote Desktop Connection client, click Start, point to All Programs, point to Accessories, and then click Remote Desktop Connection.
8. In the Remote Desktop Connection dialog box, click Options to expand the dialog box and view settings.
9. On the General tab, type the name of the computer (terminal server or computer with Remote Desktop enabled) to which you want to connect through TS Gateway.
10. Click Connect.
11. On the Enter your credentials page, select the user account that you want to use to log on remotely to the computer, enter the required credentials, and then click OK.
12. On the Gateway server credentials page, select the user name that you want to use to log on to the TS Gateway server, enter the required credentials, and then click OK.
13. After a few moments, the following error message appears:
This computer can’t connect to the remote computer because your computer or device did not pass the Network Access Policies validation set by your network administrator. Please contact your network administrator for assistance.
14. Click OK to close the message, and then cancel the connection.
Verify that the NAP health policy blocked the connection
On the TS Gateway server, the following three events will appear in the Event Log to confirm that client access to the TS Gateway server was denied because the health policy was successfully applied:
• Event ID 6272, Keyword: Audit Success: This event, which appears under Windows LogsSecurity, indicates that the NPS server granted access to the client.
• Event ID 6276, Keyword: Audit Success: This event, which appears under Windows LogsSecurity, indicates that the client was denied access to the TS Gateway server and quarantined because the health policy was successfully applied.
• Event ID 204, Keyword: Audit Failure: This event, which appears under Applications and Services LogsMicrosoftWindowsTerminalServices-GatewayOperational, indicates that the client did not meet the requirements of the NAP policies on the NPS server and therefore is not authorized to access the TS Gateway server.
To verify that the NAP health policy blocked the connection
1. On the TS Gateway server, open Event Viewer. To open Event Viewer, click Start, point to Administrative Tools, and then click Event Viewer.
2. In Event Viewer, expand Windows Logs, and then click Security.
3. With Security selected in the console tree, search for event IDs 6272 and 6276.
4. In the console tree, expand Applications and Services LogsMicrosoftWindowsTerminalServices-Gateway, and then click Operational.
5. With Operational selected in the console tree, search for Event ID 204.
6. Close Event Viewer.
Test for successful allowed connection for NAP-capable client
Perform the following procedure to test whether at least one NAP health policy is correctly configured to allow the Terminal Services client connection to the TS Gateway server when automatic updating is enabled on the client.
To attempt an end-to-end connection through the TS Gateway server when automatic updating is enabled on the client
1. Open Control Panel. To open Control Panel, click Start, and then click Control Panel.
2. In Control Panel, double-click Security Center.
3. Under Security Essentials, under Automatic updating, click Change settings.
4. In the Choose an automatic updating option dialog box, click Install updates automatically (recommended).
5. Open the Remote Desktop Connection client. To open the Remote Desktop Connection client, click Start, point to All Programs, point to Accessories, and then click Remote Desktop Connection.
6. In the Remote Desktop Connection dialog box, click Options to expand the dialog box and view settings.
7. On the General tab, type the name of the computer (terminal server or computer with Remote Desktop enabled) to which you want to connect through TS Gateway.
8. Click Connect.
9. On the Enter your credentials page, select the user account that you want to use to log on remotely to the computer, enter the required credentials, and then click OK.
10. On the Gateway server credentials page, select the user name that you want to use to log on to the TS Gateway server, enter the required credentials, and then click OK.
11. After a few moments, the connection completes and a connection will be established through the TS Gateway server to the computer.
Verify that the NAP health policy allowed the connection
On the TS Gateway server, the following three events will appear in the Event Log to confirm that client access to the TS Gateway server was granted because the health policy was successfully applied:
• Event ID 6272, Keyword: Audit Success: This event, which appears under Windows LogsSecurity, indicates that the NPS server granted access to the client.
• Event ID 6278, Keyword: Audit Success: This event, which appears under Windows LogsSecurity, indicates that the client was granted access to the TS Gateway server because the health policy was successfully applied.
• Event ID 200: This event, which appears under Applications and Services LogsMicrosoftWindowsTerminalServices-GatewayOperational, indicates that the client is healthy and therefore can access the TS Gateway server.
To verify that the NAP health policy allowed the connection
1. On the TS Gateway server, open Event Viewer. To open Event Viewer, click Start, point to Administrative Tools, and then click Event Viewer.
2. In Event Viewer, expand Windows Logs, and then click Security.
3. With Security selected in the console tree, search for event IDs 6272 and 6278.
4. In the console tree, expand Applications and Services LogsMicrosoftWindowsTerminalServices-Gateway, and then click Operational.
5. With Operational selected in the console tree, search for Event ID 200.
6. Close Event Viewer.
Test for successful blocked connection for non-NAP capable client Perform the following procedure to test whether at least one NAP health policy is correctly configured to block the Terminal Services client connection to the TS Gateway server when the client cannot send an SoH to the TS Gateway server.
To attempt an end-to-end connection through the TS Gateway server when the client cannot send an SoH
1. Open Control Panel. To open Control Panel, click Start, and then click Control Panel.
2. In Control Panel, double-click Security Center.
3. Under Security Essentials, confirm that Automatic updating is set to On.
4. Open the command prompt, right-click the command prompt, and then click Run as Administrator.
5. At the command prompt, type the following:
net stop napagent
6. Open the Remote Desktop Connection client. To open the Remote Desktop Connection client, click Start, point to All Programs, point to Accessories, and then click Remote Desktop Connection.
7. In the Remote Desktop Connection dialog box, click Options to expand the dialog box and view settings.
8. On the General tab, type the name of the computer (terminal server or computer with Remote Desktop enabled) to which you want to connect through TS Gateway.
9. Click Connect.
10. On the Enter your credentials page, select the user account that you want to use to log on remotely to the computer, enter the required credentials, and then click OK.
11. On the Gateway server credentials page, select the user name that you want to use to log on to the TS Gateway server, enter the required credentials, and then click OK.
12. After a few moments, the following error message appears: “This computer can’t connect to the remote computer because your computer or device did not pass the Network Access Policies validation set by your network administrator. Please contact your network administrator for assistance.”
13. Click OK to close the message, and then cancel the connection.
On the TS Gateway server, follow the steps in Verify that the NAP health policy blocked theconnectionto confirm that client access to the TS Gateway server was denied because the health policy was successfully applied.
Additional references
• Network Access Protection (http://go.microsoft.com/fwlink/?LinkID=70047)
• Terminal Services page on the Windows Server 2008 TechCenter (http://go.microsoft.com/fwlink/?LinkID=48555)
Configuring the TS Gateway ISA Server Scenario
You can use Internet Security and Acceleration (ISA) Server 2004 or ISA Server 2006 with TS Gateway to enhance security for a TS Gateway server by configuring ISA Server to function as an SSL bridging device. When SSL bridging is used, ISA Server can terminate SSL sessions, inspect packets, and re-establish SSL sessions. ISA Server helps enhance security by decrypting incoming SSL traffic, statefully inspecting the traffic for malicious code, and then blocking connections that contain suspicious packets or packets that reflect known exploits. ISA Server also performs stateful HTTP filtering, which provides deep inspection of HTTP application content.
Following are three scenarios in which ISA Server and a TS Gateway server can be used together to enhance security for remote connections to internal network resources:
• ISA Server as an SSL bridging device (Web proxy). In this scenario, ISA Server is hosted in a perimeter network and provides SSL bridging between the Terminal Services client and the TS Gateway server. The TS Gateway server is hosted in the corporate/private network.
This scenario is illustrated under “Setting up the TS Gateway ISA Server scenario,” in the next section.
• ISA Server as a firewall and SSL bridging device. In this scenario, ISA Server functions as a firewall that performs port filtering, packet filtering, and SSL bridging. The TS Gateway server can be hosted in the corporate/private network or in the perimeter network, depending on whether the ISA Server is located as the external firewall or the internal firewall.
• ISA Server as a firewall that performs port filtering (server publishing). In this scenario, ISA Server functions as an external packet filtering firewall and permits traffic only over port 443. The TS Gateway server is hosted in the perimeter.
Note
The steps in this setup guide provide detailed configuration information only for the first scenario (ISA Server as a Web proxy). The other two scenarios are mentioned as alternate ways in which ISA Server can be used with TS Gateway to enhance security for remote connections to internal network resources.
System configurations tested for the TS Gateway ISA Server scenario
Microsoft tested the TS Gateway ISA Server scenario by using the following system configurations.
|
Computer |
Required configuration |
|
TS Gateway server (TSGSERVER) |
• Windows Server 2008 |
|
ISA Server (ISASERVER) |
• Windows Server 2003 and ISA Server 2004 with Service Pack 3 (SP3) Or • Windows Server 2003 and ISA Server 2006 |
|
Terminal Services client (TSCLIENT) |
• Windows Vista with Service Pack 1 (SP1) or Windows XP with SP3 • Windows Vista • Windows XP with Service Pack 2 (SP2) and |
|
Computer |
Required configuration |
|
the Terminal Services client, Remote Desktop Connection (RDC) 6.0. To download RDC 6.0, see article 925876 in the Microsoft Knowledge Base (http://go.microsoft.com/fwlink/?LinkId=793 73). • Windows Server 2008 • Windows Server 2003 with SP1 or SP2 and RDC 6.0 |
|
|
Internal network resource (CORPORATERESOURCE) |
• Windows Vista with SP1 or Windows XP with SP3 • Windows Vista • Windows XP with SP2 • Windows Server 2008 • Windows Server 2003 with SP1 or SP2 |
Configuring connections between ISA Server and TS Gateway server
You can configure ISA Server communication with the TS Gateway server in either of the following two ways:
• HTTPS-HTTPS bridging: In this configuration, the TS Gateway client initiates an SSL (HTTPS) request to the SSL bridging device. The SSL bridging device initiates a new HTTPS request to the TS Gateway server, for maximum security.
• HTTPS-HTTP bridging: In this configuration, the TS Gateway client initiates an SSL (HTTPS) request to the SSL bridging device. The SSL bridging device initiates a new HTTP request to the TS Gateway server.
Setting up the TS Gateway ISA Server scenario
The following diagram illustrates the ISA Server scenario for TS Gateway, in which ISA Server is used as an SSL bridging device.
Note
The steps in this setup guide describe how to set up remote access from a Terminal Services client through a TS Gateway server, where SSL traffic from the client is first sent to the ISA Server, which is used for SSL bridging. The guide does not describe how to install ISA Server 2004 or ISA Server 2006, nor does it describe how to configure the firewalls illustrated in the diagram, the terminal servers running RemoteApp programs (hosting LOB applications), or the perimeter network or Active Directory infrastructure.
The diagram is provided to suggest one way in which this scenario might be implemented in a production environment.
Steps for configuring TS Gateway for the ISA Server scenario
To configure the TS Gateway server and ISA Server bridging scenario, complete these tasks.
|
Task |
Reference/Step-by-step instructions |
|
1. Export the SSL certificate for the TS Gateway server and copy it to the ISA Server. |
Export the certificate for the TS Gateway serverand copy it to the ISA Server |
|
2. Install the SSL certificate for the TS Gateway |
Install the SSL certificate for the TS Gateway |
|
Task |
Reference/Step-by-step instructions |
|
server on the ISA Server. |
server on the ISA Server |
|
3. Copy and install the TS Gateway server root certificate on the ISA Server. Note This step is required only if you are using a self-signed certificate or another SSL certificate type that is not trusted. |
Copy and install the TS Gateway server rootcertificate on the ISA Server |
|
4. Create a new Web publishing rule on the ISA Server. |
Create a new W eb publishing rule on the ISAServer |
|
5. Enable or disable HTTPS-HTTP bridging on the TS Gateway server. |
Enable or disable the HTTPS-HTTP bridgingsetting on the TS Gateway server |
|
6. Verify client configuration and test end-to- end connectivity. |
Verify client configuration and test end-to-endconnectivity |
1. Export the SSL certificate for the TS Gateway server and copy it to the ISA Server
When you export the certificate, ensure that you export the private key. If this option is not available for the certificate that you have selected, you must obtain a new certificate for ISA Server. For information about ISA Server certificate requirements, see Digital Certificates for ISA Server 2004 (http://go.microsoft.com/fwlink/?LinkId=104827) and Troubleshooting SSL Certificates in ISA Server Publishing (http://go.microsoft.com/fwlink/?LinkId=104826).
Perform the following procedure on the TS Gateway server to export the SSL certificate for the TS Gateway server and copy it to the ISA Server.
To export the SSL certificate for the TS Gateway server and copy it to the ISA Server
1. On the TS Gateway server, open the Certificates snap-in console. If you have not already added the Certificates snap-in console, you can do so by doing the following:
a. Click Start, click Run, type mmc, and then click OK.
b. On the File menu, click Add/Remove Snap-in.
c. In the Add or Remove Snap-ins dialog box, in the Available snap-ins list, click Certificates, and then click Add.
d. In the Certificates snap-in dialog box, click Computer account, and then click Next.
e. In the Select Computer dialog box, click Local computer: (the computer this console is running on), and then click Finish.
f. In the Add or Remove snap-ins dialog box, click OK.
2. In the Certificates snap-in console, in the console tree, expand Certificates (Local Computer), expand Personal, and then click Certificates.
3. Under certificates, click the TS Gateway server certificate. If more than one certificate is listed and you are unsure which certificate to select, view the properties for each certificate to identify the certificate that meets TS Gateway server requirements.
4. Right-click the TS Gateway certificate to export, point to All Tasks, and then click Export.
5. On the Welcome to the Certificate Export Wizard page, click Next.
6. On the Export Private Key page, click Yes, export the private key, and then click Next.
7. On the Export File Format page, ensure that Personal Information Exchange – PKCS #12 (.PFX) is selected, select the Include all certificates in the certification path if possible check box, and then click Next.
8. On the Password page, type a password to protect the private key for the certificate, confirm the password, and then click Next.
9. On the File to Export page, in the File name box, click Browse.
10. In the Save As dialog box, specify the name of the certificate that you want to export and the location to which you want to export the certificate (ensure that the location can be accessed from the ISA Server), and then click Save.
11. On the File to Export page, click Next.
12. On the Completing the Certificate Export Wizard page, confirm that the correct certificate is specified, that Export Keys is set to Yes, and that Include all certificates in the certification path is set to Yes, and then click Finish.
13. After the certificate export has successfully completed, a message appears confirming that the export was successful. Click OK.
14. Close the Certificates snap-in.
15. Copy the certificate to the ISA Server.
2. Install the SSL certificate for the TS Gateway server on the ISA Server
Perform the following procedure on the ISA Server to install the SSL certificate for the TS Gateway server.
To install the SSL certificate for the TS Gateway server on the ISA Server
1. On the ISA Server, open the Certificates snap-in console. If you have not already added the Certificates snap-in console, you can do so by doing the following:
a. Click Start, click Run, type mmc, and then click OK.
b. On the File menu, click Add/Remove Snap-in.
c. In the Add or Remove Snap-ins dialog box, in the Available snap-ins list, click Certificates, and then click Add.
d. In the Certificates snap-in dialog box, click Computer account, and then click Next.
e. In the Select Computer dialog box, click Local computer: (the computer this console is running on), and then click Finish.
f. In the Add or Remove snap-ins dialog box, click OK.
2. In the Certificates snap-in console, in the console tree, expand Certificates (Local Computer), and then click Personal.
3. Right-click the Personal folder, point to All Tasks, and then click Import.
4. On the Welcome to the Certificate Import Wizard page, click Next.
5. On the File to Import page, in the File name box, click Browse, and then browse to the location where you copied the SSL certificate for the TS Gateway server. Select the certificate (Certificate_Name.pfx), click Open, and then click Next.
6. On the Password page, do the following:
• If earlier you specified a password for the private key associated with the certificate, type the password.
• If you want to mark the private key as exportable, select the Mark this key as exportable check box.
• Ensure that the Include all extended properties check box is selected.
7. Click Next.
8. On the Certificate Store page, click Automatically select the certificate store based on the type of certificate, and then click Next.
9. On the Completing the Certificate Import Wizard page, confirm that the correct certificate has been selected and that the following certificate settings appear:
• Certificate Store Selected: Automatically determined by the wizard.
• Content: PFX
• File Name: FilePath<Certificate_Name.pfx>, where <Certificate_Name> is the name of the TS Gateway server SSL certificate.
10. Click Finish.
11. After the certificate import has successfully completed, a message appears confirming that the import was successful. Click OK.
12. With Certificates selected in the console tree, in the details pane, verify that the correct certificate appears in the list of certificates on the ISA Server. The certificate must be under the Personal store of the local computer.
3. Copy and install the TS Gateway server root certificate on the ISA Server
This procedure is required only in the following circumstances:
• If you are using a self-signed certificate or another SSL certificate type that is not trusted.
• If you did not select the option to download a certificate chain or Automatically select the certificate store based on the type of certificate when you installed the certificate on the ISA Server (as described in the preceding procedure).
To copy and install the TS Gateway server root certificate on the ISA Server
1. On the ISA Server, open the Certificates snap-in console. If you have not already added the Certificates snap-in console, you can do so by doing the following:
a. Click Start, click Run, type mmc, and then click OK.
b. On the File menu, click Add/Remove Snap-in.
c. In the Add or Remove Snap-ins dialog box, in the Available snap-ins list, click Certificates, and then click Add.
d. In the Certificates snap-in dialog box, click Computer account, and then click Next.
e. In the Select Computer dialog box, click Local computer: (the computer this console is running on), and then click Finish.
f. In the Add or Remove snap-ins dialog box, click OK.
2. In the Certificates snap-in console, in the console tree, expand Certificates (Local Computer), expand Trusted Root Certification Authorities, right-click Certificates, point to All Tasks, and then click Import.
3. On the Welcome to the Certificate Import Wizard page, click Next.
4. On the File to Import page, in the File name box, click Browse, and then browse to the location of the TS Gateway server root certificate. Select the root certificate (<Root_Certificate_Name.cer, or, if the private key was also exported,
<Root_Certificate_Name.pfx>), click Open, and then click Next.
Note
If you created a self-signed certificate by using the Add Remove Roles Wizard during installation of the TS Gateway role service, or by using TS Gateway Manager after installation (as described in “Create a self-signed certificate for TS Gateway” in Configuring the TS Gateway Core Scenario), note that the self- signed certificate is also the root certificate.
5. On the Password page, if earlier you specified a password for the private key associated with the certificate, type the password.
6. On the Certificate Store page, accept the default option (Place all certificates in the following store – Trusted Root Certification Authorities), and then click Next.
7. On the Completing the Certificate Import Wizard page, confirm that the following certificate settings appear:
• Certificate Store Selected by User: Trusted Root Certification Authorities
• Content: Certificate (or PFX)
• File Name: FilePath<Root_Certificate_Name.cer> (or
<Root_Certificate_Name.pfx>), where <Root_Certificate_Name> is the name of the TS Gateway server root certificate.
8. Click Finish.
9. After the certificate import has successfully completed, a message appears confirming that the import was successful. Click OK.
10. With Certificates selected in the console tree, in the details pane, verify that the root certificate of the TS Gateway server appears in the list of certificates on the ISA Server. Ensure that the certificate appears under the Trusted Root Certification Authorities store on the local computer.
4. Create a new Web publishing rule on the ISA Server
To configure the TS Gateway server and ISA Server for HTTPS-HTTP bridging or for HTTPS- HTTPS bridging, you must create the appropriate Web publishing rule on the ISA Server.
Important
The steps for creating a Web publishing rule for ISA Server will vary, based on whether you are using ISA Server 2004 or ISA Server 2006. Ensure that you follow the steps that correspond to the version of ISA Server that you are using.
Create a new Web publishing rule for ISA Server 2004
Use the following procedure to create a new Web publishing rule for ISA Server 2004.
To create a new Web publishing rule for ISA Server 2004
1. On the ISA Server, open ISA Server Management. To open ISA Server Management, click Start, point to All Programs, point to Microsoft ISA Server, and then click ISA Server Management.
2. In the console tree, browse to <Local ISA Server>.
3. Right-click Firewall Policy, point to New, and then click Secure Web Server Publishing Rule.
4. On the Welcome to the SSL Publishing Rule Wizard page, in the SSL Web Publishing Rule Name box, type a name for the new server publishing rule, and then click Next.
5. On the Publishing Mode page, click SSL Bridging, and then click Next.
6. On the Select Rule Action page, click Allow, and then click Next.
7. On the Bridging Mode page, do one of the following:
• To enable HTTPS-HTTP bridging, click Secure connections to clients, and then click Next.
• To enable HTTPS-HTTPS bridging, click Secure connection to clients and Web server, and then click Next.
8. On the Define Website to Publish page, do the following:
a. In the Computer name or IP address box, type the name of the TS Gateway server.
The specified name must match the name of the TS Gateway server through which users will connect in this scenario. This name must also match the certificate name (CN) in the certificate that is installed on the TS Gateway server.
b. Select the Forward the original host header instead of the actual one (specified above) check box.
c. In the Path box, type /*.
9. On the Public Name Details page, do the following:
a. In Accept requests for, ensure that This domain name is selected.
b. In the Public name box, type the name of the TS Gateway server. The specified name must match the name of the TS Gateway server through which users will connect in this scenario.
c. In the Path box, type /*. d. Click Next.
10. If required, create a new SSL Web listener. If you have a pre-existing listener with a certificate that matches the public name, you do not need to create a new SSL Web listener. In this case, select the appropriate Web listener, click Next, and then proceed to Step 11.
If you do need to create a new SSL Web listener, do the following:
a. On the Welcome to the New Web Listener page, in the Web Listener Name box, type a name for the Web listener, and then click Next. If Web listeners have already been configured for the ISA Server, on the Select Web Listener page, click New to open the Welcome to the New Web Listener page and begin specifying a new Web listener.
b. On the IP Addresses page, under Listen for requests from these networks, select the External check box, and then click Next.
c. On the Port Specification page, do the following:
d. Under SSL, select the Enable SSL check box, and then clear the Enable HTTP box. e. Click Select, and in the Select Certificate dialog box, click the certificate that you want to use.
f. Click OK to close the Select Certificate dialog box, and then click Next. g. On the Completing the New Web Listener Wizard page, click Finish.
11. On the Select Web Listener page, confirm that the correct Web listener properties appear, and then click Next.
12. On the User Sets page, click All Users, and then click Next.
13. On the Completing the New SSL Web Publishing Rule Wizard page, click Finish.
14. To save the changes and update the ISA Server firewall policy, in the details pane of the ISA Server Management console, click Apply.
15. In the Apply New Configuration dialog box, click OK after the changes are applied (a progress bar appears while the changes are being applied).
Create a new Web publishing rule for ISA Server 2006
Use the following procedure to create a new Web publishing rule for ISA Server 2006.
To create a new Web publishing rule for ISA Server 2006
1. On the ISA Server, open ISA Server Management. To open ISA Server Management, click Start, point to All Programs, point to Microsoft ISA Server, and then click ISA Server Management.
2. In the console tree, expand the ISA Server name. (If you are using ISA Server 2006 Enterprise Edition, expand Arrays, and then expand the ISA Server name.)
3. Click Firewall Policy.
4. On the Tasks tab, click Publish Web Sites.
5. On the Welcome to the New Web Publishing Rule Wizard page, in the Web publishing rule name box, type a name for the new publishing rule, and then click Next.
6. On the Select Rule Action page, click Allow, and then click Next.
7. On the Publishing Type page, ensure that Publish a single Web site or load balancer is selected, and then click Next.
8. On the Server Connection Security page, select Use SSL to connect to the published Web server or server farm, and then click Next.
9. On the Internal Publishing details page, in the Internal site name box, type the name of the TS Gateway server, and then click Next.
If the ISA Server cannot resolve the name of the TS Gateway server, type the IP address of the TS Gateway server. Alternatively you can include this information in the Hosts file.
10. On the second instance of the Internal Publishing Details page, do the following:
a. Ensure that the Path box is empty.
b. Ensure that the Forward the original host header instead of the actual one specified in the Internal site name field on the previous page check box is cleared.
c. Click Next.
11. On the Public Name Details page, do the following:
a. In Accept requests for, ensure that This domain name (type below) is selected.
b. In the Public name box, type the name of the TS Gateway server. The specified name must match the name of the TS Gateway server through which users will connect in this scenario. This name must also match the certificate name (CN) or the Storage Area Network (SAN) in the certificate that is installed on the TS Gateway server.
Note
If you are using the SAN attributes of certificates, clients that connect to the TS Gateway server must be running RDC 6.1. RDC 6.1 is available with Windows Server 2008, Windows Vista with SP1, and Windows XP with SP3. The RDC 6.1 (6.0.6001) client supports Remote Desktop Protocol 6.1.
c. Ensure that the Path box is empty. d. Click Next.
12. If required, create a new SSL Web listener. If you have a pre-existing listener with a certificate that matches the public name, you do not need to create a new SSL Web listener. In this case, select the appropriate Web listener, click Next, and then proceed to Step 13.
If you do need to create a new SSL Web listener, do the following:
a. On the Select Web Listener page, click New.
b. On the Welcome to the New Web Listener Wizard page, in the Web Listener
Name box, type a name for the Web listener, and then click Next.
c. On the Client Connection Security page, click Require SSL secured connections with clients, and then click Next.
d. On the Web Listener IP Addresses page, do the following:
e. Under Listen for incoming Web requests from these networks, select the External check box.
f. Ensure that The ISA Server will compress content sent to clients through this Web Listener if the clients requesting the content support compression check box is selected.
g. Click Select IP Addresses.
h. On the External Listener IP Selection page, do the following:
i. Click Specified IP addresses on the ISA Server in the selected Network.
Under Available IP addresses, select the appropriate IP address, click Add, and then click OK.
j. Click Next.
k. On the Listener SSL Certificates page, click Assign a certificate for each IP address, click the appropriate IP address, and then click Select Certificate.
l. On the Select Certificate page, under Select certificate, click the TS Gateway server certificate, click Select, and then click Next.
m. On the Authentication Settings page, click No Authentication, and then click Next.
n. On the Single Sign On Settings page, click SSO is not relevant for this setup, and then click Next.
o. On the Completing the New Web Listener Wizard page, click Finish.
p. On the second instance of the Completing the NewWeb Listener Wizard page, confirm that the correct Web listener properties appear, and then click Finish.
13. On the Select Web Listener page, confirm that the appropriate Web listener is selected, and then click Next.
14. On the Authentication Delegation page, click No delegation, but client may authenticate directly, and then click Next.
15. On the User Sets page, ensure that All Users is selected, and then click Next.
16. On the Completing the New Web Site Publishing Rule Wizard page, click Finish.
17. To save the changes and update the ISA Server firewall policy, in the details pane of the ISA Server Management console, click Apply.
18. In the Apply New Configuration dialog box, click OK after the changes are applied (a progress bar appears while the changes are being applied).
5. Enable or disable HTTPS-HTTP bridging on the TS Gateway server
To enable HTTPS-HTTP bridging, select the Use HTTPS-HTTP bridging check box on the SSL Bridging tab of the TS Gateway server. To disable HTTPS-HTTP bridging, clear this check box (if this setting is cleared and you attempt to use HTTPS-HTTP bridging, the TS Gateway server will not function). By design, selecting or clearing this check box creates or updates the value of the AllowAnonymous registry entry.
Important
If you enable HTTPS-HTTP bridging, the TS Gateway server will allow anonymous access, and authentication will be performed by the ISA Server. HTTPS-HTTP bridging cannot be used for clients to authenticate by using smart cards. To deactivate the ISA Server for SSL termination in this scenario, we strongly recommend that you update the configuration by disabling HTTPS-HTTP bridging on the TS Gateway server. If you do not update the configuration changes in this scenario, TS Gateway will continue to allow anonymous access.
6. Verify client configuration and test end-to-end connectivity Terminal Services clients that connect through the ISA Server to the TS Gateway server can be located in the external network range of the ISA Server. Web publication can also be configured for the internal network. Doing this allows you to use a single namespace for the TS Gateway server and ensure that Terminal Services clients must connect through ISA Server before connecting to the TS Gateway server.
In a typical deployment, the TS Gateway server address and the IP address of the ISA Server will be published in DNS. As a result, clients will resolve the TS Gateway server address to the ISA Server. The secure Web publishing rule that you create for the ISA Server ensures that all incoming requests to the TS Gateway server from the external network will be forwarded to the TS Gateway server, which is located in the internal network.
If you cannot publish entries to DNS, for testing purposes, you can add an entry to the Hosts file of the client that maps the TS Gateway server address to the IP address of the ISA Server. The Hosts file on the client is located at %windir%system32driversetchosts.
Next, ensure that the client is correctly configured as a TS Gateway client as described in “Steps for configuring a Terminal Services client for the TS Gateway core scenario” in Configuring theTS Gateway Core Scenario. To ensure that connectivity is successful in this scenario, follow the steps in “Verify that end-to-end connectivity through TS Gateway is functioning correctly” in Configuring the TS Gateway Core Scenario.
Additional references
The following resources provide information about testing and troubleshooting RPC over HTTP through ISA Server:
• Description of the ISA Server 2006 hotfix package that is dated May 14, 2007 (http://go.microsoft.com/fwlink/?LinkId=107462)
• Testing RPC over HTTP through ISA Server 2006, Part 1: Protocols, Authentication and Processing (http://go.microsoft.com/fwlink/?LinkId=104828)
• Testing RPC over HTTP through ISA Server 2006, Part 2: Test Tools and Strategies (http://go.microsoft.com/fwlink/?LinkId=104830)
• Testing RPC over HTTP through ISA Server 2006, Part 3: Common Failures and Resolutions (http://go.microsoft.com/fwlink/?LinkId=104831)
• RPC over HTTP Logging Wildness (http://go.microsoft.com/fwlink/?LinkId=104832)
Monitoring Active Connections Through a TS Gateway Server
After you have configured Terminal Services clients to connect to remote computers on the network through TS Gateway, you can monitor active connections. This section provides the following information about monitoring active connections through a TS Gateway server:
• Specify TS Gateway events to log
• View details about active connections through a TS Gateway server
Specify TS Gateway events to log
By using TS Gateway Manager, you can specify the types of events that you want to monitor, such as unsuccessful or successful connection attempts to internal network computers through a TS Gateway server.
When these events occur, you can monitor the corresponding events by using Windows Event Viewer. TS Gateway server events are stored in Event Viewer under Application and Services LogsMicrosoftWindowsTerminal Services-Gateway.
To specify TS Gateway events to log
1. Open TS Gateway Manager.
2. In the console tree, click to select the node that represents your TS Gateway server, which is named for the computer on which the TS Gateway server is running.
3. With the name of the TS Gateway server highlighted in the console tree, right-click the name of the server, and then click Properties.
4. On the Auditing tab, select or clear the appropriate check boxes to specify the events that you want to monitor for TS Gateway.
The following table lists and describes the TS Gateway event types that you can monitor.
Table 1: TS Gateway Event Types
|
Event name |
Description |
Event ID |
|
Successful User Disconnection from the Resource |
By monitoring the timestamp for this event and the related Successful User Connection to the Resource event, you can verify the user session time and the amount of data (in kilobytes) that was sent and received by the remote client through the TS Gateway server. |
303: When the client disconnects from the resource 202: When an administrator disconnects the client |
|
Failed User Connection to the Resource |
The remote client met the conditions specified in the TS CAP and the TS RAP, but could not connect to the internal network resource (computer) through the TS Gateway server because the remote computer was unavailable. By auditing this event, you can determine which connectivity issues are caused by problems with Terminal Services and Remote Desktop rather than the TS Gateway server. |
304 |
|
Event name |
Description |
Event ID |
|
Failed Connection Authorization |
The remote client could not connect to a TS Gateway server because the client did not meet the conditions specified in the TS CAPs. |
201 |
|
Failed Resource Authorization |
The remote client could not connect through a TS Gateway server to the specified computer because no TS RAPs are configured to allow the user access to the specified computer. For example, as mentioned earlier, this issue might occur if the user attempts to connect to the computer by using its NetBIOS name when the TS RAP configured on the TS Gateway server uses an FQDN name for the computer. |
301 |
|
Successful User Connection to the Resource |
The remote client successfully connected to a computer through the TS Gateway server. |
302 |
|
Successful Connection Authorization |
The remote client successfully connected to the TS Gateway server because the client met the conditions specified in at least one TS CAP. |
200 |
|
Successful Resource Authorization |
The remote client successfully connected through the TS Gateway server to the specified internal network resource because the client met the conditions specified in at least one TS RAP. |
300 |
View details about active connections through a TS Gateway server
You can use TS Gateway Manager to view information about active connections from Terminal
Services clients to internal network resources through a TS Gateway server. This information is displayed in the Monitoring details pane and includes:
|
Event name |
Description |
|
Connection ID |
In the format <a:b> where “a” is the tunnel ID that uniquely identifies a specific connection to the TS Gateway server and “b” is the channel ID. The tunnel ID represents the number of connections that the TS Gateway server has received since the Terminal Services Gateway service has been running. Each time the TS Gateway server receives a new connection, the tunnel ID is incremented by 1. |
|
User ID |
The domain and user ID of the user logged on to the client, in the format <domainuserID>. |
|
User Name |
The full name of the user logged on to the client. Note You can only view the full name of the user if you are logged on to the TS Gateway server as a domain user. If you are logged on as member of the local administrators group, you can view the full name of the user in the User ID column. |
|
Connected On |
The date and time when the connection was initiated. |
|
Connection Duration |
The length of time that the connection was active. |
|
Idle Time |
The length of time that the connection is idle, if applicable. |
|
Target Computer |
The name of the internal network computer to which the client is connected. |
|
Client IP Address |
The IP address of the client. |
|
Event name |
Description |
|
Note If your network configuration includes proxy servers, the IP address that appears in this column will reflect the IP address of the proxy server, rather than the IP address of the Terminal Services client. |
|
|
Target Port |
The port on the internal network computer to which the client is connected. |
Use the following procedure to view details about active connections through a TS Gateway server.
To view details about active connections through a TS Gateway server
1. Open TS Gateway Manager.
2. In the console tree, click to select the node that represents your TS Gateway server, which is named for the computer on which the TS Gateway server is running.
3. In the console tree, click Monitoring. The TS Gateway Manager results pane displays a summary of the number of connections from remote users to computers on the internal network. Specific connections, if any, are listed below the summary. When you click a connection, the connection details appear in the lower pane. If necessary, you can disconnect a specific connection or all TS Gateway connections for a user.
4. To refresh the display of connection status, in the Actions pane, click Refresh.
Example Script for Validating Certificate Configuration
After you have completed certificate configuration for the TS Gateway server and Terminal Service client (as described in Configuring the TS Gateway Core Scenario), you can use the Rpcping.exe resource kit tool to confirm that the certificate configuration is correct. The following script provides an example of how you can use Rpcping.exe for this purpose. Rpcping.exe is available for download from Windows Server 2003 Resource Kit Tools
(http://go.microsoft.com/fwlink/?LinkId=16544).
This appendix describes how to save the example script as a text file and run the script by using Rpcping.exe, and provides an example of successful output and the example script syntax.
Running the Rpcpingtest example script
To run this example script, use the following procedure. Note that you must run the script as a member of the local Administrators group on the TS Gateway server.
To run the example script
1. Copy and paste the example script into a text file.
2. Save the text file as Rpcpingtest.cmd.
3. Open the command prompt, switch to the directory where Rpcping.exe is located, and then type Rpcpingtest.cmd.
4. For example, if you saved Rpcping.exe to the C:Tools directory, you would do the following:
At the command prompt, type the following (replace TSGATEWAYSERVERNAME with the name of your TS Gateway server):
C:ToolsRpcpingtest TSGATEWAYSERVERNAME <user name> <domain name>
5. Press ENTER.
6. Type the password for RPC/http proxy (the password for the TS Gateway server).
Example of successful output
If the script is successful and the certificate configuration is correct, output similar to the following will appear:
Results: RPC/HTTP server preferred auth scheme is: 2
Results: Pinging successfully completed in 78 sec.
———————————————————— Prompting for second rpc ping command in the scripting file Enter the password for server: <password for TS Gateway>
Enter the password for RCP/http Proxy: <password for TS Gateway>
Results: Completed 1 calls in 141 ms
Results: 7 T/S or 141.000 ms/T.
Rpcping example script
@echo off setlocal
set _TARGETGATEWAY=%1 set _USERNAME=%2
set _DOMAINNAME=%3
if “%_TARGETGATEWAY%” == “” goto DO_USAGE
if “%_USERNAME%” == “” goto DO_USAGE
if “%_DOMAINNAME%” == “” goto DO_USAGE
Echo ******************************************************************* Echo * The first RPCPing will authenticate to the RPC over HTTP
Echo * Proxy service. If this ping fails, then the certificate Echo * on the client computer is not correctly configured, Echo * or you might have entered the wrong password.
Echo *******************************************************************
Rpcping -v 2 -e 3388 -t ncacn_http -s localhost -o RpcProxy=%_TARGETGATEWAY% -P “%_USERNAME%,%_DOMAINNAME%,*” -H NTLM -u NTLM -a connect -F ssl -B msstd:%_TARGETGATEWAY%
-E
-R None
Echo ******************************************************************* Echo * The second RPCPing will attempt to authenticate to the TS
Echo * Gateway service. If this ping fails, then the TS Gateway
Echo * service is probably not running.
Echo *******************************************************************
Rpcping -v 2 -e 3388 -t ncacn_http -s localhost -o RpcProxy=%_TARGETGATEWAY% -P “%_USERNAME%,%_DOMAINNAME%,*” -I “%_USERNAME%,%_DOMAINNAME%,*” -H NTLM -u NTLM -a connect
-F
ssl -B msstd:%_TARGETGATEWAY%
goto endall
:DO_USAGE
Echo ****************************************************************** Usage: * Echo * testclient.cmd [gateway] [user] [domain/machine] * Echo * * Echo ****************************************************************** goto endall
:ENDALL Endlocal
Disclaimer
The sample script is not supported under any Microsoft standard support program or service. The sample script is provided AS IS without warranty of any kind. Microsoft further disclaims all implied warranties including, without limitation, any implied warranties of merchantability or of fitness for a particular purpose. The entire risk arising out of the use or performance of the sample script and documentation remains with you. In no event shall Microsoft, its authors, or anyone else involved in the creation, production, or delivery of the script be liable for any damages whatsoever (including, without limitation, damages for loss of business profits, business interruption, loss of business information, or other pecuniary loss) arising out of the use of or inability to use the sample scripts or documentation, even if Microsoft has been advised of the possibility of such damages.
Appendix: Configuring the TS Gateway OTP Scenario
This scenario discusses how to configure One Time Password (OTP) authentication with Terminal Services Gateway (TS Gateway). In this scenario, Network Policy Server (NPS) is used as a Remote Authentication Dial-In User Service (RADIUS) server to authenticate users on a Microsoft Internet Security and Acceleration (ISA) Server 2006-based edge server.
NPS enables you to provide local and remote network access services and to define and enforce policies for network access authentication, authorization, and client health. The NPS role service in Windows Server 2008 is the replacement for the Internet Authentication Service (IAS) in Windows Server 2003. Deploying NPS as a RADIUS server enables users with supported clients to authenticate on the edge server by using OTP authentication. After OTP authentication, users are allowed to cross the corporate perimeter and are authenticated again for access to corporate resources. Therefore, users need to provide two forms of credentials before they are allowed to
connect to the corporate resource.
Note
If you use OTP for client authentication, this configuration does not allow you to digitally sign e-mail messages or easily share identities between different organizations.
The instructions for this scenario assume that you are already familiar with TS Gateway.
System configuration for this scenario
This example scenario uses the following configuration.
|
Computer |
Configuration |
|
ISA Server (“contoso-fw.contoso.com”) |
• The server is running Windows Server 2003. • The server is running ISA Server 2006. • The ISA Server contains a server certificate for www.contoso.com that is installed to the local computer certificate store. • The ISA Server 2006 Supportability Update package is installed from the following Web site: http://go.microsoft.com/fwlink/?LinkId=115 136. • The server has the following name and IP addresses assigned: Name: contoso-fw.contoso.com Internal IP address: 192.168.1.1 External IP address: 206.73.118.1 |
|
TS Gateway/TS Web Access server (“www.contoso.com”) |
• The server is running Windows Server 2008. • The server is running the TS Gateway and TS Web Access role services, with the TS Web Access Web site accessible at https://www.contoso.com/ts. • TS Web Access is configured to populate its list of RemoteApp programs from the terminal server “contoso-ts.contoso.com”. • The server has the following name and IP address assigned: Name: www.contoso.com IP address: 192.168.1.2 |
|
NPS (RADIUS) server (“contoso-otp.contoso.com”) |
• The server is running Windows Server 2008. • The server is running the NPS role service. |
|
Computer |
Configuration |
|
• The server has the following name and IP address assigned: Name: contoso-otp.contoso.com Internal IP address: 192.168.1.3 |
|
|
Terminal Server (“contoso-ts.contoso.com”) |
• The server is running Windows Server 2008. • The server is running the Terminal Server role service. • The terminal server has RemoteApp programs installed that are available through TS Web Access. The RemoteApp programs are configured to use TS Gateway. For more information about how to configure Terminal Services RemoteApp, see the “Terminal Services RemoteApp Step-by-Step Guide” (http://go.microsoft.com/fwlink/?LinkId=84895). • The server has the following name and IP address assigned: Name: contoso-ts.contoso.com IP address: 192.168.1.4 |
|
Client computer (“client1”) |
• The client computer is running Windows Vista with Service Pack 1 (SP1). • The computer has the following configuration: Name: client1 IP address: 206.73.118.2 |
Important
The OTP scenario is supported only for Remote Desktop Connection (RDC) 6.1 clients. RDC 6.1 is available in Windows Vista with SP1, Windows XP with Service Pack 3 (SP3), and Windows Server 2008.
Network topology
The following diagram illustrates the OTP scenario for TS Gateway.
Steps to configure OTP
To configure OTP in this scenario, you must perform the following steps:
1. Configure the NPS (RADIUS) server.
2. Set the Dial-in permission for the RADIUS user.
3. Create a RADIUS client on the ISA Server.
4. Create a Web listener on the ISA Server.
5. Publish a Web site on the ISA Server by using the Web listener.
6. Disable the HTTPOnly attribute on the ISA Server.
7. Modify the Remote Desktop Protocol (.rdp) file that clients will use to connect.
8. Set up the client computer.
9. Test the configuration.
To configure the NPS (RADIUS) server
1. Log on to the NPS server (“contoso-otp.contoso.com”) with an account that has Administrator privileges.
2. Click Start, point to Administrative Tools, and then click Network Policy Server.
3. In the console tree, expand RADIUS Clients and Servers, right-click RADIUS Clients, and then click New RADIUS Client.
4. In the New RADIUS Client dialog box, do the following:
a. In the Friendly name box, type the friendly name of the ISA Server, contoso-fw.
b. In the Address (IP or DNS) box, type the fully qualified domain name of the ISA Server, contoso-fw.contoso.com.
c. In the Vendor name list, accept the default setting of RADIUS Standard, and then click OK.
Note
For this scenario, you do not have to configure any settings in the Shared Secret section.
5. In the console tree, expand Policies, and then click Network Policies.
6. Under Policy Name, double-click Connections to other access servers.
7. In the Connections to other access servers Properties dialog box, click the Constraints tab.
8. In the Constraints column, click Authentication Methods.
9. Select the Unencrypted authentication (PAP, SPAP) check box. Leave the other check boxes with their default values, and then click OK.
NPS uses Windows Authentication to authenticate users. To use the RADIUS service that is provided by NPS, users must have the Dial-in permission assigned. You can set this permission for domain users on a domain controller by using Active Directory Users and Computers, or for local users on a member server by using Local Users and Groups. In this example scenario, the Dial-in permission is set for a local user on the NPS server.
Note
The following procedure assumes that you have set up a local user account on the NPS server that you want to use for testing.
To set the Dial-in permission for the RADIUS user
1. Log on to the NPS server (“contoso-otp.contoso.com”) with an account that has Administrator privileges.
2. Click Start, point to Administrative Tools, and then click Computer Management.
3. In the console tree, expand Local Users and Groups, and then click Users.
4. Right-click the user account that you want to modify, and then click Properties.
5. Click the Dial-in tab.
6. Under Network Access Permission, click Allow access, and then click OK.
To create a RADIUS client on the ISA Server
1. Log on to the ISA Server (“contoso-fw.contoso.com”) with an account that has
Administrator privileges.
2. Start ISA Server Management. To do this, click Start, point to All Programs, point to Microsoft ISA Server, and then click ISA Server Management.
3. In the console tree, expand the server name, expand Configuration, and then click General. (If you are running ISA Server 2006 Enterprise Edition, expand Arrays, expand the server name, expand Configuration, and then click General.)
4. In the middle pane, under ISA Server Administration, click Specify RADIUS and LDAP Servers.
5. On the RADIUS Servers tab, click Add.
6. In the Server name box, type the name of the RADIUS server to use (in this case, contoso-otp.contoso.com), and then click OK.
7. Click OK to close the Authentication Servers dialog box.
To create a Web listener on the ISA Server
1. In the console tree of ISA Server Management, expand the server name, and then click Firewall Policy. (If you are running ISA Server 2006 Enterprise Edition, expand Arrays, expand the server name, and then click Firewall Policy.)
2. In the right pane, click the Toolbox tab, and then click Network Objects.
3. On the Network Objects toolbar, click New, and then click Web Listener. The New Web Listener Definition Wizard starts.
4. In the Web listener name box, type OTP, and then click Next.
5. On the Client Connection Security page, click Require SSL secured connections with clients, and then click Next.
6. On the Web Listener IP Addresses page, do the following:
a. Under Listen for incoming Web requests on these networks, select the External check box.
b. Click Select IP Addresses.
c. Under Listen for requests on, click Specified IP addresses on the ISA Server computer in the selected network.
d. Under Available IP Addresses, click 206.73.118.1, click Add, and then click OK.
e. Accept the default (selected) setting for the ISA Server will compress content sent to clients through this Web Listener if the clients requesting the content support compression check box.
f. Click Next.
7. On the Listener SSL Certificates page, do the following:
a. Click Assign a certificate for each IP address.
b. In the IP Address column, click 206.73.118.1, and then click Select Certificate.
c. On the Select Certificate page, select the certificate that is issued to www.contoso.com, and then click Select.
d. Click Next.
8. On the Authentication Settings page, do the following:
a. In the Select how clients will provide credentials to ISA Server list, click HTML Form Authentication.
b. Under Select how ISA Server will validate client credentials, click RADIUS OTP, and then click Next.
9. On the Single Sign On Settings page, clear the Enable SSO for Web sites published with this Web listener check box, and then click Next. (SSO is not relevant for this solution.)
10. On the Completing the New Web Listener Wizard page, click Back to make any changes, or click Finish to complete the wizard.
To publish a Web site on the ISA Server by using the Web listener
1. In the console tree of ISA Server Management, expand the server name, and then click Firewall Policy. (If you are running ISA Server 2006 Enterprise Edition, expand Arrays, expand the server name, and then click Firewall Policy.)
2. In the right pane, click the Tasks tab, and then click Publish Web Sites. The New Web Publishing Rule Wizard starts.
3. In the Web publishing rule name box, type Web Site Publishing, and then click Next.
4. On the Select Rule Action page, under Action to take when rule conditions are met, click Allow, and then click Next.
5. On the Publishing Type page, click Publish a single Web site or load balancer, and then click Next.
6. On the Server Connection Security page, click Use SSL to connect to the published Web server or server farm, and then click Next.
7. On the Internal Publishing Details page, in the Internal site name box, type www.contoso.com, and then click Next.
8. On the Internal Publishing Details page, click Next. (Leave the Path (optional) box empty, and the Forward the original host header instead of the actual one specified in the Internal site name field on the previous page check box cleared.)
9. On the Public Name Details page, do the following:
a. In the Accept requests for list, ensure that This domain name (type below) is selected.
b. In the Public name box, type www.contoso.com, and then click Next.
10. On the Select Web Listener page, in the Web listener list, click OTP, and then click Next. (This is the Web listener that you created in the previous procedure.)
11. On the Authentication Delegation page, in the Select the method used by ISA Server to authenticate to the published Web server list, click No delegation, but client may authenticate directly, and then click Next.
12. On the User Sets page, under This rule applies to requests from the following user sets, ensure that All Authenticated Users is listed, and then click Next.
13. On the Completing the New Web Publishing Rule Wizard page, click Back to make any changes, or click Finish to complete the wizard.
14. Click Apply to update the configuration. (If you are running ISA Server 2006 Enterprise Edition, you can check the status by using the Configuration tab that is available when you click Monitoring in the console tree.)
To disable the HTTPOnly attribute on the ISA Server
1. Copy and paste the following script into a text editor such as Notepad. On the ISA Server, save the file to the C: directory as DisableHttpOnlyAuthCookies.vbs.
Important
Microsoft provides programming examples for illustration only, without warranty either expressed or implied. This includes, but is not limited to, the implied warranties of merchantability or fitness for a particular purpose.
Note
This script is also available at the following Web site: http://go.microsoft.com/fwlink/?LinkId=115137
If Not WScript.Arguments.Named.Exists(“WebListener”) Then
WScript.Echo “WebListener not defined” WScript.Quit(1)
End If
Set fpcRoot = CreateObject(“FPC.Root”)
Set fpcArray = fpcRoot.GetContainingArray() Set fpcWebListener =
fpcArray.RuleElements.WebListeners(WScript.Arguments.Named(“WebListener”)) Set fpcWebListenerVps = fpcWebListener.VendorParametersSets
On Error Resume Next
Set fpcCookieAuthVps = fpcWebListenerVps.Item(“{29022EBA-B030-4839-9CA6- DD8875BC7B47}”)
If Err.number = 0 Then
CookieAuthVpsExists = True
Else
CookieAuthVpsExists = False
End If
Err.Clear
On Error GoTo 0
If Not CookieAuthVpsExists Then
WScript.Echo “Cookie auth VPS settings not defined, HTTP only cookies are ON by default”
Else
WScript.Echo “HTTP only cookies: ” & (fpcCookieAuthVps.Value(“HttpOnlyCookie”) = True)
End If
If WScript.Arguments.Named.Exists(“Value”) Then
If Not CookieAuthVpsExists Then
Set fpcCookieAuthVps = fpcWebListenerVps.Add(“{29022EBA-B030-4839-9CA6- DD8875BC7B47}”)
End If
fpcCookieAuthVps.Value(“HttpOnlyCookie”) = (StrComp(WScript.Arguments.Named(“Value”), “True”, 1) = 0)
fpcArray.Save
WScript.Echo “HTTP only cookies set to ” & (fpcCookieAuthVps.Value(“HttpOnlyCookie”) = True)
End If
2. From a command prompt, run the following command from the C: directory: cscript DisableHttpOnlyAuthCookies.vbs /WebListener:OTP /Value:False You should see the following output:
HTTP only cookies: True
HTTP only cookies set to False
To modify the RDP file that clients will use to connect
1. Log on to the terminal server (“contoso-ts.contoso.com”) with an account that has
Administrator privileges.
2. Click Start, point to Administrative Tools, point to Terminal Services, and then click TS RemoteApp Manager.
3. In the Overview pane of TS RemoteApp Manager, next to RDP Settings, click Change.
4. On the Custom RDP Settings tab, type or copy the following RDP settings into the Custom RDP settings box:
pre-authentication server address: s: https://www.contoso.com/ts require pre-authentication:i:1
5. When you have finished adding the settings, click Apply.
To set up the client computer
1. Log on to the client computer (“client1”).
2. From an elevated command prompt, type the following commands, pressing ENTER after each command:
cd c:windowssystem32driversetc edit hosts
3. Add the following line to the Hosts file:
206.73.118.1 www.contoso.com
4. Save the Hosts file.
Note
Typically, you would not have to modify the Hosts file, as the address would be resolvable through DNS.
To test the configuration from the client computer
1. Open Internet Explorer and specify https://www.contoso.com/ts as the address.
You will be redirected to the OTP logon page on the ISA Server.
2. Type the user name in the format contoso-otpuser.
Note
If the user is a domain user and the RADIUS server is a member of the domain, you do not have to specify a domain name. However, because in this procedure the test user is a local user on the RADIUS server, you must specify the computer name where the account exists.
3. Enter the user’s password.
The ISA Server will pass the credentials to the NPS server for authentication. If successful, the client will be redirected to the Web site and retrieve the TS Web Access page.
Для того чтобы повысить уровень безопасности Windows-сервера бывает недостаточно сменить TCP-порт RDP . Рассмотрим настройку шлюза удаленных рабочих столов (Remote Desktop Gateway / Terminal Services Gateway) в домене Active Directory.
Remote Desktop Gateway, что это?
Remote Desktop Gateway — это роль Windows-сервера, обеспечивающая защищенное соединение, с помощью протокола SSL, с сервером по RDP. Главное преимущество этого решения в том, что не требуется развертывание VPN-сервера, для этого и используется шлюз.
Следует отметить, что начиная с Windows Server 2008 R2, были изменены названия всех служб удаленных рабочих столов. Именуемые ранее службы Terminal Services были переименованы в Remote Desktop Services.
Преимущества Remote Desktop Gateway в следующем:
- Используя зашифрованное соединение, шлюз позволяет подключаться к внутренним сетевым ресурсам без необходимости использования VPN-соединения удаленными пользователями;
- Шлюз дает возможность контроля доступа к определенным сетевым ресурсам, тем самым реализуя комплексную защиту;
- Шлюз разрешает подключение к сетевым ресурсам, которые размещены за межсетевыми экранами в частных сетях или NAT;
- С помощью консоли диспетчера шлюза появляется возможность настраивать политики авторизации для тех или иных условий, которые должны быть выполнены при подключении к сетевым ресурсам удаленными пользователями. В качестве примера, можно указать конкретных пользователей, которые могут подключаться к внутренним сетевым ресурсам, а также должен ли клиентский компьютер при этом быть членом группы безопасности AD, допустимо ли перенаправление устройства и диска;
- Консоль диспетчера шлюза содержит инструменты, предназначенные для отслеживания состояния шлюза. Используя их, вы можете назначить отслеживаемые события для аудита, например, неудачные попытки подключения к серверу шлюза служб терминалов.
Важно! Шлюз служб терминалов должен входить в домен Active Directory. Настройка шлюза выполняется только от имени администратора домена, на любом сервере в домене.
Установим роль.
Открываем Диспетчер серверов.
Выбираем “Добавить роли и компоненты”.
На этапе “Тип установки”, выбираем “Установка ролей и компонентов”.
Следующим шагом выбираем текущий сервер.
Роль сервера — Служба удаленных рабочих столов.
Переходим к службе ролей. Выбираем “Шлюз удаленных рабочих столов”.

Переходим к этапу подтверждения, нажимаем кнопку “Установить”.
Настройка политики авторизации подключения и ресурсов.

В открывшемся окне диспетчера шлюза удаленных рабочих столов, в левой части окна, раскрываем ветку с именем сервера → Политики → Политики авторизации подключений.
В правой части того же окна выбираем Создать новую политику → Мастер.

В открывшемся окне “Мастер создания новых политик авторизации” выбираем рекомендуемый параметр “Создать политику авторизации подключений к удаленным рабочим столам и авторизации ресурсов удаленных рабочих столов”. Нажимаем кнопку “Далее”.

На следующем шаге вводим удобное имя для политики авторизации подключения. Мы рекомендуем давать имена на английском языке.

Следующим этапом будет выбор удобного метода аутентификации — пароль или смарт-карта. В нашем случае оставляем отмеченным только “Пароль”. Добавляем группы, которые могут подключаться к данному RD-шлюзу, для этого нажимаем кнопку “Добавить группу…”.

В окне выбора групп кликаем по кнопке “Дополнительно”.

Окно изменит размеры. Нажимаем кнопку “Поиск”. В результатах поиска находим “Администраторы домена” и нажимаем кнопку “OK”.

В окне выбора группы проверяем выбранные имена объектов и нажимаем “OK”.

Группа добавлена. Для перехода к следующему шагу нажимаем кнопку “Далее”.

На следующем этапе выбираем пункт “Включить перенаправление устройств для всех клиентских устройств” и нажимаем “Далее”.

Устанавливаем таймауты — время простоя и время работы сессии, значения указаны в часах. Нажимаем “Далее”.

Проверяем выполненные настройки. Все правильно — нажимаем “Далее”.

На следующем этапе настроим политику авторизации ресурсов. Указываем желаемое имя политики. Нажимаем “Далее”.

Следующим шагом установим членство в группах. Обычно, группа уже установлена, но если это не выполнено, следует выполнить действия приведенные выше. Нажимаем “Далее”.

Выбираем доступные сетевые ресурсы. Для этого необходимо выбрать группу, которая содержит серверы на которых требуемые группы пользователей могли бы работать с удаленным рабочим столом. Нажимаем кнопку “Обзор”.

В окне выбора группы, нажимаем кнопку “Дополнительно”.

В измененном окне нажимаем кнопку “Поиск”. В окне результатов находим “Контроллеры домена”. Нажимаем “OK”.

Проверяем выбранные объекты и нажимаем “OK”.

Еще раз проверяем какая сетевая группа добавлена и нажимаем “Далее”.

Если номер RDP-порта неизменялся, устанавливаем значение переключателя в “Разрешить подключение только к порту 3389”. Если порт был изменен, следует указать новое значение.


На этапе подтверждения создания политики нажимаем кнопку “Закрыть”.

По окончании настройки окно будет выглядеть подобным образом.

Установим SSL-сертификат.
В том же окне “Диспетчер шлюза удаленных рабочих столов”, в левой окна кликаем по значку сервера, в основной части окна — “Просмотр и изменение свойств сертификата”.

В открывшемся окне “Свойства <имя_сервера>” переходим на вкладку “Сертификат SSL”. Устанавливаем переключатель “Создать самозаверяющий сертификат” и кликаем по кнопке “Создать и импортировать сертификат…”.
Хотя возможны еще 2 варианта:
- импорт ранее загруженного сертификата (самоподписанного ранее или стороннего);
- загрузка стороннего сертификата (например, Comodo) и его импорт;

В окне “Создание самозаверяющего сертификата” проверяем параметры и нажимаем кнопку “OK”.

Система уведомит, что сертификат был создан успешно. также присутствует информация, где можно найти сам файл сертификата. Нажимаем кнопку “OK”.

В окне свойств сервера, нажимаем кнопку “Применить”.

Самозаверенный сертификат установлен на TCP-порт 443 (SSL-порт по умолчанию).

Мы рекомендуем, в целях безопасности, изменить порт SSL, используемый по-умолчанию. Для этого, в основном меню окна, выбираем “Действия” → “Свойства”.

Переходим на вкладку “Параметры транспорта” и устанавливаем желаемое значение поля “HTTPS-порт”. Сохраняем параметры нажимая кнопку “Применить”.

Система запросит подтверждение — отвечаем ”Да”.

Выполним подключение через шлюз.
Открываем RDP-клиент, переходим на вкладку “Дополнительно” и нажимаем кнопку “Параметры”.

В открывшемся окне выбираем “Использовать следующие параметры сервера шлюза удаленных рабочих столов”. Указываем доменное имя сервера и через двоеточие (:) указываем SSL-порт. Метод входа — “Запрашивать пароль”. Нажимаем “OK”

Переходим на вкладку “Общие”. Указываем адрес компьютера и пользователя под которым будет выполняться подключение. Нажимаем кнопку “Подключить”

Программа запросит пароль от учетной записи.

Результаты работы шлюза можно проверить трассировкой — команда tracert.
220140
Минск
ул. Домбровская, д. 9
+375 (173) 88-72-49
![]()
700
300
ООО «ИТГЛОБАЛКОМ БЕЛ»
220140
Минск
ул. Домбровская, д. 9
+375 (173) 88-72-49
![]()
700
300
ООО «ИТГЛОБАЛКОМ БЕЛ»
First published on TECHNET on Feb 26, 2008
Welcome to Day Number Twenty-Six. Tomorrow is Launch Day! Over the last twenty-five days we’ve gone over several different aspects of Windows Server 2008. Just because today is the last day in our Launch Series doesn’t mean that we’re going to ignore Windows Server 2008 for a while. Count on seeing more Windows Server 2008 posts in the future — just perhaps not quite so many in such a short space of time! Anyway, getting on with the business of the day, we’re wrapping up our Launch Series with an Overview of Terminal Services Gateway (TS Gateway or TSG). So without further ado …
First, what exactly is TS Gateway? It is a role service that enables authorized remote users to connect to resources on an internal corporate or private network from Internet-connected devices. The network resources can be either Terminal Servers running RemoteApp programs or systems with Remote Desktop enabled. If you think about Terminal Services Gateway as Terminal Services Proxy (which was the original name for this feature) or a VPN for Terminal Services, it may help with understanding exactly what it does. TS Gateway uses RDP over HTTPS to help form a secure, encrypted connection between remote users on the Internet and the internal network resources to which they need to connect. Sounds like a VPN without the actual VPN doesn’t it?
So what benefits are there in running TS Gateway? Since the TS Gateway connection is encrypted, you do not have to configure a VPN connection. TS Gateway also provides a comprehensive security model that enables the administrator to control access to specific internal network resources. TS Gateway provides a point-to-point RDP connection rather than blanket access to the internal network. Using TS Gateway you can connect to internal resources that are hosted behind firewalls on private networks and across Network Address Translators (NATs). Prior to Windows Server 2008, remote users were often prevented from connecting to internal network resources across firewalls and NAT’s because port 3389 was typically blocked on the firewalls. Since TS Gateway uses port 443 for an HTTP SSL / TLS tunnel (which most organizations have open for Internet connectivity), remote access connectivity across multiple firewalls is possible.
Within TS Gateway you can also define and configure Connection Authorization Policies that define conditions that must be met for a remote user to connect to an internal resource. We’ll go Connection Authorization Policies in a bit more detail later on in this post. TS Gateway servers and Terminal Services clients can be configured to use Network Access Protection (NAP). NAP is a health policy creation, enforcement, and remediation technology. Using NAP, administrators can enforce system health requirements such as software requirements (for example the client must have an approved and updated Anti-Virus program running), as well as security update requirements, required computer configurations and other settings. Using TS Gateway in conjunction with Microsoft ISA Server, a TS Gateway server could be hosted in a DMZ network with the ISA server sitting in the perimeter network.
So as you can see, TS Gateway provides several benefits. Now let’s take a look at the architecture of TS Gateway. The diagram below shows a high level view of the architecture and connection processes:
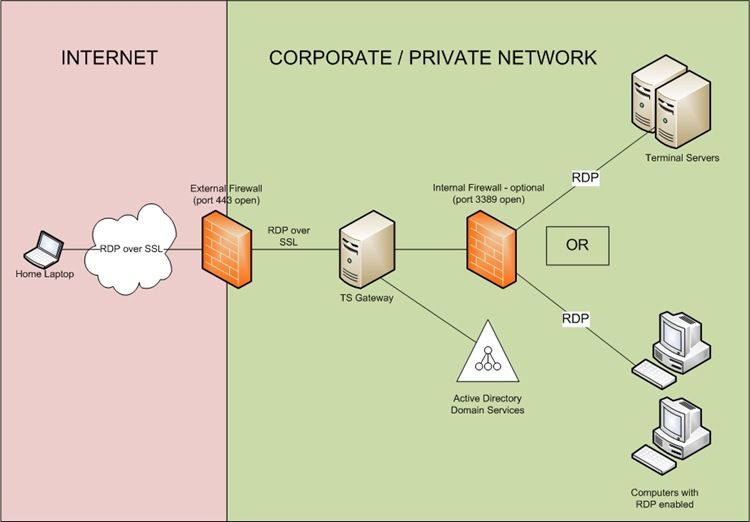
Let’s go over this connection sequence in a bit more detail:
- The user at home initiates the connection to their network by using a .RDP file or a Remote Programs icon.
- An SSL tunnel is established between the client and the server using the TS Gateway server SSL certificate. Before a connection is established however, the server must authenticate and authorize the user according to any Connection Authorization Policies (CAPs) that have been configured
- If the authentication and authorization succeed, the server signals the client to continue with the connection sequence
- The client requests a connection from the server to an internal resource — whether that is a RemoteApp program, an RDP connection to their workstation in the office or to a Terminal Server session. The server verifies the name of that resource against the names of resources included in the Resource Authorization Policies (RAPs) that have been configured
- If the name of the resource exists in at least one RAP and the name of the user requesting the connection also exists in at least one RAP then the TS Gateway server authorizes the request and establishes the connection to the resource
- The client and the resource establish a secure tunnel through the TS Gateway server over HTTPS (port 443)
- From this point, any packets that the client sends to the TS Gateway server are forwarded to the resource, and vice-versa (this is why thinking of TS Gateway as TS Proxy may help with understanding the process)
- The client will attempt to create a user session on the resource. The resource performs Windows Authentication to validate the identity of the user requesting the connection as well as the privileges that the user has on the resource. These are the same steps that would be followed if the client requested a remote connection to the server without the TS Gateway — in other words, a fairly standard logon process
- The client sends the encrypted RDP packets to the TS Gateway server over port 443. The server forwards the encrypted RDP packets to the resource over port 3389
Now that we’ve discussed the basic connection process, let’s talk about the Authorization Policies mentioned above — the Connection Authorization Policies (CAPs) and the Resource Authorization Policies (RAPs). A TS CAP allows administrators to specify connection criteria that must be met in order to connect to a Terminal Services Gateway server. A very simple TS CAP might require that the user be a member of a specific security group — either domain based, or local to the TS Gateway server. The following criteria may be defined in a CAP:
- Is the user a member of a specific security group?
- Is the client machine a member of a specific security group?
- Whether a client needs to use smart card authentication or password authentication — or perhaps they could use either method
- What devices are redirected
A Network Policy Server (NPS) can be configured to store, centralize, manage and validate TS Gateway CAPs. NPS was formerly known as a Remote Authentication Dial-In User Service (RADIUS) server. If there is already a Network Policy Server deployed for remote access scenarios such as VPN, you can use this server for TS Gateway scenarios also. If more than one TS CAP is configured, the following policy lookup behavior is used. Policies are applied in the numerical order shown in the TS Gateway Manager pane and access is granted by the first matching policy. In other words, if a client does not meet the requirements of the first TS CAP in the list, the TS Gateway will evaluate the second policy and so on, until it locates a TS CAP whose requirements are met. If a client does not meet the requirements of any of the TS CAPs then TS Gateway denies the access request.
TS Resource Authorization Policies (RAPs) allow administrators to specify the internal network resources that remote users can access through a TS Gateway server. When a TS RAP is created, the administrator can create a computer group and associate it with the TS RAP. For example, a TS RAP might specify that members of the «HR Users» group can only connect to computers that are members of the «HR Computers» computer group. Remote users connecting to an internal network through TS Gateway are granted access if they meet the conditions for at least one TS CAP and one TS RAP. An important note here — since client users may specify a NetBIOS name or a fully qualified domain name (FQDN) for the internal computer that they are trying to access, you should create a TS RAP for each possible name.
And with that, Day Twenty-Six — the final day of our Launch Series comes to an end. Tomorrow … LAUNCH DAY! We’ll have a special Launch Day post for you. Until next time …
—
CC Hameed
| Share this post : |

|

|

|

|

|
Я хотел бы начать цикл статей об использовании Windows Terminal Server. Вот чем я хотел бы поделиться с уважаемым сообществом:
- Обзор нововведений в WS2008 и WS2008R2
- Terminal Server
- Установка Terminal Server
- Установка программ
- Базовый мониторинг
- Terminal Server Farm
- Планирование
- Перенаправление и Session Broker
- Профили пользователей
- Мониторинг и обслуживание
- TSWA/RemoteApp
- WS2008 и R2: отличия
- Планирование и установка
- фильтрация приложений
- TS Gateway
- Принципы работы и условия, необходимые для установки
- Установка и настройка
- Детальное рассмотрение политик авторизации
- TS Gateway Farm
- Обслуживание, мониторинг и сбор статистики соединений
- Интеграция TSG/TSWA/TS
- VDI
- Общая интеграция
Что отличает этот цикл от многочисленных статей о Windows Terminal Services?
Во-первых, это упор на создание отказоустойчивых систем (начиная с WS2008, все необходимое для этого имеется прямо в Windows, без применения дополнительного оборудования и программ). Во-вторых, это интеграция всего множества технологий под крышей Terminal Services. В-третьих, я затрону вопросы ежедневного, периодического и экстренного облуживания ролей Terminal Services, а также мониторирование и отчетность. Ну и в четвертых, эта серия основана на более чем трехлетнем опыте работы с Windows Server 2008 (и более чем года при миграции с WS2008 на R2 и работы с прекрасной, великолепной WS2008 R2). Каким образом это возможно, спросите вы, ведь WS2008 вышел год назад, я R2 вышел только в недавно? Ответ простой: я работаю в Microsoft IT и непосредственно занимался «догфудингом» Terminal Services и последующим переводом их в полноценный продакшн сервис. (хочу заметить в скобках: многие путают догфудинг с лабораторным тестированием. Это абсолютно разные вещи: цель тестирования – выявление багов и производительности на тестах; догфудинг – развертывание реального сервиса с незначительным уменьшением планируемой надежности (например, вместо 99.9% – только 95%) и для ограниченной, но все равно довольно широкой аудитории (порядка нескольких тысяч или десятков тысяч пользователей)).
Еще одна оговорка прежде чем мы перейдем к сути: я стараюсь использовать кальки с английских терминов как можно меньше, и поверьте, что «догфудинг», «продакшн» и тому подобное было для меня крепким орешком: не подобрав хороших русских слов, я решил использовать простую транслитерацию. Так что если вы не улавливаете смысла этих слов, или хотите предложить русский аналог – комментируйте, но я все же прошу некоторого снисхождения – очень трудно адекватно перевести термины вроде Single sign-on.
Обзор нововведений Terminal Services в Windows Server 2008 и Windows Server 2008 R2.
Итак, что же нового принес WS2008 в TS по сравнению с WS2003?
Список всех нововведений очень обширен: здесь и изменение архитектуры (например, нет больше сессии 0 (aka «консольная сессия»)), и введение новых групповых политик, и многое другое. Часть мелких улучшений мы затронем далее, но пока сосредоточимся на крупных изменениях.
Terminal Server
- Новый протокол RDP 6.1. Три самых значительных улучшения:
- возможность работы через SSL (при применении TS Gateway)
- значительные улучшения клиентской безопасности (пароли не хранятся в RDP-файлах, проверка серверных сертификатов)
- новый режим работы: приложения RemoteApp
- Новый режим drainstop. Позволяет прекратить обслуживание запросов на новые сессии, но не затрагивает уже созданные, а также играет важную роль в VDI и в некоторых сценариях создания отказоустойчивых серверных ферм. Мы обязательно рассмотрим его применение.
- Новый режим аутентификации NLA (Network Level Authentication, не путать с Network Location Awareness). Позволяет аутентифицировать пользователя еще до показа ему классической формы входа (logon screen). Этот режим в большинстве случаев несовместим с TS Gateway, и мы обязательно разберемся, почему.
- Поддержка технологии EasyPrint. В WS2003 для того, чтобы клиент мог распечатать из серверной сессии на локальном принтере, драйвера этого принтера должны были быть установлены на TS. EasyPrint решает эту проблему.
EasyPrint доступен в Висте и Win7 из коробки, для его использования на XP необходимо установить .net и несколько обновлений. - Новые групповые политики для управления TS. Часть из них будет рассмотрена далее.
Session Broker
- В WS2003 назывался «Session Broker»
- Поддержка балансировки нагрузки на основе количества сессий на TS. Позволяет создавать отказоустойчивые фермы терминальных серверов без использования дополнительных аппаратных средств. Мы обсудим это в отдельной статье.
Terminal Services Gateway
Не существовал до WS2008. Позволяет подключение клиентов из других сетей (например, из интернета) к терминальным серверам и клиентским компьютерам (XP, Виста, Win7) по протоколу RDP через SSL туннель, при этом не соединяет сами сети. (Это объяснение может показаться излишне запутанным, но оно хорошо отражает суть. Мы вернемся к этому в статье о TS Gateway). Пока замечу, что эта великолепная технология позволяет во многих случаях избежать использования RAS/VPN и значительно улучшить безопасность соединения.
К слову, технология завоевала Security Award на Engineering Excellence Forum’08, и мне очень приятно что я тоже приложил к этому некоторые усилия.
Terminal Services Web Access
Не существовал до WS2008. Позволяет создать веб-сайт, на котором опубликованы приложения RemoteApp и форма подсоединения к рабочим станциям в организации. Эту технологию крайне часто путают с TS Gateway, поэтому сразу подчеркну, что TSWA
не занимается
собственно «доступом» (Access) — это пример немного неудачного названия. Наиболее интересное применение этой технологии — в сочетании с TS Gateway, и мы займемся этим в статье об интеграции Terminal Server, TS Gateway и TS Web Access
В следующей статье (ну, конечно если это кого-то интересует) мы рассмотрим нововведения WS2008R2 (aka Win7 Server) по сравнению с WS2008, и перейдем, наконец, к делу.
Отдельно замечу, что недостаток ссылок, картинок и практических рекомендаций с лихвой компенсируется позже, когда мы начнем рассматривать технологии подробнее. Надеюсь, скучно не будет.
Материал из Xgu.ru
Перейти к: навигация, поиск
- Короткий URL: TC_lab
Автор: Сергей Черепенин
На этой странице рассматриваются основные
усовершенствования терминальных служб Microsoft Windows Server 2008,
Microsoft Windows Vista и протокола удалённого доступа RDP 6.
Детально описаны процедуры по активации и использованию этих
возможностей.
Содержание
- 1 Новые возможности терминальных служб Microsoft Windows Server 2008:
- 1.1 Настройка роли терминального сервера операционной системы Microsoft Windows Server 2008.
- 1.2 Создание .rdp и .msi-файлов.
- 1.2.1 Terminal Services RemoteApp
- 1.2.2 Создание .rdp-файлов
- 1.2.3 Создание .msi-файлов
- 1.3 Создание web-сайта для обеспечения доступа к удалённым приложениям и рабочим столам корпоративной сети.
- 1.4 Обеспечение безопасного доступа к удалённым приложениям и рабочим столам с помощью сервера терминального шлюза.
- 2 Новые возможности протокола Microsoft RDP6.0 и RDP6.1:
- 2.1 Проверка новых графических возможностей терминального клиента Microsoft: 32-битной глубины цвета, сглаживания шрифтов, стилей оформления окон Microsoft Windows Vista, поддержка нескольких мониторов и высоких разрешений экрана.
- 2.2 Использование технологии single sign-on в терминальном окружении.
- 2.3 Настройка приоритезации потока данных.
- 2.4 Перенаправление устройств Plug and Play.
- 2.5 Microsoft Point of Service для перенаправления .NET устройств.
- 3 Материалы по тонким клиентам и системам удалённого доступа на Xgu.ru
[править] Новые возможности терминальных служб Microsoft Windows Server 2008:
[править] Настройка роли терминального сервера операционной системы Microsoft Windows Server 2008.
Для обеспечения доступа к удалённому рабочему столу или удалённому приложению по протоколу rdp необходимо на удалённом компьютере настроить терминальный сервер. Это выполняется путём назначения роли терминального сервера.
Для настройки роли терминального сервера откройте меню Пуск, затем Programs — Administrative Tools и выберите Server Manager.
В открывшемся окне выберите Roles. Это вызовет мастер настройки роли Add Role Wizard. На шаге Before You Begin нажмите Next. Следующим этапом будет выбор роли сервера Select Server Roles. Выберите роль Terminal Services и нажмите Next два раза.
На этапе выбора роли терминального сервера выберите Terminal Server и нажмите Next два раза.
Далее необходимо будет настроить тип аутентификации пользователей для доступа к терминальному серверу. Выберите пункт Do not require Network Level Authentication и нажмите Next.
Затем необходимо будет определить тип лицензий на терминальный сервер. Выберите пункт Configure later и нажмите Next.
На шаге Select User Groups Allowed Access to This Terminal Server убедитесь, что группа Administrators находится в перечне разрешённых групп для удалённого подключения. Затем нажмите Next два раза.
После завершения процесса установки роли терминального сервера нажмите Close и перезагрузите компьютер.
После загрузки компьютера выполните на терминальном клиенте следующую команду:
mstsc /v:XXX.XXX.XXX.XXX:3389 /w:800 /h:600
где XXX.XXX.XXX.XXX — IP адрес терминального сервера, w и h — ширина и высота в пикселях терминального окна, соответственно (необязательные параметры)
[править] Создание .rdp и .msi-файлов.
[править] Terminal Services RemoteApp
Удаленные программы служб терминалов
Удаленные программы — это функция служб терминалов Windows Server 2008, позволяющая клиентским компьютерам подключаться к удаленному компьютеру и работать с установленными на нем программами. Например, рабочее место может включать удаленный компьютер, к которому можно подключаться и работать с приложением Microsoft Word. Администратор должен сначала опубликовать программы, к которым конечные пользователи могли бы получать доступ. Работа с программой, установленной на удаленном компьютере, ничем не отличается от работы в обычных условиях. Но не нужно забывать о том, что доступ к дисковым ресурсам клиентского компьютера будет осуществляться через сеть с сервера, а оборудование, подключенное к терминальному клиенту, будет доступно благодаря работе протокола.
Сначала необходимо настроить терминальный сервер.
Затем необходимо установить программное обеспечение на сервер и сделать его доступным для терминальных клиентов.
После этого можно создать файл с расширением .rdp и сохранить его либо на клиенте либо на сетевую папку. При вызове этого файла с клиентского компьютера будет инициироваться rdp сессия, внутри которой откроется приложение. Все ресурсы при этом будут использоваться серверные (к локальным файлам всегда можно получить доступ через сеть).
Минусом создания *.rdp файлов — это отсутствие привязки типа файла к приложению. Эту привязку можно осуществить путем создания специального msi пакета и установкой его на клиентском компьютере. В этом пакете будет находиться только самая необходимая информация о приложении. Например такой msi пакет для Adobe Reader 7.0 будет объемом до ста килобайт, когда сам инсталлятор приложения — около 30Мб. Целью такого пакета являются установка связей между приложениями и создание необходимых ярлыков для пользователей.
Еще одним преимуществом msi пакетов — это простота распространения в сети. Он может быть установлен при помощи Групповых Политик в случае использования домена. Если же домена нет, то этот пакет можно будет потом удалить из Установка/Удаление Программ Панели Управления.
Создать msi пакет можно с помощью консоли TSRemoteAppManager.
Инсталляция на клиентском компьютере и последующее использование внешне ничем не будут отличаться от обычного.
Удаленные программы упрощают администрирование системы, поскольку при этом нужно обновлять и обслуживать только одну копию программы вместо нескольких, установленных на различных компьютерах.
[править] Создание .rdp-файлов
Для создания .rdp-файла приложения необходимо сначала проинсталлировать это приложение на терминальный сервер.
Для этого откройте Control Panel и выберите пункт Install Application on Terminal Server.
В результате откроется мастер установки приложений на терминальном сервере. В первую очередь необходимо выбрать место расположения инсталлятора приложения. Выберите файл gvim71.exe на компьютере в сети по адресу \192.168.7.254inst, нажмите Open и установите это приложение.
После завершения установки приложения в окне Finish Admin Install нажмите Finish.
После завершения инсталляции необходимого приложения можно приступать к созданию .rdp-файла.
Для этого откройте консоль TS RemoteApp Manager в папке Terminal Services инструментов администрирования Administrative Tools.
В поле RemoteApp необходимо правым кликом мышки вызвать контекстное меню и выбрать пункт Add RemoteApp Programs.
В результате откроется мастер RemoteApp Wizard, с помощью которого необходимо добавить только что проинсталлированное приложение в список удалённых программ.
Затем с помощью контекстного меню необходимо еще раз запустить мастер RemoteApp Wizard.
Во время работы этого мастера сохраните .rdp-файл в папку c:remoteapp, которую можно создать и сделать доступной по сети для группы Everyone в окне выбора места сохранения этого файла.
Теперь выполните этот файл на терминальном клиенте для проверки удаленного запуска приложений.
[править] Создание .msi-файлов
Для создания .msi-файла необходимо проинсталлировать приложение на терминальный сервер с помощью мастера установки приложений на терминальный сервер. Происталлируйте таким образом Acrobat Reader, инсталлятор которого находится по адресу \192.168.7.254instAdbeRdr705_rus_full.exe
Затем с помощью консоли TS RemoteApp Manager необходимо добавить Acrobat Reader в список удаленных программ и вызвать из контекстного меню по правому клику на приложении мастер RemoteApp Wizard для создания .msi-файла. Во время работы этого мастера можно настроить ярлыки рабочего стола, папку меню Пуск и установить ассоциации файлов к этому приложению.
Для установки созданного .msi-пакета на терминальные клиенты можно использовать различные методы, от установки с помощью Групповых политик до ручного инсталлирования. Установите полученный .msi-пакет на клиентском компьютере и проверьте работоспособность этого удаленного приложения.
[править] Создание web-сайта для обеспечения доступа к удалённым приложениям и рабочим столам корпоративной сети.
Terminal Services Web Access
(TS Web Access) — это роль терминального сервера, которая обеспечивает и контролирует доступ к RemoteApp™ программам или рабочим столам компьютеров офисной сети через браузер.
Преимуществами TS Web Access являются:
- Простота использования. Пользователям достаточно выбрать нужное приложение на веб-странице и кликнуть на соответствующую иконку. Причем пользователь может находиться при этом как в локальной сети, так и в сети Интернет.
- Упрощение администрирования. Нет необходимости какой-либо настройки приложений на клиентских компьютерах (распространение *.rdp файлов через logon скрипты или roaming profiles пользователей или Group Policy для msi пакетов) и создание единого центра по администрированию программного обеспечения.
- Снижение нагрузки на сеть при использовании приложений с одного терминального сервера. Несколько приложений, запущенных одновременно пользователем с одного и того же терминального сервера, будут работать внутри одной сессии.
- Простота интеграции с другими веб-решениями. Страничка TS Web Access может быть легко интегрирована в другой web-сайт или Microsoft® Windows® SharePoint® Services сайт.
- Автоматическое обновление списка опубликованных программ на TS Web Access сайте из списка RemoteApp™ программ на каждом терминальном сервере
Для определения TS Web Access сервера необходимо учесть следующие факторы:
— Операционная система Windows Server 2008
— Microsoft Internet Information Services (IIS) 7.0
— Клиенты rdp должны поддерживать версию протокола RDP 6.1. Клиенты RDP 6.1 включены в поставку следующих операционных системах:
- Windows Server 2008
- Windows Vista® Service Pack 1
- Windows XP with Service Pack 3 (SP3) включая Beta версии
Настройка TS Web Access Сервера для предоставления доступа пользователям из Интернет.
Для предоставления доступа к TS Web Access серверу пользователям из Интернет необходимо использовать так же TS Gateway сервер. Рекомендуется TS Web Access сервер и TS Gateway сервер размещать в периметре сети и за firewall`ом терминальный сервер с RemoteAPP программами. При этом, на firewall`e необходимо разрешить Windows Management Instrumentation (WMI) трафик между TS Web Access сервером и терминальным сервером.
Создание web-сайта доступа к удалённым рабочим столам или приложениям осуществляется путём добавления роли TS Web Access на терминальный сервер.
Для добавления роли необходимо открыть консоль Server Manager и выбрать в меню Roles пункт Terminal Services. Затем выбрать пункт Add Role Services для запуска мастера. На шаге Select Role Services необходимо выбрать пункт TS Web Access . Если в системе не будет необходимых компонентов, мастер добавления роли сервера предложит установить зависимости. Для этого необходимо нажать на Add Required Role Services и затем нажать Next три раза и потом Install.
После завершения работы мастера нажмите Close.
Для проверки установки наберите в Internet Explorer следующий url:
http://127.0.0.1/ts. Для доступа на эту страницу необходимо ввести регистрационные данные. Введите имя пользователя Administrator и пароль P@ssw0rd. Вы попадёте на страницу TS Web Access.
Для добавления ярлыков удалённых программ на этот сайт откройте консоль TS RemoteApp Manager, вызовите контекстное меню на необходимом приложении и выберите пункт Show in TS Web Access.
Для обеспечения возможности удалённых пользователей подключаться к рабочему столу компьютера необходимо добавить на сайт ярлык клиента rdp. Для этого в поле Overview консоли TS RemoteApp Manager найдите строку A remote desktop connection for this server is not visible in TS Web Access и нажмите Change .
После этого обновите страницу TS Web Access. Добавленные ярлыки приложений и клиента rdp станут доступными для использования. Проверьте работу этих приложений.
[править] Обеспечение безопасного доступа к удалённым приложениям и рабочим столам с помощью сервера терминального шлюза.
Сервер шлюза TS — это тип шлюза, который позволяет полномочным пользователям подключаться к удаленным компьютерам в корпоративной сети. Такие пользователи могут устанавливать подключение с любого компьютера через Интернет. Шлюз TS использует протокол удаленного рабочего стола (RDP) с протоколом HTTPS, что позволяет создать более безопасное шифрованное подключение.
Однако более ранние версии клиента подключения к удаленному рабочему столу не позволяют устанавливать подключение к удаленным компьютерам в обход брандмауэров и преобразователей сетевых адресов. Это происходит потому, что обычно порт 3389 заблокирован для повышения уровня безопасности сети. Этот порт используется для подключений к удаленному рабочему столу. Шлюз TS использует порт 443, который служит для передачи данных по туннелю SSL.
Сервер шлюза TS обеспечивает следующие преимущества:
- Подключение к корпоративной сети через Интернет с помощью клиента подключения к удаленному рабочему столу без настройки подключения VPN;
- Подключения к удаленным компьютерам в обход брандмауэров;
- Общий доступ к сетевому подключению при работе других программ, запущенных на компьютере. Это позволяет использовать подключение через поставщика услуг Интернета вместо передачи данных посредством удаленного подключения к корпоративной сети.
- Защищенность канала связи SSL-туннелем.
- Для повышения уровня безопасности существует возможность интергации с Network Access Protection. NAP — это технология, с помощью которой администратор может проверять наличие определенного программного обеспечения или обновлений на клиенте прежде чем предоставлять досуп к ресурсам. Она включена в следующие операционные системы: Windows Vista® RTM, Windows Server 2008, Windows Vista Service Pack 1 (SP1) и Windows XP Service Pack 3 (SP3).
- При использовании совместно Microsoft ISA server или другим firewall`ом может быть вынесен из периметра сети в корпоративную.
- С помошью TS Gateway Manager консоли можно настроить разлчные виды аудита и мониторинга событий на терминальном сервере.
Существует несколько способов внедрения TS Gateway сервера:
- TS Gateway Core
- TS Gateway NAP
- TS Gateway ISA Server
- Настройка клиента на использование TS Gateway сервера.
Чтобы выбрать сервер шлюза TS, выполните следующие действия:
1.Нажмите кнопку Пуск, Все программы, Стандартные, Связь, а затем – Подключение к удаленному рабочему столу.
2.Нажмите кнопку Параметры, откройте вкладку Дополнительно и нажмите кнопку Настройки.
3.Выберите Use these TS Gateway server settings (Использовать следующие параметры сервера шлюза TS), введите имя сервера в поле Имя сервера и выберите один из следующих способов входа в систему из списка Logon methods (Способы входа в систему).
3.1 Разрешить отложить этот выбор — этот вариант позволяет выбрать способ входа в систему при установке подключения.
3.2 Запрашивать пароль — при выборе этого варианта во время установки подключения выводится запрос на ввод пароля.
3.3 Смарт-карта -при выборе этого варианта во время установки подключения выводится запрос на вставку смарт-карты.
4.Установите или снимите флажок Bypass TS Gateway server for local addresses (Обходить сервер шлюза TS для локальных адресов). Если флажок установлен, маршрутизация входящего и исходящего трафика локальных сетевых адресов выполняется в обход сервера шлюза TS. Это позволяет повысить скорость подключения.
|
|
Настройка клиента может быть также выполнена при помощи Групповых Политик. |
- Настройка роли TS Gateway на терминальном сервере.
Для настройки роли TS Gateway откройте консоль Server Manager и в поле Roles Summary нажмите на Add Roles.
В результате запустится мастер Add Roles Wizard. На шаге Before You Begin ознакомьтесь с дополнительной информацией и нажмите Next.
Затем, на шаге Select Server Role, выберете Terminal Services и нажмите Next. Далее необходимо будет выбрать Role Services — выберете TS Gateway и нажмите Next.
Если в операционной системе не проинсталлированы зависимости, то мастер предложит их выбрать. Выберете настройки инсталляции зависимостей по-умолчанию путём нажатия на Add Required Role Services и затем нажмите на Next.
На шаге Choose a Server Authentication Certificate for SSL Encryption выберете Create a self-signed certificate for SSL Encryption и нажмите Next.
Затем необходимо будет настроить политики авторизации — выберете Now на шаге Create Authorization Policies for TS Gateway и нажмите на Next.
Следующим этапом настройки терминального сервера будет выбор пользователей, имеющих право подключаться к серверу. Выберете, если не выбрана, группу Administrators и нажмите Next.
Затем необходимо будет создать Connection Authorization Policy for Terminal Gateway. На этом этапе убедитесь что существует имя этой политики, выберете метод Windows authentication — Password и нажмите на Next.
Далее необходимо будет создать и настроить Resource Authorization Policy. Выберете Allow users to connect to any computer on the network и ,по необходимости, измените имя политики. Затем нажмите на Next пять раз, принимая значения по-умолчанию во время настройки зависимостей. Нажмите Install для начала установки ролей. После завершения инсатлляции нажмите на Close и перезагрузите виртуальную машину.
- Экспорт сертификата терминального шлюза
Для установки соединения через терминальный шлюз терминальному клиенту необходимо аутентифицироваться на нем. Для этого необходимо скопировать файл сертификата терминального шлюза на компьютер клиента. Для получения файла сертификата необходимо выполнить следующие действия.
Откройте консоль управления терминальным шлюзом TS Gateway Manager при помощи команды tsmanager.msc, вызовете контекстное меню на управляемом сервере и выберете в нем Properties.
В открывшемся окне перейдите на вкладку SSL Certificate и нажмите на Browse Certificates. Выберете необходимый сертификат и просмотрите его при помощи кнопки View Certificate. Перейдите на вкладку Details и нажмите на Copy to File….
При помощи мастера Certificate Export Wizard сохраните, используя параметры мастера по умолчанию, файл сертификата на файловую систему.
- Импорт сертификата терминального шлюза на терминальном клиенте.
Для импорта сертификата используйте контекстное меню на файле сертификата — выберете Install Certificate. Используя мастер импорта сертификата проинсталлируйте сертификат в автоматически определённое мастером место.
- Настройка клиента rdp на терминальном клиенте и тестирование соединения.
Для подключения к удалённому серверу через терминальный шлюз необходимо настроить rdp клиент. Откройте его, перейдите на вкладку Advanced и нажмите на Settings в поле Connect from anywhere.
В открывшемся окне настроек терминального шлюза выберете Use these TS Gateway server settings, в поле Server Name укажите имя терминального сервера192.168.7.254, снимите галочку Bypass TS Gateway server for local addresses и в поле Logon method выберете Ask for password (NTLM).
Затем перейдите на вкладку General и в поле Computer введите ip-адрес необходимого терминального сервера. Затем нажмите на Connect.
[править] Новые возможности протокола Microsoft RDP6.0 и RDP6.1:
[править] Проверка новых графических возможностей терминального клиента Microsoft: 32-битной глубины цвета, сглаживания шрифтов, стилей оформления окон Microsoft Windows Vista, поддержка нескольких мониторов и высоких разрешений экрана.
- Поддержка 32-битной глубины цвета.
Для обеспечения этой возможности необходимо настроить как клиент rdp так и терминальный сервер.
-
- Настройка клиента rdp:
Откройте клиент подключения к удалённому рабочему столу. Нажмите на Options и перейдите на вкладку Display. В поле Colors выберите Higest Quality (32 bit).
-
- Настройка терминального сервера:
Откройте Terminal Services Configuration в папке Terminal Services инструментов администрирования Administrative Tolls.
Затем вызовете контекстное меню на имени соединения RDP-Tcp и выберите Properties. В открывшемся окне свойств соединения перейдите на вкладку Client Settings и выберите в поле Limit Maximum Color Depth значение 32 bits per pixel. Нажмите Ok для сохранения изменений и закрытия окна свойств соединения.
- Поддержка сглаживания шрифтов.
-
- Настройка терминального сервера:
Для включения поддержки сглаживания шрифтов на сервере необходимо открыть консоль Personalization панели управления, в которой выбрать пункт Window Color and Appearance.
В открывшемся окне Appearence Settings нажмите на Effects и выберите пункт Clear Type в пункте Use the following method to smooth edges of screen fonts. Затем нажмите OK два раза.
-
- Настройка клиента rdp:
Откройте rdp-клиент, нажмите на Options, перейдите на вкладку Experience и выберите пункт Font smoothing.
Следует отметить, что использование сглаживания шрифтов приведёт к увеличению объёма трафика между терминальным клиентом и сервером.
- Поддержка стилей оформления окон Microsoft Windows Vista.
Клиенты rdp 6.0 и 6.1 воспроизводят удаленный рабочий стол на клиентском десктопе. Существует возможность использования тем Windows Vista для отрисовки удаленного рабочего стола. Для этого необходимо установить Desktop Experience feature на терминальном сервере Windows Server 2008. Установка Desktop Experience feature включает в себя компоненты Windows Media® Player 11, desktop themes и photo management.
Для исталляции Desktop Experience feature необходимо выполнить следующие действия:
1. Откройте коносль Server Manager.
2. Выберите пункт Features и нажмите на Add features.
3. На шаге Select Features выберите Desktop Experience и нажмите Next.
4. На шаге Confirm Installation Options нажмите Install.
5. После завершения инсталляции перезагрузите терминальный сервер.
Кроме вышеперечисленных действий необходимо проверить нет ли ограничений на глубину цвета, а также необходимо перевести службу Themes на терминальном сервере в режим Automatic и стартовать её.
Для проверки нет ли ограничений на глубину цвета откройте консоль Terminal Services Configuration в папке Terminal Services инструментов администрирования Administrative Tolls.
Затем вызовете контекстное меню на имени соединения RDP-Tcp и выберите Properties. В открывшемся окне свойств соединения перейдите на вкладку Client Settings и выберите в поле Limit Maximum Color Depth значение 32 bits per pixel.
Нажмите Ok для сохранения изменений и закрытия окна свойств соединения. После этого необходимо завершить текущую терминальную сессию и открыть ее заново.
Теперь проверьте, отрисовываются ли у вас окна стилями Windows Vista
- Поддержка нескольких мониторов.
Объединение мониторов позволяет раширить rdp-сессию на несколько мониторов. Но при этом существует ряд ограничений:
1.На всех мониторах должно быть настроено одинаковое разрешение.
2.Мониторы должны быть выровнены по горизонтали.
3.Суммарное разрешение не должно превышать значения 4096 x 2048.
Объединение мониторов при инициировании rdp-сессии может осуществляться либо из настроек в .rdp файле, или опцией командной строки.
-
- Параметры .rdp-файла:
Для включения возможности объединения мониторов через .rdp файл необходимо в этом файле указать директиву Span:
Span:i:<value>

где <value> может принимать значения:
 0 - Объединение мониторов выключено.
 1 - Объединение мониторов включено.
-
- Для включения возможности объединения мониторов при вызове клиента rdp из командной строки необходимо указывать опцию /span:
mstsc /span
- Поддержка высоких разрешений экрана.
В предыдущих реализациях RDP протокола максимальное соотношение сторон дисплея было 4:3 (это максимум 1600х1200). Сейчас поддерживается соотношение сторон до 16:10 (до 4096х2048).
Можно устанавливать разрешения экрана в .rdp-файле или в командной строке при подключении.
- для установки параметров разрешения дисплея в .rdp файле используются следующие директивы:
desktopwidth:i:<value>
desktopheight:i:<value>
где <value> это значение разрешения, например 1680 или 1050.
- для установки параметров разрешения дисплея из командной строки используются опции /w и /h:
mstsc.exe /w:<width> /h:<height>
[править] Использование технологии single sign-on в терминальном окружении.
Single sign-on — это метод аутентификации, который позволяет пользователям использовать свои доменные учётные записи для регистрации в домене и затем получать доступ к терминальным серверам без необходимости повторной регистрации.
Требования для внедрения технологии single sign-on:
1. Использование возможностей технологии single sign-on для терминальных подключений возможно только между компьютерами с операционными системами Windows Server 2008 или с терминального клиента под управлением Windows Vista на терминальный сервер Windows Server 2008.
2. Пользовательская учётная запись должна иметь достаточно полномочий для регистрации по протоколу rdp.
3. Терминальный сервер и клиент должны быть введены в домен.
Для обеспечения возможности использования технологии single sign-on необходимо настроить как терминальный сервер так и терминальный клиент.
- Для настройки терминального сервера необходимо выбрать значение SSL(TLS1.0) в поле Security Layer вкладки General свойств соединения RDP-Tcp консоли Terminal Services Configuration, которую можно открыть с помощью команды tsconfig.msc.
- Для настройки терминального клиента необходимо открыть консоль Local Group Policy Editor при помощи команды gpedit.msc.
Затем перейти к политике Credentials Delegation по пути Computer Configuration, Administrative Templates, System.
Далее необходимо перевести в значение Enable настройку Allow Delegating Default Credentials. Кроме этого в поле Show Contents необходимо добавить терминальные сервера с префиксом TERMSRV/. Например TERMSRV/win2008 или TERMSRV/* — для любых подключений.
Для завершения настройки локальных политик терминального клиента нажмите OK и обновите политики при помощи перезагрузки клиентского компьютера или при помощи команды gpupdate /force.
- Установка Active Directory.
Установку Active Directory можно выполнить при помощи мастера, запуск которого выполняется командой dcpromo
Или выполните команду ad в меню Пуск — Выполнить.
ad.cmd — это скрипт, который лежит в папке c:windowssystem32, и состоит из:
@echo ON
net use x: \192.168.7.254inst
@echo Now installing Active Directory
@echo OFF
pause
@echo ON
dcpromo.exe /unattend:X:DCPROMO.txt /SafeModeAdminPassword:P@ssw0rd
Файл DCPROMO.txt :
[DCInstall]
ReplicaOrNewDomain=Domain
NewDomain=Forest
NewDomainDNSName=polygon.tc
ForestLevel=3
DomainNetbiosName=POLYGON
DomainLevel=3
InstallDNS=Yes
ConfirmGc=Yes
CreateDNSDelegation=No
DatabasePath="C:WindowsNTDS"
LogPath="C:WindowsNTDS"
SYSVOLPath="C:WindowsSYSVOL"
RebootOnCompletion=Yes
- Введение в домен компьютера под управлением Windows Server 2008.
Для введения компьютера в домен откройте System Properties и на вкладке Computer name выберете Change.
В открывшемся окне активируйте поле Domain и введите имя домена polygon.tc. После нажатия на кнопку OK будет предложено ввести имя пользователя, обладающего правом добавления компьтеров в домен, и его пароль. После завершения этой операции необходимо перезагрузить компьютер.
- Проверка технологии single sign-on.
- Тонкий клиент также может быть введен в домен.
|
|
Перед тем как вводить в домен тонкий клиент необходимо отключить блокировку записи на системный диск и перезагрузить тонкий клиент. Иначе после перезагрузки, в результате добавления в домен, тонкий клиент вернется в исходное состояние — участник рабочей группы. После первой регистрации пользователя домене и выполнения необходимых настроек можно обратно включить блокировку записи на системный диск. |
[править] Настройка приоритезации потока данных.
Настройка приоритезации виртуального канала предоставляет возможность определить соотношение потока данных.
Установка приоритета данных автоматически управляет трафиком виртуального канала так, что данные экрана, клавиатуры и мышки будут иметь первостепенное значение по отношению к другому виртуальному каналу, например передача файлов или печать документов.
По умолчанию соотношение потоков виртуального канала составляет 70:30. Данные экрана, мышки и клавиатуры составляют 70% полосы пропускания, все остальные данные (буфер обмена, трансфер файлов, задания печати — 30).
Настройка приоритезации осуществляется с помощью значений ключей реестра на терминальном сервере. Изменения выполняются в ветке HKEY_LOCAL_MACHINESYSTEMCurrentControlSetServicesTermDD при помощи следующих ключей:
- FlowControlDisable
- FlowControlDisplayBandwidth
- FlowControlChannelBandwidth
Если эти ключи отсутствуют, то их необходимо создать. Для создания ключей необходимо правым кликом на TermDD вызвать контекстное меню, в котором выбрать New ключ DWORD (32-bit).
Для отключения приоритезации потока данных необходимо создать DWORD ключ FlowControlDisable со значением 1. В этом случае все запросы будут отрабатываться по принципу first-in-first-out. Значение по молчанию этого ключа — 0.
Для настройки значения приоритета данных на отрисовку дисплея и клавиатуры с мышью необходимо использовать ключ FlowControlDisplayBandwidth. По умолчанию значение этого ключа 70, максимальное значение- 255.
Для настройки значения приоритета на другие виртуальные каналы используйте ключ FlowControlChannelBandwidth. По умолчанию значение этого ключа 30, максимальное значение — 255.
Значение приоритета определяется соотношением ключей FlowControlDisplayBandwidth и FlowControlChannelBandwidth. Например, если значение ключа FlowControlDisplayBandwidth будет 150, а FlowControlChannelBandwidth — 50, то данные дисплея будут занимать 75% всей полосы пропускания.
Следует отметить, что после изменений значений ключей необходимо перезагрузить терминальный клиент.
[править] Перенаправление устройств Plug and Play.
В реализации протокола rdp 6 версии повилась возможность переадресовывать Windows Portable Devices на терминальный сервер поверх MTP (Media Transfer Protocol) и PTP (Picture Transfer Protocol) протокола. Это могут быть совместимые с этими протоколами медиа устройства и цифровые камеры. Для перенаправления таких устройств необходимо настроить как терминальный клиент, так и терминальный сервер. При этом существует ряд ограничений:
1. Не поддерживается перенаправление устройств при каскадном подключении.
2. Перенаправлени доступно только при подключении с компьютера под управлением операционной системой Winndows Vista или Windows Server 2008 на сервера под управлением Windows Vista или Windows Server 2008.
- Настройка терминального клиента для перенаправления совместимых с протоколами MTP и PTP выполняется на вкладке Local Resources.
Перейдите на эту вкладку и нажмите More. Если устройство подключено к терминальному клиенту, то для перенапревления на терминальный сервер его необходимо выбрать в пункте Supported Plug and Play devices.
Если необходимое устройство в данный момент не подключено, то для его перенаправления в открытую терминальную сессию необходимо в пункте Supported Plug and Play devices отметить Devices that I plug in later.
- Перенаправление MTP и PTP совместимых устройств может блокироваться терминальным сервером. Для снятия блокировки откройте Terminal Services Configuration в папке Terminal Services инструментов администрирования Administrative Tolls.
Затем вызовете контекстное меню на имени соединения RDP-Tcp и выберите Properties. В открывшемся окне свойств соединения перейдите на вкладку Client Settings и в поле Redirection проверьте, не включена ли блокировка Supported Plug and Play devices.
Нажмите Ok для сохранения изменений и закрытия окна свойств соединения.
[править] Microsoft Point of Service для перенаправления .NET устройств.
В Windows Server 2008 существует возможность перенаправления устройств, которые используют Microsoft Point of Service (POS) for .NET 1.11. Такое перенаправление доступно только при использовании х86 архитектуры Windows Server 2008.
Библиотека POS for .NET предоставляет .NET-приложениям удобный и стандартизованный интерфейс для связи с торговым оборудованием. В новой версии библиотеки расширена поддержка стандартов UnifiedPOS (Unified Point Of Service – Унифицированная торговая точка). Получить Microsoft® Point of Service для .NET версии 1.11 можно по ссылке http://go.microsoft.com/fwlink/?linkid=66169.
- Настройка терминального сервера:
1.Установите Microsoft POS для .NET 1.11 .
2.Установите конфигурационные XML-файлы или компоненты .NET для .NET устройства, которые должны поставляться производителем вместе с оборудованием или могут быть написаны с использованием Microsoft POS for .NET 1.11 Software Development Kit.
3.Перезапустите службу UserMode Port Redirector.
- Настройка терминального клиента:
Для настройки переадресации .NET устройств использовать вкладку Local Resources клиент rdp нельзя. Однако такое перенаправление может быть включено с помощью опции redirectposdevices в .rdp-файле, который будет использоваться для подключения к серверу. Формат записи этой опции следующий:
redirectposdevices:i:<value>
где: <value> может быть равно 1 для включения перенаправления и 0 — для отключения.
Контролировать возможность переадресации устройств можно на терминальном сервере в консоли Terminal Services Configuration с помощью пункта Supported Plug and Play Devices или при помощи групповых политик.
[править] Материалы по тонким клиентам и системам удалённого доступа на Xgu.ru
- Тонкие клиенты
- RDP (RDP 6)
- rdesktop
- Бесшовная виртуализация
- VNC
- Терминальные решения Microsoft Windows Server 2008
Полигоны:
- Полигон по тонким клиентам в УЦ Сетевые Технологи (2007)
- Полигон по системам Citrix в УЦ Сетевые Технологии (2007)
- Полигон по терминальным решениям Windows 2008 Server в УЦ Сетевые Технологии (2008)

Администраторы безопасности Microsoft всегда были немного осторожны с публикацией серверов терминала в Интернете. И на то была веская причина – не было возможности для предварительной аутентификации соединения или использования политики для определения того, какие пользователи могли получить доступ к тому или иному серверу терминала (Terminal Servers). Отсутствие предварительной аутентификации было особенно сложной проблемой. Без предварительной аутентификации анонимные пользователи могли использовать свое анонимное подключение для компрометации опубликованных серверов терминала. Скомпрометированный сервер терминала, возможно, представлял собой самое опасное средство атаки вашей сети, так как атакующий пользователь имеет доступ ко всей ОС, чтобы запустить свою атаку. Windows Server 2008 предоставляет решение для этой проблемы безопасности: шлюз служб терминала (Terminal Services Gateway). Используя шлюз служб терминала, вы можете предварительно аутентифицировать пользователей и контролировать, к каким серверам терминала пользователи могут получить доступ на основе мандатов и политики. Этот дает вам гибкий контроль, необходимый для RDP решения по безопасному удаленному доступу.
В этой серии статей, состоящей из двух частей, о том как заставить это решение работать, мы будем использовать лабораторную сеть, показанную на рисунке ниже. Стрелки показывают поток соединений внешнего RDP клиента с сервером терминала.
 в Windows Server 2008 - Windows Server 2008 - Операционные системы - Программирование, исходники, операционные системы")
Рисунок 1
На каждом сервере в этом примере стоит Windows Server 2008 Enterprise Edition.
В этой сети я использую Windows Server 2008 NAT сервер в качестве Интернет-шлюза. Вы можете использовать любое другое простое устройство NAT или маршрутизатор с фильтрацией пакетов, например PIX, или даже расширенный брандмауэр типа Microsoft ISA Firewall. Ключевая опция конфигурации здесь заключается в том, что вы будете направлять соединения TCP порта 443 на компьютер шлюза служб терминала.
На контроллере домена установлены DNS, DHCP, служба сертификации в режиме Enterprise CA, а также WINS.
На сервере терминала установлена только базовая операционная система. Мы установим другие службы в ходе статьи.
На шлюзе TS установлена только базовая ОС. Мы будем устанавливать другие сервисы по ходу этой серии статей.
В этой серии статей я опишу следующие процессы и процедуры, которые вы должны будите выполнить, чтобы ваше решение работало:
- Установка служб терминала (Terminal Services) и лицензий этих служб на сервере терминала
- Настройка лицензирования служб терминала (Terminal Services Licensing)
- Установка Desktop Experience на сервер терминала (не обязательно)
- Настройка режима лицензирования служб терминала (Terminal Services Licensing Mode)
- Установка сервиса шлюза служб терминала (Terminal Services Gateway Service) на шлюзе TS
- Запрос сертификата для шлюза TS
- Настройка шлюза TS на использование сертификата
- Создание RAP шлюза TS
- Создание САР шлюза TS
- Настройка клиента RDP на использование шлюза TS
![Reblog this post [with Zemanta]](https://lh3.googleusercontent.com/blogger_img_proxy/AHs97-kLgvkDCl9r-mfj6A7mX2vnTpNSlFaGcpDVpspwrwro4r6sRtWZBx4D_HMkfz_biY5_ScPR7EnhhuVpzTtt-SPGvEcaQQ8gYdtheXf3KIXBxoHdvcGTza8TuF54lBC--vbWDJGGD6jlPWhJ2E-B_oIB=s0-d)
Одним из препятствий для полноценного использования служб терминала (Terminal Services) для пользователей удаленного доступа был тот факт, что многие администраторы не доверяли последовательности аутентификации и уровню шифрования туннелей RDP. Еще одной проблемой, с которой сталкивались администраторы, было то, что многие брандмауэры в удаленных расположениях не позволяли использование исходящего протокола TCP 3389. Компания Microsoft решила эту проблему с помощью шлюза служб терминала (Terminal Services Gateway) в Windows Server 2008.
Шлюз служб терминала – это тип SSL VPN, также как и RPC/HTTP для доступа Outlook к Exchange Server через SSL VPN. Тип SSL VPN – это модуль доступа протокола приложения. Шлюз служб терминала работает с RDP 6.0+ клиентом для разрешения инкапсулированных RDP соединений к компьютеру шлюза TS.
Клиент RDP, по сути, инкапсулирует протокол RDP в два других протокола. Сначала RDP протокол инкапсулируется в RPC заголовок, а затем он инкапсулируется во второй раз с помощью зашифрованного HTTP заголовка (SSL). Протокол, используемый для подключения к шлюзу TS, по сути, является RDP/RPC/HTTP. Скорее всего, компания Microsoft сделала это с тем, чтобы использовать уже существующий RPC/HTTP код, который у них уже был для модулей доступа RPC/HTTP. Когда соединение достигает машины шлюза TS, TS шлюз удаляет RPC и HTTP заголовки и направляет RDP соединение на соответственный сервер терминала или удаленный рабочий стол компьютера.
На рисунке ниже показан интерфейс создания политики авторизации соединений (Connection Authorization Policy или CAP). CAP используются для определения того, какие пользователи могут получать доступ к ресурсам через этот компьютер TS шлюза. В диалоговом окне на рисунке ниже показан интерфейс конфигурации для привязки сертификатов этому сайту шлюза TS, чтобы разрешить надежные соединения SSL.

Шлюз служб терминала также поддерживает аутентификацию с помощью смарт-карт, и у вас также есть возможность установить контроль клиентского доступа NAP. Шлюз служб терминала, несомненно, является основной причиной перехода на Windows Server 2008.
Terminal Services RemoteApps
Целью каждого администратора безопасности является достижение минимально возможной привилегии для каждого пользователя. Это особенно актуально для соединений удаленного доступа. Администраторы безопасности, как и я сам, не спят по ночам, думая о предоставлении полного подключения к удаленным компьютерам не административным пользователям. Все, что нужно – это взлом мандатов одного пользователя заядлым хакером, и этот хакер будет контролировать полное окружение рабочего стола, чтобы навредить вашей сети. Эта довольно пугающая мысль.
Но нужен ли вашим пользователям полный доступ на самом деле? Или им нужен доступ лишь к приложениям на компьютере? Скорее всего, им нужен доступ лишь к приложениям и данным. В этом случае, Windows Server 2008 обеспечивает для вас решение под названием Terminal Services RemoteApp. Terminal Services RemoteApp позволяет вам обеспечивать доступ только к определенным приложениям через канал RDP. Таким образом, пользователи не смогут попасть в неприятности с полным доступом, и если хакеру удается взломать мандаты пользователя, все что будет ему доступно – это лишь приложения, а это значительно снижает потенциальный риск в отличие от полного доступа.
TS RemoteApps очень гибкая. Вы можете контролировать, к каким приложениям у пользователя будет доступ, и как он сможет получить доступ к приложениям на своем компьютере. TS Remote Apps наряду с TS Gateway делает Windows Server 2008 Terminal Server необходимым условием для компаний, которые заинтересованы в безопасном решении удаленного доступа на основе RDP.
На рисунке ниже показана главная страница консоли TS RemoteApp Manager. Настройка TS RemoteApps довольно проста, и вы сможете настроить и использовать ее в очень короткие сроки.

На рисунке ниже показана иконка пользовательского компьютера, который будет запускать RemoteApp. В диалоговом окне Свойства видно, что ссылка настроена на запуск файла .rdp, который разрешает определенный доступ к приложениям.

03.06.2009 —
Posted by |
ms windows server 2008
Sorry, the comment form is closed at this time.