Если вы не первый день работаете в сфере ИТ, вы, скорее всего, помните, как чувствовали себя немного не в своей тарелке, когда впервые увидели новый пользовательский интерфейс Windows 2000 Server после многих лет работы с системами NT. Все в мире ИТ, кажется, происходит циклически — за 12 лет мы прошли полный круг, и настало время для изучения нового пользовательского интерфейса
Если вы не первый день работаете в сфере ИТ, вы, скорее всего, помните, как чувствовали себя немного не в своей тарелке, когда впервые увидели новый пользовательский интерфейс Windows 2000 Server после многих лет работы с системами NT. Все в мире ИТ, кажется, происходит циклически — за 12 лет мы прошли полный круг, и настало время для изучения нового пользовательского интерфейса.
О новом экране Start в системе Windows 8 и об интерфейсе Metro в целом написано немало — мой коллега Поль Тюрро опубликовал уже буквально тома по этой теме. Но Windows Server 2012 является несколько иным «зверем», чем Windows 8. Хотя интерфейсы похожи, основные задачи, выполняемые на серверной консоли, относятся к управлению (в отличие от задач на клиенте, относящихся к производительному выполнению работ), и они обычно выполняются удаленно.
Я немного разобрался в данном вопросе, поэтому подумал, что могу поделиться советами, которые облегчат вам освоение системы Windows Server 2012. В конце концов, ваша цель — поскорее узнать, как пользоваться новыми возможностями, а не тратить десять минут, выясняя, как система выключается. На протяжении нескольких статей я буду рассказывать о ключевых моментах, которые нужно знать, чтобы ориентироваться на стартовом и связанных с ним экранах системы Windows Server 2012 и основном интерфейсе управления Server Manager.
Первый шаг при работе с удаленными сессиями Windows Server 2012
Первое изменение, с которым придется смириться – более сильная зависимость от использования комбинаций клавиш в Windows Server 2012, по сравнению с предшественниками. Вы все еще можете обойтись без них, но взаимодействие с системой будет не таким удобным и более медленным, чем в случае, если вы выделите время, чтобы запомнить несколько основных сочетаний. Но в отличие от клиентских систем, большая часть работ на сервере выполняется удаленно, либо с помощью механизма Remote Desktop, либо посредством консоли управления виртуальными машинами, такой как Hyper-V Virtual Machine Connection. А комбинации клавиш исторически не работали в удаленных сессиях так, как они функционируют в консоли. Как же решить эту проблему?
Инструмент Hyper-V Manager всегда располагал возможностью, которая настраивается в окне Hyper-V Settings на хост-сервере, позволяющей передавать сочетания клавиш в выбранную виртуальную машину. До выхода системы Windows Server в 2012 году этот механизм включался только тогда, когда виртуальная машина находилась в полноэкранном режиме. Однако из-за сильного акцента на работу с сочетаниями клавиш в системе Windows Server 2012 инструмент Hyper-V Manager теперь активирует эту функцию по умолчанию. Если вы работаете в системе Windows Server 2012 (или в Windows 8), установленной на виртуальной машине на хост-сервере Windows 2008, необходимо настроить механизмы Hyper-V таким образом, чтобы сеанс подключения к виртуальной машине всегда пересылал в нее комбинации клавиш Windows (экран 1).
 |
| Экран 1. Настройка пересылки сочетаний клавиш в? сеансе подключения к виртуальной машине |
Аналогичная ситуация возникает при использовании механизма Remote Desktop Connection, однако многие администраторы научились использовать ограниченный набор сочетаний клавиш, чтобы имитировать удаленные команды (например, Ctl+Alt+End или Alt + Page Up / Down). Тем не менее, на данный момент я не знаю ни одной комбинации клавиш удаленного рабочего стола, соответствующей комбинациям, работающим на новом экране Start. Поэтому необходимо включить возможность передачи сочетания клавиш, аналогичную предусмотренной механизмом Remote Connection. Запустите приложение Remote Desktop Connection (mstsc.exe), выберите пункт Show Options, затем перейдите на вкладку Local Resources и в разделе Keyboard выберите параметр Apply Windows key combinations on the remote computer (экран 2). Как только вы закончите процесс настройки, сохраните конфигурацию, после чего вы сможете использовать файл конфигурации для новых подключений.
|
|
| Экран 2. Настройка подключений Remote Desktop Connection для отправки сочетаний клавиш в виртуальную машину |
Я предполагаю, что ваш первый опыт работы с системой Windows Server 2012 будет, по большей части, связан с виртуальной машиной, поэтому одна из первых головоломок Metro, с которой вы столкнетесь, будет заключаться в том, как попасть в меню Start. На физическом терминале вы можете просто нажать клавишу Windows. Но это не поможет, если вы удаленно подключены к серверу посредством механизма Remote Desktop или консоли управления виртуальной машины.
Основные сочетания клавиш
Для ознакомления с полным спектром я настоятельно рекомендую вам прочитать опубликованную в этом же номере статью Поля Тюрро о комбинациях клавиш. Но приведенных ниже сочетаний будет достаточно, чтобы быстро справиться с большей частью ежедневных задач.
Экран Start
Какое же магическое сочетание клавиш вызывает экран Start при работе с виртуальной машины под управлением системы Windows Server 2012 (экран 3)?
|
|
| Экран 3. Winkey или Ctrl + Esc — вызов экрана Start |
Вы, наверное, знаете, что нажатие кнопки Winkey открывает экран Start. Но что делать, если ее нигде нет? Комбинация клавиш Ctrl + Esc действует аналогично – используя комбинацию второй раз, вы вернетесь на рабочий стол. Как и в системе Windows 8, в открывшемся экране Start вы можете просто напечатать название приложения.
Другой способ — перемещение курсора в правый верхний угол экрана для вызова меню Charms и последующий выбор ярлыка экрана Start (слишком медленно, на мой взгляд).
Или же вы можете задержать курсор в левом нижнем углу на панели задач, дождаться, когда появится миниатюрная версия экрана Start, и выбрать ее. У меня это не всегда получалось, и, как правило, не хватало терпения, чтобы точно навести курсор.
Как видите, это совершенно новый экран Start, на котором нет каких-либо приложений или других настроек. Если я хочу запустить приложение, которого нет на экране Start, я могу просто начать печатать название приложения прямо здесь, и система будет искать его. Из экрана Start легко перейти в панель Control Panel, но до нее также можно добраться и другими путями.
Комбинация Settings
Помимо экрана Start, вы будете часто использовать окно Settings (Winkey + I). Это связано с тем, что меню Settings предоставляет быстрый доступ как к панели Control Panel, так и к меню PC Info (которое на самом деле является приложением Control Panel — System), а также к таким полезным экранам, как настройка питания, настройка звуков, настройка уведомлений и настройка сети (экран 4).
|
|
| Экран 4. Winkey + I — комбинация Settings |
Комбинация Charms
Charms (Winkey + C) — это ключевое меню, из которого можно добраться почти до любого окна. Оно предоставляет доступ к экранам Start, Control Panel и позволяет искать приложения, настройки или файлы в системе в дополнение к функциям панели задач, представленных на экране Settings (экран 5).
|
|
| Экран 5. Winkey + C — комбинация для вызова Charms |
Комбинация Search
Вместо перехода в меню Charms, а оттуда на экран Search вы обойтись одним кликом мыши, если запомните сочетание клавиш для вызова экрана Search (Winkey + Q). Эта комбинация клавиш сразу переводит нас к инструменту поиска в системе, который группирует результаты по приложениям, настройкам и файлам (экран 6). Вам не придется переводить курсор в текстовое поле; как и на экране Start, просто начните печатать, и механизм поиска начнет фильтровать результаты. Если вы щелкните мышью на кнопке Apps и окно поиска будет пустым, механизм поиска покажет вам все программы, установленные в системе, в том числе встроенные.
|
|
| Экран 6. Winkey + Q — комбинация Search |
Вы заметите, что в системе Windows Server 2012 приходится печатать гораздо больше, пусть даже для того, чтобы быстро сузить область поиска. Например, чтобы быстро добраться до окна Administrative tools, вы можете нажать комбинацию Winkey + Q, затем ввести слово tools (обратите внимание, что программы не найдены, зато обнаружены две настройки), после чего дважды нажать стрелку вниз, чтобы добраться до кнопки Settings и нажать Enter (Экран 7). Да, все совсем иначе, чем раньше. Стало ли проще? Нет. Я до сих пор не уверен, что в этом есть хоть какой-то смысл применительно к механизмам управления сервером.
|
|
| Экран 7. Поиск окна Administrative tools |
Комбинация Power User
Поль Тюрро в своей статье дает отличную подсказку в виде комбинации клавиш, которая будет очень полезна для системных администраторов: Power Users (Winkey + X). Эта комбинация предоставляет быстрый доступ к «хитам» среди средств администрирования: Programs and Features, Network Connections, Power Options, Event Viewer, System, Device Manager, Disk Management, Computer Management, Command Prompt (оба режима — администратора и обычного пользователя), Task Manager, Control Panel, Windows Explorer, Search, Run, и Desktop (экран 8).
|
|
| Экран 8. Winkey + X — Комбинация Power Users-Copy |
Без этой комбинации клавиш точно невозможно прожить.
Наконец, если вам надоели все эти Metro-штучки, вы всегда можете нажать комбинацию Ctrl + D и вернуться на рабочий стол.
Настройте механизм Remote Desktop и запомните приведенные сочетания клавиш (в своей клиентской системе Windows 7 для их хранения я использовал приложение Sticky Note), и в будущем эти знания помогут быстрее освоить Windows Server 2012. В следующий раз мы приступим к более глубокому изучению инструмента Server Manager и подходов к работе с ним.
Описание курса
Курс признан компанией Microsoft устаревшим, рекомендуем обратить внимание на курс 20740B: Установка, хранение данных и вычисления с Windows Server 2016
Данный курс является первым из трех курсов, нацеленных на предоставление знаний, необходимых для реализации базовой серверной инфраструктуры в корпоративной среде. В линейке курсов рассматривается внедрение, управление, поддержка и предоставление сервисов и инфраструктуры в среде Windows Server 2012. В этом курсе акцент сделан на начальное внедрение и настройку основных сервисов, включая доменные службы каталога, сетевые сервисы и настройка Microsoft Hyper-V Server 2012 R2.
Данный курс предназначен для профессионалов в ИТ, имеющих некоторые знания и опыт работы с операционными системами Windows и желающих повысить уровень знаний, необходимых для установки и начальной настройки Windows Server 2012 и Windows Server 2012 R2.
Курс будет интересен администраторам, имеющим опыт работы с предыдущими версиями Windows, либо с другими операционными системами, а также специалистам, готовящимся к сдаче сертификационных экзаменов.
Вам необходима усиленная практика? Готовитесь к сдаче сертификационных экзаменов Microsoft? Приобретите доступ к Labs Online – виртуальным лабораторным работам по авторизованным курсам Microsoft – в течение всего курса и двух недель по окончании обучения! Услуга уникальна и доступна только в Центре «Специалист»
Узнать больше
Вы научитесь
- Установить и настроить Windows Server 2012.
- Понимать концепции службы AD DS.
- Управлять объектами службы Active Directory.
- Автоматизировать задачи по администрированию службы Active Directory.
- Внедрять IPv4.
- Реализовать Dynamic Host Configuration Protocol (DHCP).
- Реализовать Domain Name System (DNS).
- Реализовать IPv6.
- Реализовать локальное хранилище данных.
- Управлять общим доступом к папкам и принтерам.
- Применять Групповую политику.
- Использовать Групповую политику (GPOs) для безопасности Windows Servers.
- Реализовать серверную виртуализацию с помощью Hyper-V.
Специалисты, обладающие этими знаниями и навыками, в настоящее
время крайне востребованы.
Обучение по мировым стандартам позволяет нашим выпускникам работать
в ведущих компаниях России и других стран. Они делают успешную карьеру и пользуются уважением работодателей.
Узнать больше
Предварительная подготовка
Узнать больше
Программа курса
Модуль 1. Развертывание и управление Windows Server 2012 R2
(3 ак. ч.)
Модуль 2. Введение в доменные сервисы Службы Каталога
(3 ак. ч.)
Модуль 3. Управление объектами доменных служб Службы Каталога
(3 ак. ч.)
Модуль 4. Автоматизация администрирования доменных служб Службы Каталога
(3 ак. ч.)
Модуль 5. Применение IPv4
(3 ак. ч.)
Модуль 6. Применение протокола DHCP
(3 ак. ч.)
Модуль 7. Применение DNS
(3 ак. ч.)
Модуль 8. Применение IPv6
(3 ак. ч.)
Модуль 9. Применение локального хранилища данных
(4 ак. ч.)
Модуль 10. Применение файловой службы и службы печати
(3 ак. ч.)
Модуль 11. Применение групповой политики
(3 ак. ч.)
Модуль 12. Защита серверов Windows применением объектов групповой политики
(3 ак. ч.)
Модуль 13. Применение серверной виртуализации с Hyper-V
(3 ак. ч.)
Аудиторная нагрузка в классе с преподавателем: 40 ак. ч.
+ 12 ак. ч. бесплатно*
* По данному курсу бесплатно предоставляются дополнительные часы для самостоятельной работы в компьютерных классах Центра, где проводятся занятия. Вы можете закрепить полученные знания, выполнить домашние задания, проконсультироваться у специалистов Центра. Дополнительные часы предоставляются в дни занятий по предварительному согласованию с администратором комплекса.
- утренним группам с 9:00 до 10:00
- дневным группам — по 1 ак.ч. до и после занятий (13.15-14.00, 17.10-17.55)
По окончании обучения на курсе проводится итоговая аттестация. Аттестация проводится в виде теста на последнем занятии или на основании оценок практических работ, выполняемых во время обучения на курсе.
Узнать больше
Расписание групп обучения
Данный курс вы можете пройти как в очном формате, так и дистанционно в режиме
онлайн
. Чтобы записаться на онлайн-обучение, в корзине измените тип обучения на «онлайн» и выберите удобную для вас группу.
Чем онлайн-обучение отличается от других видов обучения?
Сортировать:
Дата
с 13.02.2023
по 17.02.2023
Режим обучения
ежедневно утро-день
10:00 — 17:10
Открытое обучение
Очно и онлайн
Преподаватель

СоколовМихаил
Юрьевич
Место обучения
«Белорусско-Савеловский»

м. Белорусская

м. Савеловская
Дата
с 29.05.2023
по 02.06.2023
Режим обучения
ежедневно утро-день
10:00 — 17:10
Открытое обучение
Очно и онлайн
Преподаватель
СоколовМихаил
Юрьевич
Место обучения
«Радио»

м. Бауманская

м. Авиамоторная
Дата
с 26.06.2023
по 30.06.2023
Режим обучения
ежедневно утро-день
10:00 — 17:10
Открытое обучение
Очно и онлайн
Преподаватель
СоколовМихаил
Юрьевич
Место обучения
«Белорусско-Савеловский»
м. Белорусская
м. Савеловская
Дата
с 31.07.2023
по 11.08.2023
Режим обучения
ежедневно вечер
18:30 — 21:30
Открытое обучение
Очно и онлайн
Преподаватель
СоколовМихаил
Юрьевич
Место обучения
«Радио»
м. Бауманская
м. Авиамоторная
Дата
с 14.08.2023
по 18.08.2023
Режим обучения
ежедневно утро-день
10:00 — 17:10
Открытое обучение
Очно и онлайн
Преподаватель
СоколовМихаил
Юрьевич
Место обучения
«Радио»
м. Бауманская
м. Авиамоторная
* Данная скидка действительна при заказе и оплате онлайн обучения только сегодня. Запишитесь прямо сейчас со скидкой!
Стоимость обучения
Частным лицам
Обучение в кредит
От 2 561 руб./месяц
Индивидуальное обучение
200 000 ₽ *
Организациям
Указана минимальная цена за индивидуальное обучение. Число часов работы с преподавателем в 2 раза меньше, чем при обучении в группе. Если Вам для полного усвоения материала курса потребуется больше часов работы с преподавателем, то они оплачиваются дополнительно.
В случае занятий по индивидуальной программе расчёт стоимости обучения и количества необходимых часов производится отдельно.
Длительность индивидуального обучения — минимум 4 академических часа. Стоимость обучения в Москве уточняйте у менеджера. При выездном индивидуальном обучении устанавливается надбавка: +40%
от стоимости заказанных часов при выезде в пределах МКАД, +40% от стоимости заказанных часов и + 1% от стоимости заказанных часов за каждый километр удаления от МКАД при выезде в пределах Московской области. Стоимость
выезда за пределы Московской области рассчитывается индивидуально менеджерами по работе с корпоративными клиентами.
Для юридических лиц (организаций) указана цена, действующая при полной предоплате.
Узнать больше
Документы об окончании
В зависимости от программы обучения выдаются следующие документы:

Международный сертификат Microsoft

Свидетельство выпускника

Cертификат международного образца

Удостоверение о повышении квалификации
* Для получения удостоверения вам необходимо предоставить копию диплома о высшем или среднем профессиональном образовании.
Сертификаты международного образца выводятся после окончания курса в личном кабинете слушателя.
Содержание
- Установка и конфигурирование Windows Server 2012 R2 Essentials
- Настраиваем и автоматизируем развёртывание Active Directory
- Почему такой стенд?
- Что такое Active Directory
- Начинаем
- Включаем нужные компоненты
- Доменные службы Active Directory
- DNS-сервер
- DHCP-сервер
- Мастер добавления ролей и компонентов
- Настраиваем контроллер домена Active Directory
- Настройка DHCP-сервера
- Создаём нового пользователя в домене AD
- Ввод рабочей станции в домен
- Автоматизируем
- Итоги
Установка и конфигурирование Windows Server 2012 R2 Essentials
Всем добрый день. Хотелось бы рассказать о установке и конфигурировании Windows Server 2012 R2 Essentials. Эта статья не является призывом к повсеместной установке Windows или пропагандой продуктов Microsoft. Хотелось бы просто рассказать об интересном продукте и возможно кого-то данный продукт заинтересует и пригодится в работе. Статью я старался писать для неподготовленного читателя, поэтому минимум терминологии и максимум обобщения некоторых понятий.
Немножко о редакции Essentials
Установка и первоначальная настройка
Установка данной ОС вполне стандартная процедура. Если вы хоть раз устанавливали Windows Vista /7/8/8.1, то вы без проблем установите и Essentials. Однако, если вы не устанавливали ни вышеперечисленных ОС ни любую из последних версий серверных ОС, то я рекомендую или довериться профессионалу или как минимум студенту второкурснику.
Единственное, что я бы рекомендовал в момент установки, если у вас один жёсткий диск, разбить его на два раздела. Т.е. сделать так чтобы после установки в системе был второй уже отформатированный жесткий диск. Безусловно это только рекомендация, вы сможете подготовить второй диск в последующем, однако придется переносить некоторые папки.
После первого входа в свежеустановленную ОС запустится мастер «Настройка Windows Server Essentials», который поможет произвести первоначальную настройку.

На первом шаге вам необходимо задать настройки даты и времени.
На втором шаге вам необходимо заполнить на английском языке название компании. Имя домена и имя сервера будут в таком случая сгенерированы автоматически, хотя конечно вы можете поменять их.
На следующем шаге вам необходимо заполнить имя администратора и задать его пароль.
На последнем шаге необходимо указать способ обновления операционной системы и нажать настроить
После этого запустится процесс, который произведет все необходимые первоначальные настройки. Это займет около 30 минут и потребует несколько перезагрузок. За это время ОС успеет в частности установить необходимые роли и настроить сервер в качестве домен контроллера для нового домена.
Настройка
Продукт весьма большой и обширный, я хотел бы рассказать о самых базовых возможностях настройки, такие как создание пользователей, настройка удаленного доступа, создание папок, подключение клиентов.
Вся настройка происходит в панели мониторинга, доступ к ней есть с рабочего стола, панели быстрого запуска и стартового экрана.
Создание пользователей
При первом запуске данной панели вам откроется вкладка установка, на которой можно выполнить ряд задач по настройке сервера.
Я начну с добавления пользователей. Щелкаем ссылку для добавления учетных записей.
Заполняем поля формы и нажимаем далее
Выбираем уровень доступа к общим папкам, которые были созданы. На начальном этапе существует лишь одна – Организация. В дальнейшем вы можете менять разрешения на доступ как из свойств пользователя, так и из свойств папки.
Далее устанавливаем, что будет доступно для пользователя удаленно. Про удаленный доступ расскажу чуть позже.
Учетная запись создана. Жмем закрыть.
Подобным образом можно создать множество учетных записей. Безусловно, Вы можете пользоваться и привычным и знакомым для вас интерфейсом Active Directory Users and Computers, но в таком случае выдавать разрешения на доступ вам придется ручками.
Добавление папок сервера
Для добавление папок существует другой мастер, который поможет и создать папку на диске, и общий доступ для нее настроить, и разрешения выдать. Для его запуска необходимо щелкнуть соответствующую ссылку в панели мониторинга.
В открывшемся окне мастера вводим название. Можно изменить расположение и добавить описание. Нажимаем далее.
На следующей странице указываем необходимые разрешения. При необходимости делаем ее недоступной при удаленном доступе.
С последнего шага данного мастера можно запустить мастер настройки архивации. Нажимаем закрыть.
Настройка удаленного доступа
Один, наверное, из самых сложных этапов настройки Windows Server 2012R2 Essentials. Настройка так же происходит с помощью мастера. Мастер традиционно запускается из панели мониторинга.
Первое что Вам необходимо настроить это ваш маршрутизатор – об этом Вам сообщает мастер. На самом деле Вам необходимо настроить перенаправление портов на маршрутизаторе. Для этого у маршрутизатора должен быть «белый» IP адрес. А на самом сервере лучше настроить статический IP адрес. Перенаправить нужно следующие порты 80, 443, 1723, 987 на IP адрес вашего сервера. В общем то процедуру настройки может выполнить и сам мастер, если ваш маршрутизатор поддерживает UPnP. Я делал настройку ручками, поэтому пропустил данный шаг.
После этого открывается новый мастер настройки доменного имени. Нажимаем далее.
Мастер предложит ввести имя внешнего домена или создать новый. Для собственного домена Вам понадобится сертификат, поэтому рассмотрим тут вариант настройки с использованием домена Microsoft. Выбираем другое имя домена и щелкаем далее.
Рассмотрим вариант с доменом компании Microsoft.
Тут попросит авторизоваться в Microsoft Account.
После авторизации принимаем заявление о конфиденциальности.
Вводим имя домена и проверяем доступность, жмем настроить.
Ну что с именем домена разобрались. Продолжаем — далее.
Выбираем какие именно возможности будут доступны.
Выбираем будет ли доступен удаленный доступ для текущих пользователей.
Ну вот и все можете попробовать зайти на сайт wiseguy.remoteweaccess.com.
C данного веб сайта есть возможность доступа к общим папкам и доступ к рабочим столам пользователей.
Подключение рабочих станций
Если мы и на этот раз откроем панель мониторинга и перейдем на страницу подключение компьютеров, то увидим там лишь инструкцию к действию
Следуя инструкции на клиенте в браузере открываем страничку http:// /connect. Нажимаем ссылку для скачивания.
Выбираем выполнить.
Принимаем лицензию и ждем.
Вводим имя пользователя и пароль пользователя данного компьютера или администратора. Я вводил учетку пользователя.
Выбираем, кто будет пользоваться компьютером.
Вводим описание компьютера.
Заходим на компьютер под учетной записью пользователя.
Можно работать. На рабочем столе уже есть все необходимые ярлыки.
Источник
Настраиваем и автоматизируем развёртывание Active Directory
В этой статье я бы хотел предложить вам пошаговый туториал по развёртыванию контроллера домена Active Directory на Windows Server 2016 (с графической оболочкой), а также по вводу рабочей станции в получившийся домен. Чем этот туториал может выделиться на фоне других:
Статья предполагает наличие у читателя лишь самых начальных знаний об устройстве сетей (на уровне «Что такое IP-адрес и DNS-адрес»).
Заинтересовало что-то из вышеперечисленного? Тогда погнали.
Туториал будет происходить не в вакууме, а на конкретном виртуальном стенде, состоящим из двух виртуальных машин:
Начальное состояние стенда:
На машине windows_server уже установлена ОС Windows Server 2016 Standard Evaluation (с GUI). Машина находится в состоянии «сразу после установки ОС». В процессе туториала на ней будут развернуты службы Active Directory (с доменом mydomain.com), DNS и DHCP.
Машина workstation выполняет роль рабочей станции. На ней установлена ОС Windows 7. Машина находится в состоянии «сразу после установки ОС». В процессе туториала она будет подключена к домену mydomain.com.
Туториал построен следующим образом (если вам интересен только конкретный пункт — смело кликайте прямо туда):
В конце туториала вас ждет приятный бонус — я покажу вам как можно развернуть у себя на компьютере весь этот работающий стенд одной единственной командой. Вам понадобится только наличие двух установочных iso-образов (windows 7 и windows server 2016), да небольшой скрипт, ссылку на который я вам дам в конце статьи.
Почему такой стенд?
Такой стенд, с моей точки зрения, отлично подходит для первого самостоятельного «прощупывания» технологии Active Directory. Он минималистичен (всего 2 виртуальные машины), занимает минимум ресурсов, но при этом изолирован и самодостаточен. Его можно развернуть даже на довольно средненьком компьютере и ноутбуке. При этом на стенде уже присутствуют основные сетевые службы (AD + DNS). DHCP хоть и необязателен для функционирования AD, всё равно был добавлен в стенд в ознакомительных целях.
Данный туториал предлагает исключительно пробное знакомство с Active Directory. Ни при каких обстоятельствах не рекомендуется разворачивать подобную конфигурацию при решении реальных задач администрирования сетей. В самом туториале я постараюсь обратить внимание на основные моменты, которые не рекомендуется применять в реальных сетях.
Туториал предполагает подробный разбор всех шагов по настройке, с пояснениями «что, зачем и почему». Туториал ориентирован на людей, не слишком знакомых с технологиями Active Directory, DNS и DHCP, которые хотели бы немного узнать о внутренней кухне администрирования сетей с Active Directory.
Если же базовая настройка AD вызывает у вас лишь зевоту, переходите прямо сюда и посмотрите, как можно автоматизировать весь процесс по развёртыванию собственного стенда с AD и рабочей станцией.
Что такое Active Directory
Active Directory — это службы каталогов от компании Microsoft, как подсказывает нам Википедия. За этим сухим и невзрачным определением скрывается одна из важнейших технологий в администрировании сетей. Благодаря Active Directory администратор сети получает очень удобное централизованное средство управления учетными записями пользователей, групповыми политиками (в т.ч. политиками безопасности) и объектами в сети (причём Active Directory без особых проблем справляется даже с гигантскими сетями). А благодаря встроенному механизму репликации, «положить» правильно настроенные сервисы AD не так-то просто. Ну и напоследок, благодаря Windows настроить Active Directory можно буквально мышкой, так что даже совсем начинающие IT-шники смогут с этим справиться.
Несмотря на то, что технологией заведует Microsoft, она вовсе не ограничивается управлением Windows-машин — все известные Linux-дистрибутивы уже давным давно научились работать с этой технологией. Повстречаться с Active Directory не просто, а очень просто — практически каждый офис предполагает наличие этой технологии, поэтому даже самым заядлым линуксоидам было бы неплохо разбираться в азах работы Active Directory.
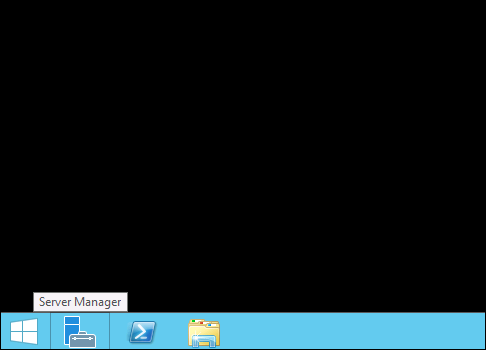
Начинаем
Вы установили Windows Server 2016 и (надеюсь) видите следующий экран:
Эта панель — основное (графическое) средство администрирования Windows Server 2016. Здесь вы можете управлять компонентами и сервисами на вашем сервере (проще говоря, настраивать то, что умеет делать сервер). Эту же панель можно использовать и для базовых сетевых настроек Windows Server, для чего есть вкладка «Локальный сервер».
Первое, что нужно сделать — это поменять сетевое имя сервера.
Сетевое имя (hostname) — это удобный способ идентификации узла в сети. Сетевое имя используется как альтернатива IP-адресу и позволяет не запоминать IP-адрес компьютера (при том, что этот адрес может меняться время от времени), а связываться с этим компьютером по его логическому названию.
Проблема в том, что по-умолчанию для Windows Server генерируется совершенно нечитаемое и неинформативное сетевое имя (я выделил его красным цветом на скриншоте).
Рабочие станции ещё могут позволить себе иметь нечитаемый Hostname, но никак не сервер. Поэтому я предлагаю поменять эту абракадабру его на что-то более разумное (например, на ADController), благо делается это быстро.
Нужно кликнуть на текущее имя сервера (отмечено красным цветом), затем во вкладке «Имя компьютера» нажать на кнопку «Изменить. «, после чего ввести что-то более благоразумное:
После смены имени машину нужно будет перезагрузить.
Теперь зададим статический IP-адрес для сервера. В принципе это делать не обязательно, раз мы всё равно собрались поднимать DHCP службу, но на самом деле это хорошая практика, когда все ключевые элементы корпоративной сети имеют фиксированные адреса. Открыть меню по настройке сетевого адаптера можно из вкладки «Локальный сервер», кликнув на текущие настройки Ethernet-адаптера (тоже выделены красным цветом).
Включаем нужные компоненты
Для нашего стенда нам понадобится включить следующие сервисы (или, как они тут называются, роли) на Windows Server:
Пройдемся вкратце по каждому из них.
Доменные службы Active Directory
Эта роль фактически «включает» технологию Active Directory на сервере и делает его контроллером домена (под доменом в технологии AD понимается группа логически связанных объектов в сети). Благодаря этой роли администратор получает возможность управлять объектами в сети, а также хранить информацию о них в специальной распределенной базе данных.
Эта база данных содержит всю информацию об объектах в сети (например, именно в неё заносится информация об учётных записях пользователей). Когда человек подходит к рабочей станции и пытается выполнить вход в свою доменную учётную запись, эта рабочая станция связывается с контроллером домена с запросом на аутентификацию, и в случае успеха загружает пользовательский рабочий стол.
Однако, что же делать, если контроллер домена выйдет из строя (или просто будет недоступен для рабочих станций)? Если вы настроили только один контроллер домена, то дела ваши довольно плохи — без связи с рабочим контроллером домена пользователи не смогут выполнить вход на свои рабочие места. Поэтому в реальных сетях всегда рекомендуется устанавливать как минимум два контроллера на каждый домен. Каждый контроллер домена участвует в так называемом механизме репликации, благодаря чему все контроллеры домена имеют полную копию базы данных со всеми объектами в домене. Если по какой-то причине один из контроллеров выйдет из строя, его место всегда может занять резервный контроллер — и пользователи даже ничего не заметят.
Однако этот туториал рассчитан на простое ознакомление с технологией AD «на виртуалках», поэтому здесь не будет рассматриваться вопрос создания нескольких контроллеров AD в одном домене.
С этим пунктом все более менее понятно, а зачем же нам включать дополнительно ещё DNS-сервер?
DNS-сервер
Обычно протокол DNS (Domain Name System) используется для обращения к узлам в сети не по их IP-адресу, а по доменному имени (строковый идентификатор), что, конечно, гораздо удобнее. Другими словами, DNS чаще всего используется для разрешения доменных имен.
Но область применения протокола DNS не ограничивается только сопоставлением хостового имени и IP-адреса, что как раз подтверждает технология Active Directory. Дело в том, что Microsoft решила построить технологию Active Directory не с нуля, а на основе протокола DNS. В частности, протокол DNS используется при определении местонахождения всех ключевых сервисов Active Directory в сети. Другими словами, рабочая станция при подключении к контроллеру домена понимает, «куда» ей надо обращаться, именно с помощью протокола DNS.
Все DNS-записи (в том числе с информацией о сервисах Active Directory) хранятся на DNS-сервере, а это значит, что нам нужно заиметь свой собственный DNS-сервер! Вот только вопрос, откуда его взять? Есть два варианта:
Первый вариант, безусловно, самый правильный — именно так и надо поступать при реальном администрировании сетей (чем больше вы разносите логику по разным узлам в сети — тем лучше). Но в учебных целях я решил выбрать второй вариант (хотя бы потому, что не придётся создавать ещё одну виртуальную машину).
Именно поэтому эту роль (DNS-сервера) тоже нужно добавить к ролям машины windows_server.
Кстати, если не добавить роль «DNS-сервер» сейчас, то в будущем у вас ещё будет такая возможность при конфигурировании контроллера домена AD.
DHCP-сервер
Протокол DHCP (Dynamic Host Configuration Protocol) нужен для автоматической выдачи сетевых настроек узлам в сети. Под сетевыми настройками понимается IP-адрес, адрес шлюза по-умолчанию, адрес DNS-сервера, и ещё ряд других настроек. Этот протокол чрезвычайно удобен при администрировании сетей, особенно больших.
В этом туториале я использую протокол DHCP чтобы рабочая станция workstation могла получить сетевые настройки (в частности, адрес DNS-сервера) без каких-либо действий с моей стороны.
Протокол DHCP не имеет никакого отношения к технологии Active Directory, и можно было бы обойтись вовсе без него (достаточно прописать все сетевые настройки на рабочей станции самостоятельно), но я решил включить этот протокол в данный туториал просто для общего ознакомления. К тому же, такая связка «Контроллер AD — DNS-сервер — DHCP-сервер» довольно часто встречается в реальной жизни, потому что это очень удобный набор сервисов.
При этом вопрос о том, стоит ли выделять отдельную машину под DHCP-сервер, остаётся открытым. Для небольших сетей однозначно не стоит разносить DNS и DHCP-серверы по разным машинам, но для больших сетей, возможно, имеет все-таки смысл задуматься об этом. В нашей же крошечной сети мы абсолютно ничего не потеряем, если включим DHCP-сервер на той же машине, что и DNS-сервер.
Что ж, довольно теории, давайте лучше перейдём к включению этих самых ролей.
Мастер добавления ролей и компонентов
Возвращаемся на панель мониторинга (самый первый скриншот) и щелкаем на пункт «Добавить роли и компоненты». Вас поприветствует мастер добавления ролей и компонентов. Первый экран («Перед началом работы») пропускаем, он совсем неинтересный, а вот дальше идёт экран «Выбор типа установки»
Нас устраивает значение по-умолчанию (Установка ролей или компонентов»), но интересен и второй пункт — он позволяет задействовать ещё одну возможность Windows Server — инфраструктуру виртуальных рабочих мест (Virtual Desktop Environment — VDI). Эта интереснейшая технология позволяет, буквально, виртуализировать рабочее место. То есть для пользователя создаётся виртуальное рабочее место, к которому он может подключаться через тонкий клиент. Пользователь лишь видит картинку, тогда как само рабочее место может совершенно прозрачно работать где угодно.
Впрочем, технология VDI это отдельная большая тема, а в этом туториале надо сосредоточиться на контроллере AD, так что кликаем «Далее» и видим экран выбора целевого сервера.
Мастер добавления ролей позволяет устанавливать роль не только на текущую машину, но вообще на любой добавленный сервер, и даже на виртуальный жёсткий диск. Да, если ваша Windows Server развернута на виртуальной машине (а это довольно частое явление), то вы можете администрировать эту виртуальную машину даже не запуская её! Понаблюдать за этим процессом можно, например, здесь
Нам же такая экзотика ни к чему, так что просто выбираем единственный возможный сервер (обратите внимание, что он теперь называется ADController место непонятной абракадабры), жмём «Далее» и, наконец, попадаем на экран выбора ролей, которые нужно добавить.
Выбираем три роли, о которых уже говорили ранее, и продолжаем.
Теперь необходимо выбрать дополнительные компоненты. В чём разница между ролью и компонентом, можете спросить вы? О, это не такой уж и лёгкий вопрос, честно говоря!
Согласно идеологии Microsoft, роль — это набор программ, которые позволяют компьютеру предоставлять некоторые функции для пользователей в сети. Например, DNS, DHCP, контроллер домена AD — это всё роли. А вот компоненты — это набор программ, которые улучшают либо возможности ролей сервера, либо самого сервера.
При этом глядя на список «Компонентов» так сходу и не скажешь, что какие-то вещи в списке лишь «вспомогательные». Вот например, DHCP-сервер расценивается как роль, а WINS-сервер — уже как компонент. А чем SMTP-сервер хуже DNS?
В общем-то, чёткой границы между ролью и компонентом не существует. Я лично предпочитаю относиться к ролям как к большим функциональным возможностям сервера, а к компонентам — как к небольшим дополнительным аддонам.
В любом случае, дополнительные компоненты нам не нужны, так что кликаем «Далее».
После этого идёт несколько пояснительных экранов с информацией по каждой добавленной роли, но эту информацию я уже разбирал, поэтому останавливаться лишний раз не буду.
На экране подтверждения ещё раз видим все устанавливаемые роли и компоненты, после чего жмём «Установить».
Остаётся лишь дождаться, когда заполнится progress-bar, и перейти к следующему пункту туториала — настройке контроллера домена AD.
Настраиваем контроллер домена Active Directory
Все роли и компоненты успешно добавлены, о чём свидетельствует следующий экран:
Вот только AD на сервере всё еще не работает — для этого его необходимо донастроить. Для этого нам настойчиво предлагают «Повысить роль этого сервера до уровня контроллера домена».
А чем же я занимался последние 15 минут? Я же добавлял роли, и судя по сообщению, они успешно добавились! И тут меня снова хотят заставить добавлять какие-то новые роли? В чем-то тут подвох.
Подвох тут действительно имеется, но вообще в не самом очевидном месте. Вот так выглядит предыдущий скриншот в английской версии Windows Server (картинка из интернета).
Видите разницу? В английской версии ни слова ни про какие роли! Про повышение есть, про роли — нет. Один из тех случаев, когда перевод вносит сумятицу на пустом месте. Согласно английской версии, никакими ролями мы дальше не занимаемся, что и логично, ведь мы их как раз только что добавили.
Что ж, тыкаем на предложение «Повысить роль этого сервера до уровня контроллера домена», и теперь нас привествует мастер настройки доменных служб Active Directory с предложением выбрать конфигурацию развёртывания.
Всего тут есть 3 варианта развития событий. Для того, чтобы выбрать правильный пункт, давайте сначала разберёмся, что эти пункты означают. В этом нам поможет вот такая картинка (картинка, если что, отсюда):
Технология Active Directory (как и DNS) подразумевает иерархическое построение имён на основе доменов. Домены могут выстраиваться в доменные деревья по принципу «родительско-дочерних» отношений. В основе дерева лежит так называемый корневой домен (на картинке выше это sources.com, xyz.com и abc.com). При этом домен может иметь сколько угодно потомков. Домен-потомок располагается в пространстве имён родителя и является его «поддоменом» (subdomain). У доменного имени домена-потомка есть дополнительный префикс относительно доменного имени родителя (rus.abc.com, eng.abc.com). Один корневой домен основывает только одно доменное дерево со своим независимым пространством имён.
Теперь представьте, что таких независимых деревьев может быть много — в этом случае эти деревья образуют структуру, которая называется «лес». При этом в Active Directory доменные деревья не могут быть «сами по себе» — они обязательно должны находиться в лесу (даже если лес будет состоять всего из одного-единственного домена). Первый домен, который добавляется в лес, называется корневым доменом леса (на рисунке выше это sources.com). Корневой домен леса используется для идентификации всего леса (то есть если корневой домен называется sources.com, то и весь лес называется sources.com).
Теперь возвращаемся к мастеру настройки доменных имен. На этом этапе мастер предлагает следующие варианты:
Назовём корневой домен mydomain.com и кликнем «Далее»
Рассмотрим возможные параметры:
А вот пункт 3 рассмотрим поподробнее, он довольно интересный.
Как я уже упоминал выше, каждый контроллер домена имеет полную и исчерпывающую информацию обо всех объектах в своём домене. Если же в домене несколько контроллеров, то они ещё и участвуют в механизме репликации, поддерживая несколько актуальных копий базы данных с объектами домена. Получается, что рабочая станция в домене может узнать информацию о любом объекте из этого домена от своего ближайшего контроллера домена.
Но что же делать, если рабочей станции нужно получить информацию об объекте из другого домена? И вот тут в дело вступает ещё один важнейший механизм технологии Active Directory, который называется глобальный каталог.
Что такое вообще «Глобальный каталог»? Согласно Miscrosoft — это распределенное хранилище данных, которое хранит частичное представление обо всех AD-объектах в лесу. Это хранилище располагается на котроллерах домена, которые имеют дополнительную роль «Global Catalog Server» (Сервер глобального каталога). От обычного контроллера домена GC-сервер отличается в первую очередь тем, что помимо полной копии всех объектов в своем домене, хранит также частичную информацию обо всех объектах в других доменах леса.
Чего это позволяет достичь? Давайте представим, что рабочая станция запросила информацию об объекте из другого домена. Она обращается на ближайший GC-сервер с просьбой предоставить ей информацию об этом объекте. GC-сервер, в свою очередь, может:
Информация о том, какие атрибуты попадают в глобальный каталог, определена в Partial Attribute Set (PAS), который может настраивать администратор AD. Например, если администратор понимает, что рабочие станции часто будут обращаться к атрибуту, который не содержится в глобальном каталоге, он может добавить туда этот атрибут. Тогда запросы рабочих станций при чтении этого атрибута будут выполняться значительно быстрее, т.к. уже ближайший GC-сервер сможет предоставить им всю нужную информацию.
Однако, если в лесе всего один домен (как у нас), то Глобальный каталог содержит полную копию объектов в домене и всё.
Что ж, возвращаемся к галочке GC, которую за нас уже проставил мастер настройки доменных служб. Если вы попробуете её отключить, то убедитесь, что отключить её нельзя. Это связано с тем, что каждый домен в AD должен иметь хотя бы один GC-сервер, и при добавлении первого контроллера в домен этот контроллер сразу помечается как GC-сервер.
Что ж, давайте согласимся с этим «выбором» мастера и перейдём к последнему параметру на этом скриншоте — к паролю для режима восстановления служб каталогов. Это особый режим безопасной загрузки Windows Server, который позволяет администратору работать с базой данных AD. Этот режим применяется, например, в следующих случаях:
Да да, вы не ослышались. Чтобы просто восстановить резервную копию базы данных, нужно перезагрузить машину и загрузиться в особом «безопасном» режиме. Это вам не Linux какой-нибудь.
Фух, вроде разобрались. Давайте перейдем дальше на шаг, где нам предложат настроить делегирование DNS.
Что такое делегирование DNS? По большей части, это передача ответственности за некоторую DNS-зону отдельному DNS-серверу. Это распространенная практика в больших сетях, в которых требуется разграничить зоны ответственности за доменные зоны между различными серверами. При делегировании DNS в «главный» DNS-сервер вносится запись о том, что «вот за эту DNS-зону несёт ответственность вон тот DNS-сервер, обращайся туда».
Т.к. у нас всего одна зона DNS и DNS-сервер тоже один, то этот шаг нам необходимо пропустить и перейти к выбору NetBIOS-имени.
Мы видим, что мастер предложил нам на выбор сразу же имя для нашего домена — MYDOMAIN. Но вы можете (и должны) задать себе вопрос: а что такое вообще NetBIOS-имя и зачем оно нужно? И разве мы уже не настраивали сетевое имя узла (Hostname) в самом начале? Чего же от вас хотят?
NetBIOS (Network Basic Input/Output) — это ещё один способ разрешения имён узлов в сети (более древний и более примитивный, чем DNS). NetBIOS-имена не предполагают никакой иерархии, их длина ограничивается всего лишь 16 символами, и они применяются только для разрешения имён компьютеров в локальной сети. Когда мы в самом начале туториала выбрали сетевое имя ADController — мы, на самом деле, задали именно NetBIOS-имя для сервера. Но теперь от нас снова требуют выбрать NetBIOS-имя (да ещё и другое, отличное от ADContoller). Не много ли NetBIOS-имён для одного компьютера?
Дело в том, что Microsoft пошла ещё дальше — и ограничила длину NetBIOS-имен не 16 символами, а 15 символами. 16-ый символ при этом считается зарезервированным суффиксом, который может принимать фиксированные значения. В зависимости от значения 16-го байта получаются разные классы NetBIOS-имён. Например, если суффикс равен 00, то NetBIOS-имя относится к рабочей станции. Если суффикс равен 1С, то это имя относится к имени домена.
То есть, как вы понимаете, на первом шаге мы задавали NetBIOS-имя для компьютера Windows Server (с суффиком 00). А теперь задаём NetBIOS-имя домена mydomain.com (с суффиксом 1С).
Кстати, можете, ради интереса, отмотать туториал в самое начало и посчитать количество символов в «нечитаемом» автоматически сгенерированном сетевом имени windows_server. Будет как раз 15 символов (максимальная длина NetBIOS-имени).
И напоследок скажу, что вы не можете пропустить этот шаг. NetBIOS хоть и устаревшая технология, но до сих пор используется ради совместимости с некоторыми старыми службами. Настроить контроллер домена Active Directory без NetBIOS-имени нельзя.
Что ж, и с этим тоже разобрались. Оставляем NetBIOS-имя по-умолчанию и двигаемся дальше, к выбору места расположения базы данных AD. Можно оставить значение по-умолчанию, комментировать особо нечего.
Все ваши настройки должны пройти предварительную проверку:
Как только всё готово, жмите «Установить» и можете спокойно идти пить чай, потому что после установки автоматически начнётся очень-очень долгая перезагрузка. Зато настройка контроллера домена AD на этом закончена, поздравляю!
Настройка DHCP-сервера
Пришло время заняться настройкой DHCP-сервера. Настройка глобально состоит из двух частей:
Для того, чтобы авторизировать DHCP-сервер, нужно вернуться на панель мониторинга (она и так должна быть перед вами после перезагрузки), перейти на вкладку DHCP (слева) и кликнуть на предложение донастроить DHCP-сервер:
В открывшемся мастере настройки DHCP после установки пропускаем первый приветственный экран и переходим к экрану авторизации
На выбор предлагаются три варианта:
По-умолчанию авторизовать DHCP-сервер в домене могут только члены группы EnterpriseAdmins, куда как раз и входит пользователь MYDOMAINАдминистратор. При желании можно потратить немного времени и делегировать эту возможность админам «помельче» (региональным администраторам), почерпнуть больше информации по этой теме можно отсюда.
Итак, выбираем вариант по-умолчанию и завершаем первый этап настроки DHCP-сервера.
Теперь переходим непосредственно к настройкам DHCP. Для этого на панели мониторинга кликаем вкладку «Средства» и выбираем пункт «DHCP»
В открывшемся окне с настройками DHCP нужно кликнуть правой кнопкой мышки на IPv4 и затем на пункт меню «Создать область». После этого откроется мастер создания новой области.
Что такое DHCP-область? Под этим понимается некий диапазон IP-адресов, которые может выдавать DHCP-сервер другим компьютерам в сети. Каждая область помимо диапазона IP-адресов также содержит другие сетевые настройки, с которыми мы сейчас и познакомимся.
Назовём DHCP-область SCOPE1 и перейдём дальше.
На следующем экране вам предложат выбрать диапазон адресов, которые будут выдаваться компьютерам в сети. Ранее я настраивал сетевой интерфейс на Windows Server, выдав ему адрес 192.168.1.1/24. Это статический адрес и он зарезервирован, его выдавать другим компьютерам нельзя.
Зато никто не мешает выдавать все остальные адреса в сети 192.168.1.0/24 — так что задаём диапазон от 192.168.1.2 до 192.168.1.254 (192.168.1.255 — это зарезервированный широковещательный адрес, его выдавать тоже нельзя).
В целом, никто не мешает вам как администратору выдавать меньше IP-адресов, чем доступно в адресации сети. Например, можно было бы выделить в сети всего 100 адресов для автоматической выдачи: 192.168.1.101-192.168.1.200.
Переходим далее и видим предложение о выборе исключений из указанонного диапазона адресов, а также о настройке задержки при передаче сообщения DHCPOFFER
С исключениями всё более-менее понятно: если вы не хотите выдавать некоторые адреса в указанном ранее диапазоне, то вы можете указать эти адреса здесь в виде исключений. А что за задержка в DHCPOFFER такая?
Эта настройка уже относится к довольно продвинутому администрированию сетей: если в вашей сети есть несколько DHCP-серверов, то с помощью этой задержки вы можете регулировать нагрузку между ними (подробнее можно прочитать, например, тут).
В любом случае, исключений в диапазоне у нас нет, да и задержка по-умолчанию нас устраивает, так что кликаем дальше и видим настройку сроков аренды адресов.
Протокол DHCP предполагает выделение адресов только на определённое время, после чего компьютеры должны продлять аренду. Здесь можно настроить это время (по-умолчанию — 8 дней).
8 дней меня лично вполне устраивает, так что кликаем «Далее» и видим предложение настроить другие настройки, которые будут получать клиенты в сети (помимо IP-адреса). Соглашаемся.
Первая сетевая настройка для клиентов — это шлюз по-умолчанию. В стенде из двух виртуальных машин эта настройка в принципе не нужна. Но можно представить, что windows_server будет играть роль шлюза во внешнюю сеть, и добавить адрес 192.168.1.1 как шлюз по-умолчанию.
Далее идет настройка DNS. Здесь можно задать имя родительского домена и адреса DNS-серверов. С адресами DNS-серверов всё более-менее понятно — это IP-адреса серверов, куда следует обращаться клиентам за помощью в разрешении DNS-имён. Сейчас в этом списке фигурирует тот же адрес, что мы добавили как шлюз по-умолчанию.
А вот для понимания имени родительского домена, рассмотрим следующую ситуацию.
Допустим, есть домен mydomain.com и есть два компьютера в этом домене с именами comp1.mydomain.com и comp2.mydomain.com. Если comp1 хочет связаться с comp2, то он должен, по-хорошему, использовать следующую команду (обращение по Fully Qualified Domain Name — FQDN):
Но задумывались ли вы когда-нибудь, что именно произойдет, если попытаться пропинговать другой узел следующим образом?
На самом деле, в этом случае начинается целая магия — очень хитрый процесс разрешения имён (картинка из интернетов).
Согласно алгоритму разрешения сетевых имен, сначала comp1 попробует найти информацию о comp2 в hosts.txt — файле. Если этой информации там не окажется, то начинается процесс поиска узла через DNS. Вот только вопрос — DNS-имена же находятся в каком-то домене, верно? Какое доменное имя нужно «пристыковать» к comp2 при выполнении пинга?
Если же DNS-разрешение окажется неудачным, дальше начнутся попытки найти comp2 уже по NetBIOS-имени. Что такое WINS, и чем он отличается от Broadcast — информация будет чуть дальше по тексту.
Что ж, в нашем случае имя родительсокго домена должно быть mydomain.com (значение по-умолчанию), а нужный DNS-сервер уже находится в списке, так что в итоге просто кликаем «Далее».
Теперь нас попросят указать настройки WINS-сервера. WINS (Windows Internet Name Service) сервер участвует в разрешении NetBIOS-имён в сети (прямо как DNS-сервер для DNS-имён). Вот только, в отличие от DNS, WINS-сервер не обязательно должен присутствовать в сети, чтобы разрешение NetBIOS-имён работало. Так зачем же он нужен тогда?
Дело в том, что по-умолчанию разрешение NetBIOS-имен происходит через широковещательные запросы. С одной стороны, это очень простой механизм (проще не придумаешь), но, с другой стороны, обладает парой недостатков:
Так вот, WINS-сервер позволяет решить обе этих проблемы. Этот сервер централизованно хранит NetBIOS-имена компьютеров, и обычные узлы в сети могут обращаться к нему для поиска IP-адреса интересующего их имени (как и для DNS). Такой подход, во-первых, резко уменьшает количество широковещательного трафика в сети, а, во-вторых, позволяет посылать NetBIOS-запросы в другие сети, а не только в текущую.
В нашей небольшой сети WINS-сервер нам ни к чему, поэтому просто пропускаем эту настройку и едем дальше.
В последнем шаге настройки вам предлагают сразу активировать настроенную область. Соглашаемся, и на этом заканчиваем настройку DHCP.
Создаём нового пользователя в домене AD
Собственно настройка контроллера домена и различных сервисов уже фактически закончена, все параметры выставлены как надо. Теперь нужно просто зарегистрировать нового пользователя, от имени которого рабочая станция workstation будет выполнять вход в домен.
Для этого возвращаемся на панель мониторинга, кликаем на «Средства» и затем на «Пользователи и Компьютеры Active Directory»
После этого появляется диалоговое окно с преложением ввести данные нового пользователя. По старой доброй традиции назовём пользователя Foo Bar. Обратите внимание, что пользователь отображается лишь как «Объект» в Active Directory наравне с другими объектами.
Теперь необходимо задать пароль и дополнительные параметры для пользователя. Пароль должен соответсовать политике паролей по-умолчанию, которая, в том числе, предписыват паролям в домене быть довольно сложными (должен использовать числа, буквы верхнего и нижнего регистра, а также спец символы).
Обычно администратор создаёт простой пароль для пользователя, а затем требует от пользователя сменить его при первом входе в систему (первая галочка в списке доступных опций). Это очень хорошая практика с точки зрения безопасности, ведь таким образом даже администратор AD не сможет узнать пароль пользователя. Также хорошей практикой считается ограничивать срок действия пароля. В этом туториале для простоты мы уберём требование о смене пароля пользователем при врходе в систему.
После этого останется лишь подтвердить создание нового пользователя.
Ну что ж, вот, кажется, и всё! Осталось лишь проверить ввод рабочей станции в домен.
Ввод рабочей станции в домен
Переключаемся на вторую машину workstation под управлением Windows 7 и заходим в свойства системы. Сейчас видно, что рабочая станция находится в рабочей группе (не в домене). Кстати говоря, WORKGROUP — это тоже NetBIOS-имя. Только в отличии от имени домена оно имеет суффикс 1E.
Щелкаем на кнопку «Изменить параметры», затем в появившемся окне ещё раз «Изменить. «.
В окне изменения имени компьютера пишем, что он должен принадлежать домену mydomain.com.
Видим предупреждение о нестандартном имени компьютера (testo-ПК содержит кириллицу). Это связано с тем, что NetBIOS-имена не могут содеражать кириллицу. Но мы с вами настроили DNS-сервер (DNS настройки прилетели на рабочую станцию по DHCP), а DNS-механизм разрешения имён, как мы знаем, имеет приоритет перед NetBOIS. Так что в данном случае на работоспособность AD кириллица не влияет. Но на практике так делать не надо!
Вводим логин-пароль от новой учетной записи FooBar и, наконец, видим заветное сообщение «Добро пожаловать в домен»
После ввода компьютера в домене необходимо перезагрузить компьютер, ну а дальше — вводим учётные данные пользователя в AD.
И после успешного входа на рабочий стол перепроверяем свойства системы.
Полное имя компьютера поменялось на testo-ПК.mydomain.com, а это значит, что мы успешно ввели рабочую станцию в домен mydomain.com.
Автоматизируем
Как вы могли заметить, весь туториал можно выполнить, пользуясь исключительно мышкой и клавиатурой. Больше того, нам даже не пригодились знания PowerShell, который позволяет выполнять бОльшую часть настройки контроллера домена AD с помощью скриптов.
Так почему бы не автоматизировать все действия с клавиатурой и мышкой, которые мы предпринимали? И нет, я говорю не об AutoIT, я говорю о платформе Testo, создателем которой я являюсь. Эта платформа позволяет фиксировать все действия, проводимые с виртуальными машинами, в виде скриптов на специальном языке Testo-lang. Ну а Testo затем превратит эти скрипты обратно в действия.
Я приведу лишь один скриншот с кусочком скрипта, чтобы у вас сложилось представление о том, о чём я говорю (да, именно скриншот, ведь хабр не умеет подсвечивать скриповый язык Testo-lang). Я даже не буду комментировать этот скрипт, т.к. верю, что код говорит сам за себя.
Я не буду сейчас рассказывать о платформе Testo и о её возможностях. Для этого есть отдельная статья на хабре. Вместо этого предлагаю просто увидеть своими глазами, как это работает:
Всё, что Вам потребуется для создания собственного стенда с настроенной Active Directory — это:
И всё. Как и я обещал — всего одна команда. Через пол часа — час (зависит от шустрости вашего компьютера) вы сможете наслаждаться своим готовым стендом.
Итоги
Надеюсь, вам понравился туториал, и вы нашли его полезным. Возможно, вас заинтересовала платформа Testo, в этом случае вот несколько полезных ссылок:
Источник
Windows Server 2012 — Overview
Windows Server 2012 codenamed Windows Server 8 is the most recent version of the operating system from Microsoft regarding server management. But it is not the last one, as the last one is Windows Server 2016. Officially it was released on August 1st, 2012 and is being sold as a commercial version only.

Improvements in Windows Server 2012
The major Improvements on this version are as follows −
-
It is ready to be integrated with cloud systems and it still can maintain the classic features of local datacenters as a result Hyper-V Virtualization has new features Hyper-v replicas, it allows you to create virtual machines replications between clusters and storage systems.
-
The Storage migration virtual disks can be moved to different physical storages, Virtual machine snapshots, virtual machines can be deleted from the Hyper-v and also from the virtual disks and it can be used directly without the need to shut down the virtual machine.
-
The Core server installation easily switches to GUI installation without the need of reinstallation.
-
The file server and storage service improvement is that it eliminates identical copies in the same volumes as such and saves space.
-
The Storage pools and storage spaces allows you to group the hard disks to one or more storage pools then it allows to create virtual disks. It can add other disks to the storage pools and make available to the users without impacting them.
-
The iSCSI Target Server can offer block storage to other servers and applications on the network using the iSCSI standard.
-
Active Directory cloning can deploy additional domain controllers by cloning an existing virtual domain controller.
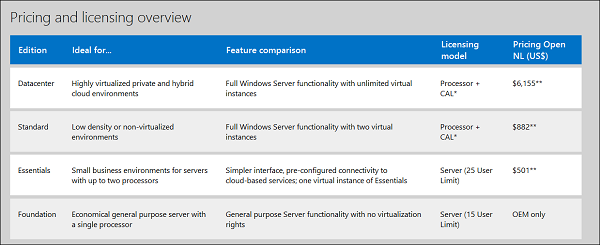
The Windows Server 2012 has four editions: Foundation, Essentials, Standard and Datacenter. Each one of them has their own limitation accept the Datacenter version which is also the most expensive one.
The following table will show what is the right one for your business needs −
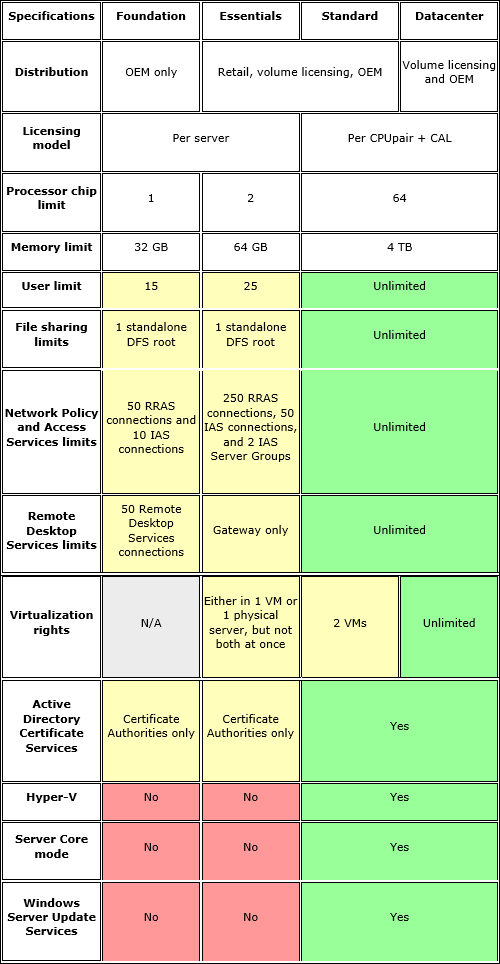
For finding out the cost of licensing you can click on the following link − https://www.microsoft.com/en-us/server-cloud/products/windows-server-2012-r2/purchasing.aspx
Windows Server 2012 — Installation
In this chapter, we will discuss regarding the requirements and prerequisites of the Windows Server 2012.
System Requirements
Although most of the servers nowadays probably have the necessary requirements for Windows Server 2012. It will certainly be useful to know them in case you want to upgrade from an older system.
The main requirements are −
-
CPU socket minimum 1.4 GHz (64-bit processor) or faster for single core and Microsoft recommends is 3.1 GHz (64-bit processor) or faster multi-core.
-
RAM memory minimum is 2GB, but Microsoft recommends 8GB.
-
160 GB hard disk with a 60 GB system partition space in your hard disk.
One important thing to note here is that the installation process itself will verify your computer hardware and let you know if it qualifies for a Windows Server 2012 installation. If not, then you will need to upgrade your hardware.
Installation
The following steps are to be adhered for the installation of Windows Server 2012.
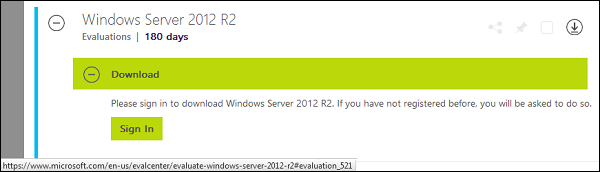
Step 1 − We can download the evaluation ISO of Windows Server 2012 R2 from the following link − https://www.microsoft.com/en-us/evalcenter/evaluate-windows-server-2012-r2
But you will need to sign in first with a Microsoft account like Hotmail for example in order to complete the download and the good thing is that the evaluation period will last for 180 days, so you will have enough time to know if it will be the right product for you or not.
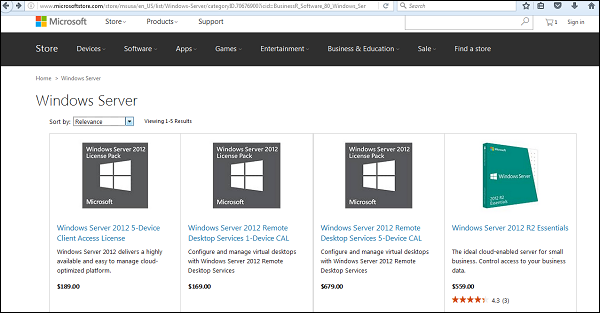
At the end, if you decide to buy the license of your Windows server 2012 R2. You can purchase it online via a Microsoft online store found in − https://www.microsoftstore.com/store/msusa/en_US/list/Windows-Server/categoryID.70676900?icid=BusinessR_Software_80_Windows_Server_112315
For the Enterprise solution, I would recommend to purchase it via a Microsoft partner that is found in your country.
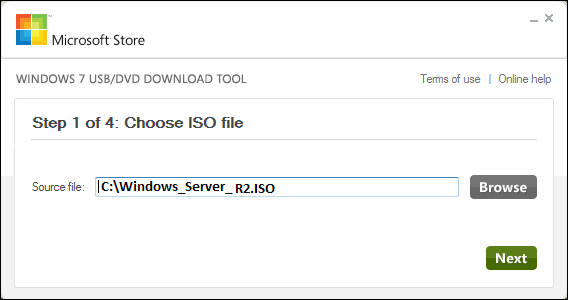
Step 2 − After downloading the ISO of Microsoft, create a boot USB driver which can be created with the Microsoft tool called Windows USB/DVD Download Tool and can be downloaded from the following link − https://www.microsoft.com/en-us/download/windows-usb-dvd-download-tool
After downloading the EXE file, open it and select the ISO file location and then click next like in the following screenshot, and wait up to the end when the Boot USB is created.
Step 3 − After completing the above given steps, plug-in the USB to the server and wait for a while till it loads the files. This will continue for about a couple of minutes as shown in the following screenshot.

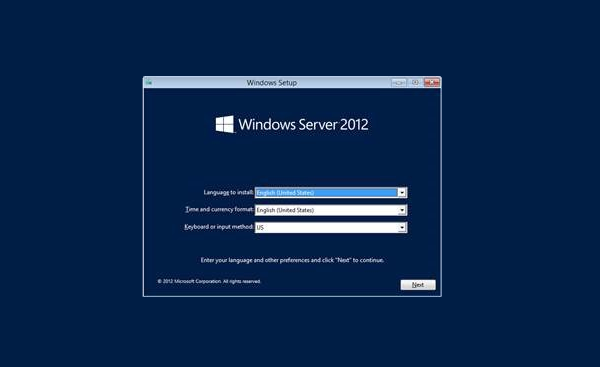
Step 4 − After the files are loaded, you will see the screen of language settings of installation, keyboard, time and currency format. Generally, all the default ones are also good enough to start with. Click Next.
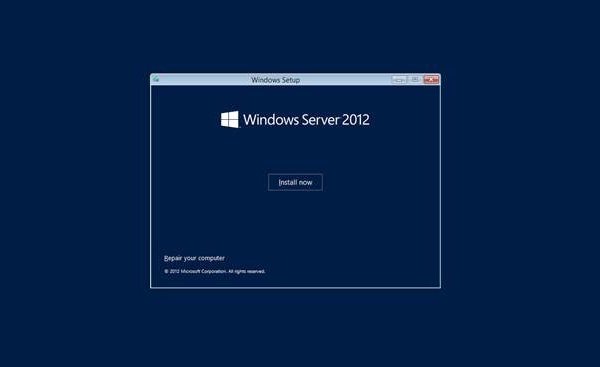
Step 5 − Click “Install now”.
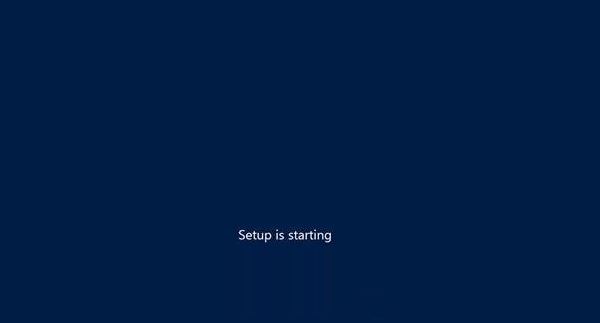
Step 6 − Once you have clicked on Install Now, the setup will start and it will load all the files and the screen will look as shown in the following screenshot.
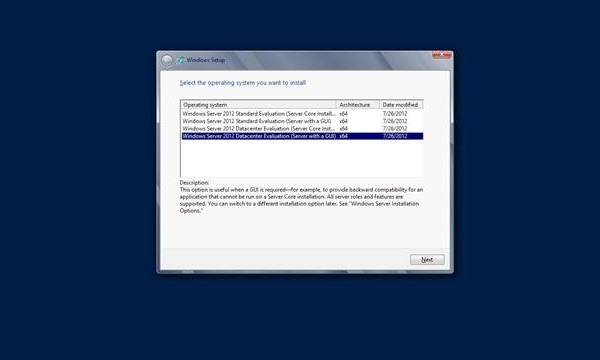
Step 7 − Wait until the files are loaded and then you will see the following screen. Let’s select Windows Server 2012 DataCenter Evaluation (Server with GUI) and click Next.
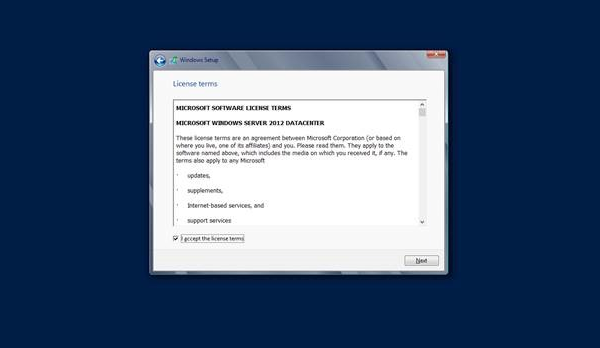
Step 8 − Click “I accept the license terms” and then click on the Next button as shown in the following screenshot.
Step 9 − The following screen will appear. In “Driver Options” you can create a new partition, delete or format the Hard disk. After you have done this process then you can select the partition where the Windows server 2012 R2 will be installed in our case we have one partition. Once all this is done, then click on Next.

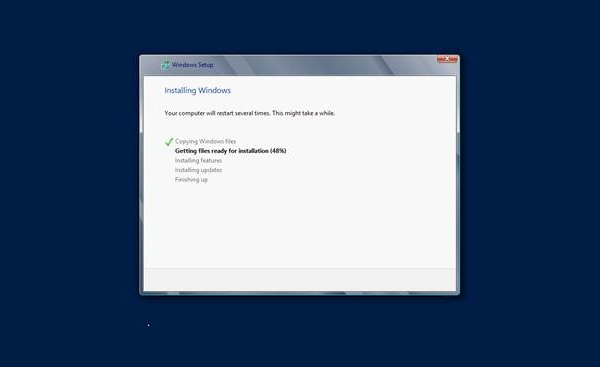
Step 10 − Let’s wait until this process finishes during this time and then the server will reboot.
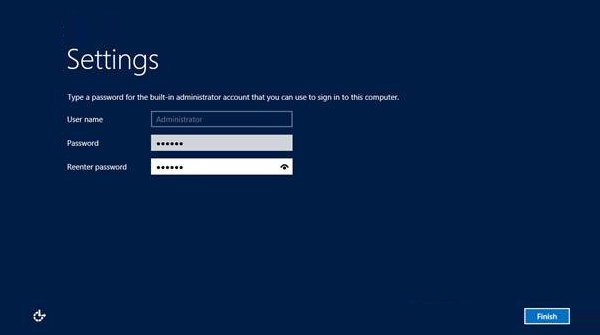
Step 11 − Once the reboot is done the following screen will appear. Set the password for the server and then click on “Finish”.
Step 12 − It will take some minutes until the setup finishes completely.
Step 13 − Once all this is done, you have completed the installation process and the following screen will appear.
Congratulations!!!
Windows Server 2012 — Server Roles
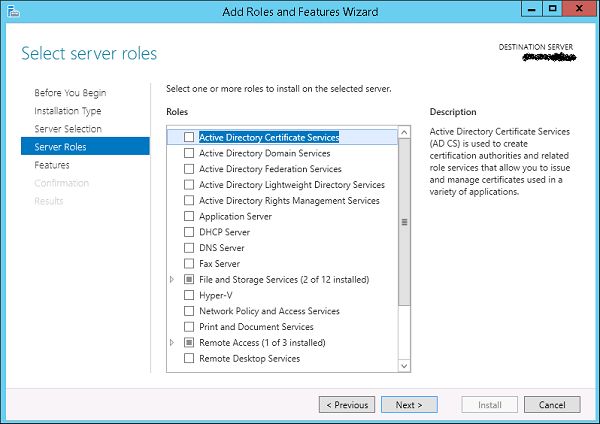
Like the previous version, Windows Server 2012 has the following roles which can be used and in the subsequent chapter, we will see how to install and configure the most important ones.
The following picture shows all the roles. A small reminder! — Roles and Features are the tools that you need to install or activate in order to complete your IT Administration duties, without their installation you cannot do anything.

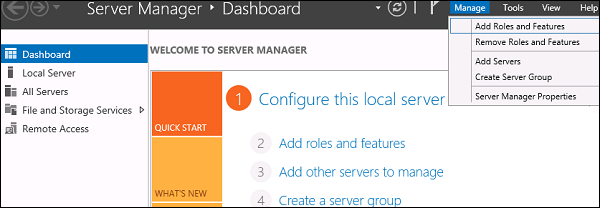
To add a role in the server we should adhere to the following steps −
Step 1 − Click with the mouse on Server Manager which is found in the task bar as shown in the following screenshot.
Step 2 − After opening the “Server Manager”, click on the second option “Add roles and features”.
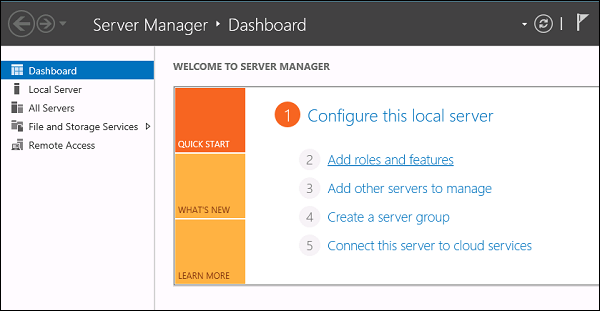
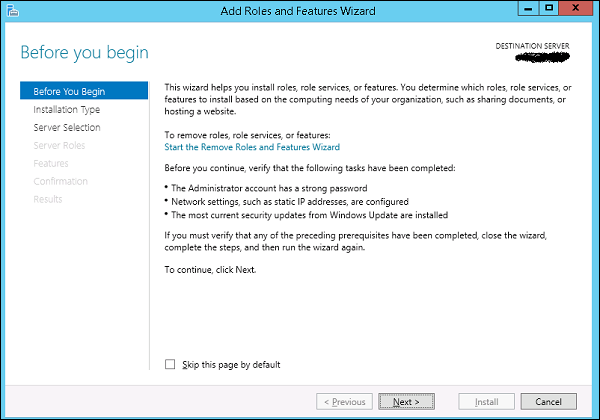
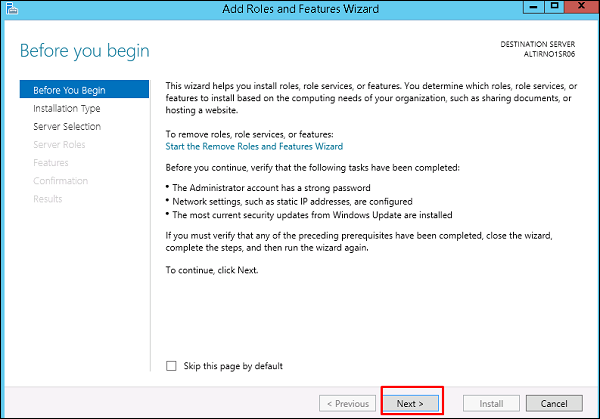
Step 3 − The following screen will appear, then you can Click on the Next button.
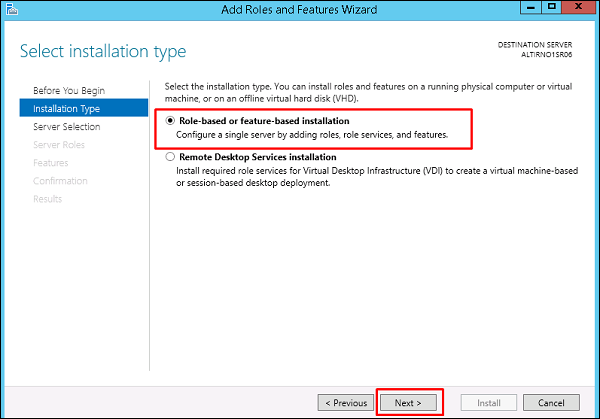
Step 4 − Select the Role-based or feature-based installation and then click on the Next button.

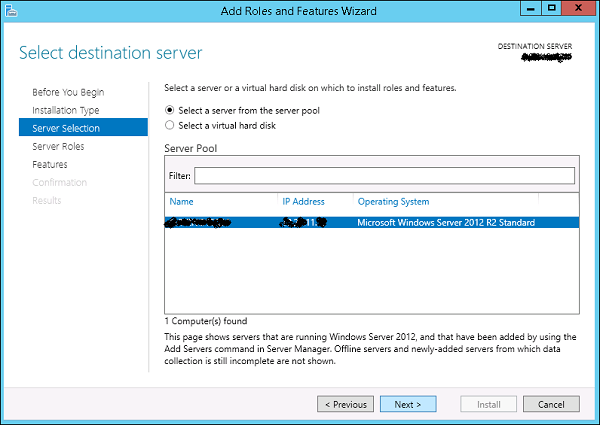
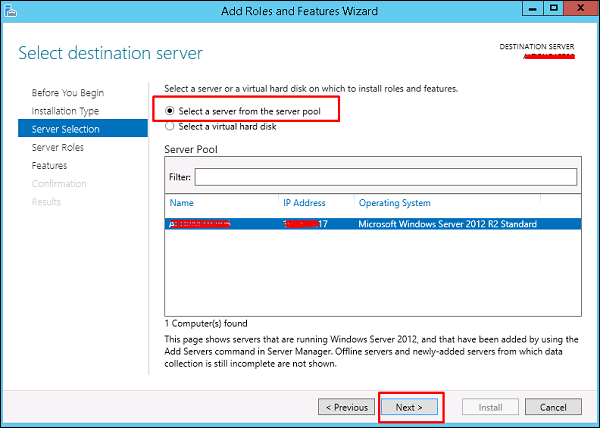
In the next screen that appears, you will have the following two options −
Option 1 − Select a server from the server pool. This option is – if you want to install the services in the physical server like being done in the following screenshot.
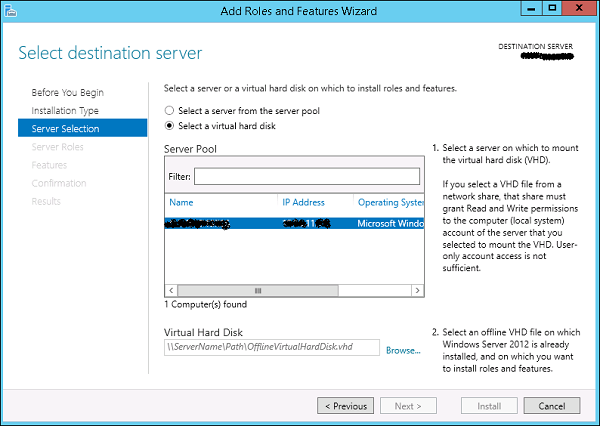
Option 2 − Select a virtual Hard disk if you want to install the services in a virtual disk that can be somewhere in the network storage. Take a look at the following screenshot for better understanding.
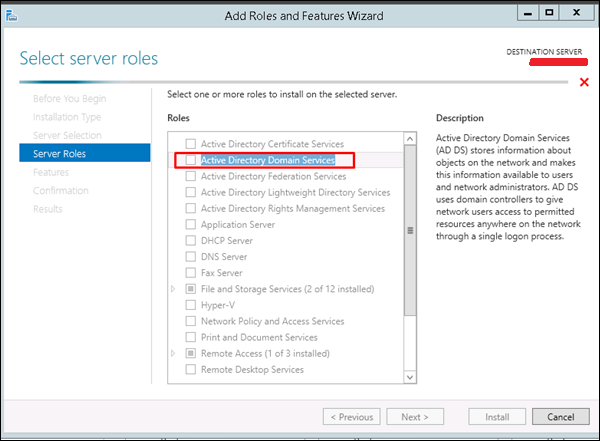
Step 5 − The last step will be to check the service that you want to install, but in the upcoming chapters we will continue this setup for each and every important services.
Windows Server 2012 — PowerShell
Windows PowerShell is a command-line shell and scripting language designed especially for system administration. It’s analogue in Linux is called as Bash Scripting. Built on the .NET Framework, Windows PowerShell helps IT professionals to control and automate the administration of the Windows operating system and applications that run on Windows Server environment.
Windows PowerShell commands, called cmdlets, let you manage the computers from the command line. Windows PowerShell providers let you access data stores, such as the Registry and Certificate Store, as easily as you access the file system.
In addition, Windows PowerShell has a rich expression parser and a fully developed scripting language. So in simple words you can complete all the tasks that you do with GUI and much more.
PowerShell Icon can be found in the task bar and in the start menu. Just by clicking on the icon, it will open.
![]()
To open it, just click on the icon and then the following screen will open and it means that PowerShell is ready for you to work on.
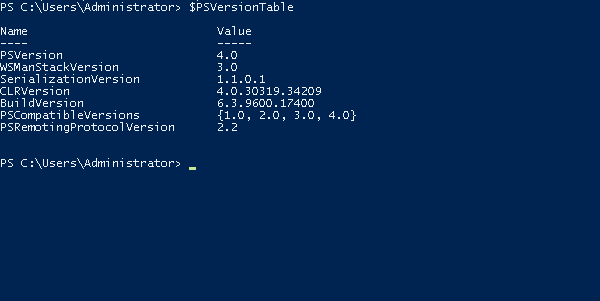
The latest version of PowerShell is 5.0 and to check what is installed in our server we type the following command – :$PSVersionTable as shown in the following screenshot and from the screen we also know that we have PSVersion 4.0
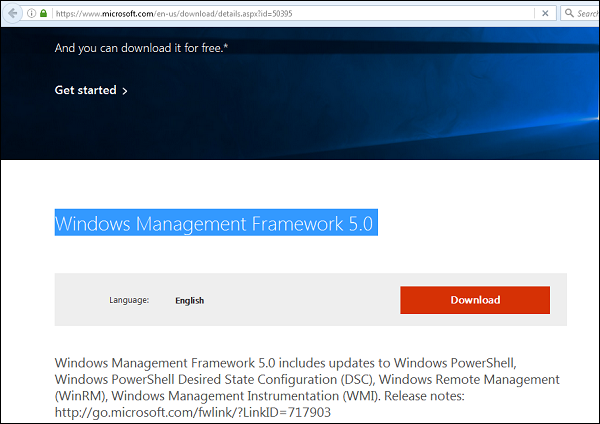
To update with the latest version where it has more Cmdlets we have to download Windows Management Framework 5.0 from the following link − https://www.microsoft.com/en-us/download/details.aspx?id=50395 and install it.
PowerShell ISE
The Windows PowerShell Integrated Scripting Environment (ISE) is a host application for Windows PowerShell. In Windows PowerShell ISE, you can run commands and write, test, and debug scripts in a single Windows-based graphic user interface with multiline editing, tab completion, syntax coloring, selective execution, context-sensitive help, and support for right-to-left languages.
You can use menu items and keyboard shortcuts to perform many of the same tasks that you would perform in the Windows PowerShell console. For example, when you debug a script in the Windows PowerShell ISE, to set a line breakpoint in a script, right-click the line of code, and then click Toggle Breakpoint.
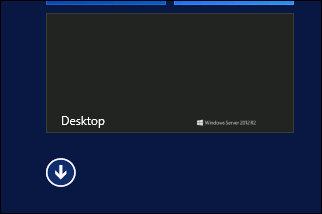
To open it you just go to Start – Search and then Type – PowerShell as shown in the following screenshot.

Then click on Windows PowerShell ISE. Or click on the downward Arrow as shown in the following screenshot.
It will list all the applications installed on the server and then click on Windows PowerShell ISE.
The following table will be open −
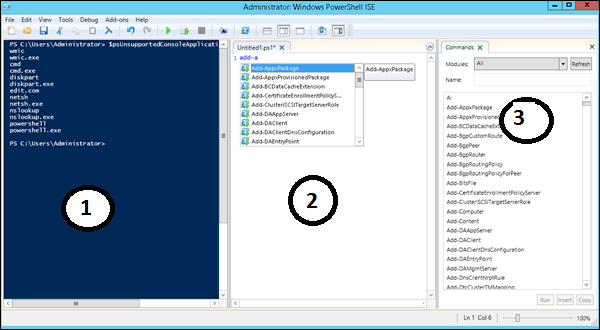
It has three sections, which include – The PowerShell Console with number 1, then Scripting File number 2 and the third is the Command Module where you can find the module.
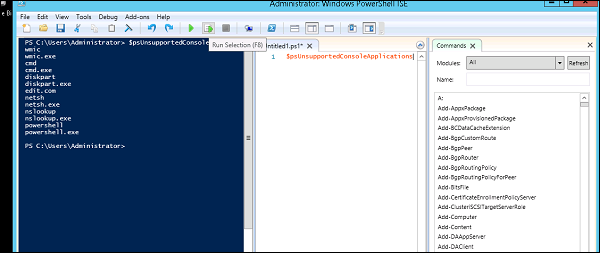
While creating the script you can run directly and see the result like the following example −
PowerShell Basic Commands
There are a lot of PowerShell commands and it is very difficult to put in all these commands in this tutorial, we will focus on some of the most important as well as basic commands of PowerShell.
The first step is to go to the Get-Help command which gives you an explanation about how to give a command and its parameter.

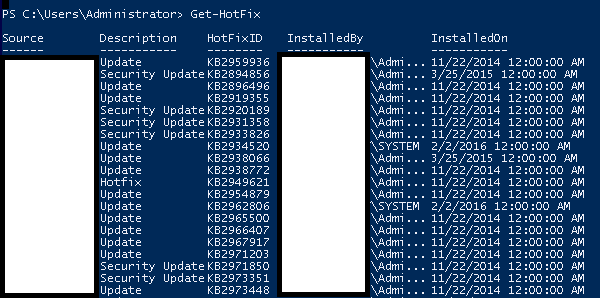
To get the list of Updates −
- Get-HotFix and to install a hot fix as follows
- Get-HotFix -id kb2741530
Remote Management
Remote Management Service is one of the most important part pertaining to administration of Windows Server 2012. Administration of servers is performed through Windows Management Instrumentation. WMI instructions can be sent over network WinRM “Remote Management”.
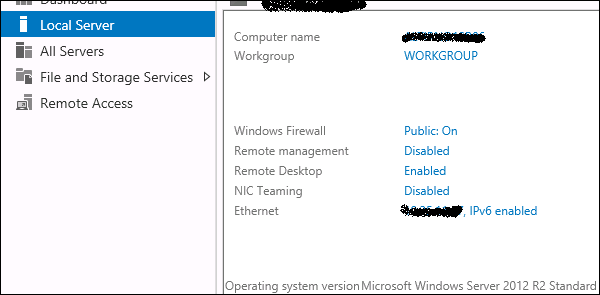
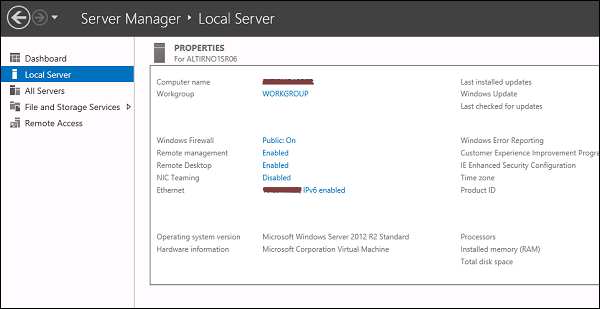
By default this utility is enabled, you can check it by going to Server Manager → then click on Local Server as shown in the following screenshot.
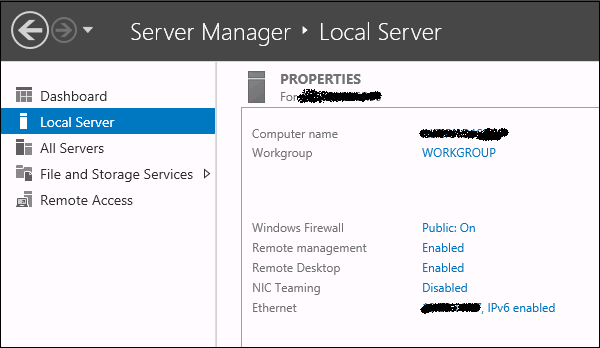
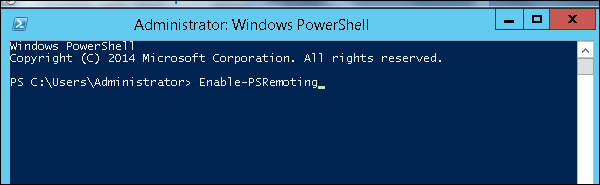
If in case it is disabled, you can enable it by Opening PowerShell and then typing EnablePSRemoting as shown in the screenshot given below.
There is another way to enable it – Click on “Server Manager” → Local Server, then ENABLE Remote management.
Adding a Server for Remote Management
To add other servers for remote management, follow the steps given below −
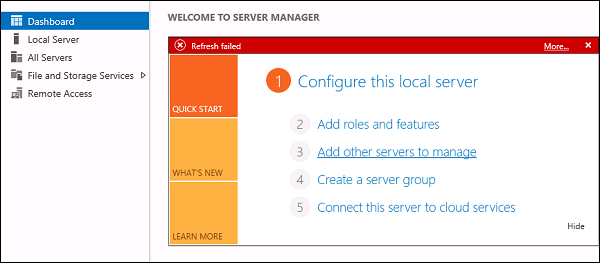
Step 1 − Server Manager → Dashboard → Add other servers to manage.
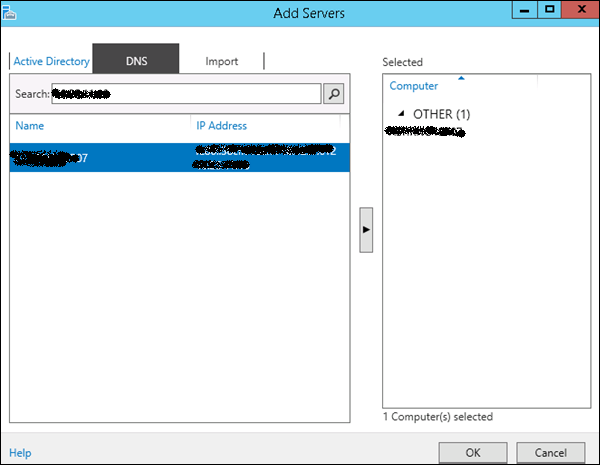
Step 2 − If the servers are joined to the domain, you add the select option “Active Directory“, in my case they are not joined, so I selected the second option “DNS” → In the search Box, I added the IP of the server that has to be managed → click on a small arrow → OK.
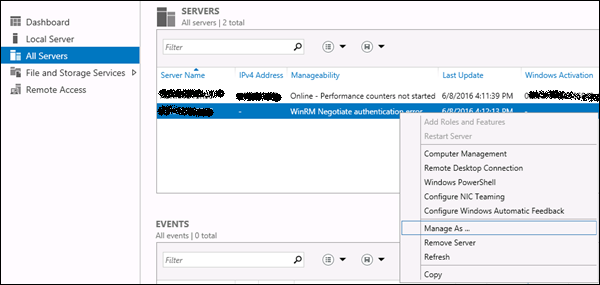
Step 3 − Go to Server Manager → All Servers, you will see the server that you have added. As my server is in the Work Group, I have to right click and click on – “Manage As” as shown in the following screenshot.
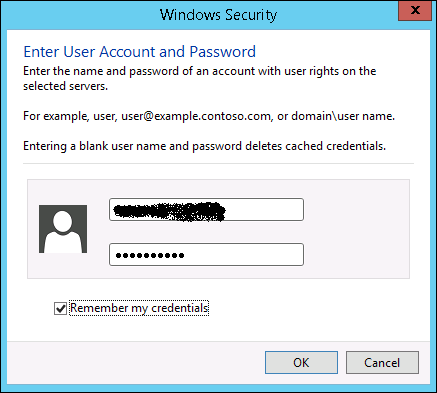
Step 4 − Enter the credentials of the remote server as follows and then → OK.
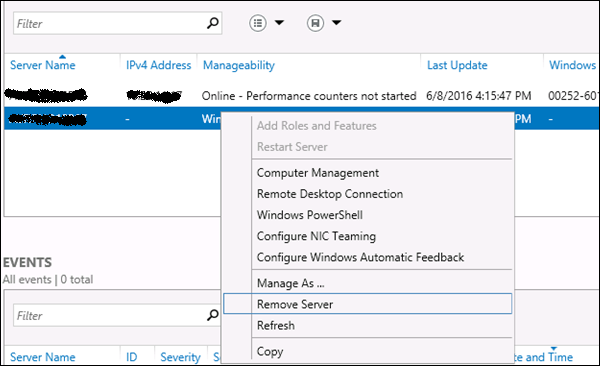
To remove a managed server, Right Click on server → Remove Server.
Windows Server 2012 — Windows Firewall
The Windows Firewall with Advanced Security is a firewall that runs on the Windows Server 2012 and is turned on by default. The Firewall settings within Windows Server 2012 are managed from within the Windows Firewall Microsoft Management Console. To set Firewall settings perform the following steps −
Step 1 − Click on the Server Manager from the task bar → Click the Tools menu and select Windows Firewall with Advanced Security.
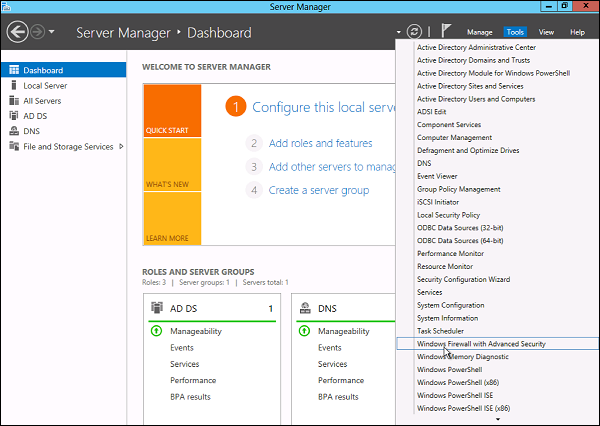
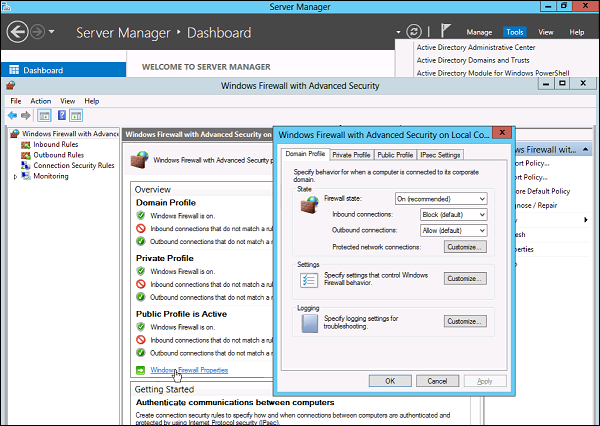
Step 2 − To see the current configuration settings by selecting Windows Firewall Properties from the MMC. This allows access to modify the settings for each of the three firewall profiles, which are – Domain, Private and Public and IPsec settings.
Step 3 − Applying custom rules, which will include the following two steps −
-
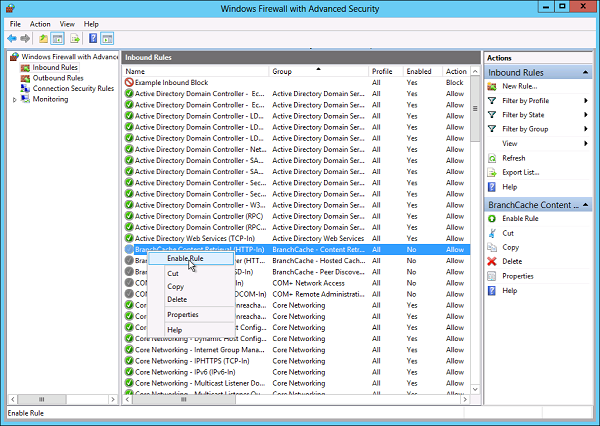
Select either Inbound Rules or Outbound Rules under Windows Firewall with Advanced Security on the left side of the management console. (As you Know outbound traffic is the traffic generated from server towards the internet and inbound traffic is vice versa). The rules that are currently enabled are denoted by green checkbox icon, while disabled rules display a grey checkbox icon.
-
Right-clicking a rule will allow you toggle enable/disable.
How to Create a New Firewall Rule?
To create a new Firewall Rule, you have to adhere to the following steps −
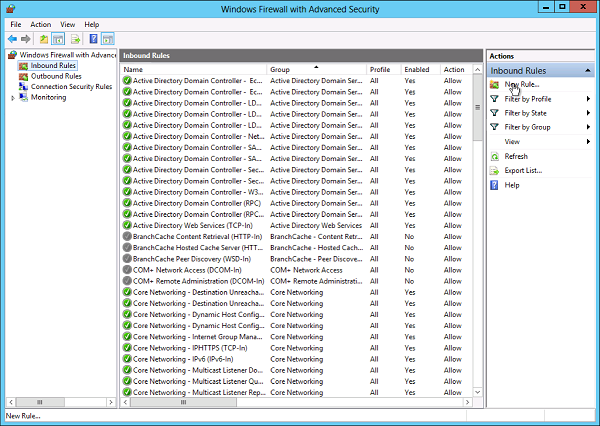
Step 1 − From the right side of either the Inbound Rules or Outbound Rules – click “New Rule”.
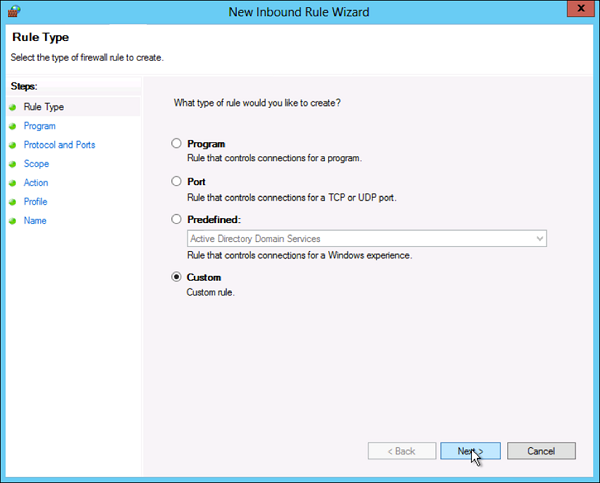
Step 2 − Custom from the Rule Type radial button → click Next.
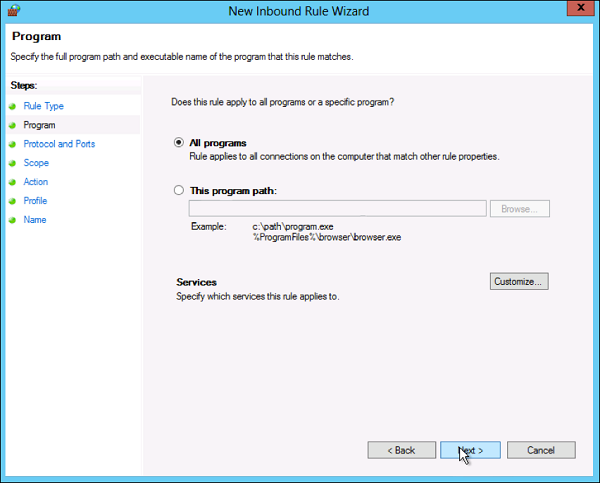
Step 3 − Select the Program association for the Custom Firewall Rule as either All programs or the path to a program → click Next.
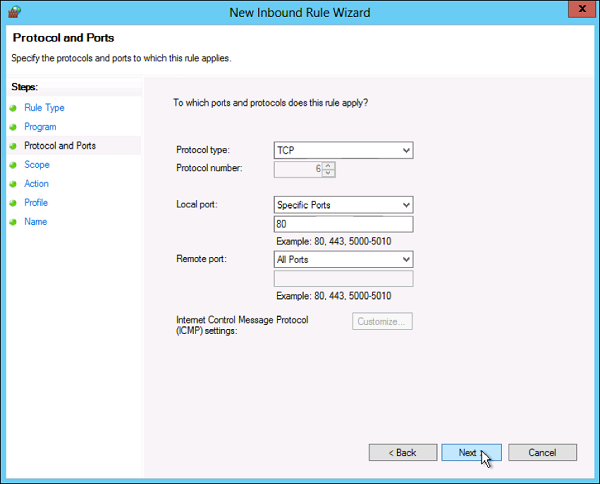
Step 4 − Protocol type field select the protocol type → click Next.
Step 5 − Select an IP address association for both local and remote addresses → click Next.

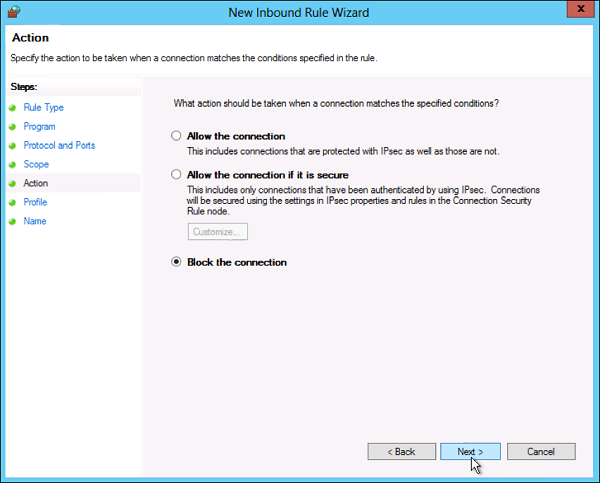
Step 6 − Select an action to take on matching traffic → click Next.
Step 7 − Select the profiles associated with the custom rule → click Next.
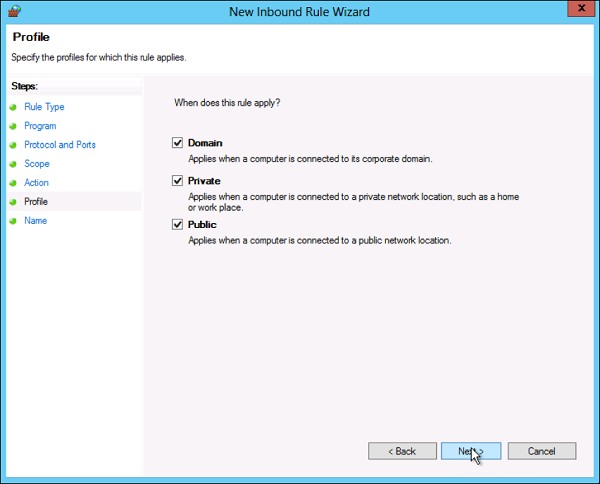
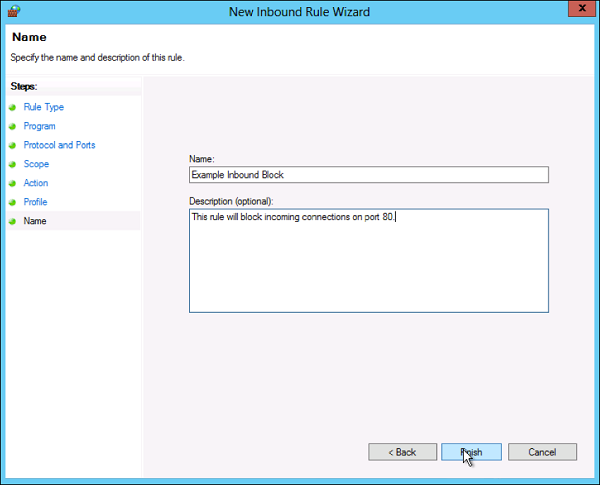
Step 8 − Put a name for your Firewall rule and an optional description → Finish.
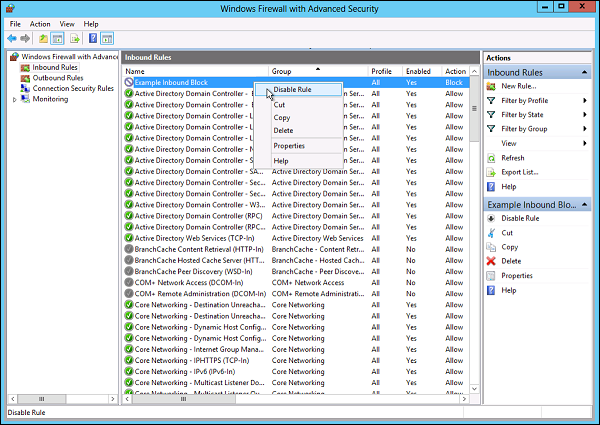
Step 9 − The firewall rule can be found on the corresponding Rule tab, either inbound or outbound depending on the type created. To disable or delete the rule find the rule in the MMC, right-click it and select either Disable Rule or Delete.
Remote Desktop Management
In this chapter, we will see how to enable remote desktop application. It is important because this enables us to work remotely on the server. To do this, we have the following two options. For the first option, we have to follow the steps given below.
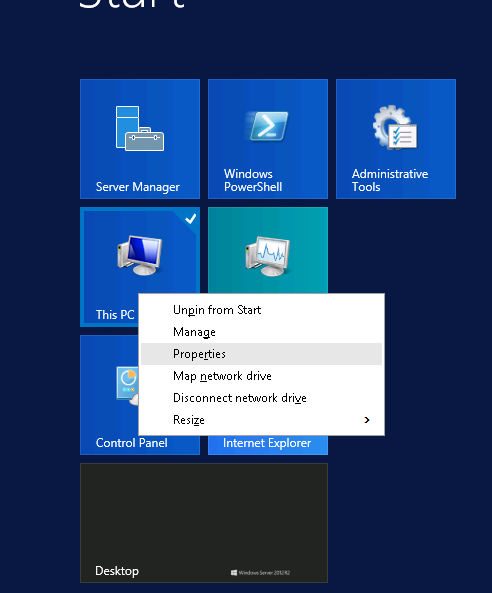
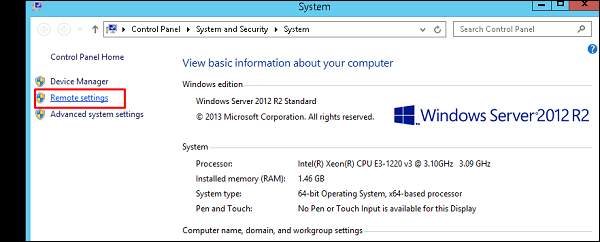
Step 1 − Go to Start → right click “This PC” → Properties.
Step 2 − On Left side click “Remote Setting”.
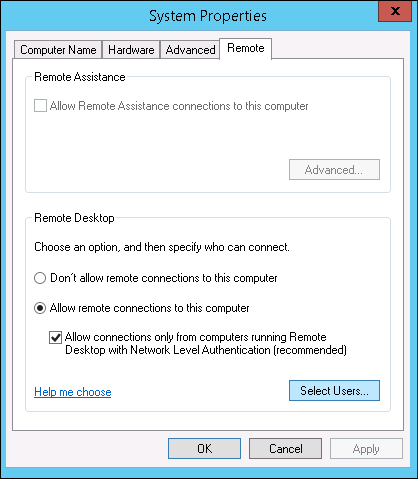
Step 3 − Check radio button “Allow Remote connection to this computer” and Check box “Allow connection only from computers running Remote Desktop with Network Level Authentication (recommended)” → click “Select Users”.
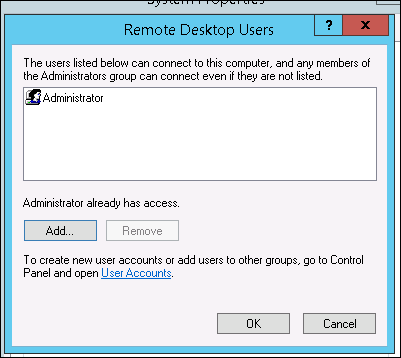
Step 4 − Click Add.
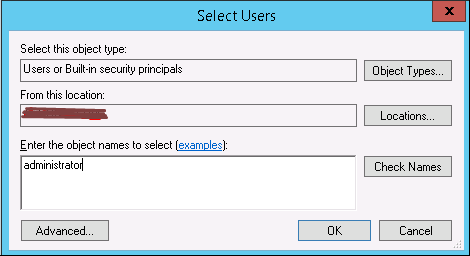
Step 5 − Type user that you want to allow access. In my case, it is administrator → click OK.
For the second option, we need to follow the steps given below.
Step 1 − Click on “Server Manage” → Local Server → click on “Enable” or Disable, if it is Disabled.
Windows Server 2012 — Resource Monitor
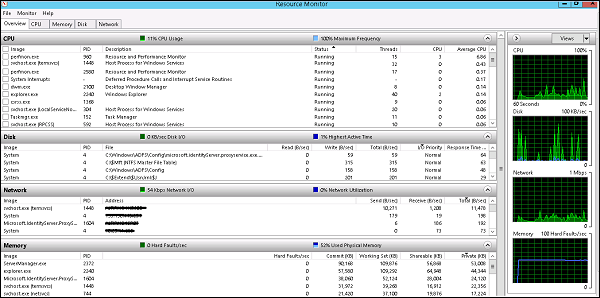
Resource Monitor is a great tool to identify which program/service is using resources like program, applications, network connection and memory usages.
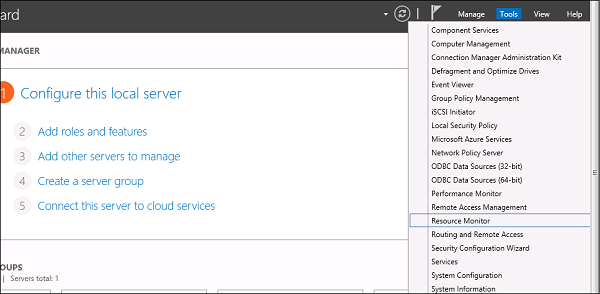
To open Resource Monitor, go to Server Manage → Tools.
Click on “Resource Monitor”, the First Section is “Overview”. It tells how much CPU is consuming every application and on the right side of the table, it monitors in real time the chart of CPU usage. The Memory tells how much memory every application is consuming and in the right side of the table it is being monitored in real time in the chart of CPU usage.
The Disk tab splits it by the different hard drives. This will show the current Disk I/O and will show the disk usage per process. The network tab will show the processes and their network bytes sent and received. It will also show the current TCP connections and what ports are currently listening, IDs too.
Windows Server 2012 — Active Directory
In this chapter, we will see how to Install Active Directory in Windows Server 2012 R2. Many of us who have worked with the previous version run DCPROMO.EXE to install it, but in the 2012 version, it is recommended by Microsoft not to use it anymore.
To continue with Installation follow the steps given below.
Step 1 − Go to “Server Manager” → Manage → Add Roles and Feature.
Step 2 − Click the Next button.
Step 3 − As we are installing AAD on this machine, we will select “Role-based or featurebased Installation” → Next.
Step 4 − Click on “Select a server from the server pool”, this is the case when it will be installed locally.
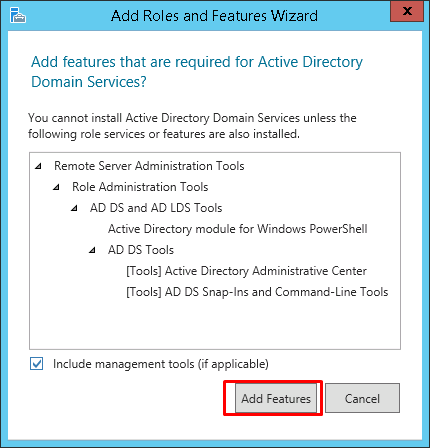
Step 5 − Check mark in the box next to Active Directory Domain Services. A box will be explaining additional roles services or features which are also required to install domain services.
Step 6 − Click Add Features.
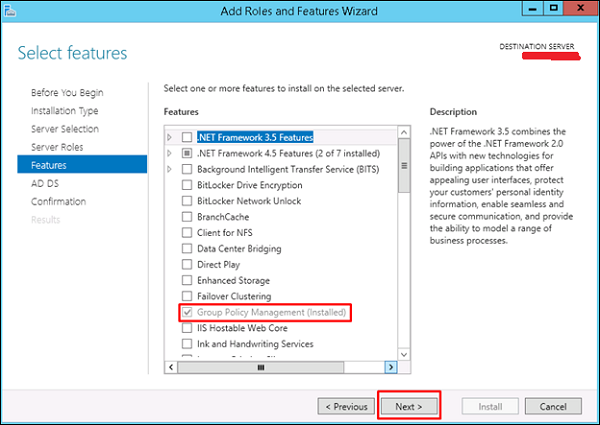
Step 7 − Check “Group Policy Management” → Next.
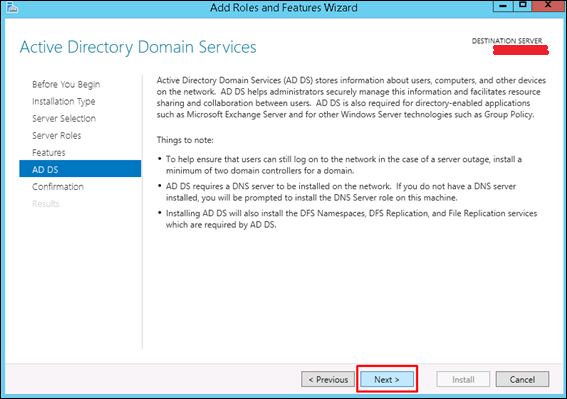
Step 8 − Click the “Next” button.
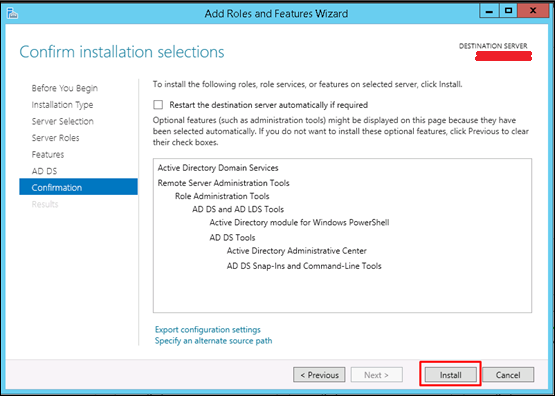
Step 9 − Click “Install”.
Installation Screen will come up now and you have to wait until installation bar completes.
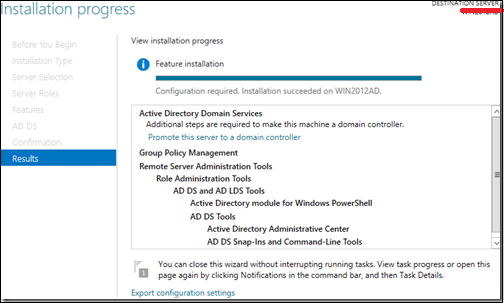
Now that the installation of DC role is finished, you have to configure it for you server.
Step 10 − Click “Server Manager” → Open the Notifications Pane by selecting the Notifications icon from the top of the Server Manager. From the notification regarding configuring AD DS (Active Directory Domain Services), click Promote this server to a domain controller.
![]()
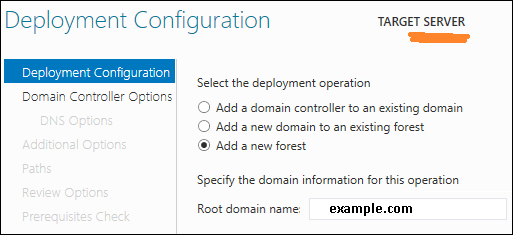
Step 11 − Click “Add a new forest” → Insert your root domain name into the Root domain name field. In my case, I have put “example.com”.
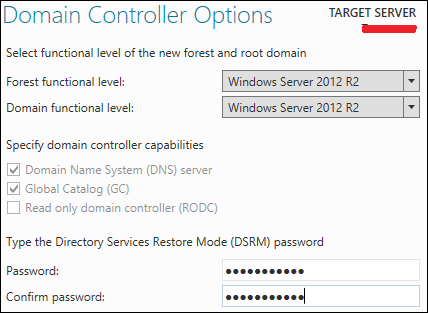
Step 12 − Select a Domain and Forest functional level. Once selected fill in a DSRM password in the provided password fields. The DSRM password is used when booting the Domain Controller into recovery mode.
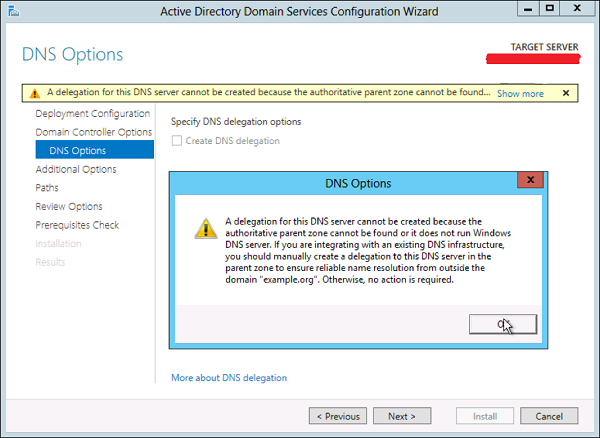
Step 13 − In the next screen which shows up, there is a warning on the DNS Options tab, click OK and then select Next.
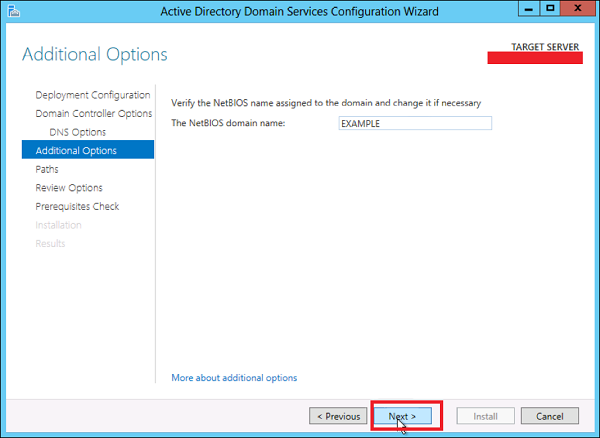
Step 14 − Enter NETBIOS name and click “Next”.
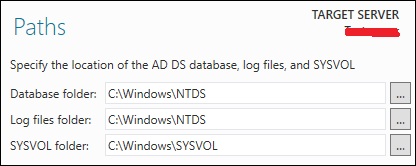
Step 15 − Select location of the SYSVOL, Log files and Database folders and then click Next.
Step 16 − Click “Install” and wait until it is finished. The server will restart several times.

The installation is now complete.
Windows Server 2012 — DC Accounts
In Windows 2012, creating account OU and group is nearly the same as in the previous versions.
To Create an OU user, please follow the steps given below.
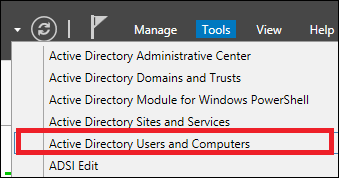
Step 1 − Go to: Server Manager → Tools → Active Directory Users and Computers.
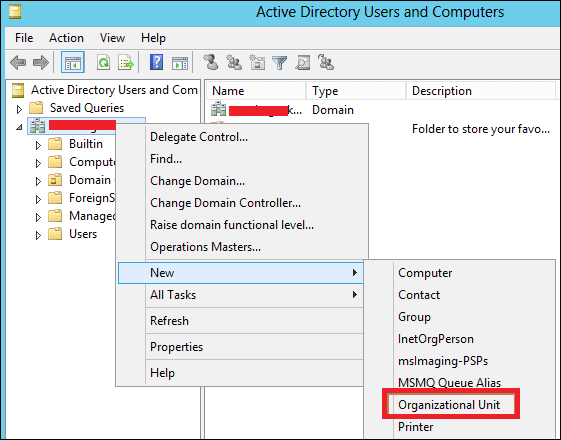
Step 2 − To create an OU named Management. Right-click domain in Active Directory Users and Computers, choose New and click Organizational Unit.
Step 3 − Type Management to name the OU. Check the Protect container from accidental deletion option. This option will protect this object from accidental deletion.
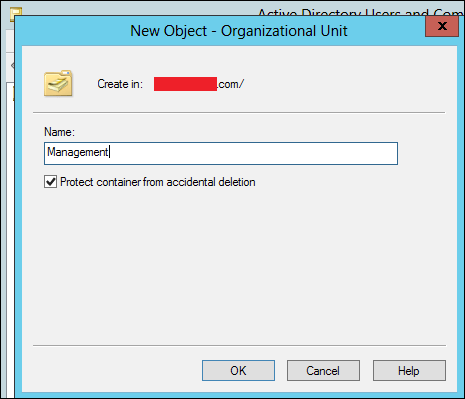
Step 4 − To create a user, Right-click on the Management OU → click New → and then click User.
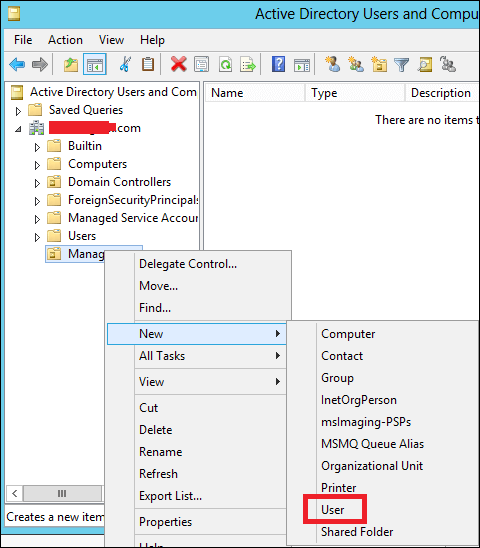
Step 5 − Complete the field with the data of the users → then click Next.
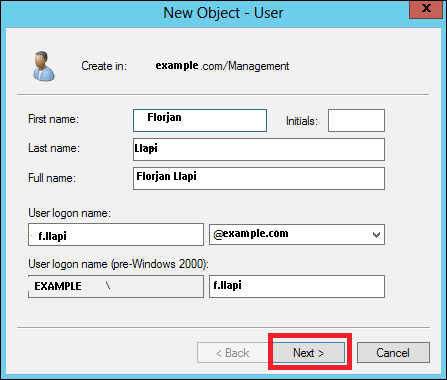
Step 6 − Now type-in the password. Check on the tick box → User must change password at next logon. The user will be forced to change the password when the user logs in → Click Next → and then click Finish.
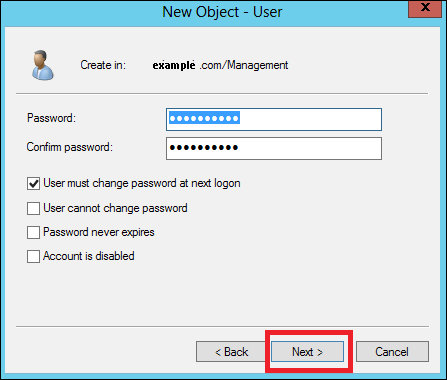
Windows Server 2012 — File System
In Windows Server 2012 a new file system it is presented with is caller Resilient File System (ReFS).
The key attributes of ReFS include −
-
Maintaining a high level of data availability and reliability, even when the individual underlying storage devices experience failures.
-
Providing a full, end-to-end resilient architecture when used in conjunction with Storage Spaces. When used together, ReFS and Storage Spaces provide enhanced resiliency to storage device failures.
The significant functionality included with ReFS is described below −
-
Integrity − ReFS stores data in a way that protects it from many of the common errors that can normally cause data loss. When ReFS is used in conjunction with a mirror space or a parity space, detected corruption — both metadata and user data, when integrity streams are enabled — can be automatically repaired using the alternate copy provided by Storage Spaces. In addition, there are Windows PowerShell cmdlets (Get-FileIntegrity and Set-FileIntegrity) that you can use to manage the integrity and disk scrubbing policies.
-
Availability − ReFS prioritizes the availability of data. Historically, file systems were often susceptible to data corruption that would require the system to be taken offline for repair. With ReFS, if corruption occurs, the repair process is both localized to the area of corruption and performed online, requiring no volume downtime. Although rare, if a volume does become corrupted or you choose not to use it with a mirror space or a parity space, ReFS implements salvage, a feature that removes the corrupt data from the namespace on a live volume and ensures that good data is not adversely affected by non-repairable corrupt data. Because ReFS performs all repair operations online, it does not have an offline chkdsk command.
-
Scalability − As the amount and size of data that is stored on computers continues to rapidly increase, ReFS is designed to work well with extremely large data sets — petabytes and larger — without performance impact. ReFS is not only designed to support volume sizes of 2^64 bytes (allowed by Windows stack addresses), but ReFS is also designed to support even larger volume sizes of up to 2^78 bytes using 16 KB cluster sizes. This format also supports 2^64 – 1-byte file sizes, 2^64 files in a directory and the same number of directories in a volume.
-
Proactive Error Correction − The integrity capabilities of ReFS are leveraged by a data integrity scanner, which is also known as a scrubber. The integrity scanner periodically scans the volume, identifying latent corruptions and proactively triggering a repair of that corrupt data.
When the metadata for a ReFS directory is corrupted, subfolders and their associated files are automatically recovered. ReFS identifies and recovers the files while ReFS remains online. Unrecoverable corruption of the ReFS directory metadata affects only those files that are in the directory in which the corruption has occurred.
ReFS includes a new registry entry, RefsDisableLastAccessUpdate, which is the equivalent of the previous NtfsDisableLastAccessUpdate registry entry. The new storage command lets in Windows PowerShell are available (Get-FileIntegrity and SetFileIntegrity) for you to manage the integrity and disk scrubbing policies.
Group Managed Service Accounts
The Managed Service Accounts (MSA) was introduced in Windows Server 2008 R2 to automatically manage (change) passwords of service accounts. Using MSA, you can considerably reduce the risk of system accounts running system services being compromised. MSA has one major problem which is the usage of such service account only on one computer. It means that MSA Service Accounts cannot work with cluster or NLB services, which operate simultaneously on multiple servers and use the same account and password. To fix this, Microsoft added the feature of Group Managed Service Accounts (gMSA) to Windows Server 2012.
To create a gMSA, we should follow the steps given below −
Step 1 − Create the KDS Root Key. This is used by the KDS service on DC to generate passwords.
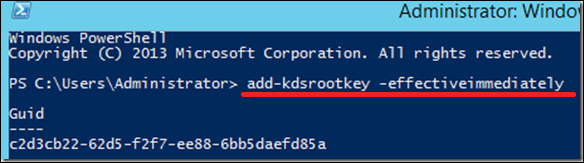
To use the key immediately in the test environment, you can run the PowerShell command −
Add-KdsRootKey –EffectiveTime ((get-date).addhours(-10))
To check whether it creates successfully or not, we run the PowerShell command −
Get-KdsRootKey
Step 2 − To create and configure gMSA → Open the Powershell terminal and type −
New – ADServiceAccount – name gmsa1 – DNSHostNamedc1.example.com – PrincipalsAllowedToRetrieveManagedPassword «gmsa1Group»
In which,
-
gmsa1 is the name of the gMSA account to be created.
-
dc1.example.com is the DNS server Name.
-
gmsa1Group is the active directory group which includes all systems that have to be used. This group should be created before in the Groups.
To check it, Go to → Server Manager → Tools → Active Directory Users and Computers → Managed Service Accounts.
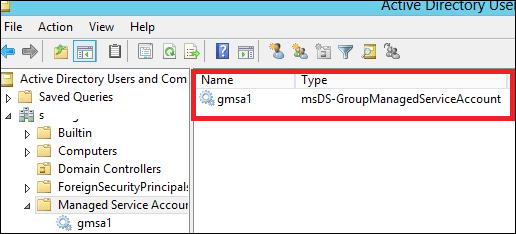
Step 3 − To install gMAs on a server → open PowerShell terminal and type in the following commands −
- Install − ADServiceAccount – Identity gmsa1
- Test − ADServiceAccount gmsa1
The result should come “True” after running the second command, as shown in the screenshot given below.
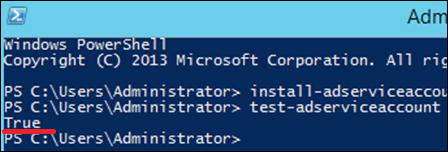
Step 4 − Go to service properties, specify that the service will be run with a gMSA account. In the This account box in the Log on tab type the name of the service account. At the end of the name use symbol $, the password need not to be specified. After the changes are saved, the service has to be restarted.
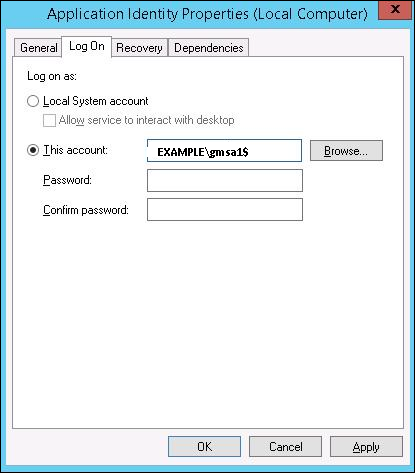
The account will get the “Log On as a Service” and the password will be retrieved automatically.
Group Policy Overview
The features of Group Policy Management were installed during the DC Role Installation. Many of the management features haven’t changed as compared to the previous versions of Windows Server. To create a GPO (Group Policy Overview), we need to follow the steps given below.
Step 1 − To create a GPO open the Group Policy Management Console (GPMC), go to Server Manager → Tools → Group Policy Management as shown in the screenshot below.
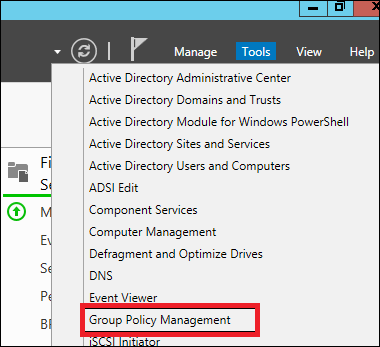
Step 2 − Right-click on an OU → select the first option Create a GPO in this domain and Link it here.
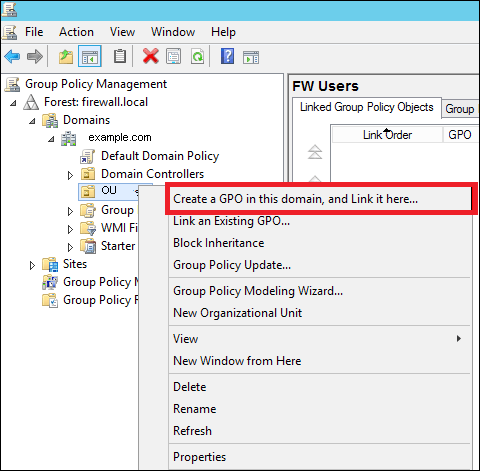
Step 3 − Type the Name for this GPO object → click OK button. We have selected the name as Test GPO.
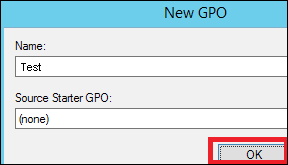
Step 4 − Right-click the GPO object and click Edit.
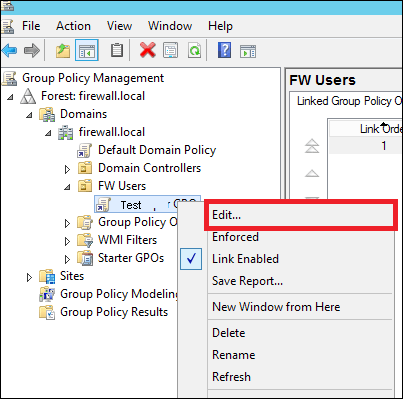
Windows Server 2012 — DHCP Role
As you know Dynamic Host Configuration Protocol (DHCP) is commonly implemented network services in today’s network environments. DHCP is primarily used to automatically distribute IP configuration settings to network clients, eliminating manually configuring hosts on TCP/IP-based networks.
To Install DHCP role, you will have to follow the steps given below.
Step 1 − Go to “Server Manager” → Manage → Add Roles and Features.

Step 2 − Click Next.
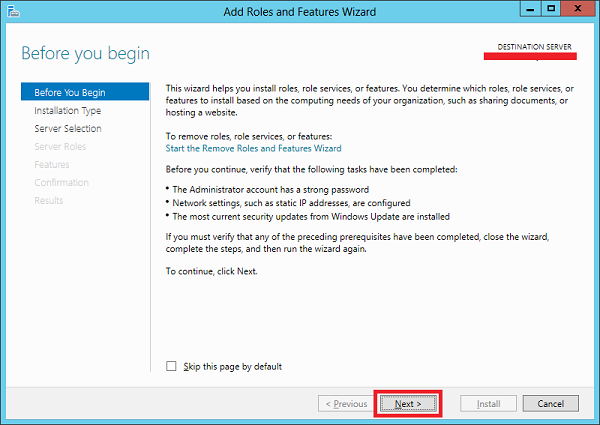
Step 3 − Select the Role-based or feature-based installation option → click Next.
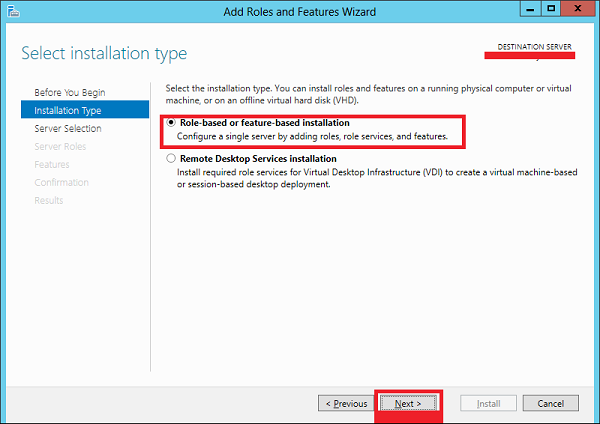
Step 4 − We will install a Local DHCP Role as it will Select a server from the Server Pool → then click Next.
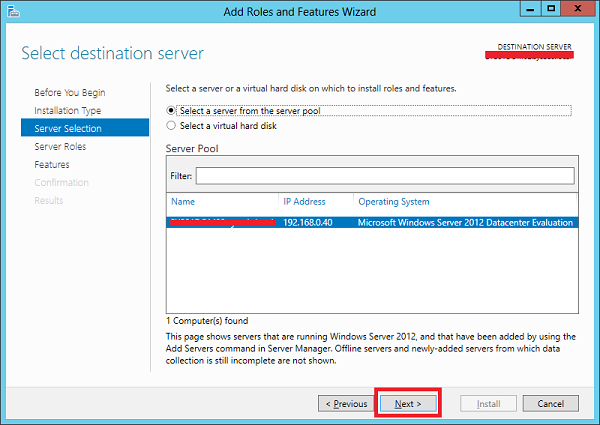
Step 5 − From the Roles lists, check the DHCP Server role → click Add Features on the popup windows as shown in the following screenshots.
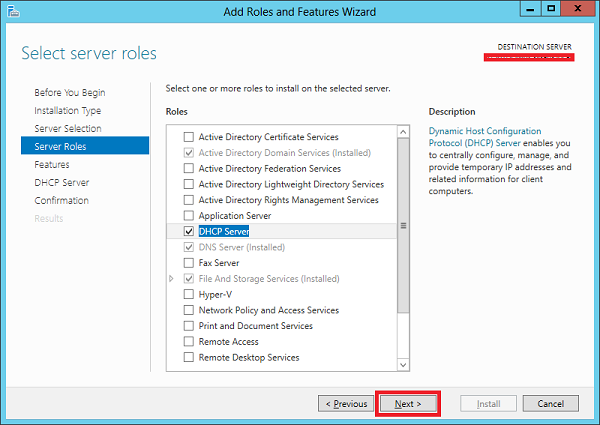
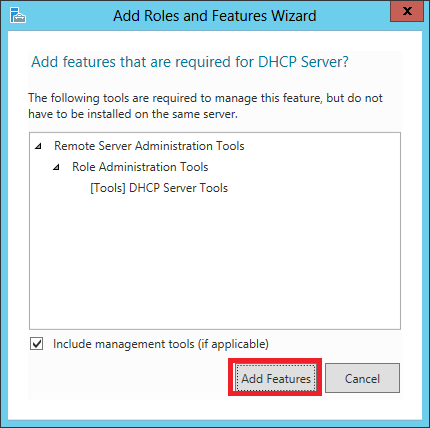
Step 6 − Click Next.
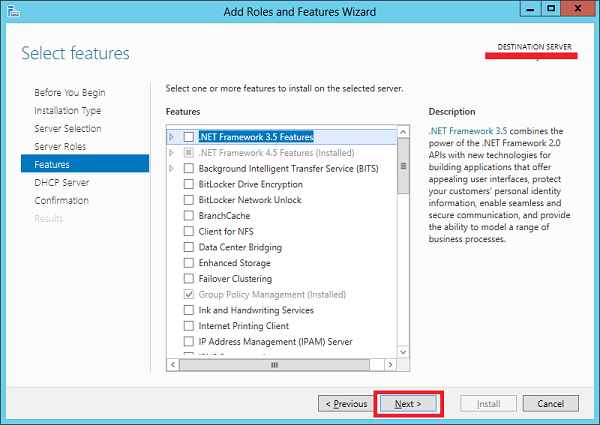
Step 7 − Click Next.
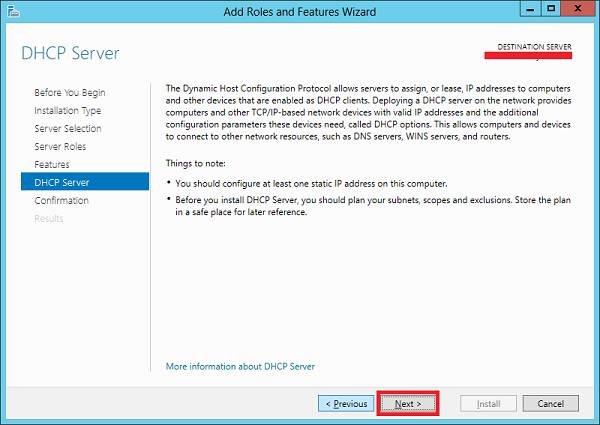
Step 8 − Click Install.
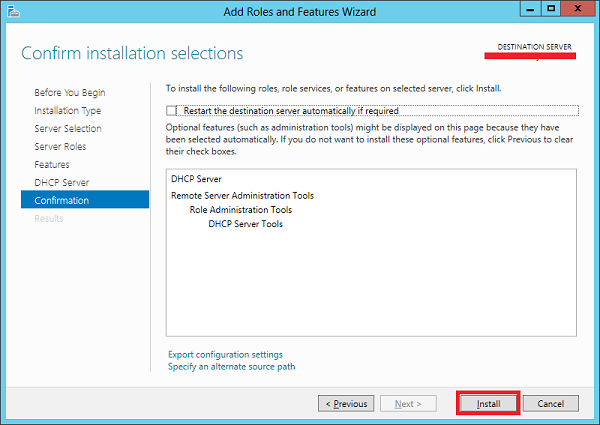
Step 9 − Click Close.
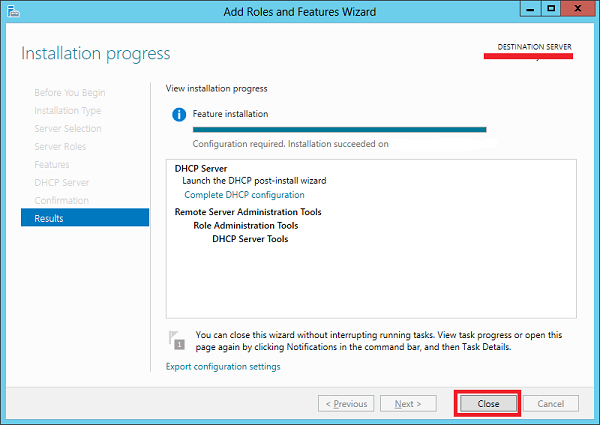
Post-deployment Configuration
In this section, we will see how to do the post-deployment configuration of the DHCP. Please follow the steps given below.
Step 1 − Click on the warning icon and then click on “Complete DHCP Configuration”.
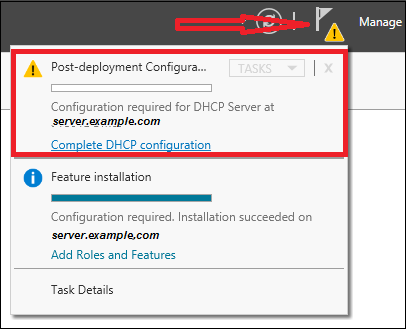
Step 2 − Click Next.
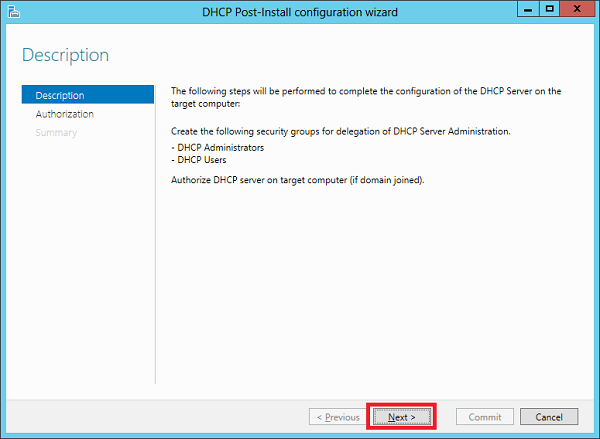
Step 3 − Select a domain user account that has permissions to create objects in the Net Services container in Active directory or a domain admin account → click Next.

Step 4 − Click Close.
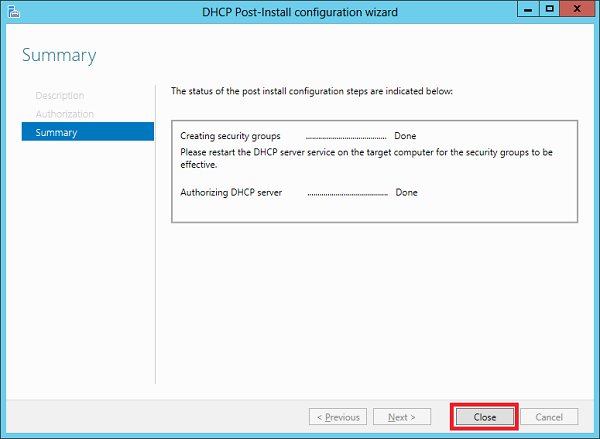
Scope Implementation of DHCP
Now we have to configure the service to make it useful for the computers. To do this, we need to follow the steps given below.
Step 1 − Server Manager screen → Tools → DHCP.
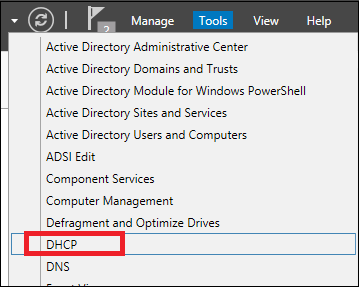
Step 2 − Right-click on the DHCP Server → then click on “Add/Remove Bindings… “
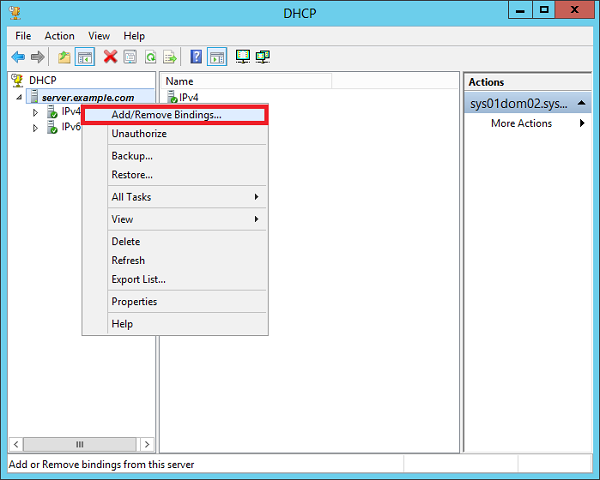
Step 3 − Ensure the static IP address of the server should appear as shown in the following screenshot.
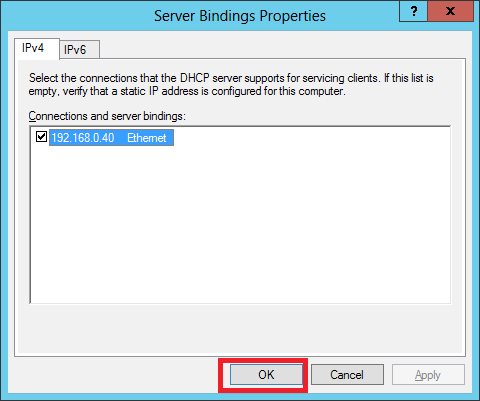
Step 4 − Right-click on IPv4 → Select “New Scope”.
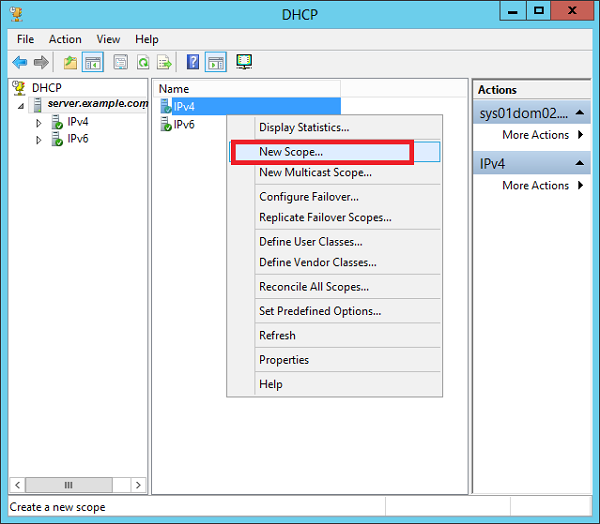
Step 5 − Click “Next”.
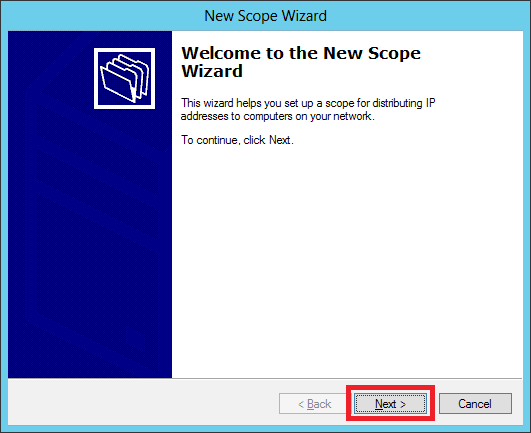
Step 6 − Enter Scope Name and description as shown in the following screenshot and then → Next.
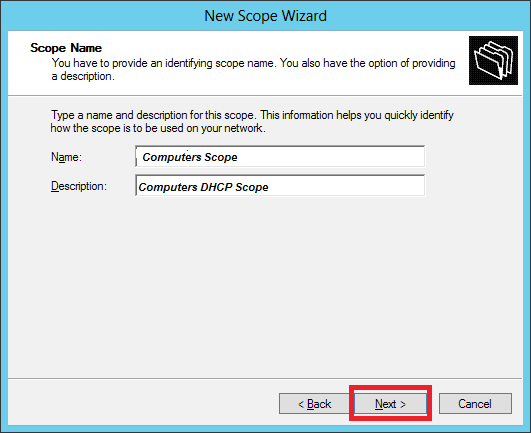
Step 7 − Enter the Start and End IP address, the Subnet mask, leave the Length as default “24” for class C subnet → click Next.
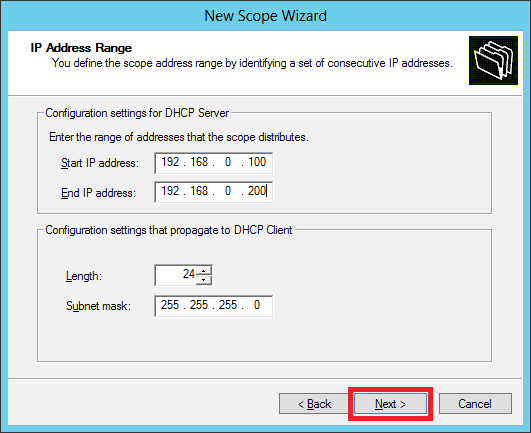
Step 8 − Enter your IP range in the exclusion list. If you have devices on the network that require static IP address and also ensure that the excluded range falls with the Start and End range earlier specified, then → click Next.
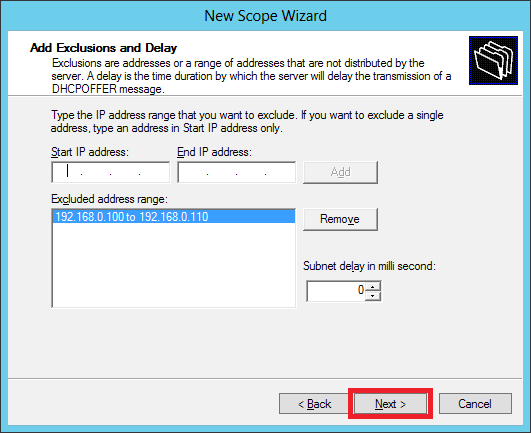
Step 9 − Enter the desired lease duration for the assigned IP’s or leave as default → then click Next.
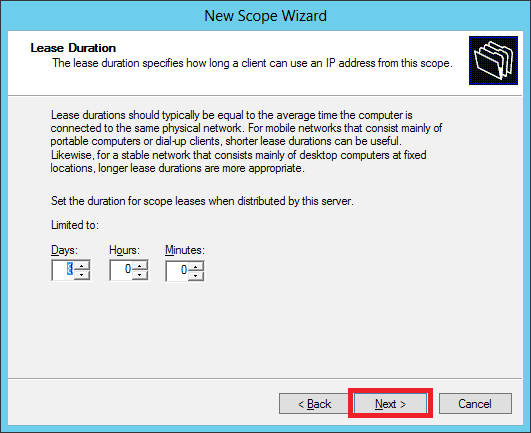
Step 10 − Select → Yes, I want to configure these options now to configure the DHCP options for the new scope → then click on Next.
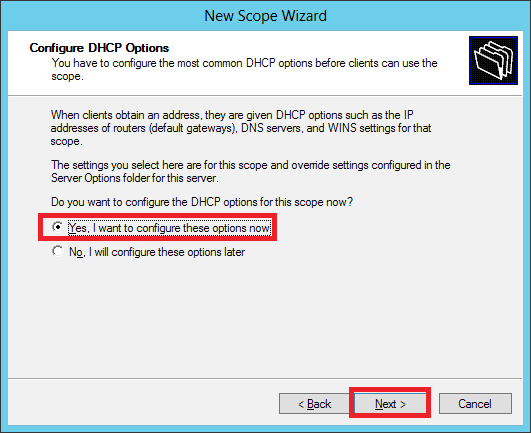
Step 11 − Enter the default gateway which is the IP of your Router → then click Next.
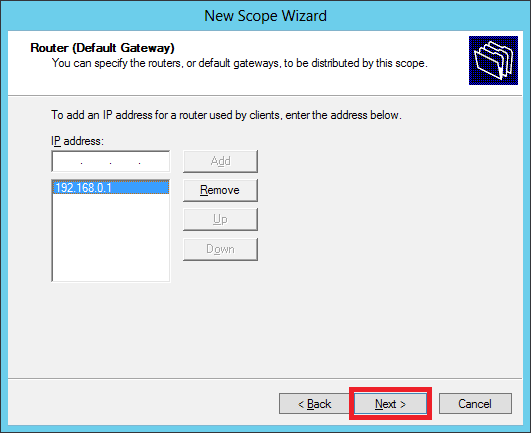
Step 12 − Add DNS IP → click Next (we can put Google DNS or if it is a Domain environment you can put the DC IP there) then click → Next.
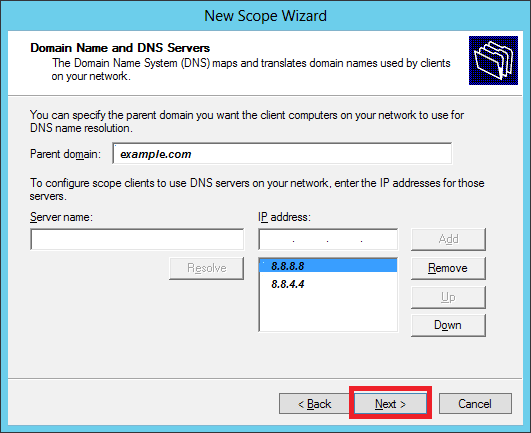
Step 13 − Specify your WINS Server if any and then click → Next.
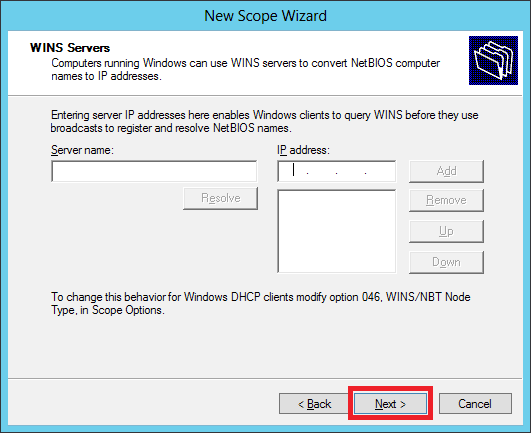
Step 14 − Select Yes, I want to activate this scope now option to activate the scope immediately and then click → Next.
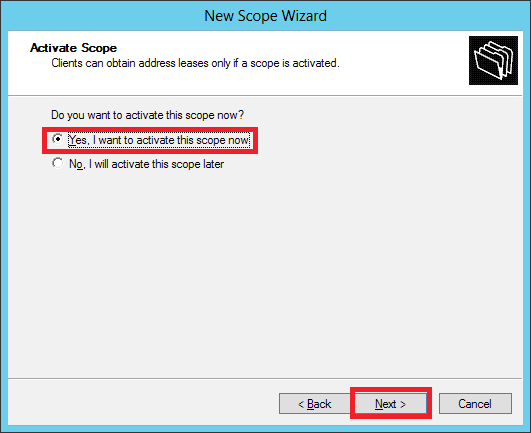
Step 15 − Click Finish.
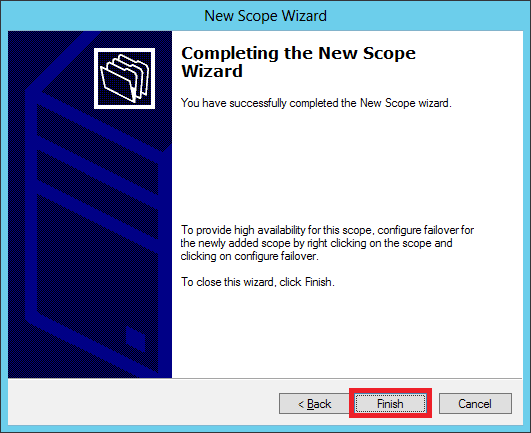
Windows Server 2012 — DNS Role
DNS Role is one of the most important services in a network with Domain Controllers Environment. It helps us to resolve domain names internally and externally to IP and to have access to the requested service for the respective domain.
Let us now see how to install the DNS Role. For this we need to follow the steps given below.
Step 1 − To Install DNS role, go to “Server Manager” → Manage → Add Roles and Features.

Step 2 − Click Next.

Step 3 − Select the Role-based or feature-based installation option and then click Next.

Step 4 − We will install a Local DNS role as it will select a server from the server pool → and then click Next.

Step 5 − From the Server Roles lists, check the DNS Server role → click Add Features on the popup windows and then click Next.
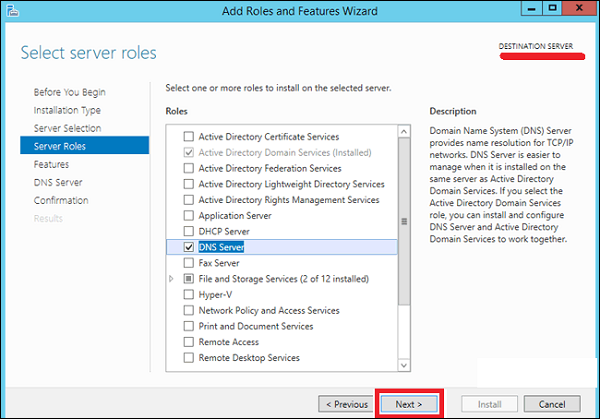
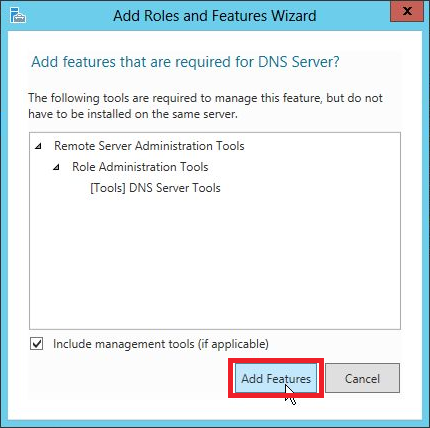
Step 6 − Click Next.
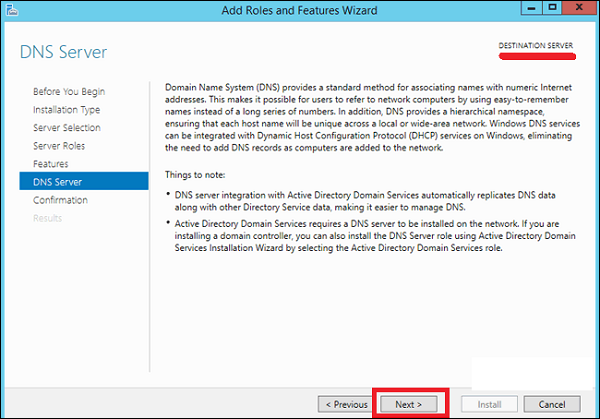
Step 7 − Click Install.
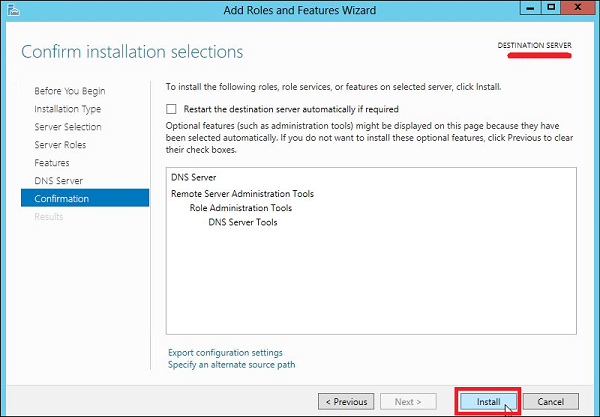
Step 8 − Wait until installation bar is complete.
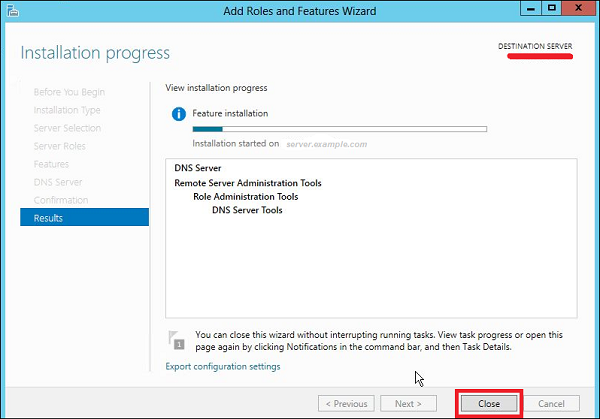
Once the installation is finished, click on Close.
Windows Server 2012 — Primary Zones
To manage DNS, we have to create a primary Zone because by default, there are no zones in order to manage the records.
Step 1 − To manage DNS, go to Server Manager → Tools → DNS → Right click on “Forward Lookup Zone” → New Zone.
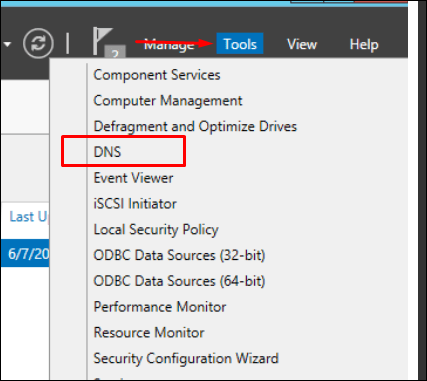
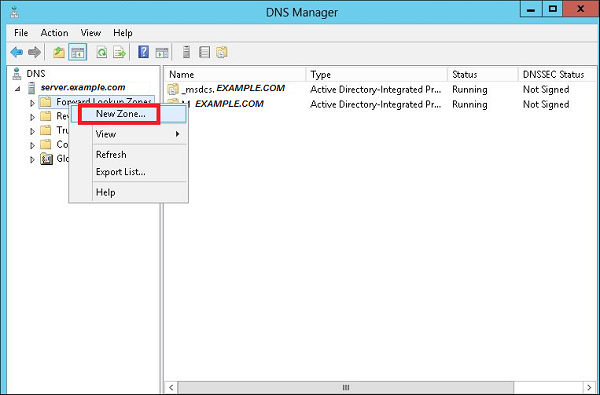
Step 2 − Select “Primary Zone” and then click Next.
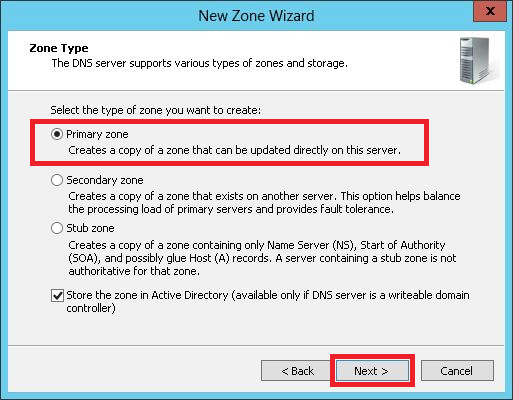
Step 3 − Enter the name of the primary Zone for which you want to manage the records.
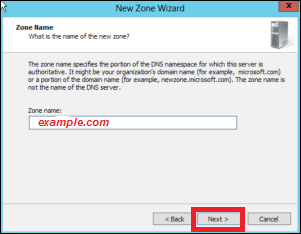
Step 4 − Select “Create a new file with this filename” option.
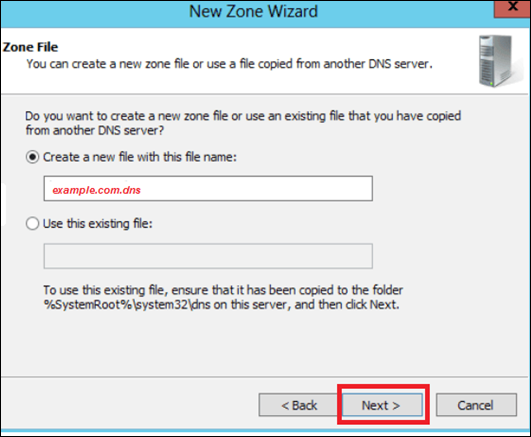
Step 5 − If you want to update the record of this zone manually, you have to select “Do not allow dynamic Updates”, as shown in the following screenshot.
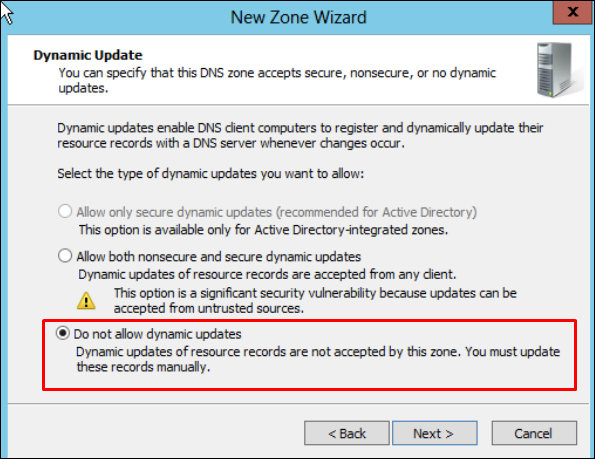
Step 6 − Click the Finish button.
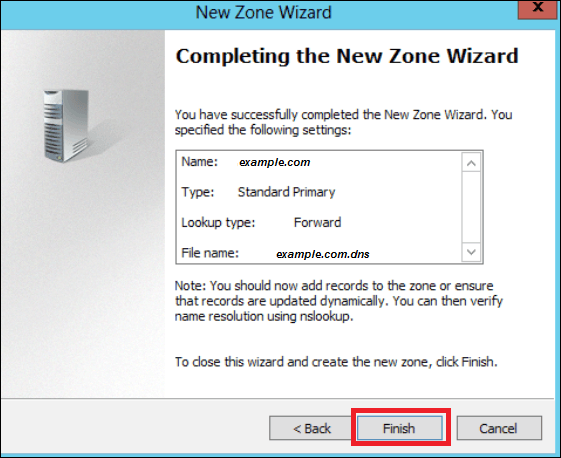
Windows Server 2012 — Manage Records
As you know, in DNS you can add records according to your need and in Windows server 2012 as well. This doesn’t change too much from its earlier version of Windows Server 2008.
To add or manage records, we have to follow the steps given below −
Step 1 − Server Manager → DNS → Right click on the server that has a DNS record, which in our case is local.
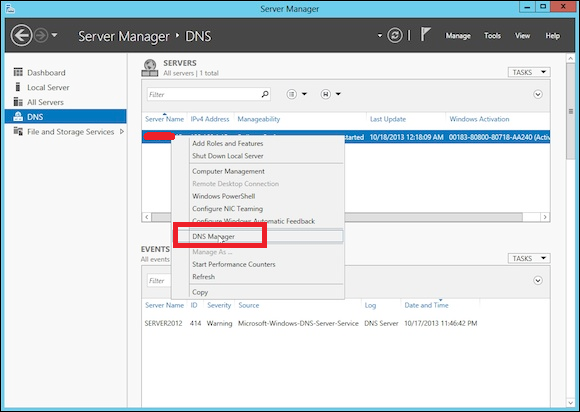
Step 2 − Go to “Forward Lookup Zone”.
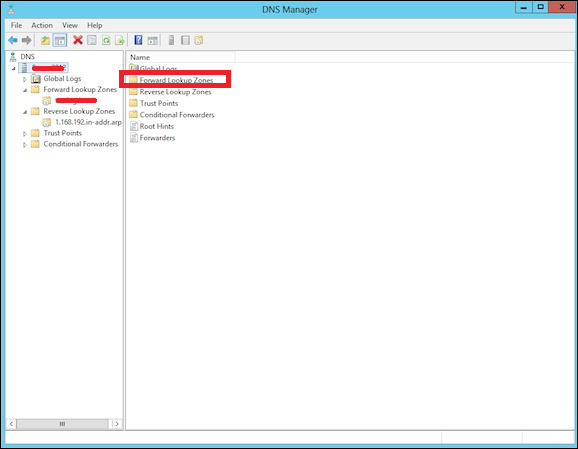
Step 3 − Right Click on the empty Field → New Host (A or AAAA) …

Step 4 − Name field and the subdomain name or case is WWW. → IP address we put is 192.168.1.200. So, when we will type-in our browser www.example.com, it will redirect us to 192.168.1.200.
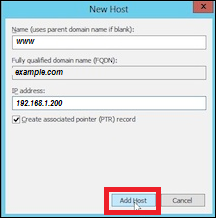
Step 5 − To add a Mail Server Record, we add an MX record and then Right click → New Mail Exchanger as shown in the screenshot given below.
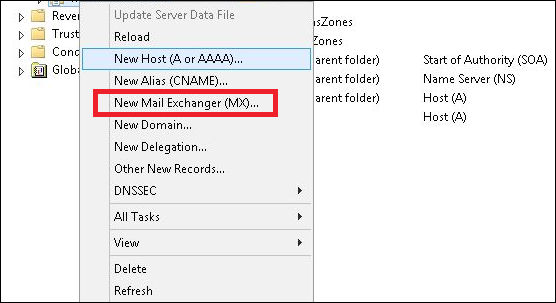
Step 6 − At “Fully qualifies domain name(FQDN) of mail server”, you enter the name of mail server → then in the “Mail server priority”, you enter a number. The smaller the number, the higher the priority.
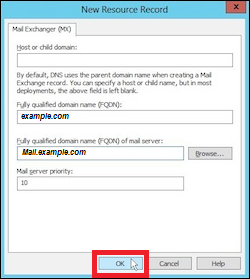
Windows Server 2012 — IIS Overview
The IIS or Internet Information Services role is one of the most important services in Windows Server 2012. It has improved features as compared to its previous versions and it helps us to publish web application or webpages.
Let us now see how to install the IIS Role for which you will have to follow the steps given below.
Step 1 − To Install IIS role, go to “Server Manager” → then Manage → and then to Add Roles and Features.
Step 2 − Click on Next in the window which pops up.
Step 3 − Select the Role-based or feature-based installation option and then click on Next.
Step 4 − I will install a Local IIS role as it will Select a server from the server pool → then click on Next.
Step 5 − From the Roles lists, check the “Web server” (IIS) Server role → Next.
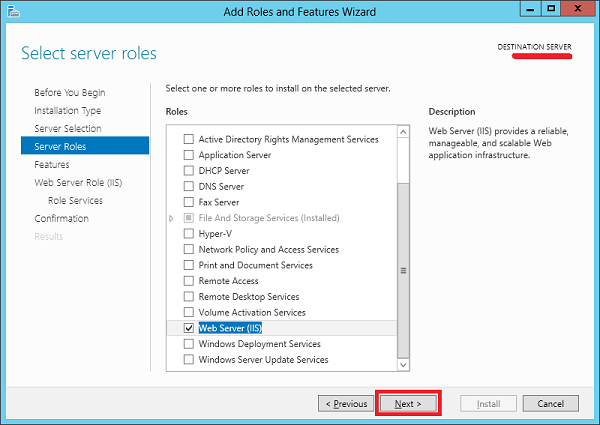
Step 6 − Click Next.
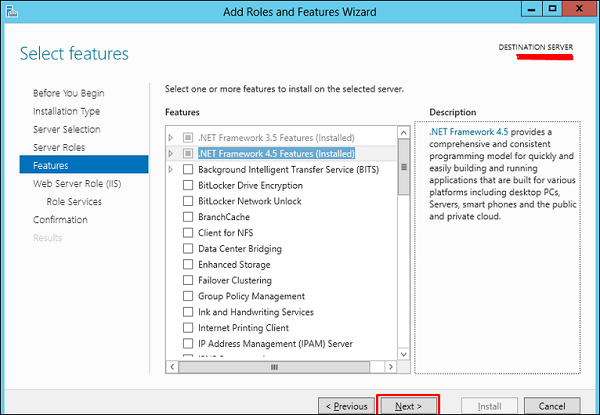
Step 7 − Click Next.
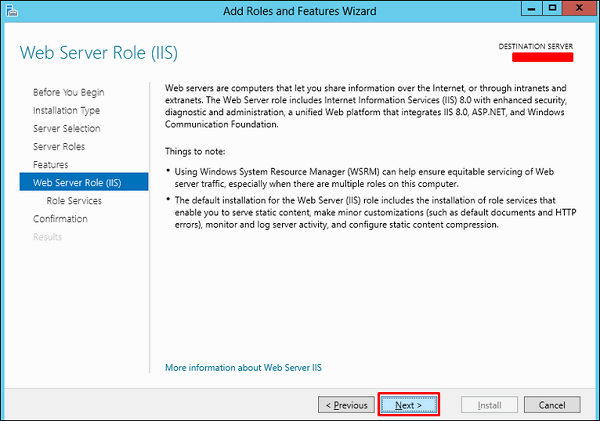
Step 8 − You can choose all the default setting or customize them according to you needs.
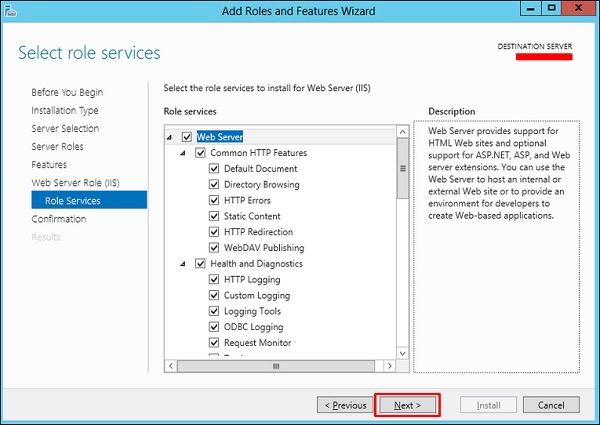
Step 9 − Click Install.
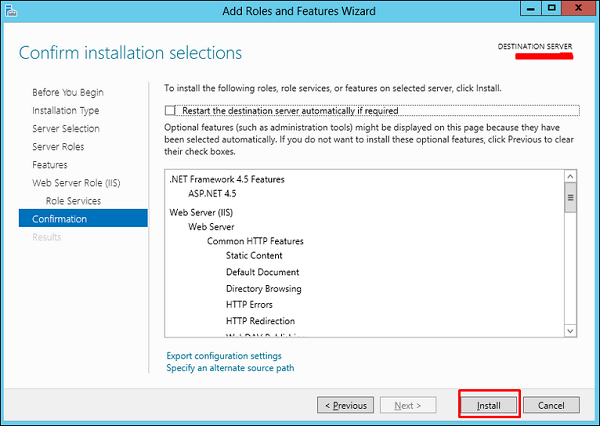
Step 10 − Wait until the Installation Wizard finishes. Once it is done click Close.
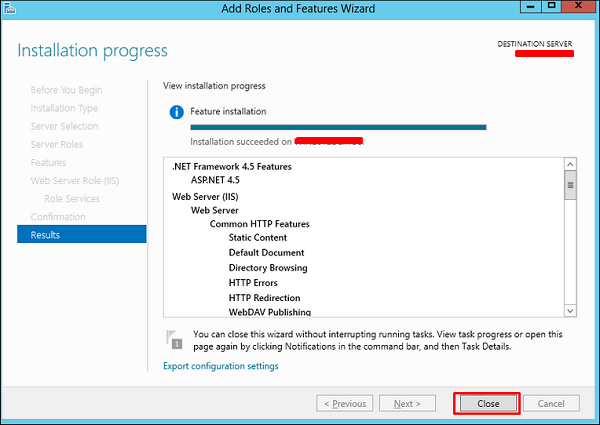
Step 11 − Check if your IIS is installed correctly. This can be done by opening your internet explorer and then typing http://localhost and you should be able to see the following screenshot.
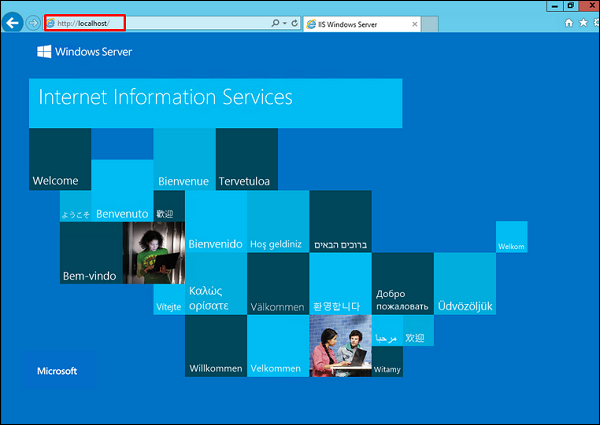
Windows Server 2012 — IIS Security
The IIS (Internet Information Services) is facing internet all the time. So, it is important to follow some rules in order to minimize the risk of being hacked or having any other security issues. The first rule is to take all the updates of the system regularly. The second one is to create different application polls to this, which can be done by following the steps shown below.
Step 1 − You have to go to: Server Manager → Internet Information Services (IIS) Manager → Application Pulls.
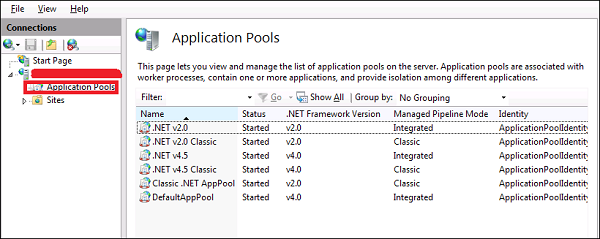
Step 2 − Click “Sites” → Right Click “Default Website” → Manage Website → Advance Settings.
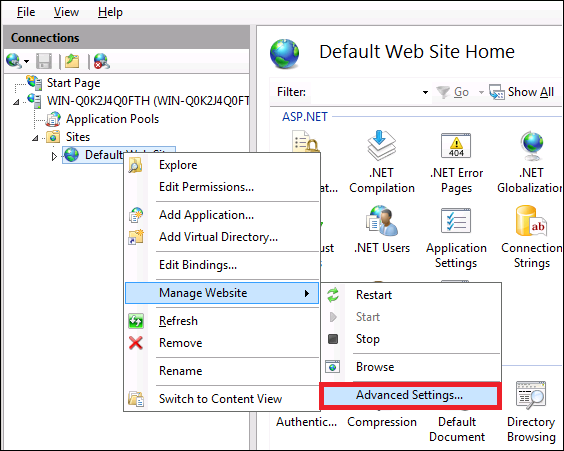
Step 3 − Select the Default Pools.
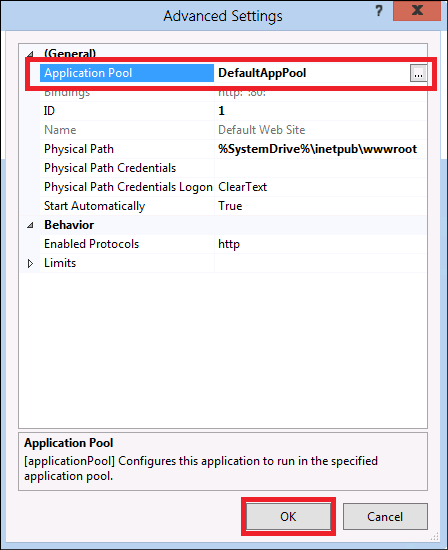
Step 4 − Disable the OPTIONS method, this can be done by following the path – Server Manager → Internet Information Services (IIS) Manager → Request Filtering.
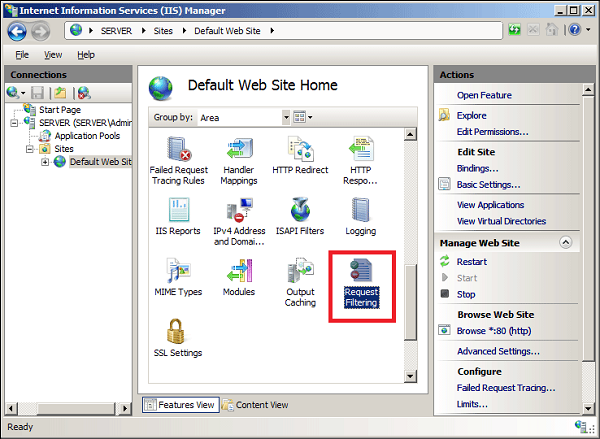
Step 5 − In the action pane, select «Deny Verb» → Insert ‘OPTIONS’ in the Verb → OK.
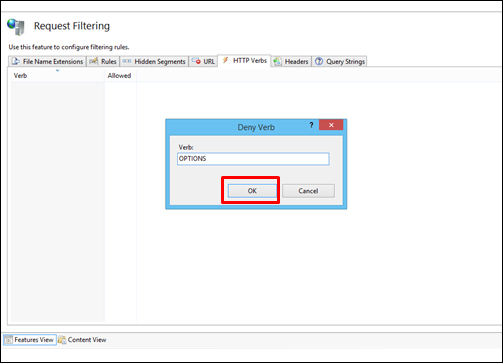
Step 6 − Enable Dynamic IP Restrictions blocks by going to – IIS Manager → Double click on «IP Address and Domain Restrictions» → Actions pane.
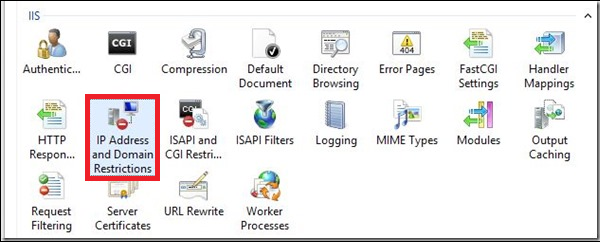
Step 7 − Then select «Edit Dynamic Restriction Settings» → Modify and set the dynamic IP restriction settings according to your needs → press OK.
Step 8 − Enable and Configure Request Filtering Rules, to do this – IIS Manager → Double click on «Request Filtering» → Change to the Rules tab → Actions Pane.
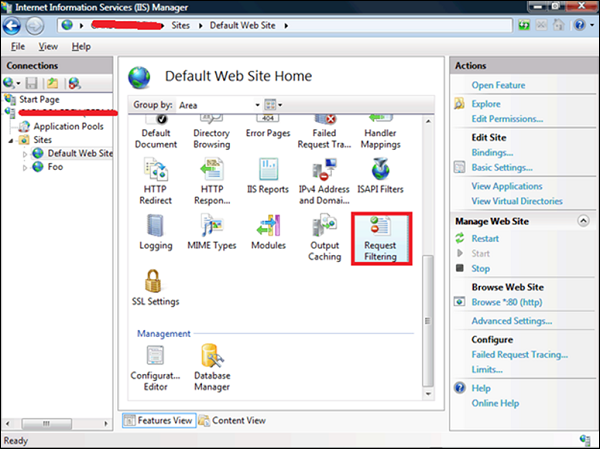
Step 9 − Then select «Add Filtering Rule» → Set the required rules → Click OK.
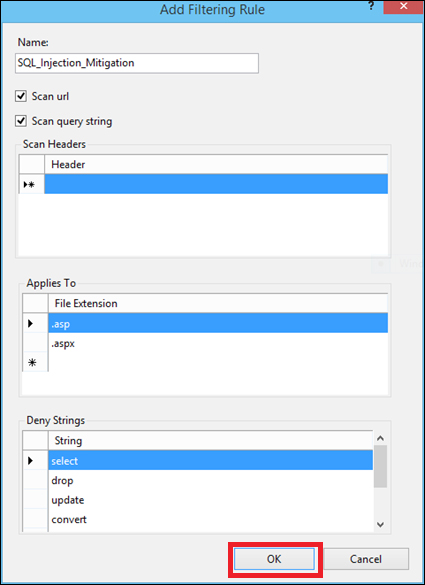
Step 10 − Enable logging, to do this we need to follow this path – IIS Manager → select the specific site you want to configure → Logging.

Windows Server 2012 — Hyper-V
Virtualization is one of the most important technology feature and Microsoft has invested on this and the responsible role is called as Hyper-V.
Let us now see how to install the Hyper-V Role, for doing this we should follow the steps given below.
Step 1 − To Install DNS role go to “Server Manager” → Manage → Add Roles and Features.
Step 2 − Click Next.
Step 3 − Select the Role-based or feature-based installation option → click Next.
Step 4 − I will install a Local Hyper-V role as it will Select a server from the server pool → Next.
Step 5 − From the Roles lists, check the Hyper-V Server role → click Add Features on the popup windows which show up and then → Next.
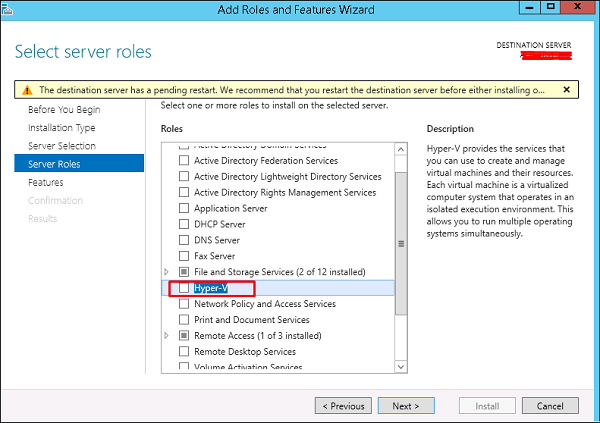
Step 6 − Click Next.
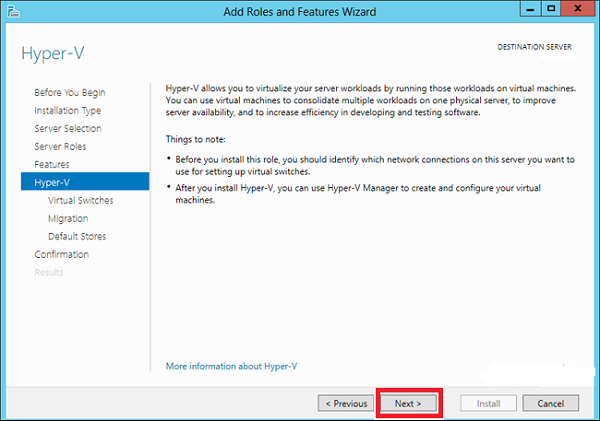
Step 7 − Choose your server’s physical network adapters that will take part in the virtualization → Next.
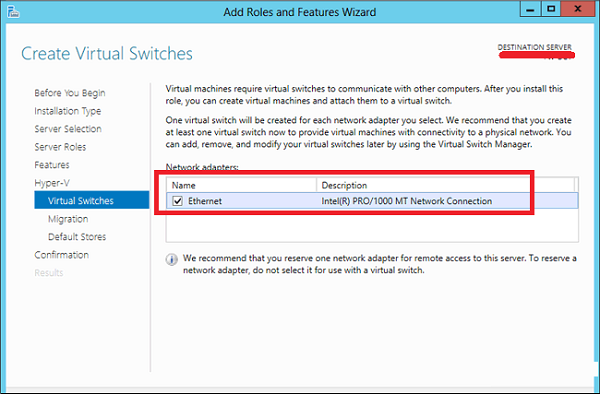
Step 8 − Under Migration, leave the default settings → Next.
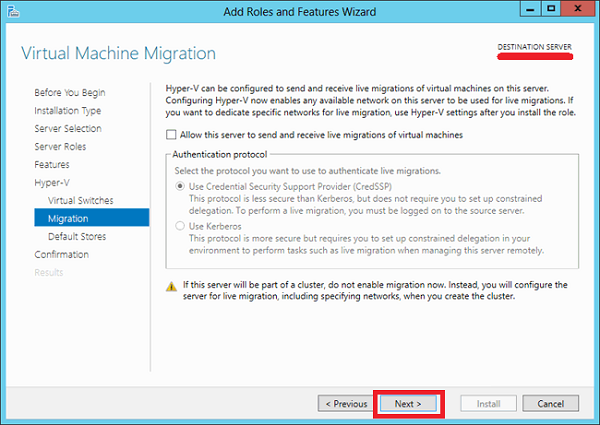
Step 9 − Choose the path where to save the file.
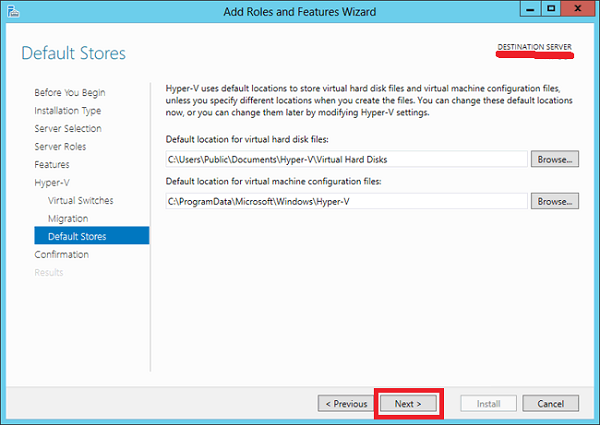
Step 10 − Click Install and wait for the installation bar to finish.
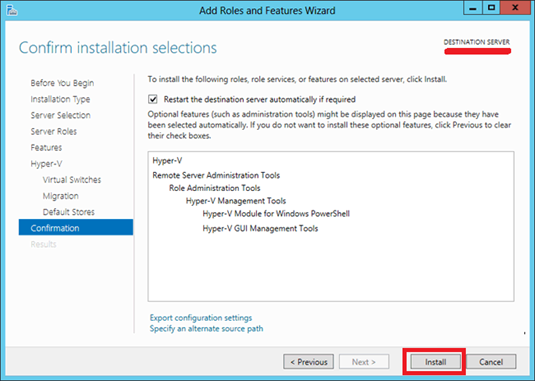
Advanced Configuration
In this chapter, we will see how to create a virtual machine. Firstly, we should open the Hyper-V manager and then follow the steps given below.
Step 1 − Open “Server Manager” → and then Click on “Hyper-V”.
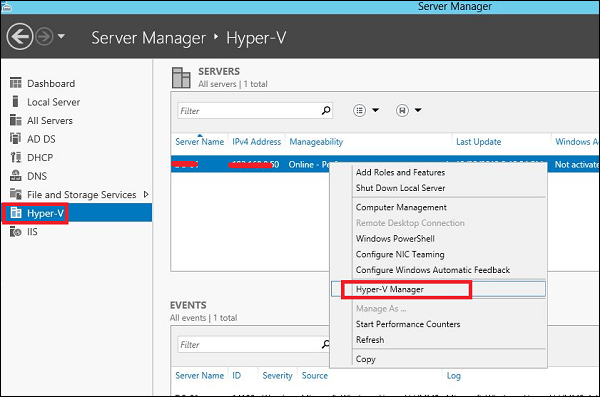
Step 2 − Click “New” on the Right side Panel or click on Action button in the options as shown in the screenshot below.
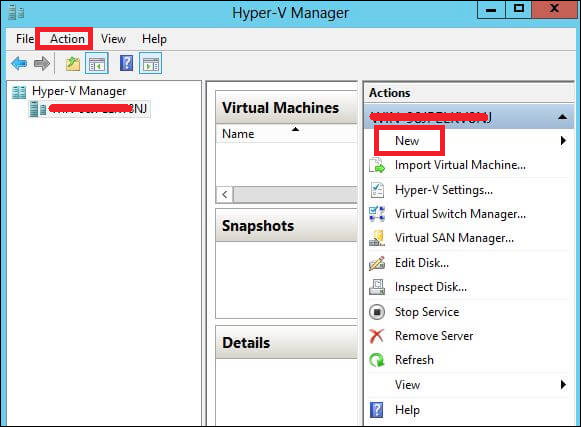
Step 3 − Double Click on the Virtual Machine option as shown in the following screenshot.
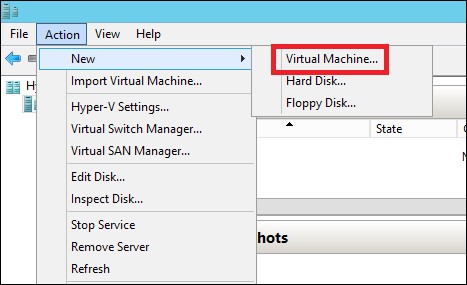
Step 4 − A new table will be open → Type the Name of your new machine and then click Next.
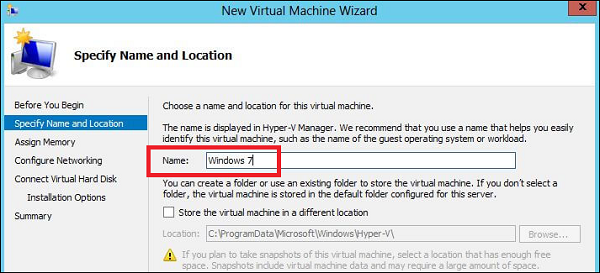
Step 5 − A new table will be open where you must allocate the memory. Keep in mind that you cannot choose more memory than what you have in your system.
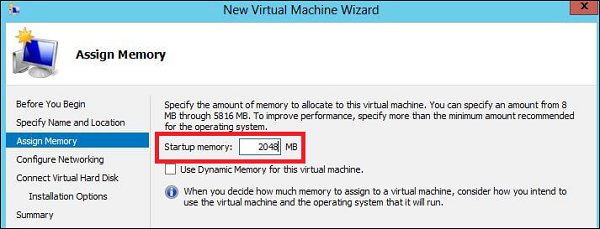
Step 6 − In the Connection dropdown box, choose you physical network adaptor and click Next.
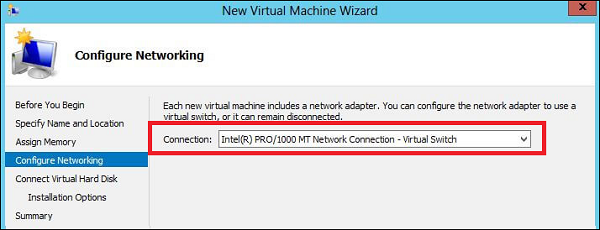
Step 7 − Now it is time to Create a Virtual Hard disk. If you already have one, choose the second option.
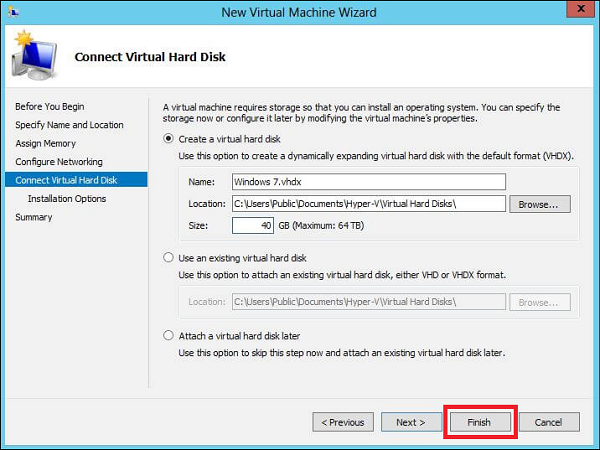
Step 8 − Select the Image of ISO that should be installed and then click Finish.
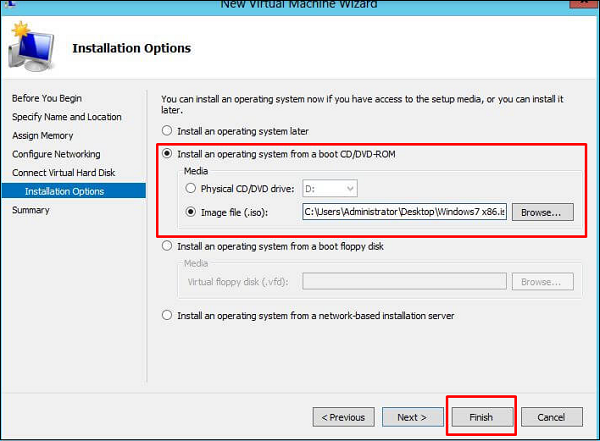
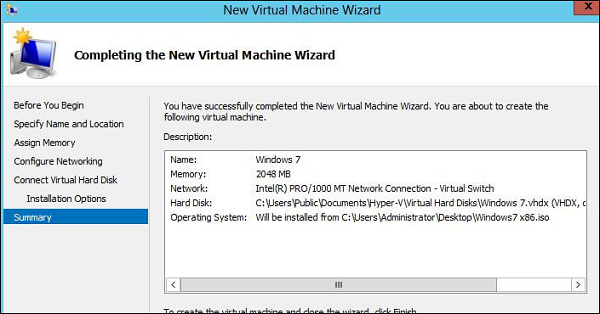
Step 9 − Connect to the Virtual machine. To do so, Right Click on the machine name and then → Connect.
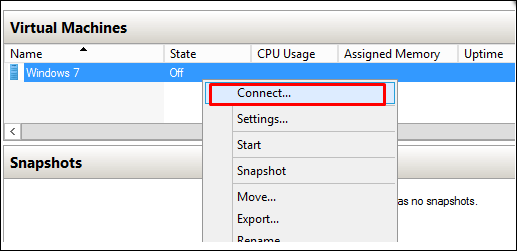
Step 10 − After that, the Installation of your ISO will continue.
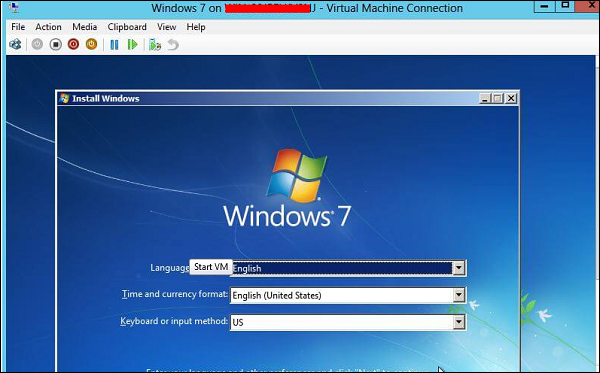
Configure WSUS Role
As you know the WSUS (Windows Server Update Services) is an update service of Microsoft which allows the companies to test updates before installing to live environment.
To install this role, we should follow the steps given below.
Step 1 − Go to “Server Manager” → Manage → Add Roles and Feature → Next → Select “Role-based or feature-Based-Installation → Select a server from the pool server and then → Next.
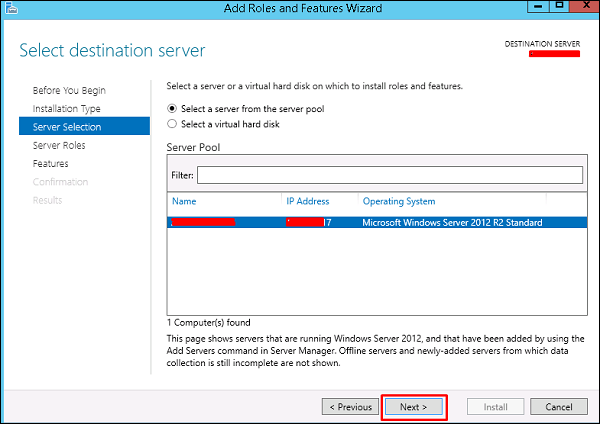
Step 2 − Check “Windows Server Update Service” a pop-up window table will come out → click “Add Features” then → Next and then again → Next.
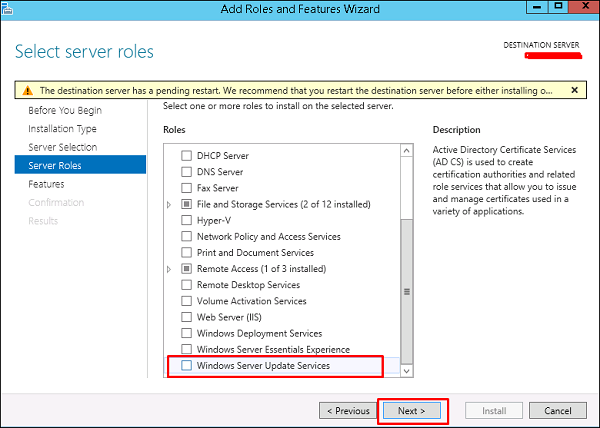
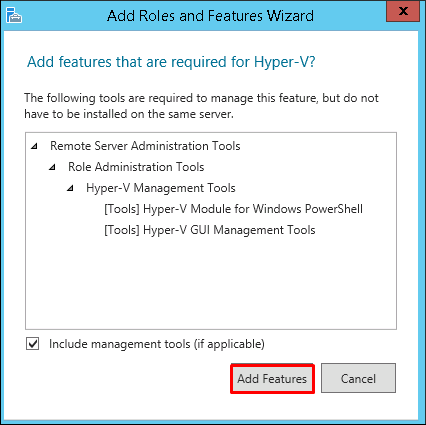
Step 3 − Check box of WID Database and WSUS Services
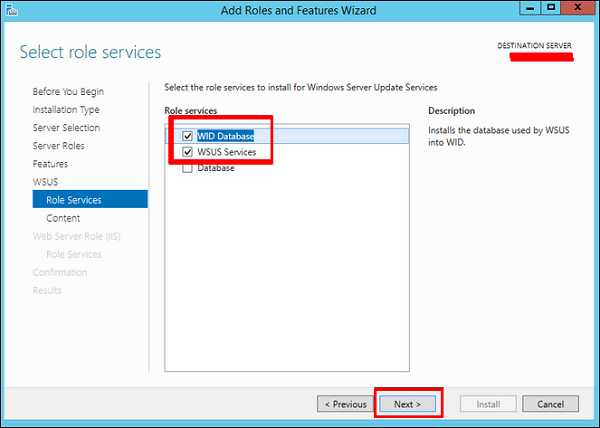
Step 4 − Choose the path for the content. If you have another partition other than C:, then install it there because C: can risk to become full → Next.
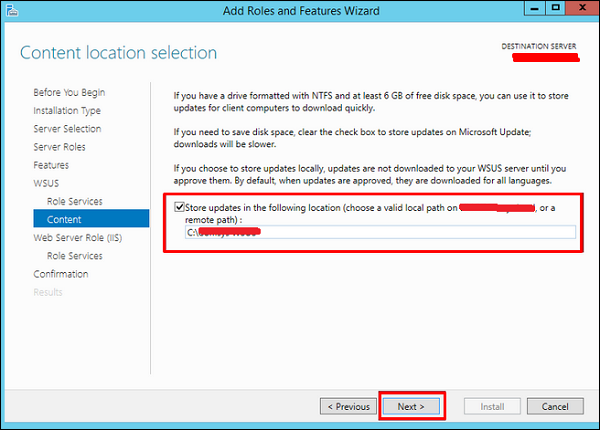
Once this is done, you should wait for the installation to finish.
WSUS Policies and Tuning
In this chapter, we will see how to configure WSUS and tune it. The following steps should be followed for configuring it.
Step 1 − When you open it for the first time, you should do it by going to “Server Manager” → Tools → Windows Server Update Services, then a Configuration wizard will be opened and then click → Next.

Step 2 − Click “Start Connecting” → Wait until the green bar is full and then → Next.
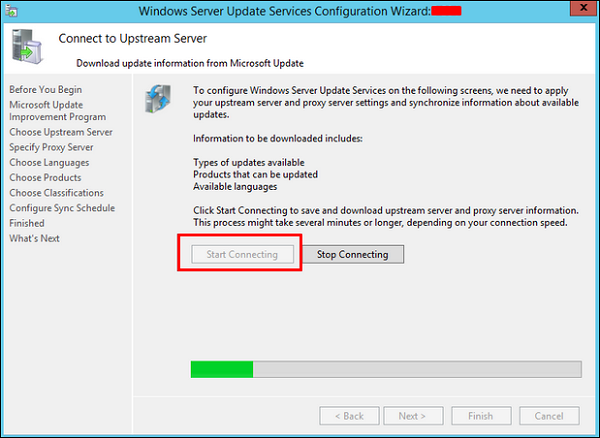
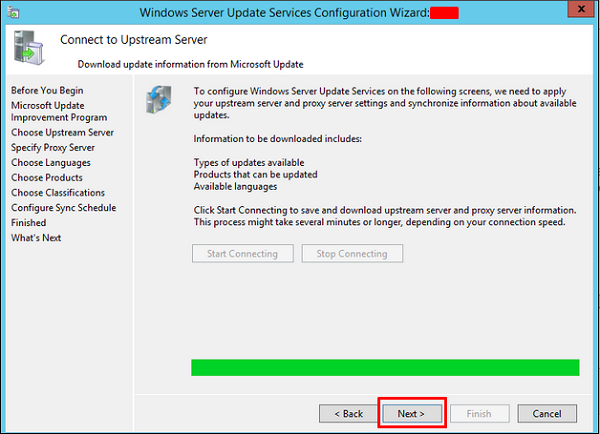
Step 3 − Check the box for which the updates want to be taken, I did for English and then → Next.
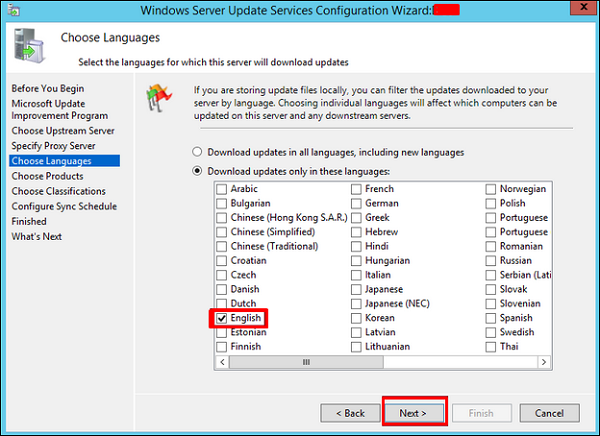
Step 4 − Check the box for all the products which you want to update. It is just for Microsoft products and it is recommended to include all the products related to Microsoft and then → Next.
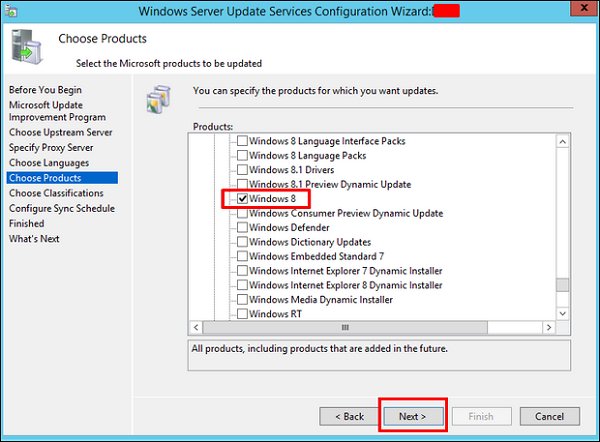
Step 5 − Choose the classification updated to be downloaded, if you have a very good internet speed, then check all the boxes, otherwise just check “Critical Updates”.
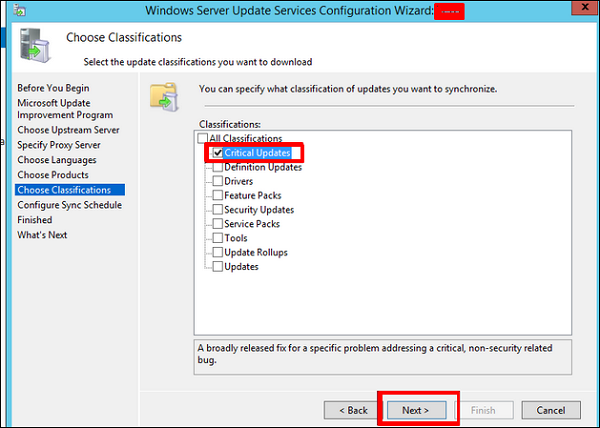
Step 6 − Now we should schedule the updates which I will recommend to do it automatically during night time → Next.

Step 7 − Check Box “Begin initial synchronization” → Finish.
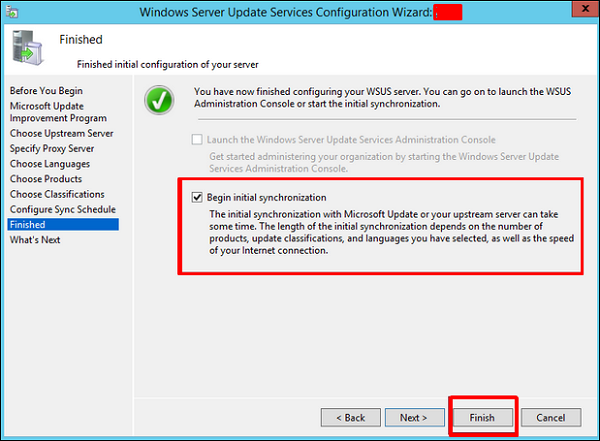
Step 8 − Now the WSUS console will be open and we must add the computer to WSUS. To do this, go to Options → Computers.
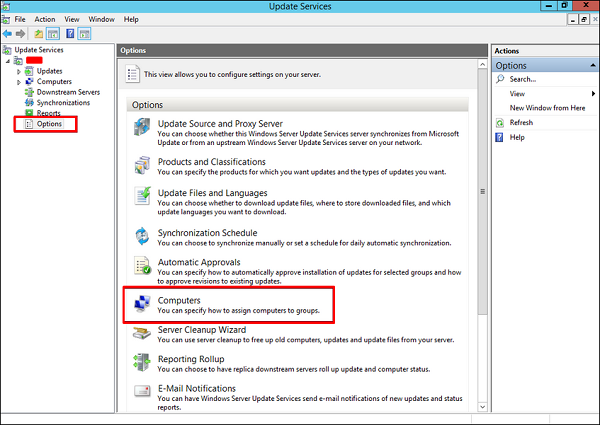
Step 9 − If you have a Domain Controler environment, choose the second option like in my case, otherwise choose the first option and then → OK.
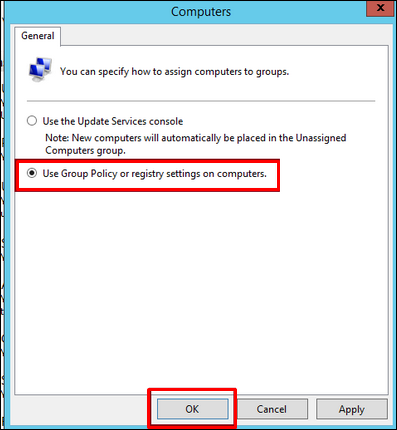
Step 10 − After you have done all this, you should approve updates, which is similar like how it is done in the previous version. To do this – Right click on the updates → Approve as shown in the screenshot given below.
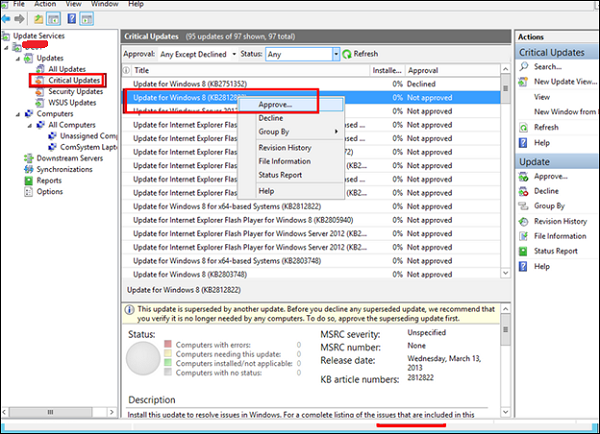
Step 11 − Then you should click Approve for install as shown in the screenshot given below.
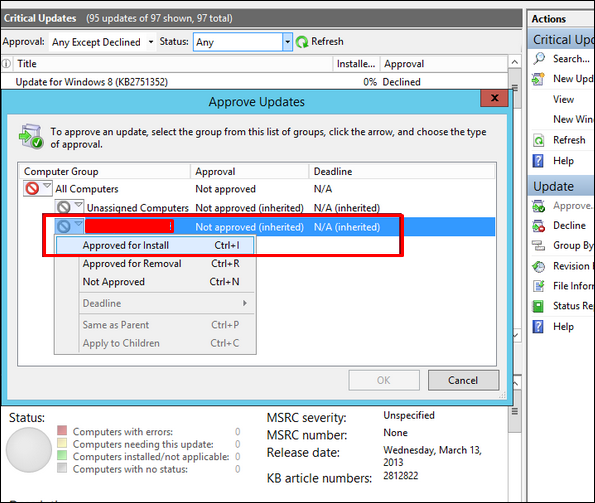
Windows Server 2012 — Sharing of Files
Another important service for Windows Server is Sharing Files and for this purpose the Windows Server 2012 has – File and Storage Services, which is found in Server Manager on the left pane as shown in the screenshot given below.
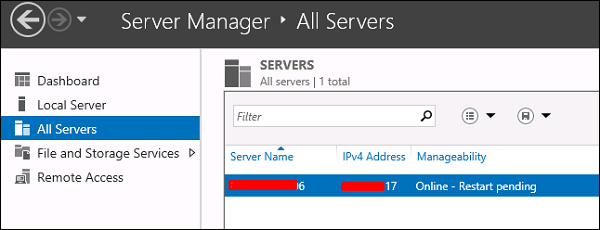
Now let us see how to create a Share in the system with its respective rights. To do this, we should follow the steps given below.
Step 1 − Click Server Manager → then click on File and Storage Services in the Server Manager sidebar → click on Shares → click on the Shares drop-down list → click on New Share.
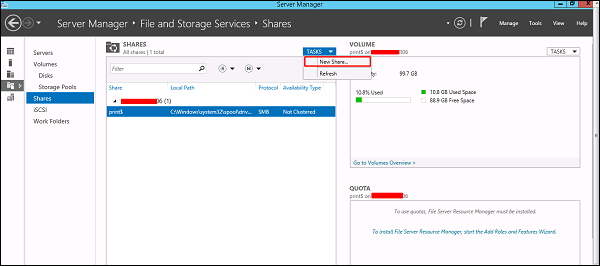
Step 2 − This will open the New Share Wizard → From here, select a type of share → I will create a very basic SMB share, so click on SMB Share – Quick. We can later configure the user rights of this share.

Step 3 − Click “Type a custom path” → click on Browse button.

Step 4 − Select the folder that you want to share → Click Select Folder.
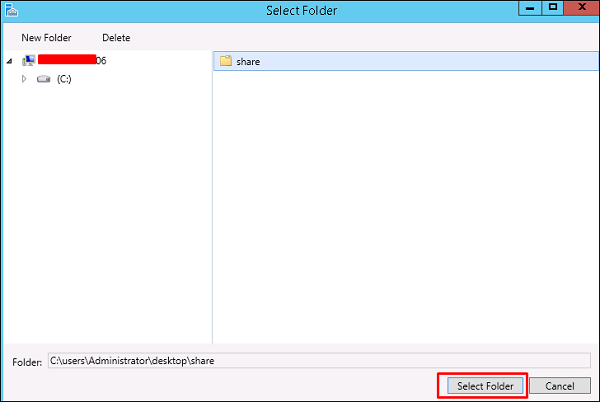
Step 5 − Click Next.
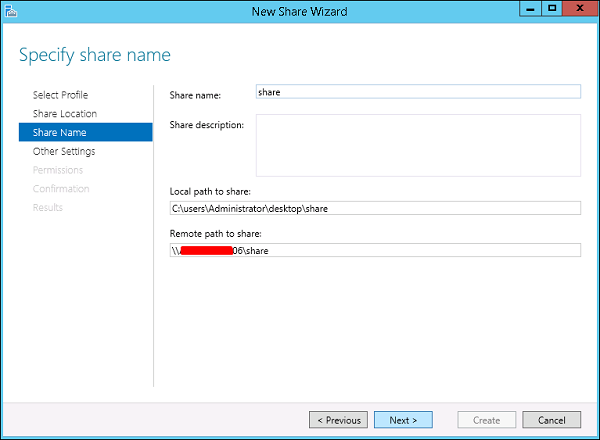
Step 6 − You can choose one of the three options as per your need. The explanations are also mentioned alongside the check boxes, once selected → Next.
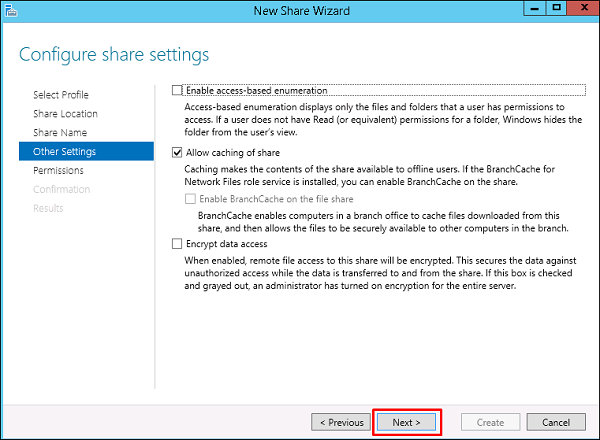
Step 7 − Click on Customize Permissions to authorize the rights that your users need to have.
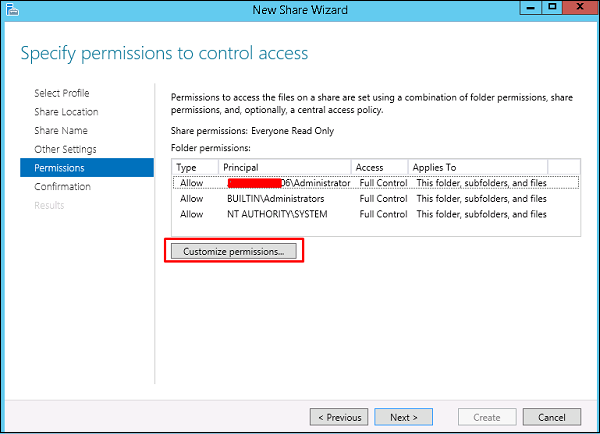
Step 8 − Click on Add if you would like to add other users.
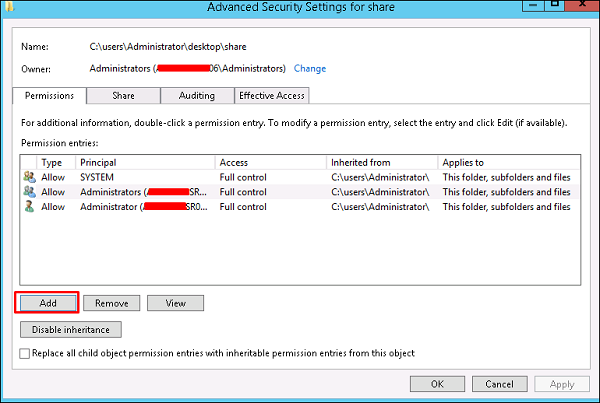
Step 9 − Click on Select a principal.
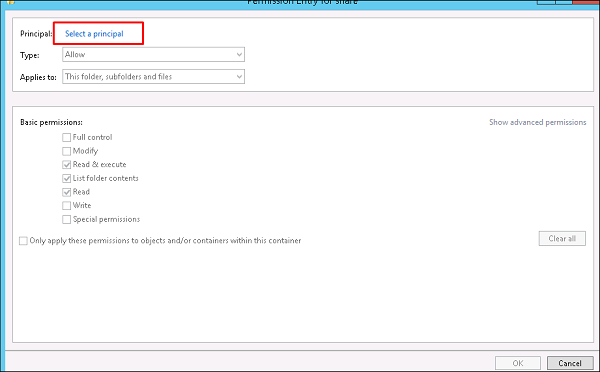
Step 10 − We should give rights that can be done by entering the object name, which is Backup Operator in this case and then → OK.
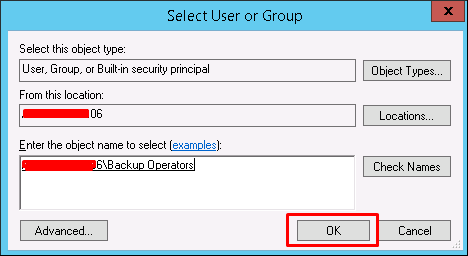
Step 11 − To this user we will give ReadWrite rights, for that we will check the respective boxes and then → OK → OK → Next.
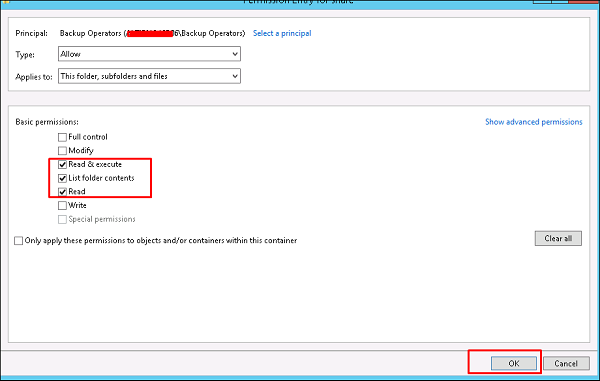
Step 12 − Click on Create.

Windows Server 2012 — File Manager
Like its previous versions, the present Windows Server 2012 version has a File Server Resource Manager Role. As you know, this is a role that helps system administrators to manage shared folders in the features link in setting up limits or file extension restrictions. To install it, we should follow the steps given below.
Step 1 − Go to Server Manager → Manage → Add Roles and Features → Next → Check on the Role-based or feature-based installation box → Check on the Select a server from the server pool box → Next.
Then, at the list of the roles find File and Storage Services and expand it. After this, expand the Files and iSCSI Services → Check on the File Server Resource Manager box and then a pop-up window will open.
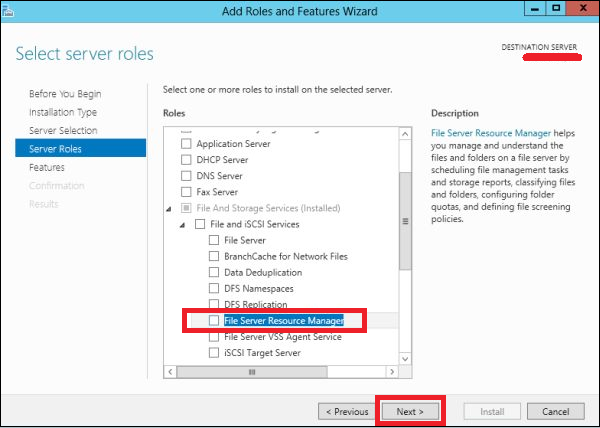
Step 2 − Click on Add features and then → Next.
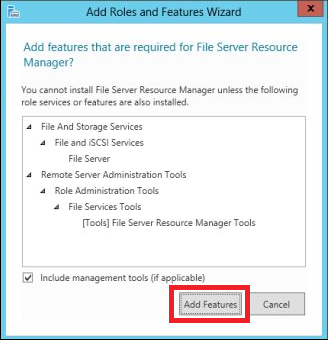
Step 3 − Click the Next button.
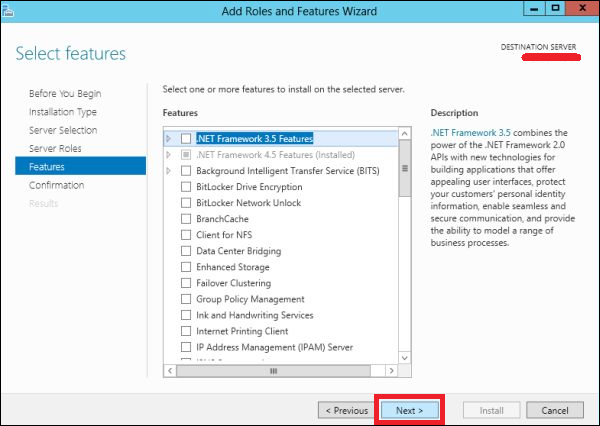
Step 4 − Click the Install button.
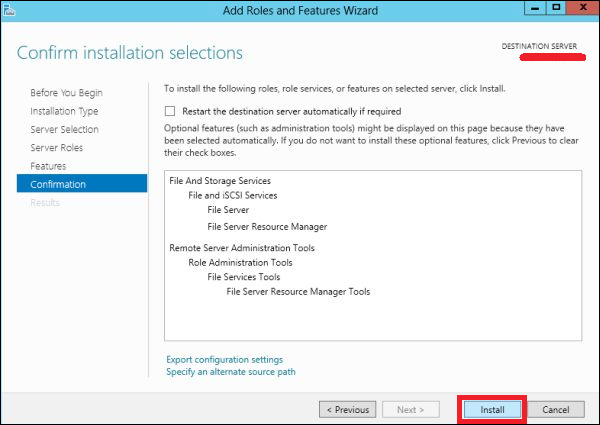
Now that we installed the File Server Resource Manager, let us open it by following the path given below.
Step 1 − Click on Server Manager → Tools → File Server Resource Manager.
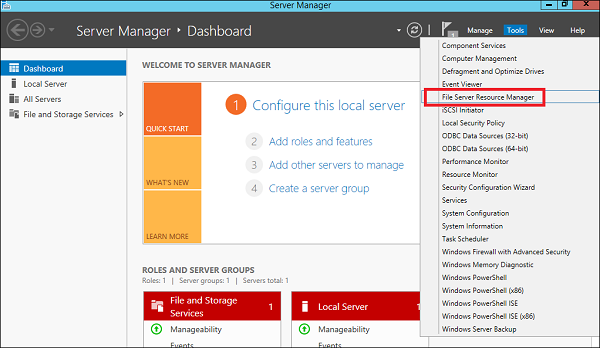
To set quota to a folder, we should follow the steps as below.
Step 2 − On the left panel click on Quota Management → expand Quota Templates → click on Create Quota Template… on the right-hand side panel as shown in the screenshot given below.
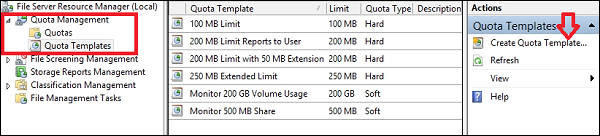
Step 3 − A new table will be opened, where the most important aspect to put is Space Limit depending on the need. Here, we will put 2GB and then → OK.
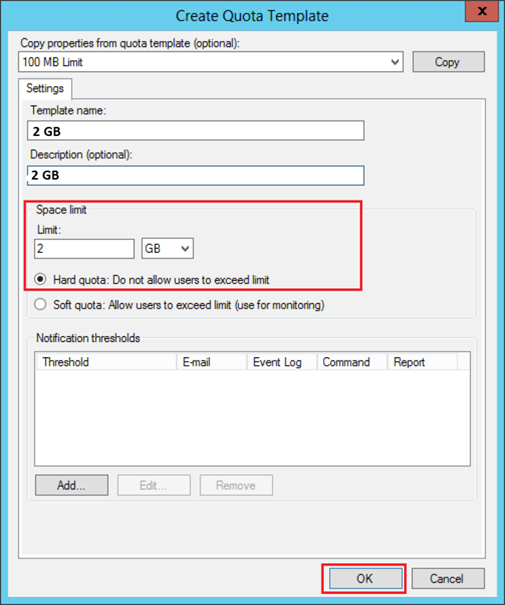
Step 4 − You must put the threshold for it and once the folder reaches the capacity, it will send you a notification where you will have an option to put the email.
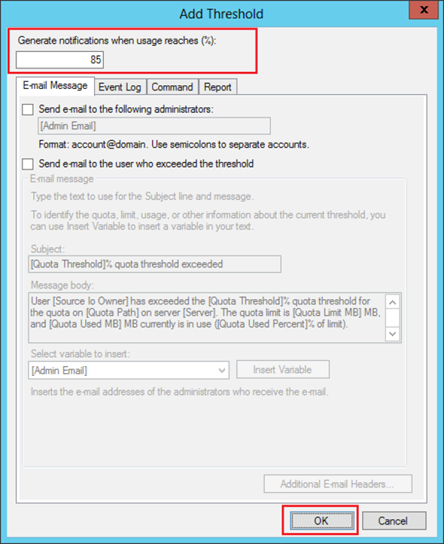
Step 5 − Click Ok.
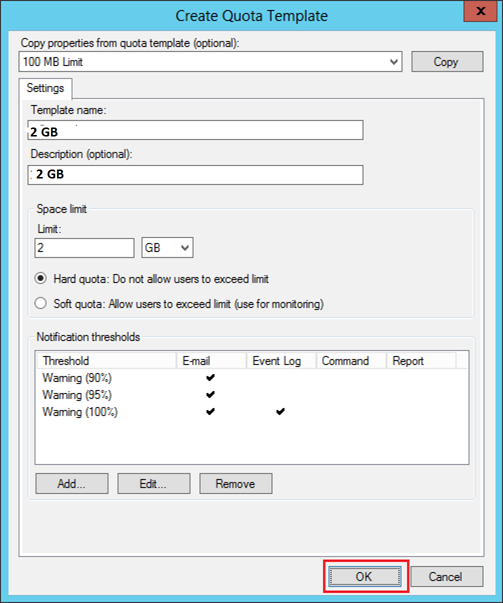
Step 6 − Then to attach this quota to a folder – Right Click on the template → click on Create Quota from Template…
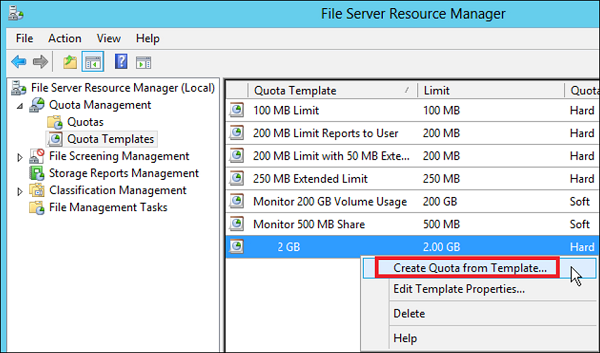
Step 7 − Click on Browse… and then select your folder → Create.
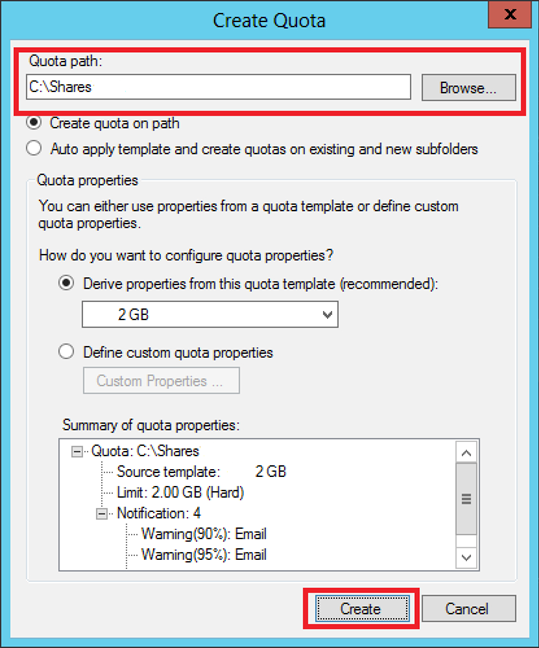
Step 8 − To put a file restriction to your folders, you can go to the left pane File Screening Management → File screening templates → Click on the left panel Create File Screen Template…
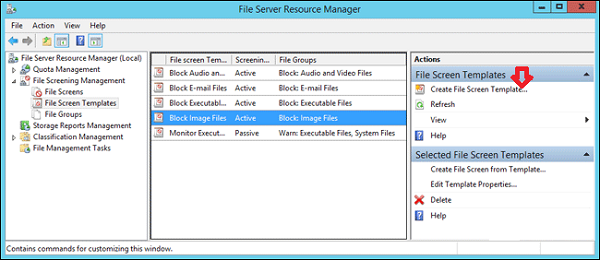
Step 9 − Click on Browse… and find the folder that you want → Create.
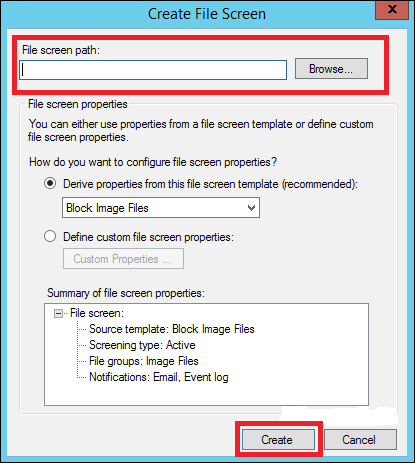
Windows Server 2012 — Print Server
In this chapter, we will see how to install a Print Server which plays some very important roles for the system administrator and the management. We should follow the steps given below.
Step 1 − Go to Server Manager → Manage → Add Roles and Features → Next → Check on the Role-based or feature-based installation box and → Check on Select a server from the server pool and then → Next.
Once it is done then, at the list of the roles find Print and Document Services → A popup window will open.
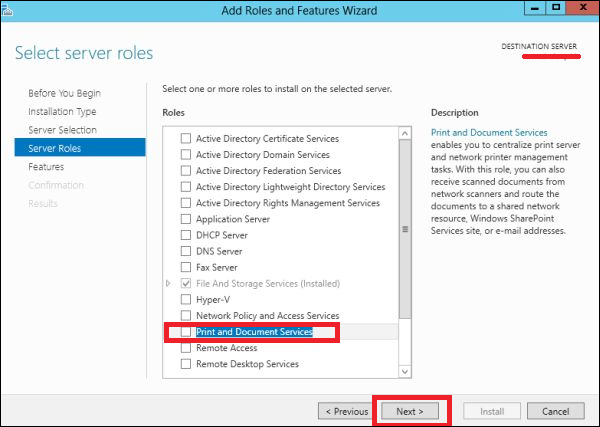
Step 2 − Click on Add features and then → Next → Next → Next.

Step 3 − Check on the Print Server box and → Next.
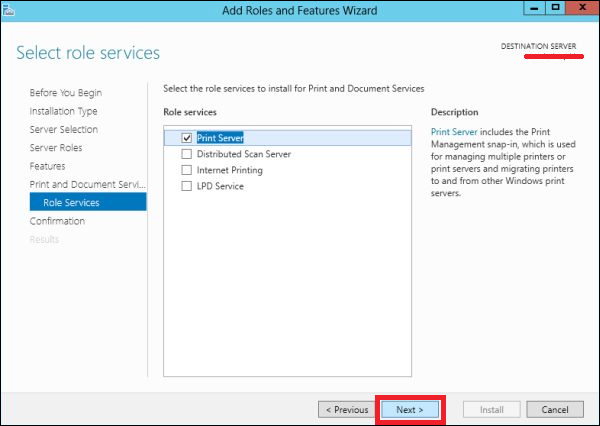
Step 4 − Click Install.
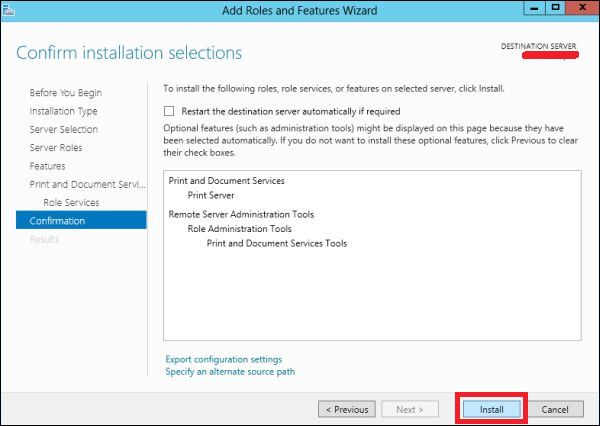
Windows Server 2012 — Easy Printing
Easy Printing is a feature which allows the client that connects via RDS to print over the network. It is installed in Windows server 2012 by default. Easy Printing is basically where the printer device is defined on the client system and a printer is connected directly via the network. All configuration is done via Group Policy Objects.
The configuration settings can be found at Computer Configuration – Administrative Templates – Remote Desktop Services – Printer Redirection.
For User Configuration, it will be have the same path – Administrative Templates – Remote Desktop Services – Printer Redirection.
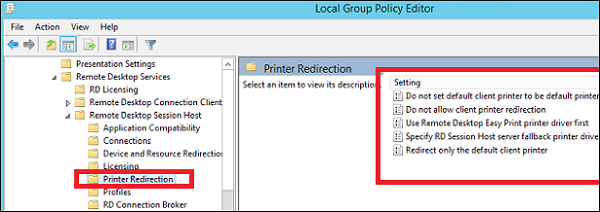
In administration, another important aspect is to set the priority for the printer, so the users have the same printer installer and can print as per their priorities. In this, the users printing with higher priorities overpass the printing will lower priorities.
To do so, you need to add different logical printers and then add then as per the users or departments that have different priorities.
To do this, firstly let us add a printer to the print server by following the steps given below.
Step 1 − Click on Server Manager → Tools → Print Management → then on the left panel click Print Servers → then right click on Printers and → Add Printer.
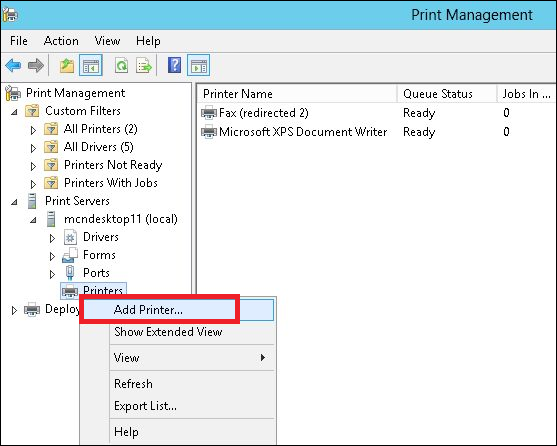
Step 2 − Next, follow the wizard to add the network printer like you do for a normal workstation and at the end this printer will be shown in the Printer Management.
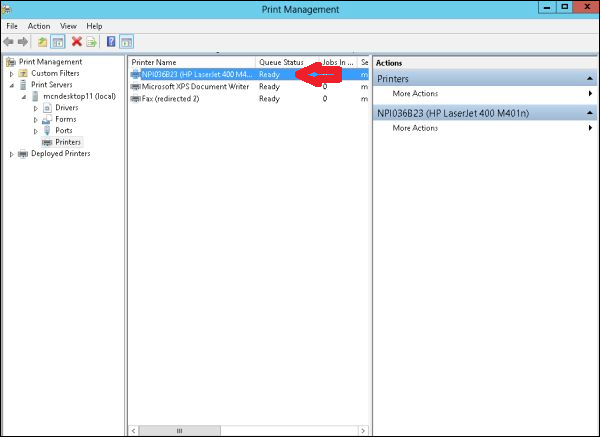
Step 3 − Now that we have installed the printer, we can set the priority on this printer – Right click on the printer → Advanced → put a number at Priority from 1-99 → OK.
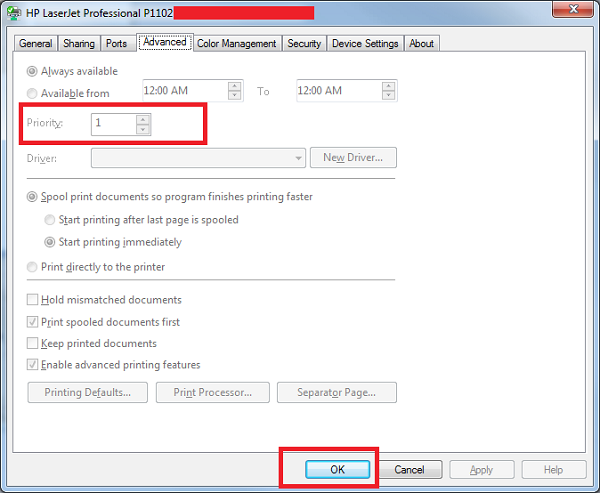
Configure Print Drivers
If we want to add other additional drivers, so that our clients find them easier to install a printer on their own. We must follow the steps given below −
Step 1 − Go to, Server Manager → Tools → Print Manager → Action → Add Driver…
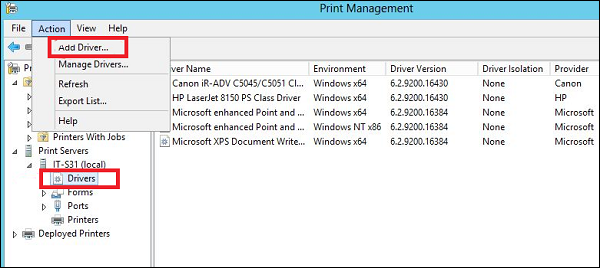
Step 2 − Check both boxes → Next.
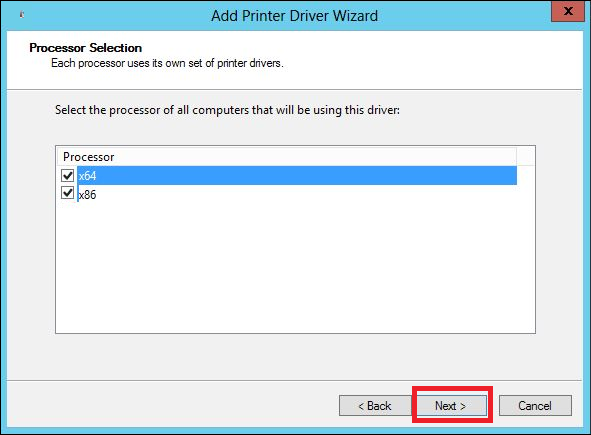
Step 3 − Choose the drivers Path to be installed and then → Next.
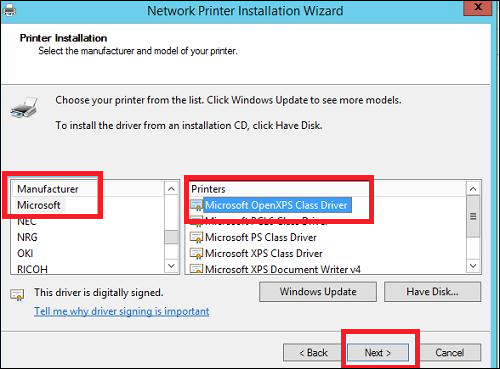
Step 4 − Click the Finish button.
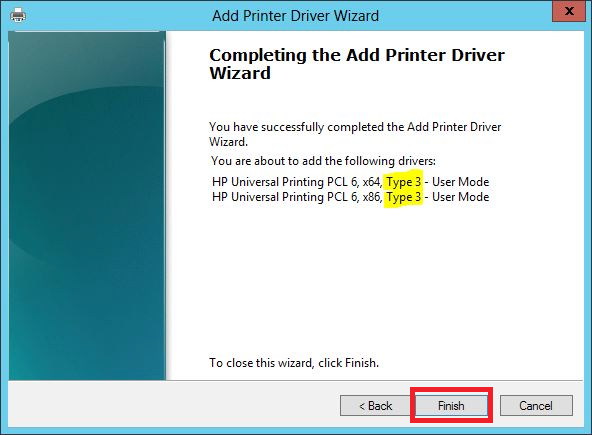
Windows Server 2012 — Network Services
Windows has many network services too and you might already be knowing that it can become a router or a VPN Server too. Let us see how to use the Windows server 2012 as a router by installing the Remote Access role to it.
PS − Server should have 2 network cards – One inside the LAN and the other facing the internet.
To add the Remote Access role, we should follow the steps given below.
Step 1 − Go to, Server Manager → Manage → Add Roles and Features → Next → Check Role-based or feature-based installation → Check Select a server from the server pool → Next.
Once all of it is done, then at the list of the roles find Remote Access and check it → A pop-up window will open.
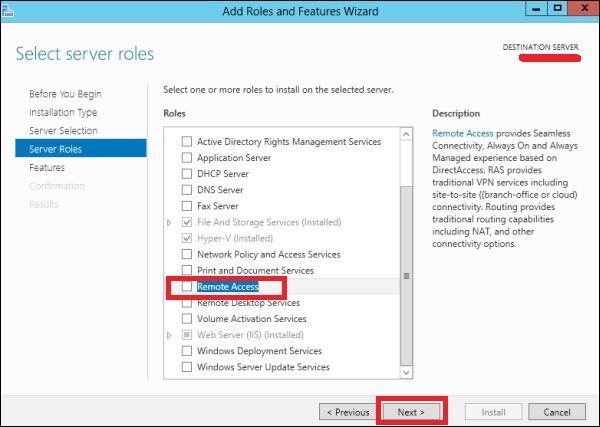
Step 2 − Click “Add Features” → Next.
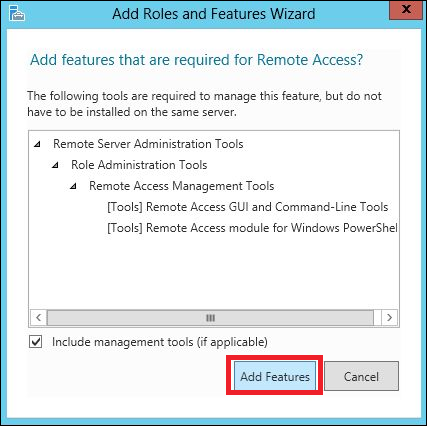
Step 3 − Click Next.
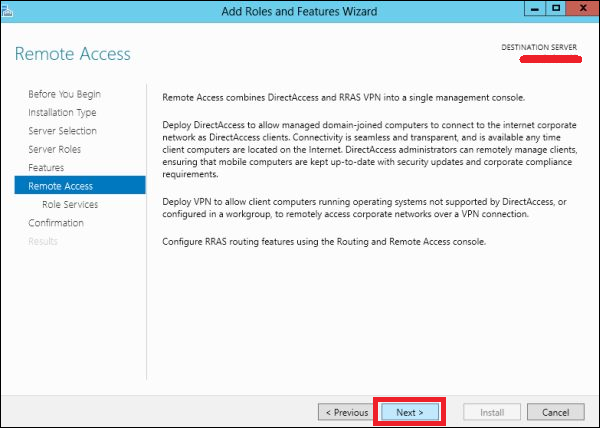
Step 4 − Check on the DirectAccess and VPN(RAS) and Routing check boxes.
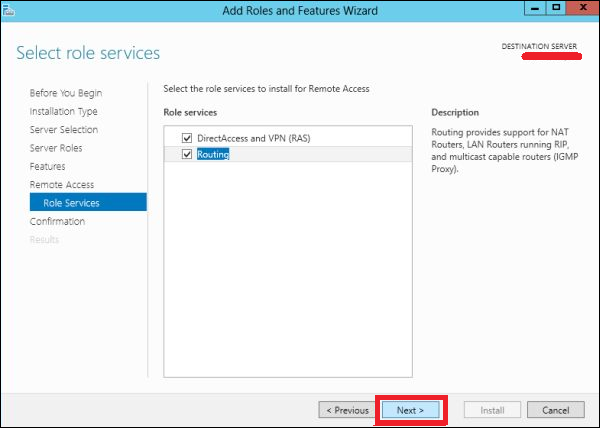
Step 5 − Click Install and wait for it to be installed completely.
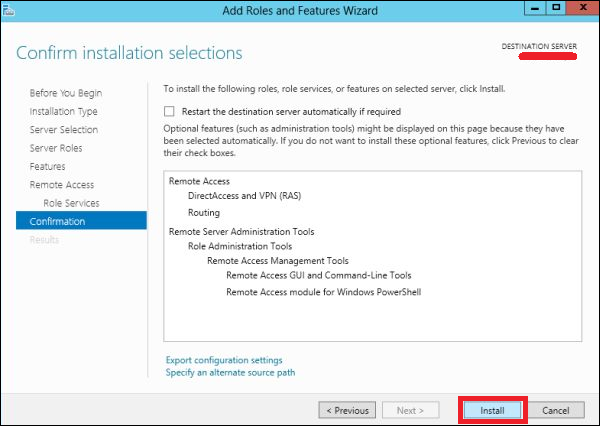
After the installation is done, let us now see the setup of the router. For this, we need to follow the steps given below.
Step 1 − Go to, Server Manager → Tools → Routing and Remote Access.
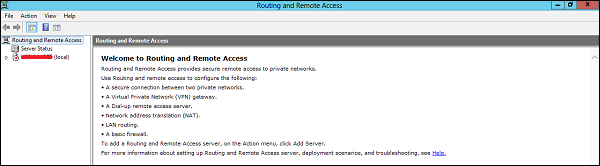
Step 2 − Right click → and then again click on Configure and Enable Routing and Remote Access as shown in the following screenshot.
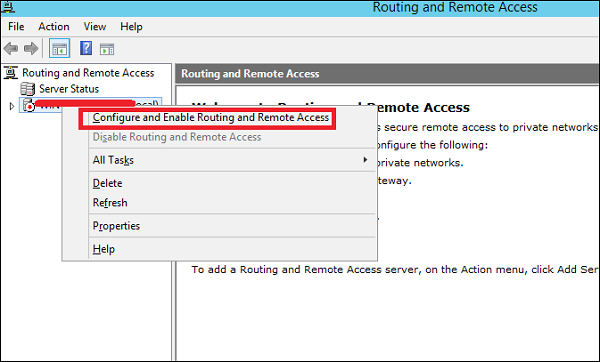
Step 3 − Select the Network address translation (NAT) option → Next.
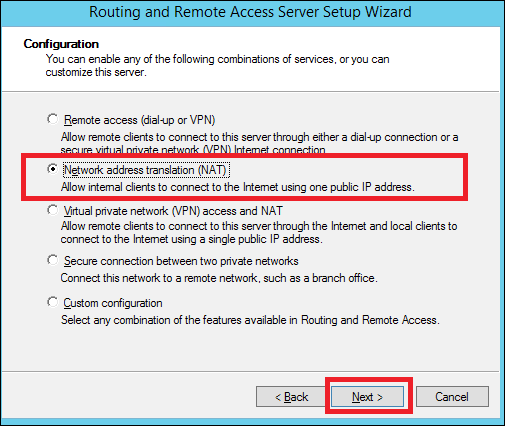
Step 4 − Now choose your Ethernet card that will be facing your internet site as shown in the following image and then → Next.
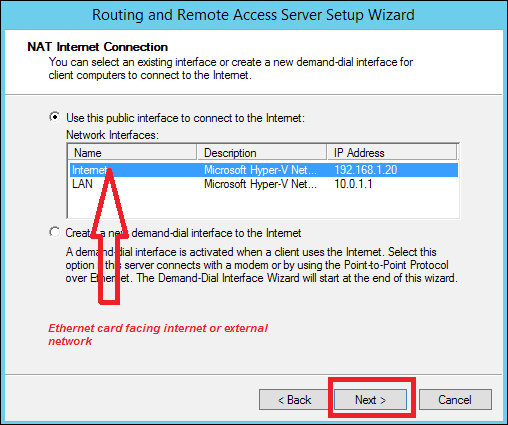
Step 5 − Choose I will set up name and address services later as we have already set up the DHCP and DNS and then → Next.
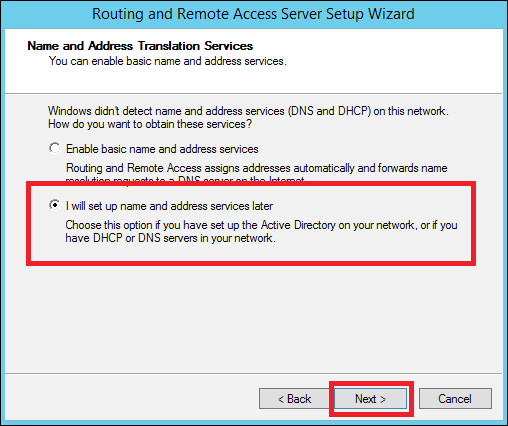
Step 6 − Click the Finish button.
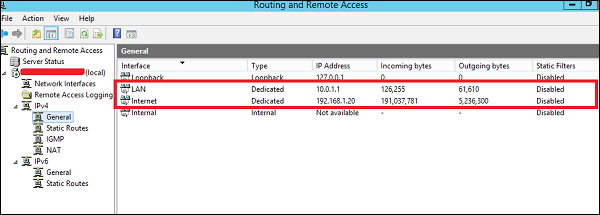
Now let us see how to make the VPN Setup to allow the employees to connect from home. To do this, we must follow the steps given below.
Step 1 − Go to, Server Manager → Tools → Routing and Remote Access → Right click → and then again click on Configure and Enable Routing and Remote Access → Custom Configuration and then → Next.
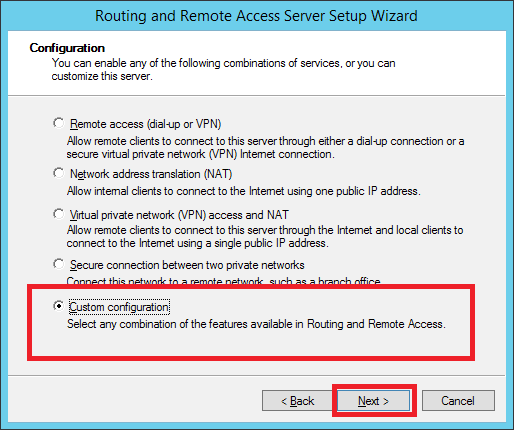
Step 2 − VPN Access and then → Next.
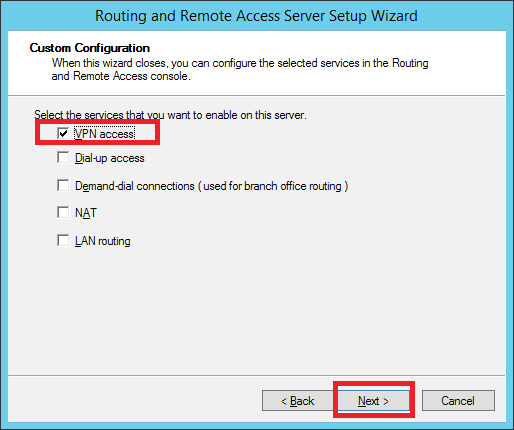
Step 3 − Click the Finish button.
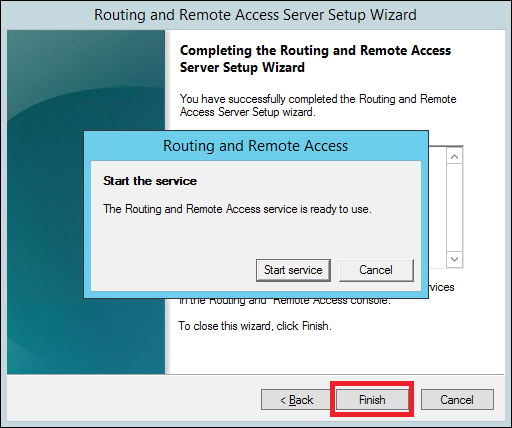
Windows Server 2012 — Backup Management
In this chapter, we will install and configure Backup which does not differ too much from the previous versions.
To Install the backup feature, we should follow the steps given below.
Step 1 − Go to Server Manager → Manage → Add Roles and Features → Next → Check the Role-based or feature-based installation box → then check on the Select a server from the server pool box and then click Next.
Once all this is done, check the Windows Backup Server box and then click on Next as shown in the following screenshot.
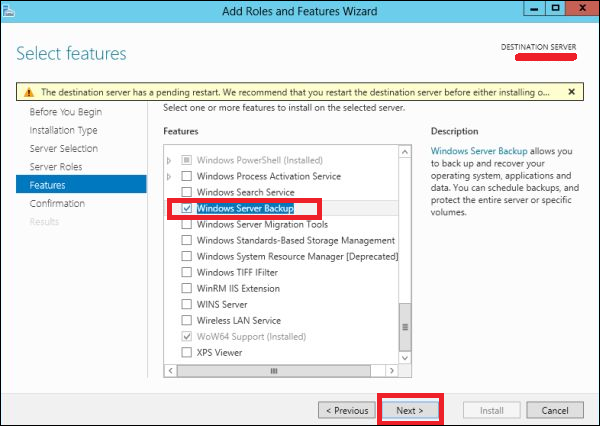
Step 2 − Click Install and then wait for the process to Finish.
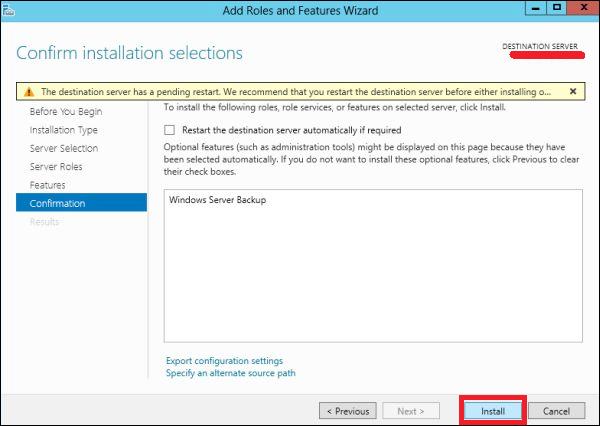
Now let us go and Configure the Backup Feature it, for which we should follow the steps given below.
Step 1 − Go to Server Manager → Tools → Windows Server Backup.
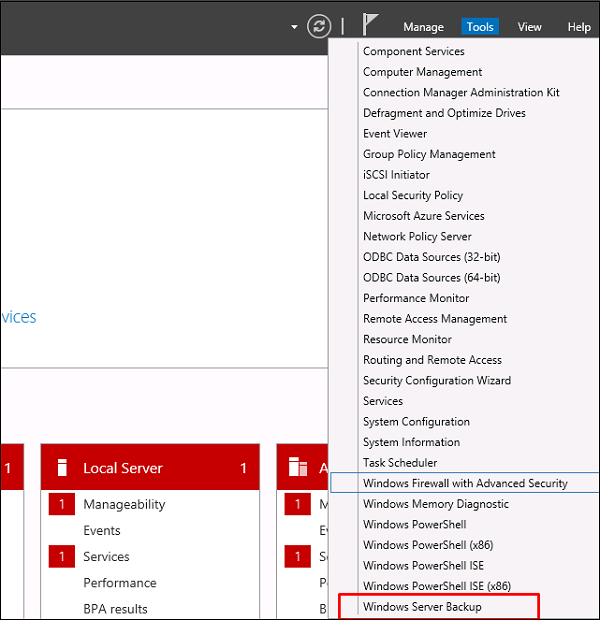
Step 2 − Click on Backup Schedule… in the left side panel or click on Action at the top of the screen as shown in the following screenshot.
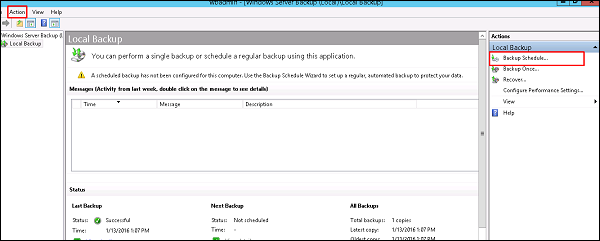
Step 3 − Click Next.
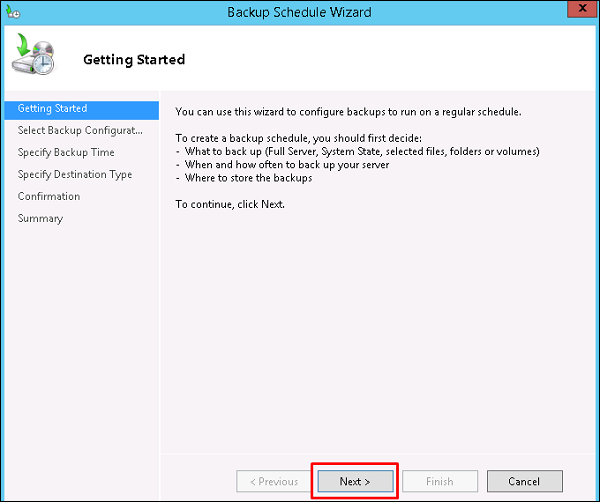
Step 4 − If you want to backup a file or a folder, you can click on custom file, but in this case I want to do a full backup of the server. So, we should click on the first option Full server (recommended) and then click Next.
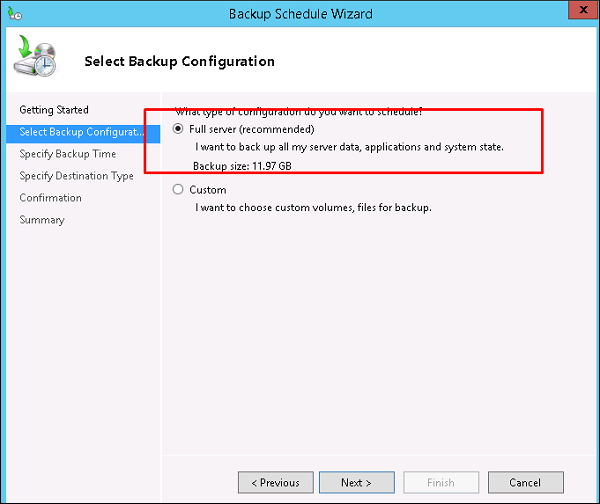
Step 5 − We should do backup once in a day, so we will choose the first option and the appropriate time, which generally is recommended at night → Next.
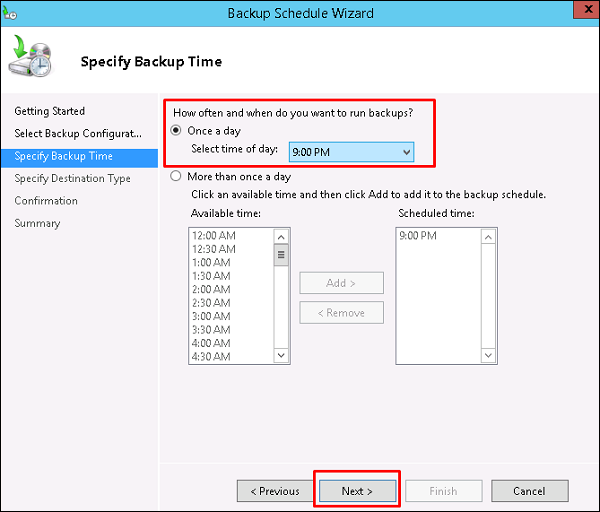
Step 6 − We should not click on the Back Up to a shared network folder option because the backup should be saved somewhere out of the server that is being backed up and then click on Next.
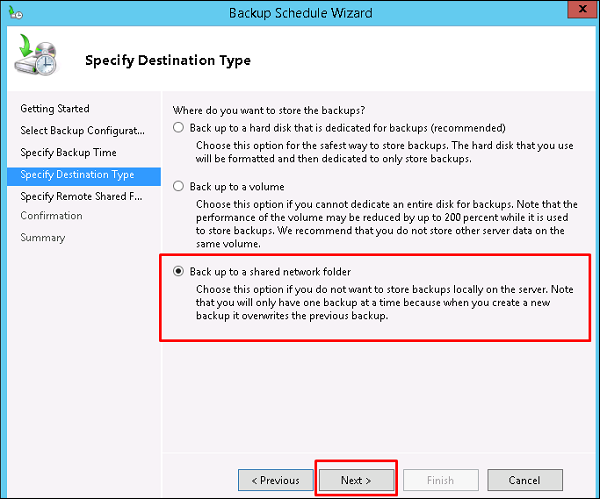
Step 7 − At the location, put the shared folder path and then → Next.

Step 8 − It will pop-up a credentials table asking you for the username and password of the shared folder which you should put here and then click → OK.
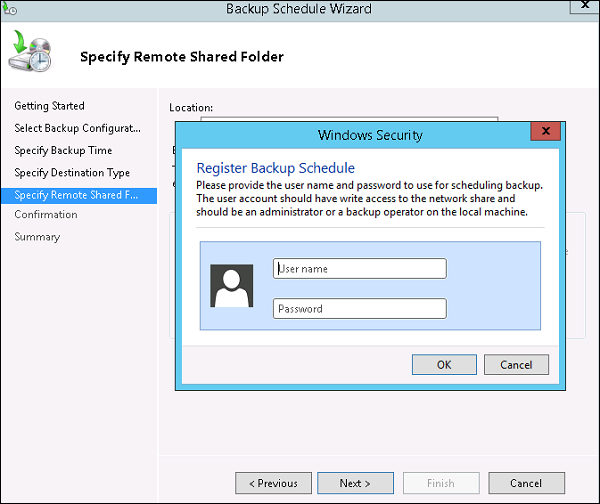
Step 9 − Click the Finish button.
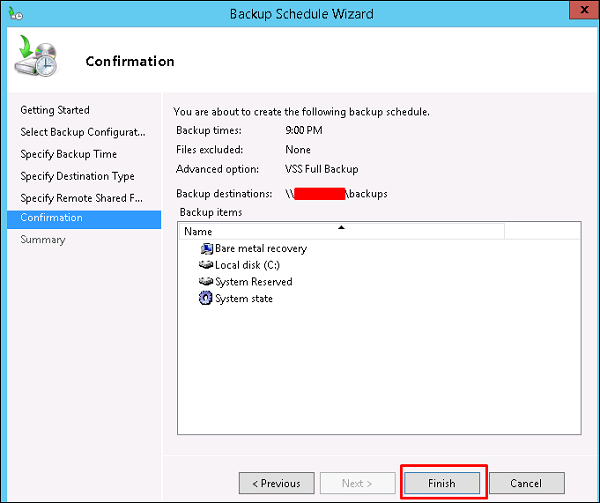
Step 10 − Now you will get a window showing the status if the backup was created successfully or not, which can be seen in the following screenshot.
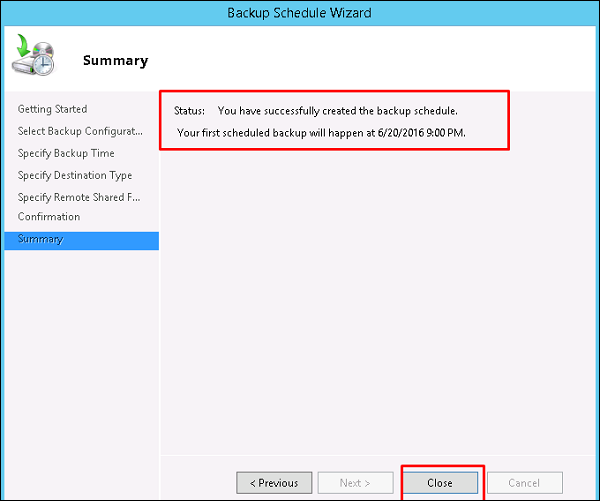
Print
Windows Server 2012 — Overview
Windows Server 2012 codenamed Windows Server 8 is the most recent version of the operating system from Microsoft regarding server management. But it is not the last one, as the last one is Windows Server 2016. Officially it was released on August 1st, 2012 and is being sold as a commercial version only.
Improvements in Windows Server 2012
The major Improvements on this version are as follows −
-
It is ready to be integrated with cloud systems and it still can maintain the classic features of local datacenters as a result Hyper-V Virtualization has new features Hyper-v replicas, it allows you to create virtual machines replications between clusters and storage systems.
-
The Storage migration virtual disks can be moved to different physical storages, Virtual machine snapshots, virtual machines can be deleted from the Hyper-v and also from the virtual disks and it can be used directly without the need to shut down the virtual machine.
-
The Core server installation easily switches to GUI installation without the need of reinstallation.
-
The file server and storage service improvement is that it eliminates identical copies in the same volumes as such and saves space.
-
The Storage pools and storage spaces allows you to group the hard disks to one or more storage pools then it allows to create virtual disks. It can add other disks to the storage pools and make available to the users without impacting them.
-
The iSCSI Target Server can offer block storage to other servers and applications on the network using the iSCSI standard.
-
Active Directory cloning can deploy additional domain controllers by cloning an existing virtual domain controller.
The Windows Server 2012 has four editions: Foundation, Essentials, Standard and Datacenter. Each one of them has their own limitation accept the Datacenter version which is also the most expensive one.
The following table will show what is the right one for your business needs −
For finding out the cost of licensing you can click on the following link − https://www.microsoft.com/en-us/server-cloud/products/windows-server-2012-r2/purchasing.aspx
Windows Server 2012 — Installation
In this chapter, we will discuss regarding the requirements and prerequisites of the Windows Server 2012.
System Requirements
Although most of the servers nowadays probably have the necessary requirements for Windows Server 2012. It will certainly be useful to know them in case you want to upgrade from an older system.
The main requirements are −
-
CPU socket minimum 1.4 GHz (64-bit processor) or faster for single core and Microsoft recommends is 3.1 GHz (64-bit processor) or faster multi-core.
-
RAM memory minimum is 2GB, but Microsoft recommends 8GB.
-
160 GB hard disk with a 60 GB system partition space in your hard disk.
One important thing to note here is that the installation process itself will verify your computer hardware and let you know if it qualifies for a Windows Server 2012 installation. If not, then you will need to upgrade your hardware.
Installation
The following steps are to be adhered for the installation of Windows Server 2012.
Step 1 − We can download the evaluation ISO of Windows Server 2012 R2 from the following link − https://www.microsoft.com/en-us/evalcenter/evaluate-windows-server-2012-r2
But you will need to sign in first with a Microsoft account like Hotmail for example in order to complete the download and the good thing is that the evaluation period will last for 180 days, so you will have enough time to know if it will be the right product for you or not.
At the end, if you decide to buy the license of your Windows server 2012 R2. You can purchase it online via a Microsoft online store found in − https://www.microsoftstore.com/store/msusa/en_US/list/Windows-Server/categoryID.70676900?icid=BusinessR_Software_80_Windows_Server_112315
For the Enterprise solution, I would recommend to purchase it via a Microsoft partner that is found in your country.
Step 2 − After downloading the ISO of Microsoft, create a boot USB driver which can be created with the Microsoft tool called Windows USB/DVD Download Tool and can be downloaded from the following link − https://www.microsoft.com/en-us/download/windows-usb-dvd-download-tool
After downloading the EXE file, open it and select the ISO file location and then click next like in the following screenshot, and wait up to the end when the Boot USB is created.
Step 3 − After completing the above given steps, plug-in the USB to the server and wait for a while till it loads the files. This will continue for about a couple of minutes as shown in the following screenshot.
Step 4 − After the files are loaded, you will see the screen of language settings of installation, keyboard, time and currency format. Generally, all the default ones are also good enough to start with. Click Next.
Step 5 − Click “Install now”.
Step 6 − Once you have clicked on Install Now, the setup will start and it will load all the files and the screen will look as shown in the following screenshot.
Step 7 − Wait until the files are loaded and then you will see the following screen. Let’s select Windows Server 2012 DataCenter Evaluation (Server with GUI) and click Next.
Step 8 − Click “I accept the license terms” and then click on the Next button as shown in the following screenshot.
Step 9 − The following screen will appear. In “Driver Options” you can create a new partition, delete or format the Hard disk. After you have done this process then you can select the partition where the Windows server 2012 R2 will be installed in our case we have one partition. Once all this is done, then click on Next.
Step 10 − Let’s wait until this process finishes during this time and then the server will reboot.
Step 11 − Once the reboot is done the following screen will appear. Set the password for the server and then click on “Finish”.
Step 12 − It will take some minutes until the setup finishes completely.
Step 13 − Once all this is done, you have completed the installation process and the following screen will appear.
Congratulations!!!
Windows Server 2012 — Server Roles
Like the previous version, Windows Server 2012 has the following roles which can be used and in the subsequent chapter, we will see how to install and configure the most important ones.
The following picture shows all the roles. A small reminder! — Roles and Features are the tools that you need to install or activate in order to complete your IT Administration duties, without their installation you cannot do anything.
To add a role in the server we should adhere to the following steps −
Step 1 − Click with the mouse on Server Manager which is found in the task bar as shown in the following screenshot.
Step 2 − After opening the “Server Manager”, click on the second option “Add roles and features”.
Step 3 − The following screen will appear, then you can Click on the Next button.
Step 4 − Select the Role-based or feature-based installation and then click on the Next button.
In the next screen that appears, you will have the following two options −
Option 1 − Select a server from the server pool. This option is – if you want to install the services in the physical server like being done in the following screenshot.
Option 2 − Select a virtual Hard disk if you want to install the services in a virtual disk that can be somewhere in the network storage. Take a look at the following screenshot for better understanding.
Step 5 − The last step will be to check the service that you want to install, but in the upcoming chapters we will continue this setup for each and every important services.
Windows Server 2012 — PowerShell
Windows PowerShell is a command-line shell and scripting language designed especially for system administration. It’s analogue in Linux is called as Bash Scripting. Built on the .NET Framework, Windows PowerShell helps IT professionals to control and automate the administration of the Windows operating system and applications that run on Windows Server environment.
Windows PowerShell commands, called cmdlets, let you manage the computers from the command line. Windows PowerShell providers let you access data stores, such as the Registry and Certificate Store, as easily as you access the file system.
In addition, Windows PowerShell has a rich expression parser and a fully developed scripting language. So in simple words you can complete all the tasks that you do with GUI and much more.
PowerShell Icon can be found in the task bar and in the start menu. Just by clicking on the icon, it will open.
![]()
To open it, just click on the icon and then the following screen will open and it means that PowerShell is ready for you to work on.
The latest version of PowerShell is 5.0 and to check what is installed in our server we type the following command – :$PSVersionTable as shown in the following screenshot and from the screen we also know that we have PSVersion 4.0
To update with the latest version where it has more Cmdlets we have to download Windows Management Framework 5.0 from the following link − https://www.microsoft.com/en-us/download/details.aspx?id=50395 and install it.
PowerShell ISE
The Windows PowerShell Integrated Scripting Environment (ISE) is a host application for Windows PowerShell. In Windows PowerShell ISE, you can run commands and write, test, and debug scripts in a single Windows-based graphic user interface with multiline editing, tab completion, syntax coloring, selective execution, context-sensitive help, and support for right-to-left languages.
You can use menu items and keyboard shortcuts to perform many of the same tasks that you would perform in the Windows PowerShell console. For example, when you debug a script in the Windows PowerShell ISE, to set a line breakpoint in a script, right-click the line of code, and then click Toggle Breakpoint.
To open it you just go to Start – Search and then Type – PowerShell as shown in the following screenshot.
Then click on Windows PowerShell ISE. Or click on the downward Arrow as shown in the following screenshot.
It will list all the applications installed on the server and then click on Windows PowerShell ISE.
The following table will be open −
It has three sections, which include – The PowerShell Console with number 1, then Scripting File number 2 and the third is the Command Module where you can find the module.
While creating the script you can run directly and see the result like the following example −
PowerShell Basic Commands
There are a lot of PowerShell commands and it is very difficult to put in all these commands in this tutorial, we will focus on some of the most important as well as basic commands of PowerShell.
The first step is to go to the Get-Help command which gives you an explanation about how to give a command and its parameter.
To get the list of Updates −
- Get-HotFix and to install a hot fix as follows
- Get-HotFix -id kb2741530
Remote Management
Remote Management Service is one of the most important part pertaining to administration of Windows Server 2012. Administration of servers is performed through Windows Management Instrumentation. WMI instructions can be sent over network WinRM “Remote Management”.
By default this utility is enabled, you can check it by going to Server Manager → then click on Local Server as shown in the following screenshot.
If in case it is disabled, you can enable it by Opening PowerShell and then typing EnablePSRemoting as shown in the screenshot given below.
There is another way to enable it – Click on “Server Manager” → Local Server, then ENABLE Remote management.
Adding a Server for Remote Management
To add other servers for remote management, follow the steps given below −
Step 1 − Server Manager → Dashboard → Add other servers to manage.
Step 2 − If the servers are joined to the domain, you add the select option “Active Directory“, in my case they are not joined, so I selected the second option “DNS” → In the search Box, I added the IP of the server that has to be managed → click on a small arrow → OK.
Step 3 − Go to Server Manager → All Servers, you will see the server that you have added. As my server is in the Work Group, I have to right click and click on – “Manage As” as shown in the following screenshot.
Step 4 − Enter the credentials of the remote server as follows and then → OK.
To remove a managed server, Right Click on server → Remove Server.
Windows Server 2012 — Windows Firewall
The Windows Firewall with Advanced Security is a firewall that runs on the Windows Server 2012 and is turned on by default. The Firewall settings within Windows Server 2012 are managed from within the Windows Firewall Microsoft Management Console. To set Firewall settings perform the following steps −
Step 1 − Click on the Server Manager from the task bar → Click the Tools menu and select Windows Firewall with Advanced Security.
Step 2 − To see the current configuration settings by selecting Windows Firewall Properties from the MMC. This allows access to modify the settings for each of the three firewall profiles, which are – Domain, Private and Public and IPsec settings.
Step 3 − Applying custom rules, which will include the following two steps −
-
Select either Inbound Rules or Outbound Rules under Windows Firewall with Advanced Security on the left side of the management console. (As you Know outbound traffic is the traffic generated from server towards the internet and inbound traffic is vice versa). The rules that are currently enabled are denoted by green checkbox icon, while disabled rules display a grey checkbox icon.
-
Right-clicking a rule will allow you toggle enable/disable.
How to Create a New Firewall Rule?
To create a new Firewall Rule, you have to adhere to the following steps −
Step 1 − From the right side of either the Inbound Rules or Outbound Rules – click “New Rule”.
Step 2 − Custom from the Rule Type radial button → click Next.
Step 3 − Select the Program association for the Custom Firewall Rule as either All programs or the path to a program → click Next.
Step 4 − Protocol type field select the protocol type → click Next.
Step 5 − Select an IP address association for both local and remote addresses → click Next.
Step 6 − Select an action to take on matching traffic → click Next.
Step 7 − Select the profiles associated with the custom rule → click Next.
Step 8 − Put a name for your Firewall rule and an optional description → Finish.
Step 9 − The firewall rule can be found on the corresponding Rule tab, either inbound or outbound depending on the type created. To disable or delete the rule find the rule in the MMC, right-click it and select either Disable Rule or Delete.
Remote Desktop Management
In this chapter, we will see how to enable remote desktop application. It is important because this enables us to work remotely on the server. To do this, we have the following two options. For the first option, we have to follow the steps given below.
Step 1 − Go to Start → right click “This PC” → Properties.
Step 2 − On Left side click “Remote Setting”.
Step 3 − Check radio button “Allow Remote connection to this computer” and Check box “Allow connection only from computers running Remote Desktop with Network Level Authentication (recommended)” → click “Select Users”.
Step 4 − Click Add.
Step 5 − Type user that you want to allow access. In my case, it is administrator → click OK.
For the second option, we need to follow the steps given below.
Step 1 − Click on “Server Manage” → Local Server → click on “Enable” or Disable, if it is Disabled.
Windows Server 2012 — Resource Monitor
Resource Monitor is a great tool to identify which program/service is using resources like program, applications, network connection and memory usages.
To open Resource Monitor, go to Server Manage → Tools.
Click on “Resource Monitor”, the First Section is “Overview”. It tells how much CPU is consuming every application and on the right side of the table, it monitors in real time the chart of CPU usage. The Memory tells how much memory every application is consuming and in the right side of the table it is being monitored in real time in the chart of CPU usage.
The Disk tab splits it by the different hard drives. This will show the current Disk I/O and will show the disk usage per process. The network tab will show the processes and their network bytes sent and received. It will also show the current TCP connections and what ports are currently listening, IDs too.
Windows Server 2012 — Active Directory
In this chapter, we will see how to Install Active Directory in Windows Server 2012 R2. Many of us who have worked with the previous version run DCPROMO.EXE to install it, but in the 2012 version, it is recommended by Microsoft not to use it anymore.
To continue with Installation follow the steps given below.
Step 1 − Go to “Server Manager” → Manage → Add Roles and Feature.
Step 2 − Click the Next button.
Step 3 − As we are installing AAD on this machine, we will select “Role-based or featurebased Installation” → Next.
Step 4 − Click on “Select a server from the server pool”, this is the case when it will be installed locally.
Step 5 − Check mark in the box next to Active Directory Domain Services. A box will be explaining additional roles services or features which are also required to install domain services.
Step 6 − Click Add Features.
Step 7 − Check “Group Policy Management” → Next.
Step 8 − Click the “Next” button.
Step 9 − Click “Install”.
Installation Screen will come up now and you have to wait until installation bar completes.
Now that the installation of DC role is finished, you have to configure it for you server.
Step 10 − Click “Server Manager” → Open the Notifications Pane by selecting the Notifications icon from the top of the Server Manager. From the notification regarding configuring AD DS (Active Directory Domain Services), click Promote this server to a domain controller.
![]()
Step 11 − Click “Add a new forest” → Insert your root domain name into the Root domain name field. In my case, I have put “example.com”.
Step 12 − Select a Domain and Forest functional level. Once selected fill in a DSRM password in the provided password fields. The DSRM password is used when booting the Domain Controller into recovery mode.
Step 13 − In the next screen which shows up, there is a warning on the DNS Options tab, click OK and then select Next.
Step 14 − Enter NETBIOS name and click “Next”.
Step 15 − Select location of the SYSVOL, Log files and Database folders and then click Next.
Step 16 − Click “Install” and wait until it is finished. The server will restart several times.
The installation is now complete.
Windows Server 2012 — DC Accounts
In Windows 2012, creating account OU and group is nearly the same as in the previous versions.
To Create an OU user, please follow the steps given below.
Step 1 − Go to: Server Manager → Tools → Active Directory Users and Computers.
Step 2 − To create an OU named Management. Right-click domain in Active Directory Users and Computers, choose New and click Organizational Unit.
Step 3 − Type Management to name the OU. Check the Protect container from accidental deletion option. This option will protect this object from accidental deletion.
Step 4 − To create a user, Right-click on the Management OU → click New → and then click User.
Step 5 − Complete the field with the data of the users → then click Next.
Step 6 − Now type-in the password. Check on the tick box → User must change password at next logon. The user will be forced to change the password when the user logs in → Click Next → and then click Finish.
Windows Server 2012 — File System
In Windows Server 2012 a new file system it is presented with is caller Resilient File System (ReFS).
The key attributes of ReFS include −
-
Maintaining a high level of data availability and reliability, even when the individual underlying storage devices experience failures.
-
Providing a full, end-to-end resilient architecture when used in conjunction with Storage Spaces. When used together, ReFS and Storage Spaces provide enhanced resiliency to storage device failures.
The significant functionality included with ReFS is described below −
-
Integrity − ReFS stores data in a way that protects it from many of the common errors that can normally cause data loss. When ReFS is used in conjunction with a mirror space or a parity space, detected corruption — both metadata and user data, when integrity streams are enabled — can be automatically repaired using the alternate copy provided by Storage Spaces. In addition, there are Windows PowerShell cmdlets (Get-FileIntegrity and Set-FileIntegrity) that you can use to manage the integrity and disk scrubbing policies.
-
Availability − ReFS prioritizes the availability of data. Historically, file systems were often susceptible to data corruption that would require the system to be taken offline for repair. With ReFS, if corruption occurs, the repair process is both localized to the area of corruption and performed online, requiring no volume downtime. Although rare, if a volume does become corrupted or you choose not to use it with a mirror space or a parity space, ReFS implements salvage, a feature that removes the corrupt data from the namespace on a live volume and ensures that good data is not adversely affected by non-repairable corrupt data. Because ReFS performs all repair operations online, it does not have an offline chkdsk command.
-
Scalability − As the amount and size of data that is stored on computers continues to rapidly increase, ReFS is designed to work well with extremely large data sets — petabytes and larger — without performance impact. ReFS is not only designed to support volume sizes of 2^64 bytes (allowed by Windows stack addresses), but ReFS is also designed to support even larger volume sizes of up to 2^78 bytes using 16 KB cluster sizes. This format also supports 2^64 – 1-byte file sizes, 2^64 files in a directory and the same number of directories in a volume.
-
Proactive Error Correction − The integrity capabilities of ReFS are leveraged by a data integrity scanner, which is also known as a scrubber. The integrity scanner periodically scans the volume, identifying latent corruptions and proactively triggering a repair of that corrupt data.
When the metadata for a ReFS directory is corrupted, subfolders and their associated files are automatically recovered. ReFS identifies and recovers the files while ReFS remains online. Unrecoverable corruption of the ReFS directory metadata affects only those files that are in the directory in which the corruption has occurred.
ReFS includes a new registry entry, RefsDisableLastAccessUpdate, which is the equivalent of the previous NtfsDisableLastAccessUpdate registry entry. The new storage command lets in Windows PowerShell are available (Get-FileIntegrity and SetFileIntegrity) for you to manage the integrity and disk scrubbing policies.
Group Managed Service Accounts
The Managed Service Accounts (MSA) was introduced in Windows Server 2008 R2 to automatically manage (change) passwords of service accounts. Using MSA, you can considerably reduce the risk of system accounts running system services being compromised. MSA has one major problem which is the usage of such service account only on one computer. It means that MSA Service Accounts cannot work with cluster or NLB services, which operate simultaneously on multiple servers and use the same account and password. To fix this, Microsoft added the feature of Group Managed Service Accounts (gMSA) to Windows Server 2012.
To create a gMSA, we should follow the steps given below −
Step 1 − Create the KDS Root Key. This is used by the KDS service on DC to generate passwords.
To use the key immediately in the test environment, you can run the PowerShell command −
Add-KdsRootKey –EffectiveTime ((get-date).addhours(-10))
To check whether it creates successfully or not, we run the PowerShell command −
Get-KdsRootKey
Step 2 − To create and configure gMSA → Open the Powershell terminal and type −
New – ADServiceAccount – name gmsa1 – DNSHostNamedc1.example.com – PrincipalsAllowedToRetrieveManagedPassword «gmsa1Group»
In which,
-
gmsa1 is the name of the gMSA account to be created.
-
dc1.example.com is the DNS server Name.
-
gmsa1Group is the active directory group which includes all systems that have to be used. This group should be created before in the Groups.
To check it, Go to → Server Manager → Tools → Active Directory Users and Computers → Managed Service Accounts.
Step 3 − To install gMAs on a server → open PowerShell terminal and type in the following commands −
- Install − ADServiceAccount – Identity gmsa1
- Test − ADServiceAccount gmsa1
The result should come “True” after running the second command, as shown in the screenshot given below.
Step 4 − Go to service properties, specify that the service will be run with a gMSA account. In the This account box in the Log on tab type the name of the service account. At the end of the name use symbol $, the password need not to be specified. After the changes are saved, the service has to be restarted.
The account will get the “Log On as a Service” and the password will be retrieved automatically.
Group Policy Overview
The features of Group Policy Management were installed during the DC Role Installation. Many of the management features haven’t changed as compared to the previous versions of Windows Server. To create a GPO (Group Policy Overview), we need to follow the steps given below.
Step 1 − To create a GPO open the Group Policy Management Console (GPMC), go to Server Manager → Tools → Group Policy Management as shown in the screenshot below.
Step 2 − Right-click on an OU → select the first option Create a GPO in this domain and Link it here.
Step 3 − Type the Name for this GPO object → click OK button. We have selected the name as Test GPO.
Step 4 − Right-click the GPO object and click Edit.
Windows Server 2012 — DHCP Role
As you know Dynamic Host Configuration Protocol (DHCP) is commonly implemented network services in today’s network environments. DHCP is primarily used to automatically distribute IP configuration settings to network clients, eliminating manually configuring hosts on TCP/IP-based networks.
To Install DHCP role, you will have to follow the steps given below.
Step 1 − Go to “Server Manager” → Manage → Add Roles and Features.
Step 2 − Click Next.
Step 3 − Select the Role-based or feature-based installation option → click Next.
Step 4 − We will install a Local DHCP Role as it will Select a server from the Server Pool → then click Next.
Step 5 − From the Roles lists, check the DHCP Server role → click Add Features on the popup windows as shown in the following screenshots.
Step 6 − Click Next.
Step 7 − Click Next.
Step 8 − Click Install.
Step 9 − Click Close.
Post-deployment Configuration
In this section, we will see how to do the post-deployment configuration of the DHCP. Please follow the steps given below.
Step 1 − Click on the warning icon and then click on “Complete DHCP Configuration”.
Step 2 − Click Next.
Step 3 − Select a domain user account that has permissions to create objects in the Net Services container in Active directory or a domain admin account → click Next.
Step 4 − Click Close.
Scope Implementation of DHCP
Now we have to configure the service to make it useful for the computers. To do this, we need to follow the steps given below.
Step 1 − Server Manager screen → Tools → DHCP.
Step 2 − Right-click on the DHCP Server → then click on “Add/Remove Bindings… “
Step 3 − Ensure the static IP address of the server should appear as shown in the following screenshot.
Step 4 − Right-click on IPv4 → Select “New Scope”.
Step 5 − Click “Next”.
Step 6 − Enter Scope Name and description as shown in the following screenshot and then → Next.
Step 7 − Enter the Start and End IP address, the Subnet mask, leave the Length as default “24” for class C subnet → click Next.
Step 8 − Enter your IP range in the exclusion list. If you have devices on the network that require static IP address and also ensure that the excluded range falls with the Start and End range earlier specified, then → click Next.
Step 9 − Enter the desired lease duration for the assigned IP’s or leave as default → then click Next.
Step 10 − Select → Yes, I want to configure these options now to configure the DHCP options for the new scope → then click on Next.
Step 11 − Enter the default gateway which is the IP of your Router → then click Next.
Step 12 − Add DNS IP → click Next (we can put Google DNS or if it is a Domain environment you can put the DC IP there) then click → Next.
Step 13 − Specify your WINS Server if any and then click → Next.
Step 14 − Select Yes, I want to activate this scope now option to activate the scope immediately and then click → Next.
Step 15 − Click Finish.
Windows Server 2012 — DNS Role
DNS Role is one of the most important services in a network with Domain Controllers Environment. It helps us to resolve domain names internally and externally to IP and to have access to the requested service for the respective domain.
Let us now see how to install the DNS Role. For this we need to follow the steps given below.
Step 1 − To Install DNS role, go to “Server Manager” → Manage → Add Roles and Features.
Step 2 − Click Next.
Step 3 − Select the Role-based or feature-based installation option and then click Next.
Step 4 − We will install a Local DNS role as it will select a server from the server pool → and then click Next.
Step 5 − From the Server Roles lists, check the DNS Server role → click Add Features on the popup windows and then click Next.
Step 6 − Click Next.
Step 7 − Click Install.
Step 8 − Wait until installation bar is complete.
Once the installation is finished, click on Close.
Windows Server 2012 — Primary Zones
To manage DNS, we have to create a primary Zone because by default, there are no zones in order to manage the records.
Step 1 − To manage DNS, go to Server Manager → Tools → DNS → Right click on “Forward Lookup Zone” → New Zone.
Step 2 − Select “Primary Zone” and then click Next.
Step 3 − Enter the name of the primary Zone for which you want to manage the records.
Step 4 − Select “Create a new file with this filename” option.
Step 5 − If you want to update the record of this zone manually, you have to select “Do not allow dynamic Updates”, as shown in the following screenshot.
Step 6 − Click the Finish button.
Windows Server 2012 — Manage Records
As you know, in DNS you can add records according to your need and in Windows server 2012 as well. This doesn’t change too much from its earlier version of Windows Server 2008.
To add or manage records, we have to follow the steps given below −
Step 1 − Server Manager → DNS → Right click on the server that has a DNS record, which in our case is local.
Step 2 − Go to “Forward Lookup Zone”.
Step 3 − Right Click on the empty Field → New Host (A or AAAA) …
Step 4 − Name field and the subdomain name or case is WWW. → IP address we put is 192.168.1.200. So, when we will type-in our browser www.example.com, it will redirect us to 192.168.1.200.
Step 5 − To add a Mail Server Record, we add an MX record and then Right click → New Mail Exchanger as shown in the screenshot given below.
Step 6 − At “Fully qualifies domain name(FQDN) of mail server”, you enter the name of mail server → then in the “Mail server priority”, you enter a number. The smaller the number, the higher the priority.
Windows Server 2012 — IIS Overview
The IIS or Internet Information Services role is one of the most important services in Windows Server 2012. It has improved features as compared to its previous versions and it helps us to publish web application or webpages.
Let us now see how to install the IIS Role for which you will have to follow the steps given below.
Step 1 − To Install IIS role, go to “Server Manager” → then Manage → and then to Add Roles and Features.
Step 2 − Click on Next in the window which pops up.
Step 3 − Select the Role-based or feature-based installation option and then click on Next.
Step 4 − I will install a Local IIS role as it will Select a server from the server pool → then click on Next.
Step 5 − From the Roles lists, check the “Web server” (IIS) Server role → Next.
Step 6 − Click Next.
Step 7 − Click Next.
Step 8 − You can choose all the default setting or customize them according to you needs.
Step 9 − Click Install.
Step 10 − Wait until the Installation Wizard finishes. Once it is done click Close.
Step 11 − Check if your IIS is installed correctly. This can be done by opening your internet explorer and then typing http://localhost and you should be able to see the following screenshot.
Windows Server 2012 — IIS Security
The IIS (Internet Information Services) is facing internet all the time. So, it is important to follow some rules in order to minimize the risk of being hacked or having any other security issues. The first rule is to take all the updates of the system regularly. The second one is to create different application polls to this, which can be done by following the steps shown below.
Step 1 − You have to go to: Server Manager → Internet Information Services (IIS) Manager → Application Pulls.
Step 2 − Click “Sites” → Right Click “Default Website” → Manage Website → Advance Settings.
Step 3 − Select the Default Pools.
Step 4 − Disable the OPTIONS method, this can be done by following the path – Server Manager → Internet Information Services (IIS) Manager → Request Filtering.
Step 5 − In the action pane, select «Deny Verb» → Insert ‘OPTIONS’ in the Verb → OK.
Step 6 − Enable Dynamic IP Restrictions blocks by going to – IIS Manager → Double click on «IP Address and Domain Restrictions» → Actions pane.
Step 7 − Then select «Edit Dynamic Restriction Settings» → Modify and set the dynamic IP restriction settings according to your needs → press OK.
Step 8 − Enable and Configure Request Filtering Rules, to do this – IIS Manager → Double click on «Request Filtering» → Change to the Rules tab → Actions Pane.
Step 9 − Then select «Add Filtering Rule» → Set the required rules → Click OK.
Step 10 − Enable logging, to do this we need to follow this path – IIS Manager → select the specific site you want to configure → Logging.
Windows Server 2012 — Hyper-V
Virtualization is one of the most important technology feature and Microsoft has invested on this and the responsible role is called as Hyper-V.
Let us now see how to install the Hyper-V Role, for doing this we should follow the steps given below.
Step 1 − To Install DNS role go to “Server Manager” → Manage → Add Roles and Features.
Step 2 − Click Next.
Step 3 − Select the Role-based or feature-based installation option → click Next.
Step 4 − I will install a Local Hyper-V role as it will Select a server from the server pool → Next.
Step 5 − From the Roles lists, check the Hyper-V Server role → click Add Features on the popup windows which show up and then → Next.
Step 6 − Click Next.
Step 7 − Choose your server’s physical network adapters that will take part in the virtualization → Next.
Step 8 − Under Migration, leave the default settings → Next.
Step 9 − Choose the path where to save the file.
Step 10 − Click Install and wait for the installation bar to finish.
Advanced Configuration
In this chapter, we will see how to create a virtual machine. Firstly, we should open the Hyper-V manager and then follow the steps given below.
Step 1 − Open “Server Manager” → and then Click on “Hyper-V”.
Step 2 − Click “New” on the Right side Panel or click on Action button in the options as shown in the screenshot below.
Step 3 − Double Click on the Virtual Machine option as shown in the following screenshot.
Step 4 − A new table will be open → Type the Name of your new machine and then click Next.
Step 5 − A new table will be open where you must allocate the memory. Keep in mind that you cannot choose more memory than what you have in your system.
Step 6 − In the Connection dropdown box, choose you physical network adaptor and click Next.
Step 7 − Now it is time to Create a Virtual Hard disk. If you already have one, choose the second option.
Step 8 − Select the Image of ISO that should be installed and then click Finish.
Step 9 − Connect to the Virtual machine. To do so, Right Click on the machine name and then → Connect.
Step 10 − After that, the Installation of your ISO will continue.
Configure WSUS Role
As you know the WSUS (Windows Server Update Services) is an update service of Microsoft which allows the companies to test updates before installing to live environment.
To install this role, we should follow the steps given below.
Step 1 − Go to “Server Manager” → Manage → Add Roles and Feature → Next → Select “Role-based or feature-Based-Installation → Select a server from the pool server and then → Next.
Step 2 − Check “Windows Server Update Service” a pop-up window table will come out → click “Add Features” then → Next and then again → Next.
Step 3 − Check box of WID Database and WSUS Services
Step 4 − Choose the path for the content. If you have another partition other than C:, then install it there because C: can risk to become full → Next.
Once this is done, you should wait for the installation to finish.
WSUS Policies and Tuning
In this chapter, we will see how to configure WSUS and tune it. The following steps should be followed for configuring it.
Step 1 − When you open it for the first time, you should do it by going to “Server Manager” → Tools → Windows Server Update Services, then a Configuration wizard will be opened and then click → Next.
Step 2 − Click “Start Connecting” → Wait until the green bar is full and then → Next.
Step 3 − Check the box for which the updates want to be taken, I did for English and then → Next.
Step 4 − Check the box for all the products which you want to update. It is just for Microsoft products and it is recommended to include all the products related to Microsoft and then → Next.
Step 5 − Choose the classification updated to be downloaded, if you have a very good internet speed, then check all the boxes, otherwise just check “Critical Updates”.
Step 6 − Now we should schedule the updates which I will recommend to do it automatically during night time → Next.
Step 7 − Check Box “Begin initial synchronization” → Finish.
Step 8 − Now the WSUS console will be open and we must add the computer to WSUS. To do this, go to Options → Computers.
Step 9 − If you have a Domain Controler environment, choose the second option like in my case, otherwise choose the first option and then → OK.
Step 10 − After you have done all this, you should approve updates, which is similar like how it is done in the previous version. To do this – Right click on the updates → Approve as shown in the screenshot given below.
Step 11 − Then you should click Approve for install as shown in the screenshot given below.
Windows Server 2012 — Sharing of Files
Another important service for Windows Server is Sharing Files and for this purpose the Windows Server 2012 has – File and Storage Services, which is found in Server Manager on the left pane as shown in the screenshot given below.
Now let us see how to create a Share in the system with its respective rights. To do this, we should follow the steps given below.
Step 1 − Click Server Manager → then click on File and Storage Services in the Server Manager sidebar → click on Shares → click on the Shares drop-down list → click on New Share.
Step 2 − This will open the New Share Wizard → From here, select a type of share → I will create a very basic SMB share, so click on SMB Share – Quick. We can later configure the user rights of this share.
Step 3 − Click “Type a custom path” → click on Browse button.
Step 4 − Select the folder that you want to share → Click Select Folder.
Step 5 − Click Next.
Step 6 − You can choose one of the three options as per your need. The explanations are also mentioned alongside the check boxes, once selected → Next.
Step 7 − Click on Customize Permissions to authorize the rights that your users need to have.
Step 8 − Click on Add if you would like to add other users.
Step 9 − Click on Select a principal.
Step 10 − We should give rights that can be done by entering the object name, which is Backup Operator in this case and then → OK.
Step 11 − To this user we will give ReadWrite rights, for that we will check the respective boxes and then → OK → OK → Next.
Step 12 − Click on Create.
Windows Server 2012 — File Manager
Like its previous versions, the present Windows Server 2012 version has a File Server Resource Manager Role. As you know, this is a role that helps system administrators to manage shared folders in the features link in setting up limits or file extension restrictions. To install it, we should follow the steps given below.
Step 1 − Go to Server Manager → Manage → Add Roles and Features → Next → Check on the Role-based or feature-based installation box → Check on the Select a server from the server pool box → Next.
Then, at the list of the roles find File and Storage Services and expand it. After this, expand the Files and iSCSI Services → Check on the File Server Resource Manager box and then a pop-up window will open.
Step 2 − Click on Add features and then → Next.
Step 3 − Click the Next button.
Step 4 − Click the Install button.
Now that we installed the File Server Resource Manager, let us open it by following the path given below.
Step 1 − Click on Server Manager → Tools → File Server Resource Manager.
To set quota to a folder, we should follow the steps as below.
Step 2 − On the left panel click on Quota Management → expand Quota Templates → click on Create Quota Template… on the right-hand side panel as shown in the screenshot given below.
Step 3 − A new table will be opened, where the most important aspect to put is Space Limit depending on the need. Here, we will put 2GB and then → OK.
Step 4 − You must put the threshold for it and once the folder reaches the capacity, it will send you a notification where you will have an option to put the email.
Step 5 − Click Ok.
Step 6 − Then to attach this quota to a folder – Right Click on the template → click on Create Quota from Template…
Step 7 − Click on Browse… and then select your folder → Create.
Step 8 − To put a file restriction to your folders, you can go to the left pane File Screening Management → File screening templates → Click on the left panel Create File Screen Template…
Step 9 − Click on Browse… and find the folder that you want → Create.
Windows Server 2012 — Print Server
In this chapter, we will see how to install a Print Server which plays some very important roles for the system administrator and the management. We should follow the steps given below.
Step 1 − Go to Server Manager → Manage → Add Roles and Features → Next → Check on the Role-based or feature-based installation box and → Check on Select a server from the server pool and then → Next.
Once it is done then, at the list of the roles find Print and Document Services → A popup window will open.
Step 2 − Click on Add features and then → Next → Next → Next.
Step 3 − Check on the Print Server box and → Next.
Step 4 − Click Install.
Windows Server 2012 — Easy Printing
Easy Printing is a feature which allows the client that connects via RDS to print over the network. It is installed in Windows server 2012 by default. Easy Printing is basically where the printer device is defined on the client system and a printer is connected directly via the network. All configuration is done via Group Policy Objects.
The configuration settings can be found at Computer Configuration – Administrative Templates – Remote Desktop Services – Printer Redirection.
For User Configuration, it will be have the same path – Administrative Templates – Remote Desktop Services – Printer Redirection.
In administration, another important aspect is to set the priority for the printer, so the users have the same printer installer and can print as per their priorities. In this, the users printing with higher priorities overpass the printing will lower priorities.
To do so, you need to add different logical printers and then add then as per the users or departments that have different priorities.
To do this, firstly let us add a printer to the print server by following the steps given below.
Step 1 − Click on Server Manager → Tools → Print Management → then on the left panel click Print Servers → then right click on Printers and → Add Printer.
Step 2 − Next, follow the wizard to add the network printer like you do for a normal workstation and at the end this printer will be shown in the Printer Management.
Step 3 − Now that we have installed the printer, we can set the priority on this printer – Right click on the printer → Advanced → put a number at Priority from 1-99 → OK.
Configure Print Drivers
If we want to add other additional drivers, so that our clients find them easier to install a printer on their own. We must follow the steps given below −
Step 1 − Go to, Server Manager → Tools → Print Manager → Action → Add Driver…
Step 2 − Check both boxes → Next.
Step 3 − Choose the drivers Path to be installed and then → Next.
Step 4 − Click the Finish button.
Windows Server 2012 — Network Services
Windows has many network services too and you might already be knowing that it can become a router or a VPN Server too. Let us see how to use the Windows server 2012 as a router by installing the Remote Access role to it.
PS − Server should have 2 network cards – One inside the LAN and the other facing the internet.
To add the Remote Access role, we should follow the steps given below.
Step 1 − Go to, Server Manager → Manage → Add Roles and Features → Next → Check Role-based or feature-based installation → Check Select a server from the server pool → Next.
Once all of it is done, then at the list of the roles find Remote Access and check it → A pop-up window will open.
Step 2 − Click “Add Features” → Next.
Step 3 − Click Next.
Step 4 − Check on the DirectAccess and VPN(RAS) and Routing check boxes.
Step 5 − Click Install and wait for it to be installed completely.
After the installation is done, let us now see the setup of the router. For this, we need to follow the steps given below.
Step 1 − Go to, Server Manager → Tools → Routing and Remote Access.
Step 2 − Right click → and then again click on Configure and Enable Routing and Remote Access as shown in the following screenshot.
Step 3 − Select the Network address translation (NAT) option → Next.
Step 4 − Now choose your Ethernet card that will be facing your internet site as shown in the following image and then → Next.
Step 5 − Choose I will set up name and address services later as we have already set up the DHCP and DNS and then → Next.
Step 6 − Click the Finish button.
Now let us see how to make the VPN Setup to allow the employees to connect from home. To do this, we must follow the steps given below.
Step 1 − Go to, Server Manager → Tools → Routing and Remote Access → Right click → and then again click on Configure and Enable Routing and Remote Access → Custom Configuration and then → Next.
Step 2 − VPN Access and then → Next.
Step 3 − Click the Finish button.
Windows Server 2012 — Backup Management
In this chapter, we will install and configure Backup which does not differ too much from the previous versions.
To Install the backup feature, we should follow the steps given below.
Step 1 − Go to Server Manager → Manage → Add Roles and Features → Next → Check the Role-based or feature-based installation box → then check on the Select a server from the server pool box and then click Next.
Once all this is done, check the Windows Backup Server box and then click on Next as shown in the following screenshot.
Step 2 − Click Install and then wait for the process to Finish.
Now let us go and Configure the Backup Feature it, for which we should follow the steps given below.
Step 1 − Go to Server Manager → Tools → Windows Server Backup.
Step 2 − Click on Backup Schedule… in the left side panel or click on Action at the top of the screen as shown in the following screenshot.
Step 3 − Click Next.
Step 4 − If you want to backup a file or a folder, you can click on custom file, but in this case I want to do a full backup of the server. So, we should click on the first option Full server (recommended) and then click Next.
Step 5 − We should do backup once in a day, so we will choose the first option and the appropriate time, which generally is recommended at night → Next.
Step 6 − We should not click on the Back Up to a shared network folder option because the backup should be saved somewhere out of the server that is being backed up and then click on Next.
Step 7 − At the location, put the shared folder path and then → Next.
Step 8 − It will pop-up a credentials table asking you for the username and password of the shared folder which you should put here and then click → OK.
Step 9 − Click the Finish button.
Step 10 − Now you will get a window showing the status if the backup was created successfully or not, which can be seen in the following screenshot.
Print
Обновлено 25.10.2016
Базовая настройка windows server 2012 r2
Настройка windows server 2012 r2 осуществляется сразу после того как была произведена установка windows server 2012 r2. Под настройкой понимается, настройка сети, смена имени и отключение не нужных для сервера вещей, благодаря этим действиям, системный администратор сможет повысить удобство и стабильность работы данной операционной системы и улучшить ее производительность, если вы производите установку массово, то это все конечно же можно автоматизировать.
Настройка сети windows server 2012 r2
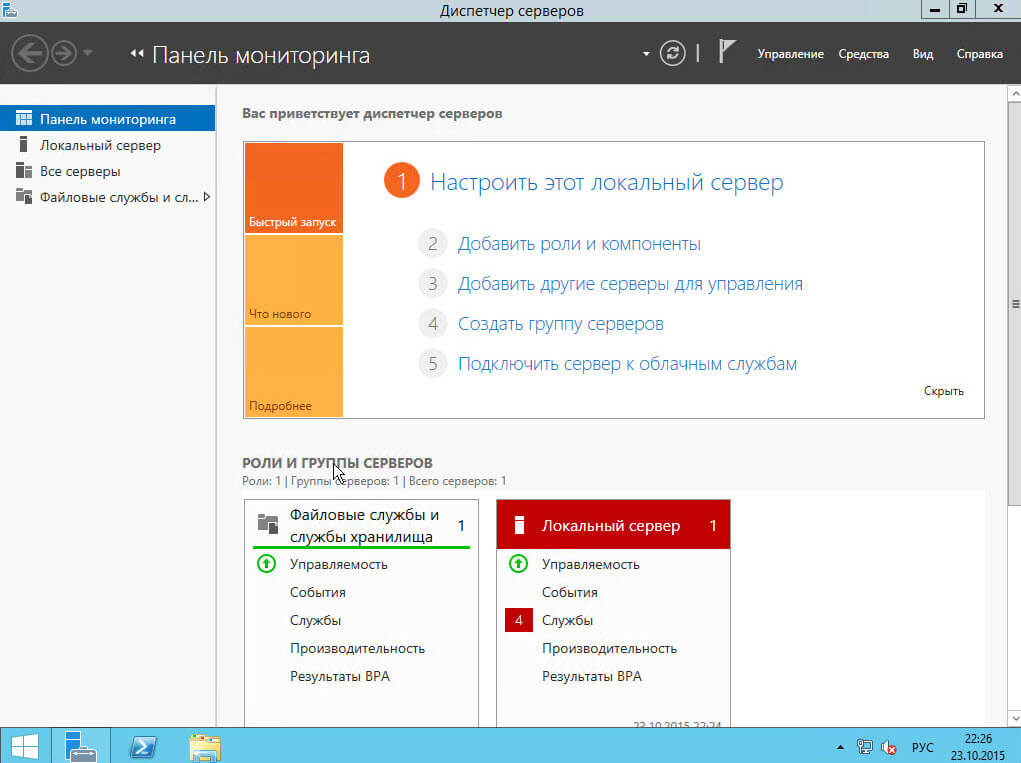
настройка windows server 2012 r2-01
Первым делом любому серверу необходима, настройка сети. В настройку сети входит выбор и установка статического ip адреса. Для этого щелкаем правым кликом по значку сети и выбираем Центр управления сетями и общим доступом
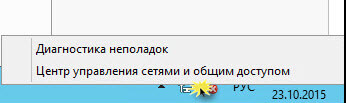
настройка windows server 2012 r2-02
Далее выбираем ваше сетевое подключение
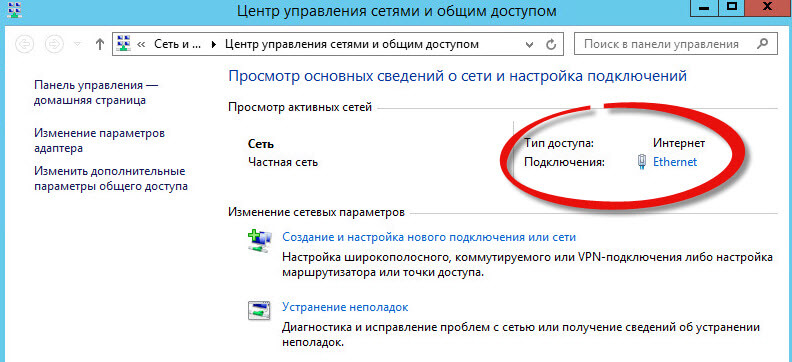
настройка сети windows server 2012
Нажимаем кнопку свойства
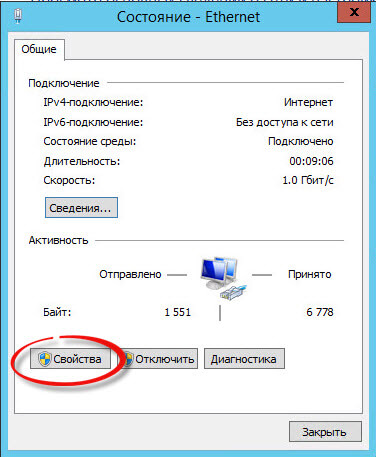
настройка сети windows server 2012
настройка сети windows server всегда требует одного правила отключаем все то, что не используется. Так как у меня не используется протокол ipv6, то я снимаю с него галку, так как компьютеры в первую очередь пытаются по умолчанию общаться через него.
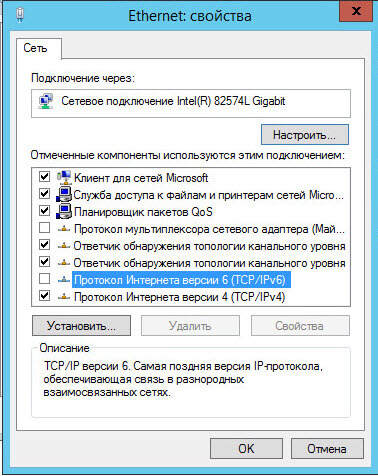
отключить ipv6
Теперь выбираем ipv4 и нажимаем свойства.

как сделать статический ip адрес из динамического
Так как наш ip адрес получен от DHCP сервера, то мы динамический ip адрес заменим на статический. Заранее вы для своей локальной сети должны были выбрать пул ip адресов, которые будут у вас. И для серверов, забронировать определенное количество ipшников. У меня это диапазон 10.10.2.0/24. И так как у меня данный сервер вскоре будет контроллером домена, то я ему назначу ip адрес 10.10.2.1 с маской 255.255.255.0 в качестве DNS сервера пропишу пока его же 10.10.2.1. Вот так производится настройка статического ip адреса.
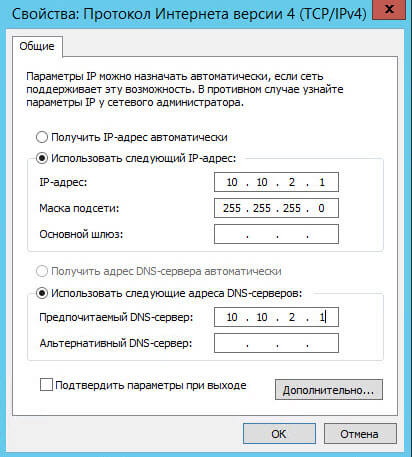
настройка статического ip адреса
Жмем везде дальше ок и закрываем все окна. С сетью мы закончили работы.
Задаем имя сервера
Имя сервера, один из важных параметров в вашей инфраструктуре, существует много вариантов наименования серверов и с точки удобства и с точки зрения безопасности сети, так как явно понятное имя позволяет хакеру ускорить процесс совершения задуманного и понимания, что и где в сети. Лично я придерживаюсь, что контроллеры домена можно назвать и dc, а вот сервера просто обезличенно назвать server01 и так далее.
Щелкаем правым кликом по пуску и выбираем Система
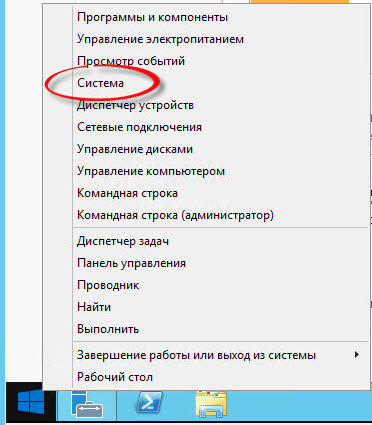
задать имя сервера
Переходим в дополнительные параметры системы
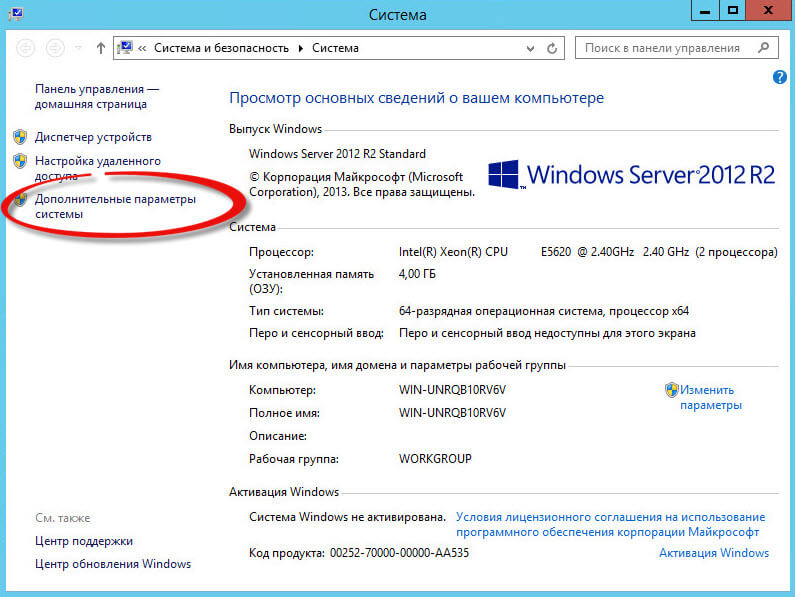
задать имя сервера
Переходим на вкладку имя сервера, на ней можно изменить имя сервера на любое какое вам нужно, до 16 символов.
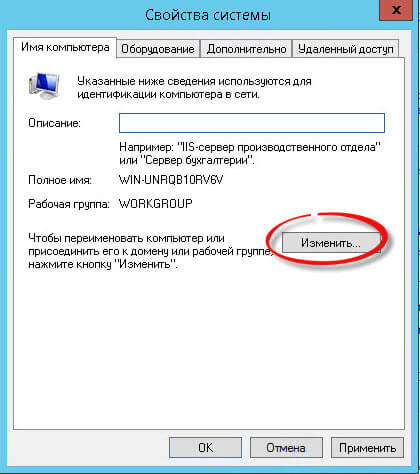
изменить имя сервера
Я задаю имя компьютера, такое: у меня домен будет inmoskow.org и от имени домена возьму первые две буквы im и добавлю dc01, в итоге получаю imdc01, у вас может быть свой принцип.
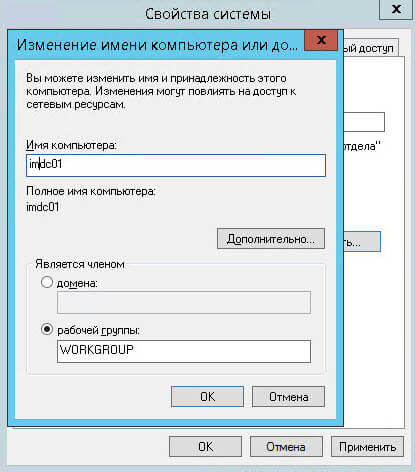
изменить имя сервера
После чего вас уведомят, все настройки будут применены только после перезагрузки.
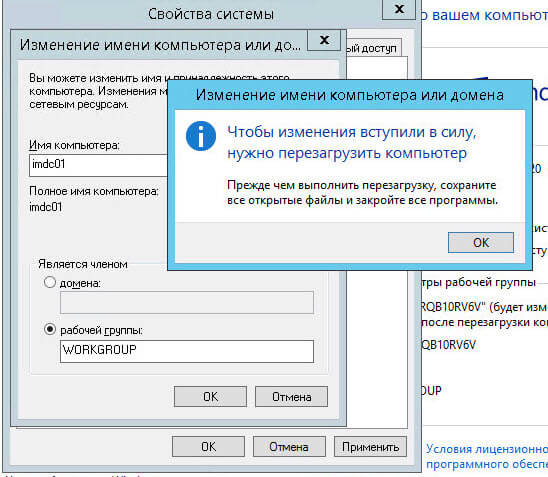
настройка windows server 2012 r2
Вас попросят перезагрузиться, сделаем это позже
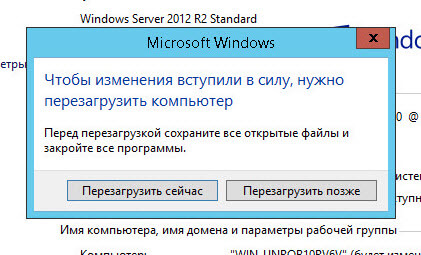
перезагрузка Windows Server 2012 r2
Быстродействие Windows Server 2012 r2
Для того, чтобы ускорить ваш сервер, нужно чтобы на нем работало только то что реально нужно, заходим на вкладку Дополнительно-Параметры
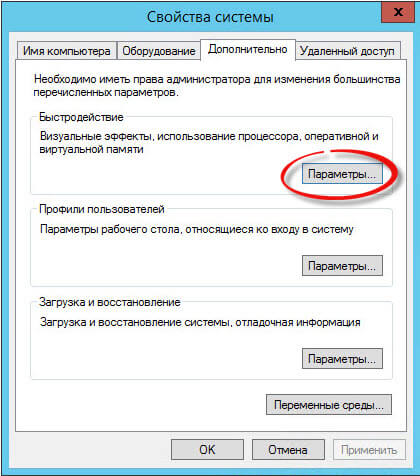
задать имя компьютера
вкладка визуальные эффекты, и ставим переключатель на Обеспечить наилучшее быстродействие, это позволит ускорить сервер.
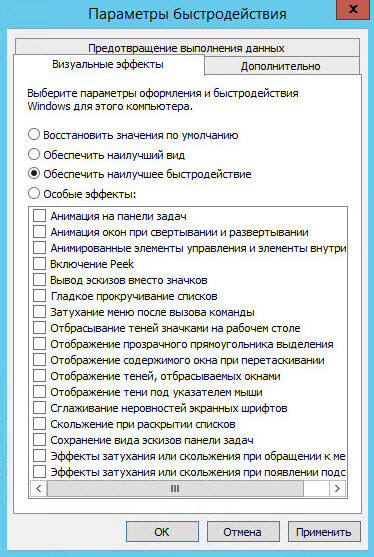
ускорить сервер
Включаем удаленный рабочий стол
Для того чтобы вы со своего рабочего места могли заходить по RDP, необходимо включить на вкладке Удаленный доступ птичку Разрешить удаленные подключения к этому компьютеру. В итоге будет создано правило в брандмауэре открывающее порт 3389.
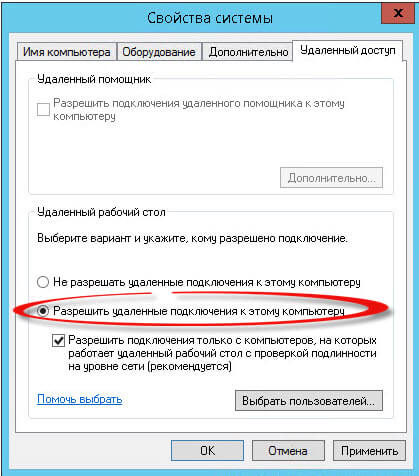
включаем RDP
Вот теперь перезагружаемся и заходим на ваш сервер по RDP. Проверим как применились настройки на нашем сервере. Для этого вводим две команды
hostname и вторая ipconfig
Команда hostname покажет текущее имя сервера, а ipconfig отобразит настройки сети, в нашем случае это ip адрес и маску. Видим, что все отлично применилось.
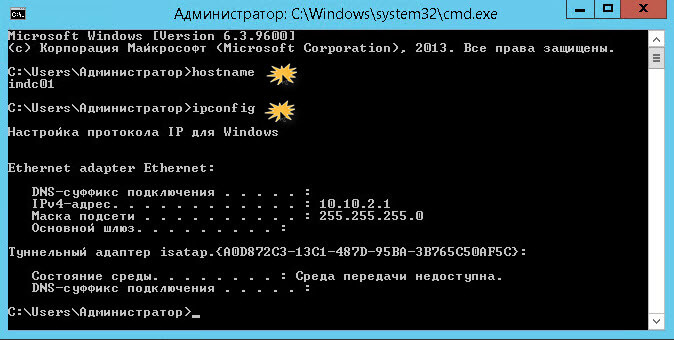
проверка настроек сервера
Вот так вот просто делается настройка windows server 2012 r2, можно двигаться дальше и устанавливать контроллер домена на платформе 2012R2.
Материал сайта pyatilistnik.org