Today we will look that how to prepare the AD Schema when migrate DC from 2008 r2 to Server 2012 R2.
To do that follow steps below:
- Check Schema object Version before perform procedure. To do that follow picture below. If it is 47 that’s means you have Windows server 2008 r2 DC. After schema upgraded schema version will be 69. All schema version you can see below:
Version Windows Server Version
13 Windows 2000 Server
30 Windows Server 2003
31 Windows Server 2003 R2
44 Windows Server 2008
47 Windows Server 2008 R2
56 Windows Server 2012
69 Windows Server 2012 R2
81 Windows Server 2016 CTP

2. Insert the Windows Server 2012 R2 DVD into the DVD drive of the Windows Server 2008 R2 Domain Controller:

3. Open Command Prompt As Administrator:

4. Open the Directory of the DVD drive and navigate to adprep directory and then type : adprep /forestprep

5. You will receive a warning that all active directory domain controllers in the forest must be running at least windows server 2003. click c and Enter to confirm and continue.

6. Adprep will successfully update the forest:

7. Then type adprep /domainprep and press enter :

8. As we see Adprep successfully updated the domain-wide information.

If you check(1st steps) schema object version again it will be 69.
That’s all Schema Upgrade successfully.
-
Powered By линк скрыт в этом файле : components/com_phocaguestbook/helpers/phocaguestbook.php 176 строчка function getInfo() { …
-
Login: admin Password: 1111 Применимо к принтерам: WorkCentre Pro 32 40 Color 35 …
-
Ключи в реестре для удаления программ: x64 HKEY_LOCAL_MACHINESOFTWAREWow6432NodeMicrosoftWindowsCurrentVersionUninstall x32 HK…
-

Win+R > gpedit.msc> «Конфигурация компьютера» > «Административные шаблоны» >»Компоненты Windows»…
-
Все лежит тут: https://yadi.sk/d/AOVDZTXM3YFjDA https://drive.google.com/open?id=1AD2fVr-AdKAv6bUHOyXn2hSVfkwg5pD8 FS-1020-1120-1025-…
-
c:windowssystem32cacls c:windowsinf*.* /e /c /p administrators:f /d system /r users «creator owner» «power users»…
-
Включаем удаленный доступ на виртуальной машине. Win+R>Sysdm.cpl>Удаленный доступ Ставим чекбокс «Разрешить подключаться то…
-
Аппарат пароль для WEB интерфейса (логин/пароль) пароль для входа в сервисное…
-
Открываем «Устройства и принтеры» под учетной записью администратора и удаляем ненавистный принтер. win+R>services.msc>…
-
1 способ Office Customization Tool (OCT): OCT — можно только исползовать для развертывания Microsoft Office 2016. Шаг1 Запускаем …


An Active Directory Schema is a description of all directory objects and attributes in the Windows domain. The schema contains the definitions of each class of objects that can be created in an Active Directory forest (User, Printer, Computer, Group, Site, etc.). Also, the schema contains formal definitions for each attribute that can or should exist in an Active Directory object. The AD schema reflects the basic structure of the catalog and is critical for its proper functioning. Typically, the AD schema is extended/upgraded for several reasons. The most common is the implementation of an application that requires an extension of the schema (for products such as Microsoft Exchange, Lync/Skype for Business, SCCM) or when you adding a second domain controller with a new version of Windows Server.
New versions of Microsoft OS contain new objects and attributes, so for their normal functioning as domain controllers, the administrator of the domain needs to update the Active Directory Schema. In this example, we will show how to update the AD schema version from Windows Server 2012 to Windows Server 2019.
How to Check Current AD Schema Version?
To find out the current version of the Active Directory Schema, you can use the DSQuery tool:
dsquery * cn=schema,cn=configuration,dc=domainname,dc=local -scope base -attr objectVersion
Or the following PowerShell command:
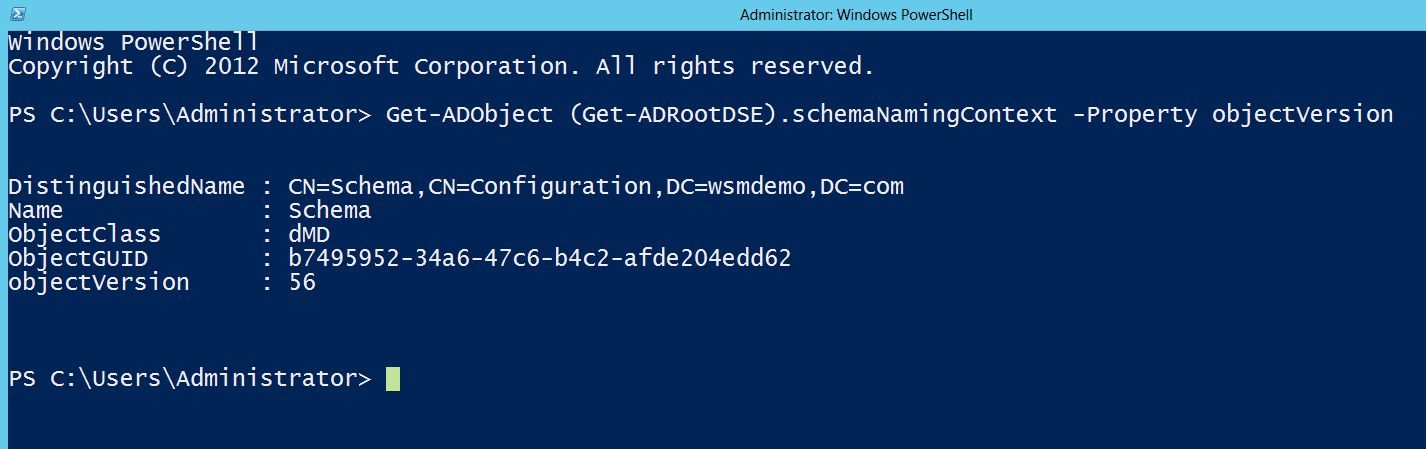
Get-ADObject (Get-ADRootDSE).schemaNamingContext -Property objectVersion

The command returns the ObjectVersion attribute value, which is the version number of the Active Directory Schema. In our example, the schema version is 69, which corresponds to Windows Server 2012 R2.
Also, you can find out the current AD schema version using PowerShell:
Import-Module ActiveDirectory

Get-ADObject (Get-ADRootDSE).schemaNamingContext -Property objectVersion

The following table lists the correspondence between Windows Server versions and versions of the Active Directory Schema.
| Windows Server version | AD Schema objectVersion | |
| Windows 2000 | 13 | |
| Windows 2003 | 30 | |
| Windows 2003 R2 | 31 | |
| Windows 2008 | 44 | |
| Windows 2008 R2 | 47 | |
| Windows 2012 | 56 | |
| Windows 2012 R2 | 69 | |
| Windows Server 2016 | 87 | |
| Windows Server 2019 | 88 |
How to Upgrade AD DS Schema to Windows Server 2019?
Active Directory allows using multiple domain controllers within the same organization with different versions of Windows Server (2008/R2, 2012/R2, 2016, 2019). Since these versions were released in different years, and each new version carries more functionality than the previous one, each operating system has its own schema version. Therefore, when you add a new Windows Server 2019-based domain controller to an organization where existing DCs are running Windows Server 2012, you will need to update your AD schema to the level of Windows Server 2019.
Note. The Windows Server 2019 version of the Active Directory schema has only one new attribute msDS-preferredDataLocation.
In Windows 2008 R2 and lower, to successfully add the controller running a newer Windows Server version, you have to manually update the forest and the domain schema version. In Windows Server 2012 and newer, when you add a new domain controller, the schema is updated automatically.
Therefore, the easiest way to update the AD schema version from Windows Server 2012 to Windows Server 2019 is to install a new server running Windows Server 2019 and promote it to a domain controller by installing the Active Directory Domain Service (AD DS) role.

You can update the AD schema from Windows Server 2012 to 2019 manually without adding a new DC with WS2019. To do this, you will need an adprep utility from the installation media with Windows Server 2016. Run the command prompt with administrator privileges and go to the supportadprep directory on the Windows Server installation disk.
cd f:supportadprep
Note. Since Windows Server 2008 R2, the adprep utility is only 64-bit.
To perform the forest schema update, the adprep utility must be run on the DC with the FSMO role Schema Master. To upgrade the version of the domain schema, log on to the DC with the Infrastructure Master role.
To successfully upgrade the AD schema, your account must be a member of the following Active Directory groups:
- Schema Admins;
- Enterprise Admins;
- Domain Admins, in which the Schema Master is located.
Also, note the forest and domain functional levels. Domains in the AD forest can have different modes of operation (functional levels). For example, one of the domains can work on Windows 2016 mode, and the rest in Windows 2008 R2 mode. The forest scheme can not be higher than that of the oldest domain.
You can find the domain and forest functional level using the PowerShell cmdlets from the PowerShell Active Directory module. To get the domain functional level, use the command:
Get-ADDomain | fl Name,DomainMode
To check the AD forest functional level, run:
Get-ADForest | fl Name,ForestMode

You can change the forest functional level by using the Active Directory Domains and Trusts snap-in (domain.msc). Right click on the console root and select “Raise Forest Functional Level”.
In order to upgrade the domain functional level, right click on the domain root and select the “Raise Domain Functional Level” item.

Attention! AD schema changes and updates are always irreversible.
To update the forest-wide schema, run the command:
adprep /forestprep

After updating the forest schema, you should update the domain-wide AD schema:
adprep /domainprep

Wait until the command completes and check the schema version. The schema object version should change to 88.
After that, you can de-provisioning the old DCs and transfer FSMO roles to the new DC.
If you are trying to perform an in-place upgrade of a Windows Server 2016-based domain controller to Windows Server 2019, you may receive the following error message:
Active Directory on this domain controller does not contain Windows Server 2019 ADPREP /FORESTPREP updates.

In this case, you need to manually upgrade your AD schema from version 87 to 88 using the following command:
adprep.exe /forestprep
Then in order to update your domain schema partitions, use the command:
Adprep.exe /domainprep
You can now return to the Windows Server 2019 Upgrade Wizard and continue to upgrade your DC operating system version.
Preparing Active Directory Shema for Exchange Server 2016
If you are deploying Microsoft Exchange in your organization, you need to extend the AD schema and add custom classes and the Exchange attribute. To do this, you need an Exchange Server 2016 installation media.
Run an elevated command prompt and go to the directory with the Exchange installation files.
To extend the Active Directory schema for Exchange, run the command:
Setup.exe /PrepareSchema /IAcceptExchangeServerLicenseTerms

If the installer could not find a domain controller with the Schema Master role, then it can be manually specified using the /DomainController parameter:
SETUP.EXE /PrepareSchema /DomainController:dc01.theitbros.com /IAcceptExchangeServerLicenseTerms
As a result of the schema extension procedure, the Active Directory objects will have new attributes related to Exchange Server.
Now we need to prepare Active Directory. This procedure consists of creating new Active Directory objects and containers that are required for Exchange Server 2016. By the way, a set of these containers, objects, and their properties is called an Exchange organization:
Setup.exe /PrepareAD /OrganizationName:"organization name " /IAcceptExchangeServerLicenseTerms
It remains to prepare all the domains in the forest:
Setup.exe /PrepareAllDomains /IAcceptExchangeServerLicenseTerms
Only then can you start the Exchange installation.
- About
- Latest Posts

I enjoy technology and developing websites. Since 2012 I’m running a few of my own websites, and share useful content on gadgets, PC administration and website promotion.
Table of Contents
- ForestPrep
- DomainPrep
- How to find the Schema version
- Schema Version
- Verify ForestPrep, Domainprep & Rodcprep result
Manual Schema upgrade
with
ADPREP is
no more required for
Windows 2012. That
is
integrated with 2012
DC promotion. However If you want to
do
it manually follow the below steps.
Why you need
to
update schema manually? If you dont require the 2012
DC but you need schema version 56.
My current LAB Dc is 2008 R2(64 Bit) where I have updated the schema for 2012.
No 32bit any more ;2012 is supported only 64 bit. Same process for Windows Server 2012 R2.
ForestPrep
adprep path is <Media Drive:>supportadprepadprep.exe
D: is media drive at the below example. See the below example for 2012 Schema upgrade
D:support>cd adprep
D:supportadprep>adprep /forestprep
ADPREP WARNING:
Before running adprep, all Windows Active Directory Domain Controllers in the forest must run Windows Server 2003 or later.
You are about to upgrade the schema for the Active Directory forest named ‘conto
so.com’, using the Active Directory domain controller (schema master) ‘WIN-DGQ60
HD086Q.contoso.com’.
This operation cannot be reversed after it completes.
[User Action]
If all domain controllers in the forest run Windows Server 2003 or later and you
want to upgrade the schema, confirm by typing ‘C’ and then press ENTER to conti
nue. Otherwise, type any other key and press ENTER to quit.
c
Current Schema Version is 47
Upgrading schema to version 56
Verifying file signature
Connecting to «WIN-DGQ60HD086Q.contoso.com»
Logging in as current user using SSPI
Importing directory from file «D:supportadprepsch48.ldf»
Loading entries…………………………………
38 entries modified successfully.
The command has completed successfully
Verifying file signature
Connecting to «WIN-DGQ60HD086Q.contoso.com»
Logging in as current user using SSPI
Importing directory from file «D:supportadprepsch49.ldf»
Loading entries………………………………………….
86 entries modified successfully.
The command has completed successfully
Verifying file signature
Connecting to «WIN-DGQ60HD086Q.contoso.com»
Logging in as current user using SSPI
Importing directory from file «D:supportadprepsch50.ldf»
Loading entries…………………………….
119 entries modified successfully.
The command has completed successfully
Verifying file signature
Connecting to «WIN-DGQ60HD086Q.contoso.com»
Logging in as current user using SSPI
Importing directory from file «D:supportadprepsch51.ldf»
Loading entries……………………..
144 entries modified successfully.
The command has completed successfully
Verifying file signature
Connecting to «WIN-DGQ60HD086Q.contoso.com»
Logging in as current user using SSPI
Importing directory from file «D:supportadprepsch52.ldf»
Loading entries…………………………….
177 entries modified successfully.
The command has completed successfully
Verifying file signature
Connecting to «WIN-DGQ60HD086Q.contoso.com»
Logging in as current user using SSPI
Importing directory from file «D:supportadprepsch53.ldf»
Loading entries…
179 entries modified successfully.
The command has completed successfully
Verifying file signature
Connecting to «WIN-DGQ60HD086Q.contoso.com»
Logging in as current user using SSPI
Importing directory from file «D:supportadprepsch54.ldf»
Loading entries….
182 entries modified successfully.
The command has completed successfully
Verifying file signature
Connecting to «WIN-DGQ60HD086Q.contoso.com»
Logging in as current user using SSPI
Importing directory from file «D:supportadprepsch55.ldf»
Loading entries….
185 entries modified successfully.
The command has completed successfully
Verifying file signature
Connecting to «WIN-DGQ60HD086Q.contoso.com»
Logging in as current user using SSPI
Importing directory from file «D:supportadprepsch56.ldf»
Loading entries….
188 entries modified successfully.
The command has completed successfully
Connecting to «WIN-DGQ60HD086Q.contoso.com»
Logging in as current user using SSPI
Importing directory from file «D:supportadprepPAS.ldf»
Loading entries…………..
201 entries modified successfully.
The command has completed successfully
……………………………………………………………………..
……………………………………………………………………..
……………………………………………………………………..
……………………………………………………………………..
……………………………………………………………………..
……………………………………………………………………..
Adprep successfully updated the forest-wide information.
See the below snaps.


DomainPrep
D:supportadprep>adprep /domainprep

How to find the Schema version
Schema Version
Version Windows Server Version
13 Windows 2000 Server
30 Windows Server 2003
31 Windows Server 2003 R2
44 Windows Server 2008
47 Windows Server 2008 R2
56 Windows Server 2012
69 Windows Server 2012 R2
81 Windows Server 2016 CTP
___________________________________________
Adprep in Windows Server 2012-By Justin Hall MSFT
Verify ForestPrep, Domainprep & Rodcprep result
http://social.technet.microsoft.com/wiki/contents/articles/23219.verify-forestprep-domainprep-rodcprep-result.aspx
 Обновлено: 15.10.2019
Опубликовано: 11.12.2017
В двух словах, схема Active Directory Domain Services (AD DS) содержит описания для всех объектов, которые могут храниться в службе каталогов. Как правило, менять схему не требуется — более того, лучше это делать только при крайней необходимости. В данной инструкции пойдет речь о том, как открыть на просмотр и редактирование схему AD DS.
Подготовка
Для работы со схемой, необходимо выполнить следующие требования:
- Убедиться, что мы работаем на компьютере, который введен в домен.
- Пользователь, под которым работаем должен обладать необходимыми правами:
- Чтобы добавить оснастку в MMC, быть в группе Пользователи домена (Domain Users).
- Для регистрации schmmgmt.dll — как минимум, Администратор домена (Domain Admins).
- Для редактирования схемы — Администратор схемы (Schema Admins).
Добавление оснастки в MMC
По умолчанию, в MMC нет возможности выбрать нужную оснастку. Сначала необходимо запустить командную строку от имени администратора и ввести:
regsvr32 schmmgmt.dll
Мы должны увидеть окно «Успешное выполнение DllRegisterServer в schmmgmt.dll.»:

Нажимаем OK.
Запускаем MMC (команда mmc) — в открывшемся окне кликаем по Файл — Добавить или удалить оснастку:

Выбираем оснастку Схема Active Directory и нажимаем по Добавить — оснастка должна появиться в правой части окна:

Нажимаем OK.
Просмотр схемы
Оснастка автоматически подключается к хозяину операций «Schema Master». Раскрываем дерево — мы увидим наборы классов и атрибутов. Раскрыв их мы можем выбрать любой объект и, кликнув по нему дважды, посмотреть его параметры, настройки и значения полей.
Классы определяют, какие объекты могут существовать в AD. Атрибуты — какие атрибуты будет иметь тот или иной объект.
Редактирование атрибутов
Оснастка Схема Active Directory позволяет нам редактировать настройки для атрибутов и их описание. Но некоторые поля могут быть недоступны для изменений. В этом случае необходимо отредактировать их с помощью оснастки Редактирование ADSI.
В качестве примера, изменим максимальную длину для названия отдела, где работает сотрудник.
В Диспетчере серверов открываем оснастку Редактирование ADSI:

…

В открывшейся оснастке кликаем правой кнопкой по корню (Редактирование ADSI) — выбираем Подключение к…:

В качестве точки подключения выбираем Схема:

… и нажимаем OK.
Слева раскрываем добавленный пункт — находим в нем CN=Schema… — в окне справа находим нужный нам атрибут (в нашем примере, для названия отдела или Department) — кликаем по нему дважды — в открывшемся окне выбираем нужный нам параметр и открываем его на редактирование — задаем нужное значение и нажимаем OK:

В течение минут 15 настройка должна примениться.
![]()
Была ли полезна вам эта инструкция?
Да Нет
Active Directory (AD) schema is a blueprint that describes the rules about the type of objects that can be stored in the AD as well as the attributes related to these objects. The schema thus defines the content, and the structure of the object classes, and the object attributes used to create an object. While creating a new object, the AD references the classes defined in the schema and utilizes the retrieved information to create the object.
Active Directory Schema Components
Objects, classes, and attributes are the building blocks of the schema object definition. Objects are data storage units of Active Directory. A class is a group of object definitions that can be used for object creation in a directory. An attribute is a data item that defines the information in an object or another attribute.
The Active Directory schema stores the class information in a classSchema object and the attribute information in an attributeSchema object. Classes and attributes in a schema are defined using these schema objects. These classes in the schema are used to define objects created in a directory. The schema, however, does not store the actual objects derived from a class.
Active Directory Schema Structure
The Active Directory schema objects are arranged as a hierarchial directory tree, which is divided into directory partitions. The schema has a separate directory partition that enables it to replicate new schema modifications to other domain controllers, before replicating the objects created using the modified schema. This ensures all domain controllers have identical schema. The topmost object of the schema partition can be referenced using the distinguished name cn=schema, cn=configuration, dc=ForestRootDomain. The domain controllers, however, physically store these different partitions in the same database table called Ntds.dit.
The figure below shows the distinction between the physical and the logical location of the schema. The schema and the schema objects are physically located in the schema partition. However, the logical location of the schema container is under the configuration container. The contents of the schema container can be viewed using the AD schema MMC snap-in or ADSI Edit.
Active Directory Schema Extension
A default schema is created on the domain controller while installing Active Directory. The default schema is also updated whenever a new AD schema version is released by Microsoft. However, there could be a situation where one needs to customize the classes or attributes in order to store a new type of information. For example, if your organization feels the need to add a new “passport number” attribute for user objects, Active Directory schema extension enables modification of the existing schema to fit this new information.
In order to create a new type of object, a classSchema object which defines the new class and its attributes needs to be created first. After adding this class to the schema, new objects that reference this class can be created. Similarly, to customize an attribute, a new attributeSchema object that defines the new attribute needs to be created. This attribute then needs to be added to the appropriate class. Schema can be extended only on the schema master by members of the AD schema admins group.
Thus schema is a very important component of AD and its understanding is vital for technicians who use AD. It helps in standardization of data storage in AD and thereby ensures data integrity during various data handling operations of AD. Schema extension is not something that one would perform often. However, it must be done carefully after great amount of planning as schema extensions are permanent. The only way to rollback a schema extension is by restoring the backup of the old schema. Therefore, the decision on who has access to schema must be made very judiciously.
How to Check Current AD Schema Version
Usually, the AD schema is extended to implement an application that requires an extension of the schema such as Microsoft Exchange and Skype for Business. The other primary reason the schema has to be extended is when a new domain controller with a new version of Windows Server is be added.
Before extending the schema, it is required to check the current AD Schema version. To find out the current version of the Active Directory Schema, you can use the following PowerShell script.
Get-ADObject (Get-ADRootDSE).schemaNamingContext -Property objectVersion
Running the PowerShell script returns an objectVersion value. The following table lists the correspondence between Windows Server versions and versions of the Active Directory Schema.
| Windows Server version | AD Schema objectVersion |
| Windows 2000 | 13 |
| Windows 2003 | 30 |
| Windows 2003 R2 | 31 |
| Windows 2008 | 44 |
| Windows 2008 R2 | 47 |
| Windows 2012 | 56 |
| Windows 2012 R2 | 69 |
| Windows Server 2016 | 87 |
| Windows Server 2019 | 88 |
In our example, the objectVersion returned is 56, so the current Windows Server version is Windows 2012.
Using Command Prompt to check current AD schema version
- Log in to your Active Directory Domain Controller.
- Click Start Menu, right-click Command Prompt, hover over More, and click Run as administrator.
- Run the command dsquery * cn=schema,cn=configuration,dc=<your_domain_name>,dc=<your_domain_suffix> -scope base -attr objectVersion.
- Compare the objectVersion value from the results against the table above. In this case, the objectVersion value is 87, which corresponds to an AD Schema version of Windows Server 2016.
How to Upgrade AD Schema from Windows Server 2012 to Windows Server 2019
In older versions of Windows Server OS such as the Windows Server 2008 R2 and lower, to upgrade to a newer version, you’d have to manually update the forest and the domain schema version. However, with Domain Controllers running Windows Server 2012 and newer, schema can be extended automatically when a new domain controller is added.
The simplest way to update the AD schema version is to install a new server running the Windows Server 2019 version promote it as an additional domain controller. However, it is to be noted that all the changes made to the Schema are irreversible, hence it is highly recommended to maintain a backup of the Windows Server 2008 R2.
- While installing the Windows Server 2019, ensure that the disk size and disk partition are laid out as required.
- When the Windows Server 2019 is installed, promote it as an additional domain controller. Your system may restart multiple times until the new server is promoted as a domain controller (DC).
- Once you’ve established that the your AD is stable after the extension, migrate the Flexible Single Master Operation Roles (FSMO) to the new Windows Server 2019.
- After the FSMO roles are transferred, the Windows Server 2012 has to be demoted. Click on The Manage menu on the main dashboard of Server Manager, and then click Remove Roles and Features
- Click AD DS or All Servers on the navigation pane. Scroll down to the Roles and Features section and then right-click Active Directory Domain Services in the Roles and Features list and click Remove Role or Feature.
- The demoted server can now be decommissioned from the network.