 Начиная
внедрять в инфраструктуру новые системы Windows 8.1 и Windows Server 2012 R2, одна из первых вещей, о которых стоит задуматься – это активация новых систем, и поэтому первый сервер, который мы разворачиваем на Windows Server
2012 R2, будет у нас выступать в качестве сервера Key Management Service (KMS). В нашем случае, текущим сервером KMS является сервер на базе Windows Server 2012. Этот сервер настроен на активацию систем до уровня Windows 8/Windows
Server 2012, а также обеспечивает активацию Office 2010/2013. Перед нами стоит задача перенести функционал KMS на новый сервере на базе Windows Server 2012 R2.
Базовые приёмы работы c KMS были описаны ранее в заметке
Основные приемы работы с Key Management Service (KMS) на Windows 7 и Windows Server
2008 R2 и для новой версии Windows эти приёмы остаются в силе. В документе
TechNet Library — Volume Activation — Appendix A: KMS Client Setup Keys расширена информация о ключах
GVLK, которые нужны для преобразования клиентов MAK/Retail в KMS. Выдержка из этого документа относительно новых систем:
Windows Server 2012 R2 and Windows 8.1 Client Setup Keys
| Operating system edition | KMS Client Setup Key |
|---|---|
| Windows 8.1 Professional | GCRJD-8NW9H-F2CDX-CCM8D-9D6T9 |
| Windows 8.1 Professional N | HMCNV-VVBFX-7HMBH-CTY9B-B4FXY |
| Windows 8.1 Enterprise | MHF9N-XY6XB-WVXMC-BTDCT-MKKG7 |
| Windows 8.1 Enterprise N | TT4HM-HN7YT-62K67-RGRQJ-JFFXW |
| Windows Server 2012 R2 Server Standard | D2N9P-3P6X9-2R39C-7RTCD-MDVJX |
| Windows Server 2012 R2 Datacenter | W3GGN-FT8W3-Y4M27-J84CP-Q3VJ9 |
| Windows Server 2012 R2 Essentials | KNC87-3J2TX-XB4WP-VCPJV-M4FWM |
Windows Server 2012 and Windows 8 Client Setup Keys
| Operating system edition | KMS Client Setup Key |
|---|---|
| Windows 8 Professional | NG4HW-VH26C-733KW-K6F98-J8CK4 |
| Windows 8 Professional N | XCVCF-2NXM9-723PB-MHCB7-2RYQQ |
| Windows 8 Enterprise | 32JNW-9KQ84-P47T8-D8GGY-CWCK7 |
| Windows 8 Enterprise N | JMNMF-RHW7P-DMY6X-RF3DR-X2BQT |
| Windows Server 2012 | BN3D2-R7TKB-3YPBD-8DRP2-27GG4 |
| Windows Server 2012 N | 8N2M2-HWPGY-7PGT9-HGDD8-GVGGY |
| Windows Server 2012 Single Language | 2WN2H-YGCQR-KFX6K-CD6TF-84YXQ |
| Windows Server 2012 Country Specific | 4K36P-JN4VD-GDC6V-KDT89-DYFKP |
| Windows Server 2012 Server Standard | XC9B7-NBPP2-83J2H-RHMBY-92BT4 |
| Windows Server 2012 MultiPoint Standard | HM7DN-YVMH3-46JC3-XYTG7-CYQJJ |
| Windows Server 2012 MultiPoint Premium | XNH6W-2V9GX-RGJ4K-Y8X6F-QGJ2G |
| Windows Server 2012 Datacenter | 48HP8-DN98B-MYWDG-T2DCC-8W83P |
При установке нового сервера для роли KMS мы используем дистрибутив
Windows Server 2012 R2, доступный нам по подписке TechNet Subscription, из образа
en_windows_server_2012_r2_x64_dvd_2707946.iso. И так как система, устанавливаемая с этого дистрибутива по умолчанию сконфигурирована для использования ключа MAK, преобразуем её в KMS-клиента путём ввода соответствующего
ключа из первой вышеприведённой таблицы ещё на этапе установки. Так как мы желаем установить редакцию
Windows Server 2012 R2 Server Standard, вводим соответствующий ключ…

По введённому ключу программа установки автоматически ограничит для нас доступ возможных вариантов установки…

После окончания установки входим в систему и убеждаемся в том, что она сконфигурирована как KMS-клиент…

Предполагается, что у нас уже имеется KMS-ключ для Windows Server 2012 R2, полученный с веб-узла
Microsoft Volume Licensing Service Center (VLSC), и мы можем приступить к последовательности
действий по вводу и активации это KMS-ключа.
Slmgr.vbs /ipk XXXXX-XXXXX-XXXXX-XXXXX-XXXXX
Slmgr.vbs /ato
Slmgr.vbs /cdns
net stop sppsvc
net start sppsvc
Третья команда отключает регистрацию KMS сервера в DNS (в нашем случае она не используется). Последние две команды выполняют перезапуск службы
Software Protection service
Проверяем состояние нашего KMS-сервера: Slmgr.vbs /dli

После успешной активации наш сервер готов отвечать на клиентские вопросы, если конечно мы не забыли в
Windows Firewall включить правило, разрешающее входящие подключения к сервису KMS (по умолчанию
TCP 1688). Включить соответствующее правило можно как через оснастку управления WF, так и с помощью PowerShell. Получаем статус правил, с вхождением в имени
*Key* и узнав имя правила и убедившись в том что оно выключено, — включаем его
Get-NetFirewallRule -DisplayName *key*
Enable-NetFirewallRule -Name SPPSVC-In-TCP

Для того, чтобы направить наших клиентов на новый KMS-сервер, в случае, если по каким то причинам не используется публикация в DNS, воспользуемся ранее описанным методом настройки через механизмы
Group Policy Preferences (GPP) —
Управляем клиентами KMS с помощью GPP
Теперь приступим к настройке активации Office. Начнём с
Office 2013.
Скачиваем пакет
Microsoft Office 2013 Volume License Pack
Запускаем с правами администратора office2013volumelicensepack_x86_en-us.exe.
Будет произведена распаковка файлов в каталог C:Program Files (x86)MSECacheOfficeKMS и установлена роль —
Volume Activation Services 
Поверх этого окна откроется графическая утилита
Volume Activation Tools установленная в систему с активацией роли Volume Activation Services. С помощью этой утилиты мы установим и активируем KMS ключ для Office 2013. На шаге выбора типа активации выбираем KMS и указываем FQDN имя нашего сервера
Далее вводим имеющийся у нас KMS-ключ Office 2013,
полученный с веб-узла Microsoft Volume Licensing Service Center (VLSC)

Если ключ успешно установлен, нам сразу будет предложено выполнить его активацию…

По введённому ключу будет определён продукт к которому он относится и предложено два варианта активации. Выбираем активацию через интернет.

После успешной активации мы получим статусный экран с информацией об установленных KMS-ключах, где увидим что в нашей службе управления ключами теперь два ключа – от Windows Server 2012 R2, установленный нами ранее с помощью
Slmgr.vbs, и от Office 2013, установленный в ходе работы этой графической утилиты. После этого мы сможет настроить параметры службы управления ключами. Укажем порт (по умолчанию 1688) и включим исключения для Windows Firewall (хотя по сути мы это уже сделали
ранее).

Закрываем утилиту Volume Activation Tools и переходим к настройке KMS для поддержки
Office 2010.
Скачиваем пакет Microsoft Office 2010 KMS Host License Pack
и запускаем с правами администратора файл KeyManagementServiceHost_en-us.exeБудет произведена распаковка файлов поддержки Office 2010 в уже существующий каталог
C:Program Files (x86)MSECacheOfficeKMS , после чего сразу появится запрос на установку KMS-ключа для Office 2010

… введём имеющийся у нас KMS-ключ …

После чего ключ будет установлен и активирован через интернет.

Теперь можем проверить состояние всех установленных нами KMS ключей:
cscript C:windowssystem32slmgr.vbs /dlv all
Так как вывод этой команды может оказаться весьма существенным, и��пользуем вывод на консоль с помощью
cscript
Для того, чтобы отдельно получить информацию только об установленном нами KMS-ключе для
Office 2010 выполним:
slmgr.vbs /dlv bfe7a195-4f8f-4f0b-a622-cf13c7d16864
…для Office 2013:
slmgr.vbs /dlv 2e28138a-847f-42bc-9752-61b03fff33cd
…для Windows Server 2012 R2 идентификатор в явном виде можно не указывать:
slmgr.vbs /dlv
Теперь по сути наш новый KMS-сервер готов, однако не забываем про то, что для того чтобы сервер смог выдавать установленные ключи KMS-клиентам, — должен быть набран нижний предел обращений от уникальных клиентов:
— для KMS-ключа Office 2010/2013 этот порог – 5 клиентов;
— для KMS-ключа
WS2012R2 этот порог – 5 клиентов для активации серверных ОС и 25 клиентов для активации клиентских ОС.
После того как новый KMS-сервер заработал, нам нужно удалить ключи активации со старого сервера KMS, и если на старом сервере KMS ещё остаются какие-то другие роли и он должен какое-то время оставаться в работе, то мы должны
конвертировать его в KMS-клиента.
Итак, на старом сервере удаляем все установленные ключи командой:
slmgr -upk
Так как наш старый сервер работает на базе Windows Server 2012 Standard, то для его конвертации в KMS-клиента воспользуемся ключом, приведённым в вышеуказанной таблице и сразу выполнима его
активацию с нового KMS-сервера
slmgr -ipk XC9B7-NBPP2-83J2H-RHMBY-92BT4
slmgr -ato
Оригинал статьи: Блог IT-KB - Windows Server 2012 R2 — Разворачиваем KMS для Windows и Office
Hi Kelly. Can you confirm that Office 2019 pro and Access 2019 will not install on Windows 2012 R2? And that the latest version that will would be 2016, via downgrade right of Office or Access 2019? This would be used on a RDS server.
- By purchasing Office 2019 Professional Plus (Open License), or Access 2019 (Open License), you are provided downgrade rights. This allows you to optionally install the 2016 or 2013 equivalents instead of 2019.
- If intend to use Access in an RDS environment, you MUST purchase either Access 2019 (Open License) or Office 2019 Professional Plus (Open License). If you purchase Office 2019 Professional (FPP/Retail, different from Professional Plus or Office 365 Pro Plus), the product does not include rights to run on a shared device (aka RDS Server).
- And just to cover all of our bases, there is an odd compatibility issue if you involve Vido or Project into the mix, see details here Opens a new window Opens a new window.
I hope that helps! Let me know if you need me to elaborate on anything else. 
1 found this helpful
thumb_up
thumb_down
After installing Office 2016 on Windows Server 2012R2 with RDS services, trying to lunch one of the Office programs (example Excel), I received this error:
The program cant’ start because api-ms-win-crt-runtime-l1-1-0.dll is missing from your computer. Try reinstalling the program to fix this problem.
To solve the problem you need to install KB2999226 update.
But unfortunately on my server, not only this patch was missing but also some required dependencies (Windows Update show me no updates missing!)
One dependency is KB2919355, that have other dependencies…
Here the patches and the steps to solve the issue. The patches order is important:
- KB2919442: is a prerequisite for Windows Server 2012 R2 Update and should be installed before attempting to install KB2919355
- KB2919355: there are multiple files available for this download and you need to install it on this order:
- clearcompressionflag.exe
- KB2919355
- KB2932046
- KB2959977
- KB2937592
- KB2938439
- KB2934018
- KB2999226: This is the required update for solve the CRT dll error.
After that Office 2016 application run without error.
Release Notes
Abstract
Publishing Office documents using Microsoft® Office® 2013 is supported in IBM® FileNet® Rendition Engine on Microsoft Windows® Server 2012 R2 since version 5.2 Fix Pack 2.
By following these instructions, you can configure Microsoft Office 2013 on Microsoft Windows Server 2012 R2 for FileNet Rendition Engine 5.2
Content
Before you can use Rendition Engine for document rendering, you must install all of the supporting authoring applications that are used to create and render publication documents and configure the applications to run without user intervention.
Installation
For more information installing authoring applications, refer to Installing and configuring authoring application on Knowledge Center.
Important: Use the FNRE_Admin account created in Users required for Rendition Engine installation when installing the authoring applications.
Configuration
To render documents accurately, Rendition Engine requires the authoring application to run without user intervention.
Important: Use the FNRE_Admin account created in Users required for Rendition Engine installation when configuring the authoring applications.
Configuring Microsoft Word
Complete this step on the Rendition Engine server where Microsoft Word 2013 is installed.
Configure Microsoft Word 2013 publishing requirements:
- In Microsoft Word, click the File tab, then click Options.
- Click General and under the User Interface options section, set ScreenTip style to Don’t show ScreenTips.
- Select the Display tab and clear the following options:
- Tab characters
- Spaces
- Paragraph marks
- Hidden text
- Optional hyphens
- Object anchors
- Show all formatting marks
- Print background colors and images
- Print hidden text
- Update fields before printing
- Update linked data before printing
- Select the Proofing tab and clear the following options:
- Check spelling as you type
- Mark grammar as you type
- Frequently confused words
- Check grammar with spelling
- Select the Save tab and clear the following options:
- Save AutoRecover information every …
- Select the Advanced tab and clear/select the following options:
- Typing replaces selected text
- When selecting, automatically select entire word
- Allow text to be dragged and dropped
- Use CTRL + Click to follow hyperlink
- Automatically create drawing canvas when inserting AutoShapes
- Use smart paragraph selection
- Use smart cursoring
- Prompt to update style
- Keep track of formatting
- Show Paste Options buttons
- Use smart cut and paste
- Show background colors and images in Print Layout view
- Show field codes instead of their values
- Print in background
- Print XML tags
- Print field codes instead of their values
- Scale content for A4 or 8.5 x 11″ paper sizes
- Allow background saves
- Provide feedback with animation
- Confirm file format conversion on open
- Update automatic links at open
- Show drawings and text boxes on screen
- Select the Trust Center tab and perform the following steps:
- Under Microsoft Word Trust Center, click Trust Center Settings.
- Click ActiveX Settings.
- Select Enable all controls without restrictions and without prompting.
- Clear Safe mode.
- Click Macro Settings.
- Under the Macro Settings section select Enable all macros.
- Under Developer Macro Settings select Trust access to the VBA project object model.
- Click Protected View and clear all options.
- Click Message Bar and select Never show information about blocked content.
- Click File Block Setting and clear all of the check boxes for each file type under Open and Save.
- Click Privacy Options tab and clear/select the following options:
- Allow Office to connect to the Internet
- Download a file periodically that helps determine system problems.
- Sign up for the Customer Experience Improvement Program
- Check Microsoft Office documents that are from or link to suspicious Web sites
- Allow the Research task pane to check for and install new services
- Allow sending files to improve file validation
- Turn on the Office Feedback Tool
- Warn before printing, saving or sending a file that contains tracked changes or comments
- Remove personal information from file properties on save
- Store Random numbers to improve Combine accuracy
- Make hidden markup visible when opening or saving
- Click OK to save and close the Trust Center.
- Click OK to save and close Word Options.
| Option category | Clear the following |
|---|---|
| Always show these formatting marks on the screen |
|
| Printing options |
|
| Option category | Clear the following |
|---|---|
| When correcting spelling and grammar in Word |
|
| Option category | Clear the following |
|---|---|
| Save documents |
|
| Option category | Clear the following |
|---|---|
| Editing options |
|
| Cut, copy and paste |
|
| Show document content |
|
|
|
|
| Save |
|
| General |
|
| Option category | Select the following |
| Show document content |
|
| Option category | Clear the following |
|---|---|
| Privacy options |
|
| Document-specific settings |
|
| Option category | Select the following |
| Document-specific settings |
|
Back to top
Configuring Microsoft Excel
Complete this step on the Rendition Engine server where Microsoft Excel 2013 is installed.
Configure Microsoft Excel 2013 publishing requirements:
- In Microsoft Excel, click the File tab and then click Options.
- Select Formulas and clear the following options:
- Enable background error checking
- Select the Save tab and clear the following options:
- Save AutoRecover information every …
- Select the Advanced tab and clear the following options:
- Show Paste Options button when content is pasted
- Show Insert Options buttons
- Ask to update automatic links
- Scale content for A4 or 8.5 x 11″ paper sizes
- Select the Trust Center tab and perform the following steps:
- Under Microsoft Excel Trust Center, click Trust Center Settings.
- Click ActiveX Settings.
- Select Enable all controls without restrictions and without prompting.
- Clear Safe mode.
- Click Macro Settings.
- Under the Macro Settings section select Enable all macros.
- Under Developer Macro Settings select Trust access to the VBA project object model.
- Click Protected View and clear all options.
- Click Message Bar and select Never show information about blocked content.
- Click File Block Setting and clear all of the check boxes for each file type under Open and Save.
- Click Privacy Options tab and clear all privacy options.
- Click OK to save and close the Trust Center.
- Click OK to save and close Excel Options.
| Option category | Clear the following |
|---|---|
| Error checking |
|
| Option category | Clear the following |
|---|---|
| Save workbooks |
|
| Option category | Clear the following |
|---|---|
| Cut, copy and paste |
|
| General |
|
Back to top
Configuring Microsoft PowerPoint
Complete this step on the Rendition Engine server where Microsoft Powerpoint 2013 is installed.
Configure Microsoft Powerpoint 2013 publishing requirements:
- In Microsoft Powerpoint, click the File tab, then click Options.
- Select Proofing tab and clear the following options:
- Check spelling as you type
- Select the Save tab and clear the following options:
- Save AutoRecover information every …
- Select the Advanced tab and clear the following options:
- When selecting, automatically select entire word
- Allow text to be dragged and dropped
- Use smart cut and paste
- Show Paste Options buttons when content is pasted
- Show menu on right mouse click
- Show popup toolbar
- Prompt to keep ink annotations when exiting
- End with black slide
- Print in background
- Provide feedback with sound
- Select the Trust Center tab and perform the following steps:
- Under Microsoft Powerpoint Trust Center, click Trust Center Settings.
- Click ActiveX Settings.
- Select Enable all controls without restrictions and without prompting.
- Clear Safe mode.
- Click Macro Settings.
- Under the Macro Settings section select Enable all macros.
- Under Developer Macro Settings select Trust access to the VBA project object model.
- Click Protected View and clear all options.
- Click Message Bar and select Never show information about blocked content.
- Click File Block Setting and clear all of the check boxes for each file type under Open and Save.
- Click Privacy Options tab and clear all privacy options.
- Click OK to save and close the Trust Center.
- Click OK to save and close Powerpoint Options.
| Option category | Clear the following |
|---|---|
| When correcting spelling in PowerPoint |
|
| Option category | Clear the following |
|---|---|
| Save presentations |
|
| Option category | Clear the following |
|---|---|
| Edition options |
|
| Cut, copy and paste |
|
| Slide Show |
|
|
|
|
| General |
|
Back to top
Configuring Microsoft Project
Complete this step on the Rendition Engine server where Microsoft Project 2013 is installed.
Configure Microsoft Project 2013 publishing requirements:
- In Microsoft Project, click the File tab, then click Options.
- Click General and under the User Interface options section, set ScreenTip style to Don’t show ScreenTips.
- Click Schedule and clear the following options:
- Show scheduling messages
- Show task schedule warnings
- Select Advanced tab and clear the following options:
- Set AutoFilter on for new projects
- Prompt for project info for new projects
- Show add-in user interface errors
- Advice from Planning Wizard
- Automatically add new resources and tasks
- Ask to update automatic links
- Select the Trust Center tab and perform the following steps:
- Under Microsoft Project Trust Center, click Trust Center Settings.
- Click Macro Settings and select Enable all macros.
- Under Developer Macro Settings select Trust access to the VBA project object model.
- Click Legacy Formats and select Allow loading files with legacy or non-default file formats.
- Click Privacy Options tab and clear all privacy options.
- Click OK to save and close the Trust Center.
- Click OK to save and close Project Options.
| Option category | Clear the following |
|---|---|
| Schedule |
|
| Schedule Alerts Options |
|
| Option category | Clear the following |
|---|---|
| General |
|
| Planning Wizard |
|
| General options for this project |
|
| Edit |
|
Back to top
Configuring Microsoft Visio
Complete this step on the Rendition Engine server where Microsoft Visio 2013 is installed.
Configure Microsoft Visio 2013 publishing requirements:
- In Microsoft Visio, click the File tab, then click Options.
- Select Proofing and clear/select the following options:
- Check spelling as you type
- Ignore words in UPPERCASE
- Ignore words that contain numbers
- Ignore Internet and file addresses
- Select the Save tab and clear the following options:
- Save AutoRecover information every …
- Prompt for document properties on first save
- Select Advanced tab and clear the following options:
- Show file save warnings
- Show file open warnings
- Select the Trust Center tab and perform the following steps:
- Under Microsoft Visio Trust Center, click Trust Center Settings.
- Click ActiveX Settings.
- Select Enable all controls without restrictions and without prompting.
- Clear Safe mode.
- Click Macro Settings.
- Under the Macro Settings section select Enable all macros.
- Under Developer Macro Settings select Trust access to the VBA project object model.
- Click Message Bar and select Never show information about blocked content.
- Click File Block Setting and clear all of the check boxes for each file type under Open and Save.
- Click Privacy Options tab and clear all privacy options.
- Click OK to save and close the Trust Center.
- Click OK to save and close Visio Options.
| Option category | Clear the following |
|---|---|
| When correcting spelling in Visio |
|
| Option category | Select the following |
| When correcting spelling in Microsoft Office programs |
|
| Option category | Clear the following |
|---|---|
| Save documents |
|
| Option category | Clear the following |
|---|---|
| Save/Open |
|
Back to top
Prevent documents from opening automatically at startup
Any document, template, or that you place in the Startup or XLStart folder is automatically opened when you start the corresponding Office application. The folder was created when you installed the Office product or launch the application the first time. Remove all files in these folders is necessary to publish documents without user intervention.
Locate the folders, move or remove everything in it:
- Open Windows Explorer
- Navigate to the following folders:
- Program Files (x86)Microsoft OfficeOffice15Startup
- Program Files (x86)Microsoft OfficeOffice15XLStart
- UsersFNRE_AdminAppDataRoamingMicrosoftWordSTARTUP
- UsersFNRE_AdminAppDataRoamingMicrosoftExcelXLStart
Note: For Microsoft Office 64-bit installation, use Program FileMicrosoft OfficeOffice15
If these folders exist and contain any files, move or remove the files.
Back to top
Related Information
[{«Product»:{«code»:»SSRA77″,»label»:»FileNet Rendition Engine»},»Business Unit»:{«code»:»BU053″,»label»:»Cloud & Data Platform»},»Component»:»—«,»Platform»:[{«code»:»PF033″,»label»:»Windows»}],»Version»:»5.2.0.2″,»Edition»:»»,»Line of Business»:{«code»:»LOB45″,»label»:»Automation»}}]
In this post, let go though a simple step how you as a Server Administrator can manage Microsoft Office 2013 in your infrastructure using GPO.
I know sometimes its really hard to manage MS Office 2013 especially when there are certain requirement, security policy or even certain function need to be customize for our user @ group.
This is where you need .adml and .admx files to manage MS Office 2013 with Group Policy.
Lets get started…
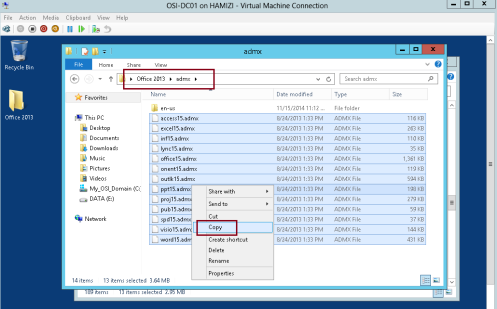
1 – Before we proceed, make sure you download .admx / .adml files from Microsoft website (this are the files that you need to configure any group policy for MS Office 2013.
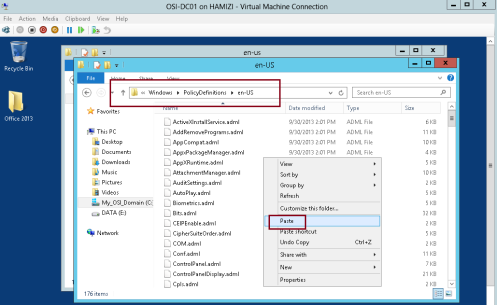
2 – Once you successfully download the admx/adml files, 1st lets copy all the .adml file and paste it in C:WindowsPolicyDefinitionsen-US folder…

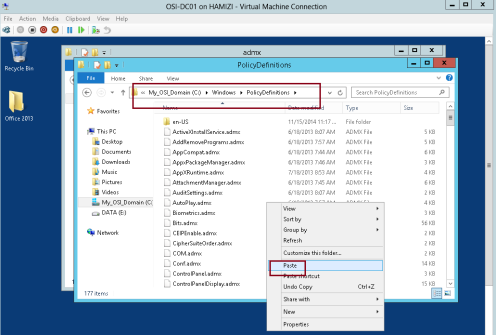
3 – Next, copy admx files and paste it in C:WindowsPolicyDefinitions folder…
4 – Next, lets start to configure the MS Office 2013 policy…
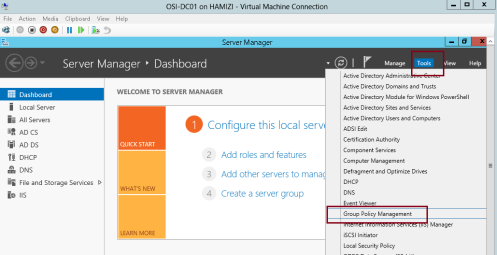
– On the Domain Server, open Server Manager, click Tools and then click Group Policy Management…
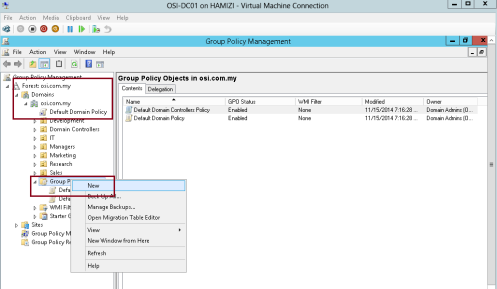
5 – On the Group Policy Management console, right Group Policy Objects, and then click New…
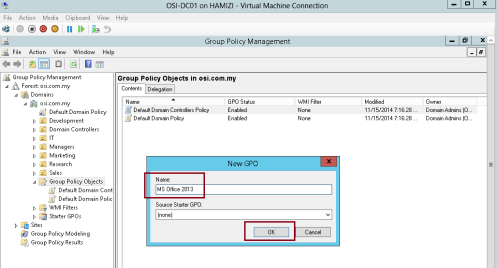
6 – In the New GPO box, type MS Office 2013 into the Name field, and then click OK…
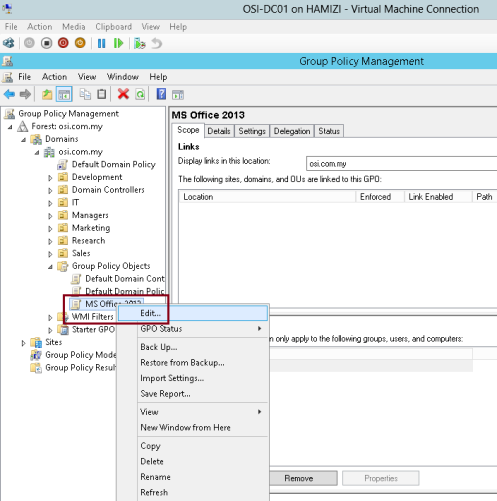
7 – Next, right-click the MS Office 2013 Group Policy Object (GPO), and then click Edit…
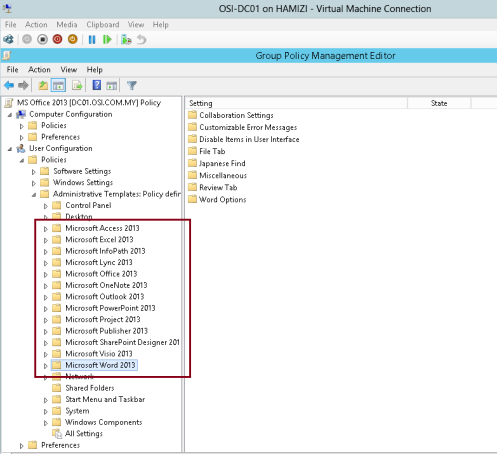
8 – Under User Configuration, expand Policies then expand Administrative Templates: Policy definitions (ADMX files) retrieved from the local computer, here you can see a list of MS Office 2013 policy that you can modified.
9 – Now lets try to modified few policy…
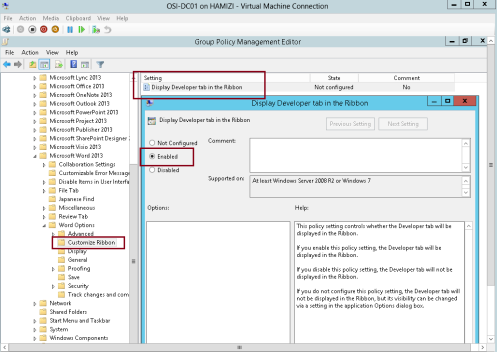
– expand Microsoft Word 2013, then expand Word Options, and then click Customize Ribbon, next on the right pane, double-click the Display Developer tab in the Ribbon setting…
– In the Display Developer tab in the Ribbon box, click the Enabled button, and then click OK…
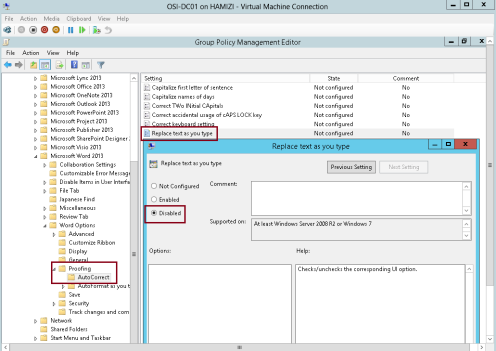
10 – Next, lets try 1 more policy, expand Proofing, and then click AutoCorrect..
– In the right pane, double-click the Replace text as you type setting, click Disabled, and then click OK…
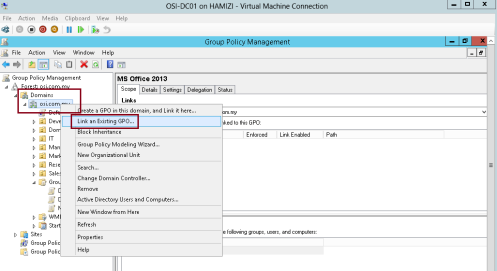
11 – Next, lets link this MS Office GPO to our domain…
– right-click the osi.com.my domain, and then click Link an Existing GPO…
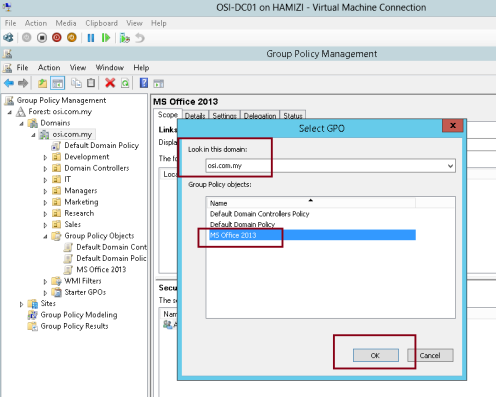
12 – Next, in the Select GPO box, click the MS Office 2013 GPO, and then click OK…
13 – Now lets verify that the settings have been applied, for this demo, i’m using my Windows 8.1 client to retrieve the MS office 2013 policy…
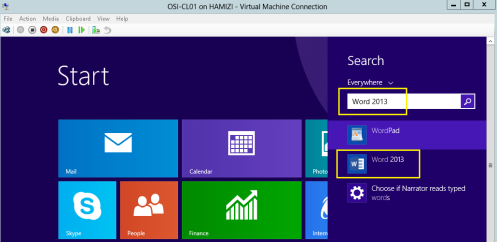
14 – Once you successfully log in to your domain client PC, search and open MS Word 2013…
15 – Once the MS Word 2013 open, check the ribbon to verify that the Developer tab is visible and also try type a few misspelled words to verify that Microsoft Word is not auto correcting the misspelled words as you type.

Orait, that’s all for now, i recommend that you explorer more on the MS Office 2013 GPO because a lot of nice things you can customize. Good luck…..
В этой статье описывается процедура централизованного разворачивания корпоративной 32-битной версии Microsoft Office Professional Plus 2016 на клиентские компьютеры с помощью System Center Configuration Manager 2012 R2. Рассмотрим процесс подготовки собственного MSP пакета с настройками Office, создания программы на сервере SCCM и установки программы на клиентских компьютерах.
Скачайте и разместите VL копию Office 2016 Pro Plus в каталоге, который будет источником файлов для SCCM пакета ( к примеру, \msk-distr01ApplicationsOffice 2016)
Вместе с Office 2016, Microsoft выпустила новую версию MS Office Deployment Tool, позволяющую создавать кастомизированные сценарии установки Office 2016. С помощью данного средства администратор можно настроить параметры и опции установки Office, предопределить настройки продукта, языковые настройки и т.д.
Примечание. Рассмотренная процедура развертывания будет работать только для корпоративной (VL) редакции Office 2016
Скачайте Office 2016 Deployment Tool и запустите файл OfficeDeploymentTool.exe. Укажите директорию, в которую нужно распаковать файлы setup.exe и Configuration.xml.
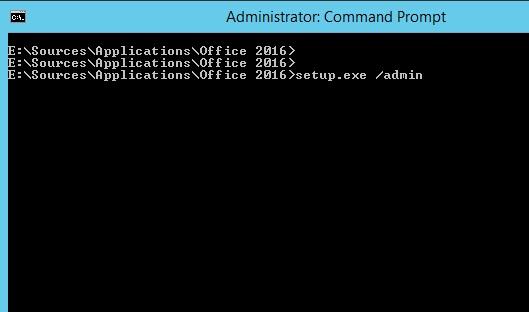
Запустите утилиту Office Customization Tool (OCT), с параметром /admin:
setup.exe /admin
 Программа установки Office 2016 запустится в особом режиме, в котором мы зададим настройки, которые должны быть использованы при разворачивании на компьютерах пользователей. На выходе программа создаст файл MSP, содержащий все указанные настройки, который нужно будет сохранить в каталог “.Updates” дистрибутива Office.
Примечание. Имейте в виду, что файл MSP привязан к архитектуре продукта, т.е. для x86 и x64 редакций понадобятся собственные MSP файлы.
Мы создадим MSP файл, позволяющий установить Office в автоматическом режиме без необходимости взаимодействия с пользователем.
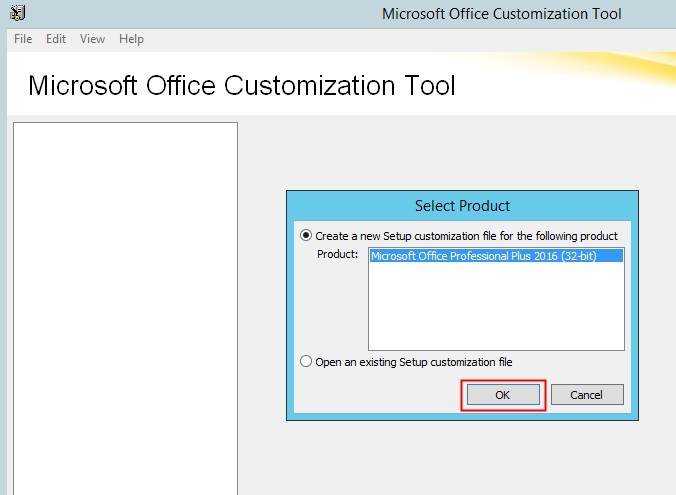
Выберите Create a new setup customization file for following product, отметьте нужную редакцию продукта и нажмите OK.
В разделе Install location and organization name укажите информацию об организации.
Затем в разделе Licensing and user interface, выберите опцию Use KMS client key (если у вас будет использоваться KMS сервер для активации Office 2016 или ADBA активация), либо вручную укажите MAK ключ, выбрав пункт Enter another product key.
Включите чекбокс в разделе I accept the terms in the license agreement, в разделе Display level укажите Basic, и выберите Suppress modal и No cancel. При данных настройках пользователь не должен вводить никакой лицензионной информации и подтверждать лицензионное соглашение.

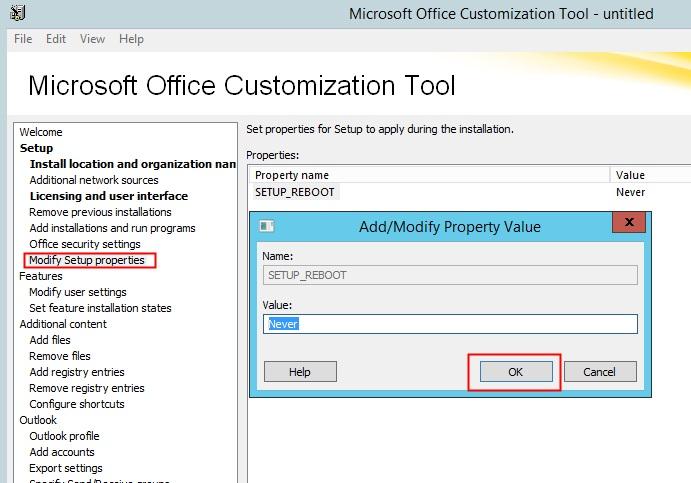
В разделе Modify Setup properties нажмите Add, и добавьте параметр с именем SETUP_REBOOT и значением Never.
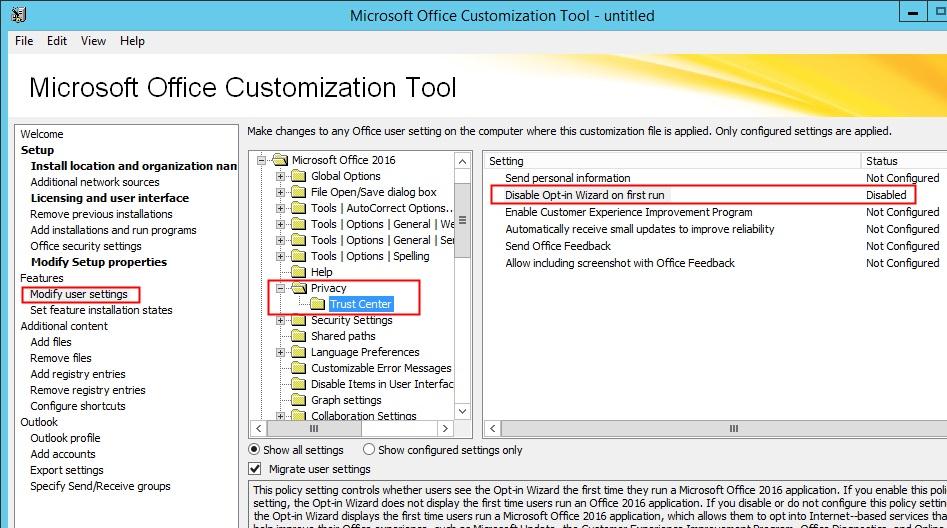
 Отключим для пользователей мастер первоначальной настройки при первом запуске, изменив в разделе Modify user settings -> Microsoft Office 2016 -> Privacy— > Trust Center. Значение параметра Disable Opt-in Wizard on first run на Enabled.
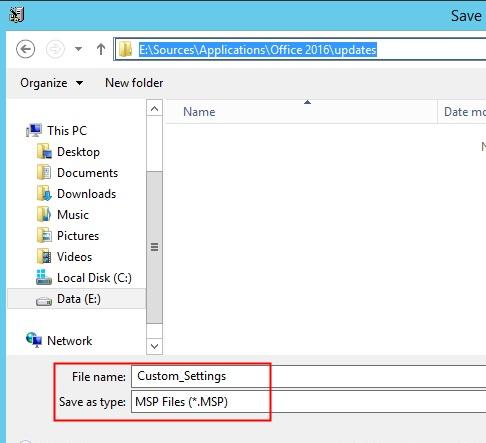
 Сохраним полученные настройки (File -> Save As) в MSP файл в каталоге дистрибутива Updates. Установщик Office автоматически проверяет эту папу на наличие MSP файла, в случае его отсутствия запускается полная установка. Закройте утилиту OCT.
 Следующий этап – создание SCCM приложения.
Откройте консоль SCCM и в разделе Software Library -> Application Management -> Applications создайте новое приложение (Create Application).
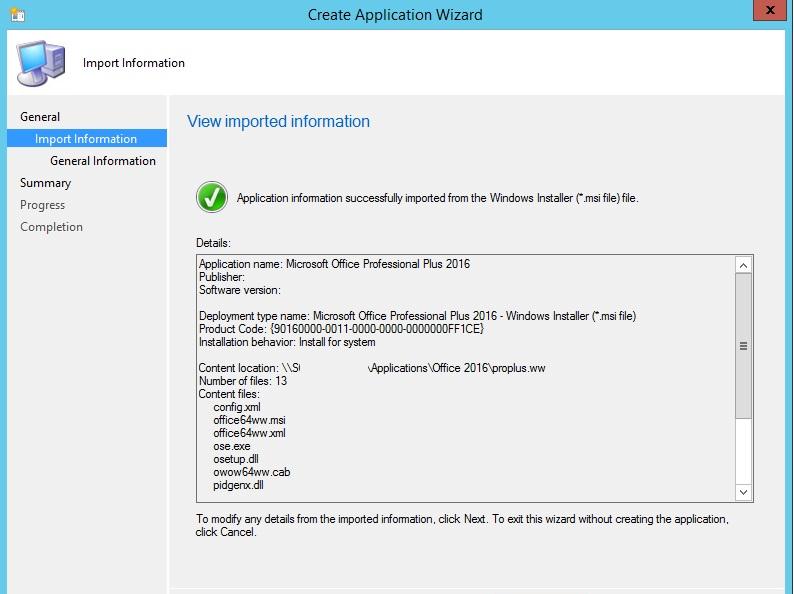
Выберите Automatically detect information и укажите UNC путь к файлу proplusww.msi
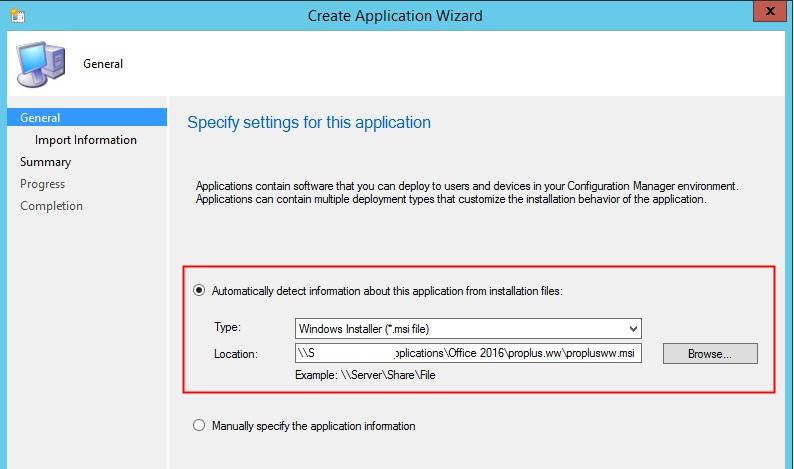 Приложение будет импортировано из файла msi. Нажмите Next.
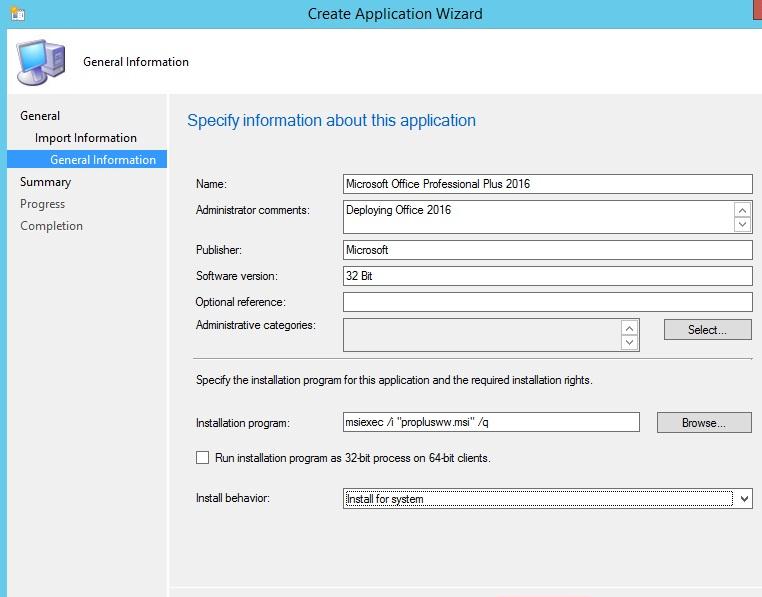
 Укажем информацию о приложении. Строку установки оставим пока без изменнеий (по умолчанию, msiexec /i “proplusww.msi” /q ). В пункте Install behavior выберем Install for system.
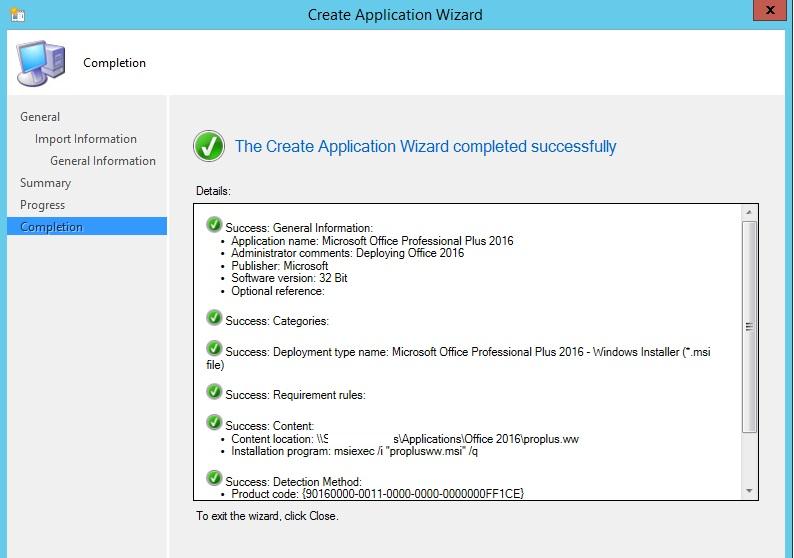
 Закроем мастер создания приложения.
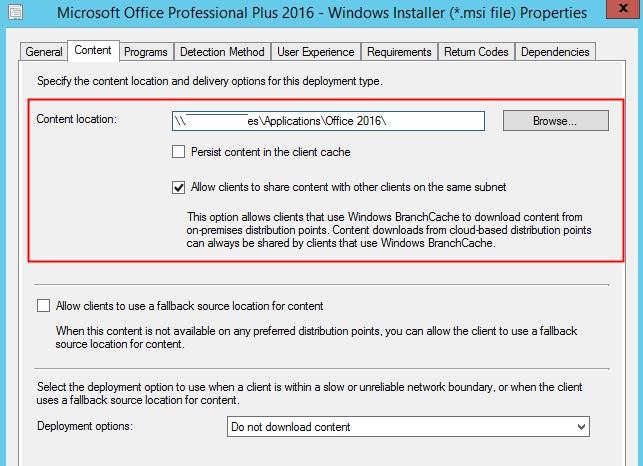
 Откроем свойства созданного приложения, на вкладке Deployment Types выберите MSI файл и перейдите в режим редактирования (Edit). На вкладке Content укажите путь к каталогу с дистрибутивом Office 2016.
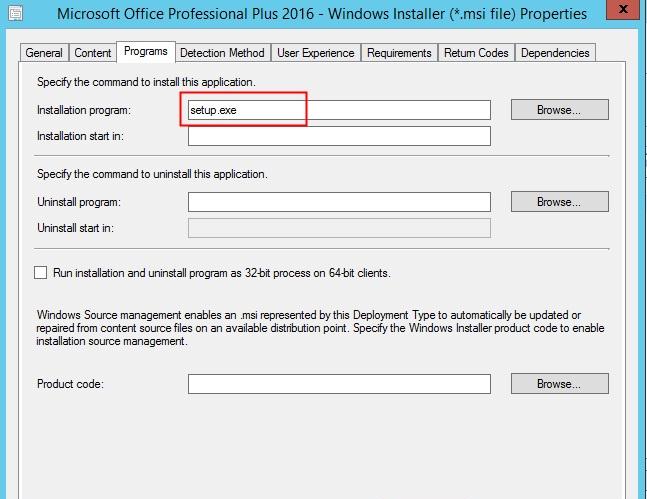
 На вкладе Programs измените строку установки (Installation Program) на setup.exe. Сохраните изменения.
 Осталось распространить приложение на нужные Distribution Point и опубликовать программу на коллекцию с компьютерами пользователей. В мастере Deploy Software Wizard укажем действие: Action – Install, Purpose — Available
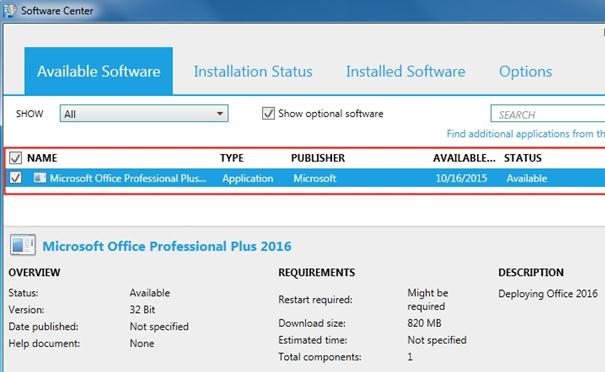
На стороне пользователя через несколько минут новое приложение станет доступно в Software Center . Пользователь может в списке приложений выбрать Microsoft Office Professional Plus 2016 и запустить его установку, нажав Install Selected.
 Подробный лог установки находится в файле %Windir%CCMLogsAppenforce.log. По этому файлу можно следить за статусом установки.
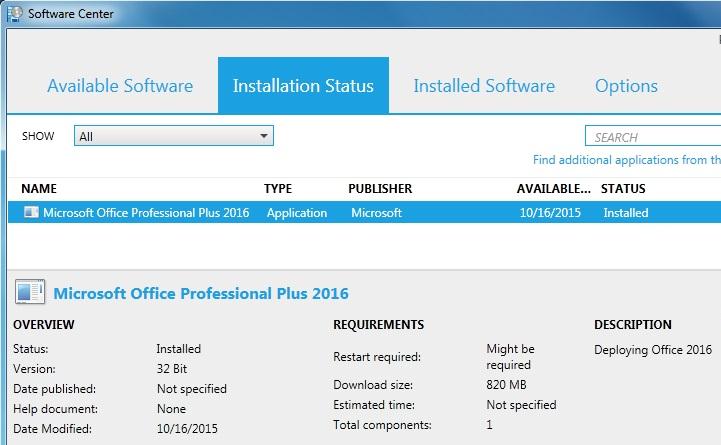
 Приложение будет скачано на компьютер клиента и установлено. Как мы видим, статус установки изменился на Installed, значит Office 2016 установился корректно.
Для автоматической установки Office 2016 в тихом режиме на компьютеры определенной коллекции нужно создать отдельный Advertisement.