The step by step guide to configure Network Access Protection (NAP), in Windows Server 2012 R2.. The NAP is a Microsoft technology for controlling network access of a computer, based on its health. With NAP, system administrators of an organization can define policies for system health requirements. For instance System health requirements are whether the computer has the most recent operating system updates installed. The computer host based firewall is installed and enabled etc.
The NAP is completely removed from Windows server 2016. It will be replace with Direct Access and new network policy feature Web Application Proxy. Also the DHCP servers are no longer capable of enforcing NAP policies.
The above screenshot is Network Policy Server in Windows Server 2016 without Network Access Protection. It shows that you must get ready to migrate from NAP to DirectAccess and Windows Web Application Proxy in Server 2016. I didn’t want to write this article, so it must be written for new admins in Windows Server 2008 and 2012 R2.
This post is going to configure network access protection. If you don’t know the installation, read the below article about installation of NAP in Windows server 2012 R2.
- Installing Network Policy Server (NPS) on Windows Server 2012 R2
- To configure network access protection, open network policy server from server manager.
- On the network policy server page, from right side select NPS (Local) then select Network Access Protection (NAP) from Standard Configuration section and click Configure NAP link.
3. On the network connection method for use with NAP page, select Dynamic Host Configuration Protocol (DHCP) from Network connection method section then click Next.
4. On the Specify NAP Enforcement Server Running DHCP Server page, just click Next. Then click Next on the Specify DHCP Scopes page. Do click Next on Configure Machine Group also.
5. On the Specify a NAP Remediation Server Group and URL click New Group and type a meaningful name for Group Name. Then click Add to specify a name for Freindly name and name or IP address of Remediation server. When complete, click OK to close the pages.
6. Now type the help page url address on Troubleshooting URL and click Next.
The Remediation Server Groups are the servers that will be made accessible to non-compliant clients. These servers can be used to patch clients to a compliant status.
7. Click Next on Define NAP Health Policy page.
8. Finally click Finish to complete the NAP enforcement policy and RADIUS client configuration.
9. Navigate to Network Policies and Health Polices to check whether the polices are ready for serving NAP.
So, everything good.
Configure Group Policy and Services for NAP
After installing and configuration of NAP, you should enable DHCP Client enforcement from group policy management.
- Type “gpmc.msc” on the run and press enter to open Group Policy Management.
- Expand Forest, Domain, and domain name. Then create a new group policy object, and named NAP enforcement.
- Now right click on the new created GPO and click Edit to edit it.
- Navigate to NAP Client Configuration and select Enforcement Clients. Finally right click DHCP Quarantine Enforcement Client and enable it. Do it like below screenshot.
5. Navigate to System Services and find Network Access Protection Agent then enable it.
6. Go to DHCP, right click IPv4 then select Properties. Now on the Network Access Protection tab, click Enable on all scopes.
That’s all, but don’t forget to configure the Windows Security Health Validator for clients. The default policy is require the Firewall and Auto Update should be enabled, Anti Virus, Spyware Protection must be installed on the client systems.
OK, hope you find this article helpful. Any question? Ask through comment sections. So have a nice and great time as system admin.
As promised, today lets go through my Part 1 of 7, step by step on how to deploy Network Access Protection in Windows Server 2012 R2.
I can promise you this deployment will be major, so many step to go through, and for that reason, i prepare 7 parts of the Step by Step so that you as a IT Administrator can understand the flow of the deployment and please take time to read more on the NAP.
a little bit of information about NAP :
NAP is a policy-enforcement platform that is built into all Windows client computers beginning with the WinXP SP3, and all server-based operating systems beginning with the Windows Server 2008.
You can use NAP to protect network assets more strongly by enforcing compliance with system-health requirements. NAP provides the necessary software components to help ensure that computers connected or connecting to your network remain
manageable, and so that they do not become a security risk to your enterprise’s network and other attached computers.
Understanding the functionality and limitations of NAP will help you protect your network from the security risks posed by noncompliant computers.
For more information on the NAP : http://technet.microsoft.com/en-us/network/bb545879.aspx
In this Part 1, lets go through how to configure Server and Client Certificate Requirements / Health Policies before we jump into NAP deployment…
1 – On OSI-ADDS01 server, open Server Manager, click Tools, and then click Certification Authority…
** in case you do not have Certificate Authority installed, please log in to my previous post : Installing Certificate Authority on Windows Server 2012 R2 (https://mizitechinfo.wordpress.com/2014/07/19/step-by-step-installing-certificate-authority-on-windows-server-2012-r2/)

2 – In the certsrv management console, double click osi-ADDS01-CA, right-click Certificate Templates, and then
select Manage on the context menu…

3 – In the Certificate Templates Console, right-click Computer, and then click Properties…

4 – In the Computer Properties box, click the Security tab, select Authenticated Users, an then in the Permissions for Authenticated Users, tick Allow check box for the Enroll permission, and then click OK.

5 – Next, in certsrv – [Certification Authority (Local)] console, right-click osi-ADDS01-CA, point to All Tasks, and then click Stop Service…

6 – Next, right-click osi-ADDS01-CA again, point to All Tasks, and then click Start Service…

7 – Next, log in to another server (OSI-NPS), in this new server we are going to enroll new certificate from AD into this OSI-NPS Server :
– On the OSI-NPS Server, open MMC…

8 – On the OSI-NPS Server, click File menu, click Add/Remove Snap-in…

9 – Next, in the Add or Remove Snap-ins dialog box, click Certificates, click Add, select Computer account, click Next, and then click Finish…


10 – In the Add or Remove Snap-ins dialog box, click OK…

11 – In the console1 tree, expand Certificates, right-click Personal, point to All Tasks, and then click Request New Certificate…

12 – In the Certificate Enrollment dialog box, click Next to proceed…

13 – Next on the Select Certificate Enrollment Policy interface, click Active Directory Enrollment Policy, and then click Next…

14 – Next, select the Computer check box, and then click Enroll…

15 – Verify the status of certificate installation as Succeeded, and then click Finish…

802.1x является стандартом авторизации и аутентификации пользователей и компьютеров в сети передачи данных. Данный стандарт позволяет очень просто назначать разным клиентам нужные VLAN-ы, а так же предотвратить доступ к сети неизвестным системе устройствам.
Для успешной работы данного стандарта в корпоративной среде под управлением операционной системы Windows требуется настроенные:
1. Домен-контроллер;
2. Сервер центра сертификации;
3. Сервер политики сети.
Выдача сертификата центром сертификации.
Для того чтобы Cisco без проблем работала с клиентами требуется сертификат созданный на основе RAS и IAS серверы.
Данный шаблон необходимо скопировать и дать при этом ему свое уникальное имя.

После копирования шаблона необходимо указать совместимость, а так же в разделе Безопасность добавить группу Серверы RAS и IAS и внести разрешения на Заявку и Автоматическую подачу заявок.
После того как сертификат скопирован нужно перезапустить сервер политики сети. В разделе Выданные сертификаты должен появиться сертификат с именем вашего скопированного шаблона сертификата, выданный вашему NAP серверу.
Настройка NAP.
Добавление клиентов
Для работы коммутатора с NAP сервером в первую очередь надо добавить RADIUS-клиенты в одноимённом пункте настройки NAP введя понятное имя, ip-адрес, секрет, а так же в разделе дополнительно необходимо выбрать в поле имя поставщика поставщика Cisco. Поставить галочку на против пункта RADIUS-клиент поддерживает защиту доступа к сети.
Создание политики запросов на подключение
В разделе Политики, в подразделе политики запросов на подключение необходимо создать политику. В данной политике необходимо указать ее имя, а так же добавить условие Тип порта NAS со значением Ethernet.

Создание сетевой политики
Если нам необходимо переводить пользователя в другой VLAN при входе в ОС то нам необходимо создать специальную группу в домене. Эта группа будет указана в условиях на подключение.
При создании сетевой политики указываем ее имя. Добавляем два условия:
Группа пользователей - указываем группу в которой будут пользователи, которым развешен доступ к данному VLAN;
Типа порта NAS - Ethernet.

На вкладке Ограничения необходимо указать тип проверки пользователей — нам необходимо указать:
Microsoft: защищённый пароль (EAP-MSCHAP v2)
Microsoft: защищённый EAP (PEAP)
Так же в пункте Менее безопасные методы проверки подлинности отмечаем:
Шифрованная проверка подлинности (Microsoft), версия 2, (MS-CHAP-v2)
Разрешить смену пароля по истечении срока действия
Шифрованная проверка подлинности Майкрософт (MS-CHAP)
Разрешить смену пароля по истечении срока действия

На вкладке Параметры, в разделе Атрибуты RADIUS — Стандарт добавим несколько атрибутов:
Tunnel-Medium-Type = 802 (includes all 802 media plus Ethernet canonical format)
Tunnel-Pvt-Group-ID = номер VLAN в который вы хотите переключать клиента
Tunnel-Type = Virtual LANs (VLAN)

После создания политик перезапустите NAP.
Настройка коммутатора Cisco
Коммутатор должен иметь первоначальную простую настройку, а так же должен знать VLAN-ы, которые будут указываться в настройке.
Настройка RADIUS серверов
Первым делом необходимо применить команду:
aaa new-model
dot1x system-auth-control
dot1x guest-vlan supplicant
Далее создаём группу серверов RADIUS отвечающих за 802.1x
aaa group server radius DOT1X
server-private IP-адрес NAP-Сервера auth-port 1812 acct-port 1813 key секрет созданный RADIUS-Клиенту на NAP сервере
ip radius source-interface Loopback0
Настраиваем авторизацию через созданные группы NAP серверов
aaa authentication dot1x default group DOT1X
aaa authorization network default group DOT1X
802.1X Port-Based Network Authentication
Настройка портов на примере GigabitEthernet1/1:
interface GigabitEthernet1/1
switchport mode access
Указываем VLAN в который помещаются клиенты не прошедшие авторизацию:
authentication event fail action authorize vlan 'номер-vlan'
Указываем VLAN в который помещаются клиенты если NAP сервер не работает:
authentication event server dead action authorize vlan 'номер-vlan'
Указываем VLAN в который помещаются клиенты если не отвечают:
authentication event no-response action authorize vlan 'номер-vlan'
Приоритет аутентификации:
authentication priority dot1x mab
Активируем функцию Mac-address bypass:
mab
Настройка таймеров и переавторизации:
 authentication port-control auto
 authentication periodic
 authentication timer reauthenticate 600
 dot1x pae authenticator
 dot1x timeout quiet-period 10
 dot1x timeout server-timeout 5
 dot1x timeout tx-period 5
Включим защиту от петель:
spanning-tree portfast
Настройка клиентского ПК под управлением Windows 7
Первым делом необходимо запустить службу Проводная автонастройка а так же назначить ей автоматический тип запуска.
После в свойствах сетевого адаптера появится Проверка подлинности.
В вкладке включаем проверку подлинности IEEE 802.1X, в параметрах отключаем проверку сертификата, включаем быстрое переключение.

В пункте Дополнительные параметры необходимо активировать пункт Указать режим проверки подлинности учётными записями пользователей, активируем Включить единую регистрацию для сети, выбрать вариант Выполнять непосредственно перед входом пользователя.
Важно: пользователь, которому разрешено подключаться в VLAN, должен выйти со всех устройств для того чтобы домен-контроллер обновил ему SID. В противном случае может получиться так, что коммутатор не сможет найти указанного пользователя в указанной группе пользователей, а следовательно он не авторизуется и не попадет в нужный VLAN.
Настройка ПК через AD
Чтобы включить необходимые настройки на ПК через групповую политику необходимо создать новую политику сети и применять ее на группу компьютеров в AD.
Включаем службу проводной автонастройки с автоматическим запуском:

Настраиваем проверку подлинности:


Данная политика применяется при включении ПК и если порт коммутатора не настроен на dot1x то не препятствует подключению к сети.
In this post, we’ll learn the steps to configure Network Policy Server (NPS). In the previous post, we learned the steps to install the Network Policy Server in Windows Server 2012 R2. NPS allows you to create Network Access Protection (NA) for client health. Through NAP, we can restrict the network access or provide limited network access to the unhealthy clients from using organization’s network.
Let’s take a scenario, we have an OU naming Sales in Active Directory Users and Computers. We have to apply the Network Access Policy on the client computers in the Sales OU. NAP policy will verify if Firewall is enable on the client computers. If Firewall is not enable then it would block or restrict the network access. However, we can also define the policy to verify Antivirus and Anti spyware applications.
How to configure Network Access Protection in Network Policy Server
Step 1. Open Network Policy Server from the Administrative Tools in Start menu.
Step 2. On Network Policy Server console, click on “Configure NAP” to configure the NAP policy server.

Step 3. On Select Network Connection Method For Use with NAP console, select the Dynamic Host Configuration Protocol (DHCP) from the options in the drop-down menu of Network connection method.
Enter the Policy name and click on Next to continue.
In this practical, we have entered “NAP DHCP” as the policy name.

Step 4. On Specify NAP Enforcement Servers Running DHCP Server console, click on Add to configure Radius clients.
Remote Authentication Dial-In User Service (RADIUS) is set of rules that authorize and authenticate users when they connect to a network.
As DHCP Server services are running on this server therefore we can skip this setting and click on Next to continue.

Step 5. On Specify DHCP Scopes console, click on Add to enable the NAP policy on DHCP scope. We can do this later also.
If you don’t specify any scope here then this policy would be enabled on all the NAP enabled DHCP scopes.
Click on Next to continue.

Step 6. On Configure Machine Groups console, click on Add to add the group of machines to grant or deny access to the computers.
If no groups are selected then this policy applies to all computers.
Click on Next to continue.

Step 7. On Specify a NAP Remediation Server Group and URL console, enter the name of the Remediation Server Group, if we already have any configured in our environment.
Click on New Group to create a new Remediation Server Group.
Enter the URL of the web page, if a web page is configured to instruct the users for complying their devices with the NAP health policy.
As for Firewall it is not required therefore we can click on Next to continue.

Step 8. On Define Nap Health Policy console, all the installed system health validators are listed. Select the System Health Validator that we want to enforce with the health policy.
In this practical, we have selected “Windows Security Health Validator“.
Check “Enable auto-remediation of client computers” this will grant limited network access to NAP-capable client computers so that they can obtain software updates from remediation server.
If this option is not selected then the client computers cannot update automatically. We have to manually update them for full network access.
Check the option “Deny full network access to NAP-ineligible client computers.
Allow access to restricted network only“. So that, NAP-ineligible client computers can access restricted network for automatic updates from remediation server.
Click on Next to continue.

Step 9. On Completing NAP Enforcement Policy and RADIUS Client Configuration console, we can verify the options and policies that we have selected on previous consoles.
Click on Finish to complete this configuration.

Step 10. To configure Network Policy server, on the console, under Network Access Protection expand System Health Validators.
Now, expand Windows Security Health Validator. Under Settings, double click on “Default Configuration” to modify its settings.

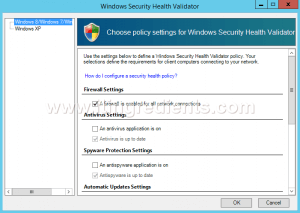
Step 11. On Windows Security Health Validator console, choose policy settings for Windows Security Health Validator.
Here, we can define the settings for Windows8/Windows7/Windows Vista clients.
For Windows XP clients we can define it separately.
Here, we have to only enable “A firewall is enabled for all network connections” option for Windows 8/Windows 7/Windows Vista clients. Click on Ok.
This policy would check if Firewall is enabled for the client computers or not. If Firewall is not enabled then it would try to Enable the Firewall automatically else it would grant restricted access to user.
Step 12. To configure Network Policy Server, on the NPS console, expand Policies and click on Network Policies.
Now, click on NAP DHCP Noncompliant to modify the policy settings.

Step 13. On NAP DHCP Noncompliant Properties console, under Access Permission setting, the first option is “Grant access.
Grant access if the connection request matches this policy“.
When this option is enabled then the client computer connects to the network only when the connection request matches this policy.
The second option is “Deny access. Deny access if the connection request matches this policy“.
When this option is enabled then client computers cannot connect to the network if connection request matches this policy.
In this practical, we have selected the first option i.e. Grant Access. Click on Ok.

Step 14. Now go to DHCP Server, we have already configured a DHCP server and a scope is also defined to assign IP addresses.
We have to define our NAP policy on DHCP scopes.
On DHCP console, right-click on IPv4 and then click Properties.

Step 15. To configure Network Policy Server, on IPv4 Properties console, under Network Access Protection settings click on “Enable on all scopes” and select “Restricted Access” under the setting of DHCP server behavior when NPS is unavailable.
Click on Apply and Ok.

Step 16. To configure Network Policy server GPO needs to be created. On Group Policy Management console, right-click on the OU “Sales“.
Then click on “Create a GPO in this domain, and Link it here“.

Step 17. On New GPO console, enter the GPO name and click on OK.
In this practical, the name of our GPO is “NPS“.

Step 18. To configure Network Policy Server, right click on the GPO “NPS” and click on Edit to modify the GPO settings.

Step 19. To configure Network Policy Server, on Group Policy Management Editor console, we have to modify four policy settings for this GPO.
Following are the four policies:
- The path of first policy is “Computer ConfigurationPoliciesWindows SettingsSecurity SettingsNetwork Access ProtectionNAP Client ConfigurationEnforcement Clients“. Right click on “DHCP Quarantine Enforcement Client” and click on Enable.

- The path of second policy is “Computer ConfigurationPoliciesAdministrative TemplatesWindows ComponentsSecurity Center“. Double click on “Turn on Security Center (Domain PCs only)” and click on Enabled to enable this policy.

- The path of third policy is “Computer ConfigurationPoliciesWindows SettingsSecurity SettingsSystem Services”. Double click on “Network Access Protection Agent” to modify its settings. On Network Access Protection Agent Properties console, select the option of “Define this policy setting” and select Automatic as service startup mode. Click on Apply and OK.

- The path of fourth policy is “Computer ConfigurationPoliciesAdministrative TemplatesWindows ComponentsNetwork Access Protection“. Double click on “Allow the Network Access Protection client to support the….” and click on Enabled to enable the policy.

Step 20. Now, go to any client computer that is part of OU “Sales” and is receiving the IP address from DHCP server.
Verify that the firewall is on.
If we try to turn off the firewall then NAP would again automatically turns on the Firewall because of NAP policies.

Hope you understood the steps to configure Network Policy Server for Firewall policies. Please share your experience, comments and suggestions in the comment section.