Статью конечно надо было назвать немного по другому (ибо на гуру претендовать смысла нет), а именно «Как я мигрировал контроллер домена на Windows Server 2012», но всё же…
Начальная ситуация такова. В конторе есть контролле домена на Windows Server 2012 Standart, используется в техподдержке и фактически только для того, чтобы операторы могли скакать с компа на комп без проблем. После нескольких лет работы, внезапно, появилось «Windows License is expired», всякие ломалки(KMS и прочие) почему-то не работают, он стал вырубаться каждые два часа. Это есть не удобно. Было решено поднять рядом новый сервер и перенести на него. Приступаем.
Домен называется: office.esteit.com
Старый контроллер: thetwo.office.esteit.com
Новый контроллер: dc01.office.esteit.com
1. Ставим Windows Server 2012 R2 Standart, активируем, настраиваем что надо и вводим сервер в существующий домен
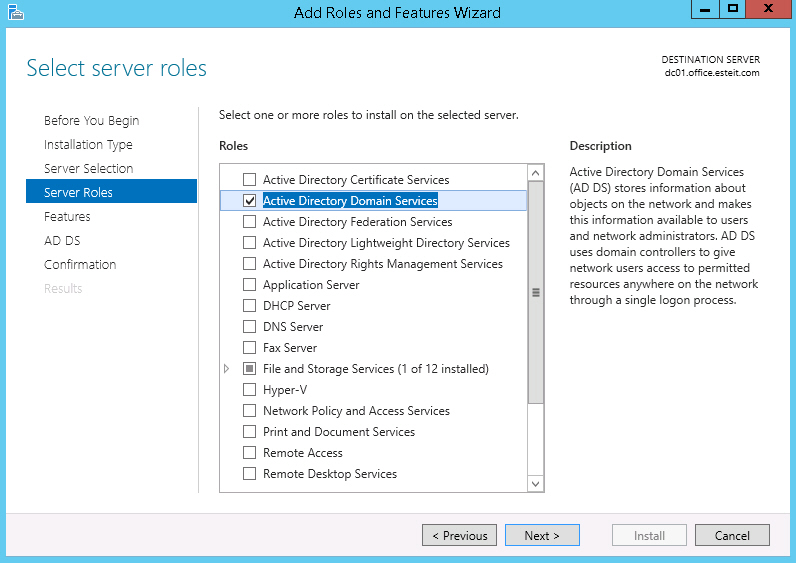
2. Устанавливаем роль Active Directory Domain Services
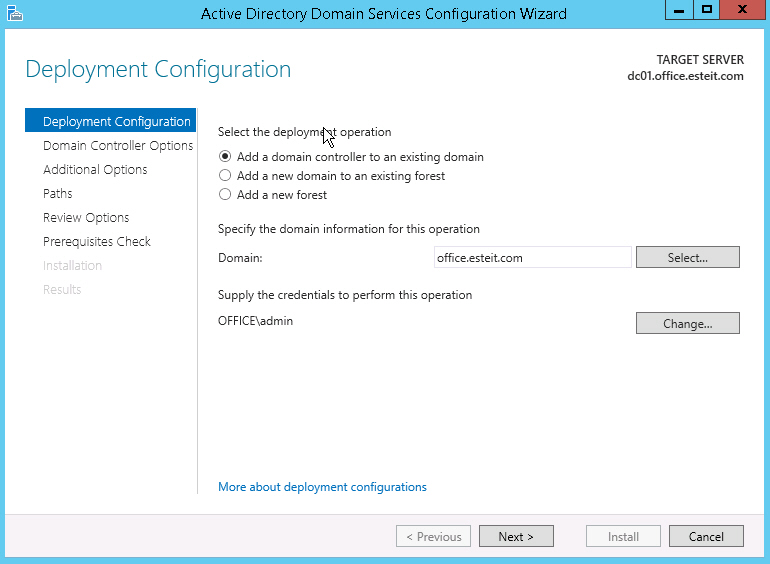
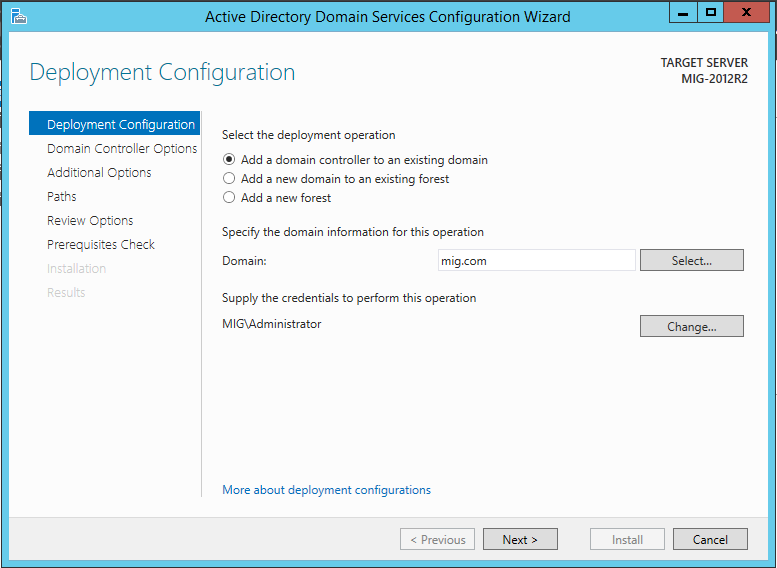
3. После установки повышаем роль нового сервера до контроллера домена. Используем для этого учетную запись в существующем домене, которая входит в группу Enterprise Admins и обладает требуемыми правами
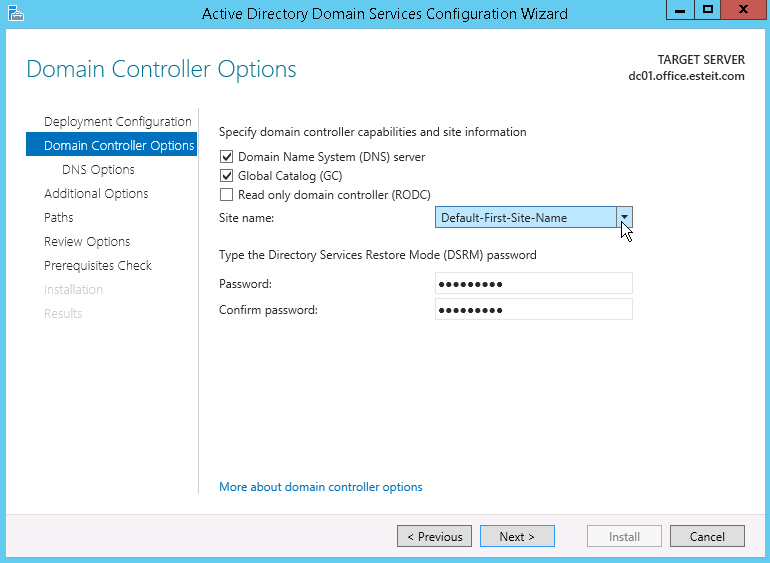
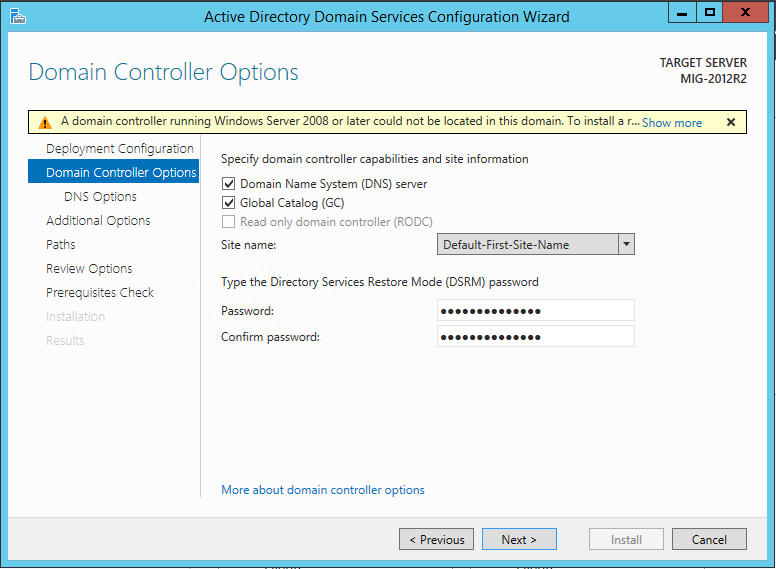
4. Далее указываем, что этот сервер будет выполнять роль DNS сервера и глобального каталога (Global Catalog – GC) и задаём пароль для восстановления
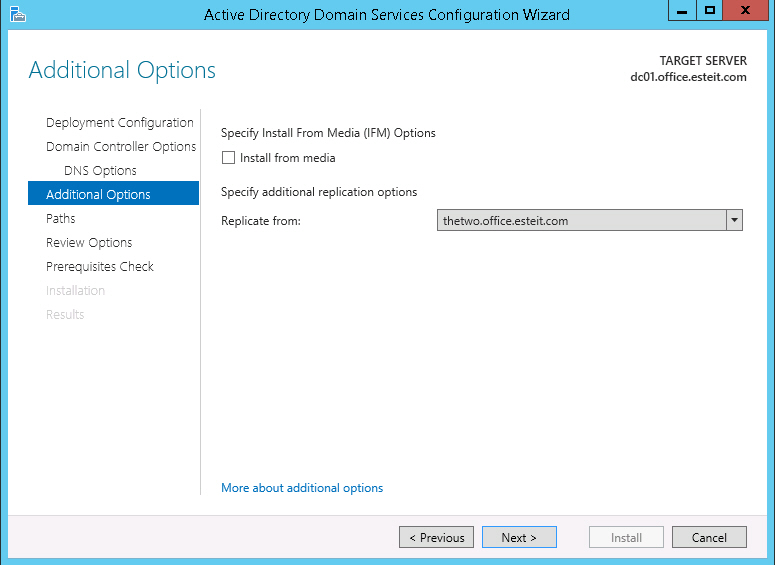
5. На экране Additional Options нужно указать с какого контроллера домена будет выполнена репликация
6. Дальше можно ничё не менять без особой надобности. Next, Next, Next, Install
7. Дожидаемся завершения установки и перезагружаемся. В итоге, получаем новый контроллер домена
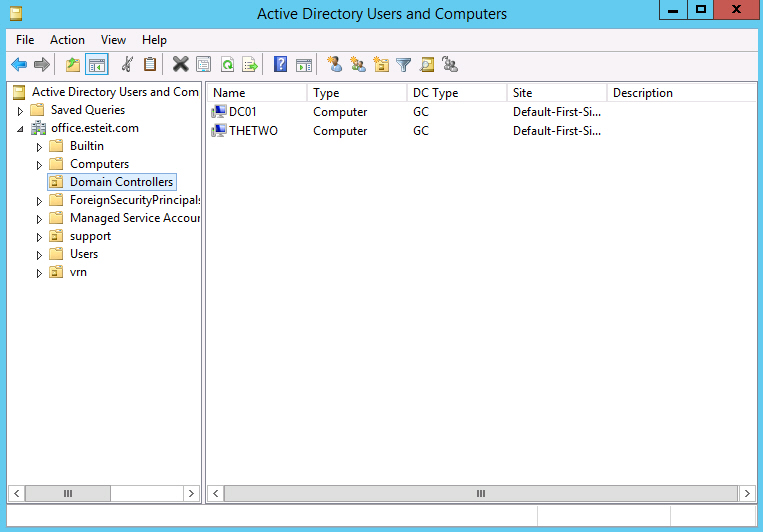
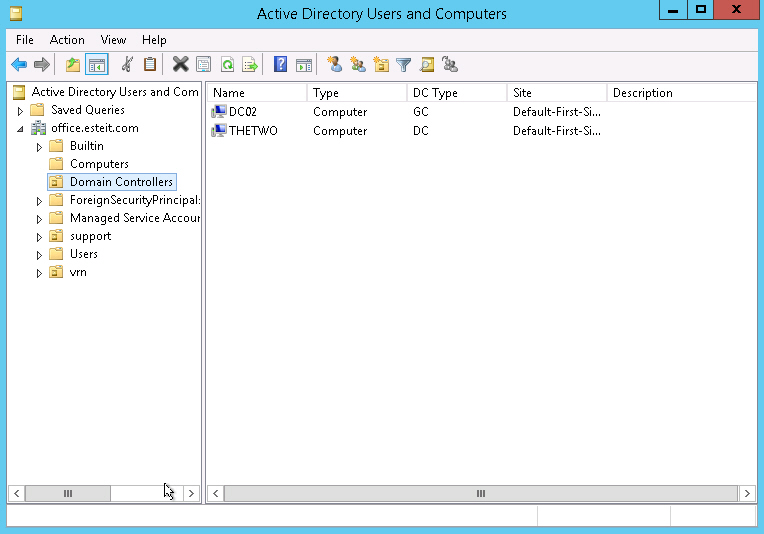
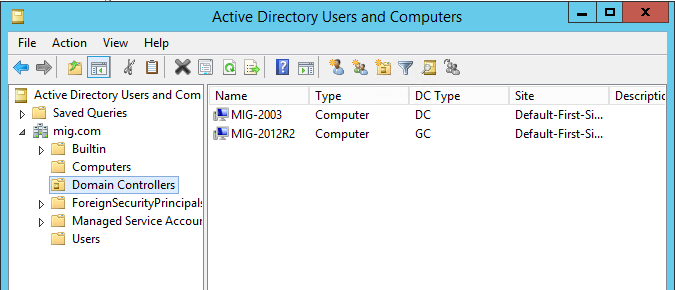
8. Подключаемся под учётной записью домена и проверяем в оснастке Active Directory Users and Computers, что в нашей сети есть два контроллера домена
После выполнения всех шагов, переходим к переносу Active Directory. Все действия проводим на новом контроллере домена в следующем порядке:
- Перенос роли FSMO (Flexible Single Master Operations)
- Изменение контроллера домена Active Directory
- Изменение Мастера схемы (Schema Master)
- Удаление старого контроллера домена из глобального каталога (Global Catalog)
Перенос роли FSMO (Flexible Single Master Operations)
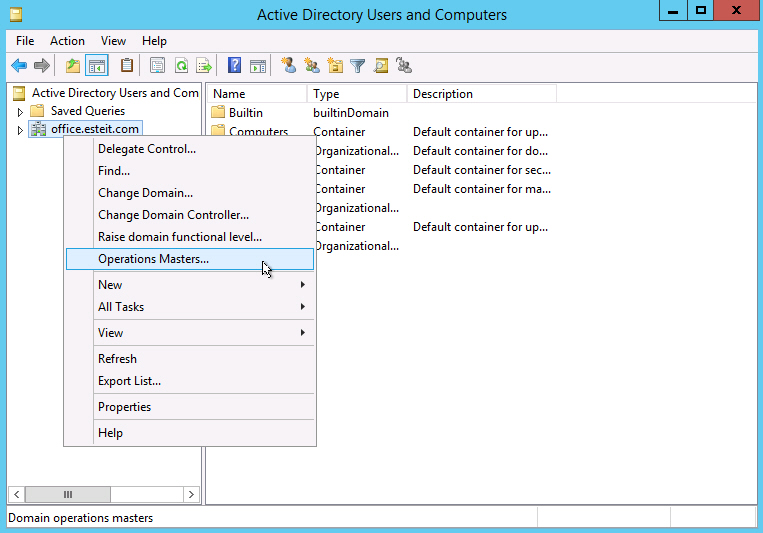
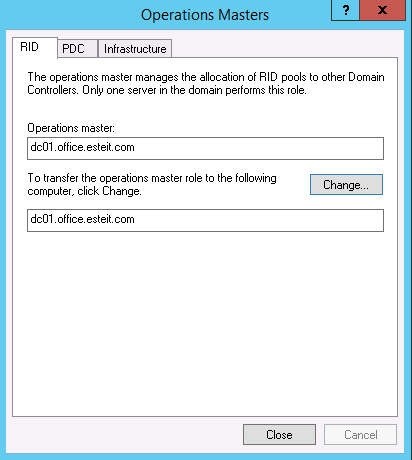
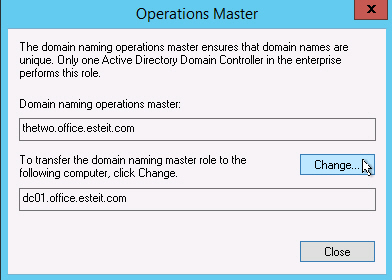
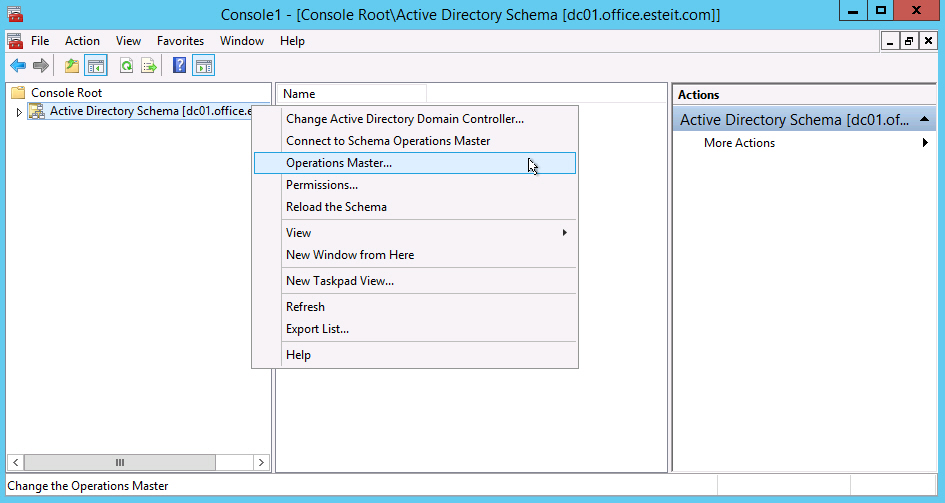
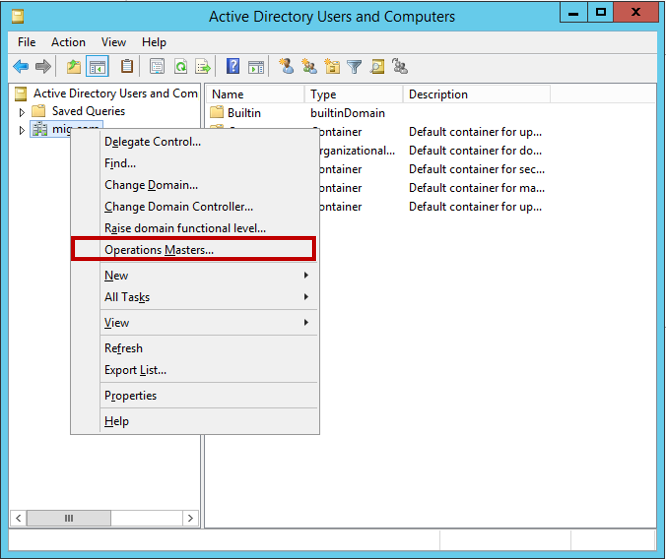
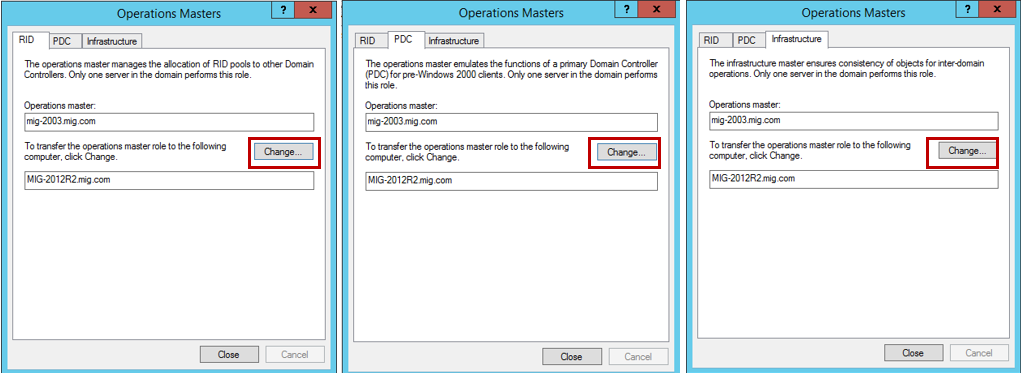
Для переноса роли FSMO, открываем оснастку Active Directory Users and Computers, щёлкаем по нашему домену и в появившемся подменю выбираем Operations Masters
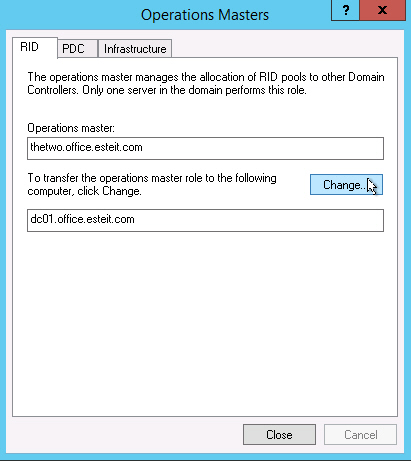
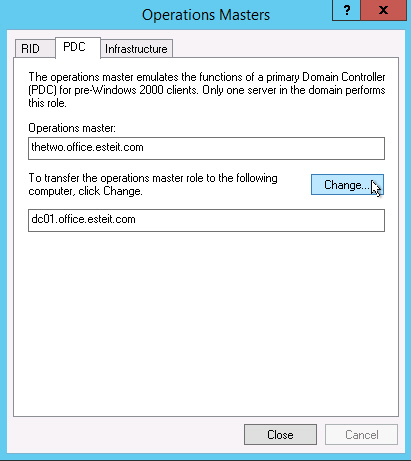
Переносим роль хозяина операций. Для этого на каждой вкладке во вновь появившемся окне нажимаем кнопку Change и переносим роль со старого сервера на новый

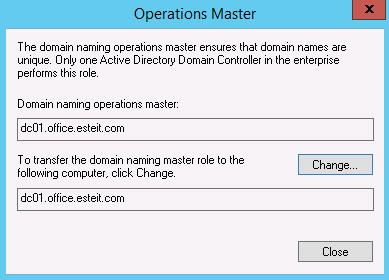
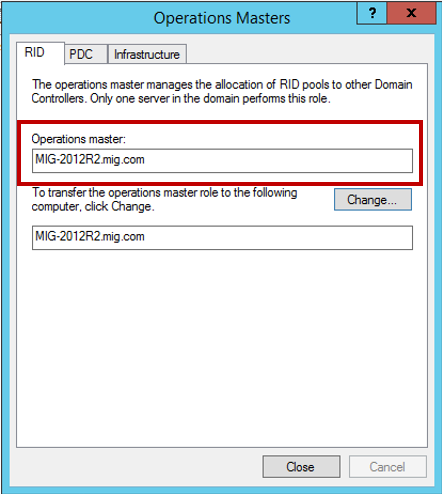
Подтверждаем операцию переноса и дожидаемся ее завершения. Проверяем, что в итоге роль хозяина операций теперь находится на новом сервере
Изменение контроллера домена Active Directory
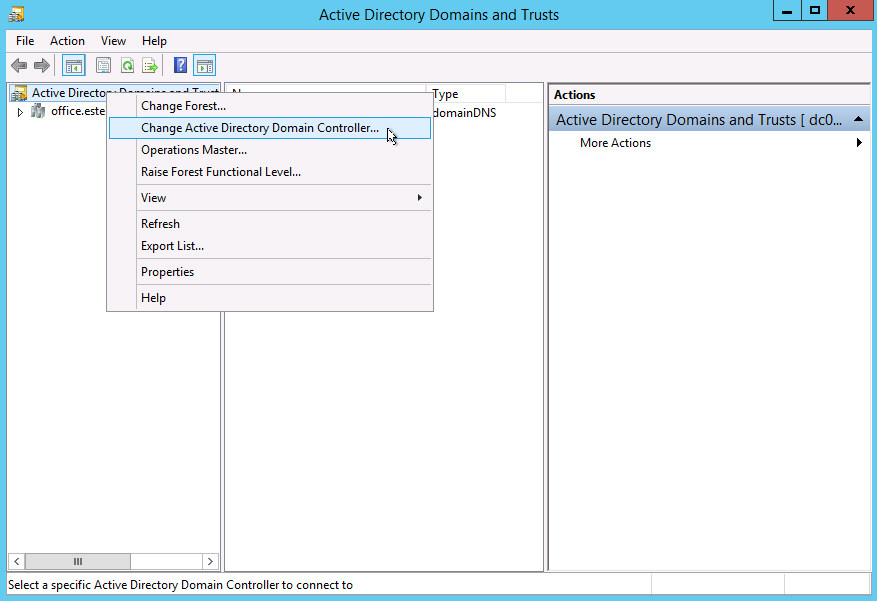
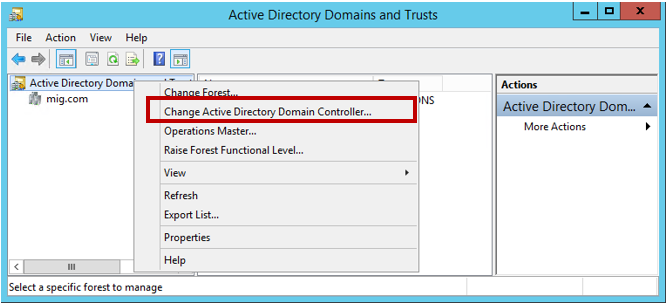
Переходим к изменению контроллера домена Active Directory. Открываем консоль Active Directory Domains and Trusts, щёлкаем по Active Directory Domain and Trusts и выбираем пункт Change Active Directory Domain Controller
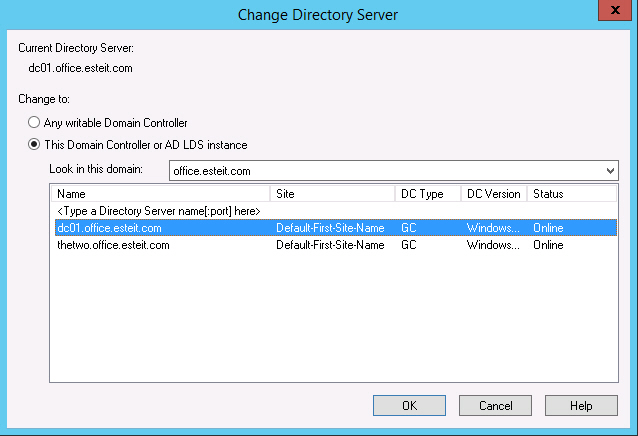
В новом окне выбираем пункт This Domain Controller or AD LDS instance и указываем новый сервер
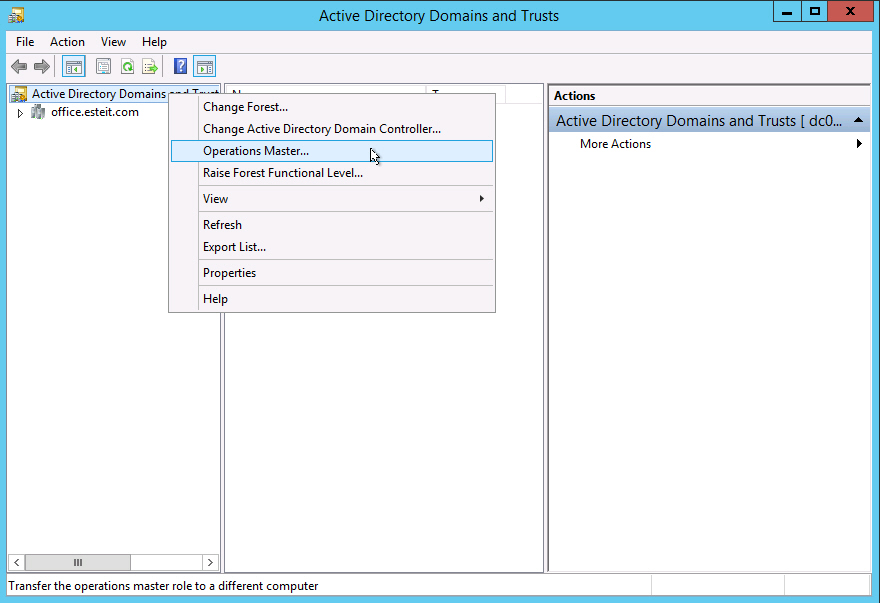
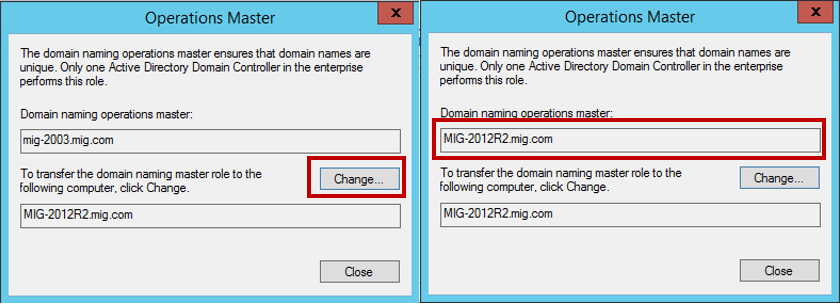
Теперь снова щёлкаем по Active Directory Domains and Trusts и выбираем пункт Operations Master
Переносим роль хозяина операций именования домена, нажав Change
Изменение Мастера схемы (Schema Master)
Теперь приступаем к изменению мастера схемы (Schema Master). Запускаем командную строку с правами Администратора и вводим команду regsvr32 schmmgmt.dll
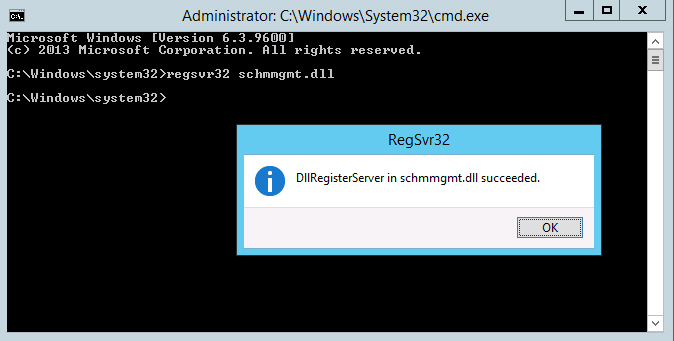
С помощью этой команды происходит первичная регистрация динамической библиотеки DLL, которая является обязательной для оснастки Active Directory Schema.
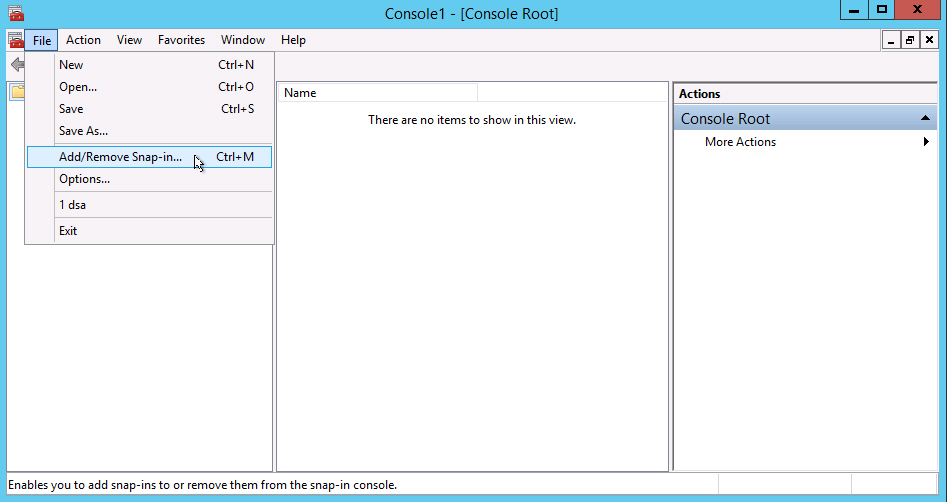
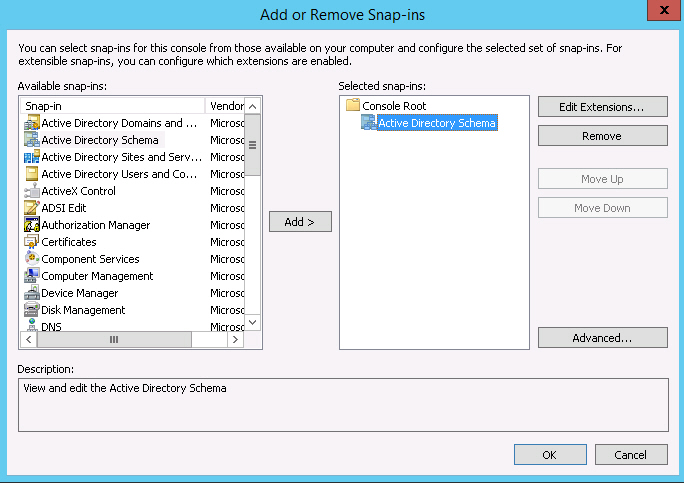
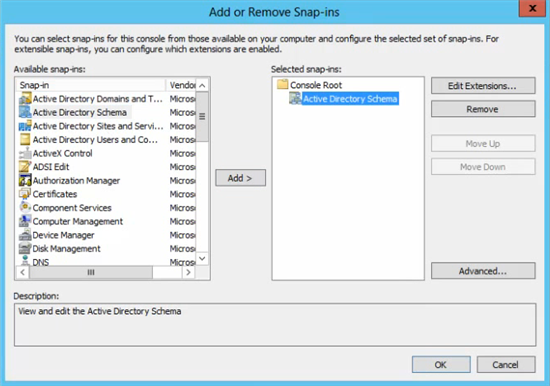
После того, как команда выполнена, запускаем консоль MMC и добавляем оснастку Active Directory Schema (для этого выбираем File > Add/Remove Snap-in)
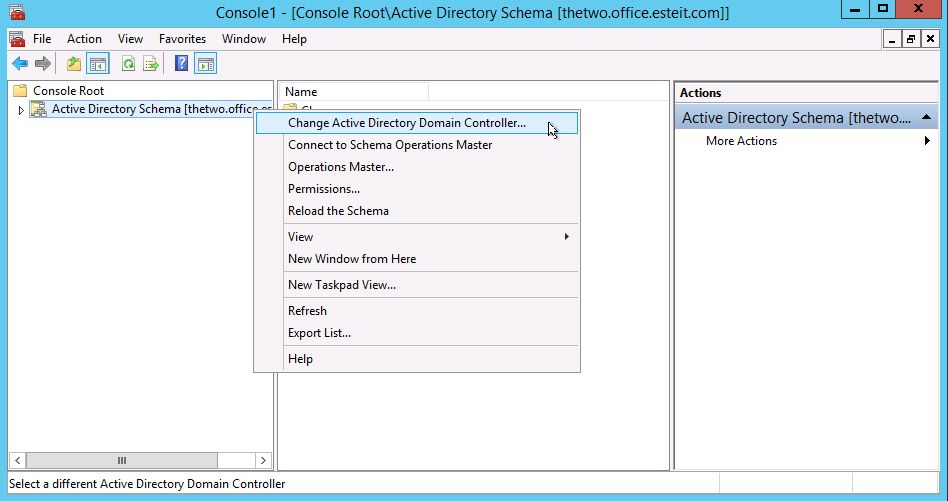
В этой же консоли MMC щёлкаем по Active Directory Schema и выбираем Change Active Directory Domain Controller
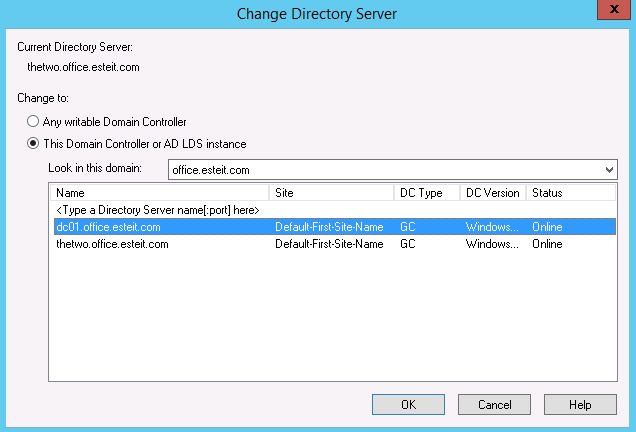
В новом окне выбираем пункт This Domain Controller or AD LDS instance и указываем новый сервер
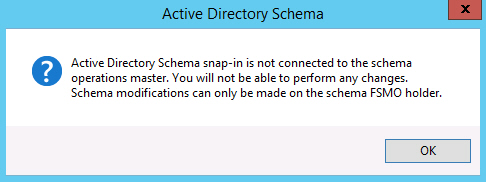
Появится предупреждение о том, что оснастка схемы Active Directory не подключена. Нажимаем ОК
Теперь снова щёлкаем по Active Directory Domains and Trusts и выбираем пункт Operations Master
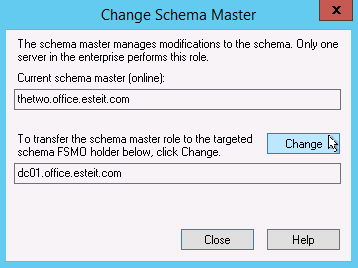
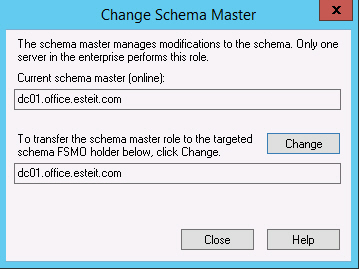
Для переноса роли хозяина схемы в новом окне нажимаем Change
Удаление контроллера домена под управление Windows Server 2003 из глобального каталога (Global Catalog)
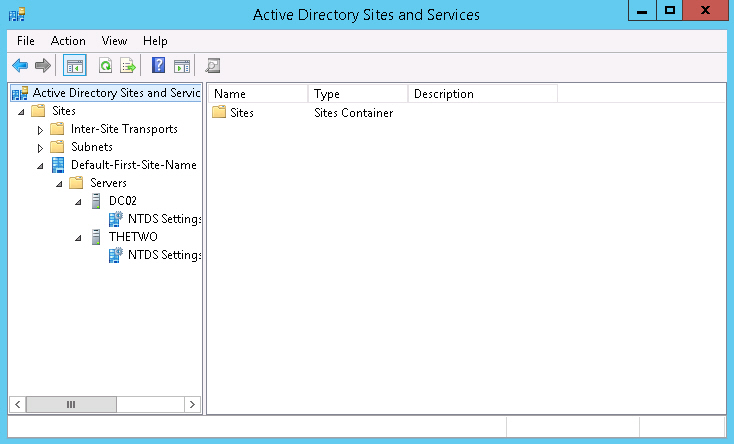
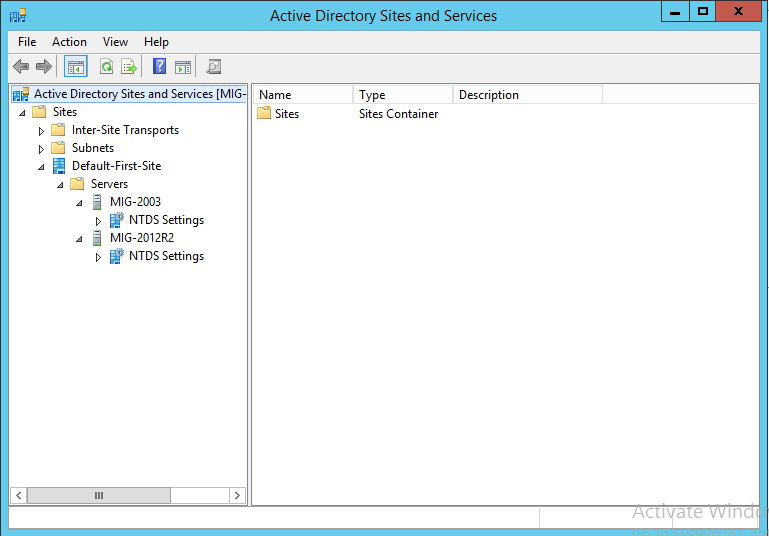
Осталось удалить старый контроллер домена из глобального каталога. Для этого открываем Active Directory Sites and Services, разворачивает папку Sites, затем Default-First-Site-Name, затем Servers и, наконец, разворачиваем оба сервера
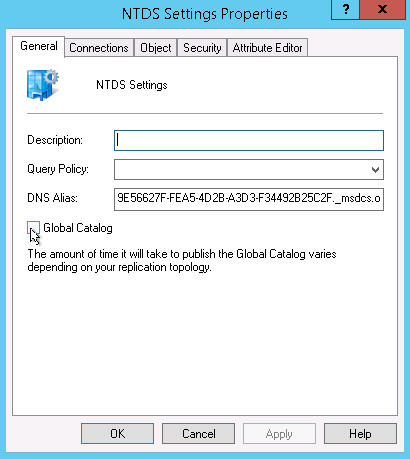
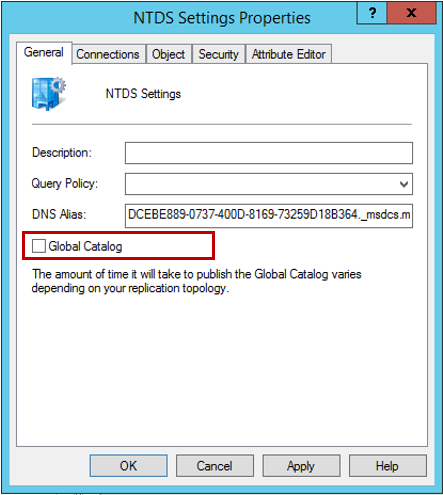
Щёлкаем по NTDS Settings для старого сервера, выбираем Properties. Во вновь появившемся окне убираем галочку с пункта Global Catalog и жмём ОК
В Active Directory Users and Computers контроллер домена на старом сервере теперь не является глобальным каталогом
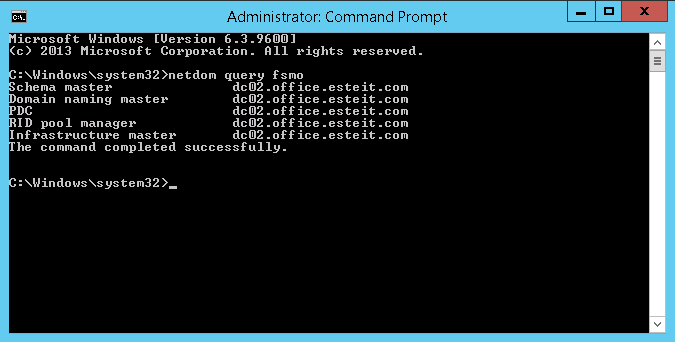
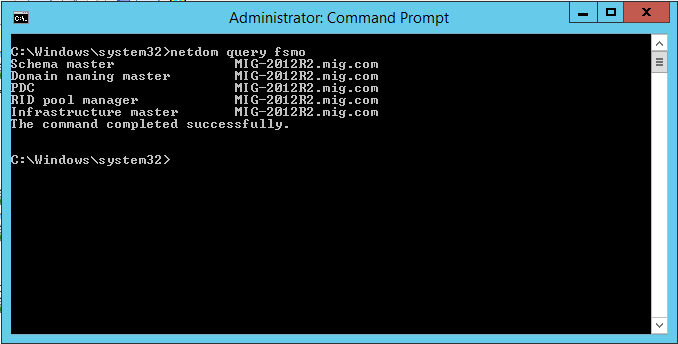
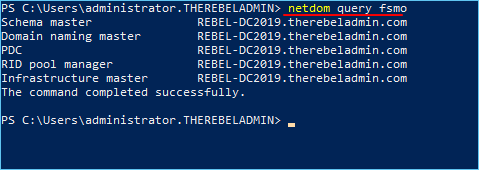
Проверяем, что теперь роль FSMO запущена на новом сервере. Для этого в командной строке, открытой с правами Администратора запускаем команду netdom query fsmo
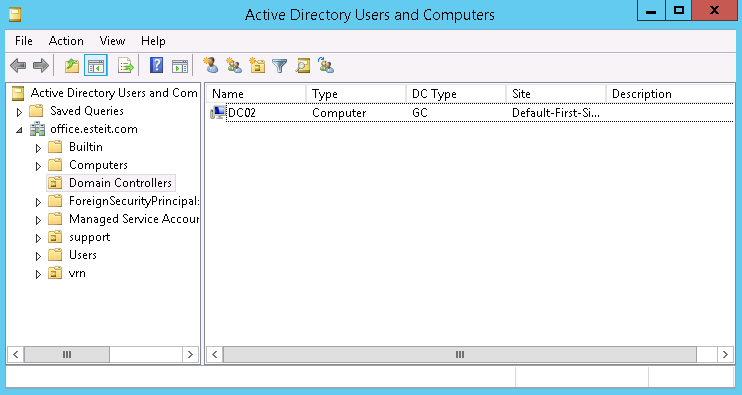
На этом миграция Active Directory завершена. Понижаем роль компьютера с контроллера домена на старом сервере. Если после этого посмотреть на консоль Active Directory Users and Computers, увидим, что остался только один(новый) контроллер домена – под управлением Windows Server 2012 R2
Не секрет, что окончание поддержки Windows Server 2003 все ближе. День Х назначен на 17 июля 2015 года, а значит остается все меньше времени, чтобы успеть перевести свою инфраструктуру на более современные версии операционной системы. На Хабре мы уже делали несколько анонсов об окончании поддержки, на портале Microsoft Virtual Academy опубликован курс по материалам Jump Start, есть перевод статьи о переносе файлового сервера. В этой статье будет рассказано о миграции Active Directory и приведен пошаговый алгоритм, которым поможет вам при реализации переноса.
Перенос Active Directory с Windows Server 2003 на Windows Server 2012 R2 является одной из первоочередных задач, которые необходимо решить в процессе миграции.
На самом деле, перенос Active Directory не несет в себе каких-либо сложностей. Нужно выполнить лишь несколько шагов, о которых будет подробно рассказано далее.
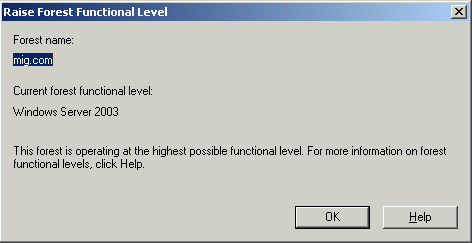
Сначала выполним небольшую настройку на контроллере домена с установленной на нем Windows Server 2003. Обязательно проверьте, что для существующего домена и леса в качестве режима работы (functional level) выбран Windows Server 2003.
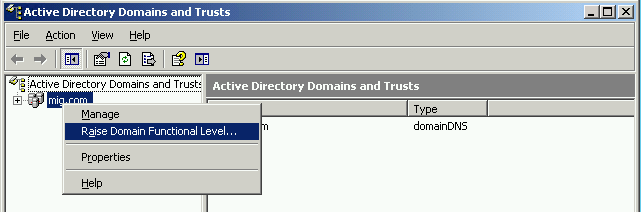
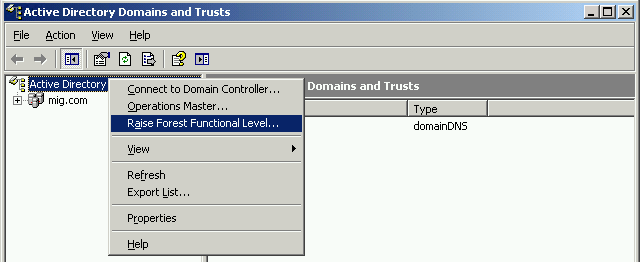
Для того, что изменить режим работы домена и леса необходимо запустить оснастку Active Directory Domains and Trust. Для изменения режима работы домена щёлкаем правой кнопкой мыши по домену, для режима работы леса – по Active Directory Domains and Trusts. Выбираем Raise Domain Functional Level и Raise Forest Functional Level соответственно.
В обоих случаях режим работы должен быть установлен на Windows Server 2003.

Следующим шагом нам нужно добавить к нашей сети второй контроллер домена под управлением Windows Server 2012 R2. Для этого на сервер с Windows Server 2012 R2 устанавливаем роль Active Directory Domain Services.

После установки добавим новый контроллер домена к существующему домену. Для этого нам нужно будет использовать учетную запись, которая входит в группу Enterprise Admins и обладает соответствующими правами.
Необходимо указать, будет ли этот сервер выполнять роль DNS сервера и глобального каталога (Global Catalog – GC).
На экране Additional Options нужно указать с какого контроллера домена будет выполнена репликация на существующий. Нужно выбрать контроллер домена под управлением Windows Server 2003.

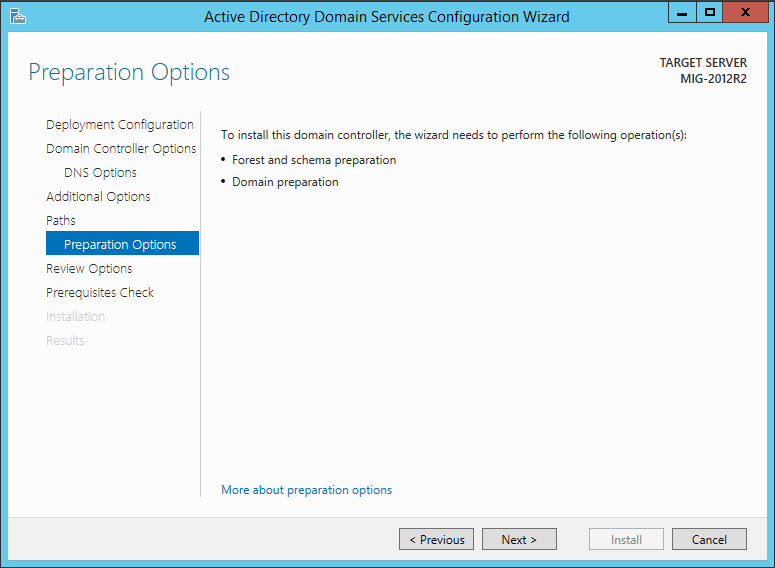
Для установки домена необходимо выполнить подготовку леса, домена и схемы. Если раньше для этого обязательно нужно было запустить команду adprep (причем сделать это надо было до начала конфигурации домена), то теперь эту задачу берет на себя мастер конфигурации ADDS, и подготовка может быть выполнена автоматически.
Далее нужно дождаться завершения установки и перезагрузить компьютер. В итоге, вы получите контроллер домена с установленной на нем Windows Server 2012 R2.
Теперь в оснастке Active Directory Users and Computers мы можем увидеть, что в нашей сети есть два контроллера домена.

После того, как выполнены предварительные шаги, мы можем перейти непосредственно к переносу Active Directory. Выполнять необходимые действия мы будем на контроллере домена под управлением Windows Server 2012 R2 в следующем порядке:
- Перенос роли FSMO (Flexible Single Master Operations)
- Изменение контроллера домена Active Directory
- Изменение Мастера схемы (Schema Master)
- Удаление контроллера домена под управлением Windows Server 2003 из глобального каталога (Global Catalog)
1. Перенос роли FSMO (Flexible Single Master Operations)
Для того, чтобы перенести роль FSMO, открываем оснастку Active Directory Users and Computers, щёлкаем правой кнопкой мышки по нашему домену и в появившемся подменю выбираем Operations Masters.
Нам нужно перенести роль хозяина операций. Для этого на каждой вкладке во вновь появившемся окне нажимаем кнопку Change и переносим роль с 2003 сервера на сервер под управлением 2012 R2.
Подтверждаем операцию переноса и дожидаемся ее благополучного завершения. Не забудьте проверить, что в итоге роль хозяина операций теперь находится на сервере под управлением Windows Server 2012 R2:
2. Изменение контроллера домена Active Directory
Теперь переходим к изменению контроллера домена Active Directory. Открываем консоль Active Directory Domains and Trusts, щёлкаем правой кнопкой мышки по лесу и выбираем пункт Change Active Directory Domain Controller.
В новом окне выберите пункт This Domain Controller or AD LDS instance и укажите сервер под управлением Windows Server 2012 R2.

Теперь снова щёлкаем правой кнопкой мышки по лесу и выбираем пункт Operations Master.

Переноси роль хозяина операций именования домена, нажав Change.
3. Изменение Мастера схемы (Schema Master)
Теперь приступаем к изменению мастера схемы (Schema Master). Запустите командную строку с правами Администратора и введите команду regsvr32 schmmgmt.dll
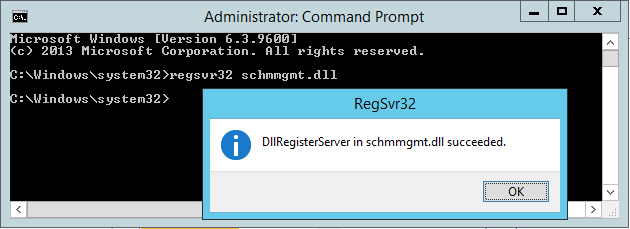
С помощью этой команды происходит первичная регистрация динамической библиотеки DLL, которая является обязательной для оснастки Active Directory Schema.
После того, как команда выполнена, можно закрыть командную строку, запустить консоль MMC и добавить оснастку Active Directory Schema (для этого выберите File > Add/Remove Snap—in).
В этой же консоли MMC щёлкаем правой кнопкой мыши по Active Directory Schema и выбираем Change Active Directory Domain Controller. Аналогично действиям, которые мы выполняли в пункте 2, в новом окне выберите пункт This Domain Controller or AD LDS instance и укажите сервер под управлением Windows Server 2012 R2 и нажмите ОК. Появится предупреждение о том, что оснастка схемы Active Directory не подключена. Нажмите ОК для продолжения.
Теперь снова щёлкаем правой кнопкой мышки по лесу и выбираем пункт Operations Master. Для переноса роли хозяина схемы в новом окне нажмите Change.
Теперь можно закрыть MMC консоль, открыть оснастку Active Directory Users and Computers и убедиться, что данные успешно реплицированы на ваш новый сервер под управлением Windows Server 2012 R2. Имейте ввиду, что процесс репликации может занять некоторое время (все зависит от количества объектов Active Directory, которые нужно реплицировать).
4. Удаление контроллера домена под управление Windows Server 2003 из глобального каталога (Global Catalog)
Осталось удалить контроллер домена под управлением Windows Server 2003 из глобального каталога. Для этого открываем Active Directory Sites and Services, разворачивает папку Sites, затем Default-First-Site-Name, затем Servers и, наконец, разворачиваем оба сервера.
Щёлкните правой кнопкой мышки по NTDS Settings для вашего старого сервера под управление Windows Server 2003, выберите Properties. Во вновь появившемся окне уберите галочку с пункта Global Catalog и нажмите ОК.
В Active Directory Users and Computers контроллер домена на Windows Server 2003 теперь не является глобальным каталогом.
Осталось проверить, что теперь роль FSMO запущена на Windows Server 2012 R2. Для этого в командной строке, открытой с правами Администратора запускаем команду netdom query fsmo
На этом миграция Active Directory завершена. На компьютере под управлением Windows Server 2003 запустите dcpromo (кстати, в Windows Server 2012 R2 dcpromo нет) для того, чтобы понизить роль компьютера с контроллера домена. Если после этого посмотреть на консоль Active Directory Users and Computers, вы увидите, что остался только один контроллер домена – под управлением Windows Server 2012 R2.

Надеюсь, что эта статья будем вам полезной!
Полезные ссылки
- Попробовать Azure бесплатно на 30 дней!
- Изучить курсы виртуальной академии Microsoft
- Основы компьютерной безопасности
- Основы построения доменной сети. Часть 2
- Модернизация инфраструктуры организации с помощью Windows Server 2012 R2
- Переход с VMware на Hyper-V
- Основы построения доменной сети
- Бизнес и облако: лучшие практики решений
- Скачать пробную версию Windows Server 2012 R2
- Загрузить бесплатную или пробную Visual Studio
- Remove From My Forums
![]()
Перенести контроллер домена на другой компьютер
-
Вопрос
-
Здравствуйте, подскажите пожалуйста
Имеется контроллер домена Windows Server 2012 R2, с AD, и ролями DNS и DHCP. Задача перенести всё это на другой компьютер… Я предполагаю что на новом компьютере, нужно установить ОС Windows Server 2012 R2, ввести новый
сервер в существующий домен, а вот что делать далее пока что не понятно. Подскажите есть ли какая нибудь инструкция от microsoft по переносу контроллера домена с Windows Server 2012 R2 на Windows Server 2012 R2 с полной передачей ролей.Заранее спасибо.
Ответы
-
Можно сделать достаточно просто и без перерывах в работе.
1) разворачиваете новый сервер, повышаете его роль до контроллера домена (то есть у вас будет на один DC больше). Вместе с AD DS должен также установиться DNS-сервер. То есть после этого этапа можно сказать две роли у вас уже «перенесены»;
2) добавляете на новом сервере роль dhcp-сервер и настраиваете failover dhcp (подробнее тут
Пошаговое руководство: настройка службы DHCP для обеспечения отказоустойчивости). То есть у вас будет два dhcp-сервера, работающих в отказоустойчивой конфигурации. В конечном счете вы просто удаляете из конфигурации первый dhcp-сервер, делая основным
второй и, таким образом, dhcp-роль у вас уже перенесена.после этого можно понижать роль первого сервера до рядового, удалять роли dns и dhcp и выводить из работы.
Если ещё один вариант, но с небольшим простоем по времени:
вы просто виртуализуете первый сервер. для этого есть специальные утилиты (Disk2vhd v2.01). во время процесса виртуализации у вас должны быть отключены все
сервисы на этом сервере! то есть нужно будет остановить службы AD DS, DNS, DHCP. Будет небольшой простой по времени (смотря конечно какой объем места занят на сервере).Далее на новом сервере ставите не Windows Server 2012 R2, а Windows Hyper-V Server 2021 R2, он бесплатен. На нем создаете виртуалку, подключаете к ней ранее созданный виртуальный диск. после этого нужно проверить конфигурацию всех служб, ведь
при виртуализации например изменится сетевой адаптер, а для ваших ролей это важно. Кроме того, как только запустите ваш виртуальный контроллер, ни в коем случае не пускайте в сеть старый сервер! обязательно прочтите Виртуализация
доменных служб Active Directory вы должны понимать как все работает и какие последствия будут при неправильном администрировании.-
Изменено
16 марта 2016 г. 5:44
-
Предложено в качестве ответа
Alexander Dekhnik
16 марта 2016 г. 6:18 -
Помечено в качестве ответа
Vector BCOModerator
16 марта 2016 г. 9:36
-
Изменено
Windows Server 2019 was available for public (GA) from early October 2018. In past I have written many articles about domain migrations by covering different Active Directory versions. So, it is time me to write about AD 2019 migrations. In this demo I am going to demonstrate how to migrate from Active Directory 2012 R2 to Active Directory 2019. The same procedure is going to apply for any AD version from Windows Server 2008.
Migration itself is very straight forward task, however, there are other things you need to consider before you do an AD migration. I have listed a checklist below you can use in many occasions.
- Evaluate business requirement for active directory migration
- Perform Audit on Existing Active Directory Infrastructure
- Provide Plan for implementation Process
- Prepare Physical / Virtual resources for Domain Controller
- Install Windows server 2019 Standard / Datacenter
- Patch Servers with latest Windows Updates
- Assign Dedicate IP address to Domain Controller
- Install AD DS Role
- Migrate Application and Server Roles from the Existing Domain Controllers.
- Migrate FSMO roles to new Domain Controllers
- Add New Domain controllers to the Existing Monitoring system
- Add New Domain controllers to the Existing DR Solution
- Decommission old domain controllers
- Raise the Domain and Forest Functional level
- On Going Maintenance

As per the above figure therebeladmin.com domain has two domain controllers. In here, the FSMO role holder is running windows server 2012 R2. Domain and forest functional level currently operating at Windows server 2012 R2. A new domain controller with Windows server 2019 will be introduce and it will be the new FSMO role holder for the domain. once FSMO role migration completed, Domain controller running windows server 2012 R2 will be decommissioned. After that forest and domain function level will raised to the windows server 2019.
In the demonstration, REBEL-DC2012 is the domain controller with windows server 2012 R2 and REBEL-DC2016 is the domain controller with windows server 2019.
Note – When you introduce new domain controllers to the existing infrastructure it is recommended to introduce to the forest root level first and then go to the domain tree levels.

- Log in to the Server 2019 as a member of local administrators group.
- Add server to the existing domain as member

- After restart, log in to the server as Enterprise Administrator
- Assign static IP address to the server
- Launch the PowerShell Console as an Administrator
- Before the configuration process, we need to install the AD DS Role in the given server. In order to do that we can use Following command.
Install-WindowsFeature –Name AD-Domain-Services -IncludeManagementTools

- Configure the new server as additional domain controller.
Install-ADDSDomainController
-CreateDnsDelegation:$false
-NoGlobalCatalog:$true
-InstallDns:$true
-DomainName «therebeladmin.com»
-SiteName «Default-First-Site-Name»
-ReplicationSourceDC «REBEL-DC2012.therebeladmin.com»
-DatabasePath «C:WindowsNTDS»
-LogPath «C:WindowsNTDS»
-NoRebootOnCompletion:$true
-SysvolPath «C:WindowsSYSVOL»
-Force:$true

There are no line breaks for the command and I have listed it as above to allow readers to identify on the parameters clearly.
|
Argument |
Description |
|
Install-ADDSDomainController |
This cmdlet will install the domain controller in active directory infrastructure. |
|
-NoGlobalCatalog |
If you do not need to create the domain controller as global catalog server, this parameter can use. By default, system will enable global catalog feature. |
|
-SiteName |
This Parameter can use to define the active directory site name. the default value is Default-First-Site-Name |
|
-DomainName |
This parameter defines the FQDN for the active directory domain. |
|
-ReplicationSourceDC |
Using this parameter can define the active directory replication source. By default, it will use any available domain controller. But if need we can be specific. |
Once execute the command it will ask for SafeModeAdministrator Password. Please use complex password to proceed. This will be used for DSRM.
- After configuration completed, restart the system and log back in as administrator to check the AD DS status.
Get-Service adws,kdc,netlogon,dns

Will confirm the status of the AD DS service.
Get-ADDomainController -Filter * | Format-Table Name, IPv4Address, Site

Will list down the domain controllers along with the IP address and Sites it belongs to.
- Migrate all five FSMO roles to the New domain controller using following command,
Move-ADDirectoryServerOperationMasterRole -Identity REBEL-DC2019 -OperationMasterRole SchemaMaster, DomainNamingMaster, PDCEmulator, RIDMaster, InfrastructureMaster
In above the REBEL-DC2019 is domain controller running with Windows Server 2019.

Once its completed, we can verify the new FSMO role holder using
Netdom query fsmo

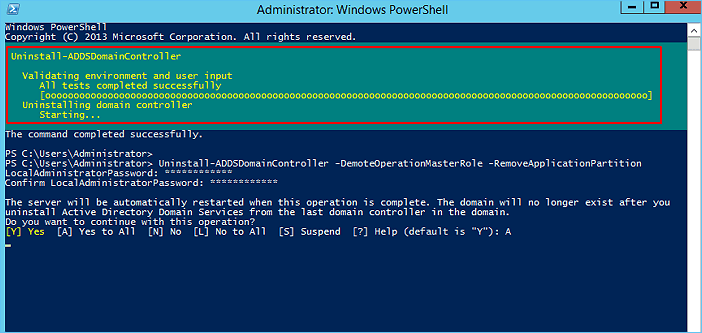
- The new step of the process is to decommission the old windows domain controller which running with Windows Server 2012 R2. To do that execute the following command as enterprise administrator from the relevant DC.
Uninstall-ADDSDomainController -DemoteOperationMasterRole -RemoveApplicationPartition
After execute the command it will ask to define password for the local administrator account.

Once its completed it will be a member server of the rebeladmin.com domain.
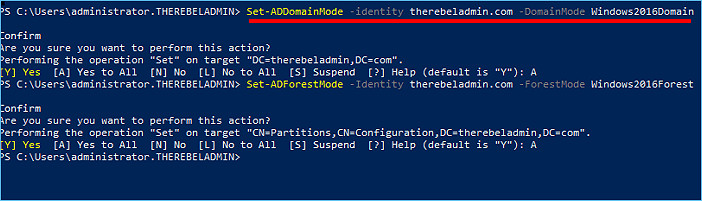
- Next step is to raise the domain and forest functional level to windows server 2019. To do that can use the following commands.
To upgrade domain functional levels
Set-ADDomainMode –identity therebeladmin.com -DomainMode Windows2016Domain
To upgrade forest function levels
Set-ADForestMode -Identity therebeladmin.com -ForestMode Windows2016Forest

Note – With Windows Server 2019, there is no domain or forest functional level called windows2019. It is still 2016.
Now we have completed the migration from AD DS 2012R2 to AD DS 2019. Same steps apply when migrate from windows server 2008, Windows server 2008 R2, Windows server 2012 & Windows server 2016.
- After the migration completes, we still need to verify if its completes successfully.
Get-ADDomain | fl Name,DomainMode
This command will show the current Domain functional level of the domain after the migration.
Get-ADForest | fl Name,ForestMode
Above command will show the current forest functional level of the domain.


Миграцию или перенос Active Directory с Windows Server 2003 на Windows Server 2012 R2 является одной из первоочередных задач, которые необходимо решить в процессе миграции.
Для начала необходимо выполнить настройку на контроллере домена с ОС Windows Server 2003. Обязательно проверьте, что для существующего домена и леса в качестве режима работы (functional level) выбран Windows Server 2003., если нет, то меняем.
Для того, что изменить режим работы домена и леса необходимо запустить оснастку Active Directory Domains and Trust (Домены и доверия), нажать правой кнопкой по домену, выбрать Raise Domain Functional Level и Raise Forest Functional Level соответственно. Далее нажать кнопку Raise и Ок.
В обоих случаях режим работы должен быть установлен на Windows Server 2003. 

Следующим шагом нам нужно добавить к нашей сети второй контроллер домена под управлением Windows Server 2012 R2. Для этого на сервер с Windows Server 2012 R2 устанавливаем роль Active Directory Domain Services.


После установки добавим новый контроллер домена к существующему домену. Нажимаем на подсказку (восклицательный знак) и переходим к мастеру.

Для этого нам нужно будет использовать учетную запись, которая входит в группу Enterprise Admins и обладает соответствующими правами на старом контроллере домена под управлением windows server 2003.

В процессе нужно указать, будет ли этот сервер выполнять роль DNS сервера и глобального каталога (Global Catalog – GC). В нашем случае, да будет.

На экране Additional Options нужно указать с какого контроллера домена будет выполнена репликация на существующий. Нужно выбрать контроллер домена под управлением Windows Server 2003.

Для развертывания домена необходимо выполнить подготовку леса, домена и схемы. Если ранее для этого обязательно нужно было запустить команду adprep (причем сделать это надо было до начала конфигурации домена), то теперь эту задачу берет на себя сам мастер конфигурации ADDS, и подготовка выполняется в автоматическом режиме.
После проверки дополнительных требований, можно нажать кнопку «Установить».

Ожидаем завершения установки и перезагрузить сервер. В результате получаем контроллер домена на базе свежей ОС Windows Server 2012 R2.
Теперь в Active Directory Users and Computers можно увидеть, что в сети имеется два действующих контроллера домена.

Мы прошли предварительную подготовку, далее переходим непосредственно к переносу Active Directory. Выполнять необходимые манипуляции будем на контроллере домена под управлением Windows Server 2012 R2 в следующем порядке:
Перенос роли FSMO (Flexible Single Master Operations)
Изменение контроллера домена Active Directory
Изменение Мастера схемы (Schema Master)
Удаление контроллера домена под управлением Windows Server 2003 из глобального каталога (Global Catalog)
1. Перенос роли FSMO (Flexible Single Master Operations)
Для того, чтобы перенести роль FSMO, открываем оснастку Active Directory Users and Computers, щёлкаем правой кнопкой мышки по нашему домену и в появившемся подменю выбираем Operations Masters.

Нам нужно перенести роль хозяина операций. Для этого на каждой вкладке во вновь появившемся окне нажимаем кнопку Change и переносим роль с 2003 сервера на сервер под управлением 2012 R2.
Подтверждаем операцию переноса и дожидаемся ее благополучного завершения. Не забудьте проверить, что в итоге роль хозяина операций теперь находится на сервере под управлением Windows Server 2012 R2:

2. Изменение контроллера домена Active Directory
Приступаем к смене первичного контроллера домена. Открываем консоль Active Directory Domains and Trusts, щёлкаем правой кнопкой мышки по лесу и выбираем пункт Change Active Directory Domain Controller.
В новом окне выберите пункт This Domain Controller or AD LDS instance и укажите сервер под управлением Windows Server 2012 R2.

Далее нажимаем правой кнопкой мышки по лесу и выбираем пункт Operations Master.
Нажав кнопку Change, мы перенесем роль хозяина операций именования домена.

3. Изменение Мастера схемы (Schema Master)
Переназначаем мастера схемы (Schema Master). В командной строке с правами Администратора и вводим команду regsvr32 schmmgmt.dll. С помощью данной команды выполняется регистрация динамической библиотеки DLL, которая является обязательной для оснастки Active Directory Schema.

Далее запускаем консоль MMC (Win+R, mmc) и добавить оснастку Active Directory Schema (для этого выберите File > Add/Remove Snap-in).

В этой же консоли MMC щёлкаем правой кнопкой мыши по Active Directory Schema и выбираем Change Active Directory Domain Controller. В новом окне выберите пункт This Domain Controller or AD LDS instance и выберите сервер под управлением Windows Server 2012 R2 и нажмите ОК.

Появится предупреждение о том, что оснастка схемы Active Directory не подключена. Игнорируем предупреждение и нажмите ОК для продолжения.

В этом же окне, нажимаем правой кнопкой мышки по лесу и выбираем пункт Operations Master. Нажимаем кнопку Change, для переноса роли хозяина схемы.

Закрываем MMC консоль и открываем оснастку Active Directory Users and Computers, для того чтобы убедиться, что данные успешно синхронизированы на новый сервер под управлением Windows Server 2012 R2. Учтите, что может потребоваться дополнительное время, в зависимости от количества объектов в активном каталоге.
4. Удаление контроллера домена под управление Windows Server 2003 из глобального каталога (Global Catalog)
Для удаления контроллер домена под управлением Windows Server 2003 из глобального каталога, открываем Active Directory Sites and Services, разворачивает папку Sites, далее Default-First-Site-Name, затем Servers, разворачиваем оба сервера.

Нажимаем правой кнопкой по NTDS Settings для вашего старого сервера Windows Server 2003, выбираем Properties (Свойства) и в появившемся окне убираем галочку с пункта Global Catalog (Глобальный каталог) и нажимаем ОК.

В Active Directory Users and Computers контроллер домена на Windows Server 2003 теперь не является глобальным каталогом.

Проверяем, что на данный момент роль FSMO уже запущена на Windows Server 2012 R2. Для этого в командной строке (Win+R), открытой с правами Администратора запускаем команду netdom query fsmo

На этом миграция Windows Server 2003 на Windows Server 2012 R2 завершена. На сервере под управлением Windows Server 2003 запустите dcpromo для того, чтобы понизить роль сервера с контроллера домена на сервер член домена и далее вывести его с эксплуатации (при необходимости). Не забудьте повысить функциональный уровень нового контроллера домена и развернуть вторичный (дублирующий) контроллер домена. Как это сделать, показано в следующей статье.
Прочитано:
1 651
Итак появилось свободное время в которое никто не отвлекает, все налажено и все работает, а потому пора заняться самообразование ведь никто кроме меня не заинтересован чтобы я был квалификационным сотрудником. Но это все лирика, а т. к. мой блог в последнее время что-то замер в наполнении практический заметок, то пора это дело исправлять. Может конечно всему виной хорошая погода, а не загруженность, но это не важно. Когда в твою команду приходит новый сотрудник и рассказывает что он успешно переводил всю инфраструктуру на новый уровень в частности серверной операционной системы становится как-то жалко себя, — а почему же я сам этого не сделал и сижу на отлаженном старом. Без думно переходить на что-то не опробовав самостоятельно я не делаю — только тест тест тест и потом практика. И вот сейчас я покажу все шаги через которые я прошел дабы произвести миграцию с домена уровня Server 2008 R2 до уровня Server 2012 R2.
Ну что ж пора:
1) Домен (polygon.local) на системе Server 2008 R2 Ent (srv-dc) развернутый по шагам заметки. Текущие действующие роли: AD + DHCP + DNS, IP Address = 10.9.9.1
2) Развернут Server 2012 R2 Standard (srv-ad), IP Address = 10.9.9.20 получен от DHCP сервера.
3) Поставлены все обновления на Server 2012 R2, предварительно у Вас должен быть развернут сервис обновления Windows систем именуемый, как WSUS, IP Address = 10.9.9.3
4) Ввести в текущий домен систему Server 2012 R2
Win + X — Control Panel — Category (Small icons) — System — Advanced system settings — вкладка Computer Name — Change
Computer name: srv-ad
Member of (Domain:) polygon.local
и нажимаю кнопку OK, затем указываю идентификационные данные учетной записи у которой есть права ввода станций в домен, в моем случае:
Login: ekzorchik
Pass: 712mbddr@
и нажимаю кнопку OK, успехом считается появление сообщения: Welcome to the polygon.local domain
и нажимаю кнопку Ok, OK (соглашаемся о том чтобы изменения применились текущую систему следует перезагрузить), Close (окна System Properties), Restart Now (окна Microsoft Windows).
5) Опираясь на инструкцию (не которые моменты будут отличаться) установки AD сделать данную систему как домен контроллер, а до этого авторизуюсь под учетной записью ekzorchik&712mbddr@, данная учетная запись является Администратором домена и обладает всеми группами которые нужны для полного администрирования AD (Domain Admins, Enterprise Admins, Schema Admins) и обязательно не забудьте сделать статический IP адрес у данного сервера.
6) Текущее положение FSMO ролей
srv-ad.polygon.local: Win + X — Command Prompt (Admin) —
C:Windowssystem32>netdom query fsmo
Schema master srv-dc.polygon.local
Domain naming master srv-dc.polygon.local
PDC srv-dc.polygon.local
RID pool manager srv-dc.polygon.local
Infrastructure master srv-dc.polygon.local
The command completed successfully.
, как видно всеми ролями владеет сервер под управлением Windows Server 2008 R2 (Ent), ну что же буду мигрировать на текущий:
Текущий список всех контроллеров домена:
C:Windowssystem32>dsquery server -forest
«CN=SRV-DC,CN=Servers,CN=Default-First-Site-Name,CN=Sites,CN=Configuration,DC=polygon,DC=local»
«CN=SRV-AD,CN=Servers,CN=Default-First-Site-Name,CN=Sites,CN=Configuration,DC=polygon,DC=local»
Дальнейшие действия опираются на следующую заметку.
Важно добиться чтобы вывод команды netdom query fsmo показал что все роли у srv-ad.polygon.local. У меня уже первая ошибка (или не знаю как по другому выразится), при попытке смены владельца Schema появляется всплывающее сообщение вида:
Active Directory Schema snap-in is not connected to the schema operations master. You will not be able to perform any changes Schema modifications can only be made on the schema FSMO holder.
Изменив шаги на:
Win + X — Command Prompts (Admin)
C:Windowssystem32>ntdsutil
ntdsutil: roles
fsmo maintenance: connections
server connections: connect to server srv-ad.polygon.local
Binding to srv-ad.polygon.local …
Connected to srv-ad.polygon.local using credentials of locally logged on user.
server connections: quit
fsmo maintenance: seize RID Master
fsmo maintenance: seize PDC
fsmo maintenance: seize infrastructure master
fsmo maintenance: seize naming master
fsmo maintenance: seize schema master
C:Windowssystem32>netdom query fsmo
Schema master srv-ad.polygon.local
Domain naming master srv-ad.polygon.local
PDC srv-ad.polygon.local
RID pool manager srv-ad.polygon.local
Infrastructure master srv-ad.polygon.local
The command completed successfully.
Отлично все роли на новом сервере под управлением Windows Server 2012 R2 (Std), теперь удаляю контроллер домена под управлением Windows Server 2008 R2 из глобального каталога (Global Catalog):
Win + X — Control Panel — Administrative Tools — Active Directory Sites and Services —
Sites — Default-First-Site-Name — Server — разворачиваю и нахожу SRV-DC — затем открываю свойства (Properties) на NTDS Settings и внутри вкладки General снимаю галочку Global Catalog после чего нажимаю Apply , OK. Когда откроем оснастку Active Directory Users and Computer в организационном юните Domain Controllers будет видно, что сервер srv-dc больше не является глобальным каталогом:

Отлично, теперь ранее имевший место быть контроллер домена со всеми ролями по обслуживанию инфраструктуры можно деинсталлировать с помощью команды запущенной с правами администратора — dcpromo:
Start — All Programs — Accessories — Command Prompts (Run as Administrator) —
dcpromo, Next — отмечаю галочкой: Delete the domain because this server is the last domain controller in the domain, Next — Yes — указываю пароль на административный аккаунт указываемый при разворачивании домена:
Password: 712mbddr@
Confirm password: 712mbddr@
И нажимаю кнопку Next , Next но вот почему-то не все так просто как должно быть:
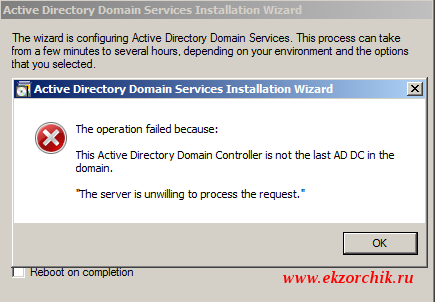
раз установщик не хочет по хорошему буду по плохому — удалю принудительно:
С:Windowssystem32dcpromo /forceremoval, Yes — Next — Next — указываю пароль на административный аккаунт указываемый при разворачивании домена:
Password: 712mbddr@
Confirm password: 712mbddr@
И нажимаю кнопку Next, — Next — отмечаю галочкой Reboot on competion и вот только после принудительно удаления контроллер домена удаляется без каких либо проблем:
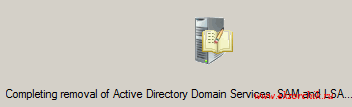
По окончании процедуры удаления нажимаем Finish — Restart Now.
Теперь нужно с мигрировать роль DHCP сервера с сервера srv-dc:
На srv-dc экспортирую настройки DHCP в файл:
Start — Control panels — Administrative Tools — DHCP — DHCP — srv-dc.polygon.local и через правый клик выбираю Backup… и указываю путь сохранения: c:1 — внутри сохраняется файл: DhcpCfg
копирую данный файл (каталог net и файл DhcpCfg) на srv-ad:
c:>xcopy c:1* \10.9.9.20c$1
но сперва поднять роль DHCP на srv-ad делать это лучше через мастер добавления ролей:
Win + X — Control Panel — Administrative Tools — Server Manager — и добавляю роль DHCP (и устанавливаю в довесок компоненты DHCP Server Tools. Почему в Microsoft ни как не могут сделать чтобы при добавлении/удалении ролей системы не нужно было перезагружать не понимаю. Перезагружаю, после запускаю оснастку DHCP:
Win + X — Control Panel — Administrative Tools — DHCP — DHCP — srv-ad.polygon.local и через правый клик мышью импортирую настройки DHCP взятые с ранее имевшего место быть сервера srv-dc.polygon.local — Restore — C:DhcpCfg
Следующим шагом проверяю какой функциональный уровень домена и леса через оснастку Active Directory Users and Computer — polygon.local — Properties и вижу не порядок (разве все это затевалось чтобы остаться как и было):
или же посмотреть текущий уровень домена можно через консоль командной строки PowerShell:
Win + X — Command Prompts (Admin) —
C:Windowssystem32>cd c:WindowsSystem32WindowsPowerShellv1.0
c:WindowsSystem32WindowsPowerShellv1.0>powershell.exe
Windows PowerShell
Copyright (C) 2013 Microsoft Corporation. All rights reserved.
c:WindowsSystem32WindowsPowerShellv1.0> import-module -name activedirectory
PS C:WindowsSystem32WindowsPowerShellv1.0> get-adforest | format-table name,
ForestMode
name ForestMode
—- ———-
polygon.local Windows2008R2Forest
PS C:WindowsSystem32WindowsPowerShellv1.0> exit
C:Windows>cd %systemroot%system32
Буду изменять:
через оснастку Active Directory Users and Computer — polygon.local — Raise domain functional level и опачки, мастер говорит что я не могу изменить функциональность домена потому что это домен включен в Active Directory Domain Controllers
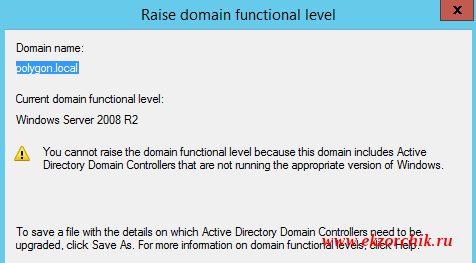
Ладно значит нужно удалить из текущего домена (За основу беру заметку по удалению неисправного контроллера домена:) все упоминания об ранее имевшем место быть srv-dc:
C:Windowssystem32>ntdsutil
ntdsutil: metadata cleanup
metadata cleanup: connections
server connections: connect to server srv-ad
Binding to srv-ad …
Connected to srv-ad using credentials of locally logged on user.
server connections: quit
metadata cleanup: select operation target
select operation target: list sites
Found 1 site(s)
0 — CN=Default-First-Site-Name,CN=Sites,CN=Configuration,DC=polygon,DC=local
select operation target: select site 0
Site — CN=Default-First-Site-Name,CN=Sites,CN=Configuration,DC=polygon,DC=local
No current domain
No current server
No current Naming Context
select operation target: list servers in site
Found 2 server(s)
0 — CN=SRV-DC,CN=Servers,CN=Default-First-Site-Name,CN=Sites,CN=Configuration,DC
=polygon,DC=local
1 — CN=SRV-AD,CN=Servers,CN=Default-First-Site-Name,CN=Sites,CN=Configuration,DC
=polygon,DC=local
select operation target: select server 0
Site — CN=Default-First-Site-Name,CN=Sites,CN=Configuration,DC=polygon,DC=local
No current domain
Server — CN=SRV-DC,CN=Servers,CN=Default-First-Site-Name,CN=Sites,CN=Configurati
on,DC=polygon,DC=local
DSA object — CN=NTDS Settings,CN=SRV-DC,CN=Servers,CN=Default-First-Site
-Name,CN=Sites,CN=Configuration,DC=polygon,DC=local
DNS host name — srv-dc.polygon.local
Computer object — CN=SRV-DC,OU=Domain Controllers,DC=polygon,DC=local
No current Naming Context
select operation target: list domains
Found 1 domain(s)
0 — DC=polygon,DC=local
select operation target: select domain 0
Site — CN=Default-First-Site-Name,CN=Sites,CN=Configuration,DC=polygon,DC=local
Domain — DC=polygon,DC=local
Server — CN=SRV-DC,CN=Servers,CN=Default-First-Site-Name,CN=Sites,CN=Configurati
on,DC=polygon,DC=local
DSA object — CN=NTDS Settings,CN=SRV-DC,CN=Servers,CN=Default-First-Site
-Name,CN=Sites,CN=Configuration,DC=polygon,DC=local
DNS host name — srv-dc.polygon.local
Computer object — CN=SRV-DC,OU=Domain Controllers,DC=polygon,DC=local
No current Naming Context
select operation target: quit
metadata cleanup: remove selected server
Transferring / Seizing FSMO roles off the selected server.
Removing FRS metadata for the selected server.
Searching for FRS members under «CN=SRV-DC,OU=Domain Controllers,DC=polygon,DC=local».
Deleting subtree under «CN=SRV-DC,OU=Domain Controllers,DC=polygon,DC=local».
The attempt to remove the FRS settings on CN=SRV-DC,CN=Servers,CN=Default-First-
Site-Name,CN=Sites,CN=Configuration,DC=polygon,DC=local failed because «Element not found.»;
metadata cleanup is continuing.
«CN=SRV-DC,CN=Servers,CN=Default-First-Site-Name,CN=Sites,CN=Configuration,DC=po
lygon,DC=local» removed from server «srv-ad»
metadata cleanup: quit
ntdsutil: quit
Удаляю хост srv-dc из оснастки Active Directory Sites and Services
Удаляю все записи в DNS относящиеся к хосту srv-dc
и вот только после этого появляется возможность изменить функциональный уровень текущего домен контроллера с Server 2008 R2 на более высокий:
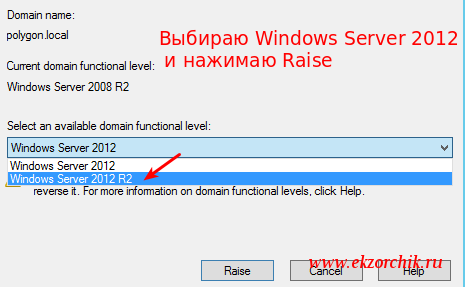
Active Directory Users and Computer — polygon.local — Raise domain functional level… — теперь доступны следующие уровни: Windows Server 2012 & Windows Server 2012 R2 — выбираю R2 и нажимаю Raise, OK, OK
И по такому же принципу изменяем функциональный уровень и для всего леса:
Active Directory Domains and Trusts — Active Directory Domains and Trusts [srv-ad.polygon.local] —
Raise Forest Functional Level… — Select an available forest functional level: сейчас установлено Windows Server 2012 изменяю на Windows Server 2012 R2 и нажимаю Raise, OK, OK. Изменения применяют сейчас, но все же это же Windows по возможности осуществите перезагрузку всего сервера: Win + X — Shut down or sign out — Restart — Continue — после перезагрузки проверяю какой функциональный уровень и вуаля и там и там значится Windows Server 2012 R2, а это новые возможности. Вот теперь я готов чтобы перевести все имеющее место быть собственно развернутое на самое последнее и стабильное. На этом я прощаюсь, с уважением автор блога — ekzorchik.
One of the best ways to secure your systems is to make sure that Active Directory (AD) domain controllers (DCs) are running an up-to-date version of Windows Server. DCs are critical infrastructure because they manage the security and access to all your IT resources. If a DC is compromised, then you should consider your entire network compromised. DCs are high-value targets for hackers and you should take all reasonable steps to protect them.
Many organizations are still running DCs on Windows Server 2012 R2. And while the OS is supported under Microsoft’s extended support until 10/10/2023, later versions of Windows Server are significantly more secure, offering features like built-in antimalware in the form of Windows Defender, Credential Guard to protect local and remote domain credentials on compromised servers, and many under-the-hood security enhancements that make newer versions of Windows more robust.
Table of Contents
- 1. Set up a new server using Windows Server 2019
- 2. Join the new server to your existing Active Directory domain
- 3. Install the Active Directory Domain Services role
- 4. Promote the new server to a domain controller
- 5. Move Flexible Single Master Operation (FSMO) roles to new server
- 6. Demote your old domain controller
- 7. Raise the domain and forest functional levels
It is often the case that organizations are licensed to upgrade to the latest version of Windows Server but don’t because they don’t want to touch their working infrastructure. But because of the nature of AD, it’s relatively easy to swap out an old domain controller for a new one. And without interrupting critical IT services.
In this article, I’m going to take you through the high-level steps for migrating a Windows Server 2012 R2 DC to Windows Server 2016 or Windows Server 2019. The procedure is the same, regardless of whether you choose Server 2016 or 2019. But I recommend migrating straight to Windows Server 2019. There simply isn’t a reason not to.
1. Set up a new server using Windows Server 2019
The first step is to install Windows Server 2019 on a new physical device or virtual machine. If you are more technically experienced with Windows Server, you could choose to install Server Core and then perform the necessary steps using PowerShell or by remotely connecting to the new server using Server Manager or Windows Admin Center. Otherwise, install Windows Server with the Desktop Experience role enabled.
If you are installing Windows Server 2016, you can check out Aidan Finn’s article on Petri here.
2. Join the new server to your existing Active Directory domain
Once the new server is up and running, join it to your existing AD domain. You can start the process from the Local Server tab in Server Manager by clicking WORKGROUP under the Properties. The procedure is then the same as joining Windows 10 to an AD domain. You will need to reboot the server to complete the process.
3. Install the Active Directory Domain Services role
Wait for the server to reboot and then sign in with a domain admin account. You can then install the Active Directory Domain Services (AD DS) server role using Server Manager and the Add Roles and Features wizard in the Manage menu. You can also use the following PowerShell command:
Install-WindowsFeature -Name AD-Domain-Services -IncludeManagementTools
4. Promote the new server to a domain controller
When the AD DS server role has been installed, you’ll get a notification in Server Manager prompting you to promote the server to a domain controller. Clicking the yellow exclamation mark icon will launch the AD DS configuration wizard. You should choose to ‘Add a domain controller to an existing domain’ and follow through the on-screen instructions. And providing that you are signed in with a domain admin account, adprep will automatically prepare your existing domain.
5. Move Flexible Single Master Operation (FSMO) roles to new server
The next step is to log on to the old domain controller and move the domain and forest FSMO roles, there are five in total, to the new DC. The easiest way to do this is using PowerShell. In the command below, you should replace DC1 with the name of your new DC.
This article assumes you have a domain with only one DC. In practice it’s likely that you will have more than one DC, so make sure you understand how FSMO roles work and on which DCs they are located in your domain and forest.
Move-ADDirectoryServerOperationMasterRole -Identity DC1 -OperationMasterRole 0,1,2,3,4
On the new domain controller, confirm that the FSMO roles have been moved. Start by checking the domain FSMO roles. Using Get-ADDomain, check the name of the server next to the following entries: InfrastructureMaster, PDCEmulator, and RIDMaster. The server name should match that of your new domain controller. Similarly, using Get-ADForest, check the name of the server next to the following entries: SchemaMaster and DomainNamingMaster. Again, the server name should match that of your new domain controller.
Image #1 Expand

6. Demote your old domain controller
Now that you have moved the FSMO roles to the new DC, you can safely demote the old Windows Server 2012 R2 domain controller. You can demote a DC using Server Manager. One way to demote a DC is to use the Remove Roles and Features command in the Manage menu to remove the AD DS server role. Removing the role will open the Active Directory Domain Services Configuration wizard and take you through the steps to demote the DC before the AD DS role can be removed.
Alternatively, you can use the Uninstall-ADDSDomainController and Uninstall-WindowsFeature PowerShell cmdlets to demote the DC and uninstall the AD DS server role respectively.
7. Raise the domain and forest functional levels
Finally, you can raise the domain and forest functional levels to Windows Server 2016. Even if you are running Windows Server 2019, the highest functional levels are Windows Server 2016. You can confirm the domain and forest levels using Get-ADDomain and Get-ADForest cmdlets.
Set-ADDomainMode -Identity CONTOSO -DomainMode Windows2016Domain
Set-ADForestMode -Identity CONTOSO Windows2016Forest
And that is it! As you can see, while there are several steps, it is relatively simple to migrate a DC to a more current version of Windows Server. So, I encourage you to look at migrating any DCs that are running anything below Windows Server 2016.
Categories
- Transfer Programs from C Drive to D Drive
- Transfer Installed Software to New PC
- Transfer Files from Old PC to New PC
- Transfer Microsoft Office
- Find Office Product Key
- Move User Folder
- Move Google Chrome Bookmarks
Target: Help all Windows Server users successfully migrate and transfer Active Directory (AD) to a new Server machine.
Supported OS: Windows Server 2022/2019/2016/2021 r2/2002/2008 r2/2008/2003, etc.
How Do I Migrate or Transfer Active Directory (AD) to Another Server
«Does anyone know how to transfer Active Directory to another Windows Server computer? For example, I purchased a new Windows Server 2022, and I want to move AD from my old Windows Server 2016 to Server 2022. How do I do it?»
Are you looking for a reliable way to migrate the Active Directory database from a Windows Server computer to a new Server machine? Relax, and don’t worry if you are a new Server manager. Here on this page, we’ll show you the complete procedure of successfully migrating AD from Server to Server. First, let’s see the details:
In this article, you’ll learn:
- What Is Active Directory and Why Need to Move It to a New Server
- Method 1. Backup Active Directory and Restore It to Another Server
- Method 2. Use Active Directory Migration Tool
Before migrating AD to a new Server, let’s see what Active Directory is and why it’s so important that Windows Server users want to transfer it from Server to Server.
What Is Active Directory and Why Need to Move It to a New Server
Active Directory stores information about objects on the network and makes this information easy for administrators and users to find and use. Active Directory uses a structured data store as the basics for a logical, hierarchical organization of directory information.
— By Microsoft Active Directory Overview
According to the above description, an Active Directory can be regarded as a database called AD, which connects users to network resources to accomplish their tasks. So what does Active Directory includes? Check this out:
- Information objects — shared resources such as servers, volumes, printers, network users, and computer accounts.
- A set of rules — schema defines the classes of objects and attributes contained in the Directory.
- A global catalog — information about every object in the Directory.
- A query and index mechanism — make sure objects, and their properties can be published and found by network users or applications.
- A replication service — distribute directory data across a network.
While switching Server computers, one of the key steps is to transfer Active Directory to a New Server. Here following, we’ve collected two methods that you can follow to successfully migrate the AD database to a new server on your own.
Both methods work to transfer Active Directory from one Server to another Server on Windows Server 2022/2019/2016/2012 r2/2012/2008 r2/2008/2003, etc.
Method 1. Backup Active Directory and Restore It to Another Server
- Tool: PowerShell
- Difficulty Level: high
Suppose you’ve got two Windows Server computers, and now you are about to transfer the active directory database from one Server to another Server computer. Here are the manual steps that you can follow:
Step 1. Introduce a new domain controller with the target Server to be the new FSMO role holder for the domain.
To migrate the FSMO role, you can refer to this post in the Microsoft community for help: Transfer FSMO Roles in Active Directory.
Step 2. Introduce new domain controllers to the forest root and domain tree levels.
Open PowerShell and type the following two command lines and hit Enter each time:
- hostname
- netdom query fsmo
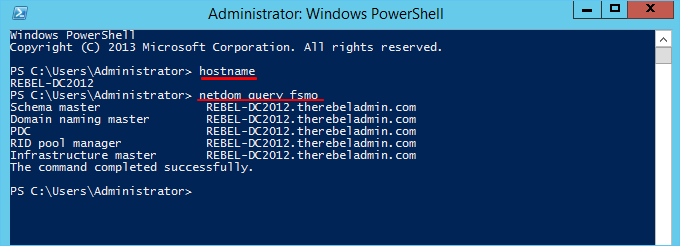
Step 3. Login into the target Server computer as a member of the local administrator group. And add Server to the existing domain as a member.
Step 4. Restart Windows Server and logo into the Server as Enterprise Administrator.
And assign the static IP address to the Server.
Step 5. Right-click the Windows icon and select «Windows PowerShell (Admin)».
Step 6. Type Install-WindowsFeature –Name AD-Domain-Services -IncludeManagementTools in PowerShell and hit enter.
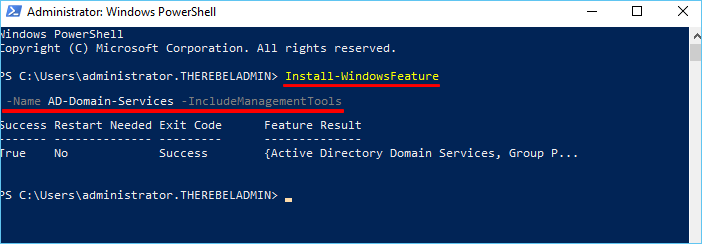
This will install the Active Directory Domain Service Role in the given Server.
Step 7. Type the following syntax command lines one by one and hit Enter each time in PowerShell. This will configure the new Server as an additional domain controller:
- Install-ADDSDomainController
- -CreateDnsDelegation:$false
- -InstallDns:$true
- -DomainName «rebeladmin.net»
- -SiteName «Default-First-Site-Name»
- -ReplicationSourceDC «DC08.rebeladmin.net»
- -DatabasePath «C:WindowsNTDS»
- -LogPath «C:WindowsNTDS»
- -SysvolPath «C:WindowsSYSVOL»
- -Force:$true
There are no line breaks for the command listed above. So what are the meanings of these syntax? Check this out:
| Syntax Content | Description |
|---|---|
| Install-ADDSDomainController | This cmdlet will install the domain controller in the active directory infrastructure. |
| -CreateDnsDelegation | Using this parameter can define whether to create DNS delegation that reference active directory integrated DNS. |
| -InstallDns | Using this can specify whether DNS role need to install with active directory domain controller. For new forest, it is default requirement to set it to $true. |
| -DomainName | This parameter defines the FQDN for the active directory domain. |
| -SiteName | This parameter can use to define the active directory site name. the default value is Default-First-Site-Name. |
| -ReplicationSourceDC | Using this parameter can define the active directory replication source. By default, it will use any available domain controller. But if need we can be specific. |
| -DatabasePath | This parameter will use to define the folder path to store active directory database file (Ntds.dit). |
| -LogPath | Log path can use to specify the location to save domain log files. |
| -SysvolPath | This is to define the SYSVOL folder path. The default location for it will be C:Windows |
| -Force | This parameter will force the command to execute by ignoring the warning. For example, it is typical for the system to pass the warning about best practices and recommendations. |
Step 8. Enter a new complex password if the command requests for SafeModeAdministrator Password.
After this, restart the Server system and log in as administrator.
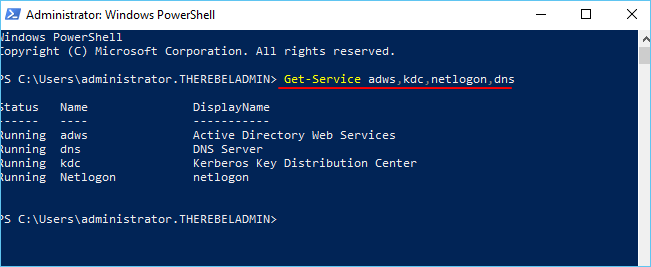
Step 9. Open PowerShell again, type Get-Service adws,kdc,netlogon,dns and hit Enter to check the AD DS status.
Step 10. Type Get-ADDomainController -Filter * | Format-Table Name, IPv4Address, Site in PowerShell, and hit Enter.
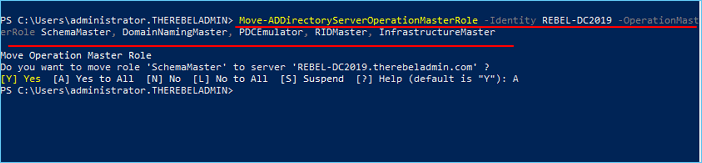
Step 11. Migrate all FSMO roles to the new domain controller by typing Move-ADDirectoryServerOperationMasterRole -Identity REBEL-DC2019 -OperationMasterRole SchemaMaster, DomainNamingMaster, PDCEmulator, RIDMaster, InfrastructureMaster in PowerShell and hit Enter.
Note: Replace REBEL_DC2019 with your new running Windows Server.
Step 12. Type Netdom query fsmo in PowerShell to verify the new FSMO role holder.
Step 13. Type Uninstall-ADDSDomainController -DemoteOperationMasterRole -RemoveApplicationPartition to decomission the old Windows domain controller.
Step 14. Type Set-ADDomainMode –identity therebeladmin.com -DomainMode Windows2016Domain in PowerShell and hit Enter to upgrade the functional domain levels.
Step 15. Type Set-ADForestMode -Identity therebeladmin.com -ForestMode Windows2016Forest in PowerShell and hit Enter to upgrade forest functional levels.
Wait for the process to complete. After this, the Server AD migration process completes. You can then verify if it completes successfully by typing the next two command lines in PowerShell and hitting Enter each time:
- Get-ADDomain | fl Name,DomainMode
- Get-ADForest | fl Name,ForestMode
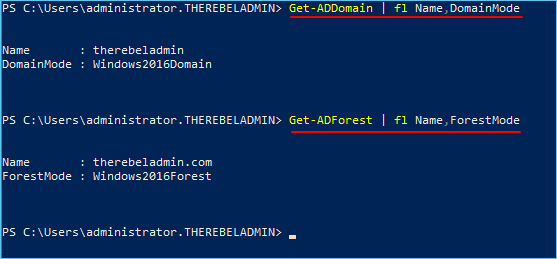
As shown above, if you see the result, you’ve successfully transferred Active Directory to a new Server machine.
Method 2. Use Active Directory Migration Tool
Aside from the above manual method, the other tool you can try is applying an Active Directory migration tool. EaseUS Todo PCTrans Technician with its PC to PC File Transfer feature can fulfill this task for you.
EaseUS Todo PCTrans Technician
- ☆ Deploy & install Todo PCTrans on multiple PCs.
- Transfer unlimited files, programs, apps between Servers.
- Transfer account, domain account, and settings.
- Data rescue, find product key of installed programs.
- One license for multiple PCs.
Here is the complete process that you can apply to migrate and transfer the Active Directory database from one Server to another Server with ease.
Note that you just need to select the AD database folder for file transferring between Server computers during the procedure.
Step 1. Open EaseUS Todo PCTrans on both of your server computers. Choose «PC to PC» to go to the next step.

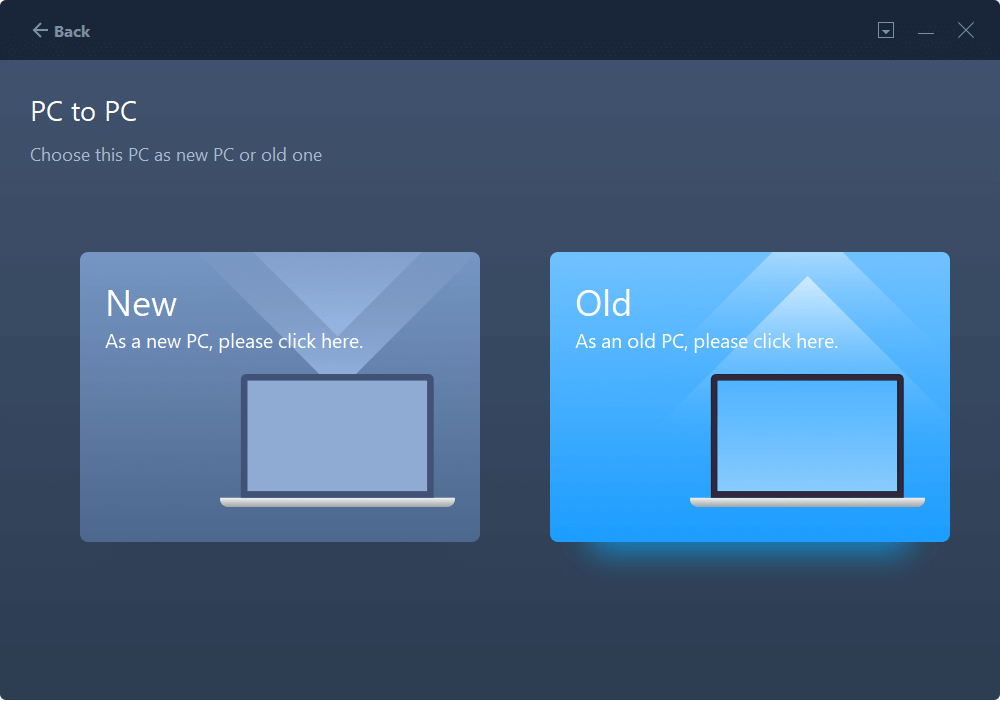
Step 2. Choose the transfer direction — New PC or Old PC.
«New» — Transfer files from old Server to current new Server.
«Old» — Transfer files from current old Server to a new Server.

Step 3. Connect the current PC to the target PC by entering the target computer’s account password or its verification code. You can turn on the «Connection Verification»on the right top of the «PC to PC» mainscreen on the target computer.

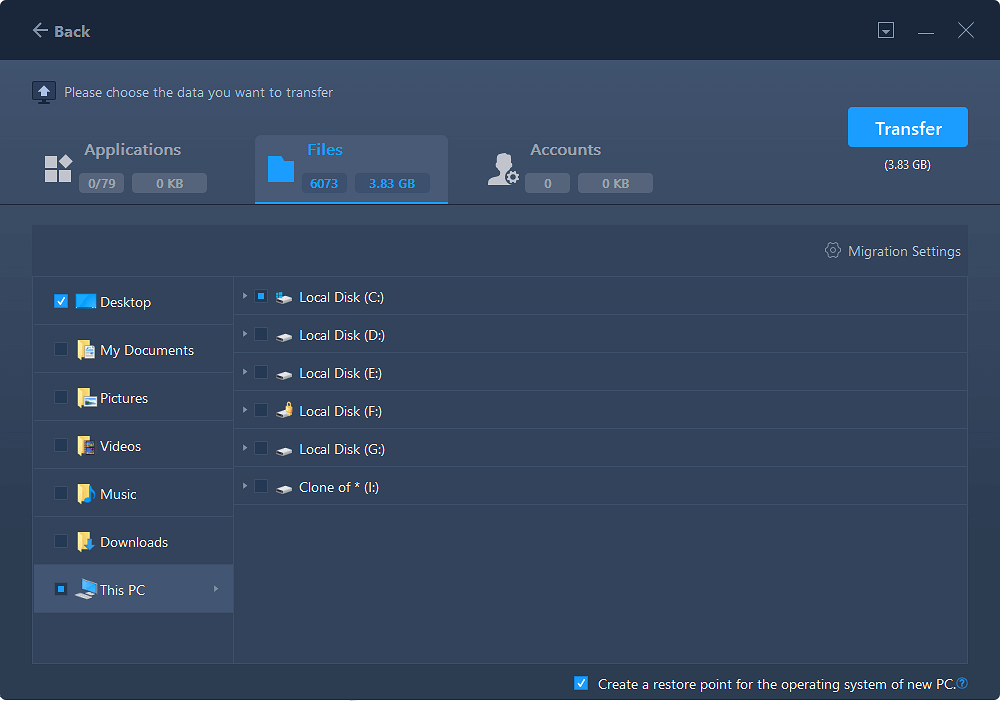
Step 4. Click «Files» > «Transfer» to check all the files you want to transfer to another Server computer. Then click «Transfer» to migrate specific data you have chosen.
Step 5. Wait for the process finishes. PCTrans will transfer files at a fast speed. It won’t take too long.

Once done, you can then reboot the target Windows Server computer and log in as administrator.
Bonus Tips for Server to Server Migration
Aside from transferring Active Directory from one Server to another Server, you may still have much other content that needs to be moved, for example, user data, user accounts, domain accounts and settings, applications, etc.,
How do you completely transfer Sever data to another Server? Check this out:
#1. Transfer User Data and Accounts to New Server
EaseUS Todo PCTrans, with its account settings transfer feature, can help you fully migrate user data and accounts to a new Server in simple clicks.
Step 1. Install and launch EaseUS Todo PCTrans on both two devices. On the source PC, select «PC to PC» to continue.
Step 2. Select the transfer direction — as an Old PC or a New PC.
Make sure the two PCs are on the same LAN. Connect to the target PC via its IP address or adding it manually. Enter the login account and password of the target PC and link two PCs by clicking «Connect».
Step 3. Click at the «Accounts» section to specify User Accounts and Settings for transferring.

Step 4. Enter the user account and password of the source computer, select the User Account Settings, User Data and other settings that you want to transfer.
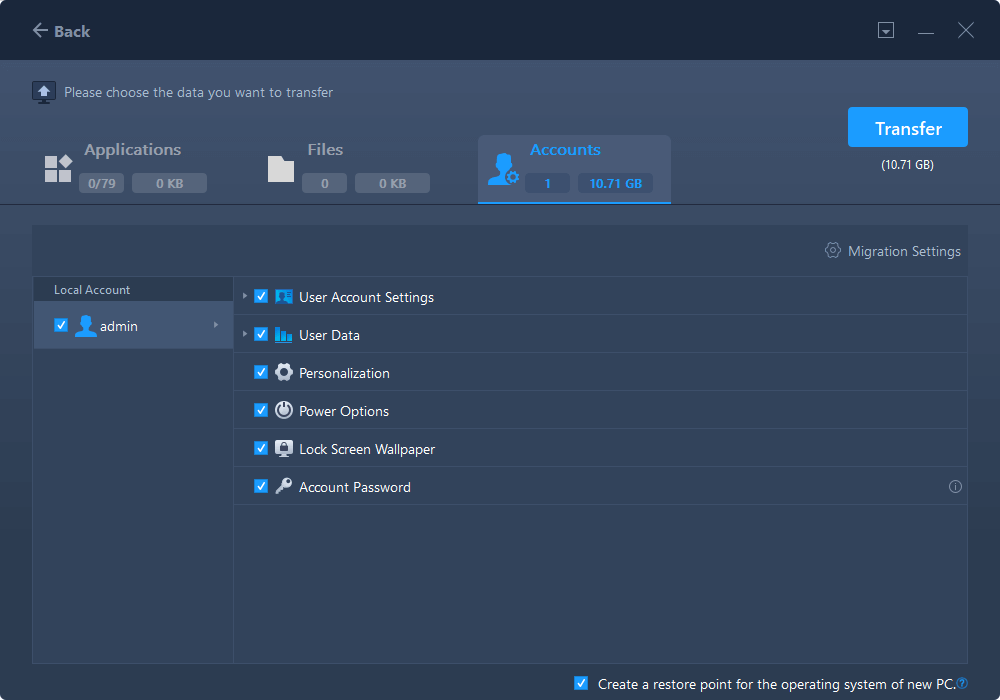
Step 5. After selection, click «Transfer» to start to transfer user accounts and settings.
#2. Migrate Essential Applications to New Server
Aside from Server data, files, and accounts, you may also want to move some essential applications to a new Server, for example, the Windows Server Manager, SQL installer, Exchange, Quickbooks, Office, Adobe, etc.
You can simply manage this task and accomplish it on your own with the help of reliable Windows Server file transfer software. Here is how to do so:
Step 1. Run EaseUS Todo PCTrans on both PCs
On the source PC, select «PC to PC» on the main screen of EaseUS Todo PCTrans and move on.
Step 2. Choose transfer direction — Old or New Computer
«New» — Transfer all data from remote old computer to current new computer.
«Old» — Transfer all data from current old device to a new computer.
Step 3. Connect two computers
1. Select your target PC to connect via its IP address or device name and click «Connect».
2. Enter the login password of your target PC and click «OK» to confirm.
If you didn’t see the target PC in the listed devices, you can also click «Add PC» to manually connect the target PC by inputting its IP address or device name.
Step 4. Select apps, programs, and software and transfer to the target computer
1. You can select and choose what you want to transfer from the current computer to the target PC.
2. After selecting desired applications and programs, click «Transfer» to start the transferring process.
Moving AD from Server to a New Server Is Complex, Be Careful and Patient
This tutorial page tells what Active Directory is and why it is so important for Server administrators to migrate AD to a new Server.
We also introduced two methods that help to successfully migrate Active Directory to a new Server on Windows Server 2022/2019/2016/2012/2008/2003, etc.
Note that the procedure is a bit complex. So be sure that you are careful and patient while typing the command lines in PowerShell to execute the task.
Categories
- Transfer Programs from C Drive to D Drive
- Transfer Installed Software to New PC
- Transfer Files from Old PC to New PC
- Transfer Microsoft Office
- Find Office Product Key
- Move User Folder
- Move Google Chrome Bookmarks
Target: Help all Windows Server users successfully migrate and transfer Active Directory (AD) to a new Server machine.
Supported OS: Windows Server 2022/2019/2016/2021 r2/2002/2008 r2/2008/2003, etc.
How Do I Migrate or Transfer Active Directory (AD) to Another Server
«Does anyone know how to transfer Active Directory to another Windows Server computer? For example, I purchased a new Windows Server 2022, and I want to move AD from my old Windows Server 2016 to Server 2022. How do I do it?»
Are you looking for a reliable way to migrate the Active Directory database from a Windows Server computer to a new Server machine? Relax, and don’t worry if you are a new Server manager. Here on this page, we’ll show you the complete procedure of successfully migrating AD from Server to Server. First, let’s see the details:
In this article, you’ll learn:
- What Is Active Directory and Why Need to Move It to a New Server
- Method 1. Backup Active Directory and Restore It to Another Server
- Method 2. Use Active Directory Migration Tool
Before migrating AD to a new Server, let’s see what Active Directory is and why it’s so important that Windows Server users want to transfer it from Server to Server.
What Is Active Directory and Why Need to Move It to a New Server
Active Directory stores information about objects on the network and makes this information easy for administrators and users to find and use. Active Directory uses a structured data store as the basics for a logical, hierarchical organization of directory information.
— By Microsoft Active Directory Overview
According to the above description, an Active Directory can be regarded as a database called AD, which connects users to network resources to accomplish their tasks. So what does Active Directory includes? Check this out:
- Information objects — shared resources such as servers, volumes, printers, network users, and computer accounts.
- A set of rules — schema defines the classes of objects and attributes contained in the Directory.
- A global catalog — information about every object in the Directory.
- A query and index mechanism — make sure objects, and their properties can be published and found by network users or applications.
- A replication service — distribute directory data across a network.
While switching Server computers, one of the key steps is to transfer Active Directory to a New Server. Here following, we’ve collected two methods that you can follow to successfully migrate the AD database to a new server on your own.
Both methods work to transfer Active Directory from one Server to another Server on Windows Server 2022/2019/2016/2012 r2/2012/2008 r2/2008/2003, etc.
Method 1. Backup Active Directory and Restore It to Another Server
- Tool: PowerShell
- Difficulty Level: high
Suppose you’ve got two Windows Server computers, and now you are about to transfer the active directory database from one Server to another Server computer. Here are the manual steps that you can follow:
Step 1. Introduce a new domain controller with the target Server to be the new FSMO role holder for the domain.
To migrate the FSMO role, you can refer to this post in the Microsoft community for help: Transfer FSMO Roles in Active Directory.
Step 2. Introduce new domain controllers to the forest root and domain tree levels.
Open PowerShell and type the following two command lines and hit Enter each time:
- hostname
- netdom query fsmo
Step 3. Login into the target Server computer as a member of the local administrator group. And add Server to the existing domain as a member.
Step 4. Restart Windows Server and logo into the Server as Enterprise Administrator.
And assign the static IP address to the Server.
Step 5. Right-click the Windows icon and select «Windows PowerShell (Admin)».
Step 6. Type Install-WindowsFeature –Name AD-Domain-Services -IncludeManagementTools in PowerShell and hit enter.
This will install the Active Directory Domain Service Role in the given Server.
Step 7. Type the following syntax command lines one by one and hit Enter each time in PowerShell. This will configure the new Server as an additional domain controller:
- Install-ADDSDomainController
- -CreateDnsDelegation:$false
- -InstallDns:$true
- -DomainName «rebeladmin.net»
- -SiteName «Default-First-Site-Name»
- -ReplicationSourceDC «DC08.rebeladmin.net»
- -DatabasePath «C:WindowsNTDS»
- -LogPath «C:WindowsNTDS»
- -SysvolPath «C:WindowsSYSVOL»
- -Force:$true
There are no line breaks for the command listed above. So what are the meanings of these syntax? Check this out:
| Syntax Content | Description |
|---|---|
| Install-ADDSDomainController | This cmdlet will install the domain controller in the active directory infrastructure. |
| -CreateDnsDelegation | Using this parameter can define whether to create DNS delegation that reference active directory integrated DNS. |
| -InstallDns | Using this can specify whether DNS role need to install with active directory domain controller. For new forest, it is default requirement to set it to $true. |
| -DomainName | This parameter defines the FQDN for the active directory domain. |
| -SiteName | This parameter can use to define the active directory site name. the default value is Default-First-Site-Name. |
| -ReplicationSourceDC | Using this parameter can define the active directory replication source. By default, it will use any available domain controller. But if need we can be specific. |
| -DatabasePath | This parameter will use to define the folder path to store active directory database file (Ntds.dit). |
| -LogPath | Log path can use to specify the location to save domain log files. |
| -SysvolPath | This is to define the SYSVOL folder path. The default location for it will be C:Windows |
| -Force | This parameter will force the command to execute by ignoring the warning. For example, it is typical for the system to pass the warning about best practices and recommendations. |
Step 8. Enter a new complex password if the command requests for SafeModeAdministrator Password.
After this, restart the Server system and log in as administrator.
Step 9. Open PowerShell again, type Get-Service adws,kdc,netlogon,dns and hit Enter to check the AD DS status.
Step 10. Type Get-ADDomainController -Filter * | Format-Table Name, IPv4Address, Site in PowerShell, and hit Enter.
Step 11. Migrate all FSMO roles to the new domain controller by typing Move-ADDirectoryServerOperationMasterRole -Identity REBEL-DC2019 -OperationMasterRole SchemaMaster, DomainNamingMaster, PDCEmulator, RIDMaster, InfrastructureMaster in PowerShell and hit Enter.
Note: Replace REBEL_DC2019 with your new running Windows Server.
Step 12. Type Netdom query fsmo in PowerShell to verify the new FSMO role holder.
Step 13. Type Uninstall-ADDSDomainController -DemoteOperationMasterRole -RemoveApplicationPartition to decomission the old Windows domain controller.
Step 14. Type Set-ADDomainMode –identity therebeladmin.com -DomainMode Windows2016Domain in PowerShell and hit Enter to upgrade the functional domain levels.
Step 15. Type Set-ADForestMode -Identity therebeladmin.com -ForestMode Windows2016Forest in PowerShell and hit Enter to upgrade forest functional levels.
Wait for the process to complete. After this, the Server AD migration process completes. You can then verify if it completes successfully by typing the next two command lines in PowerShell and hitting Enter each time:
- Get-ADDomain | fl Name,DomainMode
- Get-ADForest | fl Name,ForestMode
As shown above, if you see the result, you’ve successfully transferred Active Directory to a new Server machine.
Method 2. Use Active Directory Migration Tool
Aside from the above manual method, the other tool you can try is applying an Active Directory migration tool. EaseUS Todo PCTrans Technician with its PC to PC File Transfer feature can fulfill this task for you.
EaseUS Todo PCTrans Technician
- ☆ Deploy & install Todo PCTrans on multiple PCs.
- Transfer unlimited files, programs, apps between Servers.
- Transfer account, domain account, and settings.
- Data rescue, find product key of installed programs.
- One license for multiple PCs.
Here is the complete process that you can apply to migrate and transfer the Active Directory database from one Server to another Server with ease.
Note that you just need to select the AD database folder for file transferring between Server computers during the procedure.
Step 1. Open EaseUS Todo PCTrans on both of your server computers. Choose «PC to PC» to go to the next step.
Step 2. Choose the transfer direction — New PC or Old PC.
«New» — Transfer files from old Server to current new Server.
«Old» — Transfer files from current old Server to a new Server.
Step 3. Connect the current PC to the target PC by entering the target computer’s account password or its verification code. You can turn on the «Connection Verification»on the right top of the «PC to PC» mainscreen on the target computer.
Step 4. Click «Files» > «Transfer» to check all the files you want to transfer to another Server computer. Then click «Transfer» to migrate specific data you have chosen.
Step 5. Wait for the process finishes. PCTrans will transfer files at a fast speed. It won’t take too long.
Once done, you can then reboot the target Windows Server computer and log in as administrator.
Bonus Tips for Server to Server Migration
Aside from transferring Active Directory from one Server to another Server, you may still have much other content that needs to be moved, for example, user data, user accounts, domain accounts and settings, applications, etc.,
How do you completely transfer Sever data to another Server? Check this out:
#1. Transfer User Data and Accounts to New Server
EaseUS Todo PCTrans, with its account settings transfer feature, can help you fully migrate user data and accounts to a new Server in simple clicks.
Step 1. Install and launch EaseUS Todo PCTrans on both two devices. On the source PC, select «PC to PC» to continue.
Step 2. Select the transfer direction — as an Old PC or a New PC.
Make sure the two PCs are on the same LAN. Connect to the target PC via its IP address or adding it manually. Enter the login account and password of the target PC and link two PCs by clicking «Connect».
Step 3. Click at the «Accounts» section to specify User Accounts and Settings for transferring.
Step 4. Enter the user account and password of the source computer, select the User Account Settings, User Data and other settings that you want to transfer.
Step 5. After selection, click «Transfer» to start to transfer user accounts and settings.
#2. Migrate Essential Applications to New Server
Aside from Server data, files, and accounts, you may also want to move some essential applications to a new Server, for example, the Windows Server Manager, SQL installer, Exchange, Quickbooks, Office, Adobe, etc.
You can simply manage this task and accomplish it on your own with the help of reliable Windows Server file transfer software. Here is how to do so:
Step 1. Run EaseUS Todo PCTrans on both PCs
On the source PC, select «PC to PC» on the main screen of EaseUS Todo PCTrans and move on.
Step 2. Choose transfer direction — Old or New Computer
«New» — Transfer all data from remote old computer to current new computer.
«Old» — Transfer all data from current old device to a new computer.
Step 3. Connect two computers
1. Select your target PC to connect via its IP address or device name and click «Connect».
2. Enter the login password of your target PC and click «OK» to confirm.
If you didn’t see the target PC in the listed devices, you can also click «Add PC» to manually connect the target PC by inputting its IP address or device name.
Step 4. Select apps, programs, and software and transfer to the target computer
1. You can select and choose what you want to transfer from the current computer to the target PC.
2. After selecting desired applications and programs, click «Transfer» to start the transferring process.
Moving AD from Server to a New Server Is Complex, Be Careful and Patient
This tutorial page tells what Active Directory is and why it is so important for Server administrators to migrate AD to a new Server.
We also introduced two methods that help to successfully migrate Active Directory to a new Server on Windows Server 2022/2019/2016/2012/2008/2003, etc.
Note that the procedure is a bit complex. So be sure that you are careful and patient while typing the command lines in PowerShell to execute the task.
Хочу рассказать о том, как я обновлял главный контроллер домена (PDC) с Windows Server 2008 R2 на Windows Server 2012 R2. Матерым тру админам статья скорее всего не пригодится. Тут будут описаны очевидные им вещи. Однако, для простых эникейщиков эта заметка (слишком мала для статьи) вполне может быть полезна.
В моем распоряжении небольшая сеть. Развернут домен и всего 1 контроллер домена на базе Windows Server 2008 R2. Цель — обновить контроллер домена так, чтобы домен не вышел из стоя. В качестве рабочей машины у меня используется Windows 8.1. Это важно, потому что начиная с Windows 8 в клиентские версии операционных систем стали добавлять Hyper-V.
Общий план моих действий был примерно такой:
- Создаем виртуальную машину и устанавливает на нее Windows Server 2012 R2.
- Добавляем его в домен.
- Добавляем серверу роль AD DS.
- Делаем его масретом инфраструктуры, PDC, мастером RID, мастером схемы и мастером имен.
- Удаляем с обновляемого сервера роль AD DS и все другие роли, которые реплицируются между контроллерами домена.
- Выводим обновляемый сервер из домена вообще.
- Устанавливаем (предварительно отформатировав диски) на нем Windows Server 2012 R2.
- Добавляем новому серверу роль AD DS.
- Делаем его масретом инфраструктуры, PDC, мастером RID, мастером схемы и мастером имен.
- Удаляем с виртуального сервера роль AD DS и все другие роли, которые реплицируются между контроллерами домена.
- Выводим виртуальный сервер из домана.
- Удаляем виртуальную машину.
Т.е. все очень просто. На момент пока реального сервера не будет в живых, его функции будет выполнять виртуальный сревер.
Узнать кто у нас кто в домене можно командой:
netdom query /domain:%userdomain% fsmo
Как переносить роли контроллеров домена:
Делается это с помощью команды ntdsutil. Запускать ее мы будем на %servername%, т.е. сервере, который хотим сделать самым главным.
После запуска утилиты вводим заклинания:
roles— будем управлять владельцами NTDS ролейconnections— будем подключаться к какой AD DSconnect to server %servername%— подключаемся к серверу %servername%.q— выходим из режима подключений?— смотрим что мы можем делатьtransfer infrastructure mastertransfer naming mastertransfer PDCtransfer RID mastertransfer schema master- выходим из утилиты набрав два раза
q.
Разумеется после того, как контроллер домена (уже обновленный) вернулся на свое место, на нем необходимо развернуть все те роли, что были развернуты раньше. Вы ведь не забыли сделать бекап?