Установка и настройка подчиненного центра сертификации Microsoft CA на MS Windows Server 2012 R2
При установке подчиненного центра сертификации будет считать, что домен
уже имеется, DNS-сервер и доменная служба Active Directory установлены.
Порядок установки будет следующим:
-
Установить подчиненный Центр сертификации уровня ЦС предприятия (со
службой сертификации и службой регистрации в центре сертификации через
Интернет) MS Windows Server 2012 R2, задать имя центра сертификации,
подразделение, организацию, город и страну для сертификата, отправить
запрос на сертификат в корневой центр сертификации. -
Установить сертификат корневого центра сертификации и актуальный
список отозванных сертификатов. - Настроить службу на автоматический выпуск сертификатов.
- Включить аудит работы службы, сделать настройки безопасности.
-
Добавить ссылки на точку распространения отозванных сертификатов и
корневого сертификата центра сертификации, которые будут добавляться в
каждый выпущенный сертификат. - Выпустить внеочередной список отозванных сертификатов.
Установка службы сертификации из состава MS Windows
Установка службы сертификации производится с использованием Мастера в следующей последовательности:
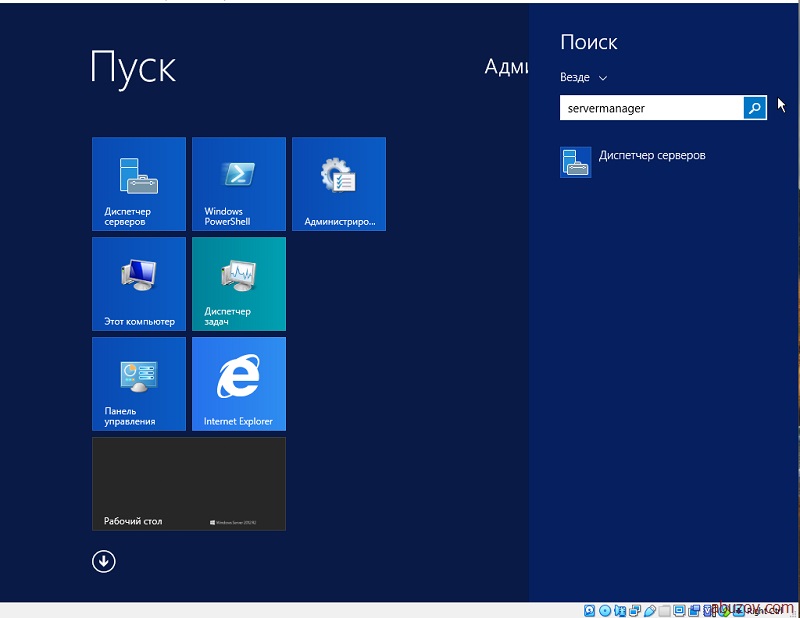
- Открыть окно Диспетчер серверов.
- В окне выбрать Добавить роли и компоненты.
-
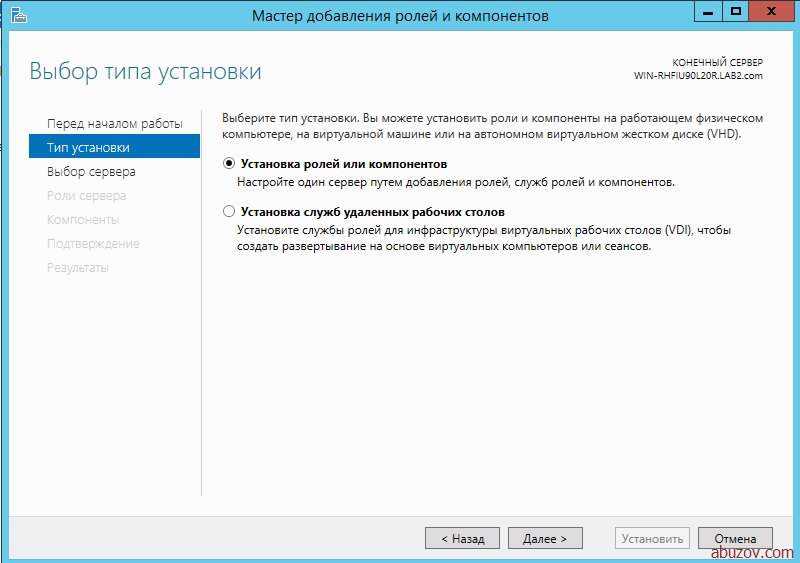
В окне Мастера добавления ролей и компонентов
оставить по умолчанию тип установки Установка ролей или компонентов. - В окне Выбор целевого сервера оставить все без изменения.
- Поставить флажок Служба регистрации в центре сертификации через Интернет.
- Нажмите Далее.
- После проверки выбранных параметров установки нажмите Установить.

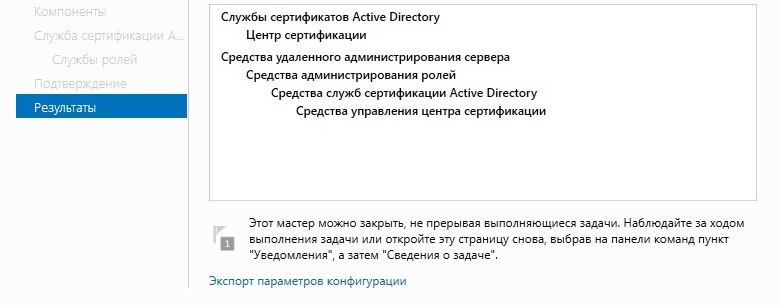
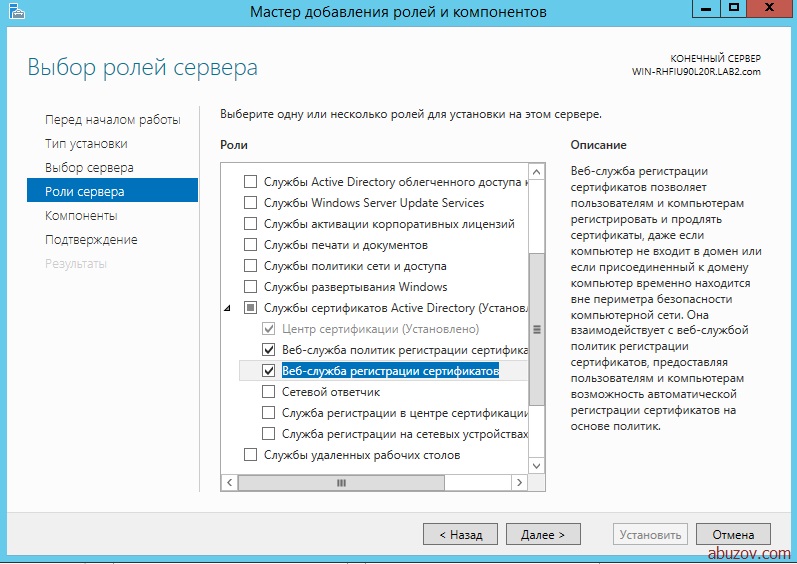
Далее выбрать роль сервера Службы сертификатов Active Directory. В Появившемся
окне оставить все по умолчанию и нажать кнопку Добавитькомпоненты.


За процессом установки можно наблюдать в окне Результаты.

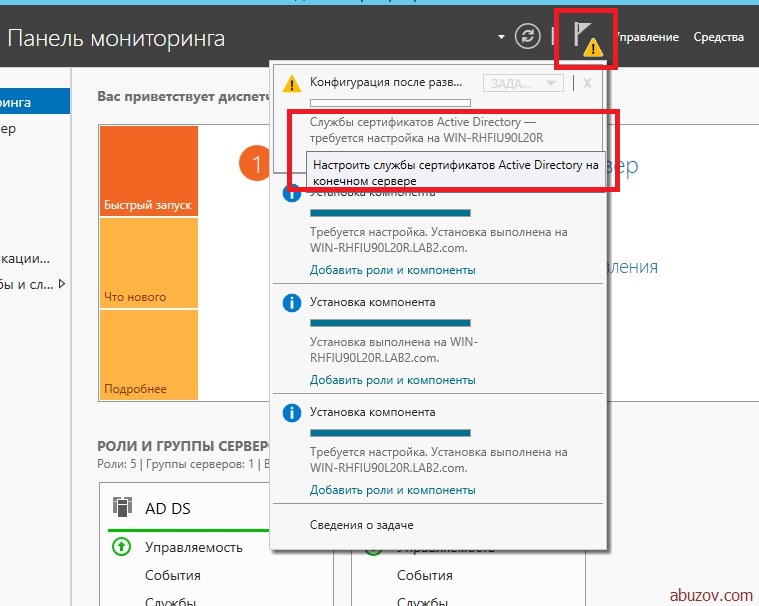
После установки службы сертификации необходимо ее настроить. Для этого
нажать Настроить службы сертификации Active Directory на конечном сервере.

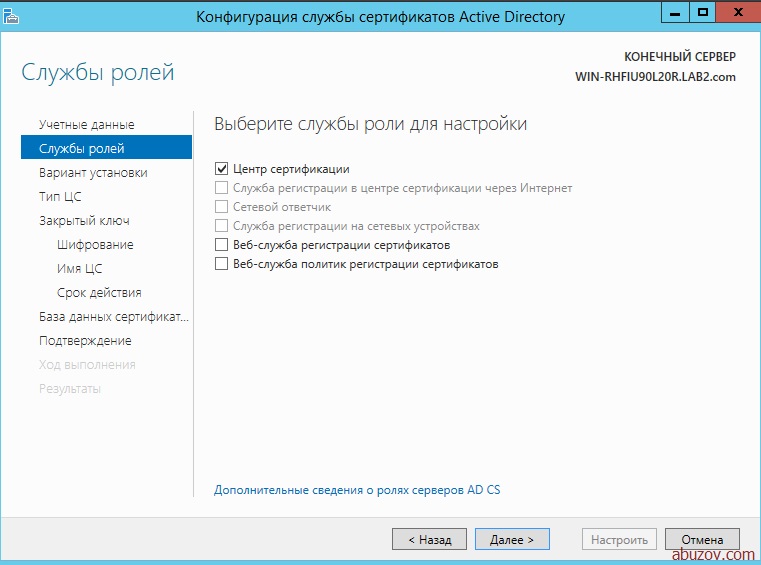
В окне учетные данные нажать Далее.

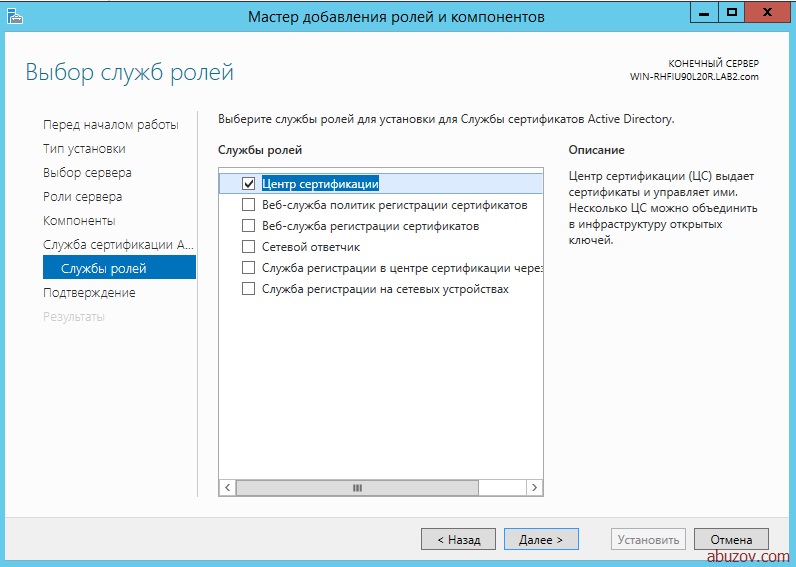
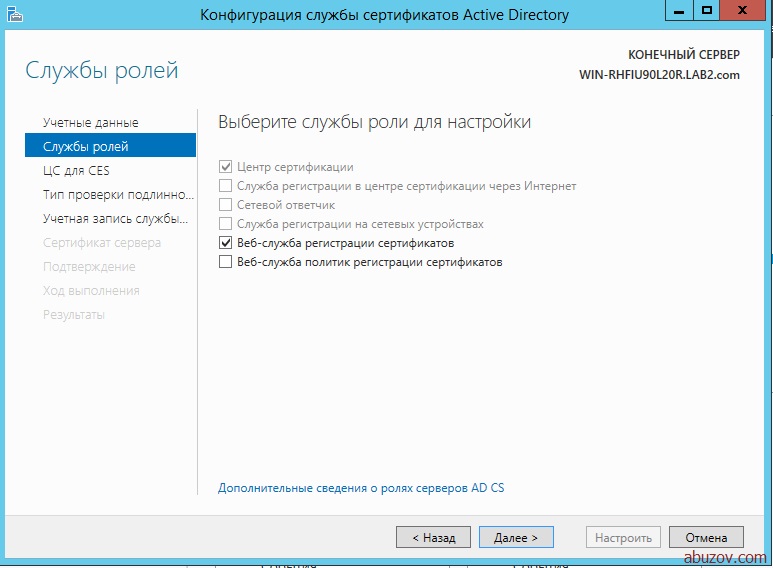
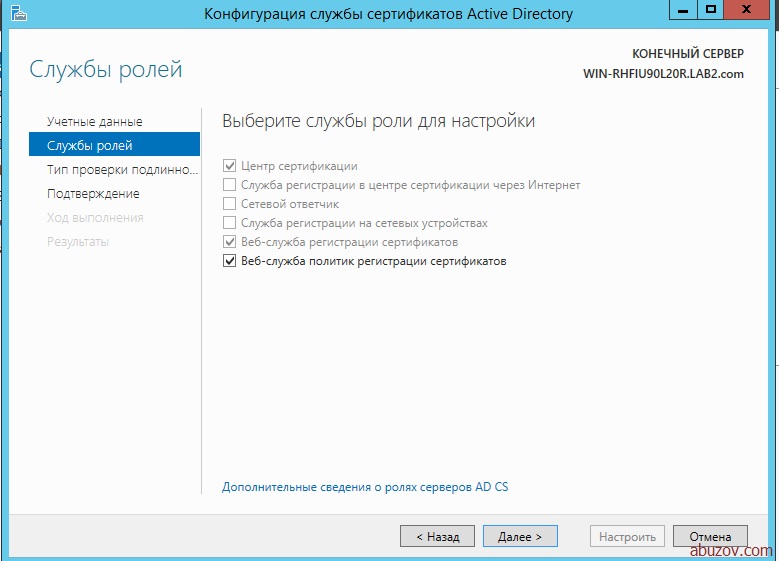
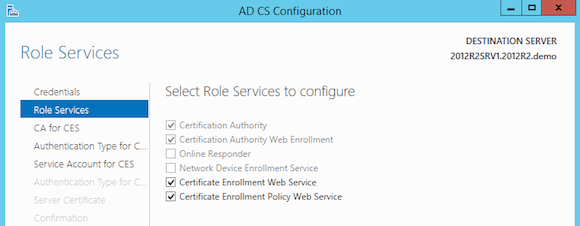
В окне выбора службы роли для настройки отметить флажками Центр сертификации и
Служба регистрации в центре сертификации через Интернет. Нажать кнопку Далее.

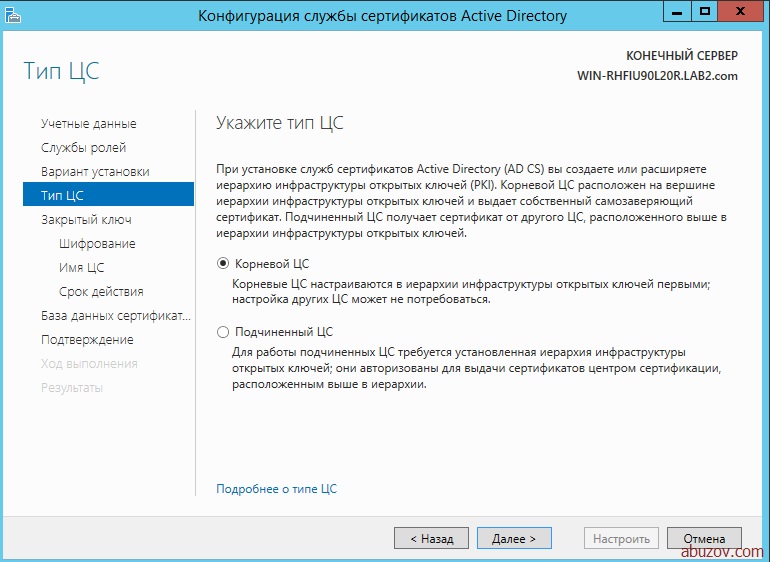
Далее следует выбрать ЦС предприятия.

Затем Подчиненный ЦС.

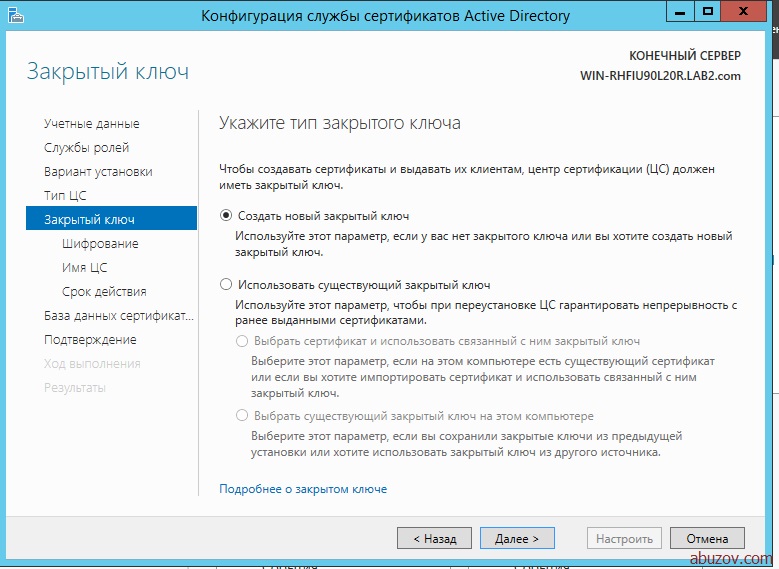
При создании нового ключа ЦС выбрать опцию Создать новый закрытый ключ.

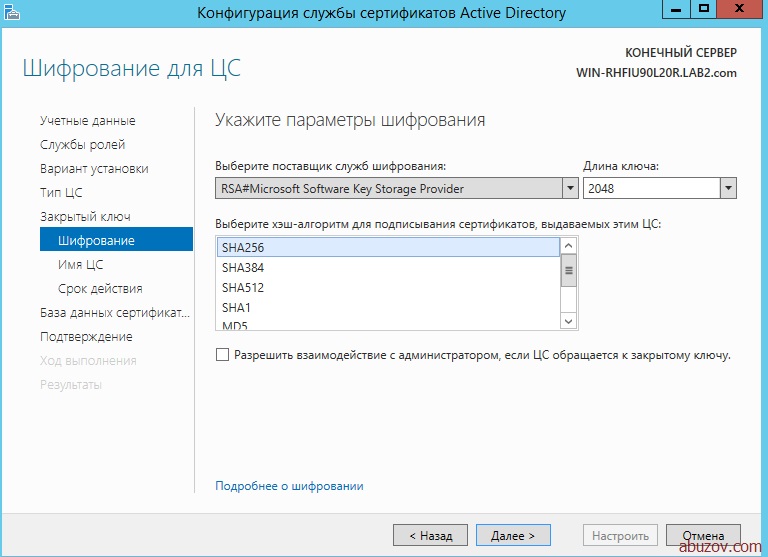
Далее следует выбрать криптопровайдер RSA#Microsoft Software Key Storage Provider и
установить опцию Разрешить взаимодействие с администратором, если центр сертификации
обращается к закрытому ключу.

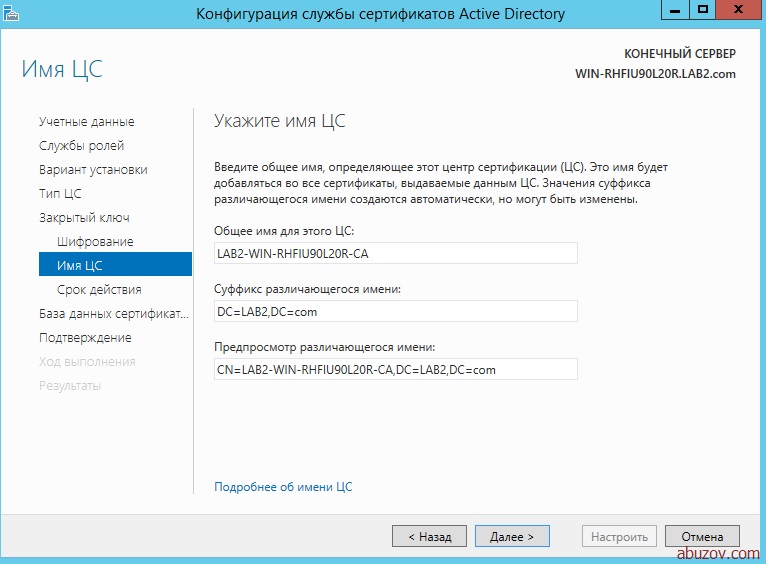
Далее ввести сведения о ЦС. Имя ЦС может быть введено
как кириллицей, так и латиницей. При этом если имя вводится кириллицей,
то его длина не должна превышать 50 символов.
Если Имя вводится латиницей, то его длина не должна превышать 250 символов.
Имя ЦС по умолчанию состоит из имени сервера и приставки CA.
Ввести сведения о Вашей организации в поле Суффикс различающегося имени, разделив значения
запятыми (после запятой пробел не ставить), по следующему примеру:
OU = название отдела
O = название организации
L = город местонахождения
C = RU
На сообщение о расширенной кодировке имен выбираем Да:

Сохранить запрос на сертификат в файл:

По окончанию появится окно с успешной установкой:

Файл запроса на сертификат будет сохранен в корне диска C:.
Установка сертификата корневого центра сертификации и актуального списка отозванных сертификатов
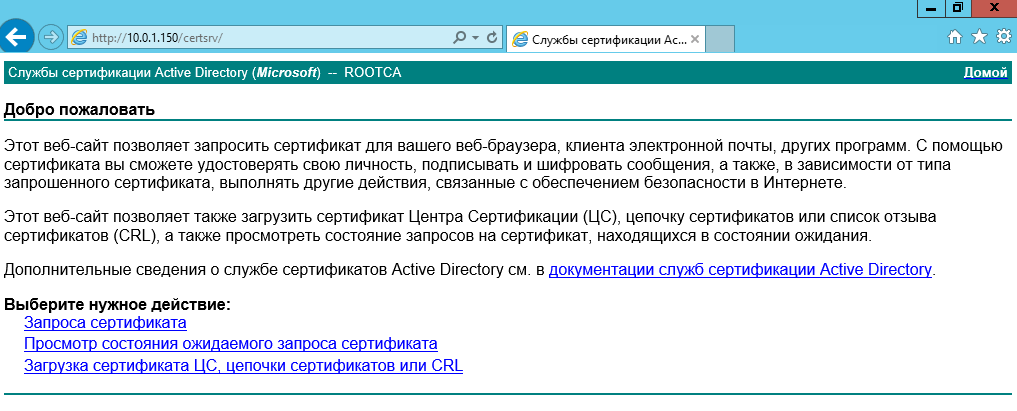
Вначале следует загрузить веб-сайт корневого центра сертификации.
Для этого запустить браузер, ввести в строку поиска адрес Вашего корневого центра
сертификации, например, по имени сервера:
https://«имя вашего корневого сервера»/certsrv.
Для изготовления сертификата выберите действие Запрос сертификата:
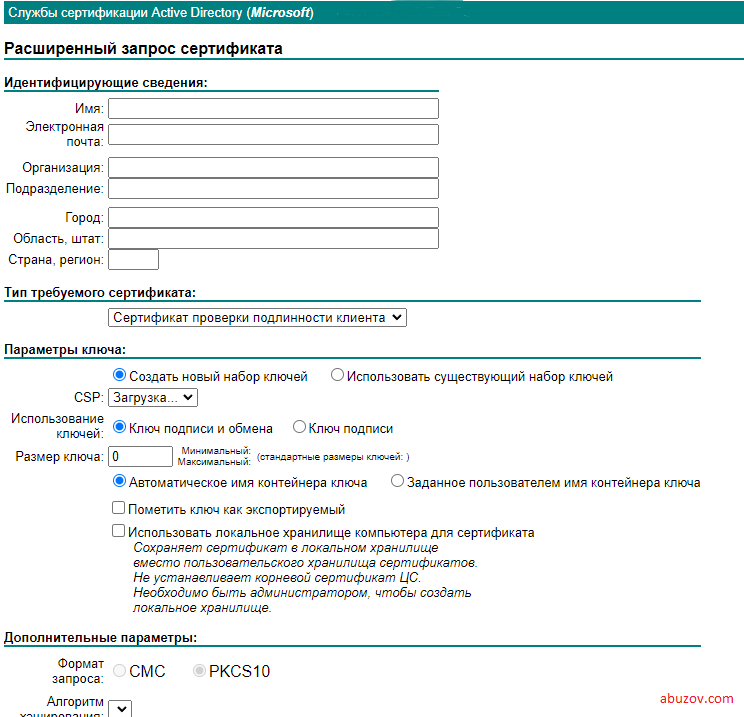
Выбрать Расширенный запрос сертификата, затем
Выдать запрос, используя base-64 шифрованный файл…:

Открыть файл с запросом на сертификат в Блокноте, выделить все
содержимое в файле (комбинация клавиш Ctrl+A) и скопировать в буфер
обмена (комбинация клавиш Ctrl+C):

Вставить содержимое буфера обмена (комбинация клавиш Ctrl+V) в окно
выдачи запроса на сертификат на веб-сайте корневого центра сертификации
и нажмите кнопку Выдать>:

В результате обработки запроса корневым центром сертификации будет
выдан сертификат, который нужно сохранить на подчиненном центре
сертификации, нажав на строку Загрузить сертификат:

Для запуска подчиненного центра сертификации необходимо встроить
цепочку доверия
к корневому центру сертификации, установив корневой
сертификат и актуальный список отозванных сертификатов. Для загрузки нужно
перейти на начальную страницу веб-сайта корневого центра сертификации,
нажав на ссылку Домой в верхнем правом углу сайта:

Нажать на строку Загрузка сертификата ЦС, цепочки сертификатов или CRL:

Скачать и сохранить на подчиненном центре сертификации сертификат ЦС и
актуальный список отозванных сертификатов, нажав по ссылкамЗагрузка сертификата ЦС
и Загрузка последнего базового CRL:

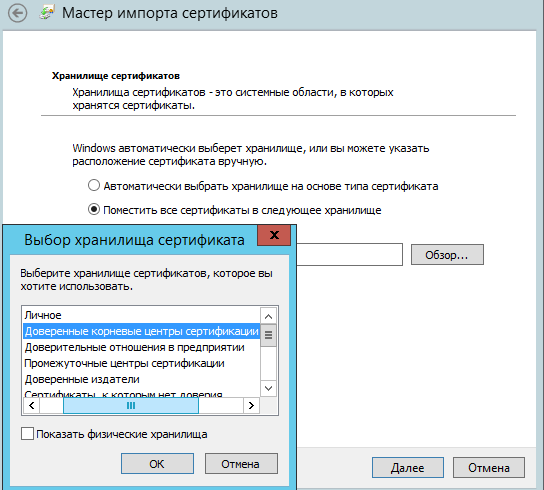
Установить корневой сертификат на сервер. Для этого кликнуть правой
кнопкой мыши на корневой сертификат, в появившемся контекстном меню
выбрать Установить сертификат. В мастере импорта
сертификатов выбрать хранилище – Локальный компьютер:


Выбрать хранилище вручную, установив переключатель на Поместить все сертификаты в следующее хранилище и
отметить в списке Доверенные корневые центры сертификации/Реестр:
При установке списка отозванных сертификатов выполнить аналогичные
действия, при этом в окне Выбор хранилища сертификата
установить флажок Показать физические хранилища, в
списке выделить Промежуточные центры сертификации/Локальный компьютер.
Запустить Центр сертификации ПускПриложенияЦентр сертификации:
Подчиненный центр сертификации еще не работает, т.к. сертификат для
него не установлен. Установка сертификата проводится при первом старте
службы. Нажать кнопку старта службы:

На запрос об установке сертификата нажать кнопку Да и
указать место, куда был сохранен выданный сертификат.
Если все действия были выполнены правильно, служба центра сертификации успешно запуститься.
Настройка подчиненного Центра сертификации
Чтобы просмотреть настройки Центра сертификации, нужно вызвать
контекстное меню и выбрать Свойства:

Настроить центр сертификации на выпуск сертификатов в автоматическом
режиме. Для этого перейти в закладку Модуль политики,
нажать кнопку Свойства. В открывшемся окне выбрать
режим Следовать параметрам, установленным в шаблоне….:


Перейти в закладку Модуль выхода. Нажать кнопку Свойства:

Установить (если не установлен) флажок Разрешить публикацию сертификатов в файловой системе:

Перейти в закладку Аудит. Включить протоколирование
некоторых событий безопасности, например, архивации и восстановления
базы данных, изменения настроек ЦС и параметров безопасности и т.д.:

Перейти в закладку Безопасность. Разрешить
Администратору запрашивать сертификаты. Установить флажок в графе Разрешить
для строки Запросить сертификаты:

Перейти в закладку Расширения. Выполнить настройку
публикации списка отозванных сертификатов. Для этого в меню Выберите расширение
выбрать Точка распространения списка отзыва (CDP) Удалить
точки распространения, кроме C:Windows….. Добавить
путь, например, https://servername/Public/servername.crl,
где servername – имя сервера, где будет настроено публичное хранилище:


Включить настройки Включать в CDP-расширение выданных сертификатов и
Включать в расширения IDP выданных CRL. Перезапустить Центр сертификации:

В дополнение к CDP, необходимо сконфигурировать дополнение включающее
информацию о локализации сертификата ЦС AIA. Для этого в поле Выберите
расширение перейти к Authority Information Access (AIA). Удалить доступы к
сведениям о центрах сертификации, кроме C:Windows…..
Добавить путь, например, https://servername/Public/servername.cer, где
servername – имя сервера, где будет настроено публичное хранилище.
Включить настройки Включать в AIA- расширение выданных сертификатов.
Перезапустить Центр сертификации:


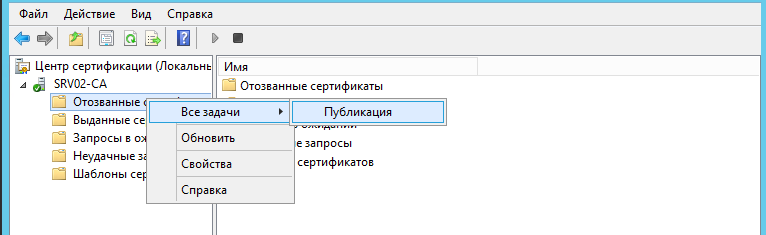
Поскольку значения дополнений CDP и AIA изменены, то для учета изменений
необходимо выпустить и опубликовать CRL. Для публикации CRL необходимо в
дереве консоли Центра сертификации нажать правой кнопкой мыши на узел
Отозванные сертификаты. В появившемся меню выбрать
Все задачи — Публикация:

По умолчанию списки отозванных сертификатов размещены в папке
C:WindowsSystem32CertsrvCertEnroll
")
![]()
В этой статье я подробно расскажу о процессе установки и настройки Active Directory Certificate Services.
Служба сертификации Active Directory создает центр сертификации, предназначенный для выдачи сертификатов пользователям. Служба может быть настроена и работать через веб-интерфейс.
В примере я разбираю Active Directory Certificate Services на операционной системе Windows Server 2012.
Первым делом нам нужно установить службу сертификации Active Directory.
Для этого нужно запустить диспетчер сервера.
Далее жмем «Добавить роли и компоненты». Кнопка далее.
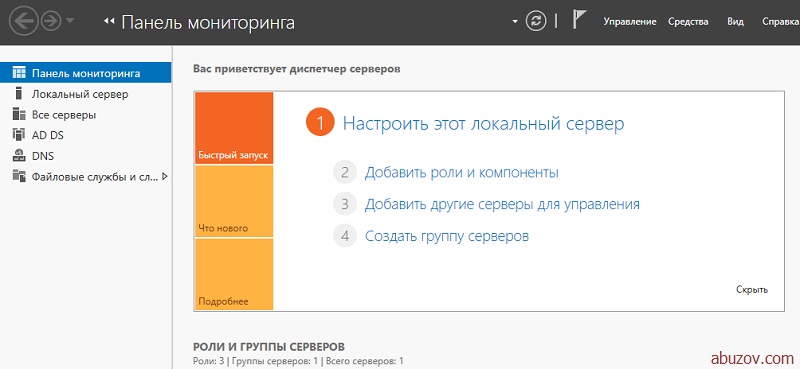
Выбираем пункт установка ролей или компонентов, а затем выбираем наш сервер.
В следующем окне выбираем пункт службы сертификатов Active Directory.
В окне выбора компонентов жмем далее.
В окне служба ролей выбираем пункт центр сертификации.
Запускаем процесс установки.
После этого по аналогии устанавливаем веб-службу регистрации сертификатов.
Установка завершена. Перейдем к настройке.
Настройка службы сертификатов Active Directory
Заходим в настройки.
Выбираем службу центр сертификации.
Вариант установки – центр сертификации предприятия.

Тип центра сертификации – корневой. Это необходимо для того, что бы в дальнейшем мы могли самостоятельно выдавать и подписывать сертификаты.
В следующем окне нужно выбрать пункт создать новый закрытый ключ.
Затем необходимо указать параметры шифрования. Вы можете указать свои параметры, или параметры как у меня на рисунке ниже.
В следующем окне указывается имя центра шифрования.
Затем указывается срок действия центра сертификации. По умолчанию он равен 5 годам. Так и оставим.
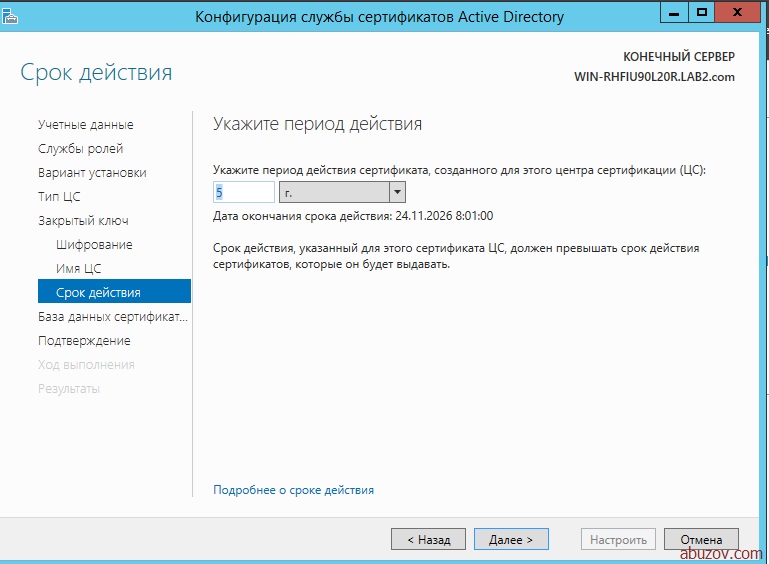
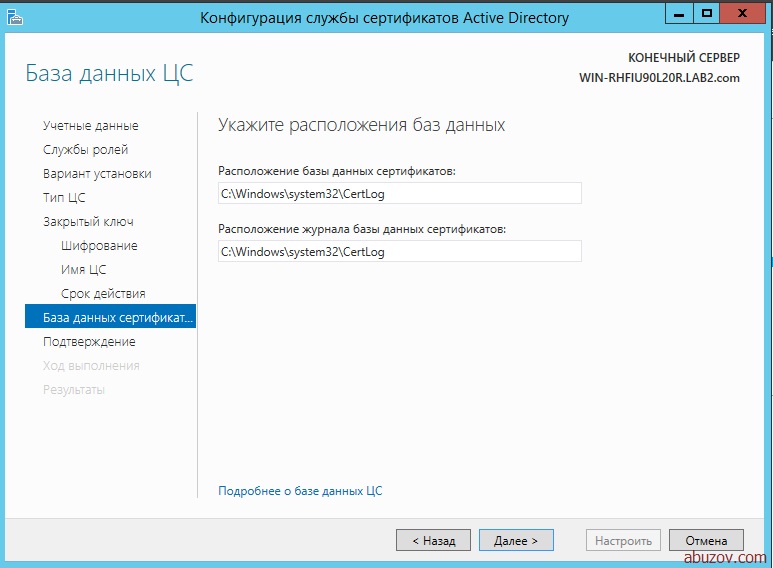
После нажатия кнопки далее вам нужно будет указать физическое место на жестком диске для хранения базы данных.
Подтверждаем настройку.

Перейдем к настройке web-службы регистрации сертификатов.
Настройка web-службы регистрации сертификатов
В окне указать центр сертификации для веб-службы регистрации сертификатов выбираем пункт «Имя ЦС».
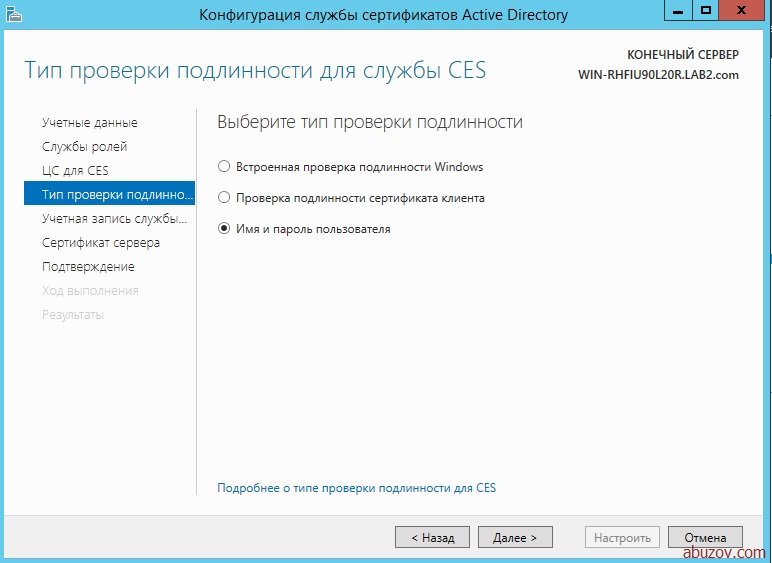
Тип проверки подлинности – имя пользователя и пароль.
Учетная запись службы CES – использовать встроенное удостоверение пула приложений.
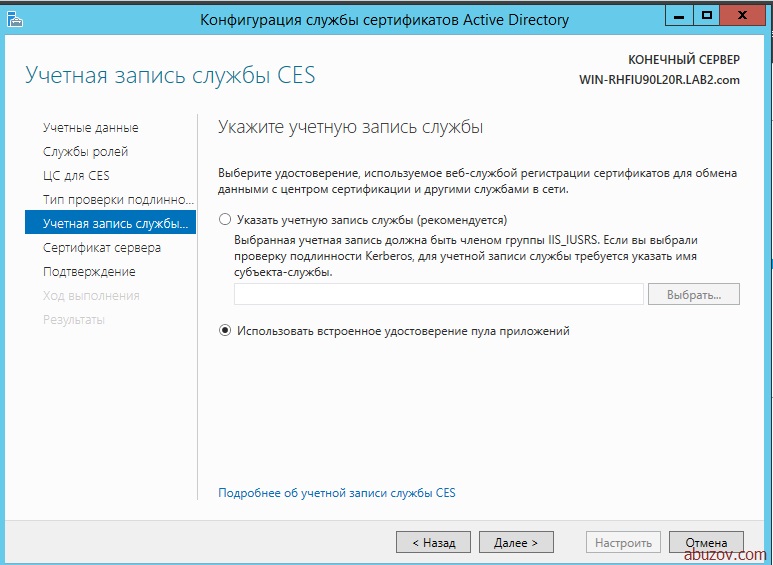
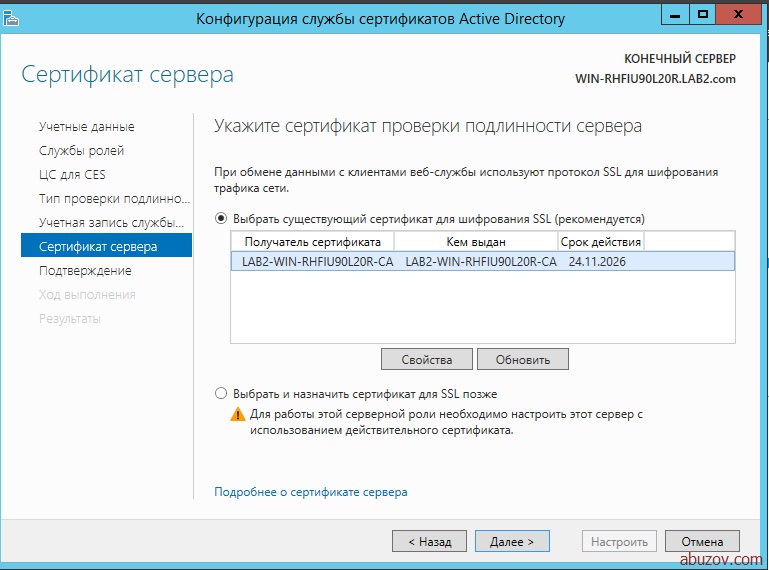
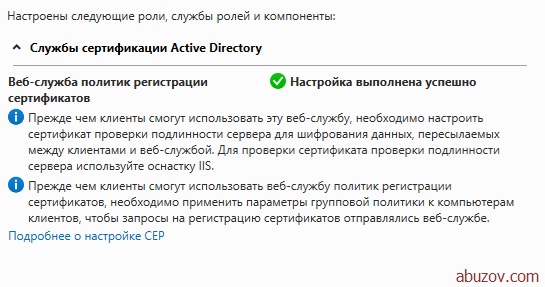
В окне выбора сертификата проверки подлинности сервера выберите существующий сертификат, затем нажмите кнопку настроить.
Настройка выполнена.

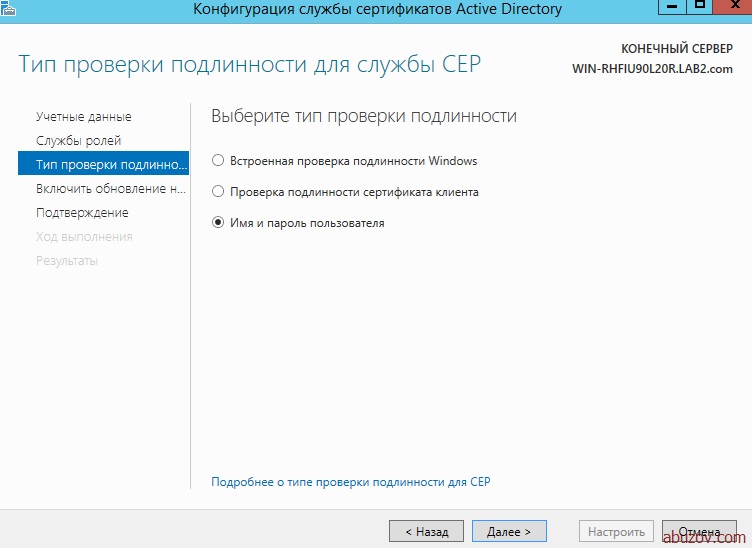
Выберите тип проверки подлинности – имя и пароль пользователя.
Включите режим обновления на останове ключей. Этот режим позволяет автоматически обновлять сертификаты ключей для компьютеров, которые не подключены к внутренней сети.
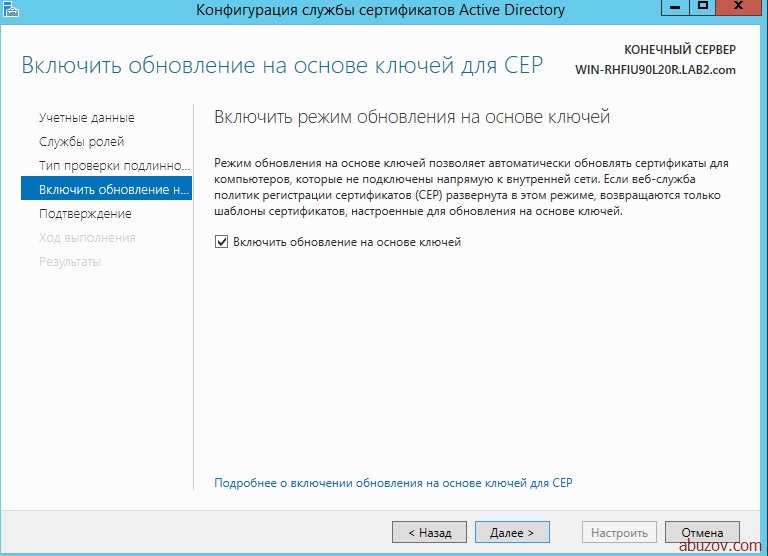
Перезагрузите сервер.
Установка и настройка удостоверяющего центра
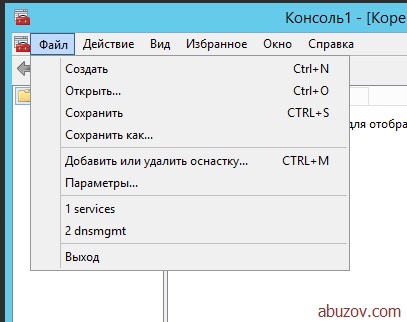
Запустите консоль управления Microsoft (пуск, выполнить, mmc).
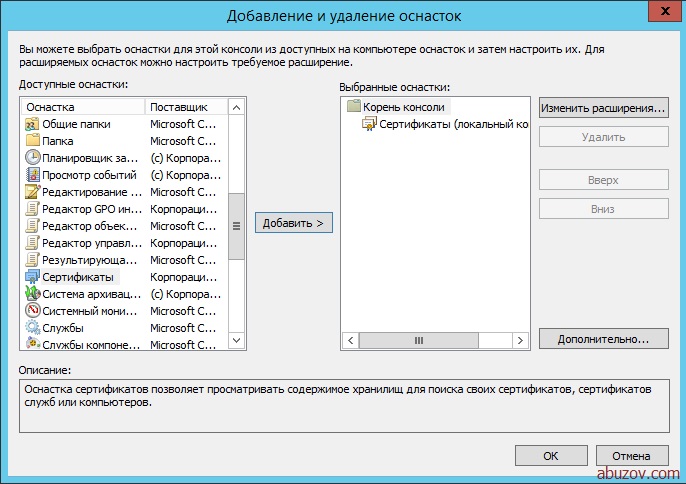
Далее нажмите файл, а затем добавить или удалить оснастку.
В левой части нужно выбрать пункт «Сертификаты» и нажать кнопку добавить.
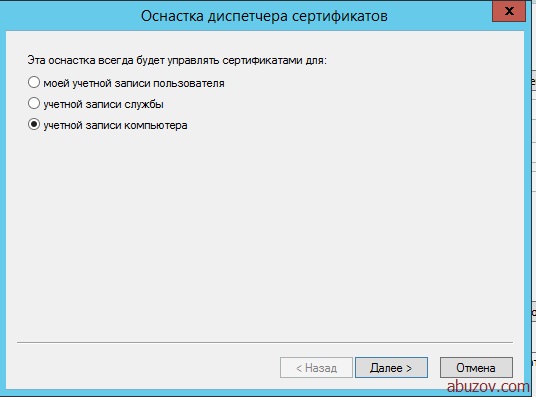
В появившемся окне выбрать пункт учетной записи компьютера.
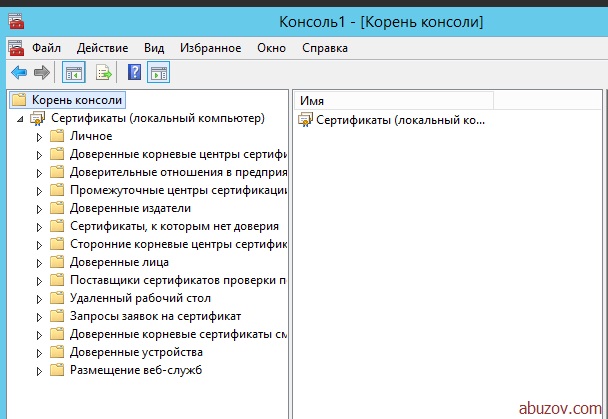
В следующем окне ничего не меняем и нажимаем кнопку готово. Оснастка добавлена.
В левой части окна можно увидеть папки, в которых хранятся сертификаты (11 штук). Они сортированы по типам сертификатов. Если нажать на папку «Личное» то можно посмотреть сертификаты в этой папке.
Запросим новый ключ, для этого нужно нажать на сертификате и выбрать меню «все задачи», а затем «запросить сертификат с новым ключом».
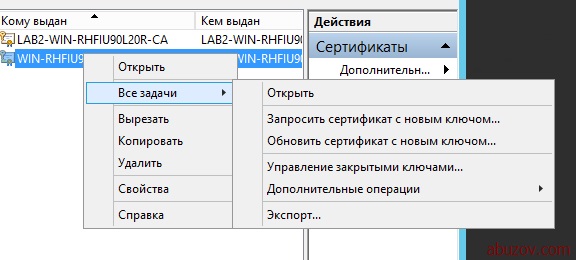
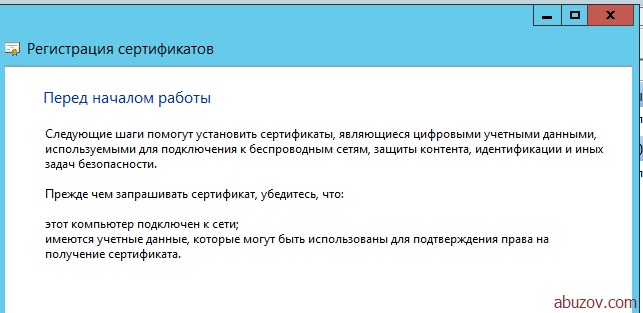
Появится окно перед началом работы. Жмем далее.
Видим окно запрос сертификатов и нажимаем «заявка».
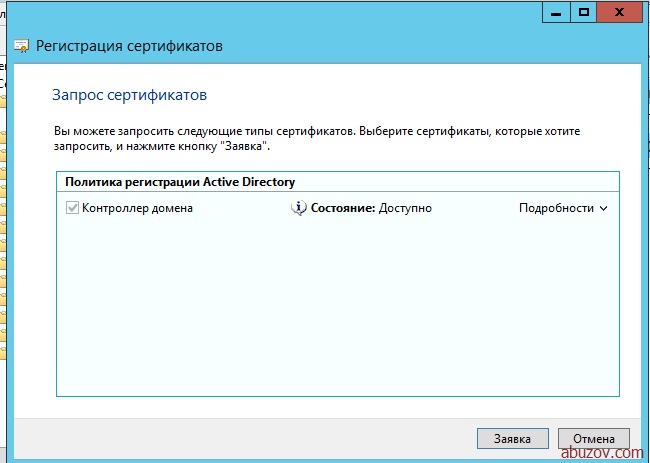
Запускается процесс установки сертификата. После успешной установки появиться следующая надпись «Состояние: Успешно».
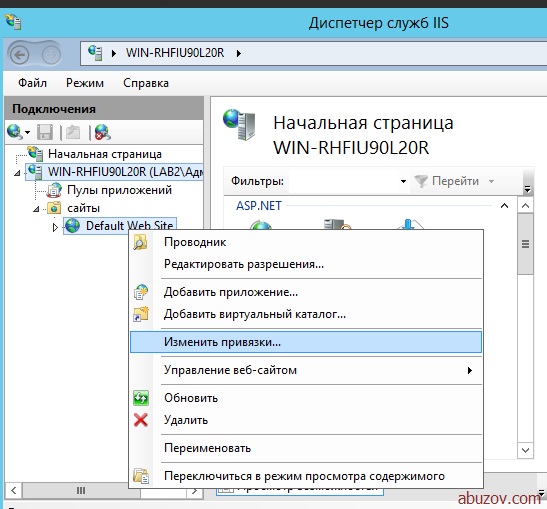
Теперь нам нужно связать сертификат с веб-сервером. Для этого нужно запустить диспетчер служб IIS.

В левой части окна нажать сайты, default web site, изменить привязки.
В появившемся окне нажмите добавить и введите данные как на изображении ниже.

Сохраните изменения и закройте окно.
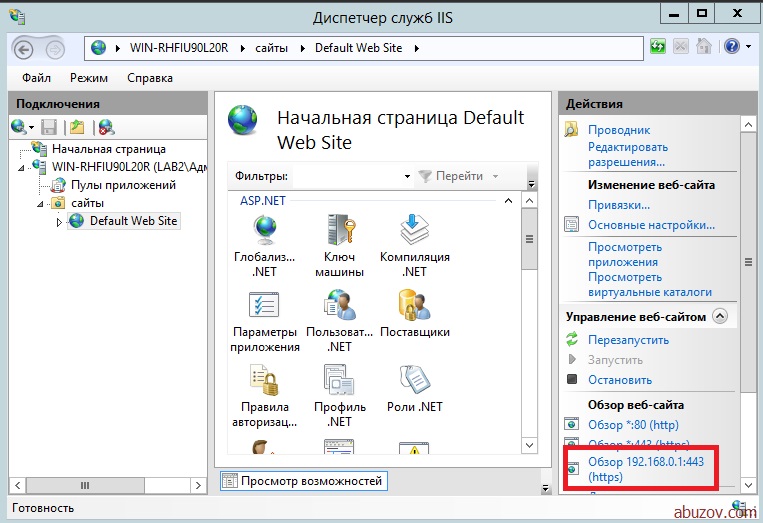
Для проверки работоспособности Центра сертификации запустите браузер Internet Explorer и в строке навигации наберите адрес «https://192.168.0.1/certsrv/» (ip-адрес может отличаться от того, который указали вы).
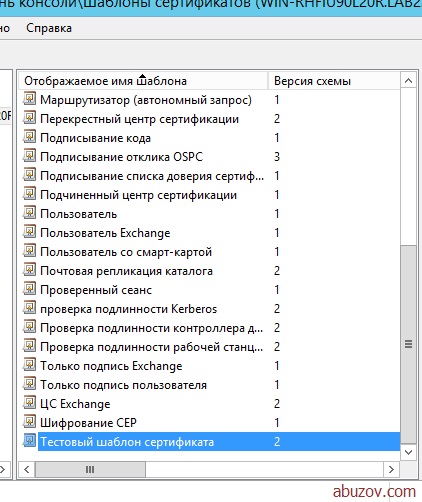
Управление шаблонами сертификата
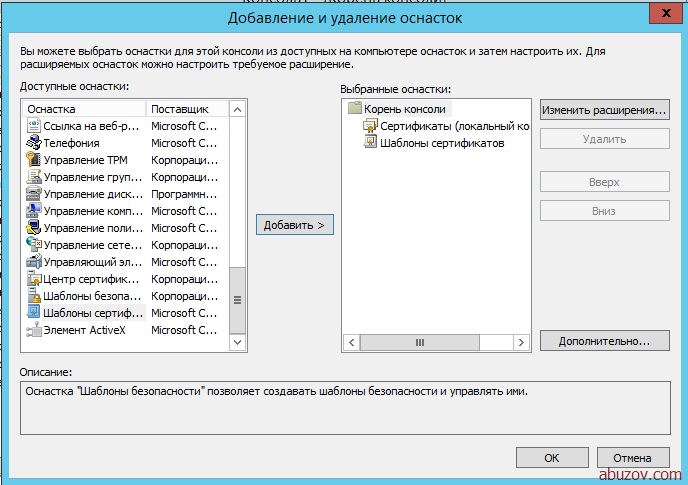
Работа с шаблонами сертификата требует установки оснастки «Шаблоны сертификатов». Откроем нашу консоль, которую мы создавали ранее и добавим оснастку «Шаблоны сертификатов».
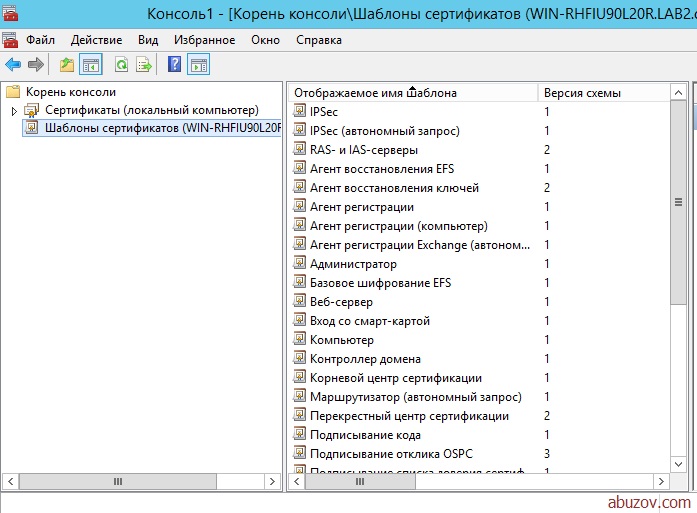
Откроем шаблоны в главном окне консоли. Создадим новый шаблон.
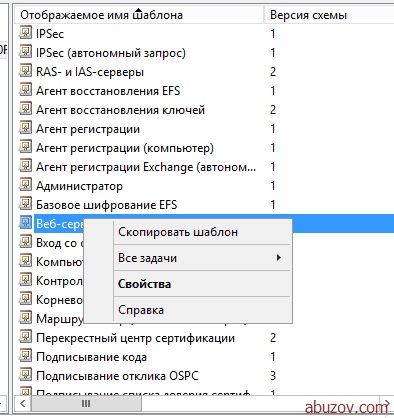
Сначала нужно выбрать любой шаблон сертификата и нажать скопировать его.
Настроим шаблон. Выберите совместимость шаблона сертификата.
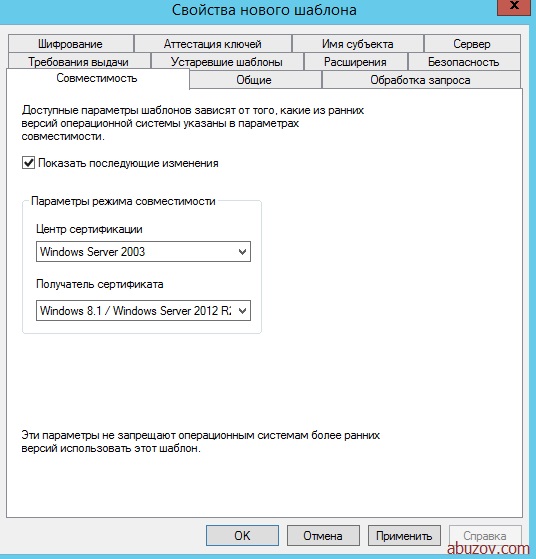
Задайте общие свойства шаблона.

В поле «отображаемое имя» , в строке «имя шаблона» будет тоже самое только без пробелов.
Параметры достоверности по умолчанию и периода обновления для сертификатов, выдаваемых службами сертификатов Active Directory (AD CS), предназначены удовлетворить большинство требований безопасности. Однако для сертификатов, используемых определенными группами пользователей, может потребоваться указать другие параметры достоверности и обновления, такие как более короткие срок действия или периоды обновления.
За это два параметра отвечают для поля «период действия» и «период обновления».
Параметр «опубликовать сертификат в Active Directory» определяет, будут ли сведения о шаблоне сертификата доступными по всему предприятию.
Параметр «не использовать автоматическую перезаявку, если такой сертификат уже существует в Active Directory». С помощью этого параметра автоматическая подача заявки на сертификат не подаст запрос повторной заявки, если в доменных службах Active Directory (AD DS) существует дубликат сертификата. Это дает возможность обновлять сертификаты, но предотвращает выдачу нескольких дубликатов сертификатов.
Обработка запроса. Цель имеет 4 возможных параметра:
- Вход с подписью и смарт-картой. Разрешает первоначальный вход в систему с помощью смарт-карты и цифровую подпись данных. Нельзя использовать для шифрования данных.
- Подпись. Содержит шифровальные ключи только для подписи данных.
- Подпись и шифрование. Охватывает все основные применения шифровального ключа сертификата, включая шифрование данных, дешифрование данных, первоначальный вход в систему и цифровую подпись данных.
- Шифрование. Содержит шифровальные ключи для шифрования и дешифрования.
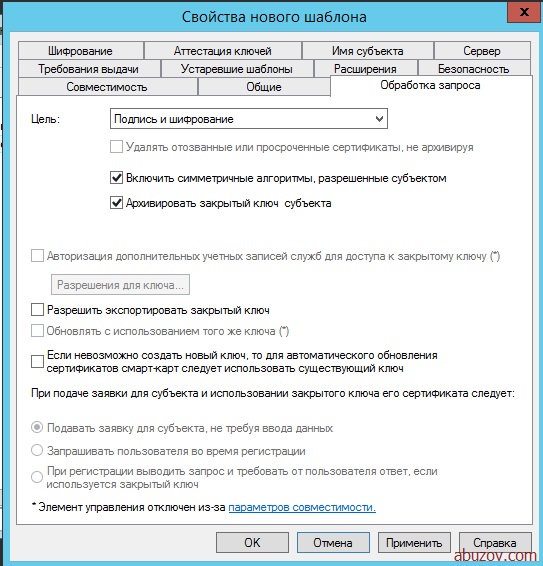
Параметр «включить симметричные алгоритмы, разрешенные субъектом» позволяет администратору выбрать алгоритм стандарта AES для шифрования закрытых ключей, когда они передаются в ЦС для архивации ключа.
Если установлен этот параметр, клиент будет использовать симметричное шифрование AES-256 (наряду с сертификатом обмена ЦС для асимметричного шифрования), чтобы отправить закрытый ключ в ЦС для архивации.
Параметр «авторизация дополнительных учетных записей служб для доступа к закрытому ключу» позволяет задать настраиваемый список управления доступом (ACL) к закрытым ключам сертификатов компьютеров на основе любых шаблонов сертификатов компьютера версии 3 за исключением корневого ЦС, подчиненного ЦС и перекрестных шаблонов ЦС.
Настраиваемый список управления доступом необходим в случае, если учетная запись службы, которой требуется доступ к закрытому ключу, не включена в разрешения по умолчанию.
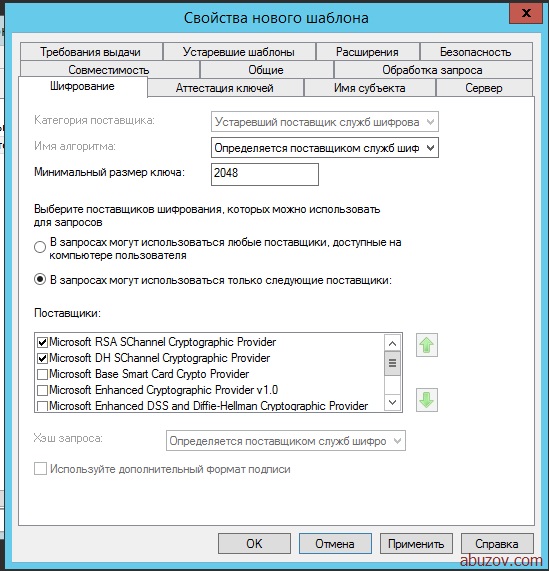
Вкладка шифрование. Определяется максимальный размер ключа. Я оставлю его без изменений.
Безопасность можно настроить по вашему усмотрению.
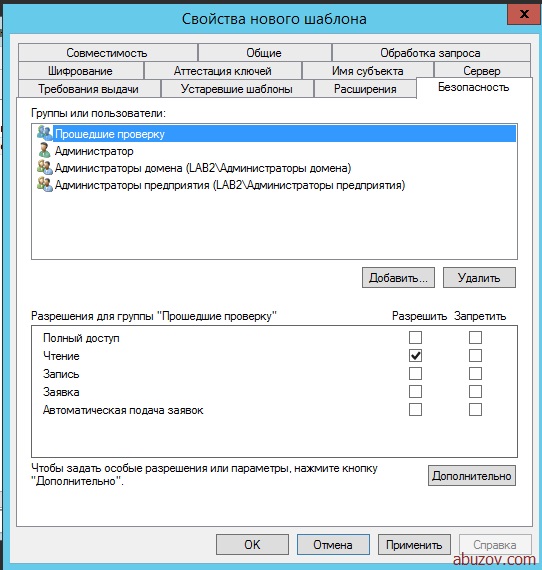
Шаблон сертификата готов.
На этом статья подходит к концу. Мы установили и настроили Active Directory Certificate Services.
20 Aug 2016 in Microsoft on Certificate authority, Certificate services

How to setup an Active Directory Certificate Services Enterprise Root Certificate Authority on Windows Server 2012 R2.
- Basics
- Further Reading
-
- Installing Certificate Services
- Configuring Certificate Services
- Configuring the Root CA
- Configure CA Extensions
- Configure CRL Publishing
- Setting the Issued Certificate Validity Period
- Conclusion
Setting up an Enterprise Root Certificate Authority isn’t a task that you’ll complete on a regular basis and something I think I’ve done twice, maybe 3 times, ever. Each time I forget what I did previously and you can guarantee I’m using a different version of Windows Server each time. Please note as you read these article and the next, that whilst I have an interest in PKI, I don’t consider myself an expert. Deploying a PKI is not a simple task, so read up carefully if you’ve not done this before.
So here’s how to setup an Enterprise Root Certificate Authority (CA) on Windows Server 2012 R2. Now that I’ve documented this, I’m hoping I won’t forget for next time.
Basics
I’m not going to go into too much detail here on the specific choices or considerations you should be making when setting up a CA in your environment; however, I would recommend that you do the following at least, to ensure certificate services is deployed securely:
- Configure a Root CA on a member server (not a member of the domain) and aim for this CA to be offline. This machine can be deployed just about anywhere and when turned off, you could protect it by removing the virtual machine from the environment and storing it in an encrypted format. This will help protect the root CA certificate. Just document where you left it, in case someone else has to take care of updates and changes.
- Deploy a subordinate CA that will be used to issue certificates. This will be a member of Active Directory to simplify management, issuance of certificates to domain members and enable certificate templates.
Using certificate templates requires Active Directory and also requires that you install and configure the subordinate CA as a member of the Enterprise Admins group. Potentially not an issue in most environments; however for large enterprise environments that may not be the case (permissions can be delegated). This also means that you won’t be installing an Enterprise CA in an environment using Azure Active Directory Domain Services because you won’t have rights.
Further Reading
There are a number of articles that I’ve drawn from and others worth reading for additional details or in-depth discussions on certificate services. I’ve listed a few here to provide some further detail:
- The DOs and DON’Ts of PKI – Microsoft ADCS
- CA Guidance for Windows Server 2012 R2/2012
- Enterprise PKI with Windows Server 2012 R2 Active Directory Certificate Services (Part 1 of 2)
- Enterprise PKI with Windows Server 2012 R2 Active Directory Certificate Services (Part 2 of 2)
- AD CS on TechNet
- Test Lab Guide: Deploying an AD CS Two-Tier PKI Hierarchy
- Active Directory Certificate Services (AD CS) Public Key Infrastructure (PKI) Frequently Asked Questions (FAQ)
Deploying an Enterprise Root Certificate Authority
The following steps are taken on a virtual machine running Windows Server 2012 R2 with all current updates as a stand-alone server. Installing the root CA on a stand-alone server ensures no issues with domain communication when the VM is booted at a later date.
Installing Certificate Services
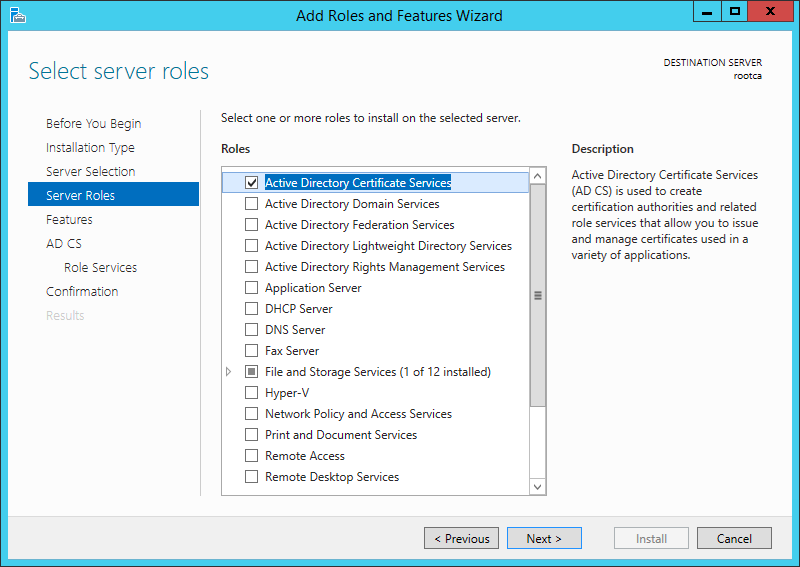
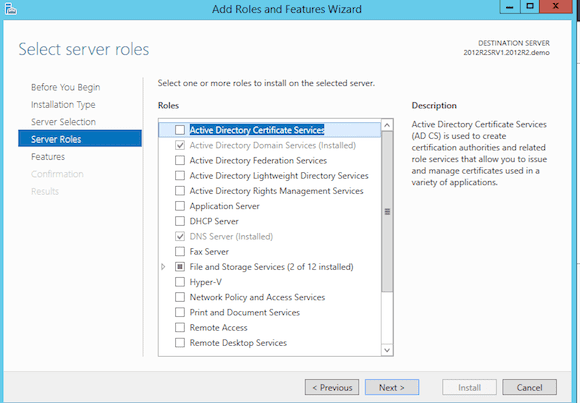
Deploying Certificate Services on Windows Server 2012 R2 is simple enough — open Server Manager, open the Add Roles and Features wizard and choose Active Directory Certificate Services under Server Roles. Ensure you choose only the Certificate Authority role for the Root CA.
Installing Active Directory Certificate Services
To make installing Certificate Services simpler, do it via PowerShell instead via Add-WindowsFeature:
Add-WindowsFeature -Name ADCS-Cert-Authority -IncludeManagementTools
Which will look like this, no reboot required:
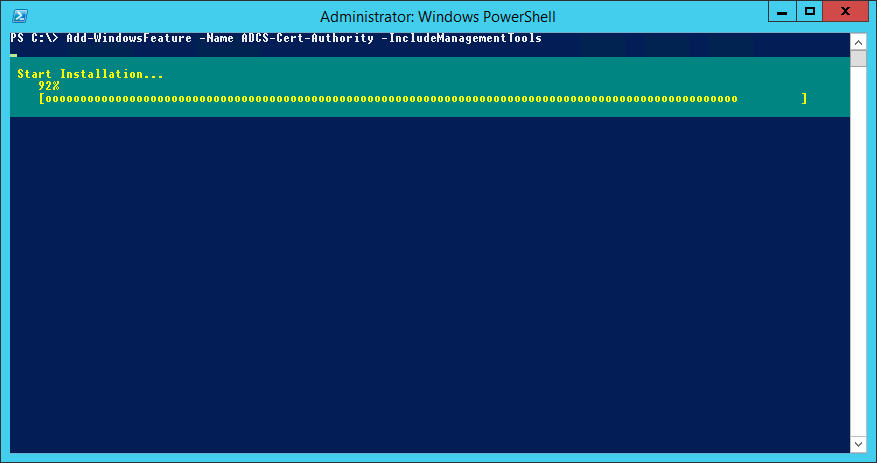
Install Certificate Services via PowerShell
Configuring Certificate Services
After Certificate Services is installed, start the configuration wizard from Server Manager:
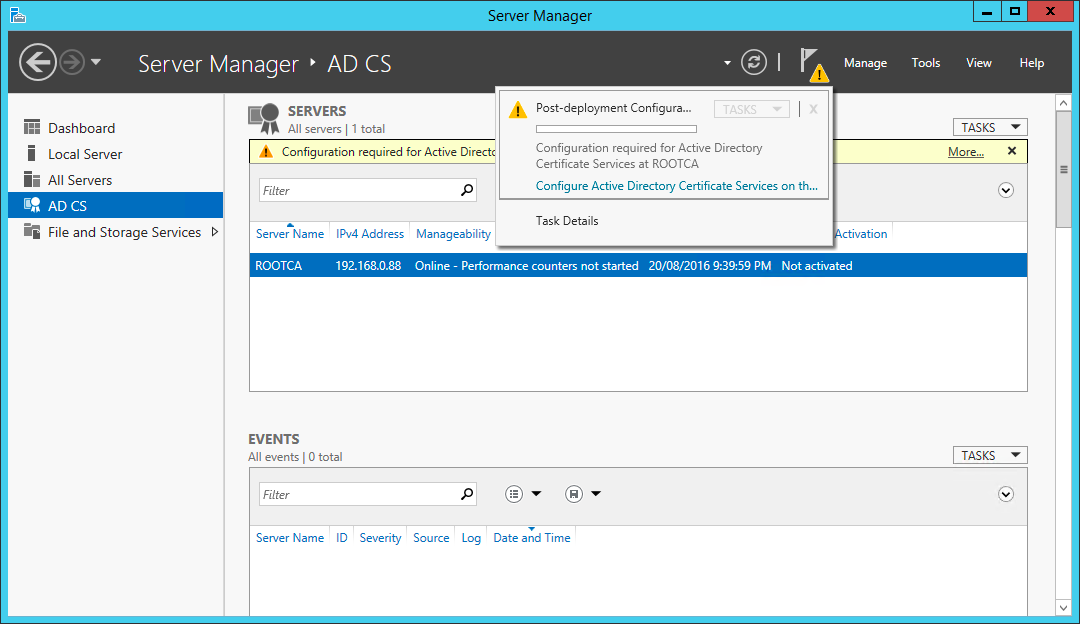
Start the Certificate Services configuration wizard
Set the credentials to be used while configuring Certificate Services. In this case, we’re configuring CA on a stand-alone machine and I’m logged on as local Administrator.
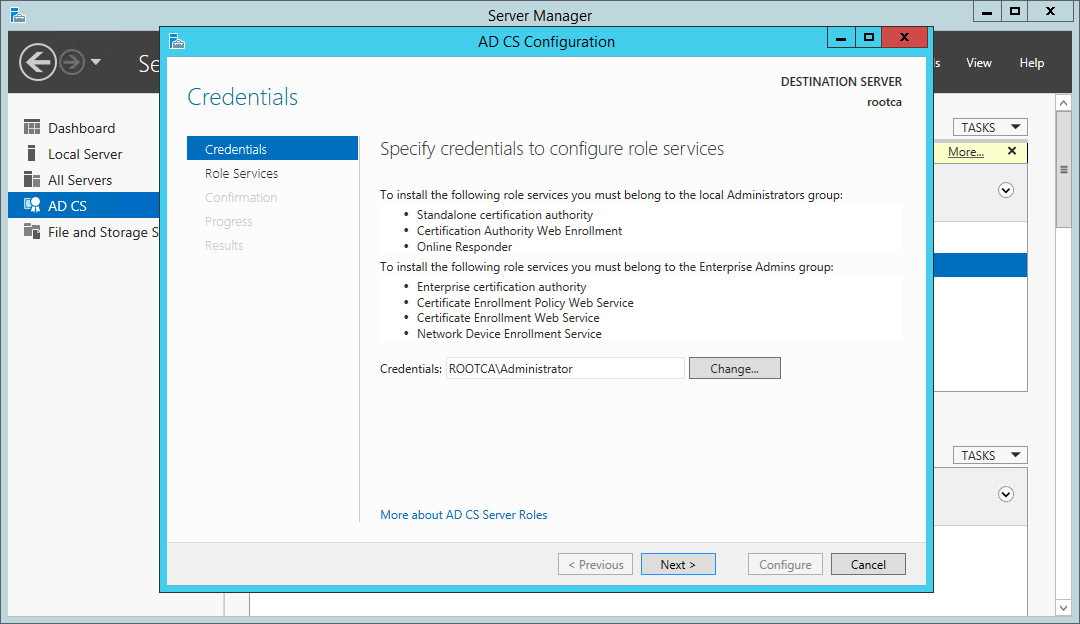
Certificate Services wizard — configuration credentials
For the Root CA, we have only one role to configure.
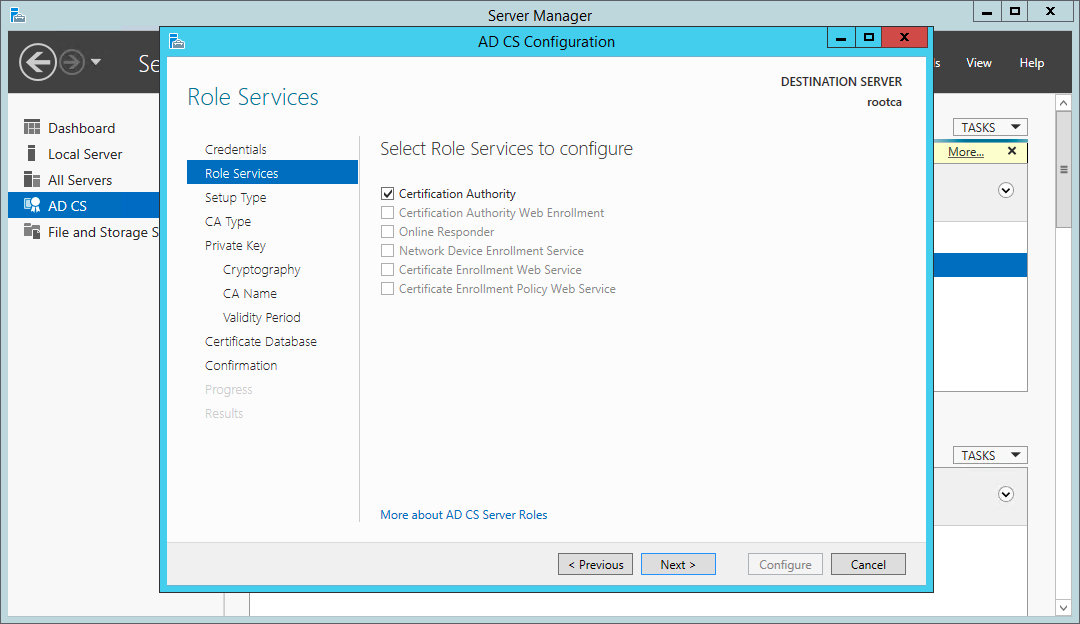
Certificate Services wizard — roles to configure
This certificate authority is being configured on a stand-alone server not a member of Active Directory, so we’ll only be able to configure a Standalone CA.
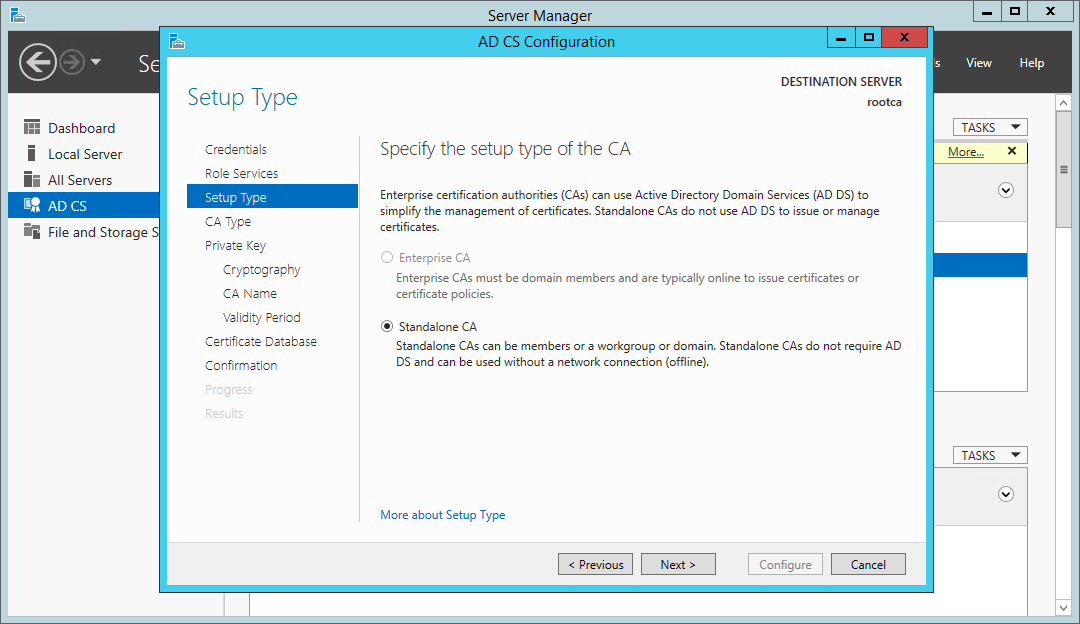
Certificate Services wizard — configure a standalone CA
This is the first CA in our environment, so be sure to configure this as a root CA.
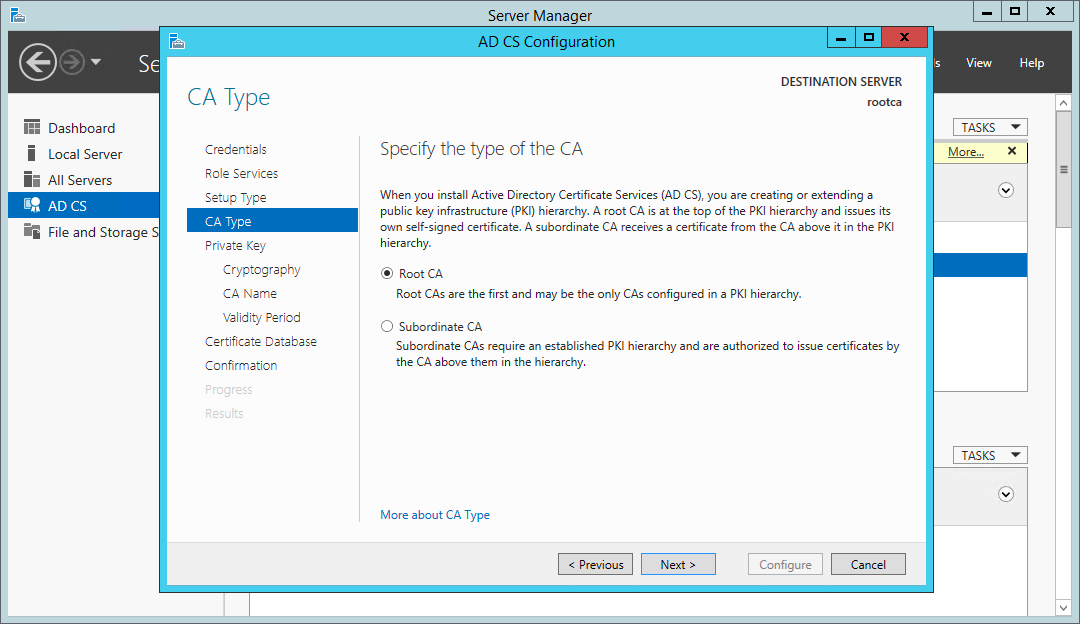
Certificate Services wizard — configure as a root CA
With the first CA in the environment, we’ll won’t have an existing private key, so must choose to create a new one.
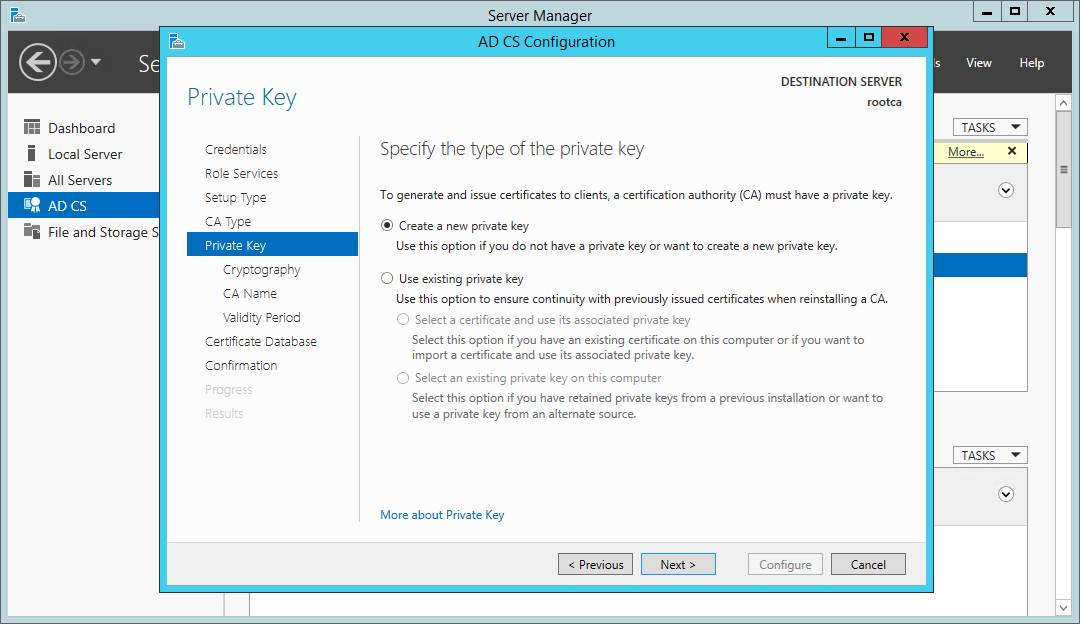
Certificate Services wizard — choose a new private key
When selecting a cryptographic provider and a hash algorithm, SHA1 will be the default hashing algorithm; however, Windows will no longer accept certificates signed with SHA1 after 1st of January 2017, so be sure to choose at least SHA256.
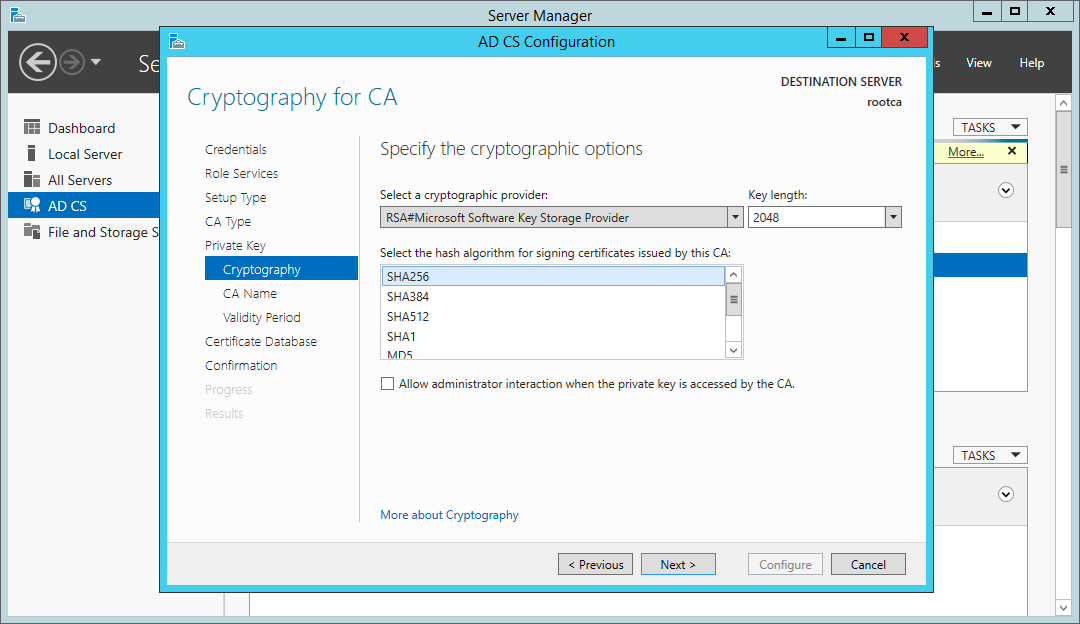
Certificate Services wizard — choosing cryptographic options
Specify a name for the new certificate authority. I’d recommend keeping this simple using the ANSI character set, using a meaningful name.
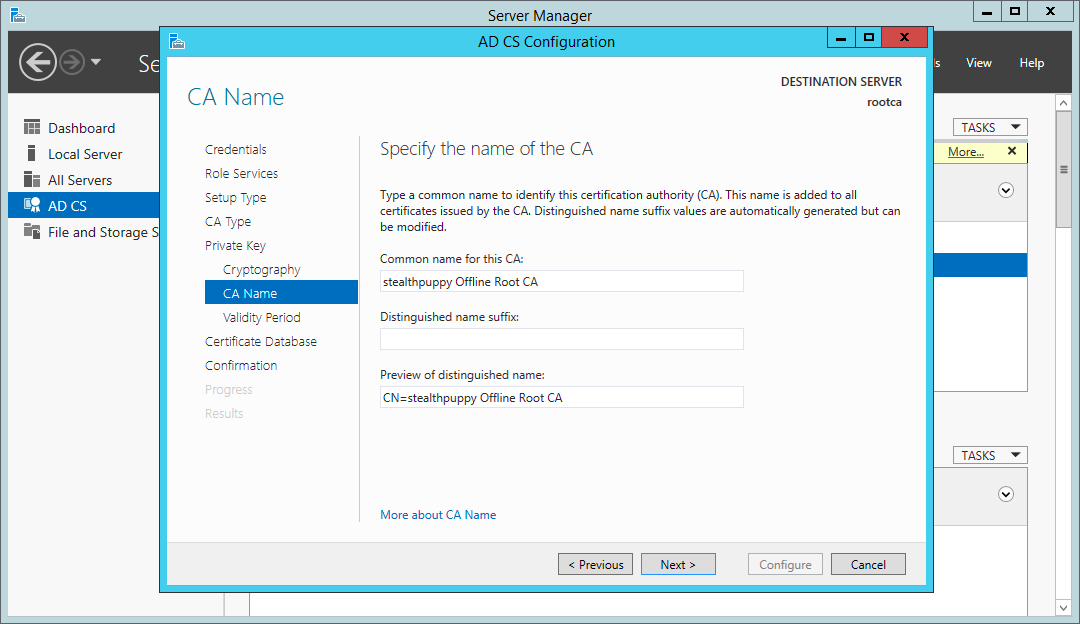
Certificate Services wizard — specify a CA name
Select the validity period — perhaps the default is the best to choose; however, this can be customised based on your requirements. This is a topic that is a whole security conversation in itself; however, renewing CA certificates isn’t something that you want to be doing too often. Considerations for setting the validity period should include business risk, the size and complexity of the environment you are installing the PKI into, and how mature the IT organisation is.
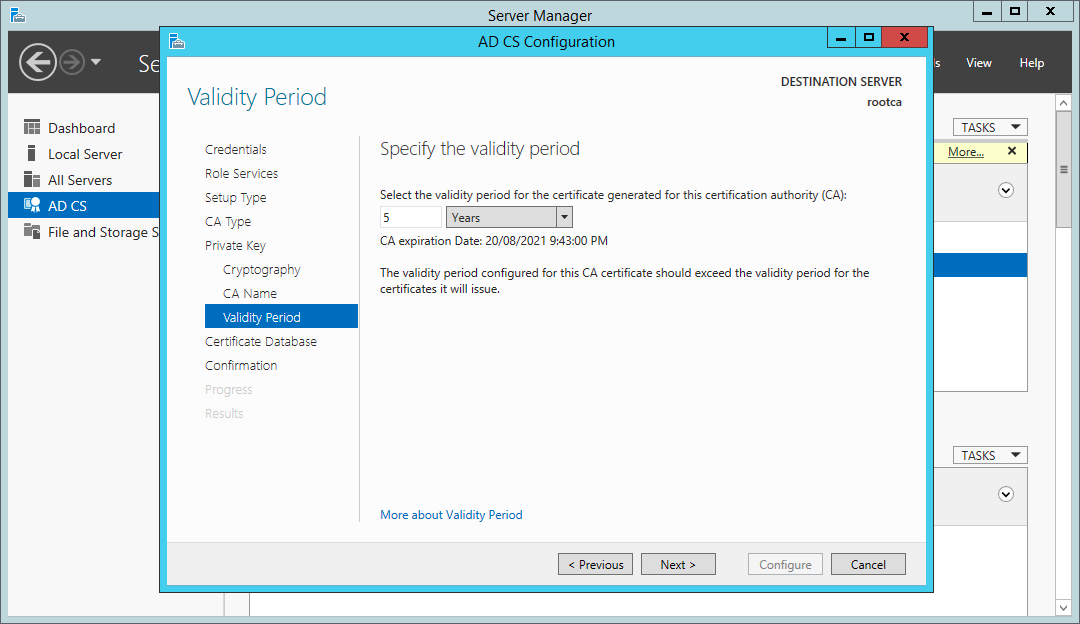
Certificate Services wizard – select the CA certificate validity period
On the next page of the wizard, you can choose the location of the certificate services database and logs location (C:WindowsSystem32Certlog), which can be changed depending on your specific environment.
On the last page, you will see a summary of the configuration before committing it to the local certificate services.
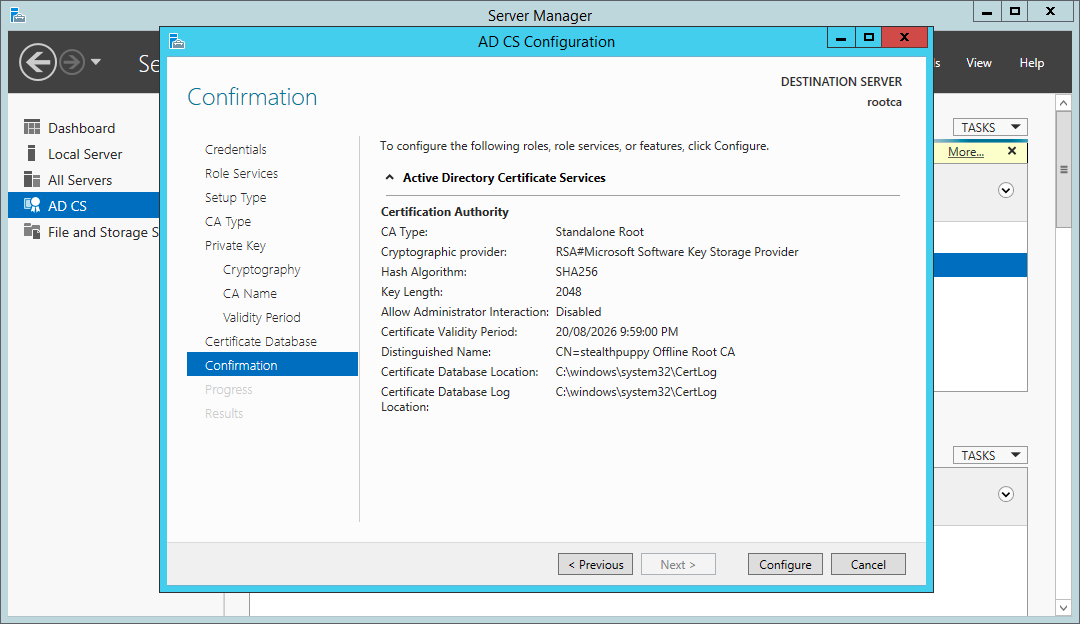
Certificate Services wizard – summary page
Configuring the Root CA
Now that certificate services have been installed and the base configuration is complete, a set of specific configuration changes is required to ensure that an offline Root CA will work for us.
If you open the Certificate Authority management console, you can view the properties of the certificate authority and the Root CA’s certificate:
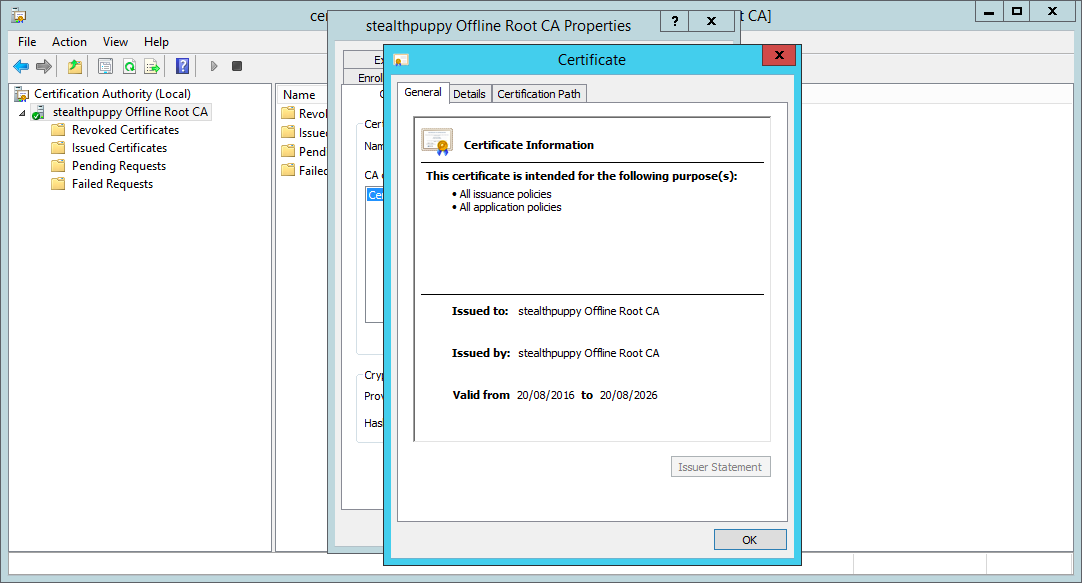
The freshly installed and configured certificate authority
Check the details and ensure the certificate hash algorithm is SHA256:
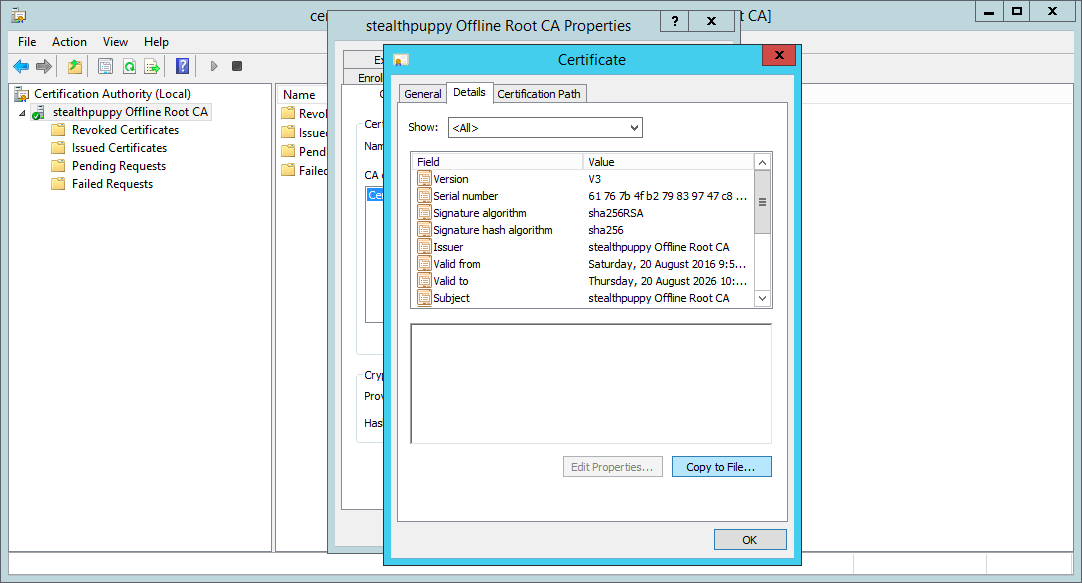
Certificate authority with SHA256 hashing algorithm
Configure CA Extensions
Before we take any further steps, including deploying a subordinate CA for issuing certificates, we need to configure the Certificate Revocation List (CRL) Distribution Point. Because this CA will be offline and not a member of Active Directory, the default locations won’t work.
In the properties of the CA, select the Extensions tab to view the CRL Distribution Points. By default, the ldap:// and file:// locations will be the default distribution points. These, of course, won’t work for the reasons I’ve just stated, and because these locations are embedded in the properties of certificates issued by this CA, we should change them.
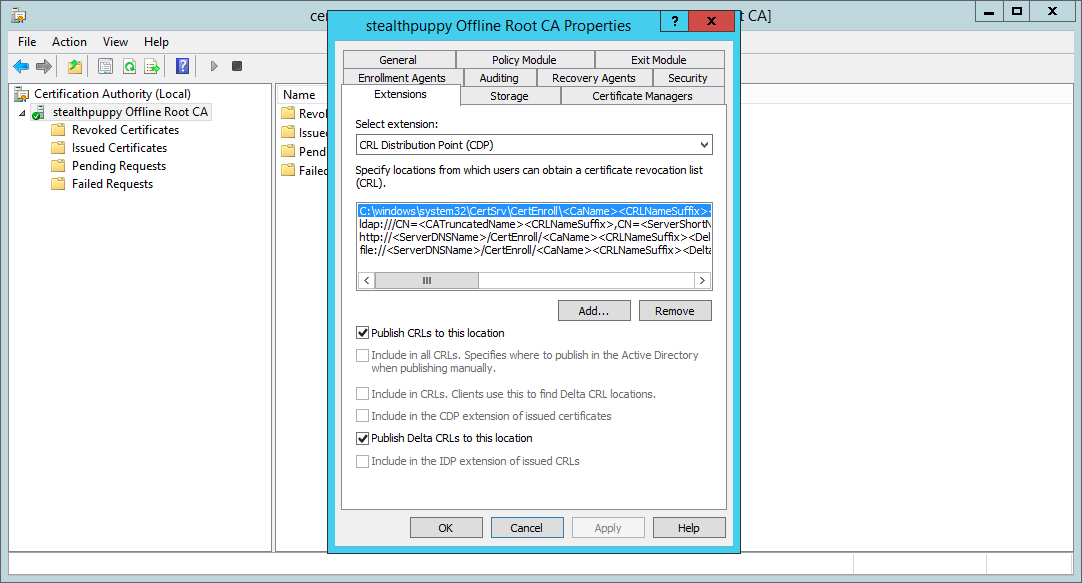
Configuring the Certificate Revocation List settings
The default CRL distribution points are as below. These can be copied by selecting each from within the dialog box and pressing Ctrl-C.
C:windowssystem32CertSrvCertEnroll<CaName><CRLNameSuffix><DeltaCRLAllowed>.crl
ldap:///CN=<CATruncatedName><CRLNameSuffix>,CN=<ServerShortName>,CN=CDP,CN=Public Key Services,CN=Services,<ConfigurationContainer><CDPObjectClass>
http://<ServerDNSName>/CertEnroll/<CaName><CRLNameSuffix><DeltaCRLAllowed>.crl
file://<ServerDNSName>/CertEnroll/<CaName><CRLNameSuffix><DeltaCRLAllowed>.crl
To set up a CRL distribution point that will work with a location that’s online (so that clients can contact the CRL), we’ll add a new distribution point rather than modify an existing DP and use HTTP.
Before that we’ll want to do two things:
- Ensure that ‘Publish CRLs to this location’ and ‘Publish Delta CRLs to this location’ are selected on the default
C:WindowsSystem32CertSrvCertEnrolllocation. This should be the default setting. - For each existing DP, remove any check marks enabled for ‘Include in CRLs’.
Now add a new CRL location, using the same HTTP location value included by default; however, change <ServerDNSName> for the FQDN for the host that will serve the CRL. In my example, I’ve changed:
http://<ServerDNSName>/CertEnroll/<CaName><CRLNameSuffix><DeltaCRLAllowed>.crl
to
http://crl.home.stealthpuppy.com/CertEnroll/<CaName><CRLNameSuffix><DeltaCRLAllowed>.crl
This FQDN is an alias for the subordinate certificate authority that I’ll be deploying to actually issue certificates to clients. This CA will be online with IIS installed, so will be available to serve the CRLs.

Adding a new CRL distribution point
Repeat the same process for the Authority Information Access (AIA) locations:
- Disable ‘Include in the AIA extensions of issued certificates’ for all existing locations
- Copy the existing
http://location - Add a new
http://location, changing<ServerDNSName>for the FQDN of the alias also used for the CRL distribution point
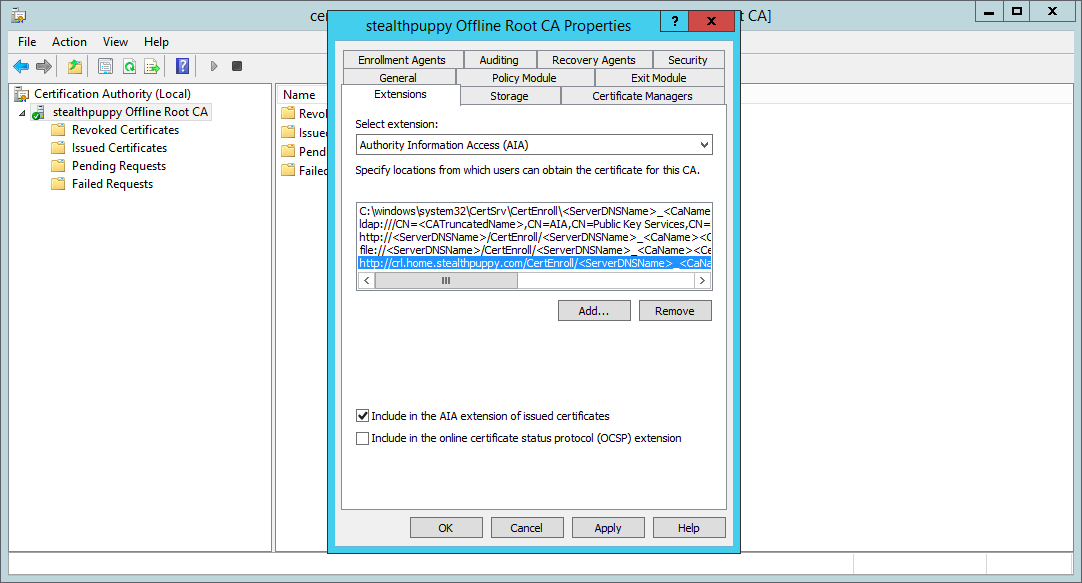
Adding an Authority Information Access location
Apply the changes, and you will be prompted to restart Active Directory Certificate Services. If you don’t remember to manually restart the service later.
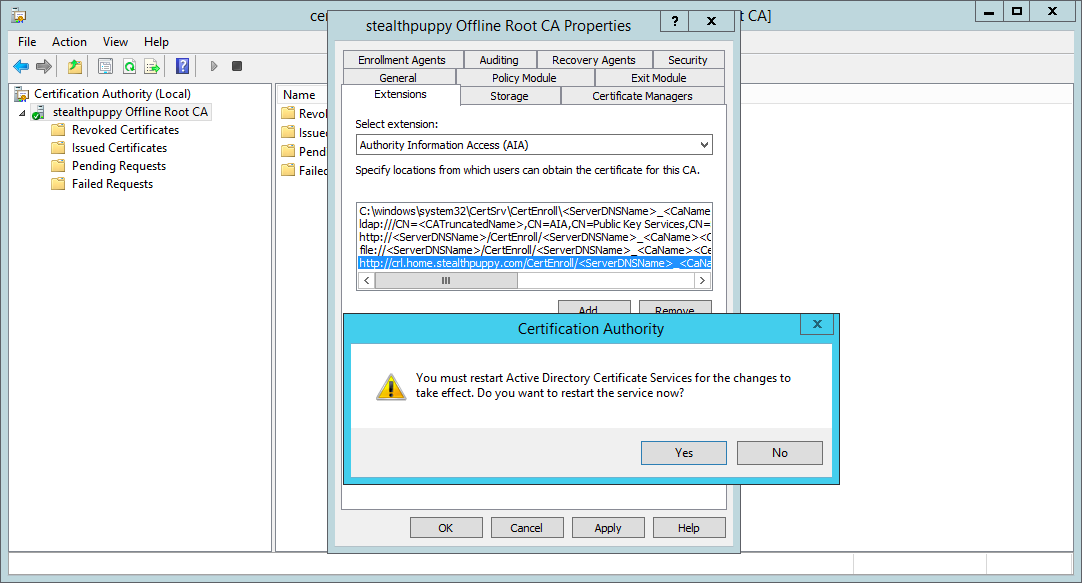
Applying the changes will require restarting the CA service
Configure CRL Publishing
Before publishing the CRL set the Publication Interval to something other than the default 1 week. Whatever you set the interval to, this will be the maximum amount of time that you’ll need to boot the CA, publish the CRL and copy it to you CRL publishing point.
Open the properties of the Revoked Certificates node and set the CRL publication interval to something suitable for the environment you have installed the CA into. Remember that you’ll need to boot the Root CA and publish a new CRL before the end of this interval.
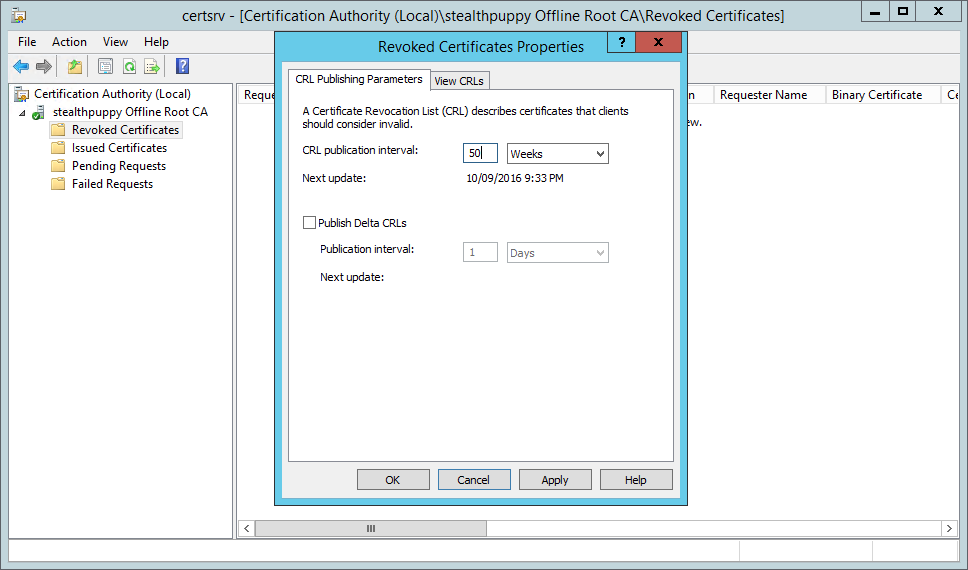
Setting the CRL Publication Interval on the Root CA
Ensure that the Certificate Revocation list is published to the to the file system — right-click Revoked Certificates, select All Tasks / Publish. We will then copy these to the subordinate CA.

Publish the Certificate Revocation list
Browse to C:WindowsSystem32CertSrvCertEnroll to view the CRL and the root CA certificate.
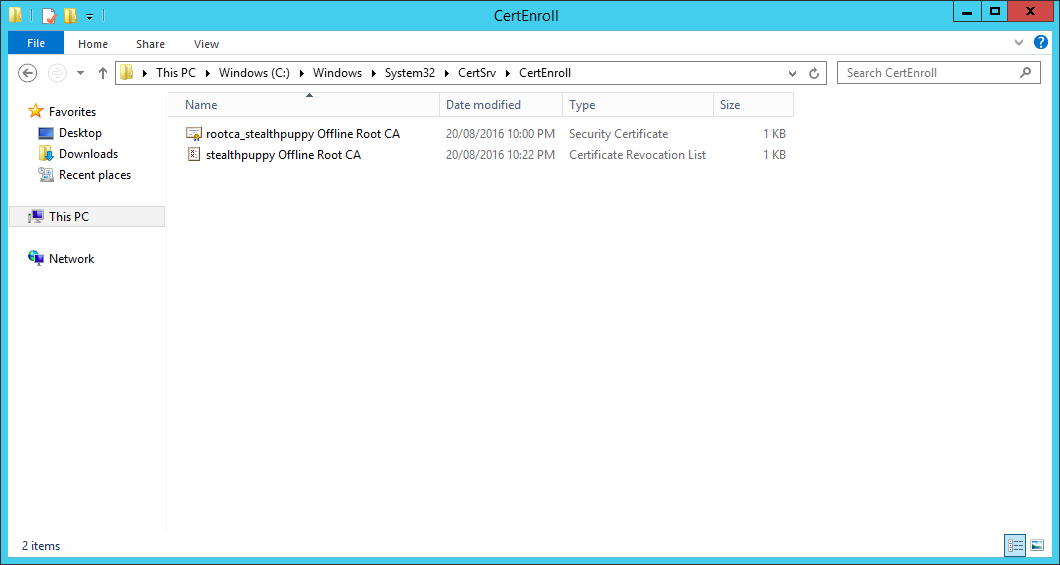
Certificates and CRL published to C:WindowsSystem32CertSrvCertEnroll
Setting the Issued Certificate Validity Period
The default validity period for certificates issued by this CA will be 1 year. Because this is a stand-alone certification authority, we don’t have templates available to use that we can use to define the validity period for issued certificates. So we need to set this in the registry.
As we’ll only be issuing subordinate CA certificates from this root CA, 1 year isn’t very long. If the subordinate CA certificate is only valid for 1 year, any certificates that it issues can only be valid for less than 1 year from the date of issue — not long indeed. Therefore, we should set the validity period on the root CA before we issue any certificates.
To change the validity period, open Registry Editor and navigate to the following key:
HKLMSYSTEMCurrentControlSetServicesCertSvcConfiguration<certification authority name>
In my lab, this path is:
HKLMSYSTEMCurrentControlSetServicesCertSvcConfigurationstealthpuppy Offline Root CA
Here I can see two values that define how long issued certificates are valid for — ValidityPeriod (defaults to 1) and ValidityPeriodUnits (defaults to “Years”).
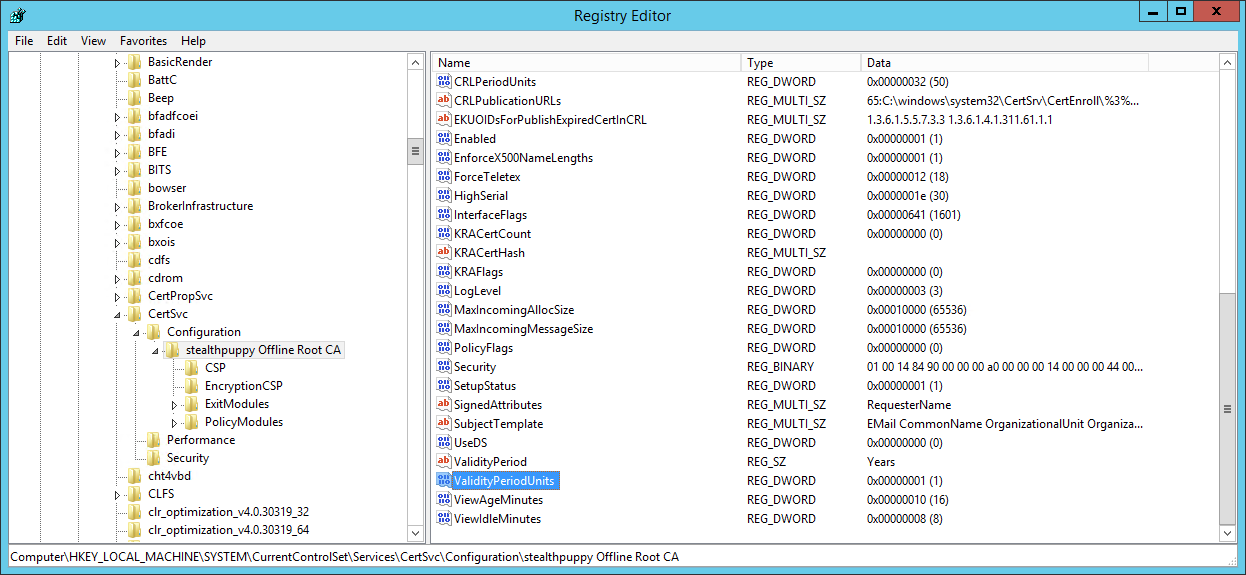
Viewing the Root CA certificate validity lifetime
Open ValidityPeriodUnits and change this to the desired value. My recommendation would be to make this 1/2 the lifetime of Root CA’s certificate validity period, so if you’ve configured the Root CA for 10 years, set this to 5 years. You’ll need to restart the Certificate Authority service for this to take effect.
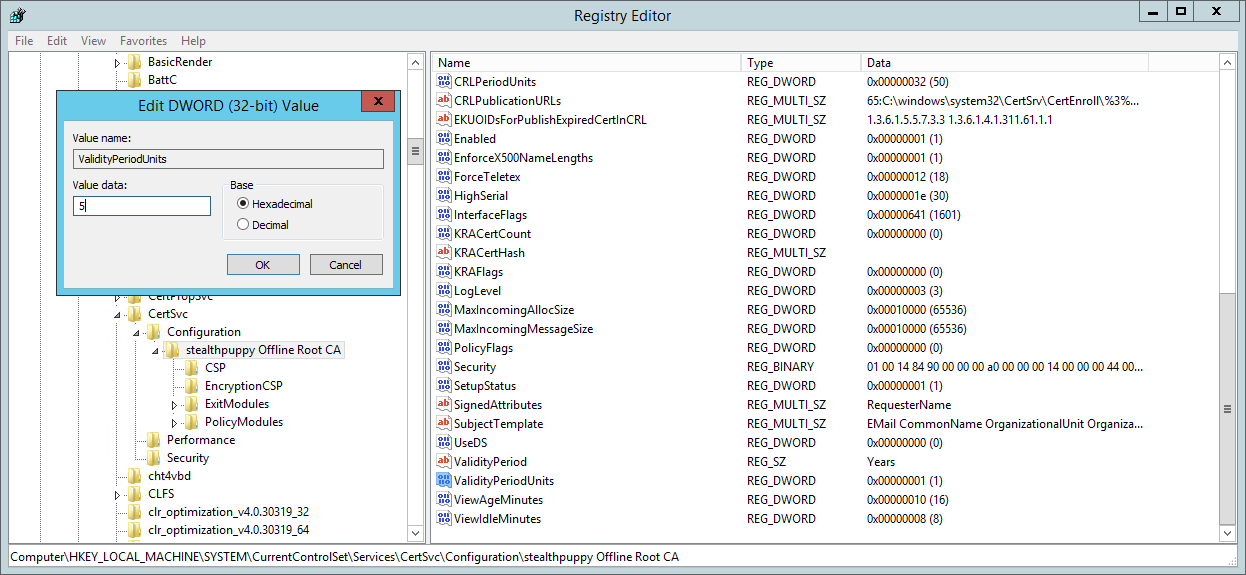
Setting the Root CA’s ValidityUnits
An alternative to editing the registry directly is to set this value to certutil.exe. To change the validity period to 5 years run:
certutil -setreg caValidityPeriodUnits "5"
There are a couple of old articles on setting this value, but they still apply to current versions of Windows Server — How to change the expiration date of certificates that are issued by a Windows Server 2003 or a Windows 2000 Server CA and How to Set an Enterprise Subordinate CA to Have a Different Certificate Validity Period than the Parent CA.
Conclusion
In this article, I’ve provided the basic steps to creating a root certificate authority on Windows Server 2012 R2. The next step is to create a subordinate CA that will issue certificates to devices and users, allowing us to take the root CA offline and protecting it from attack.
Don’t shut down the Root CA just yet. In the next article, we’ll create and configure the subordinate CA.
You can set up a Windows Server 2012 Certificate Authority (CA) using the Service Manager wizard.
The following are standard steps to set up a Microsoft CA. They are detailed here in a simple form suitable for use in a lab environment, but for a real production system it is recommended that you follow industry best practice for CA configuration.
If you need further guidance about setting up a CA, please check out the standard Microsoft technical references: Active Directory Certificate Services Step-by-Step Guide and Install a Root Certification Authority.
Note: The procedures in this topic are for Windows Server 2012 R2. Very similar steps can be followed on Windows Server 2008 R2.
Procedure
- On the Server Manager Dashboard, click Add Roles and Features to open the wizard, and then and click Next.
- On the Select Installation Type page, select Role-based or feature-based installation and click Next.
- On the Server Selection page, leave defaults and click Next.
- On the Server Roles page:
- Select Active Directory Certificate Services.
- In the dialog, select Include management tool (if applicable) and click Add Features.
- Click Next.
- On the Features page, click Next.
- On the AD CS page, click Next.
- On the Role Services page, select Certification Authority and click Next.
- On the Confirmation page, select Restart the destination server automatically is required and click Install.
Installation Progress displays. When the installation is complete, a URL link displays, allowing you to configure the newly installed CA as “Configure Active Directory Certificate Services” on the destination server.
- Click on the configuration link to launch the configuration wizard.
- On the Credentials page, enter user credentials from Enterprise Admin group and click Next.
- On the Role Services page, select CA and click Next.
- On the Setup Type page, select Enterprise CA and click Next.
- On the CA Type page, select Root or Subordinate CA as appropriate (in this example it is a Root CA) and click Next.
- On the Private Key page, select Create a new private key and click Next.
- On the Cryptography page, enter information as follows.
Field Description Cryptographic Provider RSA#Microsoft Software Key Storage Provider Key Length 4096 (or another length if you prefer) Hash Algorithm SHA256 (or another SHA algorithm if you prefer) - On the CA Name page, configure as preferred or accept defaults and click Next.
- On the Validity Period page, configure as preferred and click Next.
- On the Certificate Database page, click Next.
- On the Confirmation page, review the information and click Configure.
- Complete the configuration process by performing the following tasks (run all commands from the command prompt).
- Configure CA for non-persistent certificate processing
certutil –setreg DBFlags
+DBFLAGS_ENABLEVOLATILEREQUESTS
- Configure CA to ignore offline CRL errors
certutil –setreg caCRLFlags
+CRLF_REVCHECK_IGNORE_OFFLINE
- Restart the CA service
net stop certsvc
net start certsvc
- Configure CA for non-persistent certificate processing
- Set up a certificate template on the CA by following the steps in #GUID-7A746275-7837-439A-83EF-BA94A96BF2E1 .
As more services and device connections inside and outside of your network rely on certificate services, I thought it was a good idea to write an article about how to deploy such a Windows 2012 R2 Certificate Authority (CA).
Popular features that require a certificate include secure HTTPS connections to your web applications, device authentication for both domain and non-domain joined clients, Server 2012 R2 Work Folders, DirectAccess, and more.
Before I dive into the technical aspects of certificates, CA, and the various types of certificates, let me give you a high-level comparison between using an internal vs. public Certificate Authority.
|
Internal CA |
External CA |
| Easy to manage | No control of Certificate Authority itself, you can only “buy” SSL certificates |
| Can be configured as Active Directory integrated | No administration overhead |
| No cost per certificate | SSL certificates can become expensive, depending on types and functionalities |
| Auto-enrollment feature makes configuration of clients/devices easier | Not advised for configuring internal devices authentication |
| Not really useful for internet-facing applications, as not trusted by external parties | Trusted by most browsers |
| Often more complex to install/configure than just buying a public SSL certificate | Less flexible on SSL certificate properties |
Install Active Directory Certificate Authority
- From the Windows Server 2012 R2 Server Manager, click Add Roles and Features.
- Select Active Directory Certificate Services.

- Click the Add Features in the popup window to allow installation of the Certification Authority Management Tools

- Select the options you want to install. I recommend the following services:
– Certification Authority (this is your main CA)
– Certification Enrollment Policy Web Service
– Certificate Enrollment Web Service (web portal to request certificates)
– Certification Web Enrollment

- Once installed, Select AD CS in your Server Manager. Notice the button warning that no configuration is done yet. Click on More.

- This will bring you to the All Servers Task Details and Notifications. Click on Configure Active Directory Certificates Services in the Action column. This will launch the AD CS configuration wizard.
Use the following parameters when going through the different steps in the wizard:
Role Services to configure Certificate Authority + Certificate Authority Web Enrollment Type of CA Enterprise CA (if Active Directory integrated; otherwise choose StandAlone CA Type of CA Root CA (if 1st one) or Subordinate CA (additional CA in existing authority) Type of Private Key in most cases, create a new private key will be the best option Cryptographic options RSA#Microsoft Software Key Storage Provider 2048 as Key Length SHA1 as hash algorithm (or any other combination for your situation)
- Enter a descriptive name for your Certificate CA in the Common Name field. In my example, I named it 2012R2 domain CA. Click Next.
- Update the validity period to 5 years (or whatever fits your need).
- Accept the default database locations or modify according your own requirements.
- This completes the configuration of the first two CA components. Let’s continue with the other two. In the Select Role Services to configure, choose Certificate Enrollment Web Service and Certificate Enrollment Web Policy Service.
Use the following parameters when going through the configuration wizard:
Specify CA Select CA Name (using Select…) Type of Authentication Windows Integrated Service Account use the built-in application pool identity Authentication type for CEP Windows Integrated Specify Authentication Certificate <select an existing SSL certificate from the list)

This completes the configuration of all required Certificate Authority services.

Verify Certificate Authority Functionality
To verify that the CA server is operational, we can check both from within our browser as well as by checking the Certificate Authority management console.
Using the Browser: Certificate Authority Web Services
From any server in the domain, you can connect to http:<CA-Server>/certsrv. This will launch the Certificate Authority Web Enrollment portal.

We will use this portal later on to complete a certificate request…
Using the Certificate Authority Management Tool
- From the CA server, start the Certificate Authority Management tool. If all is well, this will show your CA server with a green icon, meaning the different CA services are up and running.

Complete an Internal Certificate Request
In this last step, we will walk through the process on how to request an internal SSL certificate from an IIS web server in the domain, against our internal deployed CA.
- From within IIS, select your server. Click on Server Certificates in the middle pane.
- On the right, click on Create Certificate Request.
- Enter the different fields in the request template. Most important field here is the common name, which should be set to the same name as the URL you want to use (eg. Workfolders.pdtit.be in my situation)

- Complete the wizard with the default settings and save your request file as text file on your system.
In previous Windows Server versions it was sufficient to logon to your CA Web Enrollment portal again and copy/paste the details of the certificate request file. Alas, it won’t work in Windows Server 2012 R2. If you perform the same steps, you are faced with the following error message.
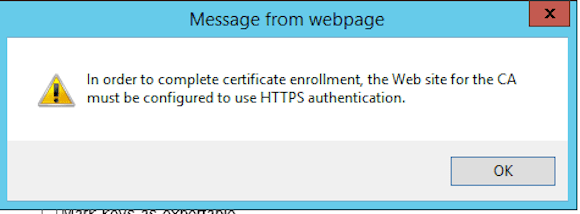
I could have explained the different steps on how to solve this matter, but there is already a great Microsoft Technet Wiki article that explains the different configuration steps that need to be taken in order to publish your CertSRV certificate Enrollment portal using HTTPS.
Once you have done all these steps, it should be possible to complete the certificate request steps from within the portal.
- Logon to your CA server using your browser (http://<CAserver>/certsrv).
- Select Request a Certificate.
- Select Advanced Certificate Request.
- Select Create and Submit a Request to This CA.
- In the Certificate Template select Web Server.
- Copy/paste the contents from your certificate request file (the “garbage text,” including the first and last line “— beginning of new request file —” and “— end of new request file —“).
- Save your certificate output as a CER-file.
- Copy this CER-file over to your web server.
- From within IIS, select Complete Certificate Request.
That’s all for this article folks! As always, do not hesitate to contact me in case of any questions regarding this article.