

Если вам понадобился SFTP/SSH сервер на Windows Server 2012 R2, то вы попали по адресу. Установим, запустим, настроим и протестируем OpenSSH Server в Windows Server 2012 R2.
Установка OpenSSH в Windows Server 2012 R2
Скачиваем последнюю версию дистрибутива OpenSSH:
https://github.com/PowerShell/Win32-OpenSSH/releases
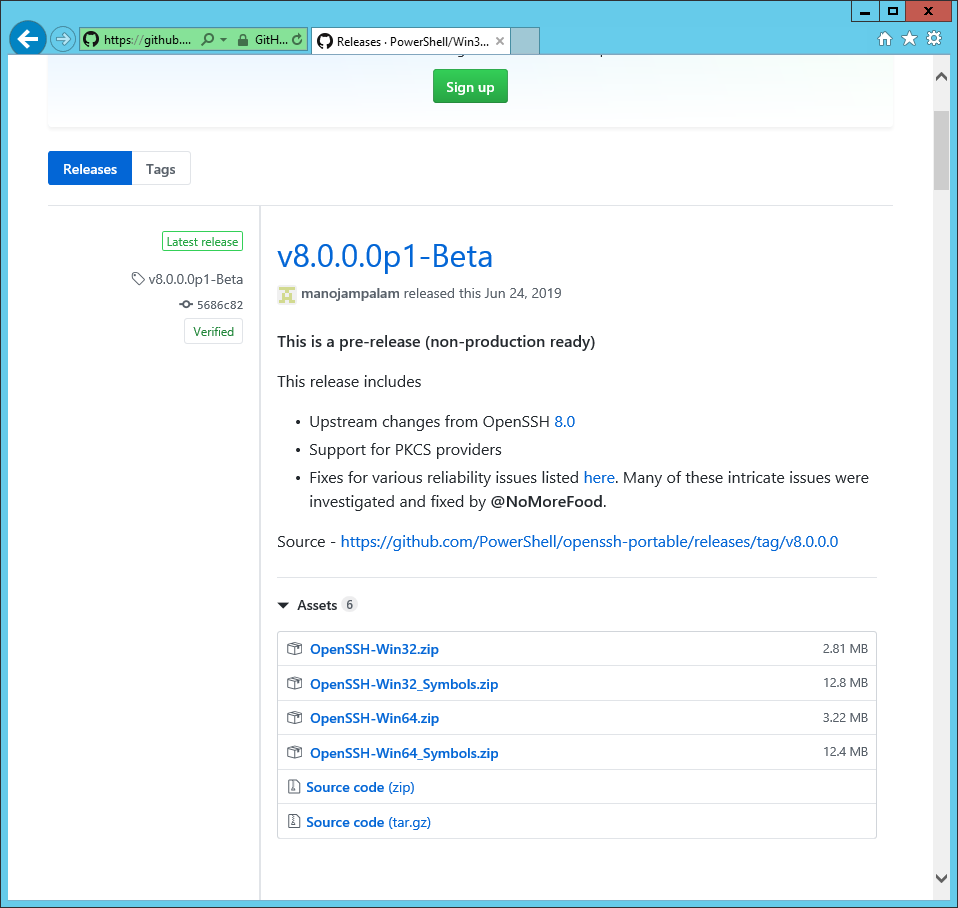
Сейчас доступна версия v8.0.0.0p1-Beta. Скачиваю OpenSSH-Win64.zip.
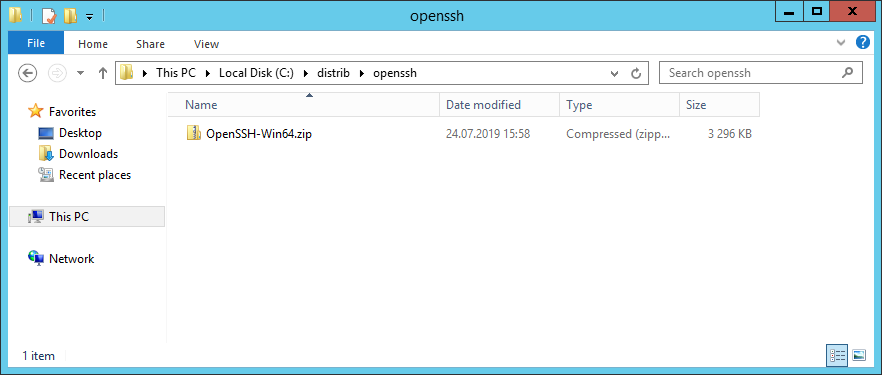
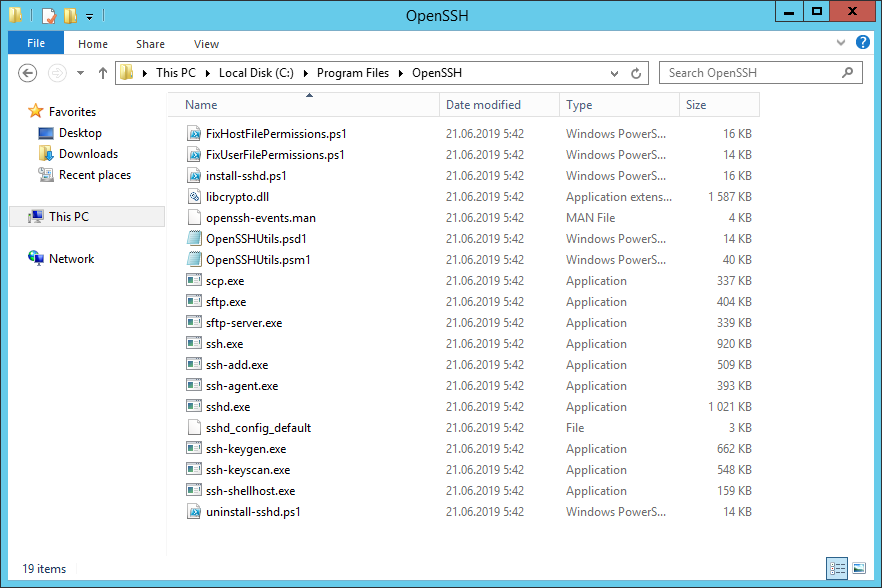
Создаю директорию C:Program FilesOpenSSH, распаковываю в неё содержимое архива.
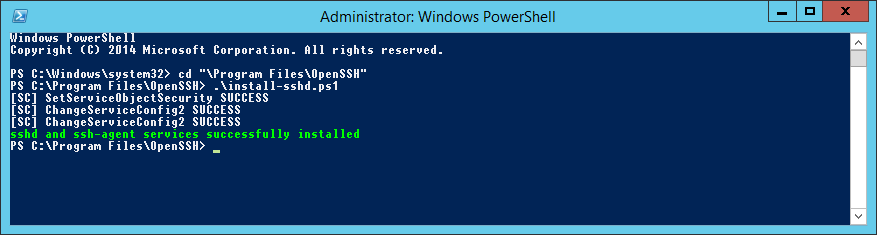
Запускаю powershell от имени администратора.

Выполняю скрипт установки:
cd "Program FilesOpenSSH"
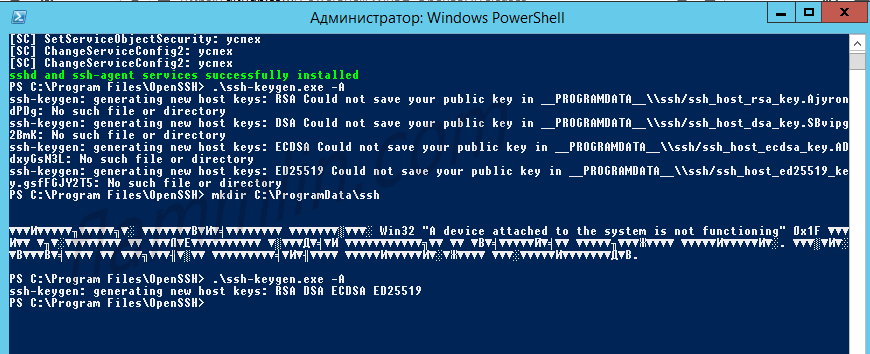
.install-sshd.ps1sshd and ssh-agent services successfully installed
Если произошла ошибка политики безопасности, то можно выполнить установку так:
powershell -ExecutionPolicy Bypass -File .install-sshd.ps1Генерирую ключи:
.ssh-keygen.exe -AВ результате вижу ошибку:
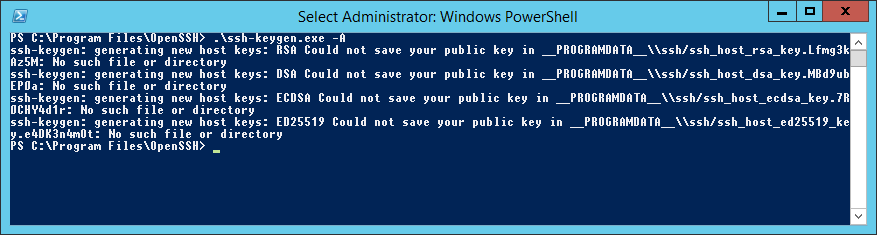
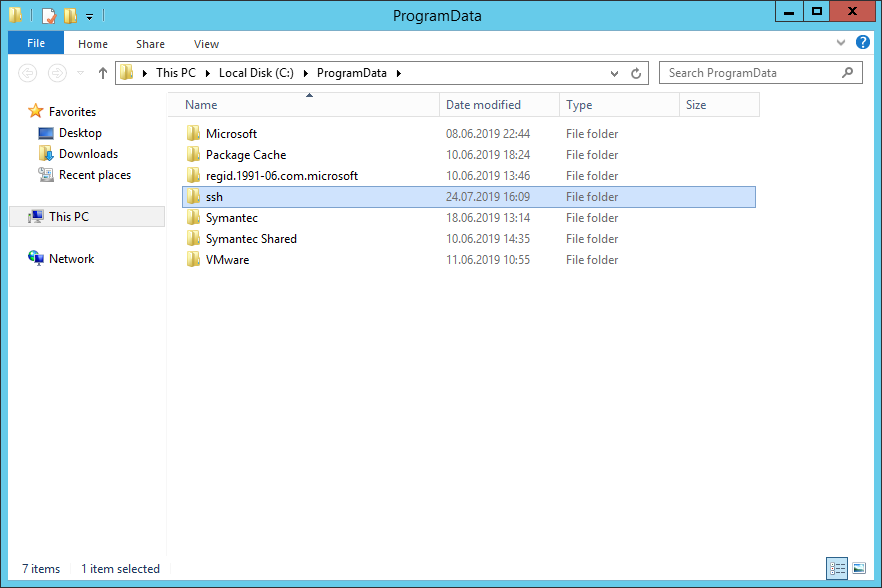
Исправляется легко, захожу в папку C:ProgramData и создаю вручную директорию «ssh».
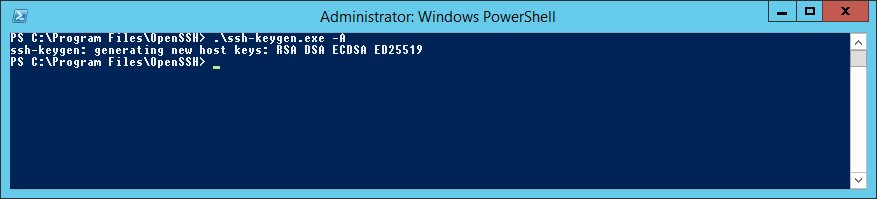
Снова пытаюсь сгенерировать ключи:
.ssh-keygen.exe -AНа этот раз процедура выполняется успешно.
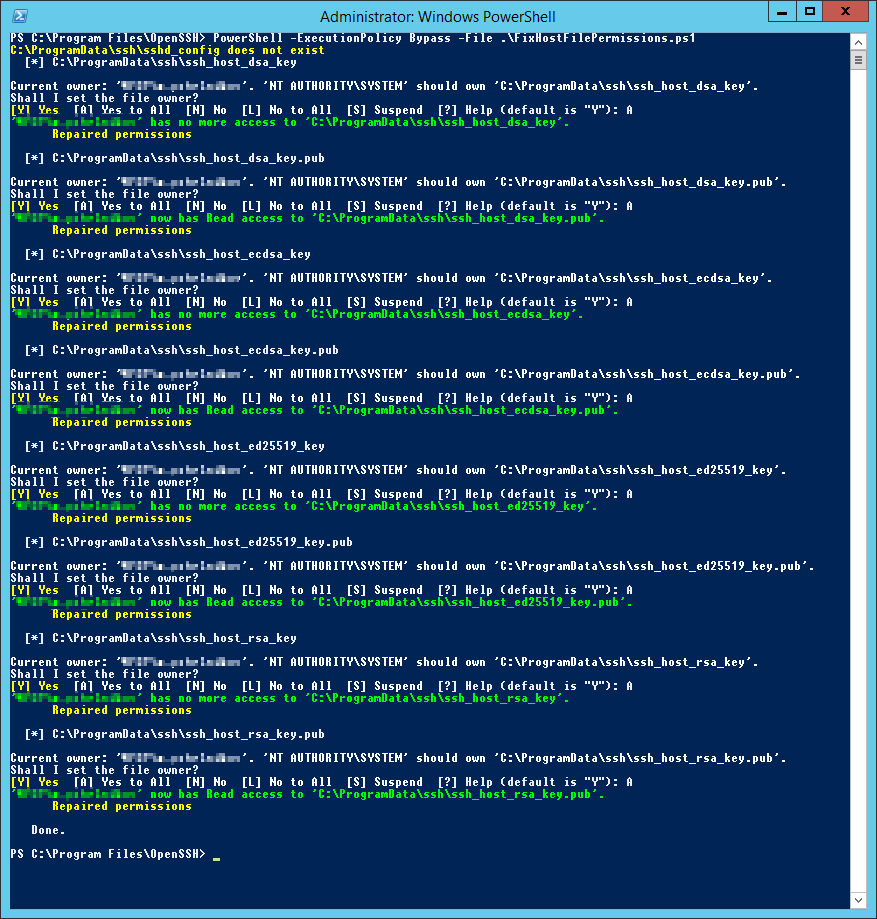
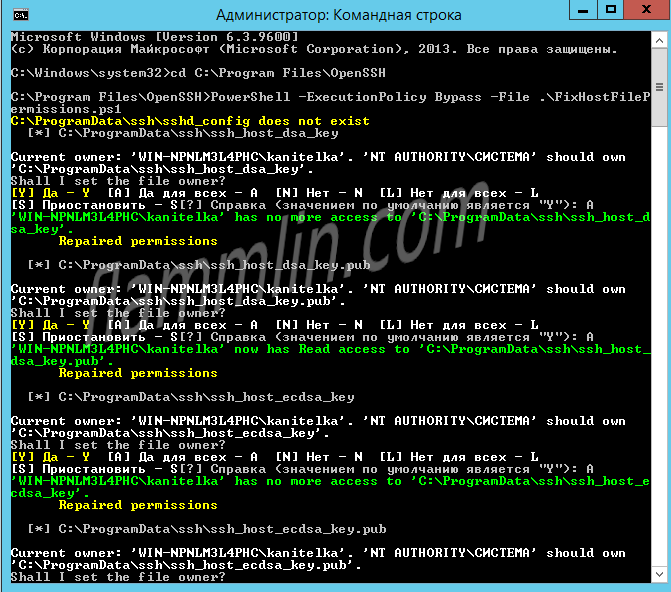
Настраиваю владельца файлов и права доступа:
PowerShell -ExecutionPolicy Bypass -File .FixHostFilePermissions.ps1На каждый вопрос отвечаю «A».
Открыть 22 порт
OpenSSH работает по порту TCP 22. Открою доступ в Firewall:
New-NetFirewallRule -Protocol TCP -LocalPort 22 -Direction Inbound -Action Allow -DisplayName SSH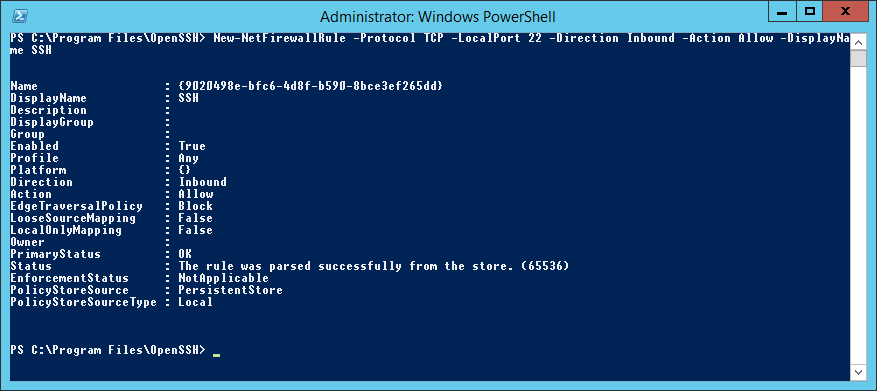
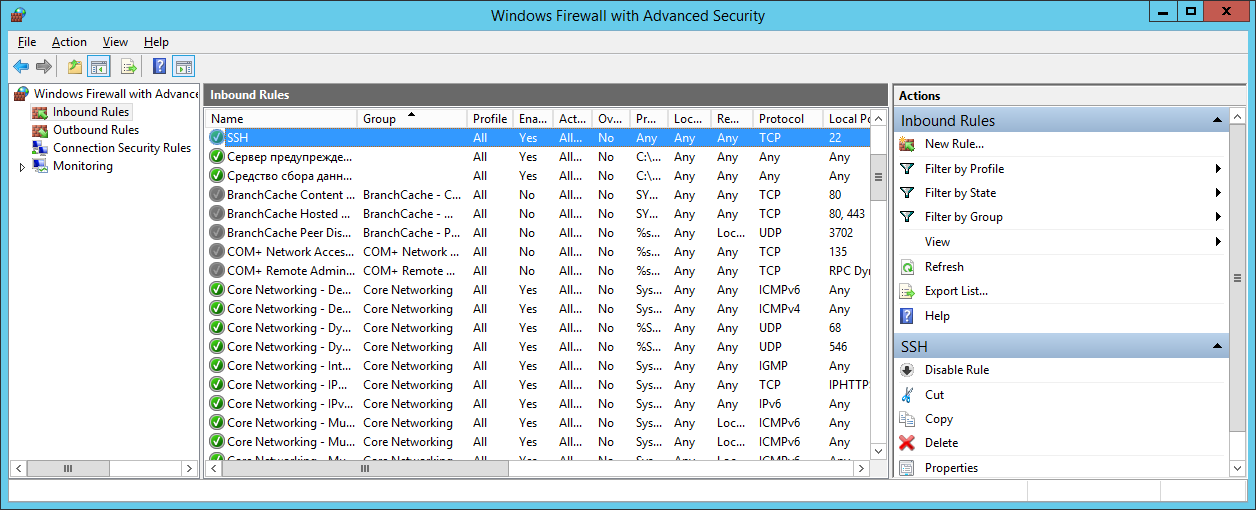
То же самое можно сделать через GUI в оснастке Windows Firewall with Advanced Security.
Запуск службы OpenSSH
Открываю список служб:
services.msc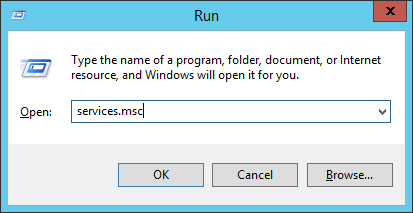
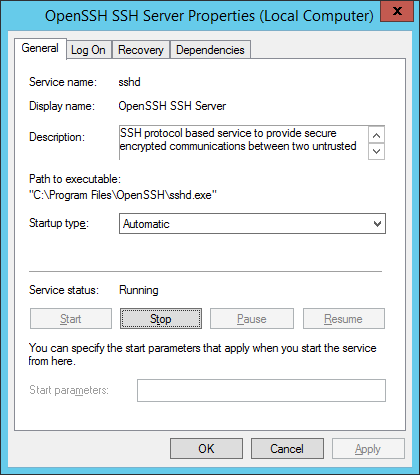
Нахожу службу «OpenSSH SSH Server». В свойствах службы делаю автоматический запуск и запускаю её.
Проверим что 22 порт работает:
netstat -tan | find "22"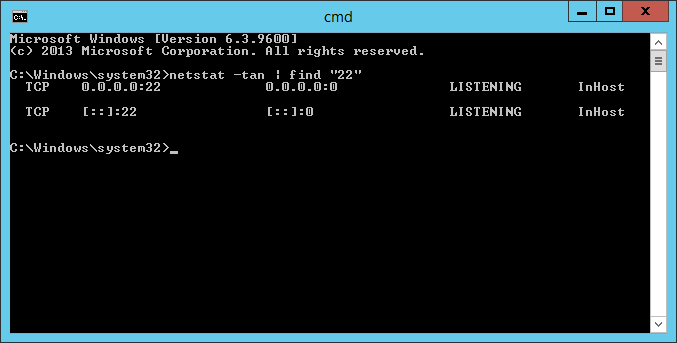
22 порт слушается.
Проверка OpenSSH
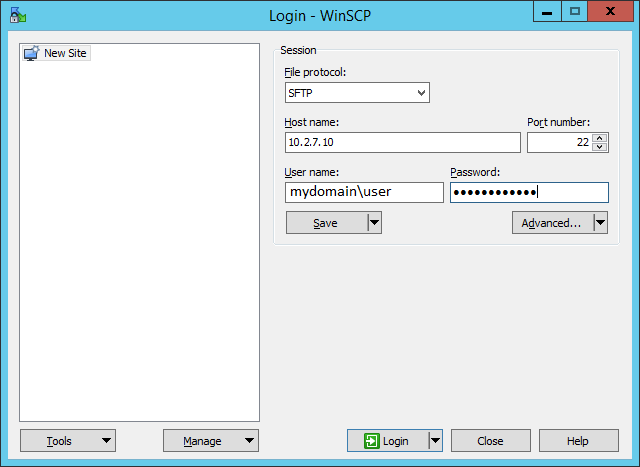
Проверю с помощью WinSCP. Для доменного пользователя используется логин вида domainusername.
При первом входе появится окно:
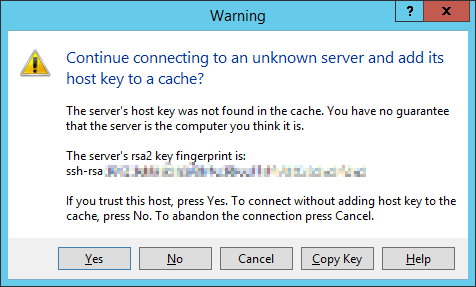
Yes.
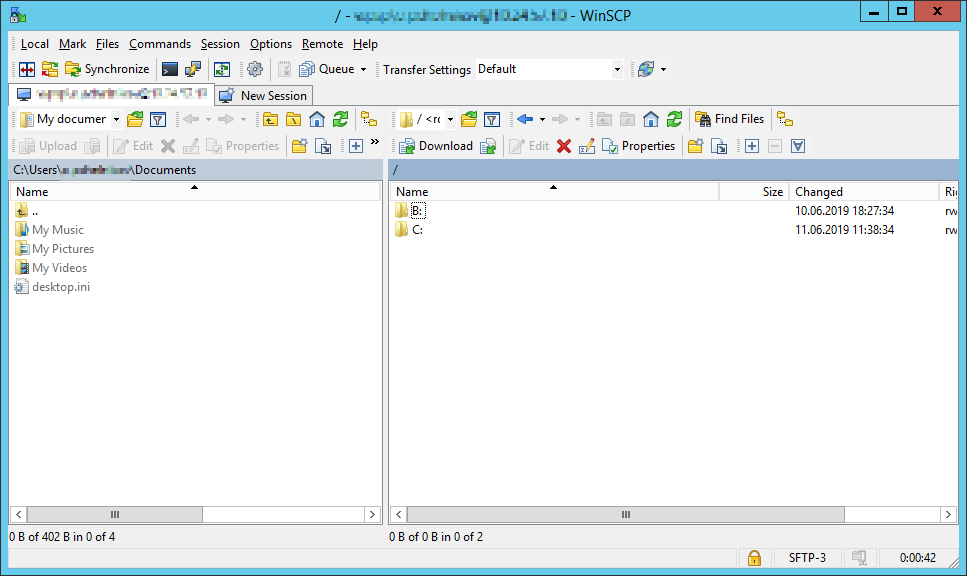
Всё работает.
Настройка доступа
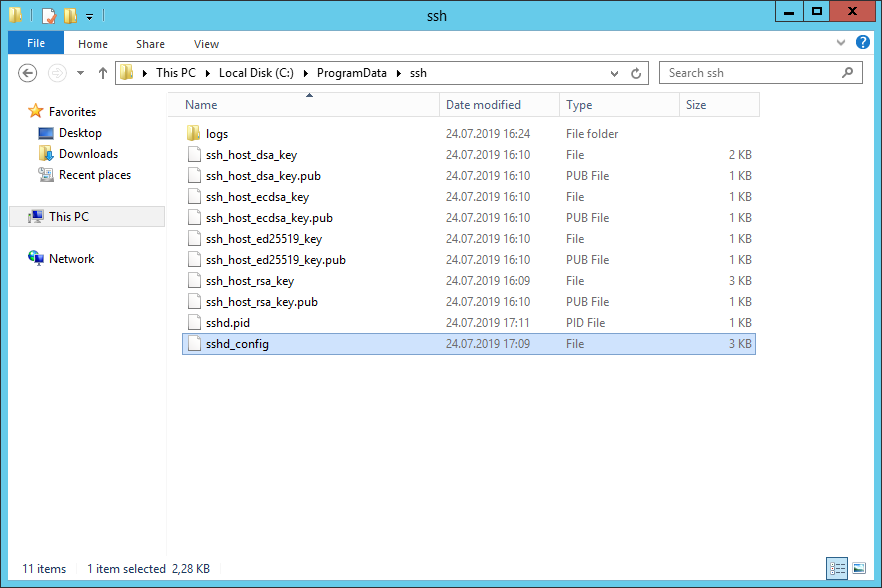
Конфигурационный файл находится здесь: C:ProgramDatasshsshd_config.
Собственно, OpenSSH конфигурируется здесь. Например, чтобы разрешить доступ по OpenSSH определённой группе пользователей, допишу в конец файла:
DenyUsers *
AllowGroups my_domainmy_group_for_ssh_access
Прочитано:
2 426
Пролистывая задачи на фриланс биржах наткнулся на такой вопрос — просьба поставить на Windows Server 2012 R2 сервис для безопасного подключения через SSH, т. к. на другом конце — сотрудник имевший в свою очередь практическое знакомство только с Linux серверами и ему консоль ближе. Данная тема также интересна, помнится мне что ранее я уже разбирал как поставить возможность подключения к Windows 7 через ssh, сейчас же разберу и для текущей задачи.
Итак есть установленная система из оригинального образа Windows Server 2012 R2 (English), имеется одна учетная запись Administrator с паролем 712mbddr@, некоторые действия будут браться из ранее опубликованной.
На момент написания данной заметки версия Cygwin — 2.876, а версия пакета openssh: — 7.3p1-2
Далее запускаю терминал cygwin:
Win +X — Command Prompt (Admin) -
C:CygwinCygwin.bat
Administrator@srv-ad ~
$ и мигает курсор ожидающий ввода команд
Генерируем ключи доступа (публичный и приватный):
$ ssh-host-config -y
*** Query: Please enter the password: 712mbddr@
*** Query: Reenter: 712mbddr@
$
Теперь переключаюсь через сочетание клавиш Alt + Tab во все еще открытое окно командной строки Windows и настраиваю правила для брандмауэра:
C:Windowssystem32>sc config sshd start= auto
C:Windowssystem32>net start sshd
C:Windowssystem32>netsh advfirewall firewall add rule name="SSH Server" dir=in protocol=tcp localport=22 action=allow
Ok.
C:Windowssystem32>netstat -an | findstr :22
TCP 0.0.0.0:22 0.0.0.0:0 LISTENING
TCP [::]:22 [::]:0 LISTENING
Отлично.
Если же нужно повесить сервис SSH на другой порт, то за редактирование следует обратиться к конфигурационному файлу который находится если через Alt +Tab переключиться в bash консоль или вызвать bat файл запускающий ее: C:CygwinCygwin.bat
(На заметку: работа с консольным редактором vi по аналогии, как и в Ubuntu)
$ vi /etc/sshd_config
Port 22
MaxAuthTries 6
MaxSessions 3
PasswordAuthentication yes
После нажимаю: Esc → :wq!
На заметку: вообще это честно говоря пародия на bash консоль, т. к. не с первого раза отрабатывает переключение в режим редактирования, да и странным образом ведут себя другие команды. А потому советую перед боевым редактированием сперва сделать резервную копию редактируемого файла.
,либо же не переключаюсь в консоль Cygwin, вызвать текстовый редактор notepad и отредактировать конфиг:
C:Windowssystem32>notepad c:Cygwinetcsshd_config
вот только все форматирование хромает, да и при сохранении не удается сохранить файл без расширения.
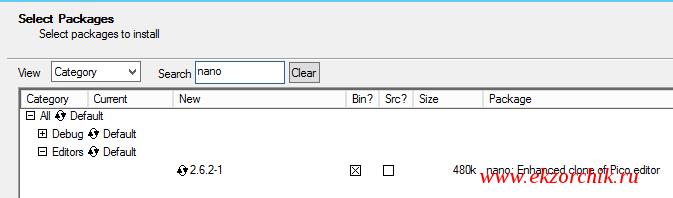
Все же лучше поставить простой редактор nano. Для этого запускаем скачанный файл: setup-x86_64.exe, далее все как обычно указываем сервер и пакет: nano
$ nano /etc/sshd_config
Port 22
Protocol 2
MaxAuthTries 6
MaxSessions 3
PasswordAuthentication yes
После: Ctrl + O, Ctrl + X и все, чем проще тем лучше.
Теперь нужно перезапустить сервис sshd для активации изменений:
(Остановить сервис sshd)
$ cygrunsrv.exe -E sshd
(Запустить сервис sshd)
$ cygrunsrv.exe -S sshd
или по старинке:
$ net stop sshd
The CYGWIN sshd service is stopping.
The CYGWIN sshd service was stopped successfully.
$ net start sshd
The CYGWIN sshd service is starting.
The CYGWIN sshd service was started successfully.
И если было настроено правило в брандмауэре на 22 порт, то видоизменяем правило:
$ netsh advfirewall firewall show rule name=all | findstr "SSH"
Rule Name: SSH Server
$ netsh advfirewall firewall set rule name="SSH Server" new localport=22777
Updated 1 rule(s).
Ok.
Проверяем, что можно с Ubuntu 12.04.5 Desktop amd64 системы подключиться к Windows Server 2012 R2 через ssh:
aollo@system:~$ ssh -l Administrator 10.7.8.193 -p 22777
The authenticity of host ‘[10.7.8.193]:22777 ([10.7.8.193]:22777)’ can’t be established.
ECDSA key fingerprint is 42:4e:f6:93:5c:f4:39:bc:44:a7:68:e9:92:de:05:e7.
Are you sure you want to continue connecting (yes/no)? yes
Warning: Permanently added ‘[10.7.8.193]:22777’ (ECDSA) to the list of known hosts.
Administrator@10.7.8.193’s password:712mbddr@
Administrator@srv-ad ~
$
$ net stop Themes
The Themes service is stopping.
The Themes service was stopped successfully.
Итого подключение успешно прошло, а если нужно поставить какое либо ПО (пакет lynx) без необходимости запускать инсталлятор (GUI оболочку) то сделать это можно так:
$ cd c:/Users/Administrator/Downloads/
$ cygcheck.exe -p 'lynx' | grep lynx
Found 12 matches for lynx
lynx-debuginfo-2.8.7-2 — lynx-debuginfo: Debug info for lynx (installed binaries and support files)
lynx-2.8.7-2 — lynx: A text-based Web Browser (installed binaries and support files)
lynx-2.8.7-2-src — lynx: A text-based Web Browser (source code)
$ ./setup-x86_64.exe --root c:/Cygwin --no-desktop --no-shortcuts --no-startmenu --quiet-mode -q -P lynx
Starting cygwin install, version 2.876
User has backup/restore rights
Current Directory: c:/Cygwin
Could not open service McShield for query, start and stop. McAfee may not be installed, or we don’t have access.
root: c:Cygwin system
Selected local directory: c:/Cygwin
net: Direct
site: http://cygwin.mirror.constant.com/
Downloaded c:/Cygwin/http%3a%2f%2fcygwin.mirror.constant.com%2f/x86_64/release/lynx/lynx-2.8.7-2.tar.bz2
Extracting from file://c:/Cygwin/http%3a%2f%2fcygwin.mirror.constant.com%2f/x86_64/release/lynx/lynx-2.8.7-2.tar.bz2
Changing gid back to original
running: c:Cygwinbindash.exe «/etc/postinstall/0p_000_autorebase.dash»
running: c:Cygwinbindash.exe «/etc/postinstall/0p_update-info-dir.dash»
running: c:Cygwinbinbash.exe —norc —noprofile «/etc/postinstall/lynx.sh»
Changing gid to Administrators
Ending cygwin install
На заметку: также можно ставить несколько пакетов просто перечисляя их после ключа: -P tar,wget,lynx,unrar
Что еще, вроде как есть специальный пакет на подобии утилиты apt-get как в Ubuntu и с его помощью можно устанавливать пакеты привычным мне способом:
$ wget raw.github.com/transcode-open/apt-cyg/master/apt-cyg
$ chmod +x apt-cyg
$ mv apt-cyg c:/Cygwin/bin/
$ apt-cyg install curl
Installing curl
—2016-09-19 11:45:49— http://cygwin.mirror.constant.com//x86_64/release/curl/curl-7.50.3-1.tar.xz
Resolving cygwin.mirror.constant.com (cygwin.mirror.constant.com)… 108.61.5.83
Connecting to cygwin.mirror.constant.com (cygwin.mirror.constant.com)|108.61.5.83|:80… connected.
HTTP request sent, awaiting response… 200 OK
Length: 289508 (283K) [application/octet-stream]
Saving to: ‘curl-7.50.3-1.tar.xz’
и далее, весь вывод установки приводить здесь не имеет смысла главное его конечная цель — пакет установлен.
Ладно что-то я отклонился от темы данной заметки, но все равно любой представленный материал у меня на блоге полезен. Так хоть и не совсем тривиальной был разбор как же все-таки установить openssh сервер на Windows Server 2012 R2 с упором на командную строку, с GUI же конечно же было бы проще, но нужно всегда заходить к решению проблемы с того, чего может не оказаться под рукой. А с помощью этой заметки я показал, как все же сделать. Итого, заметка функциональна и практична, на этом я прощаюсь, с уважением автор блога — ekzorchik.

Для удаленного запуска скриптов на Windows Server 2012 решил установить OpenSSH Server. В Windows Server 2019 такая задача проходит легко, OpenSSH спрятан в программы и компоненты, пару галочек и все готово.
Дистрибутив для установки находится на гитхабе. Установка заключается в запуске скриптов на PowerShell.
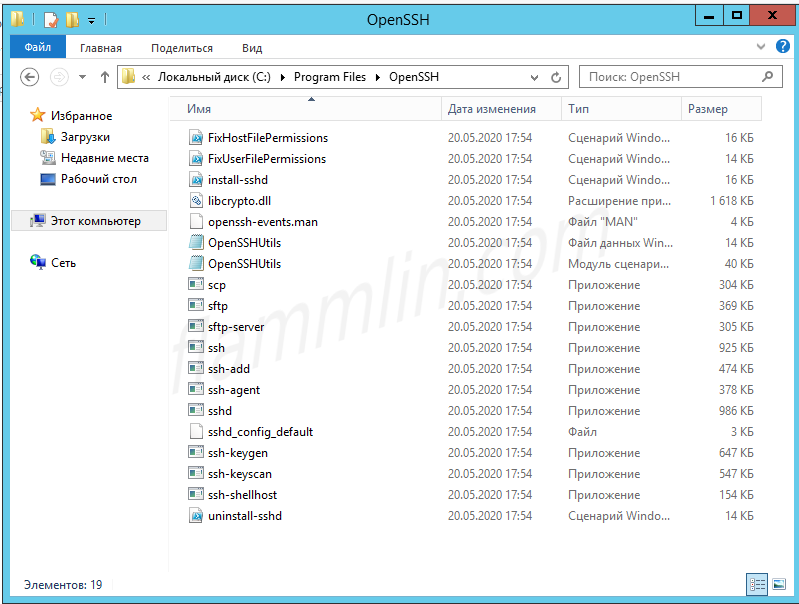
Скачиваем последнюю версию программы и извлекаем архив. Распакованный архив копируем в C:Program FilesOpenSSH
Запускаем консоль PowerShell от имени администратора и запускам скрипт:
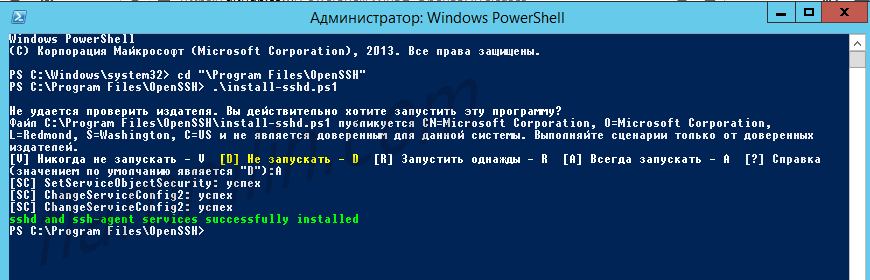
Дальше необходимо сгенерировать ключи:
Что бы избежать ошибки при генерации ключей, необходимо создать папку SSH в C:ProgramData
Далее необходимо проверить права доступа на файлы запустив скрипт:
|
.FixHostFilePermissions.ps1 |
На возникающие вопросы в скрипте отвечаем — А.
Если используется Windows Firewall, то необходимо добавить исключение для 22 порта.

Правило добавляется командой:
|
New—NetFirewallRule —Protocol TCP —LocalPort 22 —Direction Inbound —Action Allow —DisplayName Allow—SSH |
Теперь необходимо включить службу OpenSSH SSH Server в оснастке служб.

Тип запуска указываем автоматический и жмем кнопку — запустить.
You can use the built-in OpenSSH package in Windows to easily enable secure file transfers between the client and Windows server using the SFTP (Secure FTP) protocol. In this article, we will show how to install and configure an SFTP server on Windows 10 or Windows Server 2022/2019/2016/2012R2.
Contents:
- How to Install OpenSSH on Windows?
- How to Configure SFTP Server on Windows Using OpenSSH?
- Connecting to SFTP Server Using WinSCP or PowerShell
- Configuring SFTP Public Key Authentication
SFTP (Secure File Transfer Protocol, Secure FTP, or SSH FTP) is the extension of SSH protocol, which is the standard in the world of UNIX/Linux systems. From the user’s point of view, it is similar to FTP, but in fact, it is a completely different protocol, having nothing in common with FTP. Data between the client and the server is transmitted on port 22 through an SSH tunnel (TCP port 22).
The main advantages of SFTP:
- Files and commands are transferred within a secure SSH session;
- One connection is used to send both files and commands;
- Symbolic links, interrupt/resume the transfer, file delete functions, etc. are supported;
- SFTP connection is much faster and more reliable on WAN links where FTP is slow or intermittent;
- Possibility to authenticate using SSH keys.
Do not confuse SFTP and FTPS protocols. FTPS is essentially just a simple FTP with an SSL certificate, and SFTP is the protocol to transfer the FTP data and commands inside the SSH session.
The win32 port of OpenSSH (Win32-OpenSSH) is built into all modern versions of Windows by default. You can use it to configure a secure SFTP server instead of using third-party products like Core FTP, FileZilla, CYGWIN, FTP Shell, IPSwitch, etc.
How to Install OpenSSH on Windows?
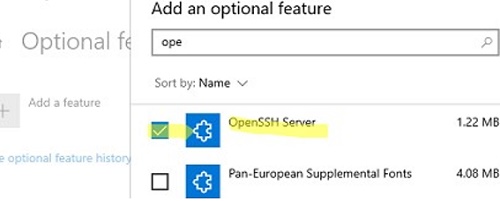
The OpenSSH package is a part of the operating system in modern builds of Windows 10 (starting from 1803), Windows 11, and Windows Server 2022/2019 as a Feature on Demand (like RSAT).
On these versions of Windows, you can install the OpenSSH server using PowerShell:
Add-WindowsCapability -Online -Name OpenSSH.Server*
Or using DISM:
dism /Online /Add-Capability /CapabilityName:OpenSSH.Server~~~~0.0.1.0
Also, you can install OpenSSH server from Windows 10 GUI (Settings -> Apps -> Optional Features -> Add a feature -> Open SSH Server -> Install).
To check if a package is installed:
Get-WindowsCapability -Online | ? Name -like 'OpenSSH*'
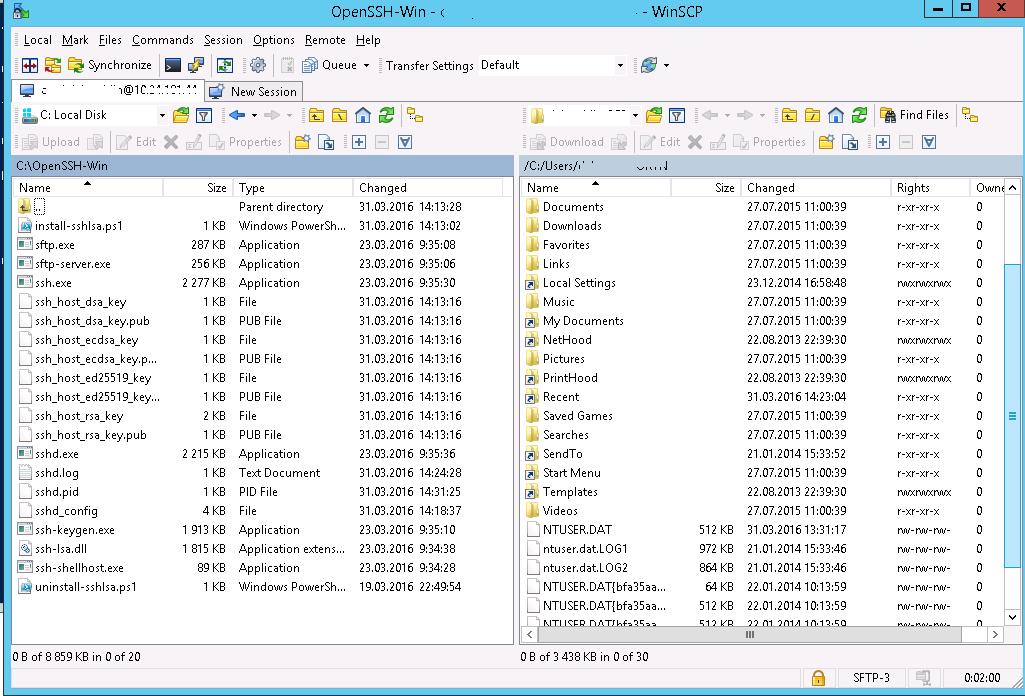
- OpenSSH executables are located in the directory:
c:windowssystem32OpenSSH; - The sshd_config configuration file is located in
C:ProgramDatassh(this directory is created after the first start of the sshd service); - Log file:
c:windowssystem32OpenSSHlogssshd.log; - The authorized_keys file and keys are stored in a directory:
%USERPROFILE%.ssh.
On the previous earlier builds of Windows 10, Windows 8.1, and on Windows Server 2016/2012 R2, you will have to download Win32-OpenSSH for Windows from GitHub and install it manually (https://github.com/PowerShell/Win32-OpenSSH/releases). We need a version for Windows x64: OpenSSH-Win64.zip (4,15 MB).
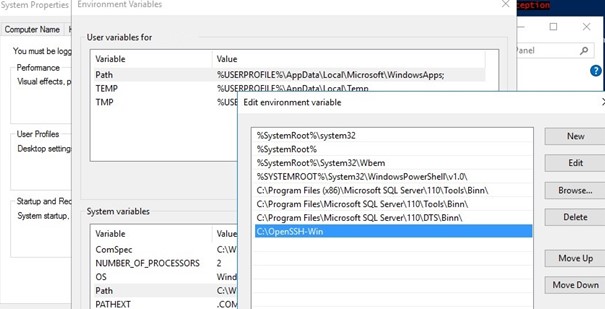
- Extract the archive to the target folder: C:OpenSSH-Win;
- Open an elevated PowerShell prompt and switch to the OpenSSH folder:
Cd C:OpenSSH-Win - Add the path to the OpenSSH directory to the Path environment variable (System Properties -> Advanced tab -> Environment Variables -> Select and edit the Path system variable -> Add the path to the OpenSSH folder);

- Install the OpenSSH server:
.install-sshd.ps1(a green message should appear “sshd and ssh-agent services successfully installed”);If running PowerShell scripts on your computer is blocked by your PowerShell Execution Policy, you can run the script with this command:
powershell.exe -ExecutionPolicy Bypass -File install-sshd.ps1

How to Configure SFTP Server on Windows Using OpenSSH?
Now you need to configure OpenSSH on Windows for SFTP mode.
Enable autostart for the SSHD service and start it using the following PowerShell service management commands:
Set-Service -Name sshd -StartupType 'Automatic'
Start-Service sshd
Use the PowerShell to open TCP port 22 in the Windows Firewall for incoming SSH traffic:
New-NetFirewallRule -Protocol TCP -LocalPort 22 -Direction Inbound -Action Allow -DisplayName SSH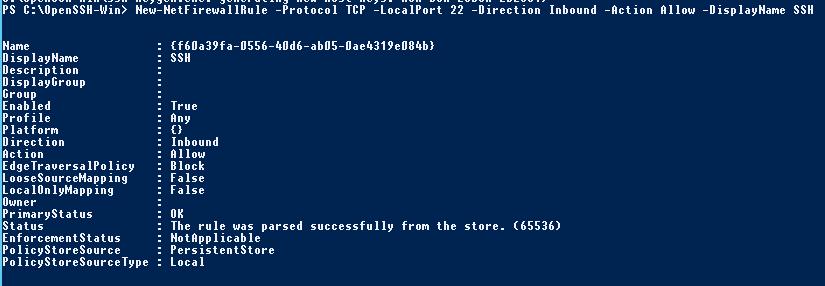
Note. The previous command won’t work in old desktop Windows versions. In this case, another command is used: netsh advfirewall firewall add rule name='SSH Port' dir=in action=allow protocol=TCP localport=22
Open the SSHD configuration file (C:ProgramDataSSHsshd_config) in any text editor. Find and check the value of the Subsystem sftp directive. The sftp-server.exe file should be specified here.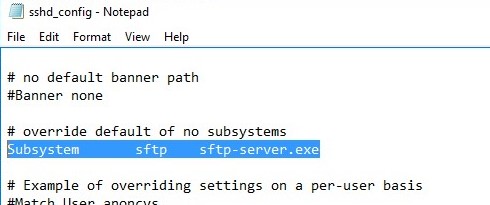
You can additionally configure the following parameters in the sshd_config configuration file:
# only allow users in this domain group to connect to OpenSSH
AllowGroups corpsftp_users
# enable password authentication (SSH keys cannot be used)
AuthenticationMethods password
#default (chrooot) directory for SFTP users  (by default, the user connects to the directory with his profile in the C:usersusername folder)
ChrootDirectory C:SFTP
ForceCommand internal-sftp
#You can set an individual chrootdirectory for each user:
Match User abrown
ChrootDirectory c:SFTPabrown
ForceCommand internal-sftp
X11Forwarding no
AllowTcpForwarding no

Match User jsmith
ChrootDirectory c:SFTPjsmith
ForceCommand internal-sftp
X11Forwarding no
AllowTcpForwarding no
Connecting to SFTP Server Using WinSCP or PowerShell
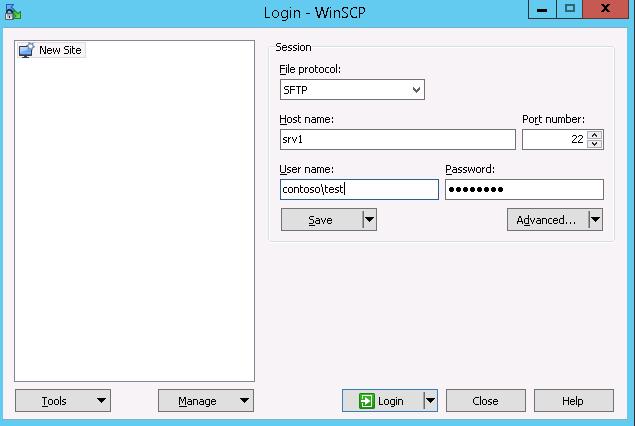
Now you can connect to your Windows SSH server using the SFTP protocol. Next, we’ll show you how to connect to an SFTP server using the free WinSCP client, the PowerShell console, and the built-in sftp.exe tool.
In the connection configuration window, select the SFTP as the file transfer protocol, specify the server name and the credentials of the Windows account (use the user@domain format for domain users), which is used for connection (it is also possible to configure public key authentication).
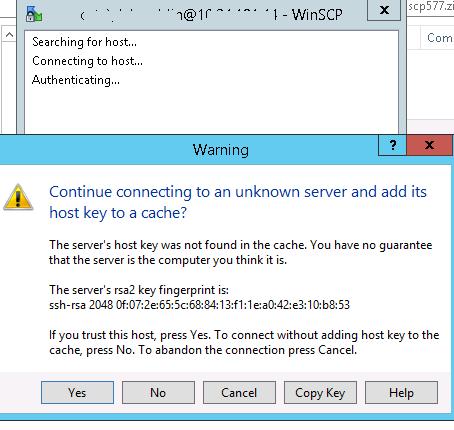
When you try to connect for the first time, the following notification of the host key not found in the local cache appears.
If everything is configured correctly, a client should connect to the SFTP server and display the list of files in the user’s home chroot directory (by default, it is the user’s profile directory).
Using the familiar file manager interface (like Total Commander), you can copy files between the server and the client using the secure SFTP protocol.
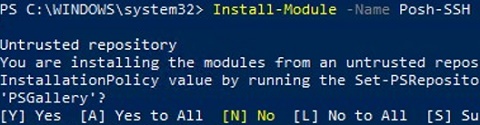
You can use the Posh-SSH module to connect to an SFTP server from PowerShell. You can download and install the module from the PowerShell Gallery or offline:
Install-Module -Name Posh-SSH
To connect to the SFTP server using a password, you need to get the username and password via Get-Credential:
$usrCreds= Get-Credential
Now you can connect to your SFTP server:
$SFTPSession = New-SFTPSession -ComputerName 192.168.3.20 -Credential $usrCreds
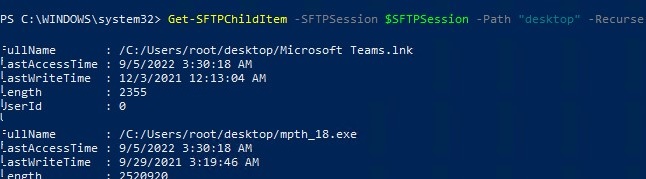
Now you can list the files in the remote directory on the SFTP server. In this example, I will get a list of files on the user’s Desktop (the user’s profile will be the root user folder/chroot in this case)
Get-SFTPChildItem -SFTPSession $SFTPSession -Path "desktop" –Recurse
Download a file from a remote SFTP server:
Get-SFTPItem -SessionId $SFTPSession.SessionId -Path "desktop/OpenVPNScript.log" -Destination c:PS
To upload a file from your computer to a remote SFTP host:
Set-SFTPItem -SessionId $SFTPSession.SessionId -Path C:PSmytestfile.log -Destination "desktop"
![]()
Close the SFTP session:
Remove-SFTPSession -SFTPSession $SFTPSession
On Windows, you can use the built-in sftp.exe console command (installed with the OpenSSH client) to connect to an SFTP server.
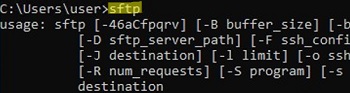
Connect to sftp server:
sftp user1@192.168.3.20
Connect using ssh private key:
sftp -i .ssh/id_rsa user1@192.168.3.20
List files in a remote directory:
pwd
Download the file from SFTP to a local directory on your computer:
get download_this_file_from_sftp.txt
Upload a file from your computer to an SFTP server:
put file_to_uplodad.txt
Close session:
exit
Configuring SFTP Public Key Authentication
You can enable SFTP key-based authentication in Windows. In this case, you can authenticate to the SFTP server without entering a password.
- Create SSH keys on your computer (SFTP client) for the user under which you will connect to the server:
ssh-keygen -t ed25519
- The ssh-keygen tool will generate two files id_ed25519 (private key for the client computer) and id_ed25519.pub (public key for the SFTP server);
- Now you need to add your SSH key to the Windows server (SFTP host). Copy the file id_ed25519.pub (or id_rsa.pub depending on the key type) to the .ssh directory of the user profile under which you will connect to the SFTP. Rename the file to authorized_keys (for example, the following key file is used for the user
max1:C:Usersmax1.sshauthorized_keys)
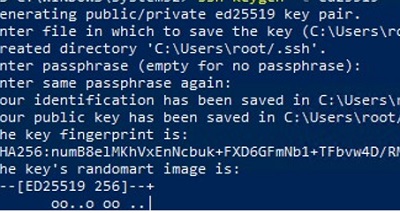
Now you can use the id_ed25519 file to authenticate on the SFTP server. You can set your key in the WinSCP settings (Advanced -> to SSH connection settings > Authentication page -> Private key file).
If you want to use an SSH key when connecting to SFTP from PowerShell, use the following command:
New-SFTPSession -ComputerName 192.168.3.20 -Credential remoteuser1 -KeyFile C:Usersmax1.sshid_ed25519" -Verbose
Whenever I need some Cygwin functionality on my Windows hosts, I always prefer pre-packaged solutions (Mobaxterm for ssh client on Windows, CopSSH for SSHD, etc.). This time around I needed a free SSH server for Windows 2012R2 host without the limits imposed by recent CopSSH free version. I decided that I’ll try to use SSHD from cygwin.com directly, something that I tried to avoid in the last decade.
1) INSTALLATION
First you’ll need to download installer from cygwin.com, save the file in some temporary directory. I downloaded 64-bit version because I’ll be installing 64-bit packages. More precisely, I selected the following packages and their dependencies: nano, zip, unzip, OpenSSH, openssl and rlwrap.
Run the installer and follow the wizard, here are screenshots from my host:


2) CONFIGURATION
2.1 Should we edit cygwin.bat?
You’ll probably find numerous recommendation on the net (and even in Oracle documentation — “Enterprise Manager Cloud Control Basic Installation Guide”) that first thing you should do is to open cygwin.bat and insert line set CYGWIN=binmode ntsec, so that bat would look like:
notepad c:cygwincygwin.bat
@echo off

C:ssh
chdir C:cygwinbin
set CYGWIN=binmode ntsec      << INSERTED LINE
bash --login -i
Both parameters are obsolete in cygwin 1.7, so I believe we can safely skip this step and leave cygwin.bat in original state.
2.2 Test installation
Open C:cygwincygwin.bat and run:
$ cygrunsrv -h
and you should see help for cygwrunsrv, otherwise something went wrong and you’ll likely have to re-install.
2.3 Configure SSHD service by opening cygwin.bat with “Run as Administrator” privilege:
$ ssh-host-config
*** Info: Generating missing SSH host keys
ssh-keygen: generating new host keys: RSA1 RSA DSA ECDSA ED25519
*** Info: Creating default /etc/ssh_config file
*** Info: Creating default /etc/sshd_config file

*** Info: StrictModes is set to 'yes' by default.
*** Info: This is the recommended setting, but it requires that the POSIX
*** Info: permissions of the user's home directory, the user's .ssh
*** Info: directory, and the user's ssh key files are tight so that
*** Info: only the user has write permissions.
*** Info: On the other hand, StrictModes don't work well with default
*** Info: Windows permissions of a home directory mounted with the
*** Info: 'noacl' option, and they don't work at all if the home
*** Info: directory is on a FAT or FAT32 partition.
*** Query: Should StrictModes be used? (yes/no)  yes

*** Info: Privilege separation is set to 'sandbox' by default since
*** Info: OpenSSH 6.1.  This is unsupported by Cygwin and has to be set
*** Info: to 'yes' or 'no'.
*** Info: However, using privilege separation requires a non-privileged account
*** Info: called 'sshd'.
*** Info: For more info on privilege separation read /usr/share/doc/openssh/README.privsep.
*** Query: Should privilege separation be used? (yes/no) yes

*** Info: Note that creating a new user requires that the current account have
*** Info: Administrator privileges.  Should this script attempt to create a
*** Query: new local account 'sshd'? (yes/no) yes

*** Info: Updating /etc/sshd_config file

*** Query: Do you want to install sshd as a service?
*** Query: (Say "no" if it is already installed as a service) (yes/no) yes
*** Query: Enter the value of CYGWIN for the daemon: [] binmode ntsec

*** Info: On Windows Server 2003, Windows Vista, and above, the
*** Info: SYSTEM account cannot setuid to other users -- a capability
*** Info: sshd requires.  You need to have or to create a privileged
*** Info: account.  This script will help you do so.

*** Info: It's not possible to use the LocalSystem account for services
*** Info: that can change the user id without an explicit password
*** Info: (such as passwordless logins [e.g. public key authentication]
*** Info: via sshd) when having to create the user token from scratch.
*** Info: For more information on this requirement, see
*** Info: https://cygwin.com/cygwin-ug-net/ntsec.html#ntsec-nopasswd1

*** Info: If you want to enable that functionality, it's required to create
*** Info: a new account with special privileges (unless such an account
*** Info: already exists). This account is then used to run these special
*** Info: servers.

*** Info: Note that creating a new user requires that the current account
*** Info: have Administrator privileges itself.

*** Info: No privileged account could be found.

*** Info: This script plans to use 'cyg_server'.
*** Info: 'cyg_server' will only be used by registered services.
*** Query: Do you want to use a different name? (yes/no) no
*** Query: Create new privileged user account 'ACMEHOSTcyg_server' (Cygwin name: 'cyg_server')? (yes/no) yes

*** Info: Please enter a password for new user cyg_server.  Please be sure
*** Info: that this password matches the password rules given on your system.
*** Info: Entering no password will exit the configuration.
*** Query: Please enter the password: mysecret
*** Query: Reenter:

*** Info: User 'cyg_server' has been created with password 'mysecret'.
*** Info: If you change the password, please remember also to change the
*** Info: password for the installed services which use (or will soon use)
*** Info: the 'cyg_server' account.

*** Warning: Expected privileged user 'cyg_server' does not exist.
*** Warning: Defaulting to 'SYSTEM'

*** Info: The sshd service has been installed under the LocalSystem
*** Info: account (also known as SYSTEM). To start the service now, call
*** Info: `net start sshd' or `cygrunsrv -S sshd'.  Otherwise, it
*** Info: will start automatically after the next reboot.

*** Info: Host configuration finished. Have fun!
Note the line 33:
*** Query: Enter the value of CYGWIN for the daemon: [] binmode ntsec
Here you should enter any env. variables for cygwin daemon if any. I did NOT set those two variables, they’re here only as a note point. According to cygwin documentation, both parameters are obsolete since Cygwin 1.7, I believe the only reason both parameter are still listed, even in Oracle current documentation, is that someone found some old “how-to” on the net (which was valid before 1.7 release) and took it as granted.
After configuration you should check services, you should see CYGWIN sshd….

and two new local accounts, cyg_server and sshd…

2.4) Enable existing local user account to connect to SSH daemon
// take a backup if by any chance you already have a passwd file (not the case for fresh installation!)
copy C:cygwinetcpasswd C:cygwinetcpasswd.bak
Open cygwin.bat:
$ /bin/mkpasswd -l -u alesk >> /etc/passwd
The above command will write something like this in the passwd file:
ACMEHOST+alesk:*:197610:197121:U-ACMEHOSTalesk,S-1-5-21-1611771360-925472152-3555864332-1002:/home/alesk:/bin/bash
It means that you can connect to ACMEHOST from some remote workstation with:
$ ssh ACMEHOST+alesk@ACMEHOST
Not cool. I prefer using, simple:
$ ssh alesk@acmehost
so, I changed the username in /etc/passwd to:
alesk:*:197610:197121:U-ACMEHOSTalesk,S-1-5-21-1611771360-925472152-3555864332-1002:/home/alesk:/bin/bash
And for a domain account you would execute:
$ /bin/mkpasswd -d -u alesk >> /etc/passwd
$ mkdir -p /home/alesk
$ chown alesk /home/alesk
2.5) Edit ssh config file:
notepad C:cygwinetcsshd_config
or within cygwin.bat:
nano /etc/sshd_config
at the end of file add:
KexAlgorithms diffie-hellman-group-exchange-sha1,diffie-hellman-group1-sha1
I’m not sure what is the true reasoning for that, but probably for hardening the sshd security!?
2.6 Start SSH daemon:
Cygwin.bat
$ /usr/bin/sshd
or
$ cyrunsrv -S sshd
or start Windows service
Open cmd.exe with “Run as admninistrator”:
cmd> net stop "CYGWIN sshd"

cmd> net start "CYGWIN sshd"
If service doesn’t start check the log at C:cygwinvarlogsshd.log.
If you need to add some package afterwards, simply re-run setup.exe installer and check additional packages that you want to install.