Вы хотите перейти на более новую версию Windows Server? Пришло время обновить Windows Server 2012 до Windows Server 2016. В Windows Server 2016 появилось множество полезных функций и улучшений.
Отметим основные особенности Windows Server 2016 – данная платформа поддерживает только 64-битную архитектуру, версия Itanium не поддерживается. Кроме того, имеется всего четыре редакции Windows Server 2012 и 2016.
Обновление Windows Server – это сложный процесс. Поэтому Microsoft рекомендует администраторам переносить роли и настройки на новый сервер с Windows Server 2016 не используя обновление (в режиме новой установки и миграции ролей), из-за возможности появления ошибок.
В нашей статье мы расскажем, как проапгрейдить Windows Server 2012 до Server 2016 без переустаноки (хотя это и не рекомендуется).
- Особенности обновления и конвертации Windows Server
- Запуск апгрейда Windows Server 2012 до Windows Server 2016
- Установка Windows Server 2016
Содержание:
Особенности обновления и конвертации Windows Server
Чтобы обновить Windows Server 2012 до Server 2016, вам необходимо учесть следующие требования:
Все редакции Windows Serer 2016 бывают только 64 битные (обновление с 32-разрядной Windows Server 2008 до 64-разрядной версии невозможно).
Windows Server 2012 можно обновить до Server 2016, более ранние версии Windows Server такой сценарий не поддерживают.
Не поддерживается обновление с одной редакции на другую ( т.е. нельзя обновить Windows Server 2012 Standart до версии Windows Server 2016 Datacenter).
- Обновление с одного языка на другой не поддерживается.
- Обновление, с переключением из режима Server Core в режим полноценного GUI (и наоборот) также не поддерживается.
- Обновление ранее установленной Windows Server на пробную версию Windows Server не поддерживается. Ознакомительные версии должны быть установлены в режиме чистой установки.
- При апгерейде отключите антивирусную защиту, поскольку она замедляет процесс, так как антивирус сканирует каждый файл, копируемый на диск.
- Если сервер использует NIC Teaming, отключите его. Вы можете включить NIC Teaming после завершения обновления ОС сервера.
- Прежде чем обновлять сервер создайте его резервную копию. При возникновении ошибок или проблем у вас будет возможность откатить систему к исходному состоянию.
- Проверьте, нет ли у в журналах сервера проблем и ошибок, если они есть – их необходимо устранить. В противном случае это может привести к ошибкам, которые способны спровоцировать сбой процесса обновления.
Запуск апгрейда Windows Server 2012 до Windows Server 2016
Теперь, когда вам известны и понятны правила апгрейда версий, давайте начнем.
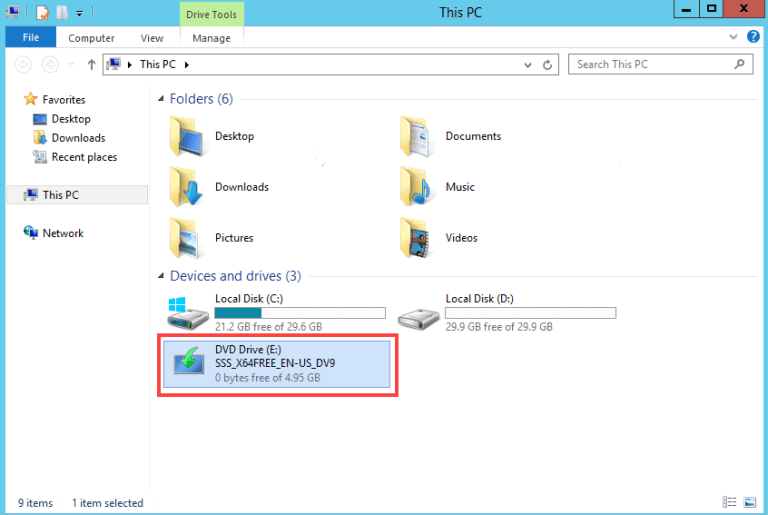
Авторизуйтесь на Windows Server 2012 и подключите к серверу установочный диск с Windows Server 2016 (в виде iso образа, или установочном DVD диске или USB флешке). Смонтируйте диск, откройте проводник и дважды щелкните по диску в устройстве DVD, чтобы запустить установку Windows Server 2016.
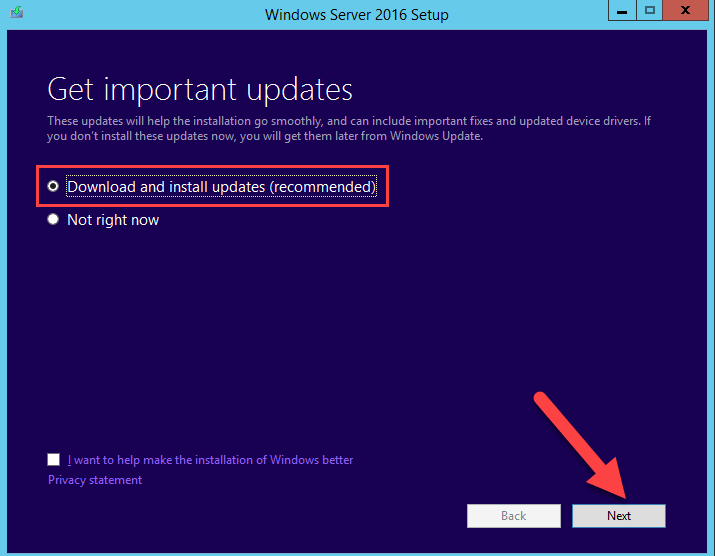
Выберите «Download & install updates», поставьте галочку напротив «I want to help make installation of Windows better». Нажмите кнопку «Next».
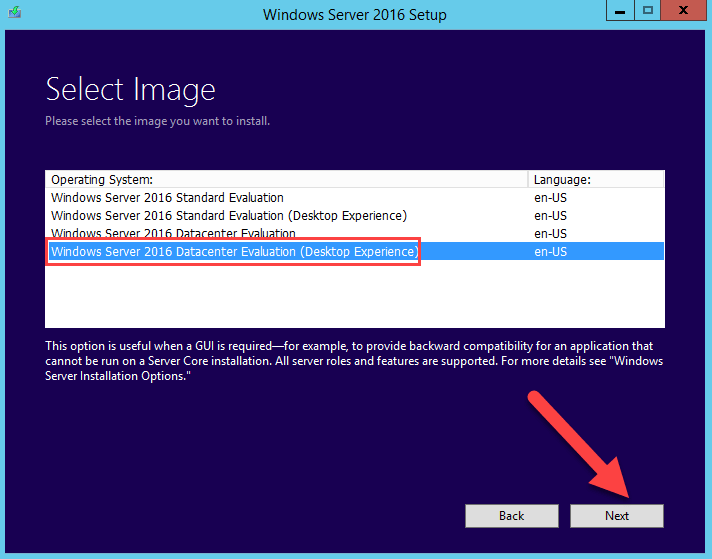
Выберите необходимую редакцию Windows Server 2016, которая соответствует ранее установленной редакции ОС. Нажмите кнопку «Next».
Прочитайте условия лицензионного соглашения. Если вы не согласны нажмите на кнопку «Decline», после чего вы вернетесь назад. Если вы согласны, нажмите кнопку «Accept».
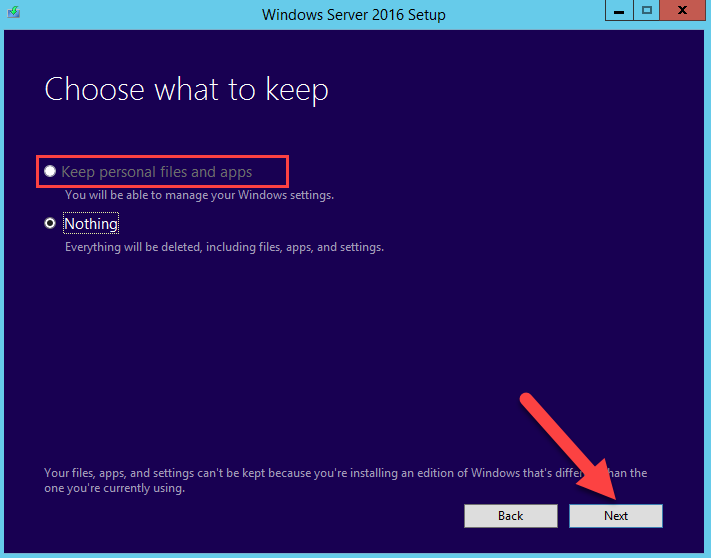
Если вы выбрали туже самую редакцию, которую используете в данный момент, вы можете сохранить свои приложения и файлы. Как уже упоминалось ранее, если вы выбрали неправильную редакцию, вы не сможете сохранить свои приложения и файлы. Выберите «Keep personal files and apps», если вы используете ту же редакцию или выберите «Nothing», чтобы затереть все. Затем нажмите кнопку «Next».
Установка Windows Server 2016
Windows Server автоматически проверит вашу систему на совместимость, поэтому просто нажмите кнопку «Install», чтобы начать установку.
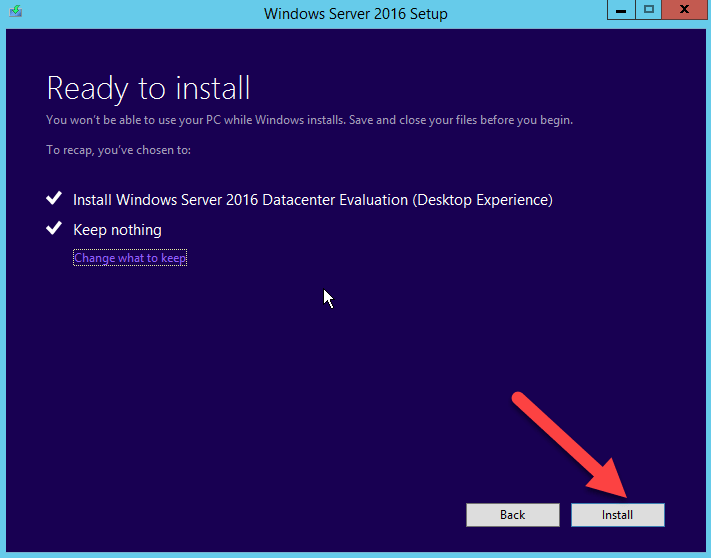
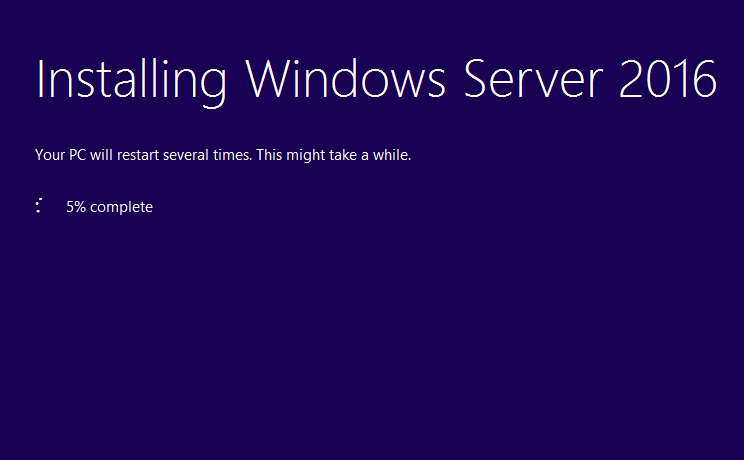
Будьте терпеливы, потому что процесс установки Windows Server занимает достаточно много времени. В процессе установки ваша система может перезагрузится несколько раз.
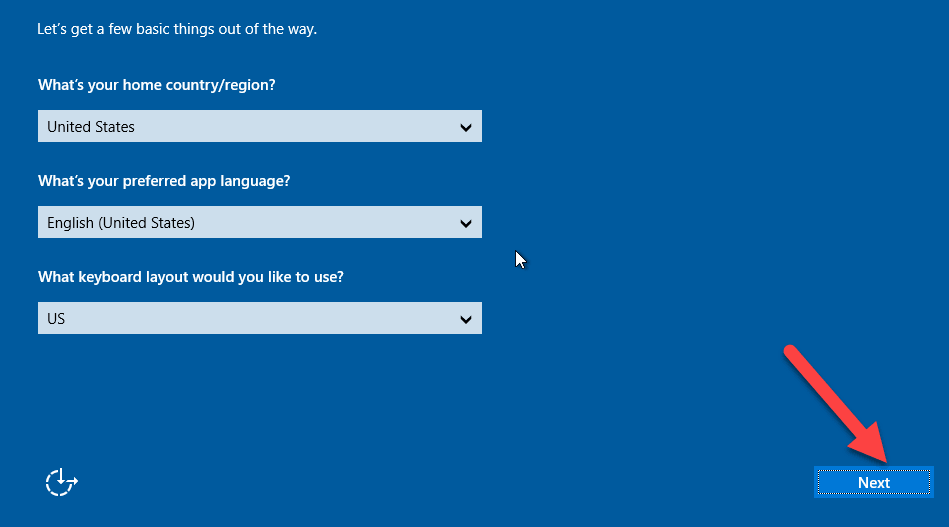
Выберите страну и предпочитаемую раскладку клавиатуры сервера.. Нажмите кнопку «Next», чтобы перейти к следующей странице.
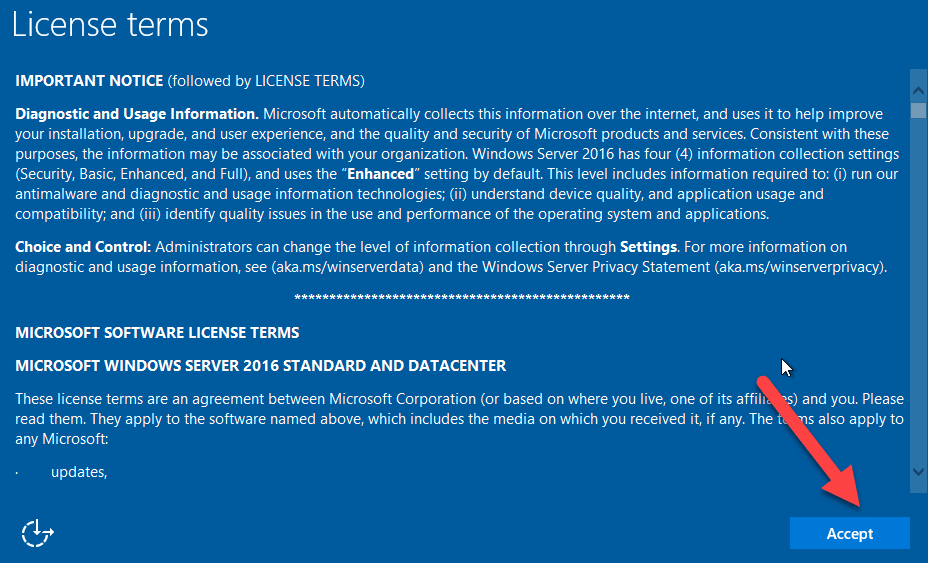
Внимательно прочитайте условия лицензии и нажмите кнопку «Accept».
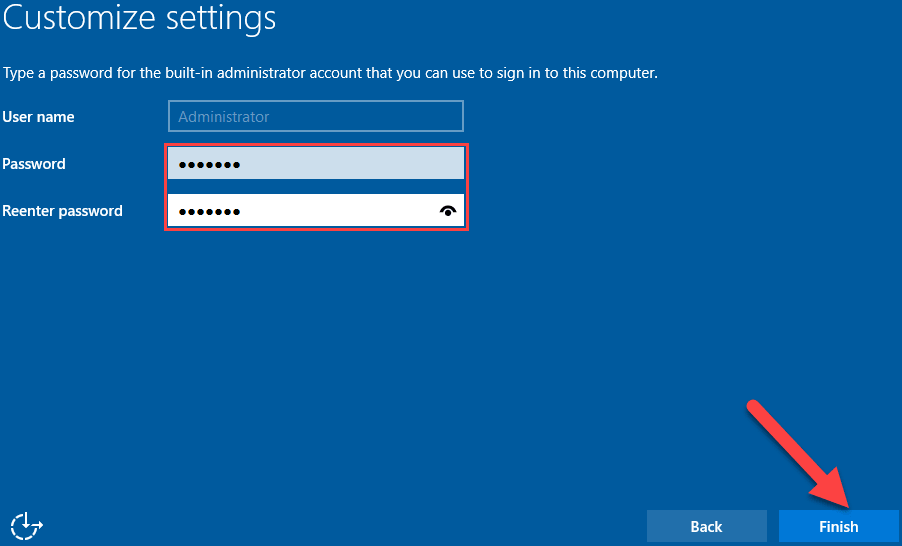
По умолчанию имя пользователя — «Administrator», придумайте ему сложный пароль (пароль, состоящий из строчных букв, прописных букв, цифр и символов). Повторно введите пароль. Затем нажмите кнопку «Finish». Используя эти имя пользователя и пароль, вы можете авторизоваться на сервере.
На экране входа нажмите нажатием клавиш Ctrl + Alt + Del, затем авторизуйтесь в системе, используя ранее созданную учетную запись.

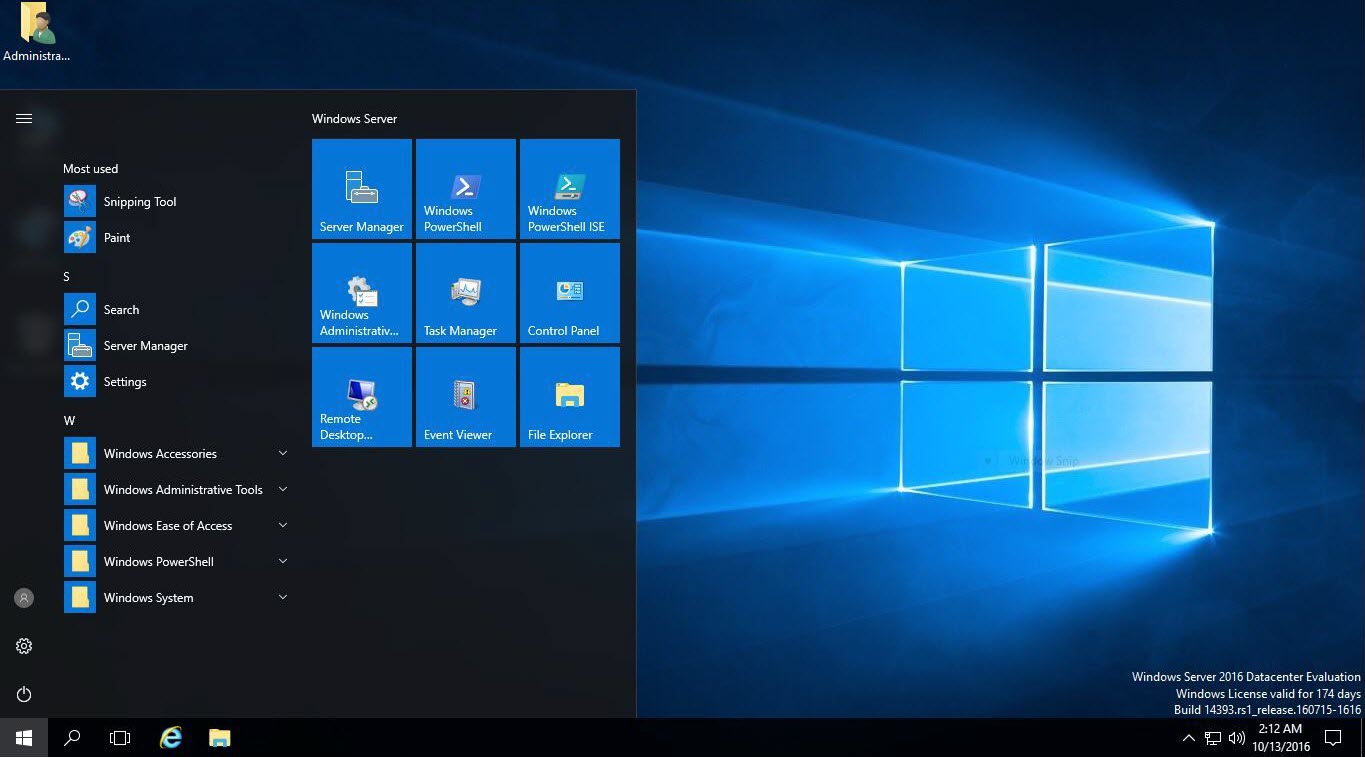
Добро пожаловать в Server Windows 2016. На этом процесс обновления Server Windows 2012 до Server Windows 2016 завершен. Теперь вы можете увидеть домашнюю страницу сервера Windows Server 2016 и оценить все нововведения.
Можете глубоко вдохнуть, процесс обновления прошел без ошибок. Не стесняйтесь, задавайте ваши вопросы и оставляйте комментарии ниже.
[Updated on Date: 2021-01-27] Do you want to migrate to the new version of Windows Server? Since Windows Server 2016 offers new features compared to Windows Server 2012, your answer is probably yes. These new features have greatly improved the management of Windows Server. That’s why we decided to learn you How to upgrade Windows Server 2012 to 2016. You can choose your perfect Windows VPS Server Packages from Eldernode to install your required windows server.
Unlike upgrading previous versions of Windows Server to 2012, Windows Server 2016 only supports 64-bit architecture. In addition, Windows Server 2012 and 2016 have only 4 versions. Upgrading Windows Server is a complicated process. So, Microsoft recommends that instead of updating the entire Windows server, it upgrades the roles and settings of the Windows 2016 server.
Requirements for upgrading Windows 2012 to 2016
In order to be able to upgrade Windows Server 2012 to 2016, you must follow the following requirements:
1. All versions of Windows Server 2016 are 64-bit (upgrading from 32-bit to 64-bit is not possible.)
2. Only Windows Server 2012 can be upgraded to 2016, other versions cannot be upgraded.
3. Upgrades are not supported from one version to another. For example, you can’t upgrade the standard version of Windows Server 2012 to the Data Center version of Windows Server 2016.
4. It is not possible to upgrade from one language to another. For example, you can’t upgrade the German version of Windows Server to Chinese.
5. The upgrade from Server Core to Desktop version (or vice versa) is not supported.
6. Upgrading from older versions of Windows Server to trial versions of Windows Server is not supported. Trial versions must be installed manually.
7. Disable antivirus, because it scans every file that is copied to the disk and slows down the processing speed.
8. If this server uses NIC Teaming, disable it and reactivate it.
9. Make a full backup of the server, as you may have a problem during the upgrade and want to go back to the previous version.
10. Check that the server has no problems, if you see any problems, try to solve them. Otherwise, you may encounter an error that will cause the entire installation process to fail.
Upgrade with Step By Step :
Now that you understand the rules of the upgrade, let’s move on.
Log in to Windows Server 2012 and install DVD or Flash. Open File Explorer and click on DVD Drive as shown below:
Select Download & install updates to begin the Windows installation process.
Choose a version of Windows Server 2016 that suits your needs. You may need to enlarge the network in the future and require more roles and licenses. So be careful at this point.
In the license stage, click Accept. You will enter the next step.
If you have selected the same version as the previous version, you can keep all the applications and files in the system. As we said, if you don’t want to select the previous version, the apps and files will be deleted. Select Keep personal files and apps to save files and apps, otherwise, click Nothing to delete all files. Then click Next.
How to install Windows Server 2016
Windows Server automatically checks your system for compatibility. So, click Install to start the installation.
Wait a bit, because it will take a very long time to install Windows Server on your system. Your system will be reset several times during installation.
Select the country and keyboard language. Note that you cannot change the language. Click Next.
Click Accept on the License Terms page.
Username is the default Administrator, enter a password (code that contains uppercase and lowercase letters, numbers, and symbols), and re-enter the password. Then click Finish. You can log in to the server locally using this username and password.
Press Ctrl + Alt + Del to enter the login page and log in with the username and password.
Here we have successfully upgraded from Windows Server 2012 to 2016. By entering the Windows Server 2016 page, you can see the differences and improvements.
Conclusion
Before explaining how to upgrade Windows Server 2012 to 2016, we first needed to mention some of the requirements for updating to Windows Server 2016. Then, you were completely taught how to upgrade from Windows Server 2012 to Windows Server 2016.
Introduction
This document provides information about upgrading Windows Server 2012 R2 to Windows Server 2016. Before you begin, ensure that you have a valid Windows Server 2016 key and the installation media. You can perform the upgrade from DVD, from a mounted ISO, or from files extracted from an ISO image.
Direct upgrades from Windows Server 2008 R2 to Windows Server 2016 are not supported.
Before You Begin
The Windows Server 2016 Setup wizard is straightforward and requires the following input:
| Download Updates | Select if you want to download Windows updates during the installation. |
| Product Key | Enter your Windows Server 2016 product key. |
| Select Image | Select Windows Server 2016 Standard (Desktop Experience). |
| Notices and license terms | Read and accept the Windows Server 2016 notice and license agreement. |
| Choose what to keep |
Keep personal files and apps (in-place upgrade) or keep nothing (fresh install). If you are upgrading an existing LogRhythm system, select Keep personal files and apps. If you are performing an upgrade, the setup wizard asks you to confirm your selection later. |
| Confirm installation options | Before starting the installation of Windows Server 2016, you will be prompted to confirm your image and upgrade/fresh install selection. |
Licensing
LogRhythm customers may or may not be entitled to an update to Windows Server 2016.
LogRhythm appliances are shipped using the latest Operating System license available at the time of purchase. However, appliances may be shipped with older Operating Systems depending on software support at the time of shipment. Check the license sticker on your LogRhythm Appliance to determine which Operating System you are licensed for. If your LogRhythm Appliance is not licensed for Windows Server 2016, you must provide your own license.
Upgrade Instructions
To upgrade Windows Server 2012 R2 to Windows Server 2016, do the following:
- Log in as an administrator on the server you want to upgrade.
- Insert the Windows Server 2016 DVD or mount the installation ISO.
- Browse to the root of the installation media and double-click setup.exe.
The Windows Server 2016 Setup window appears. -
Follow the steps in the wizard according to the guidance in the Before You Begin section above. Note the following:
-
If you are upgrading from a DVD, you may be prompted to boot from DVD. You can let the request time out and the upgrade will continue.
-
When the upgrade is almost finished, a screen will indicate that settings are being finalized. When the upgrade is finished, you will be presented with the Windows Server 2016 login screen.
-
The upgrade process may remove some of LogRhythm’s branding, but this has no impact on the appliance or the functionality of the operating system.
-
-
After logging in, verify that all LogRhythm services have started and are functioning normally.
Do you want to move to a newer version of Windows Server? Yes, it’s time to upgrade Windows Server 2012 to Windows Server 2016. Because the Windows Server 2016 is out. There are many awesome features added in Windows server 2016. There is a list of improvements and new features which are ready to use that enhance handling managements.
Unlike upgrading Windows Servers prior versions to Server 2012, thus, upgrading Windows Server 2016 supports only 64-bit architecture and Itanium edition isn’t supported. Also, the Windows Server 2012 and 2016 have only four editions.
Upgrading Windows server is complicated process. Therefor Microsoft recommends Administrators to migrate the roles and settings to Server 2016 instead of upgrading, because the upgrading process many things can go wrong. No matter, in this article, we’ll upgrade Windows Server 2012 to Server 2016 fully step by step.
Upgrade and conversion options:
In order to upgrade Windows Server 2012 to Server 2016, you need to obtain the following requirements.
- All editions of Windows Serer 2016 are 64-bit only (upgrades from 32-bit to 64-bit can’t be done).
- Only Server 2012 can be upgraded to Server 2016 not earlier versions of Windows Server.
- Upgrades from one version to another version isn’t supported. Like you can’t upgrade Windows Server 2012 Standard edition to Windows Server 2016 Datacenter edition.
- Upgrades from one language to another language server isn’t supported. For example, you can’t upgrade Windows Server running on German language to Chinese.
- Upgrades that switch from a Server Core installation to a Server with a Desktop installation (or vice versa) are not supported.
- Upgrades from a previous Windows Server installation to an evaluation copy of Windows Server are not supported. Evaluation versions should be installed as a clean installation.
- Deactivate virus protection because it makes the process slower. Because the virus protection scanning every file copied on the disk.
- If the server uses NIC Teaming, disable it and when the server upgraded, enable the NIC Teaming again.
- Backup the server fully before upgrading the server because maybe you face the problem and want to go back to the previous version. Check out: Backup Windows Server 2016 Step by Step
- Check out if the server doesn’t have any problem, if it has, search for fixing it. Otherwise it might cause an error which can fail whole upgrade process.
Now that you’ve understood the rules, let’s get started and move on.
1. Log in to Windows Server 2012 and plug the media file (DVD, Flash memory, etc) to the server. Open the file explorer and double click on the DVD Drive to run the Windows Server 2016 setup.

2. Select Download & install updates to let the installation go on smoothly and mark, I want to help make installation of Windows better. Click on Next button.

3. Select an edition of Windows Server 2016 which meets your organization requirements. Also, in the future you may enlarge your network and need more roles and license support for your network computers. Click on Next button.

4. Read the notes and license terms. If you don’t like, clicking on Decline button, you can go back. If you agree, click on Accept button.

5. If you choose the edition same as the edition you used currently, you can keep your apps and files. As mentioned before if you don’t choose the right edition you can’t keep your apps and files. Select Keep personal files and apps if you’re using the same edition or select Nothing to erase everything. Then click on Next button.

Installing Windows Server 2016
6. The Windows Server automatically checks your system and finds if your server is compatable, so just click on Install button to start the installation.

Be patient because it takes almost long time since the Windows server installs on your system. Therefore, your system may restart several times until the installation completes.

7. Specify country and keyboard for server. Don’t forget that you can’t change the language. Click on Next button to move to the next page.

8. Read the license terms carefully and click on Accept button.

9. The user name is Administrator by default, just type a complex password (a password composed of lowercase letters, uppercase letters, numbers and symbols) and reenter you password. Then click on Finish button. Using this user name and password you can log on to the server locally.

10. Unlock the page pressing Ctrl+Alt+Del buttons in order to unlock the page then sign in with the password you had entered before and press the Sign in button.

Welcome to Windows server 2016. Finally you upgraded Windows server 2012 to Windows server 2016. You can see the server Windows Server 2016 homepage + the latest improvements.

Conclusion
Finally, we upgraded Server 2012 to Windows Server 2016 and we can take deep breathes. For any kind of question feel free and leave a comment below. I’ll answer your questions as soon as possible. Hope you would like our articles and wait for the next.
If you like to know how to do the initial configuration of Windows Server 2016, please click on the link below and read the article on our website.
Check out: Initial configuration of Windows Server 2016
| Workable Solutions | Step-by-step Troubleshooting |
|---|---|
| Windows Server Migration Checklist | #1. Download essential Windows server migration tool; #2. Find out your goals in Windows server migration…Full steps |
| Solution 1. Migration (Data, Apps, Account) | Step 1. Launch EaseUS Todo PCTrans on your source and target computers, connect both PCs via the internet…Full steps |
| Solution 2. In-place Upgrade (Everything) | Step 1. Create an image of all important data, apps, and even accounts on Windows Server 2012…Full steps |
Methods on this page are also applicable to Windows Server 2008/2008 R2/2012/2012 R2/2016/2019. It also works to upgrade and migrate Windows Server essentials to standards.
According to Microsoft, the new end-of-extended support date for Windows Server 2012 is October 10, 2023. The original date had been January 10, 2023.
It’s confirmed that Windows Server 2012 and Windows Server 2012 R2 supports will end by Oct.10th, 2023. And Microsoft has released two new Windows Servers — 2016 and 2019 for personal and enterprise users to explore their businesses on the new Windows Server systems. And it’s a smart choice to get things ready in advance. Therefore, it’s time to make a full plan of upgrading or migrating Windows Server 2012/2012 R2 to new Windows Server 2016/2019.
So how to successfully migrate your Windows Server 2012 to 2016 with all applications, data, and even accounts? If you are having the same doubts as listed here, stay calm and follow the provided tips in the following to get problems resolved:
- 1. Will I lose data while migrating Windows Server 2012 to 2016?
- 2. How do I upgrade Windows Server 2012 to 2019?
- 3. How to keep applications, data, accounts while migrating Windows Server 2012 to 2016/2019?
Windows Server Migration Checklist (2 Steps)
Here is a checklist that can be applied to upgrade and migrate Windows Servers applications, data, and accounts, etc., for all Windows Server users. Take the following two steps to get the right tool and resolution for Windows Server Migration:
- #1. Download Essential Windows Server Migration Tool
For most Windows Server users, the biggest challenge of migrating Windows Server is about how to fully transfer data, installed applications, and even Windows Server accounts to the new Windows Server machine. Advanced Windows Server PC transfer software — EaseUS Todo PCTrans Technician specializes in Windows Server data, app, account and settings migration between Windows Servers.
EaseUS Todo PCTrans Technician supports to transfer data, application, accounts via network or image on all Windows Servers, including Windows Server 2019/2016/2012/2012 R2/2008/2008 R2, etc.
EaseUS Todo PCTrans Technician
- ☆ Deploy & install Todo PCTrans on multiple PCs.
- Transfer unlimited files, programs, apps between Servers.
- Transfer account, domain account, and settings.
- Data rescue, find product key of installed programs.
- One license for multiple PCs.
- #2. Find Out Your Goals in Windows Server Migration
To find out the right way to migrate Windows Server, you should first find out your goals.
- If you want to transfer Windows Server OS to a new computer, try EaseUS Windows Server Migration Tool. You will successfully migrate Windows Server OS to a new computer without reinstalling the Server OS.
- If you only want to transfer Windows Server 2012 data, installed applications, account and settings to Windows Server 2016/2019 computer, follow Solution 1 listed below for help.
- If you want to perform an in-place upgrade from Windows Server 2012 to 2016/2019 or fresh install Windows Server 2016/2019 on old Windows Server 2012 but keep all data, installation apps, and account, follow Solution 2 on this page for help.
Solution 1. Migrate Windows Server 2012 to New Server 2016/2019 (Data, Apps, Account)
Applies to: Transfer data, installed applications, account and settings from Windows Server 2012 to new Windows Server 2016/2019 computers. No reinstallation is required.
To transfer Windows Server 2012 data, applications, and account, etc., to a new Windows server computer like 2016 or 2019, all you need is a reliable Windows Server PC Transfer software. EaseUS Todo PCTrans Technician is capable to help. It enables all levels of users to efficiently transfer everything from an old Windows Server computer to a new Server machine via the network connection.
See how to migrate Windows Server 2012 data, application, and even account to new Server step by step:
Step 1. Launch EaseUS Todo PCTrans on your source and target computers, connect both PCs via the internet.
1. At the «PC to PC» section, click «PC to PC» to continue.

2. Select your target computer via its device name, then enter its account password or verification code and select the transfer direction. Then click «Connect» to continue.
You can check the verification code on the right top of «PC to PC» mainscreen on the target computer.

Step 2. Select the categories Applications, Files, and Accounts to transfer via the internet.
If you want to transfer data selectively, click «Edit» under each category, and choose the specific items.

Step 3. Click «Transfer» to start transferring your apps/files/accounts from one computer to another computer via the Internet.

After the migration, you can restart the new Windows Server 2016 or 2019 computer and then continue using the software again. If some applications require reactivation, use your old key to activate the programs again.
Solution 2. In-place Upgrade Windows Server 2012 to 2016/2019, Keep Everything on Server
Applies to: In-place upgrade Windows Server 2012 to 2016 or 2019 and keep everything on the Server, including data, applications, and account, etc.
If you need to in-place upgrade Windows Server 2012 to newer Windows Server, keeping everything on the machine, follow the tutorial steps below carefully.
Step 1. Create an image of all important data, apps, and even accounts on Windows Server 2012
EaseUS Todo PCTrans with its Backup and Restore feature supports you to create an image backup of all important data, applications, accounts, etc., from Windows Server 2012 to an external hard drive.
Video Tutorial of Image Transfer using EaseUS Todo PCTrans:
Step 2. Perform in-place upgrade from Windows Server 2012 to 2016/2019, or fresh install Windows server 2016 on old Server PC.
If you don’t know how to perform Windows Server in-place upgrade, follow to the Microsoft tutorial: Upgrade Windows Server 2012 to Windows Server 2016 for help.
If you need to fresh install Windows Server 2016 or 2019 on the old Server machine, you need first download a Windows Server ISO and then follow the video below to clean install the Windows Server:
Video Tutorial to Install Windows Server 2016 produced by Server Academy on YouTube:
Step 3. Restore data, applications, accounts to new Windows Server via EaseUS Todo PCTrans using its Image Transfer feature.
If you lost some apps or data, you can use EaseUS Todo PCTrans Technician to selectively restore applications, data, and accounts to your new Windows Server 2016/2019.
Conclusion
On this page, we collected two solutions to help Windows Server users migrating Windows Server 2012 with data, applications, and accounts, etc., to Windows Server 2016/2019 using reliable PC transfer — EaseUS Todo PCTrans.
We also provide extra tips to help users to perform in-place upgrade or fresh install Windows Server 2016/2019 on old Windows Server machine. By following the provided tips, you can effortlessly move everything to the new Windows Server computer.
Windows Server 2012 Migration FAQs
If you have more questions about Windows Server migration, check the following questions and find answers here immediately.
1. Can Windows Server 2012 be upgraded to 2016?
Yes. Windows Server 2012 can be upgraded to 2016 in many ways. Here, we have collected all the possible ways that you can try to upgrade to Windows Server 2016 from 2012:
- Method 1. Use Windows Server migration tool: back up Windows Server 2016 OS and restore to the Windows Server 2012.
- Method 2. Perform in-place Windows Server upgrade from 2012 to 2016.
- Method 3. Clean install Windows Server 2016 on the old Windows Server 2012 computer.
2. Can Windows Server 2008 r2 be upgraded to 2016?
Sure. You can upgrade Windows Server 2008 r2 to 2016 by performing an in-place upgrade or fresh installing Windows Server 2016 on the computer. If you need to move data, applications, and account from the old Windows Server 2008 to new Windows server 2016, refer to Migrate Windows Server 20018 (R2) to 2016 step by step guide for help.
3. How do I migrate Windows Server 2012 R2 to 2019?
The ways to migrate Windows Server 2012 R2 to 2019 is similar to the ways as recommended on this page — migrating Windows Server 2012 to 216.
First, you need a reliable Windows PC transfer software that supports you to migrate old Windows Server data, apps, accounts to the new server computer.
Next, confirm your goals — to transfer data, apps, accounts between server machines, or to upgrade Windows server to 2019 but keep everything on the computer.
Last, take the right solution to migrate Windows Server 2012 R2 to 2019:
- If you need to migrate everything to a new Server computer, use the PC to PC feature in EaseUS Todo PCTrans Technician and migrate data, apps, accounts to Windows Server 2019 without losing anything.
- If you need to perform in-place upgrade or clean install Windows Sever 2019 on the old Server 2012 R2 computer, use Image Transfer feature in EaseUS Todo PCTrans to create an image of all important things, in-place upgrade or fresh install new Server, and then recover the image back to the computer.
| title | description | ms.topic | ms.assetid | author | ms.author | manager | ms.date |
|---|---|---|---|---|---|---|---|
|
Cluster Operating System Rolling Upgrade |
Learn more about: Cluster operating system rolling upgrade |
how-to |
6e102c1f-df26-4eaa-bc7a-d0d55d3b82d5 |
jasongerend |
jgerend |
lizross |
01/07/2022 |
Cluster operating system rolling upgrade
Applies to: Windows Server 2022, Windows Server 2019, Windows Server 2016
Cluster OS Rolling Upgrade enables an administrator to upgrade the operating system of cluster nodes Hyper-V or Scale-Out File Server workloads without stopping them. Using this feature, the downtime penalties against Service Level Agreements (SLA) can be avoided.
Cluster OS Rolling Upgrade provides the following benefits:
-
Failover clusters running Hyper-V virtual machine and Scale-out File Server (SOFS) workloads can be upgraded from a version of Windows Server, starting with Windows Server 2012 R2, to a newer version of Windows Server. For example you can upgrade Windows Server 2016 (running on all cluster nodes of the cluster) to Windows Server 2019 (running on all nodes in the cluster) without downtime.
-
It doesn’t require any additional hardware. In small clusters, you can add additional cluster nodes temporarily to improve availability of the cluster during the Cluster OS Rolling Upgrade process.
-
The cluster doesn’t need to be stopped or restarted.
-
A new cluster is not required. The existing cluster is upgraded. In addition, existing cluster objects stored in Active Directory are used.
-
The upgrade process is reversible until the final step, when all cluster nodes are running the newer version of Windows Server and the
Update-ClusterFunctionalLevelPowerShell cmdlet is run. -
The cluster can support patching and maintenance operations while running in the mixed-OS mode.
-
It supports automation via PowerShell and WMI.
-
The cluster public property ClusterFunctionalLevel property indicates the state of the cluster on Windows Server 2016 and later cluster nodes. This property can be queried using the PowerShell cmdlet from a cluster node that belongs to a failover cluster:
Get-Cluster | Select ClusterFunctionalLevel
The table below shows the values and each corresponding functional level:
Value Functional level 8 Windows Server 2012 R2 9 Windows Server 2016 10 Windows Server 2019
This guide describes the various stages of the Cluster OS Rolling Upgrade process, installation steps, feature limitations, and frequently asked questions (FAQs), and is applicable to the following Cluster OS Rolling Upgrade scenarios in Windows Server:
- Hyper-V clusters
- Scale-Out File Server clusters
The following scenario is not supported:
- Cluster OS Rolling Upgrade of guest clusters using virtual hard disk (.vhdx file) as shared storage.
Cluster OS Rolling Upgrade is fully supported by System Center Virtual Machine Manager (SCVMM). If you are using SCVMM, see Perform a rolling upgrade of a Hyper-V host cluster to Windows Server 2016 in VMM for guidance on upgrading the clusters and automating the steps that are described in this document.
Requirements
Complete the following requirements before you begin the Cluster OS Rolling Upgrade process:
- Start with a Failover Cluster running Windows Server 2012 R2 or newer. You can upgrade to the next version, for example from Windows Server 2016 to Windows Server 2019.
- Verify that the Hyper-V nodes have CPUs that support Second-Level Addressing Table (SLAT) using one of the following methods;
— Review the Are you SLAT Compatible? WP8 SDK Tip 01 article that describes two methods to check if a CPU supports SLATs
— Download the Coreinfo v3.31 tool to determine if a CPU supports SLAT.
Cluster transition states during Cluster OS Rolling Upgrade
This section describes the various transition states of the Windows Server cluster that is being upgraded to the next version of Windows Server using Cluster OS Rolling Upgrade.
In order to keep the cluster workloads running during the Cluster OS Rolling Upgrade process, moving a cluster workload from a node running an older version of Windows Server to a node running a newer version of Windows Server works by using a compatibility mode. This compatibility mode makes the nodes running the newer version of Windows Server appear as if they are running the the same older version of Windows Server. For example, when upgrading a Windows Server 2016 cluster to Windows Server 2019, Windows Server 2019 nodes operate in a Windows Server 2016 compatibility mode as a temporary measure. A new conceptual cluster mode, called mixed-OS mode, allows nodes of different versions to exist in the same cluster (see Figure 1).

Figure 1: Cluster operating system state transitions
A Windows Server cluster enters mixed-OS mode when a node running a newer version of Windows Server is added to the cluster. The process is fully reversible at this point — newer Windows Server nodes can be removed from the cluster and nodes running the existing version of Windows Server can be added to the cluster in this mode. The process is not reversible once the Update-ClusterFunctionalLevel PowerShell cmdlet is run on the cluster. In order for this cmdlet to succeed, all nodes must be running the newer version of Windows Server, and all nodes must be online.
Transition states of a four-node cluster while performing Rolling OS Upgrade
This section illustrates and describes the four different stages of a cluster with shared storage whose nodes are upgraded from Windows Server 2012 R2 to Windows Server 2016. The process is the same for later versions of Window Server.
«Stage 1» is the initial state — we start with a Windows Server 2012 R2 cluster.

Figure 2: Initial State: Windows Server 2012 R2 Failover Cluster (Stage 1)
In «Stage 2», two nodes have been paused, drained, evicted, reformatted, and installed with Windows Server 2016.

Figure 3: Intermediate State: Mixed-OS mode: Windows Server 2012 R2 and Windows Server 2016 Failover cluster (Stage 2)
At «Stage 3», all of the nodes in the cluster have been upgraded to Windows Server 2016, and the cluster is ready to be upgraded with Update-ClusterFunctionalLevel PowerShell cmdlet.
[!NOTE]
At this stage, the process can be fully reversed, and Windows Server 2012 R2 nodes can be added to this cluster.

Figure 4: Intermediate State: All nodes upgraded to Windows Server 2016, ready for Update-ClusterFunctionalLevel (Stage 3)
After the Update-ClusterFunctionalLevel cmdlet is run, the cluster enters «Stage 4», where new Windows Server 2016 cluster features can be used.

Figure 5: Final State: Windows Server 2016 Failover Cluster (Stage 4)
Cluster OS Rolling Upgrade Process
This section describes the workflow for performing Cluster OS Rolling Upgrade.

Figure 6: Cluster OS Rolling Upgrade Process Workflow
Cluster OS Rolling upgrade includes the steps below for upgrading from Windows Server 2012 R2 to Windows Server 2016, however the process is the same for later versions of Window Server.
-
Prepare the cluster for the operating system upgrade as follows:
-
Cluster OS Rolling Upgrade requires removing one node at a time from the cluster. Check if you have sufficient capacity on the cluster to maintain HA SLAs when one of the cluster nodes is removed from the cluster for an operating system upgrade. In other words, do you require the capability to failover workloads to another node when one node is removed from the cluster during the process of Cluster OS Rolling Upgrade? Does the cluster have the capacity to run the required workloads when one node is removed from the cluster for Cluster OS Rolling Upgrade?
-
For Hyper-V workloads, check that all Windows Server Hyper-V hosts have CPU support for Second-Level Address Table (SLAT). Only SLAT-capable machines can use the Hyper-V role in Windows Server 2016 and newer.
-
Check that any workload backups have completed, and consider backing-up the cluster. Stop backup operations while adding nodes to the cluster.
-
Check that all cluster nodes are online /running/up using the
Get-ClusterNodecmdlet (see Figure 7).
Figure 7: Determining node status using Get-ClusterNode cmdlet -
If you are running Cluster Aware Updates (CAU), verify if CAU is currently running by using the Cluster-Aware Updating UI, or the
Get-CauRuncmdlet (see Figure 8). Stop CAU using theDisable-CauClusterRolecmdlet (see Figure 9) to prevent any nodes from being paused and drained by CAU during the Cluster OS Rolling Upgrade process.
Figure 8: Using theGet-CauRuncmdlet to determine if Cluster Aware Updates is running on the cluster
Figure 9: Disabling the Cluster Aware Updates role using theDisable-CauClusterRolecmdlet
-
-
For each node in the cluster, complete the following:
-
Using Cluster Manager UI, select a node and use the Pause | Drain menu option to drain the node (see Figure 10) or use the
Suspend-ClusterNodecmdlet (see Figure 11).
Figure 10: Draining roles from a node using Failover Cluster Manager
Figure 11: Draining roles from a node using theSuspend-ClusterNodecmdlet -
Using Cluster Manager UI, Evict the paused node from cluster, or use the
Remove-ClusterNodecmdlet.
Figure 12: Remove a node from the cluster usingRemove-ClusterNodecmdlet -
Reformat the system drive and perform a «clean operating system install» of Windows Server 2016 on the node using the Custom: Install Windows only (advanced) installation (See Figure 13) option in setup.exe. Avoid selecting the Upgrade: Install Windows and keep files, settings, and applications option since Cluster OS Rolling Upgrade doesn’t encourage in-place upgrade.
Figure 13: Available installation options for Windows Server 2016 -
Add the node to the appropriate Active Directory domain.
-
Add the appropriate users to the Administrators group.
-
Using the Server Manager UI or Install-WindowsFeature PowerShell cmdlet, install any server roles that you need, such as Hyper-V.
Install-WindowsFeature -Name Hyper-V
-
Using the Server Manager UI or Install-WindowsFeature PowerShell cmdlet, install the Failover Clustering feature.
Install-WindowsFeature -Name Failover-Clustering
-
Install any additional features needed by your cluster workloads.
-
Check network and storage connectivity settings using the Failover Cluster Manager UI.
-
If Windows Firewall is used, check that the Firewall settings are correct for the cluster. For example, Cluster Aware Updating (CAU) enabled clusters may require Firewall configuration.
-
For Hyper-V workloads, use the Hyper-V Manger UI to launch the Virtual Switch Manager dialog (see Figure 14).
Check that the name of the Virtual Switch(s) used are identical for all Hyper-V host nodes in the cluster.
Figure 14: Virtual Switch Manager -
On a Windows Server 2016 node (do not use a Windows Server 2012 R2 node), use the Failover Cluster Manager (see Figure 15) to connect to the cluster.
Figure 15: Adding a node to the cluster using Failover Cluster Manager -
Use either the Failover Cluster Manager UI or the
Add-ClusterNodecmdlet (see Figure 16) to add the node to the cluster.
Figure 16: Adding a node to the cluster usingAdd-ClusterNodecmdlet[!NOTE]
When the first Windows Server 2016 node joins the cluster, the cluster enters «Mixed-OS» mode, and the cluster core resources are moved to the Windows Server 2016 node. A «Mixed-OS» mode cluster is a fully functional cluster where the new nodes run in a compatibility mode with the old nodes. «Mixed-OS» mode is a transitory mode for the cluster. It is not intended to be permanent and customers are expected to update all nodes of their cluster within four weeks. -
After the Windows Server 2016 node is successfully added to the cluster, you can (optionally) move some of the cluster workload to the newly added node in order to rebalance the workload across the cluster as follows:
Figure 17: Moving a cluster workload (cluster VM role) usingMove-ClusterVirtualMachineRolecmdlet-
Use Live Migration from the Failover Cluster Manager for virtual machines or the
Move-ClusterVirtualMachineRolecmdlet (see Figure 17) to perform a live migration of the virtual machines.Move-ClusterVirtualMachineRole -Name VM1 -Node robhind-host3
-
Use Move from the Failover Cluster Manager or the
Move-ClusterGroupcmdlet for other cluster workloads.
-
-
-
When every node has been upgraded to Windows Server 2016 and added back to the cluster, or when any remaining Windows Server 2012 R2 nodes have been evicted, do the following:
[!IMPORTANT]
- After you update the cluster functional level, you cannot go back to Windows Server 2012 R2 functional level and Windows Server 2012 R2 nodes cannot be added to the cluster.
- Until the
Update-ClusterFunctionalLevelcmdlet is run, the process is fully reversible and Windows Server 2012 R2 nodes can be added to this cluster and Windows Server 2016 nodes can be removed. - After the
Update-ClusterFunctionalLevelcmdlet is run, new features will be available.
-
Using the Failover Cluster Manager UI or the
Get-ClusterGroupcmdlet, check that all cluster roles are running on the cluster as expected. In the following example, Available Storage is not being used, instead CSV is used, hence, Available Storage displays an Offline status (see Figure 18).
Figure 18: Verifying that all cluster groups (cluster roles) are running using theGet-ClusterGroupcmdlet -
Check that all cluster nodes are online and running using the
Get-ClusterNodecmdlet. -
Run the
Update-ClusterFunctionalLevelcmdlet — no errors should be returned (see Figure 19).
Figure 19: Updating the functional level of a cluster using PowerShell -
After the
Update-ClusterFunctionalLevelcmdlet is run, new features are available.
-
Resume normal cluster updates and backups:
-
If you were previously running CAU, restart it using the CAU UI or use the
Enable-CauClusterRolecmdlet (see Figure 20).
Figure 20: Enable Cluster Aware Updates role using theEnable-CauClusterRolecmdlet -
Resume backup operations.
-
-
Enable and use the Windows Server 2016 features on Hyper-V Virtual Machines.
-
After the cluster has been upgraded to Windows Server 2016 functional level, many workloads like Hyper-V VMs will have new capabilities. For a list of new Hyper-V capabilities. see Migrate and upgrade virtual machines
-
On each Hyper-V host node in the cluster, use the
Get-VMHostSupportedVersioncmdlet to view the Hyper-V VM configuration versions that are supported by the host.
Figure 21: Viewing the Hyper-V VM configuration versions supported by the host -
On each Hyper-V host node in the cluster, Hyper-V VM configuration versions can be upgraded by scheduling a brief maintenance window with users, backing up, turning off virtual machines, and running the
Update-VMVersioncmdlet (see Figure 22). This will update the virtual machine version, and enable new Hyper-V features, eliminating the need for future Hyper-V Integration Component (IC) updates. This cmdlet can be run from the Hyper-V node that is hosting the VM, or the-ComputerNameparameter can be used to update the VM Version remotely. In this example, here we upgrade the configuration version of VM1 from 5.0 to 7.0 to take advantage of many new Hyper-V features associated with this VM configuration version such as Production Checkpoints (Application Consistent backups), and binary VM configuration file.
Figure 22: Upgrading a VM version using the Update-VMVersion PowerShell cmdlet
-
-
Storage pools can be upgraded using the Update-StoragePool PowerShell cmdlet — this is an online operation.


Although we are targeting Private Cloud scenarios, specifically Hyper-V and Scale-out File Server clusters, which can be upgraded without downtime, the Cluster OS Rolling Upgrade process can be used for any cluster role.
Restrictions / Limitations
- This feature works only for versions of Windows Server starting with Windows Server 2012 R2. This feature cannot upgrade earlier versions of Windows Server such as Windows Server 2008, Windows Server 2008 R2, or Windows Server 2012.
- Each Windows Server 2016 node should be reformatted/new installation only. In-place or upgrade installation types are discouraged.
- A node running the newer version of Windows Server must be used to add the new nodes to the cluster.
- When managing a mixed-OS mode cluster, always perform the management tasks from an up-level node that is running Windows Server 2016. Downlevel Windows Server nodes cannot use UI or management tools against newer versions of Windows Server.
- We encourage customers to move through the cluster upgrade process quickly because some cluster features are not optimized for mixed-OS mode.
- Avoid creating or resizing storage on newer Windows Server nodes while the cluster is running in mixed-OS mode because of possible incompatibilities on failover from a newer Windows Server node to down-level Windows Server nodes.
Frequently asked questions
How long can the failover cluster run in mixed-OS mode?
We encourage customers to complete the upgrade within four weeks. We have successfully upgraded Hyper-V and Scale-out File Server clusters with zero downtime in less than four hours total.
Will you port this feature back to Windows Server 2012, Windows Server 2008 R2, or Windows Server 2008?
We do not have any plans to port this feature back to previous versions. Cluster OS Rolling Upgrade is our vision for upgrading Windows Server clusters.
Do the nodes running the older Windows Server version need to have all the software updates installed before starting the Cluster OS Rolling Upgrade process?
Yes, before starting the Cluster OS Rolling Upgrade process, verify that all cluster nodes are updated with the latest software updates.
Can I run the Update-ClusterFunctionalLevel cmdlet while nodes are Off or Paused?
No. All cluster nodes must be on and in active membership for the Update-ClusterFunctionalLevel cmdlet to work.
Does Cluster OS Rolling Upgrade work for any cluster workload? Does it work for SQL Server?
Yes, Cluster OS Rolling Upgrade works for any cluster workload. However, it is only zero-downtime for Hyper-V and Scale-out File Server clusters. Most other workloads incur some downtime (typically a couple of minutes) when they failover, and failover is required at least once during the Cluster OS Rolling Upgrade process.
Can I automate this process using PowerShell?
Yes, we have designed Cluster OS Rolling Upgrade to be automated using PowerShell.
For a large cluster that has extra failover capacity, can I upgrade multiple nodes simultaneously?
Yes. When one node is removed from the cluster to upgrade the OS, the cluster will have one less node for failover, hence will have a reduced failover capacity. For large clusters with enough workload and failover capacity, multiple nodes can be upgraded simultaneously. You can temporarily add cluster nodes to the cluster to provide improved workload and failover capacity during the Cluster OS Rolling Upgrade process.
What if I discover an issue in my cluster after Update-ClusterFunctionalLevel has been run successfully?
If you have backed-up the cluster database with a System State backup before running Update-ClusterFunctionalLevel, you should be able to perform an Authoritative restore on a node running the previous version of Windows Server and restore the original cluster database and configuration.
Can I use in-place upgrade for each node instead of using clean-OS install by reformatting the system drive?
We do not encourage the use of in-place upgrade of Windows Server, but we are aware that it works in some cases where default drivers are used. Please carefully read all warning messages displayed during in-place upgrade of a cluster node.
If I am using Hyper-V replication for a Hyper-V VM on my Hyper-V cluster, will replication remain intact during and after the Cluster OS Rolling Upgrade process?
Yes, Hyper-V replica remains intact during and after the Cluster OS Rolling Upgrade process.
Can I use System Center Virtual Machine Manager (SCVMM) to automate the Cluster OS Rolling Upgrade process?
Yes, you can automate the Cluster OS Rolling Upgrade process using VMM in System Center.