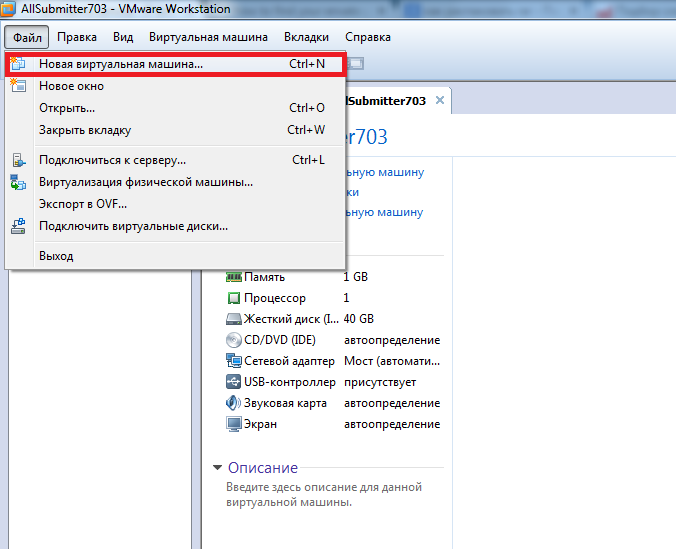
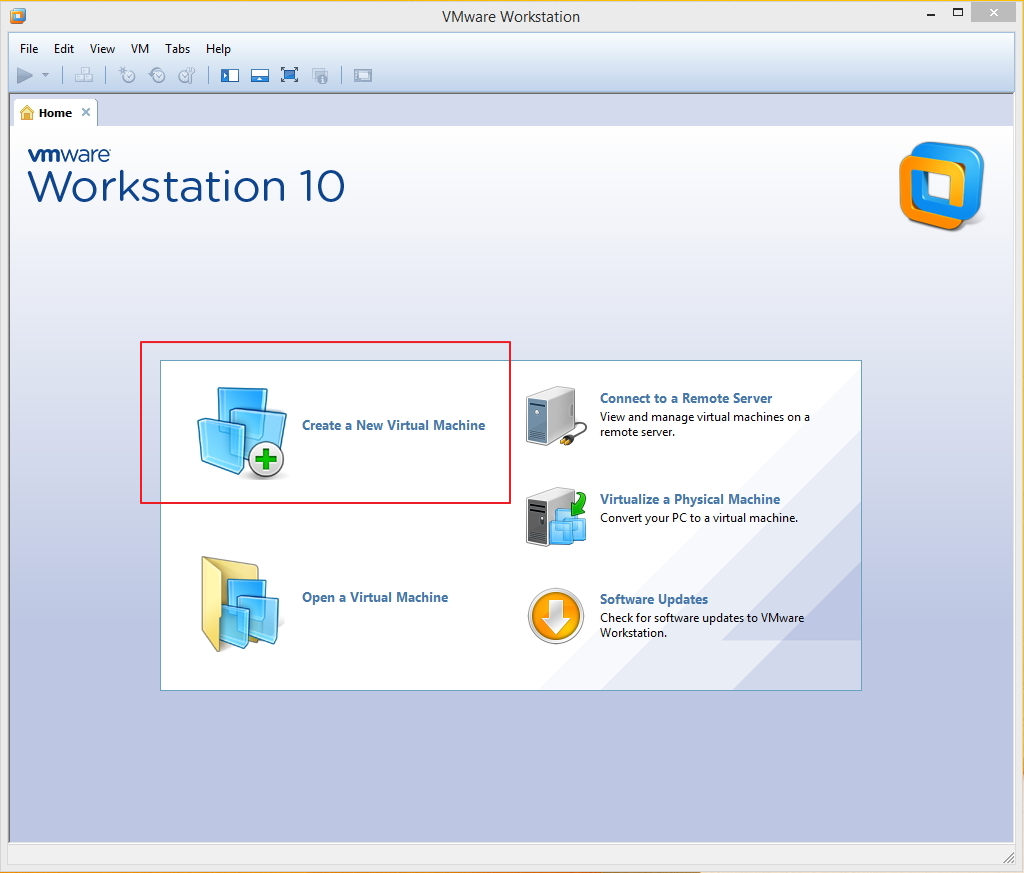
Здравствуйте, дорогие читатели. Сегодня мы займемся установкой операционной системы Windows Server 2012 R2 на эмуляторе виртуальных машин VMware Workstation 9 или 10 версии. Для начала необходимо скачать архив самой ОС. Архив должен быть в формате ISO (.iso). После скачивания операционной системы запускаем VMware.
После запуска заходим в меню Файл — Новая виртуальная машина (или в программе нажимаем комбинацию клавиш CTRL+N).
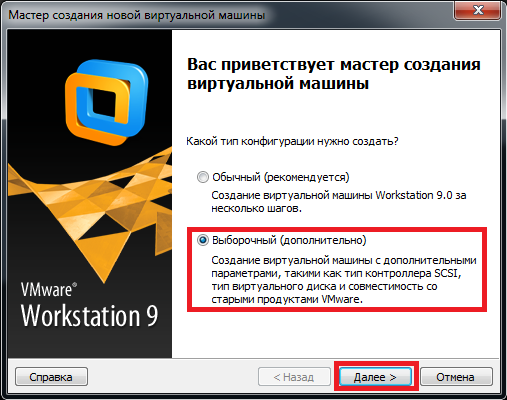
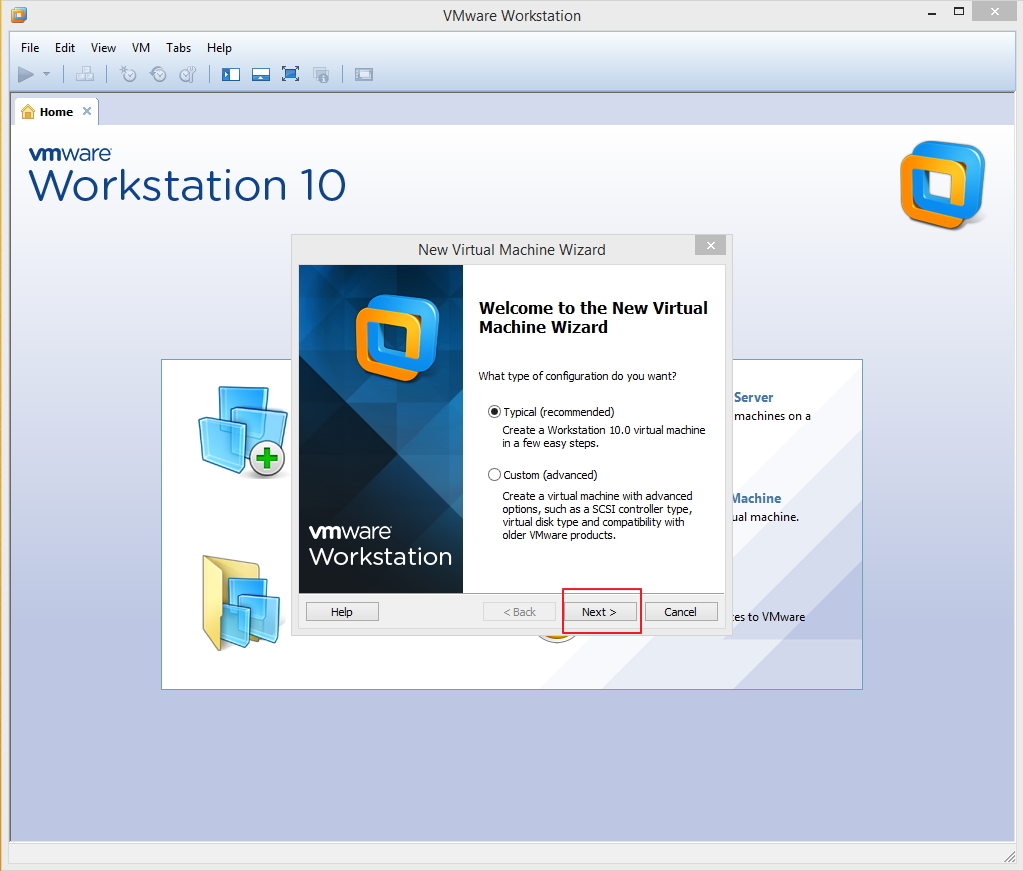
Программа спросит какой тип конфигурации необходимо создать, необходимо выбрать Выборочный (дополнительно) и нажать кнопку далее.
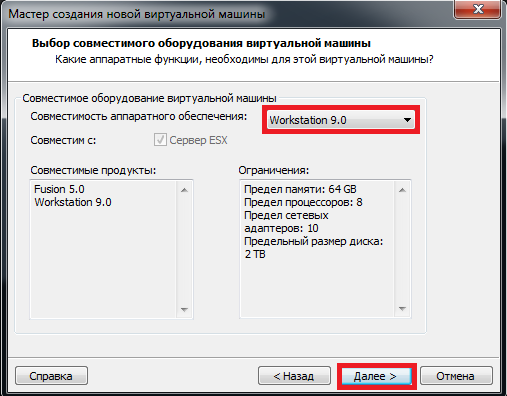
В совместимости аппаратного обеспечения выбираем Workstation 9 и нажимаем Далее.
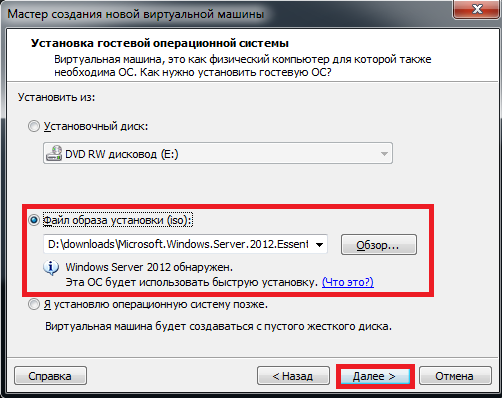
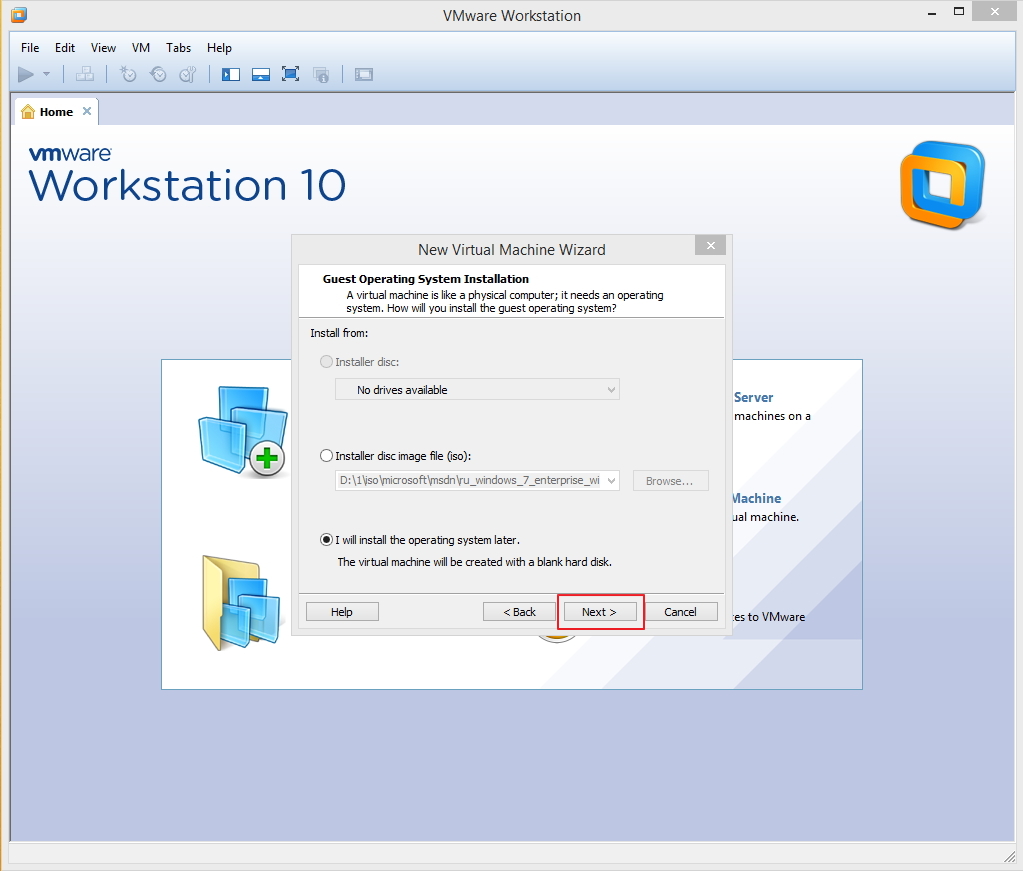
Указываем место расположения нашего файла-образа (скачанный образ Windows Server 2012) если образ находится на DVD диске выбираем 1-й пункт (установить с диска), если образ находится на жестком диске выбираем 2-й пункт и нажимаем кнопку Далее
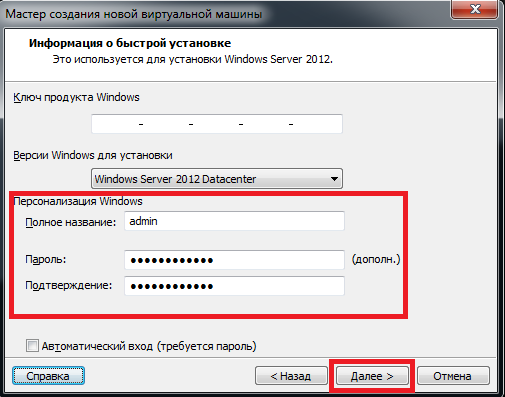
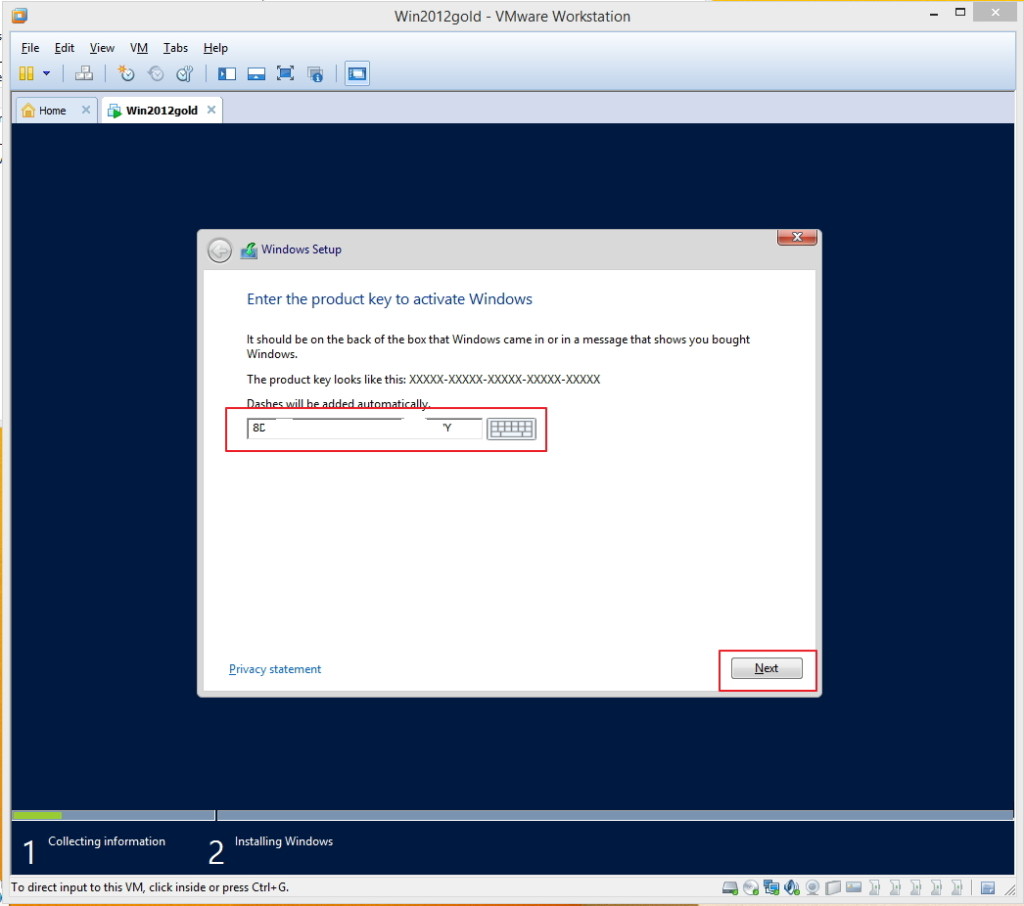
Программа просит ввести лицензионный ключ к Windows и учетные данные (пользователь/пароль) для последующего входа в систему.
Если лицензионного ключа нет (как в моем случае), его можно не вводить (а с помощью windows loadrer и других подобных программ активировать нашу операционную систему позднее).
Заполняем имя пользователя и дважды вводим пароль и опять же нажимаем далее.
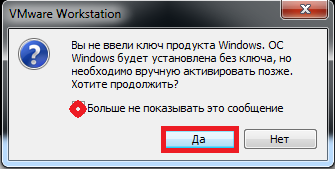
Программа предупредит нас, что мы не ввели ключ продукта и что его можно ввести в последствии, мы соглашаемся и нажимаем Да
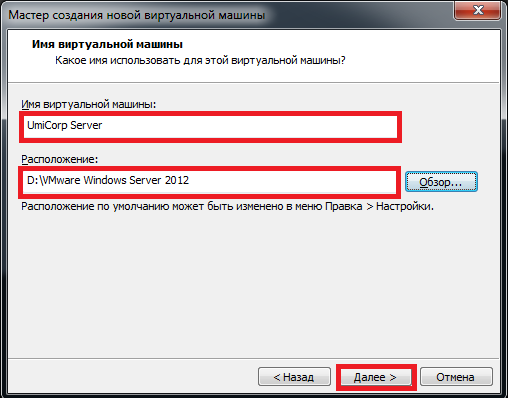
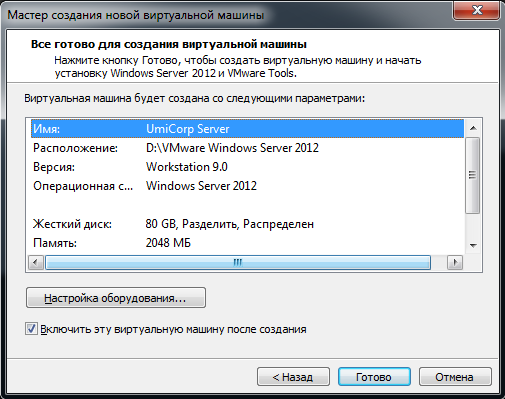
Присваиваем имя для нашей виртуальной машины и указываем путь установки и подтверждаем наши действия.
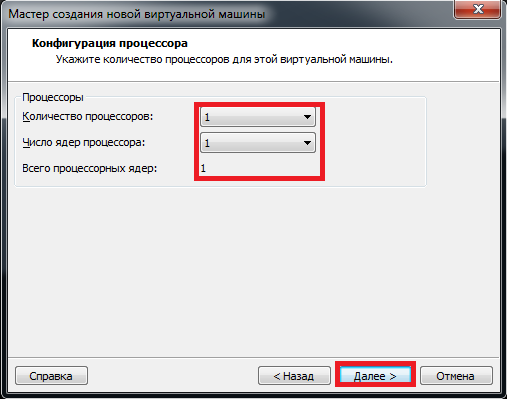
Указываем количество выделяемых для ОС процессоров и ядер (позже это количество можно изменять в большую или меньшую сторону), на своем ПК я выбрал 1 процессор и 1 ядро (у меня Intel Core i7 3630QM).
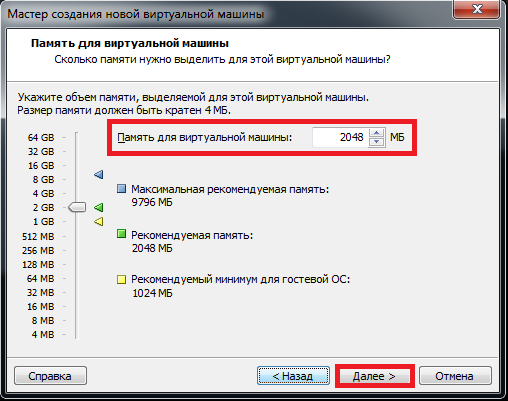
Выделяем оперативную память для Windows Server 2012. По рекомендуемым требованиям необходимо 2 Гб оперативной памяти (минимум 512 Мб), для жесткого диска рекомендуется 80 Гб и более.
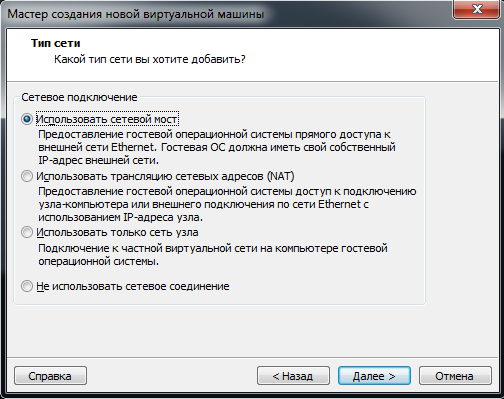
Далее программа спросит: Какой тип сети вы хотите выбрать? Я обычно выбираю 1-й пункт (сетевой мост), т.к. данный тип позволяет виртуальной машине находиться в единой сети с реальными компьютерами. Выбираем необходимый нам пункт и подтверждаем выбор.
В типе контроллера ввода-вывода выбираем рекомендуемый программой пункт (LSI logic SAS) и нажимаем Далее.
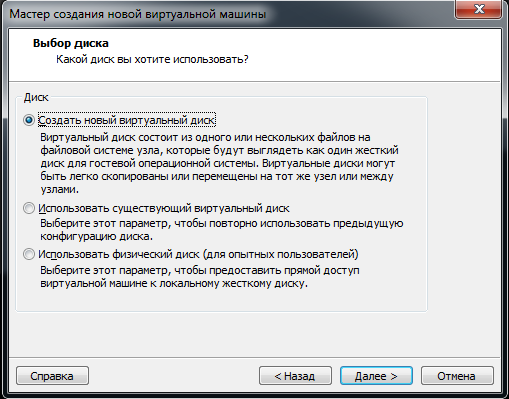
После программа спросит какой диск мы хотим использовать. Я выбрал пункт Создать новый виртуальный диск и нажал Далее.
Затем выбираем тип виртуального диска, который по умолчания предлагает нам VMware (SCSI).
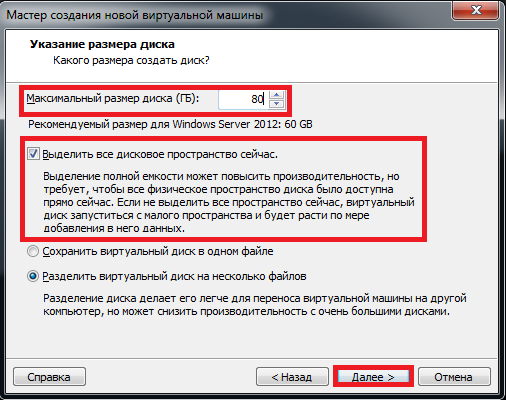
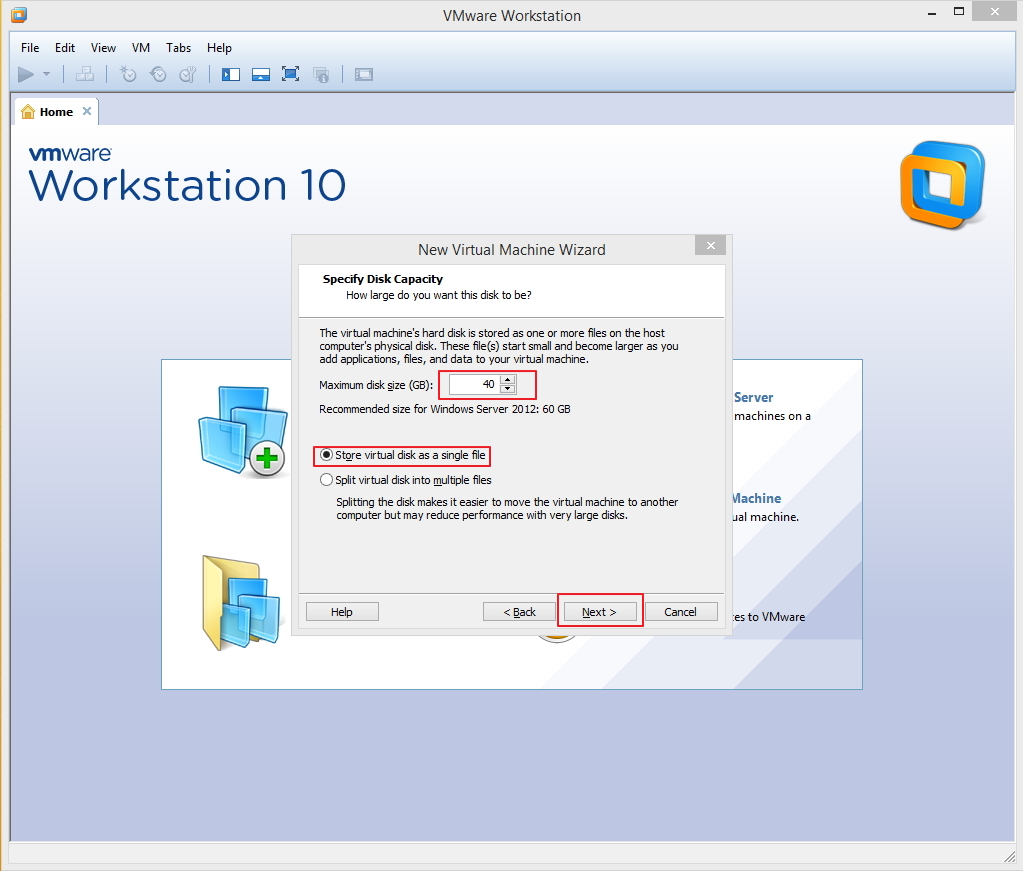
В максимальном размере диска я указал рекомендуемый Microsoft объем равный 80 Гб, также для производительности я выбрал пункт выбелить все дисковое пространство сейчас.
Программа спросит где хранить файлы диска, я указал директорию установки схожей с директорией основных файлов нашей операционной системы.
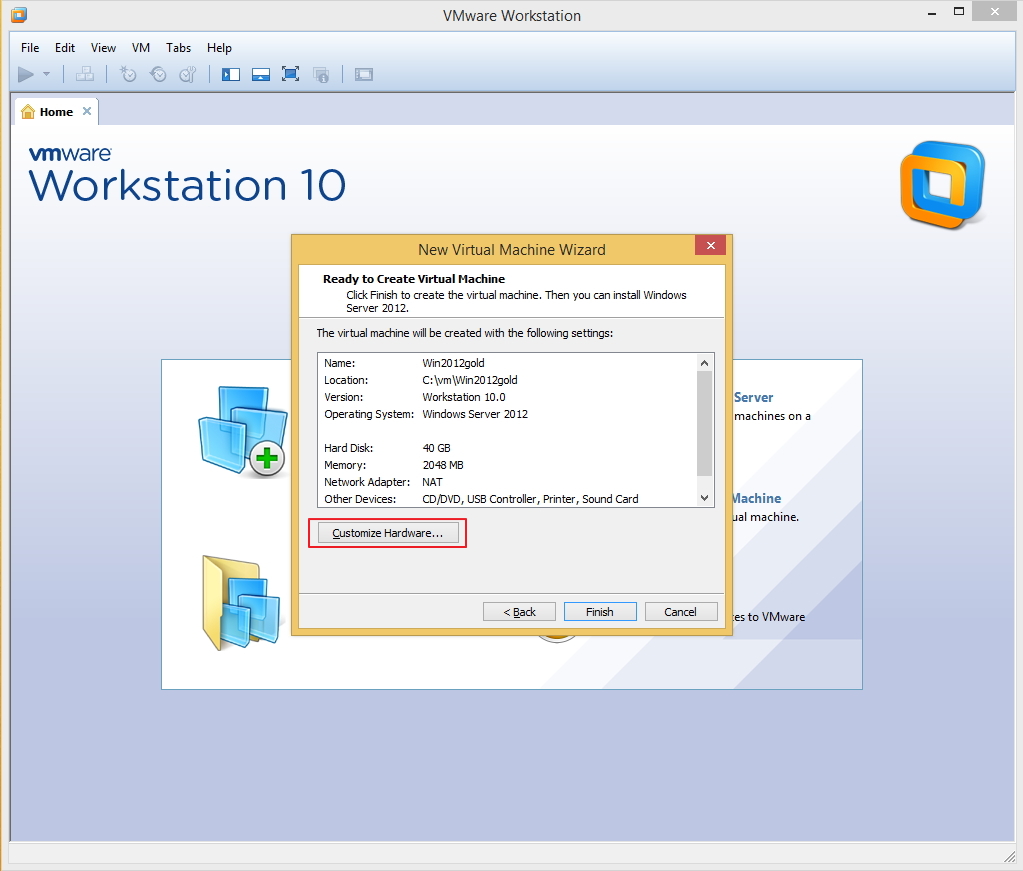
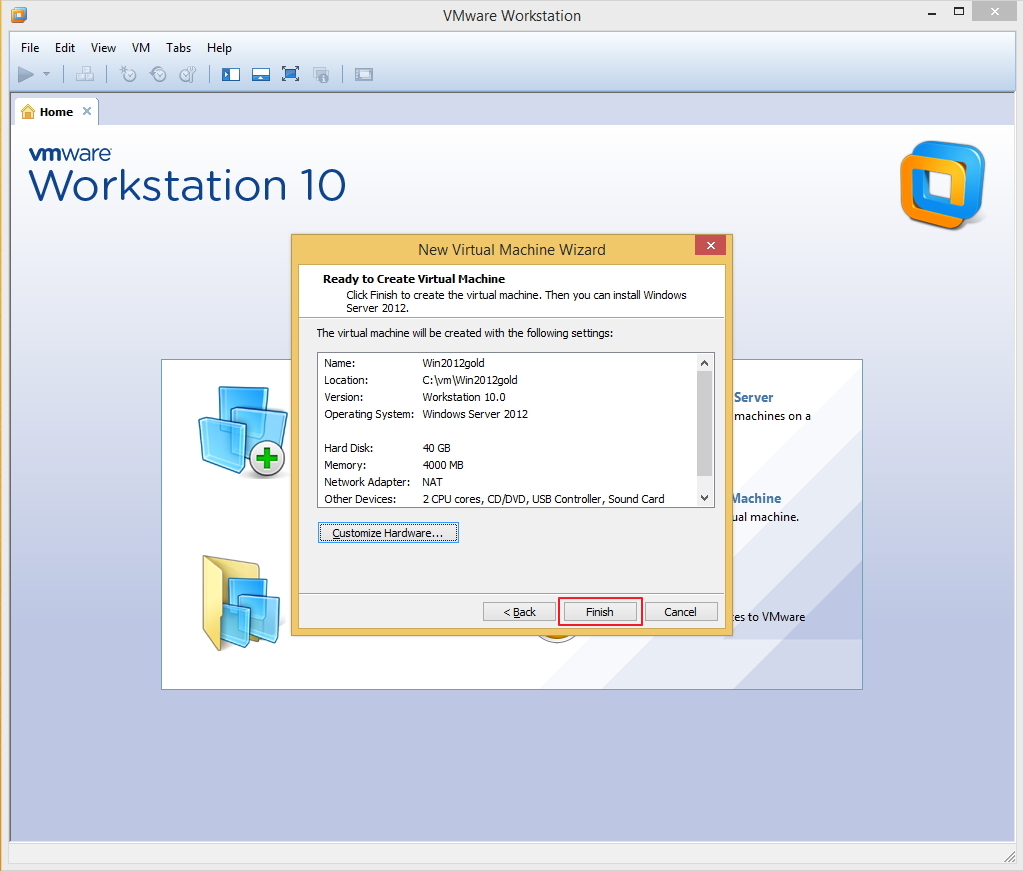
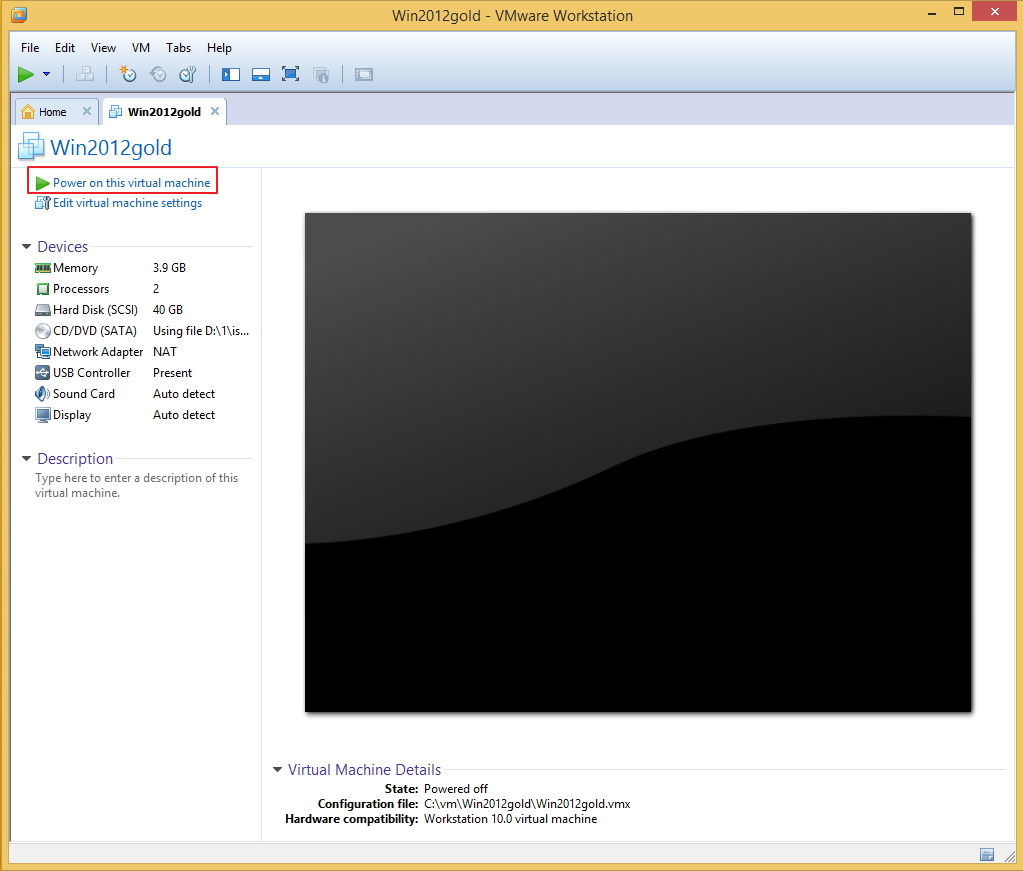
В конце программа выведет список всех наших настроек, проверяем их, оставляем «галочку» на пункте запустить виртуальную машину после создания (если желаем сразу приступить к установке) и жмем кнопку готово.
Программа создает диск и приступает к установке.
Многие сталкиваются с проблемой, на экране выскакивает ошибка:
 (This virtual machine is configured for 64-bit guest operating systems. However, 64-bit operation is not possible.) Как справиться с данной проблемой я писал в своей статье.
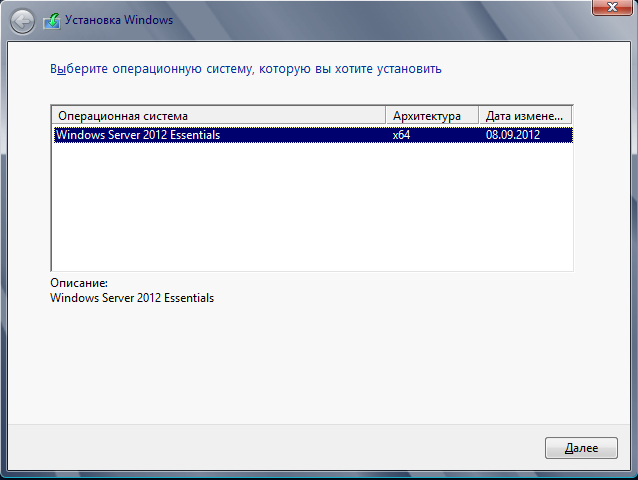
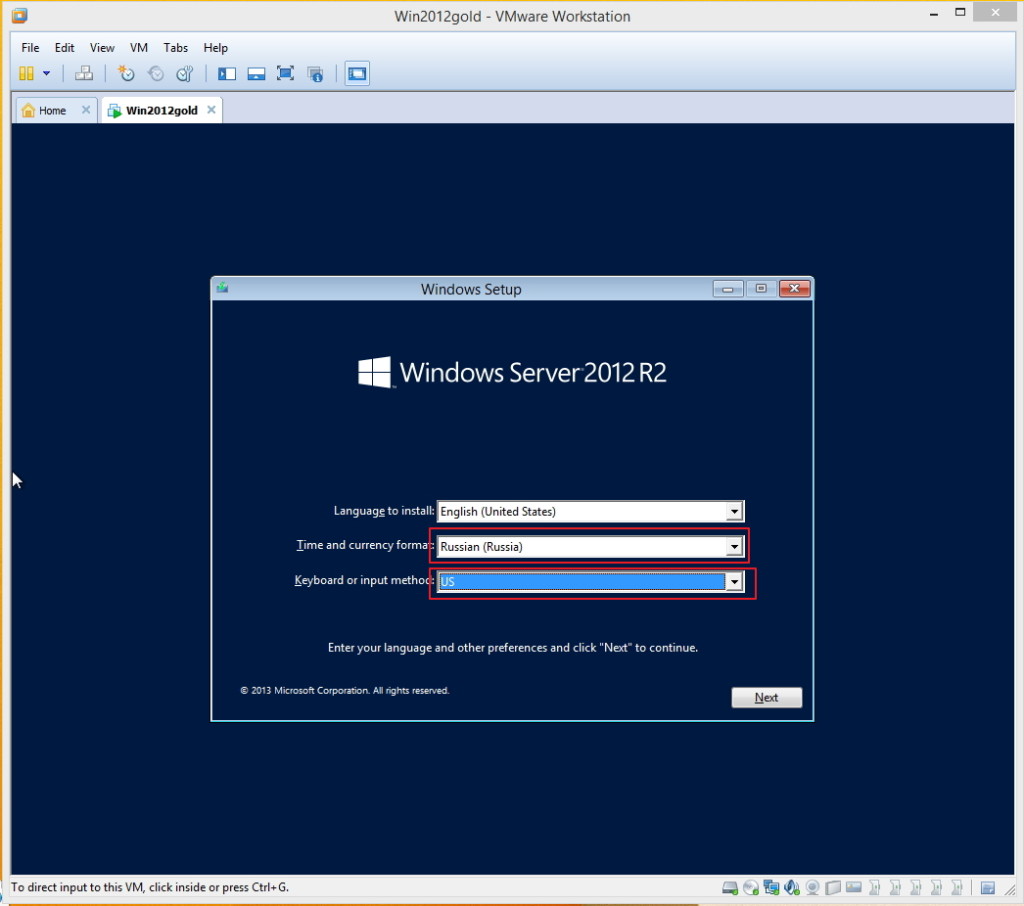
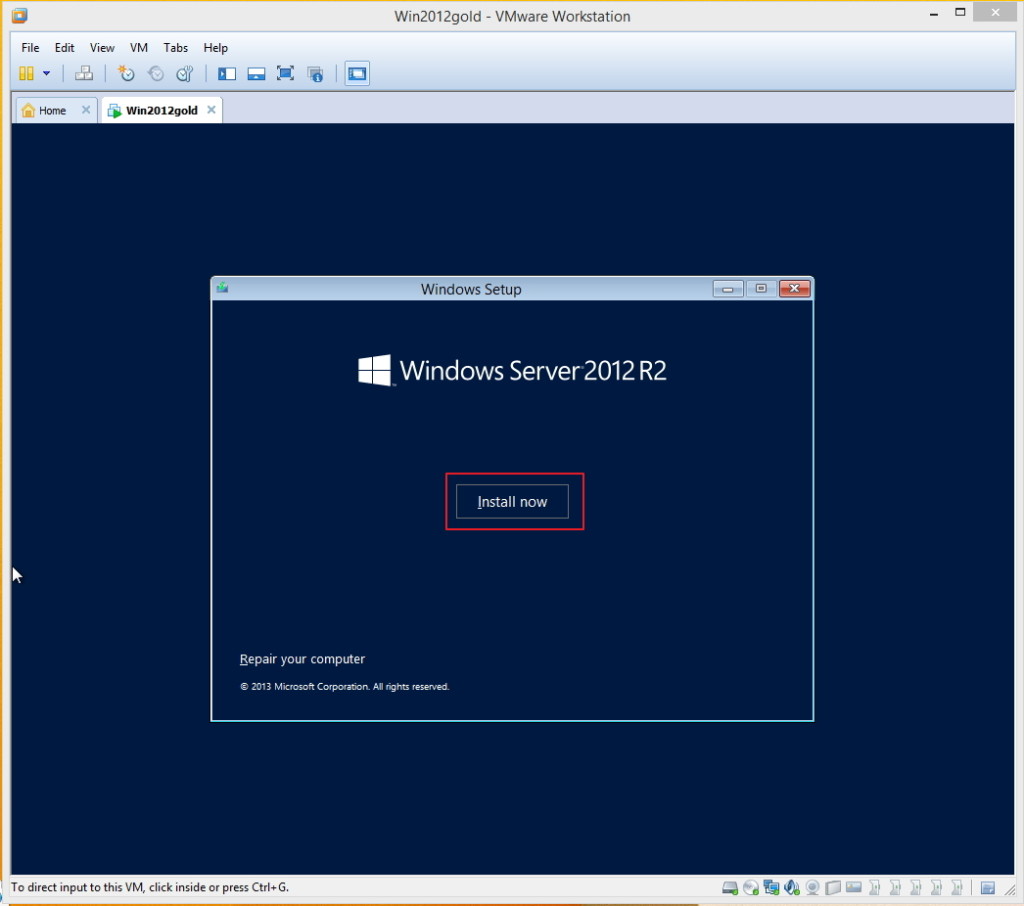
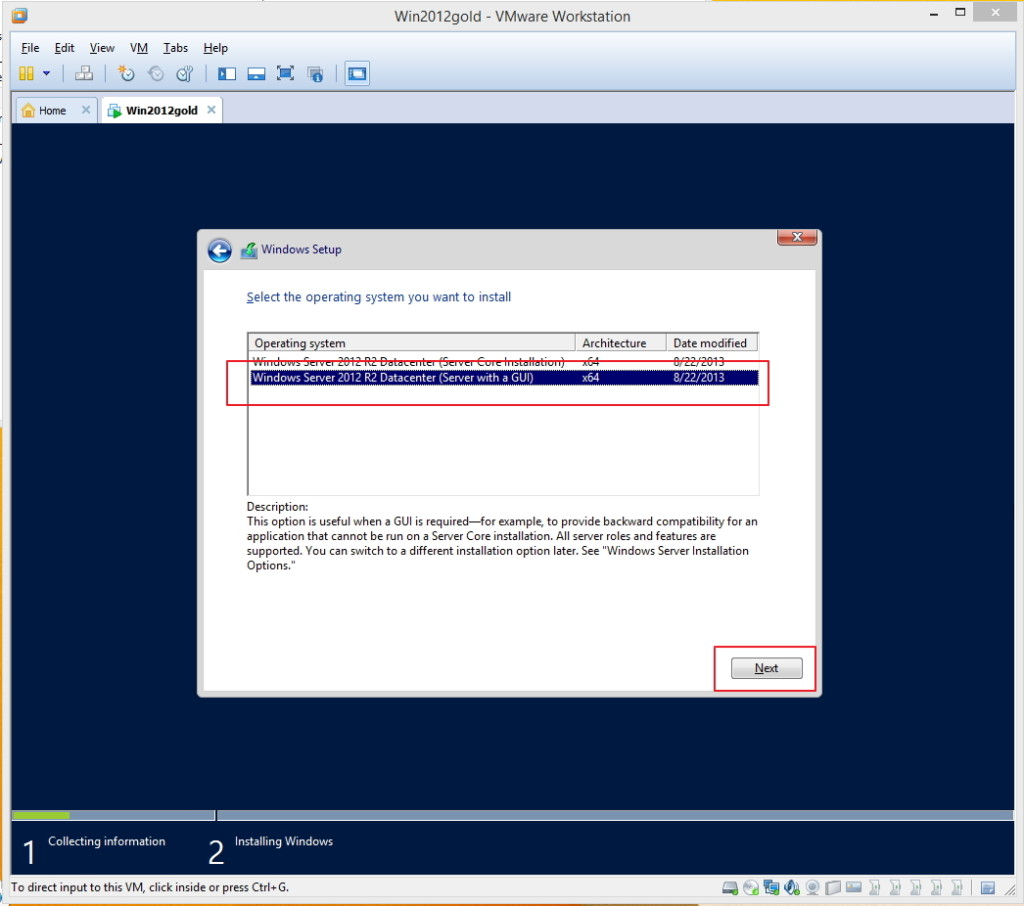
Первым шагом установки является выбор устанавливаемой операционной системы:
После подтверждения начинается процесс установки Windows Server 2012.
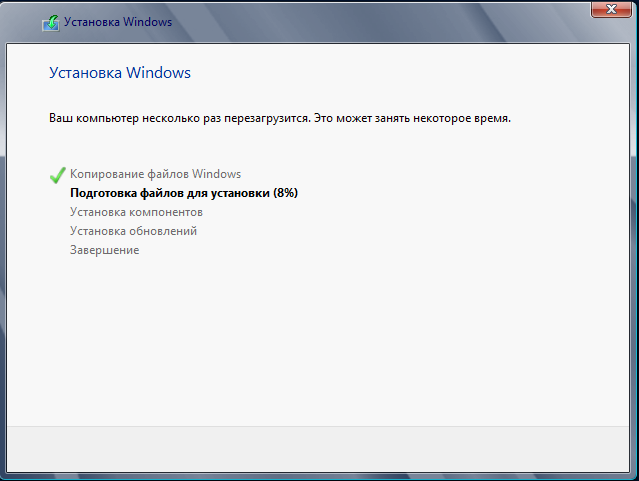
Процесс установки занимает от 15 до 50 минут (у меня система установилась за 25 минут). В процессе установки VMware перезагружает систему несколько раз. И вот спустя 25 минут ОС установлена и просит нажить CTRL+ALT+DEL, для этого во вкладке Виртуальная машина выбираем пункт Отправить команду CTRL+ALT+DEL.

Затем вводим ранее заданные учетные данные логин+пароль и нажимаем ENTER.
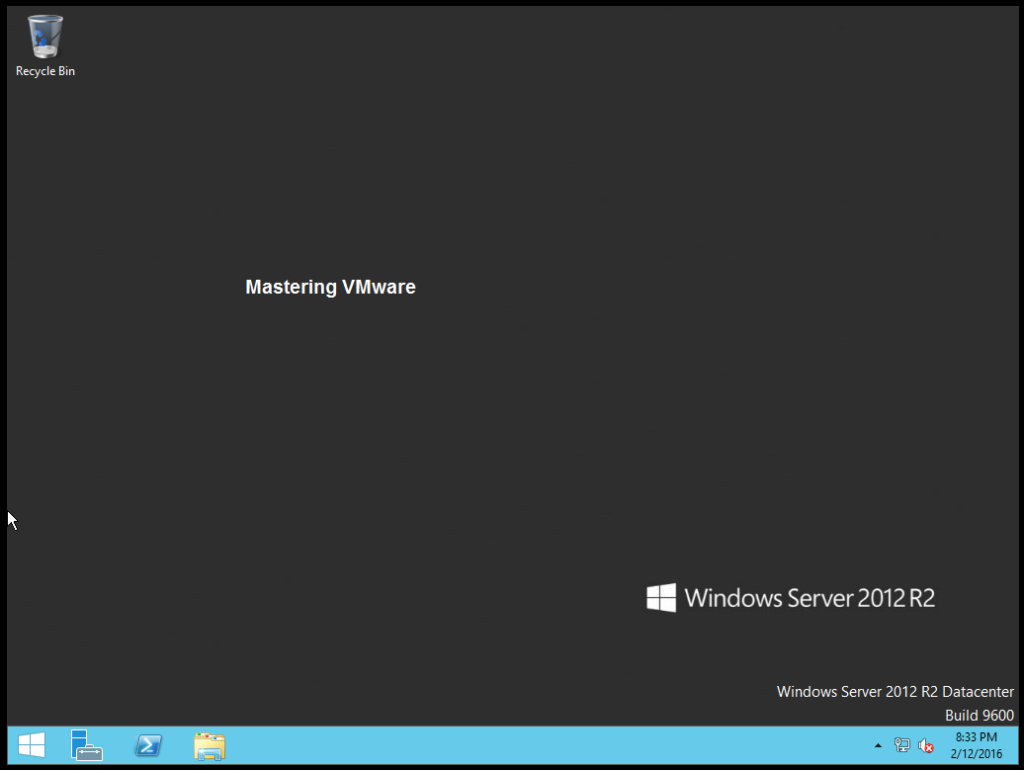
После входа в систему сервер готов к работе.

После установки Windows Server 2012 можно продолжить настройку ОС. Если сервер будет использоваться в организации первой ролью можно установить роль домен контроллера.
Про установку AD DS на Windows Server 2012 я писал в одной из своих статей.
На этом все, надеюсь статья Вам понравилась, если у кого-то возникнут вопросы или ошибки в процессе установки пишите, попробую Вам помочь.
Hello guys in this post i will show you how to install windows server 2012 r2 step by step. As Windows Server is required for vCenter Server Installation. I know that all of you are familiar with this process but some people are freshers so for their help i am writing this post.
Featured Sponsor 
Check below step for step by step guide to install Windows Server 2012 R2
Installing Windows Server 2012 R2:-
Step 1:
Insert the Windows Server 2012 R2 installation Disk into CD/DVD Drive.
Start the server or system.
Server will load the OS wait till it completes.

Step 2:
Choose your appropriate language.
Choose Time & Currency Format.
Choose your keyboard.
Click Next to continue.

Step 3:
Click Install Now button to start the installation process.

Step 4:
Enter the Product Key here & click Next to continue.

Step 5:
Choose the appropriate server edition according to your requirement & click Next to continue.


Step 6:
Accept the License agreement & click Next to continue.

Step 7:
As we are installing the first time choose the second option custom.

Step 8:
Choose the Drive where you want to install the OS.
Click on the New button below to create the partition according to your requirement & click Apply to create partition.

Step 9:
You will get prompt for additional partition windows create click OK to continue.

Step 10:
You will see that your partition is created choose the partition & click Next to continue.

Step 11:
Windows will start the Installation wait till all the process complete.

Step 12:
After successful all the installation windows will ask for restart.
It will automatically restart in 10 Seconds or you can click on button below Restart Now.

Step 13:
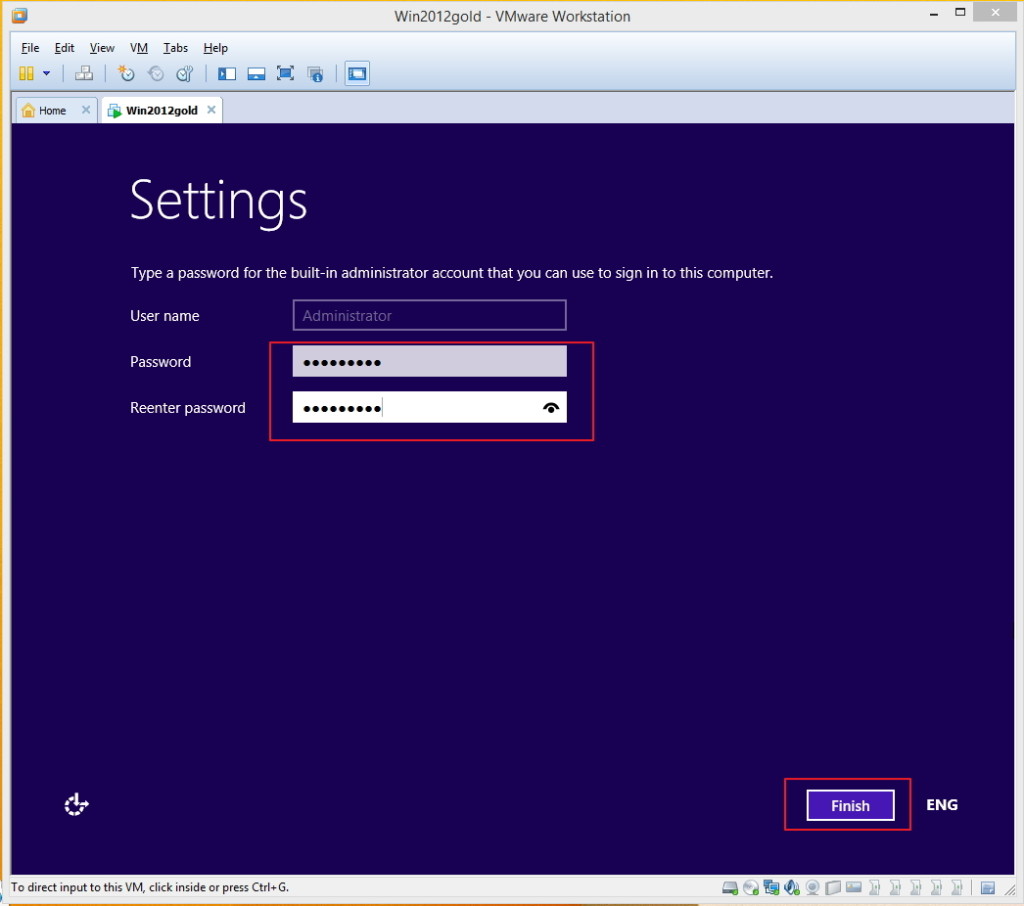
After restart it will load the system & will ask to set password for the administrator account.
Set the Password with alpha-numeric characters so it will be strong.
Click Finish to complete the installation

Step 14:
Windows will finalize all the settings.
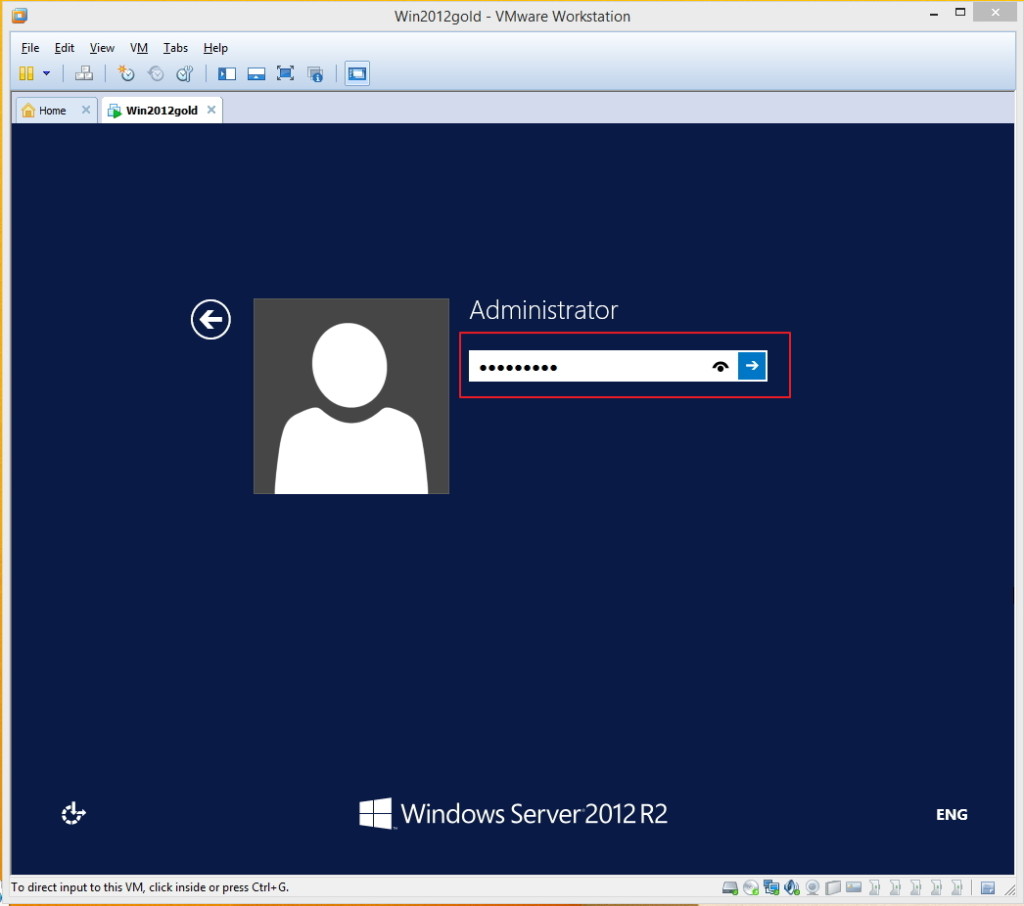
Press Ctrl +Alt + Delete to sign in to you windows server.

Step 15:
Provide the Administrator password which you have set before & click Enter to login.

That’s it You have successfully installed the Windows Server 2012 R2 & you will get below screen.
That’s it for Today Friends. I Hope you liked reading this post & If you find anything more to be added or removed feel free to write it in our comments. If you find it useful You are Feel free to share this on social media to help others & spread knowledge.
If you have any query on any thing you are free to write it in our comments section & we will make sure to provide you the better solution as soon as possible.
Checkout our Facebook Group for discussions & more.
You can also Like & Share our Facebook Page for Latest Updates.

Hi I am Mayur Parmar. Independent Author & Founder of Mastering VMware. I am working in IT industry for more than 4 Years with knowledge of VMware , Microsoft Server’s, Linux Server’s.
Run VMware Workstation 9.0 and click File – New Virtual Machine.

Follows «New Virtual Machine Wizard«, click «Next».

Choose the Virtual Machine Hardware Compatibility and click «Next». Browse installer disc image file you have just downloaded, click Next.

Choose Windows operational system version.

Name the Virtual Machine and choose one location for it. Click «Next» to let it go.
Generally, choose the default settings are OK. Until you create a disk for Windows server 2012 R2, confirm all the settings you have set and click Finish to complete New Virtual Machine creation.

Choose Windows operational system Language.

Type in Windows server 2012 R2 product key and click Next.

Accept license terms and click Next.

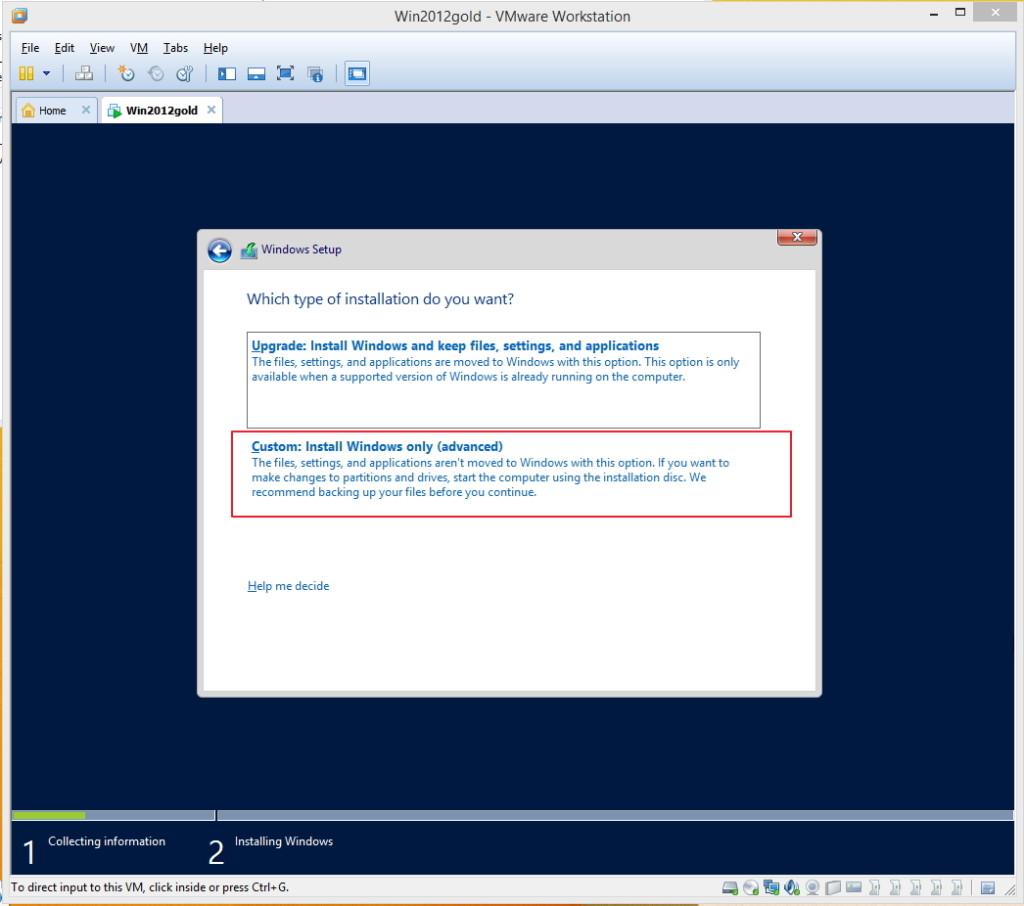
Choose one type of installation you want:
-
Upgrade: Install Windows and keep files, settings, and applications.
-
Custom: Install Windows only (advanced)
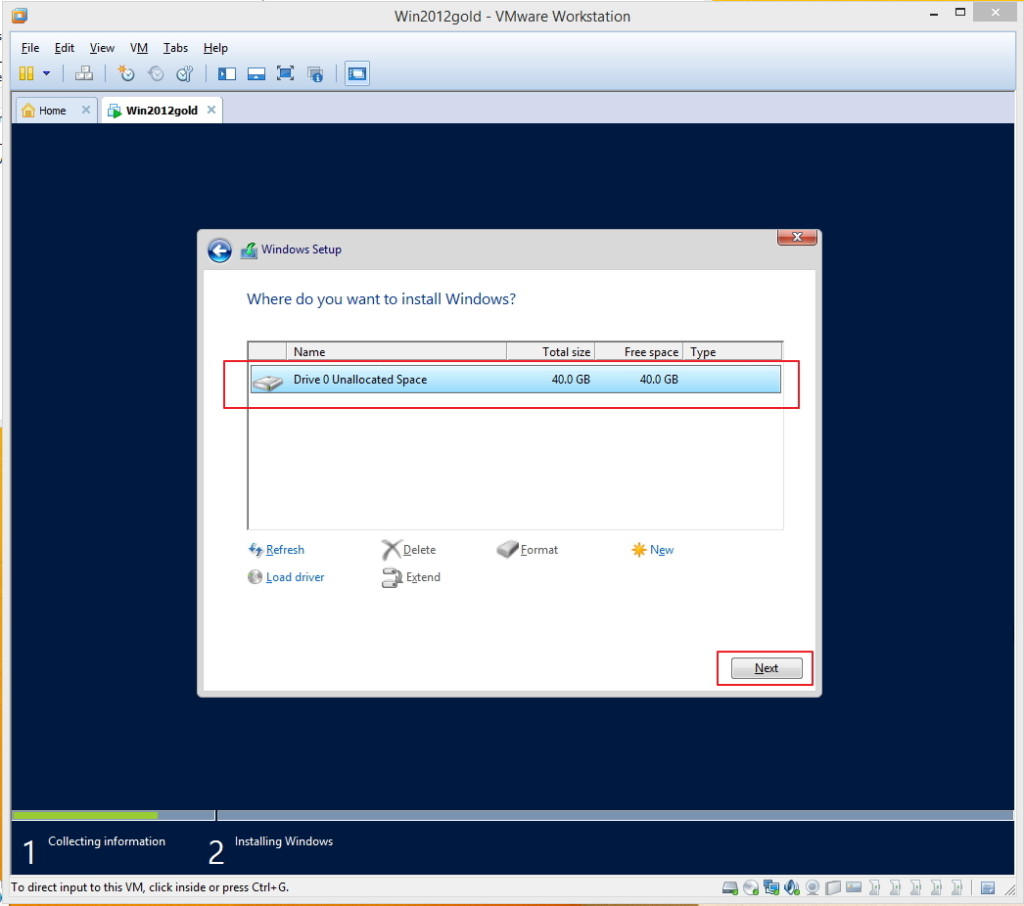
Choose the disk where you want to install Windows operational system.

Windows system program installs. Just wait for minutes to finish all operational system settings.

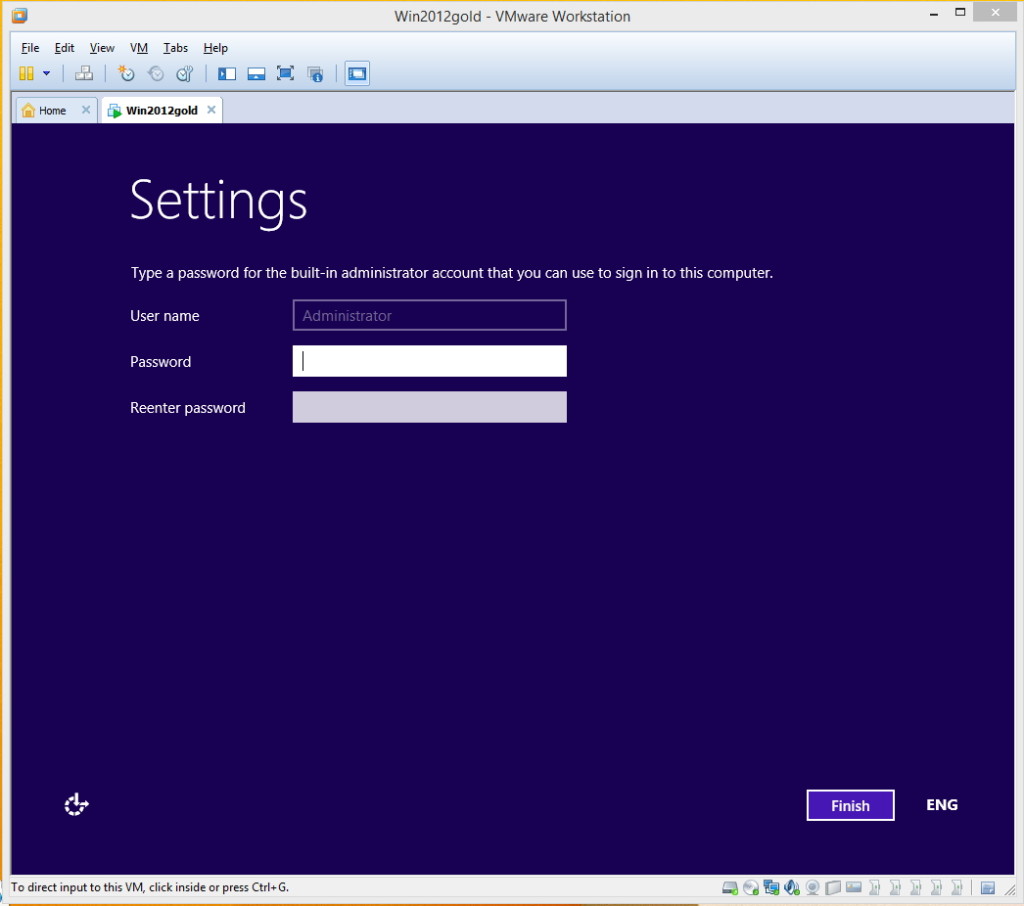
After it completes the installation, a window pops up and asks you to set password for built-in administrator. Type in password twice, and the password has to meet password complexity requirement set by administrator for network or group.

Click “Finish” to restart Windows server 2012 R2. You are required to login to Windows with default administrator and password.

Now, you can set a new user name for this Administrator.
План настройки фермы терминальных серверов:
- Различные варианты архитектуры решений MS RDS (эта статья)
- Описание MS RDS в Windows server 2012 и плана моей настройки (тут)
- Настройка шаблона виртуальной машины Windows server 2012 R2 (эта статья)
- Настройка домена в Windows server 2012 R2: Active Directory, DNS, DHCP
- Настройка дублирующих служб Active Directory, DNS, DHCP
- Развертывание RDS и создание кластера NLB
- Развертывание DFS для хранения данных пользователей
- Настройка премещаемых профилей и перенаправленных папок
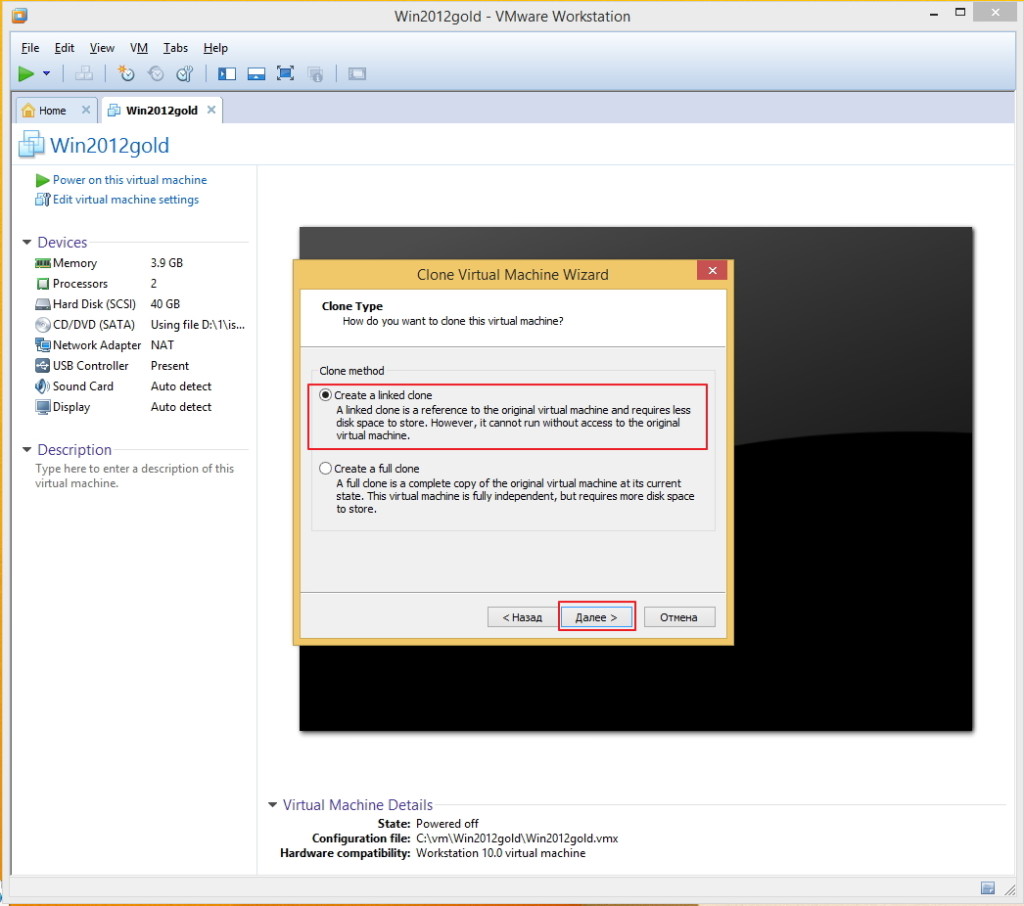
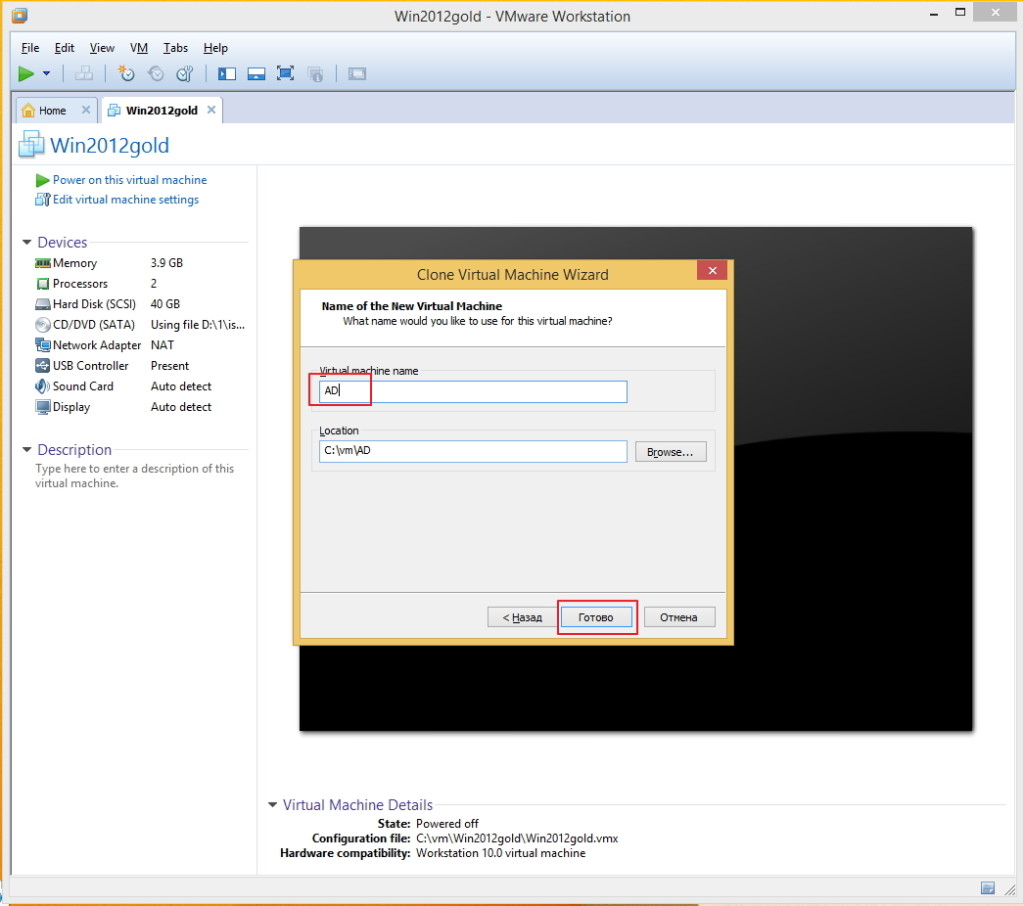
Как я уже писал ранее весь тестовый стенд для терминальной фермы будет развернут в среде VMware Workstation 10. Чтобы каждый раз не устанавливать Windows server 2012 R2 я сделаю шаблон виртуальной машины, из которого буду делать клоны (linked clones). Это позволяет значительно ускорить процесс развертывания новых ВМ и экономит дисковое пространство.
Также я покажу, как настроить виртуальную сеть в VMware Workstation, чтобы в дальнейшем могли работать доменные службы DHCP. Для кого-то это просто, а кто-то сталкивается в первый раз.
Описание слайдов:
1 — запускаем VMware Workstation 10. У меня подготовлен .iso образ Windows server 2012 R2 и ключ, но для тестов можно скачать пробную версию, разницы никакой нет. Выбираю пункт, создание новой виртуальной машины — Create a New Virtual Machine.
2-4 Все оставляю по умолчанию, из выпадающего списка выбираю Windows server 2012, чтобы далее установились подходящие данной версии ОС драйверы VMware tools.
5 Задаю название виртуальной машины и место хранения файлов виртуальной машины.
6 Задаю размер жесткого диска, кстати он будет тонкий, т.е. не сразу займет весь указанный объем на жестком диске моего компьютера, а будет расти динамически. Отмечаю настройку, чтобы виртуальный жесткий диск сохранялся одним файлом.
7 ВМ почти создана, чтобы изменить некоторые ее свойства нажимаю Customize Hardware
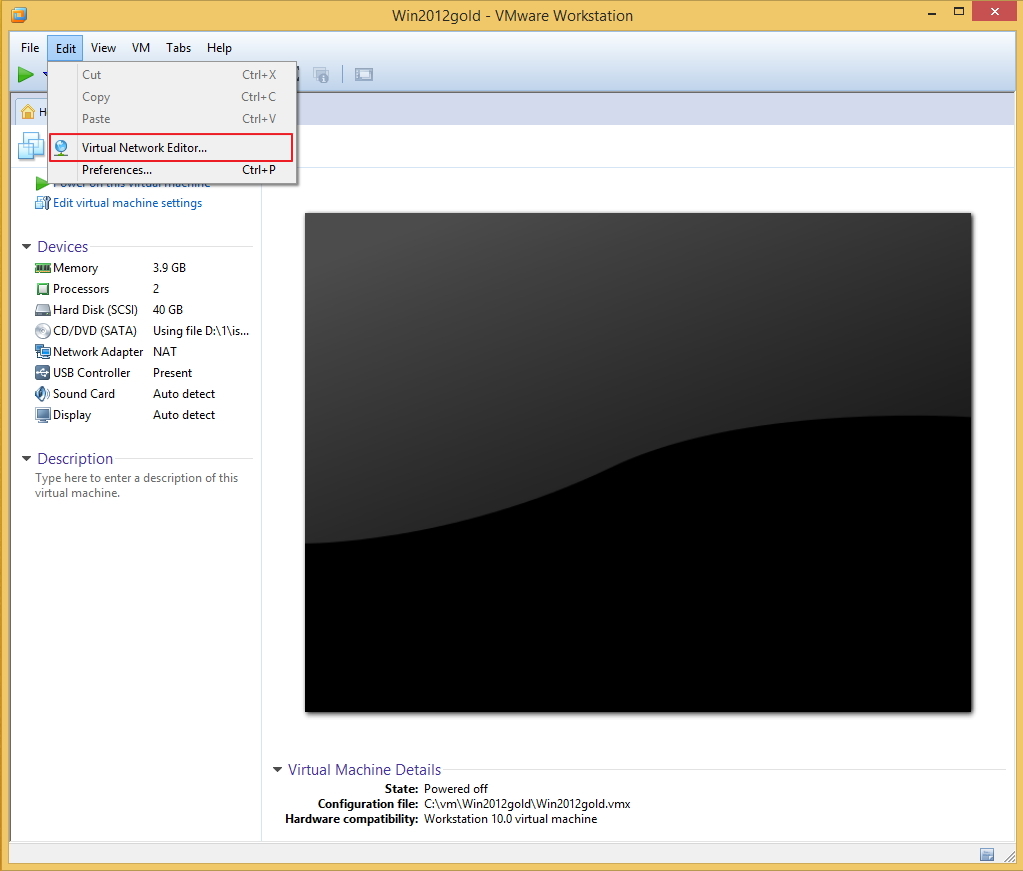
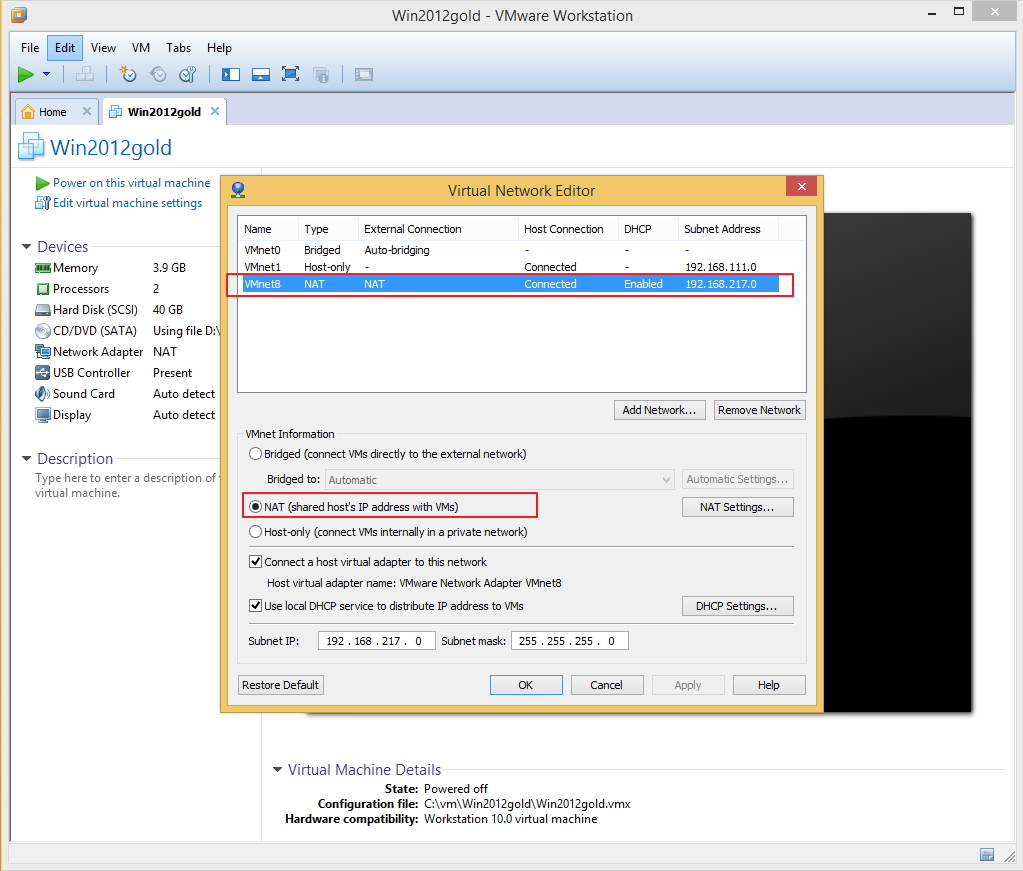
8-9 Я указываю путь к образу Windows server 2012 R2 и указываю сеть доступа для виртуального сетевого интерфейса — NAT. ВМ, которая попадает в эту виртуальную сеть, по умолчанию получает через DHCP настройки и использует физический компьютер, как роутер для выхода в общую сеть, а затем и в интернет (если компьютер может выйти в интернет). Для этого на физическом компьютере во время установки VMware Workstation специально создается сетевой интерфейс (VMware Network Adapter VMnet8)
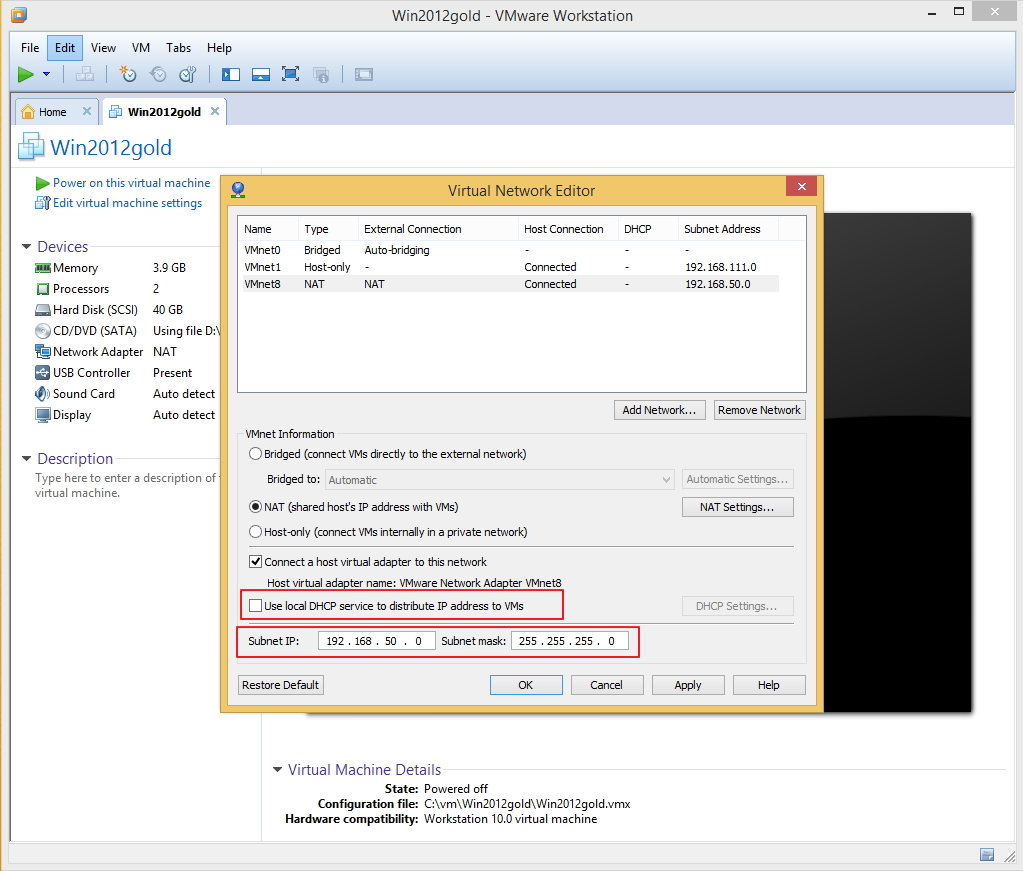
10-14 Мне для настройки стенда Терминального сервера нужно отключить в NAT виртуальной сети DHCP и поменять подсеть на более простую. Для этого захожу в настройки Virtual Network Editor, выбираю сеть NAT, снимаю галочку с пункта Use local DHCP service to distribute IP address to VMs. У меня в сети будет свой DHCP сервер на базе Windows server.
Также меняю значения подсети на 192.168.50.0 со стандартной маской 255.255.255.0.
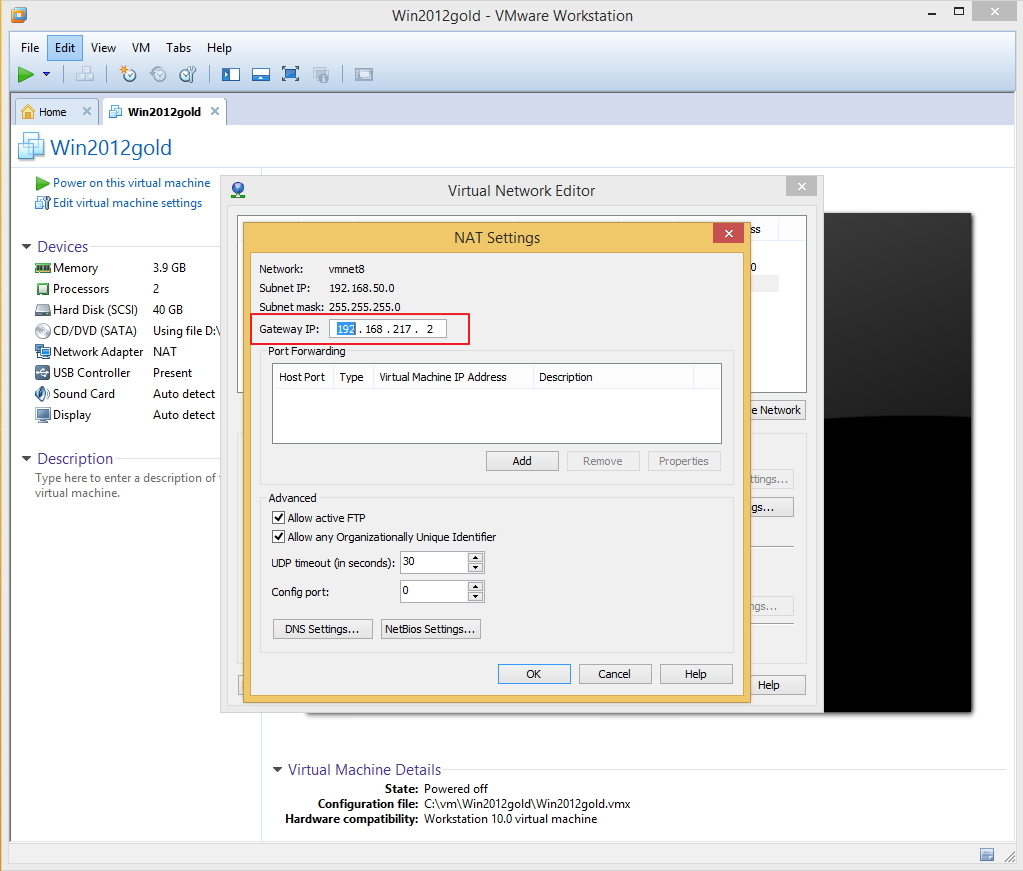
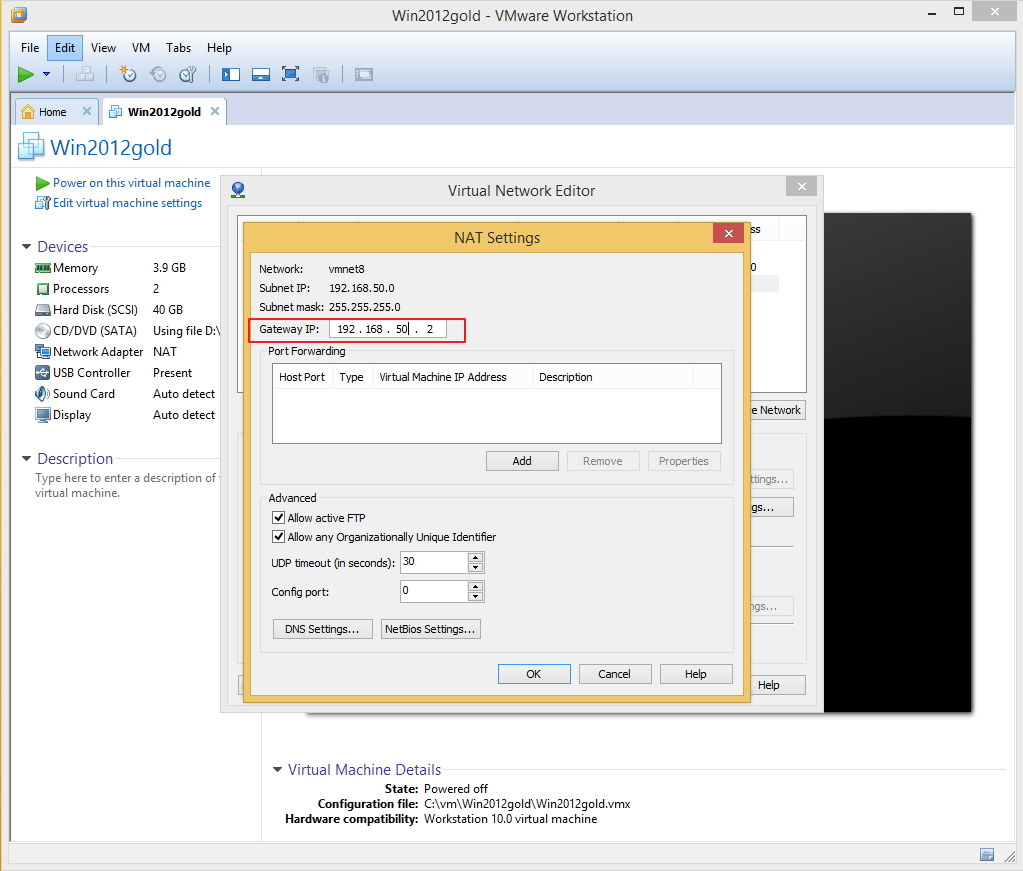
Захожу в NAT settings и меняю параметры шлюза на 192.168.50.2
Не забываю нажать Apply, чтобы сохранить настройки
15-25 Пробегаю по мастеру установки Windows server 2012 R2, тут ошибок сделать не получится при всем желании
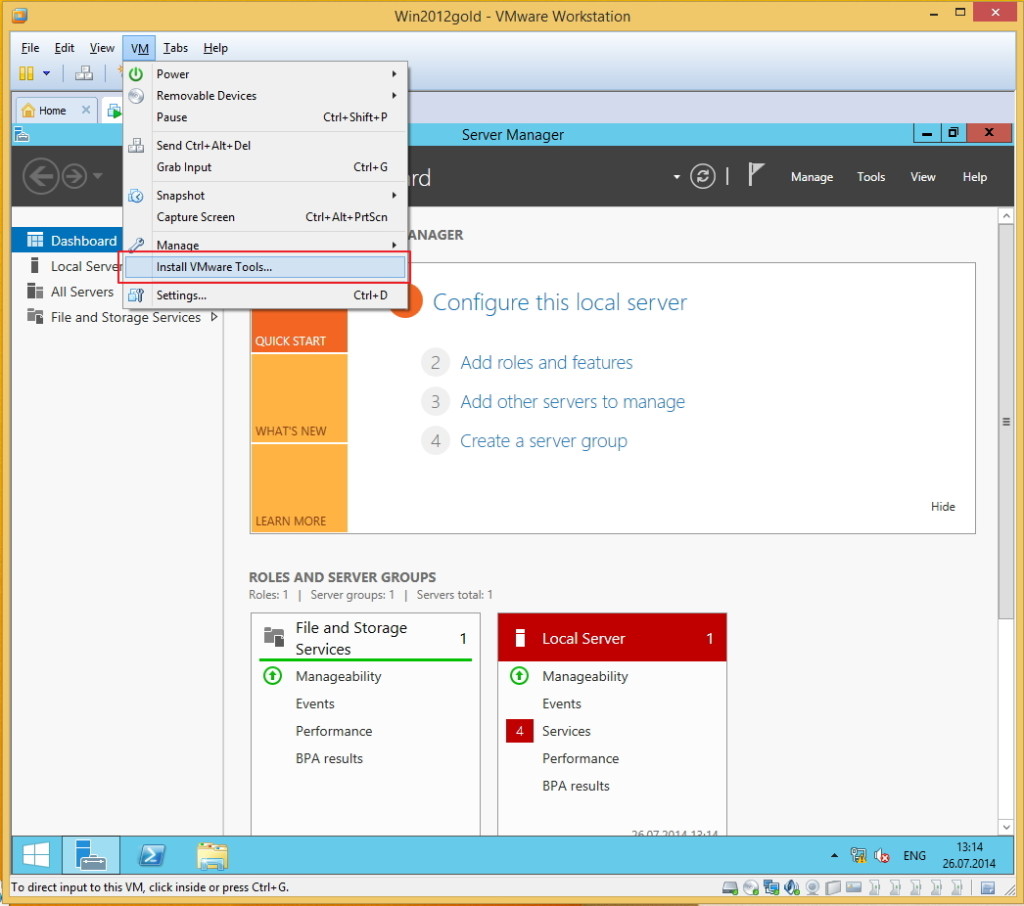
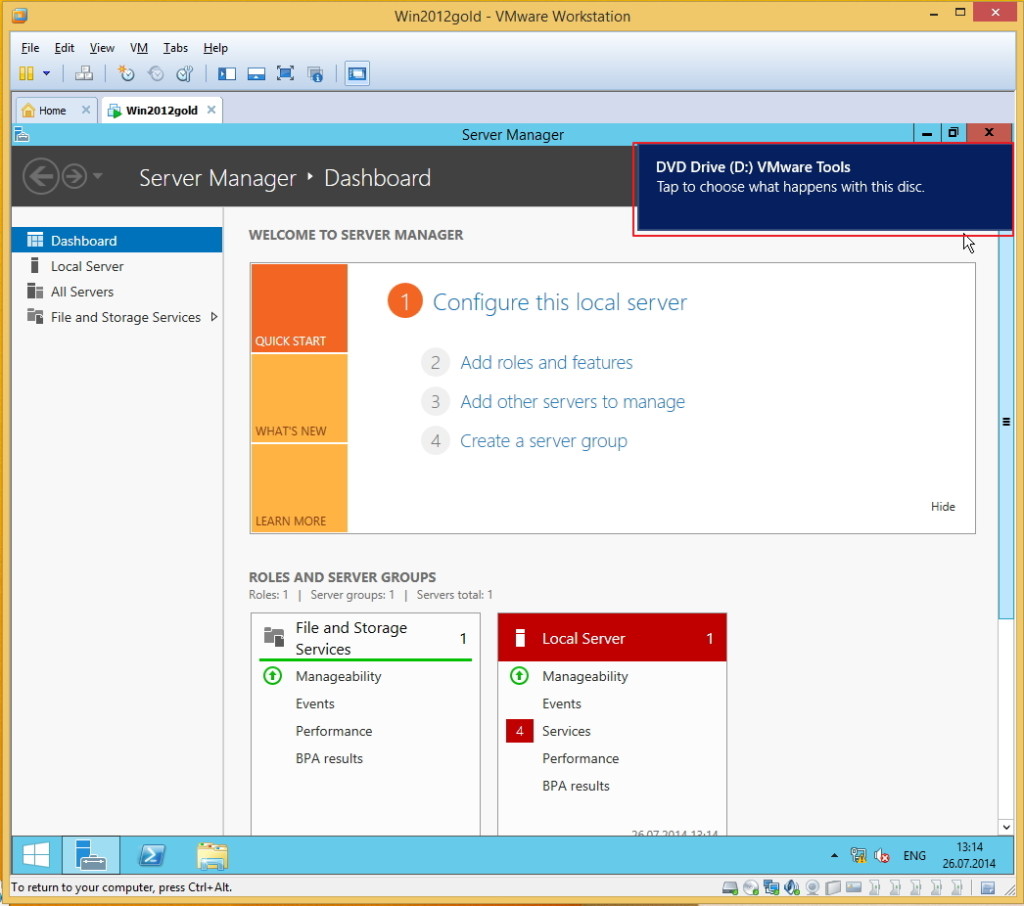
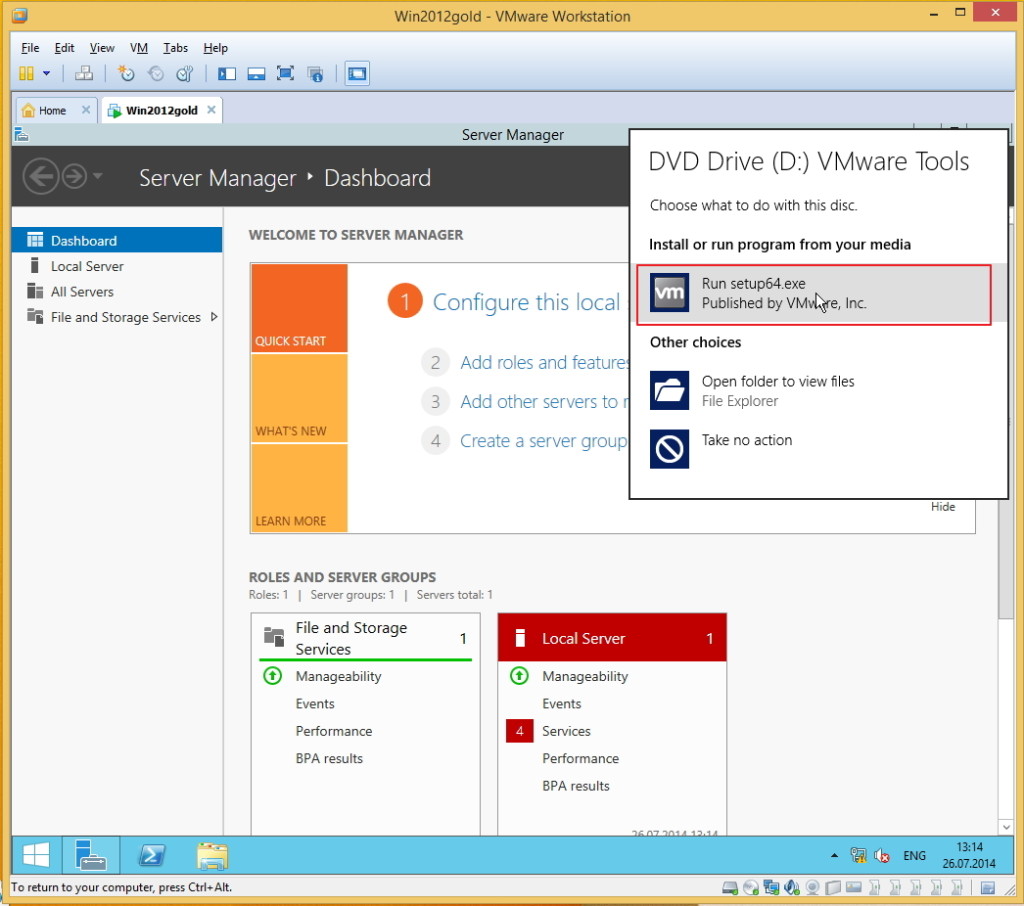
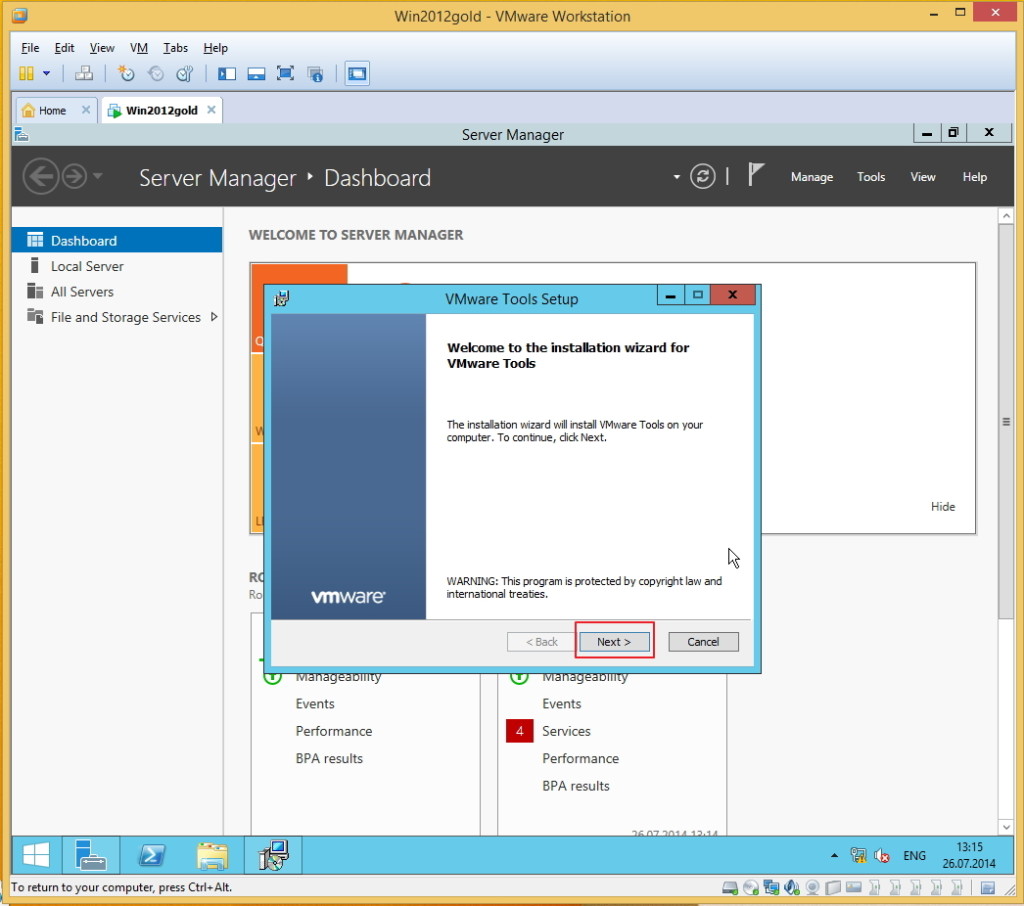
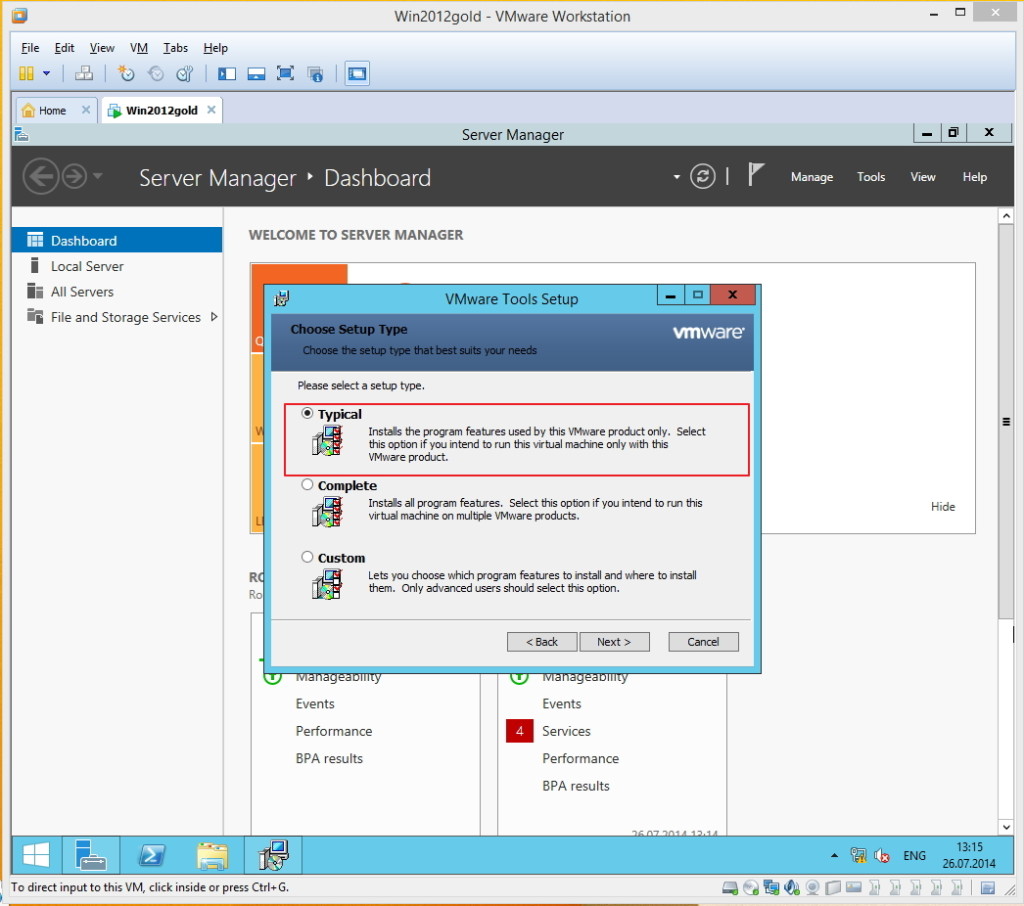
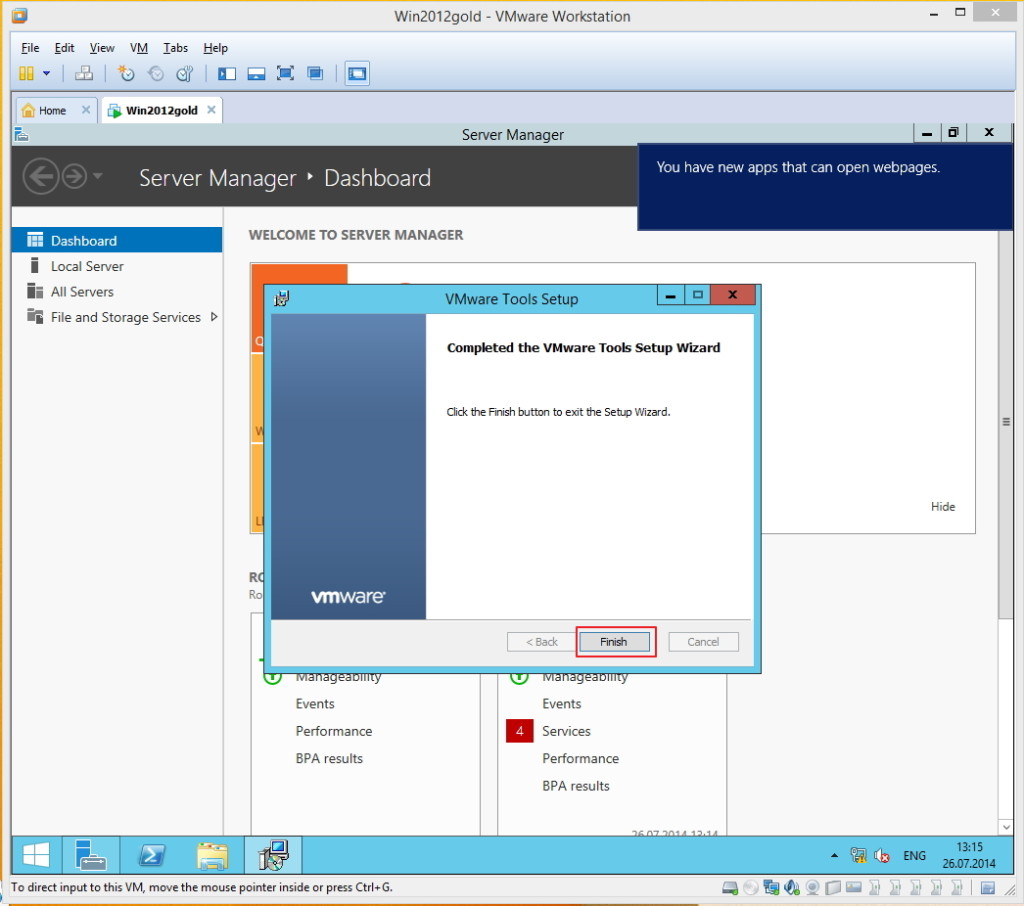
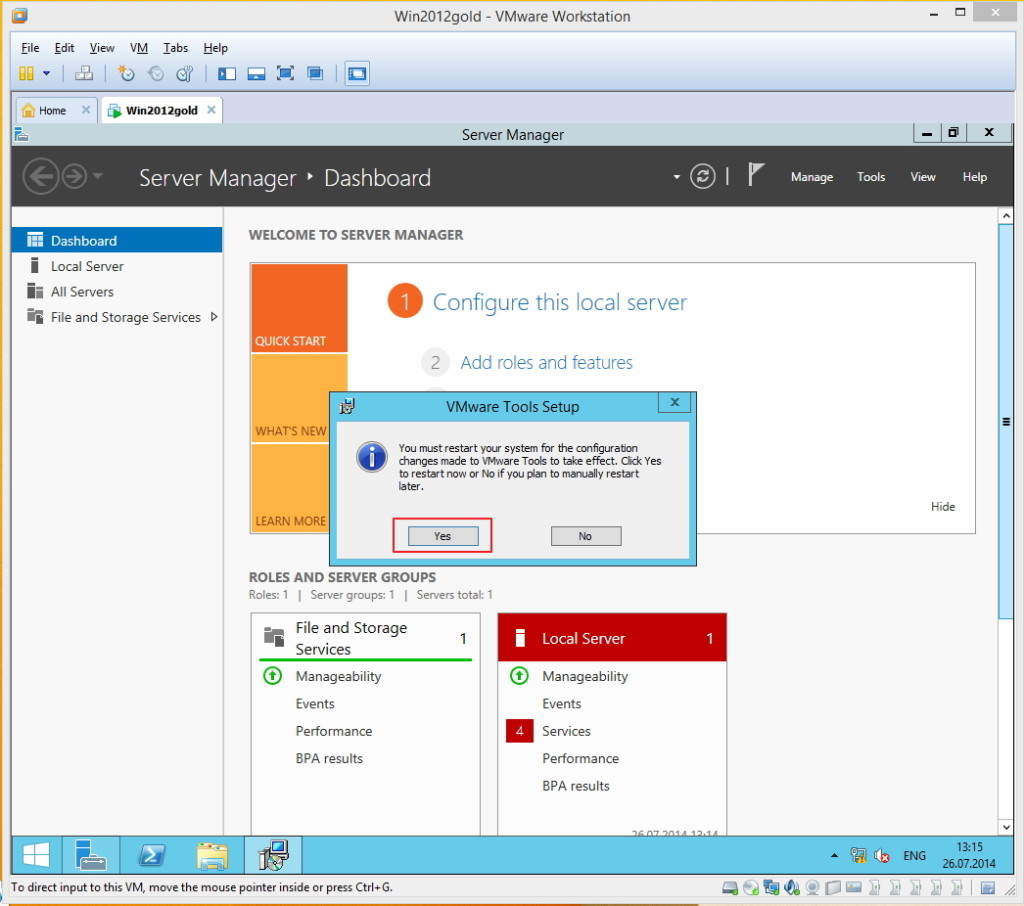
26-32 После успешного захода в систему, устанавливаю драйверы VMware Tools, все по умолчанию. ВМ перезагружается.
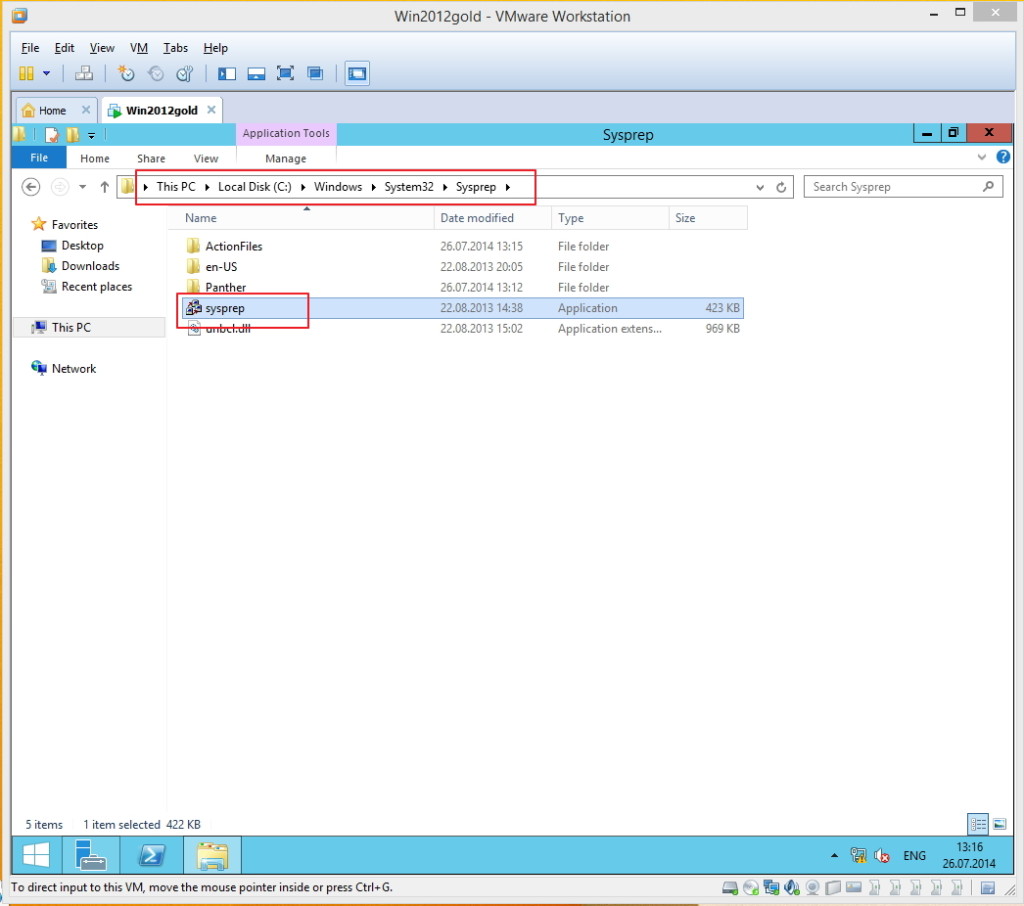
33-35 Теперь система готова к тому, чтобы стать шаблоном. Но прежде мы должны запустить специальную программу, встроенную в любой Windows — Sysprep. Когда она запуститься произойдет полная очистка системы от различных идентификаторов, и подготовка к использованию. Но я, в качестве действия после прогона Sysprep, выбираю выключение. Чтобы в дальнейшем делать связные клоны из выключенной ВМ.
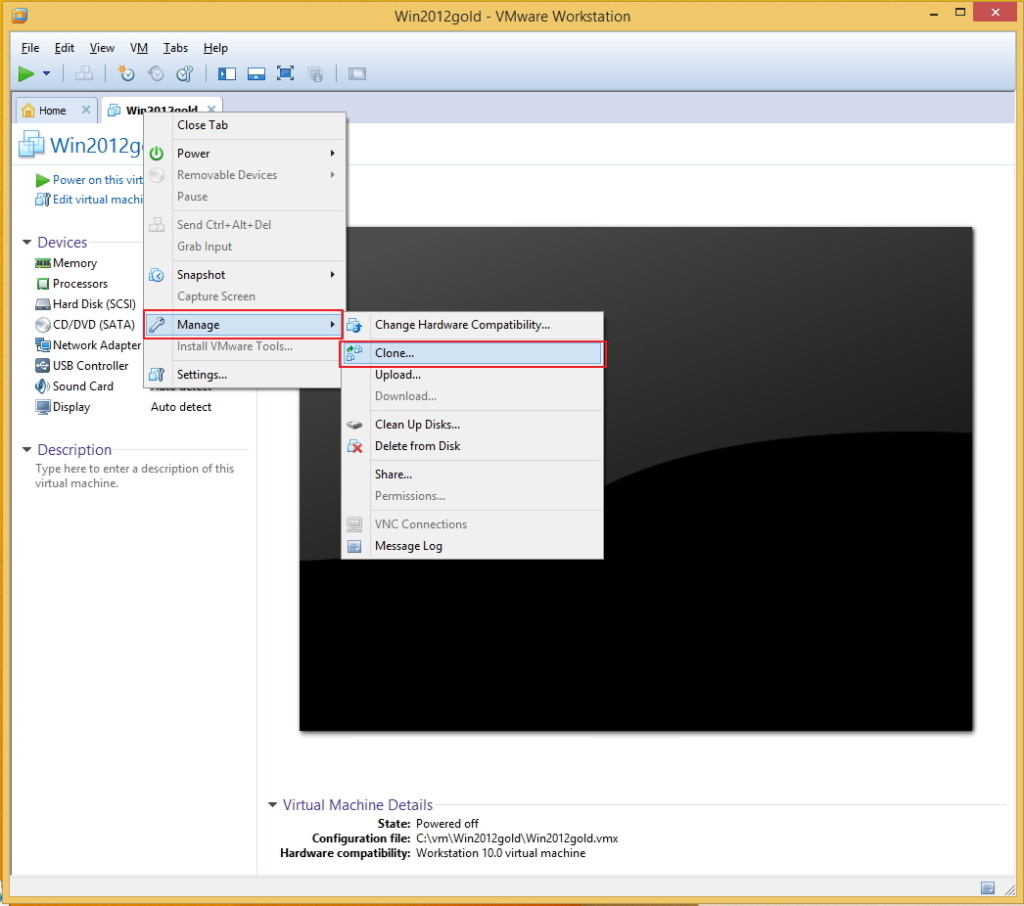
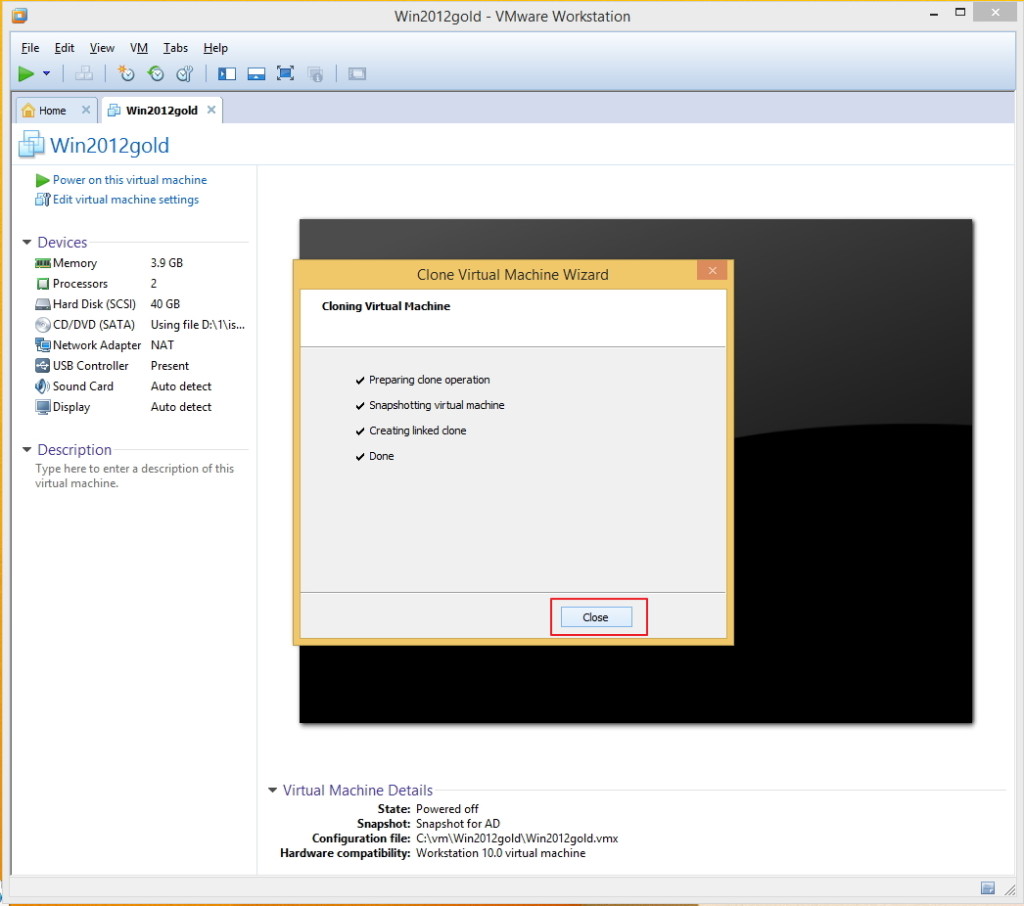
36-41 Создание клона виртуальной машины, который я буду использовать для установки служб Active Directory, DNS, DHCP
Linked clone — связный клон. Принцип работы следующий, сначала делается снапшот исходной виртуальной машины, затем к файлу этого снапшота привязывается дифференциальный диск новой виртуальной машины. Можете не заморачиваться и просто пользоваться данной технологией.
1
2
3
4
5

6
7
8

9
10
11
12
13
14
15
16
17
18
19
20

21
22
23
24
25
26
27
28
29
30
31
32
33
34

35
36
37

38

39
40
41
Creating new Windows VMs can be time consuming due to having to create the VM, install the Operating System, and then having to install Gigs of patches which can be time consuming. In this post today I will show you how to create a Windows Server 2012 R2 Template VM which can be cloned to create new VMs in order to speed up the process of deploying a new VM in VMWare Workstation 11.
Creating a Windows Server 2012 R2 Template VM in VMWare Workstation 11
1) Create your VM, install the Operating System, and run Windows Updates in order to have latest patches installed.(I assume you know how to do this.)
2) Once the VM is in the state you want. Open up the command Prompt as a Administrator.

3) In the Command Prompt, run the following command in order to clean up the old Patches and Updates.
dism /online /cleanup-image /StartComponentCleanup /ResetBase

4) Once the cleanup is done, go to “C:WindowsSystem32sysprep” folder in the Command Prompt and then run the following command.
sysprep

5) In the SysPrep Tool Window, Make sure “Enter System Out-of-Box Experience (OOBE)” is selected, the “Generalize” box is checked in, and in Shutdown Options select “Shutdown”. Once done, click on “OK”.

6) Sysprep will begin to prepare the OS. Once it is finished, the VM will shut down.

7) In the VMWare Workstation 11 Window, Right Click on the VM that is your Template, go to “Snapshot” and select “Take Snapshot”.

8)In the Take Snapshot Window, name your Template Snapshot and then click on “Take Snapshot”.

9)Once the Snapshot is complete, Right Click on the VM that is your Template and go to “Settings”.

10) In the VM Settings Window, go to the “Options” Tab. Look for “Advanced” in the Settings Window and in there make sure the “Enable Template mode (to be used for cloning)” box is checked in. Once that is done, click on “OK”.

11) In the VMWare Workstation 11 Window, Right Click on the VM that is your Template, go to “Manage” and then click on “Clone”.

12) The Clone Virtual Machine Window will come up and click on “Next”.

13) Make sure the Template Snapshot is selected and click on “Next”.

14) Select the Clone type you want to use. In this example we will “Create a Full clone”. Once selected click on “Next”.

15) Select where you want to store the Cloned VM and then click on “Finish”.

16) Wait for the Cloning process to finish.

17) Once the Cloning is finished, this Window will pop up. You can click on “Close”.

18) You can now power on your Cloned VM and do the initial Windows Setup.

I hope this has been useful for all of you 😀 .
Hyper V is one of the hottest feature of Windows Server 2012. You will definitely want to install Hyper V server role and play around with it. Installing Hyper V role in server 2008 in VMware Workstation was difficult until VMware released VMware Workstation 9. Here I will show you how to install Windows Server 2012 as virtual machine in VMware workstation 9 with Hyper V ready. So let’s get going.
Before installing Windows Server 2012 as virtual machine in VMware workstation you might want to make sure following things,
- At least 2 GB memory or more for Hyper V and nested VM installation.
- Processor that have Intel VT technology supported and enabled.
- At least 50 GB hard drive space or more for Hyper V virtual machine installation.
I am installing Server 2012 on my laptop running core i7 2670 processor with 16 GB RAM and 750 GB HDD with Windows 7 Ultimate. Here are the steps. Open VMware Workstation application from desktop. I am running VMware Workstation 9.
Click File from the Menu and select New Virtual Machine

Here choose Custom option and click Next button.
![]()
Choose Workstation 9 as hardware compatibility and click Next button. Under guest OS installation option, choose install operating system later. Click Next button.

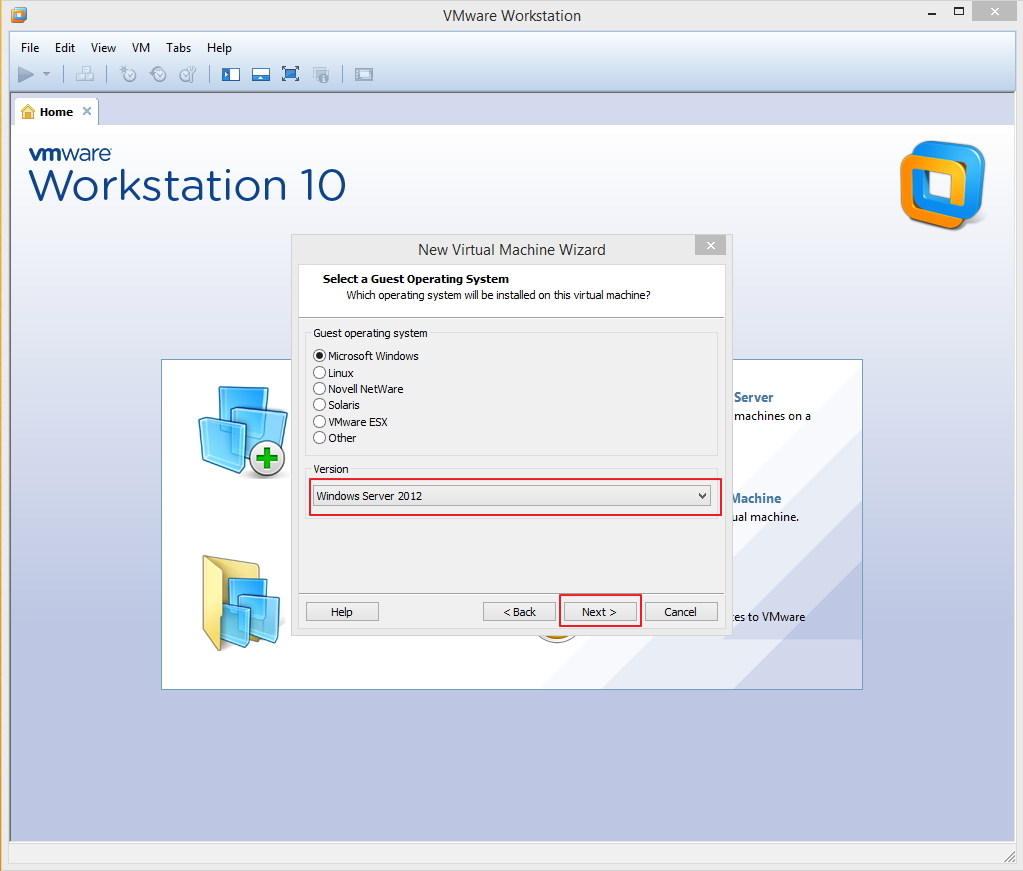
Here I will choose Microsoft Windows as guest operating system and Hyper V as version. Click Next. Now name the virtual machine and browse the location to store this virtual machine and click Next button.

Under processor configuration, I will select 4 cores per processor and click Next.

I will select 6 GB of memory since I will be installing Hyper V and virtual machines under it. After configuring memory click Next.

In network type option choose NAT so that you can use Internet within the virtual machine. Then click Next button. Under I/O controllers type leave the default, LSI Logic SAS. Click Next button.

In select disk option, choose create new virtual disk and click Next button. In disk type, choose SCSI and click Next button.

Now, specify the disk capacity. I will enter 90 GB so that I will have enough space to install virtual machines in Hyper V. Then click Next button. Browse the location where you want to save the disk file. Click Next button.

Now you can see all the information in one place. If you think something is not right then you can click back and edit it. Click Finish button. Now click edit virtual machine settings to configure installation file of Server 2012.

As you can see below picture, select CD/DVD under device and browse the location of ISO installation file of Server 2012.

After configuration click OK button and click power on this virtual machine. You can now start installing Windows Server 2012.

After installation completes you can start using Windows Server 2012. You can also install Hyper V role and install virtual machines.
The following two tabs change content below.
- Bio
- Latest Posts

Bipin is a freelance Network and System Engineer with expertise on Cisco, Juniper, Microsoft, VMware, and other technologies. You can hire him on UpWork. Bipin enjoys writing articles and tutorials related to Network technologies. Some of his certifications are, MCSE:Messaging, JNCIP-SEC, JNCIS-ENT, and others.
This procedure describes how to install Windows Server 2012 in VMware Workstation. The following versions are used:
- VMware Workstation Technology Preview 2012 e.x.p Build-646643
- Windows Server 2012 Release Candidate Datacenter Build 8400
In VMware Workstation Technology Preview 2012 create a new VM with the following settings:
- New Virtual Machine
- Custom (advanced)
- Workstation Tech Preview
- Select “I will install the operating system later”
- Select “Microsoft Windows” and select as version “Windows 8 x64”
- Set the Name and Location
- Minimal 1 processor, 1 core
- 2048 MB memory
- Select “Use network address translation (NAT)”
- Select “LSI Logic SAS”
- Create a new virtual disk
- SCSI
- 60 GB disk size
- Leave default disk file
- Finish
- After the VM is created, edit virtual Machine settings and browse for the Windows Server 2012 ISO in the the CD/DVD option

- Remove the VM from VMware Workstation by clicking on the X icon
![]()
- Edit the VMX file (i use Notepad++) and add the following line to the end to of the VMX file:
vmGenCounter.enable = FALSE
- Add the VM back to VMware Workstation by clicking on the *.VMX file
- During the installation choose the Windows Server 2012 Release Candidate (Server wit GUI)

- When the installation is ready you have a working Windows Server 2012 server

- Install VMware tools
Source: ivobeerens.nl
Hi
Sorry for not replying sooner but yes checked using coreinfo and processor is CMPXCHG16B compliant but still can’t install Windows 8 or Server 2012 with the same error.
What else am I missing here as surely it can’t be this difficult to stand up the vm’s on hardware that is only a year old.
I have copied the coreinfo output below…
Coreinfo v3.2 — Dump information on system CPU and memory topology
Copyright (C) 2008-2012 Mark Russinovich
Sysinternals — www.sysinternals.com
Intel(R) Xeon(R) CPU E5-1603 0 @ 2.80GHz
Intel64 Family 6 Model 45 Stepping 7, GenuineIntel
HTT * Hyperthreading enabled
HYPERVISOR — Hypervisor is present
VMX * Supports Intel hardware-assisted virtualization
SVM — Supports AMD hardware-assisted virtualization
EM64T * Supports 64-bit mode
SMX * Supports Intel trusted execution
SKINIT — Supports AMD SKINIT
NX — Supports no-execute page protection
SMEP — Supports Supervisor Mode Execution Prevention
SMAP — Supports Supervisor Mode Access Prevention
PAGE1GB * Supports 1 GB large pages
PAE * Supports > 32-bit physical addresses
PAT * Supports Page Attribute Table
PSE * Supports 4 MB pages
PSE36 * Supports > 32-bit address 4 MB pages
PGE * Supports global bit in page tables
SS * Supports bus snooping for cache operations
VME * Supports Virtual-8086 mode
RDWRFSGSBASE — Supports direct GS/FS base access
FPU * Implements i387 floating point instructions
MMX * Supports MMX instruction set
MMXEXT — Implements AMD MMX extensions
3DNOW — Supports 3DNow! instructions
3DNOWEXT — Supports 3DNow! extension instructions
SSE * Supports Streaming SIMD Extensions
SSE2 * Supports Streaming SIMD Extensions 2
SSE3 * Supports Streaming SIMD Extensions 3
SSSE3 * Supports Supplemental SIMD Extensions 3
SSE4.1 * Supports Streaming SIMD Extensions 4.1
SSE4.2 * Supports Streaming SIMD Extensions 4.2
AES * Supports AES extensions
AVX * Supports AVX intruction extensions
FMA — Supports FMA extensions using YMM state
MSR * Implements RDMSR/WRMSR instructions
MTRR * Supports Memory Type Range Registers
XSAVE * Supports XSAVE/XRSTOR instructions
OSXSAVE * Supports XSETBV/XGETBV instructions
RDRAND — Supports RDRAND instruction
RDSEED — Supports RDSEED instruction
CMOV * Supports CMOVcc instruction
CLFSH * Supports CLFLUSH instruction
CX8 * Supports compare and exchange 8-byte instructions
CX16 * Supports CMPXCHG16B instruction
BMI1 — Supports bit manipulation extensions 1
BMI2 — Supports bit maniuplation extensions 2
ADX — Supports ADCX/ADOX instructions
DCA * Supports prefetch from memory-mapped device
F16C — Supports half-precision instruction
FXSR * Supports FXSAVE/FXSTOR instructions
FFXSR — Supports optimized FXSAVE/FSRSTOR instruction
MONITOR * Supports MONITOR and MWAIT instructions
MOVBE — Supports MOVBE instruction
ERMSB — Supports Enhanced REP MOVSB/STOSB
PCLULDQ * Supports PCLMULDQ instruction
POPCNT * Supports POPCNT instruction
SEP * Supports fast system call instructions
LAHF-SAHF * Supports LAHF/SAHF instructions in 64-bit mode
HLE — Supports Hardware Lock Elision instructions
RTM — Supports Restricted Transactional Memory instructions
DE * Supports I/O breakpoints including CR4.DE
DTES64 * Can write history of 64-bit branch addresses
DS * Implements memory-resident debug buffer
DS-CPL * Supports Debug Store feature with CPL
PCID * Supports PCIDs and settable CR4.PCIDE
INVPCID — Supports INVPCID instruction
PDCM * Supports Performance Capabilities MSR
RDTSCP * Supports RDTSCP instruction
TSC * Supports RDTSC instruction
TSC-DEADLINE * Local APIC supports one-shot deadline timer
TSC-INVARIANT * TSC runs at constant rate
xTPR * Supports disabling task priority messages
EIST * Supports Enhanced Intel Speedstep
ACPI * Implements MSR for power management
TM * Implements thermal monitor circuitry
TM2 * Implements Thermal Monitor 2 control
APIC * Implements software-accessible local APIC
x2APIC * Supports x2APIC
CNXT-ID — L1 data cache mode adaptive or BIOS
MCE * Supports Machine Check, INT18 and CR4.MCE
MCA * Implements Machine Check Architecture
PBE * Supports use of FERR#/PBE# pin
PSN — Implements 96-bit processor serial number
PREFETCHW * Supports PREFETCHW instruction
Logical to Physical Processor Map:
*— Physical Processor 0
-*— Physical Processor 1
—*- Physical Processor 2
—* Physical Processor 3
Logical Processor to Socket Map:
**** Socket 0
Logical Processor to NUMA Node Map:
**** NUMA Node 0
Logical Processor to Cache Map:
*— Data Cache 0, Level 1, 32 KB, Assoc 8, LineSize 64
*— Instruction Cache 0, Level 1, 32 KB, Assoc 8, LineSize 64
*— Unified Cache 0, Level 2, 256 KB, Assoc 8, LineSize 64
-*— Data Cache 1, Level 1, 32 KB, Assoc 8, LineSize 64
-*— Instruction Cache 1, Level 1, 32 KB, Assoc 8, LineSize 64
-*— Unified Cache 1, Level 2, 256 KB, Assoc 8, LineSize 64
—*- Data Cache 2, Level 1, 32 KB, Assoc 8, LineSize 64
—*- Instruction Cache 2, Level 1, 32 KB, Assoc 8, LineSize 64
—*- Unified Cache 2, Level 2, 256 KB, Assoc 8, LineSize 64
—* Data Cache 3, Level 1, 32 KB, Assoc 8, LineSize 64
—* Instruction Cache 3, Level 1, 32 KB, Assoc 8, LineSize 64
—* Unified Cache 3, Level 2, 256 KB, Assoc 8, LineSize 64
**** Unified Cache 4, Level 3, 10 MB, Assoc 20, LineSize 64
Logical Processor to Group Map:
**** Group 0