Remote Desktop Users Group. Windows Server is a version of the Windows family that is designed to be installed on servers. Compared to Windows desktop version, it is more stable and much less likely to crash, and supports powerful server hardware with high amounts of RAM and CPU.
If you are using virtual machines on your dedicated server or Windows is installed on a dedicated server / physical server, you can easily consider the Windows server desktop by activating Remote Desktop.
The Remote Desktop Users group grants its members access to securely connect to the server through RDP (Remote Desktop Protocol) as well. This article will go over the basics of the Remote Desktop Users group.
In this article, you will be able to add users to the group, understand permissions, and basic user management. The information below covers methods to configure the Remote Desktop Users group for Windows Server 2012 and Windows Server 2016 on the Windows server.
Remote Desktop Users Group.
Manage Local Users and Groups
Users and groups on Windows servers are managed in a number of different ways. The most user-friendly way is through the Local Users and Groups interface.
There are several ways to open the interface. The easiest is to run lusrmgr.msc. Lusrmgr.msc can be launched by searching the start menu, command line, or through a run dialog.
These methods allow you to find users and groups easily.
*
User Management
Once you open the Local Users and Groups interface, you will see two folders on the left, one for Users, and one for Groups. By selecting Users, you will see a full list of local users on the server.
You can also see a variety of related tasks by right-clicking Users, Groups, a user’s name, or a blank area of the middle pane.
There are several ways to add a new user through the Local Users and Groups interface. These methods all result in the same New User dialog box opening where you can then configure a Username, Password, and other options.
Choose one of the options below to create a new user:
The first way to create a new user
1. Select the Users folder from the left side of the screen.
2. Click the Action menu.
3. Select New User….
The second method to create a new user
1. Select the user folder from the left
2. Click More Actions from the right-hand pane.
3. Select New User… .
The third method to create a new user
1. Right-click on the Users folder.
2. Select New User….
The fourth method to create a new user
1. Select the users folder from the left side of the screen.
2. Right-click in a blank area of the middle page
3. Select New User….
Once you have created a new user, or have identified the username of the existing user, you are ready to assign that user to a Group.
Note: Users assigned to a group are known as group members.
Group Management
Group management can be done in several ways. The options below cover several of the most common ways to assign a new member to the Remote Desktop Users group:
The first way to Group Management
1.Select the Users folder from the left pane of the Local Users and Groups interface.
2.Open the Users Properties window by double-clicking the user.
3.Select the Member Of tab.
4.Click Add….
5.Type Remote Desktop Users in the text box and click OK.
The second way to Group Management
1.Select the Groups folder from the left pane of the Local Users and Groups interface.
2.Double-click the Remote Desktop Users group.
3.Click Add… .
4.Enter the user’s name in the text box and click OK.
The third way to Group Management
1.Open the system settings by right-clicking the start menu.
2.Select System.
3.Choose Advanced system settings.
4.Select the Remote tab.
5.Click the Select Users… button.
6.Click the Add button.
7.Enter the user’s name in the text box and click OK.
The fourth way to Group Management
1.Open the Server Manager.
2.Select Local Server from the left pane.
3.Click the blue text next to Computer Name.
4.Select the Remote tab.
5.Click the Select Users… button.
6.Click the Add button.
7.Now enter the user’s name in the text box and click OK.
You can also use the “Advanced…” button when selecting users or groups instead of typing its name.
Clicking the “Advanced…” button followed by the Find Now button will result in a list of users to select.
By default, there are no members of the Remote Desktop Users group and only members of the Administrators group are allowed to connect through RDP.
Members added to the Remote Desktop Users group are considered non-Administrative users. These users will be unable to perform most management tasks such as installing software, managing IIS, or rebooting the server.
If a user requires management abilities, the user will need explicit access to that task or will need to be a member of the Administrators.
Test Group Membership
When configuring new user and group memberships, you should always review group membership once complete.
Reviewing group membership is most commonly performed through the Local Users and Groups interface. In addition to verifying membership, we also recommend attempting a remote desktop connection with your newest Remote Desktop Users group member.
Once you have logged in with your newest member of the Remote Desktop Users group, you can further verify that groups are set up correctly by running the command “whoami /groups” from a command line.
The output of this command lists the username and its associated Group names.
Also, see:
How to transfer file using RDP to Windows Server
Learn how to change the default RDP port simply
4 Ways to enable remote desktop in windows 10
How to Set the RDP limit on Windows Server
Tutorial enable RDP on Windows Server 2019
Dear user, we hope you would enjoy this tutorial, you can ask questions about this training in the comments section, or to solve other problems in the field of Eldernode training, refer to the Ask page section and raise your problem in it as soon as possible. Make time for other users and experts to answer your questions.
Goodluck.
Сегодня мы объясним, чем развертывание RDS Session Host на Windows Server 2012 R2 отличается от более ранних версий Windows Server и расскажем о доступных опциях развертывания. Remote Desktop Services на Windows Server значительно усовершенствовались за последнее время, но остается, тем не менее, много непонятного по причине множества вовлеченных в процесс компонентов. RD Session Host-ы выполняют всю грязную работу, обслуживая терминальные сессии пользователей. Однако даже при самом примитивном сценарии обязательно использование RD Connection Broker (посредника подключений к удаленному рабочему столу). Еще до того, как вы запланируете развертывание служб удаленного рабочего стола, стоит ознакомиться с его ролью.
RD Connection Broker
Когда сеанс удаленного рабочего стола отключается, приложения в сеансе пользователя продолжают работать. Для отслеживания сеансов пользователей RD Connection Broker (Посредник подключений удаленного рабочего стола) хранит такую информацию, как название хост-сервера сеансов удаленных рабочих столов, где проходит каждая сессия, состояние сессии и ее идентификатор, а также информация о подключенных пользователях в каждой сессии. Эта информация используется для подключения пользователей к существующим сеансам на серверах RD Session Host (терминальные сервера Windows). При создании новой сессии RD Connection Broker-ы также играют свою роль путем подключения пользователей к серверам RD Session Host по мере загрузки.
Начиная с Windows Server 2012, посредники подключений к удаленному рабочему столу не только хранят данные о пользовательских сессиях, но и информацию о конфигурации. Посредник подключений к удаленным рабочим столам использует внутреннюю базу данных Windows для сохранения сессии и информации о конфигурации, кроме случаев, когда установлен режим высокой доступности (HA), где используется сервер SQL 2008 R2 (или более поздняя версия).
Посредник подключений к удаленному рабочему столу требует домен Active Directory, но не может быть установлен на контроллере домена (DC). Можно развернуть службы удаленного рабочего стола в рабочей группе с помощью установки роли сервера, хотя при этом теряется возможность централизованного управления, пульты управления и функционал удаленных приложений Remoteapp.
Централизованная публикация приложений
В Windows Server 2012 также введен концепт коллекций (collections). В Windows Server 2008 R2 требовалось, чтобы системные администраторы публиковали приложения для каждого RD Session Host в индивидуальном порядке. Теперь посредник подключений к удаленному рабочему столу хранит информацию о конфигурации.
Опции развертывания: быстрая и стандартная
Ключ к пониманию того, как развернуть RDS на Windows Server 2012 R2 в понимании того, что недостаточно установки роли RD Session Host. Диспетчер серверов обеспечивает специальный режим развертывания для установки RDS, таким образом все необходимые компоненты установлены в нужных местах, чтобы делает развертывание простым и быстрым.

Службы удаленного рабочего стола на Windows Server 2012 R2
В мастере добавления ролей и компонентов (Add Roles and Features Wizard) в диспетчере серверов есть специальная опция установки, установка служб удаленных рабочих столов (Remote Desktop Services installation), которую необходимо выбрать при развертывании служб удаленных рабочих столов. Формулировка при этом варианте немного смущает, но опция позволяет устанавливать хосты сеансов удаленных рабочих столов без развертывания полной инфраструктуры виртуальных ПК (virtual desktop infrastructure — VDI).
Стандартное развертывание — это модель развертывания по умолчанию, и если вы действительно хотите установить все необходимые роли на одном сервере, что не является лучшей практикой, то стоит выбрать эту опцию. Быстрая установка (Quick Start) может быть полезна в сценариях тестирования или в небольших филиалах, где есть только один доступный сервер.
Стандартное развертывание позволяет установить RD Connection Broker, RD Session Host и RD Web Access на одном сервере или на нескольких серверах, что является наиболее вероятным сценарием развертывания в производственной среде. Посредник подключений к удаленному рабочему столу включает внутреннюю базу данных Windows, RD Session Host и RD Web Access roles. Все это является обязательным, но RD Gateway играет факультативную роль. RD Web Access предоставляет пользователям доступ к RemoteApps или рабочим столам из меню «Пуск» или с веб-портала. Если вы хотите использовать RDS больше, чем в течение 120-дневного пробного периода, вам потребуется дополнительно устанавливать роль лицензирования удаленных рабочих столов.
Консоли управления
Все необходимые консоли управления можно найти в диспетчере серверов на сервере, где установлен посредник подключений к удаленным рабочим столам, за исключением RD Gateway и RD Licensing.
Установка служб удаленного рабочего стола на Windows Server 2012 R2
Здесь мы расскажем о стандартной модели развертывания, которая позволяет распределить роли серверов удаленного рабочего стола или установить их для одного сервера.

Стандартное развертывание — это модель развертывания по умолчанию, и даже при том условии, что для демонстрации будут установлены три роли сервера на один сервер, это не лучшее решение. Внутренняя база данных Windows устанавливается как часть процесса для поддержки роли посредника подключений к удаленному рабочему столу, также как и некоторые компоненты IIS для RD Web Access, которые обеспечивают доступ к RemoteApps или рабочим столам из меню «Пуск» или с веб-портала.
Лицензирование
При желании использовать развернутые службы удаленного рабочего стола более чем в течение 120-дневного тестового периода необходимо установить роль RD Licensing, добавить лицензию, зарегистрировать сервер лицензирования с Active Directory, а затем добавить RD Licensing в RDS-инфраструктуру. RD Licensing устанавливается также, как любая другая роль, поэтому нет необходимости использовать специальную опцию развертывания в диспетчере серверов.
Развертывание служб удаленного рабочего стола
Серверы, которые вы планируете использовать в своем RDS-развертывании, должны быть добавлены в Пул Серверов (Server Pool) в диспетчере серверов перед началом процесса. Вам потребуется домен Active Directory domain и аккаунт, у которого есть разрешение на установку ролей сервера на выбранный сервер (серверы). Дополнительно может быть установлена роль посредника подключений к удаленному рабочему столу на контроллер домена.
- Откройте Диспетчер серверов;
- Выберите «Добавить роли и компоненты» в меню управления;
- В Мастере добавления ролей и компонентов нажмите «Далее» на экране «Перед началом установки» (Before You Begin).
- На экране «Выберите тип установки» выберите «Установка служб удаленного рабочего стола» и нажмите «Далее»;
- На экране «Выберите тип развертывания» выберите «Стандартное» и нажмите «Далее».

Стандартное или быстрое развертывание
- На экране «Выберите сценарий развертывания» выберите развертывание серверов сеансов (Session-based desktop deployment) и нажмите «Далее».
- На экране обзора служб ролей (Review role services) отметьте службы ролей для установки и нажмите «Далее».

Роли служб удаленных рабочих столов
- На экране определения сервера посредника подключений к удаленному рабочему столу кликните дважды на сервер в пуле серверов для того, чтобы добавить его в список выбранных. Это тот сервер, на который будет установлена роль посредника подключений к удаленному рабочему столу. Нажмите «Далее».

Выберите сервер из пула серверов
- На экране определения сервера RD Web Access повторите предыдущий шаг, чтобы добавить сервер в Selected, или поставьте галочку в «Установить службу роли RD Web Access на сервер посредника подключений к удаленному рабочему столу» (Install the RD Web Access role service on the RD Connection Broker server), если вы хотите установить эту роль на тот же сервер, что и посредника подключений к удаленному рабочему столу. Нажмите «Далее». continue.
- На экране определения серверов RD Session Host выберите один или более серверов из пула серверов, кликнув дважды или с помощью выбора мышью и нажатия на стрелку в центре диалогового окна.
- На экране подтверждения нажмите «Перезапустить сервер автоматически, если необходимо» (Restart the destination server automatically if required) и нажмите «Развернуть».
- Когда 3 роли сервера будут установлены, нажмите «Закрыть» на экране хода развертывания (View progress).
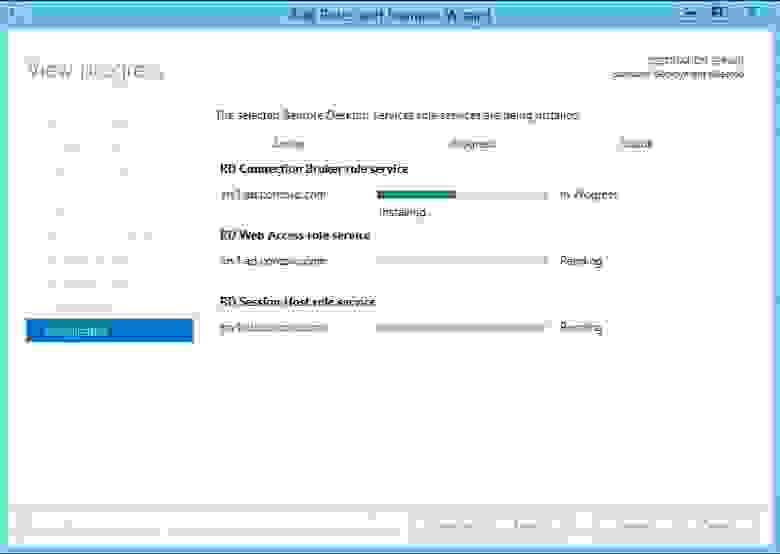
Ход развертывания
Теперь необходимо залогиниться на сервере, где установлена роль посредника подключений к удаленному рабочему столу, открыть Диспетчер серверов и нажать «Службы удаленного рабочего стола» (Remote Desktop Services) в списке опций слева, чтобы увидеть информацию по вашему
RDS-развертыванию
.
Дашборд служб удаленного рабочего стола в Диспетчере серверов
Добрый день, уважаемые читатели моего блога. В этой статье я рассказываю, как происходить настройка rdp windows server 2012 r2. Во всех операционных системах windows настройка rdp довольно простая задача, но конечно есть особенности, я расскажу и покажу, как настроить rdp в windows 2012 r2…
Введение
Я уже рассказывал, как включить удаленный рабочий стол (rdp) удаленно тут. А также рассказывал, как поменять стандартный порт rdp 3389 на любой другой. Теперь давайте посмотрим, как собственно происходит настройка rdp на winows server 2012, также полезно будет почитать как подключиться к удаленному рабочему столу windows 10.
Хочу напомнить, что rdp — это remote desktop protocol или если по-русски протокол удаленного рабочего стола. Давайте перейдем к настройке.
Настройка rdp windows server 2012 r2 — пошаговая инструкция
Итак, первым делом нам надо включить remote desktop в server 2012 r2. Выполним следующие простые шаги:
- Запускаем оснастку Server Manager (сделать это можно кликнув по кнопке прикрепленной на панели задач):

- В результате откроется окно настроек, Server Manager. Нам необходимо перейти в раздел Local Serve (слева). Откроется окно настроек сервера. Необходимо найти среди всех настроек пункт Remote Desktop, щелкнуть по значению Disabled.

- В результате нажатия значения Disabled, откроется окно включения rdp. Необходимо выбрать следующие значение: Allow remote connections to this computer. Галочка — Allow connections only from computers running Remote Desktop with Network Level Authentication (recommended) означает, что подключиться по RDP можно будет только с компьютеров, у которых есть поддержка Network Level Authentication (проверка подлинности на уровне сети). Если простым языком, то вы не сможете подключиться к этому компьютеру по rdp с Windows XP и windows 2003 (если использовать бубен, то сможете). Так что можете эту галку оставить включенной.

- Нажимаем ОК. Все, после этого ваш компьютер доступен по RDP. Но есть особенность с FireWall. Он может блокировать подключения, читаем ниже…


FireWall блокирует RDP
Итак, вы включили rdp, по инструкции выше, но подключиться так и не можете к компьютеру. По умолчанию, в Windows есть разрешающие правила rdp в FireWall. После включения remote desktop эти правила активируются. Но есть одно но, включаются правила только для сетей Domain и Private, и если ваш компьютер находится в сети Public то вы не сможете подключиться по rdp. Надо эти правила активировать. 
Вот собственно и все, на этом настройка rdp windows server 2012 r2 завершена. Можете спокойно подключаться к своему серверу. Как это сделать в Windows Xp написано в моей статье — 7.1 rdp клиент для windows xp.
Если у вас остались вопросы, замечания, или какая-то критика, то прошу оставлять их в комментариях. С вашей помощью буду приводить статьи к идеальному виду. Надеюсь, вы нашли ответ на свой вопрос.
С уважением, Александр Глебов.
![]() Загрузка…
Загрузка…
Интересные статьи по теме:
Table of Contents
- Intro and lab configuration
- A quick overview of consoles
- Remote Desktop Session Host Configuration
- Remote Desktop Services Manager
- RemoteAPP Manager
- Remote Desktops
- Remote Desktop Gateway Manager
- Remote Desktop Licensing Manager
- Remote Desktop Web Access Configuration
- A brief description of Server Manager
- Basic RDS Configuration
- General Tab
- Log on settings
- Sessions
- Environment
- Remote Control
- Client Settings
- Network Adapter
- Security
- Remote Desktop Session Host General
-
- General
- Licensing
- Connection Broker
- RD IP Virtualization
- Remote Desktop Services Manager
- RemoteApp Manager
- RD Gateway
- Digital Signature
- Common / Custom RDP Settings
- RemoteApp Settings
 Note Note |
|---|
| Management (how to) changes for RDS in Windows Server 2012 and 2012R2 This wiki article main purpose is to provide administrators familiar with Windows Server 2008 R2 Remote Desktop Services a quick overview of management changes in Windows Server 2012.It covers settings locations only and does not provide information about the technology used in each component Windows Server 2012 introduced the Remote Desktop Management Service (RDMS) effectively removing the standard MMC consoles used to manage a Windows Server 2008 R2 Remote Desktop Services server. The RDMS is responsible for adding, removing and updating configuration for all of the servers comprising a Remote Desktop Services deployment. All of the configuration is now stored in the Connection Broker database. |
Intro and lab configuration
In order to provide the best possible guidance in this article, two virtual machine based labs are being used to generate screenshots.
The first lab consists of a pure Windows Server 2008 R2 installation, the virtual machines used are the following:
- SRV2008DC / Windows Server 2008 R2 Domain Controller, DNS and DHCP
- SRV2008RDS1 / Windows Server 2008 R2 Remote Desktop Session Host
- SRV2008Web1 / Windows Server 2008 R2 Remote Desktop Services Web and Gateway Services
The second lab is a pure Windows Server 2012 R2 installation, the virtual machines used are the following:
- SRV2012DC /Windows Server 2012 R2 Domain Controller, DNS and DHCP
- SRV2012CB1 /Windows Server 2012 R2 Remote Desktop Services Connection Broker
- SRV2012RDS1 /Windows Server 2012 R2 Remote Desktop Services Session Host
- SRV2012Web1 /Windows Server 2012 R2 Remote Desktop Services Web and Gateway Services
A quick overview of consoles
In order to gain a better understanding of the administration in the previous release of Windows Server, I will quickly go through the MMC consoles used in order to configure the deployment options. The consoles used to manage the settings are the following:
Remote Desktop Session Host Configuration
The Remote Desktop Session Host configuration is used on a server running Remote Desktop Session Host to configure
RDP-Tcp server specific settings such as Color Depth, Session Settings, licensing options etc.

Remote Desktop Services Manager
The Remote Desktop Services Manager is used to manage the user connections like disconnect users and provide connection info.

RemoteAPP Manager
The RemoteAPP manager is used to publish and configure all of the remote application settings. Essentially this console provides the RDP Settings in each .rdp file.

Remote Desktops
The Remote Desktops MMC is used to host connection information on a single pane providing administrators with quick access to Remote Desktop Servers instead of the Remote Desktop Services Client functionality. This console is no longer used in Windows Server
2012 and Windows Server 2012 R2. An administrator can still use the Remote Desktop Client in order to connect to a Remote Desktop Server.

Remote Desktop Gateway Manager
The Remote Desktop Gateway Manager is the console used to manage Remote Desktop Services Gateway Settings.

Remote Desktop Licensing Manager
The Remote Desktop Licensing Manager is used to configure a License Server for the Remote Desktop Services Deployment. This console is unchanged in Windows Server 2012 and Windows Server 2012 R2.

Remote Desktop Web Access Configuration
Finally the Remote Desktop Web Access Configuration is a web page with which we can configure the sources a Remote Desktop Services Web Access server can connect and provide Remote Desktop services to users. These settings are automatically configured by
the Server Manager in Windows Server 2012 and Windows Server 2012 R2.

A brief description of Server Manager
The new unified administrative experience in Windows Server 2012 and 2012 R2 is provided within Server Manager.

Server Manager hosts the Remote Desktop Services administration page for most of the settings an administrator need to configure. Some of the options in the previous release consoles are moved to either PowerShell or Group Policy.
This management change effectively pushes all of the configuration changes to the servers providing Remote Desktop functionality and eases the administrative burden of having to move through different consoles. It also provides an easy way to add or remove
servers as needed empowering administrators with true scale out options.
Only Licensing and Gateway server consoles are available due to the fact that these roles can exist on different servers. For example a single Licensing server can provide licenses to both Windows Server 2008 R2 and Server 2012 R2 deployments and a Gateway
server can reside on a DMZ.
Basic RDS Configuration
As installation completes on Windows Server 2008 R2 for the Remote Desktop Session Host, a number of settings would be revised by an administrator to provide users with optimal experience. This configuration was done through the Remote Desktop Session Host
Configuration.
General Tab
The first tab is the General Tab which is used to configure security settings and Certificate Settings on the RDP-Tcp Listener

The same functionality is provided by the Server Manager by navigating to the Collection, selecting Tasks->Edit Properties and then the Security Tab

The certificate settings can be globally configured by navigating to Overview and selecting Edit Deployment Properties from the Tasks Button. On the deployment properties we can find the Certificates tab with which we can configure the certificates on all
of the deployment.

Log on settings
The Log on Settings Tab is deprecated in Windows Server 2012 and Windows Server 2012 R2.

Although the Always prompt for password option is available in Group Policy. The setting can be found in Computer Configuration->Administrative Templates->Windows Components->Remote Desktop Services->Remote Desktop Session Host Security.

Sessions
The Sessions settings provide the options to disconnect or end sessions as needed.

The same functionality can be found by navigating to the Collection and then opening the Collection properties from the tasks button. The sessions tab contains the settings.

Environment
The Environment tab specifies an initial program to start when a user logs on.

The same functionality can be achieved through Group Policy for general settings or the Environment tab on the user property page in Active Directory Users and Computers for more granular control . The setting can be found in Computer Configuration->Administrative
Templates->Windows Components->Remote Desktop Services->Remote Desktop Session Host->Remote Session Environment.

Remote Control
The Remote Control feature used in Windows 2008 R2 was added again in Windows Server 2012 R2.

The settings are now found in the users Remote Control tab in the Active Directory Users and Computers console.

Client Settings
The Client Settings tab configures the options for the monitor redirection, maximum color depth and redirection settings.

These settings can be found at the Server Manager by editing the properties of the collection and navigating to Client Settings. Maximum color depth can be adjusted per RemoteApp by editing the custom rdp property “Session BPP” .

Network Adapter
The Network Adapter tab is does no longer exist in Windows Server 2012 and Windows Server 2012 R2.

Security
The Security Tab on Windows Server 2008 R2 controls the access control lists

The same functionality is found on the Collection properties Users Group Tab and by editing each RemoteApp individually.

Remote Desktop Session Host General
On the general properties an administrator can configure the following tabs.
General
The General tab with which we can configure the temporary files behavior, the single session limit enforcement and the Remote Desktop Session Host drain mode.

The temporary files settings can be configured by navigating to the session collection properties and selecting the Session Tab.

The single session restriction can be enforced through Group Policy. The settings exists in Computer Configuration > Administrative Templates > Windows Components > Remote Desktop Services > Remote Desktop Session Host > Connections

The Drain mode is much simpler. By right clicking a Remote Desktop Session Host in the specified collection , you can select Do not allow new connections.

Licensing
The Licensing tab allows you to configure a License server as well as the licensing mode. Either Per User or Per Device.

The same functionality can be found by editing the deployment properties from the Overview tab in Server Manager.

Connection Broker
The Connection Broker options allow you to configure the server role in a farm , the connection broker responsible for the redirections, the farm name and the redirection mode.

Since Windows Server 2012 and 2012 R2 Remote Desktop Service rely on a Connection Broker, the role is configured automatically for each Session Host. However the DNS farm name in Windows Server 2012 and 2012 R2 needs to be configured when you prepare high
availability mode as in the screenshot below. If you need to change that name later you can use the PowerShell cmd-let Set-RDClientAccessName [[-ConnectionBroker] <String> ] [-ClientAccessName] <String> [ <CommonParameters>]

RD IP Virtualization
The RD IP Virtualization tab is used when we need to provide a virtual IP address per session or program. This is a requirement for some applications to work correctly.

These settings can now be configured through Group Policy. Navigate to Computer Configuration->Administrative Templates->Windows Components->Remote Desktop Services->Remote Desktop Session Host->Application Compatibility->Turn on Remote Desktop IP Virtualization.

Remote Desktop Services Manager
The Remote Desktop Services Manager allowed an administrator to act on user sessions like log off and disconnect by simply selecting a user session and right click upon it.

This Session administration is now moved to Server Manager. By navigating to a collection you can manage the user sessions on the right side of Server Manager in a widget-like tab named Connections.

The management scope extends to all collections by navigating to the Collection tab in Server Manager. Again on the right side you can manage the connections but this time collectively for all sessions on all of the available collections.

RemoteApp Manager
The RemoteAPP manager is used to publish and configure all of the remote application settings. Essentially this console provides the RDP Settings in each .rdp file.
RD Session Host Server
The first tab is the RD Session Host Server. On this tab you can configure the Server name , the rdp port as well as general access settings. Since Windows Server 2012 and Windows Server 2012 R2 use a Connection broker the Server name and port is no longer
needed.

However the Access to unlisted programs can be found in Group Policy. Navigate to Computer Configuration->Administrative Templates->Windows Components->Remote Desktop Services->Connections->Allow remote start of unlisted programs, in order to select the
appropriate setting.

RD Gateway
The same principle applies to the RD Gateway tab. Once a gateway server is configured through the Server Manager in Server 2012 and Server 2012 R2 it will automatically apply to all RemoteApp programs.

Digital Signature
The digital signature will derive from the certificate settings in the deployment properties.

Common / Custom RDP Settings
The Common RDP Settings and the Custom RDP Settings can be configured per Collection by using the powershell cmdlet Set-RDSessionCollectionConfiguration.


RemoteApp Settings
The RemoteApp settings control the Name, visibility and command line arguments as well as the User Assignment.

These settings also exist on Windows Server 2012 and Windows Server 2012 R2. Simply navigate to the collection and on the middle of the page select the RemoteApp you want to change the settings for, right click and choose the appropriate settings.

Written by Allen White on September 18, 2013. Posted in Server 2012
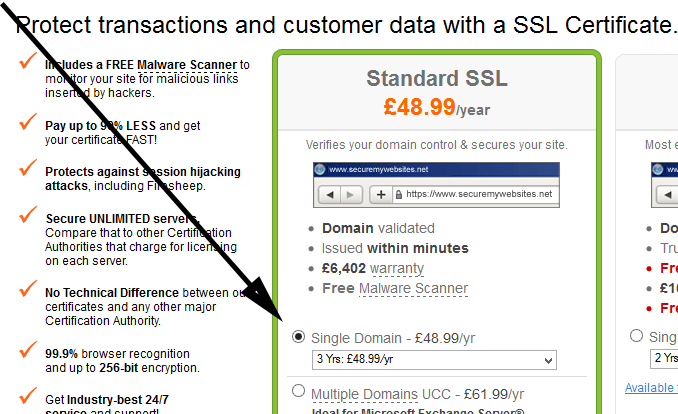
In this guide we will install and configure the Windows 2012 Remote Desktop Services Role. We will configure the website for RDWEB access and also configure remote app apps locally through the remote desktop client. Before we start bare in mind RDS is not supported on a Domain Controller, it may work but you may come across lots of issues while installing, also if you plan to connect to applications with the remote web site (RDWEB) and do not want an annoying certificate error for your users then you will need a certificate which matches the A Record you want to hit externally. For example remote.techieshelp.com. SSL Certificates are available from GoDaddy![]() . Once purchased then read how to install SSL certs into iis7 here. Read on!
. Once purchased then read how to install SSL certs into iis7 here. Read on!
Windows 2012 Install Remote Desktop Services
As with all other roles we need to first launch Server Manager so we can install the Remote Desktop Services Role, once launched then select “Manage” from the top right hand corner and select Add Roles and Features as seen below.

You will now see the standard welcome splash screen, click next to continue. On the next screen you get to choose what type of Installation type we are doing. Select Remote Desktop Services Installation. Then click next. ( Remember click the images to zoom in. )

In my environment I will be running a single server, as you can see there is a wizard for this called “Quick Start”, select this option to continue.

In remote desktop services 2012 you get the option of deploying full virtual desktops with their own applications or traditional session based desktops that can be published via a web-page or via remote app. Here we are deploying a session based environment. Select this option and continue.

The following screen states that it will install all of the required roles on one server. in a multi server environment you create a pool and you can select what role is installed to each server, you can load balance etc if your environment is a large remote desktop environment. In this deployment all the roles are on one server. Click next.

You wll now see the summary screen, to start the installation you must put a tick in the box to accept the server will reboot, Do so and click deploy.

The server will now go away and install the roles. Once done click close. The server will reboot.Upon reboot remote Desktop Services will continue to install, once done close the screen/
Server 2012 – Configure Remote Desktop Services
You will see in server manager you now have a Remote Desktop Services option. We now have a nice network diagram as seen below, the sections we are going to configure first is RD licensing.

Click the RD licensing icon and either add the server as your license server or point it to your existing license server on the network by entering the server name or IP then click the forward arrow. Then click next then add to install the role

Setting Up Remote Desktop Licensing Server 2012
We now need to configure server 2012 remote desktop licensing.You will need to purchase Remote Desktop CALs these are concurrent which means you buy the amount of licenses for the amount of people that will use remote desktop. Or if you have only 100 devices that will access remote desktop then you but 100 device CALS, links below. Once purchased you will receive license codes that we install later.


Device CAL Above User CAL Above
Once done we need to add the licenses as the diagram below shows. Select Tools > Terminal Services and launch Remote Desktop Licensing manager, then right click your server and Activate, follow the wizard and enter you companies details until you get to the install licenses screen. Select the type of license you own and have been sent when we purchased CALS above and enter the details. Once checked by the Microsoft clearing house the license is now fully configured.

Server 2012 Remote Desktop – Deploy Applications.
Now the role is installed and licensed correctly we can deploy our applications. They are now called “collections. In Remote Desktop Services in Server Manager. select the collections, you will see the newly created collection called QuickSessionCollection, select it and you can add any application that is installed onto your server. Once selected click confirmation and then publish. We are now ready to access these applications.
 Accessing Remote Desktop Services Applications
 Accessing Remote Desktop Services Applications
Permissions. Any user that you want to be able to access these apps MUST be a member the domain level Remote Desktop Users in Active Directory. Additionally, in the local server policy check that remote desktop users is allowed to “log on locally“. this is normally enabled by default.
To access the web apps, in your browser of choice hit.
https://servername/rdweb or https://externaldomain/rdweb
You will get a certificate error if you do not own one from GoDaddy![]() or other SSL providers with your servers name etc, the certificate you need is as seen below.
or other SSL providers with your servers name etc, the certificate you need is as seen below.
You will also need to add the external A record name if you plan to use from outside the office. Then it is a case of installing the SSL cert into IIS7 . Once logged in with valid credentials you will see your apps.

To launch an app over RDP simply enter the correct details in your connection and save the connection.

If you have purchased and SSL Cert for RDWEB here is how to install the certificate into IIS7
Remote Desktop Services in Server 2012 is now configured. For more information view Microsofts Official Remote Desktop Services page.
Tags: Remote Working

Allen White
Allen is an IT Consultant and holds the following accreditations. MCSA, MCSE, MCTS, MCITP, CCA, CCSP, VCP 4,5, 6 and HP ASE, AIS — Network Infrastructure.
Windows Server 2012 R2 — решение для организации единой инфраструктуры в компании любого размера. WS также применяют для аутентификации и идентификации пользователей. Рассмотрим начало работы с Windows Server 2012 R2: установку, настройку и добавление новых пользователей для удаленного доступа.
Установка Windows Server 2012 R2 на VDS
На хороших хостингах установить Windows Server можно в автоматическом режиме при создании нового VDS. Посмотрим, как это работает, на примере Timeweb.
-
Открываем панель управления VDS.
-
Переходим в раздел «Список VDS».
-
Нажимаем на кнопку «Создать сервер».
-
Указываем любое имя и комментарий (опционально).
-
Выбираем в списке операционных систем Windows Server 2012 R2.
-
Настраиваем конфигурацию сервера: количество ядер процессора, объем оперативной памяти (минимум 512 МБ) и размер хранилища (минимум 32 ГБ).
-
Включаем защиту от DDoS, если она требуется.
-
Нажимаем на кнопку «Создать сервер».

Лицензия уже входит в итоговую стоимость сервера. При создании VDS система будет установлена и активирована. Хостер отправит на почту данные для авторизации на сервере, чтобы вы могли его настроить.
Если на хостинге нет автоматической установки Windows Server, то придется инсталлировать систему вручную. Для этого нужно купить лицензию и скачать ISO-образ WS 2012 R2.
Для установки системы из ISO-образа обычно используется панель VMmanager. Порядок ручной инсталляции такой:
-
Запускаем VMmanager.
-
Открываем раздел «Виртуальные машины» в меню слева.
-
Останавливаем VDS, на который будем устанавливать WS 2012 R2.
-
Кликаем на кнопку «Диски» на верхней панели.
-
Выбираем пункт «ISO» на верхней панели.
-
В строке «Имя образа» выбираем дистрибутив Windows Server, указываем шину «IDE» и порядок загрузки «В начало».
-
Возвращаемся в раздел «Диски виртуальной машины» и ставим шину IDE для виртуального диска.
-
Жмем на кнопку «Интерфейсы» на верхней панели.
-
Выбираем интерфейс и нажимаем на кнопку «Изменить».
-
Далее – интерфейс «rtl8139». Это нужно для автоматической установки сетевого адаптера.
-
Возвращаемся в раздел «Виртуальные машины» и запускаем VDS, которую мы остановили на втором шаге.
-
Переходим в консоль VNC — на верхней панели есть соответствующая кнопка.
В VNC-консоли запустится установка Windows Server 2012 R2. Если вы ставили любую другую версию ОС от Майкрософт, то без проблем здесь разберетесь.
-
Нажимаем на кнопку «Установить».
-
Вводим лицензионный ключ для активации системы.
-
Выбираем установку с графическим интерфейсом — так будет проще разобраться с настройками.
-
Принимаем лицензионное соглашение.
-
Запускаем выборочную установку.
-
Выбираем диск и при необходимости делим его на части.
-
Ждем, пока скопируются файлы.
-
Придумываем пароль администратора.
-
Ожидаем завершения установки.
Ручная установка занимает заметно больше времени и требует опыта в администрировании. Автоматическая же инсталляция намного быстрее и проще.
Защита от DDoS + CDN в подарок при заказе VDS Timeweb
Обезопасьте свой проект и ускорьте его работу: при заказе любого тарифа вы получаете защиту от DDoS + CDN на 3 месяца бесплатно. Сообщите в поддержку промокод community3.
Заказать
Условия использования промокода
Настройка Windows Server 2012 R2
Сразу после установки рекомендуется установить обновления.
-
Открываем «Панель управления».
-
Переходим в раздел «Система и безопасность».
-
Открываем «Центр обновления».
-
Запускаем поиск и установку апдейтов.
Система установлена, обновления есть — теперь приступаем к настройке базовых параметров.
Первый шаг — изменение имени, чтобы было удобно настраивать подключения.
-
Открываем раздел «Панель управления» — «Система и безопасность» — «Система».
-
Нажимаем на ссылку «Изменить параметры».
-
В появившемся окне на вкладке «Имя компьютера» нажимаем на кнопку «Изменить».
-
В строке «Имя компьютера» указываем имя сервера, которое будет удобно использовать для настройки подключений. Например, WServer.
-
Перезагружаем машину для применения параметров.
Следующий шаг — проверка IP-адреса, по которому будет доступен сервер.
-
Открываем поисковую строку и вводим запрос «ncpa.cpl» и нажимаем на Enter.
-
Находим основной сетевой адаптер, кликаем по нему правой кнопкой и открываем «Свойства».
-
Выделяем «Протокол интернета версии 4» и нажимаем на кнопку «Свойства».
-
Прописываем IP-адрес, маску сети, шлюз по умолчанию, адреса DNS-серверов.
Теперь нужно добавить роли и компоненты.
-
Запускаем «Диспетчер серверов».
-
В «Панели мониторинга» нажимаем «Добавить роли и компоненты».
-
Выбираем тип установки «Установка ролей или компонентов».
-
На вкладке «Выбор сервера» выделяем свой VDS.

Выбираем из списка стандартные роли, которые подходят для решения большинства задач. Если вам нужны другие роли, отметьте их тоже.
-
DHCP-сервер
-
DNS-сервер
-
Веб-сервер (IIS)
-
Доменные службы Active Directory
-
Сервер приложений
-
Службы политики сети и доступа
-
Службы активации корпоративных лицензий
-
Службы удаленных рабочих столов
-
Удаленный доступ
-
Файловые службы и хранилища
На вкладке «Компоненты» оставляем стандартные отметки. Единственное возможное изменение — включение службы беспроводной локальной сети.
На вкладке «Службы ролей» отмечаем роли, необходимые для работы с удаленными рабочими столами.
-
Лицензирование удаленных рабочих столов
-
Узел виртуализации удаленных рабочих столов
-
Узел сеансов удаленных рабочих столов
-
Шлюз удаленных рабочих столов
В службах ролей удаленного доступа можно также отметить работу с VPN и прокси, если есть такая необходимость.
Доходим до вкладки «Подтверждение». Отмечаем опцию «Автоматический перезапуск конечного сервера, если требуется». Нажимаем на кнопку «Установить» и ждем завершения инсталляции.
После установки нужно все настроить. Начнем с DNS.
Настройка DNS
-
Открываем «Диспетчер серверов».
-
Жмемна флажок на верхней панели.
-
Кликаем на опцию «Повысить роль этого сервера до контроллера домена».

В конфигурации развертывания выбираем режим «Добавить новый лес» и придумываем корневой домен. Название может быть любым — например, domain.com.
На вкладке «Параметры контроллера» указываем новый пароль и нажимаем «Далее». Затем доходим до вкладки «Проверка предварительных требований». Если параметры установлены верно, то в окне будет сообщение о том, что все проверки готовности к установке выставлены успешно. Нажимаем на кнопку «Установить».
После завершения инсталляции перезагружаем сервер и авторизируемся под именем администратора.
После перезагрузки продолжаем настройку DNS.
-
Открываем «Диспетчер серверов».
-
Переходим в меню «Средства» на верхней панели и выбираем пункт «DNS».
-
В диспетчере DNS разворачиваем ветку DNS — Server — «Зоны обратного просмотра». Кликаем правой кнопкой мыши и выбираем пункт «Создать новую зону».
-
Выбираем тип зоны «Основная» и отмечаем пункт «Сохранять зону в Active Directory».
-
Выбираем режим «Для всех DNS-серверов, работающих на контроллерах домена в этом домене».
-
Отмечаем зону обратного просмотра IPv4.
-
В строке «Идентификатор сети» выбираем диапазон IP-адресов или имя зоны.
-
На следующем шаге разрешаем безопасные динамические обновления.
-
Жмем «Готово» для применения конфигурации.
Настройка DHCP
Следующий шаг — настройка DHCP. Это нужно для того, чтобы сервер мог раздавать диапазон IP.
-
Открываем «Диспетчер серверов».
-
Нажимаем на флажок и выбираем пункт «Завершение настройки DHCP».
-
В разделе «Авторизация» отмечаем пункт «Использовать учетные данные следующего пользователя» и нажимаем на кнопку «Фиксировать».
-
В разделе «Сводка» нажимаем «Закрыть».
-
Открываем меню «Средства» на верхней панели и выбираем пункт «DHCP».
-
Разворачиваем ветку DHCP — «Имя домена» — IPv4. Кликаем по IPv4 правой кнопкой и выбираем пункт «Создать область».
-
Задаем любое название области.
-
Прописываем диапазон IP-адресов, которые будет раздавать сервер. Он задается по желанию пользователя.
-
В следующем окне исключаем определенный диапазон адресов. Этот шаг можно пропустить.
-
Задаем срок действия IP-адреса для устройства. По истечении указанного периода адрес изменится.
-
Отмечаем пункт «Да, настроить эти параметры сейчас».
-
Добавляем IP-адрес маршрутизатора или пропускаем этот шаг.
-
Указываем имя домена в качестве родительского домена.
-
Подтверждаем, что хотим активировать область сейчас.
-
Нажимаем «Готово» для сохранения конфигурации.
Настройка сервера для подключения по RDP
Чтобы к VDS можно было подключаться по RDP, должны быть установлены следующие роли и компоненты:
-
Службы удаленных рабочих столов.
-
Лицензирование удаленных рабочих столов
-
Узел сеансов удаленных рабочих столов
-
Шлюз удаленных рабочих столов
Все эти роли и компоненты мы установили в предыдущем разделе. Теперь нужно настроить групповую политику.
-
Открываем «Поиск» на панели инструментов.
-
Находим и открываем редактор групповых политик — gpedit.msc.
-
Переходим на ветку «Конфигурация компьютера» — «Административные шаблоны» — «Компоненты Windows» — «Службы удаленных рабочих столов» — «Узел сеансов удаленных рабочих столов» — «Лицензирование».
-
Разворачиваем пункт «Использовать указанные серверы лицензирования удаленных рабочих столов».
-
В строке «Использовать серверы лицензий» указываем имя или адрес своего сервера.
-
Возвращаемся обратно в раздел «Лицензирование» и открываем пункт «Задать режим лицензирования».
-
Выбираем режим лицензирования — на пользователя или на устройство в зависимости от того, какой тип лицензии имеется.
После настройки групповых политик переходим к самому лицензированию.
-
Открываем «Панель управления».
-
Переходим в раздел «Администрирование» — Remote Desktop Services — «Диспетчер лицензирования».
-
Кликаем по серверу правой кнопкой и нажимаем «Активировать».
-
Выбираем метод подключения «Авто».
-
Вводим имя, фамилию, организацию, страну расположения сервера. Можно указать любые данные, они не проверяются.
-
Запускаем мастер установки лицензий.
-
Выбираем программу лицензирования, по которой была приобретена лицензия.
-
Вводим ключ активации, который получили после покупки лицензии.
-
Указываем количество пользователей/устройств, если оно не определилось автоматически.
-
Нажимаем «Готово», чтобы завершить работу мастера установки лицензий.
Затем нужно вернуться в раздел «Администрирование» — Remote Desktop Services — «Диспетчер лицензирования» и посмотреть, активирован ли сервер. Если да, значит, настройка успешно завершена.
На иконке сервера может быть желтый значок предупреждения. Чтобы устранить проблемы, нажимаем на ссылку «Рецензия». В меню будут пункты, которые необходимо отметить.
Добавление пользователей для подключения через RDP
После успешного лицензирования добавляем первого пользователя для подключения через RDP.
-
Открываем «Диспетчер серверов».
-
Раскрываем меню «Средства», выбираем пункт «Пользователи и компьютеры Active Directory».
-
Разворачиваем раздел «Пользователи и компьютеры».
-
Кликаем правой кнопкой по своему домену и выбираем пункт «Создать» — «Подразделение».
-
Задаем имя подразделения — например, «Пользователи».
-
Кликаем правой кнопкой по созданному подразделению и выбираем пункт «Создать» — «Пользователь».
-
В карточке пользователя задаем параметры: имя, фамилию, имя на латинице для авторизации.
-
Указываем пароль и настраиваем его параметры — например, можно запретить смену пароля пользователем и сделать срок действия неограниченным.
-
Нажимаем «Готово» для сохранения конфигурации.
Аналогичным образом добавляются другие пользователи, которые могут удаленно подключаться к серверу с Windows Server 2012.
Базовая настройка Windows Server 2012 R2 завершена.
This article contains step by step instructions on how to install and configure the Remote Desktop Services on a Windows Server 2016 or 2012. In Windows Server 2016 & 2012 the Terminal Services role has been replaced by the Remote Desktop Session Host (RDSH) role service and is part of Remote Desktop Services (RDS). A Remote Desktop Session Host (RDSH) server, provides to remote users the ability to access the applications on the RDS host server and the company resources from anywhere by using an RDP client.
In this tutorial you ‘ll learn how to setup and configure a Windows Server 2016 or 2012 as a Remote Desktop Session Host (Terminal) server, in order to provide remote desktop sessions, based on the number of Remote Desktop Services client access licenses (RDS CALs) installed on the RDSH server.
How to Setup and Configure a Windows Server 2016/2012 as a Remote Desktop Session Host Server (Terminal Server).
Notes:
1. The mentioned steps below, can be applied either on a Domain Controller or in a standalone server 2016/2012.
2. If the Terminal services are installed on a server that will act as a Domain Controller also, then first install the Active Directory Domain Service (AD DS) role service and promote the Server to a Domain Controller, before installing the Remote Desktop Session Host (RDSH) role service (Terminal Service).
3. Keep in mind that the below configuration does provide access to RemoteApp programs or the RDWeb site, because the Remote Desktop Connection Broker role service will not be installed.
Step 1. Install Remote Desktop Services on Server 2016/2012.
Step 2. Activate the Remote Desktop License Server.
Step 3. Install Licenses on the Remote Desktop License Server.
Step 4. Configure RD Session Host role to use the local Remote Desktop Licensing server & Set the Remote Desktop licensing mode.
Step 5. Add RD Clients (Users) to the Remote Desktop Users Group.
Step 6. Allow the log on through remote desktop Services.
Step 1. Install Remote Desktop Licensing and Remote Desktop Session Host role services.
1. Open ‘Server Manager’ and click on Add Roles and Features.

2. At the first screen of ‘Add Roles and Features wizard’ leave the Role-based or feature-based installation option and click Next.
 Server 2016/2012")
3. At the next screen, leave the default option «Select server from the server pool» and click Next.

4. Select the Remote Desktop Services and click Next.

5. Leave the default settings and click Next at Features and Remote Desktop Services screens.
6. At Role Services screen, select the Remote Desktop Licensing role service and then click Add Features.

7. Then select the Remote Desktop Session Host role service and click Add Features again.

8. When done, click Next to continue.

9. Finally click Install to install the Remote Desktop Services: Remote Desktop Licensing and Remote Desktop Session Host.

10. When the installation is completed close the ‘Add Roles and Features Wizard’ and restart your server.

Step 2. Activate the Remote Desktop License Server.
1. Simultaneously press the Windows ![]() + R keys to open run command box.
+ R keys to open run command box.
2. Type licmgr.exe and press Enter to open the RD Licensing Manager *
* Note: Alternately, you can launch the RD Licensing Manager, from Control Panel –> Administrative Tools –> Remote Desktop Services –> Remote Desktop Licensing Manager.

3. At the right pane, right click on the server name and select Activate Server.

4. Click Next at the Welcome screen and then click Next again at Connection method options.

5. At ‘Company Information’ window, fill the required fields and click Next twice to activate your License Server.

6. When the activation is completed, leave checked the ‘Start Install Licenses Wizard’ checkbox and click Next.

7. Continue to next step.
Step 3. Install Licenses on the Remote Desktop License Server.
1. At ‘Welcome to the install licenses wizard’, click Next

2. On the License Program page, select the appropriate program through which you purchased your RDS CALs, and then click Next.

3. According the License Program you selected on the previous page, type either the license code or the agreement number provided when you purchased your RDS CALs and then click Next.
4. On the Product Version and License Type page, select the appropriate product version, license type, and the quantity of the RDS CALs based on your RDS CAL purchase agreement, and then click Next.
5. When the RDS CALs installed on the server, click Finish. *
TIP: If you cannot activate the RDS Server automatically, then try to activate it using the Web Browser or via Telephone. To do that:
a. Right-click on the Server’s name and select Properties.
b. Change the Connection Method to Web Browser or to Telephone. When done, click OK.
c. Finally, right click on the server name, select Activate Server and follow the onscreen instructions to completed the activation.
Step 4. Configure RD Session Host role to use the local Remote Desktop Licensing server & Set the Remote Desktop licensing mode.
1. Open Group Policy Editor. To do that:
1. Simultaneously press the Windows
+ R keys to open run command box.
2. Type gpedit.msc and press Enter.

2. In Group Policy Editor navigate to:
- Computer ConfigurationAdministrative TemplatesWindows ComponentsRemote Desktop ServicesRemote Desktop Session Host Licensing
3. At the right pane, double click at Use the specified Remote License Servers.

4. Click Enabled, and then at ‘License server to use‘ field, type the RDS license server name and click OK.

5. Then open the Set the Remote Desktop licensing mode setting.

6. Click Enabled and then specify the licensing mode (Per User or Per Device) for the RDS host server and then click OK again.

7. Close Group Policy Editor.
8. Verify the RD Licensing configuration, by going to: Windows Control Panel –> Administrative Tools –> Remote Desktop Services –> RD Licensing Diagnoser.

Step 5. Add RD Clients (Users) to the Remote Desktop Users Group.
1. Open Server Manager.
2. From Tools menu, select Active Directory Users and Computers. *
* Note: If the RD Session Host Service is not installed on the Domain Controller, use the ‘Local Users and Groups’ snap-in or the ‘Remote’ tab in the ‘System Properties’ on the RDS host server, to add the remote desktop users.

3. Double click at your domain on the left and then select Builtin.
4. Open Remote Desktop Users on the right pane.

5. At Members tab, click Add.

6. Type the name(s) of the users that you want to give Remote access to the RDS Server and click OK.

7. After selecting the remote desktop users, click OK again to close the window.

8. Continue to step-6 below.
Step 6. Allow the log on through remote desktop Services.
1. Open the Local Group Policy Editor. To do that:
1. Simultaneously press the Windows
2. Type gpedit.msc and press Enter.
2. In Group Policy Editor navigate to: Computer Configuration > Windows Settings > Security Settings > Local Policies > User Rights Assignment.
3. At the right Pane: double click at Allow log on through Remote Desktop Services.

4. Click Add User or Group.

5. Click Object Types, check all the available objects (Users, Groups, & Built-in security principals) and then click OK.

6. Type remote desktop users and then click OK.

7. Finally click OK again and close Group Policy Editor.

8. Now you ‘re ready to connect to the Remote Desktop Session Host Server 2016/2012 from any Remote desktop client.
That’s it! Let me know if this guide has helped you by leaving your comment about your experience. Please like and share this guide to help others.
If this article was useful for you, please consider supporting us by making a donation. Even $1 can a make a huge difference for us in our effort to continue to help others while keeping this site free:

If you want to stay constantly protected from malware threats, existing and future ones, we recommend that you install Malwarebytes Anti-Malware PRO by clicking below (we
do earn a commision from sales generated from this link, but at no additional cost to you. We have experience with this software and we recommend it because it is helpful and useful):