Although the Hyper-V environment provides quite a lot of technologies of high availability and fault tolerance for running virtual machines (such as failover clusters, Live Migration, replication, etc.), an administrator must implement traditional ways to back up virtual machine instances. All these technologies can minimize the VMs downtime in various scenarios, but do not provide any disaster recovery options due to human errors, hacker or virus attacks, competitor attacks or similar circumstances. In this article I will try to review the basic requirements for Hyper-V backup solutions, backup strategies and the features of free and commercial backup products.
You can backup virtual machines running on the Hyper-V host using the built-in Windows Server Backup features (or wbadmin scripts based on it), as well as other free or commercial products. All of them are using snapshot (checkpoint) technology to backup running Hyper-V VMs. A checkpoint is a state of a virtual machine at some point of time. The checkpoint stores the state of virtual disks, the contents of RAM, as well as the settings of a VM.
Contents:
- How Does the Hyper-V Virtual Machine Backup Work?
- Hyper-V VM Backup Best Practices and Requirements
- Backup Hyper-V VMs Using Windows Server Backup
- Top Third-Party Hyper-V Backup Products
How Does the Hyper-V Virtual Machine Backup Work?
Let’s consider the operation scheme of any modern Hyper-V virtual machine backup solution.
Note. Previously, server backup was performed by a backup agent installed on each host. In the virtualization era the backup creation point has moved from the guest OS to the Hyper-V host, on which VMs are running. Currently, agent backup scenarios are rare, and are mostly used for the specific apps that do not support VSS.
The backup tool instructs the Hyper-V host to create a checkpoint. After receiving the command, the hypervisor creates some new files (delta files) and the VM goes on working and starts saving changes in the files. Now the backup tool must copy the original VM files (no changes are written to them) to the backup media and then delete the checkpoint. When deleting the checkpoint, Hyper-V consolidates (merges) the original and delta files, in the meantime the VM goes on working. If you lose the productive VM, you will be able to recover its state at the point of time when the backup was created.
Hyper-V VM Backup Best Practices and Requirements
This is general information about the Hyper-V backup, but actually, there are a ton of nuances and issues. I will try to list the most common problems:
- The longer the backup tool is copying the checkpoint (backup), the more changes are logged in the delta files. If there are many changes in the VM while the checkpoint is being copied, merging files after deleting the checkpoint may high load the storage subsystem, the Hyper-V host, and the VM itself. It means that it is better to copy the checkpoint as quickly as possible. In Hyper-V Server 2016, the Resilient Changed Tracking (RCT) technology is used to make backup faster due to copying only the blocks of data changed since the last backup. Thus, you do not need to copy the VM as a whole.
- When copying the VM checkpoint data over LAN from the Hyper-V host to the backup storage, the network may be highly loaded. So it is better to use a separate server network or HBA interface for the backup traffic or copy the data over SAN.
- Based on the points described above, when using external data storage to store VM files, you can use the features of data storage integration with the backup product (such a hardware snapshots).
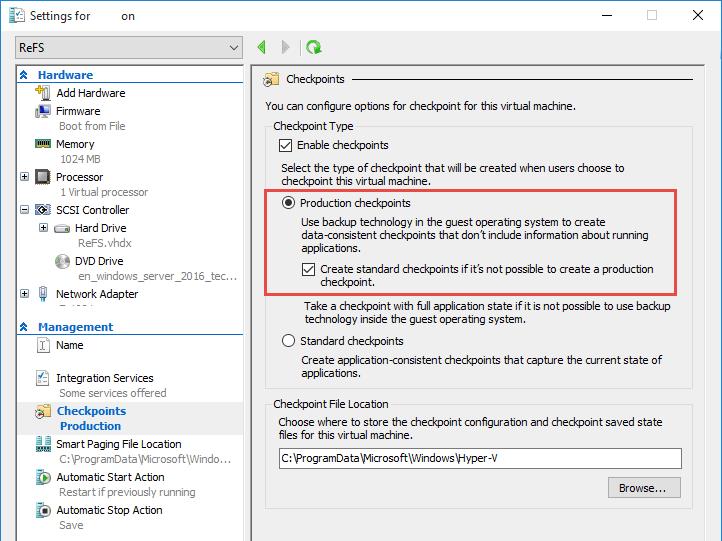
- Originally, the guest OS does not know that it is backed up. So when trying to restore a VM from that backup, the OS tries to continue its operation since the moment the checkpoint has been created. In some cases, it may result in some issues in the OS itself and losing data in the running apps (especially in transaction ones, like Exchange, SQL, ADDS, etc.). To solve this problem, a new checkpoint type — Production Checkpoints appeared in Hyper-V 2016. (Microsoft recommends using Standard Checkpoints only in test or laboratory environments or to backup stopped VMs.)
 The production checkpoints are working due to Hyper-V integration tools in the guest OS and are based on Volume Shadow Copy (Windows) or file system freezing daemon on Linux (fsfreeze). However, the state of the memory is not copied. It means that Hyper-V notifies the guest OS of creating a checkpoint, the app supporting VSS consolidation ends up the current transactions, goes into a consistent state and the VM checkpoint is created. When recovering from a checkpoint, the guest OS is powered off (since the memory state has not been saved), and after being turned on it thinks that an emergency shutdown has occurred. The app (if it supports VSS) starts working from the saved consistent state.
 - To store virtual machine backups you need quite a lot of space. The more often you make checkpoints, the more place you need in the backup storage. Typically, you can use the Data Deduplication technology (integrated into Windows Server) or the deduplication solution from the backup provider. If you are using differential disks, choose the backup tool that supports this technology. Otherwise, you can store the same VM data several times.
- If the density of VMs on the host is high, it is worth to plan the backup time to prevent high load on the productive systems in the working hours.
- If you have to store multiple VM copies for several days, you will have to manage the number of the stored VM copies (you can automatize backup management using scripts or your backup tool features).
- Backup monitoring tools are also important. It would be frustrating to learn that you cannot back up something due to the lack of free space in the data storage. The backup verification tool is also recommended.
- Quite often you have to recover a certain file from a VM backup. Some backup/recovery products allow fine-grained recovery of files/folders without the need to restore the whole VM or its virtual disk.
Note. Also, there are some tools that can recover specific mailbox databases, mailboxes, and even the specific emails from a VM backup with Exchange installed.
.
- You can split the access privileges with the role-based backup management model (it is relevant for administrators responsible for different system or device groups).
- Don’t forget about implementing the traditional backup strategy 3-2-1 (three copies on two different media with one of them being stored on a remote site).

 The production checkpoints are working due to Hyper-V integration tools in the guest OS and are based on Volume Shadow Copy (Windows) or file system freezing daemon on Linux (fsfreeze). However, the state of the memory is not copied. It means that Hyper-V notifies the guest OS of creating a checkpoint, the app supporting VSS consolidation ends up the current transactions, goes into a consistent state and the VM checkpoint is created. When recovering from a checkpoint, the guest OS is powered off (since the memory state has not been saved), and after being turned on it thinks that an emergency shutdown has occurred. The app (if it supports VSS) starts working from the saved consistent state.
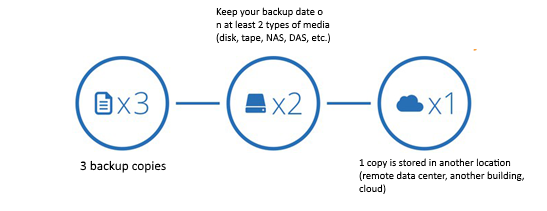
Next, we’ll consider some common solutions for Hyper-V VM backup based on the features described above.
Backup Hyper-V VMs Using Windows Server Backup
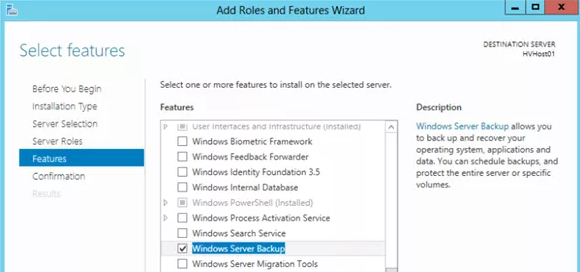
A free way to organize VM backup on Hyper-V suggests using the built-in Windows Server Backup feature. You can use WSB via the graphic backup/restore wizard or the wbadmin command-line tool (it is a part of WSB). Windows Server Backup supports VSS and incremental backup. This feature is available both on Windows Server 2012 (and newer) and on Hyper-V Server. To install WSB component, go to the Server Manager console or run this command:
Install-WindowsFeature Windows-Server-Backup -IncludeManagementTools

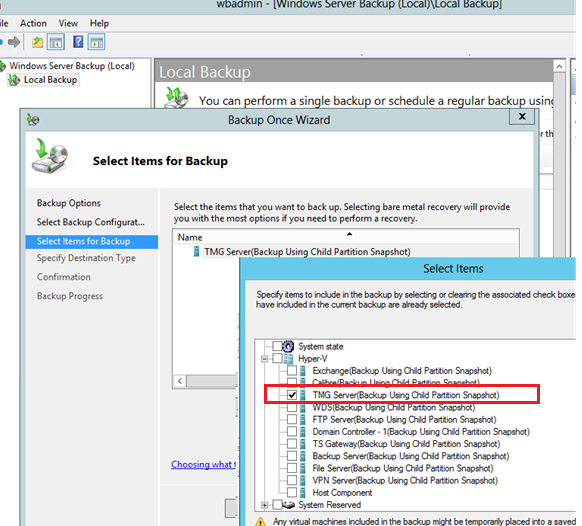
Windows Server Backup has the GUI console (wbadmin.msc) that allows to create and manage Hyper-V backups, create backup schedule, etc. To backup a VM, just start a simple wizard, select which VMs from your Hyper-V server have to be backed up and where the backups are to be saved, and specify the backup schedule.
Tip. In Hyper-V Server versions before 2012 you could not create a backup of a single VM using the built-in backup tool – all VMs were backed up at once.
Usually, it is easier to use the command prompt to backup a Hyper-V VM. Moreover, you cannot create more than one VM backup task in the graphic interface, and the task will overwrite all previous backup tasks.
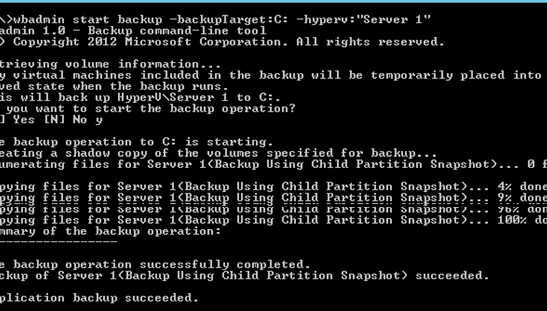
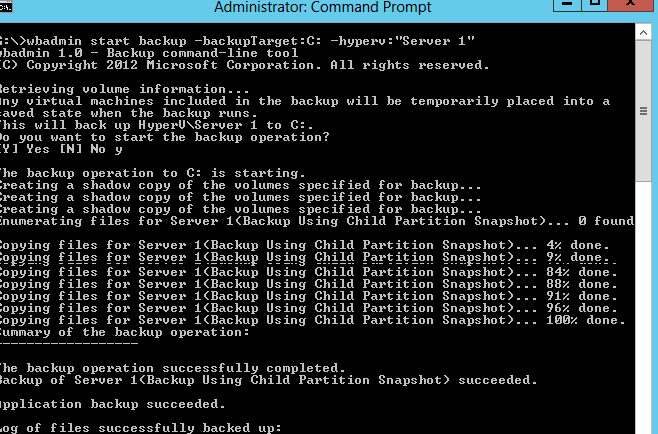
To back up a VM named “Server 1” to a local folder on disk C: (it is not the best idea, is it?), just run this command:
wbadmin start backup –backupTarget:C: –hyperv:"Server 1"
For example, to back up two VMs and save them to a network shared folder (suppose, it is the external NAS storage), it is enough to run the following command:
wbadmin start backup -backuptarget:\192.168.2.15HVMback: -hyperv:"TestVM01,TestVM02" -allowDeleteOldBackups -quiet
You can add this command to the Windows Task Scheduler using PowerShell and thus schedule regular VM backups (older backups will be removed in this case).
For example, to backup a VM with the AD domain controller, you can reset the AD transaction logs after the backup is over in order for the ADDS database in the backup to be consistent (in the same way you can back up a VM with Exchange or SQL Server):
wbadmin start backup -backuptarget:\192.168.2.15HVMback: -hyperv:PAR-DC1 -vssFull
To get the list of backups registered in the system, run this command:
wbadmin get versions
Tip. Please note that when you backup a VM on the Hyper-V host running Windows 2012 or newer, the VM is not paused (suspended) if it has Hyper-V integration components installed.
WSB is a simple, but reliable solution for Hyper-V VM backup. It is quite fast and allows to manage the backup schedule. However, Windows Server Backup has its drawbacks:
- There are no tools to monitor backup process, to verify the consistency of VM backups or apps in them.
- It is hard to manage backup in medium and large Hyper-V installations (it is suitable only for small environments with 1-3 Hyper-V hosts).
- You cannot automatically recover the specific file or the app state. (You will have to manually mount a .vhdx file of a backup and manually copy the file you need).
- With high density and large sizes of VMs on a host, you will have to schedule backups using Windows Task Scheduler to prevent server overloads , as well as high load on LAN/SAN/iSCSI network during the business hours (if you store your backups on an external storage).
Top Third-Party Hyper-V Backup Products
It is impossible to use the Windows Server Backup if there are a lot of Hyper-V hosts and virtual machines. In this case you will have to choose one of the third-party solutions. You cannot say for sure that this or that product would be an ideal solution for Hyper-V backup since there are a lot of things to be considered. They include the number of hosts, licensing limitations, necessary features, network architecture, etc.
There are many commercial and free backup products in the market, and it is hard to choose the right one. Usually, Gartner magic quadrant is used to determine the niche leaders. I have found this image that shows the main players and leaders in the market of backup solutions for data centers in 2019.

As you can see, Gartner names the following companies and products among the leading providers of backup solutions:
- Commvault
- Dell EMC
- IBM
- Veeam
- Veritas Technologies (Symantec — Veritas Backup Exec)
- Actifio
- MIcroFocus (HPE Data Protector)
Несмотря на то, что среда Hyper-V предоставляет довольно много технологий обеспечения высокой доступности и отказоустойчивости виртуальных машин (таких как кластера, Live Migration, репликация, и т.д.), администратору необходимо думать о классическом резервном копировании виртуальных машин. Все эти технологии позволяют минимизировать время недоступности ВМ в различных сценариях, но не обеспечивают возможность восстановления в случаях различных форс мажоров, таких как природные катаклизмы, ошибки персонала, хакерские или вирусные атаки, атаки конкурентов и подобные сценарии. В этой статье я постараюсь рассмотреть основные требования, которые предъявляются к системам резервного копирования Hyper-V, стратегии резервного копирования и возможности бесплатных и коммерческих продуктов резервного копирования.
Вы можете создавать резервные копии виртуальных машин, запущенных на хосте Hyper-V, с помощью встроенного Windows Server Backup (или скриптов на его основе, запускаемых через wbadmin), бесплатных или коммерческих продуктов. Всех эти способ объединяет то, что в основе резервного копирования виртуальных машин Hyper-V лежит технология снапшотов (или снимков). В снимке хранится как состояние виртуальных дисков, так и содержимое памяти и настройки виртуальной машины. Т.е. снапшот представляет собой состояние виртуальной машин на какой-то момент времени.
Содержание:
- Как работает резервное копирование виртуальных машин Hyper-V?
- Основные требования к средствам резервного копирования ВМ Hyper-V
- Резервное копирование Hyper-V с помощью встроенного Windows Server Backup
- Сторонние средства резервного копирования Hyper-V
Как работает резервное копирование виртуальных машин Hyper-V?
Рассмотрим упрощенно схему работы любого современного средства для бэкапа виртуальных машин Hyper-V.
Примечание. Ранее резервное копирование серверов выполнялось за счет установки агента резервного копирования на каждый хост. В эпоху виртуализации точка создания бэкапа сместилась из гостевой ОС на сам Hyper-V хост, на котором запущены ВМ. Агентные сценарии резервного копирования применяются довольно редко, в основном для конкретных приложений, которые не поддерживают VSS.
Средство резервного копирования отдает команду хосту Hyper-V на создание снимка. После получения команды на создание снапшота гипервизор создает новые файлы (дельта-файлы) и ВМ продолжает свою работу, сохраняя изменения в этих файлах них. Теперь задача средства резервного копирования скопировать оригинальные файлы ВМ (изменения в них не пишутся) на носитель резервных копий и после этого удалить снапшот. При удалении снимка Hyper-V производит консолидацию (слияние) исходных и дельта файлов, работа ВМ при этом также не прерывается. В случае потери продуктивной ВМ, вы можете восстановить ее состояние на момент даты создания резервной копии.
Основные требования к средствам резервного копирования ВМ Hyper-V
Это в общих чертах о резервном копировании Hyper-V, но на деле возникает куча нюансов и проблем. Попробую перечислить наиболее распространены проблемы:
- Чем дольше средство резервного копирования забирает снапшот (бэкап) к себе, тем больше изменений накапливается в дельта файлах. При достаточно большом количестве изменений внутри ВМ за время копирования файлов, процесс слияния файлов при удалении снапшота может вызывать высокую нагрузку на диски, Hyper-V хост и саму ВМ. Т.е. желательно максимально быстро забрать снимок. В Hyper-V Server 2016 для ускорения процесса резервного копирования используется технологий Resilient Changed Tracking, которая позволяет средству резевного копирования копировать только блоки данных, измененные с момент последнего бэкапа. При этом не нужно «забирать» ВМ целиком.
- При копировании данных снимка ВМ по LAN сети с хоста Hyper-V на хранилище резервных копий возможно вызвать высокую нагрузку на сеть. Поэтому для трафика резервного копировании желательно использовать отдельный интерфейс сервера, или же копировать данные через SAN сеть.
- Исходя из вышестоящих пунктов при использовании внешних систем хранения для хранения файлов ВМ, вы можете воспользоваться возможностями СХД по интеграции со средствами резервного копирования (аппаратные снапшоты).
- Изначально гостевая ОС не подозревает о том, что создается ее резервная копия. Соответственно при попытке восстановить ВМ из такого бэкапа, ОС пытается продолжить свою работу с момента создания снимка. В некоторых случаях это может вызвать проблемы как с самой ОС, так и с потерей данных в запущенными внутри нее приложениях (особенно в транзакционных, таких как Exchange, SQL, ADDS и т.п.). Для преодоления этой проблемы в Hyper-V 2016 появился новый тип снимков — Production Checkpoints (Microsoft рекомендуется применять обычные снимки — Standard Checkpoint только в тестовых и лабораторных средах, или для бэкапа остановленных виртуальных машин). Производственные снимки работают за счет наличия в гостевой ОС средств интеграции Hyper-V и основываются на технологии Volume Shadow Copy (Windows) или заморозки файловой системы fsfreeze (Linux). Однако состоянии памяти при этом не копируется. Т.е. Hyper-V уведомляет гостевую ОС о создании снимка, приложение с поддержкой VSS корректор завершает текущие транзакции, переходит в консистентное состояние и создается снимок ВМ. При восстановлении из такого снимка гостевая ОС выключена (т.к. состояние памяти не сохранялось), после включения она считает, что просто произошло аварийное отключение по питанию. Приложение (если оно поддерживает VSS) при этом начинает работу с сохранённого согласованного состояния.
- Для хранения бэкапов виртуальных машин нужно достаточно много места. Чем чаще вы делаете снимки и чем дольше должны хранится бэкапы, тем больше места вам нужно в хранилище резервных копий. Как правило вам на помощь может прийти технология дедупликации данных (встроенная в Windows Server) или собственная технология от вендора средства резервного копирования. Если вы используете дифференциальные диски, нужно чтобы средство резервного копирования поддерживало эту технологию. Иначе вы можете хранить одинаковые данные ВМ несколько раз.
- При большой плотности виртуальных машин на хосте желательно иметь возможность планирования времени резервного копирования ВМ, чтобы избежать чрезвычайно нагрузки на продуктивные системы в производственное время.
- Если вам нужно хранить несколько копий виртуальной машины на несколько дат несколько дней, нужно обеспечить управление количеством хранимых копий ВМ, автоматизировав управление резервными копиями скриптами или средствами программы резервного копирования.
- Также важны средства мониторинга создания резервных копий. Не хочется в определенных момент узнать, то резервное копирование не работает, т.к. на СХД под бэкапы уже давно кончилось место. Здесь же нужно вспомнить про средство верификации резервных копий.
- Довольно часто нужно восстановить из резервной копии виртуальной машины конкретный файл. Некоторые средства резервного копирования / восстановления позволяют выполнять гранулярное восстановление файлов / папок без необходимости развёртывания целиком ВМ или ее виртуального диска.
Примечание. Есть даже средства восстановления конкретных хранилищ, ящиков и даже отдельных писем из резервной копии ВМ с Exchange.
- Возможность разделения прав доступа к системе за счет ролевой модели управления резервным копированием (актуально для администраторов, отвечающих за разные группы систем или устройств).
- Не забывайте про необходимость реализации классической стратегии резервного копирования 3-2-1 (три копии, на двух разных носителях, один из которых на другой площадке).

 Производственные снимки работают за счет наличия в гостевой ОС средств интеграции Hyper-V и основываются на технологии Volume Shadow Copy (Windows) или заморозки файловой системы fsfreeze (Linux). Однако состоянии памяти при этом не копируется. Т.е. Hyper-V уведомляет гостевую ОС о создании снимка, приложение с поддержкой VSS корректор завершает текущие транзакции, переходит в консистентное состояние и создается снимок ВМ. При восстановлении из такого снимка гостевая ОС выключена (т.к. состояние памяти не сохранялось), после включения она считает, что просто произошло аварийное отключение по питанию. Приложение (если оно поддерживает VSS) при этом начинает работу с сохранённого согласованного состояния.
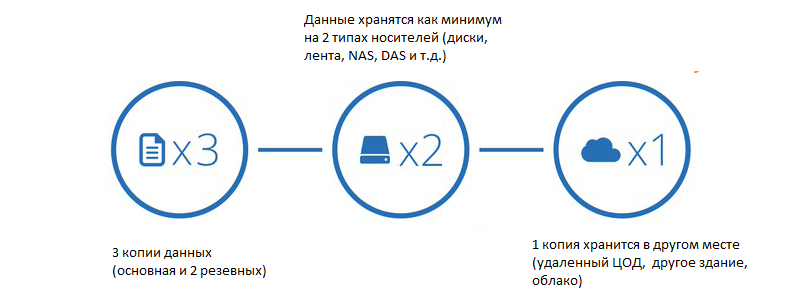
Далее мы рассмотрим несколько популярных решений по организации резервного копирования ВМ на Hyper-V с точки зрения рассмотренных возможностей.
Резервное копирование Hyper-V с помощью встроенного Windows Server Backup
Бесплатный способ организации системы резервного копирования ВМ на Hyper-V предполагает использование встроенного Windows Server Backup через графический мастер резервного копирования/восстановления или утилитой wbadmin (входит в состав WSB). Windows Server Backup поддерживает VSS и инкрементальное копирование, эта фича доступна как в полноценной редакции Windows Server 2012 и выше, так и в Hyper-V. Для установки данного компонента нужно воспользоваться консолью Server Manager или командой:
Install-WindowsFeature Windows-Server-Backup -IncludeManagementTools
У WSB есть графическая консоль wbadmin.msc, которая позволяет создавать и управлять резервным копированием Hyper-V, создавать расписание резервного копирования и т.д. Для бэкапа ВМ достаточно запустить простой мастер, в котором нужно выбрать какие ВМ с сервера Hyper-V нужно бэкапить, куда, и указать расписание резервного копирования.

Совет. В предыдущих версиях Hyper-V до 2012 с помощью встроенных средств резервного копирования было нельзя создать резервную копию одной ВМ – бэкапились все виртуальные машины сразу.
Но обычно проще воспользоваться утилитой командной строки wbadmin для бэкапа ВМ Hyper-V. Тем более из графического интерфейса нельзя создать более одного задания резервного копирования ВМ, причем это задание всегда будет перезатирать предыдущие резервные копии.
Чтобы создать резервную копию ВМ с именем Server 1 в локальную папку на диске C: (не самая правильная, идея не так, ли), просто выполните команду:
wbadmin start backup –backupTarget:C: –hyperv:"Server 1"
Например, чтобы создать резервную копию двух ВМ и сохранить их в сетевую папку (допустим это внешнее NAS хранилище), достаточно выполнить команду:
wbadmin start backup -backuptarget:\192.168.1.100VMbackup: -hyperv:"TestVM01,TestVM 02" -allowDeleteOldBackups -quiet
Вы можете добавить эту команду в планировщик Windows (с помощью того же PowerShell) и тем самым настроить регулярное создание бэкапов ВМ (старые бэкапы при этом удаляются).
Например, при бэкапе ВМ с контроллером домена AD, вы можете по окончании бэкап сбросить транзакционные логи AD, чтобы база ADDS в резервной копии была в консистентном состоянии (аналогично можно сделать бэкап ВМ с Exchange или SQL Server:
wbadmin start backup -backuptarget:\192.168.1.100VMbackup: -hyperv:MSK-DC1 -vssFull
Чтобы получить список зарегистрированных в системе резервных копий, выполните команду:
wbadmin get versions
Совет. Обратите внимание, что при резервном копировании ВМ Hyper-V на хосте с Windows 2012 и выше, ВМ не переводится в режим приостановки, если на ней установлены компоненты интеграции Hyper-V.
С восстановлением ВМ из такого бэкапа все также достаточно просто. Однако вы не можете восстановить из бэкапа один конкретный файл или папку, вам придется вручную смонтировать vhdx файл с резервной копией и также вручную скопировать нужный файл.
При всей своей простоте WSB достаточно надежное решение для резервного копирования ВМ Hyper-V, работает довольно быстро и позволяет управлять расписанием резервного копирования. Но конечно, у Windows Server Backup есть свои недостатки:
- Нет средств мониторинга выполнения бэкапов, проверки консистентности резервных копий ВМ и приложений в них;
- Сложно управлять резервным копированием в средних и крупных инсталляциях Hyper-V (подходит для небольших сред с 1-2 хостами Hyper-V);
- Нельзя автоматически восстановить конкретный файл или состояние приложения (вам придется вручную смонтировать vhdx файл с резервной копией и вручную скопировать нужный файл);
- При большой плотности и размерах виртуальных машин на хосте вам придется с помощью планировщика Windows настраивать порядок создания резервных копий, чтобы не вызвать перегрузки сервера, а также высокой нагрузки на сети LAN/SAN/ iSCSI в рабочие часы (если вы храните бэкапы на другом хранилище).
Сторонние средства резервного копирования Hyper-V

МАТЕРИАЛ ПОДГОТОВЛЕН ПРИ СОДЕЙСТВИИ BACKUPSOLUTION.RU
Специализированный поставщик решений для резервного копирования и восстановления данных
При большом количестве хостов Hyper-V и виртуальных машин, использовать встроенный Windows Server Backup нереально. Вам в любом случае придется выбирать одно из сторонних решений. Однозначно говорить, что тот или иной продукт будет идеальным решением для резервного копирования Hyper-V нельзя, слишком много нюансов нужно учесть. Это и количество хостов, лицензионные ограничения, необходимый функционал, архитектура сети и т.д.
На рынке представлено большое количество коммерческих и бесплатных продуктов для резервного копирования, и запутаться в них очень сложно. Обычно для оценки лидеров ниши используется магический квадрант Gartner. Я нашел такую картинку, характеризующие основных игроков и лидеров на рынке резервного копирования для дата-центров.

Как вы видите, Гартнер среди лидеров решений по резервному копированию выделяет компании и продукты:
- Actifio
- Commvault
- Dell EMC
- IBM
- Rubrik
- Veeam
- Veritas Technologies (Symantec — Veritas Backup Exec)
- Acronis (Veritas Backup Exec)
- Symantec (Veritas Backup Exec)
В рамках одной статьи оценить и сравнить все продукты довольно сложно, поэтому попробуем рассмотреть возможности нескольких программ – лидеров рынка по резервному копированию Hyper-V.
- Veritas Backup Exec
- Commvault Backup
- Veeam Backup
- Acronis Backup
Я составил небольшую сравнительную таблицу с интересными мне возможностями этих средств резервного копирования (рассматривается функционал версий, актуальных на момент написания статьи).
| Функционал/ Продукт | Veritas Backup Exec 20.2 | Commvault Backup and Recovery 11 | Veeam Backup & Replication 9.5 | Acronis Backup 12.5 |
| Резервное копирование файловых систем | Windows / Linux | Windows / Linux / IBM AIX / HP-UX | Windows / Linux / IBM AIX / HP-UX. Агенты для физических систем автономны, не поддерживают совместное использование хранилищ групповые политики | Windows / Linux |
| Передача резервных копий дисковых массивов по NDMP | + Поддержка NDMP v4+. Список поддерживаемых хранилищ есть на сайте veritas. Не поддерживается инкрементальное и дифференциально копирование, бэкап только LUN целиком и нельзя восстановить отдельные файлы. |
+ Поддержка прямого резервного копирования данных с файловых устройств NAS. На сайте Commvault есть список поддерживаемых версий файловых систем разных производителей. При использовании этого типа резервного копирования данные отправляются напрямую с NAS через MediaAgent (прокси сервер) на устройство хранения, минуя управляющий сервер CommServe. Поддержка бэкапов отдельных vmdk файлов. |
+ Поддержка NDMP (v4 и выше) появилась относительно недавно. Поддерживается бэкап только LUN целиком. Поддерживается до 10 точек восстановления (на NetApp до 30). |
— |
| Передача моментальных снимков ВМ по SAN | + На сайте Veritas в секции Hardware Compatibility List представлен список совместимых HBA адаптеров, SAN свичей |
+ Поддерживается бэкап по SAN как для ESXi так и для Hyper-V хостов |
+ Необходимо дополнительная физическая машина с ролью выделенного прокси сервера Veeam, подключенного к той же сети SAN и презентованными LUN |
Поддержка моментальных снимков только в VMware vSphere для хранилищ NetApp с Data ONTAP |
| Репликация резервных копий в несколько хранилищ (в том числе на удаленную площадку) | + | + | + | + |
| Поддержка гранулярного восстановления приложений и БД | Microsoft SQL / Exchange / AD | Microsoft SQL / Exchange / AD / Domino / DB2 / MySQL / Oracle | Microsoft SQL / Exchange / AD / Oracle (только для виртуализированных приложений, не поддерживается на физических системах) |
Microsoft SQL / Exchange / AD |
| Управление аппаратными снимками СХД | + | + (IntelliSnap) | + (список поддерживаемых вендоров и моделей СХД ест ь на сайте, для некоторых необходима установка отдельного модуля интеграции) | + |
| Лицензирование для сред виртуализации | Хост / сокет / Объем данных | Сокет / Объем данных | На сокет (процессор) | На хост |
| Стоимость 1 лицензии (ориентировано) | От 85 тыс. р. | 190 тыс. р. | 70 тыс. р. (редакция Standard), 200 тыс. р. (редакция Enterprise Plus) |
45 тыс. р. (редакция Standard), 95 тыс. р. (редакция Advanced) |
Как вы видите, функционал и стоимость лицензий для каждого продукта довольно сильно отличается. Поэтому перед принятием решений о выборе того или иного решения стоит составить список требований к продукту резервного копирования Hyper-V, список имеющегося оборудования и необходимый функционал. У большинства известных продуктов резервного копирования есть бесплатные версии с некоторыми ограничениями, обычно их достаточно для оценки функционала.
Although the Hyper-V environment provides quite a lot of technologies it is always best to implement traditional ways to backup Hyper-V Virtual Machines
At Bobcares, we often get requests to configure backup on Hyper-V Virtual Machines for our customers.
Today, let’s see how our Support Engineers set this up for our customers as part of our Server Management Services.
How Does the Hyper-V Virtual Machine Backup Work?
The backup creation is on the Hyper-V host rather than the guest OS, on which VMs are running.
The backup tool instructs the Hyper-V host to create a checkpoint.

After receiving the command, the hypervisor creates some data files, and VM starts saving changes in the files.
Then the backup tool copies the original VM files (no changes are written to them) to the backup media and then deletes the checkpoint.
While deleting the checkpoint, Hyper-V merges the original and delta files, in the meantime, the VM goes on working. And we will be able to recover its state at the point of time we started to backup.
[Need assistance to backup your VM? We are here for you!]
Backup Hyper-V Virtual Machines Using Windows Server Backup
One of the easiest ways to VM backup on Hyper-V is to use the built-in Windows Server Backup(WSB) feature.
We can use WSB via the graphic backup/restore wizard or the wbadmin command-line tool. Windows Server Backup supports VSS and incremental backup.
To install WSB component
Run the following command to install WSB component.
Install-WindowsFeature Windows-Server-Backup -IncludeManagementToolsWindows Server Backup has the GUI console (wbadmin.msc) that allows to create and manage Hyper-V backups.
To backup a Virtual Machine
1. Start a simple wizard.
2. Then select the VMs which we want to backup from the Hyper-V server.
3. And specify where the backups are to be saved.
4. Also, we have to specify the backup schedule.
To backup a Hyper-V VM using the command prompt
We can backup a VM named “Server 1” to a local folder on disk C (or any other disk preferred) by giving the following command:
wbadmin start backup –backupTarget:C: –hyperv:"Server 1"Example to back up two VMs and save them to a network shared folder:
If it is an external NAS storage we can run the following command:
wbadmin start backup -backuptarget:\192.168.2.15HVMback: -hyperv:"TestVM01,TestVM02" -allowDeleteOldBackups -quietTo get the list of backups
We can use the following command to get the list of backups registered in the system:
wbadmin get versionsIt should always be kept in mind that when we backup a VM on the Hyper-V host running Windows 2012 or newer versions the VM is not paused (suspended).
[Need further assistance? We are here for you!]
Conclusion
In short, we’ve seen how the Hyper-V Virtual Machine Backup works. Also, we saw the method that our Support Engineers use to backup Hyper-V Virtual Machines.
PREVENT YOUR SERVER FROM CRASHING!
Never again lose customers to poor server speed! Let us help you.
Our server experts will monitor & maintain your server 24/7 so that it remains lightning fast and secure.
GET STARTED
var google_conversion_label = «owonCMyG5nEQ0aD71QM»;
Let’s dive in together and take a closer look.
Introduction
In Windows Sever 2016 Microsoft improved Hyper-V backup to address many of the concerns mentioned in our previous Hyper-V backup challenges Windows Server 2016 needs to address:
- They avoid the need for agents by making the API’s remotely accessible. It’s all WMI calls directly to Hyper-V.
- They implemented their own CBT mechanism for Windows Server 2016 Hyper-V to reduce the amount of data that needs to be copied during every backup. This can be leveraged by any backup vendor and takes away the responsibility of creating CBT from the backup vendors. This makes it easier for them to support Hyper-V releases faster. This also avoids the need for inserting drivers into the IO path of the Hyper-V hosts. Sure the testing & certification still has to happen as all vendors now can be impacted by a bug MSFT introduced.
- They are no longer dependent on the host VSS infrastructure. This eliminates storage overhead as wells as the storage fabric IO overhead associated with performance issues when needing to use host level VSS snapshots on the entire LUN/CSV for even a single VM.
- This helps avoid the need for hardware VSS providers delivered by storage vendors and delivers better results with storage solution that don’t offer hardware providers.
- Storage vendors and backup vendors can still integrate this with their snapshots for speedy and easy backup and restores. But as the backup work at the VM level is separated from an (optional) host VSS snapshot the performance hit is less and the total duration significantly reduced.
- It’s efficient in regard to the number of data that needs to be copied to the backup target and stored there. This reduces capacity needed and for some vendors the almost hard dependency on deduplication to make it even feasible in regards to cost.
- These capabilities are available to anyone (backup vendors, storage vendors, home grown PowerShell scripts …) who wishes to leverage them and doesn’t prevent them from implementing synthetic full backups, merge backups as they age etc. It’s capable enough to allow great backup solutions to be built on top of it.
Let’s dive in together and take a closer look.
Windows Server 2016 Hyper-V Backup Rises to the challenges
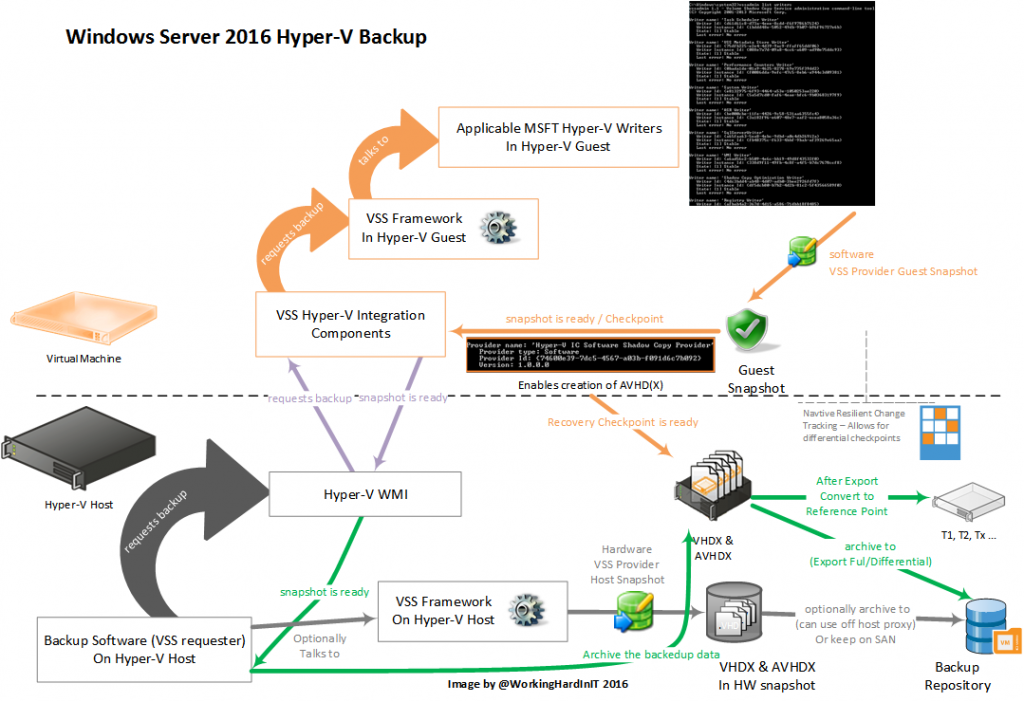
How did they do this? As you might have guessed they implemented change block tracking and they did so while maintaining VM mobility and even the ability to survive a host crash. They also leveraged the capabilities native to Hyper-V to make backups. This allow the backup treat VMs like objects which are their own entity instead of being treated like files that need to be backed up. Actually it leverages a new type of checkpoints: recovery checkpoints. This is the secret sauce that removes the dependency on the host VSS snapshots.
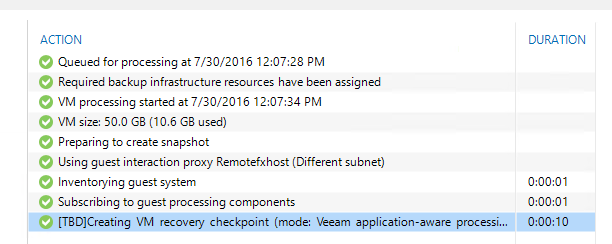
Figure: Veeam backup 9.5 (beta) is creating recovery checkpoint
Recovery checkpoints are used to backup, restore and replicate VMs. A recovery checkpoint has three defines consistency levels:
- Application consistent: this leverages the guest VSS framework to achieve this. These are functionally the same as production checkpoints.
- File system consistent: this one works on both Windows and Linux guest VMs via a filter driver. In windows this can be used as a fail back when the guest VSS Writer needed is in a bad state or on purpose.
- Crash consistent: when else fails or is not possible or desired to have another type of checkpoint. Think about network appliances and so forth that might not have the right integration components.
Reference points are used to track changes, which allow for efficient incremental backups and they are expired/retired on an “as needed basis”.
The above takes care of capturing the state at a point in time and gives us the ability to keep track of that point in time. Cool. Now for a complete backup we need to be able to move that checkpoint to a save place (the backup target) or preserver is on a storage hardware snapshot.
That’s where the enhanced export and import functionality comes into play. The ability to do a differential export allows the time and space efficient export of configuration and state changes between 2 points in time. For example, between a reference point and a consistent point in time that we created now. It enables to efficiently archive incremental backups via differential VHDX files. It’s the resilient change block tracking they implemented that allows for this to be possible. Once a checkpoint has been exported it’s removed after a reference point has been created. The reference point reference a RCT file ID for change tracking.
Virtual Machine ID management allows for the preservation of VM IDs during imports, which allows for restores without impacting the identity of the VM to anything else referencing that VM. It also allows to restore with a different ID so testing of restores does not impact the production VMs.
As you figured out it’s the Import functionality that’s leveraged to restore backups. The basic functionality is there and backup software vendors can leverage them and offer all kinds of advanced scenarios and capabilities as before to deliver extra value.
StarWind HyperConverged Appliance is a turnkey hyper-converged hardware platform fitted into a small two-node footprint. You don’t need anything else to build a budget-friendly new IT infrastructure or upgrade an existing one. All your systems will be “babysitted” by StarWind 24/7/365, troubleshooting any concerns without your involvement. Everything’s operated through a neat web UI. We’ll also migrate your workloads at no extra cost.
Dramatically decrease your CapEx, OpEx, and IT management costs, while visibly increasing return on investment (ROI) with hyperconvergence for ROBO, SMB & Edge from StarWind.
When you leverage SAN snapshots things are a little different. You can use the hardware snapshot integrated with your backup software in which case you don’t need to export the VHDX as you’ll leverage the SAN snapshot which means you’ll also don’t need a reference point as that’s the SAN snapshot. You just have to make sure you have an export or copy of the configuration stored somewhere. Alternatively, you could leverage the SAN Snapshot and transport it to an off host proxy. I that case you’ll do a normal export of the VHDX, the configuration as the SAN Snapshot is thrown away after the backup. When the Checkpoint merges a reference point needs to be created as, again, the SAN snapshot is discarded.
Now you might have noticed that Windows Server 2016 allows for grouping VMs and perform actions against groups that span the cluster (think anti affinity scenarios). This is great for guest clusters, web farms, multi-tier applications or distributed applications. We can perform checkpoint / export actions against groups and a backup vendor can leverage this capability in their own offerings.
All the above Hyper-V features provide the mechanism to backup and restore VMs. But they went the extra mile to make change block tracking fully compatible with VM mobility and it evens survives host crashes and power outages. That’s why they call it Resilient Change Tracking. This deserves a closer look right now, but I hope to show case it in a later article in more detail.
A closer look at resilient change tracking
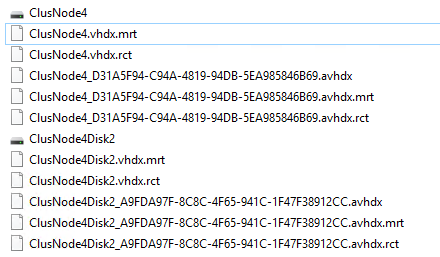
In Windows Server 2016 we see two files appear the first time you take a backup of a VM with configuration version 8.0 on Windows Server 2016 Hyper-V: a mrt file and a rct file in the location of the virtual hard disks. These files appear per virtual hard disk and are there to stay. If you don’t see these, that means you’ve haven’t taken a resilient change tracking based backup for some reason (old configuration version, cluster not completely on Windows Server 2016 functional level 9, you think backups are a sign of weakness, …)
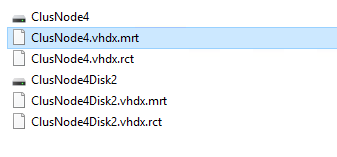
During the backup phase where the checkpoint is being created you’ll also see them get a avhdx just like the virtual hard disks.
Note that you no longer see the autorecovery avhdx like in Windows Server 2012 R2 as that was a capability needed and tied into the host VSS framework where the snapshot needed to be reverted to a consistent situation due to the time elapse between the guest VS snapshot and the host VSS snapshot.
Do note that in earlier versions of the Technical Preview you only had a rct file. This could grow 6MB large and was used for persisting the change block tracking to make it resilient. This file had to server both the mobility as well as the host crash scenarios. That meant it was coarser in granularity than the memory tracking as it functioned in write through to make sure the date was not cached but directly written to disk. To avoid too much overhead, it had to me coarser.
Now, since TPv5 they switched to two files to get the best of both worlds. The rct file is now has a finer granularity (16K, still not as detailed as the memory map) and persists the change block tracking information in normal write back mode (cached). The cached writes mean it has better write performance and can be finer in granularity. The maximum size it can grow to is still 6MB. Caching does mean you can’t guarantee data will be persisted so it used only to preserve change block tracking data for the normal VM mobility use case.
To make sure we can still handle a host crash due to a BSOD or a power failure they now have a mrt file (modifier region table) tracking file that has a coarser granularity and always seems to be 76KB in size (or maybe I haven’t tested enough yet). Writes are done in write-through mode, which guarantees persistence at the cost of performance, but it makes sure change block tracking is resilient to power losses etc.
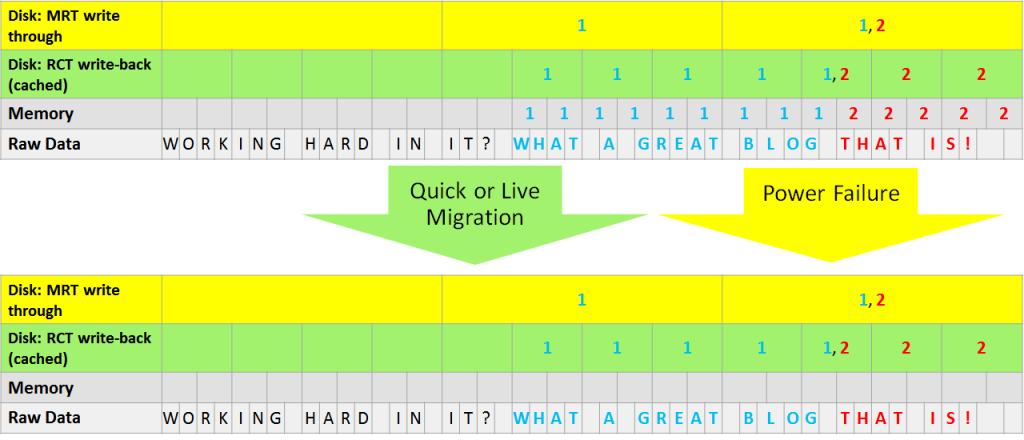
The above figure illustrates which file will be used in what case. As you can see the memory bit map after a crash of any form of VM mobility won’t be available, it’s empty. Green is the rct file which will be used under normal operations and has a less coarse granularity. Yellow is the mrt file which has a coarser granularity but is way still better than a new full back up or a lengthy check summing process to determine the delta again. These 2 files together protect the change block tracking for both planned and unplanned maintenance and any VM mobility scenario out there whether it’s for dynamic optimization, reorganizing or migrations.
It goes without saying that when a host crashes the in memory bit map tracking change is lost. When you live migrate a virtual machine the in memory bit map is lost as well. In a third party CBT solution that information is not part of the VM and is not moved with live or quick migrations. It’s bound to the limits of the host memory on the host that owns the VM.
The 2 files types (mrt and rct) solve this by persisting that info with the VM. The different write characteristics and granularity make sure both scenarios are covered with the least storage IO possible overhead. This means there is no need to do a new full back up or checksum to determine what the changes are after a crash or a VM live or quick migration. This is really good stuff and it definitely gives Hyper-V an edge. But that’s not all! It also survives some other actions such as when you compact or dedupe virtual machines and even when you move VMs around even between NFTS and ReFS!
Conclusion
Microsoft really stepped up its efforts to make Hyper-V backup scalable, reliable and performant in an ever more diverse storage landscape. I can only applaud this. The changes made are significant and help deliver on VM mobility without the constraints of operational overhead. It should make life easier for the users, the storage and backup vendors that no longer need to come up with their own CBT solution as well as Microsoft support who’ll hopefully have less calls in relation to backup issues. Backup vendors who now take more than 3 months to deliver full support after RTM of a new version have zero excuses left. Not that customers care about that. They care about their own challenges.
Now to make this materialize Microsoft has got to get this right. Over the years VMware has made some serious mistakes in their CBT implementation that has led to issues. Both minor and major. Some of them going unnoticed until restore time. That’s unacceptable. So my message to Microsoft is that they cannot afford to get this wrong and they must have stringent quality assurance in place.
So the message to Microsoft here is to do this right and have excellent quality assurance & testing done for this feature during the entire lifespan of its existence. No one is happy with backup issues, let alone restore problems.
It seems Microsoft delivers on their much needed intention to make Hyper-V backups reliable, scalable and deliver great performance in such a way that it will finally keep up with the ever growing virtualization.
- Hyper-V backup challenges Windows Server 2016 needs to address
- How To Install Microsoft MultiPoint Service On Windows Server 2016
Virtualization is becoming ubiquitous today as more and more companies realize the benefits of Hyper-V. But as a line of business apps and mission-critical functions are moved from physical hosts to virtual ones, the idea of using “snapshots” to take backups of VMs is simply not enough. They don’t scale, can be confusing to work with, and consume resources much better left for running the production VMs. In this article, we’re going to look at what you want to do to provide a scalable and performant backup solution for your Hyper-V virtual machines running on Microsoft Windows Server 2012, 2012 R2, 2016, and 2019 hosts.
Why Backing Up VMs is Different
It’s important to understand that, while a virtual disk is, at least to the host operating system, a single big file, it’s definitely not just a single big file. Even a simple VM with a single disk for everything has an image of a system volume, with the full directory structure you’d find on any system, along with supporting files for the image, changes, et al. More advanced VMs may also include other image files on other storage arrays to handle databases, or log files, or to host the applications that the VM runs. All of these are likely to be in a constant state of reading and write while the VM is running. When a virtual machine is shut down, you can treat that data like a handful of really big files, but who wants to shut down mission-critical servers every night so you can make a backup? Anybody?
In addition to all the changes going on within the VM’s file systems, which are all reads and writes to that big file, there’s the memory image being written to the swap file of the VM, which is again a bunch of changes being written to that one big file. Trying to “grab” an image of a file that is in an almost constant state of change is what makes backing up VMs so different from backing up files. A file system can be held off from committing a change to disk when a backup application puts a lock on a file to capture it to back up in a second or two, but you cannot do that when you’re trying to back up a virtual disk that may take several minutes to complete. That virtual machine is wanting to write multiple changes per second and cannot just stop when it’s running. And you can’t shut down VMs each night just so you can do backups. If you have multiple machines behind a load balancer, you can take one at a time out of rotation to back things up, but that increases complexity, reduces performance, and risks fault tolerance.
There’s also the method to consider. Physical device backups require software to be running on the host machine or access to the host’s storage over a network share. Running the software on the host may be okay in smaller environments but is not advisable. You want to preserve as much as possible of the host’s resources as you can for the VMs to use. Agent-based backups use a small software service to run on the VM host, while the heavy lifting of the backup application handling things like compression, encryption, deduplication, and the actual jobs of backing up VMs is handled by a server separate from your VM hosts.
Choosing the right application
There are several applications on the market that can do backups of virtual machines, but not all have all of the key features you want to have to protect your mission-critical systems. Here is the shortlist of must-have features you need to have in order to get the best performance and protection for your VMs in the most cost-effective way you can.
- Live backups
Make sure your backup solution can do backups while the VM is running. Not shut down, not paused, not taken out of the load balancer rotation. Backups should help protect you, not slow you down. Live backups mean you can back up when you want without dropping capacity or staying up late at night. - Continuous Data Backups
How many changes a day do your VMs process? 10? 1000? 1M? How much work would it take to bring a machine and its config back to “current” if you had to start from a backup taken last night? Continuous Data Backup lets you backup your VMs throughout the day-as frequently as every five minutes if that’s what you need. That’s a pretty good RPO. - Deduplication
Backing up multiple times a day is great for RPO but will need a LOT of storage space to do. Save space by choosing a backup solution that can do deduplication and make sure it can do it inline, not after the fact. - Automatic Retention Policies Further help keep your storage use in line by choosing a solution that handles retention policies automatically. You don’t have time to go through and dump old backups. Your solution should do that for you.
- Historical Point-in-Time Options There are benefits to keeping some older backups for recovery, analysis, and other just-in-case scenarios. Systems that can take and keep yearly or quarterly or monthly or weekly backups so you have a historical point you can go back to is invaluable. Frequently called a “Grandfather-father-son” rotation scheme, make sure your solution can take care of this for you.
- Concurrency
Even with fast backups that can run while the VMs are live, you don’t have time to do backups serially. Unfortunately, some solutions can only do one VM at a time. Make sure the one you choose offers concurrency so you can back up multiple machines all at once. - Options options options
You want options on where your backups go. Disk to disk is okay but can be costly, and if they are all in the same place, a site disaster means you’re toast. Over the wire to an offsite location is much safer, but of course, it requires that you have an offsite location. If you don’t have a second datacenter, make sure your solution supports cost-effective and secure data storage. Azure Blob Storage is a great solution offering secure storage, fault tolerance, and quick recovery, so consider a solution that can use Azure for storing your backups.
Crash Course on VSS (Brief)
We mentioned in the features section live backups. How do you take a backup of a VM that is currently running? Easy. Use a solution that works with VSS. The Volume Shadow Copy Service, or VSS, is where the magic happens. This service, a part of all currently supported versions of the Windows operating system and dating back to Windows XP, enables the operating system and compatible applications to take backups of volumes while other applications or services are actively writing data to them. That’s critical to obtaining consistent and complete backups of large data sets, including databases, complete volumes, and virtual disks. VSS coordinates all the actions needed to create a “shadow copy,” also called a snapshot, of whatever data is being backed up. VSS is useful for more than just backups. You can use it for data mining, disk-to-disk backups, fast data recovery for failed LUNs, and more. In the case of VMs, using VSS to create backups ensures that you get everything that makes up the virtual disk so that you have an application-consistent backup. That way, you have a working VM you can boot if you need to, not just a VHD you can mount to search the file system.
There are four parts of VSS. They include
- The VSS service, which is a part of Windows and arbitrates the communications between the various other components
- One or more VSS requestors, which are the backup applications to use VSS. These include the Windows Server Backup Utility (Windows Backup,) System Center Data Protection Manager and many third-party backup software solutions.
- The VSS writers, which are the components that guarantee that data is complete and consistent when committed to a volume and made available for backup. Microsoft server products like Exchange and SQL Server and, yes, Hyper-V, include VSS writers, as so some third-party server applications that need to rely on VSS.
- The VSS writer, which is what handles the shadow copy creation and maintenance. This can be software in the operating system or in drivers or can be a hardware solution included in a SAN. Windows’ included VSS writer uses a copy-on-write to ensure all writes are committed to a shadow copy.
VSS writers can write data for shadow copies in three different ways.
- Complete copy – consider this a clone. Every single block at a given point in time is copied to another volume.
- Copy on write – this creates a differential copy of all changes (writes) from a given point in time going forward.
- Redirect on write – similar to the copy on write. This redirects all changes to a different volume.
Please see https://docs.microsoft.com/en-us/previous-versions/windows/it-pro/windows-server-2008-R2-and-2008/ee923636(v=ws.10) if you would like a deeper dive into VSS, including information on I/O and storage costs as well as different providers that are available. For the purposes of backing up Hyper-V virtual machines, it’ enough to understand that you want a VSS-compatible backup solution so that you can take exact point-in-time backups as and when you need it.
What are Production Checkpoints? (2016 & 2019)
Hyper-V in Windows Server 2016 introduced a new type of checkpoint, called the Production Checkpoint. The original checkpoint is now referred to as a “standard checkpoint”. The Production Checkpoint is a point in time image of VM and leverages the guest operating system’s backup technology to take a complete snapshot of the VHDX at the point in time. Not only is this faster than using a saved state technology, but it’s also fully supported to restore this image for all production workloads, which is a pretty big deal for things like Exchange, SQL, and Active Directory. Standard checkpoints rely upon the host and “grab the state, data, hardware settings, et al” of a running VM but are not supported for production recovery. You can use them for dev and test all you want, but don’t count on them for production if you need to maintain a supported state.
What is Resilient Change Tracking (aka CBT), and why is it Important?
Changed Block Tracking (CBT,) or as Microsoft refers to this, Resilient Change Tracking, is a native change tracking mechanism in Hyper-V 2016 and onward. This is a more flexible and better-performing method of capturing changes to a volume than VSS offers and is a feature VMware admins have enjoyed for a few years. RCT’s most important capabilities are the ability to track and capture changes at the block level, which speeds up performance and can save 30% or more on storage requirements when taking backups of VHDXs. That equates to cost savings for storage.
Use case of a non-VM based VM Backup tool vs. something like Altaro VM Backup.
When it comes down to what solution to use to backup (and restore) your mission-critical virtual machines, you can use any system that can back up files stored for Hyper-V VMs, including the VHDXs, differencing files, configuration files, and memory dumps. If you store all of those in a single location, you can just back up the directory, and Bob’s your uncle. What’s not to love? Actually, quite a bit. There are several to consider. Let’s take a look at a hypothetical organization that runs a mission-critical web application with a three-tier architecture. The front-end web servers, middle-tier application servers, and back-end database servers all work together and all have different backup needs, RPO/RTO targets, and retention requirements. All are running as Windows Server 2016 (in this case but would work with other supported versions) guests on various Hyper-V hosts.
- Storage requirements-Using Windows Backup or a third-party backup application means taking backups of every single machine in all three tiers. Even though they are all running the same operating system and at the same patch level, each VM is a unique set of files. But when using Altaro VM Backup can reduce storage costs by performing inline deduplication. Since the VMs are running, and the solution is leveraging the guest operating system, files that are common amongst the VMs, like the operating system, can be deduplicated in the backups, saving tons of space.
- Reduced RPO-Backups of files can take a significant amount of time to start, run, and complete, increasing the elapsed time between your most recent backup and when something bad happens. Continuous Data Protection enables you to take a backup as frequently as every five minutes, ensuring a very short RPO. And that policy can be set at different frequencies for different VMs easily. Take a backup of the web servers once a day, the middle-tier servers four times a day, and the database servers every five minutes, to get a balance between RPO and storage costs.
- Simplicity-many backup applications are written for file systems and don’t have as much granularity for different needs for different sources, making the setup and maintenance of backups much more work. Altaro is purpose-built to backup virtual machines, and the interface is easy and intuitive, letting you get your backups set quickly.
An Example Backup Job
Still not convinced? Here’s a quick walkthrough of how quick and easy it is to set up a backup of a VM using Altaro, complete with pretty pictures. We’re using our own product as an example here, but many other backup applications targeting virtual machines will work in a somewhat similar manner.
- If you haven’t already, log onto your Hyper-V host, download and install Altaro Backup fromhttps://www.altaro.com/vm-backup/download.php. You can choose a free version that lets you back up two VMs per host forever or a thirty-day trial that lets you try everything for a month before you buy. It’s a “next, next, enter” type install. At the end of the install, you will be prompted to launch the management console like this.

- The console will prompt you to either connect to “This Machine” or to a “Remote Machine” since you can manage more than one instance of Altaro VM Backup from the same console. Choose “This Machine” to set up your job. You can also tick the box to log on automatically next time if you wish.
- You can use the Quick Setup to get a backup job up and running quickly. As you can see in the console, there are three simple steps.

- Click Add Hyper-V/VMware Host to add your host physical server. This will switch to the management console once it enumerates the host.
- Select the backup location you wish to use to store your backups. You can select local or network storage, as seen below.


In this example, we will use a Physical Drive, so we click that and then click Next.
- Here we can see the three physical disks connected to our Hyper-V host, and we have selected the G: drive. Note, backups will be stored at the root of the volume, under a folder names AltaroV7, unless you click the “Choose Folder” to pick or create another folder.
To complete step 2, we just need to select the drive and click Finish.

- Now we need to select the VM or VMs we wish to backup to this drive and simply drag-and-drop them to the drive. Make sure you drag the VMs over the actual drive letter, not just into the middle pane.

You can see in the console pane on the left that there are several options you can configure, including scheduling, retention, and more. For a quick backup, though, we’re just going to click down on Step 3, Take Backup.

- You will be prompted to save changes. Do so, then tick the box next to the VMs you wish to back up and click “Take Backup.”


- Please note, if you have VMs that were created on an older version of Hyper-V, they might be running configuration version 5.0. If you get an error that they cannot be backed up, you need to first shut down the VM, then update the configuration (right-click the VM in the Hyper-V console and select upgrade) and then restart the VM. You’ll be able to back it up then.


- As the backups run, you can see the status by moving your mouse over the progress icon.
![]()
- When complete, you should see this.

If you click the + sign on the far right, you’ll see some statistics on the backup. Notice the space savings for this particular backup!

If you need to do a restore, the steps are very similar.
- On the right-hand menu, click Restore.

- Click the source location, and click Next.
- Select the VM or VMs you want to restore, and click Next.
- Choose the options appropriate for your restore job. Notice you can restore to another host, and the default is to restore with the NIC disconnected. Click Restore, and off it goes!


Other options
There are several other options you can select. You can do granular file-level restores from file servers or item-level restores from Exchange servers.

You can also test and verify your backups, which is probably the single most important thing to do with any backup solution but is missed by so many other systems. The very last thing you ever want to do is find out your backups are not working only when you actually need to do a restore!
One other thing you may want to make sure you look at is the Reports section. It gives you just what you need to check and confirm operations completed successfully, without burying you in details you won’t want to read anyway. It tells you the what, when, and how, and that things were successful, or if something wasn’t, why.

You cannot export the reports, but you can see everything you need. If the boss wants a printout, screenshots of the console should suffice.
Setting up scheduled backups and retention policies are both simple drag and drop operations. Pick a default schedule or create your own, drag the VMs to it you want to be covered, and that’s it. It will take you longer to read this paragraph than to set up a backup and retention schedule!
Final thoughts
If your business relies upon virtual machines, then you need backups that you can rely upon. Altaro VM Backup gives you all the functionality you need to backup, and restore VMs and individual items from VM backups with the security and flexibility every business needs, without the costs that only enterprises can afford. You owe it to yourself to get the peace of mind that Altaro VM Backup offers by downloading and installing it today.
In this post, I will be going over Hyper-V backup and restore. We’ll back up and restore Hyper-V virtual machines using Windows Server Backup WSB and command line CLI, to and from iSCSI and a .VHDX located on a network drive.
Table of Contents
- 1 Windows Server Backup
- 1.1 Backup Command
- 1.2 Restoring
- 1.2.1 Get Versions
- 1.2.2 Get Items
- 1.2.3 Restore Command
- 1.2.3.1 Parallel Restoration
- 2 Restoring from Backup located on a .VHDX virtual disk
Windows Server Backup
Hyper-V backup, in many circumstances, can be nicely backed up using Windows Server Backup, without the need for expensive third-party software.
Backup Command
The following command will, from the Hyper-V hypervisor (HV01), back up a Hyper-V VM named “serv-WEB1” to the F: drive without prompting for a yes/no. In this case, the F: drive is an iSCSI device.
- wbadmin start backup -backupTarget:F: -hyperv:serv-WEB1 -quiet
Restoring
Get Versions
You need the backup “version identifier” to see which items you can restore.
- wbadmin get versions -backupTarget:F: -machine:HV01
Get Items
You need the item ID’s of what you can restore.
- wbadmin get items -version:08/09/2016-16:18 -backuptarget:F: -machine:HV01
Restore Command
With the above information you obtained, you now have the required info to restore a VM or other item.
- NOTE: When you restore a VM from backup, it will delete the existing VM if it exists on the same server you are restoring it to!
- wbadmin start recovery -version:<version> -itemType:hyperv -items:<serverName> -backuptarget:F: -machine:HV01
- In this example, we’d replace <serverName> with “serv-Web1” to restore a VM named serv-Web1, using the version identifier you found.
Parallel Restoration
Use the following options to restore a VM to an alternate location if you, for example, need to recover a file. This method will not delete the existing VM.
- Add the -recoveryTarget: switch to the above restore command, and make sure it points to somewhere different than the real VM.
- Use -recreatePath to re-create folder structure in the recoveryTarget path / restore path you choose.
Restoring from Backup located on a .VHDX virtual disk
This process guides you through restoring from a backup located on a .VHDX virtual disk, may be hosted on some network share.
- Make sure the backup .vhdx is not in-use.
- Un-mount it from any other server that might be using it, by right-clicking on it and selecting “eject”.
- If it’s attached in Hyper-V Manager, you can remove it live. It’s hot-pluggable both ways.
- Create a new Gen 2 VM in Hyper-V Manager using modified settings below:
- If testing, Configure Network Connection to Not Connected, Click Next.
- Create a new virtual hard disk, should be 150 GB, default location, click Next.
- Configure to Install an Operating System from .iso
- Should be located at: c:isoSW_DVD9_Windows_Svr_Std_and_DataCtr_2012_R2_64Bit_English_…
- Click Next, Finish.
- Before turning VM on, configure with typical other settings.
- For example, 2 logical procs, compatibility setting, etc.
- Attach the backup .vhdx disk to the VM.
- Select SCSI Controller and then Add a Hard Drive.
- Browse to the location of the backup .vhdx
- For example: F:server-backups.vhdx .
- Turn on the VM, and press any key to boot to the install disk.
- Click Next and then click Repair your computer.
- Click Troubleshoot.
- Click System Image Recovery.
- Select Use the latest available… and click Next, but if the .vhdx you attached above doesn’t automatically appear:
- …click Select a system image and click Next.
- Find it, then click Next.
- Select the date and time you would like to restore from, then click Next.
- Default settings should be okay in typical circumstances. Click Next.
- Click Finish, then click Yes.
- Wait for the restore to complete.
- It will restart automatically.
- Restore process is now complete. Don’t forget to connect the network when you’re ready.