| title | description | ms.topic | ms.assetid | ms.author | author | ms.date |
|---|---|---|---|---|---|---|
|
System requirements for Hyper-V on Windows Server |
Lists the hardware and firmware requirements for Hyper-V in Windows Server |
article |
bc4a4971-f727-40cd-91f5-2ee6d24b54cb |
benarm |
BenjaminArmstrong |
9/30/2016 |
System requirements for Hyper-V on Windows Server
Applies to: Windows Server 2022, Windows Server 2016, Microsoft Hyper-V Server 2016, Windows Server 2019, Microsoft Hyper-V Server 2019
Hyper-V has specific hardware requirements, and some Hyper-V features have additional requirements. Use the details in this article to decide what requirements your system must meet so you can use Hyper-V the way you plan to. Then, review the Windows Server catalog. Keep in mind that requirements for Hyper-V exceed the general minimum requirements for Windows Server 2016 because a virtualization environment requires more computing resources.
If you’re already using Hyper-V, it’s likely that you can use your existing hardware. The general hardware requirements haven’t changed significantly from Windows Server 2012 R2 . But, you will need newer hardware to use shielded virtual machines or discrete device assignment. Those features rely on specific hardware support, as described below. Other than that, the main difference in hardware is that second-level address translation (SLAT) is now required instead of recommended.
For details about maximum supported configurations for Hyper-V, such as the number of running virtual machines, see Plan for Hyper-V scalability in Windows Server 2016. The list of operating systems you can run in your virtual machines is covered in Supported Windows guest operating systems for Hyper-V on Windows Server.
General requirements
Regardless of the Hyper-V features you want to use, you’ll need:
-
A 64-bit processor with second-level address translation (SLAT). To install the Hyper-V virtualization components such as Windows hypervisor, the processor must have SLAT. However, it’s not required to install Hyper-V management tools like Virtual Machine Connection (VMConnect), Hyper-V Manager, and the Hyper-V cmdlets for Windows PowerShell. See «How to check for Hyper-V requirements,» below, to find out if your processor has SLAT.
-
VM Monitor Mode extensions
-
Enough memory — plan for at least 4 GB of RAM. More memory is better. You’ll need enough memory for the host and all virtual machines that you want to run at the same time.
-
Virtualization support turned on in the BIOS or UEFI:
-
Hardware-assisted virtualization. This is available in processors that include a virtualization option — specifically processors with Intel Virtualization Technology (Intel VT) or AMD Virtualization (AMD-V) technology.
-
Hardware-enforced Data Execution Prevention (DEP) must be available and enabled. For Intel systems, this is the XD bit (execute disable bit). For AMD systems, this is the NX bit (no execute bit).
-
How to check for Hyper-V requirements
Open Windows PowerShell or a command prompt and type:
Scroll to the Hyper-V Requirements section to review the report.
Requirements for specific features
Here are the requirements for discrete device assignment and shielded virtual machines. For descriptions of these features, see What’s new in Hyper-V on Windows Server.
Discrete device assignment
Host requirements are similar to the existing requirements for the SR-IOV feature in Hyper-V.
-
The processor must have either Intel’s Extended Page Table (EPT) or AMD’s Nested Page Table (NPT).
-
The chipset must have:
-
Interrupt remapping — Intel’s VT-d with the Interrupt Remapping capability (VT-d2) or any version of AMD I/O Memory Management Unit (I/O MMU).
-
DMA remapping — Intel’s VT-d with Queued Invalidations or any AMD I/O MMU.
-
Access control services (ACS) on PCI Express root ports.
-
-
The firmware tables must expose the I/O MMU to the Windows hypervisor. Note that this feature might be turned off in the UEFI or BIOS. For instructions, see the hardware documentation or contact your hardware manufacturer.
Devices need GPU or non-volatile memory express (NVMe). For GPU, only certain devices support discrete device assignment. To verify, see the hardware documentation or contact your hardware manufacturer. For details about this feature, including how to use it and considerations, see the post «Discrete Device Assignment — Description and background» in the Virtualization blog.
Shielded virtual machines
These virtual machines rely on virtualization-based security and are available starting with Windows Server 2016.
Host requirements are:
-
UEFI 2.3.1c — supports secure, measured boot
The following two are optional for virtualization-based security in general, but required for the host if you want the protection these features provide:
-
TPM v2.0 — protects platform security assets
-
IOMMU (Intel VT-D) — so the hypervisor can provide direct memory access (DMA) protection
Virtual machine requirements are:
- Generation 2
- Windows Server 2012 or newer as the guest operating system
If you want to create and run Virtual Machines you must create a HYPER-V Environment before.
Base on the size of your company and workload you can select how will be install the HYPER-V.
If you already use HYPER-V and decide to move on then you must know that Windows Server 2016 has add great features in HYPER-V that i will describe most of them in next articles.
Today i would like to discuss and get part of this of how can install HYPER-V in Windows Server 2016.
So let’s start.
Requirements for HYPER-V Deployment
Before start with the installation of HYPER-V in Windows Server 2016 it’s good idea to check the requirements.
If you have read the requirements from Microsoft the only change is that SLAT which was optional in Windows Server 2012 in Windows Server 2016 is required.
So let’s do a recap all the requirements
For the BIOS
- You must support and enable the following features:
- Hardware Virtualization Assisted
- Data Execution Prevention
- SLAT
- You must disable the following features for the BIOS
-
Disable C States (power management)
-
For the Physical Server
- At least 4 GB for the HYPER-V. Depends on the Virtual Machines that you will Host calculate the RAM that you need.
- A 64-bit processor with second-level address translation (SLAT)
- VM Monitor Mode extensions
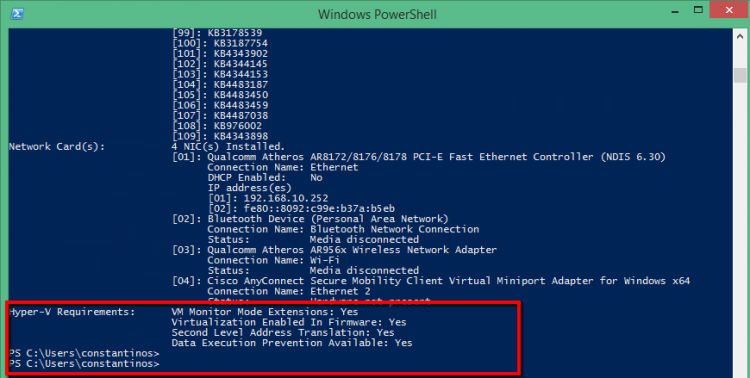
To identify if your Physical Server met the requirements open the cmd or Powershell and type the following command.
After get the results go in the bottom and check the Hyper-v Requirements
Systeminfo.exe
After find out that met all the requirements we can start the installation of HYPER-V
Because HYPER-V can install with different ways i would like to show all of them.
> Video : Implementing Windows Server 2016 Hyper-V by Greg Shields (MVP)
How to install HYPER-V Server 2016
Most of you are familiar with HYPER-V Role from Windows Server 2016. But find out that you can use only the HYPER-V Server as standalone installation.
Which are the difference of HYPER-V Standalone from HYPER-V Role?
- HYPER-V Server 2016 it’s a free product and you can download from Microsoft Site. You don’t need any license and you can use it for unlimited period.
- For Guest VM’s there are no licenses and must buy the licenses for every Guest VM that you would like to install.
- HYPER-V Server 2016 has no GUI and must be work with CLI. For example to change computer name, join to the domain, setup a vm. You can use Powershell from cmd
Now that you have see all the difference let’s start the installation
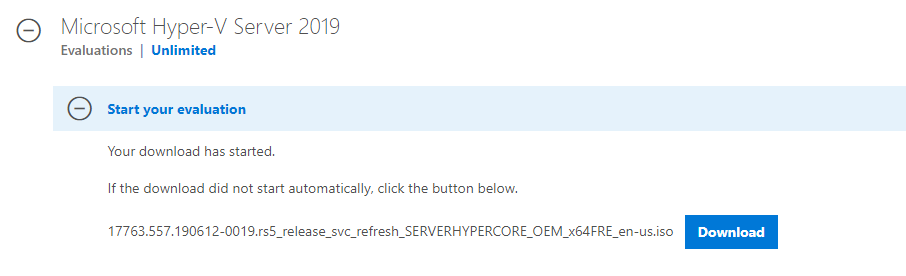
- Download HYPER-V Server from Microsoft Site
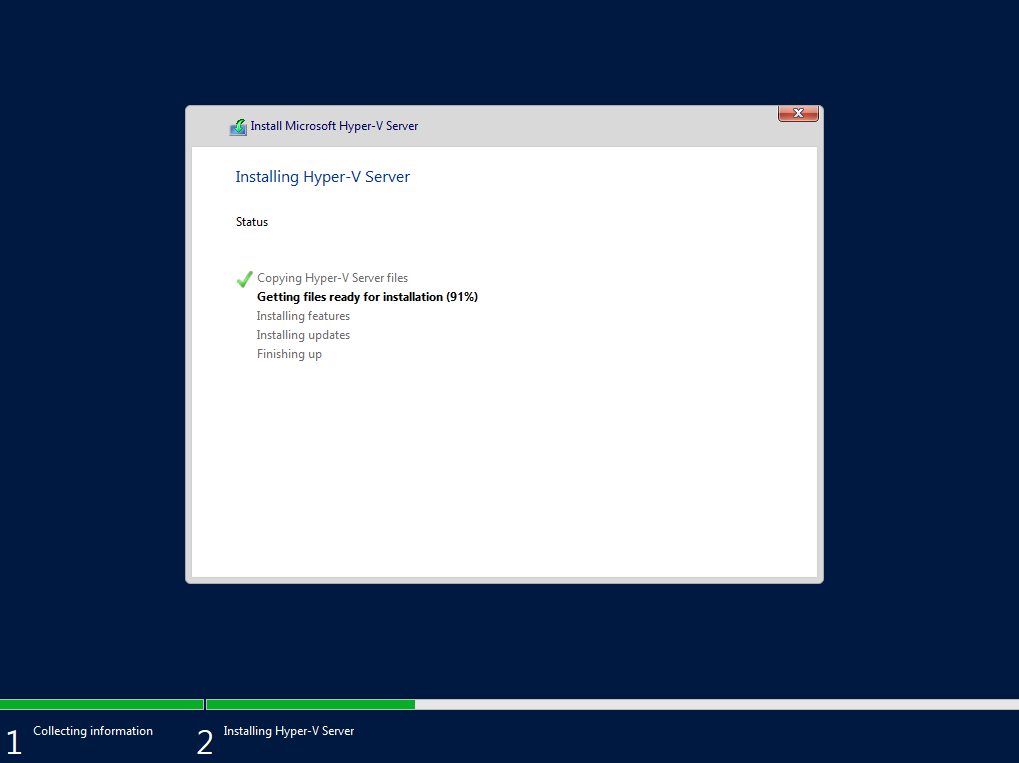
- Boot your ISO and start the installation
- Add your prefer language,Time and Keyboard and click Next

- Click Install Now

- Accept the licenses terms and click Next

- Select Custom:Install the newer version of HYPER-V only to do a clean installation

- Configure your partitions base on your requirements and click Next to start the installation.

- Wait until finish.

- When the installation finish you will get a cmd window only because no GUI exist

- From now on you need to start the configuration of your HYPER-V Core that will be discuss in the next article.
> How to Configure HYPER-V Server Core 2016
Installation Procedure from GUI
Now let’s go to explain the most common installation type of HYPER-V as Role in Windows Server 2016
- Open Server Manager
- Click Manage — — Add Roles
- Click Next in the first Step

- Keep as it the selection of Role-based or feature-based installation. Click Next

- Verify the Server Name and click Next

- Check the HYPER-V Role

- Click in Add Features

- Click Next
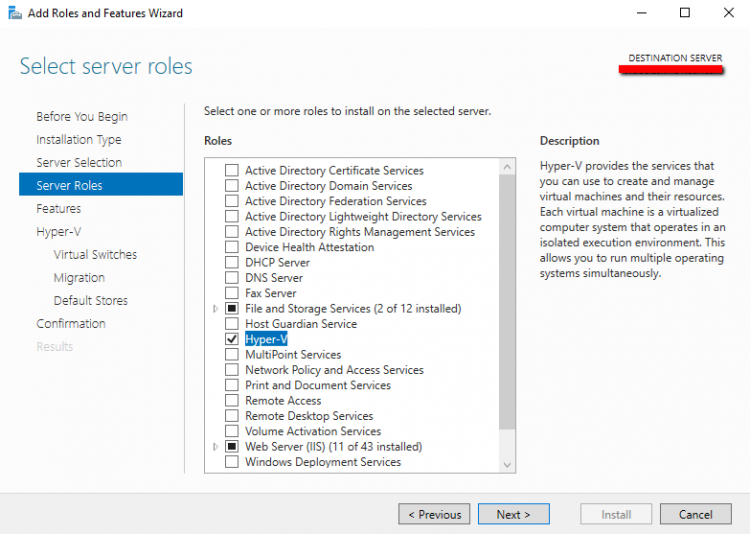
- Click once again Next because you don’t want to add any feature

- Now start the Wizard installation of HYPER-V Role. Click Next

- I recommend to do all the configuration after finish the installation. So don’t change anything and click Next. If you read carefull the name of the Ethernet Adapter you will understand that this is a VM. I use Nested Virtualization which is one of the new feature of Windows Server 2016 that i will explain in another article.

- Click Next once again without change anything

- Keep the Default Stores for the Virtual Machines and click Next.

- Click Install and wait to finish.

When finish the Installation must be restart the Server. After that open Hyper-v Manager to start build your configuration and HYPER-V Enviroment.
You can find very useful articles in Virtualization Category
If you are using first time Hyper-v you can start with How to use HYPER-V Manager — Part 2
Installation Procedure from Powershell
One last installation of HYPER-V Role in Windows Server 2016 is from Powershell.
Of course the steps are few from installation with GUI.
So let’s see how can install the HYPER-V Role from Powershell
- Open a Powershell
- Type the following command
Install-WindowsFeature -Name Hyper-V -IncludeManagementTools -Restart

Now you can select which installation method you prefer to do for the HYPER-V.
I hope to give you a valuable article and use it when you real need to find or learn something
Have a nice weekend !!
You can send me an email at info@askme4tech.com or do your comments in Twitter or Facebook
I invite you to follow me on Twitter or Facebook. If you have any questions, send email to me at info@askme4tech.com.
Windows Hyper-V Server — это бесплатная серверная версия гипервизора от Microsoft, которую можно использовать для запуска виртуальных машин. В этой статье мы рассмотрим, как установить и настроить версию Windows Hyper-V Server 2019 (инструкция также применима и к Hyper-V Server 2016).
Содержание:
- Что нового в Hyper-V Server 2019?
- Установка Hyper-V Server 2019/2016
- Утилита Sconfig: базовая настройка Hyper-V Server 2019/2016
- Удаленное управление Hyper-V Server 2019/2016
- Настройка Hyper-V Server 2019 с помощью PowerShell
Microsoft анонсировала, что не будет выпускать отдельную версию Hyper-V Server 2022. Связано с тем, что сейчас они сфокусированы на другом стратегическим продуктов Azure Stack HCI.
Hyper-V Server 2019 подходит специально для тех, кто не хочет платить за систему аппаратной виртуализации. В нем доступны все функции Hyper-V и при этом он абсолютно бесплатный. Основные преимущества Windows Hyper-V Server:
- Поддержка всех популярных ОС – совместим со всеми операционными системами. Поддержка Hyper-V присутствует во всех Windows системах, в ядре всех современных систем Linux и FreeBSD;
- Поддерживаются много способов бекапа виртуальных машин — простые скрипты, бесплатные программы, платные версии популярных программ для бекапа;
- Несмотря на то, что в Hyper-V Server отсутствует графический интерфейс управления Windows Server, вы можете управлять им удаленно через стандартную консоль управления гипервизором Hyper-V Manager или веб консоль Windows Admin Center;
- В основе Hyper-V Server популярная платформа Windows Server, с которой привычно и просто работать;
- Hyper-V можно установить на псевдоRAID – например, RAID контроллер Intel, программный RAID Windows;
- Не нужно лицензировать гипервизор – подходит для запуска VDI и виртуальных машин с Linux;
- Нетребовательность к железу – x64 процессор с поддержкой аппаратную виртуализацию (у Intel — Intel-VT или VMX, у AMD — AMD-V (SVM ) и трансляцию адресов второго уровня SLAT (Intel EPT или AMD RV). Эти опции процессора должны быть включены в BIOS/UEFI/nested host. Полные системные требования можно найти на сайте Microsoft;
- Рекомендуется устанавливать на хосты с минимум 4 Гб памяти.
Не нужно путать полноценный Windows Server 2016/2019/2022 с установленной ролью Hyper-V с Free Hyper-V Server 2019/2016. Это разные продукты.
Также отметим, что использование бесплатного гипервизора не освобождает вас от обязанности лицензировать виртуальные машин. Вы можете запустить неограниченное количество ВМ с opensource ОС типа Linux, но виртуальные машины с Windows придется лицензировать. Десктопные редакции Windows лицензируются с помощью ключа продукта. Если вы используете Windows Server в качестве гостевой ОС, его нужно лицензировать по физическим ядрам вашего хоста. Подробнее о лицензировании Windows Server при запуске в среде виртуализации смотрите здесь.
Что нового в Hyper-V Server 2019?
Вкратце пробежимся по объявленным новшествам в Hyper-V Server 2019:
- Появилась поддержка Shielded Virtual Machines для Linux;
- Версия VM конфигурации 9.0 (поддержка гибернации);
- Поддержка дедупликации для ReFS;
- Core App Compatibility – возможность запуска дополнительных графических панелей управления в консоли сервера Hyper-V;
- Поддержка 2-node Hyper-V cluster, кросс-доменной миграция кластеров.
Установка Hyper-V Server 2019/2016
Скачать ISO образ гипервизора Hyper-V Server 2019 можно https://www.microsoft.com/en-us/evalcenter/evaluate-hyper-v-server-2019.

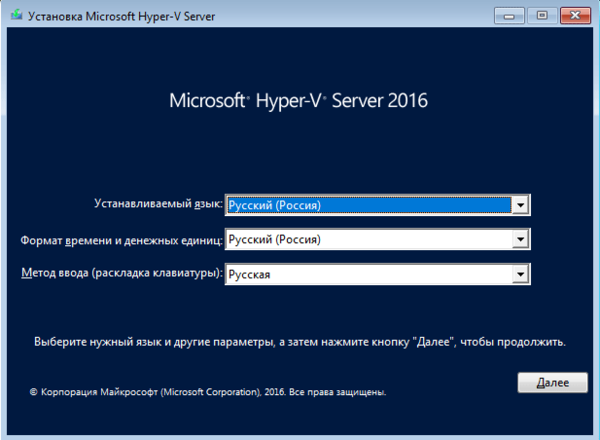
После нажатия на кнопку “Continue” откроется небольшая форма регистрации для ввода ваших данных. Заполняете, затем выбираете язык устанавливаемой системы. Настоятельно рекомендую выбрать английский. И ждете, когда закончится скачивание образа Hyper- V. Размер .iso файла около 3 ГБ.
Установка Microsoft Hyper-V Server идентична установки Windows 10/11 на компьютер. Просто загрузите ваш сервер (компьютер) с установочной USB флешки с установочным образом Microsoft Hyper-V Server (для записи ISO образа на USB накопитель проще всего использовать утилиту Rufus) и следуйте инструкциям мастера установки ОС.
Утилита Sconfig: базовая настройка Hyper-V Server 2019/2016
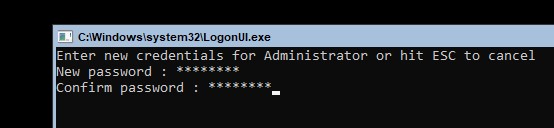
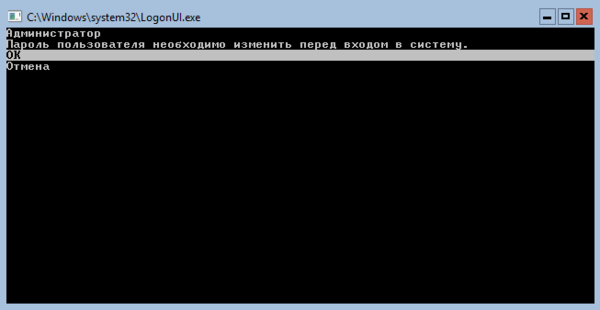
После завершения установки Hyper-V Server потребует задать пароль администратора.
После этого перед вами откроется консоль гипервизора.
Обратите внимание, что у Hyper-V Server нет привычного графического интерфейса Windows. Большинство настроек сервера придется выполнять через командную строку.
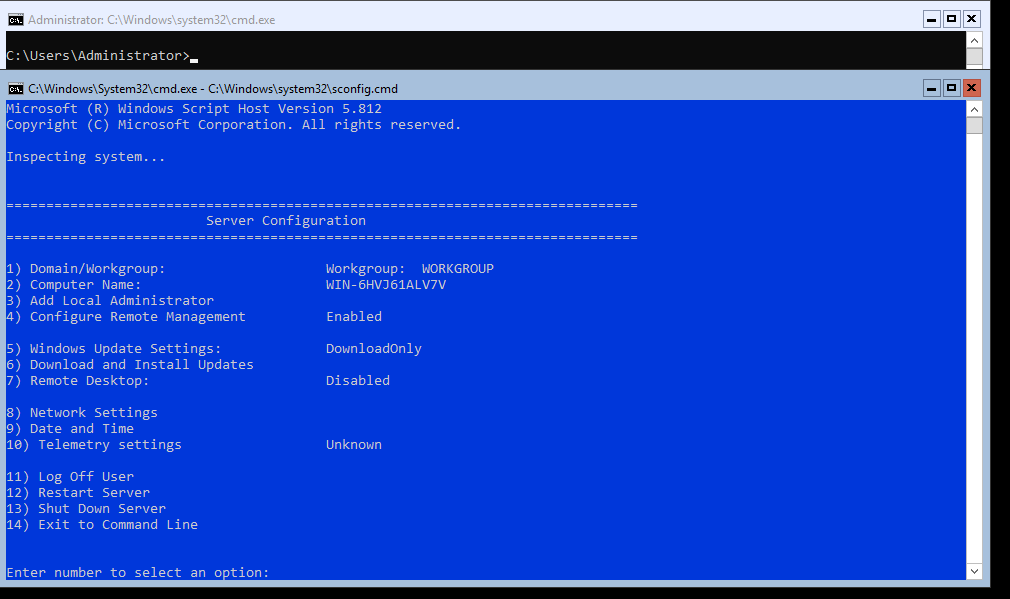
На рабочем столе два окна – стандартная командная строка и окно скрипта sconfig.cmd. С помощью данного скрипта можно выполнить первоначальную настройку сервера Hyper-V. В строке “Enter number to select an option:” введите номер пункта меню, с которым будете работать.
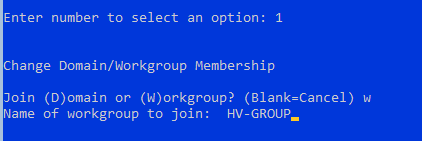
- Первый пункт меню позволяет ввести сервер в домен AD или в рабочую группу;

- Затем задайте имя хоста (сервера);
- Добавьте локального администратора (дополнительную учетную запись, помимо встроенного administrator). Обратите внимание, что при вводе пароля курсор остается на одном месте, тем не менее, пароль и его подтверждение успешно вносятся в систему;
- Включите удаленный доступ к серверу. Это позволить управлять им с помощью Server Manager, консолей MMC, PowerShell, проверить доступность с помощью ping или tracert;
- Настройте Windows Update. Выберите один из трех режимов:
- Automatic (автоматическая загрузка и установка обновлений)
- DownloadOnly (только загрузка без установки)
- Manual (решение о загрузке и установке обновлений принимает администратор)
- Загрузите и установите последние обновления Windows;
- Включите RDP доступ с или без NLA (Network Level Authentication);
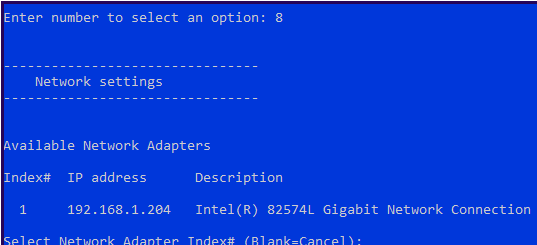
- Настройки параметры сетевых адаптеров. По умолчанию сервер получает адрес от DHCP. Обычно тут стоит указать статический IP адрес;

- Установите дату и время системы;
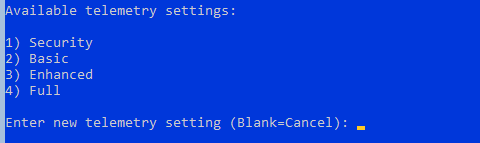
- Настройте телеметрию. Полностью ее отключить система не позволит. Выберите режим, который вам больше нравится
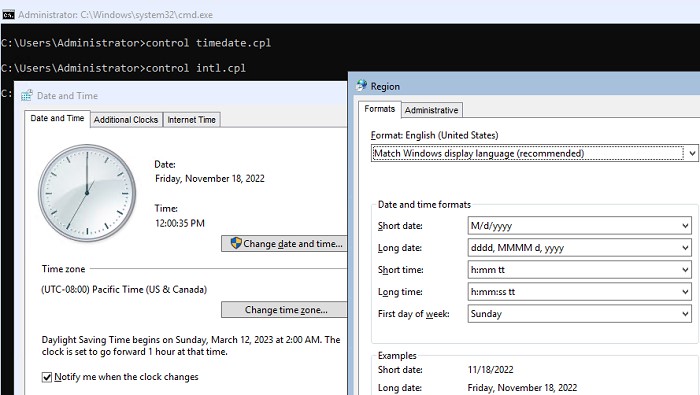
Дату, время и часовой пояс можно также настроить с помощью команды:
control timedate.cpl
Региональные параметры:
control intl.cpl
При этом открываются стандартные консоли Windows.
Внимание! Если вы закрыли все окна и оказались перед черным экраном, то нажмите Ctrl+Shift+Esc, чтобы запустить диспетчер задач данное сочетание клавиш работает в том числе и в RDP-сессии). С помощью Task Manager вы можете запустить командную строку или утилиту конфигурации Hyper-V (нажмите File -> Run Task ->
cmd.exe
или
sconfig.cmd
).
Удаленное управление Hyper-V Server 2019/2016
Для удобного управления Free Hyper-V Server 2019 из графического интерфейса вы можете использовать:
- Веб консоль Windows Admin Center (см. статью Windows Admin Center: веб-интерфейс управления серверами Windows Server);
- Стандартную консоль Hyper-V Manager – можно установить, как на Windows Server, так и на десктопных версиях Windows 10/11.
Для работы с Hyper-V Server 2016/2019 вам потребуется ПК с операционной системой Windows 10 версий Pro или Enteprise х64.
Удаленное управление Hyper-V Server с помощью Hyper-V Manager
Рассмотрим, как удаленно подключиться к хосту Hyper-V сервер с другого компьютера с помощью консоли Hyper-V Manager. В этой статье мы подразумеваем, что у вас сервер Hyper-V и компьютер с Windows 10 находятся в одной рабочей группе (WORKGROUP).
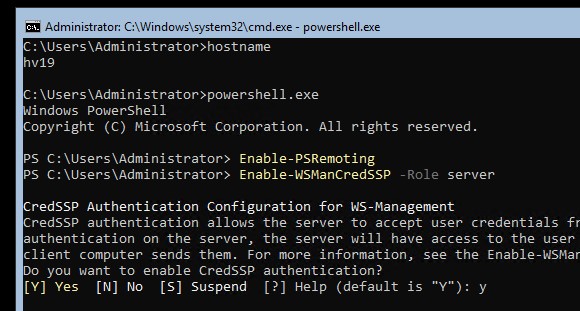
Cначала выполните настройки на сервере Hyper-V. Запустите консоль PowerShell (powershell.exe) и выполните следующие команды:
Enable-PSRemoting
Enable-WSManCredSSP -Role server
Утвердительно отвечаете на все вопросы, при этом будет настроен автоматический запуск службы WinRM и созданы разрешающие правила в брандмауэре.
Теперь переходит к настройке клиентского компьютера с Win 10.
Сервер Hyper-V должен быть доступен по своему сетевому имени, в доменной сети ему должна соответствовать A-запись на DNS-сервере. В рабочей группе такую запись потребуется нужно создать вручную на локальном DNS, либо добавить нужную запись в файл hosts (C:WindowsSystem32driversetchosts) клиентской машины. В нашем случае она выглядит следующим образом:
192.168.13.55 hv19
Можно добавить запись в файл hosts с помощью PowerShell:
Add-Content -Path "C:WindowsSystem32driversetchosts" -Value "192.168.13.55 hv19"
Добавьте Hyper-V сервер в доверенные узлы:
Set-Item WSMan:localhostClientTrustedHosts -Value "hv19"
Если учетная запись, под которой вы работаете на клиентском ПК, отличается от учетных данных администратора Hyper-V, нужно явно сохранить учетные данные для соединений с сервером в диспетчер учетных записей Windows командой:
cmdkey /add:hv19 /user:Administrator /pass:MyPa$$word
Проверьте используемый профиль сети на клиенте Windows 10. Если используется тип сети Public, ее нужно сменить на Private:
Get-NetConnectionProfile|select InterfaceAlias,NetworkCategory

Set-NetConnectionProfile -InterfaceAlias "EthernetLAN2" -NetworkCategory Private
Выполите команду:
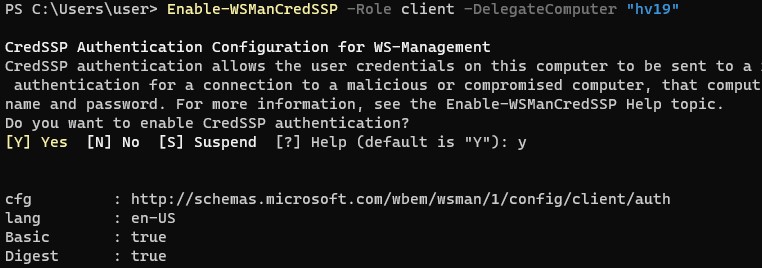
Enable-WSManCredSSP -Role client -DelegateComputer "hv19"
Теперь выполните команду
gpedit.msc
чтобы открыть редактор локальной GPO.
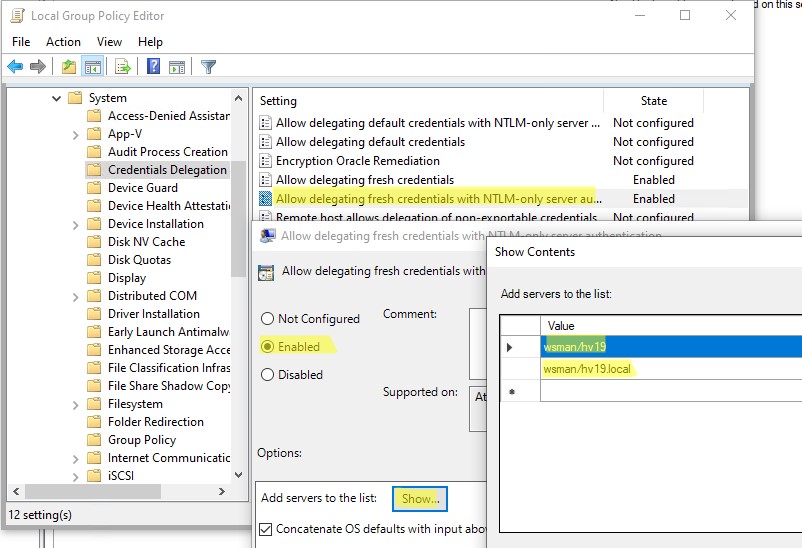
- Перейдите в раздел Local Computer Policy -> Computer Configuration -> Administrative Templates -> System -> Credentials Delegation;
- Включите параметр Allow Delegating Fresh Credentials with NTLM-only Server Authentication.
- Затем нажмите кнопку Show и добавьте два значения
wsman/hv19
и
wsman/hv19.local - Закройте консоль редактора и обновите настройки локальной групповой политики командой
gpupdate /force
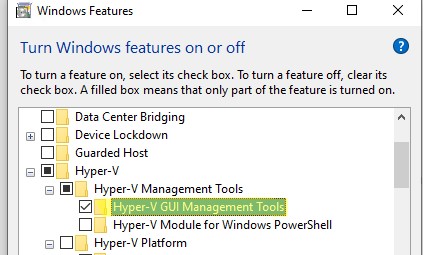
Теперь нужно установить в Windows консоль Диспетчер Hyper-V. Откройте оснастку Programs and Features и перейдите в Turn Windows Features on or off. В открывшемся окне найдите пункт Hyper-V и отметьте для установки Hyper-V GUI Management Tools.
Или вы можете установить клиент Hyper-V Manager с помощью PowerShell:
Enable-WindowsOptionalFeature -Online –FeatureName Microsoft-Hyper-V-Management-Clients
Запустите оснастку Hyper-V Manager (
virtmgmt.msc
), щелкните правой кнопкой по Hyper-V Manager и выберите Connect to Server. Укажите имя вашего сервера Hyper-V.
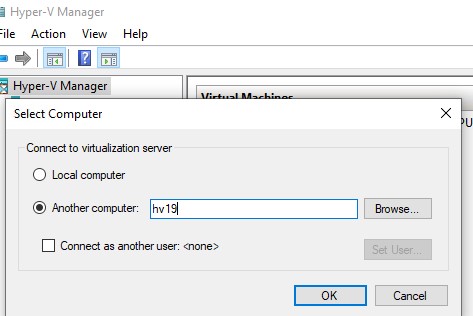
Теперь вы можете управлять настройками Hyper-V Server, создавать виртуальный машины и управлять ими из графической консоли.
Управление Hyper-V с помощью Windows Admin Center
Для удаленного управления хостом Hyper-V можно использовать Windows Admin Center (WAC). WAC это веб консоли и дашбоард для полноценного управления Windows Server, Server Core и Hyper-V Server.
На стороне Hyper-V нужно включить разрешающие правила для SMB подключений в Windows Defender Firewall:
Set-NetFirewallRule -DisplayGroup "File and Printer Sharing" -Enabled true -PassThru
Теперь нужно скачать (https://aka.ms/WACDownload) и установить агент Windows Admin Center на ваш хост Hyper-V. Скачайте WindowsAdminCenter2110.2.msi на любом компьютере Windows с доступом в интернет. Можно скопировать установочный MSI файл на Hyper-V сервер через подключение к административной шаре C$. Для этого выполните команду:
Win+R ->
\192.168.13.55C$
и введите пароль администратора Hyper-V
Создайте папку и скопируйте в нее MSI файл.
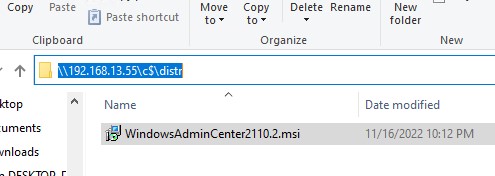
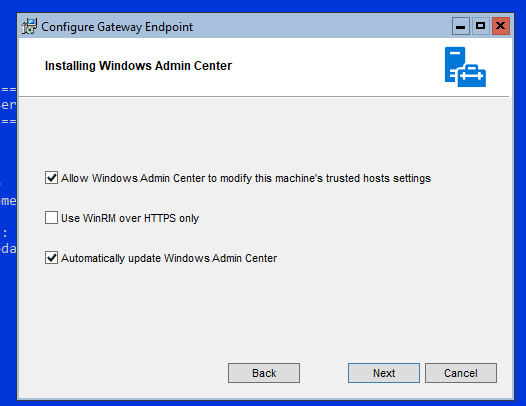
Теперь запустите установку WAC из консоли Hyper-V:
c:distrWindowsAdminCenter2110.2.msi
Установите WAC с настройками по-умолчанию.
После окончания установки вы можете подключиться к вашему Hyper-V Server из браузера, простой перейдите по адресу
https:\192.168.13.55:443
Перед вами откроется дашбоард вашего Hyper-V Server хоста. Вы увидите базовую информацию о сервере, используемых ресурсах и т.д.
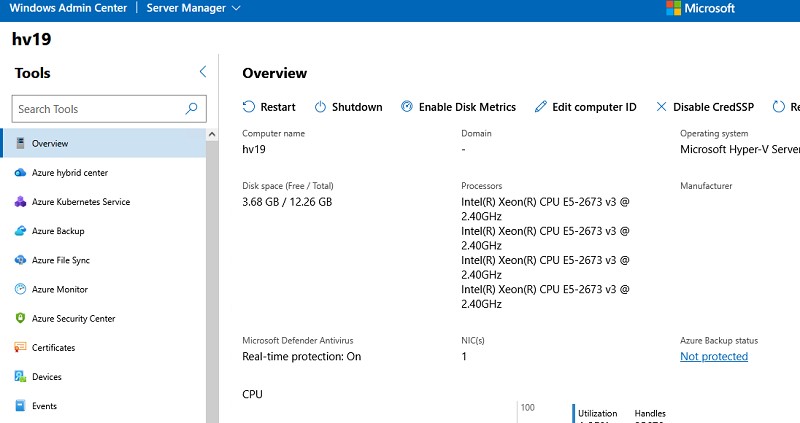
Настройки хоста Hyper-V можно задать в разделе WAC -> Settings -> Hyper-V Host Settings. Доступны следующие разделы:
- General
- Enhanced Session Mode
- NUMA Spanning
- Live Migration
- Storage Migration

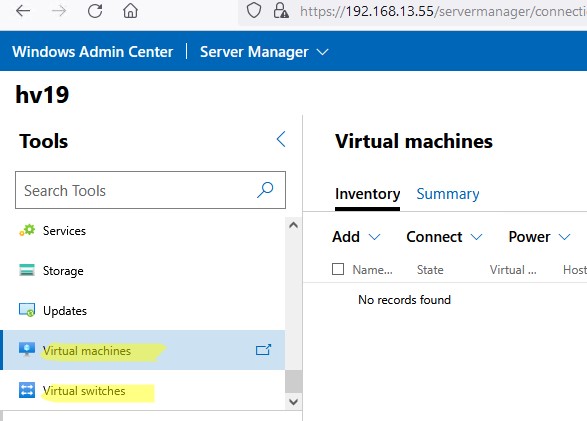
Для управления Hyper-V вы будете преимущественно использовать две секции в консоли WAC:
- Virtual Switches – нужно создать как минимум один виртуальный коммутатор, чтобы предоставить сетевой доступ для ВМ;
- Virtual Machines – в этом разделе вы можете создать, настроить, включить/выключить, импортировать/экспортировать виртуальную машину Hyper-V.
Далее я рассмотрю некоторые способы управления Hyper-V Server из PowerShell
Настройка Hyper-V Server 2019 с помощью PowerShell
Для настройки сервера рекомендую использовать PowerShell. В модуле Module Hyper-V доступно более 238 командлетов для управления сервером Hyper-V.
Get-Command –Module Hyper-V | Measure-Object
Настройте автоматический запуск консоли PowerShell (вместо cmd.exe) при входе в систему.
New-ItemProperty -path HKLM:SOFTWAREMicrosoftWindowsCurrentVersionrun -Name PowerShell -Value "cmd /c start /max C:Windowssystem32WindowsPowerShellv1.0powershell.exe -noExit" -Type string
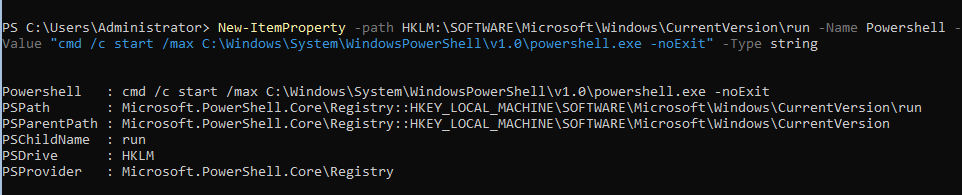
Теперь при входе в сеанс будет запускаться окно PowerShell.
Настройка параметров сети Hyper-V Server 2019 из PowerShell
Если вы не настраивали сетевые параметры в окне sconfig.cmd, то настройте их через PowerShell. С помощью командлета Get-NetIPConfiguration можно увидеть текущую конфигурацию IP сетевых интерфейсов.
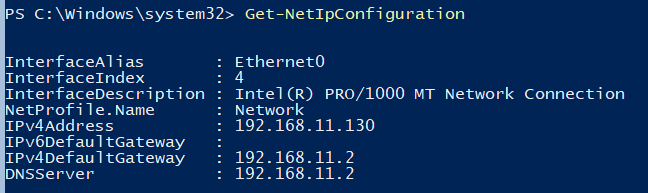
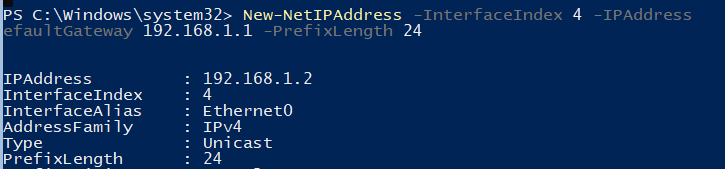
Через PowerShell назначьте статический IP адрес, маску сети, шлюз по умолчанию и адреса DNS серверов. Индекс (InterfaceIndex) сетевого адаптера берем из вывода предыдущего командлета.
New-NetIPAddress -InterfaceIndex 4 -IPAddress 192.168.1.2 -DefaultGateway 192.168.1.1 -PrefixLength 24
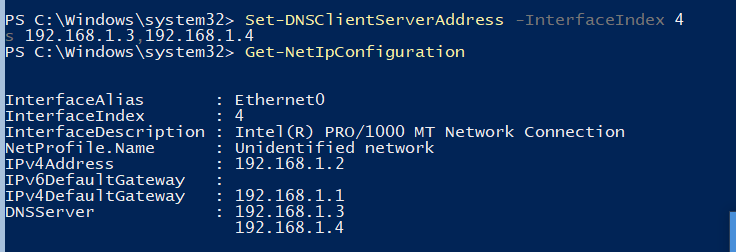
Set-DnsClientServerAddress -InterfaceIndex 4 -ServerAddresses 192.168.1.3,192.168.1.4
Для настройки IPV6 смотрим имя интерфейса командлетом Get-NetAdapter из PowerShell модуля управления сетью NetTCPIP:

Проверьте текущую настройку IPv6 следующей командой:
Get-NetAdapterBinding -InterfaceDescription "Intel(R) PRO/1000 MT Network Connection" | Where-Object -Property DisplayName -Match IPv6 | Format-Table –AutoSize

Отключить IPV6 можно так:
Disable-NetAdapterBinding -InterfaceDescription " Intel(R) PRO/1000 MT Network Connection " -ComponentID ms_tcpip6
Настройка правил Windows Defender Firewall для управления Hyper-V Server 2019
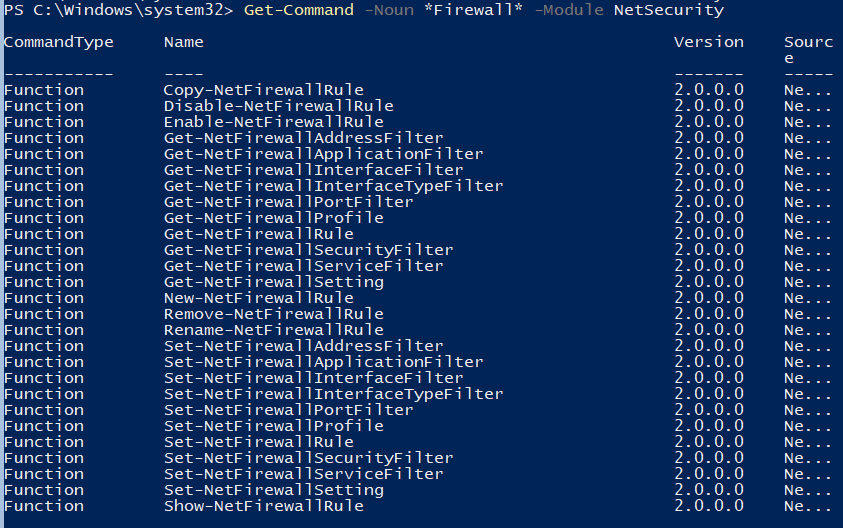
Просмотреть список командлетов для управления файерволом Windows можно с помощью Get-Command.
Get-Command -Noun *Firewall* -Module NetSecurity
Для полноценного удаленного управления сервером выполните последовательно следующие команды для включения разрешающих правил Windows Firewall из PoSh:
Enable-NetFireWallRule -DisplayName "Windows Management Instrumentation (DCOM-In)"
Enable-NetFireWallRule -DisplayGroup "Remote Event Log Management"
Enable-NetFireWallRule -DisplayGroup "Remote Service Management"
Enable-NetFireWallRule -DisplayGroup "Remote Volume Management"
Enable-NetFireWallRule -DisplayGroup "Windows Defender Firewall Remote Management"
Enable-NetFireWallRule -DisplayGroup "Remote Scheduled Tasks Management"
Создание дискового хранилища для виртуальных машин
Для хранения данных (файлов виртуальных машин и дистрибутивов) будем использовать отдельный раздел на физическом диске. Просмотрите список физических дисков на сервере.
Get-Disk
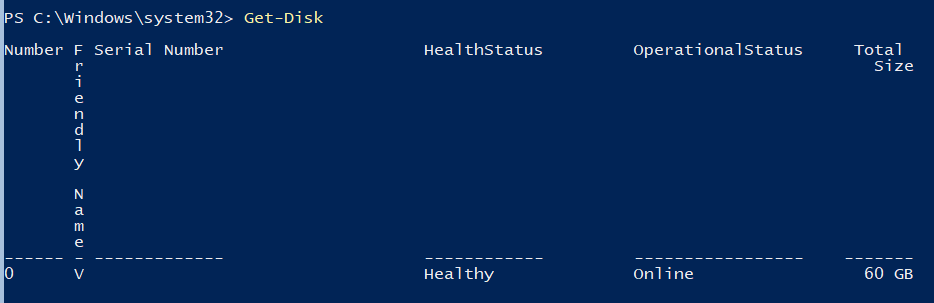
Создайте новый раздел на диске максимально возможного размера и назначьте ему букву D. Используйте DiskNumber из Get-Disk.
New-Partition -DiskNumber 0 -DriveLetter D –UseMaximumSize
После этого отформатируйте раздел в NTFS и укажите его метку.
Format-Volume -DriveLetter D -FileSystem NTFS -NewFileSystemLabel "HVStore"
Подробнее о командлетах управления дисками и разделами из PowerShell здесь.
Создайте каталог, где будете хранить настройки и файлы дисков виртуальных машин. Командлет New-Item позволяет создавать вложенные пути:
New-Item -Path "D:Hyper-VVirtual Hard Disks" -Type Directory
Создайте папку D:Distrib для хранения установоых ISO образов ОС:
New-Item -Path D:Distr -ItemType Directory
Для создания общей сетевой папки (шары) используйте командлет New-SmbShare, с помощью которого предоставьте полный доступ по сети для группы локальных администраторов сервера:
New-SmbShare -Path D:Distr -Name Distr -Description "OS Distributives" -FullAccess "BUILTINAdministrators"
Более подробно о базовой настройке Hyper-V Server и Windows Server Core из командой строки рассказано в этой статье.
Настройка параметров хоста в Hyper-V Server 2016/2019
Откроем параметры сервера командой:
Get-VMHost | Format-List

Пути виртуальных машин и виртуальных дисков находятся на одном разделе с операционной системой, что неправильно. Пропишите путь к созданным ранее папкам с помощью команды:
Set-VMHost -VirtualMachinePath D:Hyper-V -VirtualHardDiskPath 'D:Hyper-VVirtual Hard Disks'
Создание виртуального коммутатора Hyper-V
Создайте External Switch, который привязывается к сетевой карте Hyper-V Server и организует взаимодействие ВМ с физической сетью.
Проверьте поддержку SR-IOV (Single-Root Input/Output (I/O) Virtualization):
Get-NetAdapterSriov
Получите список подключенных сетевых адаптеров:
Get-NetAdapter | Where-Object -PropertyStatus –eqUp
Привяжите виртуальный свитч к сетевому адаптеру и при наличии SR-IOV включите его поддержку.
Внимание! Включить или отключить поддержку SR-IOV после создания свитча будет невозможно, для изменения этого параметра необходимо будет пересоздавать коммутатор.
New-VMSwitch -Name "Extenal_network" -NetAdapterName "Ethernet 2" -EnableIov 1
Проверить настройки виртуального коммутатора можно с помощью командлетов:
Get-VMSwitch
Get-NetIPConfiguration –Detailed
На этом первоначальная настройка Hyper-V Server 2016/2019 закончена. Можно переходить к созданию и настройке виртуальных машин.
Более подробно команды PowerShell для управления Hyper-V и виртуальными машинами описаны в этой статье.
 One of Windows Server 2016 highlights is the newer Hyper-V server that not only extends the hypervisor’s features and capabilities but also introduces a number of new enhancements and concepts that take virtualization to a new level.
There’s a lot of new exciting features we are covering so without any further delay, let’s take a look at what we have in hand for you:
- Hyper-V Hypervisor Technology Overview
- Hyper-V in Windows Server 2016
- Hyper-V Containers
- Hyper-V Security Features
- Generation2 VMs Performance and Features
- Hyper-V Backups & Checkpoints
- Hyper-V Rolling Cluster Upgrades
- Hyper-V Networking
- Hyper-V Storage
- Miscellaneous Hyper-V Improvements
- Hyper-V Requirements on Windows Server 2016
- Hyper-V Shielded Virtual Machines
- Discrete Device Management
- Hyper-V Supported Windows Guest O/S
- Linux Support
- Hyper-V Scalability
Users new to Hyper-V can also read our Introduction to Hyper-V Concepts article
Hyper-V Hypervisor Technology Overview
Hyper-V was first released in 2008 as a re-brand of Microsoft’s Virtual PC. It lets users create a virtual machine (VM), a complete, software version of a computer. Users don’t have to install an OS through the normal route, and instead run a program on top of their current one.
This is made possible by a hypervisor – a layer between the physical and virtual environments that can manage the system’s hardware between VMs. It isolates the host machine from its underlying hardware.
This opens some natural benefits. Firstly, a virtual machine is in a separate environment to the host computer. As a result, any problems that occur do not affect the regular operating system. This makes virtual machines ideal testing environments.
This is furthered by the ability to run multiple operating systems at once. Most modern computers have more hardware than needed for day to day tasks, and users can run, for example, a Windows, Windows Server, and Linux operating system simultaneously. Instead of requiring three different servers, only one is required. This cuts down on hardware, power, maintenance, and cooling costs.
It also allows for more flexible deployment. At a hefty fee, admins can purchase a Windows Datacenter license and create infinite virtual machines without having to pay any extra. In testing or production environments, this cuts out vital slowdown while employees check licenses. With virtualization, new servers can be deployed in minutes.
Another flexibility is hardware resources. Users can configure Hyper-V to utilize different amounts of resources, including the processor, storage, and memory. This is particularly useful if an organization uses a Virtual Desktop Infrastructure (VDI). A Windows operating system is hosted on a central server, and users are given virtual desktops over the network. Not only does this save on licensing costs, it means admins can scale the amount of resources users have depending on various factors.
Hyper-V also lets admins make easy backups. It’s simple to copy a VM and restore it later if anything goes wrong. With Hyper-V, there are two options – saved states, and Volume Shadow Copy Service (VSS). VSS lets admins make backups even when files are in use, meaning the process can be completed on demand.
This ease of movement can be useful in other scenarios. Built-in features like live and storage migration make virtual machines much more portable. Users can access the exact same environment on a different machine, without the need for complex procedures. That combines with security features like Secure Boot to protect the host OS from viruses, malware, and attacks.

Hyper-V in Windows Server 2016
One of the most popular hosts for a virtual machine is Microsoft’s Windows Server OS. For the past few years, admins have been running Windows Server 2012 R2, a Windows 8.1-based platform. However, the release of Windows 10 has prompted a Windows Server 2016 variant, and it comes with plenty of new functionality.
A big example is the introduction of Microsoft’s Nano Server. A purpose-built OS, Nano Server is a lightweight version of Windows Server Core that’s designed to run born-in-the-cloud applications and containers. It’s complementary to Windows Server 2016, has no GUI, and is optimized for Hyper-V. The service provides an environment with a low overhead and fewer avenues of attack.
Windows Server 2016 also introduces nested virtualization. Essentially, this lets you run a VM inside another VM. Though it’s a strange concept, the usage scenarios are more common than you may think. Many companies now use the virtual infrastructure we mentioned earlier, and this means those systems can still use Hyper-V. It also makes for a good test environment, letting trainees try out different Oss and situations without the need for separate hardware.
Other big improvements come to the Hyper-V manager. An updated WS-MAN management protocol lets admins do a live migration without having to enable extra settings in Azure Active Directory. This also enables CredSSP, Kerbos or NTLM authentication, and makes it easy to enable a host for remote management.
This is furthered by support for alternate credentials when connecting to another Windows 10 or 2016 remote host. This includes a save functionality so that you don’t have to type it every time. Though earlier versions don’t support this functionality, you can still use the Hyper-V manager in Windows Server 2016 to control earlier versions. The new manager supports Windows Server 2012, 2012 R2, Windows 8, and 8.1.
The next major change is PowerShell Direct. The process runs between the host and virtual machine, meaning there’s less need to configure firewalls and networks. It lets users remotely run cmdlets in multiple VMs without complex setup. PowerShell functionality extends to NanoServers, where it can run directly.
Hyper-V Containers
It’s no secret that containers are on the rise, and are becoming increasingly common in production scenarios. With Windows Server 2016, Microsoft has introduced Windows and Hyper-V Containers for the first time.
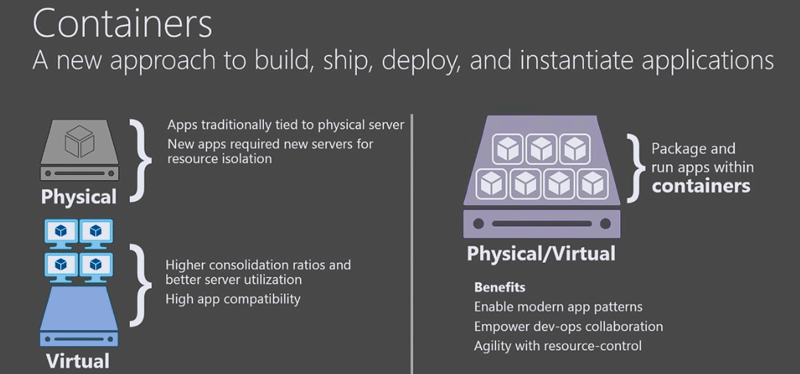
For those unfamiliar, containers let users create an isolated environment in which to run an application. The environment lets an app run without affecting the rest of the system, and vice versa. In comparison to a VM, they’re more lightweight and don’t emulate hardware in the same way.

Traditionally, containers were limited to Linux Oss. Through a collaboration with Docker, Windows Server 2016 now offers two type of containers.
- A Windows Server Container uses namespace and isolation technology, but shares a kernel with the container host and all other running containers.
- A Hyper-V container instead runs each container in an optimized VM. In this case, the kernel isn’t shared with the host, or other containers.
Windows Containers have several important features, including HTTPS support, data management through container shared folders, and the ability to restrict container resources.
Hyper-V Security Features
Hyper-V on Windows Server 2016 also comes with new security features. The first is the ability to use Secure Boot with Linux VMs. This feature was previously restricted to Windows 8 and Server 2012, and checks the signature of boot software on launch to prevent malware and unauthorized OSs launching during start up.
Host resource protection also has some security and stability improvements. It stops VMs from hogging system resources by monitoring activity and downgrading VMs with excessive usage. It can be enabled through PowerShell and prevents performance degradation with the host or other machines.
Shielded virtual machines provide further protection. In essence, they provide a stronger barrier against spying by administrators and malware. Encryption is applied to the state and data, meaning admins can’t see the activities or intercept information. This combines with further encryption options for operating system disks on generation 1 virtual machines. Users can utilize BitLocker to do this, creating a small drive that contains the encryption key. To start the machine, hosts need either access to the private key or to be part of an authorized guarded fabric.
Generation 2 Virtual Machines, Performance and Features
Generation 2 VMs have some new features, too. Namely, they can use a lot more memory and virtual processors. Gen 2 supports up to 12 TB of virtual memory versus the previous 1 TB, and up to 24 TB per physical host server. It also supports 240 Virtual Processors instead of 64, and 512 logical processors rather than 320.
The result is a huge increase in performance, suitable for large-scale online transaction processing and data warehousing. Microsoft benchmarks reveal up to 343,000 transactions per second with a 4 TB in-memory database and 128 virtual processors. That’s 95% of a physical server’s performance.

Figure 2. Physical server vs. Hyper-V performance
Generation 2 VMs also offer new, virtualization-based security. Microsoft’s Device Guard and Credential Guard offers protection against malware and operating systems in guest VMs that are version 8 or higher.
Further functionality comes with the ability to hot add and remove network adapters and memory. In simple terms, this lets users add or remove network adapters while a machine is still running. While that feature is exclusive to Gen 2, both generations can now adjust the amount of memory utilised on-the-fly, even with the “dynamic memory” option disabled.
Backups and Checkpoints
Though Hyper-V offers significantly easier backups, the VSS system can be a little unreliable. In 2016, Microsoft has built change tracking into Hyper-V, which makes it easier for third-party software vendors to create backup solutions.
However, a backup system isn’t much use if you have faulty checkpoints and snapshots. In Windows Server 2012, snapshots could cause serious problems in a production environment. Restoring a VM from a snapshot could put the database server out of sync, creating problems down the line.
Thankfully, this is remedied in Windows Server 2016. It introduces “production checkpoints”, which complies with support policies. The new checkpoints use VSS rather than saved states, greatly reducing the risks. The feature is enabled by default in Hyper-V.
Rolling Cluster Upgrades
An efficient, reliable upgrade system is equally important. Microsoft has made upgrading from 2012 R2 to 2016 far easier than previous versions. Rather than requiring a separate cluster to start the migration process, 2016 introduces rolling cluster upgrades.

This lets admins upgrade a cluster without any downtime. Clusters run at the feature level of 2012 R2 until all the nodes are upgraded, at which point the user can either reverse it or enable the 2016 features with a PowerShell cmdlet.
Networking
Further functionality is introduced to Hyper-V networking. Microsoft has enabled Remote direct memory access for switch embedded teaming (SET). This lets admins group up to eight network adapters into a single virtual one, whilst still able to use RMDA. For those unfamiliar, RDMA allows you to read and write memory without the use of a remote CPU, leading to less CPU utilization and latency.
Another new feature is Virtual machine multi queues, or VMMQ. This builds on the previous VMQ by allowing multiple hardware queues for each VM. Thus, default queues are actually a set, with traffic spread between them.
Storage
Windows Server 2016 also makes changes to storage options for a more manageable experience. Shared virtual hard disks can now be resized while the machine is still online. New functionality also extends to guest clusters, which can protect virtual hard disks with Hyper-V replica.
Microsoft has updated its storage Quality of Service policies. QoS lets admins manage and monitor storage performance using scale-out file server roles. Windows Server 2016 makes several tweaks to that system.
Storage QoS now makes sure a VM can’t take all the storage resources, cutting out other machines’ options. This combines with the ability to define performance minimum’s and maximums for individual VMs, providing a more reliable experience.
Finally, the storage of virtual machines can be monitored as soon as they start. These details are all viewable from a new, single location.
There are other options available for those struggling with storage space. Data Deduplication searches for redundant data by looking for duplicate files. The data is then sorted and compressed, optimizing the drive without compromising data integrity. Further improvements come in the form of a new VM configuration format. Vmcx files make data reading and writing more efficient, and lessen the chance of corruptions.
Miscellaneous Hyper-V Improvements
Though Windows Server 2016 introduces some major improvements, there are also smaller ones that are very interesting. One is the ability to connect PCIe hardware directly to a VM. Microsoft calls it Discrete Device Assignment and currently supports NVMe storage, allowing for fast SSD speeds.
However, more exciting is the future of PCIe in Windows Server. Microsoft is working with GPU vendors to add support for specific GPUs, which could be useful for graphic intensive programs like rendering software and Photoshop.
There’s also a minor but important feature for Always On computers. A Connected Standby power state is now available, even with the Hyper-V role installed. Connected Standby is available with select CPUs, and lets the PC listen for notifications in a similar way to phones. If a message appears, the screen will light up, notifying the user.
Hyper-V System Requirements on Windows Server 2016
Naturally, some of these new features come with hardware requirements. Though those prerequisites haven’t changed dramatically since 2012 R2, Hyper-V still won’t work with every system. This is especially true if you want to utilize new features such as shielded VM and discrete device assignment.
General Requirements
First off, the general Hyper-V requirements. You’ll need the following specifications as a base, regardless of any extra features you want:
- A processor that’s 64-bit and supports Second-Level Address Translation (SLAT). This is required for virtualization, but not for Hyper-V management tools.
- At least 4 GB of RAM, preferably more, and higher amounts for multiple VMs.
- VM Monitor Mode extensions
- Virtualization turned on in BIOS of UEFI, including hardware-assisted virtualization and hardware-enforced Data Execution prevention (DEP).
There are several ways to tell if you meet these requirements, but the easiest is through command prompt or PowerShell. You can follow these steps:
- Press Windows + R
- Type cmd.exe (powershell.exe alternatively)
- In the command line, enter Systeminfo.exe and press Enter
- View your report under Hyper-V Requirements

Hyper-V Shielded Virtual Machines
As mentioned earlier, Shielded Virtual Machines have further requirements. The host needs the following:
- UEFI 2.3.1c for secure and measured booting
- TMP v2.0 if you want platform security asset protection
- IOMMU (Intel VT – D) for direct memory access protection

In addition, VMs need to be Generation 2, and the guest operating system must be Windows Server 2016, 2012 R2, or 2012.
Discrete Device Management
The feature with the most requirements is Discrete Device Management. Hosts need supported processors, chipsets and firmware table, as follows:
- Processor: Support for Intel Extended Page Table (EPT) or AMD Nested Page Table (NPT)
- Chipset: Interrupt Remapping support, either Intel VT-d2, or AMD I/O memory management. It must also support DMA remapping and Access control services for PCI-e root ports.
- Firmware tables: I/O MMU exposure to the Windows hypervisor is a must, and needs to be enabled in UEFI or BIOS.
Hyper-V Supported Guest Operating Systems
The availability of guest operating systems also varies slightly with Windows Server 2016. While Windows Server has the best virtual processor support, other systems still provide great functionality. Here’s the full list of Windows guest operating systems and their differences:
- Windows Server 2016: 240 virtual processors (gen 2), 64 (gen 1)
- Windows Server 2012 R2: 64 virtual processors
- Windows Server 2012: 64 virtual processors
- Windows Server 2008 R2 with SP 1: 64 virtual processors
- Windows Server 2008 with SP 2: 4 virtual processors
- Windows Small Business Server 2011: 4 virtual processors (standard edition) 2 (essentials edition)
- Windows 10: 32 virtual processors
- Windows 8.1: 32 virtual processors
- Windows 7 with SP 1: 4 virtual processors (must be Professional, Enterprise, or Ultimate)
- Windows Vista with Service Pack 2 (SP2): 2 virtual processors (must be Business, Enterprise, or Ultimate)
Guest OSs also vary in the support for Integration Services. In general, Windows 8.1 (Windows Server 2012) or higher has Integration Services built-in. Other versions usually require an upgrade or install after the guest operating system is set up.
Hyper-V Linux Support
Hyper-V support for Linux is a little more complex. Microsoft provides both emulated and Hyper-V specific devices, but the performance and features of emulated devices is limited. As a result, the software giant recommends using Hyper-V specific devices for Linux, alongside its Linux Integration Services (LIS) drivers.
LIS is integrated into the Linux kernel and is regularly updated, but this may not extend to users on older distributions. Thus, some users must download LIS manually.
That said, support for Linux in Windows Server 2016 is good, and builds on previous versions. Microsoft has LIS support for the following distributions:
CentOS
- RHEL/CentOS 7.x, 64-bit
- RHEL/CentOS 6.x, 64-bit (No built-in LIS for 6.0-6.3)
- RHEL/CentOS 5.x, 32-bit (No built-in LIS before 5.9
It’s worth noting that CentOS has some feature limitations, though these can vary depending on version. There are issues with StaticIP injection across the board when Network Manager is configured for a synthetic network adapter. In addition, VLAN trunking only works in 7.x, PCI pass through and SR-IOV only work on 7.3 and higher. Live virtual machine backups aren’t possible in 5.2, 5.3, or 5.4.
Debian
- Jessie [8.0-8.5]
- Wheezy [7.0-7.11]
Debian also has some restrictions. The main one is the inability to create file systems on VHD’s larger than 2TB. There are live virtual machine backup problems here too, not working with ext2 filesystems.
Oracle
- Red Hat (No built-in LIS for 6.0-6.3)
- 6.x — 32-bit, 32-bit PAE, 64-bit
- 7.x — 64-bit
- Unbreakable Enterprise Kernel
With RedHat, VLAN trunking only works on versions 7.0-7.2. It also has issues with virtual fibre channels, where the machine may not be able to mount correctly if LUN 0 has not been populated. Both RedHat and UEK may have to undergo a filesystem check if there are open file handles during backup and may fail silently if there is an iSCSI or pass-through disk attached.
SUSE
- SLES SP2
- SLES SP1 – 64-bit only
- SLES 12 – 64-bit only
- SLES 11 SP4
- SLES 11 SP3
- SLES 11 SP2
- Open SUSE 12.3
SUSE has the same Static IP injection limitations as CentOS, so Network Manager must be turned off or configured correctly. Similarly, live backup issues mirror that of Oracle VMs. Finally, Windows Server 2016 users must type memory parameters in multiples of 128 MB or there will be Hot-Add failures and lack of a memory increase.
Ubuntu
- 16.10
- 16.04
- 14.04
- 12.04
Ubuntu suffers from some of the limitations mentioned earlier. Specifically, there are static IP injection problems with Network Manager, virtual fibre channel issues if LUN 0 isn’t populated (except for 12.04), and similar problems with live backups in 14.04+.
It’s worth noting that most of these problems can be solved by proper configuration. It’s worth checking the TechNet documentation for a full list of issues and solutions for each version. Microsoft also has some best practices for running Linux on Hyper-V.
Hyper-V Scalability
Other than OS and feature support, Hyper-V varies in its scalability. While we have mentioned some of the virtual hardware increases in Gen 2 VMs, there are other factors to consider too. Here are the maximum numbers for each virtual machine component:
- Checkpoints: 50
- Memory: 12 TB for Gen 2, 1 TB for Gen 1
- Serial ports: 2
- Virtual Fibre Channel adapters: 4
- Virtual Floppy devices: 1
- Virtual hard disk capacity: 64 TB VHDX, 2040 GB VHD
- Virtual IDE disks: 4
- Virtual processors: 240 for Gen 2, 64 for Gen 1, 320 for host OS
- Virtual SCSI controllers: 4
- Virtual SCSI disks: 256
- Virtual network adapters: 12 (8 Hyper-V specific, 4 legacy)
There are also some limitations for each Hyper-V host, though many components are uncapped:
- Logical processors: 512 (320 for host OS partition)
- Memory: 24 TB
- Virtual machines per server: 1024
- Virtual processors per server: 2048
Finally, Hyper-V has some Failover Clustering maximums. There’s a maximum of 64 nodes per cluster, so admins need to be aware of that when planning. There’s also an 8,000 per cluster limit for running virtual machines. However, this can vary significantly depending on the use of physical memory by each VM, number of disk spindles, and networking and storage bandwidth.
Conclusion
Windows Server 2016 takes many of the traditional advantages of virtualization and extends them. With its latest release, Microsoft has managed to provide major increases in performance, security, and management without complex system requirements or lack of OS support.
The Redmond giant’s latest server OS brings huge improvements in the form of Nano Servers, Containers, Shielded VMs, and hardware virtualization. The result is an undeniably better operating system for hosting Hyper-V machines.
However, there are still some possible issues admins should be aware of. Windows Server 2016 collects telemetry data by default, and there’s no option to turn it off entirely. It consists of security information, basic device information, how apps are used, and more. Naturally, all this data is anonymised and is used to create significant improvements. Still, some users may not be happy with this change from 2012 R2.
Microsoft is moving to a different update model with 2016, which can be positive in some cases but negative in others. The company rolls out two updates per month, one with security fixes and another with quality fixes. Each falls on a different day of the month.
On the plus side, this removes the issue of security updates being unnecessary once the quality update rolls out. The annoyance comes from the automatic updates and restarts that are enabled by default. Naturally, admins don’t want their server restarting without their express permission, and it’s not uncommon for updates to cause an issue with certain applications. Though this can be configured in 2016, it’s not as simple as previous versions.
Despite this, Windows Server 2016 remains a huge step forward for Hyper-V virtualization. It introduces some great new virtualization features, and its fleshed out free version makes it a natural choice for small businesses.
Back to Windows Server 2016 Section
 Продолжая тему виртуализации на основе Hyper-V в данном материале мы рассмотрим установку и настройку бесплатного гипервизора Hyper-V Server 2016. Основным отличием этой версии от Hyper-V как роли Windows Server является его полная бесплатность — вам не требуются лицензии на серверную версию ОС и благодаря минимальному числу служб повышается стабильность, уменьшается возможный периметр атаки и сокращаются затраты на обслуживание. За это приходится платить более сложным процессом установки и настройки о которых мы расскажем в данной статье.
Научиться настраивать MikroTik с нуля или систематизировать уже имеющиеся знания можно на углубленном курсе по администрированию MikroTik. Автор курса, сертифицированный тренер MikroTik Дмитрий Скоромнов, лично проверяет лабораторные работы и контролирует прогресс каждого своего студента. В три раза больше информации, чем в вендорской программе MTCNA, более 20 часов практики и доступ навсегда.
На момент написания данной статьи Hyper-V Server 2016 является предпоследней версией гипервизора, однако в Hyper-V Server 2019 были обнаружены ошибки и релиз был отозван, в настоящий момент он недоступен для скачивания. А с учетом здоровой консервативности, версию 2016 можно смело рассматривать как основной гипервизор для современных внедрений, актуальность которого будет сохраняться еще как минимум в течении года — полутора, пока в новой версии найдут и исправят все ошибки, а также отшлифуют огрехи.
Получить Hyper-V Server 2016 можно на официальном сайте, для скачивания вам потребуется учетная запись Microsoft, либо будет необходимо заполнить небольшую анкету. При этом мы настоятельно не рекомендуем скачивать установочный образ из иных, непроверенных источников.
Установка и первоначальная настройка Hyper-V Server
Мы не будем подробно останавливаться на процессе установки — он ничем не отличается от установки других продуктов Microsoft и не должен вызвать каких-либо сложностей.
 При первой загрузке вы попадете в интерфейс командной строки, в которой вам предложат изменить пароль Администратора, будьте внимательны, в русской системе по умолчанию активирована русская раскладка.
 После чего нас встретит уже знакомый с версии Hyper-V Server 2012 текстовый интерфейс конфигурации сервера.
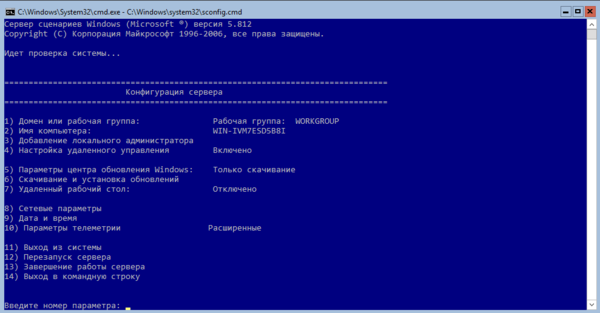
Если вы случайно закрыли это окно, то повторно его можно вызвать командой:
sconfigЕсли же вы закрыли все окна и оказались перед пустым экраном, то нажмите Ctrl+Shift+Esc, данное сочетание клавиш работает в том числе и в RDP-сессии и вызывает диспетчер задач, с помощью которого вы можете запустить командную строку или утилиту конфигурации.
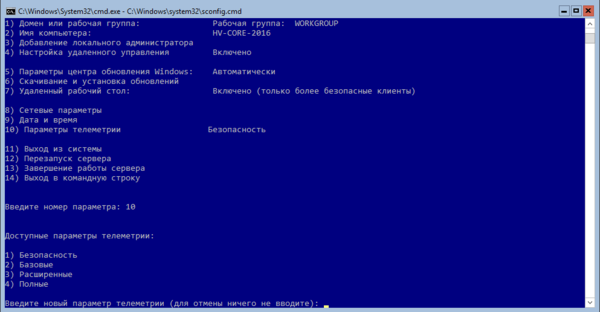
Далее идем практически по порядку. Но первым шагом следует изменить имя сервера на что-нибудь более информативное и удобное, в нашем случае это будет HV-CORE-2016. Затем, при необходимости, изменяем рабочую группу или присоединяем сервер к домену. Также рекомендуется добавить локального администратора, чтобы не использовать встроенную учетную запись.
Если вы хотите, чтобы ваш сервер отвечал на пинги, то следует явно разрешить такое поведение в пункте 4) Настройка удаленного управления, которое также должно быть включено.
 Следующий пункт — Параметры центра обновления Windows имеют по умолчанию настройку Только скачивание, это означает, что установку обновлений вам надо будет запускать вручную. Если ваши виртуальные машины не предполагают режима работы 24/7 есть смысл рассмотреть вариант настройки Автоматически, тем более новая система обновлений предусматривает получение накопительного пакета один раз в месяц.
Затем включаем удаленный рабочий стол (пункт 7) и настраиваем сетевые параметры (пункт  . Отдельным пунктом нас ожидает телеметрия (куда же без нее), полностью отключить ее невозможно, поэтому устанавливаем минимальный уровень — Безопасность.
 После того, как вы настроили сеть дальнейшую работу с сервером удобнее производить по RDP, как минимум это позволить вам просто скопировать некоторые длинные команды. Но перед тем, как двигаться дальше следует скачать и установить доступные обновления (пункт 6).
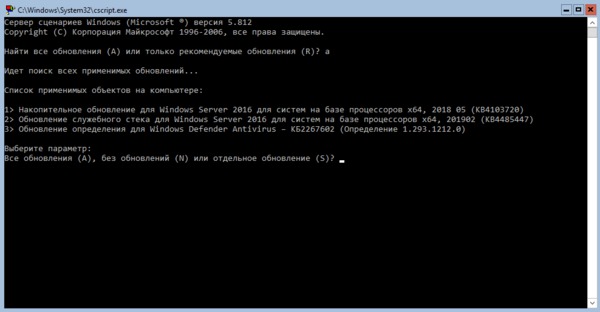 В этом выпуске разработчики учли свои ошибки (в версии 2012 требовалось указывать совсем иные буквы, нежели было написано) и все параметры соответствуют указанным на экране, также, во избежание разночтений, используются только буквы латинского алфавита. Обновлений немного, всего три пакета, однако накопительный пакет старый — май 2018. Поэтому после установки обновлений их поиск следует повторить.
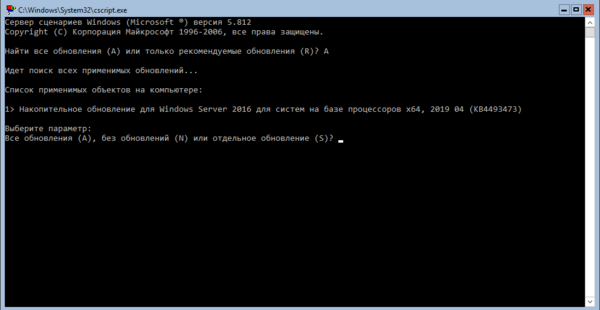 Действительно, теперь нам стал доступен последний накопительный пакет. Данный пример очень хорошо иллюстрирует все достоинства новой модели обновления. Чтобы привести в актуальное состояние систему, выпущенную более 2,5 лет назад, нам потребовалось всего четыре пакета обновления и менее часа времени.
Для полноценного удаленного управления данным сервером нужно включить соответствующие правила брандмауэра, для этого выйдем в командную строку и запустим оболочку PowerShell:
powershellЦвет окна при этом останется черным, но в начале приглашения командной строки появятся буквы PS. Затем последовательно выполним следующие команды:
Enable-NetFireWallRule -DisplayName "Инструментарий управления Windows (DCOM - входящий трафик)"
Enable-NetFireWallRule -DisplayGroup "Удаленное управление журналом событий"
Enable-NetFireWallRule -DisplayGroup "Удаленное управление Windows"
Enable-NetFireWallRule -DisplayGroup "Удаленное управление томами"
Enable-NetFireWallRule -DisplayGroup "Удаленное управление брандмауэром Windows"
Enable-NetFireWallRule -DisplayGroup "Удаленное управление назначенными задачами"
для англоязычного выпуска Hyper-V эти команды будут выглядеть следующим образом:
Enable-NetFireWallRule -DisplayName "Windows Management Instrumentation (DCOM-In)"
Enable-NetFireWallRule -DisplayGroup "Remote Event Log Management"
Enable-NetFireWallRule -DisplayGroup "Remote Service Management"
Enable-NetFireWallRule -DisplayGroup "Remote Volume Management"
Enable-NetFireWallRule -DisplayGroup "Windows Firewall Remote Management"
Enable-NetFireWallRule -DisplayGroup "Remote Scheduled Tasks Management"
На этом настройку сервера можно считать законченной, и мы перейдем к настройке клиентского ПК.
Настройка клиента для работы с Hyper-V Server
Для работы с Hyper-V Server 2016 вам потребуется ПК с операционной системой Windows 10 версий Pro или Enteprise х64, иные редакции или 32-х разрядные версии не подойдут, так как в них нет возможности установить диспетчер Hyper-V.
Прежде всего проверим, что сервер доступен по своему сетевому имени, в доменной сети ему должна соответствовать A-запись на DNS-сервере, в одноранговой сети такую запись потребуется создать вручную на локальном DNS, либо добавить нужную запись в файл hosts клиентской машины, в нашем случае она выглядит следующим образом:
192.168.16.146 HV-CORE-2016Если учетная запись под которой вы работаете на клиентском ПК отличается от учетных данных администратора Hyper-V, а это практически всегда так, даже если вы работаете в доменной сети (мы надеемся, что вы не используете в повседневной деятельности учетку Администратора домена), то следует явно указать учетные данные для соединений с сервером командой:
cmdkey /add:HV-CORE-2016 /user:Администратор /pass:MyPa$$wordВ особых пояснениях данная команда не нуждается, мы указали сетевой узел и учетные данные для подключения к нему. Если вы будете подключаться к нескольким серверам, то необходимо выполнить данное действие для каждого из них.
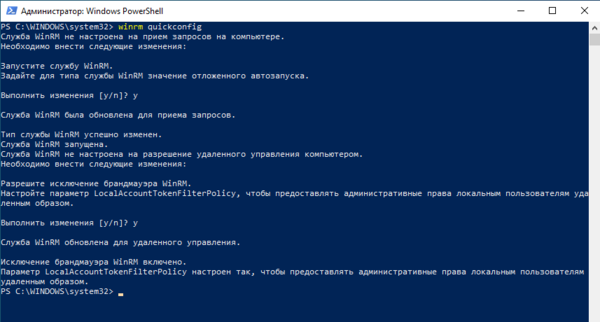
Теперь запустим консоль PowerShell от имени Администратора и выполним следующую команду:
winrm quickconfigУтвердительно отвечаем на все вопросы, при этом будет настроен автоматический запуск службы WinRM и созданы разрешающие правила в брандмауэре.
 После чего добавим наш сервер в доверенные узлы:
Set-Item WSMan:localhostClientTrustedHosts -Value "HV-CORE-2016"Если серверов несколько — добавляем в доверенные каждый из них.
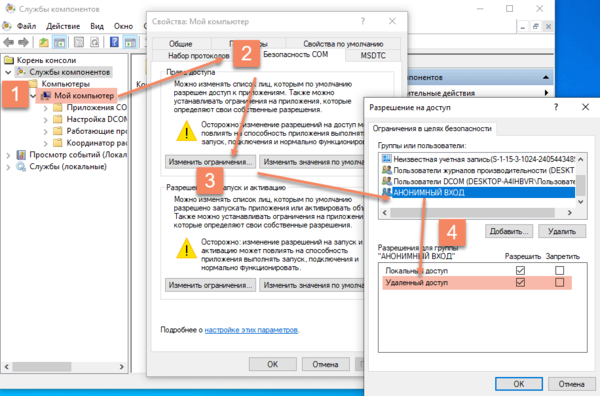
Теперь через командную строку или команду Выполнить (Win + R) запустим оснастку dcomcnfg, в ней разверните дерево Службы компонентов — Компьютеры — Мой компьютер. После чего по щелчку правой кнопки мыши выберите Свойства и перейдите на закладку Безопасность COM — Права доступа — Изменить ограничения и в открывшемся окне установите для пользователя АНОНИМНЫЙ ВХОД права Удаленный доступ.
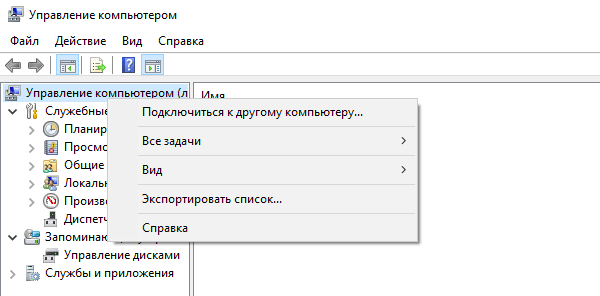
 Теперь попробуем подключиться к удаленному серверу. Запустите оснастку Управление компьютером и щелкнув правой кнопкой на верхнем уровне выберите Подключиться к другому компьютеру.
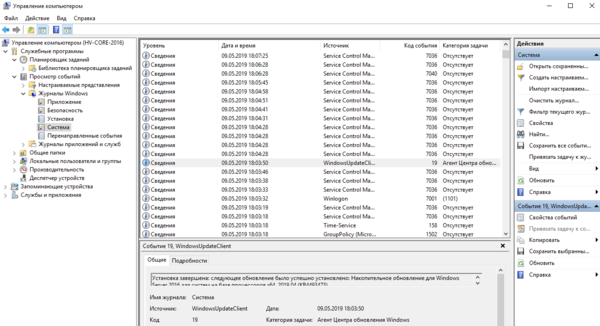
 После чего вы сможете управлять удаленным сервером используя привычные инструменты. Можно просмотреть журнал событий:
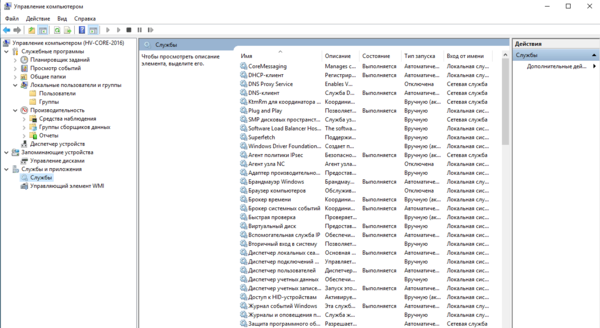
 Управлять заданиями планировщика, дисками, службами:
 Единственной недоступной оснасткой останется Диспетчер устройств, при желании его можно включить, но особого смысла в этом нет, так как он будет доступен только на чтение.
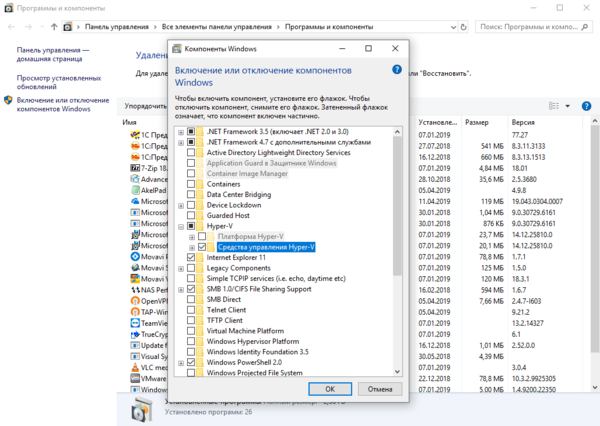
Теперь установим Диспетчер Hyper-V, для этого откроем оснастку Программы и компоненты и перейдем во Включение или отключение компонентов Windows. В открывшемся окне найдем пункт Hyper-V и отметим для установки Средства управления Hyper-V.
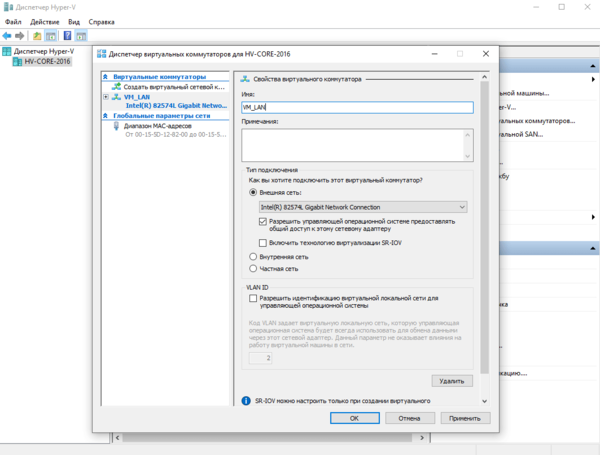
 После чего запустим установленную оснастку и подключимся к серверу Hyper-V. В первую очередь обеспечим связь наших виртуальных машин с внешним миром, для этого перейдем в Диспетчер виртуальных коммутаторов и создадим новый коммутатор с типом Внешний и укажем для него ту сетевую карту, которая смотрит в локальную сеть. Более подробно о настройке сети в Hyper-V вы можете прочитать здесь.
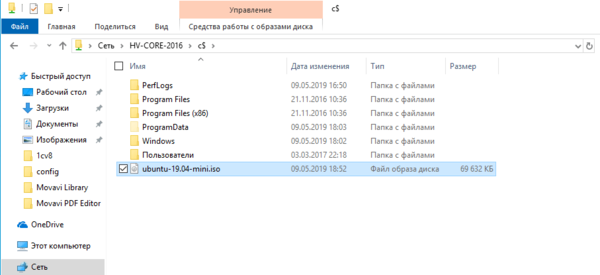
 Для того, чтобы установить ОС на виртуальную машину нам потребуется передать на сервер Hyper-V установочный образ, это можно легко сделать через подключение к стандартным общим ресурсам, например, набрав в адресной строке проводника:
\HV-CORE-2016C$мы попадем на диск C сервера.
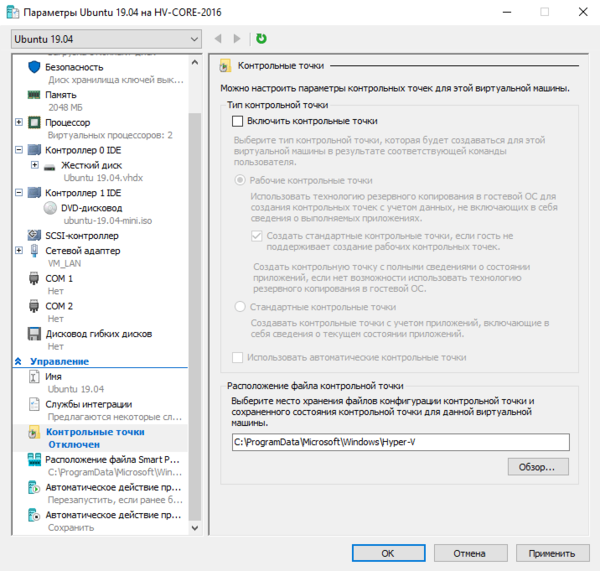
 Мы не будем подробно рассматривать процесс создания новой виртуальной машины, но обратим внимание на некоторые моменты. Прежде всего Снимки они же Контрольные точки, это удобно для целей настройки и тестирования, но не следует использовать их в продакшене, поэтому использование снимков у рабочих виртуальных машин следует отключить (можно оставить на период настройки, но обязательно выключить перед вводом в эксплуатацию).
 Также обязательно настройте поведение виртуальной машины при перезагрузке сервера. Для этого в пунктах Автоматическое действие при запуске и Автоматическое действие при завершении укажите желаемое поведение. Обратите внимание, что при выборе пункта Сохранять состояние виртуальной машины следует проверить поведение прикладного ПО в этом режиме, так как не все приложения корректно ведут себя при выходе виртуальной машины из этого режима.
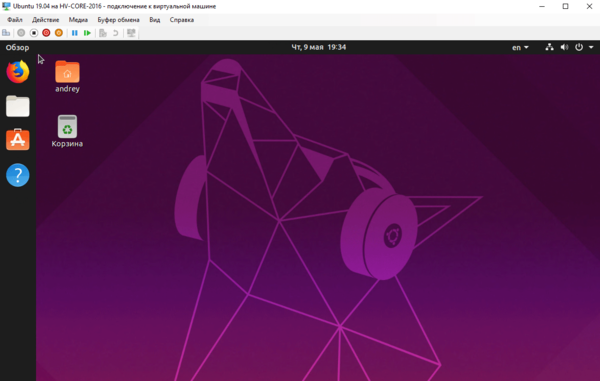
Для примера мы создали новую виртуалку и без каких-либо проблем установили туда свежую Ubuntu 19.04.
 Как видим, работа с Hyper-V Server 2016 не доставляет никаких сложностей, достаточно лишь один раз выполнить ряд действий по настройке сервера и клиента, в чем вам поможет данная статья.
Научиться настраивать MikroTik с нуля или систематизировать уже имеющиеся знания можно на углубленном курсе по администрированию MikroTik. Автор курса, сертифицированный тренер MikroTik Дмитрий Скоромнов, лично проверяет лабораторные работы и контролирует прогресс каждого своего студента. В три раза больше информации, чем в вендорской программе MTCNA, более 20 часов практики и доступ навсегда.