В этой статье мы создадим виртуальную машину с Windows Server 2019 и развернем там Hyper-V Server. Попутно разберемся что нового появилось в этой версии.
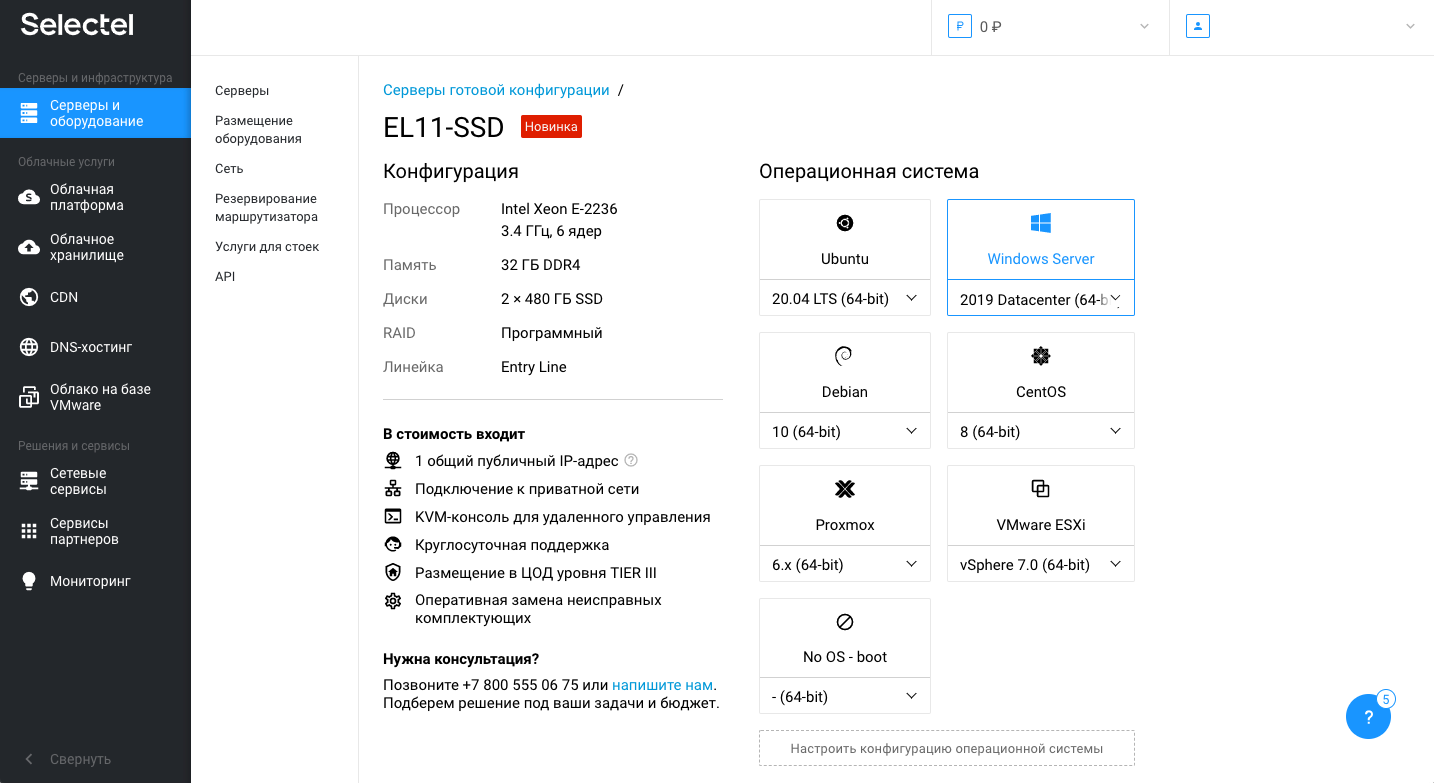
Hyper-V — это платформа виртуализации от Microsoft, которая распределяет ресурсы одного физического сервера между набором виртуальных серверов. Чтобы создать среду для Hyper-V Server 2019, закажем выделенный сервер. Для этого в меню Серверы и оборудование выберем нужный сервер.
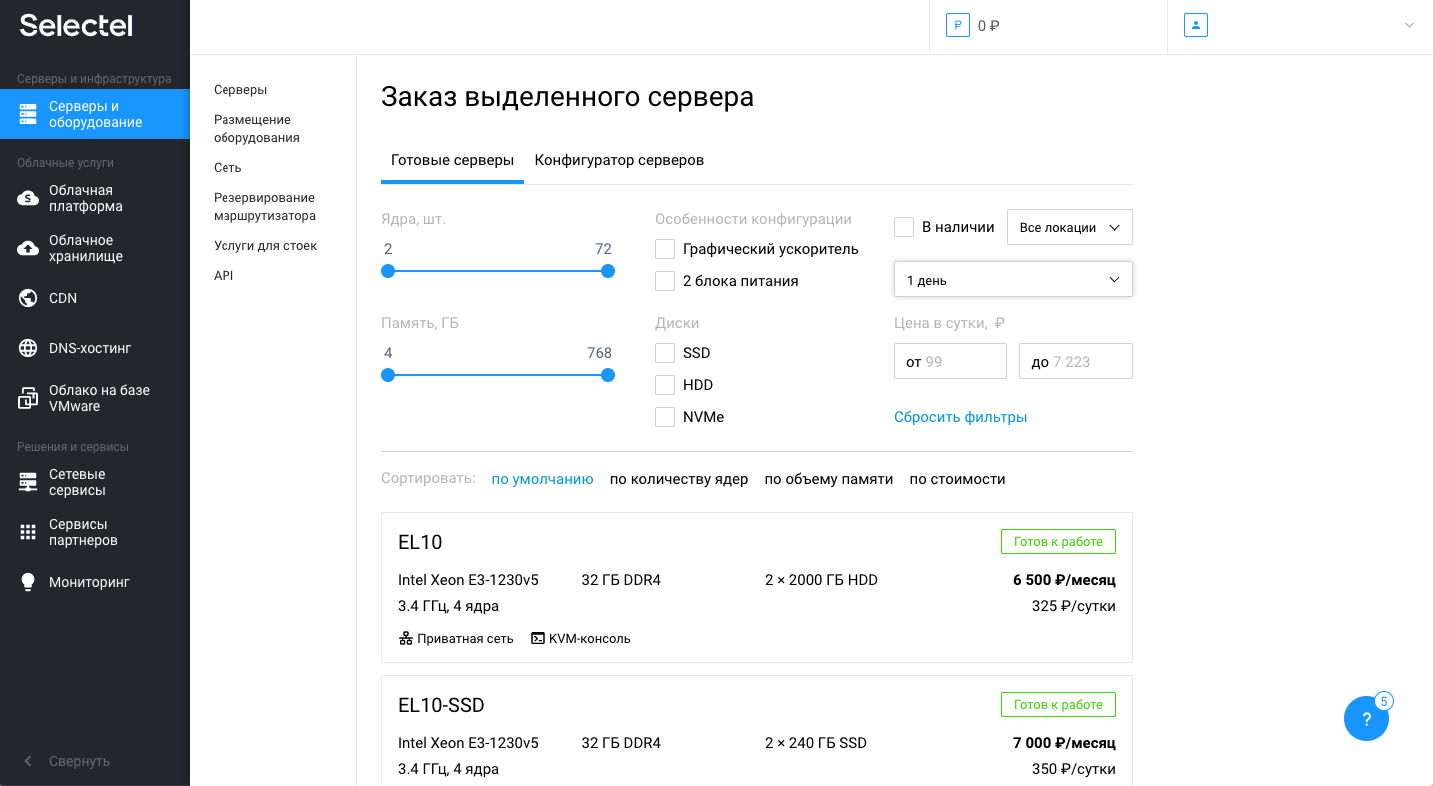
В нашем примере — это сервер по тарифу EL11-SSD с процессором Intel® Xeon® E-2236 3.4 ГГц, ОЗУ 32 ГБ DDR4 и двумя дисками SSD по 480 ГБ каждый. Далее выбираем операционную систему Windows 2019 — подойдут версии 2019 Datacenter (64-bit) и 2019 Standard (64-bit). В обоих случаях можно добавить роль Hyper-V.
Далее нажимаем Заказать и Оплатить. Деньги списываются с личного счёта.
Установка сервера занимает время, поэтому, чтобы его не тратить впустую, расскажем о новых функциях в Windows Server 2019 относительно Hyper-V.
Любопытная особенность Hyper-V Server 2019 — это то, что первоначально эта версия была Hyper-V Server 2016 R2, вышедшая в конце 2018 года. Но из-за неприемлемого количества багов, она была отозвана и полноценно вышла уже в 2019 году под новой версией. А теперь, давайте разберем нововведения данного релиза.
Во-первых — это обновленная консоль администратора Windows Admin Center (WAC). Теперь она доступна через веб-интерфейс. Из браузера стало возможным управлять виртуальными машинами, сервисами на них, запускать скрипты PowerShell, инициировать RDP-сессии и выполнять прочие операции. Во-вторых, появилась возможность работать с окружением Linux. Работает через специальный слой совместимости Windows Subsystem for Linux (WSL) на уровне ядра ОС. Таким образом, можно запускать bash-скрипты или бинарные файлы ELF без необходимости входа на виртуальный сервер через консольный клиент (например, Putty или SecureCRT).
Во-вторых, улучшились механизмы безопасности. Windows Defender теперь имеет на борту поддержку Advanced Threat Protection. Этот механизм умеет блокировать доступ к файлам и папкам из недоверенных источников (например, для защиты от вирусов-шифровальщиков), защищает от вредоносных процессов, сетевых атак, а также поддерживает шифрование сетевых соединений между виртуальными машинами.
В-третьих, улучшилась поддержка экранированных виртуальных машин. Теперь внутри них можно запускать Linux-подобные системы: RHEL, SUSE, Ubuntu. Кроме этого, такими машинами теперь можно управлять при помощи VMConnect и PowerShell Direct.
В-четвертых, появилась служба миграции хранилища. Этот инструмент позволяет мигрировать с устаревших версий Windows Server: 2003, 2008 или 2012. Можно мигрировать даже AD со всеми пользователями и настройками.
В-пятых и далее: улучшились инструменты репликации, работа с географически распределенными серверами, функции дедупликации, появилась поддержка Kubernetes и многое другое. Подробнее о нововведениях можно узнать на соответствующей странице Microsoft.
А пока мы рассказывали о новых возможностях гипервизора, установка сервера завершилась и можно приступать к настройке Hyper-V.
Как установить Hyper-V Server 2019
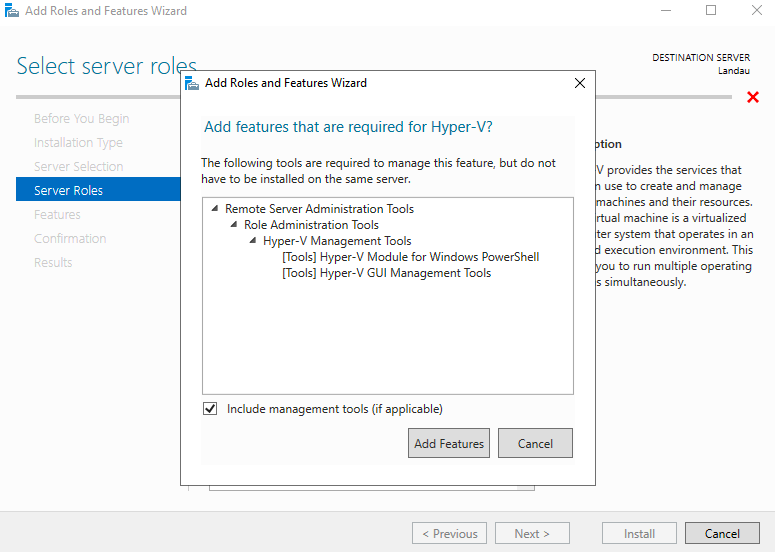
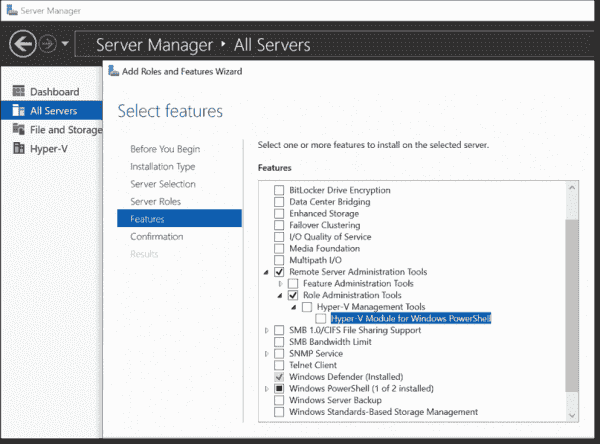
Для установки Hyper-V в образе Windows Server есть соответствующая роль, которую нужно активировать. Для этого откроем консоль управления сервером и нажмем Add Roles and Features. Появится меню, в котором нужно выбрать Hyper-V.
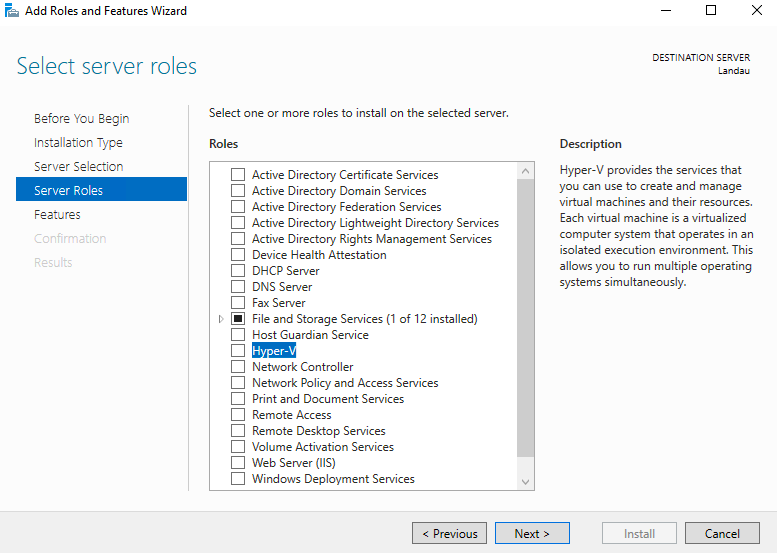
Далее нажать на Add Features для добавления необходимых инструментов.
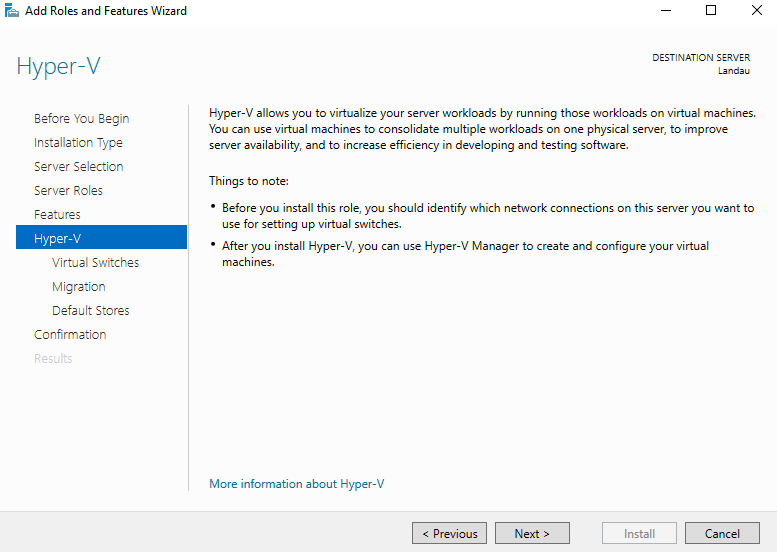
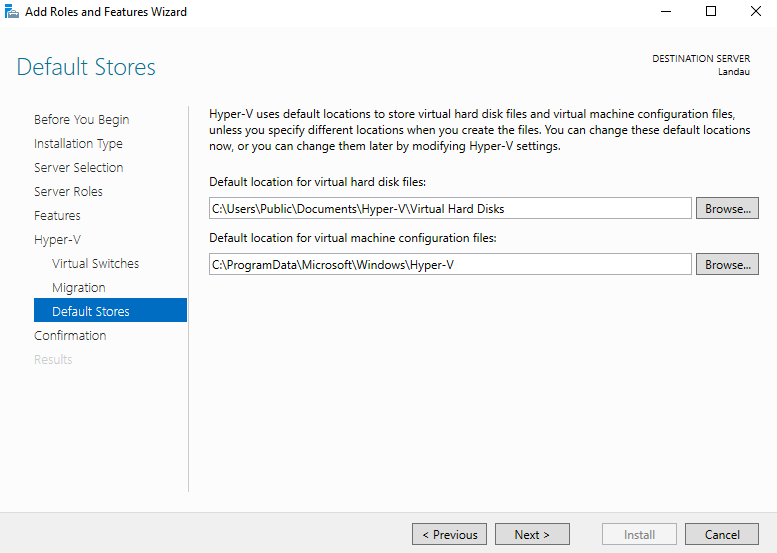
Далее нужно настроить роль Hyper-V: Virtual Switches, Migration и Default Stores.
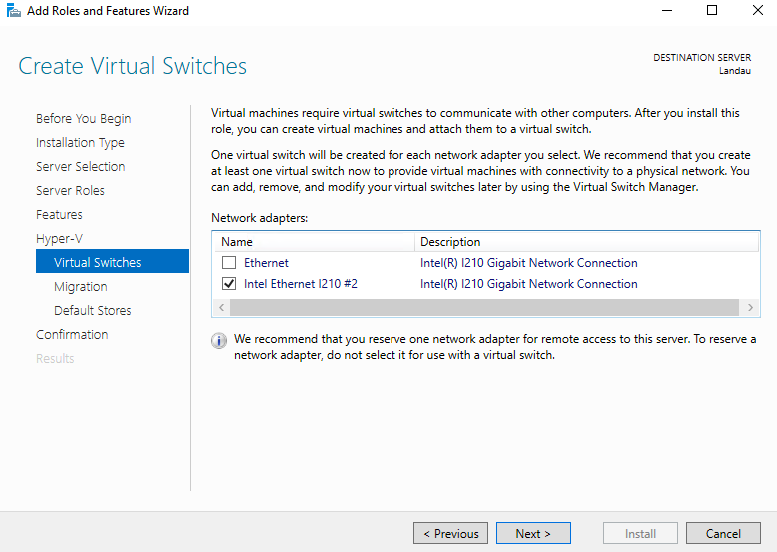
На экране Virtual Switches нужно выбрать сетевой интерфейс, который будет использоваться платформой виртуализации в качестве виртуального коммутатора. В нашем примере — Intel Ethernet l210 #2. Важно не задействовать под это основной сетевой интерфейс, который будет использоваться для физического доступа к управлению сервером.
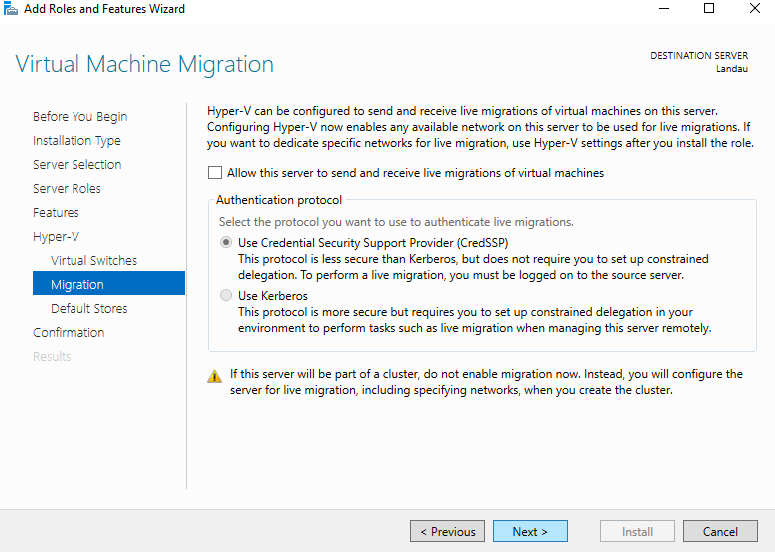
Следующая настройка — Migration. Для целей демонстрации здесь можно оставить всё по умолчанию.
Default Stores — также оставляем по умолчанию.
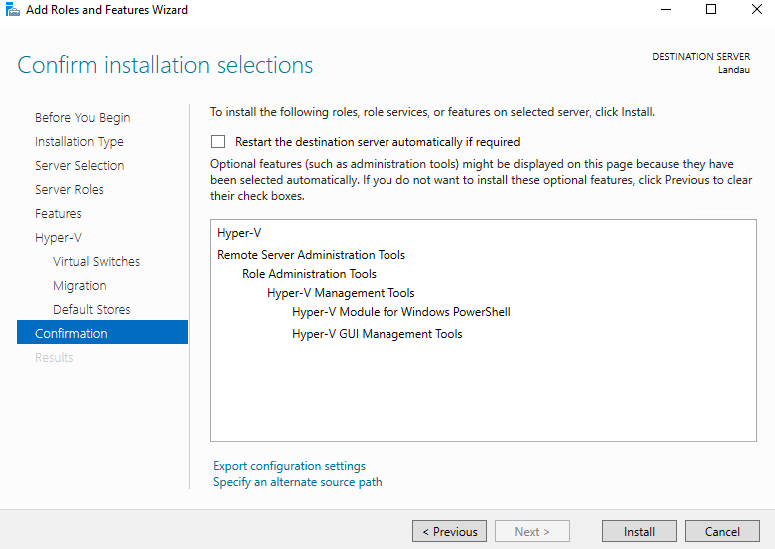
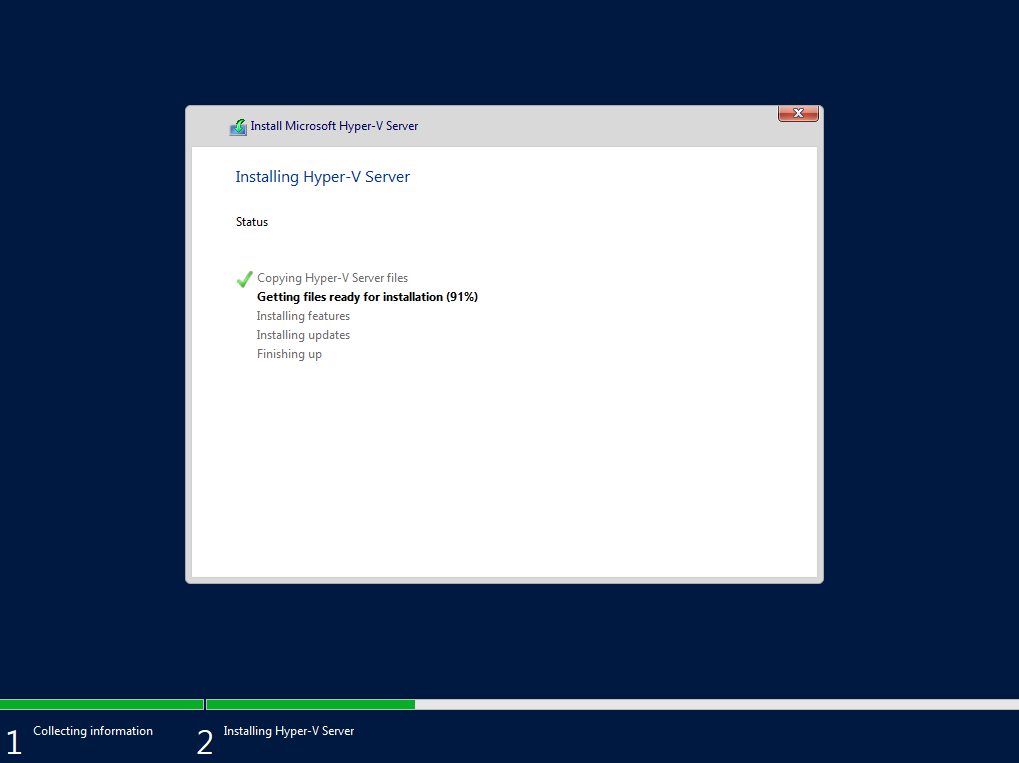
Когда всё готово к установке — можно нажимать кнопку Install. После завершения установки потребуется перезагрузка.
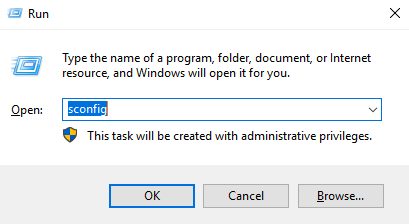
После перезагрузки сервера, через командную строку можно открыть утилиту sconfig и посмотреть возможные настройки Hyper-V Server. Об этом в следующем разделе.
Как настроить Hyper-V Server утилитой sconfig
Утилита sconfig имеет интерфейс командной строки.
Важными пунктами являются:
- Domain/Workgroup — настроено при создании сервера.
- Computer Name — настроено при создании сервера.
- Configure Remote Management — включено. Опция нужна для удалённого управления сервером с Hyper-V через специальные утилиты или PowerShell.
- Remote Desktop — включено. Опция нужна для возможности удаленного управления сервером.
- Network Setting — это сетевые настройки виртуального коммутатора, которые уже были выполнены на этапе установки роли Hyper-V на шаге Virtual Switches.
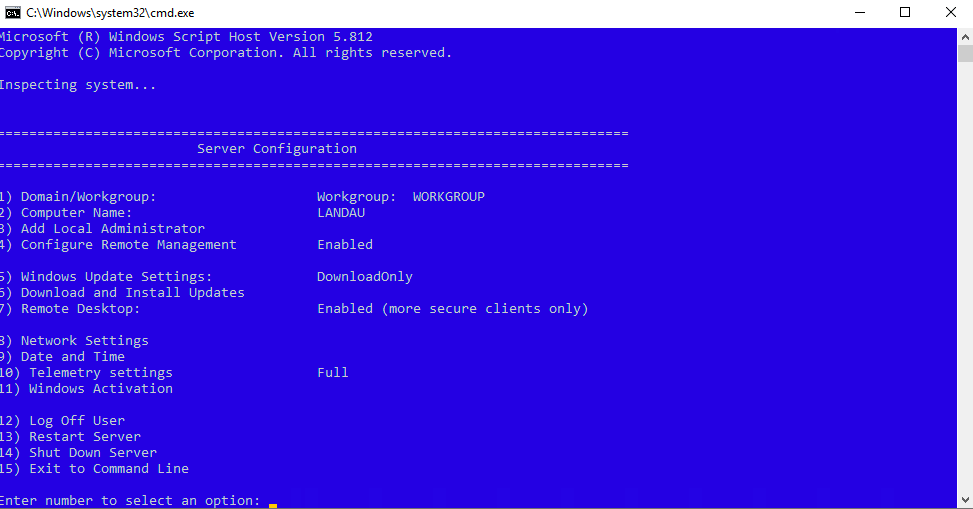
Таким образом, необходимые настройки были выполнены ранее.
Как удаленно управлять Hyper-V Server
Самый простой способ удаленного управления — это использование веб-интерфейса WAC. Для начала, нужно загрузить это приложение с сайта Microsoft. При установке следует использовать значения по умолчанию. После установки станет доступен веб-интерфейс консоли. Его можно открыть по имени сервера или IP-адресу из удаленных локаций.
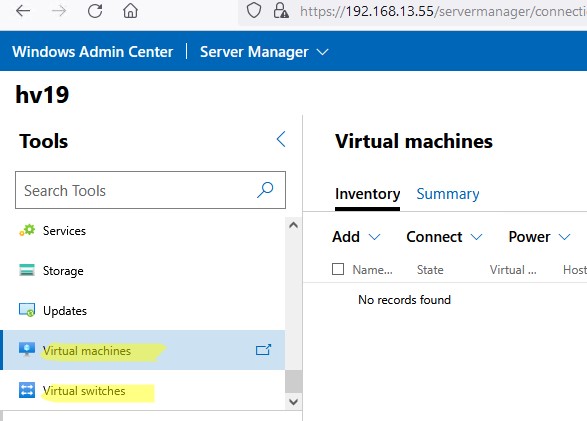
Из этого интерфейса можно управлять виртуальными коммутаторами.
Или, например, создать в Hyper-V новую виртуальную машину.
Об отдельных функциях управления Hyper-V расскажем в разделах ниже.
Как использовать PowerShell для настройки Hyper-V Server
Обратите внимание, что на этапе добавления роли Hyper-V, мы добавили возможность управления через PowerShell при помощи Hyper-V Module for Windows Power Shell. Таким образом, теперь достаточно просто открыть консоль PowerShell. Чтобы узнать общее количество командлетов, выполним следующую команду:
Get-Command –ModuleHyper-V | Measure-ObjectУвидим, что общее количество командлетов — 1940 штук.
Командлеты управляют инфраструктурой Hyper-V аналогично консоли WAC. Например, при помощи командлета Get-NetIPConfiguration можно проверить настройки сети:
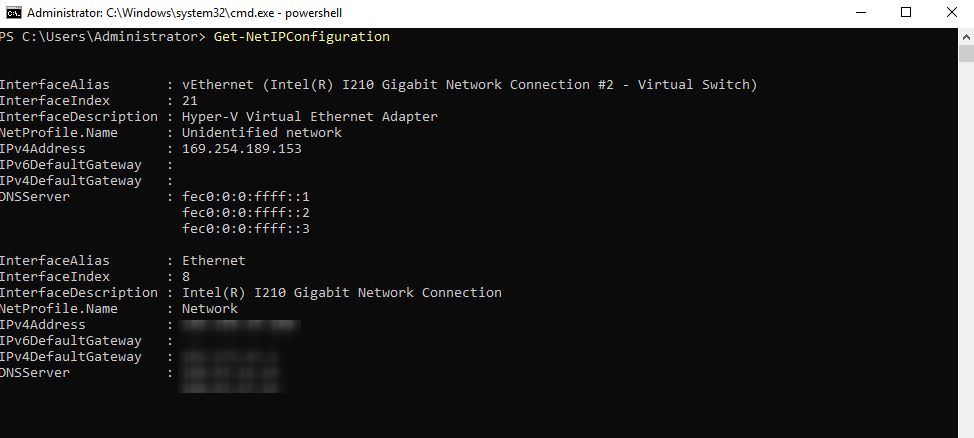
Для примера, проверим включена ли поддержка IPv6 на сетевом интерфейсе. Для этого выполним команду:
Get-NetAdapterBinding -InterfaceDescription "Hyper-V Virtual Ethernet Adapter" | Where-Object -Property DisplayName -Match IPv6 | Format-Table -AutoSizeВывод будет следующим:

Значение True в поле Enabled показывает, что IPv6 включен. Попробуем его выключить. Для этого выполним следующий командлет:
Disable-NetAdapterBinding -InterfaceDescription "Hyper-V Virtual Ethernet Adapter" -ComponentID ms_tcpip6Этот командлет вывод не показывает, поэтому проверим поле Enabled при помощи командлета Get-NetAdapterBinding:

PowerShell позволяет полноценно управлять инфраструктурой Hyper-V.
Как настроить правила Advanced Firewall для Hyper-V Server
Advanced Firewall — это расширенные настройки сетевого экрана на основе правил. Как и все остальное, их можно настраивать через PowerShell. Чтобы увидеть доступные команды для управления сетевым экраном, выполним следующий командлет с параметрами:
Get-Command -Noun *Firewall* -Module NetSecurityВ выводе увидим:

Теперь, чтобы включить правила для удаленного доступа к серверу, выполняем последовательно следующие командлеты через командную строку PowerShell:
Enable-NetFireWallRule -DisplayName "Windows Management Instrumentation (DCOM-In)"
Enable-NetFireWallRule -DisplayGroup "Remote Event Log Management"
Enable-NetFireWallRule -DisplayGroup "Remote Service Management"
Enable-NetFireWallRule -DisplayGroup "Remote Volume Management"
Enable-NetFireWallRule -DisplayGroup "Windows Defender Firewall Remote Management"
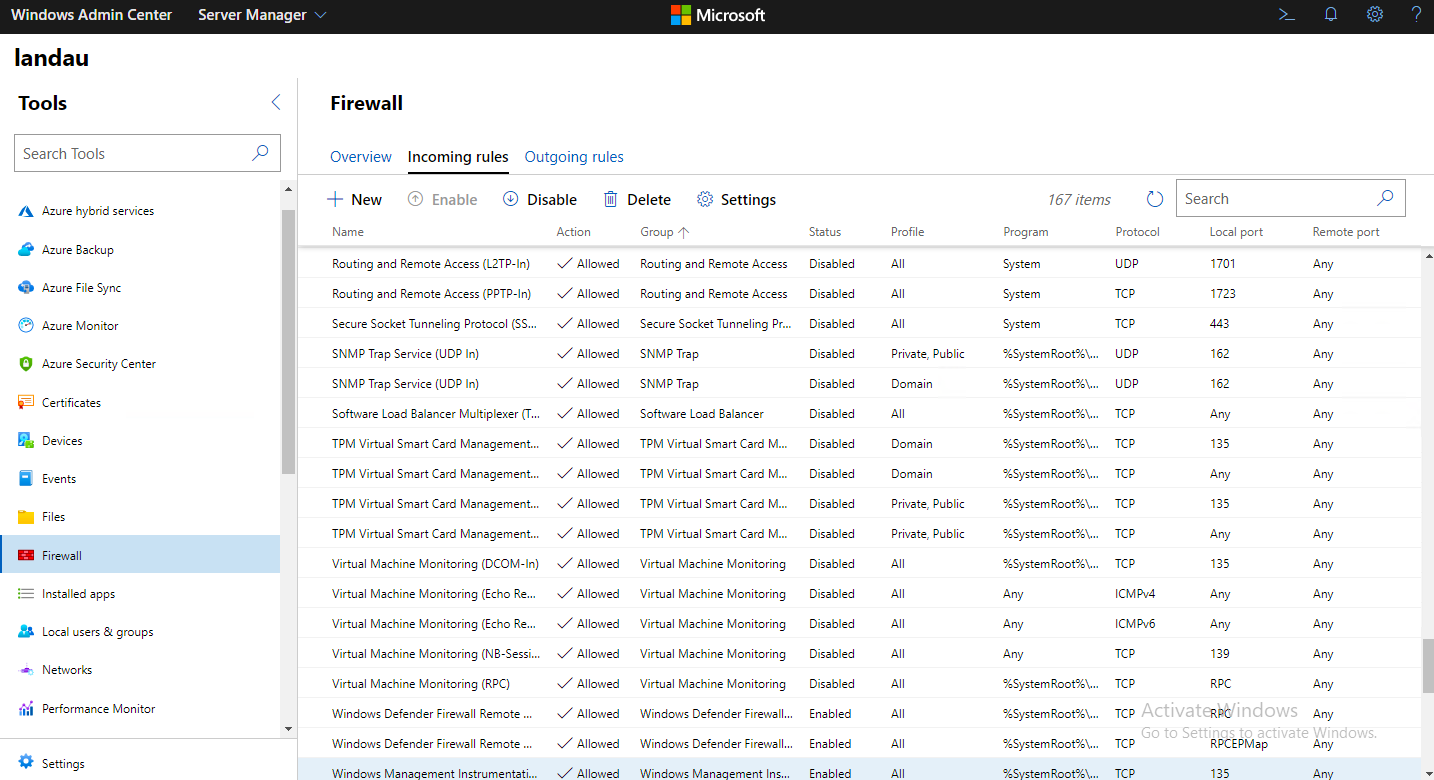
Enable-NetFireWallRule -DisplayGroup "Remote Scheduled Tasks Management"Проверить работу и статус этих правил можно в веб-консоли Windows Admin Center:

Обратите внимание, что если открывать Windows Admin Center через браузер с русской локалью, интерфейс будет на русском языке. Это не зависит от настроек самого сервера. Например, наш демо-сервер развернут с английской локалью и тот же самый Windows Admin Center открывается там на английском языке. Для сравнения:
Возможность выбирать — очень приятная возможность.
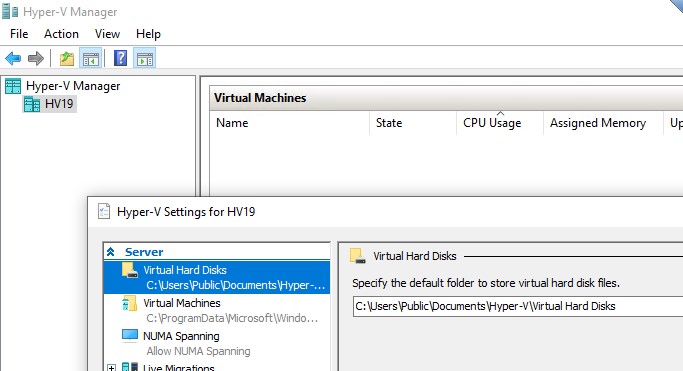
Как создать дисковое хранилище для виртуальных машин
Дисковое хранилище для виртуальных машин мы создали на этапе установки на сервер роли Hyper-V. Это было на шаге Default Stores. В этом разделе мы покажем как теперь управлять этими разделами. Самый простой способ — через консоль Windows Admin Center.
Для этого нужно перейти в раздел Settings и перейти к настройкам Hyper-V. Здесь мы видим те же самые созданные разделы под хранилище для виртуальных машин.
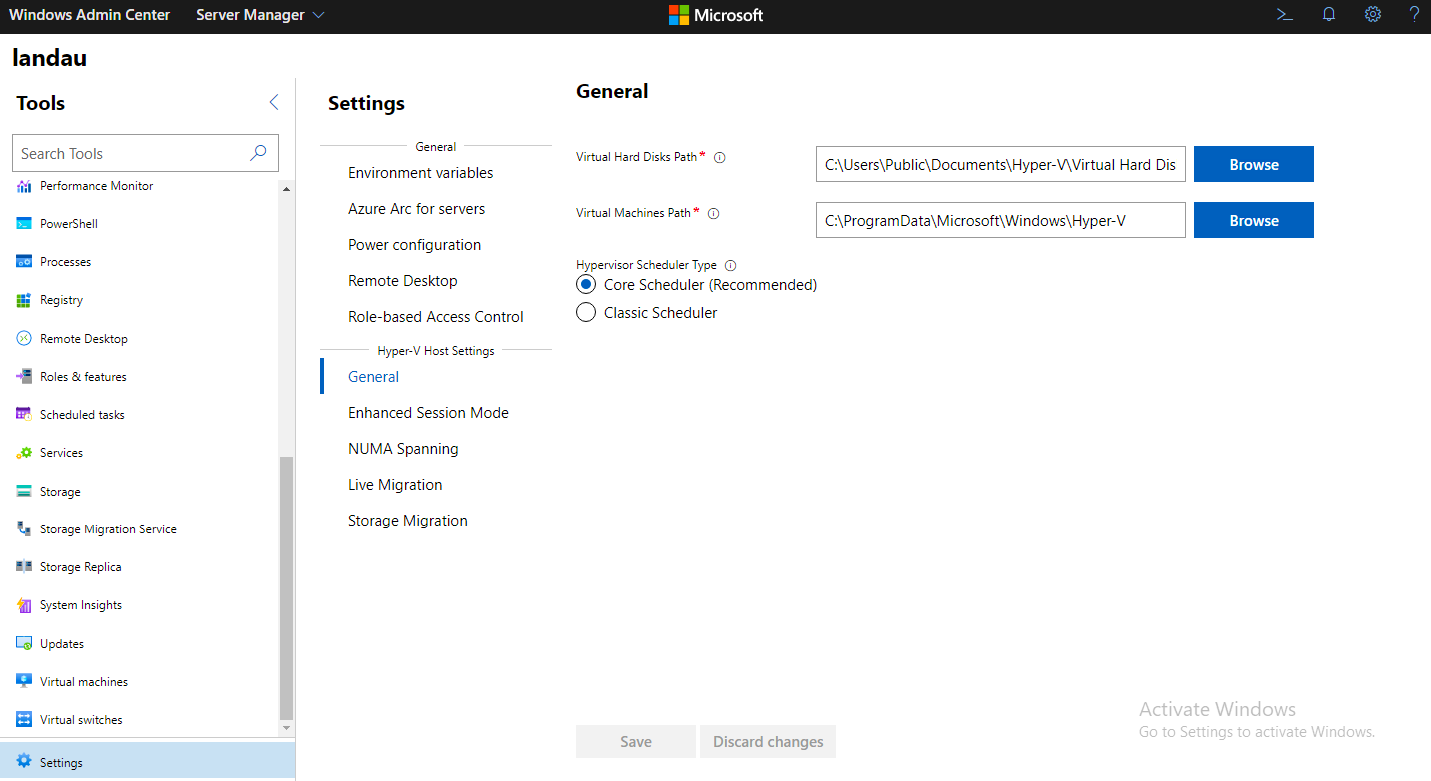
При необходимости, расположение хранилища можно изменить, создав под него, например, новый дисковый раздел.
Как настроить виртуальный коммутатор в Hyper-V Server
Базовая настройка виртуального коммутатора была выполнена при установке роли Hyper-V на экране Virtual Switches. Посмотрим эти настройки в WAC.
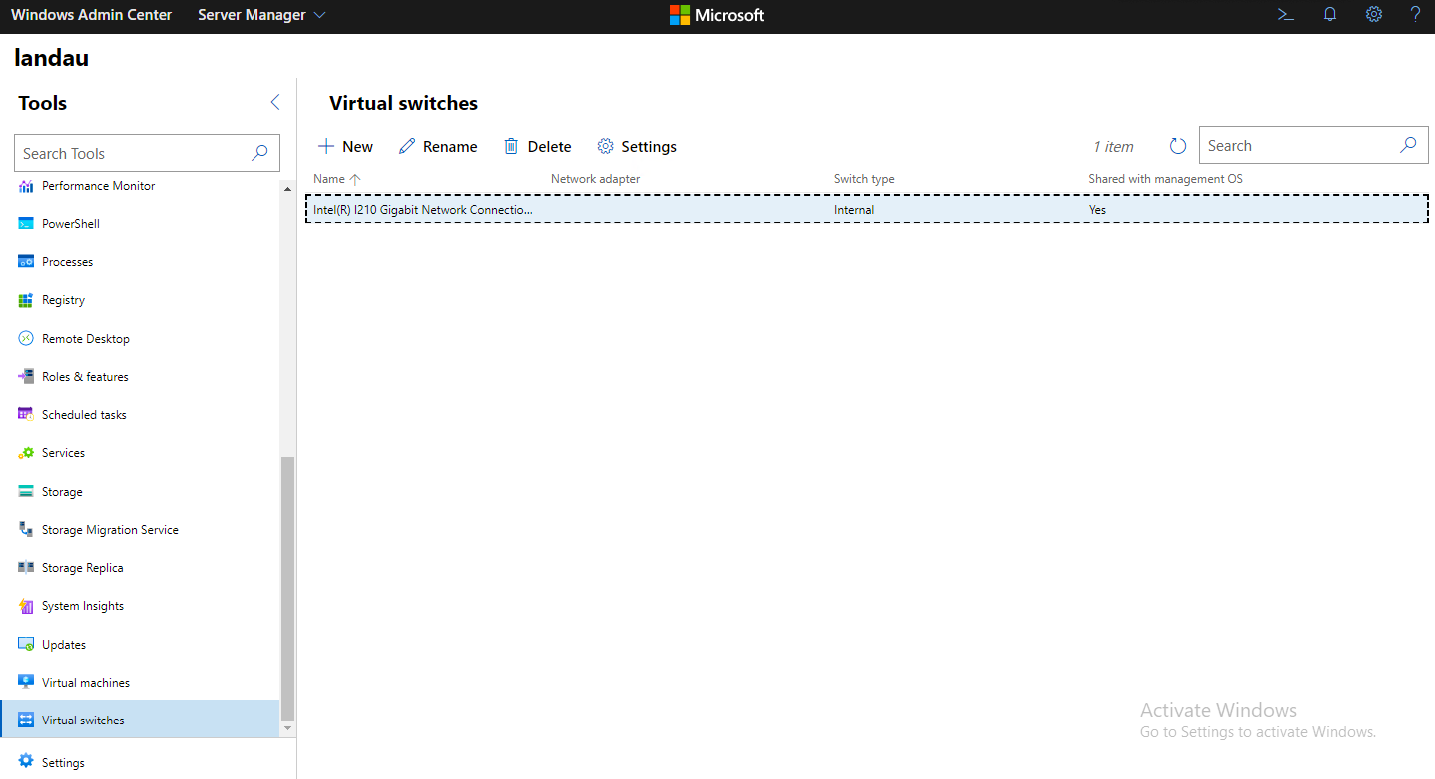
Из этого же интерфейса возможно создание новых виртуальных коммутаторов или редактирование существующих.
Как создавать виртуальные машины в Hyper-V Server
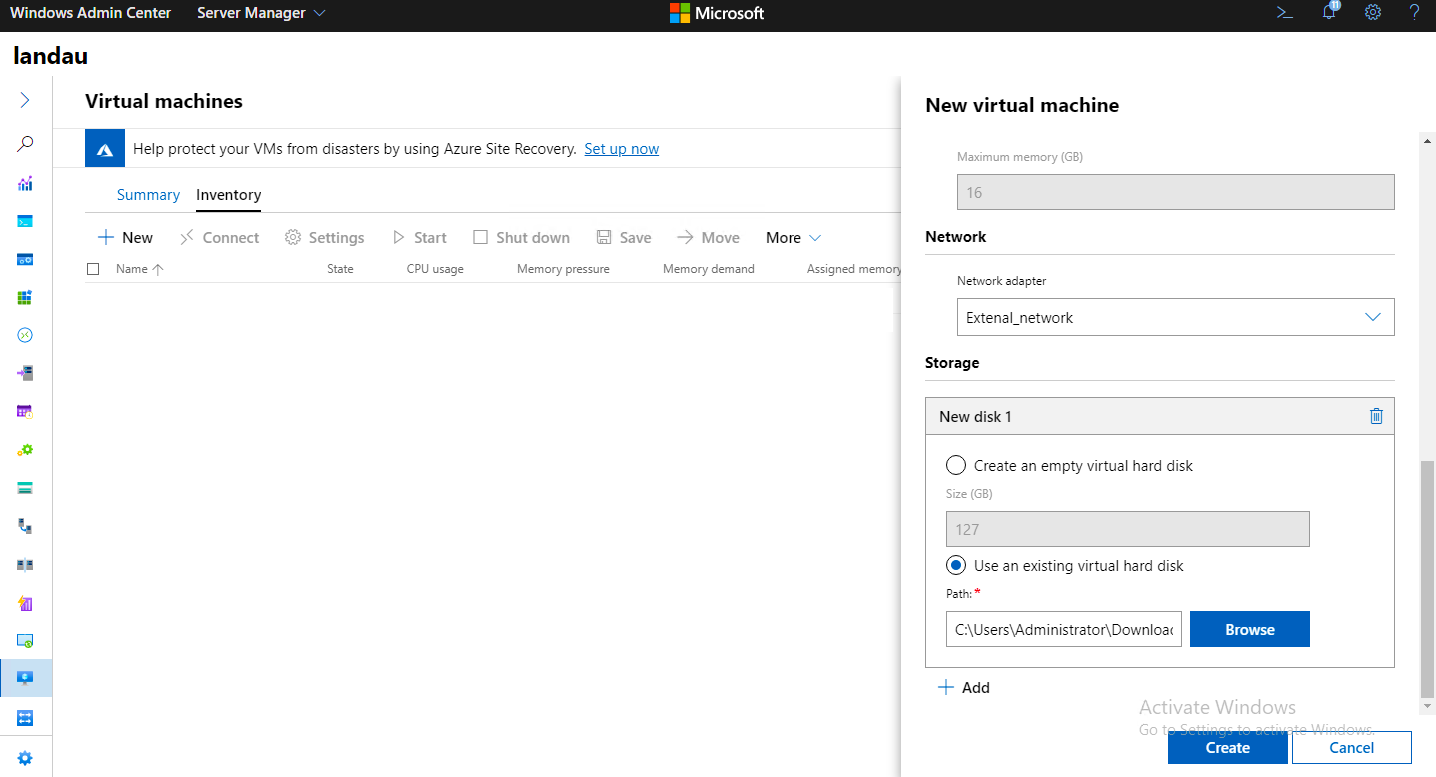
Теперь перейдем к тому, ради чего всё и затевалось — созданию виртуальной машины в Hyper-V. Воспользуемся для этого уже знакомым WAC. Для начала скачаем образ Windows 10 с сайта для разработчиков Microsoft.
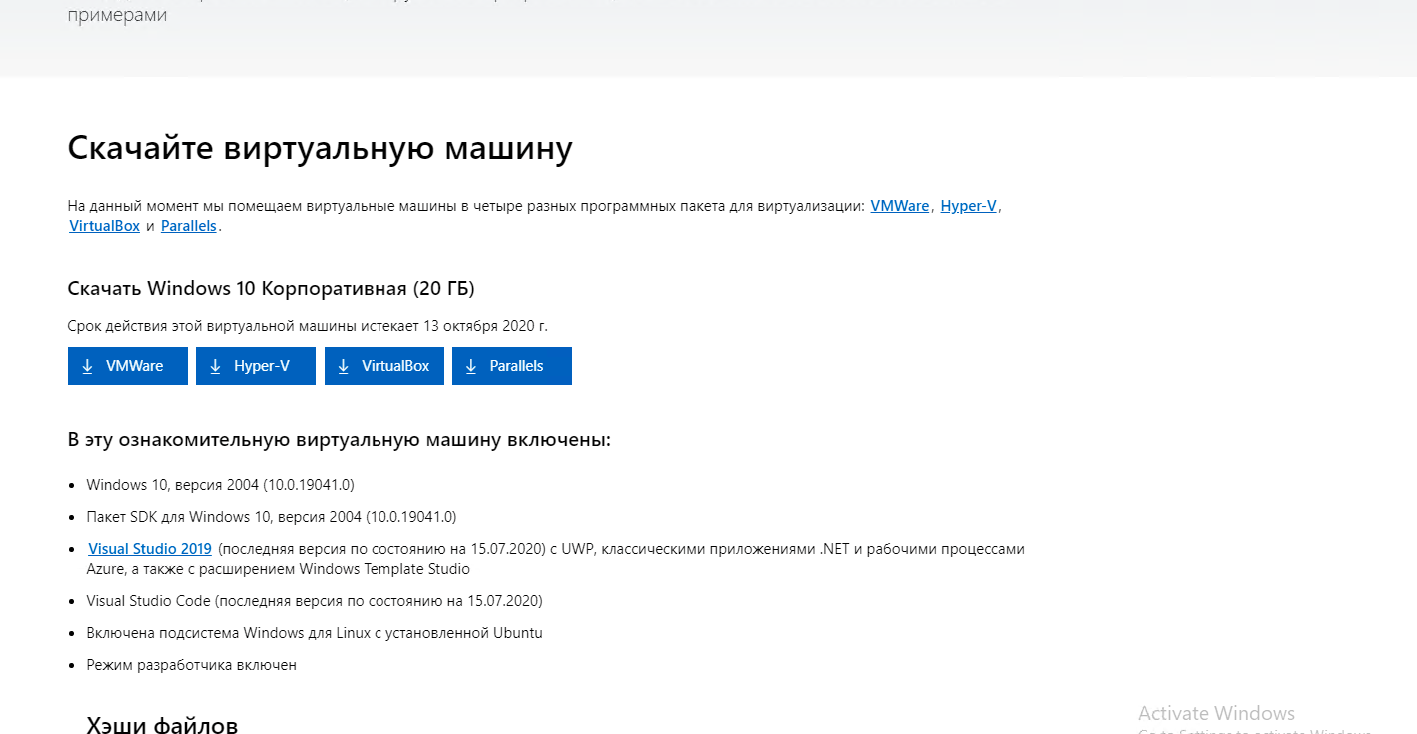
Разархивируем и добавим образ жесткого диска при создании виртуальной машины и нажимаем кнопку Create.
После создания виртуальной машины, можно ее запускать через меню WAC.
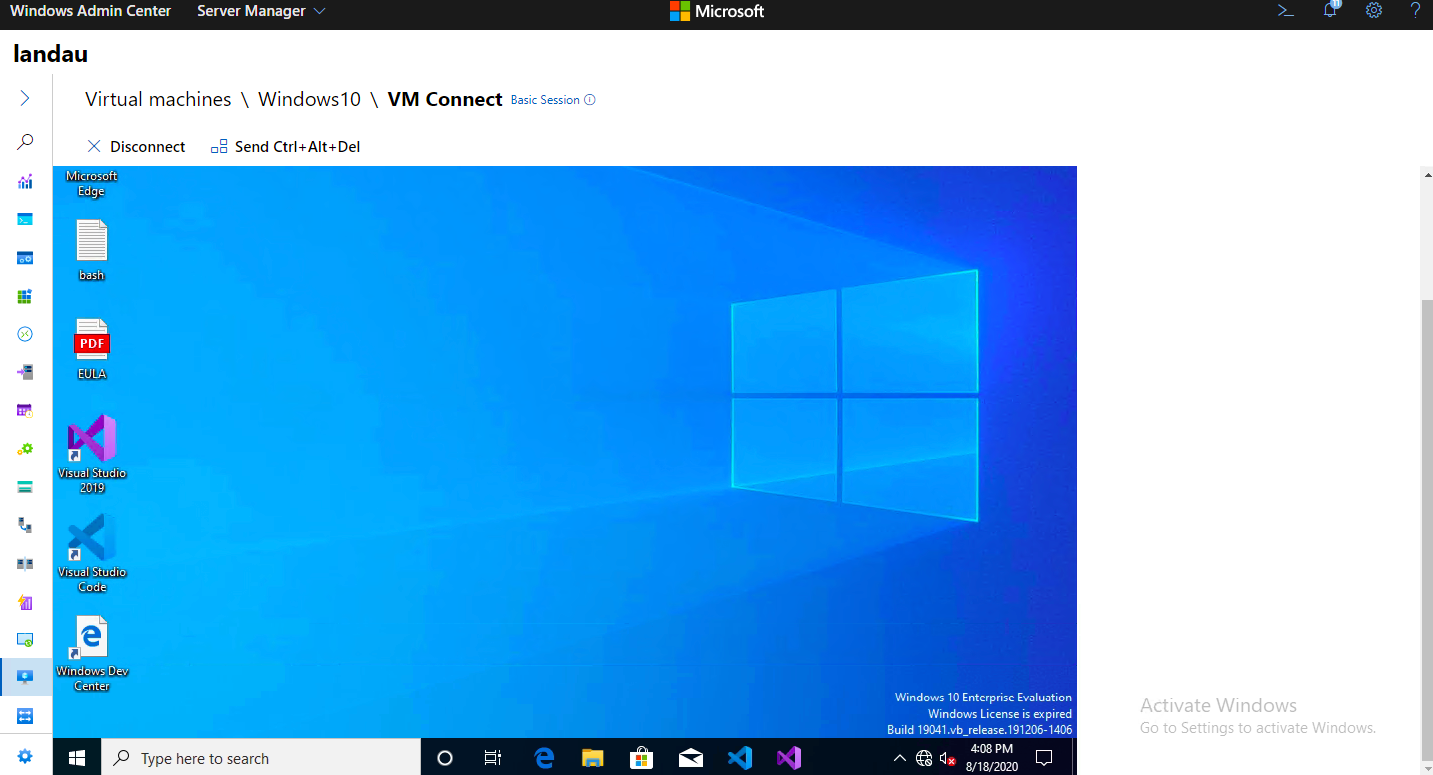
Виртуальная машина создана и готова к использованию.
Как сделать резервную копию виртуальных машин в Hyper-V Server
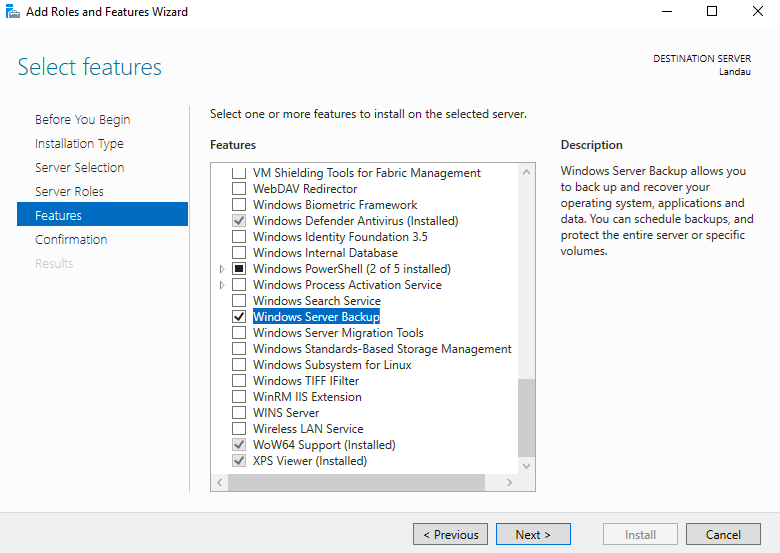
Создать резервную копию виртуальной машины Hyper-V можно при помощи встроенной утилиты wbadmin. По умолчанию её на сервере нет, поэтому добавим роль Windows Server Backup.
После добавления новой роли, будет доступна утилита wbadmin. Выполним команду для получения списка имеющихся на сервере виртуальных машин:
wbadmin get virtualmachines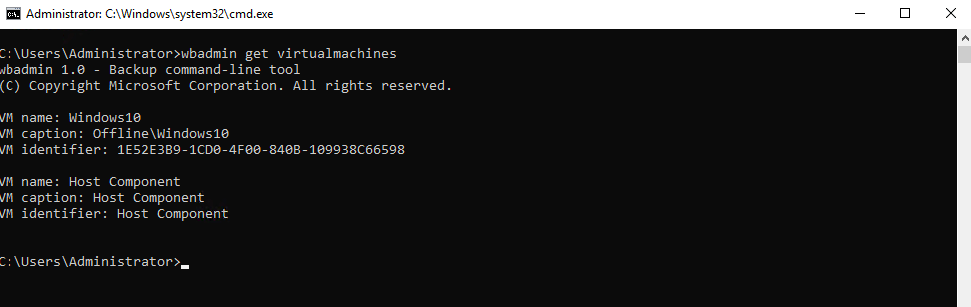
В ответ получим данные о созданной ранее виртуальной машине с именем Windows10.
После получения имени машин все готово к началу создания резервной копии. Для этого выполним следующую команду:
wbadmin start backup -backuptarget:D: -hyperv:"Windows10" -quietЭто запустит процесс создания резервной копии:
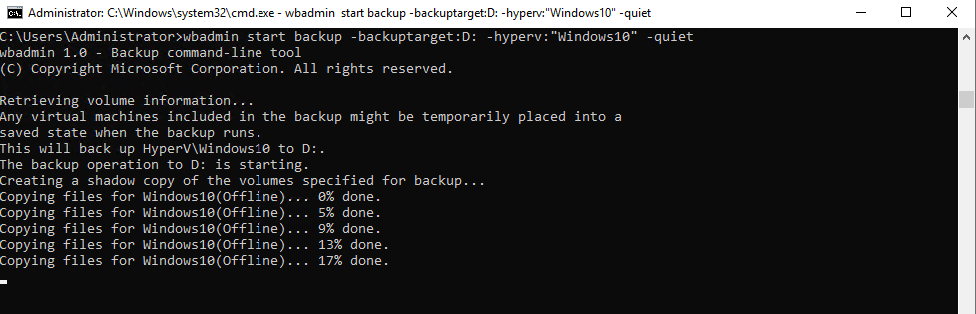
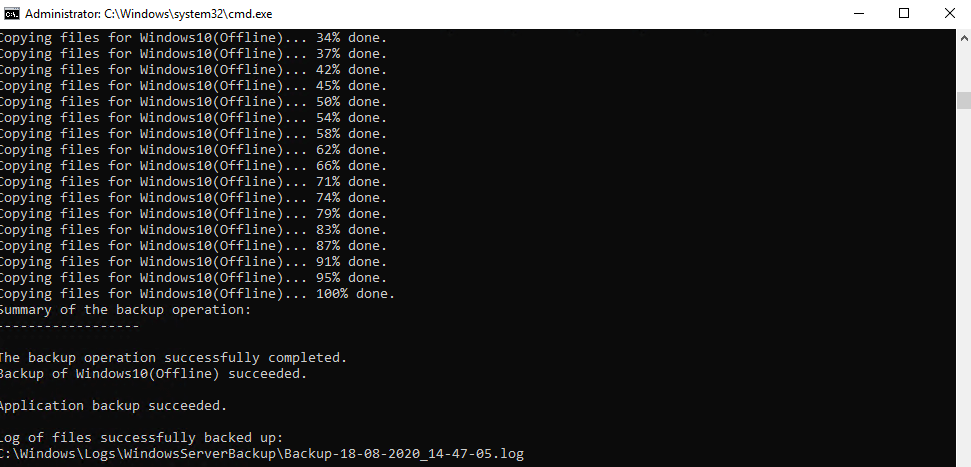
После достижения 100% появится сообщение об успешном завершении операции. Лог создания можно увидеть в одной директории с резервной копией.
Утилита позволяет настроить создание резервных копий по расписанию.
Заключение
Мы рассказали об обновлениях в Hyper-V Server 2019 и о базовых настройках, которых будет достаточно для запуска вашей первой виртуальной машине на гипервизоре. Выделенный сервер Selectel с предустановленной операционной системой поможет максимально быстро запустить проект виртуализации на базе Hyper-V.
Windows Hyper-V Server — это бесплатная серверная версия гипервизора от Microsoft, которую можно использовать для запуска виртуальных машин. В этой статье мы рассмотрим, как установить и настроить версию Windows Hyper-V Server 2019 (инструкция также применима и к Hyper-V Server 2016).
Содержание:
- Что нового в Hyper-V Server 2019?
- Установка Hyper-V Server 2019/2016
- Утилита Sconfig: базовая настройка Hyper-V Server 2019/2016
- Удаленное управление Hyper-V Server 2019/2016
- Настройка Hyper-V Server 2019 с помощью PowerShell
Microsoft анонсировала, что не будет выпускать отдельную версию Hyper-V Server 2022. Связано с тем, что сейчас они сфокусированы на другом стратегическим продуктов Azure Stack HCI.
Hyper-V Server 2019 подходит специально для тех, кто не хочет платить за систему аппаратной виртуализации. В нем доступны все функции Hyper-V и при этом он абсолютно бесплатный. Основные преимущества Windows Hyper-V Server:
- Поддержка всех популярных ОС – совместим со всеми операционными системами. Поддержка Hyper-V присутствует во всех Windows системах, в ядре всех современных систем Linux и FreeBSD;
- Поддерживаются много способов бекапа виртуальных машин — простые скрипты, бесплатные программы, платные версии популярных программ для бекапа;
- Несмотря на то, что в Hyper-V Server отсутствует графический интерфейс управления Windows Server, вы можете управлять им удаленно через стандартную консоль управления гипервизором Hyper-V Manager или веб консоль Windows Admin Center;
- В основе Hyper-V Server популярная платформа Windows Server, с которой привычно и просто работать;
- Hyper-V можно установить на псевдоRAID – например, RAID контроллер Intel, программный RAID Windows;
- Не нужно лицензировать гипервизор – подходит для запуска VDI и виртуальных машин с Linux;
- Нетребовательность к железу – x64 процессор с поддержкой аппаратную виртуализацию (у Intel — Intel-VT или VMX, у AMD — AMD-V (SVM ) и трансляцию адресов второго уровня SLAT (Intel EPT или AMD RV). Эти опции процессора должны быть включены в BIOS/UEFI/nested host. Полные системные требования можно найти на сайте Microsoft;
- Рекомендуется устанавливать на хосты с минимум 4 Гб памяти.
Не нужно путать полноценный Windows Server 2016/2019/2022 с установленной ролью Hyper-V с Free Hyper-V Server 2019/2016. Это разные продукты.
Также отметим, что использование бесплатного гипервизора не освобождает вас от обязанности лицензировать виртуальные машин. Вы можете запустить неограниченное количество ВМ с opensource ОС типа Linux, но виртуальные машины с Windows придется лицензировать. Десктопные редакции Windows лицензируются с помощью ключа продукта. Если вы используете Windows Server в качестве гостевой ОС, его нужно лицензировать по физическим ядрам вашего хоста. Подробнее о лицензировании Windows Server при запуске в среде виртуализации смотрите здесь.
Что нового в Hyper-V Server 2019?
Вкратце пробежимся по объявленным новшествам в Hyper-V Server 2019:
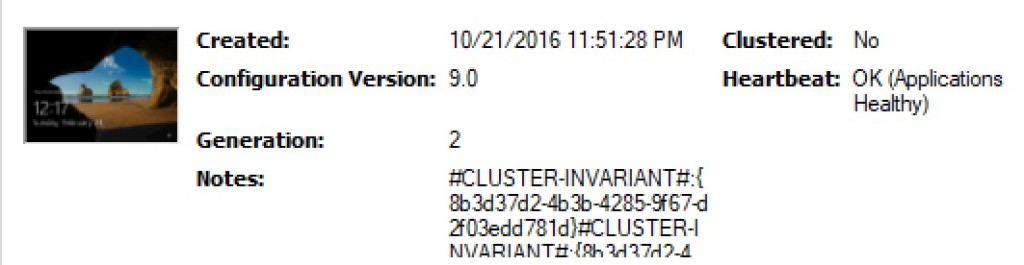
- Появилась поддержка Shielded Virtual Machines для Linux;
- Версия VM конфигурации 9.0 (поддержка гибернации);
- Поддержка дедупликации для ReFS;
- Core App Compatibility – возможность запуска дополнительных графических панелей управления в консоли сервера Hyper-V;
- Поддержка 2-node Hyper-V cluster, кросс-доменной миграция кластеров.
Установка Hyper-V Server 2019/2016
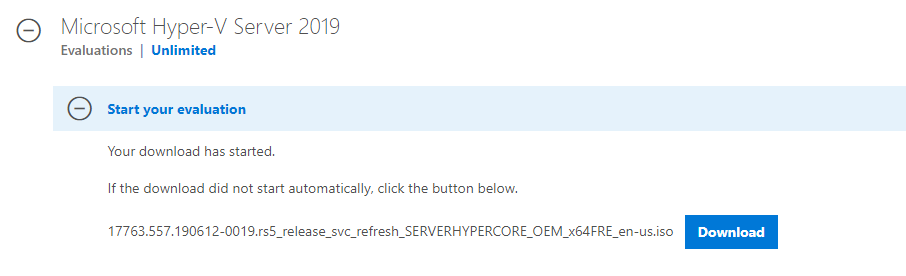
Скачать ISO образ гипервизора Hyper-V Server 2019 можно https://www.microsoft.com/en-us/evalcenter/evaluate-hyper-v-server-2019.

После нажатия на кнопку “Continue” откроется небольшая форма регистрации для ввода ваших данных. Заполняете, затем выбираете язык устанавливаемой системы. Настоятельно рекомендую выбрать английский. И ждете, когда закончится скачивание образа Hyper- V. Размер .iso файла около 3 ГБ.
Установка Microsoft Hyper-V Server идентична установки Windows 10/11 на компьютер. Просто загрузите ваш сервер (компьютер) с установочной USB флешки с установочным образом Microsoft Hyper-V Server (для записи ISO образа на USB накопитель проще всего использовать утилиту Rufus) и следуйте инструкциям мастера установки ОС.
Утилита Sconfig: базовая настройка Hyper-V Server 2019/2016
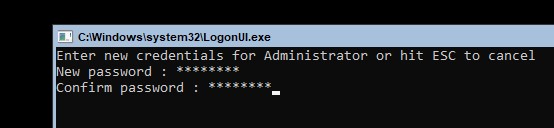
После завершения установки Hyper-V Server потребует задать пароль администратора.
После этого перед вами откроется консоль гипервизора.
Обратите внимание, что у Hyper-V Server нет привычного графического интерфейса Windows. Большинство настроек сервера придется выполнять через командную строку.
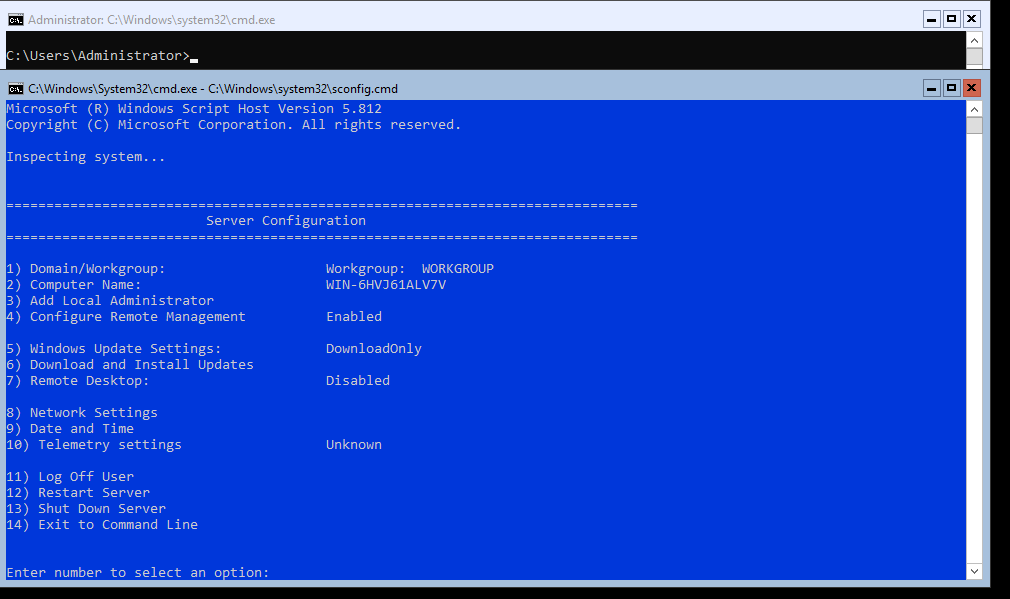
На рабочем столе два окна – стандартная командная строка и окно скрипта sconfig.cmd. С помощью данного скрипта можно выполнить первоначальную настройку сервера Hyper-V. В строке “Enter number to select an option:” введите номер пункта меню, с которым будете работать.
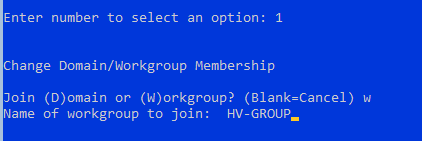
- Первый пункт меню позволяет ввести сервер в домен AD или в рабочую группу;

- Затем задайте имя хоста (сервера);
- Добавьте локального администратора (дополнительную учетную запись, помимо встроенного administrator). Обратите внимание, что при вводе пароля курсор остается на одном месте, тем не менее, пароль и его подтверждение успешно вносятся в систему;
- Включите удаленный доступ к серверу. Это позволить управлять им с помощью Server Manager, консолей MMC, PowerShell, проверить доступность с помощью ping или tracert;
- Настройте Windows Update. Выберите один из трех режимов:
- Automatic (автоматическая загрузка и установка обновлений)
- DownloadOnly (только загрузка без установки)
- Manual (решение о загрузке и установке обновлений принимает администратор)
- Загрузите и установите последние обновления Windows;
- Включите RDP доступ с или без NLA (Network Level Authentication);
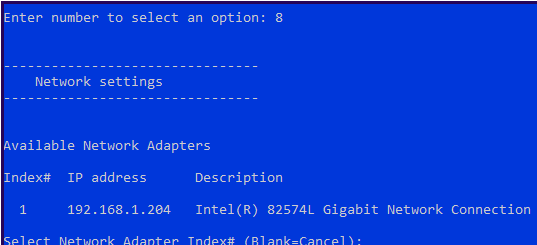
- Настройки параметры сетевых адаптеров. По умолчанию сервер получает адрес от DHCP. Обычно тут стоит указать статический IP адрес;

- Установите дату и время системы;
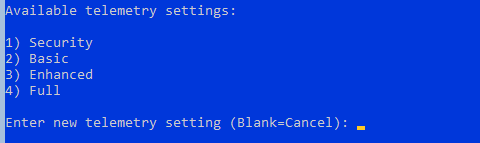
- Настройте телеметрию. Полностью ее отключить система не позволит. Выберите режим, который вам больше нравится
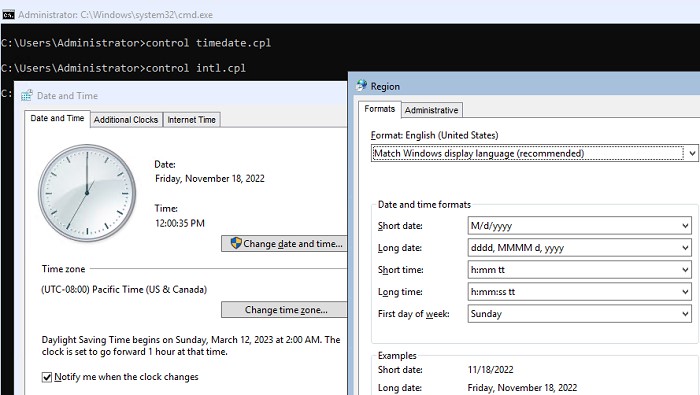
Дату, время и часовой пояс можно также настроить с помощью команды:
control timedate.cpl
Региональные параметры:
control intl.cpl
При этом открываются стандартные консоли Windows.
Внимание! Если вы закрыли все окна и оказались перед черным экраном, то нажмите Ctrl+Shift+Esc, чтобы запустить диспетчер задач данное сочетание клавиш работает в том числе и в RDP-сессии). С помощью Task Manager вы можете запустить командную строку или утилиту конфигурации Hyper-V (нажмите File -> Run Task ->
cmd.exe
или
sconfig.cmd
).
Удаленное управление Hyper-V Server 2019/2016
Для удобного управления Free Hyper-V Server 2019 из графического интерфейса вы можете использовать:
- Веб консоль Windows Admin Center (см. статью Windows Admin Center: веб-интерфейс управления серверами Windows Server);
- Стандартную консоль Hyper-V Manager – можно установить, как на Windows Server, так и на десктопных версиях Windows 10/11.
Для работы с Hyper-V Server 2016/2019 вам потребуется ПК с операционной системой Windows 10 версий Pro или Enteprise х64.
Удаленное управление Hyper-V Server с помощью Hyper-V Manager
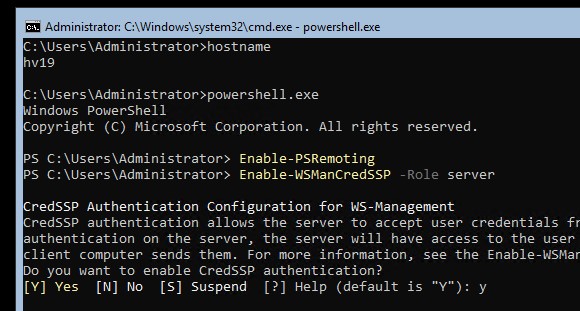
Рассмотрим, как удаленно подключиться к хосту Hyper-V сервер с другого компьютера с помощью консоли Hyper-V Manager. В этой статье мы подразумеваем, что у вас сервер Hyper-V и компьютер с Windows 10 находятся в одной рабочей группе (WORKGROUP).
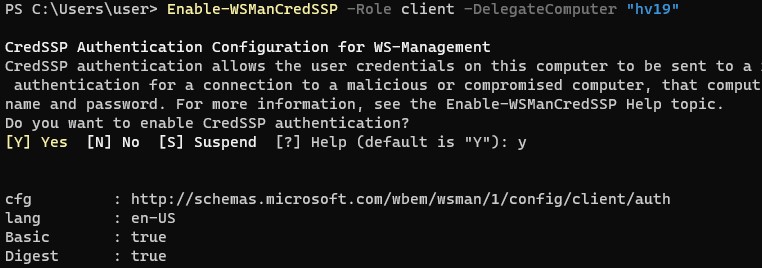
Cначала выполните настройки на сервере Hyper-V. Запустите консоль PowerShell (powershell.exe) и выполните следующие команды:
Enable-PSRemoting
Enable-WSManCredSSP -Role server
Утвердительно отвечаете на все вопросы, при этом будет настроен автоматический запуск службы WinRM и созданы разрешающие правила в брандмауэре.
Теперь переходит к настройке клиентского компьютера с Win 10.
Сервер Hyper-V должен быть доступен по своему сетевому имени, в доменной сети ему должна соответствовать A-запись на DNS-сервере. В рабочей группе такую запись потребуется нужно создать вручную на локальном DNS, либо добавить нужную запись в файл hosts (C:WindowsSystem32driversetchosts) клиентской машины. В нашем случае она выглядит следующим образом:
192.168.13.55 hv19
Можно добавить запись в файл hosts с помощью PowerShell:
Add-Content -Path "C:WindowsSystem32driversetchosts" -Value "192.168.13.55 hv19"
Добавьте Hyper-V сервер в доверенные узлы:
Set-Item WSMan:localhostClientTrustedHosts -Value "hv19"
Если учетная запись, под которой вы работаете на клиентском ПК, отличается от учетных данных администратора Hyper-V, нужно явно сохранить учетные данные для соединений с сервером в диспетчер учетных записей Windows командой:
cmdkey /add:hv19 /user:Administrator /pass:MyPa$$word
Проверьте используемый профиль сети на клиенте Windows 10. Если используется тип сети Public, ее нужно сменить на Private:
Get-NetConnectionProfile|select InterfaceAlias,NetworkCategory

Set-NetConnectionProfile -InterfaceAlias "EthernetLAN2" -NetworkCategory Private
Выполите команду:
Enable-WSManCredSSP -Role client -DelegateComputer "hv19"
Теперь выполните команду
gpedit.msc
чтобы открыть редактор локальной GPO.
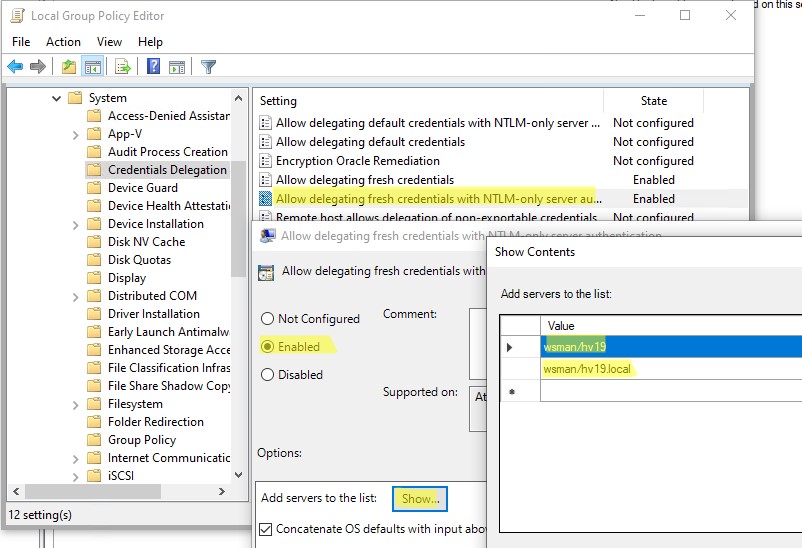
- Перейдите в раздел Local Computer Policy -> Computer Configuration -> Administrative Templates -> System -> Credentials Delegation;
- Включите параметр Allow Delegating Fresh Credentials with NTLM-only Server Authentication.
- Затем нажмите кнопку Show и добавьте два значения
wsman/hv19
и
wsman/hv19.local - Закройте консоль редактора и обновите настройки локальной групповой политики командой
gpupdate /force
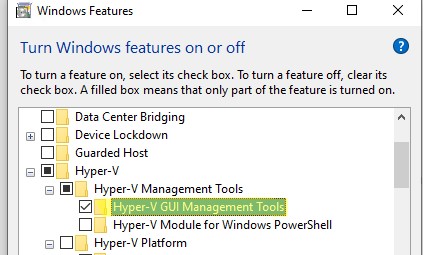
Теперь нужно установить в Windows консоль Диспетчер Hyper-V. Откройте оснастку Programs and Features и перейдите в Turn Windows Features on or off. В открывшемся окне найдите пункт Hyper-V и отметьте для установки Hyper-V GUI Management Tools.
Или вы можете установить клиент Hyper-V Manager с помощью PowerShell:
Enable-WindowsOptionalFeature -Online –FeatureName Microsoft-Hyper-V-Management-Clients
Запустите оснастку Hyper-V Manager (
virtmgmt.msc
), щелкните правой кнопкой по Hyper-V Manager и выберите Connect to Server. Укажите имя вашего сервера Hyper-V.
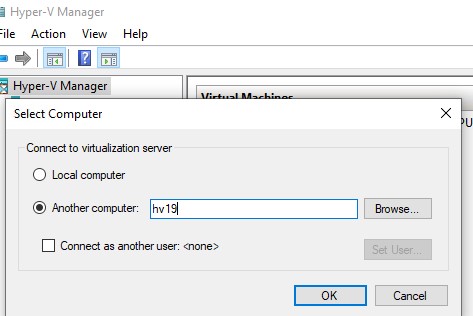
Теперь вы можете управлять настройками Hyper-V Server, создавать виртуальный машины и управлять ими из графической консоли.
Управление Hyper-V с помощью Windows Admin Center
Для удаленного управления хостом Hyper-V можно использовать Windows Admin Center (WAC). WAC это веб консоли и дашбоард для полноценного управления Windows Server, Server Core и Hyper-V Server.
На стороне Hyper-V нужно включить разрешающие правила для SMB подключений в Windows Defender Firewall:
Set-NetFirewallRule -DisplayGroup "File and Printer Sharing" -Enabled true -PassThru
Теперь нужно скачать (https://aka.ms/WACDownload) и установить агент Windows Admin Center на ваш хост Hyper-V. Скачайте WindowsAdminCenter2110.2.msi на любом компьютере Windows с доступом в интернет. Можно скопировать установочный MSI файл на Hyper-V сервер через подключение к административной шаре C$. Для этого выполните команду:
Win+R ->
\192.168.13.55C$
и введите пароль администратора Hyper-V
Создайте папку и скопируйте в нее MSI файл.
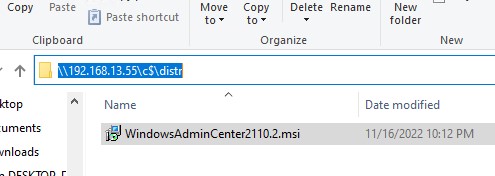
Теперь запустите установку WAC из консоли Hyper-V:
c:distrWindowsAdminCenter2110.2.msi
Установите WAC с настройками по-умолчанию.
После окончания установки вы можете подключиться к вашему Hyper-V Server из браузера, простой перейдите по адресу
https:\192.168.13.55:443
Перед вами откроется дашбоард вашего Hyper-V Server хоста. Вы увидите базовую информацию о сервере, используемых ресурсах и т.д.
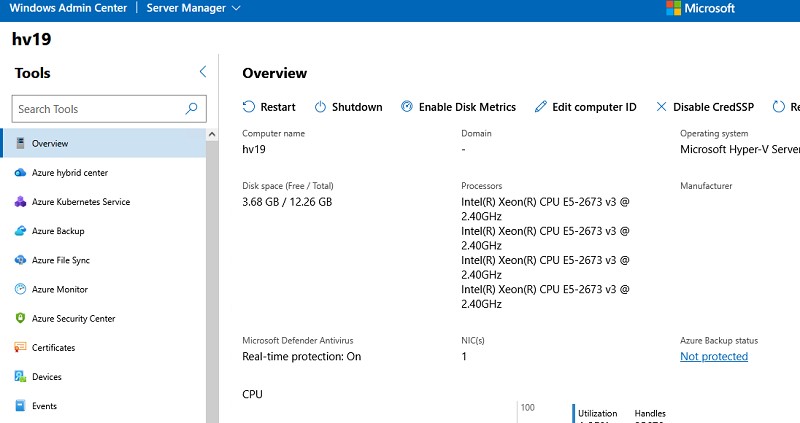
Настройки хоста Hyper-V можно задать в разделе WAC -> Settings -> Hyper-V Host Settings. Доступны следующие разделы:
- General
- Enhanced Session Mode
- NUMA Spanning
- Live Migration
- Storage Migration

Для управления Hyper-V вы будете преимущественно использовать две секции в консоли WAC:
- Virtual Switches – нужно создать как минимум один виртуальный коммутатор, чтобы предоставить сетевой доступ для ВМ;
- Virtual Machines – в этом разделе вы можете создать, настроить, включить/выключить, импортировать/экспортировать виртуальную машину Hyper-V.
Далее я рассмотрю некоторые способы управления Hyper-V Server из PowerShell
Настройка Hyper-V Server 2019 с помощью PowerShell
Для настройки сервера рекомендую использовать PowerShell. В модуле Module Hyper-V доступно более 238 командлетов для управления сервером Hyper-V.
Get-Command –Module Hyper-V | Measure-Object
Настройте автоматический запуск консоли PowerShell (вместо cmd.exe) при входе в систему.
New-ItemProperty -path HKLM:SOFTWAREMicrosoftWindowsCurrentVersionrun -Name PowerShell -Value "cmd /c start /max C:Windowssystem32WindowsPowerShellv1.0powershell.exe -noExit" -Type string
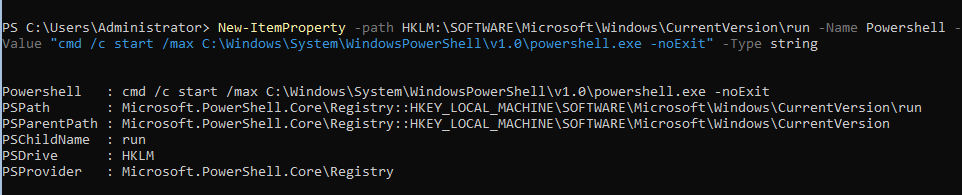
Теперь при входе в сеанс будет запускаться окно PowerShell.
Настройка параметров сети Hyper-V Server 2019 из PowerShell
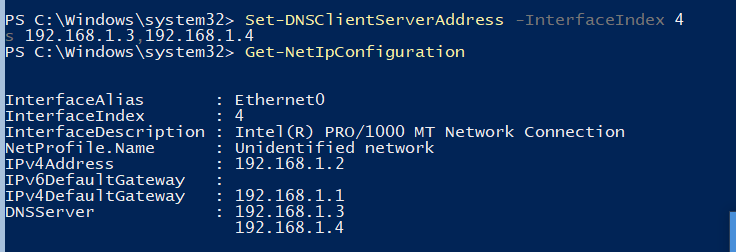
Если вы не настраивали сетевые параметры в окне sconfig.cmd, то настройте их через PowerShell. С помощью командлета Get-NetIPConfiguration можно увидеть текущую конфигурацию IP сетевых интерфейсов.
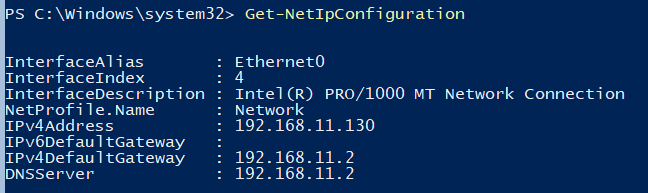
Через PowerShell назначьте статический IP адрес, маску сети, шлюз по умолчанию и адреса DNS серверов. Индекс (InterfaceIndex) сетевого адаптера берем из вывода предыдущего командлета.
New-NetIPAddress -InterfaceIndex 4 -IPAddress 192.168.1.2 -DefaultGateway 192.168.1.1 -PrefixLength 24
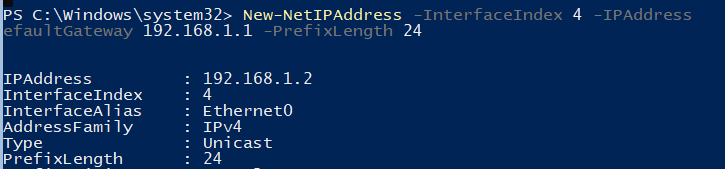
Set-DnsClientServerAddress -InterfaceIndex 4 -ServerAddresses 192.168.1.3,192.168.1.4
Для настройки IPV6 смотрим имя интерфейса командлетом Get-NetAdapter из PowerShell модуля управления сетью NetTCPIP:

Проверьте текущую настройку IPv6 следующей командой:
Get-NetAdapterBinding -InterfaceDescription "Intel(R) PRO/1000 MT Network Connection" | Where-Object -Property DisplayName -Match IPv6 | Format-Table –AutoSize

Отключить IPV6 можно так:
Disable-NetAdapterBinding -InterfaceDescription " Intel(R) PRO/1000 MT Network Connection " -ComponentID ms_tcpip6
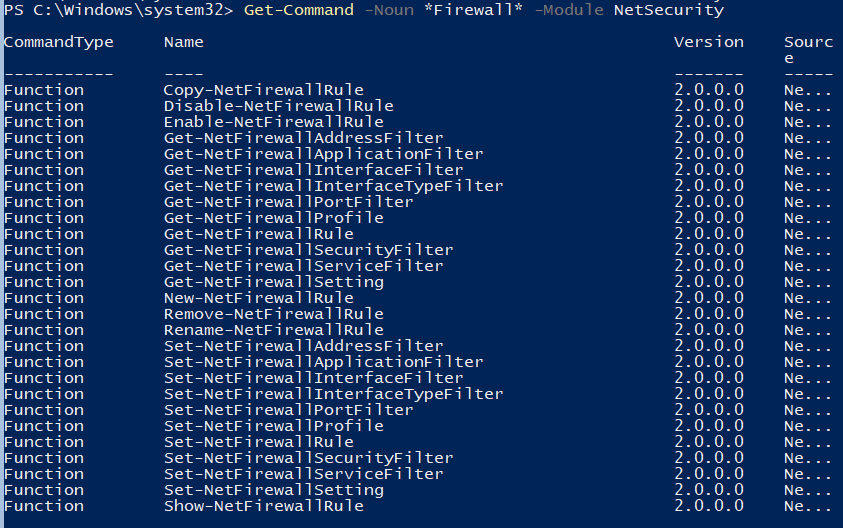
Настройка правил Windows Defender Firewall для управления Hyper-V Server 2019
Просмотреть список командлетов для управления файерволом Windows можно с помощью Get-Command.
Get-Command -Noun *Firewall* -Module NetSecurity
Для полноценного удаленного управления сервером выполните последовательно следующие команды для включения разрешающих правил Windows Firewall из PoSh:
Enable-NetFireWallRule -DisplayName "Windows Management Instrumentation (DCOM-In)"
Enable-NetFireWallRule -DisplayGroup "Remote Event Log Management"
Enable-NetFireWallRule -DisplayGroup "Remote Service Management"
Enable-NetFireWallRule -DisplayGroup "Remote Volume Management"
Enable-NetFireWallRule -DisplayGroup "Windows Defender Firewall Remote Management"
Enable-NetFireWallRule -DisplayGroup "Remote Scheduled Tasks Management"
Создание дискового хранилища для виртуальных машин
Для хранения данных (файлов виртуальных машин и дистрибутивов) будем использовать отдельный раздел на физическом диске. Просмотрите список физических дисков на сервере.
Get-Disk
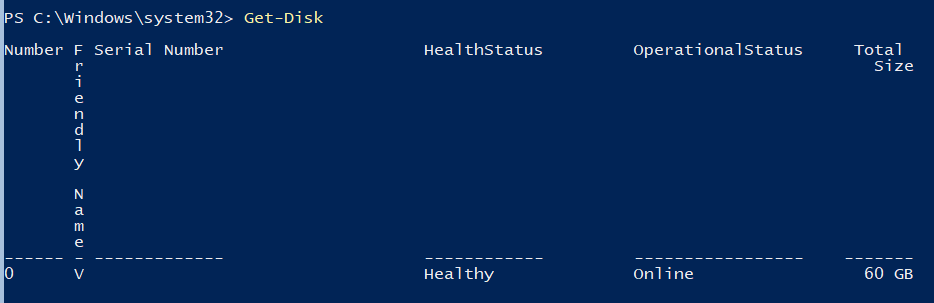
Создайте новый раздел на диске максимально возможного размера и назначьте ему букву D. Используйте DiskNumber из Get-Disk.
New-Partition -DiskNumber 0 -DriveLetter D –UseMaximumSize
После этого отформатируйте раздел в NTFS и укажите его метку.
Format-Volume -DriveLetter D -FileSystem NTFS -NewFileSystemLabel "HVStore"
Подробнее о командлетах управления дисками и разделами из PowerShell здесь.
Создайте каталог, где будете хранить настройки и файлы дисков виртуальных машин. Командлет New-Item позволяет создавать вложенные пути:
New-Item -Path "D:Hyper-VVirtual Hard Disks" -Type Directory
Создайте папку D:Distrib для хранения установоых ISO образов ОС:
New-Item -Path D:Distr -ItemType Directory
Для создания общей сетевой папки (шары) используйте командлет New-SmbShare, с помощью которого предоставьте полный доступ по сети для группы локальных администраторов сервера:
New-SmbShare -Path D:Distr -Name Distr -Description "OS Distributives" -FullAccess "BUILTINAdministrators"
Более подробно о базовой настройке Hyper-V Server и Windows Server Core из командой строки рассказано в этой статье.
Настройка параметров хоста в Hyper-V Server 2016/2019
Откроем параметры сервера командой:
Get-VMHost | Format-List

Пути виртуальных машин и виртуальных дисков находятся на одном разделе с операционной системой, что неправильно. Пропишите путь к созданным ранее папкам с помощью команды:
Set-VMHost -VirtualMachinePath D:Hyper-V -VirtualHardDiskPath 'D:Hyper-VVirtual Hard Disks'
Создание виртуального коммутатора Hyper-V
Создайте External Switch, который привязывается к сетевой карте Hyper-V Server и организует взаимодействие ВМ с физической сетью.
Проверьте поддержку SR-IOV (Single-Root Input/Output (I/O) Virtualization):
Get-NetAdapterSriov
Получите список подключенных сетевых адаптеров:
Get-NetAdapter | Where-Object -PropertyStatus –eqUp
Привяжите виртуальный свитч к сетевому адаптеру и при наличии SR-IOV включите его поддержку.
Внимание! Включить или отключить поддержку SR-IOV после создания свитча будет невозможно, для изменения этого параметра необходимо будет пересоздавать коммутатор.
New-VMSwitch -Name "Extenal_network" -NetAdapterName "Ethernet 2" -EnableIov 1
Проверить настройки виртуального коммутатора можно с помощью командлетов:
Get-VMSwitch
Get-NetIPConfiguration –Detailed
На этом первоначальная настройка Hyper-V Server 2016/2019 закончена. Можно переходить к созданию и настройке виртуальных машин.
Более подробно команды PowerShell для управления Hyper-V и виртуальными машинами описаны в этой статье.
| title | description | ms.topic | ms.assetid | ms.author | author | ms.date |
|---|---|---|---|---|---|---|
|
What’s new in Hyper-V on Windows Server 2016 |
Gives a summary of the new features in Hyper-V |
article |
1a65a98e-54b6-4c41-9732-1e3d32fe3a5f |
benarm |
BenjaminArmstrong |
09/21/2017 |
What’s new in Hyper-V on Windows Server
Applies to: Windows Server 2022, Windows Server 2019, Microsoft Hyper-V Server 2016, Windows Server 2016
This article explains the new and changed functionality of Hyper-V on Windows Server 2019, Windows Server 2016, and Microsoft Hyper-V Server 2016. To use new features on virtual machines created with Windows Server 2012 R2 and moved or imported to a server that runs Hyper-V on Windows Server 2019 or Windows Server 2016, you’ll need to manually upgrade the virtual machine configuration version. For instructions, see Upgrade virtual machine version.
Here’s what’s included in this article and whether the functionality is new or updated.
Windows Server, version 1903
Add Hyper-V Manager to Server Core installations (updated)
As you might know, we recommend using the Server Core installation option when using Windows Server, Semi-Annual Channel in production. However, Server Core by default omits a number of useful management tools. You can add many of the most commonly used tools by installing the App Compatibility feature, but there have still been some missing tools.
So, based on customer feedback, we added one more tools to the App Compatibility feature in this version: Hyper-V Manager (virtmgmt.msc).
For more info, see Server Core App Compatibility Feature on Demand (FOD).
Windows Server 2019
Security: Shielded Virtual Machines improvements (new)
-
Branch office improvements
You can now run shielded virtual machines on machines with intermittent connectivity to the Host Guardian Service by leveraging the new fallback HGS and offline mode features. Fallback HGS allows you to configure a second set of URLs for Hyper-V to try if it can’t reach your primary HGS server.
Offline mode allows you to continue to start up your shielded VMs, even if HGS can’t be reached, as long as the VM has started successfully once, and the host’s security configuration has not changed.
-
Troubleshooting improvements
We’ve also made it easier to troubleshoot your shielded virtual machines by enabling support for VMConnect Enhanced Session Mode and PowerShell Direct. These tools are particularly useful if you’ve lost network connectivity to your VM and need to update its configuration to restore access.
These features do not need to be configured, and they become available automatically when a shielded VM is placed on a Hyper-V host running Windows Server version 1803 or later.
-
Linux support
If you run mixed-OS environments, Windows Server 2019 now supports running Ubuntu, Red Hat Enterprise Linux, and SUSE Linux Enterprise Server inside shielded virtual machines.
Windows Server 2016
Compatible with Connected Standby (new)
When the Hyper-V role is installed on a computer that uses the Always On/Always Connected (AOAC) power model, the Connected Standby power state is now available.
Discrete device assignment (new)
This feature lets you give a virtual machine direct and exclusive access to some PCIe hardware devices. Using a device in this way bypasses the Hyper-V virtualization stack, which results in faster access. For details on supported hardware, see «Discrete device assignment» in System requirements for Hyper-V on Windows Server 2016. For details, including how to use this feature and considerations, see the post «Discrete Device Assignment — Description and background» in the Virtualization blog.
Encryption support for the operating system disk in generation 1 virtual machines (new)
You can now protect the operating system disk using BitLocker drive encryption in generation 1 virtual machines. A new feature, key storage, creates a small, dedicated drive to store the system drive’s BitLocker key. This is done instead of using a virtual Trusted Platform Module (TPM), which is available only in generation 2 virtual machines. To decrypt the disk and start the virtual machine, the Hyper-V host must either be part of an authorized guarded fabric or have the private key from one of the virtual machine’s guardians. Key storage requires a version 8 virtual machine. For information on virtual machine version, see Upgrade virtual machine version in Hyper-V on Windows 10 or Windows Server 2016.
Host resource protection (new)
This feature helps prevent a virtual machine from using more than its share of system resources by looking for excessive levels of activity. This can help prevent a virtual machine’s excessive activity from degrading the performance of the host or other virtual machines. When monitoring detects a virtual machine with excessive activity, the virtual machine is given fewer resources. This monitoring and enforcement is off by default. Use Windows PowerShell to turn it on or off. To turn it on, run this command:
Set-VMProcessor TestVM -EnableHostResourceProtection $true
For details about this cmdlet, see Set-VMProcessor.
Hot add and remove for network adapters and memory (new)
You can now add or remove a network adapter while the virtual machine is running, without incurring downtime. This works for generation 2 virtual machines that run either Windows or Linux operating systems.
You can also adjust the amount of memory assigned to a virtual machine while it’s running, even if you haven’t enabled Dynamic Memory. This works for both generation 1 and generation 2 virtual machines, running Windows Server 2016 or Windows 10.
Hyper-V Manager improvements (updated)
-
Alternate credentials support — You can now use a different set of credentials in Hyper-V Manager when you connect to another Windows Server 2016 or Windows 10 remote host. You can also save these credentials to make it easier to log on again.
-
Manage earlier versions — With Hyper-V Manager in Windows Server 2019, Windows Server 2016, and Windows 10, you can manage computers running Hyper-V on Windows Server 2012, Windows 8, Windows Server 2012 R2 and Windows 8.1.
-
Updated management protocol — Hyper-V Manager now communicates with remote Hyper-V hosts using the WS-MAN protocol, which permits CredSSP, Kerberos or NTLM authentication. When you use CredSSP to connect to a remote Hyper-V host, you can do a live migration without enabling constrained delegation in Active Directory. The WS-MAN-based infrastructure also makes it easier to enable a host for remote management. WS-MAN connects over port 80, which is open by default.
Integration services delivered through Windows Update (updated)
Updates to integration services for Windows guests are distributed through Windows Update. For service providers and private cloud hosters, this puts the control of applying updates into the hands of the tenants who own the virtual machines. Tenants can now update their Windows virtual machines with all updates, including the integration services, using a single method. For details about integration services for Linux guests, see Linux and FreeBSD Virtual Machines on Hyper-V.
[!IMPORTANT]
The vmguest.iso image file is no longer needed, so it isn’t included with Hyper-V on Windows Server 2016.
Linux Secure Boot (new)
Linux operating systems running on generation 2 virtual machines can now boot with the Secure Boot option enabled. Ubuntu 14.04 and later, SUSE Linux Enterprise Server 12 and later, Red Hat Enterprise Linux 7.0 and later, and CentOS 7.0 and later are enabled for Secure Boot on hosts that run Windows Server 2016. Before you boot the virtual machine for the first time, you must configure the virtual machine to use the Microsoft UEFI Certificate Authority. You can do this from Hyper-V Manager, Virtual Machine Manager, or an elevated Windows Powershell session. For Windows PowerShell, run this command:
Set-VMFirmware TestVM -SecureBootTemplate MicrosoftUEFICertificateAuthority
For more information about Linux virtual machines on Hyper-V, see Linux and FreeBSD Virtual Machines on Hyper-V. For more information about the cmdlet, see Set-VMFirmware.
More memory and processors for generation 2 virtual machines and Hyper-V hosts (updated)
Starting with version 8, generation 2 virtual machines can use significantly more memory and virtual processors. Hosts also can be configured with significantly more memory and virtual processors than were previously supported. These changes support new scenarios such as running e-commerce large in-memory databases for online transaction processing (OLTP) and data warehousing (DW). The Windows Server blog recently published the performance results of a virtual machine with 5.5 terabytes of memory and 128 virtual processors running 4 TB in-memory database. Performance was greater than 95% of the performance of a physical server. For details, see Windows Server 2016 Hyper-V large-scale VM performance for in-memory transaction processing. For details about virtual machine versions, see Upgrade virtual machine version in Hyper-V on Windows 10 or Windows Server 2016. For the full list of supported maximum configurations, see Plan for Hyper-V scalability in Windows Server 2016.
Nested virtualization (new)
This feature lets you use a virtual machine as a Hyper-V host and create virtual machines within that virtualized host. This can be especially useful for development and test environments. To use nested virtualization, you’ll need:
-
To run at least Windows Server 2019, Windows Server 2016 or Windows 10 on both the physical Hyper-V host and the virtualized host.
-
A processor with Intel VT-x (nested virtualization is available only for Intel processors at this time).
For details and instructions, see Run Hyper-V in a Virtual Machine with Nested Virtualization.
Networking features (new)
New networking features include:
-
Remote direct memory access (RDMA) and switch embedded teaming (SET). You can set up RDMA on network adapters bound to a Hyper-V virtual switch, regardless of whether SET is also used. SET provides a virtual switch with some of same capabilities as NIC teaming. For details, see Remote Direct Memory Access (RDMA) and Switch Embedded Teaming (SET).
-
Virtual machine multi queues (VMMQ). Improves on VMQ throughput by allocating multiple hardware queues per virtual machine. The default queue becomes a set of queues for a virtual machine, and traffic is spread between the queues.
-
Quality of service (QoS) for software-defined networks. Manages the default class of traffic through the virtual switch within the default class bandwidth.
For more about new networking features, see What’s new in Networking.
Production checkpoints (new)
Production checkpoints are «point-in-time» images of a virtual machine. These give you a way to apply a checkpoint that complies with support policies when a virtual machine runs a production workload. Production checkpoints are based on backup technology inside the guest instead of a saved state. For Windows virtual machines, the Volume Snapshot Service (VSS) is used. For Linux virtual machines, the file system buffers are flushed to create a checkpoint that’s consistent with the file system. If you’d rather use checkpoints based on saved states, choose standard checkpoints instead. For details, see Choose between standard or production checkpoints in Hyper-V.
[!IMPORTANT]
New virtual machines use production checkpoints as the default.
Rolling Hyper-V Cluster upgrade (new)
You can now add a node running Windows Server 2019 or Windows Server 2016 to a Hyper-V Cluster with nodes running Windows Server 2012 R2. This allows you to upgrade the cluster without downtime. The cluster runs at a Windows Server 2012 R2 feature level until you upgrade all nodes in the cluster and update the cluster functional level with the Windows PowerShell cmdlet, Update-ClusterFunctionalLevel.
[!IMPORTANT]
After you update the cluster functional level, you can’t return it to Windows Server 2012 R2.
For a Hyper-V cluster with a functional level of Windows Server 2012 R2 with nodes running Windows Server 2012 R2, Windows Server 2019 and Windows Server 2016, note the following:
-
Manage the cluster, Hyper-V, and virtual machines from a node running Windows Server 2016 or Windows 10.
-
You can move virtual machines between all of the nodes in the Hyper-V cluster.
-
To use new Hyper-V features, all nodes must run Windows Server 2016 or and the cluster functional level must be updated.
-
The virtual machine configuration version for existing virtual machines isn’t upgraded. You can upgrade the configuration version only after you upgrade the cluster functional level.
-
Virtual machines that you create are compatible with Windows Server 2012 R2, virtual machine configuration level 5.
After you update the cluster functional level:
-
You can enable new Hyper-V features.
-
To make new virtual machine features available, use the
Update-vmVersioncmdlet to manually update the virtual machine configuration level. For instructions, see Upgrade virtual machine version. -
You can’t add a node to the Hyper-V Cluster that runs Windows Server 2012 R2.
[!NOTE]
Hyper-V on Windows 10 doesn’t support failover clustering.
For details and instructions, see the Cluster Operating System Rolling Upgrade.
Shared virtual hard disks (updated)
You can now resize shared virtual hard disks (.vhdx files) used for guest clustering, without downtime. Shared virtual hard disks can be grown or shrunk while the virtual machine is online. Guest clusters can now also protect shared virtual hard disks by using Hyper-V Replica for disaster recovery.
Enable replication on the collection. Enabling replication on a collection is only exposed through the WMI interface. See the documentation for Msvm_CollectionReplicationService class for more details. You cannot manage replication of a collection through PowerShell cmdlet or UI. The VMs should be on hosts that are part of a Hyper-V cluster to access features that are specific to a collection. This includes Shared VHD — shared VHDs on stand-alone hosts are not supported by Hyper-V Replica.
Follow the guidelines for shared VHDs in Virtual Hard Disk Sharing Overview, and be sure that your shared VHDs are part of a guest cluster.
A collection with a shared VHD but no associated guest cluster cannot create reference points for the collection (regardless of whether the shared VHD is included in the reference point creation or not).
Virtual machine backup(new)
If you are backing up a single virtual machine (regardless of whether host is clustered or not), you should not use a VM group. Nor should you use a snapshot collection. VM groups and snapshot collection are meant to be used solely for backing up guest clusters that are using shared vhdx. Instead, you should take a snapshot using the Hyper-V WMI v2 provider. Likewise, do not use the Failover Cluster WMI provider.
Shielded virtual machines (new)
Shielded virtual machines use several features to make it harder for Hyper-V administrators and malware on the host to inspect, tamper with, or steal data from the state of a shielded virtual machine. Data and state is encrypted, Hyper-V administrators can’t see the video output and disks, and the virtual machines can be restricted to run only on known, healthy hosts, as determined by a Host Guardian Server. For details, see Guarded Fabric and Shielded VMs.
[!NOTE]
Shielded virtual machines are compatible with Hyper-V Replica. To replicate a shielded virtual machine, the host you want to replicate to must be authorized to run that shielded virtual machine.
Start order priority for clustered virtual machines (new)
This feature gives you more control over which clustered virtual machines are started or restarted first. This makes it easier to start virtual machines that provide services before virtual machines that use those services. Define sets, place virtual machines in sets, and specify dependencies. Use Windows PowerShell cmdlets to manage the sets, such as New-ClusterGroupSet, Get-ClusterGroupSet, and Add-ClusterGroupSetDependency.
.
Storage quality of service (QoS) (updated)
You can now create storage QoS policies on a Scale-Out File Server and assign them to one or more virtual disks on Hyper-V virtual machines. Storage performance is automatically readjusted to meet policies as the storage load fluctuates. For details, see Storage Quality of Service.
Virtual machine configuration file format (updated)
Virtual machine configuration files use a new format that makes reading and writing configuration data more efficient. The format also makes data corruption less likely if a storage failure occurs. Virtual machine configuration data files use a .vmcx file name extension and runtime state data files use a .vmrs file name extension.
[!IMPORTANT]
The .vmcx file name extension indicates a binary file. Editing .vmcx or .vmrs files isn’t supported.
Virtual machine configuration version (updated)
The version represents the compatibility of the virtual machine’s configuration, saved state, and snapshot files with the version of Hyper-V. Virtual machines with version 5 are compatible with Windows Server 2012 R2 and can run on both Windows Server 2012 R2 and Windows Server 2016. Virtual machines with versions introduced in Windows Server 2016 and Windows Server 2019 won’t run in Hyper-V on Windows Server 2012 R2.
If you move or import a virtual machine to a server that runs Hyper-V on Windows Server 2016 or Windows Server 2019 from Windows Server 2012 R2, the virtual machine’s configuration isn’t automatically updated. This means you can move the virtual machine back to a server that runs Windows Server 2012 R2. But, this also means you can’t use the new virtual machine features until you manually update the version of the virtual machine configuration.
For instructions on checking and upgrading the version, see Upgrade virtual machine version. This article also lists the version in which some features were introduced.
[!IMPORTANT]
- After you update the version, you can’t move the virtual machine to a server that runs Windows Server 2012 R2.
- You can’t downgrade the configuration to a previous version.
- The Update-VMVersion cmdlet is blocked on a Hyper-V Cluster when the cluster functional level is Windows Server 2012 R2.
Virtualization-based security for generation 2 virtual machines (new)
Virtualization-based security powers features such as Device Guard and Credential Guard, offering increased protection of the operating system against exploits from malware. Virtualization based-security is available in generation 2 guest virtual machines starting with version 8. For information on virtual machine version, see Upgrade virtual machine version in Hyper-V on Windows 10 or Windows Server 2016.
Windows Containers (new)
Windows Containers allow many isolated applications to run on one computer system. They’re fast to build and are highly scalable and portable. Two types of container runtime are available, each with a different degree of application isolation. Windows Server Containers use namespace and process isolation. Hyper-V Containers use a light-weight virtual machine for each container.
Key features include:
-
Support for web sites and applications using HTTPS
-
Nano server can host both Windows Server and Hyper-V Containers
-
Ability to manage data through container shared folders
-
Ability to restrict container resources
For details, including quick start guides, see the Windows Containers Documentation.
Windows PowerShell Direct (new)
This gives you a way to run Windows PowerShell commands in a virtual machine from the host. Windows PowerShell Direct runs between the host and the virtual machine. This means it doesn’t require networking or firewall requirements, and it works regardless of your remote management configuration.
Windows PowerShell Direct is an alternative to the existing tools that Hyper-V administrators use to connect to a virtual machine on a Hyper-V host:
-
Remote management tools such as PowerShell or Remote Desktop
-
Hyper-V Virtual Machine Connection (VMConnect)
Those tools work well, but have trade-offs: VMConnect is reliable, but can be hard to automate. Remote PowerShell is powerful, but can be hard to set up and maintain. These trade-offs may become more important as your Hyper-V deployment grows. Windows PowerShell Direct addresses this by providing a powerful scripting and automation experience that’s as simple as using VMConnect.
For requirements and instructions, see Manage Windows virtual machines with PowerShell Direct.
The year of 2018 welcomed the release of Windows Server 2019, which mainly focused on solving the issues surrounding hybrid clouds, failover clustering, security, storage, and application platforms. Today’s blog post discusses new Hyper-V features which can be found in Windows Server 2019, discovers how Hyper-V Backup can protect your data, and provides answers to the following questions:
What’s new in Windows Server 2019? – The main focus of Windows Server 2019 is to ensure the performance of hybrid cloud environments as well as datacenter infrastructures. This operating system (OS) allows you to enjoy the benefits of both on-premises and Azure Cloud environments.
What can Windows Server 2019 offer? – With the new feature set of Windows Server 2019, you can do the following:
- Enjoy the benefits of hybrid clouds with Microsoft Azure services.
- Increase your datacenter resilience with multiple security layers built into the OS.
- Create cloud-native applications and upgrade traditional apps using containers and micro-services.
- Transform a traditional datacenter into hyper-converged infrastructure to achieve a better performance.
Which Hyper-V features have been added to Windows Server 2019? – With Windows Server 2019, new Hyper-V features were introduced:
- True two-node clusters
- Storage Spaces Direct improvements
- ReFS deduplication
- Windows Admin Center
- Shielded virtual machines
- Container advancements
- Encrypted networks
How can NAKIVO Backup & Replication protect your infrastructure? – NAKIVO Backup & Replication is a powerful yet affordable tool which offers multiple data protection options, including backup, backup copy, backup to cloud, replication, and site recovery.
New Hyper-V Features You Should Know About
Windows Server 2019 adopted the most effective features of its predecessor, Windows Server 2016, and greatly improved them to achieve even better results. Windows Server 2019 also presented a rich set of Hyper-V features which provide extended support for hybrid cloud deployments, hyper-converged infrastructure, and network security.
In today’s blog post, we are going to discuss how Windows Server 2019 has transformed Hyper-V functionality and what new Hyper-V features can do.
True two-node clusters
Previously, the File Share Witness could only exist on a physical file server or in the Azure Cloud. In Windows Server 2019, you can create two-node clusters, including Hyper-V clusters, using a USB flash drive as a file share witness. For example, if you have a four-node cluster, with two nodes at each site, and one node accidentally fails, a File Share witness can provide an additional vote in order to reach a quorum in a cluster. The upside of this approach is that the USB witness can function even without Internet connectivity or shared drives. Thus, true two-node technology can significantly simplify the process of determining quorum for a cluster.
Storage Spaces Direct improvements
Windows Server 2019 has greatly improved storage performance with the help of new functionality, which includes native support for persistent memory, nested resiliency for two-node infrastructures, and mirror-accelerated parity, among other features.
In Windows Server 2019, storage configuration maximums have also been improved.
| Windows Server 2016 | Windows Server 2019 |
| Scale up to 1 petabyte (PB) of raw capacity per cluster | Scale up to 4 petabytes (PB) of raw capacity per cluster |
| Create 32 volumes | Create 64 volumes |
| Support volume sizes up to 32 TB | Support volume sizes up to 64 TB |
As a result, enhanced configuration maximums allow for increasing Hyper-V storage capacity and achieving better I/O performance.
ReFS deduplication
Another feature of Windows Server 2019 is ReFS deduplication, which allows you to enjoy the benefits of both data deduplication and the ReFS file system. By removing duplicated data blocks, you can ensure that only unique data is saved and storage space consumption is reduced.
Read more from our blog post to learn how data deduplication works in NAKIVO Backup & Replication.
Windows Admin Center
Windows Admin Center is a server management solution which allows you to easily manage your servers as well as hyper-converged infrastructure from a single pane of glass. Managing local and remote servers is simplified due to the use of familiar tools (PowerShell, Task Manager, Remote Desktop, etc.).

Previously, certain Hyper-V features could only be configured using PowerShell cmdlets. Windows Admin Center can now provide access to these features using simple and intuitive GUI. Moreover, Windows Admin Center can integrate with Azure services, thus allowing you to enjoy the benefits of hybrid cloud environments.
To see the product in action, you can download Windows Admin center for free.
Shielded Virtual Machines
Shielded virtual machines (VMs) were introduced in Windows Server 2016. The main purpose of this security feature is to ensure protection of Generation 2 Hyper-V VMs against unauthorized access. In Windows Server 2019, this Hyper-V feature can do even more.
First of all, Windows Server 2019 can provide shielded VM protection for Linux VMs. Moreover, you can troubleshoot your shielded VMs, for example, to restore failed network connectivity to your VM. Last but not least, you can start up and run shielded VMs remotely (for example, in branch offices with poor Internet connectivity). For this purpose, you need to enable the Host Guardian Service (HGS) in the branch office and configure fallback URLs which allows for falling back to the main datacenter in case the primary HGS server cannot be reached.
Container advancements
Windows Server 2019 supports both Windows and Linux containers, which can run on the same container host. Moreover, Windows Server 2019 includes built-in Kubernetes support, which can significantly improve container networking. Additional container improvements include integrated Windows authentication in containers, improved application compatibility, and reduced size of base container images. These Hyper-V features can increase the speed of container workflows, make containers more secure and reliable, and ensure the efficiency of container networking.
Encrypted networks
Virtual network encryption is another Hyper-V feature available in Windows Server 2019, which enables encryption of virtual network traffic between VMs. Each packet leaving a selected VM will be automatically encrypted when moving across network subnets. Along with Datagram Transport Layer Security, encrypted networks can help you protect your infrastructure against data tampering, network eavesdropping, or theft.

After about a seven-month delay, Microsoft finally published the free Hyper-V Server 2019. As usual, the new version benefits from some innovations of the full product as well as add-ons for Windows Server. These include the Admin Center and Core App Compatibility, which allows Microsoft Management Console (MMC) execution.
Contents
- Not the latest VM configuration version
- General improvements to Windows Server
- MMC-based admin tools in the console
- No Hyper-V Manager
- Remote management with Admin Center
- Availability and installation
- Author
- Recent Posts

Wolfgang Sommergut has over 20 years of experience in IT journalism. He has also worked as a system administrator and as a tech consultant. Today he runs the German publication WindowsPro.de.
Since the hypervisor innovations in Server 2019 were relatively few, the free Hyper-V Server core functions have seen hardly any improvements. One of them are shielded virtual machines (VMs) for Linux. In addition, updating to VM configuration version 9.0 achieves some improvements, including hibernation support.
Not the latest VM configuration version
However, Microsoft did not use the long break between releasing Windows Server 2019 and Hyper-V Server 2019 to update the latter’s virtual hardware support. This command displays 9.0 as the maximum version:
Get-VMHostSupportedVersion

Hyper V Server supports a maximum VM configuration version of 9.0
The recently released Server 1903 in the semi-annual channel and the Windows 10 May update already support VM configuration 9.1. Therefore, this command results in an error on Hyper-V Server 2019:
New-VM -Name MyVM -Version 9.1
However, the minor update to VM version 9.1 does not include any new features. In addition, the risk of compatibility problems is low because virtual hardware 9.0 is still the default for the two latest OS versions.
General improvements to Windows Server
As with version 2016, which had significantly more new features, Hyper-V Server 2019 also benefits from several general improvements in Windows Server. These include, for example, Microsoft now also supporting data deduplication with Resilient File System (ReFS).
In addition, there are some improvements in the cluster feature, such as cross-domain cluster migration. This allows moving server clusters between domains in Active Directory (AD). Another new feature is the option to use a file share witness on a machine that is not an AD member.
MMC-based admin tools in the console
Essentially, Hyper-V Server is Server Core reduced to the role of Hyper-V. Thus, it benefits from an innovation Microsoft introduced specifically for this installation option.
This new feature on demand (FOD) is Core App Compatibility, which allows executing additional GUI applications. Basically, Hyper-V Server also supports graphical programs without this FOD, but their number is very limited. These include some applets from the Control Panel, Task Manager, or Notepad.
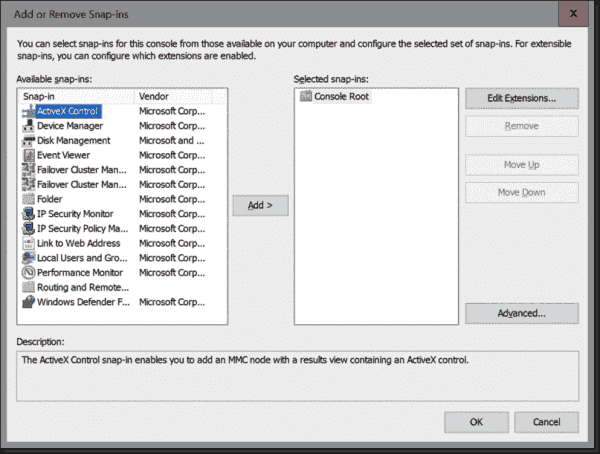
Thanks to Core App Compatibility, you can execute various MMC snap ins in the console
Core App Compatibility significantly increases the number of graphical management tools admins can run in the console. This applies in particular to mmc.exe with a number of snap-ins, including those for Event Viewer, Disk Management, or Failover Cluster Management.
No Hyper-V Manager
However, Hyper-V Manager is missing, although it would be most needed on a virtualization host. A look into the %windir%system32 directory shows that the required file virtmgmt.msc has not been installed.
You can use the Server Manager to add Hyper V tools, but Hyper V Manager is not available with it
By adding roles and features, you can install the hypervisor management tools with Server Manager, but these are limited to the PowerShell module.
Remote management with Admin Center
Thanks to Core App Compatibility, the management options for Hyper-V 2019 have been extended by adding local tools to the console. They complement remote management using Remote Server Administration Tools (RSAT) or PowerShell.
But that’s not all. Windows Admin Center (WAC) is now also available, which did not exist when Hyper-V Manager 2016 appeared (nevertheless, it is now also manageable via WAC).
The browser-based tools offer all the essential functions for configuring the host, virtual switches, and VMs. They are particularly suitable for simple tasks such as changing VM power states because you can perform them from any computer without having to install any software. Other activities such as creating VMs are relatively cumbersome with the web tools.
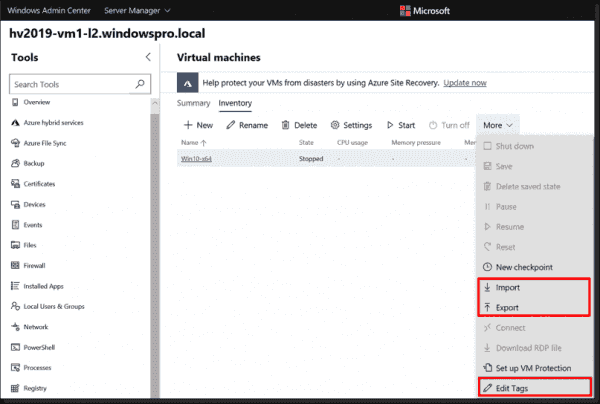
Windows Admin Center 1906 allows importing, exporting, and tagging VMs
In Preview 1906, WAC received additional Hyper-V management functions also available for Hyper-V Server 2019. These include VM importing and exporting, both of which are limited to local drives on the host.
Another new feature is the ability to tag VMs. Don’t confuse this feature with the VM notes assignable in Hyper-V Manager.
Availability and installation
As usual, Microsoft provides Hyper-V Server 2019 as an .iso file for free download in the Evaluation Center. Due to the license conditions for Windows Server, the free Hyper-V Server’s primary application is to provision virtual desktops or Linux in the VMs.
If you want to operate Windows Server in VMs, you must acquire the required virtualization rights via the Standard or Datacenter Edition, which also allow the bare-metal installation of the full operating system including the hypervisor.
While Microsoft supports an in-place upgrade from Server 2012 R2 or 2016 to 2019, this does not apply to Hyper-V servers.
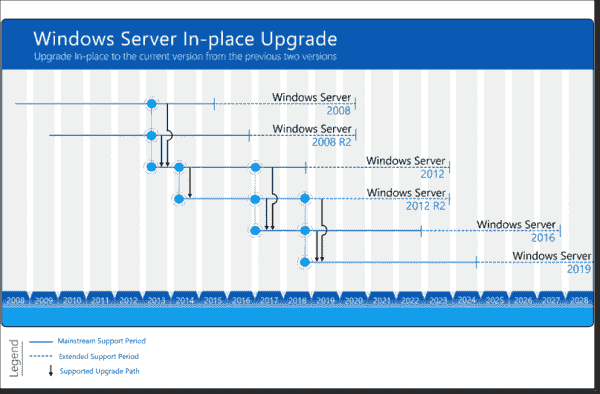
Microsoft supports n + 2 in place upgrades for Windows Server
Nevertheless, a direct upgrade has been popular in the past, especially in lab environments, because it saves some work. If you start the setup of version 2019 in Hyper-V 2016, you can run through all dialogs and get no indication of possible problems.
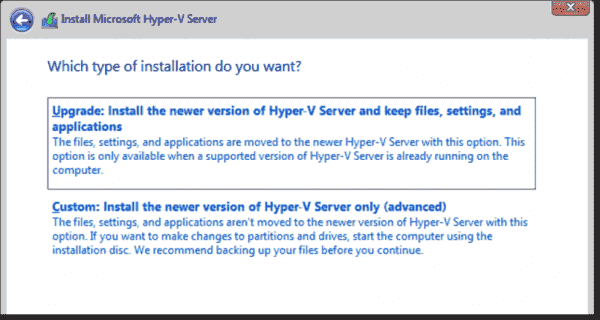
The setup of Hyper V Server 2019 will offer you an in place upgrade that, however, will fail
At the very end, the installation fails with this message:
0x80070490 — 0x2000e «The installation failed in the SAFE_OS phase with an error during SET_PRODUCT_KEY operation.»
This does not seem to be strictly an upgrade problem but a bug of the sloppily adopted Windows setup for Hyper-V servers.
![]()
![]()
In-Depth
Windows Server 2019: What’s New in Hyper-V
A look at what’s new in general and specifically for virtualization and containers in the next LTSC release, Windows Server 2019, due out in the second half of 2018.

In case you haven’t kept up with the different Windows Server releases coming from Microsoft (and it is confusing), here’s the TLDR:
Since the release of Windows Server 2016 there are now two «tracks» of Windows Server: the Semi-Annual Channel (SAC), which puts out two releases a year (in Server Core — no GUI flavor only) and the Long-Term Servicing Channel (LTSC), which will come out every two to three years, just like Windows Server has for many years.
You need to have Software Assurance to use SAC releases, and they’re only supported for 18 months, whereas the LTSC releases will have the normal five years mainstream support (new features and bug fixes), followed by five years extended support (bug fixes only).
In this article I’ll look at what’s new in general and specifically for virtualization and containers in the next LTSC release, Windows Server 2019, due out in the second half of 2018 (a good guess is that it’ll be released at Ignite in September). This article is written on build 17650, released April 24, 2018.
Windows Server 2019 Hyper-V
Failover Clustering
One of the biggest gripes I hear from cluster administrators is the difficulty of moving a cluster from one domain to another (mergers is a common cause of this); this is being addressed in 2019. Using just two PowerShell cmdlets you can remove the cluster name account from the original Active Directory domain, shut down the cluster functionality, unjoin from the source domain and add all nodes to a workgroup, then join them to the new domain and create new cluster resources in the destination AD domain. This definitely adds flexibility around Hyper-V clusters and their domain status.
Speaking of clusters, most businesses I speak to tend to keep the number of nodes in their clusters relatively low (six, eight, 12 and 16 nodes), even though the max number of nodes is 64, and instead have more clusters. Each of these clusters is totally separate but that’s going to change in Windows Server 2019. You’ll be able to group several clusters together (Hyper-V, Storage and even Hyper-Converged), with a Master cluster resource running on one cluster, coordinating with a Cluster Set Worker in each cluster. You’ll be able to Live Migrate VMs from one cluster to another. I can see this being useful for scaling out Azure Stack (currently limited to 12 nodes) and for bringing the concept of the Software-Defined Datacenter (SDDC) closer to reality.
Another minor but potentially vital detail is using a file share witness stored in DFS. This isn’t and has never been supported but not everyone reads the documentation. Imagine a six-node cluster with three nodes in a separate building with a file share witness as the tie breaker for the quorum. You could end up in a situation where the network connection between the two buildings is severed and the three nodes on one side keeps the cluster service (and thus the VMs) running because they can talk to the file share witness. But the other side has a DFS replicated copy of the same file share witness, so they, too, decide to keep the cluster service running (as they also have a majority of votes) and both sides could potentially be writing to back-end storage simultaneously, leading to serious data corruption. In Windows Server 2019 if you try to store a file share witness in DFS you’ll get an error message and if it’s added to DFS replication at some point in time later, it’ll stop working.
You can also create a file share witness that doesn’t use an AD account for scenarios where a DC isn’t available (DMZ), or in a workgroup/cross-domain cluster.
Storage Replica & Migration
In Windows Server 2016 (Datacenter only) we finally got the missing puzzle piece in Microsoft’s assault on SANs — Storage Replica (SR). This directly competes with (very expensive) SAN replication technologies and lets you replicate from any volume on a single server or a cluster to another volume in another location (synchronously up to 150 km [90 miles for those of you in the United States]), asynchronously anywhere on the planet). This is useful for creating stretched Hyper-V clusters for very high resiliency or for Disaster Recovery (DR) in general.
In Windows Server 2019 Standard we’re getting SR «Lite»: a single volume per server (unlimited in Datacenter), a single partnership per volume (unlimited in Datacenter) and up to 2TB volumes (unlimited in Datacenters). These are the current limitations in the preview and voting is open to change this.
Hyper-V Replica is a different technology than SR. For instance, you could create a stretched Hyper-V cluster with SR as the transport mechanism for the underlying storage between the two locations and then use Hyper-V Replica for DR, replicating VMs to a third location or to Azure.
A totally new feature, Storage Migration Service is coming in Windows Server 2019. Intended to solve the problem of migrating from older versions of Windows Server to 2019 or Azure, it’s not directly related to Hyper-V, although you can of course use it from within VMs or to migrate data to Azure Stack.
Data Deduplication is now available for Storage Spaces Direct (S2D) with the ReFS filesystem, so you could be looking at saving up to 50 percent of disk space. Speaking of S2D, Microsoft now supports Persistent Memory (aka Storage Class Memory) which is essentially battery-backed DDR memory sticks, leading to storage with incredibly low latency. Also new is performance history for S2D, where you can get a history of performance across drives, NICs, servers, VMs, vhd/vhdx files, volumes and the overall cluster. You can either use PowerShell or Windows Admin Center to access the data.
Containers
There’s a lot of focus on hybrid cloud in this preview, which makes sense, given Microsoft’s assertion that most businesses will be in a hybrid state for a long time to come. The focus on containers continues with much smaller images available for both the server core and Nano server images.
Installing Docker on Windows Server 2019
But the coolest feature yet is the ability to run Linux containers on Windows Server. This first saw light in one of the SAC releases and it makes a lot of sense. Remember that in Windows (unlike Linux) we have two flavors of containers, Windows Containers and Hyper-V Containers. For a developer they work exactly the same and it’s a deployment choice (develop on normal containers and deploy in production in Hyper-V containers). The Hyper-V flavor gives you the security isolation of a VM although they’re much smaller than a «real» VM. So, the next logical step was running a different OS in the container, in this case Linux. Following a tutorial, I was able to get a Linux container up and running quickly.
Security
The battle to increase security continues unabated and in this version we get Windows Defender ATP Exploit Guard, which is an umbrella for four new features: Network protection blocks outbound access from processes on the server to untrusted hosts/IP address based on Windows Defender SmartScreen information. Controlled folder access protects specified folders against untrusted process access such as ransomware whereas Exploit protection mitigates vulnerabilities in similar ways to what EMET used to do. Finally, Attack Surface Reduction (ASR) lets you set policies to block malicious files, scripts, lateral movement and so on.
Windows Defender Advanced Threat Protection (ATP) is now available for Windows Server, as well, and can integrate with your current deployment.
These measures will increase the security of your Hyper-V hosts but another feature (also first seen in a SAC release) applies directly to virtualization deployments: Encrypted Networks in SDN. A single click when you create a new virtual network in the SDN stack will ensure that all traffic on that network is encrypted, preventing eavesdropping. Note that this does not protect against malicious administrators but curiously, Microsoft has promised such protection in forthcoming versions, bringing the network protection in line with the host security Shielded Virtual Machines offer.
Windows Admin Center
No discussion of the future of Windows Server is complete without mentioning the free, Web-based Windows Admin Center (WAC), formerly known as «Project Honolulu.» It’s going to be the GUI for managing Windows Server, including Hyper-V servers, clusters, Storage Spaces Direct and HCI clusters. It’s got a lot of benefits over the current mix of Server Manager, Hyper-V Manager and Failover Cluster Manager (along with PowerShell) that we use today, including the simple fact that it’s all in the one UI.
Wrapping Up
As I predicted, the twice-yearly SAC releases of Windows Server enables Microsoft to work at bringing new features on a more rapid cadence than in the past and that shows in this preview, which has several new and improved items to make our lives as virtualization administrators easier.
About the Author
Paul Schnackenburg has been working in IT for nearly 30 years and has been teaching for over 20 years. He runs Expert IT Solutions, an IT consultancy in Australia. Paul focuses on cloud technologies such as Azure and Microsoft 365 and how to secure IT, whether in the cloud or on-premises. He’s a frequent speaker at conferences and writes for several sites, including virtualizationreview.com. Find him at @paulschnack on Twitter or on his blog at TellITasITis.com.au.
Windows Server 2019 is now available for everyone and many companies are planning the migration to the new operating system to benefit from the new features. The thrust of the new Windows Server 2019 has been focused on hybrid cloud environments and the virtualization is the hearth of everything.
Hyper-V 2019 introduces new features to support Microsoft Azure and on-premises as well; the continuous integration allows companies to migrate their workloads with low effort. The new engine of Hyper-V is not a revolution like we’ve seen in Windows Server 2016, but is an important improvement.
See also: Backup Hyper-V virtual machines with Iperius
What new features and functionality are included with the next release of Windows Server 2019 Hyper-V? Let’s take a look at the following areas:
- Version
- ReFS Deduplication
- Storage Spaces Direct
- Shielded VM
- Encrypted Subnets
- Simplified Two-Node Clusters
- Persistent Memory
Version
Hyper-V 2019 implements the configuration version 9, that is not compatible with previous versions of Windows Server.
The new version introduces also new functionalities like:
- It allows additional processor features for Perfmon
- It utomatically exposes simultaneous multithreading configuration for VMs running on hosts using the Core Scheduler
- Hibernation support
To upgrade the VM configuration you can use the cmdlet Update-VMVersion. Remember to check the compatibility list of your virtual machine before running the upgrade because the task is not reversible.
ReFS Deduplication
Resilient File System was first introduced in Windows Server 2012 as a replacement for the aging NTFS file system. During the previous editions we saw an improvement of this component, but one of the big limitations were not allowing to utilize deduplication and this is not good when you want to store many virtual machines, because, as you know, there are many common blocks when the operating system is based on the same core. So, with Windows Server 2019 we can save up to 90% of space when the VMs are based on same OS.
Storage Spaces Direct
S2D was introduced in Windows Server 2012 R2 with the idea to have a new storage model, but it hasn’t been a success until 2016, when the component became a requirement for the Hyper Converged Infrastructure.
Storage Spaces Direct features a built-in server-side cache to maximize storage performance. It allows to create an highly available, highly scalable software-defined storage at a fraction of the cost of traditional SAN or NAS arrays.
There are two deployment models:
- Converged
- Hyper Converged
The first one is a disaggregated model with Scale-out File Server (SoFS), a top Storage Spaces Direct to provide network-attached storage over SMB3 file shares. The Hyper-V hosts are independent from storage and this means attach stand-alone or cluster machines or using the SoFS to share resource for other services like SQL Database or File Server.
The second option is an aggregated model where storage and compute are in the same machine. This allows to reduce the costs, but generates a dependency between components; we can add another node to the cluster but there are fixed requirements to avoid losing validation.
In Windows Server 2019, the maximum storage per cluster is now 4 Petabytes – four times the previous limit.
Unless you plan to use a third party storage, consider implementing S2D in your environment; it doesn’t matter if your infrastructure has a single server or a cluster. Remember only that S2D is included only in Datacenter SKU.
Shielded VM
Shielded VMs allow critical virtual machines, such as domain controllers, to be encrypted when they are on disk. This helps to protect against rogue administrators or attackers from gaining access to the virtual disks, taking them to another Hyper-V environment and attempting to access VM data. It’s true that most companies don’t need Shielded VM but if you are a Service Provider, if there are many Hyper-V Admins in your environment or if you have non-secure remote office, consider implementing this feature.
Windows Server 2019 introduces shielding for Linux VMs. Additionally, there is a new authorized host cache that allow caching VM keys for starting up virtual machines even when the host guardian service cannot be reached; this open the possibility to deploy Shielded VMs also for branch offices.
Encrypted Subnets
Part of HCI model, Encrypted subnets allow administrators to specify subnets of traffic to encrypt in the Software Defined Network (SDN) infrastructure. This ensures that attackers who might have or gain physical access to the network infrastructure cannot sniff network traffic and see traffic traversing the software defined networking overlay to and from Hyper-V virtual machines.
Simplified Two-Node Clusters
The two-node technology greatly simplifies the witness share that can be utilized for quorum in a two-node configuration. Traditionally, this witness node had to exist on a file server on-premises or in Azure. While not that difficult to satisfy, Microsoft has taken this even further with the true two-node configuration. With true two-node, you can use a router that supports mounting a USB key. The router should allow configuring a share and permissions to the share.
Persistent Memory
To leverage the high throughput and low latency of persistent memory (a.k.a. storage class memory) in virtual machines, it can now be projected directly into VMs. This can help to drastically reduce database transaction latency or reduce recovery times for low latency in-memory databases on failure. Persistent Memory was introduced in Windows Server 2016, but only for physical servers. With Server 2019, it has been introduced also for VMs. Currently there are still some limitations:
- No VM Migrations
- No runtime resizing
- No Thin-Provisioning or Snapshots
- Implemented through PowerShell
This kind of configuration allows Microsoft to achieve 13 million IOPs with only 8 server nodes.
Windows Admin Center
WAC is not an original innovation, but the news is that the web-based console is the future to manage Hyper-V infrastructure – cluster or standalone. There will not be additional investment on Hyper-V Manager or Failover Cluster Manager, and PowerShell is the best way to manage Windows roles, so Windows Admin Center will be the focus on for Microsoft.
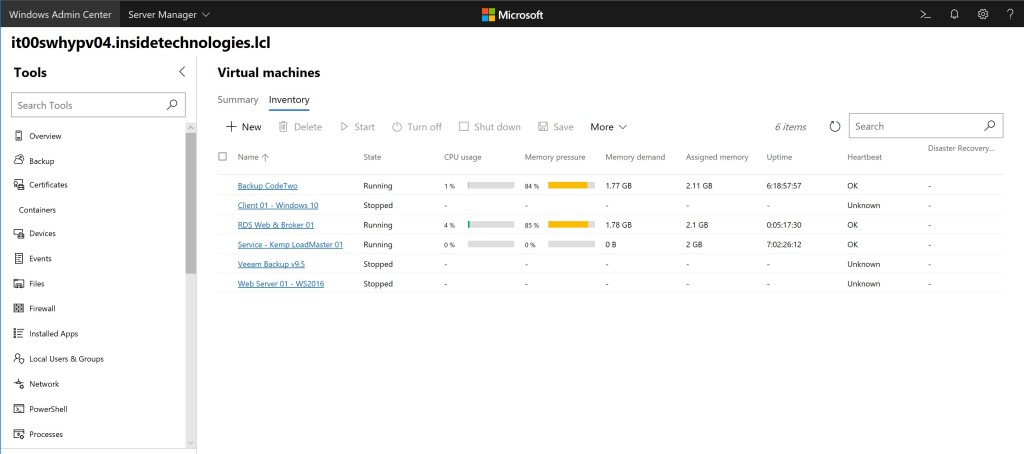
Conclusions
Windows Server 2019 doesn’t introduce too much new features in Hyper-V role, but the product team has fixed some limitations to enhance the hybrid world and to make Hyper-V an enterprise hypervisor for datacenters.
(Italian)